1
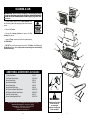
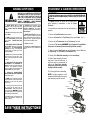
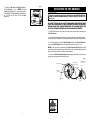
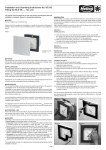
u.s.a.
LLC
ATTENTION
If any components of this unit are broken,
do not operate properly, or for product returns,
please contact Pragotrade LLC at
1-800-814-4895
Outside the U.S. call 440-638-3131.
MEAT
CUBER/TENDERIZER
GRINDER ATTACHMENT
For the online catalog, log onto www.westonsupply.com.
MODEL # 07-3201-W-A
Exclusively imported by Pragotrade LLC Strongsville, Ohio
www.pragotrade.com
REV031709
Grinder Not Included
WARRANTY INFORMATION
SAVE THIS WARRANTY INFORMATION FOR YOUR RECORDS!
MEAT CUBER/TENDERIZER
GRINDER ATTACHMENT
MODEL # 07-3201-W-A
COMPONENT LIST
DIAGRAM NO.
PART DESCRIPTION
PART NO.
Lower Housing
Top Housing
Shaft Adapter
Blade Rack Assembly
Left Comb
Right Comb
Housing Thumbscrews (2)
Electric Grinder Adapter
Chute
Shaft Adapter Set Screw
Adapter Mounting Bolt (2)
Stainless Steel Tongs
Nylon Bushing
Screw & Lock Washers for Chute (2)
Allen Wrench for Set Screws
Allen Wrench for Chute/Adapter
Shaft Clip (2)
07-3184-A
07-3181-A
07-3213
07-3103
07-3119
07-3118
07-3166
07-3202
07-3182-A
07-3187
07-3188
07-3151
07-3127
07-3183
07-3186
07-3178
07-3165
1
2
3
4
5
6
7
8
9
10
11
12
13
14
15
16
17
Pragotrade LLC warrants to the ORIGINAL RETAIL PURCHASER of this product that if operated in accordance
with the printed instruction accompanying it, then for a period of 1 year from the date of purchase, the product shall be
free from defects in material and workmanship.
The Warranty Card, along with a copy of the original receipt, must be received by Pragotrade LLC within 30 days
from purchase date for the warranty to apply. Failure to send the completely filled out Warranty Card, along with a copy
of the original receipt, will void the warranty.
The product must be delivered to or shipped freight prepaid to Pragotrade LLC for warranty services, in either its
original packaging or similar packaging affording an equal degree of protection. Damage due to shipping is not the
responsibility of the company. Pragotrade LLC charges a $35.00 per hour bench charge. NOTE: No repairs will be
started without the authorization of the customer. The return shipping cost to the customer will be added to the repair
invoice.
Pragotrade LLC will repair (or at its discretion, replace) the product free of charge, if in the judgment of the company,
it has been proven to be defective as to seller’s labor and material, within the warranty period.
New or rebuilt replacements for factory defective parts will be supplied for one (1) year from the date of purchase.
Replacement parts are warranted for the remainder of the original warranty period.
For non-warranty repairs, contact Pragotrade’s Customer Service at 1-800-814-4895 M-F 8am-5pm EST (outside of
the United States 440-638-3131) to obtain a Return Authorization Number (RMA Number). Pragotrade will refuse all
returns that do not contain this number. DO NOT RETURN THE UNIT WITHOUT PROPER AUTHORIZATION
FROM PRAGOTRADE LLC.
LIMITATIONS: The warranty is void if the product is used for any purpose other than that for which it is designed.
The product must not have been previously altered, repaired, or serviced by anyone else other than Pragotrade LLC.
If applicable, the serial number must not have been altered or removed. The product must not have been subjected
to accident in transit or while in the customer’s possession, misused, abused, or operated contrary to the instructions
contained in the instruction manual. This includes failure caused by neglect of reasonable and necessary maintenance,
improper line voltage and acts of nature. This warranty is not transferable and applies only to U.S. and Canadian
sales.
Except to the extent prohibited by applicable law, no other warranties whether expressed or implied, including
warranty merchantability and fitness for a particular purpose, shall apply to this product. Under no circumstances shall
Pragotrade LLC be liable for consequential damages sustained in connection with said product and Pragotrade LLC
neither assumes nor authorizes any representative or other person to assume for it any obligation or liability other than
such as is expressly set forth herein. Any applicable implied warranties are also limited to the one (1) year period of
the limited warranty.
This warranty covers only the product and its specific parts, not the food or other products processed in it.
CUT ALONG THE DOTTED LINE AND SEND THE WARRANTY CARD ALONG WITH A
COPY OF YOUR ORIGINAL PURCHASE RECEIPT TO:
Pragotrade LLC
20365 Progress Drive, Strongsville, OH 44149
WARRANTY CARD
SEND THIS CARD ALONG WITH A COPY OF YOUR ORIGINAL PURCHASE RECEIPT
Customer Name: ________________________________
Address:
______________________________________
City/State/Zip: ___________________________________
Telephone Number: (_________) ___________________
E-Mail Address: ___________________________________
If any components of this unit are broken or the unit does not operate
properly, call Pragotrade LLC Toll Free at
Original Date of Purchase: _______/_________/__________
1-800-814-4895
Product Model #: __________________________________
Monday thru Friday 8:00am-5:00pm EST.
Outside the U.S. call 440-638-3131
Serial # (if applicable): ____________________________
-2-
-11-
CLEARING A JAM
WARNING!
6
Before cleaning, assembling or disassembling the Cuber/
Tenderizer Attachment make sure the PLUG of the GRINDER IS REMOVED
FROM THE OUTLET/POWER SOURCE! ALWAYS unplug the grinder when
not in use.
5
• If meat becomes jammed in the Cuber/Tenderizer, turn
off the electric grinder and unplug the grinder from the power
source.
•
9
Remove the Combs.
• Unscrew the Housing Screws and remove the Top
Housing from the unit.
7
• Using the Tongs, remove any meat that may be jammed in
the Blade Racks.
2
14
13
• DO NOT use your fingers to remove any meat The Blades on the Driven and
Driving Racks are very sharp. Always wear cut-resistant gloves when handling
the Blade assembly.
4
17
3
1
8
ADDITIONAL ACCESSORIES AVAILABLE
6” Jerky Slicer Blade
Food-Grade Silicone Spray
Kevlar Gloves Small
Kevlar Gloves Medium
Kevlar Gloves Large
Kevlar Gloves Extra Large
#22 Pro-Series Electric Meat Grinder
#32 Pro-Series Electric Meat Grinder
Pro-2100 Vacuum Sealer
Vacuum Sealer Bags Multi Pack
07-3302
03-0101-W
34-0101
34-0102
34-0103
34-0104
08-2201-W
08-3201-W
65-0101
30-0107-W
These products and many more products can be ordered by visiting
w w w . w e s t o n s u p p l y . c o m or by calling
Pragotrade LLC Toll Free at 1-800-814-4895
Monday thru Friday 8:00am-5:00pm EST.
Outside the U.S. call 440-638-3131
-10-
8
3
12
10
11
15
16
WARNING!
Protective/cut-resistant
Kevlar Gloves are
recommended
whenever handling the
Blade assembly!
-3-
GENERAL SAFETY RULES
WARNING!
READ AND FULLY UNDERSTAND ALL INSTRUCTIONS
AND WARNINGS PRIOR TO USING THIS PRODUCT.
YOUR SAFETY IS MOST IMPORTANT! FAILURE TO
COMPLY WITH PROCEDURES AND SAFE GUARDS
MAY RESULT IN SERIOUS INJURY OR PROPERTY
DAMAGE.
REMEMBER:
YOUR PERSONAL
SAFETY IS YOUR RESPONSIBILITY!
1.
NEVER REACH INTO the Cuber/
Tenderizer. Doing so could cause serious
injury.
ALWAYS USE THE PROVIDED
TONGS.
2. DO NOT push the Tongs or other utensils
into the Blades.
3. NEVER use fingers to scrape food away
from the Cuber/Tenderizer while the grinder
is in operation.
SEVERE INJURY MAY
RESULT.
4. KEEP FINGERS CLEAR OF THE BLADES
AT ALL TIMES. Failure to do so may result in
personal injury. The Cutting Blades/Blade
Assembly is very sharp. It is recommended
to wear Kevlar, cut resistant gloves when
handling the Blades.
11. TIE BACK loose hair and clothing, and roll
up long sleeves before operating the Cuber/
Tenderizer. REMOVE ties, rings, watches,
bracelets, or other jewelry before operating the
Cuber/Tenderizer.
12. WEAR EYE PROTECTION. Wear safety
glasses. Everyday eye glasses are not safety
glasses. Safety glasses conform to ANSI Z87.1
requirements. Note: approved safety glasses
have Z87 printed or stamped on them.
13. DO NOT use outdoors.
14. DO NOT use the Cuber/Tenderizer while
under the influence of drugs, medications or
alcohol.
5. DO NOT press or push meat into the Chute
with your fingers or any other object. Doing
so may cause personal injury and/or damage
to the unit.
6. NEVER LEAVE THE Cuber/Tenderizer
UNATTENDED. Be safe, DISCONNECT the
Grinder from power source before leaving the
work area. Close supervision is necessary
when any appliance is used near children. This
appliance is NOT to be used by children.
7. FOLLOW ALL MANUFACTURER’S
INSTRUCTIONS AND SAFETY GUIDELINES
for operating the grinder.
8. NEVER use any accessories or parts from
other manufacturers. Doing so will VOID YOUR
WARRANTY and may cause fire, electrical
shock or injury.
9. Thoroughly clean all parts that will come
into contact with food before using the
Tenderizer/Cuber. Wash all parts by hand
and dry thoroughly. WARNING! Protective/
cut-resistant Kevlar gloves are recommended
when handling the blade assembly.
10. DO NOT attempt to tenderize meat with
bones or other hard items. Damage to the
machine will occur.
SAVE THESE INSTRUCTIONS!
DISASSEMBLY & CLEANING INSTRUCTIONS
WARNING!
Before cleaning, assembling or disassembling the Cuber/
Tenderizer Attachment make sure the PLUG of the GRINDER IS REMOVED
FROM THE OUTLET/POWER SOURCE! ALWAYS unplug the grinder when
not in use.
1. ALWAYS disconnect the grinder from the power source
before attempting to disassemble or clean the Cuber/
Tenderizer.
2. Keep children at a safe distance from unit while cleaning or
operating.
3. Remove the Cuber/Tenderizer from the grinder.
4. Remove the Combs from the Top Housing by lifting up on Combs. Figure 6
5. Remove the two Thumbscrews from the Top Housing. Set aside.
6. Remove the Top Housing. WARNING! This will expose the Cutting Blades.
Always wear cut-resistant gloves when handling the Blade assembly.
7. Using the provided Allen Wrench, remove the Screws to remove Chute from
the Top Housing. Set the Screws and Lock Washers aside.
8. Carefully lift the Blade Rack Assembly from the Lower Housing.
9. Wash all parts thoroughly with warm,
soapy water. Rinse with clear water. A
long bristle brush is recommended for
cleaning the Blade Rack Assembly.
Always wear cut-resistant gloves when
handling the Blade assembly.
Figure 6
Combs
10.Dry thoroughly before re-assembling.
NOTE: It is highly suggested to coat all
metal parts with a food-grade silicone spray
(sold separately) to prevent corrosion.
Chute
Top Housing
Thumbscrew
Blade Rack
Assembly
Lower Housing
Refer to them often and use them to instruct others.
-4-
-9-
Electric Grinder
Adapter
Thumbscrew
DIRECTIONS FOR USE
WARNING!
Before cleaning, assembling or disassembling the Cuber/
Tenderizer Attachment make sure the PLUG of the GRINDER IS REMOVED
FROM THE OUTLET/POWER SOURCE! ALWAYS unplug the grinder when
not in use.
BE SURE TO FOLLOW ALL SAFETY WARNINGS
AND PRECAUTIONS THAT ARE CONTAINED IN
YOUR GRINDER INSTRUCTION MANUAL BEFORE
USING THE CUBER/TENDERIZER ATTACHMENT
WITH THE ELECTRIC GRINDER! NEVER LEAVE
MACHINE UNATTENDED!
• Make sure the Cuber/Tenderizer is fully assembled and
correctly attached to the electric grinder.
• Remove all bones or hard items in the meat before tenderizing or cubing. Damage
to the unit may occur if bones or hard objects are pushed through.
• Do not cube or tenderize meat that is more than 1” (2.5 cm) thick. Thicker meat
may get lodged in Blades, which may cause damage to the product.
• Use Tongs to insert the meat to be tenderized or cubed into the mouth of the
Chute until the meat comes in contact with the Blades. The meat will be pulled
through the unit by the Blade movement.
• If a piece of meat is too short to reach the Blades, use the provided Tongs to
guide the meat to the Blades.
• CAUTION! DO NOT press or push the meat into the Chute with your fingers or
any other object. Doing so may cause personal injury and/or damage to the unit. DO
NOT push the Tongs or other utensils into the Blades.
• It may be necessary to pass the meat through the Cuber/Tenderizer several
times to obtain the desired results. You may also pass the meat through at different
angles if a different result is desired.
• When finished tenderizing or cubing the meat, turn off the electric grinder and
unplug it from the power source.
•
Clean the unit before and after each use.
ASSEMBLY INSTRUCTIONS
WARNING!
Before cleaning, assembling or disassembling the Cuber/
Tenderizer Attachment make sure the PLUG of the GRINDER IS REMOVED
FROM THE OUTLET/POWER SOURCE! ALWAYS unplug the grinder when
not in use.
BE SURE TO FOLLOW ALL SAFETY WARNINGS
AND PRECAUTIONS THAT ARE CONTAINED
IN YOUR GRINDER INSTRUCTION MANUAL
BEFORE USING THE CUBER/TENDERIZER
ATTACHMENT
WITH
THE
ELECTRIC
GRINDER! NEVER LEAVE THE MACHINE
UNATTENDED!
PRIOR TO FIRST USE: Disassemble the Cuber/
Electric Grinder Adapter
Tenderizer and hand wash each part in warm, soapy
water. Rinse with clear water. Dry thoroughly before
re-assembling. WARNING! This will expose the Shaft Adapter
Cutting Blades. ALWAYS wear cut-resistant gloves
when handling the Blade assembly.
1. If the Shaft Adapter is not already attached to the
Cuber/Tenderizer attachment, loosen the Set Screw
on the Shaft Adapter using the supplied Allen Wrench.
Slide the Shaft Adapter onto the Driving Blade Rack
Shaft and tighten the Set Screw. DO NOT over tighten.
Figure 1
2. To install the Chute onto the Top
Housing, remove the Top Housing from
the Lower Housing. Secure the Chute to
the Top Housing using the two Screws and
Lock Washers. DO NOT over tighten.
3. Insert the Driving Blade Rack into the
Lower Housing, guiding the Drive Shaft
into the bearing journals. NOTE: When
installing the Blade Rack Assembly, you
must position the drive shaft with the Shaft
Adapter through the hole in the Electric
Grinder Adapter before seating into the
bearing journals. Figure 2
-8-
6. Secure the Top Housing to the
Lower Housing using the Housing
Thumbscrews. DO NOT over
tighten.
Figure 2
Chute
Thumbscrew
Top Housing
Driving Blade
Lower Housing
-5-
Adapter Mountig
Bolts
Combs
4. Install the Driven Blade Rack Thumbscrew
into the Lower Housing making
sure the teeth on the Driving Blade
Rack are properly meshed together
with the teeth on the Driven Blade
Blade
Rack.
Assembly
5. Position the Top Housing onto
the Lower Housing and line up the
screw holes.
Shaft
Adapter
Set Screw
Figure 1
Electric Grinder
Adapter
Driven Blade
7. Insert the Left Comb and Right Comb into
the Top Housing. Figure 3 NOTE: The Left
Comb is marked with an “L” on the upper portion
of the Comb. The Top Housing is marked with
an “L Comb” and “R Comb” to aid in Comb
installation.
Figure 3
ATTACHING TO THE GRINDER
WARNING!
Before cleaning, assembling or disassembling the Cuber/
Tenderizer Attachment make sure the PLUG of the GRINDER IS REMOVED
FROM THE OUTLET/POWER SOURCE! ALWAYS unplug the grinder when
not in use.
BE SURE TO FOLLOW ALL SAFETY WARNINGS AND PRECAUTIONS
THAT ARE CONTAINED IN YOUR GRINDER INSTRUCTION MANUAL
BEFORE USING THE CUBER/TENDERIZER ATTACHMENT WITH THE
ELECTRIC GRINDER! NEVER LEAVE MACHINE UNATTENDED!
1. ALWAYS disconnect the grinder from the power source before attaching the
Cuber/Tenderizer.
2. Unscrew the head locking knob (turn counter-clockwise) on the electric grinder
until the end of the threads are no longer protruding into the grinder output housing.
3. Line up the grinder pin with the Grinder Adapter notch on the Cuber/Tenderizer.
Line up the Shaft Adapter splines with the grinder output housing. Figure 4
NOTE: You may have to reposition the Cuber/Tenderizer Shaft splines so that
they match up with the grinder output shaft. Make sure the grinder head locking knob
lines up with the groove on the electric grinder adapter.
4. Once the Cuber/Tenderizer Attachment is properly positioned on to the electric
grinder, tighten the grinder head locking knob.
Figure 4
Cuber/Tenderizer
Attachment
Head Locking
Knob of Grinder
Grinder Pin
Groove
Shaft Adapter
Notch
Output Shaft
Splines
Grinder
-6-
Shaft Adapter
Splines
-7-