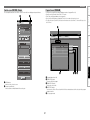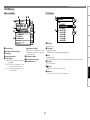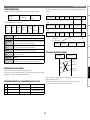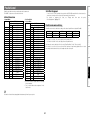
1
Network CD/Media Player
DN-700C
Owner’s Manual
IMPORTANT TO SAFETY
WARNING:
FCC INFORMATION
(For US customers)
To reduce the risk of fire and electric shock, this apparatus should not be
exposed to rain or moisture and objects filled with liquids, such as vases,
should not be placed on this apparatus
1.COMPLIANCE INFORMATION
Product Name: NETWORK CD/MEDIA PLAYER
Model Number: DN-700C
This product complies with Part 15 of the FCC Rules. Operation is subject to the following
two conditions: (1) this product may not cause harmful interference, and (2) this product
must accept any interference received, including interference that may cause undesired
operation.
CAUTION
1.Handle the power supply cord carefully
Do not damage or deform the power supply cord. If it is damaged or deformed,
it may cause electric shock or malfunction when used. When removing from wall
outlet, be sure to remove by holding the plug attachment and not by pulling the cord.
2.Do not open the rear cover
In order to prevent electric shock, do not open the top cover.
If problems occur, contact your DENON DEALER.
3.Do not place anything inside
Do not place metal objects or spill liquid inside the system.
Electric shock or malfunction may result.
Denon Professional div. D&M Professional
1100 Maplewood Drive Itasca, IL 60143
Tel. 630-741-0330
2.IMPORTANT NOTICE: DO NOT MODIFY THIS PRODUCT
This product, when installed as indicated in the instructions contained in this manual,
meets FCC requirements. Modification not expressly approved by DENON may void your
authority, granted by the FCC, to use the product.
3.IMPORTANT
Please, record and retain the Model name and serial number of your set shown on
the rating label.
Model No. DN-700C
Serial No.
When connecting this product to network hub or router, use only a shielded STP or ScTP
LAN cable which is available at retailer.
Follow all installation instructions. Failure to follow instructions could void your authority,
granted by the FCC, to use the product.
CAUTION
4.NOTE
RISK OF ELECTRIC SHOCK
DO NOT OPEN
CAUTION:
O REDUCE THE RISK OF ELECTRIC SHOCK, DO NOT REMOVE COVER
T
(OR BACK). NO USER-SERVICEABLE PARTS INSIDE. REFER SERVICING
TO QUALIFIED SERVICE PERSONNEL.
The lightning flash with arrowhead symbol, within an equilateral
triangle, is intended to alert the user to the presence of uninsulated
“dangerous voltage” within the product’s enclosure that may be of
sufficient magnitude to constitute a risk of electric shock to persons.
•
•
•
The exclamation point within an equilateral triangle is intended
to alert the user to the presence of important operating and
maintenance (servicing) instructions in the literature accompanying
the appliance.
•
This product has been tested and found to comply with the limits for a Class B digital device,
pursuant to Part 15 of the FCC Rules. These limits are designed to provide reasonable
protection against harmful interference in a residential installation.
This product generates, uses and can radiate radio frequency energy and, if not installed
and used in accordance with the instructions, may cause harmful interference to radio
communications. However, there is no guarantee that interference will not occur in a particular
installation. If this product does cause harmful interference to radio or television reception,
which can be determined by turning the product OFF and ON, the user is encouraged to try to
correct the interference by one or more of the following measures:
Reorient or relocate the receiving antenna.
Increase the separation between the equipment and receiver.
Connect the product into an outlet on a circuit different from that to which the receiver is
connected.
Consult the local retailer authorized to distribute this type of product or an experienced
radio/TV technician for help.
This Class B apparatus complies with Canadian ICES-003.
Cet appareil numérique de la classe B est conforme à la norme NMB-003 du Canada.
I
IMPORTANT SAFETY INSTRUCTIONS
READ BEFORE OPERATING EQUIPMENT
This product was designed and manufactured to meet strict quality and safety standards. There are, however, some installation and operation precautions which you should be particularly aware of.
1. Read these instructions.
12.Use only with the cart, stand, tripod, bracket, or table specified by the
manufacturer, or sold with the apparatus. When a cart is used, use caution
when moving the cart/apparatus combination to avoid injury from tip-over.
2. Keep these instructions.
3. Heed all warnings.
13.Unplug this apparatus during lightning storms or when unused for long
periods of time.
4. Follow all instructions.
5. Do not use this apparatus near water.
14.Refer all servicing to qualified service personnel. Servicing is required
when the apparatus has been damaged in any way, such as power-supply
cord or plug is damaged, liquid has been spilled or objects have fallen into
the apparatus, the apparatus has been exposed to rain or moisture, does not operate normally, or
has been dropped.
6. Clean only with dry cloth.
7. Do not block any ventilation openings. Install in accordance with the manufacturer’s
instructions.
8. Do not install near any heat sources such as radiators, heat registers, stoves, or other apparatus
(including amplifiers) that produce heat.
15.Batteries shall not be exposed to excessive heat such as sunshine, fire or the like.
9. Do not defeat the safety purpose of the polarized or grounding-type plug. A polarized plug has two
blades with one wider than the other. A grounding type plug has two blades and a third grounding
prong. The wide blade or the third prong are provided for your safety. If the provided plug does
not fit into your outlet, consult an electrician for replacement of the obsolete outlet.
Additional Safety Information!
16.This product is equipped with a three-wire grounding type plug, a plug having a third (grounding)
pin.
This plug will only fit into a grounding-type power outlet.
If you are unable to insert the plug into the outlet, contact your electrician to replace your obsolete
outlet. Do not defeat the safety purpose of the grounding-type plug.
10.Protect the power cord from being walked on or pinched particularly at plugs, convenience
receptacles, and the point where they exit from the apparatus.
11. Only use attachments/accessories specified by the manufacturer.
nnLaser Class
ADVARSEL:
VAROITUS!
VARNING:
CAUTION:
USE OF CONTROLS OR ADJUSTMENTS OR
PERFORMANCE OF PROCEDURES OTHER THAN THOSE
SPECIFIED HEREIN MAY RESULT IN HAZARDOUS
RADIATION EXPOSURE.
THIS PRODUCT SHOULD NOT BE ADJUSTED OR
REPAIRED BY ANYONE EXCEPT PROPERLY QUALIFIED
SERVICE PERSONNEL.
CLASS 1
,,
LASER PRODUCT
,,
(IEC60825-1:2007)
CLASS 1 LASER PRODUCT
LUOKAN 1 LASERLAITE
KLASS 1 LASERAPPARAT
USYNLIG LASERSTRÅLING VED ÅBNING, NÅR
SIKKERHEDSAFBRYDERE ER UDE AF FUNKTION.
UNDGÅ UDSAETTELSE FOR STRÅLING.
LAITTEEN KÄYTTÄMINEN MUULLA KUIN TÄSSÄ
KÄYTTÖOHJEESSA MAINITULLA TAVALLA SAATTAA
ALTISTAA KÄYTTÄJÄN TURVALLISUUSLUOKAN 1
YLITTÄVÄLLE NÄKYMÄMTTÖMÄLLE LASERSÄTEILYLLE.
OM APPARATEN ANVÄNDS PÅ ANNAT SÄTT ÄN I DENNA
BRUKSANVISNING SPECIFICERATS, KAN ANVÄNDAREN
UTSÄTTAS FÖR OSYNLIG LASERSTRÅLNING SOM
ÖVERSKRIDER GRÄNSEN FÖR LASERKLASS 1.
ATTENZIONE: QUESTO APPARECCHIO E’ DOTATO DI DISPOSITIVO OTTICO CON RAGGIO LASER.
L’USO IMPROPRIO DELL’APPARECCHIO PUO’ CAUSARE PERICOLOSE ESPOSIZIONI A RADIAZIONI!
II
CAUTION:
(English)
To completely disconnect this product from the mains,
disconnect the plug from the wall socket outlet.
The mains plug is used to completely interrupt the power
supply to the unit and must be within easy access by the
user.
Do not expose batteries to excessive heat such as
sunshine, fire or the like.
VORSICHT:
(Deutsch)
Um dieses Gerät vollständig von der Stromversorgung
abzutrennen, trennen Sie bitte den Netzstecker von der
Wandsteckdose ab.
Die Hauptstecker werden ver wendet, um die
Stromversorgung zum Gerät völlig zu unterbrechen; er
muss für den Benutzer gut und einfach zu erreichen sein.
Setzen Sie Batterien nicht übermäßiger Wärme aus, z. B.
Sonnenstrahlung, Feuer oder dergleichen.
PRECAUTION:
(Français)
Pour déconnecter complètement ce produit du courant
secteur, débranchez la prise de la prise murale.
La prise secteur est utilisée pour couper complètement
l’alimentation de l’appareil et l’utilisateur doit pouvoir y
accéder facilement.
N’exposez pas les batteries à une chaleur excessive telle
que le soleil, le feu ou autre.
ATTENZIONE:
(Italiano)
Per scollegare definitivamente questo prodotto dalla rete
di alimentazione elettrica, togliere la spina dalla relativa
presa.
La spina di rete viene utilizzata per interrompere
completamente l’alimentazione all’unità e deve essere
facilmente accessibile all’utente.
Non esporre le batterie a un calore eccessivo, per
esempio al sole, al fuoco o altre fonti.
PRECAUCIÓN:
(Español)
Para desconectar completamente este producto de
la alimentación eléctrica, desconecte el enchufe del
enchufe de la pared.
El enchufe de la alimentación se utiliza para interrumpir
por completo el suministro de alimentación a la unidad y
debe de encontrarse en un lugar al que el usuario tenga
fácil acceso.
No exponga las pilas a calor excesivo, como a la luz solar,
el fuego, etc.
VOORZICHTIGHEID:
(Nederlands)
Om de voeding van dit product volledig te onderbreken
moet de stekker uit het stopcontact worden getrokken.
De netstekker wordt gebruikt om de stroomtoevoer naar
het toestel volledig te onderbreken en moet voor de
gebruiker gemakkelijk bereikbaar zijn.
Stel de batterijen niet bloot aan felle zonneschijn, brand,
enzovoorts.
FÖRSIKTIHETSMÅTT:
(Svenska)
Koppla loss stickproppen från eluttaget för att helt skilja
produkten från nätet.
Stickproppen används för att helt bryta
strömförsörjningen till apparaten, och den måste vara
lättillgänglig för användaren.
Utsätt inte batterierna för stark hetta såsom solsken, eld
eller liknande.
ATENÇÃO:
(Português)
Para desligar completamente este produto da corrente,
desligue a ficha da tomada eléctrica.
A ficha eléctrica é utilizada para interromper
completamente a alimentação da unidade e deve estar
num local onde o utilizador lhe possa aceder facilmente.
Não exponha as pilhas a fontes de calor excessivo, como
luz solar, fogo ou semelhantes.
III
nnNOTE ON USE / HINWEISE ZUM GEBRAUCH
WARNINGS
WARNHINWEISE
•Avoid high temperatures.
Allow for sufficient heat
dispersion when installed in a
rack.
•Handle the power cord carefully.
Hold the plug when unplugging
the cord.
•Keep the unit free from
moisture, water, and dust.
•Unplug the power cord when
not using the unit for long
periods of time.
•Do not obstruct the ventilation
holes.
•Do not let foreign objects into
the unit.
•Do not let insecticides,
benzene, and thinner come in
contact with the unit.
•Never disassemble or modify
the unit in any way.
•Ventilation should not be
impeded by covering the
ventilation openings with
items, such as newspapers,
tablecloths or curtains.
•Naked flame sources such as
lighted candles should not be
placed on the unit.
•Observe and follow local
regulations regarding battery
disposal.
•Do not expose the unit to
dripping or splashing fluids.
•Do not place objects filled with
liquids, such as vases, on the
unit.
•Do not handle the mains cord
with wet hands.
•When the switch is in the
OFF (STANDBY) position, the
equipment is not completely
switched off from MAINS.
•The equipment shall be
installed near the power supply
so that the power supply is
easily accessible.
•Do not keep the battery in
a place exposed to direct
sunlight or in places with
extremely high temperatures,
such as near a heater.
•Vermeiden Sie hohe Temperaturen.
Beachten Sie, dass eine
ausreichende Belüftung
gewährleistet wird, wenn das Gerät
auf ein Regal gestellt wird.
•Gehen Sie vorsichtig mit dem
Netzkabel um.
Halten Sie das Kabel am
Stecker, wenn Sie den Stecker
herausziehen.
• Halten Sie das Gerät von
Feuchtigkeit, Wasser und Staub fern.
•Wenn das Gerät längere Zeit nicht
verwendet werden soll, trennen Sie
das Netzkabel vom Netzstecker.
•Decken Sie den Lüftungsbereich
nicht ab.
•Lassen Sie keine fremden
Gegenstände in das Gerät kommen.
•Lassen Sie das Gerät nicht
mit Insektiziden, Benzin oder
Verdünnungsmitteln in Berührung
kommen.
•Versuchen Sie niemals das Gerät
auseinander zu nehmen oder zu
verändern.
•Die Belüftung sollte auf keinen
Fall durch das Abdecken der
Belüftungsöffnungen durch
Gegenstände wie beispielsweise
Zeitungen, Tischtücher, Vorhänge o.
Ä. behindert werden.
•Auf dem Gerät sollten keinerlei
direkte Feuerquellen wie
beispielsweise angezündete Kerzen
aufgestellt werden.
•Bitte beachten Sie bei der
Entsorgung der Batterien die örtlich
geltenden Umweltbestimmungen.
•Das Gerät sollte keiner tropfenden
oder spritzenden Flüssigkeit
ausgesetzt werden.
•Auf dem Gerät sollten keine mit
Flüssigkeit gefüllten Behälter wie
beispielsweise Vasen aufgestellt
werden.
•Das Netzkabel nicht mit feuchten
oder nassen Händen anfassen.
•Wenn der Schalter ausgeschaltet
ist (OFF (STANDBY)-Position), ist
das Gerät nicht vollständig vom
Stromnetz (MAINS) abgetrennt.
•Das Gerät sollte in der Nähe einer
Netzsteckdose aufgestellt werden,
damit es leicht an das Stromnetz
angeschlossen werden kann.
• Lagern Sie die Batterie nicht an einem
Ort, an dem sie direktem Sonnenlicht
oder extrem hohen Temperaturen
ausgesetzt ist, wie z. B. in der Nähe
eines Heizgeräts.
nnOBSERVATIONS RELATIVES A L’UTILISATION / NOTE SULL’USO / NOTAS SOBRE EL USO / ALVORENS TE GEBRUIKEN / OBSERVERA /
NOTA SOBRE UTILIZAÇÃO
AVERTISSEMENTS
AVVERTENZE
ADVERTENCIAS
WAARSCHUWINGEN
•Eviter des températures
élevées.
Tenir compte d’une dispersion
de chaleur suffisante lors de
l’installation sur une étagère.
•Manipuler le cordon
d’alimentation avec précaution.
Tenir la prise lors du
débranchement du cordon.
•Protéger l’appareil contre
l’humidité, l’eau et la poussière.
•Débrancher le cordon
d’alimentation lorsque l’appareil
n’est pas utilisé pendant de
longues périodes.
•Ne pas obstruer les trous
d’aération.
•Ne pas laisser des objets
étrangers dans l’appareil.
•Ne pas mettre en contact des
insecticides, du benzène et un
diluant avec l’appareil.
•Ne jamais démonter ou
modifier l’appareil d’une
manière ou d’une autre.
•Ne pas recouvrir les orifices
de ventilation avec des objets
tels que des journaux, nappes
ou rideaux. Cela entraverait la
ventilation.
•Ne jamais placer de flamme
nue sur l'appareil, notamment
des bougies allumées.
•Veillez à respecter les lois en
vigueur lorsque vous jetez les
piles usagées.
•L’appareil ne doit pas être
exposé à l’eau ou à l’humidité.
•Ne pas poser d’objet contenant
du liquide, par exemple un
vase, sur l’appareil.
•Ne pas manipuler le cordon
d’alimentation avec les mains
mouillées.
•Lorsque l’interrupteur
est sur la position OFF
(STANDBY), l’appareil n’est pas
complètement déconnecté du
SECTEUR (MAINS).
•L’appareil sera installé près de
la source d’alimentation, de
sorte que cette dernière soit
facilement accessible.
•Ne placez pas la pile dans un
endroit exposé à la lumière
directe du soleil ou dans
des endroits présentant des
températures extrêmement
élevées, par exemple près d’un
radiateur.
•Evitate di esporre l’unità a
temperature elevate.
Assicuratevi che vi sia
un’adeguata dispersione del
calore quando installate l’unità in
un mobile per componenti audio.
•Manneggiate il cavo di
alimentazione con attenzione.
Tenete ferma la spina quando
scollegate il cavo dalla presa.
•Tenete l’unità lontana
dall’umidità, dall’acqua e dalla
polvere.
•Scollegate il cavo di
alimentazione quando prevedete
di non utilizzare l’unità per un
lungo periodo di tempo.
•Non coprite i fori di ventilazione.
•Non inserite corpi estranei
all’interno dell’unità.
•Assicuratevi che l’unità non
entri in contatto con insetticidi,
benzolo o solventi.
•Non smontate né modificate
l’unità in alcun modo.
•Le aperture di ventilazione
non devono essere ostruite
coprendole con oggetti, quali
giornali, tovaglie, tende e così via.
•Non posizionate sull’unità
fiamme libere, come ad esempio
candele accese.
•Prestate attenzione agli aspetti
legati alla tutela dell’ambiente
nello smaltimento delle batterie.
•L’apparecchiatura non deve
essere esposta a gocciolii o
spruzzi.
•Non posizionate sull’unità alcun
oggetto contenente liquidi, come
ad esempio i vasi.
•Non toccare il cavo di
alimentazione con le mani
bagnate.
•Quando l’interruttore è nella
posizione OFF (STANDBY),
l’apparecchiatura non è
completamente scollegata da
MAINS.
•L’apparecchio va installato
in prossimità della fonte di
alimentazione, in modo che
quest’ultima sia facilmente
accessibile.
•Non tenere la batteria in
luoghi esposti alla luce solare
diretta o con temperature
estremamente elevate, ad
esempio in prossimità di
dispositivi di riscaldamento.
•Evite altas temperaturas.
Permite la suficiente dispersión
del calor cuando está instalado
en la consola.
•Maneje el cordón de energía
con cuidado.
Sostenga el enchufe cuando
desconecte el cordón de
energía.
•Mantenga el equipo libre de
humedad, agua y polvo.
•Desconecte el cordón de
energía cuando no utilice el
equipo por mucho tiempo.
•No obstruya los orificios de
ventilación.
•No deje objetos extraños
dentro del equipo.
•No permita el contacto
de insecticidas, gasolina y
diluyentes con el equipo.
•Nunca desarme o modifique el
equipo de ninguna manera.
•La ventilación no debe quedar
obstruida por haberse cubierto
las aperturas con objetos
como periódicos, manteles o
cortinas.
•No deberán colocarse sobre
el aparato fuentes inflamables
sin protección, como velas
encendidas.
•A la hora de deshacerse de las
pilas, respete la normativa para
el cuidado del medio ambiente.
•No exponer el aparato al goteo
o salpicaduras cuando se
utilice.
•No colocar sobre el aparato
objetos llenos de líquido, como
jarros.
•No maneje el cable de
alimentación con las manos
mojadas.
•Cuando el interruptor está en
la posición OFF (STANDBY), el
equipo no está completamente
desconectado de la
alimentación MAINS.
•El equipo se instalará cerca
de la fuente de alimentación
de manera que resulte fácil
acceder a ella.
•No coloque las pilas en un lugar
expuesto a la luz directa del
sol o donde la temperatura sea
extremadamente alta, como
cerca de una calefacción.
•Vermijd hoge temperaturen.
Zorg er bij installatie in een
audiorack voor, dat de door het
toestel geproduceerde warmte
goed kan worden afgevoerd.
•Hanteer het netsnoer
voorzichtig.
Houd het snoer bij de stekker
vast wanneer deze moet
worden aan- of losgekoppeld.
•Laat geen vochtigheid,
water of stof in het apparaat
binnendringen.
•Neem altijd het netsnoer uit
het stopkontakt wanneer het
apparaat gedurende een lange
periode niet wordt gebruikt.
•De ventilatieopeningen mogen
niet worden beblokkeerd.
•Laat geen vreemde voorwerpen
in dit apparaat vallen.
•Voorkom dat insecticiden,
benzeen of verfverdunner met
dit toestel in contact komen.
•Dit toestel mag niet
gedemonteerd of aangepast
worden.
•De ventilatie mag niet
worden belemmerd door de
ventilatieopeningen af te dekken
met bijvoorbeeld kranten, een
tafelkleed of gordijnen.
•Plaats geen open vlammen,
bijvoorbeeld een brandende
kaars, op het apparaat.
•Houd u steeds aan de
milieuvoorschriften wanneer u
gebruikte batterijen wegdoet.
•Stel het apparaat niet bloot aan
druppels of spatten.
•Plaats geen voorwerpen gevuld
met water, bijvoorbeeld een
vaas, op het apparaat.
•Raak het netsnoer niet met
natte handen aan.
•Als de schakelaar op OFF
(STANDBY) staat, is het
apparaat niet volledig
losgekoppeld van de
netspanning (MAINS).
•De apparatuur wordt in de
buurt van het stopcontact
geïnstalleerd, zodat dit altijd
gemakkelijk toegankelijk is.
•Bewaar de batterijen niet op een
plaats waar deze blootstaan aan
direct zonlicht of op plaatsen
waar zeer hoge temperaturen
heersen, zoals in de buurt van
een kachel.
IV
VARNINGAR
•Undvik höga temperaturer.
Se till att det finns möjlighet
till god värmeavledning vid
montering i ett rack.
AVISOS
•Evite temperaturas altas.
Assegure uma suficiente
dispersãodo calor quando a
unidade forinstalada numa
•Hantera nätkabeln varsamt. prateleira.
•Manuseie o cabo de
Håll i kabeln när den kopplas
alimentaçãocom cuidado.Puxe
från el-uttaget.
pela ficha quando desligar
•Utsätt inte apparaten för fukt,
ocabo de alimentação.
vatten och damm.
•Mantenha a unidade afastada
•Koppla loss nätkabeln om
dahumidade, da água e do pó.
apparaten inte kommer att
•Desligue o cabo de
användas i lång tid.
alimentaçãoquando não estiver
•Täpp inte till
a utilizar aunidade por longos
ventilationsöppningarna.
períodos detempo.
•Se till att främmande föremål
•Não
obstrua os orifícios
inte tränger in i apparaten.
deventilação.
•Se till att inte insektsmedel
•Não deixe objectos estranhos
på spraybruk, bensen och
dentro da unidade.
thinner kommer i kontakt med •Não permita que insecticidas,
benzina e diluente entrem em
apparatens hölje.
contacto com a unidade.
•Ta inte isär apparaten och
•Nunca desmonte ou modifique
försök inte bygga om den.
dealguma forma a unidade.
•Ventilationen bör inte
•A ventilação não deve
förhindras genom att täcka
ser obstruída, tapando as
för ventilationsöppningarna
aberturas de ventilação com
med föremål såsom tidningar,
objectos, como jornais, toalhas
ou cortinas.
bordsdukar eller gardiner.
•Não devem ser colocadas
•Placera inte öppen eld, t.ex.
junto à unidade fontes de
tända ljus, på apparaten.
chama aberta, como velas
•Tänk på miljöaspekterna när du
acesas.
bortskaffar batterier.
•Respeite as regulamentações
•Apparaten får inte utsättas för
locais relativas à eliminação
vätska.
de pilhas.
•Placera inte föremål fyllda
•Não exponha a unidade a
med vätska, t.ex. vaser, på
gotejamento ou salpicos de
apparaten.
líquidos.
•Hantera inte nätsladden med
•Não coloque objectos com
våta händer.
líquidos, como jarras, em cima
•Även om strömbrytaren står
da unidade.
i det avstängda läget OFF
•Não manuseie o cabo de
(STANDBY), så är utrustningen
alimentação com as mãos
inte helt bortkopplad från det
molhadas.
elektriska nätet (MAINS).
•Quando o interruptor se
•Utrustningen ska vara
encontra na posição OFF
installerad nära strömuttaget
(STANDBY), o equipamento
så att strömförsörjningen är lätt
não está completamente
att tillgå.
desligado da REDE
•Förvara inte batteriet på en
ELÉCTRICA.
plats som utsätts för direkt
•O equipamento deve ser
solljus eller på platser med
instalado junto da fonte de
extremt höga temperaturer,
alimentação, para que a
som nära ett värmeelement.
fonte de alimentação esteja
facilmente acessível.
•Não deixe a pilha num local
exposto à luz solar directa
ou em locais sujeitos a
temperaturas extremamente
elevadas, como, por exemplo,
junto de um aquecedor.
•DECLARATION OF CONFORMITY
•DECLARACIÓN DE CONFORMIDAD
(English)
We declare under our sole responsibility that this product, to which this declaration relates, is
in conformity with the following standards:
EN60065, EN55013, EN55020, EN61000-3-2 and EN61000-3-3.
Following the provisions of Low Voltage Directive 2006/95/EC and EMC Directive 2004/108/
EC, the EC regulation 1275/2008 and its frame work Directive 2009/125/EC for Energy-related
Products (ErP).
(Español)
Declaramos bajo nuestra exclusiva responsabilidad que este producto al que hace referencia
esta declaración, está conforme con los siguientes estándares:
EN60065, EN55013, EN55020, EN61000-3-2 y EN61000-3-3.
De acuerdo con la directiva sobre baja tensión 2006/95/CE y la directiva sobre CEM 2004/108/
CE, la normativa CE 1275/2008 y su directiva marco 2009/125/EC para productos relacionados
con la energía (ErP).
•ÜBEREINSTIMMUNGSERKLÄRUNG
(Deutsch)
•EENVORMIGHEIDSVERKLARING
•DECLARATION DE CONFORMITE
(Français)
•ÖVERENSSTÄMMELSESINTYG
•DICHIARAZIONE DI CONFORMITÀ
(Italiano)
Wir erklären unter unserer Verantwortung, daß dieses Produkt, auf das sich diese Erklärung
bezieht, den folgenden Standards entspricht:
EN60065, EN55013, EN55020, EN61000-3-2 und EN61000-3-3.
Gemäß den Bestimmungen der Niederspannungsrichtlinie 2006/95/EG und EMV Richtlinie
2004/108/EG, der Verordnung (EG) Nr. 1275/2008 der Kommission und deren Rahmenrichtlinie
2009/125/EG zu energieverbrauchsrelevanten Produkten (ErP).
(Nederlands)
Wij verklaren uitsluitend op onze verantwoordelijkheid dat dit produkt, waarop deze verklaring
betrekking heeft, in overeenstemming is met de volgende normen:
EN60065, EN55013, EN55020, EN61000-3-2 en EN61000-3-3.
Volgens de voorzieningen van lage spanningsrichtlijn 2006/95/EC en EMC-richtlijn 2004/108/
EC, de EU-richtlijn 1275/2008 en de kaderrichtlijn 2009/125/EC voor energieverbruikende
producten (ErP).
Nous déclarons sous notre seule responsabilité que l’appareil, auquel se réfère cette
déclaration, est conforme aux standards suivants:
EN60065, EN55013, EN55020, EN61000-3-2 et EN61000-3-3.
Selon la directive 2006/95/EC concernant la basse tension et la directive CEM 2004/108/EC,
la réglementation européenne 1275/2008 et la directive 2009/125/EC établissant un cadre de
travail applicable aux produits liés à l’énergie (ErP).
(Svenska)
Härmed intygas helt på eget ansvar att denna produkt, vilken detta intyg avser, uppfyller
följande standarder:
EN60065, EN55013, EN55020, EN61000-3-2 och EN61000-3-3.
Uppfyller reglerna i lågspänningsdirektivet 2006/95/EC och EMC-direktivet 2004/108/
EC, EU-förordningen 1275/2008 och ramverksdirektivet 2009/125/EC för energirelaterade
produkter (ErP).
•DECLARAÇÃO DE CONFORMIDADE
Dichiariamo con piena responsabilità che questo prodotto, al quale la nostra dichiarazione si
riferisce, è conforme alle seguenti normative:
EN60065, EN55013, EN55020, EN61000-3-2 e EN61000-3-3.
Facendo seguito alle disposizioni della direttiva sul basso voltaggio 2006/95/EC alla direttiva
EMC 2004/108/EC, alla norma EC 1275/2008 e alla relativa legge quadro 2009/125/EC in
materia di prodotti alimentati ad energia (ErP).
QUESTO PRODOTTO E’ CONFORME
AL D.M. 28/08/95 N. 548
(Português)
Declaramos sob nossa exclusiva responsabilidade que este produto, ao qual se refere esta
declaração, se encontra em conformidade com as seguintes normas:
EN60065, EN55013, EN55020, EN61000-3-2 e EN61000-3-3.
De acordo com as provisões da Directiva de Baixa Tensão 2006/95/CE e a Directiva CEM
2004/108/CE, o Regulamento (CE) 1275/2008 e a respectiva Directiva-Quadro 2009/125/CE
para produtos relacionados com o consumo de energia (ErP).
D&M Professional Europe
A division of D&M Europe B.V
Beemdstraat 11
5653 MA Eindhoven
The Netherlands
V
A NOTE ABOUT RECYCLING:
This product’s packaging materials are recyclable and can be reused. Please dispose of any
materials in accordance with the local recycling regulations.
When discarding the unit, comply with local rules or regulations.
Batteries should never be thrown away or incinerated but disposed of in accordance with the
local regulations concerning battery disposal.
This product and the supplied accessories, excluding the batteries, constitute the applicable
product according to the WEEE directive.
HINWEIS ZUM RECYCLING:
Das Verpackungsmaterial dieses Produktes ist zum Recyceln geeignet und kann wieder
verwendet werden. Bitte entsorgen Sie alle Materialien entsprechend der örtlichen RecyclingVorschriften.
Beachten Sie bei der Entsorgung des Gerätes die örtlichen Vorschriften und Bestimmungen.
Die Batterien dürfen nicht in den Hausmüll geworfen oder verbrannt werden; bitte entsorgen Sie
die Batterien gemäß der örtlichen Vorschriften.
Dieses Produkt und das im Lieferumfang enthaltene Zubehör (mit Ausnahme der Batterien!)
entsprechen der WEEE-Direktive.
UNE REMARQUE CONCERNANT LE RECYCLAGE:
Les matériaux d’emballage de ce produit sont recyclables et peuvent être réutilisés. Veuillez disposer
des matériaux conformément aux lois sur le recyclage en vigueur.
Lorsque vous mettez cet appareil au rebut, respectez les lois ou réglementations en vigueur.
Les piles ne doivent jamais être jetées ou incinérées, mais mises au rebut conformément aux lois en vigueur sur la
mise au rebut des piles.
Ce produit et les accessoires inclus, à l’exception des piles, sont des produits conformes à la directive DEEE.
NOTA RELATIVA AL RICICLAGGIO:
I materiali di imballaggio di questo prodotto sono riutilizzabili e riciclabili. Smaltire i materiali conformemente alle
normative locali sul riciclaggio.
Per lo smaltimento dell’unità, osservare le normative o le leggi locali in vigore.
Non gettare le batterie, né incenerirle, ma smaltirle conformemente alla normativa locale sui rifiuti chimici.
Questo prodotto e gli accessori inclusi nell’imballaggio sono applicabili alla direttiva RAEE, ad eccezione delle batterie.
ACERCA DEL RECICLAJE:
Los materiales de embalaje de este producto son reciclables y se pueden volver a utilizar. Disponga de estos
materiales siguiendo los reglamentos de reciclaje de su localidad.
Cuando se deshaga de la unidad, cumpla con las reglas o reglamentos locales.
Las pilas nunca deberán tirarse ni incinerarse. Deberá disponer de ellas siguiendo los reglamentos de su localidad
relacionados con los desperdicios químicos.
Este producto junto con los accesorios empaquetados es el producto aplicable a la directiva RAEE excepto pilas.
EEN AANTEKENING MET BETREKKING TOT DE RECYCLING:
Het inpakmateriaal van dit product is recycleerbaar en kan opnieuw gebruikt worden. Er wordt verzocht om zich van
elk afvalmateriaal te ontdoen volgens de plaatselijke voorschriften.
Volg voor het wegdoen van de speler de voorschriften voor de verwijdering van wit- en bruingoed op.
Batterijen mogen nooit worden weggegooid of verbrand, maar moeten volgens de plaatselijke voorschriften
betreffende chemisch afval worden verwijderd.
Op dit product en de meegeleverde accessoires, m.u.v. de batterijen is de richtlijn voor afgedankte elektrische en
elektronische apparaten (WEEE) van toepassing.
OBSERVERA ANGÅENDE ÅTERVINNING:
Produktens emballage är återvinningsbart och kan återanvändas. Kassera det enligt lokala återvinningsbestämmelser.
När du kasserar enheten ska du göra det i överensstämmelse med lokala regler och bestämmelser.
Batterier får absolut inte kastas i soporna eller brännas. Kassera dem enligt lokala bestämmelser för kemiskt avfall.
Denna apparat och de tillbehör som levereras med den uppfyller gällande WEEE-direktiv, med undantag av batterierna.
UMA NOTA SOBRE A RECICLAGEM:
Os materiais de embalagem deste produto são recicláveis e podem ser reutilizados. Elimine quaisquer materiais de
acordo com as normas de reciclagem locais.
Quando eliminar a unidade, obedeça às regras ou normas locais.
As pilhas nunca devem ser deitadas fora ou incineradas, mas sim eliminadas de acordo com as normais locais
relativas aos resíduos químicos.
Este produto e os respectivos acessórios embalados em conjunto constituem o produto aplicável de acordo com a
directiva WEEE, excepto as pilhas.
VI
Contents
Getting started········································································1
Playback····················································································24
1
Information··············································································56
Error messages·············································································56
RC-F400S error messages···························································56
Troubleshooting···········································································57
Warranty·······················································································58
Main Specifications ·····································································59
Information
Selecting the media to playback················································24
Playback························································································24
Operations during playback························································25
Track switching (8, 9)························································25
Fast forward and fast rewind (Search)·········································25
Jumping by frames (Frame jump)················································25
A-B Repeat Playback (A-B Repeat)··············································25
Playback pitch adjustment (Pitch control)····································26
Single playback or continuous playback (Single/Cont.)················26
Direct jump··················································································26
Changing the output level····························································26
Rewind a specified amount of time and playback (Skip back)·····26
Playback in the preferred order
(Program playback)······································································27
Playing back from track hot points
(Hot Start playback)······································································27
Registering a selected track to the Hot list··································27
iPod® playback·············································································28
iPod playback ··············································································28
Connecting to a network (LAN) ·················································30
Required system·········································································30
Network Settings·········································································31
LAN Connection··········································································31
Control function
Preparations·················································································12
Cables used for audio connection···············································12
Audio connections·······································································12
Analog connection (unbalanced connection)·······························12
Analog connection (balanced connection)···································12
Digital connection (COAXIAL)······················································12
Digital connection (AES/EBU)······················································12
Connecting the external control terminal·································13
Parallel port··················································································13
RS-232C terminal·········································································13
Connecting headphones······························································13
Connecting the power cord························································13
Connecting Media········································································14
Inserting and ejecting discs·························································14
Connecting a USB device or iPod················································14
Cautions when using media························································14
File List Menu···············································································21
Select copy targets (Select)·························································21
Selecting all files for copying (Select All)·····································21
Copying files (Copy)·····································································22
Track Information Display (Property)············································22
Media List·····················································································23
Media Server List·········································································23
Web Remote·················································································35
Various playback functions with RC-F400S·······························41
Part names and functions····························································41
Connection··················································································43
Hot Start playback········································································44
Playback from the main screen···················································46
Other Functions ···········································································47
Lock operating buttons (Key lock)················································47
“DENON Professional Pitch Control” App
for iPhone/iPod Touch·································································47
Serial remote control function····················································48
RS-232C control···········································································48
IP Control (Ethernet)····································································48
700 Series Extended Communication Format·····························49
D&M RC Communication format·················································52
Parallel Control·············································································54
Playback
Connections············································································12
File and folder settings······················································21
File and folder
settings
Front Panel······················································································4
Rear Panel·······················································································5
Remote control unit·······································································6
Inserting the batteries···································································7
Operating range of the remote control unit···································7
Display·····························································································8
Display during playback·································································8
Control Function···································································35
Setting Defaults
Part names and functions··················································4
Menu List······················································································15
Setting Defaults···········································································16
Menu Operations (Preset Settings/System Settings)··················16
Menu Operations (Utility)·····························································19
Other Functions (Product Manager) ··········································32
Installation of Product Manager···················································32
Product Manager Window ··························································33
Operations···················································································34
Connections
Accessories·····················································································2
Main features··················································································2
Cautions on handling·····································································2
Discs································································································3
Discs playable on this unit·····························································3
Holding discs·················································································3
Loading discs·················································································3
Cautions on loading discs······························································3
Cautions on storing discs······························································3
Cleaning discs················································································3
Setting Defaults····································································15
Part names
and functions
Thank you for purchasing this Denon Professional product. To ensure proper operation, please read this owner’s manual carefully before using the product.
After reading, be sure to keep for future reference.
Getting started
Getting started
Main features
r
File and folder
settings
Playback
Control function
Max.10°
Setting Defaults
NOTE
The reproduction or use of materials such as music data or files may
be restricted under the Copyright Act or other applicable laws, or
under the terms of a license agreement between yourself and the
material owner. Check that the conditions of use for all materials are
thoroughly satisfied before reproduction etc., and use this equipment
correctly. DENON Professional cannot accept any responsibility
whatsoever for acts of copyright infringement undertaken by the user.
Connections
e
•Before turning the power switch on
•Check once again that all connections are correct and that there are
no problems with the connection cables.
•Power is supplied to some of the circuitry even when the unit is set
to the standby mode. When not using the machine for long periods
of time, be sure to unplug the power cord from the power outlet.
•About condensation
If there is a major difference in temperature between the inside
of the unit and the surroundings, condensation may form on parts
inside the unit, causing the unit to fail to operate properly.
If this happens, let the unit sit for an hour or two with the power off
and wait until there is little difference in temperature before using
the unit.
•Cautions on using mobile phones
Using a mobile phone near this unit may result in noise. If that
occurs, move the mobile phone away from the unit when it is in use.
•Moving the unit
Turn off the power and unplug the power cord from the power outlet.
Next, disconnect the cables connected to other system units before
moving the unit.
•Rack mount cautions (Required rack specifications for mounting
the DN-700C on a rack )
•EIA Standard 19 inch rack
•1U Size installation compatible rack
•Rack that has a guide rail or shelf board that can support this device
•Rack Installation
The DN-700C will work normally when the player unit is mounted
within 10 degrees off the vertical plane at the front panel. If the unit
is tilted excessively, the disc may not be loaded or unloaded properly.
Part names
and functions
qBOOK (Owner’s manual).......................................................... 1
wCD-ROM (Owner’s manual)..................................................... 1
ePower cords for each region (US, EU, JP)................... 1 of each
rPower plug conversion adapter (3 pin -> 2 pin)........................ 1
tRemote control unit (RC-1177)................................................. 1
yAAA Batteries........................................................................... 2
Cautions on handling
•CD media, USB device (mass storage class) and iPod playback
•Streaming playback of music files stored on the network media
server
•Large, easy to see organic electroluminescent (EL) display
•Balanced XLR connectors equipped for all outputs
•Supports remote control via Ethernet using specialized software
(DENON Professional Product Manager, Web remote control)
•Supports pitch control of music on an iPod/iPhone using specialized
software (DENON Professional Pitch Control)
•Pitch control playback allows adjustment of the playback speed
between –16 % to +16 % in 0.1 % steps
•Master Key function allows for adjustment of the playback speed
without changing the musical interval
•Supports remote control operation from parallel port, RS-232C and
Ethernet
Getting started
Accessories
Check that the following parts are supplied with the product.
Information
DN-700C
2
Discs playable on this unit
Discs marked with the logo at right can be played in
this unit.
NOTE
Do not touch the signal surface.
Gently wipe the disc from the
inside towards the outside.
Do not wipe in a circular motion.
NOTE
3
Information
Do not use record spray, antistatic agents, benzene, thinner or other
solvents.
Control function
•Do not get fingerprints, oil or dirt on discs.
•Take special care not to scratch discs when removing them from
their cases.
•Do not bend or heat discs.
•Do not enlarge the hole in the center.
•Do not write on the labeled (printed) surface with ball-point pens,
pencils, etc., or stick new labels on discs.
•Water droplets may form on discs if they are moved suddenly from
a cold place (outdoors for example) to a warm place, but do not try to
dry them off using a hair-dryer, etc.
•If there are fingerprints or dirt on a disc, wipe them off before using
the disc. Fingerprints and dirt can impair sound quality and cause
interruptions in playback.
•Use a commercially available disc cleaning set or a soft cloth to clean
discs.
Playback
Holding discs
Cautions on loading discs
Cleaning discs
File and folder
settings
zzWhat is finalization?
Finalization is the process that makes recorded CD-R/CD-RW discs
playable on compatible players.
•Be sure to remove discs after using them.
•Be sure to store discs in their cases to protect them from dust,
scratches, warping, etc.
•Do not store discs in the following places:
•Places exposed to direct sunlight for long periods of time
•Dusty or humid places
•Places exposed to heat from heaters, etc.
Setting Defaults
•Discs in special shapes
(heartshaped discs, octagonal
discs, etc.) cannot be played. Do
not attempt to play them, as doing
so can damage the unit.
•Some discs and some recording formats cannot be played.
•Non-finalized discs cannot be played.
•Only load one disc at a time. Loading two or more discs can damage
the unit or scratch the discs.
•When the disc is drawn into the unit, be careful not to trap your
fingers.
•Do not insert anything other than discs into the disc loading slot.
•Do not use cracked or warped discs or discs that have been repaired
with adhesive, etc.
•Do not use discs on which the sticky part of cellophane tape or labels
is exposed or on which there are traces of where labels have been
removed. Such discs can get caught inside the player and damage it.
•If the label side of the disc is dirty, wipe it clean before use. If the
disc loading/ejection roller becomes dirty, discs may not load or eject
correctly.
Connections
wCD-R/CD-RW
Cautions on storing discs
Part names
and functions
q Music CDs
Loading discs
Getting started
Discs
Getting started
Part names and functions
Part names
and functions
Front Panel
For buttons not explained here, see the page indicated in parentheses ( ).
W5
W4
W3
W2 W1 W0
Q9
Q8
Q7
Connections
w
e
Connects to a USB device or iPod.
rSHIFT button (SHIFT)·································· (16)
tLOCK/HOT 1 button···································· (47)
Press and hold for more than 1 second to switch
between all keys locked, specific button lock,
and all keys unlocked.
•Press while holding down as the r SHIFT to
play back from the location set as Hot Start #1.
(Same applies for y to o HOT 2 to 5 buttons.)
•When in Hot Set mode, the currently selected
track is registered as Hot Start #1. (Same
applies for y to o HOT 2 to 5 buttons.)
Displays the main menu.
uTEXT/HOT 3 button···································· (27)
Scrolls the file name and text information on
display.
Q3
Q4
W1TRK NO./HOT SET button·························· (26)
Returns to the previous operation.
•Press and hold the button for more than 1
second in the file list display to return to normal
screen.
Selects tracks directly.
•Press while holding down the r SHIFT to
switch to HOT SET Mode and register the
current track to Hot Start.
PUSH ENTER button················· (16, 21, 24, 25)
Moves between tracks.
•Rotate the jog dial while holding down the
r SHIFT to adjust the output level.
•This is used to select items displayed in the
menu.
Sets A-B repeat playback.
oSINGLE/CONT./HOT 5 button·············· (26, 27)
Switches the playback mode (SINGLE and
CONTINUOUS).
Q0EJECT button··············································· (14)
Q1Display···························································· (8)
Q2Stop/Cancel Button (2)
Q8Fast Forward/Pitch + Button (7)············ (26)
Q9Fast Rewind/Pitch - Button (6)·············· (26)
W0FRAME/PITCH button ······························· (25)
·············································· (16, 21, 24, 25, 28)
Q3CUE button·················································· (24)
Q4Pause button (3)··································· (24, 28)
Q5Play button (1)······································ (24, 28)
Switches to frame search mode.
•Press while holding down the r SHIFT button
to switch the pitch on/off.
4
Q6
Q6BACK button······························ (16, 21, 23, 28)
Q7Jog Dial/
iA-B/HOT 4 button································· (25, 27)
Q5
W2MEDIA/LIST button······························· (23, 24)
Switches between media.
•Press while holding down the
display the file list.
r SHIFT
to
W3Remote control signal receiver
········································································ (7)
W4Disc Slot······················································· (14)
W5Headphone Volume Adjustment Knob
(LEVEL)························································· (13)
Adjusts the volume of the headphones.
Press the knob to make it spring out.
After adjusting the volume, press the knob back
in again.
Information
When the LED is lit, the function assigned to
SHIFT is enabled.
yMENU/HOT 2 button···························· (27, 30)
Q2
Control function
wHeadphones jack (PHONES)······················· (13)
eUSB port······················································· (14)
Q1
Playback
·························································· (16, 24, 28)
Turns the power on and off.
GPower indicator statusH
Power on: Off
Normal standby: Red
Network standby: Orange
Q0
File and folder
settings
qON/STANDBY, Power indicator
r t y u i o
Setting Defaults
q
Getting started
Rear Panel
Part names
and functions
w e
•Pin Arrangement: 1. GND/2. Hot/3. Cold
•XLR Type
wAnalog output (unbalanced) terminal···································· (12)
•Pin Arrangement: 1. Common/2. Hot/3. Cold
•Signal Format: IEC-60958 Type I (AES/EBU)
y
tLAN Terminal············································································ (30)
•IEEE 802.3u/10/100Base-T(X) / RJ-45
yRS-232C Terminal····································································· (12)
uParallel port (PARALLEL)························································· (12)
•25pin DSUB Connector (Female)
iAC Inlet (AC IN)········································································· (12)
rDigital output (RCA) terminal ················································ (12)
i
Playback
•IEC60958 Type g
•Signal Format: IEC-60958 Type g (COAXIAL)
u
File and folder
settings
•RCA Type
eDigital output (XLR) terminal·················································· (12)
t
Setting Defaults
qAnalog output (balanced) terminal········································ (12)
r
Connections
q
Control function
Information
5
qPOWER button (X)
Q5RANDOM button
q
w
Q3
Q4
e
Q6
r
u
i
Switches the playback mode (SINGLE/CONTINUOUS).
Selects tracks directly.
Q8FRAME button
rTEXT button
Changes to frame search mode.
Re-displays text information for tracks.
tBACK button
Displays the “File List”.
Returns to the previous menu.
W0MEDIA button
yA-B button
Displays the “Media List”.
Sets A-B repeat.
W1REPEAT button
uUTILITY button
Sets the repeat mode ON/OFF.
Displays the utilities.
W2MENU button
iARROW button
Displays the main menu.
Moves the cursor.
W3VOL +/– button
oDIR +/– button
Adjusts the output level.
Changes the directory (folder).
W4ENTER button
Q0Stop button (2)
Confirms the selected content.
Stops playback, or cancels the currently selected operation.
Q1CUE button
Q2Track Skip button (8, 9)
Moves tracks.
W6Pause button (3)
Pauses playback.
W7Search button (6, 7)
Q3EJECT button
Fast forwards or rewinds tracks.
Ejects the disc. Does not operate during playback.
Q4LOCK button
6
Information
Locks all of the operations or specific buttons on the front panel
of the unit.
Control function
W5
W6
W7
W5Play button (1)
Starts playback.
Returns to the cue point.
Q0
Q1
Q2
Q9LIST button
Playback
o
eNumber buttons (0 to 9)
Switches to program mode.
Q7SINGLE/CONT. button
File and folder
settings
t
y
Q8
Q9
W0
W1
W2
W3
W4
W3
Q6PROGRAM button
•Turns the pitch control ON/OFF.
•Changes the pitch adjustment value.
Setting Defaults
Q7
wPITCH button
Connections
Q5
Switches to random mode.
Part names
and functions
Turns the power on and off.
Getting started
Remote control unit
Operating range of the remote control unit
qPush the rear cover upwards
in the direction of the arrows
to remove it.
Point the remote control unit at the remote sensor when operating it.
wLoad the two batteries properly
as indicated by the marks in the
battery compartment.
Part names
and functions
Inserting the batteries
R03/AAA
30°
30°
Setting Defaults
ePut the rear cover back on.
NOTE
Connections
Approx. 7 m
NOTE
Playback
Control function
•The set may function improperly or the remote control unit may not
operate if the remote control sensor is exposed to direct sunlight,
strong artificial light from an inverter type fluorescent lamp or
infrared light.
•When using 3D video devices that transmit radio communication
signals (such as infrared signals etc) between the various units (such
as the monitor, 3D glasses, 3D transmitter unit etc), the remote
control unit may not operate due to interference from those radio
communication signals. If this occurs, adjust the direction and
distance of the 3D communication for each unit, and check that the
remote control unit operation is not affected by these signals.
File and folder
settings
Information
•Insert the specified batteries in the remote control unit.
•Replace the batteries with new ones if the set does not operate
even when the remote control unit is operated close to the unit. (The
supplied batteries are only for verifying operation. Replace them
with new batteries at an early date.)
•When inserting the batteries, be sure to do so in the proper direction,
following the q and w marks in the battery compartment.
•To prevent damage or leakage of battery fluid:
•Do not use a new battery together with an old one.
•Do not use two different types of batteries.
•Do not attempt to charge dry batteries.
•Do not short-circuit, disassemble, heat or dispose of batteries in
flames.
•Do not keep the battery in a place exposed to direct sunlight or in
places with extremely high temperatures, such as near a heater.
•If the battery fluid should leak, carefully wipe the fluid off the inside
of the battery compartment and insert new batteries.
•Remove the batteries from the remote control unit if it will not be in
use for long periods.
•Used batteries should be disposed of in accordance with the local
regulations regarding battery disposal.
•The remote control unit may function improperly if rechargeable
batteries are used.
Getting started
Display
7
Q1Pitch display
Displays the ON/OFF status of the pitch function, master key and playback speed (percentage).
W0 Q9
Q8 Q7
TR
ID
Q4
REM
Q3 Q2
012:34;56
Q1
PITCH
OFF M
Q0
+12.3%
01
23
123:45;67
p
Sam le12345678.MP3
TITLE:SONG0123
e
ARTIST: SINGER
r
Displayed in the “mmm (minutes):ss (seconds):ff (frame)” format.
•Minutes are displayed in two digits during CD playback.
•The display changes to “--:--:--” during VBR file playback.
oi
Q3Elapsed time display
Displayed in the “mmm (minutes):ss (seconds):ff (frame)” format.
•The display stops at a maximum of 999:59:74.
•Minutes are displayed in two digits during CD playback.
RCU
ACU
EOM
44K
232
t
Q4Status display
•Displays the operating status of devices.
STOP
CUE
yu
CUE
PAUSE
qRepeat playback display
SEARCH
wRandom playback display
“RND” lights during random playback.
PLAY
eProgrammed playback display
Q5Index number display
“PRG” lights during programmed playback.
Q6File name display
Displays text data (CD-TEXT/ID3 tags in MP3 data) included in the currently playing file.
•Text that is too long to fit in the display is scrolled.
tRemote serial connection display
Lights when remote serial commands are being received.
•The hold time is 0.5 seconds.
Q7Track number display
•Flashes when there is a following track to be played.
•Two digits are displayed for CD playback, and 4 digits are displayed for all other media.
ySampling rate display
Displays the sampling rate of the audio output. (44 K/48 K/96 K)
•It is not displayed when “automatic” settings are used.
Q8Media display
Q9Playback range display
“EOM” lights when the end of track function is ON.
Displays the current playback range. (“FLD”: Current folder/“ALL”: All folders)
iAuto cue display
W0Playback mode display
“ACU” lights when the auto cue function is ON.
Displays the current playback mode. (“CNT”: Continuous/“SGL”: 1 track)
oEnd of track mode display
Displays the mode when the current track ends. (“NXT” when “Next” is set, “RCU” when “Recue”
is set)
Q0Ethernet display
Lights when an Ethernet cable that can be used for communication is connected.
8
Information
Displays the currently selected media. (“CD”/“USB”/“iPod”/“NET”)
uEnd of track notification
Control function
The name of the file currently being played is displayed along with the progress display bar.
•File names that are too long to fit in the display are scrolled.
•“TRACK NN” is displayed during CD playback.
Playback
Only displayed during CD playback.
rText information display
File and folder
settings
AUDIBLE PAUSE
“RPT” or “A-B” light during repeat playback.
Setting Defaults
qw
Q5
Connections
CD
FLD
CNT
RPT
RND
PRG
Q6
Q2Remaining time display
Part names
and functions
Display during playback
Getting started
Display
The playback status and information about various media is displayed on the DN-700C display.
nnMenu Screen
Press the MENU button to display the following screen.
File List
Program List
Hot List
Preset Setting
System Setting
q
w
e
r
t
Current Folder
02
---< Up One Level >
Lower Folder
---0001
BGM.MP3
Music.WAV
•Folders are displayed first, followed by sound files.
qDisplays the folder of the currently selected track.
•The disc icon is displayed when CD is selected.
Program List
BGM01.MP3
BGM02.MP3
Music01.WAV
Music02.WAV
•The numbers of the left side indicate the programmed playback
order.
•For CD-DA, <TRACK-XX> (XX=Track No.) is displayed in the file
name display.
eSelect to move down from the current folder hierarchy.
rDisplays the first file in the current folder.
tDisplays the currently selected file.
9
Information
•The “File List Menu” contains the following items.
•Set Current Track
•Preview
•Select
•Select All
•Copy
•Property
•The “Program List Menu” contains the following items.
•Preview
•Insert
•Remove
•Remove All
•Load (Only for USB media)
•Save (Only for USB media)
Control function
Set Cuurent Track
Preview
Select
Select All
Copy
Preview
Insert
Remove
Remove All
Load
Playback
01
02
03
04
05
01
02
03
04
05
File and folder
settings
File List Menu
Press the PUSH ENTER button when the “File List” is displayed to
display this menu.
Program List Menu
Press the PUSH ENTER button when the “Program List” is displayed
to display this menu.
Setting Defaults
wSelect to move up from the current folder hierarchy.
01
02
03
04
Connections
•The Menu contains the following items.
•File List
•Program List
•Hot List
•Preset Setting
•System Setting
•Utility
Program List
Displays the files registered for programmed playback.
Part names
and functions
01
02
03
04
05
File List
Displays folders and sound files.
Getting started
Display
Misc List
Preset Setting
Select the “Save” menu when the “Hot List Menu” and“Program List
Menu” is displayed to display this menu.
The “Playlist” file and “Hot Start” file can be confirmed.
Sets the operating status of the unit.
Hot List
BGM01.MP3
BGM02.MP3
Music01.WAV
Music02.WAV
Current Folder
02
---< Up One Level>
Lower Folder
---0001
BGM.M3U
Music.M3U
0002
q Displays the name of the currently selected folder.
w Select to move up from the current folder hierarchy.
e Select to move down from the current folder hierarchy.
r,t Display the “Misc List” files in the current folder.
Hot List Menu
Preview
Auto Mapping
Set
Remove
Remove All
For details on “Preset Setting”, see “Preset Setting” (vpage 16).
System Setting
Sets the initial status of the unit.
01
02
03
04
05
Mono
Output rate
Auto Sleep
Volume Output
Ref(XLR/RCA)
Off
Auto
Off
Variable
+24dBu/+10dBV
For details on “System Setting”, see “System Setting” (vpage 18).
Playback
01
02
03
04
05
•xxx.ini
The file containing setting information for this unit.
•xxx.m3uThe file containing setting information for program
playback.
•xxx.ppl The file containing setting information for hotstart
playback.
Momentary
Resume Play
All
Continuous
Off
File and folder
settings
Press the PUSH ENTER button when the “Hot List” is displayed to
display this menu.
Shift Mode
Power On
Play Range
Play mode
Random
Setting Defaults
•The number on the left side indicates the Hot Start number.
•For CD-DA, <TRACK-XX> (XX=Track No.) is displayed in the file
name display.
•Unregistered Hot Start are displayed as <Empty>.
q
w
e
r
t
01
02
03
04
05
Connections
01
02
03
04
Part names
and functions
Hot List
Displays the files registered for “Hot Start”.
Getting started
Display
Control function
•Screen used for editing “Hot Start” assignments.
•The “Hot List Menu” contains the following items.
•Preview
•Auto Mapping
•Set
•Remove
•Remove All
•Load (Only for USB media)
•Save (Only for USB media)
Information
10
Utility
Media List
Media Server List
Displays the utility menu.
Select the media to play back.
Press the MEDIA button to display the following screen.
Select servers that can be played back on the network.
•The “Media List” contains the following items.
•CD
•USB
•iPod/iPhone
•NET
File and folder
settings
•“(None)” is displayed after the media name for media that is not
ready to playback.
•When “NET” is selected, the “Media Server List” is displayed to
allow selection of the media server.
Setting Defaults
•“Utility” contains the following items.
•Load Setting
•Save Setting
•Firmware Version
•Network Status
•Format Media
Media List
CD
USB(None)
iPod/iPhone
NET
Media Server List
HDD RECORDER 01
NAS_01
PC01
PC02
Connections
Load Setting
Save Setting
Firmware Version
Network Status
Format Media
Part names
and functions
01
02
03
04
05
Getting started
Display
Playback
Control function
Information
11
NOTE
Analog connection (unbalanced connection) Digital connection (COAXIAL)
Connect a line level analog cable to the analog output (unbalanced)
terminal.
Connect the COAXIAL digital output terminal to a digital input terminal.
Connections
L
R
Mixer
Recorder
Amp
Mixer
Pre-amp
DIGITAL
IN
AUDIO
IN
R
Cables used for audio connection
File and folder
settings
L
Select the cables according to the equipment being connected.
L
R
Audio cables
Digital connection (AES/EBU)
Connect the AES/EBU digital output terminal to a digital input terminal.
(White)
L
L
(Red)
R
R
Digital Connection (RCA)
Coaxial digital cable (Sold separately)
Mixer
Recorder
1:GND
2:Hot
3:Cold
DIGITAL
IN
Amp
Mixer
Pre-amp
Balanced cable (Sold separately)
L
12
AUDIO
IN
R
Information
Analog Connection (XLR), Digital Connection (XLR)
Connect the analog output (balanced) terminal to a line level analog
input.
Control function
Stereo audio cable (Sold separately)
Analog connection (balanced connection)
Playback
Analog Connection (RCA)
Setting Defaults
Preparations
Audio connections
Part names
and functions
•Do not plug in the power cord until all connections have been
completed.
•When making connections, also refer to the operating instructions of
the other components.
•Insert the plugs securely. Loose connections will result in the
generation of noise.
•Be sure to connect the left and right channels properly (left with left,
right with right).
•Connect the output correctly.
•Do not bundle power cords together with connection cables. Doing
so can result in humming or noise.
Getting started
Connections
Connecting headphones
Connect the headphones to the headphone jack (PHONES).
Part names
and functions
Parallel port
Connecting the power cord
Insert the power cord when all other connections are completed.
Be sure to connect the ground wire also.
Getting started
Connecting the external control
terminal
Connect an external device to the parallel port.
Connections
RS-232C terminal
NOTE
To prevent hearing loss, do not raise the volume level excessively
when using headphones.
Power cord
(provided)
To the power socket
(AC 120 V, 60 Hz)
U.S.A. and Canada models
NOTE
13
Information
•Be sure to insert the power plug firmly into the AC outlet. If the plug
is not properly inserted, it could cause a malfunction or noise.
•Do not unplug the power cord while the unit is operating.
•Do not use a power cord other than the cord supplied with this unit.
Control function
RS-232C control can be used for external control of the host device
and to configure settings.
For details on RS-232C control, see “RS-232C control” (vpage 48).
Playback
To the power socket
(AC 230 V, 50/60 Hz)
European, UK and Asia/Pacific models
File and folder
settings
Connect an RS-232C straight cable with a 9-pin D-sub connector to the
RS-232C serial terminal.
When you press the headphone volume adjustment knob (LEVEL), the
knob will spring out. After adjusting the volume, press the knob back
in again.
To the power socket
(AC 100 V, 50/60 Hz)
Japan models
Setting Defaults
Parallel control can be used to control DN-700C from an external
device.
For details on parallel control, see “Parallel Control” (vpage 54).
Connecting a USB device or iPod
Cautions when using media
This operation is done when the power is switched on.
DN-700C supports external USB devices (mass storage class).
•A USB hub is not supported.
•FAT16/FAT32/HFS+ (read only) file systems are supported.
•Do not use a cracked or warped CD or USB drive, or one that has
been repaired with adhesive.
•“Loading...” appears on the display when media is used or loaded.
Do not remove the media while this message is displayed.
Connections
1 Press ON/STANDBY to turn the power on.
the edges of the disc, and insert the disc into
2 Hold
the disc slot.
Part names
and functions
Inserting and ejecting discs
Getting started
Connecting Media
•Do not touch the recorded surface (shiny surface) with your
hands.
Setting Defaults
iPod
NOTE
Control function
nnMessages
Message
Information
The DN-700C displays various messages during use. The message
contents are explained below.
Content
No Disc
The disc slot is empty.
Eject Locked
Ejection of the disc that is currently being
played is locked. Playback needs to be
stopped for the disc to be ejected."
Playback
3 Press EJECT and remove the disc.
•Do not remove the USB device during USB playback. Forcibly
removing the USB device during USB playback may damage the
data on the USB memory or hard disk.
•Do not use an extension cable to connect the USB device.
File and folder
settings
USB device
NOTE
Do not attempt to push a disc in by hand when the power is off. Doing
so may damage the CD player or cause a malfunction.
14
Getting started
Setting Defaults
Setting Item
File List Menu
File List
File List Menu
(Set/Insert)
File List Menu
16
16
16
16
16
16
16
16
16
16
16
16
17
17
17
Utility
*1 Press the ENTER button to enter the “Misc List”.
*2 Press the ENTER button to enter the “Text Editor”.
*3 Press the ENTER button to enter the “Net Address Editor”.
*4 Press the ENTER button to enter the “Media List”.
*5 Press the ENTER button to enter the “File List”.
15
11
Information
Preset Setting
Shift Mode
Power On
Play Range
Play Mode
Random
Program
Finish Mode
Repeat
Auto Cue
Skip Back
Search Mode
Auto Fade In
Auto Fade Out
Start Delay
End Of Message
10
Control function
Hot List Menu
System Setting
Playback
Hot List
9
File and folder
settings
Program List Menu
Preview
Insert*5
Remove
Remove All
Load*1
Save*1
Preview
Auto Mapping
Set*5
Remove
Remove All
Load*1
Save*1
Preset Setting
21
Page
17
17
17
17
17
17
17
17
17
17
18
18
18
18
18
18
18
18
18
18
18
18
18
18
18
18
18
18
18
Setting Defaults
Program List
(Copy)
Setting Item
Next Trk Reserve
Master Key
Dimmer
Display Dimmer
LED Dimmer
Screen Saver
Remain Time Mode
Fader Start
Para Rem Mode
Default
Mono
Output Rate
Auto Sleep
Volume Output
Ref (XLR/RCA)
Trim Lch
Trim Rch
Display Contrast
IR Remote
Serial Bit Rate
Serial Protocol
Machine Name*2
IP Address*3
Subnet Mask*3
Gateway*3
DNS Server*3
Network Standby
Password*2
Default
Load Setting
Save Setting
Firmware Version
Network Status
Format Media
Connections
(Normal)
Page
Set Current Track
Preview
Select
Select All
Copy*5
Property
Change Folder
Change Media*4
Execute
Preview
Change Folder
Execute
Part names
and functions
Menu List
nnPreset Setting
Menu Operations (Preset Settings/System Settings)
MENU
2
BACK
Jog Dial/
ENTER
The menu list is displayed.
•For details on the setting items in each menu, see “Menu List” (vpage 15).
The menu list of the selected item is displayed.
The setting item is chosen.
•To continue to set other items, perform the operation in step 3 again.
•To return to the upper level menu from the menu item currently being set, press BACK.
After you finish all settings, press MENU.
The changed settings are saved, and DN-700C returns to the stopped status.
To cancel the settings, press 2.
The DN-700C has a function for saving menu settings to USB media. This function is useful for sharing
the same settings from one DN-700C on multiple DN-700C units.
Skip Back
Search Mode
Sets the search mode.
Auto Fade In
Sets fade in.
16
On: Performs repeat playback according to the “Play Mode” settings.
Off: Repeat playback is not performed.
Off: Does not function.
–48 dB: After a track has been selected, playback is cued at the point where the
volume level is less than –48 dB.
–42 dB: After a track has been selected, playback is cued at the point where the
volume level is less than –42 dB.
–36 dB: After a track has been selected, playback is cued at the point where the
volume level is less than –36 dB.
0.5 to 2 to 60 sec: Set the skip back time for a track that is currently being
played back to 0.5 second intervals between 0.5 and 10 seconds, or 5 second
intervals between 10 and 60 seconds.
Normal: Plays back audio in 2 x speed search, but does not play back audio at
faster playback speeds.
Silent: Audio is not played back during search.
Off: Does not function.
0.5 sec: Sets the volume to gradually increase every 0.5 seconds.
1.0 sec: Sets the volume to gradually increase every 1 seconds.
3.0 sec: Sets the volume to gradually increase every 3 seconds.
Information
nnSaving menu settings to USB memory
Stop: Playback stops in the current position.
Next: When playback is stopped, the next track is cued.
Recue: Playback stops and returns to the cue point.
Control function
5
Program
Sets programmed
playback.
Finish Mode
Sets the operation
when playback is
stopped.
Repeat
Sets repeat playback.
Auto Cue
Playback
4 Select the setting item that you want to change, and press the jog dial.
File and folder
settings
3
Play Mode
Sets the track playback
mode.
Random
Sets random playback.
Rotate the jog dial to select the setting item that you want to change, and press the
jog dial.
NOTE
“All” is only valid during CD, USB device or iPod playback. During NET playback,
even if you select “All”, the setting switches to “Folder”.
Continuous: Plays back all tracks on a CD, or all tracks within the selected
folder of the playback media continuously.
Single: Plays back only 1 track.
On: Random playback starts after the media/folder is selected, or when
playback of the current track has finished.
Off: Random playback is not performed.
On: Plays back tracks in the set order (programmed playback).
Off: Programmed playback is not performed.
Setting Defaults
Play Range
Sets the track playback
range.
The power of DN-700C is switched ON, and the display screen lights.
Connections
1 Press ON/STANDBY.
2 While DN-700C is stopped, press MENU.
Setting Details (Items in bold are factory default)
Momentary: Shift mode can be operated while push holding the shift button.
Lock: Shift button is lighting when shift button push, and transition to shift
mode.
Stop: A track is not played back when the power is switched on.
Resume Play: Start playback from the track that was played last by the previous
operation.
Play First: Start playback at track #1 of the last folder that you played back
during the previous operation.
All: Plays back all of of the tracks in all folders.
Folder: Plays back all of of the tracks in the selected folder.
Part names
and functions
ON/STANDBY
Item
Shift Mode
Sets operations for the
SHIFT button.
Power On
Sets the operation
when the DN-700C
power is switched on.
Getting started
Setting Defaults
Item
Auto Fade Out
Sets fade out.
Information
Screen Saver
Sets the screen saver
operation.
Control function
LED Dimmer
Sets the LED
brightness.
Playback
Dimmer
Enables/disables the
“Display Dimmer”
and “LED Dimmer”
settings.
Display Dimmer
Sets the brightness of
the display.
File and folder
settings
Master Key
Default
Play: Plays back while the FADER START pin of the parallel remote is closed.
Play-Pause: Plays back while the FADER START pin is closed, and pauses
when this pin is opened.
Play-Next: Plays back while the FADER START pin is closed, and jumps to the
next track when this pin is opened.
Play&Lock: Plays back while the FADER START pin is closed, and locks the
keys of the unit.
Play&Lock-Pause: Plays back when the FADER START pin closes, and locks
the keys of the unit. Playback pauses when this pin opens.
Play&Lock-Next: Plays back when the FADER START pin closes, and locks the
keys of the unit. Playback jumps to the next track when this pin opens.
Hot Start: Sets the Hot Start mode.
Hot Cue: Sets the Hot Cue mode (Playback is not performed by Hot Start).
Resets all of the preset settings to the defaults.
Setting Defaults
Next Trk Reserve
Para Rem Mode
Setting Details (Items in bold are factory default)
Track: Displays the remaining time for each track.
Total: Displays the remaining time for all playback target tracks (CDDA only).
Connections
End Of Message
Sets how the EOM
display lights in the
display.
Item
Remain Time Mode
Sets the remaining
time display.
Fader Start
Sets the operations
when parallel remote
is used.
Part names
and functions
Start Delay
Sets the playback start
timing.
Setting Details (Items in bold are factory default)
Off: Does not function.
0.5 sec: Sets the volume to gradually decrease every 0.5 seconds.
1.0 sec: Sets the volume to gradually decrease every 1 seconds.
3.0 sec: Sets the volume to gradually decrease every 3 seconds.
Off: Does not function. (Playback starts immediately).
100 ms: Playback starts after a 0.1 second gap.
200 ms: Playback starts after a 0.2 second gap.
300 ms: Playback starts after a 0.3 second gap.
Off: Does not function.
0 sec: The playback time flashes and the EOM display lights for 0.5 seconds
after the track finishes.
5 sec:The playback time flashes and EOM display lights from 5 seconds before
the track finishes.
10 sec:The playback time flashes and EOM display lights from 10 seconds
before the track finishes.
15 sec:The playback time flashes and EOM display lights from 15 seconds
before the track finishes.
20 sec:The playback time flashes and EOM display lights from 20 seconds
before the track finishes.
30 sec:The playback time flashes and EOM display lights from 30 seconds
before the track finishes.
60 sec:The playback time flashes and EOM display lights from 60 seconds
before the track finishes.
Off: Plays back the selected track immediately after the current track finishes.
On: When a track is selected, the selected track number is reserved until
playback of the track stops.
Off: Disables the master key for the pitch control function.
On: Enables the master key for the pitch control function.
Off/On
Getting started
Setting Defaults
100 %: Normal brightness.
75 %: 75 % of the normal brightness.
50 %: 50 % of the normal brightness.
25 %: 25 % of the normal brightness.
0 %: Off in the standby status, and 25 % of the normal brightness during
operation.
100 %: Normal brightness.
75 %: 75 % of the normal brightness.
50 %: 50 % of the normal brightness.
25 %: 25 % of the normal brightness.
Off: Does not function.
On: The screen saver starts when there are no operations for 30 minutes.
17
Getting started
Setting Defaults
nnSystem Setting
Item
Output Rate
Ref (XLR/RCA)
Serial Protocol
Subnet Maskz
DNS Serverz
Network Standby
Password
Default
Information
Gatewayz
Control function
Machine Namez
IP Addressz
Playback
Serial Bit Rate
File and folder
settings
Trim L
Trim R
Display Contrast
IR Remote
Setting Defaults
Volume Output
Connections
Auto Sleep
Sleep is stopping the
CD reading.
Setting Details (Items in bold are factory default)
Off: Channel output based on the input source.
On: Forced monaural output.
Auto: Audio output based on the rate of the input media or file.
44.1 k: Audio output at 44.1 kHz.
48 k: Audio output at 48 kHz.
Off: Does not function.
30 sec: Switches to sleep mode if there are no operations for 30 seconds.
10 min: Switches to sleep mode if there are no operations for 10 minutes.
20 min: Switches to sleep mode if there are no operations for 20 minutes.
30 min: Switches to sleep mode if there are no operations for 30 minutes.
Fixed (0 dB): Output audio control is fixed at 0 dB.
Variable: Output audio control is variable.
+24 dBu/+10 dBV: XLR=+24 dBu / RCA=+10 dBV
+20 dBu/+6 dBV: XLR=+20 dBu / RCA=+6 dBV
+18 dBu/+4 dBV: XLR=+18 dBu / RCA=+4 dBV
+6 dBV/+6 dBV: XLR=+6 dBV / RCA=+6 dBV
+2.0 dB - –2.0 dB: Adjusts the left channel in 0.1 dB steps. Initial value is “0 dB”.
+2.0 dB - –2.0 dB: Adjusts the right channel in 0.1 dB steps. Initial value is “0 dB”.
1 to 10: 1 is the darkest, 10 is the brightest. Initial value is “5”.
On: Receives IR remote commands.
Off: Does not receive IR remote commands.
9600: 9600 bps
38400: 38400 bps
MIDI: Conforms to MIDI controls.
RC: Conforms to D&M RC protocol.
DN-700C: Displays the UPnP device name. (Maximum 12 characters)
Auto: DHCP is assigned automatically.
Static: Specify a fixed IP address. When selected, the fixed address is displayed.
None: The IP address is not displayed and cannot be configured when “IP
Address” is set to “Auto”.
Static: 0.0.0.0 - 255.255.255.255
None: The IP address is not displayed and cannot be configured when “IP
Address” is set to “Auto”.
Static: 0.0.0.0 - 255.255.255.255
None: The IP address is not displayed and cannot be configured when “IP
Address” is set to “Auto”.
Static: 0.0.0.0 - 255.255.255.255
Off: Only Front Sub u-Con operates (low power operation).
On: The display section and LEDs of the DN-700C are off, but power is supplied.
****: Sets a password (6 to 12 characters) for system settings and using the
web. Displayed as “****” when set.
Default value is “NULL”.
Resets all of the system settings to the defaults.
Part names
and functions
Mono
zzRestart the DN-700C after changing this setting.
18
nnSave Setting
Menu Operations (Utility)
MENU
2
BACK
The power of DN-700C is switched ON, and the display screen lights.
The menu list is displayed.
nnLoad Setting
Reads the setting file stored in the root of the USB media device and changes the DN-700C's settings
1
2 While DN-700C is stopped, press MENU.
3 Rotate the jog dial to select “06 Utility”, and press the jog dial.
4 Rotate the jog dial to select “01 Load Setting”, and press the jog dial.
5 Select “OK” and press the jog dial.
The power of DN-700C is switched ON, and the display screen lights.
The file (DN-700C.ini) is written to the root of the USB memory stick.
The menu list is displayed.
Setting Defaults
A pop up is displayed.
Press ON/STANDBY.
Connections
1 Press ON/STANDBY.
2 While DN-700C is stopped, press MENU.
3 Rotate the jog dial to select “06 Utility”, and press the jog dial.
4 Rotate the jog dial to select “02 Save setting”, and press the jog dial.
5 Select “OK” and press the jog dial.
Jog Dial/
ENTER
Part names
and functions
ON/STANDBY
The current settings are saved to the root of the USB media device
Getting started
Setting Defaults
File and folder
settings
A pop up is displayed.
Playback
The file (DN-700C.ini) saved in the USB media device is read, and the DN-700C settings are changed.
Control function
Information
19
The power of DN-700C is switched ON, and the display screen lights.
The power of DN-700C is switched ON, and the display screen lights.
The menu list is displayed.
The menu list is displayed.
A pop up message is displayed.
Displays the firmware version of the DN-700C.
•Press either the Back or STOP button to return.
The media is formatted.
•Press either the Back or STOP button and selected Cancel to return.
nnNetwork Status
File and folder
settings
Displays network setting information.
Setting Defaults
1
2 While DN-700C is stopped, press MENU.
3 Rotate the jog dial to select “06 Utility”, and press the jog dial.
4 Rotate the jog dial to select “03 Firmware Version”, and press the jog dial.
1 Press ON/STANDBY.
2 While DN-700C is stopped, press MENU.
3 Rotate the jog dial to select “06 Utility”, and press the jog dial.
4 Rotate the jog dial to select “05 Format Media”, and press the jog dial.
5 Select “OK” and press the jog dial.
Press ON/STANDBY.
Connections
nnFormat Media
Displays the firmware version of the DN-700C.
Part names
and functions
nnFirmware Version
Getting started
Setting Defaults
1 Press ON/STANDBY.
2 While DN-700C is stopped, press MENU.
3 Rotate the jog dial to select “06 Utility”, and press the jog dial.
4 Rotate the jog dial to select “04 Network Status”, and press the jog dial.
The power of DN-700C is switched ON, and the display screen lights.
Playback
The menu list is displayed.
Control function
Network setting information (IP address, MAC address, Netmask, Gateway, DNS) is displayed.
•Press either the Back or STOP button to return.
Information
20
Getting started
File and folder settings
You can select files and check file information.
SHIFT
MEDIA
2
BACK
Jog Dial/
ENTER
Select copy targets (Select)
Select “Select” and press the jog dial.
the MEDIA while holding down SHIFT when
1 Press
the playback screen is displayed, or select “File List”
Displays the “File List”.
Explanation
Prepares to playback the selected track.
Preview
Preview the selected Track
Select
Selects the file.
Select All
Selects all files in the list.
Copy
Copies selected files.
Property
Displays information of the selected track.
Selecting all files for copying (Select All)
This function is used to select all files to be copied. Select or unselect
all of the files in the displayed file list.
Select “Select All” and press the jog dial.
The display returns to the “File List”. All of the files are selected and
a check mark is added to the front of the file name.
•If all files were in the selected state, they change to unselected.
The selected state is cleared when the folder is changed.
The “File List Menu” is displayed.
Information
Set Cuurent Track
Preview
Select
Select All
Copy
Control function
the file or folder that you want to operate, and
2 Select
press the jog dial.
01
02
03
04
05
The selected state is cleared when the folder is changed.
Playback
Current Folder
02
---< Up One Level >
Lower Folder
---0001
BGM.MP3
Music.WAV
Display
Set Current Track
File and folder
settings
from the menu screen.
nnFile List Menu List
Setting Defaults
nnDisplaying the File List Menu
Close the file menu and return to the file list. The file under the
cursor is selected and a check mark is added to the front of the file
name.
•If the file is in the selected state, it changes to unselected.
Connections
This is used when you want to select multiple items to copy.
Part names
and functions
File List Menu
•Press BACK when the “File List Menu” is displayed to return to
the previous screen.
21
Track Information Display (Property)
Files selected with “Select” or “Select All” are copied.
•If the selected copy source is CD-DA, WAV files are created in the
copy destination (ripping function).
Displays information of the currently selected track.
Part names
and functions
Copying files (Copy)
Getting started
File List Menu
1 Select “Copy” and press the jog dial.
2 Locate the copy destination folder using the jog dial.
the copy destination folder and press the jog
3 Select
dial.
The “Media List” is displayed.
Connections
Setting Defaults
The “File List Menu” is displayed.
•To change the media of the copy destination, select “Change
Media” from the “File List Menu” and press the jog dial.
•Media that cannot be written to (including iPod, NET, CD) cannot
be selected.
File and folder
settings
4 Select “Execute” and press the jog dial.
Copying of the selected track starts.
Playback
•During copying, a pop up screen shows the copying progress as a
percentage.
•Press the jog dial during copying to cancel the process.
•Files that have already been copied are not deleted.
•When copying is completed, “Completed” appears in the display.
Control function
Information
22
Media Server List
Media servers or PCs on the same network that the DN-700C is connected to that can be played back are
displayed.
MEDIA
BACK
Jog Dial/
nnMedia Server List Display
ENTER
Set the media that you want to playback to “NET” to display it in the “Media Server List”.
nnDisplaying the media list
Select the media server or PC that you want to playback and press the jog dial.
The media list is displayed.
For details on how to select files, see “File List Menu” (vpage 21).
NOTE
When Media Server playback, Play range setting switch to "Folder" automatically.
•Press BACK when the media list is displayed to return to the previous screen.
•“(None)” is displayed after the media name for media that is not ready to playback.
File and folder
settings
Media List
CD
USB(None)
iPod/iPhone
NET
Setting Defaults
1 While DN-700C is stopped, press MEDIA.
Connections
Media Server List
HDD RECORDER 01
NAS_01
PC01
PC02
Part names
and functions
2
Getting started
Media List
Media that can be selected are displayed in a list.
Playback
2 Select the media to change using the jog dial.
Control function
Information
23
ON/STANDBY
MEDIA
The power of DN-700C is switched ON, and the display screen
lights.
Playback
Rotate the jog dial to select the file that you want to
playback, and press 1.
1 lights and playback starts.
nnTo pause playback
Press 3 during playback.
•Playback is paused, and 3 lights.
•Press 1 again to restart playback.
While DN-700C is stopped, press MEDIA.
The media list is displayed.
Media List
CD
USB(None)
iPod/iPhone
NET
nnTo return to the playback start position
Press CUE during playback.
•Playback switches to cue standby at the playback start position.
File and folder
settings
2
1
Setting Defaults
1 Press ON/STANDBY.
3
Press 2.
•Playback stops, 1 goes out and CUE lights.
•The playback position is moved to the playback start position set
for “Finish Mode” in the preset menu, and playback stops.
•The stop position can be changed in the “Finish Mode” settings
as shown below.
When Stop is set :
Playback is stopped at the beginning of the
track.
When Next is set :
Playback is stopped at the beginning of the
next file.
When Recue is set :
Playback is stopped at the point where
playback was previously started.
Connections
Selecting the media to playback
CUE
nnTo stop playback
Part names
and functions
2
Jog Dial / ENTER
Getting started
Playback
Playback
the jog dial to select the media that you want
3 Rotate
to play back, and press the jog dial.
Press 3
Press 1 button button
•To change the playback folder, press the LIST button on the remote
control or select “File List” in the menu (vpage 21).
Press CUE
button
During
playback
Cue search operation
24
Disc position
Information
During
playback
Press 1 button
Control function
•For details on the media list display contents, see “Displaying the
media list” (vpage 23).
SHIFT
MENU A-B
SINGLE/
CONT.
MEDIA
FRAME 6
Jog Dial/
ENTER
7
A-B Repeat Playback (A-B Repeat)
Set the repeat start point (A point).
HOT 1 - 5
Track switching (8, 9)
PITCH +/–
Set the repeat end point (B point), and repeat playback
continues between A and B points.
NOTE
•Rotate in the clockwise direction to switch to the next track.
•Rotate in the counterclockwise direction to switch to the start of
the current track or previous tracks.
Press 7 or 6 during playback.
CD-DA Track
×2
Once
×2
Twice
×10
×5
3 times
×50
×10
4 times
×100
×20
5 times
×200
×50
FRAME lights and sound output is paused.
•Press 7 to move 1 frame in the forward direction.
•Press 6 to move 1 frame in the reverse direction.
Rotate the jog dial counterclockwise during playback.
Playback returns to the track start position, and playback starts again.
Rotating the jog dial within 1 second of the beginning of the track
moves back to the previous track.
Control function
Music file
1
2 Press 7 or 6 while sound output is paused.
Press FRAME.
nnReturn to the start position of a track during
playback
Playback
•Press 7 for fast forward playback.
•Press 6 for fast rewind playback.
•The operation switches as shown below depending on how many
times the button is pressed.
Jumping by frames (Frame jump)
3 Press A-B again to exit repeat playback.
File and folder
settings
Fast forward and fast rewind (Search)
•Search cannot be performed on files that are recorded using VBR.
•If a VBR file is found during the search process, the search ends at
the VBR file.
•No operations including search can be performed for 0.2 seconds
from the start of Hot Start playback.
Setting Defaults
Rotate the jog dial during playback or while stopped.
No. of times button is
pressed
PITCH
2
Connections
1 Press A-B during playback.
2 Press A-B to set the repeat end point.
Part names
and functions
Repeat playback is performed between the set A and B point during
playback.
Getting started
Operations during playback
1 frame is 1/75 seconds.
Information
•Sound is not output at speeds above 2x.
•When fast forward search is used to the end of the last file, or when
fast rewind search is used to the start of the first file, the file pauses.
25
Playback pitch adjustment (Pitch control)
A pop up is displayed and the pitch adjustment is enabled.
2 SHIFT.
Press PITCH + or PITCH – while holding down
The icon on the screen changes.
CNT: Continuous playback
SGL: Single track playback
GOperations on the remote controlH
Press the VOL + or – button.
Direct jump
GOperations on the UnitH
1 Press TRK NO.
2 Rotate the jog dial to select a track number.
A pop up is displayed.
In 1 second, playback moves to the selected track.
•To select a number from the 10th and subsequent tracks, select
the first digit -> press the jog dial -> select the second digit.
E.g. Playing back track 12
qPress the number button 1.
wPress the number button 2
within one second.
+12.3%
123:45;67
m p le12345678.MP3
LE:SONG0123
ARTIST: SINGER
The track is rewound for the set amount of time from the current
playback position during playback or pause from an operation on an
external remote (parallel, RS-232C).
The skip back time setting is set in “Skip Back” in the “Preset
Settings” (vpage 16).
GParallel ControlH
When the parallel input normal mode is set, press the
skip back switch on the connected device.
For details, see “Parallel Control” (vpage 54).
GRS-232C ControlH
RCU
ACU
EOM
44K
232
Send a skip back command.
For details, refer to “RS-232C control” (vpage 48)
26
Information
PITCH
OFF M
Rewind a specified amount of time and
playback (Skip back)
Control function
GOperations on the remote controlH
While stopped, press the number buttons on the remote control (0
to 9) to jump directly to the track you want to hear.
To select the 10th and subsequent tracks, push the number buttons
in the order of 10 digit -> 1 digit.
Master Key Mark
012:34;56
Hold down the SHIFT button and rotate the jog dial.
Playback
When the playback speed is adjusted using the pitch control, the
musical interval changes according to the playback speed. With the
Master Key function on, you can play back music without changing
the musical interval even when you change the pitch.
•The Master Key setting is performed in“Master Key”
(vpage 17) in the preset menu.
•If “Master Key” in the menu is set to “On”, the master key mark
appears in the display when the pitch is adjusted.
Press SINGLE/CONT. during playback or while stopped.
File and folder
settings
nnChanging the playback speed without changing
the musical interval
(Master Key)
GOperations on the UnitH
Setting Defaults
•The pitch changes by 0.1 % each time the button is pressed.
•Press and hold the button to change the pitch continuously.
•To cancel the pitch control, press PITCH again while holding down
the SHIFT button.
Select whether to playback one track or to playback continuously.
Changes the output level of both analog and digital outputs.
Connections
Press PITCH while holding down SHIFT during
1 playback
or when stopped.
Changing the output level
Part names
and functions
The playback speed can be adjusted within a range of –16 % to +16
%.
By adjusting the pitch, you can listen to recordings over a shorter time
span, or listen more slowly.
Single playback or continuous playback
(Single/Cont.)
Getting started
Operations during playback
Playback in the preferred order
(Program playback)
“Program List” is displayed.
•Files are not displayed if no program has been set.
The “Program List Menu” is displayed.
•Press 2 to cancel the operation and return to the playback screen.
Tracks are played back in the selected order.
•This function can also be turned ON/OFF using the PROGRAM
button on the remote control.
The selected file is deleted from the program.
You can use the HOT1 to 5 buttons on the DN-700C panel for hot start
playback.
qHot List
Displays the tracks currently registered to Hot Start.
1 Select “Hot List” from the menu.
01
02
03
04
“Hot List” is displayed.
•If there are no tracks registered to HOT1 to 5, tracks are not
displayed.
2 Press the jog dial.
3 Register tracks.
The “Hot List Menu” is displayed.
Hot List
BGM01.MP3
BGM02.MP3
Music01.WAV
Music02.WAV
wHot List Menu
The Hot List Menu contains the following items.
Select “Set”, “Auto mapping” or “Load”. When “Set” is
selected, continue to select tracks.
Item
Explanation
Preview
Preview the selected track or file.
Auto Mapping
The first 20 tracks are automatically
assigned from the currently
selected folder.
Set
Registers the track or file in the Hot
List.
•Press 2 to cancel the operation and return to the playback screen.
Remove
Press Hot 1 to 5 and the hot start button on the
6 external
remote control.
Removes tracks and files from the
Hot List.
Remove All
Removes all tracks and files from
the Hot List.
Load
Reads hot lists from a device such
as a USB memory stick.
Save
Saves the hot lists set to a USB
memory stick.
4
5 Press MENU to exit the “Hot List”.
Select “Execute” and register files to the “Hot List”.
The track registered to the selected number is played back.
•Only tracks on the CD and USB can be registered to the program.
Files on an iPod or network cannot be registered to the program.
•A maximum of 99 tracks can be registered to a program.
27
Information
1
2 Select “Remove” from the “Program List Menu”.
Select the track that you want to edit from the
“Program List” display.
Playing back from track hot points
(Hot Start playback)
Control function
nnEditing registered programs
The track is registered to the entered number.
•If the track is registered in the paused or cued state, information
from that playback position is registered.
Playback
6
Set “Program” in the preset menu to “On”.
the hot list number that you want to register
2 Enter
and press the jog dial.
File and folder
settings
4
5 Press MENU to exit the “Program List Menu”.
Select “Execute” and register files to the “Program
List”.
“Input Hot No xx” is displayed.
Setting Defaults
The “File List” is displayed.
Confirm the settings.
a track is stopped or paused, press the HOT
1 When
SET button while holding down the SHIFT button.
Connections
2 Press the jog dial.
“Insert” and select the file you want to
3 Select
program.
1 Set “Program” in the preset menu to “Off”.
2 Press MENU.
Registering a selected track to the Hot list
Part names
and functions
1
Select “Program List” from the menu.
nnCanceling program playback
Getting started
Operations during playback
ON/STANDBY
6, 7
MEDIA
ENTER/8, 7
NOTE
-
8, 9
Playback from start of
track/Playback from
next track
1
13
Playback start
3
13
Pause
6, 7
8, 9
(Press and
hold)
Fast forward/Fast
rewind
-
uio p
Click
wheel
Stop playback
Move cursor (up/
down)
BACK
MENU
Display menu, display
previous screen again
ENTER
Select
Enter item, playback
track
REPEAT
-
Switch repeat
playback function
RANDOM
-
Switch random
playback function
Information
iPod playback
Control function
The Random, Repeat and Single/Cont. settings for the DN-700C are
not applied to the iPod. iPod setting status is applied.
Playback
2
File and folder
settings
•D&M will accept no responsibility whatsoever for any loss of iPod
data.
•Depending on the type of iPod and the software version, some
functions may not operate.
•This unit does not support playback on an iPad. Do not connect an
iPad to the unit.
•When connecting an iPhone to this unit, keep the iPhone at least 20
cm away from this unit. If the iPhone is kept closer to this unit and a
telephone call is received by the iPhone, noise may be output from
this device.
•If the iPod is connected using an iPod cable (commercially available)
that is longer than 2 m (6.6 ft), sound may not be played correctly.
In this case, use a genuine iPod cable, or a cable that is shorter than
1 m (3.3 ft).
•If the size of the image registered to the music file as album artwork
is larger than 500 x 500 pixel, the music file cannot be played
correctly. In this case, delete the album artwork from iTunes.
•When playing back from an iPod or iPhone, the headphone output
is muted.
DN-700C Operation
Setting Defaults
“Made for iPod” and “Made for iPhone” mean that an electronic
accessory has been designed to connect specifically to iPod or iPhone,
respectively, and has been certified by the developer to meet Apple
performance standards.
Apple is not responsible for the operation of this device or its
compliance with safety and regulatory standards. Please note that
the use of this accessory with iPod or iPhone may affect wireless
performance.
iPhone, iPod, iPod classic, iPod nano, iPod shuffle, and iPod touch are
trademarks of Apple Inc., registered in the U.S. and other countries.
•The iPod may only be used to copy or play contents that are not
copyrighted or contents for which copying or playback is legally
permitted for your private use as an individual. Be sure to comply
with applicable copyright laws.
1
iPod
button
Connections
You can listen to music from an iPod using the DN-700C.
You can also control the iPod using the DN-700C or the remote control.
•For details on compatible iPod models, see “Compatible iPod/iPhone
models” (vpage 29).
3
Remote
control
button
Part names
and functions
2
nnTable of corresponding remote control and iPod
buttons
Getting started
iPod® playback
1 Connect the iPod to the DN-700C.
For details on how to connect it, see “Connecting a USB
device or iPod” (vpage 14).
2 Select “iPod/iPhone” from the “Media List”.
“Remote iPod/iPhone” appears in the display.
Remote iPod/iPhone
28
Getting started
iPod® Playback
nnCompatible iPod/iPhone models
•iPod classic
Part names
and functions
Connections
•iPod nano
Setting Defaults
File and folder
settings
•iPod touch
Playback
Control function
•iPhone
Information
29
Required system
•Use only a shielded STP or ScTP LAN cable which is available at retailer.
•The normal shielded-type Ethernet cable is recommended. If a flat-type cable or unshielded-type cable
is used, other devices could be affected by noise.
Network settings need to be configured after the network (LAN) is connected. For details, see “Network
Settings” (vpage 31).
Media server, NAS
(Network Attached Storage)
•When using this unit connected to a network with no DHCP function, make the settings for the IP
address, etc., at “System Setting” (vpage 18).
•When setting manually, check the setting contents with the network administrator.
Modem
NOTE
DENON assumes no responsibility whatsoever for any communication errors or troubles resulting from
customer’s network environment or connected devices.
To WAN
File and folder
settings
To LAN side port
To LAN side port
LAN port/
Ethernet
terminal
Setting Defaults
Internet
Connections
Computer
Part names
and functions
nnEthernet cable (CAT-5 or greater recommended)
•Streaming playback of tracks from a media server on the network
•Control of the DN-700C via the network
Getting started
Connecting to a network (LAN)
You can connect this unit to your network (LAN) to perform various types of playbacks and operations as
follows. Make network connections for this unit by carefully reading information on this page.
LAN port/Ethernet
terminal
Playback
Router
Control function
Information
30
LAN Connection
The screen returns to the “System Setting” screen.
NOTE
The DN-700C restarts automatically, and a pop up appears.
1 Connect the Ethernet cable.
2 Turn the DN-700C power on.
3 Press MENU.
4 Select “System Setting”.
5 Set the “IP Address” to “Static”.
(vpage 30 “Connecting to a network (LAN)”)
Setting Defaults
10 Select “OK” and press the jog dial.
nnNetwork connection (DHCP=Off)
Connections
When configuring the network settings manually, contact your network administrator for the necessary
setting details.
Part names
and functions
7 Press the jog dial when you have finished entering the numbers.
the same way, enter the “Subnet Mask”, “Gateway” and “DNS Server”
8 Inaddresses.
the “IP Address”, “Subnet Mask”, “Gateway” and “DNS Server” settings
9 When
are complete, press the MENU button.
When connected to a network that has a DHCP function, settings for the DN-700C such as the IP address
are configured automatically. When connected to a network that does not have a DHCP function, you need
to configure settings such as the IP address and DNS server in “System Setting” (vpage 18) in the
menu.
Getting started
Network Settings
(vpage 16 “Setting Defaults”)
File and folder
settings
Playback
The currently set IP Address is displayed.
Specify the appropriate IP address for your network.
Control function
6 Enter the address using the jog dial and 6/7.
•Press FRAME to delete the previously entered number. Press BACK to cancel the settings.
Information
31
The installer will install Product Manager to the following folder.
To install in this folder, click “Next” .To install to a different folder, enter it below or click “Browse”.
Folder:
C:¥Program Files¥Denon and Marantz Professional¥Product
NETWORK CD/MEDIA PLAYER
Instruction Manuals
Browse...
Disk Cost...
Product Manager
ENGLISH
Install Product Manager for yourself. or for anyone who uses this computer:
INSTALLER
Everyone
FRANÇAIS
Just me
ESPAÑOL
DEUTSCH
ITALIANO
Cancel
SVENSKA
< Back
Next >
•If a folder is not specified, the software will be installed in “C:XXXX”.
Please take a moment to read the license agreement now. if you accept the terms below, click “l
Agree”, then “Next”, Otherwise click “Cancel”.
SOFTWARE LICENSE AGREEMENT
Product Manager
The installer will guide you through the steps required to install Product Manager on your computer.
NOTICE TO USER: Please read this Agreement carefully. By installing and
using all or any portion of the software(“Software”)supplied by D&M Holdings
Inc(“D&M”), you accept all the terms and conditions of this Agreement. You
agree that this agreement is enforceable like any written negotiated agreement
signed by you. This Agreement is enforceable against you and person or
legal entity that obtained the software and on whose behalf it is used. If you do
not agree, do not install or use this Software.
I Do Not Agree
I Agree
Cancel
< Back
Next >
Information
WARNING: This computer program is protected by copyright law and international treaties.
Unauthorized duplication or distribution of this program, or any portion of it, may result in severe civil
or criminal penalties,and will be prosecuted to the maximum extent possible under the law.
Cancel
32
< Back
Next >
Control function
Welcome to the Product Manager Setup Wizard
Playback
through the displayed cautions, and click
3 Read
“Next”.
Product Manager
License Agreement
File and folder
settings
•If the installation screen is not displayed, open the disc drive in “My
Computer”, open the “Installer” folder and double-click “SETUP.
EXE”.
through the contents of the user license
5 Read
agreement, select “I Agree” and click “Next”.
Setting Defaults
GCompatible Web BrowsersH
•Microsoft Internet Explorer Ver.9 or later (Windows)
•Google Chrome 21 for Windows or later (Windows)
•Mac OS Safari 5 or late
The installation screen is displayed.
Product Manager
Select Installation Folder
Connections
GCompatible Operating Systems H
•Microsoft Windows (Windows XP SP3 or later)
•Mac OS X (OS 10.7 or later)
1 Insert the provided CD-ROM into the PC disc drive.
2 Click “Product Manager Install”.
the installation folder, select “Everyone” or
4 Specify
“Just me” and click “Next”.
Part names
and functions
GMain Functions H
1.Searches the network for DENON products that can be controlled.
2.When the icon or product information of the target product is clicked,
the web browser opens and connects to the target product.
Installation of Product Manager
Getting started
Other Functions (Product Manager)
Denon Professional Product Manager (hereinafter Product Manager)
is an application that allows you to control DENON products from a
PC or MAC.
v See overleaf
6
Product Manager Window
Click “Next”.
Installation starts.
Installing Product Manager
File(F)
Edit(E)
View(V)
All ON
Product Manager is being installed.
Help(H)
All OFF
Please wait...
❶
❷
< Back
Next >
7 Click “Close” when the installation is completed.
STOP
❹
Click here to access interface
Properties
OFF
The installation window closes.
t
Installation Complete
y
Click “Close” to exit.
STOP
Playback
DN-700C
DN-700C_PLAYER-2
192.168.0.3
CD
Click here to access interface
Properties
< Back
OFF
Control function
Cancel
File and folder
settings
Product Manager
Product Manager has been successfully installed.
Setting Defaults
Cancel
DN-700C
DN-700C_PLAYER-1
192.168.0.2
NET
Connections
e
The power can be switched ON/OFF for connected devices in the
specified group units.
eProduct Information Display
Displays the network name, IP address, power status and currently
selected source.
❹Transport Status Icon
Displayed when the power of the connected device is ON.
tIndividual power ON/OFF button
The power can be switched ON/OFF individually for connected
devices.
yProperties Button
The window for configuring power control groups and batch power
ON/OFF function settings is displayed.
Part names
and functions
❶File menu, Edit menu, View menu, Help menu
❷Batch power ON/OFF button
DENON Professional-...
Product Manager
Getting started
Other Functions (Product Manager)
Close
Information
33
Operations
nnPassword Settings
Please Setup Passwords
Quits the application.
Setup power
sequence
Sets the timing between groups for the
Power ON/OFF sequence group.
Open the setting window to configure the
settings.
Setup Password
The password setup screen appears and
passwords can be setup.
Updates the Device List and Window
display.
Browser
Displays the web browser at the side of the
Product Manager main window. The Control
Screen (Web remote) is displayed when a
DENON product is selected in the Product
Manager window.
Input NEW password
Re-Input NEW password
Version
Cancel
nnPassword Input
Power ON Group no.
q
Power OFF Group no.
w
Ignore All OFF
Yes
OK
No
e
Cancel
r
Setting window
The batch power ON and batch power OFF settings can be grouped,
and intervals between the groups specified.
Select Menu - setup to open a different window for configuring
settings.
Power Sequence
Power ON sequence
Group1
Power OFF sequence
Group1
1.2 sec
5.6 sec
GPassword Entry ScreenH
7.8 sec
3.4 sec
Password
Group3
OK
34
r
Group3
Cancel
Information
Cancel
e
Group2
Group2
Control function
Please Setup Passwords
q
w
Playback
When a password has been set, a password entry screen is
displayed on the second and subsequent times the software is
launched.
OK
File and folder
settings
OK
The version of this application is displayed.
D&M Pro Control
Version a.b.c.ddddd
Copyright D&M Holdings Inc.
Properties
Setting Defaults
Refresh
•Click the Properties button to display the window below and
configure power control settings.
Connections
GPassword Setting ScreenH
Description
Quit
Part names
and functions
The first time Product Manager is launched, the password setup
screen is displayed.
•Alphabetic characters (large and small case), numbers, hyphen
and under bar can be used in the password.
•Set a password that is between 6 to 12 characters in length.
•Use “Setup Password” in the menu to reset passwords.
Menu Item
Getting started
Other Functions (Product Manager)
Properties Window
Getting started
Control Function
nnMain Frame Screen
This is the first screen displayed when Web Remote is launched.
q
w
e
r
t y
u
Machine Name
DN-700C
OPERATION
SETTINGS
CONTROL
PROGRAM
HOT START
PRESET
OTHERS
UTILITY
SYSTEM
1
2 Click “GO”.
Enter the password in the “Password” text box.
Setting Defaults
Launch the application and enter the password in the password screen to proceed to Web Remote. The
password screen is displayed if a password is set in the preset menu. If a password is not set in the
preset menu, the screen proceeds directly to the control screen.
•Alphabetic characters (large and small case), numbers and symbols can be used in the password.
•The password is between 6 to 12 characters in length.
Connections
nnPassword Screen
Part names
and functions
Web Remote
The DN-700C is compatible with web browser applications. You can use the “Web Remote” application to
control and configure settings for the DN-700C from your computer.
To connect to the DN-700C via web remote, launch a web browser and type the IP address of the DN-700C
in the address bar. Example: http://192.168.0.1.
File and folder
settings
DN-700C
DN-700C
eScreen Tab List
This is the screen list. Click the screen that you want to see to open it.
rTime Information Display
35
Information
Displays the current time originating from the device.
This is not displayed because the DN-700C does not have a clock function.
tMain Screen
yModel Name
uBrowser Layout Button
You can switch between a simplified screen for use with Android or iOS and the full screen for use on
a computer.
Control function
Unique name set in the “Network Setting” screen.
GO
Playback
qDENON Professional Logo
wMachine Name
Please enter password
Control screen (CONTROL) (Full Size)
qTrack List
The DN-700C play list. The file name and size of MP3 and WAV data is displayed.
Q1 Q0
o
wPanel Lock button
All buttons are locked other than Power, Lock and Shift.
eAdjust the pitch and volume
rDOWNLOAD button
Downloads the selected file to the computer.
i
DN-700C
OPERATION
SETTINGS
The file selected in the track list is loaded in the DN-700C.
OTHERS
iTransport controls
oTime and operating status display
CONTROL
Elapsed Time
PROGRAM PANGLLOCK
L
60
R
40
20
12
6
0 0V
Information about time, track number, operating status and the volume level meter are displayed.
•Over(OV) is indicated when it reaches -1dB.
Q0Hide button
Hides items in the screen.
Q1Media select
CUE
dB
dB
Source CD
Track-01
Track-02
Track-03
Track-04
Track-05
Track-06
Track-07
Track-08
Track
Size(KB)
Pitch
ENTER
BACK
DOWNLOAD
PITCH
M.KEY
4dB
Control function
q
LOAD
Volume
0%
Panel Lock
Path
Playback
0/
0/
0/
0/
0/
0/
0/
0/
File and folder
settings
#
0001
0002
0003
0004
0005
0006
0007
0008
LOCK
w
e
Setting Defaults
Track-01
0001
000:00
Connections
DN-700C
tBACK button
yENTER button
uLOAD button
Part names
and functions
•Current track list is displayed. (Maximum number of files: 2000)
•The [Change Folder] button is disabled when CD-DA is used or the Play Range is ALL
•The time code display is updated every 0.1 to 0.3 seconds
•The Track List display periodically checks consistency with the DN-700C
Getting started
Web Remote
rt y u
Information
36
Program Screen (PROGRAM)
This is a simplified version of the full size control screen with fewer displays and operation items.
•Configure the program (List) settings (Maximum number of program files: 99)
•Changes can only be made when in the STOP mode.
•Files can be deleted and added to the program list
•Press the [Insert File] button to display the File List Screen and select tracks to insert.
•The files selected in [Insert File] is inserted one line above the selected line. (To insert a file last, select
the EOL line.)
q
w
DN-700C
DN-700C
MENU
Part names
and functions
Control screen (CONTROL) (Simple)
Getting started
Web Remote
CONTROL
t
Elapsed Time
PROGRAM PANGLLOCK
L
60
R
40
Connections
Track-01
0001
000:00
dB
20
12
6
0 0V
dB
Machine Name
OTHERS
PROGRAM
CUE
Program Mode
Source USB
#
DN-700C
SETTINGS
Setting Defaults
OPERATION
OFF
Program List
Track-01
Track-02
Track-03
Track-04
Track-05
Track
Size(KB)
0/
0/
0/
0/
0/
Path
INSERT FILE
File and folder
settings
#
0001
0002
0003
0004
0005
EOL
Track
REMOVE FILE
REMOVE ALL
CHANGE FOLDER
LOAD
Playback
Pitch
0
0
%
Volume
9
q
dB
w e r
qProgram playback track list
wREMOVE ALL button
LOCK
Removes all files in program.
qMENU button
eREMOVE FILE button
Switches to the selected screen.
Deletes the selected line.
wBrowser Layout Button
rINSERT FILE button
Switches between simplified and full screen layouts.
Switches to the file list. Files selected in the file list are inserted above the line selected in the program
playback track list.
tSelect program mode
37
Information
Panel Lock
8
Control function
M.KEY
PITCH
Hot Start Screen (HOT START)
Press the [MAPPING] button in the HOT START screen or the [INSERT FILE] button in the PROGRAM
screen to display the DN-700C file list and select files.
•Starts playback for Hot Start (Maximum number of registered files: 20)
•Press any of the buttons from [1] to [20] to start playback.
•The time code display is updated every 0.1 to 0.3 seconds
Machine Name
OPERATION
DN-700C
DN-700C
SETTINGS
DN-700C
OPERATION
OTHERS
SETTINGS
HOT START
FILE LIST
#
Track
0001 $$$$$$ 1.MP3
Size(KB)
PROGRAM PANGLLOCK
CHANGE FOLDER
60
Elapsed Time
L
40
R
0 0V
dB
2
3
4
5
11
12
13
14
15
6
7
8
9
10
16
17
18
19
20
Track
Size(KB)
0/
Track-02
0/
Track-03
Track-04
Track-05
0/
0/
0/
Path
AUTO MAPPING
MAPPING
REMOVE
e
r t y
Returns to the program screen. The selected file is added to the program playback track list in the
program screen or the Hot Start list in the Hot Start screen.
qTime Display
wHot Start Buttons
Cancels assignment of the selected Hot Start number.
tMAPPING button
Individually assigns a file to the number selected in the Hot Start list.
Press this button to display the file list and select a file you want to assign to Hot Start.
yAUTO MAPPING button
Automatically assigns up to 20 files to Hot Start from the top of the current file list.
38
Information
Playback of the track assigned to the button starts.
eHot Start track list
rREMOVE button
Control function
qw
Track-01
Playback
Switches to the folder list.
eSELECT FILE Button
6
File and folder
settings
qFile List
wCHANGE FOLDER Button
12
1
#
0001
0002
0003
0004
0005
0006
0007
0008
0009
0010
0011
w e
dB
20
Setting Defaults
q
0/
Path
SELECT FILE
Connections
Track-01
0001
000:01
File List
OTHERS
Part names
and functions
File list screen
Getting started
Web Remote
Preset Setting Screen (PRESET)
System Setting Screen (SYSTEM)
•Changes can only be made when in the STOP mode.
•For details on the setting items, see “Preset Settings” (vpage 16).
•Changes can only be made when in the STOP mode.
•For details on the setting items, see “System Setting” (vpage 18).
DN-700C
SETTINGS
DN-700C
DN-700C
OPERATION
OTHERS
PRESET
SETTINGS
OTHERS
SYSTEM
SAVE
CANCEL
SAVE
DEFAULT
Power On Stop
Play Range
All
Random Off
Skip Back 2.0sec
Program Off
Finish Mode
Output Rate Auto
Next
Search
Mode Normal
Auto Sleep Off
Auto Fade In Off
Start Delay 0ms
Auto Fade
Out Off
NETWORK
Master Key Off
Machine Name DN-700C
Network Standby Off
IP Address Auto
Remain
Time Mode Track
Led Dimmer 100%
Screen
Saver Off
MAC Address
00-05-CD-12-00-70
PASSWORD
REMOTE SETTINGS
End Of
Message Off
Serial Bit
Rate 9600
File and folder
settings
Display
Dimmer 100%
Serial
Protocol MIDI
IR Remote On
Display
Contrast 0%
DISPLAY SETTINGS
Dimmer Off
Trim L +0.0dB
Trim R +0.0dB
OTHER SETTINGS
Repeat Off
AUDIO SETTINGS
Auto Cue Off
Reference
(XLR/RCA) +6dBu/+6dBV
Volume
Output Variable
Mono Off
Next Track
Reveres Off
Setting Defaults
Play Mode Conitinuous
DEFAULT
Connections
Shift Mode Lock
CANCEL
AUDIO SETTINGS
OPERATION SETTINGS
Part names
and functions
DN-700C
OPERATION
Getting started
Web Remote
Access Password
Parallel
Remote Hot Start
Fader Start Play
CANCEL
Re-enter
DEFAULT
SAVE
CANCEL
DEFAULT
Playback
SAVE
Control function
Information
39
Getting started
Web Remote
Utility Screen (UTILITY)
Connections
DN-700C
OPERATION
Part names
and functions
•Firmware Version Information Display.
•A firmware update file can be uploaded.
•Press the [Update] button to navigate and select the update file.
•Messages are displayed during the update, and the browser window needs to be closed before reboot.
•A confirmation dialog appears when the POWER STANDBY button is pressed.
OK: The screen switches to the Power Off screen.
CANCEL: No screen transition.
DN-700C
SETTINGS
OTHERS
UTILITY
A-0.60
Software Update
BROWSE
UPDATE
BROWSE
File and folder
settings
DOWNLOAD
Preset File
Power Control
Setting Defaults
Software Version
UPLOAD
STANDBY
Playback
Control function
Information
40
RC-F400S features
NOTE
nnRC-F400S top panel
nnRC-F400S rear panel
MUSIC \ abcdefg.MP3
TRACK
0005 00 : 45
TOTAL
0005
REPEAT
REMAIN
SINGLE
RECUE
REMOTE CONTROLLER RC-F400S
TIME
ELAPSED
02:35
ARTIST
ALBUM
HOT
LIST
Fordidden Par
2-Travelers
White Label R
FRAME
STOP/CUE
PLAY/PAUSE
2
3
4
5
6
7
8
9
10
11
12
13
14
15
16
17
18
19
20
Correspond to the function display.
eFast rewind button (6)
rFast forward button (7)
tJog dial (8/9)
•Rotate the jog dial to search for folders and
files.
•Press the jog dial to play back the selected file.
w
e r
i
yPlay/Pause button (PLAY/PAUSE)
qPower switch··············································· (44)
wRS-232C terminal········································· (43)
eDC power input terminal···························· (43)
The green light is on during playback and the
green light flashes during pause.
uStop/Cue button (STOP/CUE)
Connect the supplied power cord.
Lights orange during stop or cueing.
iHot start buttons (1-20)
Corresponds to the Hot Start list.
41
rDC power cord holder mounting hole
The supplied power cord holder will prevent the
connected power cord from disconnecting from
the terminal.
Information
qDisplay
wFunction buttons
q
DC IN 5V
Control function
1
RS232C
Playback
256KB
SIZE
FORMAT MP3 256kbps 44.1KHz
CHANNEL STEREO
POWER
t
y
u
FILE INFORMATION
TITLE
OFF
r
FILE
LIST
RANDOM
ON
File and folder
settings
w
e
q
Setting Defaults
Part names and functions
Connections
If the firmware version of your RC-F400S is an earlier version than A-4.00 it will not work correctly with the
DN-700C. Please visit our website (URL:http://www.d-mpro.com) for the latest firmware version.
The RC-F400S version information is displayed under the startup screen that appears when it is turned on.
Part names
and functions
•With RC-F400S, you can only perform playback operations. You cannot set various menu modes (menu
list/file list/file menu). When you are making changes in the menu, the RC-F400S will display “wait...”.
•Quick file search with the jog dial.
•Large 3.8” display (320X240 dots).
•Stationary top panel operations.
Getting started
Various playback functions with RC-F400S
You can perform Hot Start playback by using the hot start remote control RC-F400S (sold separately).
nnRC-F400S display
Main screen display
File list display
q
\ MUSIC \ abcdefg.MP3
TRACK
u
0005
REPEAT
SINGLE
REMAIN
RECUE
02:35
RANDOM
q
w
TIME
ELAPSED
0005 00 : 45
TOTAL
r
A.CUE
FILE
LIST
y
256KB
SIZE
FORMAT MP3 256kbps 44.1KHz
CHANNEL STEREO
HOT
LIST
FRAME
\ MPGLANG \
0123456789012345678901234567
0001 abcdefg.MP3
0002 abcdefg(Remix).MP3
0003 Honey01.MP3
0004 abcdefg00.MP3
0005 abcdefg01.MP3
0006 abcdefg02.MP3
0007 abcdefg03.MP3
---- abcdefg04.MP3
0009 abcdefg05.MP3
EXIT r
t
LOAD y
qTitle display
wFolder display
Displays the folder name.
“PROGRAM PLAY” is displayed during program playback.
eFile list
yFile information display
uCurrent playback mode display
iPlayback elapsed positi
Displays file names.
The ♪ mark is displayed for the file that is currently being played back or set to be played back.
rEXIT button
Enters the main mode.
button
Displays the list of folders in the selected media.
yLOAD button
Sets the selected file to one of the Hot Start buttons 1-20.
Control function
t
Playback
•TIME: Press the function button to switch the
time display.
•FILE LIST: Press the function button to play
back the file in the file list mode.
•HOT LIST: Press the function button to check
the Hot Start list.
[Special Feature of DN-700C]
•FRAME: Press the FRAME button to start
Audible pause from that position, and switch
to frame search mode.
File and folder
settings
Displays “FILE LIST”.
qFile name display
wFile number/total file count display
eTime display
rOperating Status Display
tFunction Display
Setting Defaults
Fordidden Par
ARTIST 2-Travelers
ALBUM White Label R
TITLE
e
t
FILE INFORMATION
FILE LIST
Connections
i
e
Part names
and functions
w
Getting started
Various playback functions with RC-F400S
Information
42
Connection
Hot Start list display
EXIT r
FILE
LIST t
STORE y
NEXT
PAGE u
qTitle display
Displays “HOT START LIST”.
wPAGE display
As shown below, connect the RS-232C port on DN-700C to the
RS-232C port on RC-F400S using the straight cable that is supplied
with RC-F400S.
•Once they are connected, turn the power switch on for the
respective devices.
•Configure the following items in the DN-700C “System Setting”.
•Serial bit Rate: 38400
•Serial Protocol: RC
•After connection, fix the cable by turning the cable terminal screws.
DN-700C
Notes on connecting the AC adapter
•Always turn the power switch off before connecting/
disconnecting the AC adapter.
•Do not touch the AC adapter with wet hands.
•When disconnecting the AC adapter, make sure that you hold the
plug. Pulling or bending the cord may damage the cord or cause
electric shock or fire.
RS-232C Straight cable
File and folder
settings
Displays the page.
eHot Start list
Displays the set file name.
The ♪ mark is displayed for the file that is being played back.
ON
rEXIT button
Setting Defaults
PAGE 1
01 \ MPGLANG \ abcdefg.MP3
02 \ MPGLANG \ Honey01.MP3
03 \ MPGLANG \ abcdefg0.MP3
04 \ MPGLANG \ abcdefg1.MP3
05 \ MPGLANG \ abcdefg2.MP3
06 \ MPGLANG \ abcdefg3.MP3
07 \ MPGLANG \ abcdefg4.MP3
08 \ MPGLANG \ abcdefg6.MP3
09 \ MPGLANG \ abcdefg7.MP3
10 \ MPGLANG \ abcdefg5.MP3
Connections
e
HOT START LIST
Part names
and functions
q
w
Getting started
Various playback functions with RC-F400S
OFF
POWER
tFILE LIST button
RC-F400S
Moves to the file list.
DC IN 5V
Control function
ySTORE button
RS232C
Playback
Enters the main mode.
When the media is set to USB, the set Hot Start list is saved as
a file.
The PPL file is saved in the root directory.
•A PPL file is the file that saves the content of a Hot Start list.
uNEXT PAGE/PREV PAGE buttons
Information
Display the list in the next/previous page.
43
Hot Start playback
nnPerform Hot Start playback
•In the RC-F400S display, the startup screen “DENON
PROFESSIONAL” appears.
•When the startup is completed, the file information is shown
in the display.
During playback, press 7 or 6.
•During pause, 1/3 flashes.
•To resume playback, press 1/3.
nnStop
•Press 7 to perform fast forward playback.
•Press 6 to perform fast rewind playback.
•The fast forward/fast rewind speed changes in the order shown
below each time the button is pressed.
•CD-DA: x2, x5, x10, x20, x50
•Others: x2, x10, x50, x100, x200
Press 20.
nnJumping by frames (Frame Accurate Search)
Press 7 or 6 during Audible pause.
Press HOT LIST on the main screen.
•Pressing 7 moves 1 frame in the forward direction.
•Pressing 6 moves 1 frame in the reverse direction.
The first 10 files in the Hot Start list are displayed.
To display files 11 through 20 in the Hot Start list, press NEXT
PAGE.
File and folder
settings
3 Press the Hot Start button for playback.
Setting Defaults
2
During playback, press 1/3.
Connections
connecting DN-700C to RC-F400S, turn the
1 After
power switch on for the respective devices.
nnFast forward and fast rewind (search)
Part names
and functions
You can instantly start playing back a file that is registered with the
Hot Start buttons 1-20 on RC-F400S by pressing the corresponding
button.
nnPause
Getting started
Various playback functions with RC-F400S
Hot Start playback starts.
Playback
Hot Start can also be performed from the main screen and the file list
screen.
Control function
Information
44
nnSet and allocate the Hot Start folder
The first 20 files in the selected folder are automatically allocated
to the Hot Start buttons.
\
FILE LIST
EXIT
LOAD
EXIT
LOAD
Press the jog dial to play back the selected file.
•“Completed” is displayed and the setting has changed.
•Press the set button to perform Hot Start playback.
Hot Starts can only be set in the stop or cue modes.
45
Information
the Hot Start button you want to allocate the
4 Press
setting to.
Control function
•“Please select HOT START button” is displayed.
•To cancel, press 20.
NOTE
When the Hot Start list is loaded and any audio file in the list is missing
on the media, that file is removed from the Hot Start list.
Playback
These settings can only be configured during stop or pause modes.
The file list is displayed.
•The Hot Start list is saved as “DN-700C.ppl” in the root
directory of the USB device connected to the DN-700C.
•A saved PPL file can be re-read by operating the DN-700C.
File and folder
settings
The first 20 files in the selected folder are automatically
assigned to the hot start button.
“Completed” is displayed, and the settings are completed.
1 On the main screen, press HOT LIST.
2 Press STORE.
The Hot Start list is displayed.
1 On the main screen, press FILE LIST.
1 On the main screen, press FILE LIST.
the folder you would like to set with the jog
the file you want to set with the jog dial.
2 Select
2 Select
dial.
Or, pause at the point where you want to resume
playback in the set file.
Press LOAD.
3
3 Press LOAD.
The file list is displayed.
Convert the allocated Hot Start list into a file and save it to a
USB device connected to the DN-700C. If this file exists in the
USB device, the Hot Start list in this file is automatically used for
allocation.
Setting Defaults
\ MPGLANG \
0123456789012345678901234567
0001 abcdefg.MP3
0002 abcdefg.MP3
0003 Honey01.MP3
Please select
0004 abcdefg00.MP3
HOTSTART button.
0005 abcdefg01.MP3
0006 abcdefg02.MP3
0007 abcdefg03.MP3
---- abcdefg04.MP3
0009 abcdefg05.MP3
nnSave the Hot Start list
Connections
01
02
03
04
05
Assign the Hot Start button for the file or point that you would like
to play back.
Part names
and functions
FILE LIST
nnSet and allocate Hot Start points
Getting started
Various playback functions with RC-F400S
Playback from the main screen
nnSTOP
NOTE
Press 20 during stop.
Press FRAME.
nnJump by frames (Frame Accurate Search)
F1 - 4
Power Switch
Jog Dial
After connecting the DN-700C to the RC-F400S, turn the
power switch on for the respective devices.
Press 1/3.
The button lights green and file playback starts.
•Rotate clockwise to switch to the next file.
•Rotate counterclockwise to switch to the beginning of the current
file or the previous file.
•To switch to the previous file, rotate the jog dial counterclockwise
within one second from the start of file playback.
nnFast forward or fast rewind (search)
During playback, press 7 or 6.
nnPause
Press 1/3 during playback or search modes.
nnCUE
Press 20.
46
Information
•1/3 flashes during pause.
•To restart playback, press 1/3.
•If the “Search Mode” settings in the “Preset Menu” of the DN-700C
are set to “Normal”, sound is output when the search speed is 2x.
Please note that sound is not output at search speeds above 2x.
•After you fast forward to the end of the last file or fast rewind to the
beginning of the first file, the unit pauses.
•When you fast rewind to the beginning of the file, the fast rewind
operation continues from the end point of the previous file.
AUTO CUE automatically detects the audio level and performs the
cue operation.
•When AUTO CUE is enabled, the playback mode display in the
RC-F400S display shows
.
•The detected level is the set value for the preset menu “Auto
Cue” in DN-700C (vpage 16).
•If the audio level is not detected for 20 seconds or more after the
playback for automatic detection of the audio level has started,
the cue operation is performed at the beginning of the file.
Control function
•Press 7 to perform fast forward playback.
•Press 6 to perform fast rewind playback.
•The fast forward/fast rewind speed changes in the order shown
below each time the button is pressed.
•CD-DA: x2, x5, x10, x20, x50
•Others: x2, x10, x50, x100, x200
nnAUTO CUE
Playback
nnPlay back
During playback or stop, rotate the jog dial.
File and folder
settings
•The RC-F400S display shows the startup screen “DENON
PROFESSIONAL”.
•When the startup is completed, the file information is shown in
the display.
•Pressing 7 moves 1 frame in the forward direction.
•Pressing 6 moves 1 frame in the reverse direction.
Setting Defaults
nnBefore playback
nnSwitching files (8/9)
Connections
Press 7 or 6 during repeat playback.
Part names
and functions
nnRepeat playback (0.5 sec)
•When you perform search on a short file, the indicated speed may
not be available.
•You cannot perform search on files that are recorded in VBR.
•If searched files contain a VBR file, the search stops at that VBR file.
Getting started
Various playback functions with RC-F400S
Lock operating buttons (Key lock)
When LOCK is pressed for more than 1 second, the buttons in the following table are locked and you will not be able to operate them.
Switch the lock status as shown below.
Specific button lock
All lock
This application enables playback and pitch control of tracks on your
iPod Touch/iPhone.
For details such as operating conditions etc, see our website
http://www.d-mpro.com.
Lock cancel
iPod
15:40
Yael Naim
Yael Naim
Elapsed
Status
SHIFT
LOCK
POWER
PLAY
PAUSE
CUE
STOP
Single
00:45:73
SHIFT+
JOG
FRAME 6/7
HOT XX
(8/9)
Other
S
S
S
S
S
S
S
S
S
S
S
S
S
S
S
S
S
S
S
S
S
S
S
×
All lock
S
S
S
×
×
×
×
×
×
×
×
×
PITCH
0.0%
M.KEY
Playback
Lock cancel
Specific
button lock
File and folder
settings
Lock cancel: All buttons can be operated.
Specific button lock: All buttons other than those needed for playback operations are locked.
All lock: All buttons other than Power, Lock and Shift are locked.
Setting Defaults
New Soul
Key Locked
Connections
•If buttons are operated while the key lock is enabled, “Key Locked” is displayed.
Part names
and functions
“DENON Professional Pitch Control” App
for iPhone/iPod Touch
Getting started
Other Functions
S: Can be operated.
×: Cannot be operated.
0
Setting
Control function
Play Control
Information
47
nnConnections
You will be able to perform the three control functions from the
host by connecting an RS-232C straight cable to the RS-232C serial
terminal (9-pin D-sub) connector.
RS-232C Straight cable
nnConnections
qConnecting the unit and host directly
Host
receives a status request command from the host
when there is a change to the DN-700C status
nnAbout Connections
You will be able to perform the three control functions from the
host by connecting an ethernet cable to the ethernet connector
(Connector type:RJ-45 (10BASE-T/100BASE-TX).
nnCommunication format
•Communication system: A full duplex
•Communication speed: 10 Mbps/100 Mbps
•Communication port: TCP port 23 (telnet)
•Communication data length: 135 bytes (maximum)
wConnecting the unit and host via a Switch/Router
Host
Pin number
Ground
6
2
NC
TxD
7
Ethernet straight
cable
NC
RxD
8
4
NC
NC
9
Ethernet straight
cable
Information
3
5
Signal name
Control function
1
Switch/Router
Playback
Pin arrangement
File and folder
settings
•Transmission System: Asynchronous full duplex transmission
•Compatible connector: 9-pin D-sub (male)
•Communication speed: 9,600/38,400 bps selectable
•Data bit: 8 bit
•Parity: None
•Start bit: 1 bit
•Stop bit: 1 bit
•Flow control: None
IP Control (Ethernet)
Setting Defaults
eAutomatically sending the status information to the host
Ethernet cross
cable
Connections
GThree control functionsH
qControlling the DN-700C externally
wSending the status information to the host when DN-700C
Part names
and functions
RS-232C control
Getting started
Serial remote control function
In the serial remote control function, a host such as a computer is connected to the unit. By sending control commands from the host to the unit, the unit can be operated, and the status information of the unit can be
checked both on the unit and host. There are 2 methods for connecting the host and unit, RS-232C control and IP Control.
NC
S. Ground
48
700 Series Extended Communication
Format
Host device
Host device
Status
Command
DN-700C
File and folder
settings
nnStatus information output for external status
request commands
Setting Defaults
Control commands are commands such as play, stop etc. sent from
the controller to control the DN-700C.
The status notification command is automatically generated when the
DN-700C changes status. The status notification uses an information
command to notify the host of the status.
Connections
Control
Command
Part names
and functions
DN-700C
nnControlling the DN-700C externally
DN-700C
nnAutomatic output of status information when the
DN-700C status changes
Getting started
Serial remote control function
Host device
Playback
Status Request
Command
Status Information
Command
Control function
The status request command is a command used to obtain status
information from the DN-700C. When the DN-700C receives a status
request command, it uses a status information command to notify its
status.
Information
49
nnCommand Sending Format
Commands are issued using a Command Packet surrounded by the Start Byte and End Byte.
1st part
0xF7
(End byte)
CommandPacket
Format-Model ID Total 3 Remain 2 Command Length
Command
(2bytes)
Parameter
Parameter
Pack Length Pack
(1byte)
(0-80bytes)
Format-Model ID Total 3 Remain 1 Command Length
Check Sum
(2bytes)
Parameter part 2
Sum
Parameter part 3
Sum
3rd part
Format-Model ID Total 3 Remain 0 Command Length
Used to send commands that have parameters that do not fit into the Parameter
Pack. This is 1 when the parameter is less than 80 bytes.
Remain Command
Packet
Used to send commands that have parameters that do not fit into the Parameter
Pack. This is 0 when the parameter is less than 80 bytes.
Command
Consists of 2 bytes from the category code and command.
Parameter Pack
Length
Describes the length of the Parameter Pack. The maximum length of the
Parameter Pack is 80 bytes.
Parameter Pack
Parameters.
Check Sum
All of the bytes from the Format to the Parameter Pack are added, and the top 4
bits and bottom 4 bits are each converted to ASCII code and stored.
Interpretation of
received command
Command
Parameter part 1
Parameter part 2
Parameter part 3
nnPrecautions when dividing commands
DN-700C
Controller
Command A
Remain (1)
Command B
Command A
Remain (0)
If a Parameter Pack exceeds 80 bytes, the command is divided and sent.
In this case, the Total Command Packet contains the total number of commands, and the Remain
Command Packet contains the remaining number of transmissions.
nnRemainCommandPacket for a command divided and sent in 3 parts
Total Command Packet
Remain Command Packet
1st
3
2
Two Command Packets remain
Description
2nd
3
1
One Command Packet remains
3rd
3
0
No Command Packets remain
50
Information
Do not send any other commands in between sending parts of divided commands. In such a case,
DN-700C will discard command A.
Commands can be divided to a maximum of 10 parts. Do not divide into 11 or more parts.
Do not divide the command if the parameters are less than 80 bytes.
Control function
nnDivided transmission of commands
Playback
Fixed as 0x11 in the DN-700C.
Total Command
Packet
File and folder
settings
Content
Format
Setting Defaults
Item
Connections
Format
(0x11)
Remain
Command
Packet
(1byte)
Sum
2nd part
The Command Packet format is as shown below.
Total
Command
Packet
(1byte)
Parameter part 1
Part names
and functions
0x F0004003
(Start Byte)
Getting started
Serial remote control function
The divided Parameter Pack is reconstructed by the receiver, and is interpreted as the parameters for one
command.
Track number
TIME STRING
Expression: MMM:SS;FF
Colon is used between MMM and SS (:) 0x3A
Semicolon is used between SS and FF (;)0x3B
MMM is displayed in 3 digits with 0 embedded expressions (000 - 999) In ASCII,
each digit is expressed in ASCII
SS is displayed in 2 digits with 0 embedded expressions (00 - 59) In ASCII, each
digit is expressed in ASCII
FF is displayed in 2 digits with 0 embedded expressions (00 - 74) In ASCII, each
digit is expressed in ASCII
012:34;56 is transmitted as 0x30 0x31 0x32 0x3A 0x33 0x34 0x3b 0x35 0x36
Value from 0 - 1999 2 byte binary value. 0 - 7CF Transfer order from top down.
In ASCII systems, each digit of a track number expressed in base 10 is transferred
in ASCII code.
Range of 0x30 0x30 0x30 0x30 - 0x31 0x39 0x39 0x39.
Pitch value
DN-700C has a range of ±16.00%. However, the second value after the decimal
is always 0.
This value is multiplied by 100 and transferred.
The specification range is ±999.99%.
In binary mode, a 3-byte value is transferred. Transfer order from top down.
In ASCII systems, each digit of a pitch expressed in base 10 is transferred in
ASCII code. Upper order values are zero filled.
Transmission order is symbol, hundreds, tens, ones, first decimal, second
decimal.
The symbol is not coded to ASCII, and is sent as 0 or 1.
Current Track Audio
Format String
For PCM
WAV\Sampling rate\quantization bit rate (WAV file)
AIF\Sampling rate\quantization bit rate (AIFF file)
For compressed formats
MP3\Sampling rate\Bit rate (MP3 file)
M4A\Sampling rate\Bit rate (AAC/iTunes format)
MP4\Sampling rate\Bit rate (MP4 file)
AAC\Sampling rate\Bit rate (AAC/Winamp5 format)
Sampling rate: Hz unit numerical value. In the ASCII format, each digit is
converted to ASCII.
Quantization bit number: bit number such as 16/24 etc. In the ASCII format, each
digit is converted to ASCII.
Bit Rate: Numerical value in kbps unit such as 320 etc. In the ASCII format, each
digit is converted to ASCII.
1 - 5 integer expression
Sample Rate
Hz unit numerical value
Lock No.
0:All Keys available
1:Only Transport Keys Available
2:All Keys Locked
Version No
SSMMmmRR
SS is a specification code (0x00=A,0x01=B…0x19=Z)
MM is a major code(0 - 0x63)
MM is a minor code(0 - 0x63)
RR is a revision code (0 - 0x63)
Ex. When SSMMmmRR=0x00010000, A-1.00
File Name String
Folder Name String
Media Name String
Folder delimiter is ‘\(0x5C)’
Media name is “CDA:”, “CDD:”, “USB:”, or “NETxxx:”
CDA indicates CD-DA
CDD indicates CD-DATA
USB indicates USB storage
NETxxx indicates a server on the NET
Media name ends in ‘:’ (colon)
Folder name ends in ‘\’
<root> indicates “\\”
Absolute path is expressed as “\\Folder name\Folder name\”
Relative path is expressed as “Folder name\Folder name\”
Folder in one superior hierarchy level is expressed as “..\”
Current folder is expressed as “.\”
File name is expressed as “Track name:extension”
Combinations of the expressions above can be used
E.g.) Expression of a full path from the media “CDD:\\Folder name\Track name.
MP3”
E.g.) Expression of a full path from <root> “\\Folder name\Folder name\Track
name.MP3”
NOTE
About the command list see page “Appendix”.
51
Information
Dimmer Value
Control function
Character string
Playback
Value from 1 - 20 1 byte, not ASCII coded even with ASCII systems
Name String
File and folder
settings
description
Hot number
Setting Defaults
parameter
Numerical value
Connections
description
Number
Part names
and functions
parameter
Getting started
Serial remote control function
q External control and operation of the DN-700C
nnConfiguration of control commands
When the DN-700C receives a control command from the host, the
DN-700C sends ACK (received successfully) to the host and executes
the command.
The packets of control commands start with the Start Character “@”,
and end with the End Character “0x0D” as shown below.
DN-700C
Start
Character
DN-700C
End
Character
COMMAND
0
‘@’ (0x40)
ID
‘0’ (0x30)
Command
Indicates the command details.
End Character
‘¥r’ (0x0D)
Status information
command
Response timeout is 100msec.
Transmission conditions
ACK
0x06
–
NACK
0x15
•When an End Character (0x0D) is received
with no Start Character “@”
•When a command that does not exist is
received
•When there is a space more than 5msec
between command characters
Information
Hex
value
However, if data other than a specified command or an End Character
(0x0D) with no Start Character (‘@’) is received, receive fails and NACK
is returned.
Control function
Content
Sequence diagram of status request command
Playback
nnACK (received successfully) and NACK (receive
failed) command codes
However, if data other than a specified command or an End Character
(0x0D) with no Start Character ‘@’ is received, receive fails and NACK
is returned.
File and folder
settings
Start Character
ACK
ACK
Setting Defaults
Value (Hex value within parentheses)
Host device
Status request
command
Control command
\r (0x0D)
nnConfiguration of command codes
Item
Host device
When a status request is received from the host, the DN-700C returns
ACK and a response to the request details.
Connections
@
ID
w S
tatus information output for external status
request commands
Part names
and functions
D&M RC Communication format
Getting started
Serial remote control function
•When a command is received, ACK or NACK is returned within 100
msec.
•If there is no response after 100 msec, the next command is
permitted.
52
Getting started
Serial remote control function
e A
utomatic output of status information when
the DN-700C status changes
DN-700C
Part names
and functions
When the DN-700C status or recording or playback file changes, or
when the storage status changes, the details of the change of status
are sent to the host.
Host device
Connections
Status command
Setting Defaults
ACK
File and folder
settings
The command sent at this time uses the same status information
command as w.
NOTE
Playback
About the command list see page “Appendix”.
Control function
Information
53
nnHot Start Assignment
•Normal Mode
NO.
Parallel remote mode switching
NAME
GND
PLAY
PAUSE
CUE
MODE 1
MODE 2
RELOAD
HOT START 1(11)
HOT START 2(12)
GND
HOT START 3(13)
HOT START 4(14)
HOT START 5(15)
PLAY TALLY
PAUSE TALLY
CUE TALLY
HOT START 6(16)
HOT START 7(17)
HOT START 8(18)
STOP TALLY
EOM TALLY
TALLY POWER SUPPLY
GND
HOT START 9(19)
HOT START 10(20)
•Parallel remote mode is switched according to the status of parallel remote inputs #5 and #6.
MODE 1
MODE 2
FUNCTION
HIGH
HIGH
NORMAL
HIGH
LOW
Reserved
LOW
HIGH
HOT START 1
LOW
LOW
HOT START 2
Hot Start 1: Hot list #1 - #10 can be played from the parallel remote.
Hot Start 2: Hot list #11 - #20 can be played from the parallel remote.
Hot Start mode can be switched to Hot Cue using “Para Rem Mode” in the “Preset setting”.
If the mode is set to the Hot Cue mode, when Hot Start input is performed, playback does not start
immediately and instead switches to the standby state at the start point.
File and folder
settings
Playback
Control function
Information
1
2
3
4
5
6
7
8
9
10
11
12
13
14
15
16
17
18
19
20
21
22
23
24
25
I/O
I
I
I
I
I
I
I
I
I
I
I
O
O
O
I
I
I
O
O
I
I
DN-700C
Setting Defaults
NAME
GND
PLAY
PAUSE
CUE
MODE 1
MODE 2
FWD
RWD
FADER START
GND
SKIP BACK
Reserved
Reserved
PLAY TALLY
PAUSE TALLY
CUE TALLY
Reserved
Reserved
Reserved
STOP TALLY
EOM TALLY
TALLY POWER SUPPLY
GND
TRACK +
TRACK –
•Hot Start Mode
•Hot Cue Mode
NO.
Connections
1
2
3
4
5
6
7
8
9
10
11
12
13
14
15
16
17
18
19
20
21
22
23
24
25
I/O
I
I
I
I
I
I
I
I
I
I
I
O
O
O
I
I
I
O
O
I
I
DN-700C
Part names
and functions
nnAbout Connections
If one of the HOT START terminals is shorted when the RELOAD terminal is in the shorted state, the
current track is assigned to the shorted Hot Start number (reload function).
For details on assigning Hot Start, see “Playing back from track hot points
(Hot Start playback)” (vpage 27).
Getting started
Parallel Control
Parallel control has two modes, normal mode and hot start mode.
The MODE 1,2 pins are used to switch this mode.
•In Hot Cue mode, the status switches to standby
for hot start input.
•The () contents indicate the assignment for Hot
Start 2 mode.
Hot start is a function that starts playback instantaneously from the preset point.
54
nnRemote Control Connection
13
12
25
11
24
23
9
10
22
8
21
7
20
6
19
5
18
4
17
3
16
2
14
15
1
13
12
25
11
24
23
9
10
22
8
21
7
20
6
19
5
18
4
17
3
16
2
14
13
23
12
23
Hot
Start 5
25
Hot
Start 10
23
Hot
Start 9
2
14
22
23
3
15
22
23
11
23
Hot
Start 4
24
19
23
Hot
Start 8
Hot
Start 3
23
9
23
8
18
Hot
Start 7
23
4
16
22
23
5
23
23
7
17
23
24
Hot
Start 2
Playback
(22pin)
IN
VCC
NOTE
最大
Maximum
1010mA
mA
Power is supplied to the external remote controller from Pin No.22 (Tally Power Supply) from this terminal.
However, as the maximum rating for this pin is +5 VDC 100 mA, select circuit and current controls
(resistance values) so as not to exceed the rating. Using this equipment when the rated value is exceeded
may cause damage to the equipment, which may also lead to fire or a similar unexpected accident.
55
Information
•Tally output pin is an open collector. (Maximum current: 10 mA, maximum voltage; 5.5 V)
•Input pin is 5 V for Vcc TTL specification.
•The maximum current supplied by the Tally Power Supply (22 pin) is 100 mA.
•The input/output logic is active low (negative logic).
Tally出力ピン
Tally output pin
(23pin)
IN GND
Hot
Start 1
Hot
Start 6
It is assumed that the input pins and Tally output pins are used as follows.
Input pin
入力ピン
6
23
23
2
14
22
23
3
15
TRACK (+)
23
25
RELOAD
Playback pause
Control function
23
TRACK (–)
Playback
CUE
Playback
9
22
23
4
16
22
23
Playback pause
FADER
START
23
11
23
7
23
8
CUE
19
21
22
23
18
20
EOM
MODE1
File and folder
settings
22
23
STOP
MODE2
Skip back
6 Search 7
23
5
23
6
MODE1
Setting Defaults
23
Hot Cue Mode
Connections
MODE2
Hot Start Mode
Part names
and functions
Normal Mode
15
1
•Connection Example
Getting started
Parallel Control
Getting started
Information
Details on procedure for handling error messages
Error message
Cause/Solution
•The media is formatted in an unsupported format. Format the
media on DN-700C or set the format to FAT16 or FAT32. For
details, see the operation instructions of the recording media.
–
Media Full
•The remaining space on a media is running low. Replace the media
with a new one or delete files that are no longer required.
–
File Not Found
•Target file does not exist. Check the file.
21
VBR
•This error message appears when a VBR file search is performed.
Search cannot be performed on VBR files. The remaining time of a
file is not displayed either.
25
Already Exists
•A file with the same file name already exists. Change the file name
and then press the jog dial to enter the data.
•Key lock is activated. To operate DN-700C, cancel the lock.
21
•Remote control operations are locked. To operate the remote
control, cancel the lock.
•This appears when an invalid operation is performed. Check the
details of the operation because the operation may be invalid due
to other setting items such as the preset menu etc.
•Format the media on DN-700C or set the format to FAT16 or
FAT32. For details, see the operation instructions of the media.
•The media is not compatible with the DN-700C. Replace with
compatible media.
•Error in upgrading a file or file system.
Contact your local Denon repair service center listed on our website
(URL: http://www.d-mpro.com).
•Error in flash ROM.
Contact your local Denon repair service center listed on our website
(URL: http://www.d-mpro.com).
•An error has occurred in the network connection. Check the
network connection.
•The target track does not exist. Check the media.
•Some file operations were skipped because files with the same
name exist. Check the file name.
•Password authentication failed. Check the password.
18
ErrUpdateFile
Err Network
Track Not Found
Some files are
skipped
Password Error
Not Connected
•Check if it is properly connected to DN-700C. If this message
persists, replace the cable.
–
Not Supported
•A device that is not supported by RC-F400S is connected. Check
the connected device.
–
No Media
•The media inserted in DN-700C has not been detected. Eject and
insert the media again.
14
Error xxxxx
•Contact your nearby service center listed on our web site
(URL: http://www.d-mpro.com)
–
47
15
–
–
–
Information
Err FlashROM
Related
Page
Control function
Err Media X
Cause/Solution
Playback
Err Format
Error message
File and folder
settings
Unformat
Not allowed
14
Setting Defaults
•Cannot detect media.
Connections
No Media
•Key Restricted
•All key Locked
IR Locked
RC-F400S error messages
Related
Page
Part names
and functions
Error messages
–
30, 31
–
–
–
56
Getting started
Troubleshooting
If a problem should arise, first check the following:
Part names
and functions
1. Are the connections correct?
2. Is the set being operated as described in the owner’s manual?
3. Are the external devices (mixer and player) operating properly?
If this unit does not operate properly, check the items listed in the table below.
If the symptom is not covered on the check list, contact your dealer or service centers.
Service centers are listed at http://www.d-mpro.com.
Symptom
Does not power on.
Cause/Solution
Related
Page
13
Setting Defaults
•Check whether the power cord is firmly connected to the AC
outlet.
Connections
GGeneralH
GPlaybackH
Symptom
–
21
21
13
–
Control function
No sound is produced •Make sure that the headphone volume level adjustment switch
from the headphones.
(LEVEL) is not set to MIN.
•Check whether sound is reproduced from the headphones by
using another audio file or recording media.
–
Playback
•The media could be a cause of this trouble. Copy a file to another
media and retry playback.
•Check whether this unit supports the format of the playback file.
•Check that the target folder is stored within the first 8 levels of the
media root directory.
•Check whether the number of folders does not exceed 1000. This
unit recognizes up to 1000 folders.
Related
Page
File and folder
settings
Cannot perform
playback or does not
recognize a file.
Cause/Solution
GRecording mediaH
Symptom
Related
Page
•Sometimes this unit cannot recognize media because of a
defective connection. Check the connection of the media.
•This unit supports USB mass-storage class flash memory and
USB external storage. It does not recognize USB drives other than
the above.
•You cannot connect USB devices to this unit via a USB hub.
•Make sure to supply external power to the type of USB hard
disk drives that can connect to the external power source via AC
adapter, etc.
14
The media icon is
•Check the display and make sure that the currently selected
displayed, but the unit
media and the actual media that you want to use are the same. If
does not recognize
they are not the same, display the media list to select the media
a file.
to be used.
23
Information
The media is not
shown in the display
even though it is
connected.
Cause/Solution
14
14
–
57
WARRANTY ONLY IN U.S.A.
nn How to Obtain Warranty Performance
nn Length of Warranty
nn What is Covered
THIS WARRANTY IS VALID IN THE U.S.A. ONLY.
If your product does not require service, but you have questions regarding its operation, please contact our
Technical Services Department as listed below.
This warranty gives you specific legal rights, but you may also have other rights which vary from state to
state.
Control function
WARRANTY IN EUROPE AND ASIA
In Europe and Asia (except Japan), the warranty of this product is supplied by your local importer. Please
contact your point of purchase for help with warranty claims.
D&M Professional EUROPE
http://www.dm-pro.eu/
D&M Professional ASIA
http://apac.d-mpro.com/
58
Information
D&M Professional AMERICA
http://usa.d-mpro.com/
You can find the contact details on this website.
Playback
THIS WARRANTY IS EXPRESSLY MADE IN LIEU OF ALL OTHER WARRANTIES, EXPRESSED OR
IMPLIED, INCLUDING WITHOUT LIMITATION, WARRANTIES OF MERCHANTABILITY AND FITNESS
FOR A PARTICULAR PURPOSE.
OUR LIABILITY IS LIMITED TO THE REPAIR OR REPLACEMENT, AT OUR OPTION, OF ANY DEFECTIVE
PRODUCT AND SHALL IN NO EVENT INCLUDE INCIDENTAL OR CONSEQUENTIAL COMMERCIAL OR
PROPERTY DAMAGES OF ANY KIND.
SOME STATES DO NOT ALLOW LIMITATIONS ON HOW LONG AN IMPLIED WARRANTY LASTS AND/
OR DO NOT ALLOW THE EXCLUSION OF INCIDENTAL OR CONSEQUENTIAL DAMAGES, SO THE
ABOVE LIMITATIONS AND EXCLUSIONS MAY NOT APPLY TO YOU.
File and folder
settings
nn What We Will Pay For
If during the applicable warranty period from the date of original consumer purchase your Denon
professional product is found to be defective by D&M Professional, D&M Professional will repair, or at its
option, replace with new, used or equivalent model, such defective product without charge for parts or
labor.
Setting Defaults
Except as specified below, this Warranty covers all defects in material and workmanship in this product.
The following are not covered by the Warranty:
(1) Any product which is not distributed in the U.S.A. by Denon Professional div. D&M Professional.
(2) Any product on which the serial number has been defaced, modified or removed.
(3) Damaged deterioration or malfunction resulting from:
a) Accident, act of nature, abuse, misuse, neglect, unauthorized product repair or modification or failure
to follow instructions supplied with the product.
b) Repair or attempted repair by anyone not authorized by Denon Professional. c) Any shipment of the product (claim must be presented to carrier).
(4) Items subject to wear from normal usage (tape heads, cartridges, stylus, battery, etc.).
(5) Periodic check-ups which do not disclose any defect.
(6) Use of the product outside the U.S.A.
(7) Damaged magnetic tape or CD/DVD/BD discs.
Connections
The warranty on your Denon Professional product which is distributed and warranted by D&M Professional
will remain in effect when purchased from an Authorized D&M Professional Reseller for 1 year Parts and
Labor.
Part names
and functions
If your unit requires service under the warranty period, telephone the D&M Professional Technical Service
and Support Department for available warranty repair options. You can find the contact details on our
website (http://usa.d-mpro.com/). During the warranty period, the following procedures apply:
a. A copy of the original, dated retail sales receipt from an authorized reseller is required for warranty
repair.
b. All warranty repairs require a service return authorization prior to shipment to the service center.
c. You are responsible for shipping charges to the service center. Warranty repaired units will be returned
to you freight prepaid.
d. You should include the following: your name, address, daytime telephone number, model and serial
number of the product and a description of the problem. In the case of a CD/DVD/BD Player, please
enclose ONE (1) disc that the unit has failed with for test reasons. It will be returned with the unit.
LIMITED WARRANTY FOR PROFESSIONAL PRODUCTS
This warranty will be honored only in the U.S.A.
Getting started
Warranty
nn Digital Audio System
•System
•Playable formats, file systems
WAV, AIFF, AIF
16 bit, 24 bit
96, 48, 44.1 kHz
•Power supply
•Power consumption
•Environmental conditions
Operating temperature
Operating humidity
Storage temperature
AC 120 V, 60 Hz
(U.S.A and Canada models)
AC 230 V, 50/60 Hz
(European, U.K and Asia/Pacific
models)
AC 100 V, 50/60 Hz
(Japan model)
30 W
0.4 W (standby)
5 – 35 °C
25 – 85 %, no condensation
–20 – 60 °C
File and folder
settings
nn Others
Playback
M4A, AAC
AAC-LC
64 – 320 kbps and VBR
48, 44.1 kHz
2 (stereo), 1 (mono)
20 Hz - 20 kHz (±0.5 dB)
More than 105 dB (A-Weighted)
Less than 0.005 %
More than 105 dB
(for 24 bit WAV playback)
•Channel separation
Less than –106 dB
•Variable pitch width
–16 % – +16 %
•Variable trim adjustment width ±2.0 dB
•BALANCED ANALOG OUT L/R
Type
XLR(1:GND, 2:Hot, 3:Cold)
Load impedance
Over 600 Ω/ohms
Output level
8.23 dBu (Max. 24 dBu)/
at 600 Ω/ohms load
•UNBALANCED ANALOG OUT L/R
Type
RCA terminal
Load impedance
Over 10 kΩ/kohms
Output level
2 Vrms (Max. 10 dBV)/
at 10 kΩ/kohms load
•BALANCED DIGITAL OUT
Type
XLR(1:GND, 2:Hot, 3:Cold)
Output impedance
110 Ω/ohms
Standard output level
3.5 Vp-p
Format
IEC-60958(AES/EBU)
•UNBALANCED DIGITAL OUT
Type
RCA terminal
Output impedance
75 Ω/ohms
Standard output level
0.5 Vp-p
Format
IEC-60958(COAXIAL)
•HEADPHONE OUT
20 mW/32 Ω/ohms
nn General
•Maximum storage capacity
•Maximum file size
•Maximum number of files
Control function
Up to 2 TB
4 GB
2000 files
(for 1 folder)
•Maximum number of folders
1000 folders
•Maximum number of folder 8 (under the root directory)
hierarchies
•Maximum number of marks
30 per file
•Maximum file name length
255 characters
•Maximum folder name length 255 characters
•Maximum preset name length 8 characters
•Maximum machine ID name 8 characters
length
Information
bbSpecifications and external appearance may be
changed without prior notice for improvement
purposes.
59
Setting Defaults
MP3
32 – 320 kbps and VBR
48, 44.1 kHz
0 dBu=0.775 Vrms,
0 dBV=1.0 Vrms
Connections
•Playable WAV Format
Extension
Resolution
Sampling frequency
•Playable MP3 Format
Extension
Bit rate
Sampling frequency
•Playable AAC Format
Extension
Compression method
Bit rate
Sampling frequency
•Number of channels
•Audio frequency characteristics
•S/N ratio
•Total harmonic distortion
•Dynamic range
nn Output
Part names
and functions
•Compatible media
Network CD/
Media Player
CD Media, USB flash memory ,
USB HDD, iPod
CD: CD-DA (CD TEXT),
CD-ROM (ISO9660)
USB: FAT16/FAT32/HFS+
Getting started
Main Specifications
vvA
Accessories··························································· 2
Rear Panel····························································· 5
Remote control unit·············································· 6
Inserting the batteries········································ 7
RS-232C control·················································· 48
Playback
vvS
Save Setting························································ 19
Select·································································· 21
Select All····························································· 21
Single/Cont.························································· 26
Skip back····························································· 26
System setting···················································· 18
Control function
vvW
Information
vvH
vvR
File and folder
settings
File List Menu····················································· 21
Firmware Version················································ 20
Format Media······················································ 20
Front Panel···························································· 4
vvP
Pitch control························································ 26
Playback······························································ 24
A-B Repeat······················································· 25
Cue··································································· 24
Frame jump······················································ 25
iPod··································································· 28
Pause································································ 24
Search······························································· 25
Stop·································································· 24
Preset Setting····················································· 16
Product Manager················································· 32
Program playback················································ 27
Property······························································· 22
Setting Defaults
vvF
Network Status··················································· 20
Connections
vvD
DENON Professional Pitch Control····················· 47
Direct jump·························································· 26
Display··································································· 8
vvN
Part names
and functions
vvC
Cable
Balanced cable·················································· 12
Coaxial digital cable·········································· 12
Stereo audio cable············································ 12
CD-R/CD-RW························································· 3
Connection
Analog balanced··············································· 12
Analog unbalanced··········································· 12
Digital································································ 12
Digital (AES/EBU)·············································· 12
Headphones····················································· 13
iPod··································································· 14
Network (LAN)·················································· 30
Parallel······························································ 13
Power cord······················································· 13
RS-232C···························································· 13
USB device······················································· 14
Copy···································································· 22
Getting started
Index
Warranty······························································ 58
Web Remote······················································· 35
Headphones························································ 13
Hot list································································· 27
Hot Start playback··············································· 27
vvI
IP Control (Ethernet)············································ 48
vvL
Load Setting························································ 19
vvM
Menu List···························································· 15
Menu Operations················································ 16
60
Appendix
Appendix shows the list of commands that control this unit externally through a host device.
Normally, it is dealers such as installers that use the list of commands to make settings, so this section is only in English.
nn700 Series Extended Communication Format (MIDI)
Control Command List
Category
Playback operation
Device operation
Command
STOP
PLAY
PAUSE
CUE
CUE TRK XXXX
CUE TIM XXXX
FRAME FWD
FRAME REV
SEARCH SS1 FWD
SEARCH SS1 REV
SEARCH SS2 FWD
SEARCH SS2 REV
SEARCH SS3 FWD
SEARCH SS3 REV
SEARCH SS4 FWD
SEARCH SS4 REV
SEARCH SS5 FWD
SEARCH SS5 REV
TRACK FWD
TRACK REV
HOT START XXXX
HOT CUE XXXX
SKIP BACK
FRAME ON
POWER ON
POWER STDBY
RETRACT
EJECT
Command code
Command
number
0
0
0
0
0
0
0
0
0
0
0
0
0
0
0
0
0
0
0
0
0
0
0
0
1
1
1
1
Parameter 1
Category code
1
2
3
4
5
6
7
8
10
11
12
13
14
15
16
17
18
19
20
21
22
23
24
25
1
2
3
4
Number
TIME STRING.
Number
Number
Number
-
Parameter 2
-
UNBAL VOL UP
1
5 Number
-
UNBAL VOL DN
1
6 Number
-
UNBAL VOL XXXX
1
7 Number
-
ENTER
ESC
ABORT
ARROW D
ARROW U
ARROW R
ARROW L
1
1
1
1
1
1
1
8
9
10
11
12
13
14
-
APPENDIX
Remarks
Command example) F0 00 40 03 11 01 00 00 01 00 31 33 F7
Command example) F0 00 40 03 11 01 00 00 02 00 31 34 F7
Track No. 2 bytes specification (700 system extended to 4 bytes)
TIME STRING specified
Not No. 1 byte specification (1 - 20)
Not No. 1 byte specification (1 - 20)
ON:1/OFF:0
“Volume Up Step Up Count 1 byte received side is interpreted as Count
value x volume minimum step (dB) Up.”
“Volume Down Step Count 1 byte received side is interpreted as Count
value x volume minimum step (dB) Down.”
“Volume Value 4bytes specification Byte1 symbol =0:positive/1:negative
Byte2 Volume(db) ten value (0 - 9) Byte3 Volume(db) single value (0 - 9) Byte4
Volume(db) first decimal value (0 - 9) Byte5 Volume(db) first decimal value (0 - 9)”
-
Appendix
Category
File operation
Playback setting
Command
HOT LOAD XXXX
HOT SAVE XXXX
PRG LOAD XXXX
PRG SAVE XXXX
HOT SET XXXX
Command code
Command
Category code
number
3
3
3
3
5
Parameter 1
3
4
5
6
1
Name String
Name String
Name String
Name String
Number
Parameter 2
-
HOT SET XXXX YYYY
5
2 Number
Number
HOT RMV XXXX
HOT IN XXXX YYYY
5
5
3 Number
7 Number
TIME STRING.
PRG INS XXXX
5
11 Number
-
PRG INS XXXX YYYY
5
12 Number
Number
PRG RMV XXXX
SET CUR FDR XXXX
SET CUR FDR FWD
SET CUR FDR REV
SET CUR FIL XXXX
PITCH SW XXXX
5
5
5
5
5
5
13
17
18
19
20
21
-
PITCH VAL XXXX
5
22 Number
-
KEY SW
PITCH UP LOW
PITCH UP MID
PITCH UP HI
PITCH DN LOW
PITCH DN MID
PITCH DN HI
SET AB XXXX YYYY
5
5
5
5
5
5
5
5
25
27
28
29
30
31
32
33
TIME STRING.
Number
Name String
Name String
Number
Number
TIME STRING.
APPENDIX
Remarks
Parameter1=File Name String specification
PPL File Name String specification
m3u File Name String specification
m3u File Name String specification
Hot No. 1 byte specification (1 - 20)
“Parameter1=Hot No. 1byte Parameter2= Track No. 2byte specification
(Extended to 4 bytes in ASCII system)”
Hot No. 1byte specification
“Parameter1=Hot No. 1byte Parameter2=TIME STRING specification”
Insert Position No. 2bytes specification (ASCII system extended to 4
bytes)
“Parameter1=Insert Position No. 2bytes (ASCII system extended to 4
bytes) Parameter2=TrackNo. 2bytes specification (ASCII system extended
to 4 bytes)”
Remove Position No. 2bytes specification
Folder Name String specification
File Name String specification
Pitch switch Value 1byte specification ON:1/OFF:0
“Pitch Value 6 digit specification However, the pitch value is converted
to ASCII code by multiplying each digit by 100. Be sure that each digit
uses 2 bytes each as a result of conversion to the ASCII code. 1st digit
Symbol = 0: positive/1: negative 2nd digit Pitch hundred value (0 - 9)
3rd digit Pitch ten value (0 - 9) 4th digit Pitch single value (0 - 9) 5th digit
Pitch first decimal value (0 - 9) 6th digit Pitch second decimal value (0 - 9)
Transmission from the 1st digit.”
Key Sw Value 1byte ON:1/OFF:0
Pitch Value is +0.1%.
Pitch Value is +0.7%.
Pitch Value is +1.3%.
Pitch Value is -0.1%.
Pitch Value is -0.7%.
Pitch Value is -1.3%.
Appendix
Category
Device setting
Command
DIMMER XXXX
LOCK XXXX
PRESET XXXX YYYY
PRESET ALL CHG
PRESET DEF
PRESET LOAD
PRESET SAVE
SET MAC ADDR
GET MAC ADDR
SYSCFG XXXX YYYY
SYSCFG ALL CHG
SYSCFG DEF
ANS_MAC_ADDR
Command code
Command
Parameter 1
Category code
number
7
1 Number
7
2 Number
7
3 Number
7
4 Number
7
57
6 Name String
7
7 Name String
7
8 Number
7
9 Number
7
10 Number
7
11 Number
7
12 7
69 Number
APPENDIX
Parameter 2
Remarks
Number
Number
-
Dimmer Value 1byte specification
Lock No. 1byte specification
“Parameter1=Preset Index 1byte Parameter2=Preset Value 4Bytes ”
Preset Value Table 37×4bytes
Preset File Name String
Preset File Name String
Mac Address 6 bytes specification
Mac Address 6 bytes specification
“Parameter1=SYSCFG Index 1byte Parameter2=SYSCFG Value 4Bytes”
SYSCFG Value Table xx × 4Bytes
-
-
“Response to GET_MAC_ADDR. Return Mac Address 6 bytes”
Appendix
nnStatus request command
Category
Playback status
Command
GET TRP STAT
GET CUR FDR
GET ELP TIME
GET REM TIME
GET CUR FILE
GET CUR TRK
GET CUR IDX
GET CUR SIZE
GET CUR LEN
GET CUR TITL
GET CUR ART
GET CUR ALBM
GET CUR CH
GET CUR FMT
GET CUR SMP
GET TAT TTL
GET TAT FIL XXXX
GET CUE FILE
GET CUE TRK
GET CUE TIME
GET HOT NO
GET HOT FILE
GET HOT FILE XXXX
GET HOT IN XXXX
GET PRG NO
GET PRG FILE
GET PRG FILE XXXX
GET PRG TTL
GET TRP DIR
GET TRP SPD
Command code
Command
number
9
9
9
9
9
9
9
9
9
9
9
9
9
9
9
9
9
9
9
9
9
9
9
9
9
9
9
9
9
9
Parameter 1
Category code
1
2
3
4
5
6
7
8
9
10
11
12
13
14
15
16
17
18
19
20
21
22
23
24
28
29
30
31
33
34
Number
Number
Number
Number
-
APPENDIX
Parameter 2
-
Remarks
Track No. 2 bytes specification (ASCII system extended to 4 bytes)
Hot No. 1byte specification
Hot No. 1byte specification
Program No. 2 bytes specification (ASCII system extended to 4 bytes)
-
Appendix
Category
Device status
Get list
Command
GET POW STAT
GET WIN STAT
GET DIM STAT
GET LOK STAT
GET PITCH STAT
GET PITCH VAL
GET KEY STAT
GET PRS XXXX
GET UBL VOL
GET FW VER
GET DRV VER
GET DEV ID
GET PID
GET PPWD
GET AVAILABLE PSTAT
GET CUR MEDIA
Command code
Command
Category code
number
11
11
11
11
11
11
11
11
11
11
11
11
11
11
11
11
Parameter 1
1
2
3
4
5
6
7
8
9
10
11
12
13
14
15
18
Parameter 2
Number
-
-
GET ALV XXXX
11
19 Number
-
GET MEDIA LST
GET MEDIA TTL
GET MEDIA XXXX
GET MSV LST
GET MSV TTL
GET MSV XXX
GET FDR LST XXXX
GET FDR TTL XXXX
GET FDR XXXX YYYY
GET SND LST XXXX
GET SND TTL XXXX
GET SND XXXX YYYY
GET M3U LST XXXX
GET M3U TTL XXXX
13
13
13
13
13
13
13
13
13
13
13
13
13
13
1
2
3
4
5
6
7
8
9
10
11
12
13
14
?
?
-
GET M3U XXXX YYYY
13
15 Number
Number
GET PPL LST XXXX
GET PPL TTL XXXX
13
13
16 17 Number
-
GET PPL XXXX YYYY
13
18 Number
Number
Number
Number
Number
Number
Number
Number
Number
Number
Number
Number
APPENDIX
Remarks
Preset Item Number specification
Inquiry about transferable power status.
Inquiry of current media
SYSCFG Value Table Number 2 bytes specification (ASCII system
extended to 4 bytes)
Media No. 2 bytes specification (ASCII system extended to 4 bytes)
Server No. 2 bytes specification (ASCII system extended to 4 bytes)
Folder No. 2 bytes specification (ASCII system extended to 4 bytes)
Folder No. 2 bytes specification (ASCII system extended to 4 bytes)
Folder No. 2 bytes specification (ASCII system extended to 4 bytes)
List No. 2 bytes specification (ASCII system extended to 4 bytes)
List No. 2 bytes specification (ASCII system extended to 4 bytes)
List No. 2 bytes specification (ASCII system extended to 4 bytes)
Folder No. 2 bytes specification (ASCII system extended to 4 bytes)
Folder No. 2 bytes specification (ASCII system extended to 4 bytes)
“Parameter1=Folder No. 2bytes (ASCII system extended to 4 bytes)
Parameter2=M3U No. 2bytes specification (ASCII system extended to 4
bytes)”
Folder No. 2 bytes specification (ASCII system extended to 4 bytes)
“Parameter1=Folder No. 2bytes (ASCII system extended to 4 bytes)
Parameter2=PPL No. 2bytes specification (ASCII system extended to 4
bytes)”
Appendix
nnStatus notification command
Category
Command
Playback status
Command code
Command
number
Parameter 1
Category code
Parameter 2
ANS TRP STAT*
9
60 Number
-
ANS CUR FDR
ANS ELP TIME*
ANS REM TIME*
ANS CUR FILE
ANS CUR TRK*
ANS CUR IDX*
ANS CUR SIZE
ANS CUR LEN
ANS CUR TITL
ANS CUR ART
ANS CUR ALBM
ANS CUR CH
ANS CUR FMT
ANS CUR SMP
ANS TAT TTL
ANS TAT FIL XXXX
ANS CUE FILE
ANS CUE TRK
ANS CUE TIME
ANS HOT NO
ANS HOT FILE
ANS HOT FILE XXXX
ANS HOT IN XXXX
ANS PRG NO
ANS PRG FILE
ANS PRG FILE XXXX
ANS PRG TTL
ANS METER VALUE*
ANS TRP DIR
ANS TRP SPD
9
9
9
9
9
9
9
9
9
9
9
9
9
9
9
9
9
9
9
9
9
9
9
9
9
9
9
9
9
9
61
62
63
64
65
66
67
68
69
70
71
72
73
74
75
76
77
78
79
80
81
82
83
87
88
89
90
91
92
93
-
Name String
TIME STRING.
TIME STRING.
Name String
Number
Number
Number
TIME STRING.
Name String
Name String
Name String
Number
Name String
Number
Number
Name String
Name String
Name String
TIME STRING.
Number
Name String
Name String
TIME STRING.
Number
Name String
Name String
Number
Number
Number
Number
APPENDIX
Remarks
“0 : TSTA_STOP 1:TSTA_CUE 2:TSTA_CUE_EXECUTING 3:TSTA_PAUSE
4 : TSTA_AUD_PAUSE 5:TSTA_SEARCH FWD 6:TSTA_SEARCH_BWD
7 : TSTA_PLAY”
Current Folder Name String reply
TIME STRING reply
TIME STRING reply
Folder Name String reply
Current Track Number reply
Current Index Number reply
Current Track Size reply
TIME STRING reply of total Current Track time
Current Track Title Name String reply
Current Track Artist Name String reply
Current Track Album Name String reply
Current Track Channel Number reply
Current Track Audio Format String reply
Current Track Sample Rate 2byte reply
Total Track Number 2 byte reply
File Name String reply of specified Track No.
Current Track File Name String reply
Cue File Name String reply
Cue TIME STRING reply
Hot No. 1byte reply
Hot Playing File Name String reply
Hot No. File Name String reply
Hot No. Start TIME STRING reply
Current Playing Program No. 2 byte reply
Current Playing File Name String reply
Program No. File Name String reply
Total Program number 2 bytes reply
MS4Bytes=Rch,LS4Byte=Lch =8bytesMeterValue reply
0: FWD/1:REV
Value of speed scale x 10.
Appendix
Category
Device status
Command
Command code
Command
Category code
number
Parameter 1
Parameter 2
ANS POW STAT*
11
60 Number
-
ANS WIN STAT
ANS DIM STAT*
ANS LOK STAT*
ANS PITCH STAT*
11
11
11
11
61
62
63
64
Number
Number
Number
Number
-
ANS PITCH VAL*
11
65 Number
-
ANS KEY STAT
ANS PRS XXXX
11
11
66 Number
67 Number
-
ANS UBL VOL
11
68 Number
-
ANS FW VER
ANS DRV VER
ANS DEV ID
ANS PID
ANS PPWD
ANS ERROR*
11
11
11
11
11
11
69
70
71
72
73
74
-
ANS AVAILABLE PSTAT
11
75 Number
-
ANS CUR MEDIA
11
78 String
-
ANS ALV XXXX
11
79 Number
-
Number
Number
Number
Number
Name String
Number
APPENDIX
Remarks
“GET POW STAT 1byte reply 0:POWER ON 1:POWER NEUTRAL
2:POWER STANDBY”
See FRS Main State.
Dimmer Value 1byte reply
Lock No. 1byte specification
Pitch switch Value 1byte reply ON:1/OFF:0
“Pitch Value 5bytes specification Byte1 symbol =0:positive/1:negative
Byte2 Pitch hundred value (0 - 9) Byte3 Pitch ten value (0 - 9) Byte4 Pitch
single value (0 - 9) Byte5 Pitch first decimal value (0 - 9)”
Key Sw Value 1byte ON:1/OFF:0 reply
Preset Value 4bytes reply
“Volume Value 4bytes reply Byte1 symbol =0:positive/1:negative Byte2
Volume(db) ten value (0 - 9) Byte3 Volume(db) single value (0 - 9) Byte4
Volume(db) first decimal value (0 - 9) Byte5 Volume(db) first decimal value
(0 - 9)”
Version No. reply
Optical Drive Version No. reply
Device ID=MAC Addr 12bytes
“GeneCode 4bytes ModelCode 4bytes ModelSubCode 4bytes”
Password string reply
Error Code
“Transferable power status indicated in 2 bytes Bit Pattern bit0: Power
OFF bit1: Power ON bit2: Power Neutral bit3: Network Standby bit4:
Standby”
“Return current media. Within 16 characters. E.g.) CD USB1 USB2 iPod/
iPhone NET SD1 SD2 SD(Front) SD(Rear)”
SYSCFG Setting value
Appendix
Category
Get list
Command
ANS MEDIA TTL
ANS MEDIA XXXX
ANS MSV TTL
ANS MSV XXX
ANS FDR TTL XXXX
ANS FDR XXXX YYYY
ANS SND TTL XXXX
ANS SND XXXX YYYY
ANS M3U TTL XXXX
ANS M3U XXXX YYYY
ANS PPL TTL XXXX
ANS PPL XXXX YYYY
Command code
Command
Category code
number
13
13
13
13
13
13
13
13
13
13
13
13
Parameter 1
61
62
64
65
67
68
70
71
73
74
76
77
Number
Name String
Number
Name String
Number
Name String
Number
Name String
Number
Name String
Number
Name String
APPENDIX
Parameter 2
-
Remarks
Media List Total No. 2bytes reply
Media Name String reply of Media List Index No.
Media Server Total No. 2 bytes reply
Media Server Name String reply of Media Server No.
Total Folder Number 2 bytes reply
Folder No. Folder Name String reply
Total Sound File Number 2 bytes reply
Track No. File Name String reply
Total M3U File Number 2 bytes reply
File Name String reply
Total PPL File Number 2 bytes reply
File Name String reply
Appendix
nnD&M RC Communication format
Control Command List
KEY Control
File List
Description
Standby
PowerON
PLAY
STOP
PAUSE
RWD
FF
Track Jump
Track Jump >>I
Track Jump I<<
SKIP BACK
HOT START PLAY
HOT START CUE UP
Frame
Frame +
Frame –
Hot Start List Store
Select Folder
HotStart Set
nnnn
Hot Start No. nn
Hot Start No. nn
xxxx
Command
@02312‘¥r’
@023PW‘¥r’
@02353‘¥r’
@02354‘¥r’
@02348‘¥r’
@02350‘¥r’
@02352‘¥r’
@0Trnnnn‘¥r’
@02332‘¥r’
@02333‘¥r’
@023SB‘¥r’
@0HPnn‘¥r’
@0HCnn‘¥r’
@0frON‘¥r’
@0fr00‘¥r’
@0fr01‘¥r’
@0HSSR‘¥r’
@0Sfxxxx‘¥r’
@0hsnnNNNNNNN‘¥r’
APPENDIX
Remarks
nn : Hot Start No. (nn=01~20)
nn : Hot Start No. (nn=01~20)
xxxx : Folder No.
nn: Hot Start No.
NNNNNNN : The full path.
Appendix
Status Command List
Status
Status request command (host ! this unit)
Request.
Command
Ans.
Power Status
@0?PW‘¥r’
Power Mode
Disc/USB Storage
@0?CD ‘¥r’
Disc
STOP
Status
@0?ST‘¥r’
Play
Others
Status message (this unit ! host)
On
Standby
No Disc/USB Storage
Disc/USB Storage In
STOP
Cue
AutoCue
PLAY
PLAYPAUSE
REPEAT PLAY PAUSE
FF
RWD
A-B Repeat
Loading
Busy
File List
TrackEdit/Preset
Operation Error
APPENDIX
Command
@0PW00‘¥r’
@0PW01‘¥r’
@0CDNC‘¥r’
@0CDCI‘¥r’
@0STST‘¥r’
@0STCE‘¥r’
@0STAC‘¥r’
@0STPL‘¥r’
@0STPP‘¥r’
@0STPR‘¥r’
@0STFF‘¥r’
@0STRW‘¥r’
@0STAB‘¥r’
@0STLD‘¥r’
@0STBY‘¥r’
@0STFL‘¥r’
@0STED‘¥r’
@0STER‘¥r’
Remarks
Appendix
Track, Key
settings
Status request command (host ! this unit)
Request.
Command
Total Track Number
@0?Tt‘¥r’
Track Number
@0?Tr‘¥r’
HOT START PLAY No.
(xx : Hot Start No.)
Elapse Time
Remain Time
Status message (this unit ! host)
Command
XXXX
@0TtXXXX‘¥r’
XXXX
@0TrXXXX‘¥r’
Ans.
@0?HP‘¥r’
HOT START PLAY
XX
@0HPXX‘¥r’
@0?ET‘¥r’
@0?RM‘¥r’
Elapse Time
Remain Time
hhmmss
hhmmss
@0EThhhmmss‘¥r’
@0RMhhhmmss‘¥r’
Remarks
4 digits
4 digits
During HOT START playback for No.XX
@0HPxx‘¥n’
Normally, during PLAY, STOP, etc.
@0HP00‘¥n’
D: Drive No. (2 : USB, 3 : CD, 5: Net)
XXXX… : Folder name
(Max 256 characters)
Select Folder
@0?SF‘¥r’
Select Folder
DXXXXXXXXXXXX @0SFDXXXXXXXXXXXX‘¥r’
Folder Name
DXXXXXXXXXXXX @0FnXXXXXXXXXXXX‘¥r’
Folder Name
(NNNN : Folder No.)
@0?FnNNNN‘¥r’
Track Name
Track Size
Total Folder Number
(xxxx : Track No.)
(xxxx : Track No.)
@0?tnxxxx‘¥r’
@0?tsxxxx‘¥r’
@0?Tf‘¥r’
Total Folder Number
CH
@0?ch‘¥r’
CH
Algo
@0?af‘¥r’
Algo
FS
Artist
Title
Album
@0?fs‘¥r’
@0?at‘¥r’
@0?ti‘¥r’
@0?al‘¥r’
FS
Artist
Title
Album
nn : Hot Start No.
@0?Hsnn‘¥r’
Hot Start Set
@0?PG‘¥r’
Program Play/
Nomal Play
XXXXXX
Play Track Algo/File
Hot Start Set
Program Play/
Nomal Play
STEREO
MONO
PCM
MP3
AAC
XX
XXX
XXX
XXX
@0tnXXXXXX‘¥r’
@0tsXXXXXX‘¥r’
@0TfXXXX‘¥r’
@0chST‘¥r’
@0chMO‘¥r’
@0afPMXX‘¥r’
@0afM3XXX‘¥r’
@0afACXXX‘¥r’
@0fsXX‘¥r’
@0atXXX‘¥r’
@0tiXXX‘¥r’
@0alXXX‘¥r’
@0Hsnnxxxxxxx:HHHmmss‘¥r’
Nomal Play
Program Play
APPENDIX
@0PG00‘¥r’
@0PG01‘¥r’
ex1. Root folder in USB storage
@0SF2‘¥r’
ex2. ¥Folder01 in USB storage
@0SF2/Folder01‘¥r’
D : Drive No. (2: USB, 3: CD, 5: Net)
XXXX… : Folder name of Folder No.NNNN
(Max 256 characters)
XX : The bit length
XXX : bps
XXX : bps
XX is 48 for 48kHz, 44 for 44.1kHz, etc.
XXX… : Artist, Max 64 characters
XXX… : Title, Max 64 characters
XXX… : Album, Max 64 characters
xxx… : The full path of Track
“:” : separator
HHHmmss : Time
Appendix
Status request command (host ! this unit)
Request.
Command
Version etc
Version
@0?VN‘¥r’
Ans.
Version
Status message (this unit ! host)
Command
xxxxxxxx
@0VNxxxxxxxxmmmmmmmm‘¥r’
APPENDIX
Remarks
xxxxxxxx : Version No.
mmmmmmmm : Model name
License
This section contains details of the consent agreement (license) of the software used in the DN-700C.
The original text is used to ensure accuracy is maintained.
[NFLC]
(1) This product is installed with “NetFront Living Connect” home
network interconnection software made by ACCESS Co., Ltd.
(2) Logos specified by ACCESS Co., Ltd. (ACCESS company logo and
NetFront logo)
(3) ACCESS and NetFront are the trademarks or registered trademarks
of ACCESS Co., Ltd in Japan and other countries.
(4) Copyright (c) 2012 ACCESS CO., LTD.
[GD]
Portions copyright 1994, 1995, 1996, 1997, 1998, 1999, 2000, 2001, 2002, 2003,
2004 by Cold Spring Harbor Laboratory. Funded under Grant P41-RR02188 by the
National Institutes of Health.
Portions copyright 1996, 1997, 1998, 1999, 2000, 2001, 2002, 2003, 2004 by Boutell.Com, Inc.
Portions relating to GD2 format copyright 1999, 2000, 2001, 2002, 2003, 2004 Philip Warner.
Portions relating to PNG copyright 1999, 2000, 2001, 2002, 2003, 2004 Greg Roelofs.
Portions relating to gdttf.c copyright 1999, 2000, 2001, 2002, 2003, 2004 John Ellson
([email protected]).
Portions relating to gdft.c copyright 2001, 2002, 2003, 2004 John Ellson
([email protected]).
Portions relating to JPEG and to color quantization copyright 2000, 2001, 2002, 2003, 2004, Doug Becker and copyright (C) 1994, 1995, 1996,
1997, 1998, 1999, 2000,
2001, 2002, 2003, 2004 Thomas G. Lane. This software is based in part on the work of the Independent JPEG Group. See the file READMEJPEG.TXT for more information.
Portions relating to GIF compression copyright 1989 by Jef Poskanzer and David Rowley, with modifications for thread safety by Thomas
Boutell.
Portions relating to GIF decompression copyright 1990, 1991, 1993 by David Koblas, with modifications for thread safety by Thomas Boutell.
Portions relating to WBMP copyright 2000, 2001, 2002, 2003, 2004 Maurice Szmurlo and Johan Van den Brande.
Portions relating to GIF animations copyright 2004 Jaakko Hyvatti
([email protected])
Permission has been granted to copy, distribute and modify gd in any context without fee, including a commercial application, provided that this
notice is present in user-accessible supporting documentation.
LICENSE
License
This does not affect your ownership of the derived work itself, and the intent is to assure proper credit for the authors of gd, not to interfere with your productive use of gd. If you have questions, ask. “Derived works”
includes all programs that utilize the library. Credit must be given in user-accessible documentation.
This software is provided “AS IS.” The copyright holders disclaim all warranties, either express or implied, including but not limited to implied warranties of
merchantability and fitness for a particular purpose, with respect to this code and accompanying documentation.
Although their code does not appear in the current release, the authors also wish to thank Hutchison Avenue Software Corporation for their prior contributions.
(1)“This product contains NetFront Living Connect of ACCESS CO., LTD.”
(2)“ACCESS and NetFront are trademarks or registered trademarks of ACCESS CO., LTD. in Japan and in other countries.”
(3)“Copyright (c) 2012 ACCESS CO., LTD.”
expat
Copyright (c) 1998, 1999, 2000 Thai Open Source Software Center Ltd
Permission is hereby granted, free of charge, to any person obtaining a copy of this software and associated documentation files (the “Software”), to deal in the Software without restriction, including without limitation
the rights to use, copy, modify, merge, publish, distribute, sublicense, and/or sell copies of the Software, and to permit persons to whom the Software is furnished to do so, subject to the following conditions:
The above copyright notice and this permission notice shall be included in all copies or substantial portions of the Software.
THE SOFTWARE IS PROVIDED “AS IS”, WITHOUT WARRANTY OF ANY KIND, EXPRESS OR IMPLIED, INCLUDING BUT NOT LIMITED TO THE WARRANTIES OF
MERCHANTABILITY, FITNESS FOR A PARTICULAR PURPOSE AND NONINFRINGEMENT.
IN NO EVENT SHALL THE AUTHORS OR COPYRIGHT HOLDERS BE LIABLE FOR ANY CLAIM, DAMAGES OR OTHER LIABILITY, WHETHER IN AN ACTION OF CONTRACT, TORT OR OTHERWISE, ARISING FROM,
OUT OF OR IN CONNECTION WITH THE SOFTWARE OR THE USE OR OTHER DEALINGS IN THE SOFTWARE.
LICENSE
License
md5
/* Copyright (C) 1991-2, RSA Data Security, Inc. Created 1991. All rights reserved.
License to copy and use this software is granted provided that it is identified as the “RSA Data Security, Inc. MD5 Message-Digest Algorithm” in all material mentioning or referencing this software or this function.
License is also granted to make and use derivative works provided that such works are identified as “derived from the RSA Data Security, Inc. MD5 Message-Digest Algorithm” in all material mentioning or referencing
the derived work.
RSA Data Security, Inc. makes no representations concerning either the merchantability of this software or the suitability of this software for any particular purpose. It is provided “as is” without express or implied
warranty of any kind.
These notices must be retained in any copies of any part of this documentation and/or software.
*/
zlib
/* zlib.h -- interface of the ‘zlib’ general purpose compression library version 1.2.7, May 2nd, 2012
Copyright (C) 1995-2012 Jean-loup Gailly and Mark Adler
This software is provided ‘as-is’, without any express or implied warranty. In no event will the authors be held liable for any damages arising from the use of this software.
Permission is granted to anyone to use this software for any purpose, including commercial applications, and to alter it and redistribute it freely, subject to the following restrictions:
1. The origin of this software must not be misrepresented; you must not claim that you wrote the original software. If you use this software in a product, an acknowledgment in the product documentation would be
appreciated but is not required.
2. Altered source versions must be plainly marked as such, and must not be misrepresented as being the original software.
3. This notice may not be removed or altered from any source distribution.
Jean-loup Gailly
[email protected]
Mark Adler
[email protected]
*/
LICENSE
License
libpng
This copy of the libpng notices is provided for your convenience. In case of any discrepancy between this copy and the notices in the file png.h that is included in the libpng distribution, the latter shall prevail.
COPYRIGHT NOTICE, DISCLAIMER, and LICENSE:
If you modify libpng you may insert additional notices immediately following this sentence.
libpng versions 1.2.6, August 15, 2004, through 1.2.29, May 8, 2008, are Copyright (c) 2004, 2006-2008 Glenn Randers-Pehrson, and are distributed according to the same disclaimer and license as libpng-1.2.5 with
the following individual added to the list of Contributing Authors
Cosmin Truta
libpng versions 1.0.7, July 1, 2000, through 1.2.5 - October 3, 2002, are Copyright (c) 2000-2002 Glenn Randers-Pehrson, and are distributed according to the same disclaimer and license as libpng-1.0.6 with the
following individuals added to the list of Contributing Authors
Simon-Pierre Cadieux
Eric S. Raymond
Gilles Vollant
and with the following additions to the disclaimer:
There is no warranty against interference with your enjoyment of the library or against infringement. There is no warranty that our efforts or the library will fulfill any of your particular purposes or needs. This library
is provided with all faults, and the entire risk of satisfactory quality, performance, accuracy, and effort is with the user.
libpng versions 0.97, January 1998, through 1.0.6, March 20, 2000, are Copyright (c) 1998, 1999 Glenn Randers-Pehrson, and are distributed according to the same disclaimer and license as libpng-0.96, with the
following individuals added to the list of Contributing Authors:
Tom Lane
Glenn Randers-Pehrson
Willem van Schaik
libpng versions 0.89, June 1996, through 0.96, May 1997, are Copyright (c) 1996, 1997 Andreas Dilger
Distributed according to the same disclaimer and license as libpng-0.88, with the following individuals added to the list of Contributing Authors:
John Bowler
Kevin Bracey
Sam Bushell
Magnus Holmgren
Greg Roelofs
Tom Tanner
LICENSE
License
libpng versions 0.5, May 1995, through 0.88, January 1996, are Copyright (c) 1995, 1996 Guy Eric Schalnat, Group 42, Inc.
For the purposes of this copyright and license, “Contributing Authors” is defined as the following set of individuals:
Andreas Dilger
Dave Martindale
Guy Eric Schalnat
Paul Schmidt
Tim Wegner
The PNG Reference Library is supplied “AS IS”. The Contributing Authors and Group 42, Inc. disclaim all warranties, expressed or implied, including, without limitation, the warranties of merchantability and of fitness
for any purpose. The Contributing Authors and Group 42, Inc. assume no liability for direct, indirect, incidental, special, exemplary, or consequential damages, which may result from the use of the PNG Reference
Library, even if advised of the possibility of such damage.
Permission is hereby granted to use, copy, modify, and distribute this source code, or portions hereof, for any purpose, without fee, subject to the following restrictions:
1. The origin of this source code must not be misrepresented.
2. Altered versions must be plainly marked as such and must not be misrepresented as being the original source.
3. This Copyright notice may not be removed or altered from any source or altered source distribution.
The Contributing Authors and Group 42, Inc. specifically permit, without fee, and encourage the use of this source code as a component to supporting the PNG file format in commercial products. If you use this source
code in a product, acknowledgment is not required but would be appreciated.
A “png_get_copyright” function is available, for convenient use in “about” boxes and the like:
printf(“%s”,png_get_copyright(NULL));
Also, the PNG logo (in PNG format, of course) is supplied in the files “pngbar.png” and “pngbar.jpg” (88x31) and “pngnow.png” (98x31).
Libpng is OSI Certified Open Source Software. OSI Certified Open Source is a certification mark of the Open Source Initiative.
Glenn Randers-Pehrson
glennrp at users.sourceforge.net
May 8, 2008
LICENSE
Dimensions
29/64
(11.6)
1 49/64
(45.0)
Weight: 9 lbs 0.62 oz (4.1 kg)
13 35/64 (344.0)
1 49/64
(45.0)
17/64
(6.8)
1 47/64
(44.0)
19 (482.6)
13 15/32
(342.0)
12 25/32
(324.8)
7/32
(5.6)
Unit: in. (mm)
V00
3520 10201 00AP