1
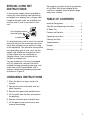
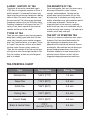
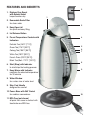
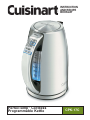
INSTRUCTION AND RECIPE BOOKLET PerfecTemp™ Cordless Programmable Kettle CPK-17C IMPORTANT SAFEGUARDS When using an electrical appliance, basic safety precautions should always be taken, including the following: garage, and the door does not touch the unit as it closes. Contact could cause the unit to turn ON, creating a risk of fire. 12. Do not use appliance for other than intended use. 13. Scalding may occur if the lid is removed during the heating cycle. 1. READ ALL INSTRUCTIONS. 2. Unplug from outlet when not in use and before cleaning. Allow to cool before putting on or taking off parts, and before cleaning appliance. 3. Do not touch hot surfaces. Use handle. 4. To protect against fire, electric shock and injury to persons, DO NOT IMMERSE CORD, PLUG OR BASE UNIT in water or other liquids. WARNING: RISK OF FIRE 5. Close supervision is necessary when any appliance is used by or near OR ELECTRIC SHOCK children. The lightning flash with arrowhead 6. Do not operate any appliance with a symbol within an equilateral triangle is damaged cord or plug, or after the appliance has malfunctioned or has intended to alert the user to the been damaged in any manner. Return presence of uninsulated dangerous appliance to the nearest Cuisinart voltage within the product’s enclosure Authorized Service Facility for that may be of sufficient magnitude to examination, repair or adjustment. constitute a risk of fire or electric shock 7. The use of accessory attachments not to persons. recommended by Cuisinart may result in fire, electric shock or injury to persons. The exclamation point within an 8. Do not use outdoors. equilateral triangle is intended to 9. Do not let power cord hang over edge of alert the user to the presence of table or counter, or touch hot surfaces. important operating and maintenance 10. Do not place on or near a hot gas or (servicing) instructions in the literature electric burner, or in a heated oven. accompanying the appliance. 11. Always attach the plug to the appliance first, then plug cord into wall outlet. To disconnect, push switch to Off, then remove plug from wall outlet. RISK OF FIRE OR ELECTRIC SHOCK DO NOT OPEN CAUTION: Do not operate your appliance in an appliance garage or under a wall cabinet. When WARNING: TO REDUCE THE RISK OF FIRE OR ELECTRIC SHOCK, storing any appliance in an DO NOT REMOVE COVER (OR BACK) appliance garage always unplug the unit from the NO USER-SERVICEABLE PARTS INSIDE electrical outlet. Be sure the REPAIR SHOULD BE DONE BY AUTHORIZED SERVICE PERSONNEL ONLY appliance does not touch the interior wall of the appliance 1 FOR HOUSEHOLD USE ONLY SAVE THESE INSTRUCTIONS WARNING SPECIAL CORD SET INSTRUCTIONS: A short power-supply cord is provided to reduce the risks resulting from becoming entangled in or tripping over a longer cord. Longer extension cords are available and may be used if care is exercised in their use. We suggest you save all packing materials in the event that future shipping of the machine is needed. Keep all plastic bags away from children. TABLE OF CONTENTS Important Safeguards. . . . . . . . . . . . . . . . . . . . 1 Cord Set and Unpacking Instructions . . . . . . . 2 All About Tea . . . . . . . . . . . . . . . . . . . . . . . . . . 3 Circuit Grounding Conductor Connected Properly Grounding Prong Features and Benefits . . . . . . . . . . . . . . . . . . . 4 Operating Instructions . . . . . . . . . . . . . . . . . . . 5 Cleaning and Care . . . . . . . . . . . . . . . . . . . . . . 6 If a long extension cord is used, the marked electrical rating of the extension cord must be at least as great as the electrical rating of the appliance. The extension cord should be a grounding-type 3-wire cord, and the longer cord should be arranged so that it will not drape over the countertop or tabletop where it can be pulled on by children or tripped over. Troubleshooting . . . . . . . . . . . . . . . . . . . . . . . . 6 Recipes. . . . . . . . . . . . . . . . . . . . . . . . . . . . . . . 7 Warranty . . . . . . . . . . . . . . . . . . . . . . . . . . . . . 10 For your protection, this unit is equipped with a 3-conductor cord set that has a molded 3-prong grounding-type plug, and should be used in combination with a properly connected grounding-type outlet as shown in Figure A. UNPACKING INSTRUCTIONS 1. Place the box on a large, sturdy, flat surface. 2. Remove the instruction book and any other literature. 3. Remove the upper pulp molded insert. 5. Lift the kettle from the box and remove the polybag. 6. Remove the lower pulp molded insert. 7. Lift the power base from the box and remove the polybag. 2 A BRIEF HISTORY OF TEA THE BENEFITS OF TEA The origins of tea can be traced back nearly 5,000 years to a legendary emperor of China. A prolific herbalist, it is believed that leaves from some twigs he was burning floated into a boiling kettle of water. The results were delicious, and tea was invented. The hot beverage flourished throughout southern Asia; the Dutch East India th Company introduced it to Europe in the late 17 century. From there it spread to the American colonies and the rest of the world! Tea is more popular than ever. And every cup is brimming with benefits: natural vitamins, minerals, and antioxidants. Drinking tea has actually been found to be better for you than drinking water. It rehydrates your body and its healthy antioxidants may offer protection against a wide range of diseases. Tea can be an invigorating start to the morning, a soothing break from a busy day, or a comfortable way to unwind and relax each evening – it all adds up to a healthy mind, body, and spirit. TYPES OF TEA There are many types of teas, the most popular being black, oolong, green and white. All teas come from the same warm-weather evergreen plant: the Camellia sinensis, or tea plant. Tisane or “herbal” teas can be a mixture of just about anything: herbs, flowers, spices, seeds, etc. There are also varieties of tea that are real teas with spices or other flavourings blended in. Earl Grey, for instance, is black tea with bergamot peel or oil added. THE ART OF STEEPING TEA Great care is taken to create every tea’s unique character. Each tea should be brewed at the right temperature to properly savour and appreciate all the natural and aromatic flavours and benefits. More delicate teas risk burning at general steeping temperatures; this variety should be steeped at a lower temperature to optimize flavours. Below is a chart with our suggested steeping temperatures and times. TEA STEEPING CHART 3 Type Temperature Steep Time Delicate Tea 160°F (71°C) 1–2 min Green Tea 175°F (80°C) 2–3 min White Tea 185°F (85°C) 2–3 min Oolong Tea 190°F (88°C) 3–4 min French Press 200°F (95°C) 4–5 min Black & Herbal Teas 212°F (full boil [100°C]) 3–5 min FEATURES AND BENEFITS 2 1. Dripless Pour Spout with Splash Guard keeps counters dry 1 2. Removable Scale Filter for clean water 3 3. Easy-Open Lid for quick and easy filling 4. Lid Release Button 5. Preset Temperature Controls with Indicators Delicate Tea (160°F [71°C]) Green Tea (175°F [80°C]) Oolong Tea (185°F [85°C]) 4 5 6 7 White Tea (190°F [88°C]) French Press (200°F [95°C]) Black Tea (Boil - 212°F [100°C]) 8 6. Start (Stop) with Indicator to start/stop the heating process 7. Keep Warm with Indicator maintains the selected temperature for 30 minutes 9 8. Water Window for a clear view of water level 9. Stay-Cool Handle designed for comfort 10. Power Base with 360° Swivel for cordless convenience 10 11. BPA Free (not shown) all parts that come in contact with food/water are BPA-free 4 BEFORE USING FOR THE FIRST TIME Before using your Cuisinart® PerfecTemp™ Cordless Programmable Kettle for the first time, we recommend rinsing the kettle with water to remove any dust or residue remaining from the manufacturing process. OPERATION/HEATING 1. Open kettle by pressing the Lid Release (OPEN) Button. 2. Add fresh, cold water, watching level in water window. Do not fill past 1.7L mark – overfilling could cause boil-over. 3. Close the lid by pressing down until it locks shut. 4. Make sure the unit is plugged in, then place the kettle on the power base. 5. Press the preset temperature button for the type of tea you are brewing; both preset and Keep Warm buttons will light up. NOTE: If Keep Warm function has been turned off, only the preset temperature button will light up. 6. Begin the heating process by pressing the Start button. The selected preset will flash until water reaches set temperature. To turn kettle off at any time, simply press the Start (Stop) button again. 7. Once your kettle has reached the selected temperature, the unit will beep. The Keep Warm, preset temperature and Start lights will stay on, and temperature will be maintained for 30 minutes. 8. Lift the kettle off the base to pour water. All lights will turn off while the kettle is off the base. 9. Return kettle to the base. Indicator lights will go back on and the Keep Warm cycle will pick up right where it left off. 5 MEMORY FEATURE The kettle features an internal “memory” that lets you leave the kettle off the base for up to 2 minutes without it going into standby mode. When returned to the base, it will restart the heating and/or Keep Warm cycles right where they left off. NOTE: If kettle goes into standby mode before it’s returned to base, simply reselect your preset temperature and press Start to restart. KEEP WARM MODE Keep Warm is the kettle’s default function that automatically maintains selected temperature for 30 minutes. If you have selected the Boil preset, your unit will hold a temperature just below boiling during the Keep Warm cycle. To bring water back to a rolling boil, press the Start button twice. Keep Warm can be turned off by pressing the Keep Warm button at any time before or during the heating cycle. To turn it back on, just press the button again. If Keep Warm is not selected, when the kettle reaches the preset temperature the unit will beep and the Start light will turn off. The preset temperature light will remain lit until water temperature has dropped below the preset. BOIL-DRY PROTECTION Your kettle is equipped with boil-dry protection. If it starts heating without enough water in the unit, the heater will automatically shut off to avoid damaging the heating element. The lights will flash and the unit will beep to alert you. Once the kettle has cooled down, lift it off the base, then replace it to reset and restart the heating cycle. The quickest way to cool down the heater is to fill the kettle with cold water; however, you can also wait for it to cool down by itself. SLEEP MODE If the unit is not in use for 5 minutes, it will revert to sleep mode. The heater and all lights will be off, but your last selections will remain in the unit’s memory. To turn the kettle back on, simply press any button, or lift it up and then return it to the base. CLEANING AND CARE DECALCIFICATION Unplug your kettle and allow it to cool before cleaning. Wipe the kettle and base of unit with a soft, damp cloth. Be sure that the electric kettle socket is kept dry. Dry all parts after every use. Never immerse kettle or power base in water. Any other servicing should be performed by an authorized service representative. REMOVABLE SCALE FILTER This kettle has a scale filter inside for clean water. The filter can be removed by grasping it and pulling upward. Run under hot water and rub with a clean cloth or brush. Replace the filter; it will snap back into place. Decalcification refers to removing mineral deposits, which may form in the interior of the kettle and may result in discoloration. To get the best performance from your Cuisinart® PerfecTemp™ Cordless Programmable Kettle, decalcify your unit from time to time. Frequency will depend on the hardness of your tap water and how often you use your kettle. We suggest using a kettle descaler in order to dissolve these deposits or scale. Follow the directions on the descaler package. If a commercial descaler is not available, fill the kettle with enough white vinegar to cover the bottom by about ½ inch (1.25 cm). Heat the vinegar to a boil. Repeat this with cooled vinegar until all deposits are removed. When the descaling process is complete, empty the kettle and rinse out several times with clean water. TROUBLESHOOTING Problem Solution No lights are on Be sure the unit is plugged in and the kettle is securely on the power base. Then press your preset temperature selection and press Start. Kettle is not heating water Be sure to press Start after pressing your temperature selection. If you are pressing Start and kettle is still not heating, call Cuisinart Customer Service. Kettle goes into standby mode instead of remembering its settings when put back on the base. If the kettle is off the base for more than 2 minutes, the internal memory turns off. Simply put it back on the base, reselect your settings and press Start. Keep Warm function is not working The Keep Warm function is the default setting; the LED light indicates whether it is on or off. Unit beeps and all the lights are flashing The water level in the kettle is too low for heating. To avoid damaging the heating element, remove the kettle from base, add water, return it to the base and press Start again. I pressed the wrong temperature button Change your selection at any time by simply pressing another preset. When flashing light stays lit, the selected temperature has been reached. Water is taking longer than usual to heat Several variables can affect heat-up time, including room temperature, how much water is in the kettle, and the temperature of the water. If you’ve recently heated water to a higher temperature than your current selection, the kettle will appear to be heating, but is actually waiting for water to cool down. Add cold water to speed the process. 6 RECIPES We’ve included a variety of tea recipes to enjoy with your Cuisinart® PerfecTemp™ Kettle. If you’re a coffee lover, be sure to try our French Press option. Brewing in a French Press maintains essential oils to maximize coffee flavour. And don’t forget to use the Boil setting to prepare your favourite hot breakfast cereals, instant soup and hot chocolate drinks. ICED SOUTHERN SWEET TEA A staple in any Southern household, Cuisinart’s Sweet Tea is a perfect companion on a hot summer day. Makes one 8-ounce (250 ml) serving 3 WHITE TEA WITH FENNEL Fennel is a great aid in digestion. This tea is light and fragrant. Makes one 8-ounce (250 ml) serving 1½ 1 1 water tablespoons (25 ml) fennel seed teaspoon (5 ml) honey bag white tea (or 1 serving loose tea) 1. Put at least 10 ounces (300 ml) of water into your kettle and select the White setting. 2. While water is heating, put the fennel and honey into an 8-ounce (250 ml) mug. Add the tea. Pour 8 ounces of the hot water over the tea and stir to combine. bags black tea (or three servings loose tea) water cup (250 ml) ice cubes cup (50 ml) simple syrup* 3. Let tea steep for 2 to 3 minutes. Strain and enjoy. 1. Put tea in a small bowl. Put at least 10 ounces (300 ml) of water into your kettle and select the Black setting. Pour 8 ounces (250 ml) of the hot water over tea and let steep 3 to 5 minutes. Strain. Refrigerate tea until chilled. THAI ICED TEA 1 ¼ 2. Put the ice in a tall glass. Pour the chilled, steeped tea over the ice and stir in the simple syrup. Adjust sweetness to taste. * While you can purchase simple syrup at gourmet shops, it is easy to make at home (and less expensive). To prepare, add equal parts granulated sugar and water to a small saucepan set over medium-low heat. Let mixture heat until all of the sugar has dissolved. Cool mixture to room temperature. Nutritional information per serving: $BMPSJFTGSPNGBU tDBSCHtQSPHtGBUH tTBUGBUHtDIPMNHtTPENHtDBMDNHtGJCFSH Nutritional information per serving: $BMPSJFTGSPNGBU tDBSCHtQSPHtGBUH tTBUGBUHtDIPMNHtTPENHtDBMDNHtGJCFSH A very sweet treat, this tea is a perfect way to end a spicy Thai meal. Makes two 8-ounce (250 ml) servings 2 oolong tea bags (or two servings loose tea) water ice 4 ounces (115 ml) sweetened condensed milk 1. Put the tea into a small bowl. Put at least PVODFTNM PGXBUFSJOUPZPVSLFUUMF and select the Delicate setting. Pour 12 ounces (350 ml) of the hot water over the tea bags and let steep 10 to 15 minutes. Strain and cool to room temperature. "EETJYPVODFTNM PGUIFDPPMFEUFB to two tall glasses filled with ice. Add 2 ounces (60 ml) of the sweetened condensed milk to each glass. Stir to combine and serve. Nutritional information per serving: $BMPSJFTGSPNGBU tDBSCHtQSPHtGBUH tTBUGBUHtDIPMNHtTPENHtDBMDNHtGJCFSH 7 BUBBLE TEA MOROCCAN MINT TEA Makes two 10-ounce (300 ml) servings Makes one 8-ounce (250 ml) serving Tapioca: ¼ cup (50 ml) large pearl tapioca, dried 2 cups (500ml) room temperature water water 2 tablespoons (30 ml) fresh mint leaves (about 16 medium leaves) 1 to 2 tablespoons (15 to 30 ml) granulated sugar 1 bag black tea (or 1 serving loose tea) Sugar Syrup: ½ cup (125 ml) packed light brown sugar ½ cup (125 ml) granulated sugar 1 cup (250 ml) water Tea: water 2 bags black tea (or two servings loose tea) ½ cup (125 ml) half & half ice (optional) 1. Prepare the tapioca: Put the dried tapioca in a medium bowl and add the room temperature water. Cover and let sit overnight to soften. Once plumped, strain, discarding water and reserving the tapioca (tapioca should be gummy-like in texture and taste). 2. Prepare sugar syrup: In a small saucepan, combine the sugars and measured water and set over medium-low heat. Let mixture heat until all of the sugar has dissolved. Cool mixture to room temperature. 3. Prepare the tea: Put tea into a small bowl. Put at least 20 ounces (590 ml) of water into your kettle and select the Black TFUUJOH1PVSPVODFTNM PGUIFIPU water over tea and let steep 3 to 5 minutes. Strain and cool to room temperature. 'PSFBDITFSWJOHQVUDVQNM FBDIPG the tapioca, sugar syrup and half & half into a tall glass. Add ½ of the tea and stir to combine. For a colder drink, add ice. Serving note: Traditionally, Bubble Tea is served with a large straw so the tapioca can be enjoyed while sipping the tea. Nutritional information per serving: $BMPSJFTGSPNGBU tDBSCHtQSPHtGBUH tTBUGBUHtDIPMNHtTPENHtDBMDNHtGJCFSH 1. Put at least 10 ounces (300 ml) of water into your kettle and select the Black setting. 2. While water is heating, put the mint and sugar into an 8-ounce (250 ml) mug. Using a spoon, crush the mint and sugar together to release the mint’s oils. Add the tea. Pour 8 ounces (250 ml) of the hot water over the tea and stir to combine. 3. Let tea steep for 3 to 5 minutes. Strain and enjoy. Nutritional information per serving: $BMPSJFTGSPNGBU tDBSCHtQSPHtGBUH tTBUGBUHtDIPMNHtTPENHtDBMDNHtGJCFSH GINGER, LEMON & HONEY TEA Makes one 8-ounce (250 ml) serving water 3 tablespoons (45 ml) chopped fresh ginger ½ teaspoon (2 ml) fresh lemon juice ½ to 1 tablespoon (7 to 15 ml) honey 1 bag green tea (or 1 serving loose tea) 1. Put at least 10 ounces (300 ml) of water into your kettle and select the Green setting. 2. While water is heating, put the ginger, lemon juice and honey into an 8-ounce (250 ml) mug. Add the tea. Pour 8 ounces (250 ml) of the hot water over the tea and stir to combine. 3. Let tea steep for 2 to 3 minutes. 8 Strain and enjoy. Nutritional information per serving: $BMPSJFTGSPNGBU tDBSCHtQSPHtGBUH tTBUGBUHtDIPMNHtTPENHtDBMDNHtGJCFSH CHAI While this tea is best prepared with half & half, reduced-fat or soy milk may be substituted. (*/(&3+"4.*/&."35*/* Makes two 5-ounce (150 ml) drinks Ginger Syrup: ½ ½ 2 Makes one 6-ounce (175 ml) serving 3 6 ½ ¼ ¼ ½ 3 1 2 black tea bags water ounces (175 ml) half & half teaspoon (2 ml) pure vanilla extract teaspoon (1 ml) freshly ground black pepper teaspoon (1 ml)ground cloves teaspoon (2 ml) ground cinnamon star anise pods ½ x ½-inch (1.25 cm x 1.25 cm) piece of peeled fresh ginger pinch orange zest teaspoons (10 ml) honey 1VUUFBCBHTJOUPBOPVODFNM NVH 1VUBUMFBTUPVODFTNM PGXBUFSJOUP ZPVSLFUUMFBOETFMFDUUIF#MBDLTFUUJOH 1PVSPVODFTNM PGUIFIPUXBUFS PWFSUIFUFBCBHTBOEMFUTUFFQUP NJOVUFT 8IJMFUIFXBUFSJTIFBUJOHCSJOHUIFIBMG IBMGBOEWBOJMMBUPBCPJMJOBNFEJVN TBVDFQBOTFUPWFSNFEJVNIFBU0ODFUIF NJYUVSFDPNFTUPBCPJMTUJSJOUIFTQJDFT HJOHFSBOE[FTU-FUUIFNJYUVSFTJNNFS UPNJOVUFT 0ODFUIFUFBIBTTUFFQFEGVMMZTRVFF[FPVU UFBGSPNUFBCBHTSFTFSWJOHUIFUFBBOE EJTDBSEJOHUIFCBHT"EEUIFTUFFQFEUFB UPUIFIBMGIBMGNJYUVSF 4USBJONJYUVSFJOUPBOPVODFNM NVH BOETUJSJOIPOFZ Nutritional information per serving: $BMPSJFTGSPNGBU tDBSCHtQSPHtGBUH tTBUGBUHtDIPMNHtTPENHtDBMDNHtGJCFSH 9 cup (125 ml) water cup (125 ml) granulated sugar tablespoons (30 ml) chopped ginger (approximately one 2-inch [5 cm] piece of ginger) Tea: 1 jasmine tea bag (or 1 serving loose tea) water Cocktail: ice 2 ounces (60 ml) chilled jasmine tea 4 ounces (125 ml) vodka 2 ounces (60 ml) ginger syrup ½ ounce (15 ml) peach schnapps ½ ounce (15 ml) fresh squeezed orange juice (about ½ small orange) 1. Prepare the ginger syrup: Put water and sugar into a small saucepan and place over medium heat. Bring just to a boil to dissolve the sugar. Add the chopped ginger and allow syrup to simmer for about 30 minutes. Strain and reserve the syrup, discarding the ginger. Chill the syrup in the refrigerator until needed. 2. Prepare the tea: Put tea in a heatproof glass or measuring cup. Put at least 10 ounces (300 ml) of water into the kettle and select the Delicate setting. Pour 8-ounces (250 ml) of hot water into the cup. Allow to steep for about 5 minutes. Strain. Refrigerate tea until chilled. 3. Prepare the cocktail: Fill a cocktail shaker with ice. Put cocktail ingredients into the shaker. Shake well and pour evenly between 2 martini glasses. Serve immediately. Nutritional information per serving: $BMPSJFTGSPNGBU tDBSCHtQSPHtGBUH tTBUGBUHtDIPMNHtTPENHtDBMDNHtGJCFSH WARRANTY LIMITED THREE-YEAR WARRANTY We warrant that this Cuisinart product will be free of defects in materials or workmanship under normal home use for 3 years from the date of original purchase. This warranty covers manufacturer’s defects including mechanical and electrical defects. It does not cover damage from consumer abuse, unauthorized repairs or modifications, theft, misuse, or damage due to transportation or environmental conditions. Products with removed or altered identification numbers will not be covered. This warranty is not available to retailers or other commercial purchasers or owners. If your Cuisinart product should prove to be defective within the warranty period, we will repair it or replace it if necessary. For warranty purposes, please register your product online at www.cuisinart.ca to facilitate verification of the date of original purchase and keep your original receipt for the duration of the limited warranty. This warranty excludes damage caused by accident, misuse or abuse, including damage caused by overheating, and it does not apply to scratches, stains, discolouration or other damage to external or internal surfaces that does not impair the functional utility of the product. This warranty also expressly excludes all incidental or consequential damages. Your Cuisinart product has been manufactured to the strictest specifications and has been designed for use only in 120 volt outlets and only with authorized accessories and replacement parts. This warranty expressly excludes any defects or damages caused by attempted use of this unit with a converter, as well as use with accessories, replacement parts or repair service other than those authorized by Cuisinart. If the appliance should become defective within the warranty period, do not return the appliance to the store. Please contact our Customer Service Centre: Toll-free phone number: 1-800-472-7606 Address: Cuisinart Canada 100 Conair Parkway Woodbridge, Ont. L4H 0L2 Email: [email protected] Model: CPK-17C To facilitate the speed and accuracy of your return, please enclose: rGPSTIJQQJOHBOEIBOEMJOHPGUIF product (cheque or money order) r3FUVSOBEESFTTBOEQIPOFOVNCFS r%FTDSJQUJPOPGUIFQSPEVDUEFGFDU r1SPEVDUEBUFDPEFDPQZPGPSJHJOBMQSPPG of purchase r"OZPUIFSJOGPSNBUJPOQFSUJOFOUUPUIF product’s return 1SPEVDUEBUFDPEFDBOCFGPVOEPOUIF underside of the base of the product. The product date code is a 4 or 5 digit number. Example, 90630 would designate year, month & day (2009, June 30th). Note: We recommend you use a traceable, insured delivery service for added protection. Cuisinart will not be held responsible for in-transit damage or for packages that are not delivered to us. To order replacement parts or accessories, call our Customer Service Centre at 1-800472-7606. For more information, please visit our website at www.cuisinart.ca 10 Coffeemakers Cafetières Food Processors Toaster Ovens Wafflemakers Cookware Grille-pain Gaufrier Utensiles de cuisson Robots culinaires Ice Cream Makers Sorbetières Cuisinart offers an extensive assortment of top quality products to make life in the kitchen easier than ever. Try some of our other countertop appliances and cookware, and Savor the Good Life®. Cuisinart offre un vaste choix de produits haut de gamme pour vous faciliter la tâche dans la cuisine. Essayez nos autres appareils de comptoir ainsi que nos ustensiles de cuisine et… Savourez le bonne vie ! www.cuisinart.ca ©2011 Cuisinart CuisinartTM is a registered trademark of Cuisinart 100 Conair Parkway, Woodbridge, ON L4H 0L2 Cuisinart® est une marque de commerce enregistrée de Cuisinart Printed in China / Imprimé en Chine Consumer Call Centre E-mail: / Courriel centre au consommateur : [email protected] Any trademarks or service marks of third parties used herein are the trademarks or service marks of their respective owners. Toutes les autres marques de commerce ou de service qui sont mentionnées dans le présent livret sont des marques de leur propriétaire respectif. 1-800-472-7606 11CC126154 IB-9325-CAN-DL