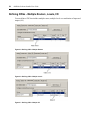
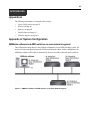
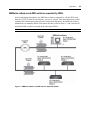
1
AMWorks®
Installer/User Guide
For Technical Support:
www.avocent.com/support
Avocent Corporation
4991 Corporate Drive
Huntsville, Alabama 35805-6201
USA
Tel: +1 256 430 4000
Fax: +1 256 430 4031
Avocent Asia Pacific
Singapore Branch Office
100 Tras Street, #15-01
Amara Corporate Tower
Singapore 079027
Tel: +656 227 3773
Fax: +656 223 9155
Avocent International Ltd.
Avocent House, Shannon Free Zone
Shannon, County Clare, Ireland
Tel: +353 61 715 292
Fax: +353 61 471 871
Avocent Germany
Gottlieb-Daimler-Straße 2-4
D-33803 Steinhagen
Germany
Tel: +49 5204 9134 0
Fax: +49 5204 9134 99
Avocent Canada
20 Mural Street, Unit 5
Richmond Hill, Ontario
L4B 1K3 Canada
Tel: +1 877 992 9239
Fax: +1 877 524 2985
590-605-501C
USA Notification
Warning: Changes or modifications to this unit not expressly approved by the party responsible for compliance
could void the user’s authority to operate the equipment.
Note: This equipment has been tested and found to comply with the limits for a Class A digital device, pursuant to Part 15 of the FCC Rules. These limits are designed to provide reasonable protection against harmful
interference when the equipment is operated in a commercial environment. This equipment generates, uses and
can radiate radio frequency energy and, if not installed and used in accordance with the instruction manual, may
cause harmful interference to radio communications. Operation of this equipment in a residential area is likely to
cause harmful interference in which case the user will be required to correct the interference at his own expense.
Canadian Notification
This digital apparatus does not exceed the Class A limits for radio noise emissions from digital apparatus set out
in the Radio Interference Regulations of the Canadian Department of Communications.
Le présent appareil numérique n’émet pas de bruits radioélectriques dépassant les limites applicables aux
appareils numériques de la classe A prescrites dans le Règlement sur le brouillage radioélectrique édicté par le
Ministère des Communications du Canada.
Japanese Approvals
Safety and EMC Approvals and Markings
EN55022 Class A, EN55024, EN61000-3-2, EN61000-3-3, EN60950, FCC 47CFR Part 15 Class A, CSA
C22.2 No. 60950, IEC 60950, FCC Class A, UL 60950 3rd Edition, VCCI Class A
AMWorks®
Installer/User Guide
Avocent, the Avocent logo, The Power of Being There, AMX,
AMWorks, OSCAR, AutoView, DSR, OutLook, SwitchView and XP
are registered trademarks of Avocent Corporation or its affiliates. All
other marks are the property of their respective owners.
© 2007 Avocent Corporation. All rights reserved. 590-605-501C
iii
T A B L E O F C ON T E N T S
Table of Contents
Chapter 1: Product Overview.......................................................................................... 1
Features and Benefits ........................................................................................................................ 1
Getting Started ................................................................................................................................... 3
Chapter 2: Installation ..................................................................................................... 5
System Requirements ......................................................................................................................... 5
Installing and Updating the AMWorks Software ............................................................................... 6
Uninstalling the AMWorks Software ................................................................................................. 7
Chapter 3: Basic Operations........................................................................................... 9
Launching the AMWorks Software .................................................................................................... 9
Navigating the AMWorks Software.................................................................................................... 9
Device icons.............................................................................................................................. 12
Connectivity table ..................................................................................................................... 12
Logging Out of the AMWorks Software ........................................................................................... 13
Exiting the AMWorks Software........................................................................................................ 13
Chapter 4: Resource Switching Router ....................................................................... 15
Adding a Switching Router .............................................................................................................. 15
Deleting a Switching Router ............................................................................................................ 16
Configuring a Switching Router ...................................................................................................... 17
Naming Router Levels and Ports ..................................................................................................... 17
Defining TRGs ................................................................................................................................. 18
Defining CRGs ................................................................................................................................. 20
Defining DRGs................................................................................................................................. 21
Defining TRGs - Multiple Routers, Levels, I/O ............................................................................... 23
Defining CRGs - Multiple Routers, Levels, I/O ............................................................................... 24
Defining DRGs - Multiple Routers, Levels, I/O............................................................................... 25
Viewing Switching Router Information............................................................................................ 26
Chapter 5: Managing Multimedia.................................................................................. 27
Setting Audio and Serial for Users .................................................................................................. 27
Setting Audio and Serial for Servers................................................................................................ 28
Setting Global Audio and Serial for Users and Servers .................................................................. 28
iv
AMWorks Software Installer/User Guide
Setting Audio and Serial for the Administrator ............................................................................... 29
Chapter 6: Managing Users and User Groups ............................................................ 31
Adding and Removing Users............................................................................................................ 31
Importing Usernames ...................................................................................................................... 33
Editing and Viewing Users .............................................................................................................. 34
Viewing User Permissions ............................................................................................................... 35
Editing and Viewing the Administrator ........................................................................................... 35
Setting Hotkeys, Target Flag and Scan Dwell Time ........................................................................ 36
Adding and Removing User Groups ................................................................................................ 38
Editing and Viewing User Groups................................................................................................... 39
Exporting Usernames ...................................................................................................................... 40
Logging Out Users........................................................................................................................... 40
Chapter 7: Managing Servers and Server Groups ...................................................... 43
Adding and Removing Server Groups ............................................................................................. 43
Importing Server Names .................................................................................................................. 45
Editing and Viewing Servers............................................................................................................ 46
Editing and Viewing Server Groups ................................................................................................ 47
Offline servers........................................................................................................................... 48
Exporting Server Names .................................................................................................................. 48
Chapter 8: Managing AMX Switching System Devices .............................................. 49
Editing and Viewing AMX Switches ................................................................................................ 49
Offline matrix switches ............................................................................................................. 50
Dual AMX Switch Configuration ..................................................................................................... 50
Editing and Viewing AMX User Stations......................................................................................... 51
Viewing AMIQ and AMIQDM Modules .......................................................................................... 52
Viewing All Matrix Switches............................................................................................................ 52
Editing and Viewing MDM-Capable Devices ................................................................................. 53
Chapter 9: Connection Control..................................................................................... 55
Forcing a Connection ...................................................................................................................... 55
Forcing a Disconnect....................................................................................................................... 56
Configuring a Matrix ....................................................................................................................... 56
Follow Mode .................................................................................................................................... 57
Table of Contents
v
Chapter 10: Managing Event Logs ............................................................................... 61
Changing the Order in an Event Log Display ................................................................................. 61
Changing Log Properties................................................................................................................. 61
Clearing the Log .............................................................................................................................. 62
Displaying the User Events Log ...................................................................................................... 62
Displaying the Server Events Log.................................................................................................... 63
Displaying the System Events Log ................................................................................................... 63
Displaying the All Events Log ......................................................................................................... 63
Chapter 11: System Administration Tools................................................................... 65
Adding AMX Switching System Devices .......................................................................................... 65
Changing the Session Time-out Value ............................................................................................. 66
Configuring Network Settings.......................................................................................................... 67
Changing the Administrator’s Password......................................................................................... 67
Setting Blank Passwords.................................................................................................................. 68
Enabling Auto Login ........................................................................................................................ 68
Discovering Devices ........................................................................................................................ 69
Displaying Connection Comparisons .............................................................................................. 70
Find .................................................................................................................................................. 71
Pinging Devices ............................................................................................................................... 71
Removing Offline Devices................................................................................................................ 72
Removing Offline Servers ................................................................................................................ 72
Removing Offline Switches .............................................................................................................. 72
Synchronizing the System Database ................................................................................................ 73
Updating Firmware ......................................................................................................................... 74
Forcing a User Login ...................................................................................................................... 74
Viewing Offline Devices................................................................................................................... 75
Database Maintenance .................................................................................................................... 75
Controlling Multiple AMX Switching Systems from the AMWorks Software .................................. 76
Changing network environments .............................................................................................. 76
Managing event logs................................................................................................................. 76
Working Offline................................................................................................................................ 77
Chapter 12: Configuring LDAP ..................................................................................... 79
Selecting a User Authentication Option .......................................................................................... 79
Setting Server Parameters for LDAP User Authentication ............................................................. 80
vi
AMWorks Software Installer/User Guide
Setting Search and Query Parameters for LDAP User Authentication........................................... 81
Appendices..................................................................................................................... 83
Appendix A: System Configuration.................................................................................................. 83
Appendix B: Glossary ...................................................................................................................... 86
Appendix C: Reference .................................................................................................................... 88
Appendix D: Troubleshooting.......................................................................................................... 95
Appendix E: Technical Support ..................................................................................................... 103
1
CHAPTER
1
Product Overview
The AMWorks® software is a Java™-based system administration tool that enables you to easily
customize the user, server, device and security environments of your Avocent AMX® switching
system. The AMWorks software supports the management of a cross-subnet AMX switch
configuration and automatic synchronization of data through tiers.
Features and Benefits
Comprehensive system administration
The AMWorks software enables you to configure and manage all users, servers and AMX
switching system devices across networks through one easy-to-navigate interface. Using
AMWorks software, you can display user and server information and group membership, as well as
user login status and device configuration. Overall system management includes verifying device
communication, initiating software updates, removing offline devices and synchronizing databases.
Cross network discovery
Cross network discovery is the mechanism used by the AMWorks software to automatically
determine the matrix switches on the AMX switching system configuration.
Multimedia modules
The AMWorks software enables you to discover AMIQDM-PS2, AMIQDM-USB and AMIQDMVSN dual port/multimedia modules connected to your AMX switching system. The AMIQDM
modules provide multimedia access to attached servers and may be connected to two AMX
switches, an AMX switch and user station or two ports on the same AMX switch.
Multimedia feature
The AMWorks software provides settings for enabling and disabling the multimedia features
(audio and serial) of the AMIQDM module for users and servers individually and globally. These
features can also be set for the AMWorks software administrator.
Multilevel access to servers with password protection for each user
Each user profile supports a username and password for increased system security. User access to
each system server can be individually configured with No access, View Only or Full access rights.
2
AMWorks Software Installer/User Guide
System synchronization
The AMWorks software provides enhanced system synchronization, which enables database
changes (made on the AMX user station OSCAR® graphical user interface or from the AMWorks
software) to be replicated across the entire AMX switching system in real time. This enhancement
enables the AMX switching system to maintain a synchronized state without the need for users to
perform repetitive synchronization. An overwrite option enables the pre-selected system database
to replace all existing individual databases residing on the system. A merge option combines all
existing databases, redistributes the new database across the AMX switching system and resolves
any conflicts found on the system. The Sync Status Indicator displays the system synchronization
state at a glance.
User and server groups
The AMWorks software enables you to create user groups to easily configure and manage multiple
users with identical access rights to system servers. Change user group membership and server
access rights at any time. Similarly, servers can be grouped for easy access management. Assign
users specific access rights to all grouped servers with point and click ease. Both user and server
groups allow easy viewing of group membership and characteristics.
System activity logs
The AMWorks software maintains detailed logs that record user, server and AMX switching
system events for your reference. Events may be tailored by date and time intervals, type of device
and type of event. Additionally, you may change the log’s maximum size, event capacity and
duration. Log maintenance operations include saving the event log contents to a specified location
and clearing the log.
Seamless cascading
The AMWorks software enables you to seamlessly connect to servers attached to KVM switches
cascaded below an AMX switch. The AMWorks software also enables you to change the mode of
an MDM-capable device from Multiple Device mode to Single Device mode and back.
Redundancy and scalability
The AMX5111, AMX5121 and AMX5130 user stations may be connected to two AMX matrix
switches in the same AMX switching system to allow redundancy and fault tolerance. In addition,
you may increase the number of available target devices accessed from a single AMX user station.
Firmware updates
The AMWorks software provides the Update Firmware option, enabling you to update any of the
devices in either Parallel or Sequential mode. In either mode, accurate update progress is reported
from the system and displayed in the AMWorks software.
Resource switching router
The AMWorks software allows you to automatically control the switching of input ports to output
ports on a resource switching router. This control is configurable, and based on AMX user station
Chapter 1: Product Overview
3
and server combinations. Within the AMWorks software, you can add, delete and configure one or
multiple resource switching routers. The AMWorks software supports standalone routers and
backup routers for redundancy.
LDAP user authentication
The AMWorks software enables you to configure LDAP (Lightweight Directory Access Protocol)
and/or native AMX user authentication on AMX switches in your system that support LDAP.
When AMX switches are discovered on the system, the AMWorks software will identify the LDAP
compatible AMX switches, enabling you to choose an authentication method and set server and
query/search parameters.
Getting Started
Begin your AMWorks Java-based system administration tool session by installing and/or updating
the AMWorks software. After installation, launch the AMWorks software and configure the
network before using the management features. If a switching router has been installed in the AMX
switching system, see Resource Switching Router on page 15 to add and configure the router.
For more information, see the following topics:
•
Installing and Updating the AMWorks Software on page 6
•
Launching the AMWorks Software on page 9
•
Configuring Network Settings on page 67
NOTE: You must configure the network settings the first time the AMWorks software is installed. Once
installation is complete, you may reconfigure the networks settings at any time.
•
Changing the Administrator’s Password on page 67
•
Adding AMX Switching System Devices on page 65
•
Discovering Devices on page 69
•
Updating Firmware on page 74
•
Synchronizing the System Database on page 73
4
AMWorks Software Installer/User Guide
5
CHAPTER
2
Installation
If you already have the AMWorks software installed, we strongly recommend that you update to
the most recent revision on your installation CD. If you are updating to the AMWorks software
revision 5.0.x.x (or later) from 4.x.x.x (or earlier), we also recommend that you update the
firmware on your AMX switches to revision 3.x.x.x (or later). The AMX switches must be at
revision 3.x.x.x or later to be fully compatible with all revisions of the AMWorks software from
5.0.x.x and later. At this time, you also should update user station and server (AMIQ module)
firmware. You may update your firmware either before or after you update the AMWorks software.
Visit http://www.avocent.com to download the AMX switching system firmware update files.
NOTE: If you are installing an earlier version of the AMWorks software, we recommend that you delete the
current database and then install the database of the desired version. Deleting the current database and
installing the new one will guarantee its proper operation.
See Updating Firmware on page 74 for instructions on updating the firmware on your
AMX switches.
System Requirements
To run AMWorks software, your PC must meet the following system requirements:
•
Windows NT® with Service Pack 5.0 or higher.
•
Windows® 2000 with Service Pack 2.0 or higher.
•
Windows Server 2003.
•
Windows XP.
•
For optimal performance, at least 128 MB of RAM available for AMWorks software only.
•
A minimum of 100 MB hard drive space. The total amount of storage space required will vary
according to the size of the database and number of users, servers and Avocent AMX switch
equipment being used.
You must have administrator privileges to install AMWorks software.
6
AMWorks Software Installer/User Guide
Installing and Updating the AMWorks Software
To install AMWorks software for the first time:
1.
Place the AMWorks software installation CD into an appropriate drive and select Setup.
2.
Follow the on-screen instructions.
3.
Launch the AMWorks software. You will be prompted to enter a password. The default
password is password. We recommend that you change the password from its default setting.
See Changing the Administrator’s Password on page 67.
4.
After initial installation, follow the instructions in Configuring Network Settings on page 67.
NOTE: You must configure the network settings the first time the AMWorks software is installed. Once
installation is complete, you may reconfigure the network settings at any time.
To update from AMWorks software revision 3.0.x.x (or earlier):
1.
Ensure that the correct database information is distributed across the AMX switching system
by performing a Synchronize System Database command from your existing AMWorks
software installation. Use the AMWorks software database as the database reference source.
2.
Note all user and server group information (see User groups and server groups on page 93 for
more information). This upgrade will not restore current user and server group information.
3.
Stop the mySql service. You must have administrator privileges to do this. If you are unsure
about this process, contact your system administrator.
4.
Uninstall the existing AMWorks software installation.
5.
Continue with the previous instructions provided for installing AMWorks software for the
first time.
To update from AMWorks software revision 4.x.x.x (or later):
1.
Ensure that the correct database information is distributed across the system by performing a
Synchronize System Database command from your existing installation. Use the AMWorks
software database as your database source.
2.
When synchronization has completed, close your version of AMWorks software.
3.
Place the installation CD for your new version of AMWorks software into your CD drive, and
select Setup.
4.
Follow the on-screen instructions. You may install the new version of AMWorks software over
the old version, and you may choose to keep your existing database intact.
5.
Proceed to the next section.
To complete the installation:
1.
After updating the AMWorks software, follow the instructions in Discovering Devices on page
69 or Adding AMX Switching System Devices on page 65. If the AMWorks software exists on
the same physical network and subnet as the AMX switches, then you will only need to a
Chapter 2: Installation
7
perform a Discover Devices command, and all of your AMX switches will be automatically
discovered. If they are not automatically discovered, check that the configuration ID specified
in the Network Settings dialog box matches the configuration ID specified on all of your AMX
switches.
2.
3.
Perform a Synchronize System Database command on your newly configured system. See
Synchronizing the System Database on page 73 for more information.
a.
Choose one of your AMX switches as your database source.
b.
Select the Overwrite option.
c.
Click the Start button.
Update the firmware on your AMX switches, if necessary. See Updating Firmware on page 74
for more information. After updating firmware, proceed to step 4.
NOTE: Unless firmware updates are made to AMX switches, synchronization of the system databases will not be
performed successfully.
4.
If you wish to set up user groups and server groups, you may do so now.
Uninstalling the AMWorks Software
To uninstall the AMWorks software:
1.
Go to the Windows Control Panel.
2.
Select the Add or Remove Programs option from the Control Panel.
3.
Select Avocent AMWorks.
4.
Click the Change/Remove button.
5.
Follow the uninstall instructions.
8
AMWorks Software Installer/User Guide
9
CHAPTER
3
Basic Operations
Once installed, you may begin using the AMWorks software to manage the AMX
switching system.
Launching the AMWorks Software
To launch the AMWorks software:
1.
Select Start - Programs - AMWorks from the menu bar.
- or Click the AMWorks icon on your desktop, if available.
2.
When prompted, type your password. The default is password. Click OK.
To change your password, see Changing the Administrator’s Password on page 67.
NOTE: Only one instance of the AMWorks software is permitted to run at any one time.
Navigating the AMWorks Software
The AMWorks software window is divided into several areas: the menu bar, toolbar, tree view,
display screen and synchronization status bar. The connectivity table is also displayed when
applicable. The content of these areas changes based on whether a user, server or device is selected
or what task is to be completed. The following section illustrates the AMWorks software window
and provides descriptions of each area.
10
AMWorks Software Installer/User Guide
A
B
C
D
E
F
Figure 3.1: AMWorks Software Window
Table 3.1: Window Areas
Window Areas
Content
The menu bar at the top of the window contains command menus for
Admin Tools, Users, Servers, Devices, Event Logs and Help.
A: Menu Bar
NOTE: The term “devices” is used in the AMWorks Java-based system
administration tool to refer to AMX switches, AMX user stations and
AMIQ modules.
Chapter 3: Basic Operations
11
Table 3.1: Window Areas
Window Areas
Content
The toolbar contains icons that are equivalent to certain
menu commands:
•
New User, Edit/View User
•
New User Group, Edit/View User Group, Edit/View Server
•
Add Server Groups, Edit/View Server Groups
B: Group Selector Pane (Toolbar) •
Edit/View User Station, Edit/View Matrix Switch, View AMIQ
Module, View All Matrix Switches
•
User Event Log, Server Event Log, System Event Log
•
Help
When you place the mouse pointer over a toolbar icon without selecting
it, a tool tip appears, displaying the icon name.
C: System Selector Pane
(Tree View)
The system selector pane in the left portion of the window contains icons
for user groups, users, server groups, servers, devices and offline
devices. Double-clicking an icon expands the tree view, enabling you to
view the selected information. Right-clicking certain icons displays
additional functionality.
D: Display Screen
The display screen in the right portion of the window contains user, user
group, server, server group or device information, according to what has
been selected in the system selector pane.
E: Connectivity Table
When a device is selected in the system selector pane, the connectivity
table displays detailed connection information.
If an AMX5111, AMX5121 or AMX5130 user station is connected to two
AMX switches within the same AMX switching system, the connectivity
table displays the connection information for both switches.
F: Synchronization Status Bar
The status bar at the bottom-left corner of the window indicates the
AMWorks software synchronization status. The synchronization indicator
is green when the local database is synchronized with the AMX switch
databases. The synchronization indicator is red when a change has been
made to the AMWorks software, and it is no longer synchronized with the
local database.
NOTE: Some AMWorks software operations have equivalent functions in the OSCAR interface. If a change is
made to the same object using the AMWorks software and the OSCAR interface, the most recent change will
take precedence.
12
AMWorks Software Installer/User Guide
Device icons
The AMX switching system and MDM devices are represented in the AMWorks software menu
bar, tree view and connectivity table by the following icons.
Table 3.2: Tree View
Device Icon
Description
AMX switch
AMX user station
AMIQ/AMIQDM modules
MDM-capable AMIQ module (AMIQ module attached to a KVM switch)
MDM server (MDM servers within an AMIQ module that represent the physical
servers attached through a KVM switch)
AMIQ/AMIQDM module icons
The AMIQDM modules are represented in the AMWorks software tree view by the MDM AMIQ
module icon. The AMIQDM module is represented by only one MDM AMIQ module icon in the
AMWorks software device tree regardless of how it is physically configured. You can display
AMIQDM module connectivity information by clicking on the MDM AMIQ module icon. When
you expand the MDM AMIQ module branch in the tree view and click on the attached server
icon(s), the information panel will display the AMIQDM module name, device type and
port information.
NOTE: The AMIQDM modules in your system will not operate in Dual mode or support multimedia functionality
unless your AMX switching system is upgraded to the latest AMX switch system firmware.
Connectivity table
Connectivity information for each of the devices (matrix switches, user stations and AMIQ
modules) present in the AMX switching system is displayed in a connectivity table when a device
is selected. You may select a device by clicking the device icon in the tree view or by going to the
menu bar and choosing Admin Tools - Find.
The task bar on the connectivity table displays the number and type of connections for the input and
output ports on the selected AMX switch. See Device icons on page 12 for more information.
If an AMIQDM module is connected to two ports on the same switch, there will be two entries for
the AMIQDM module in the connectivity table for that switch. Otherwise, the connectivity table
will display a single entry for each AMIQDM module connected to the selected switch.
Chapter 3: Basic Operations
13
NOTE: Since the MDM servers are virtual and have no real connectivity, there is no connectivity table for the
MDM server. However, MDM server port numbers and port names/UIDs are displayed in the existing connectivity
table of the parent MDM AMIQ module.
Logging Out of the AMWorks Software
To log out of the AMWorks software:
1.
Select Admin Tools - Logout from the menu bar.
- or Type Ctrl+L.
2.
When you log out, the AMWorks software is minimized on the desktop. When you maximize
the AMWorks software, you will be prompted for your password.
Exiting the AMWorks Software
To exit the AMWorks software:
Select Admin Tools - Exit from the menu bar.
- or Type Ctrl+X.
- or Click the Close (X) button in the upper-right corner of the window.
14
AMWorks Software Installer/User Guide
15
CHAPTER
4
Resource Switching Router
The AMWorks software provides control of the resource switching router (nVision) through a
series of pre-configured connections tables or “resource groups.” Resource groups define a set of
input ports and/or output ports that will be connected (input to output) on the resource router when
a connection or disconnection occurs between an AMX user station and a server. Using the Define
Resource Groups [Define TRG (Target Resource Group), Define CRG (Console Resource Group)
or Define DRG (Default Resource Group)] feature, you can create connections tables and associate
them with system servers and user stations. These connection paths enable any input to be switched
to any output having the same signal type. In addition, one input can be switched to many outputs.
When the AMWorks software receives a switching event for an AMX user station and server
combination, the switching of the proper resource groups is executed. Generally speaking, TRGs
and DRGs define input ports and CRGs define output ports.
NOTE: Changes made to a router's partitions are not updated in the AMWorks software. After making changes to
partition information, you must delete the router from the AMWorks software and re-add the router.
Perform the following tasks in the order shown to add and configure the nVision router using the
Resource Routers feature:
•
Add one or more switching routers.
NOTE: The nVision switching router does not respond to UDP broadcast messages; therefore, it must be
manually added.
•
Synchronize the system database, if you have not done this previously.
•
If desired, name router levels and ports.
NOTE: Naming levels and ports is recommended.
•
Configure the switching router(s) by defining resource groups.
Adding a Switching Router
You can add a router using the Resource Routers feature. If you add a backup to a primary router,
ensure that both routers are identical in hardware and format. However, the primary and backup
must have different IP addresses.
16
AMWorks Software Installer/User Guide
NOTE: The nVision switching router does not respond to UDP broadcast messages and cannot be automatically
discovered; therefore, it must be manually added.
To add a switching router:
1.
From the Resource Routers tab on the AMWorks software main menu, click NVISION - Add.
The Add Resource Router dialog box displays.
2.
In the IP Address field, type the IP address of the router you wish to add to your system.
3.
(Optional) In the Device Name field, type a name for the router. This name can be up to 20
characters long.
NOTE: The IP address is used as the router name if you do not enter a device name in this field.
4.
Click the Backup checkbox if you wish to designate this router as a backup. The Primary dropdown list displays a list of available primaries in the system that can be associated with
the backup.
NOTE: The Backup checkbox is gray if no primary routers exist on the system.
5.
From the Primary drop-down list, select the primary router connected to your system.
6.
Click the Add Device button to add the router to your system.
7.
Click Cancel to exit the Add Resource Router dialog box.
8.
Repeat steps 1-7 to add another router to your system.
Deleting a Switching Router
Delete a primary or backup router from your system using the Resource Routers feature.
To delete a router:
1.
From the Resource Routers tab on the AMWorks software main menu, click NVISION Delete. The Delete Resource Router dialog box displays the names of the resource routers in
your system.
2.
Under Device Name, select the router you wish to delete and click the Remove Device button.
If the primary has a backup associated with it, it will be deleted also.
NOTE: Clicking Remove Device removes all of the associations, backups and group definitions assigned to the
selected router.
3.
If you wish to delete a backup router, select the associated router, then click the Remove
Backup button. The Delete Backup message box displays.
4.
Click Continue to delete the selected backup(s).
5.
After deleting routers, click Exit to dismiss the dialog box.
Chapter 4: Resource Switching Router
17
Configuring a Switching Router
The AMWorks software enables you to configure a switching router by using one of the Configure
Resource Router options (Define TRG, Define CRG or Define DRG). Using the Configure
Resource Router feature, you can create connections tables and associate them with system servers
and AMX user stations (supported by AMX5120, AMX5121 and AMX5130 user stations). These
connection paths enable any input to be switched to any output having the same signal type. Before
defining resource groups, you may name the router levels and ports on the selected router.
To configure a switching router:
1.
From the AMWorks software main menu, select the Resource Routers tab and then click
NVISION - Configure.
2.
(Optional) Name the levels and ports on the switching router. On the Resource Router
Configuration dialog box, click the Naming tab and name the router as desired.
3.
After naming the levels and ports, define CRGs, TRGs and DRGs for the switching routers in
your system by selecting the appropriate tabs on the Configure Resource Router dialog box.
For more information see Defining TRGs on page 18, Defining CRGs on page 20 and Defining
DRGs on page 21.
4.
After you have defined the resource groups for the switching router(s) in your system, view the
router information by selecting the Router Info tab.
To change the IP address of a resource router:
1.
From the AMWorks software main menu, select the Resource Routers tab and then click
NVISION - Configure.
2.
Using the Device IP Address drop-down menu, select the IP address of the resource router you
wish to change and click the Change Address button.
3.
Enter the new device name, device IP and backup IP in the provided spaces.
NOTE: Changing the device IP does not automatically change the device name: the device name is purely a
label-string that is assigned by the user. Therefore, it is possible for the device-name to be inconsistent with the
device-IP.
4.
Click OK to accept the changes
- or Cancel to exit without making the change.
Naming Router Levels and Ports
After adding the switching router(s), you may enter descriptive names for a router's level for the
input/output ports to replace the default internal numbers. These descriptive names will be
displayed in the Define TRG, Define CRG and Define DRG tab dialogs to assist in creating the
resource groups. After naming the levels, inputs and outputs for selected routers, begin defining the
resource groups.
18
AMWorks Software Installer/User Guide
To name a router's levels and ports:
1.
From the Resource Routers tab on the AMWorks software main menu, click NVISION Configure. The Resource Router Configuration dialog box displays.
2.
Click the Naming tab on the Resource Router Configuration dialog box.
3.
From the Device drop-down list, select the switching router you wish to configure.
4.
From the Level drop-down list, select the level you wish to name.
NOTE: The input and output tables will display the input and output port numbers for the level you selected.
5.
(Optional) In the Level Name field, type a descriptive name to associate with the Level entry
you selected. This name can be from 1-8 characters.
NOTE: The Level Name field will display a name if one has been defined or the ASCII character for its number if
a name has not been defined. Leading and trailing spaces will be deleted when Save Names or OK is selected.
6.
(Optional) In the Name fields of each table, type descriptive names for the input and the output
ports for each port number. The port numbers will be displayed in the Input and
Output columns.
NOTE: The Name fields in the tables will display names if they have been entered or ASCII characters for the
numbers if names have not been defined. Leading and trailing spaces will be deleted when Save Names or OK
is selected.
7.
Click the Save Names button to save the association between the level and the level name,
ports and port names.
8.
Repeat steps 4-7 to name additional levels and ports in the selected router.
9.
(Optional) If you wish to name levels and ports for an additional router, complete steps 3-7.
10. After naming the levels and ports for the selected router(s), click OK to save changes and exit
the Resource Router Configuration dialog box.
- or Click the Define CRG tab to begin defining resource groups. For more information, see
Defining TRGs on page 18, Defining CRGs on page 20 and Defining DRGs on page 21.
Defining TRGs
After you have added a switching router and named the levels and ports available in the router,
define a Target Resource Group (TRG) for a particular server. The TRG you define will associate a
router, an input or output port designation and an input port definition with the selected server for
each index in the group. When this server is connected to a user station, the AMWorks software
maps, by index number, the TRG with the corresponding Console Resource Group (CRG),
enabling the switching of the proper input ports to output ports. After defining the TRG for a
selected server, define a CRG and, optionally, a Default Resource Group (DRG) for AMX
switching system user stations.
The AMX switching system also enables you to define TRGs that group each of the following:
Chapter 4: Resource Switching Router
•
Multiple routers
•
Multiple levels
•
Both inputs and outputs
19
See Defining TRGs - Multiple Routers, Levels, I/O on page 23 for more information.
To define a TRG:
1.
From the Resource Routers tab on the AMWorks software menu bar, click NVISION Configure. The Configure Resource Router dialog box displays.
2.
Click the Define TRG tab.
3.
From the Server Name drop-down list, select the server for which you wish to define a TRG.
The drop-down list contains the name of the available servers in the system. If a TRG has
already been defined for the selected server, the information is displayed in the input and
output tables.
4.
From the Device drop-down list, select the switching router for the TRG.
NOTE: The switching router you select must be the same in the TRG, CRG and DRG for a specific index.
5.
From the Level drop-down list, select the desired level available on the switching router for the
TRG. If you named levels earlier, the Level drop-down list will display the named levels;
otherwise, the name will be the ASCII character string representing the level number.
6.
The Port Disposition button is selected by default. In this case, the Input button should be
the default.
NOTE: The port disposition can be changed from the default. If changed, ensure that the DRG is set to the same
port disposition as the TRG and the CRG is set to the opposite port disposition.
7.
From the Port drop-down list, select a port (number or name) for the level you selected in
step 5. The port name, if applicable, or the ASCII string representing the port number
is displayed.
8.
After selecting the router, level, port disposition and port, click the Add button to add the entry
to the end of the table. The table accumulates the entries made and displays them when you
click Add.
NOTE: The Index automatically numbers the TRGs you define, starting at one and incrementing each row you
add. Ensure that the index (number) of the TRG entries matches the index (number) of the CRG and
DRG entries.
9.
Repeat steps 5-8 to continue defining the TRG for the selected server.
10. (Optional) Modify a table entry by selecting the entry in the table. The entry parameters are
loaded into the fields to the left of the table. After making your selection from the drop-down
lists, click Update to update the index parameters.
- and/or Delete a table entry by selecting the entry table and clicking the Delete button.
20
AMWorks Software Installer/User Guide
11. After configuring the TRG for the selected server, click the Save Group button to save the
TRG to the database and associate it with the selected server.
12. Click OK to save changes to all of the dialog boxes and exit the Configure Resource Router
dialog box.
-or Click the Define CRG tab to define a resource group for a particular user station.
Defining CRGs
After you have defined a Target Resource Group (TRG) for a particular server, define a Console
Resource Group (CRG) for a particular user station. The CRG you define will associate a router, a
level, an input or output port and an output port definition with the selected user station for each
index in the group. When this user station is connected to a server, the AMWorks software maps,
by index number, the TRG with the corresponding CRG, enabling the switching of the proper input
ports to output ports. After defining the CRG for a selected user station, define a Default Resource
Group (DRG) for AMX user stations.
The AMWorks software also enables you to define CRGs that combine each of the following:
•
Multiple routers
•
Multiple levels
•
Both inputs and outputs
See Defining CRGs - Multiple Routers, Levels, I/O on page 24 for more information.
To define a CRG:
1.
From the Resource Routers tab on the AMWorks software main menu, click NVISION Configure. The Configure Resource Router dialog box displays.
2.
Click the Define CRG tab.
3.
From the User Station Name drop-down list, select the user station for which you wish to
define a CRG. The drop-down list contains the names of the available user stations in the
system. If a CRG has already been defined for the selected user station, the information is
displayed in the input and output tables.
4.
From the Device drop-down list, select the switching router for the CRG.
NOTE: The switching router you select must be the same in the TRG, CRG and DRG for a specific index.
5.
From the Level drop-down list, select the desired level available on the switching router for the
CRG. The Level drop-down list will display the named levels, if applicable, or ASCII character
string representing the level number.
6.
The Port Disposition button is selected by default. In this case, the Output button should be
the default.
NOTE: The port disposition can be changed from the default. If changed, ensure that the DRG is set to the same
port disposition as the TRG. The CRG must be set to the opposite port disposition.
Chapter 4: Resource Switching Router
21
7.
From the Port drop-down list, select a port (number or name) for the level you selected in
step 5. The port name, if applicable, or the ASCII string representing the port number
is displayed.
8.
After selecting the router, level, port disposition and port, click the Add button to add the entry
to the end of the table. The table accumulates the entries made and displays them when you
click Add.
NOTE: The Index automatically numbers the CRGs you define, starting at one and incrementing each row you
add. Ensure that the index (number) of the CRG entries matches the index (number) of the TRG and
DRG entries.
9.
Repeat steps 5-8 to continue defining the CRG for the selected server.
NOTE: Selecting an entry in the table loads the entry's parameters. Clicking the Update button updates the index
parameters after you have modified an index selection. Clicking the Delete button deletes the selected entry from
the table.
10. (Optional) Modify a table entry by selecting the entry in the table. The entry parameters are
loaded into the fields to the left of the table. After making your selection from the drop-down
lists, click Update to update the index parameters.
- and/or Delete a table entry by selecting the entry table and clicking the Delete button.
11. After configuring the CRG for the selected user station, click the Save Group button to save the
CRG to the database and associate it with the selected user station.
12. Click OK to save changes to all the dialog boxes and exit the Configure Resource Router
dialog box.
-or Click the Define DRG tab to define a resource group for a particular user station under
disconnect conditions.
Defining DRGs
After you have defined a Console Resource Group (CRG) for a particular user station, define a
Default Resource Group (DRG) for a particular user station in a disconnected state. The DRG you
define will associate a router, a level, an output port designation and an output port definition with
the selected user station. When the user station is disconnected, the AMWorks software maps, by
index number, the DRG with the corresponding CRG, enabling the disconnection of the switch.
The AMWorks software also enables you to define DRGs that combine each of the following:
•
Multiple routers
•
Multiple levels
•
Both inputs and outputs
See Defining DRGs - Multiple Routers, Levels, I/O on page 25 for more information.
22
AMWorks Software Installer/User Guide
To define a DRG:
1.
From the Resource Routers tab on the AMWorks software main menu, click NVISION Configure. The Configure Resource Router dialog box displays.
2.
Click the Define DRG tab.
3.
From the User Station Name drop-down list, select the user station for which you wish to
define a DRG. The drop-down list contains the name of the available user stations in the
system. If a DRG has already been defined for the selected user station, the information is
displayed in the input and output tables.
4.
From the Device drop-down list, select the switching router for the DRG.
NOTE: The switching router you select must be the same in the TRG, CRG and DRG for a specific index.
5.
From the Level drop-down list, select the desired level available on the switching router for the
DRG. The Level drop-down list will display the named levels, if applicable, or the ASCII
character string representing the level number.
6.
The Port Disposition button is selected by default. In this case, the Input button should be
the default.
NOTE: The port disposition of the DRG must be the same as the TRG. The port disposition of the CRG must
be opposite.
7.
From the Port drop-down list, select a port (number or name) for the level you selected in
step 5. The port name, if applicable, or the ASCII string representing the port number
is displayed.
8.
After selecting the router, level, port disposition and port, click the Add button to add the entry
to the end of the table. The table accumulates the entries made and displays them when you
click Add.
NOTE: The Index automatically numbers the DRGs you define, starting at one and incrementing each row you
add. Ensure that the index (number) of the DRG entries matches the index (number) of the TRG and
CRG entries.
9.
Repeat steps 5-8 to continue defining the DRG for the selected user station.
NOTE: Selecting an entry in the table loads the entry's parameters. Clicking the Update button updates the index
parameters after you have modified an index selection. Clicking the Delete button deletes the selected entry from
the table.
10. (Optional) Modify a table entry by selecting the entry in the table. The entry parameters are
loaded into the fields to the left of the table. After making your selection from the drop-down
lists, click Update to update the index parameters.
- and/or Delete a table entry by selecting the entry table and clicking the Delete button.
11. After configuring the DRG for the selected user station, click the Save Group button to save
the DRG to the database and associate it with the selected user station.
Chapter 4: Resource Switching Router
23
12. Click OK to save changes to all of the dialogs and exit the Configure Resource Router
dialog box.
Defining TRGs - Multiple Routers, Levels, I/O
You can define a TRG that includes multiple routers, multiple levels or a combination of inputs and
outputs (I/O).
Figure 4.2: Defining TRGs - Multiple Routers
Figure 4.3: Defining TRGs - Multiple Levels
Figure 4.4: Defining TRGs - Multiple I/O
24
AMWorks Software Installer/User Guide
Defining CRGs - Multiple Routers, Levels, I/O
You can define a CRG that includes multiple routers, multiple levels or a combination of inputs and
outputs (I/O).
Figure 4.5: Defining CRGs - Multiple Routers
Figure 4.6: Defining CRGs - Multiple Levels
Figure 4.7: Defining CRGs - Multiple I/O
Chapter 4: Resource Switching Router
Defining DRGs - Multiple Routers, Levels, I/O
You can define a DRG that includes multiple routers, multiple levels or a combination of inputs
and outputs (I/O).
Figure 4.8: Defining DRGs - Multiple Routers
Figure 4.9: Defining DRGs - Multiple Levels
Figure 4.10: Defining DRGs - Multiple I/O
25
26
AMWorks Software Installer/User Guide
Viewing Switching Router Information
You can view partition and connection information related to all switching routers available in your
system from the Configure Resource Router dialog box.
To view router information:
1.
From the Resource Routers tab on the AMWorks software main menu, click NVISION Configure. The Configure Resource Router dialog box displays.
2.
Click the Router Info tab.
3.
From the Device Name drop-down list, select the name of the switching router. Selecting the
name of the router displays its IP address in the Device IP Address field and also populates the
partition information table. The partition information is manually set when the router is first
added and is assumed to be current as long as the router is in the system.
NOTE: You can edit the name of the selected switching router in the Device Name field. Type the new name and
click OK to execute the change. Placing your cursor over the Device IP Address field displays a tool tip with the
associated backup IP address if one is present.
4.
If you wish to show connection information, click the Get Conn Info button. The connection
information table displays the current state of the switching router's crosspoints.
5.
Click OK to save any edits to a router's name and to exit the Configure Resource Router
dialog box.
27
CHAPTER
5
Managing Multimedia
The AMWorks software enables you to set the multimedia (audio and serial) feature globally and
for individual users and servers.
NOTE: The AMIQDM modules in your system will not operate in Dual mode or support multimedia functionality
unless your AMX switching system is upgraded to the latest firmware.
Setting Audio and Serial for Users
The multimedia (audio and serial) feature will be operational under the following conditions:
•
All AMX switching system hardware devices in a single path, including the server, the
AMIQDM module, the AMX switch and the AMX5130 user station, are multimedia capable.
•
The user’s multimedia settings are enabled.
To set audio and serial for a user:
1.
Select Users - Edit/View User from the menu bar.
- or Type Ctrl+U.
- or Click the Edit/View User icon in the toolbar.
2.
Type or select a username from the list. Click OK. The Edit/View User window is displayed.
3.
Click User Settings - Audio/Serial. The default audio and serial settings display as checked
(enabled) for all users.
4.
Click the checkboxes to enable or disable the audio in, audio out and serial features.
5.
Click OK to save revised user information.
- or Click Cancel to exit the dialog box without saving the changes.
28
AMWorks Software Installer/User Guide
Setting Audio and Serial for Servers
To set audio and serial for a server:
1.
Select Servers- Edit/View Server from the menu bar.
- or Type Ctrl+U.
- or Click the Edit/View Server icon in the toolbar.
2.
Type or select a server name from the list. Click OK. The Edit/View Server window
is displayed.
3.
Select the Audio/Serial tab. The default audio and serial settings display as checked (enabled)
for all servers.
NOTE: The Audio/Serial tab will be active when the server is capable of supporting the multimedia feature.
4.
Click the checkboxes to enable or disable the audio in, audio out and serial features.
5.
Click OK to save revised user information.
- or Click Cancel to exit the dialog box without saving the changes.
Setting Global Audio and Serial for Users and Servers
The checkboxes used for the global multimedia settings can represent three different system states.
In addition, the function of the checkboxes is slightly different when the dialog box is first
displayed and when the settings are being configured (enabled or disabled). Follow the procedures
below to set multimedia features (audio and serial) globally for all users and all servers.
Checkbox settings when first displayed
All checkboxes will be checked, gray background, with the exception of the Include Administrator
checkbox, which will be unchecked.
Checkbox settings after configuration
•
Unchecked - All eligible multimedia users or servers in the system will be disabled for
this feature.
•
Checked - All eligible multimedia users or servers in the system will be enabled for
this feature.
•
Checked, gray background - The multimedia states for the users or servers for this feature
remain unchanged.
To display and change global audio and serial settings:
1.
Select Users - Edit/View Users from the menu bar.
- or -
Chapter 5: Managing Multimedia
29
Type Ctrl+U.
- or Click the Edit/View User icon in the toolbar.
2.
Select the administrator from the list of users. Click OK. The Edit/View Administrator
window displays.
3.
Click the Global button. The Global Multimedia Settings window displays.
NOTE: All checkboxes and buttons under All Users will be inactive if there are no users in the AMX
switching system.
4.
Under All Users, click the checkboxes to enable or disable the audio in, audio out and serial
features globally for all servers.
5.
Click the Include Administrator checkbox to apply these global settings to the administrator.
6.
Click the Apply to Users button to apply the changes to all users in the system.
NOTE: All checkboxes and buttons under All Servers will be inactive if there are no multimedia capable servers
in the AMX switching system.
7.
Under All Servers, click the checkboxes to enable or disable the audio in, audio out and serial
features globally for all servers.
8.
Click the Apply to Servers button to apply the changes to all servers in the system.
9.
Click Exit to exit the dialog box.
Setting Audio and Serial for the Administrator
The multimedia (audio and serial) feature will be operational under the following conditions:
•
All AMX switching system hardware devices in a single path, including the server, the
AMIQDM module, the AMX switch and the AMX5130 user station, are multimedia capable.
•
The administrator’s multimedia settings are enabled.
To set audio and serial for the administrator:
1.
Select Users - Edit/View User from the menu bar.
- or Type Ctrl+U.
- or Click the Edit/View User icon in the toolbar.
2.
Select the administrator from the list of users. Click OK. The Edit/View User window
is displayed.
3.
Click User Settings - Audio/Serial. The default audio and serial settings display as checked
(enabled) for the administrator.
4.
Click the checkboxes to enable or disable the audio in, audio out and serial features.
30
AMWorks Software Installer/User Guide
5.
Click OK to save revised information for the administrator.
- or Click Cancel to exit the dialog box without saving the changes.
NOTE: Clicking Global enables you to display the global multimedia settings for all users and all servers. It also
enables you to include the administrator in the list of users' global settings.
31
CHAPTER
6
Managing Users and User Groups
The AMWorks software enables you to manage users and user groups in your AMX switching
system. For an introduction to user and server groups, see User groups and server groups on
page 93.
By using AMWorks software to manage users and user groups, you can:
•
Add up to 295 users (see Adding and Removing Users on page 31)
•
Display a list of all users and their login status, a list of logged in users and information about a
logged in user’s session (see Editing and Viewing Users on page 34)
•
Display and change a user’s configuration information (see Editing and Viewing Users on
page 34)
•
Set audio and serial for users (see Setting Audio and Serial for Users on page 27)
•
Set global audio and serial for users and servers (see Setting Global Audio and Serial for Users
and Servers on page 28)
•
Remove users (see Adding and Removing Users on page 31)
•
Log out users (see Logging Out Users on page 40)
•
Add user groups (see Adding and Removing User Groups on page 38)
•
Display and change user group configuration information (see Editing and Viewing User
Groups on page 39)
•
Display user memberships in user groups (see Editing and Viewing User Groups on page 39)
•
Remove user groups (see Adding and Removing User Groups on page 38)
Adding and Removing Users
Follow the procedures below to add and remove users in the AMX switching system. For more
information, see User groups and server groups on page 93.
To add a user:
1.
Select Users - New User from the menu bar.
- or Click the New User icon in the toolbar.
32
AMWorks Software Installer/User Guide
2.
The New User dialog box appears. In the Username field, type a 1-15 character username.
3.
In the Password field, type a 6-15 character password. In the Confirm Password field, retype
the password.
-orIf you wish to set a blank password for the user, select Allow Blank Password. The Password
and Confirm Password fields will be disabled.
NOTE: See Rules for usernames and passwords on page 90 for more information.
4.
If you wish to associate this user with a user group, click the User Groups tab. The
UnAssociated Groups column lists all user groups.
NOTE: If you create user groups on your system, you must use the AMWorks software for all subsequent user
access rights changes on the system. If you make any subsequent changes from an AMX user station OSCAR
interface, the system will go out of sync. See Synchronization status indicator turns red on page 98 for
more information.
To associate the new user with one or more groups, select a group name, or use the Shift or
Ctrl keys to select multiple group names. Then click the right angle (>) button. The selected
group name(s) will move from the UnAssociated Groups column to the Associated
Groups column.
To associate the new user with all groups, select any group name in the UnAssociated Groups
column. Then click the double right angle (>>) button. All group names will move from the
UnAssociated Groups column to the Associated Groups column.
To remove group associations, select one or more group names in the Associated Groups
column and click the left angle (<) or double left angle (<<) button to move them to the
UnAssociated Groups column.
5.
Click the Servers tab. The dialog box that appears contains three columns: No Access, View
Only and Full Access. Each column has two buttons underneath it, labeled with the names of
the remaining columns. By default, a user has no access to any server.
To change server access rights for the user, select the server name and click the button below it
that corresponds to the desired rights. This moves the server name from the current access
column to the access column indicated on the button. For example, if you select a server in the
No Access column and then click the View Only > button, that server name moves to the View
Only column, granting the user View Only access to that server.
6.
Click the Server Groups tab. The dialog box that appears contains the same access columns
and boxes as the Servers tab. By default, a user has no access to any server groups. To change
server group access rights, select a server group name and then click one of the boxes below
the column in the same manner described in step 5.
7.
Click OK to save the new user information.
- or Click Cancel to exit the dialog box without saving the user information.
Chapter 6: Managing Users and User Groups
33
To remove a user:
1.
Select Users - Remove User from the menu bar.
2.
Select a user, or use the Shift or Ctrl keys to select multiple users.
3.
Click the Delete User(s) button. A confirmation box appears.
4.
Click Yes to confirm the deletion.
- or Click No to cancel the deletion.
5.
Click Exit.
Importing Usernames
Usernames can be added to the AMWorks software database from comma separated value (CSV)
files or LDAP servers. When the usernames are added, a default password of 123456 is
automatically assigned to the AMX switch database for each username.
NOTE: The Import Wizard filters the list of names being imported. Names already appearing in the system will
not appear in the list of usernames found.
To import usernames from a CSV file:
1.
Select Admin Tools - Import from the menu bar.
2.
In the Import Type box, click the User Names radio button.
3.
In the Import Source box, click the File radio button. Then click the Next button.
4.
Enter the name of the file you wish to import, then click the Import button.
5.
A list of usernames will be displayed. Highlight the users that you wish to import and click the
Finish button.
To import usernames from an LDAP server:
1.
Select Admin Tools - Import from the menu bar.
2.
In the Import Type area, select User Names.
3.
In the Import Source area, select LDAP Server and then click Next.
4.
In the Host Address field, type the IP address or DNS name for the LDAP server from which
you wish to import names. If LDAP authentication settings are not present, the default value of
the field is blank.
5.
In the Port field, enter the port number that will be the target for the calling socket. By default,
port 389 will be used for LDAP and port 636 will be used for LDAPS.
6.
In the User Name field, type an LDAP Distinguished Name. (If LDAP authentication settings
are available, they will be entered already.) You must follow standard LDAP authentication
formatting rules to specify an LDAP Distinguished Name. An example would be:
cn=Administrator,cn=Users,dc=yourDomainName,dc=com
34
AMWorks Software Installer/User Guide
NOTE: This example represents a user called administrator, which exists in the Users container on the
yourDomainName.com Authentication server. At a minimum, you must replace the "yourDomainName" text with
a valid domain name for your Authentication server.
7.
In the Password field, type the password associated with the entered username. If the user is
the administrator, you must specify the administrator password recognized by the
Authentication server. The password you enter may be up to 30 characters long. All standard
Microsoft Windows characters are allowed. Asterisks (*) will display for each character you
type in the field.
8.
In the Mode area, select either LDAP of LDAPS to specify the server type for your system.
The default selection is LDAP, a server type that sends system communications without
encryption, a method often called “in the clear.” The LDAPS server type encrypts system
communications by sending them over an SSL connection.
9.
(Optional) You may choose to use the fields within the Schema area to narrow the search for
server names.
In the Search DN field, you may type an LDAP Distinguished Name using the criteria defined
in step 6. The Search DN must represent the name of a user (whose permissions on the
Authentication server will determine the scope of the LDAP search), and the domain name of
the LDAP server on which this user exists.
In the Object Criteria field, you may type additional parameters for the search, such as country
or organizational information.
In the Name Attribute field, you may type the name attributes of the server names you wish to
be included in the search results.
10. Click the Import button to begin the search.
11. A list of usernames will be displayed. Highlight the users that you wish to import and click the
Finish button.
NOTE: If errors occur on import, you will need to synchronize the system. See the Troubleshooting section for
more information.
Editing and Viewing Users
Follow the procedures below to display and change user information.
To display a list of all users with their login status:
Click the Users icon in the group selector pane. The display screen will list all usernames and the
login status of each user.
To display a list of logged in users:
Double-click the Users icon in the group selector pane, then click the Logged In Users icon. The
display screen will list all usernames and the number of logins for each user.
Chapter 6: Managing Users and User Groups
35
To display information about a logged in user:
1.
Select Users - Logged In Users from the menu bar.
2.
Select a user from the User list box. The display will include the time the user logged in and
the session duration.
To display and change a user’s configuration information:
1.
Select Users - Edit/View User from the menu bar.
- or Type Ctrl+U.
- or Click the Edit/View User icon in the toolbar.
2.
Type a username or select a name from the list. Click OK.
3.
The user’s configuration information is displayed. You may change the username, set a new or
blank password, and modify settings for user groups, server access and server group access.
The User Settings tab also enables you to configure hot keys, target flag position, scan dwell
time and audio and serial settings for system users. See Setting Audio and Serial for Users on
page 27 and Setting Hotkeys, Target Flag and Scan Dwell Time on page 36 for
more information.
4.
Click OK to save revised user information.
- or Click Cancel to exit the dialog box without saving the changes.
NOTE: See Rules for usernames and passwords on page 90 for more information.
Viewing User Permissions
To display a user’s effective permissions:
1.
Select Users - View Effective Permissions from the menu bar. A list of users will appear.
2.
Select the user whose permissions you wish to display and click OK. The permission list will
be displayed.
3.
When you’re finished viewing permissions, click Exit to close the window.
Editing and Viewing the Administrator
To display information about a logged in system administrator:
1.
Select Users - Logged In Users from the menu bar.
2.
Select admin from the User list box. The display will include the time the administrator logged
in and the session duration.
36
AMWorks Software Installer/User Guide
To display and change the system administrator's configuration information:
1.
Select Users - Edit/View Users from the menu bar.
- or Type Ctrl+U.
- or Click the Edit/View User icon in the toolbar.
2.
Select admin from the list. Click OK. The Edit/View Administrator window displays.
3.
You may change the system administrator's username and password. The User Settings tab also
enables you to configure hot keys, target flag position, and scan dwell time and audio and
serial settings for the system administrator. Refer to Setting Audio and Serial for Users on
page 27 and Setting Hotkeys, Target Flag and Scan Dwell Time on page 36 for more
information.
4.
Click OK to save revised administrator information.
- or Click Cancel to exit the dialog box without saving the changes.
Setting Hotkeys, Target Flag and Scan Dwell Time
Follow the procedures below to assign hotkeys to system servers, place the Target Flag on user
screens and set the time the server channel will remain on the screen while it is in Scan mode. You
can define up to 12 hotkey sequences for each AMX switching system user.
To set hotkeys:
1.
Select Users - Edit/View User from the menu bar.
- or Type Ctrl+U.
- or Click the Edit/View User icon in the toolbar.
2.
Type a username or select a name from the list. Click OK. The user's configuration information
is displayed.
3.
Click the User Settings tab. The HotKeys settings display. The defined keys table displays
existing hotkey sequences and associated server information for the selected user.
4.
Select the hotkey sequence from the Assigned Key drop-down list that you wish to assign to a
specific server.
5.
Select the server name from the Assigned Server drop-down list. The Assigned Server Details
displays information corresponding to the selected server, including the name and the IUD
switch to which the server is connected.
6.
Click the Define button to display the assigned hotkey sequences in the defined keys table.
Chapter 6: Managing Users and User Groups
37
NOTE: The Clear and Clear All buttons enable the removal of defined hotkey sequences and associated servers
from the defined keys table and the AMX switching system. Selecting None from the Assigned Server drop-down
list also enables the removal of a hotkey sequence.
7.
Click OK to save changes.
To set the Target Flag position:
1.
Select Users - Edit/View User from the menu bar.
- or Type Ctrl+U.
- or Click the Edit/View User icon in the toolbar.
2.
Type a username or select a name from the list. Click OK. The user's configuration information
is displayed.
3.
Click the User Settings tab.
4.
Click the Target Flag tab. The current Target Flag settings are displayed.
5.
In the Display panel, click Yes to display the Target Flag.
- or Click No to hide the Target Flag.
6.
Click Name to display the server name on the Target Flag.
- or Click UID to display the UID on the Target Flag.
7.
Click Yes to display the Target Flag for the time period specified in the Duration field.
- or Click No if you do not wish to specify a time period in the Duration field. The Duration field
will be disabled.
8.
Select a time period between 3 - 99 seconds for the Target Flag to be displayed. The default is
5 seconds.
9.
Select a hotkey for the display of the Target Flag.
- or Select none if you do not wish to assign a hotkey to the Target Flag display.
NOTE: Hotkeys used as server switching hotkeys will be unavailable for the Target Flag and will not display in
the hotkey list.
10. Select a location for the Target Flag.
11. From the Color panel, select the text and the background colors for the Target Flag.
12. Click the Preview button to display the Target Flag.
NOTE: During preview, the target flag may disappear and the system may become unresponsive. For more
information, see Target flag disappears after preview on page 100.
13. Double-click or press Esc to dismiss the Target Flag.
38
AMWorks Software Installer/User Guide
14. Click OK to save changes.
To set the dwell time:
1.
Select Users - Edit/View User from the menu bar.
- or Type Ctrl+U.
- or Click the Edit/View User icon in the toolbar.
2.
Type a username or select a name from the list. Click OK. The user's configuration information
is displayed.
3.
Click the User Settings tab.
4.
Click the Scan tab.
5.
Select a time period between 3 - 99 seconds that the server channel will be displayed before
going to the next server.
6.
Click OK to save changes.
Adding and Removing User Groups
Follow the instructions below to add or remove user groups in the AMX switching system. For
more information, see User groups and server groups on page 93.
NOTE: If you create user groups in your system, you must use the AMWorks software for all subsequent user
access rights changes in the system. If you make any subsequent changes from an AMX user station OSCAR
interface, the system will go out of sync. See Synchronization status indicator turns red on page 98 for
more information.
To add a user group:
1.
Select Users - New User Group from the menu bar.
- or Click the New User Group icon in the toolbar.
2.
The Add New User Group dialog box appears. In the Name of New Group box, type a name.
3.
In the Description box, you may type an optional description containing up to 80 characters.
This description appears during user group dialog.
4.
Click the Users tab. The UnAssociated Users column lists all defined users.
To associate users with the new group, select a user, or use the Shift or Ctrl keys to select
multiple users. Then click the right angle (>) button. The selected user(s) will move from the
UnAssociated Users column to the Associated Users column.
To associate all users with the new group, select any user in the UnAssociated Users column.
Then click the double right angle (>>) button. All users will move from the UnAssociated
Users column to the Associated Users column.
Chapter 6: Managing Users and User Groups
39
To remove group associations, select one or more users in the Associated Users column. Then
click the left angle (<) or double left angle (<<) button to move them to the UnAssociated
Users column.
5.
Click the Server Access Rights tab. The dialog box that appears contains three columns: No
Access, View Only and Full Access. Each column has two buttons underneath it, labeled with
the names of the remaining columns. By default, a user group has no access to any server.
To change server access rights for the group, select one or more server names and click the
button below that corresponds to the desired rights. This moves the server name(s) from the
current access column to the access column indicated on the button.
For example, if you select a server in the No Access column and then click the View Only >
button, that server name moves to the View Only column, granting the group View Only
access to that server.
6.
Click OK to save the new group information.
- or Click Cancel to exit the dialog box without saving the group information.
To remove a user group:
1.
Select Users - Remove User Group from the menu bar.
2.
Select a group, or use the Shift or Ctrl keys to select multiple groups.
3.
Click the Delete User Group(s) button. A confirmation box appears.
4.
Click Yes to confirm the deletion.
- or Click No to cancel the deletion.
5.
Click Exit.
Editing and Viewing User Groups
Follow the procedures below to display and change user group information. For more information,
see User groups and server groups on page 93.
To display the names of user groups to which a user belongs:
1.
Select Admin Tools - Find from the menu bar. In the Select Entity list box, choose Users. Type
a username or select a name from the list. Click OK.
- or Double-click the Users icon in the group selector pane. Double-click the All Users icon in the
group selector pane or click the handle to the left of the All users icon. Select a user.
2.
The display screen will list the user group(s) to which that user belongs.
To display a list of user groups and their member counts:
Click the User Group icon in the group selector pane. The display screen will list the user group
names and the number of members in each user group.
40
AMWorks Software Installer/User Guide
To display the names of users in a user group:
1.
Select Admin Tools - Find from the menu bar. In the Select Entity list box, choose User
Groups. Type a user group name or select a name from the list. Click OK.
- or Double-click the User Group icon in the group selector pane. Select a user group.
2.
The display screen will list the names of users in that user group.
To display and change a user group’s configuration information:
1.
Select Users - Edit/View User Group from the menu bar.
- or Type Ctrl+G.
- or Click the Edit/View User Group icon in the toolbar.
2.
Type a user group name or select a name from the list. Click OK.
3.
The user group’s configuration information is displayed. You may change the group name,
description, associated users and server access rights.
4.
Click OK to save revised group information.
- or Click Cancel to exit the dialog box without saving the changes.
Exporting Usernames
A list of all usernames within the AMWorks software database can be exported to a comma
separated value (CSV) file.
To export usernames to a CSV file:
1.
Select Admin Tools - Export from the menu bar.
2.
In the Name Type box, click the Users radio button. Then click the Next button.
3.
Enter the name of the file to which you wish to export, then click the Export button.
Logging Out Users
Follow the procedure below to log out users from one or more AMX user stations.
To log out users:
1.
Select Users - Logged In Users from the menu bar.
2.
To log out a specific user, select the name from the User list box, then click the Logout from the
user station button.
- or -
Chapter 6: Managing Users and User Groups
If a user is logged in to more than one AMX user station, you may select one or more AMX
user stations from the User Stations list box and then click the Logout from the user
station button.
- or To log out all users from all AMX user stations, click the Logout all Users button.
3.
Click Done.
41
42
AMWorks Software Installer/User Guide
43
CHAPTER
7
Managing Servers and
Server Groups
The AMWorks software enables you to manage servers and server groups as listed below. For an
introduction to user and server groups, see User groups and server groups on page 93.
By using AMWorks software to manage servers and server groups, you can:
•
Display information about servers (see Editing and Viewing Servers on page 46)
•
Display and change a server’s configuration information (see Editing and Viewing Servers on
page 46)
•
Display and change configuration information for an MDM-capable device (see Editing and
Viewing MDM-Capable Devices on page 53)
•
Set audio and serial for servers (see Setting Audio and Serial for Servers on page 28)
•
Set global audio and serial for users and servers (see Setting Global Audio and Serial for Users
and Servers on page 28)
•
Add and remove server groups (see Adding and Removing Server Groups on page 43)
•
Display and change server group configuration information (see Editing and Viewing Server
Groups on page 47)
•
Display server memberships in server groups (see Editing and Viewing Server Groups on
page 47)
•
Remove server groups (see Adding and Removing Server Groups on page 43)
Adding and Removing Server Groups
Follow the instructions below to add or remove server groups in the AMX switching system. For
more information, see User groups and server groups on page 93 for more information.
NOTE: If you create server groups in your system, you must use the AMWorks software for all subsequent user
access rights changes on the system. If you make any subsequent changes from an AMX user station OSCAR
interface, the system will go out of sync. See Synchronization status indicator turns red on page 98 for
more information.
44
AMWorks Software Installer/User Guide
To add a server group:
1.
Select Server - New Server Group from the menu bar.
- or Click the New Server Group icon in the toolbar.
2.
The Add New Server Group dialog box appears. In the Name of New Server Group field, type
a name.
3.
Click the Servers tab. The UnAssociated Servers column lists all servers.
To associate a server with the new group, select a server, or use the Shift or Ctrl keys to select
multiple servers. Then click the right angle (>) button. The selected server(s) will move from
the UnAssociated Servers column to the Associated Servers column.
To associate all servers with the new group, select any server in the UnAssociated Servers
column. Then click the double right angle (>>) button. All servers will move from the
UnAssociated Servers column to the Associated Servers column.
To remove group associations, select one or more servers in the Associated Servers column.
Then click the left angle (<) or double left angle (<<) to move the selected server(s) to the
UnAssociated Servers column.
4.
Click the Users tab. The dialog box that appears contains three columns: No Access, View
Only and Full Access. Each column has two buttons underneath it, labeled with the names of
the remaining columns. By default, no users have access to the server group.
To change user access for the server group, select one or more usernames and click the button
below that corresponds to the desired rights. This moves the username(s) from the current
access column to the access column indicated on the button.
For example, if you select a user in the No Access column and then click the View Only >
button, that username moves to the View Only column, granting the user View Only access to
that server group.
5.
To add a description for the server group, click the Description tab. You may type up to
80 characters.
6.
Click OK to save the new server group information.
- or Click Cancel to exit the dialog box without saving the server group information.
To remove a server group:
1.
Select Users - Remove Server Group from the menu bar.
2.
Select a group, or use the Shift or Ctrl keys to select multiple groups.
3.
Click the Delete Server Group(s) button. A confirmation box appears.
4.
Click Yes to confirm the deletion.
- or Click No to cancel the deletion.
5.
Click Exit.
Chapter 7: Managing Servers and Server Groups
45
Importing Server Names
Server names can be added to the AMWorks software database from comma separated value
(CSV) files or LDAP servers.
NOTE: The Import Wizard filters the list of names being imported. Names already appearing in the system will
not appear in the list of usernames found.
To import server names from a CSV file:
1.
Select Admin Tools - Import from the menu bar.
2.
In the Import Type box, click the Server Names radio button.
3.
In the Import Source box, click the File radio button. Then click the Next button.
4.
Enter the name of the file you wish to import, then click the Import button.
5.
A list of UID numbers, server names and imported names will be displayed. Select a name
from the Imported Names list, select the server(s) to update in the system servers table and
click the Update button. Repeat until all desired names have been assigned.
6.
Click the Finish button to exit.
To import server names from an LDAP server:
1.
Select Admin Tools - Import from the menu bar.
2.
In the Import Type area, select Server Names.
3.
In the Import Source area, select LDAP Server and then click Next.
4.
In the Host Address field, type the IP address or DNS name for the LDAP server from which
you wish to import names. If LDAP authentication settings are not present, the default value of
the field is blank.
5.
In the Port field, type the port number that will be the target for the calling socket. By default,
port 389 will be used for LDAP mode and port 636 will be used for LDAPS mode.
6.
In the User Name field, type an LDAP Distinguished Name. Use standard LDAP
authentication formatting rules to specify the name. An example would be:
cn=Administrator,cn=Users,dc=yourDomainName,dc=com
NOTE: This example represents a user called administrator, which exists in the Users container on the
yourDomainName.com Authentication server. At a minimum, you must replace the "yourDomainName" text with
a valid domain name for your Authentication server.
7.
In the Search Password field, type the password associated with the entered username. If the
user is the administrator, you must specify the administrator password recognized by the
Authentication server. The password you enter may be up to 30 characters long. All standard
Microsoft Windows characters are allowed. Asterisks (*) will display for each character you
type in the field.
8.
In the Mode area, select either LDAP of LDAPS to specify the server type for your system.
46
AMWorks Software Installer/User Guide
The default selection is LDAP, a server type that sends system communications without
encryption, a method often called “in the clear.” The LDAPS server type encrypts system
communications by sending them over an SSL connection.
9.
(Optional) You may choose to use the fields within the Schema area to narrow the search for
server names.
In the Search DN field, you may type an LDAP Distinguished Name using the criteria defined
in step 6. The Search DN must represent the name of a user (whose permissions on the
Authentication server will determine the scope of the LDAP search), and the domain name of
the LDAP server on which this user exists.
In the Object Criteria field, you may type additional parameters for the search, such as country
or organizational information.
In the Name Attribute field, you may type the name attributes of the server names you wish to
be included in the search results.
10. Click the Import button to begin the search.
11. A list of UID numbers, server names and imported names will be displayed. Select a name
from the Imported Names list, select the server(s) to update in the system servers table and
click Update. Repeat this process until all desired names have been assigned.
12. Click Finish to write the names to the AMWorks software database.
-orClick Cancel to exit without saving.
NOTE: If errors occur on import, you will need to synchronize the system. See Troubleshooting on page 95 for
more information.
Editing and Viewing Servers
Follow the procedures below to display server information and to change a server's
configuration information.
To display a list of all servers:
Click the Servers icon in the group selector pane. The display screen lists each server name with its
unique identification number (UID) and location.
To display information about a server:
1.
Select Admin Tools - Find from the menu bar. In the Select Entity list box, choose Servers.
Type a server name or select a name from the list. Click OK.
- or Double-click the Servers icon in the group selector pane and select a server.
2.
The display screen will list the UID, location and comments for that server.
3.
To display and change a server’s configuration information, select Servers - Edit/View Server
from the menu bar.
Chapter 7: Managing Servers and Server Groups
47
- or Type Ctrl+S.
- or Click the Edit/View Server icon in the toolbar.
4.
Type a server name or select a name from the list. Click OK.
5.
The server’s configuration information is displayed. You may change the server name,
location, server group association, user group access, user access, comments and Audio
Serial options.
6.
Click OK to save the new server information.
- or Click Cancel to exit the dialog box without saving the changes.
Editing and Viewing Server Groups
Follow the procedures below to display and change server group information. For more
information, see User groups and server groups on page 93.
To display a list of server groups and their member counts:
Click the Server Groups icon in the group selector pane. The display screen will list the names of
server groups and the number of members in each group.
To display a list of associated servers in a server group:
1.
Select Admin Tools - Find from the menu bar. In the Select Entity list box, choose Server
Groups. Type a server group name or select a name from the list. Click OK.
- or Double-click the Server Groups icon in the group selector pane and select a server group.
2.
The display screen will list the names of servers in that server group.
To display and edit a server group’s configuration information:
1.
Select Users - Edit/View Server Group from the menu bar.
- or Type Ctrl+R.
- or Click the Edit/View Server Group icon in the toolbar.
2.
Type a server group name or select a name from the list. Click OK.
3.
The server group’s configuration information is displayed. You may change the group name,
description, associated servers and user access.
4.
Click OK to save revised group information.
- or Click Cancel to exit the dialog box without saving the changes.
48
AMWorks Software Installer/User Guide
Offline servers
Servers that cannot be contacted by the AMWorks software are considered “offline.” Offline
servers are placed in the offline database under the following conditions:
•
While the AMWorks software is running, a server is removed from an AMX switch in the
system. The AMWorks software will move the server to the offline database.
•
The server was previously online and the AMWorks software was not continuously running
and did not receive notification of server removal. When the AMWorks software queries the
switch for the servers attached to it during discovery, the AMWorks software discovers that the
server is missing and will move the server to the offline database.
•
During synchronization, a user was given rights to a server that does not exist in the AMWorks
software database (for instance, from a user station or from legacy servers that were never
removed). The AMWorks software will move the server to the offline database.
•
In the Offline Devices tree node, each server will be identified by type. Under each type, the
server is identified by its previous name or its UID.
Exporting Server Names
All server names within the AMWorks software database can be exported to a comma separated
value (CSV) file. You may export up to 4096 target server names from your AMWorks
software database.
To export server names to a CSV file:
1.
Select Admin Tools - Export from the menu bar.
2.
In the Name Type box, click the Servers radio button. Then click the Next button.
3.
Enter the name of the file to which you wish to export, then click the Export button.
49
CHAPTER
8
Managing AMX Switching
System Devices
The AMWorks software enables you to view and edit the following devices configured in your
AMX switching system:
•
AMX switches
•
AMX user stations
•
AMIQ/AMIQDM modules
Editing and Viewing AMX Switches
Follow the instructions below to display a list of AMX switches in the system and to edit
related information.
To display a list of AMX switches:
1.
Double-click the Devices icon in the group selector pane.
2.
Select AMX Switch. The display screen will list the names of attached AMX switches and
their UIDs.
To display information about an AMX switch:
1.
Select Admin Tools - Find from the menu bar. In the Select Entity box, choose AMX Switch.
Type the name of an AMX switch or select a name from the list. Click OK.
- or Double-click the Devices icon in the group selector pane. Double-click the AMX switch icon. A
list of all AMX switches appears under the icon. Select an AMX switch.
2.
The information screen will list the IP address, hardware version, software version, FPGA
version, UID, MAC address and device type. It will also list the number of input and output
ports on the switch and how many of these ports are currently connected. The connectivity
table below the display screen will list detailed connection information for each port on the
switch. For more information, see Connectivity table on page 12.
To display and edit AMX switch configuration information:
1.
Select Devices - Edit/View Matrix Switch from the menu bar.
- or -
50
AMWorks Software Installer/User Guide
Type Ctrl+M.
- or Click the Edit/View Matrix Switch icon in the toolbar.
2.
Type the name of an AMX switch or select one from the list. Click OK.
3.
The AMX switch information is displayed. You may change the name.
4.
Click OK to save the revised information.
- or Click Cancel to exit the dialog box without saving the changes.
Offline matrix switches
Matrix switches that cannot be contacted by the AMWorks software are considered “offline.”
Offline matrix switches are placed in the offline database under the following conditions:
•
When you manually add a matrix switch using the Add Devices command, and the switch
cannot be contacted, the AMWorks software will prompt you to add it to the offline database.
If Yes is selected from the dialog box, the matrix switch will be placed in the Unknown tree
node.
•
If a matrix switch was previously in the Online database, it failed to respond to the AMWorks
software discovery queries during device discovery. The matrix switch is automatically placed
into the offline database. The offline matrix switch is placed into the Offline Devices tree node
under its own name.
•
If the matrix switch was previously in the Online database, it failed to respond to the
AMWorks software required synchronization queries during system synchronization. The
matrix switch is automatically placed into the offline database. The offline matrix switch is
placed into the offline tree node under its own name.
Dual AMX Switch Configuration
This feature enables you to connect an AMX user station to two AMX switches in the same
switching system to take advantage of the following benefits:
•
Redundancy - Connect your target servers using dual port AMIQDM modules to two AMX
switches in the same switching system. Through this connection method, you may log in once
to both AMX switches enabling access to the same set of target servers. If one of the AMX
switches has a power failure, the second AMX switch provides an alternate path to access the
target servers.
NOTE: Connection through an alternate path may happen automatically if Persistent mode is enabled on the
user station OSD. Refer to the AMX Switch Installer/User Guide for configuration information.
•
Scalability - Extend your user station access to additional target servers connected to a second
AMX switch in the same switching system.
Chapter 8: Managing AMX Switching System Devices
51
You may create an environment where critical servers that require redundancy are connected to
both AMX switches. In addition, you can increase user station access to non-critical target servers
connected to either of the two AMX switches.
In a dual matrix switch configuration, all connection and configuration changes are made through
port 1 of the user station.
NOTE: The dual AMX switch configuration is supported on AMX5111, AMX5121 and AMX5130 user stations.
Editing and Viewing AMX User Stations
When you select an AMX user station from the list of devices, the screen displays hardware and
software information. In addition, the connectivity table displays the user station ports connected to
the AMX switch. In a dual AMX switch configuration where you have connected both user station
ports, the connectivity table displays the connection information for each port. The connectivity
table is updated as changes take place in the AMX switching system. For example, when a cable is
connected or disconnected from an AMX user station, the connectivity table is updated
dynamically. In a dual matrix configuration when both cables are disconnected from the AMX user
station, the user station is removed from the list of devices.
To display a list of AMX user stations:
1.
Double-click the Devices icon in the group selector pane.
2.
Select AMX User Station. The display screen will list the names of attached AMX user
stations, their identification numbers and the name of the user logged in to each.
To display information about an AMX user station:
1.
Select Admin Tools - Find from the menu bar. In the Select Entity box, select AMX User
Station. Type an AMX user station name or select one from the list. Click OK.
- or Double-click the Devices icon in the group selector pane. Double-click the AMX user station
icon and select an AMX user station.
The display screen list the hardware version, software version, FPGA version, UID, number of
input ports, the name of the user logged in and the server that is logged into. In addition, the
connectivity table displays the user station ports and AMX switch ports configuration.
2.
To display and edit AMX user station configuration information, complete one of the
following steps:
Select Devices - Edit/View User Station from the menu bar.
- or Type Ctrl+A.
- or Click the Edit/View User Station icon in the toolbar.
3.
Type the name of an AMX user station or select one from the list. Click OK.
4.
The AMX user station configuration information is displayed. You may change the name.
52
AMWorks Software Installer/User Guide
5.
Click OK to save the revised information.
- or Click Cancel to exit the dialog box without saving the changes.
Viewing AMIQ and AMIQDM Modules
NOTE: Unless otherwise stated, commands for AMIQ modules are applicable to AMIQDM modules.
To display a list of AMIQ modules:
1.
Double-click the Devices icon in the system selector pane.
2.
Select AMIQ modules. The display screen will list the names of AMIQ modules and their
identification numbers.
To display information about an AMIQ module:
1.
Select Admin Tools - Find from the menu bar.
2.
In the Select Entity box, choose AMIQ module. Type the name of an AMIQ module or select a
name from the list. Click OK.
- or Double-click the Devices icon in the group selector pane. Double-click the AMIQ module icon
and select an AMIQ module.
3.
The display screen will list the name of the associated server, hardware version, software
version, FPGA version, UID, attached server and number of output ports.
To view AMIQ module configuration information:
1.
Select Devices - View AMIQ module from the menu bar.
- or Type Ctrl+P.
- or Click the View AMIQ module icon in the toolbar.
2.
Type a name or select one from the list. Click OK.
3.
The AMIQ module information is displayed.
4.
Click OK to save the revised information.
- or Click Cancel to exit the dialog box without saving the changes.
Viewing All Matrix Switches
To view a list of all matrix switches in the AMX switching system:
Double-click the Devices icon in the group selector pane. The display screen will list the names of
all attached matrix switches, device names, device IP and status.
Chapter 8: Managing AMX Switching System Devices
53
Editing and Viewing MDM-Capable Devices
NOTE: Before configuring an MDM-capable device, ensure that the MDM-AMIQ module is not in
Emulation mode.
To view and edit information for MDM-capable devices:
1.
Select Servers - Edit/View Server from the menu bar.
- or Type Ctrl+S.
- or Click the Edit/View Server icon in the toolbar.
2.
Type an MDM-capable device name or select an MDM-capable device name from the list.
Click OK. The Edit/View Server window displays information for the selected MDMcapable device.
3.
Click the Multiple Device Mode checkbox.
NOTE: You can change a Multiple Device mode to a Single Device mode by unchecking the Multiple Device
Mode checkbox. The Configure button is disabled when the Multiple Device Mode checkbox is unchecked.
4.
Click the Configure button. The Configure Device window displays.
5.
Select a device type from the Device Type drop-down list. For more information about device
types and a list of KVM switches that can be cascaded in an AMX seamless switching system,
see KVM switches in seamless switching system on page 90.
6.
Select a hotkey sequence from the Device Hotkey drop-down list.
7.
Select the number of ports provided by the selected MDM-capable device from the Number of
Ports drop-down list.
8.
(Optional) Edit the port names.
NOTE: A port name may consist of 1-15 characters.
9.
Click OK to save revised information.
- or Click Cancel to exit the dialog box without saving the changes.
54
AMWorks Software Installer/User Guide
55
CHAPTER
9
Connection Control
The AMWorks software can issue commands to AMX user stations and AMIQ modules to perform
switches remotely and/or connect and disconnect users and servers. These commands may be
issued one at a time or to a pre-defined group of devices.
Before connection control commands can be issued, the following must be in effect:
•
The system must be synchronized.
•
If the command is being sent to a user station, a user must be logged in at that station.
•
The logged in user must have permission to access the designated device.
Some instructions may be sent to several user stations/servers at once through the use of a saved
group called a matrix. Once a matrix has been configured, it may be loaded from the Configure
Matrix window as needed.
Forcing a Connection
To remotely switch a user station to a different device:
1.
Select Devices - Force Connect from the menu bar to activate the Force Single
Connection window.
2.
Using the drop-down menu, select the user that will be switched. A list of user stations that the
user is logged in on will be displayed beside a list of servers that may be accessed. All users
currently logged into the system are displayed in the User Name drop-down list. Select the user
for whom you wish to force a connection.
3.
Select the type of connection by clicking Shared, Private or Maintain.
4.
In the User Station column, click the user station that will perform the switch.
5.
Click the name of the server to which you wish to connect.
6.
Click the Connect button to force the switch.
- or Click Exit to exit without forcing a switch.
NOTE: In a dual AMX switch configuration, each AMIQ module appears once in the server list on the Force
Single Connection dialog box.
56
AMWorks Software Installer/User Guide
Forcing a Disconnect
To remotely disconnect one or several user station(s):
1.
Select Devices - Force Disconnect from the menu bar. A list of user stations and their
connections will be displayed.
2.
Select the user station that is to be disconnected. You may select multiple user stations by
holding the Ctrl key and clicking the desired user stations.
3.
Click the Disconnect button to perform the disconnect(s).
- or Click Exit to exit without forcing a disconnect.
NOTE: In a dual AMX switch configuration, the user station is displayed once in the Force Disconnect dialog box.
Configuring a Matrix
NOTE: It could take up to four seconds for each connection to be made. Please allow the system proper time to
complete the connections that you have configured. The more connections configured, the more time it will take
to make them.
To configure a new matrix:
1.
Select Devices - Configure Matrix from the menu bar. The Configure Matrix window
will appear.
2.
From the Configure Matrix window, select Configuration - New. (If a matrix has not been
saved, the dialog box will be blank and there will be no need to click New.)
3.
Enter a name for the configuration in the Name field.
4.
Select the connections that the matrix will perform by right-clicking the table cell where the
user station and server intersect and selecting the mode of the video signal (None, Shared,
Private or Maintain) for the connection.
5.
When all servers have been assigned, complete one of the following steps:
Click Configuration - Save to save the matrix for future use.
- or Click Connect to use it immediately.
To edit an existing matrix:
1.
Select Devices - Configure Matrix from the menu bar. The Configure Matrix window
will appear.
2.
From the Configure Matrix window, select Configuration – Load.
3.
Click the name of the matrix that you wish to load and click the Load button.
4.
When all servers have been assigned, complete one of the following steps:
Chapter 9: Connection Control
57
Click Configuration - Save to save the matrix for future use.
- or Click Connect to use it immediately.
To delete a matrix:
1.
Select Devices - Configure Matrix from the menu bar. The Configure Matrix window
will appear.
2.
From the Configure Matrix window, select Configuration – Delete.
3.
Click the name of the matrix that you wish to delete. You may select multiple configurations
by holding the Shift key while you click each configuration. When the desired configurations
have been selected, click the Delete button.
NOTE: In a dual AMX switch configuration, the matrix configuration dialog box displays the user stations and
AMIQ modules once.
Follow Mode
The AMWorks software can be configured to designate certain user stations and servers as leaders.
When a user station designated as a leader performs a switch, the AMWorks software will force
other user stations that have been assigned Follow mode setting to switch to the same server as
the leader.
In Multi-Video mode, the AMWorks software will maintain a connection between the individual
user stations in a group and individual servers in a group. When the leader switches to a server also
designated as a leader, the user stations in the leader’s group will be force switched back to
corresponding servers in the server group.
NOTE: If at any time the leader logs out of the AMX switching system, all user stations in the user station group
will be logged out regardless of their mode or connection.
Example of Follow mode
In a classroom environment, an instructor has 10 student servers and his own linked via an AMX
switch. He has designated his user station as leader and the student user stations as part of its group.
Likewise, he has designated his server as server leader and grouped the student user stations and
servers with it. He has also grouped each student's user station with his or her own server.
When a student asks a question, the instructor switches to that student's server. In this case, a leader
user station is switching to a non-leader server. This is basic Follow mode. When the instructor
executes the switch, the AMWorks software will force switch every student along with him so
everyone will be viewing the same video source.
When the instructor has answered the question, he switches back to his server. (Leader user station
to leader server.) This is Multi-Video mode. The AMWorks software will then force switch each
user back to his or her own server.
58
AMWorks Software Installer/User Guide
To create a new user station group for Follow mode:
1.
Select Devices - Follow Mode from the menu bar to activate the Follow Mode
Settings window.
2.
Click the Userstation Groups tab.
3.
Click the New button. (This step can be skipped if no other user station groups exist.)
4.
In the Userstation drop-down list, select the user station that you wish to be the leader and click
the Add button.
5.
In the Userstation drop-down list, select a user station that will be a part of the group. Enable
the Multi-Video + Follow checkbox if you wish to enable Multi-Video Follow mode for the
selected user station and click the Add button.
6.
Repeat step 5 for each user station that will be part of the group.
7.
When finished, select the Save menu option to save the group or click the Exit button to close
the window without saving.
NOTE: A user station may only be a member of one group.
To create a new server group for Follow mode:
1.
Select Devices - Follow Mode from the menu bar to activate the Follow Mode
Settings window.
2.
Click the Server Groups tab.
3.
Click the New button.
4.
In the Servers drop-down list, select the server that you wish to be the leader and click the
Add button.
5.
Select the rest of the servers that will be a part of the group and click the Add button.
6.
When finished, select the Save menu option to save the group or click the Exit button to close
the window without saving.
NOTE: A server may be a member of many groups but can only lead one. In Follow mode servers are identified
by name only, not UID. Ensure that all servers have unique names.
To edit a user station or server group:
1.
Select Devices - Follow Mode from the menu bar to activate the Follow Mode
Settings window.
2.
Select the Userstation Groups or Server Groups tab corresponding to the group you wish
to edit.
3.
In the Group Name drop-down window, select the group that you wish to edit.
4.
You may now make any desired changes. Click Exit when the desired changes are complete.
Chapter 9: Connection Control
59
NOTE: If you are using Follow Mode while the authentication setting is configured to LDAP user-login
authentication only, the lead user station login attempt is authenticated through a configured LDAP server. When
the user connects to a lead server, all preconfigured follower user stations are logged in automatically as the
same user by the AMWorks software, and are connected to the lead server. When the lead user station
disconnects or logs out, the follower user stations are disconnected or logged out as well.
60
AMWorks Software Installer/User Guide
61
CHAPTER
10
Managing Event Logs
The AMWorks software maintains event logs that record user events, server events and/or system
events. You may:
•
Display the content of a user event, server event and/or system event
•
Change the properties of the logs
•
Save log contents to your PC
•
Clear the logs
You may change the ordering of the columns in an event log and the ordering of events within a
column for the duration of the current display.
Changing the Order in an Event Log Display
To change the order in an event log display:
1.
To change the column order, position the cursor over the header of the column to be moved.
Press and hold the left mouse button. Drag the column header horizontally to the desired
position. Release the mouse button. The displaced column(s) shift accordingly.
2.
To change the order of events within a column, click on the column header that corresponds to
the sort order you prefer. The display will be re-sorted according to that column’s subject, in
the order indicated by the arrow in the column header: up for ascending and down
for descending.
NOTE: When you change a log display’s order, the reordering remains in effect only for the duration of the
current display. The next time you display that event log, the columns appear in the original order.
Changing Log Properties
To change log properties:
1.
Select Event Logs - Log Properties from the menu bar.
2.
The top portion of the window specifies log properties.
To change the maximum size of the log file, click the Maximum log size checkbox and select a
value from the list box. The range is 1-10,000 Kb.
62
AMWorks Software Installer/User Guide
To change the maximum number of events the log file can hold, click the Maximum number of
events checkbox and select a value from the list box. The range is 1-99,995 events.
To change the maximum duration of the logging operation, click the Maximum duration
checkbox and select a value from the list box. The range is 1-52 weeks.
3.
Click OK to save the changes
- or Click Cancel to exit the dialog box without saving the changes.
4.
To save the log, click the Save Log button and indicate where the log should be saved on
your PC.
Clearing the Log
To clear the log:
1.
Click the Clear Log button. A confirmation box appears.
2.
Click Yes to confirm the clear.
- or Click No to cancel the clear.
Displaying the User Events Log
To display the User Events log:
1.
Select Event Logs - User Events from the menu bar.
- or Click the User Events Log icon in the toolbar.
2.
You may optionally specify a date and time interval by selecting the year, month, day, hour,
minute, second and AM or PM in the Date From and To boxes. If you omit this information, all
user events are displayed from the last time the log was cleared.
3.
Select a username or All Users from the Users list box. The default is All Users.
4.
Enable one of the three user event radio buttons: Server Access, Failed Attempts or
Login Times.
5.
Click the Retrieve Data button. If the log contains entries for the specified events, they are
displayed. If there are no log entries, a message reports that there are no results for
specific criteria.
6.
To close the log, click the Exit button.
Chapter 10: Managing Event Logs
63
Displaying the Server Events Log
To display the Server Events log:
1.
Select Event Logs - Server Events from the menu bar.
- or Click the Server Events Log icon in the toolbar.
2.
You may optionally specify a date and time interval by selecting the year, month, day, hour,
minute, second and AM or PM in the Date From and To boxes. If you omit this information, all
server events are displayed from the last time the log was cleared.
3.
Select a server name or All Servers from the Servers list box. The default is All Servers.
4.
Enable one of the three server event radio buttons: Server Access, Failed Switches or
Power On.
5.
Click the Retrieve Data button. If the log contains entries for the specified events, they are
displayed. If there are no log entries, a message displays that there are no results for
specific criteria.
6.
To close the log, click the Exit button.
Displaying the System Events Log
To display the System Events log:
1.
Select Event Logs - System Events from the menu bar.
- or Click the System Events Log icon in the toolbar.
2.
You may optionally specify a date and time interval by selecting the year, month, day, hour,
minute, second and AM or PM in the Date From and To boxes. If you omit this information, all
system events are displayed from the last time the log was cleared.
3.
Select a system event type from the list box below the Devices list box.
4.
Click the Retrieve Data button. If the log contains entries for the specified criteria, they are
displayed. If there are no log entries, a message displays, indicating that there are no results for
specific criteria.
5.
To close the log, click the Exit button.
Displaying the All Events Log
To display the All Events log:
1.
Select Event Logs - All Events from the menu bar.
2.
Select an event from the list box, or use the Shift or Ctrl keys to select multiple events.
64
AMWorks Software Installer/User Guide
3.
Click the Retrieve Data button. If the log contains entries for the specified events, they are
displayed. If there are no log entries, a message displays, indicating that there are no results for
specific criteria.
4.
To close the log, click the Exit button.
65
CHAPTER
11
System Administration Tools
Use the AMWorks software system administration commands to perform the following operations:
•
Add a device (see Adding AMX Switching System Devices on page 65)
•
Change the session time-out value (see Changing the Session Time-out Value on page 66)
•
Configure network settings (see Configuring Network Settings on page 67)
•
Change your password (see Changing the Administrator’s Password on page 67 or Setting
Blank Passwords on page 68)
•
Set AMWorks software to automatically log in the administrator (see Enabling Auto Login on
page 68)
•
Discover a device (see Discovering Devices on page 69)
•
Display any differences between original and current AMX switch connections
(see Displaying Connection Comparisons on page 70)
•
Find an entity (see Find on page 71)
•
Ping an AMX switch (see Pinging Devices on page 71)
•
Remove an offline device, server or switch (see Removing Offline Devices on page 72,
Removing Offline Servers on page 72 and Removing Offline Switches on page 72)
•
Synchronize the system database (see Synchronizing the System Database on page 73)
•
Update AMX switch firmware (see Updating Firmware on page 74)
•
Force a user login (see Forcing a User Login on page 74)
•
View an offline device (see Viewing Offline Devices on page 75)
•
Backup and restore the user database (see Database Maintenance on page 75)
•
Control multiple AMX switching systems (see Controlling Multiple AMX Switching Systems
from the AMWorks Software on page 76
•
Work offline (see Working Offline on page 77)
Adding AMX Switching System Devices
The AMWorks software enables you to manually add an AMX switching system device, including
switches, user stations and AMIQ/AMIQDM modules, by providing the IP address of the device. If
66
AMWorks Software Installer/User Guide
a device cannot be automatically discovered, perform an Add Devices command to add one
manually. A device that does not respond when you attempt to add it manually will be placed into
the Offline Devices database, if desired. For more information, see Removing Offline Devices on
page 72 and Viewing Offline Devices on page 75.
NOTE: All AMX switches that are added manually must have their default gateway set up correctly from the
console menu of the AMX switch.
To add a matrix switch:
1.
Click Admin Tools - Add Device from the menu bar.
2.
Type the IP address of the AMX switch, user station or AMIQ/AMIQDM module you wish
to add.
3.
Click the Add Device button.
4.
If the AMWorks software successfully contacts the device, the Contacting Device dialog box
displays the IP address, the status of the device being contacted and the name of the device
contacted (if one exists). If the firmware version of the AMX switch is earlier than 3.x.x.x, the
Add Device dialog displays a request to update the firmware. Click OK to close the dialog box.
5.
If the device cannot be contacted, the Add Device Error dialog box will prompt you to add the
device to the offline database. Click yes to add the device to the database.
- or Click no to avoid adding the device to the offline database.
6.
Repeat steps 2 - 5 for each device that you wish to add to your AMX switching system.
NOTE: When all of the devices have been either discovered or added, you must synchronize the AMX switching
system database.
Changing the Session Time-out Value
The security time-out specifies the number of minutes the AMWorks software will remain idle
before ending the current session. When there is no session activity for this interval, the session
closes and a dialog box is displayed, requesting your password.
To change the time-out value:
1.
Select Admin Tools - Security Settings from the menu bar.
2.
Choose a value from the Security Time Out list box. The range is 1 - 99 minutes.
NOTE: Setting the value in the Security Time Out list box to 0 disables the time-out.
3.
Click Start.
Chapter 11: System Administration Tools
67
Configuring Network Settings
After installing the AMWorks software for the first time or changing the IP address of the PC on
which the AMWorks software is running, you must configure the network settings to associate the
AMWorks software with the IP address of your server. If your server has only one IP address, a
single IP address will display in the Choose Network IP drop-down list. If your server is bound to
multiple IP addresses, select the address from the list that the AMWorks software will use to
communicate with system devices. After you have configured the network settings, see
Synchronizing the System Database on page 73 to complete the installation.
NOTE: You may change the network settings at any time.
To configure the network settings:
1.
Select Admin Tools - Network Settings from the menu bar.
2.
Select the IP address you wish to associate with the AMWorks software from the Choose
Network IP drop-down list. There will be one entry for each IP address you have bound to
your system.
3.
Enter the subnet mask of your local network.
4.
If you intend to automatically discover AMX switches, the configuration ID of the AMWorks
software should be the same as that of the AMX switches in the system. If you have never
changed the configuration IDs on the AMX switches, set the configuration ID of the AMWorks
software to 000000.
5.
Click OK to save your settings.
Changing the Administrator’s Password
You may change the administrator’s password at any time during an AMWorks software session.
All AMWorks software passwords are encrypted for enhanced security.
See Rules for usernames and passwords on page 90 for more information about setting passwords.
To change your AMWorks software password:
1.
Click Admin Tools - Password from the menu bar.
2.
In the Old Password box, type your current password.
3.
In the New Password box, type a new 6-15 character password.
4.
In the Confirm Password box, retype the new password.
5.
You may select Enable auto login if you wish to allow AMWorks software to automatically log
you in as the administrator without requiring a password. See Enabling Auto Login on page 68
for more information.
6.
Click OK.
68
AMWorks Software Installer/User Guide
NOTE: You may also change your AMX switching system administrator password by selecting Users - Edit/View
Users from the menu bar and admin from the list of users. See Editing and Viewing the Administrator on page 35
for more information.
Setting Blank Passwords
The administrator may set a blank password for any normal user (a blank password may not be set
for the administrator). When a blank password is set, the user will not have to enter any characters
in the password field to log in to the AMX switching system at the user station.
To create a blank password for a new user:
1.
Select Users - New User from the menu bar.
- or Click the New User icon in the toolbar.
2.
The New User dialog box appears. In the Username field, type a 1-15 character username. A
username may not contain spaces, quotation marks or exclamation points.
3.
Select Allow Blank Password. The Password and Confirm Password fields will be disabled.
4.
Click OK to save revised user information.
- or Click Cancel to exit the dialog box without saving the changes.
NOTE: For more information about creating new users, see Adding and Removing Users on page 31.
To set a blank password for an existing user:
1.
Select Users - Edit/View User from the menu bar.
- or Type Ctrl+U.
- or Click the Edit/View User icon in the toolbar.
2.
Type a username or select a name from the list. Click OK.
3.
The user’s configuration information is displayed. Select Allow Blank Password. The
Password and Confirm Password fields will be disabled.
4.
Click OK to save revised user information.
- or Click Cancel to exit the dialog box without saving the changes.
NOTE: For more information about viewing and editing user settings, see Editing and Viewing Users on page 34.
Enabling Auto Login
You will be prompted to log in with a password when the AMWorks software is launched or when
the inactivity timer expires. If you want the AMWorks software administrator to be logged in
Chapter 11: System Administration Tools
69
automatically during these instances, you may enable the auto login feature. Enabling auto login
provides unrestricted access to the AMWorks software and is typically only used when the
AMWorks software server is in a secure location.
To enable auto login in AMWorks software:
1.
After logging in to AMWorks software, click Admin Tools - Password from the menu bar.
2.
Select Enable auto login.
3.
Click OK.
Discovering Devices
The AMWorks software enables the “discovery” of AMX switching system devices, including
switches, user stations and AMIQ/AMIQDM modules. The Discover Devices command detects
devices present on different subnets by the use of a directed UDP (User Datagram Protocol)
broadcast. During this phase of discovery, only devices with the same configuration ID will
respond to these UDP broadcasts. After compiling a list of the devices that have responded, the
AMWorks software gathers information about the system topology. The AMWorks software also
contacts online devices to ensure that they still exist and also attempts to re-establish contact with
offline devices.
The AMWorks software enables you to automatically discover AMX switches that are:
•
Located on the same physical network and have the same subnet and configuration ID settings
as the AMWorks software.
•
Located on a different network and subnet, provided that any intervening network routers
allow directed broadcast. The configuration ID setting on the AMWorks software must be the
same setting on all of the AMX switches.
NOTE: If you cannot discover a device automatically, (for instance, if a network router will not forward a directed
broadcast) see Adding AMX Switching System Devices on page 65 to add a device manually.
To discover devices:
1.
Select Admin Tools - Discover Devices from the menu bar.
NOTE: When first displayed, the fields on the Discover Devices dialog box display the local network’s
default settings.
2.
Type a name in the Name field for the new subnet. Once the subnet is discovered by, this name
will be used by the AMWorks software to identify the subnet and associated devices.
3.
Type the subnet address of the subnet to be discovered. If you do not know the subnet address,
enter the IP address of a matrix switch on that subnet. The subnet address will be calculated
automatically before the discovery begins. This subnet address will be stored for the history,
not the individual IP address.
4.
Type the subnet mask for the subnet to be discovered in the Subnet Mask field.
70
AMWorks Software Installer/User Guide
NOTE: The configuration ID shown in this dialog box is for information purposes only. You cannot change it here.
If you need to change the configuration ID, see Configuring Network Settings on page 67.
5.
Click the Add Subnet button to add the subnet to the Subnet(s) History list and the Discovery
List with the name you assigned to it in step 2.
NOTE: Double-clicking on a user-defined name in either the Subnet(s) History list or the Discovery List will cause
the subnet parameters to be displayed in the Subnet Properties section.
6.
If necessary, repeat steps 2 - 5 to automatically discover AMX switches on all other subnets.
7.
If the subnet address and the subnet mask that you entered resolve to the same directed
broadcast address, the Duplicate Address message box prompts you to add the new parameters.
8.
Click yes if you wish to add the entry (even though it is a duplicate).
- or Click no if you do not wish to add the entry.
NOTE: Although duplicate entries may exist in the subnet history, each subnet will only be discovered once.
9.
Click Discover to locate the devices on the new subnet(s). Only the subnets listed in the
Discovery List window will be discovered. The Subnet(s) History list is for reference only.
After discovery is complete, a Discover Results dialog box displays a list of the devices
discovered on the subnet(s) you specified. The Discover Results dialog box displays the
following information:
•
Device Name: Name of the device found. If the firmware version is older than the
baseline, an information icon is placed next to the device name and an explanation is
shown in the upper-right corner of the dialog box.
•
Device IP: The IP address reported by the device.
•
Revision: The current revision of the AMX switching system firmware.
10. Click OK. All newly discovered matrix switches, previously online matrix switches and offline
matrix switches will be queried for system topology. Those that respond will be moved to the
online database. Those that do not respond will be put into the offline database. At this point,
the AMWorks software has identified all existing system devices and their topology. User
databases may not be in a synchronized state at this point.
NOTE: When all of your AMX switches have been either discovered or added, you must synchronize the system
database. See Synchronizing the System Database on page 73 for more information.
Displaying Connection Comparisons
When the AMX switching system is initially installed, the AMWorks software collects and stores
information about the devices that are connected to each AMX switch. A connection comparison
displays the differences, if any, between the original AMX switch connections and the
current connections.
Chapter 11: System Administration Tools
71
NOTE: This comparison is only useful if the system goes out of sync for any reason. For more information, see
Synchronizing the System Database on page 73.
To display connection comparison information:
1.
Select Admin Tools - Connectivity Overview from the menu bar.
- or Type Ctrl+C.
2.
Click the Start button to list the AMX switches with connectivity errors.
3.
Choose an AMX switch.
4.
Click Start again to view the errors for the AMX switch.
5.
To stop the operation, click the Cancel button.
6.
To end the operation and close the window, click the Exit button.
Find
The Find tool enables you to find and display information on users, user groups, servers, server
groups and devices in your AMX switching system configuration.
To find an entity:
1.
Click Admin Tools - Find.
2.
Select an entity from the Select Entity drop-down list.
3.
Double-click a named entity in the list.
4.
Click OK.
Pinging Devices
Pinging a device from the AMWorks software ensures device accessibility. The AMX switches
will respond to the traditional command line ping; however, using the AMWorks software
produces a more reliable measure of device integrity.
To ping an AMX switch:
1.
Select Admin Tools - Ping Devices from the menu bar.
2.
Choose an AMX switch from the Select AMX switches to ping list box.
3.
Click the Start button. The device name and ping results are displayed.
4.
To cancel the operation, click the Cancel button.
5.
To end the operation and close the window, click the Exit button.
72
AMWorks Software Installer/User Guide
Removing Offline Devices
The Remove Offline Devices operation permanently removes an offline device (AMX switch or
AMIQ module) from the AMX switching system databases. After a device has been permanently
removed, there are three ways to retrieve an offline device:
•
User rediscovers the device (AMX switch or AMIQ module). See Discovering Devices on
page 69.
•
User manually adds the device (AMX switch). See Adding AMX Switching System Devices on
page 65.
•
Device notifies the AMWorks software of its presence (AMIQ module).
Follow the instructions below to remove a matrix switch or AMIQ module from the AMX
switching system.
To remove a device:
1.
Select Admin Tools - Offline Devices - Remove from the menu bar.
2.
From the submenu, select Matrix Switch to display all the matrix switches in the database.
- or Select Server(s) to display all the servers in the database.
3.
In the Remove Device box, select the matrix switch you wish to delete from the database and
click Remove.
- or In the Remove Device box, select the server you wish to delete from the database and
click Remove.
NOTE: If the matrix switch is still present on the network and its network settings and configuration ID have not
been changed, it will be added back to the database when a discovery operation is performed.
Removing Offline Servers
The AMWorks software enables you to remove servers no longer connected to the AMX switching
system from the database.
To remove an offline server:
1.
Click Admin Tools - Offline Devices - Remove - Server from the menu bar.
2.
In the Remove Device dialog box, select the server(s) you wish to remove and click Remove.
3.
Click Exit to close the dialog box.
Removing Offline Switches
The AMWorks software enables you to remove AMX switches no longer connected to the AMX
switching system from the database.
Chapter 11: System Administration Tools
73
To remove an offline matrix switch:
1.
Click Admin Tools - Offline Devices - Remove [Switch Type] from the menu bar.
2.
In the Remove Device dialog box, select the matrix switch(s) you wish to remove and
click Remove.
3.
Click Exit to close the dialog box.
Synchronizing the System Database
Once the system devices have been synchronized, they will maintain the sync state unless there is a
temporary network error. If this occurs, the status bar at the bottom of the AMWorks software
window will turn red, requiring that you re-synchronize the system database. You must perform
system synchronization in the following cases:
•
After you have set up and configured the system for the first time.
•
After you have either manually added or automatically discovered a new AMX switch.
•
After you have physically removed (for example, powered down and removed) an existing
AMX switch.
•
Once you have created user and/or server groups and then make user rights changes from an
AMX user station OSCAR interface.
•
When user information has been modified, and/or user-to-server permissions have
been modified.
•
There was a network error which prevented the modifications from successfully replicating
across the entire system.
NOTE: The indicator will be green when the system databases are in sync. If the indicator is red, the system
databases are not in sync and will have to be synchronized to restore system operation.
To synchronize the system database:
1.
Select Admin Tools - Synchronize System Database from the menu bar.
2.
In the Synchronize System dialog box, click Merge to merge all existing databases residing on
the system and redistribute the new database to all AMX switches in the system. See Merge
Synchronization mode on page 92 for more information.
- or Click Overwrite to overwrite the existing system database with a preselected (for instance, the
AMWorks software) database. See Overwrite Synchronization mode on page 92 for
more information.
3.
Click Start to synchronize the system database. After the operation is completed, click Exit.
CAUTION: If you use the Overwrite option and specify an AMX switch database, you will lose the information
associated with any user and server groups that you have configured in the AMWorks software.
74
AMWorks Software Installer/User Guide
Updating Firmware
Make sure that you have access to the appropriate update files before you begin updating
the firmware. See Firmware update files on page 88 for more information.
NOTE: During the initial installation/configuration of the AMWorks software, it may be necessary to update the
AMX switches to a compatible revision before the Synchronize System Database operation can be performed
successfully. See Installation on page 5 for details.
To update the AMX switching system firmware:
1.
Select Admin Tools - Firmware Updates from the menu bar.
- or Type Ctrl+O.
2.
In the Device Type list box, select the appropriate switch, user station or AMIQ module.
3.
Choose a device to update from the Devices box.
4.
Under Update Type, click Sequential to update selected devices one at a time.
- or Click Parallel to update all devices at one time.
NOTE: Using Parallel mode enables you to complete updates in less time.
NOTE: You must update the firmware of the AMX switch before updating the firmware of any attached user
stations or AMIQ/AMIQDM modules.
5.
If the file displayed in the File Name field is the desired upgrade file, click Begin Update to
start the software upgrade.
- or Click Browse to locate the desired file.
6.
After locating the desired file, click Begin Update to start the software upgrade.
- or Click Cancel to cancel the operation.
7.
To end the operation and close the window, click the Exit button.
Forcing a User Login
If necessary, an administrator can remotely log a user in to a user station.
To remotely log a user in to a user station:
1.
Select Users – Log In User.
2.
Use the drop-down list to select the name of the user you wish to log in.
3.
Click the name of the user station to which you wish to log in the user.
4.
Click the Login button.
Chapter 11: System Administration Tools
75
Viewing Offline Devices
The AMWorks software enables you to view matrix switches or servers no longer connected to the
AMX switching system.
To view an offline device:
1.
Click Admin Tools - Offline Devices - View from the menu bar.
- or In the Devices tree view, double-click Offline Devices and the device type to view a list
of devices.
NOTE: Devices display in the device tree only when they exist in the database.
2.
The Offline Devices dialog box displays the type, ID and name of each offline device in
the database.
3.
Click OK to dismiss the Offline Devices dialog box.
Database Maintenance
The AMWorks software allows administrators to manually backup, restore and clear the user
database as well as automatically backing up the user database at certain events. It allows
administrators to take a “snapshot” of their configuration as it currently exists and saves that file to
a directory separate from everyday database operations. It is recommended that the system be in
sync before any backup functions are started.
To manually backup the user database:
1.
Select Admin Tools - Database - Backup Database from the menu bar.
2.
Enter the directory for the backup.
3.
Click the Execute button.
To restore a user database:
1.
Select Admin Tools - Database - Restore Database from the menu bar.
2.
Enter the directory where the backup is stored.
3.
Click the Execute button.
To schedule automatic database backups:
1.
Select Admin Tools - Database - Event Backup from the menu bar.
2.
Select when you would like for automatic backups to occur.
3.
Click the OK button.
NOTE: You must perform at least one manual backup before enabling automatic backups.
76
AMWorks Software Installer/User Guide
To clear a user database:
1.
Select Admin Tools - Database - Clear Database from the menu bar.
2.
Confirm that you want all users, permissions and switches removed from the database.
Controlling Multiple AMX Switching Systems from the
AMWorks Software
The AMWorks software administrators can manage multiple separate and distinct AMX switching
systems from the AMWorks software. This feature is much like backup and restore except when an
administrator switches between multiple managed systems, the AMWorks software will perform a
mini-sync with the Master switch, if necessary, in an effort to keep the system in sync.
When an administrator changes to a new environment, the AMWorks software will:
•
Restore the database from the chosen location
•
Restore the network properties file from the chosen location and update the network properties
in the AMWorks software
•
Try to contact the master of the new system to retrieve its database and overwrite the
AMWorks software database
•
Refresh the AMWorks software GUI with new database
Changing network environments
Before changing network environments, back up the current database and verify that the AMWorks
software is in sync.
To change network environments for the AMX switching system:
1.
Select Admin Tools - Database - Change Environment from the menu bar.
2.
Enter the directory path to the database backup for the AMX switching system to which you
want to switch.
3.
Click the Execute button.
Managing event logs
After changing environments, all of the events logged from the previous network are still saved in
the event log files. To avoid confusion, you should clear the events in the log files before operating
in the new environment.
To save and clear the event log:
1.
Select Event Logs - Log Properties from the menu bar.
2.
(Optional) Click Save to save the existing log.
3.
Click Clear Log. All events logged from the previous network environment will be removed.
4.
Click OK. AMWorks software will begin logging events for the new network environment.
Chapter 11: System Administration Tools
77
Working Offline
The AMWorks software enables you to work “offline.” This means that you can execute a limited
set of administrative functions without being connected to the network. When working offline, the
changes you make will be added to the local database only. After you reconnect to the network and
resynchronize the system, the changes made while working offline will be added to the AMX
switching system database.
NOTE: The option to work offline is only available if Discover Devices and Synchronize System Database
commands have been performed previously.
When the AMWorks software is launched, it attempts to contact AMX switching system devices on
the network for system synchronization status. If devices are not responding, or if there is no
network connection, the AMWorks software displays a message dialog box prompting you to work
offline. Clicking the Yes button enables you to modify the offline database. Clicking No provides
you with two options: quitting the AMWorks software or performing the Discover Devices
command to determine if the devices will respond.
To work offline:
Unplug the network cable from the server running the AMWorks software. After the AMWorks
software is launched, the Startup Error message box prompts you to work offline. Click Yes to work
offline to perform the following operations:
•
Adding AMX Switching System Devices on page 65
•
Editing and Viewing Users on page 34
•
Adding and Removing Users on page 31
•
Adding and Removing User Groups on page 38
•
Adding and Removing Server Groups on page 43
•
Editing and Viewing Server Groups on page 47
After connecting to the network, perform a synchronize system database command. See
Synchronizing the System Database on page 73 for more information.
78
AMWorks Software Installer/User Guide
79
CHAPTER
12
Configuring LDAP
The AMWorks software enables you to configure LDAP (Lightweight Directory Access Protocol)
user login authentication on your AMX switching system (provided the firmware on your AMX
switches supports LDAP). The LDAP Configuration menu option will only be enabled if the
AMWorks software discovers AMX switches that support LDAP; otherwise, the menu option will
be disabled. The LDAP Configuration interface enables you to select either LDAP or Matrix user
login authentication, or both (providing a backup login authentication if one fails). This interface
also allows you to set any required LDAP server parameters and set search and query parameters
for use with a specific server.
LDAP enables users to log in to the AMX switching system remotely using their default Windows
Authentication usernames and passwords; however, these users will not have server-access rights
on the AMX switching system, since the users have not been created in the AMWorks software.
Once users have been created and access rights have been assigned, a user who is remotely logged
into the system will be authenticated against the remote authentication server, and server access
permissions will be granted from the local AMX switching system. Refer to the following topics to
create a user and then assign server-access rights:
•
Adding and Removing Users on page 31
•
Editing and Viewing Users on page 34
Selecting a User Authentication Option
The AMWorks software enables you to select LDAP and/or Matrix user authentication.
NOTE: The LDAP Configuration interface is enabled only if at least one of your AMX switches supports LDAP.
To select an authentication option:
1.
From the AMWorks software main menu, click Users - User Authentication. The LDAP
Configuration dialog box displays.
2.
From the Options list, click the desired option for user authentication. If you select Matrix
user-login authentication only, the authentication setup tabs for LDAP will be disabled. If you
select any of the other options, you will have to enter LDAP setup details in the Server
Parameters and Search and Query Parameters setup-tabs.
3.
Click OK to save changes and exit the dialog box.
80
AMWorks Software Installer/User Guide
NOTE: You will not be able to save changes if you have selected one of the LDAP user login authentication
options, but have not configured the LDAP parameters.
Setting Server Parameters for LDAP User Authentication
After selecting an LDAP user login authentication option, you will need to set up the LDAP server
parameters that will be used by an AMX switch to connect to the LDAP authentication server when
a user attempts to log in.
NOTE: The LDAP Configuration interface, including the Server Parameters and the Search and Query
Parameters tabs, will be enabled only if AMX switches support LDAP and an LDAP user login authentication
option has been selected.
To set server parameters:
1.
From the AMWorks software main menu, click Users - User Authentication. The LDAP
Configuration dialog box displays.
2.
From the Authentication tab, select one of the options that enables LDAP.
3.
Click the Server Parameters tab.
4.
In the Domain Name/IP Address field, type the IP address (or Domain Name) of the primary
authentication server. Parameters for a secondary authentication are optional. If the Primary
field is empty, fields in the Secondary and DNS sections of the dialog box will be disabled.
5.
The entry in the Port field is the port number for the primary (and secondary) LDAP
authentication server(s). Default values depend on the choice of security level. For secure
communication (LDAPS), the default port number is 636. For unsecure communication
(LDAP), the default port number is 389. User input entries must be within the range of
0-65535.
6.
Under Security, select the LDAP radio button to send queries in a Non-secure mode
(clear text).
- or Select LDAPS to send queries in Secure mode [over Secure Sockets Layer (SSL)]. The port
number is updated based on whether you chose LDAP or LDAPS.
NOTE: The default Security mode is LDAP.
7.
In the Primary DNS IP Address field, you may type the IP address of your primary DNS server
in network dot notation. This field will be enabled if an entry exists in the Primary Domain
Name/IP address field. If you have specified a primary authentication server as a domain name
(not as an IP address), the Primary DNS IP Address becomes a required field. The DNS
address that you specify here will be used to resolve the authentication server domain name.
You must specify a DNS if your user exists in a domain other than the primary domain.
Chapter 12: Configuring LDAP
81
8.
In the Secondary DNS IP Address field, you may type the IP address of your secondary DNS
server in network dot notation, if one is desired. This field is enabled only if there is an entry in
the Primary DNS IP Address field, and is not a required field.
9.
In the Tertiary DNS IP Address field, you may type the IP address of your tertiary DNS server
in network dot notation, if one is desired. This field is enabled only if there is an entry in the
Secondary DNS IP Address field and is not a required field.
NOTE: The primary DNS IP address will be addressed first for DNS resolution. The secondary and tertiary DNS
IP addresses will be addressed only if the primary DNS machine is not available for DNS resolution.
10. Click OK to apply your changes and to dismiss the LDAP Configuration dialog box.
NOTE: Clicking OK checks that all required fields in the Server Parameters tab and the Parameters tab are filled
in. If a required field is left blank, a message box displays indicating the missing required field.
Setting Search and Query Parameters for LDAP
User Authentication
After selecting an LDAP user login authentication option, you must set up the LDAP search and
query parameters that will be used by an AMX switch to search the specified containers within the
Authentication server when a user attempts to log in.
NOTE: The LDAP Configuration interface, including the Server Parameters and Search and Query Parameters
tabs, will be enabled only if AMX switches support LDAP and an LDAP user login authentication option has
been selected.
To set search and query parameters:
1.
From the AMWorks software main menu, click Users - User Authentication. The LDAP
Configuration dialog box is displayed.
2.
From the Authentication tab, select one of the options that enables LDAP.
3.
Click the Search and Query Parameters tab.
4.
In the Search DN field, type an LDAP Distinguished Name. You must follow standard LDAP
authentication formatting rules to specify an LDAP Distinguished Name. The default is the
following: cn=Administrator,cn=Users,dc=yourDomainName,dc=com
NOTE: This default represents a user called administrator, which exists in the Users container on the
yourDomainName.com Authentication server. At a minimum, you must replace the "yourDomainName" text with
a valid domain name for your Authentication server. The Search DN must represent the name of a user (whose
permissions on the Authentication server will determine the scope of the LDAP search), and the domain name of
the LDAP server on which this user exists.
5.
In the Search Password field, type the password that corresponds with the user that you
specified in the Search DN field. In the default case (where the user is administrator) you must
specify the administrator password that is known on the Authentication server. The password
82
AMWorks Software Installer/User Guide
you enter may be up to 30 characters long. All standard Microsoft Windows characters are
allowed. Asterisks (*) will display for each character you type in the field.
6.
In the Confirm Password field, retype the password entered in the Search Password field.
7.
In the Search Base field, type the starting domain for the LDAP search or query. You must
follow standard LDAP authentication formatting rules to specify the Search Base as an LDAP
Distinguished Name. The field will be validated for label=value pairs, separated by commas.
The default format is the following: dc=yourDomainName,dc=com
NOTE: At a minimum you must replace the "yourDomainName" text with a valid domain name for your
Authentication server.
8.
In the UID Mask field, type the text to be used as a user ID search. This text is schema
dependent. The default is the following: sAMAccountName=%1
NOTE: The text entered in the UID Mask field will determine the format of the username that must be typed in at
the AMX user station OSCAR interface login prompt.
9.
Click OK to apply all your changes and exit the dialog box.
NOTE: Clicking OK checks that all required fields in the Server Parameters tab and the Search and Query
Parameters tab are filled in. If a required field is left blank, the password fields do not match or a parameter string
is incorrectly formatted, a message box will be displayed to report an error.
83
APP ENDICE S
Appendices
The following information is contained in this section:
•
System Configuration on page 83
•
Glossary on page 86
•
Reference on page 88
•
Troubleshooting on page 95
•
Technical Support on page 103
Appendix A: System Configuration
AMWorks software and AMX switches on same network segment
The configuration shown below is the simplest configuration for an AMX switching system. All
nodes are on the same physical network and the same network subnet. In this configuration, the
AMWorks software will be able to automatically discover all of the connected matrix switches.
Figure 1.1: AMWorks Software and AMX Switches on the Same Network Segment
84
AMWorks Software Installer/User Guide
AMWorks software and AMX switches separated by router
In the configuration shown below, the AMX switches are separated by a router onto different
physical network segments. The AMWorks software will be able to automatically discover the
matrix switch at node 2. The AMWorks software may be able to automatically discover the matrix
switches at nodes 3, 4 and 5; however, it is more likely that the administrator will have to manually
add the switches at those nodes.
Figure 1.2: AMWorks Software and AMX Switches Separated by a Router
Appendices
85
AMWorks software and AMX switches separated by WAN
In the configuration shown below, the AMWorks software is separated by a WAN (Wide Area
Network), a VPN (Virtual Private Network - a secure or “private” data network that uses a public
communication infrastructure) and a firewall. Despite these limitations, the AMWorks software
administrator can manually add all of the matrix switches located at nodes 2, 3 and 4, because all
networked AMX switches are located on the same logical WAN.
NOTE: The assistance of a corporate network administrator may be required to configure the firewalls.
Figure 1.3: AMWorks Software and AMX Switches Separated by WAN
86
AMWorks Software Installer/User Guide
Appendix B: Glossary
•
AMIQ module (AMX Switch Intelligent Module) - The AMIQ module connects a target
device to an AMX switch.
•
AMIQDM module (AMX Switch Intelligent Module Dual Port/Multimedia) - The AMIQDM
module has two RJ45 ports and can connect a target device to one or two AMX switches or to
one or two ports on the same AMX switch. The AMIQDM module can also support
multimedia (audio and serial) features.
•
Cascading - A method of configuring matrix switches in an AMX switch system configuration
to provide a user access to a much larger set of target devices than can be provided through a
single matrix switch.
•
Configuration - A grouping of all AMX switch networkable system components (AMWorks
software and matrix switches) having the same configuration ID.
•
Configuration ID - A group of resources associated with a particular user station under
connection conditions.
•
Console Resource Group (CRG) - A group of resources associated with a particular user
station under connection conditions.
•
Crosspoint - The switch from input to output executed by a router.
•
Default Resource Group (DRG) - A group of resources associated with a particular user station
under disconnect conditions.
•
Discovery - The mechanism used by AMWorks software to automatically determine the matrix
switches on the AMX switching system configuration.
•
Index - An incrementing number used to relate TRG entries to CRG entries in the resource
routers table.
•
LDAP (Lightweight Directory Authorization Protocol) - A network used to authenticate a user.
•
Level - A group of input ports and output ports of the same type. Partition is another name
for level.
•
Local discovery - Automatic discovery of devices that exist on the same physical network
segment and on the same subnet as AMWorks software. The devices must have the same
configuration ID as AMWorks software.
•
Matrix switch - A device that provides matrix switch connectivity from user ports to
server ports.
•
Merge synchronization - A synchronization method which merges all existing individual
databases residing on AMWorks software and on the matrix switches and re-distributes the
new database.
•
Multimedia - Refers to the audio and serial feature supported by the AMX switching system
through the AMX5130 user station and AMIQDM module.
•
Multiple Device Mode (MDM) - The device mode used to configure an MDM-capable device
for seamless cascading of servers attached to KVM switches cascaded below the AMX switch.
Appendices
87
•
Non-local discovery - Automatic discovery of devices that are updated to the latest software,
exist on a reachable physical network and on a specified subnet. The devices must have the
same configuration ID as AMWorks software.
•
Offline devices - Devices that cannot be contacted by AMWorks software but still exist in its
database or in a system AMX50xx switch database. Only matrix switches and servers (AMIQ
modules) can have offline status.
•
Overwrite synchronization - A method of synchronization which replaces all existing
individual databases that reside on AMWorks software and on the matrix switches with a preselected database.
•
Pinnacle FAK - Pinnacle Fast Action Keyboard.
•
Resource group - A group of signal resources, including input or output status, level (partition)
and port number, associated with a server or a user station in the AMWorks software.
•
Seamless cascading - Cascading KVM switches below the AMX switching system without the
use of special cascading protocols.
•
Server group - A defined selection of associated servers. Users can be granted No Access,
View Only or Full Access rights to a server group (and therefore, all servers in the group).
•
Synchronization indicator - The status bar at the bottom-left corner of the window that
indicates the AMWorks software synchronization status.
•
System synchronization - A feature of AMWorks software used to (1) merge all existing
individual databases residing on AMWorks software and on the matrix switches and redistribute the new database, or (2) replace all existing individual databases that reside on
AMWorks and on the matrix switches with a pre-selected database.
•
Target Resource Group (TRG) - A group of resources associated with a particular server.
•
Tiers - A method of configuring matrix switches in an AMX switching system configuration to
provide a user access to a much larger set of target devices than can be provided through a
single matrix switch.
•
UDP broadcast (User Datagram Protocol) - The communication protocol used by the
AMWorks software to discover AMX switching system devices. Only matrix switches with the
same configuration ID will respond to the UDP broadcast.
•
UID - Unique identification number.
•
User group - A defined selection of associated users. This group (and therefore, all the users in
the group) can be granted No Access, View Only or Full Access to individual servers.
•
VPN (Virtual Private Network) - a secure or “private” data network that uses a public
communication infrastructure.
•
WAN - Wide Area Network.
88
AMWorks Software Installer/User Guide
Appendix C: Reference
AMX switching system
The AMX switching system refers to the cluster of AMX switches that are synchronized together
through the AMWorks software. When AMWorks software synchronizes a cluster of AMX
switches, one of the switches is designated as the master switch. For switches to be considered part
of the same AMX switching system, they must have the same master switch.
The AMWorks software may be used to manage one or more AMX switching systems. Each
switching system has its own database which stores information on a set of AMX switches, user
stations, AMIQ modules and the associated username settings and permissions.
When you add an AMX switch, all user stations and AMIQ modules connected to that AMX switch
are added automatically. To add an AMX switch to a database, you need to either discover the
switch on the subnet, or if the switches are on different subnets, add them manually.
Cross network discovery
The AMWorks software provides the following methods of adding AMX switches to
a configuration:
•
Local discovery: AMX switches that exist on the same physical network segment and on the
same subnet as the AMWorks software may be automatically discovered. The AMX switches
must have the same configuration (config) ID as the AMWorks software.
•
Non-local discovery: AMX switches that are updated to the latest software, exist on a
reachable physical network and reside on a specified subnet may be automatically discovered.
The AMX switches must have the same configuration ID as the AMWorks software.
Manual addition: AMX switches that exist on any reachable network may be specified by IP
address. In this case, the AMWorks software does not need to have the same configuration ID as
the specified AMX switches.
Firmware update files
Each device type has one or more file(s) containing the programming code or firmware that the
AMWorks software can use for the updates. Before beginning the firmware update, access the files
for each device type you wish to update, as shown below.
CAUTION: The term “update” can refer to either a firmware upgrade or downgrade. Since the name of the
update file for each device is the same regardless of firmware version, ensure that the update files that you are
using are the correct versions.
Table 1.1: Firmware Update Files for AMX Switches
AMX Switch Device Type
Filename
Any AMX switch
amx50xx.avt
Appendices
89
Table 1.2: Firmware Update Files for AMX User Stations
AMX User Station Device Type
Filename
AMX5100 User Station
amx51xx.avt
AMX5110, AMX5120 User Station
amx51p2.avt
AMX5111, AMX5121, AMX5130 User Station
amx51p3.avt
Table 1.3: Firmware Update Files for IQ Modules
IQ Module Type
Filename
AMIQ-PS2, AMIQDM-PS2 modules
amiqps2.avt
AMIQ-SERIAL module
amiqsrl.avt
AMIQ-USB, AMIQ-VSN, AMIQDM-USB,
AMIQDM-VSN modules
amiqsusb.avt
Keyboard emulation and layout selection
The Emulation and Layout fields enable you to select a keyboard emulation and a country code
layout for devices in the AMX switching system.
To select a keyboard emulation and layout:
1.
Under Emulation, select a setting for the device type in your system as shown below.
•
AMIQDM-USB module - Standard or Sun-USB
•
AMIQDM-PS2 module - Standard or Pinnacle FAK
•
All other modules and MDM servers - The field is disabled
NOTE: The Chyron keyboard uses Standard emulation.
2.
Under Layout, select the desired keyboard layout if the device is an AMIQDM-USB module or
AMIQDM-VSN module. For all other devices, the field is disabled.
90
AMWorks Software Installer/User Guide
KVM switches in seamless switching system
The following KVM switches can be seamlessly cascaded in an AMX switching system. No special
cascading protocols are required between the AMX switching system and these KVM switches.
Table 1.4: KVM Switches in Seamless Cascaded Switching System
KVM Switches in Cascaded Seamless Switching System
AutoView switch
AutoView® 2000 switch
AutoView 200 switch
DSR® switch
AutoView 416 switch
OutLook® ES switch
AutoView 424 switch
SwitchView® OSD switch
AutoView 1000R switch
XP® switch
AutoView 2000R switch
Rules for usernames and passwords
Usernames must be 1-15 characters. A normal user’s password must have 6-15 characters or be set
as a blank password. See Setting Blank Passwords on page 68 for more information. The
administrator’s password must have 6-15 characters and cannot be set as a blank password.
You may use special characters in the username and password. However, in some cases, you may
need to press the key twice to enter the character. See LDAP usernames and passwords on page 90
for more information.
Usernames and passwords may not contain spaces, quotation marks or exclamation points.
LDAP usernames and passwords
When entering your LDAP username and password, you will need to press some keys twice to
enable characters, such as é or á, to be displayed on the OSCAR interface without requiring a
keyboard containing these characters. If you need to use one of these characters in your username
or password, press the key twice and then erase the second character.
Merge mode conflict resolution
The System Synchronization command in AMWorks software can be used to (1) merge all existing
individual databases residing on the AMWorks software and on the matrix switches and redistribute the new database, or (2) replace all existing individual databases that reside on the
AMWorks software and on the matrix switches with a pre-selected database. The System
Synchronization Database - Merge Synchronization mode automatically detects, resolves and logs
conflicts in user passwords, administrator passwords and user-to-server permissions as shown in
the following table.
Appendices
91
Table 1.5: Merge Mode Conflict Resolution
Type of Conflict
Resolution
Password is reset automatically and randomly. Neither the administrator nor the
user will know what the password is. Only the AMWorks software administrator
can resolve this situation.
The Conflicts Found message box displays.
Conflicting users are listed in the Status window.
User Passwords
Administrator Passwords
User-to-server Permissions
Group versus Individual
User Permissions
The password is reset automatically to the last known good password or
defaults to “password.” If it defaults to “password,” the administrator should
change it immediately by selecting the Admin Tools - Password command.
The Conflicts Found message box displays.
The administrator password conflict will be listed in the Status window.
Permissions are resolved by assigning the lowest user-to-server permissions
that were found during the merge synchronization. For more information see
User to-server-permissions resolution on page 91.
NOTE: Conflict resolution only applies to users that exist in the system. If a user
exists in one system database and does not exist in another system database,
the user will be added to the second system database with existing user
permissions. No conflict will be logged.
The system will go out of sync if you have set up user and server groups on the
AMWorks software and then change user-to-server permissions from an AMX
user station OSCAR interface.
After re-synchronizing the system, conflicts will be resolved by taking the highest
user-to-server permissions from the user groups and server groups.
User to-server-permissions resolution
The following table shows how the user-to-server permissions are resolved by a
merge synchronization.
NOTE: Permissions will be resolved by assigning the lowest of all the user-to-server permissions found during
the merge synchronization.
Table 1.6: User-to-User Server Permissions Resolution
Servers List
User A’s Rights on AMX User A’s Rights on AMX
Switch 1
Switch 2
Access Rights After Merge
Server 1
Full
Full
Full (no conflict)
Server 2
Full
View
View
Server 3
Full
None
None
Server 4
View
Full
View
92
AMWorks Software Installer/User Guide
Table 1.6: User-to-User Server Permissions Resolution
Servers List
User A’s Rights on AMX User A’s Rights on AMX
Switch 1
Switch 2
Access Rights After Merge
Server 5
View
View
View (no conflict)
Server 6
View
None
None
Server 7
None
Full
None
Server 8
None
View
None
Server 9
None
None
None (no conflict)
Merge Synchronization mode
The System Synchronization Database - Merge Synchronization mode performs the following:
•
Merges the user and permissions data that exists on all AMX switches and on the
AMWorks software
NOTE: The AMWorks software shows accurate progress status information as the synchronization
is progressing.
•
Shows synchronization details in real-time in the Status window
•
Automatically detects, resolves and logs the following conflicts:
•
The same user record on one or more matrix switch(es), but with conflicting passwords
•
The same administrator record on one or more matrix switch(es), but with
conflicting passwords
•
The same user record on one or more matrix switch(es), but with conflicting sets of user/
server permissions records
See Merge mode conflict resolution on page 90 for more information about conflicts.
NOTE: If more than 295 users are detected by the AMWorks software during merge synchronization, the
process is aborted and a failure message displays at the end of a merge synchronization. For more information
see System synchronization fails after merge on page 99.
Overwrite Synchronization mode
Overwrite Synchronization mode, a method of synchronization which replaces all existing
individual databases that reside on the AMWorks software and on the matrix switches with a preselected database, performs the following:
•
Copies the selected database source over all the databases in the AMX switching system
NOTE: The AMWorks software shows accurate progress status information as the synchronization
is progressing.
•
Shows synchronization details in real-time in the Status window
Appendices
•
93
Performs faster than the Merge Synchronization mode with no conflicts to resolve
CAUTION: If you use the Overwrite option and specify an AMX switches database, you will lose the information
associated with any user and server groups that you have configured in the AMWorks software.
System limit dependencies
Due to the physical memory limits in the AMX switching system hardware, the following system
constraints have been imposed and will be enforced by the AMWorks software:
•
Rule defining the maximum number of users allowed in the system.
•
Rule defining the maximum number of servers allowed in the system.
•
Rule defining the maximum number of records present in the system permission databases.
One record is defined as a user-to-server permission combination. The system can handle
65,536 permission records.
NOTE: The rule defining the maximum number of records present in the system permission databases affects
the rules defining the maximum number of users and servers. This means that the number of users times the
number of servers with permissions must be less than or equal to 65,536. An AMWorks software administrator
can define a large number of combinations within this limit.
User groups and server groups
A user group consists of a defined selection of associated users. This group (and therefore, all the
users in the group) can be given No Access, View Only or Full Access rights to individual servers.
A user can be a member of a number of user groups and can also be given different access rights to
a number of server groups. A user can also be assigned individual access rights to a server.
A server group is a defined selection of associated servers. Individual users can be given No
Access, View Only or Full Access rights to the server group (and therefore, all servers in the
group). A server can be a member of more than one server group and can also be given different
access rights from a number of user groups. A user can also be assigned individual access rights to
a server.
If a user is a member of two or more groups with different permissions to the same server, the
AMWorks software will always assign the highest privilege level to that server for that user.
Example of user groups and server groups
A new user joins the company. By default, when the user is added to the system, the user has no
access rights to any of the AMX switching system servers. The AMWorks software administrator
adds the user to the Employees user group, which has View Only access rights to all the servers in
the company. However, the new user needs full access rights to a small group of servers belonging
to the user's department. In this case, the administrator assigns the user Full Access rights to the
Accounts Servers server group. The new user will have the following access rights:
•
When logged into the AMX user station, the user will have Full Access rights to the servers in
the Account Servers server group and View Only access to all other servers.
94
AMWorks Software Installer/User Guide
•
If removed from the Employees user group, the user will have Full Access rights to the
Accounts Servers server group, but will have no access to all other servers.
•
If a server is removed from the Accounts Servers server group, the user will no longer have
any access to this server.
CAUTION: After you have created user and/or server groups using the AMWorks software, do not modify any
user-to-server access rights from an AMX user station OSCAR interface. Doing so will result in the system going
out-of-sync.
Appendices
95
Appendix D: Troubleshooting
Cancel button does nothing during firmware update
If the Cancel button is clicked during a firmware update, a cancel message is sent to the system
devices to stop any further updating. However, aborting firmware updates can leave the device in
an undetermined state. So, the device is instructed to finish the update that is in progress, but do
nothing more. The consequences of canceling a firmware update differ for the Sequential and
Parallel modes as follows:
•
Sequential mode: The device that is currently being updated is finished and the update stops.
No additional devices are updated.
•
Parallel mode: Once the update has progressed past a fail safe point, the Cancel button is
disabled. Aborting after this point would leave all the updating devices in an undetermined
state. As a result, the update continues until it completes.
Devices are not updated in the tree view
Table 1.7: Troubleshooting - Devices Are Not Updated in the Tree View
Cause
Recommended Solution
The devices connected to the AMX switch are not
updated properly in the tree view.
The AMX switch must be synchronized with the
current version of the AMWorks software to receive
all events from the switch.
The CSV of LDAP Add User Wizard fails
Table 1.8: Troubleshooting - The CSV of LDAP Add User Wizard Fails
Cause
Recommended Solution
The user was not successfully added to the
Master Switch or the AMWorks
software database.
Synchronize the AMWorks software database and run
the ADD User Wizard again.
Discover devices does not detect AMX switches in the system
Automatic discovery only succeeds if all AMX switches have been updated to a compatible
software revision. For the initial installation of AMWorks software, all AMX switches in the
96
AMWorks Software Installer/User Guide
existing system (if any) on a different subnet from the AMWorks software must be manually added
and updated before discovery is successful.
Table 1.9: Troubleshooting - Discover Devices Does Not Detect AMX Switches in the System
Cause
Recommended Solution
The Discover Devices operation does not detect all
AMX switches in the system.
Initial Installation: If the AMX switches are on a
different subnet than the AMWorks software, perform
the Add Devices and the Update Firmware
commands. Then perform the Discover
Devices command.
General: Ensure that all AMX switches have
compatible firmware. If so, then verify that switches
and routers in the system (if any) have directed IP
broadcast enabled and the AMX switch(es)/AMWorks
software have the correct default gateway(s)
configured. If directed IP broadcast is not enabled,
discovery will not be successful. Perform the Add
Devices command to manually add devices.
The Discover Devices command does not work if the
local PC's UDP or TCP protocols are disabled.
Enable the local PC's UDP (port 9737) or TCP (port
9734) protocols. This operation may be performed
through a router, firewall or operating system.
Log in delay at user station
The delay you experience when logging in to the user station may have the following causes:
•
LDAP is enabled and you have a multi-domain tree. The user that is logging in may be in a
domain other than the primary domain.
•
All users will experience a delay while logging in to the user station as the number of LDAP
users increases.
Log in failure at user station
Table 1.10: Troubleshooting - Log In Failure at User Station
Cause
Recommended Solution
When a user was created on the Enterprise
Authentication server, the option to force the user to
change their password was selected. The next time
the user logs in to the user station, the login fails.
Request that users log in to the Windows workstation
environment and change their Enterprise passwords
before logging into the user station and the
OSCAR interface.
User does not exist.
Create a new user.
You have entered the incorrect password for that user. Re-enter the user's password.
Appendices
97
Table 1.10: Troubleshooting - Log In Failure at User Station
Cause
Recommended Solution
LDAP authentication is enabled and you are entering
your AMX switch password.
Enter your LDAP password.
LDAP is enabled and at least one of your LDAP
parameters is incorrect.
Make corrections to your LDAP
Configuration parameters.
Grouping conflicts
Table 1.11: Troubleshooting - Grouping Conflicts
Cause
Recommended Solution
If you attempt to edit a user's access permissions from
a user station (while logged in as the administrator)
and the user is associated with one or more user and/
or server groups, the user will be removed from all
group associations.
Once you have set up groups in the AMWorks
software, you should only administrate the system
from the AMWorks software. You should not permit
any administration to occur from the user
station interface.
Groups were removed as a result of an overwrite
synchronization. If you perform an overwrite
synchronization that uses a database stored on an
AMX switch instead of stored in the AMWorks
software, all user and server groups will be
automatically removed. Users that were associated
with groups will maintain their system-wide effective
rights. User server access rights will become
individual user-to-server rights.
When performing an overwrite synchronization, select
the AMWorks software as the source database in
order to preserve current groups settings.
Lost password
If you should lose your password, contact Avocent Technical Support for assistance. Visit http://
www.avocent.com/support for more information.
98
AMWorks Software Installer/User Guide
AMWorks software hangs during firmware update
If the matrix switch is powered down or the network is lost during the ftp portion of a firmware
update, the AMWorks software may appear to hang. There will be a delay before the AMWorks
software becomes responsive again.
Table 1.12: Troubleshooting - AMWorks Software Hangs During Firmware Update
Cause
Recommended Solution
The matrix switch was powered down or the network
connection was lost during a firmware update.
Terminate and restart the application. Once the
network problem is fixed, start a new firmware update.
See Updating Firmware on page 74 for
more information.
Synchronization status indicator turns red
When the synchronization status indicator turns red, the AMWorks software may be “out of sync.”
The causes and solutions for the out-of-sync state are shown below.
Table 1.13: Troubleshooting - Synchronization Status Indicator Turns Red
Cause
Recommended Solution
A new AMX switch has been manually added to the
system or a new AMX switch has been
automatically discovered.
Perform another synchronization to return the system
to a synchronized state.
An existing AMX switch has been removed from
the system.
Perform another synchronization to return the system
to a synchronized state.
The system is newly installed and has not yet
been synchronized.
Perform an initial synchronization to complete
the installation.
You have set up user and/or server groups on the
system using the AMWorks software, but have made
user access rights changes from an AMX user station
OSCAR interface.
Perform another synchronization to return the system
to a synchronized state.
NOTE: If you have set up user and/or server groups,
use only the AMWorks software to administer
the system.
You have made database changes from the AMWorks
software (for example, added or removed users) and
Perform another synchronization to return the system
a network error prevented your changes from
to a synchronized state.
propagating to the distributed AMX
switch configuration.
You have made database changes from the AMWorks
software or from an AMX user station OSCAR
Perform another synchronization to return the system
interface and one or more of your configured AMX
to a synchronized state.
switches was not powered at the time.
Appendices
99
NOTE: After the AMWorks software has been synchronized successfully, you may take the AMWorks software
offline and perform database changes. When the AMWorks software comes back online, it will automatically
attempt to synchronize with the rest of the AMX switch distributed system.
System cannot retrieve synchronization status
After launching the AMWorks software, the Startup Error dialog box displays indicating that the
system cannot retrieve synchronization status from the system.
Table 1.14: Troubleshooting - System Cannot Retrieve Synchronization Status
Cause
Recommended Solution
Click Yes on the Startup Error dialog box to
work offline.
The AMWorks software cannot contact the network for
- or these reasons:
Click No on the Startup Error dialog box. Run the
•
It is not connected to the network.
Discover Devices and Synchronize System
•
One or more of the AMX switches may be turned
Database commands.
off or have been removed from the system.
- or •
There is a network error.
Fix the network problems, then restart the
AMWorks software.
System synchronization fails after merge
The AMX switching system limits the number of users to 295. If more than 295 users are detected
by the AMWorks software during merge synchronization, the process is aborted and a failure
message displays at the end of a merge synchronization.
Table 1.15: Troubleshooting - System Synchronization Fails After Merge
Cause
Recommended Solution
Verify that there is a maximum of 295 users present
on the system.
•
Perform the Synchronize System Database
command and select the Overwrite option. Select
More than 295 users are detected by the AMWorks
one of the AMX switches or the AMWorks
software. These users may be different on all the AMX
software as the database source.
switches being synchronized.
•
Delete the required number of users from the
AMX switch(es) through an AMX user station.
Perform the Synchronize System
Database command.
100
AMWorks Software Installer/User Guide
Target flag disappears after preview
The target flag disappears after you have clicked the Preview button. The AMWorks software
is unresponsive.
Table 1.16: Troubleshooting - Target Flag Disappears After Preview
Cause
Recommended Solution
The position of the target flag coincides with that of the
Windows task bar. The Windows task bar may have a
setting of Always on top and/or Auto hide. The
AMWorks software is waiting for the target flag
preview window to be dismissed and will not respond
to any other input stimulus.
Resize the task bar with the Always on top
setting selected.
- or Reset the task bar settings to access the target flag.
Unable to connect to database
The AMWorks software is busy accessing the database during an operation and receives a request
to access the database for another operation. The Unable to Connect to Database message
box displays.
Table 1.17: Troubleshooting - Unable to Connect to Database
Cause
Recommended Solution
The AMWorks software is busy accessing the
database in an operation that may take a considerable
Retrying the same action will usually succeed.
amount of time and then receives another request that
involves accessing the database.
Update file is invalid
The multimedia module will fail a firmware update request and will display the following message:
Started the update successfully, but the Update File is Invalid For Device UID <Device Number>.
Table 1.18: Troubleshooting - Update File is Invalid
Cause
Recommended Solution
The version of the firmware update is less than the
required version.
Visit http://www.avocent.com for the correct version of
the firmware.
Appendices
101
User does not hear sound
Table 1.19: Troubleshooting - User Does Not Hear Sound
Cause
Recommended Solution
The connected devices may not be capable of
supporting multimedia or multimedia may not be
enabled in the AMWorks software.
Ensure that all connected devices can support the
multimedia feature and the multimedia settings in the
AMWorks software are enabled for the user.
User station displays in connection table, not in tree view
Table 1.20: Troubleshooting - User Station Displays in Connection Table, Not in Tree View
Cause
Recommended Solution
An attempt to update the firmware on a user station
has resulted in the device running from boot code.
Update the user station firmware. In the Firmware
Update dialog box, under Device Type, select the type
of user station. If a device named InBootloader
displays in the Devices list, update to the most current
firmware. See Updating Firmware on page 74 for
more information.
User station gets “lost” after attempting to update it
Table 1.21: Troubleshooting - User Station Gets “Lost” After Attempting to Update It
Cause
Recommended Solution
An unsuccessful attempt to update the firmware
on an AMX user station has resulted in the
device running from boot code. The AMWorks
software is no longer able to communicate with
the device.
Perform a system discovery. The AMX user station
will display in the AMX switch connection table in the
AMWorks software. It still may not display in
the Device tree view. Attempt to update the firmware on this
device again. For more information, refer to
User station displays in connection table, not in tree view on
page 101.
102
AMWorks Software Installer/User Guide
Cannot successfully connect a user station to two AMX matrix switches
Table 1.22: Troubleshooting - Cannot Successfully Connect a User Station to Two AMX Matrix Switches
Cause
Recommended Solution
The user station does not support dual AMX
switch configuration.
Dual AMX matrix configuration is supported on AMX5111,
AMX5121 or AMX5130 user stations. If you are using any of
the supported user stations, please ensure the firmware is
updated to the latest revision.
One or both AMX switches do not support the
dual AMX switch configuration.
Ensure that both switches are updated with the latest
firmware revision.
AMX switches are not in the same environment.
Discover and synchronize both AMX switches, and power
cycle the user station.
Appendices
103
Appendix E: Technical Support
Our Technical Support staff is ready to assist you with any installation or operating issues you
encounter with your Avocent product. If an issue should develop, follow the steps below for the
fastest possible service.
To resolve an issue:
1.
Check the pertinent section of this manual to see if the issue can be resolved by following the
procedures outlined.
2.
Check our web site at www.avocent.com/support to search the knowledge base or use the
on-line service request.
3.
Call the Avocent Technical Support location nearest you.
USA Notification
Warning: Changes or modifications to this unit not expressly approved by the party responsible for compliance
could void the user’s authority to operate the equipment.
Note: This equipment has been tested and found to comply with the limits for a Class A digital device, pursuant to Part 15 of the FCC Rules. These limits are designed to provide reasonable protection against harmful
interference when the equipment is operated in a commercial environment. This equipment generates, uses and
can radiate radio frequency energy and, if not installed and used in accordance with the instruction manual, may
cause harmful interference to radio communications. Operation of this equipment in a residential area is likely to
cause harmful interference in which case the user will be required to correct the interference at his own expense.
Canadian Notification
This digital apparatus does not exceed the Class A limits for radio noise emissions from digital apparatus set out
in the Radio Interference Regulations of the Canadian Department of Communications.
Le présent appareil numérique n’émet pas de bruits radioélectriques dépassant les limites applicables aux
appareils numériques de la classe A prescrites dans le Règlement sur le brouillage radioélectrique édicté par le
Ministère des Communications du Canada.
Japanese Approvals
Safety and EMC Approvals and Markings
EN55022 Class A, EN55024, EN61000-3-2, EN61000-3-3, EN60950, FCC 47CFR Part 15 Class A, CSA
C22.2 No. 60950, IEC 60950, FCC Class A, UL 60950 3rd Edition, VCCI Class A
AMWorks®
Installer/User Guide
For Technical Support:
www.avocent.com/support
Avocent Corporation
4991 Corporate Drive
Huntsville, Alabama 35805-6201
USA
Tel: +1 256 430 4000
Fax: +1 256 430 4031
Avocent Asia Pacific
Singapore Branch Office
100 Tras Street, #15-01
Amara Corporate Tower
Singapore 079027
Tel: +656 227 3773
Fax: +656 223 9155
Avocent International Ltd.
Avocent House, Shannon Free Zone
Shannon, County Clare, Ireland
Tel: +353 61 715 292
Fax: +353 61 471 871
Avocent Germany
Gottlieb-Daimler-Straße 2-4
D-33803 Steinhagen
Germany
Tel: +49 5204 9134 0
Fax: +49 5204 9134 99
Avocent Canada
20 Mural Street, Unit 5
Richmond Hill, Ontario
L4B 1K3 Canada
Tel: +1 877 992 9239
Fax: +1 877 524 2985
590-605-501C