1
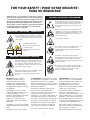
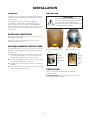
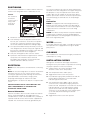
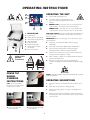
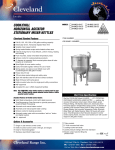
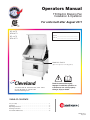
Operators Manual
TR Electric Braising Pan
Installation & Operation
For units built after August 2011
SEL-30-TR
For your future reference.
SEM-30-TR
Model # ______________________________________
SEL-40-TR
Serial # _______________________________________
SEM-40-TR
Model # & Serial #.
(Open front panel to view rating label.)
!
™
Cleveland
Read the manual thoroughly.
Improper installation, operation or
maintenance can cause property
damage, injury or death.
1333 East 179th St., Cleveland, Ohio, U.S.A. 44110
Ph: 216.481.4900 Fx: 216.481.3782
www.clevelandrange.com
TABLE OF CONTENTS
For your safety . . . . . . . . . . . . . . . . . . . . . . . . . . . . . . . . . . . . . . . . . . . . . . .
Installation . . . . . . . . . . . . . . . . . . . . . . . . . . . . . . . . . . . . . . . . . . . . . . . . . . .
Operating Instructions . . . . . . . . . . . . . . . . . . . . . . . . . . . . . . . . . . . . . . . . . .
Cleaning Instructions . . . . . . . . . . . . . . . . . . . . . . . . . . . . . . . . . . . . . . . . . . .
Preventative Maintenance . . . . . . . . . . . . . . . . . . . . . . . . . . . . . . . . . . . . . . .
1
2
4
5
6
SE95032 Rev. 7
May 2012
FOR YOUR SAFETY / POUR VOTRE SÉCURITÉ /
PARA SU SEGURIDAD
Hazard warnings are for your safey. Absence of a warning does not mean the
hazard is not present. Unforeseen actions may result in unanticipated hazards.
/ Les avertissements de danger sont pour votre sécurité. L’absence d'un
avertissement ne signifie pas que le danger n'est pas présent. Les actions
imprévues peuvent entraîner des dangers imprévus. / Las advertencias
sobre los peligros son para su seguridad. La ausencia de una advertencia
no significa que el peligro no está presente. Las acciones imprevistas
podrían resultar en peligros no anticipados.
CAUTION / ATTENTION / PRECAUCIÓN
Keep hands away from moving parts and pinch
points. / Gardez les mains loin des pièces mobiles et
des points de pincement. / Mantenga las manos
lejos de piezas movibles y puntos de presión muy
localizada.
Surfaces and product may be hot! Wear protective
equipment. /Les surfaces et le produit peuvent être
chauds! Portez un équipement de protection. / ¡Las
superficies y el producto pueden estar calientes!
Utilice equipo protector.
IMPORTANT / IMPORTANT / IMPORTANTE
Inspect unit daily for proper operation. / Inspectez
l’unité tous les jours pour son bon fonctionnement. /
Inspeccione diariamente el funcionamiento correcto
de la unidad.
Hot! / Chauds ! / ¡Caliente!
Lift lid before tilting skillet.
1
2
Ôtez le couvercle avant d’incliner
la chaudière à frire.
Do not climb, sit or stand on equipment. /Il ne faut
pas monter, s'asseoir ni se tenir debout sur
l'équipement. /No subirse, ni sentarse ni pararse
sobre el equipo.
Levante la tapa antes de inclinar
la sartén.
Stand clear of product discharge path when
discharging hot product. / Écartez-vous du chemin
de décharge d’un produit chaud. / Permanezca
alejado de la ruta de descarga del producto al vaciar
producto caliente.
SERVICING / ENTRETIEN / SERVICIO
Have a qualified service technician maintain your
equipment. / Demandez à un technicien en entretien
et en réparation qualifié d’effectuer l’entretien de
votre équipement. / Haga que un técnico de servicio
calificado mantenga su equipo.
Do not lean on or place objects on kettle lip. / Ne
vous appuyez pas et ne placez pas d’objets sur le
bec de la chaudière. / No se apoye o coloque
objetos en el borde de la marmita.
Remove electrical power prior to servicing. / Coupez
l'alimentation électrique avant l'entretien. /
Desconecte la energía eléctrica antes de darle
servicio.
WARNING: Improper installation,
adjustment, alteration, service or
maintenance can cause property
damage, injury or death. Read the
installation and operating instructions
thoroughly before installing or servicing
this equipment.
This appliance is not to be used by
persons with reduced physical, sensory
or mental capabilities, or lack of
experience and knowledge, unless they
have been given supervision or
instruction concerning use of the
appliance by a person responsible for
their safety.
This appliance is not for use by children
and they must be supervised not to play
with it.
AVERTISSEMENT : Une installation, un réglage,
une modification, une réparation ou un entretien
inadéquat peut occasionner des dommages
matériels, des blessures ou la mort. Lire la notice
de montage et d'exploitation avant d'installer ou
d'entretenir cet équipement.
Cet appareil ne doit pas être utilisé par des
personnes dont les capacités physiques,
sensorielles ou mentales sont réduites, ou des
personnes dénuées d'expérience ou de
connaissance, sauf si elles ont pu bénéficier, par
l'intermédiaire d'une personne responsable de
leur sécurité, d'une surveillance ou d'instructions
préalables concernant l'utilisation de l'appareil.
Cet appareil n'est pas destiné à être utilisé par
des enfants et ils doivent être surveillés pour
s'assurer qu'ils ne jouent pas avec l'appareil.
Conservez ce manuel pour votre référence
Retain this manual for your reference.
ADVERTENCIA: La instalación, el ajuste, la
alteración, el servicio o el mantenimiento
incorrectos pueden ocasionar daños a la
propiedad, lesiones o la muerte. Lea
detenidamente las instrucciones de
instalación y de operación antes de instalar
o darle servicio a este equipo.
Este aparato no debe ser utilizado por
personas con capacidades físicas,
sensoriales o mentales reducidas, o que no
tengan la experiencia y los conocimientos
adecuados, a menos que estas personas
hayan recibido supervisión e instrucciones
en cuanto al uso del aparato por la persona
responsable de la seguridad de ellas.
Este aparato no debe ser usado por los
niños y ellos deben ser supervisados para
que no jueguen con el aparato.
Guarde este manual para su referencia.
1.
INSTALLATION
UNCRATING
GENERAL
Installation of the unit must be accomplished by qualified
installation personnel working to all applicable local and
national codes.
CAUTION:
!
This equipment is built to comply with applicable
standards for manufacturers. Included among those
approval agencies are: UL, A.G.A., NSF, ASME/N.Bd.,
CSA, CGA, ETL, and others. Many local codes exist, and it
is the responsibility of the owner/installer to comply with
these codes.
Straps under tension and will snap when cut.
Carton may contain staples and skid contains
nails. Use proper safety equipment and
precautions. Unit is heavy. Use adequate help
or lifting equipment as needed.
RECEIVING INSPECTION
Before unpacking visually inspect the unit for evidence of
damage during shipping.
If damage is noticed, do not unpack the unit, follow
shipping damage instructions.
SHIPPING DAMAGE INSTRUCTIONS
If shipping damage to the unit is discovered or suspected,
observe the following guidelines in preparing a shipping
damage claim.
1. Cut straps and remove
box.
1. Write down a description of the damage or the reason
for suspecting damage as soon as it is discovered.
This will help in filling out the claim forms later.
2. As soon as damage is discovered or suspected, notify
the carrier that delivered the shipment.
3. Arrange for the carrier's representative to examine the
damage.
4. Fill out all carrier claims forms and have the examining
carrier sign and date each form.
2. Cut straps on unit.
3.
4.
Remove
screws from
back of
flanged feet
(x6).
Remove
nails to
free
blocks
on front
legs.
VENTILATION
These units must be installed under an adequate
ventilation system.
FOR YOUR SAFETY. Keep the appliance area free and
clear of combustible materials.
2.
POSITIONING
installer.
This unit must be installed in accordance with the clearances
shown on the rating label which is adhered to the unit.
The electrical supply must match the power requirements
specified on the unit's rating label. The copper wiring must
be adequate to carry the required current at the rated
voltage. Wire must be suitable for at least 194°F (90°C).
Refer to Specification Sheet for all electrical specifications.
Cleveland strongly recommends the use of liquid tight
fittings.
Caution:
The actuator is
mounted in
center of unit, if
using a fork
truck, lift as
illustrated.
Connection
NOTE: The supply lines will enter throught the rear (or
bottom) of the unit near the left side of the skillet and are
connected to the terminal block. For ease in attaching the
supply lines there is a removable cover on the wiring
compartment.
Lift
Here
Actuator
Support
NOTE: This skillet is factory wired for a 3 phase installation.
If single phase is required, check the wiring diagram for
proper modifications. The wiring diagram is located on the
back of the hinged front panel.
Remove Drain
Drawer (if installed)
1
Position the unit in it's permanent location.
2. Level skillet by means of adjustable stainless steel
feet. For your convenience a foot wrench is taped to
one leg. Use a spirit level and level unit four ways;
across front and back and down left and right edges.
WATER
(OPTIONAL)
A 1/2" NPT cold water line and/or a 1/2" NPT hot water line
are required if unit is equipped with a single or double
pantry faucet.
3. Once positioned and leveled, permanently secure the
unit's flanged feet to the floor using 5/16" lag bolts and
floor anchors (supplied by the installer). Three bolts are
required to secure each of the flanged feet.
CLEANING
4. Seal joints of flanged feet with a silicone sealant.
After installation the unit must be thoroughly cleaned and
sanitized prior to cooking.
5. A protective material has been applied to the stainless
steel panels. This material must be removed
immediately after installation, as heat will melt the
material and make it difficult to remove.
INSTALLATION CHECKS
Although the unit has been thoroughly tested before
leaving the factory, the installer is responsible for ensuring
the proper operation of unit once installed.
ELECTRICAL
Note: Ensure main power is turned off before connecting
wires.
1. Supply power to the unit by placing the fused
disconnect switch to the "ON" position.
Note: The electrical rating label is located on the back the
front panel. For easy access, remove the two screws
securing the upper front panel and hinge the lower front
panel downwards. Serial number, voltage, phase,
amperage and wattage are stated on this label.
2. Turn Temperature Dial to 150°F (66°C).
3. Toggle Power Switch to the "ON" position.
4. Heat Indicator Light (yellow) should be ON and unit
heating. When temperature is reached, Yellow
Indicator Light will switch OFF.
Wiring diagram is located on the bottom of component box
cover.
5. Turn Temperature Dial to 300°F (150°C). Unit will
continue to heat, Heat Indicator Light (yellow) will
remain ON until temperature is reached. Then the heat
indicator light will cycle off indicating the heating
system has shut OFF. The heat indicator light will
continue to cycle ON and OFF as the heating system
cycles ON and OFF maintaining the desired
temperature.
ENSURE THE ELECTRICAL SUPPLY MATCHES THE
UNIT'S REQUIREMENTS AS STATED ON THE
ELECTRICAL RATING LABEL.
General Information
Install in accordance with local codes and/or the National
Electric Code ANSI/NFPA No. 70-1990 (USA) or the
Canadian Electric Code CSA Standard C22.1 (Canada). A
separate fused disconnect switch must be supplied and
installed. The unit must be electrically grounded by the
6. Toggle Power Switch to the "OFF" position.
3.
OPERATING INSTRUCTIONS
3
OPERATING THE UNIT
2
1.
Perform daily startup inspection.
2.
Turn Power Switch to the ON position. The
yellow Heat Indicator Light will indicate pan is
heating.
3.
MANUAL TILT: To raise pan, raise the cover and turn the
crank clockwise. To lower pan, turn counterclockwise.
1
4
5
POWER TILT: To raise pan, raise the cover and press up
on the tilt switch. To lower pan, press down on the tilt switch.
FOR YOUR SAFETY: A power interrupter will automatically shut
of the power to the elements whenever the skillet is raised more
than 1/2" (13mm).
# DESCRIPTION
1.
2.
3.
4.
5.
6.
7.
6
!
OPEN COVER
BEFORE
TILTING PAN
On-Off Switch
Power Indicator Light (Red)
Heat Indicator Light (Yellow)
Temperature Dial
Power Tilt Switch
Manual Tilt Override
Tangent Draw-Off Valve
(not shown)
8. Faucet (not shown)
IMPORTANT: Before commencing to cook, ensure pan is in the
lowered position.
4.
1
NOTE: Once unit has been
tilted there is now way to lower
it until power is restored.
2. Reach under skillet and
remove tilt handle.
5.
Allow skillet to preheat for approximately 15-30 minutes.
6.
Once preheated, insert product in skillet and adjust
Temperature Dial to required cooking temperature.
7.
If desired, once product has cooked, it can be held prior to
serving at a lower temperature setting.
8.
When cooking is completed, set Temperature Dial and Power
Switch to the OFF position.
9.
Pour the contents of the unit into an appropriate
container by tilting the kettle forward or using discharge
valve.
2
POWER TILT
MANUAL
OVERRIDE
INSTRUCTIONS
To preheat, set Temperature Dial to desired cooking
temperature.
NOTE: Cleaning should be completed immediately after cooked
foods are removed.
OPERATING SUGGESTIONS
1.
1. Remove plug.
3. Insert handle onto pump
shaft and turn.
4.
Turn power switch to the "OFF" position when skillet is not in
use.
2.
Allow skillet to preheat before adding product.
3.
Always lift the spring assist cover before activating the tilt
mechanism.
4.
During an electrical power interruption, turn Power Switch to
the OFF position. This unit cannot be made to operate without
electrical power.
0
CLEANING
INSTRUCTIONS
CLEANING INSTRUCTIONS
CARE AND CLEANING
Cooking equipment must be cleaned
regularly to maintain its fast, efficient
cooking performance and to ensure its
continued safe, reliable operation. The
best time to clean is shortly after each
use (allow unit to cool to a safe
temperature).
1.
Turn unit off.
2.
Remove drain screen (if applicable). Thoroughly wash and rinse the screen
either in a sink or a dishwasher.
3.
Prepare a warm water and mild detergent solution in the unit.
4.
Remove food soil using a nylon brush.
0 5.
6.
Drain unit.
7.
Rinse interior thoroughly.
8.
b) In a sink, wash and rinse the inside of the valve body using a nylon
brush.
Do not use
detergents or
cleansers that are
chloride based or
contain quaternary
salt.
c) Use a nylon brush to clean tangent draw-off tube.
d) Rinse with fresh water.
e) Reassemble the draw-off valve by reversing the procedure for
disassembly. The valve's hex nut should be hand tight only.
9.
Do not use a metal
bristle brush or
scraper.
If the unit is equipped with a Tangent Draw-Off Valve, clean as follows:
a) Disassemble the draw-off valve first by turning the valve knob counterclockwise, then turning the large hex nut counter-clockwise until the
valve stem is free of the valve body.
WARNINGS
Chloride Cleaners
Loosen food which is stuck by allowing it to soak at a low temperature
setting.
Using mild soapy water and a damp sponge, wash the exterior, rinse, and
dry.
NOTES
➩ For more difficult cleaning applications one of the following can be used:
alcohol, baking soda, vinegar, or a solution of ammonia in water.
➩ Leave the cover off when the kettle is not in use.
➩ For more detailed instructions refer to Stainless Steel Equipment Care and
Cleaning (www.nafem.org/resources/stainlesssteelfinal.doc) on Nafem’s
website (www.nafem.org).
Wire Brush &
Scrapers
Steel wool should
never be used for
cleaning the stainless
steel.
Steel Pads
Unit should never be
cleaned with a high
pressure spray hose.
High Pressure
Spray Hose
Do not leave water
sitting in unit when
not in use.
Stagnant
Water
5.
0
PREVENTATIVE MAINTENANCE
FOR MAINTENANCE AND REPAIRS CONTACT YOUR AUTHORIZED
MANITOWOC SERVICE AGENCY AND HAVE A QUALIFIED
SERVICE TECHNICIAN MAINTAIN YOUR EQUIPMENT.
Shut off power at main
0
Ensure kettle is at room temperature
and pressure
gauge is We
showing
zero
Cleveland Range
requires little preventative
maintenance.
do however
provide the following
fuse equipment
disconnect prior
0
or
less
prior
to
removing
any
fittings.
to
servicing.
guidelines for inspection and maintenance to keep your unit functioning at 100%.
0
DAILY PRE-STARTUP
INSPECTION
1. Pan (A) tilts up and down correctly.
2. Tilt switch (if equiped) (E) is not broken and is
functioning properly.
3. Red Light (F) comes on when unit is turned on.
4. Orange Light (G) is off when unit is tilted.
5. Orange Light (G) is off when unit is heating.
6. Temperature dial (H) is in place and functioning
properly.
7. Cover (B) tilts up and down freely and is held
in place when fully open.
8. Side (C) and rear (D) panels are in place.
9. Draw-Off Valve (if equiped) is installed and
handle is in place.
B
A
K
C
E
SIX MONTH SERVICE
INSPECTION
D
1. Perform daily startup inspection.
2. Tilt hand wheel is tight (if equiped).
3. Fasteners securing panels (K) are in place
and tight.
4. There are no hydraulic oil leaks.
H
G
YEARLY SERVICE INSPECTION
1. Perform six month service inspection.
2. Check units maximum temperature setting.
3. Inspect safety thermostat for proper
connections.
4. No oil leaks in tilting system.
F
6.