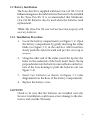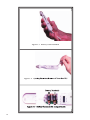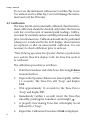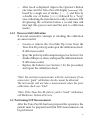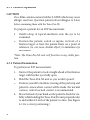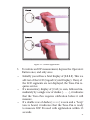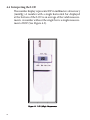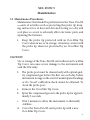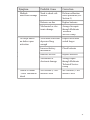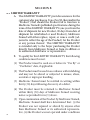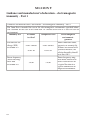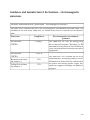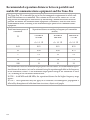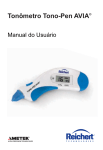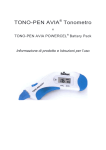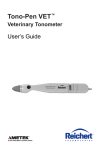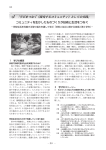
1
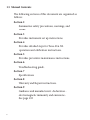
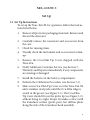
Tono-Pen® XL Product Information and Instructions Informations et instructions concernant le produit Informazioni sul prodotto ed istruzioni per l’uso Produktinformation und Gebrauchsanweisung Instrucciones e información sobre el producto Rx Only 0123 EC Manufacturer: Medtronic Ophthalmics, Inc. A Division of Medtronic Xomed Inc. 6743 Southpoint Drive Jacksonville, FL 32216 USA Authorized Representative (for EC regulatory matters) Medtronic B.V. Earl Bakkenstraat 10 6422 PJ Heerlen The Netherlands Tel.: 011-31-45-566-8000 Fax: 011-31-45-566-8668 © Medtronic 2005 ™ are trademarks and ® are registered marks of Medtronic Xomed, Inc. / ™ sont des propriétés et ® sont des marques déposées de Medtronic Xomed, Inc. / ™ sono marchi di fabbrica e ® sono marchi registrati della Medtronic Xomed, Inc. / ™ sind Warenzeichen und ® sind eingetragene Warenzeichen von Medtronic Xomed, Inc. / ™ son marcas comerciales y ® son marcas registradas de Medtronic Xomed, Inc. Table of Contents Table des Matières Indice Inhaltsverzeichnis Índice Product Information and Instructions ..................................... 5 Informations et instructions concernant le produit................ 41 Informazioni sul prodotto ed istruzioni per l’uso .................. 79 Produktinformation und Gebrauchsanweisung...................... 117 Instrucciones e información sobre el producto........................ 157 3 4 SECTION 1 Introduction 1.1 Overview This manual describes components, setup, procedures, and operation of the Medtronic Tono-Pen XL Tonometer. The Medtronic Tono-Pen XL is a precision electronic tonometer which measures intraocular pressure (IOP). The body of the instrument is specially designed to fit comfortably in the user’s hand, facilitating fast and accurate measurements. The stainless steel probe on the Tono-Pen XL contains a solid state strain gauge which converts intraocular pressure (IOP) to an electrical signal. The probe tip must be covered by a protective membrane. Medtronic Ocu-Film® Tip Covers are recommended. Utilizing a sophisticated “single chip” microprocessor and electronics housed in the body of the instrument, the waveform produced by each touch to the anesthetized corneal surface is analyzed and stored for a statistical comparison process. Each single valid IOP reading is digitally displayed on the liquid crystal display (LCD). When four valid readings are obtained, the mean IOP and the standard deviation for those readings (an indication of reliability) are shown on the LCD. 1.2 Intended Use The Tono-Pen XL is intended for measuring IOP as a screening/monitoring tool for Glaucoma or when increased IOP is suspected. 5 1.3 Features The Tono-Pen XL has the following features: • • • • Easy to use - IOP can be measured reliably by ophthalmologists, optometrists, technicians and other medical professionals. Portable - The Tono-Pen XL weighs just 2.1 ounces and is battery operated. Accurate - The accuracy of the Tono-Pen XL equals or exceeds that of other electronic applanation tonometers. It is highly correlated with Goldmann® applanation tonometry and direct measurements of intraocular pressure. Versatile - The Tono-Pen XL can be used in cases of irregular or high corneal astigmatism. It may be used easily with the patient in any position, making the instrument suitable for the office, during surgery, in glaucoma clinics, at the hospital bedside, and in remote locations. 1.4 Components The Tono-Pen XL unit (see Figure 1-1) is provided in a storage case, complete with: • • • • • • 6 Ocu-Cel™ XL Batteries Ocu-Film® Tip Covers Stylus Blade for battery replacement Desiccant to keep the instrument and components dry. Instruction Manual Instruction video Instruction Manual Ocu-Film Tip Covers Desiccant Stylus Blade Ocu-Cel XL Batteries Tono-Pen XL Tonometer Figure 1-1 Tono-Pen XL Components (in Storage Case) 7 1.5 Manual Contents The following sections of this document are organized as follows: Section 2 Summarizes safety precautions, warnings, and terms. Section 3 Provides instrument set up instructions. Section 4 Provides detailed steps for Tono-Pen XL operation and calibration instructions. Section 5 Provides preventive maintenance instructions. Section 6 Troubleshooting guide. Section 7 Specifications Section 8 Warranty and Repair instructions. Section 9 Guidance and manufacturer’s declaration electromagnetic immunity and emissions See page 192 8 SECTION 2 Safety 2.1 Safety Precautions and Warnings The Tono-Pen XL is used in non-invasive IOP measurement procedures. Hazards exist from improper use of the instrument. Damage to the instrument may also occur from improper usage. This section lists Cautions (which indicate conditions that may cause damage) associated with the TonoPen XL and provides an overview of safety precautions for: • • Patients Equipment 2.1.1 Patient Safety When using the Tono-Pen XL for IOP testing: • Be sure not to apply too much force to the probe tip as this may cause eye injury. A quick, gentle, tapping technique is sufficient to achieve measurements. CAUTION Ocu-Film contains natural rubber LATEX which may cause allergic reactions. Question patients about allergies to Latex before examining them with the Tono-Pen XL. 9 2.1.2 Equipment Safety This unit should not be modified in any way by any user. Unauthorized modifications to the unit may cause it to malfunction or fail in use. This will also cause the Warranty to become void. CAUTION • The tip of theTono-Pen XL is a sensitive electronic component. Be careful not to bump or jar the unit as this may damage the tip and effect operation. • Do not immerse probe in fluids. This will cause damage to the electronics and invalidate the Warranty. • Do not sterilize probe. This will cause damage to the electronics and void the Warranty. • Medical Electrical Equipment needs special precautions regarding EMC and needs to be installed and put into service according to the EMC information provided in this Guide. • Portable and mobile RF communications equipment can affect Medical Electrical Equipment. • The Tono-Pen XL should not be used adjacent to or stacked with other equipment. If adjacent or stacked use is necessary, the Tono-Pen XL should be observed to verify normal operation in the configuration in which it will be used. Batteries CAUTION • Do not incinerate. • Do not expose to high temperatures (140 °F). • Do not recharge. • Do not disassemble. • Do not carry batteries loose in a pocket or elsewhere as burn injury may result. • Dispose of batteries properly. 10 SECTION 3 Set Up 3.1 Set Up Instructions To set up the Tono-Pen XL for operation, follow the instructions listed below. 1. 2. 3. 4. 5. 6. 7. 8. 9. Remove all protective packaging materials. Remove and discard the desiccant. Carefully remove the tonometer and accessories from the case. Check for missing items. Visually check the instrument and accessories for damage. Remove the Ocu-Film Tip Cover shipped with the Tono-Pen. Notify Medtronic Customer Service (see Section 7, Warranty and Repairs) immediately if any components are missing or damaged. Install the batteries in the battery compartment. Perform the Calibration Procedure (see Section 3.3). Slide a new Ocu-Film Tip Cover over the Tono-Pen XL unit’s stainless steel probe until the Ocu-Film ridge is seated in the groove (see Figure 3-1). The Ocu-Film Tip Cover should fit over the probe tip (see Figure 3-2), without being too tight. Proper fit makes contact with the transducer surface (probe post), but still has pleats along the side of the transducer head assembly. 11 Probe Post Groove Probe Tip Operator’s Button LCD Battery Compartment Figure 3-1 Tono-Pen XL Top and Side Views Ocu-Film Tip Cover - Correct Ocu-Film Tip Cover - Too Loose Ocu-Film Tip Cover - Too Tight Figure 3-2 Ocu-Film Tip Cover Placement 12 3.2 Battery Installation The Tono-Pen XL is supplied with four Ocu-Cel™ XL 3.0 volt lithium manganese dioxide batteries that need to be installed in the Tono-Pen XL. It is recommended that Medtronic Ocu-Cel XL Batteries also be used when the batteries need replacement. *Note: The Tono-Pen XL unit will not function properly with mercury batteries. 3.2.1 Installation Procedure 1. Locate the battery compartment (see Figure 3-1). Open the battery compartment by gently inserting the stylus blade (see Figure 3-3) in the end slot. After insertion, slowly push the stylus forward and pry the cover up to remove. 2. Using the other end of the stylus, insert the tip into the holes on the underside of the body mold. Insert the tip perpendicular into the battery removal holes on the bottom of the base housing to push the batteries out (see Figure 3-4). 3. Insert two batteries as shown in Figure 3-5 (also diagrammed on the floor of the battery compartment). 4. Replace the battery cover. CAUTION Check to be sure that the batteries are installed correctly. Incorrect installation could cause severe damage to the electronics and void the Warranty. 13 Figure 3-3 Battery Cover Removal Figure 3-4 Ejecting Batteries (Bottom of Tono-Pen XL) - + + - Battery Terminals Figure 3-5 Battery Placement (in Compartment) 14 3.3 Calibration Procedure Calibration must be performed whenever batteries are replaced or after an unsuccessful calibration. The calibration procedure must also be routinely and successfully performed once daily prior to instrument use, or whenever indicated by the LCD display. To calibrate the Tono-Pen XL: 1. Point the transducer end of the Tono-Pen straight down towards the floor (see Figure 3-6). 2. Depress the Operator’s Button two times rapidly, (within 1.5 seconds). The Tono-Pen will “beep” and display CAL. 3. Wait approximately 15 seconds for the Tono-Pen to “beep” and display UP (see Figure 3-6). 4. Immediately (within 1 second) invert the Tono-Pen smoothly, pointing the transducer end straight up up. 5. A properly functioning Tono-Pen will display Good followed by a “beep”. 6. Repeat this Calibration Procedure if bAd is displayed. 7. After Good is displayed, depress the Operator’s Button one time and the Tono-Pen will display [8.8.8.8], followed by a single row of dashes, [- - - -], and then by a double row of dashes [====] followed by a “beep” tone, indicating the instrument is ready to measure IOP (Depressing the activation button a second time will interrupt this process and send the unit to calibration mode). *Note: If the Tono-Pen XL fails to yield a “Good” calibration, call Medtronic Technical Service. 15 Down Up Figure 3-6 Calibration Positions 16 SECTION 4 Tono-Pen XL Operation 4.1 Instrument Preparation Prior to using the Tono-Pen XL for IOP measurement prepare the instrument according to the instructions below. 1. Allow the instrument to thermally stabilize at room temperature (72-82° F, 22 - 28° C) for approximately 30 minutes prior to use. 2. Remove the Ocu-Film Tip Cover from the probe. Visually inspect the tonometer’s probe tip for cracks, chips or other irregularities. If irregularities are present, contact Medtronic (see Section 7). Do not use the instrument. 3. If the probe tip passes a visual inspection, proceed. 4. To help prevent build-up of debris around the probe post, spray the probe tip with compressed gas before the first use of the day. 5. Cover the Tono-Pen XL probe tip with a new OcuFilm Tip Cover. Medtronic Ocu-Film Tip Covers are: • Individually wrapped and sterilized. • For Single Use only. • May be gas sterilized for intraoperative use. 6. Perform daily routine calibration. *Note: Calibration should only be performed on the TonoPen once daily, unless otherwise indicated by the instrument. The Tono-Pen does not require calibration after every patient examination. 17 CAUTION Do not use the instrument without an Ocu-Film Tip Cover. Use without an Ocu-Film Tip Cover will damage the instrument and void the Warranty. 4.2 Calibration The Tono Pen XL unit is internally calibrated, thus the instrument calibration should be checked only before the first use each day or in the event of unanticipated readings. Calibration must be routinely and successfully performed once daily prior to instrument use. Calibration should also be performed whenever it is indicated by the LCD display, when batteries are replaced, or after an unsuccessful calibration. It is not necessary to check calibration prior to each use. *Note: If during operation the Operator’s Button is pushed only once and the Tono-Pen displays CAL, the Tono-Pen needs to be calibrated. The calibration procedure is as follows: 1. 2. 3. 4. 5. 6. 18 Point the transducer end of the Tono-Pen straight down towards the floor. Depress the Operator’s Button two times rapidly, (within 1.5 seconds). The Tono-Pen will “beep” and display CAL. Wait approximately 15 seconds for the Tono-Pen to “beep” and display UP. Immediately (within 1 second) invert the Tono-Pen smoothly, pointing the transducer end straight up up. A properly functioning Tono-Pen will display Good followed by a “beep”. Repeat this Calibration Procedure if bAd is displayed. 7. After Good is displayed, depress the Operator’s Button one time and the Tono-Pen will display [8.8.8.8], followed by a single row of dashes, [- - - -], and then by a double row of dashes [====] followed by a “beep” tone, indicating the instrument is ready to measure IOP (Depressing the activation button a second time will interrupt this process and send the unit to calibration mode). 4.2.1 Unsuccessful Calibration If several consecutive attempts at checking the calibration are unsuccessful: • • • Loosen or remove the Ocu-Film Tip Cover from the Tono-Pen XL probe tip and repeat the calibration check. If still unsuccessful: Spray the probe tip with compressed gas (see Section 5 for details of this proce-dure), and repeat the calibration check. If still unsuccessful: Replace the batteries (see Section 3 for the procedure) and repeat the calibration check. *Note: Do not take measurements with the instrument if two consecutive “good” calibration checks cannot be obtained. The instrument will not take a measurement when the prior calibration check was “bAd”. *Note: If the Tono-Pen XL fails to yield a “Good” calibration, call Medtronic Technical Service. 4.3 Performing IOP Measurements After the Tono-Pen XL has been prepared for operation, the patient must be prepared and then IOP measurements can be performed. 19 4.3.1 Patient Preparation CAUTION Ocu-Film contains natural rubber LATEX which may cause allergic reactions. Question patients about allergies to Latex before examining them with the Tono-Pen XL. To prepare a patient for an IOP measurement: Instill a drop of topical anesthetic onto the eye to be examined. 2. Position the patient, seated or supine, in front of a fixation target; or have the patient fixate on a point of reference (i.e. ear, nose, distant object) to minimize eye movement. *Note: The Tono-Pen XL unit will function in any stable position. 1. 4.3.2 Patient Examination To perform an IOP measurement: 1. 2. 3. 4. 20 Instruct the patient to look straight ahead at the fixation target with his/her eyes fully open. Hold the Tono-Pen XL unit as you would a pencil. Position yourself to facilitate viewing of the probe tip and patient’s cornea where contact will be made. For normal corneas, central corneal contact is recommended. Brace the heel of your hand on the patient’s cheek for stability while holding the Tono-Pen XL unit perpendicular to and within 1/2 inch of the patient’s cornea. (See Figure 4-1 for correct positioning.) Correct Incorrect Figure 4-1 Corneal Applanation 5. • • • To initiate an IOP measurement, depress the Operator’s Button once, and only once. Initially you will see a brief display of [8.8.8.8]. This is a self-test of the LCD (Liquid Crystal Display). If any of the LCD segments are not displayed, the Tono-Pen requires service. If a momentary display of [CAL] is seen, followed immediately by a single row of dashes [- - - -], it indicates that the Tono-Pen requires calibration before it will measure. If a double row of dashes [====] is seen and a “beep” tone is heard, it indicates that the Tono-Pen is ready to measure IOP. Proceed with applanation within 15 seconds. 21 *Note: After acquiring the double row of dashes [====], if more than 15 seconds elapses prior to applanation, the Tono-Pen will not measure. The software will have initiated a batterysaving function, indicated initially by the display of a single row of dashes [- - - -], then followed in sequence by a blank display [ ]. A new IOP measurement can be initiated by depressing the operator’s button once. *Note: Anytime the operator’s button is depressed twice within 1.5 seconds, (which may be caused by operator’s inadvertent pressure on the button) the software will interpret this as a demand for calibration. Then a sustained display of [CAL] CAL] will CAL be seen which initiates the calibration sequence. The calibration sequence must be successfully completed before further measurements can be accomplished. 6. 7. 8. Once activated, after [====] is displayed and a “beep” tone is heard, touch the Tono-Pen XL unit to the cornea lightly and briefly, then withdraw. Repeat several times. The corneal surface needs only to be momentarily contacted; indentation is not required and may lead to inaccurate readings. A chirp will sound and a digital IOP measurement will be displayed each time a valid reading is obtained. The single horizontal bar at the bottom of the LCD, indicating statistical reliability, will not be displayed with each single IOP measurement. After four (4) valid readings are obtained, a final beep will sound and the averaged measurement will appear on the LCD along with the single bar denoting statistical reliability. *Note: If a single row of dashes [- - - -] appears on the LCD after the final beep, an insufficient number of valid readings was collected. If this 22 occurs, repeat the patient examination procedure, starting at step 1. 9. To take another measurement, reactivate the Tono-Pen XL unit by pressing and releasing the activation switch as described in step 5. *Note: If not reactivated within 25 seconds, the Tono-Pen XL unit will automatically turn off and the LCD will clear, placing the device in sleep mode, to conserve battery life. If this occurs, activate the Tono Pen XL by pressing the Operator’s Button once. 10. Replace the Ocu-Film Tip Cover before using the TonoPen XL unit on another patient and before storage. *Note: Failure to replace the Ocu-Film Tip Cover between patients may result in unreliable readings of IOP by allowing debris to enter the transducer assembly. *Note: A reused Ocu-Film Tip Cover may leak. This may cause damage to the strain gauge and void the Warranty. 23 4.4 Interpreting the LCD The number display represents IOP in millimeters of mercury (mmHg.) A number with a single horizontal bar displayed at the bottom of the LCD is an average of the valid measurements. A number without the single bar is a single measurement of IOP. (See Figure 4-2). Figure 4-2 LCD (Single Measurement) 24 The display of one of four horizontal bars located along the lower border of the LCD block indicates the statistical reliability of the averaged measurement. For example, if the 5% bar is displayed, the standard deviation of the valid measurements is 5% or less of the number shown. If the reliability measure is 20% or > 20%, a repeat measurement is recommended. A single row of dashes [- - - -] indicates that the instrument is activated. Two rows of dashes [====] followed by a “beep” indicates that the instrument is ready to take measurements. “CAL” indicates that the instrument is in the process of calibration check or the instrument needs to undergo calibration check procedure. If “CAL” is displayed following a long beep and “- - - -”, the latter is the case. A “Good” calibration check must be obtained. “Lob” indicates the need to replace both batteries prior to using the instrument (see Section 3). “UP” indicates that the instrument is being calibrated and the probe tip should be turned from pointing down to pointing up. “Good” indicates the calibration check procedure was successful. After two “Good” calibration checks, the Tono-Pen XL unit is ready for use in patient examinations. “bAd” indicates the calibration check procedure was unsuccessful and must be repeated. 25 4.5 Instrument Storage 1. Cover the probe tip with an Ocu-Film Tip Cover for protection. 2. If the Tono-Pen XL unit is not to be used until a subsequent day, the instrument and accessories should be replaced in the storage case provided. 3. If the Tono-Pen XL unit is not to be used for an extended period of time, remove the batteries from the instrument. 26 SECTION 5 Maintenance 5.1 Maintenance Procedures Maintenance that should be performed on the Tono-Pen XL consists of activities such as protecting the probe tip, keeping surfaces free of dust and dirt and storing in a dry and cool place so as not to adversely affect electronic parts, and replacing the batteries. 1. Keep the probe tip protected with an Ocu-Film Tip Cover when in use or in storage. Avoid any contact with the probe tip when not protected by an Ocu-Film Tip Cover. CAUTION Use or storage of the Tono-Pen XL unit without an Ocu-Film Tip Cover can cause severe damage to the instrument and void the Warranty. 2. a. b. c. d. The probe post must be cleaned only with optical quality compressed gas before the first use each day, before instrument storage, in the event of unanticipated readings or if a “Good” calibration check cannot be obtained. To clean the probe post: Remove the Ocu-Film Tip Cover. Spray the compressed gas onto the probe tip for approximately 2 seconds. Wait 3 minutes to allow the instrument to thermally stabilize. Cover the Tono-Pen XL unit’s probe tip with a new Ocu-Film Tip Cover. 27 5.2 Tono-Pen XL Body 1. Avoid any shock or excessive vibration which will damage the unit. 2. Clean with a non-abrasive, dry cloth. CAUTION DO NOT IMMERSE TONO-PEN XL BODY IN FLUIDS. THIS WILL CAUSE DAMAGE TO THE ELECTRONICS AND VOID THE WARRANTY. 5.3 Battery Replacement 1. The batteries need replacing when multiple beeps sound and “Lob” appears on the LCD upon depressing the activation switch. Occasionally, a noticeable slowing in the calibration check process or in activating the instrument for taking measurements may suggest that the batteries need replacing. 2. Always replace both batteries. Do not mix used and new batteries in the instrument. Medtronic Ocu-Cel XL batteries are recommended. *Note: The instrument will not function properly when mercury batteries are used. 3. 4. 28 Replace the batteries using the procedure described in Section 3.2, Set Up. If the instrument is not to be operated for an extended period of time, remove both batteries. This will avoid possible damage to the instrument due to battery leakage. 5.4 Attachment Screw The attachment screw, located on the underside of the instrument, is used to protect the sensitive electronics against intrusion and should be removed only by the manufacturer. WARNING Removal of the Attachment Screw will void the warranty. 29 SECTION 6 Troubleshooting 6.1 Overview This section provides a guide for troubleshooting some basic Tono-Pen XL operational problems. If a problem persists after using this guide contact your nearest Medtronic Representative. Table 6-1: Tono-Pen XL Troubleshooting Guide Symptom Probable Cause Correction “Lob” Batteries are displayed Low Batteries Replace batteries Noticeable slowing in the calibration check process, or in activating instrument Batteries are low Replace batteries Compressed air cleaning has lowered the temperature of the instrument Allow Tono-Pen XL unit to warm to room temperature Multiple inaccurate readings Improper technique Review Section 4 or watch Instructional Video Old or improperly Replace Ocu-Film Tip Cover applied Ocu-Film Tip Cover Debris around probe post 30 Clean with compressed gas (see Section 5 for procedure) Symptom Multiple inaccurate readings No beeps and/or no dashes upon activation Unable to obtain “Good’ calibration check Probable Cause Correction Need to check calibration Perform calibration check procedure (see Section 4) Batteries are low Replace batteries Mechanical or electronic damage Arrange for repair through Medtronic Technical Service Group Activation switch not depressed long enough Depress activation switch longer Incorrect battery installation Check batteries Batteries are low Replace batteries Mechanical or electronic damage Arrange repair through Medtronic Technical Service Group See Section 4, Calibration Check See Section 4, Calibration Check 31 6.1.1 Further Assistance If a malfunction persists call the Medtronic Technical Service Group. Please be sure to contact this group before returning the unit for repair. (See Section 8 for return details). Technical Service Group Toll Free (in USA): 1-800-872-9877 32 SECTION 7 Specifications 7.1 Overview Table 7-1 lists the physical and operational specification for the Tono-Pen XL. Table 7-1: Tono-Pen Specifications Dimensions 7 1/4” X 1” X 7/8” Weight 59.4g (2.1 oz.) Range of Measurement 5 - 80 mmHg Power Source 3V Lithium Manganese Dioxide Batteries. 33 SECTION 8 8.1 LIMITED WARRANTY A. This LIMITED WARRANTY provides assurance for the customer who purchases a Tono-Pen XL (hereinafter the “Product”) that should the Product fail to function to Medtronic Xomed’s published specifications during the term of this LIMITED WARRANTY (one year from the date of shipment for new Product, 90 days from date of shipment for refurbished or used Product), Medtronic Xomed will either replace, repair, or issue a credit (adjusted to reflect the age of the Product) for the Product or any portion thereof. This LIMITED WARRANTY is extended only to the buyer purchasing the Product directly from Medtronic Xomed or from its affiliate or its authorized distributor or representative. B. To qualify for this LIMITED WARRANTY, the following conditions must be met: (1) The Product must be used on or before its “Use By” or “Use Before” date, if applicable. (2) The Product must be used in accordance with its labeling and may not be altered or subjected to misuse, abuse, accident or improper handling. (3) Medtronic Xomed must be notified in writing within thirty (30) days following discovery of a defect. (4) The Product must be returned to Medtronic Xomed within thirty (30) days of Medtronic Xomed receiving notice as provided for in (3) above. (5) Upon examination of the Product by Medtronic Xomed, Medtronic Xomed shall have determined that: (i) the Product was not repaired or altered by anyone other than Medtronic Xomed or its authorized representative, (ii) the Product was not operated under conditions 34 other than normal use, and (iii) the prescribed periodic maintenance and services have been performed on the Product. C. This LIMITED WARRANTY is limited to its express terms. THIS LIMITED WARRANTY IS IN LIEU OF ALL OTHER WARRANTIES, EXPRESSED OR IMPLIED WHETHER STATUTORY OR OTHERWISE, INCLUDING ANY IMPLIED WARRANTY OF MERCHANTABILITY OR FITNESS FOR A PARTICULAR PURPOSE. In no event shall Medtronic Xomed be liable for any consequential, incidental, prospective or other similar damage resulting from a defect, failure, or malfunction of the Product, whether a claim for such damage is based upon the warranty, contract, negligence or otherwise. D. The exclusions and limitations set out above are not intended to, and should not be construed so as to, contravene mandatory provisions of applicable law. Users may benefit from statutory warranty rights under legislation governing the sale of consumer goods. If any part or term of this LIMITED WARRANTY is held by any court of competent jurisdiction to be illegal, unenforceable, or in conflict with applicable law, the validity of the remaining portion of the LIMITED WARRANTY shall not be affected, and all rights and obligations shall be construed and enforced as if this LIMITED WARRANTY did not contain the particular part or term held to be invalid. 35 8.1.1 Unpacking The Medtronic Tono-Pen XL is shipped in a case. Upon receipt, open the case carefully and inventory all parts against the shipping list. Check for any damage that may have ccurred during shipping. If shipping damage is present immediately notify the freight carrier and Medtronic Customer Service. If the Unit must be returned or repaired, repack it in the shipping case. Take care that the Medtronic Tono-Pen XL or its components are not excessively bumped or dropped. Although this Tono-Pen unit is a rugged instrument, it should be handled like any sophisticated electronic medical device. 8.2 Service and Repair Before returning instruments for service or repair, you must contact the Medtronic Repair Department for a return goods authorization (RGA) number. Telephone: Toll-free (in USA): Fax: 1-904-296-9600 1-800-535-4646 1-904-279-2630 Returned Goods No merchandise may be returned without prior authorization from Medtronic. In requesting a return authorization, please contact Customer Service with the following information: Original invoice number or purchase order number, reason for return, product(s) catalog number, quantity, and lot number for merchandise to be returned. Please display the RGA number given by Customer Service prominently on the box and include it on all paperwork. All authorized reurns must be sent freight prepaid. The date of purchase is the invoice date and the date of authorization is the date of return. 36 A. All merchandise (except battery-powered devices) returned intact within 45 days of date of purchase will be credited at customer’s purchase price. Battery-powered devices returned within 45 days of date of purchase will be credited at purchase price less 30%. All merchandise returned intact after 45 days and up to 90 days from date of purchase will be credited at purchase price less 50%. Merchandise returned more than 90 days from date of purchase is not eligible for credit. B. Merchandise returned will not be eligible for credit if obsolete, beyond expiration date, custom or special order, defaced, altered, damaged, or has come in contact with body tissue or fluids. STERILE product must be returned in full-box quantities with the outer seals intact. C. Merchandise returned without prior authorization, intact and in a saleable condition, within 90 days from date of purchase will be credited at purchase price less 60% after approval by Medtronic . D. Merchandise returned that is not approved by Medtronic for credit will be returned at customer’s expense. Repair/Returns Please have the original invoice number or purchase order number available to assist in verifying warranty information. The RGA # should be prominently displayed on the box and included on all paperwork enclosed with the repair. Product(s) returned for repair should be safely packaged in protective wrapping. Customer must supply the following: 1)P.O. number, 2) correct shipping and billing address, and 3) repair order form or statement of problem/reason for repair. 37 All repairs should be shipped freight prepaid to: Repair Department Medtronic Ophthalmics A Division of Medtronic Xomed, Inc. 6743 Southpoint Drive North Jacksonville, FL 32216-0980 8.3 Non-Returnable Merchandise Medtronic will not authorize a return for merchandise held longer than 30 days, or for sterile products that have been opened or that are not in original packaging. Telephone: 904-296-9600 After receiving authorization, print the RGA number on the outside of the package and send the instrument to: Technical Services Group Medtronic Ophthalmics 6743 Southpoint Drive North Jacksonville, FL 32216-0980 International customers should contact their local distributor or their local Medtronic office. SECTION 9: Guidance and manufacturer’s declaration – electromagnetic immunity - See Page 192 38 SECTION 9 Guidance and manufacturer’s declaration – electromagnetic immunity - Part 1 Guidance and manufacturer’s declaration – electromagnetic immunity - Part I The Tono-Pen is intended for use in the electromagnetic environment specified below. The customer or the user of the Tono-Pen® XL should assure that it is used in such an environment. Immunity test EN 60601 Compliance level Electromagnetic test level environment guidance Electrostatic disFloors should be wood, charge (ESD) concrete, or ceramic tile. ±6 kV contact ±6 kV contact If floors are covered with EN 61000-4-2 synthetic material, the ±8 kV air ±8 kV air relative humidity should be at least 30 %. Power frequency Power frequency mag(50/60 Hz) magnetic fields should be at netic field levels characteristic of 3 A/m 3 A/m a typical location in a EN 61000-4-8 typical commercial or hospital environment. 192 Guidance and manufacturer’s declaration – electromagnetic emissions Guidance and manufacturer’s declaration – electromagnetic emissions The Tono-Pen is intended for use in the electromagnetic environment specified below. The customer or the user of the Tono-Pen® XL should assure that it is used in such an environment. Emissions Compliance Electromagnetic environment guidance RF emissions Group 1 The Tono-Pen® XL uses RF energy only CISPR 11 for its internal function. Therefore, its RF emissions are very low and are not likely to cause any interference in nearby electronic equipment RF emissions Class B CISPR 11 The Tono-Pen® XL is suitable for use in all establishments, including domestic estabHarmonic emissions N/A lishments and those directly connected to EN 61000-3-2 the public low-voltage power supply netVoltage fluctuations N/A work that supplies buildings for domestic EN 61000-3-3 purpose. 193 Recommended separation distances between portable and mobile RF communications equipment and the Tono-Pen The Tono-Pen® XL is intended for use in the electromagnetic environment in which radiated RF disturbances are controlled. The customer or the user of the Tono-Pen® XL can help prevent electromagnetic interference by maintaining a minimum distance between portable and mobile RF communications equipment (transmitters) and the Tono-Pen as recommended below, according to the maximum output power of the communications equipment. Rated maximum power of transmitter W Separation distance according to frequency of transmitter (meters) 150 kHz to 80 MHz 80 MHz to 800 MHz 800 MHz to 2.5 GHz d = 1.2 √P d = 1.2 √P d = 2.3 √P 0.01 0.12 0.12 0.23 0.1 0.38 0.38 0.73 1 1.2 1.2 2.3 10 3.8 3.8 7.3 100 12 12 23 For transmitters rated at a maximum output power not listed above, the recommended separation distance d in meters (m) can be estimated using the equation applicable to the frequency of the transmitter, where P is the maximum output power rating of the transmitter in watts (W) according to the transmitter manufacturer. NOTE 1 At 80 MHz and 800 MHz, the separation distance for the higher frequency range applies. NOTE 2 These guidelines may not apply in all situations. Electromagnetic propagation is affected by absorption and reflection from structures, objects and people. 194 Guidance and manufacturer’s declaration – electromagnetic immunity - Part II The TTono-Pen® XL is intended for use in the electromagnetic environment specified below. The customer or the user of the Tono-Pen should assure that it is used in such an environment. Immunity test EN 60601 test level Compliance level Electromagnetic environment - guidance Portable and mobile RF communications equipment should be used no closer to any part of the Tono-Pen, including cables, than the recommended separation distance calculated from the equation applicable to the frequency of the transmitter. Recommended separation distance Conducted RF EN 61000-4-6 3 Vrms 150 kHz to 80 MHz N/A d = 1.2 √P Radiated RF EN 61000-4-3 3 V/m 80 MHz to 2.5 GHz 3 V/m d = 1.2 √P 80 MHz to 800 MHz d = 2.3 √P 800 MHz to 2.5 GHz where P is the maximum output power rating of the transmitter in watts (W) according to the transmitter manufacturer and d is the recommended separation distance in meters (m).Field strengths from fixed RF transmitters, as determined by an electromagnetic site surveya, should be less than the compliance level in each frequency rangeb. Interference may occur in the vicinity of equipment marked with the following symbol: NOTE 1 At 80 MHz and 800 MHz, the higher frequency range applies. NOTE 2 These guidelines may not apply in all situations. Electromagnetic propagation is affected by absorption and reflection from structures, objects and people a Field strengths from fixed transmitters, such as base stations for radio (cellular/cordless) telephones and land mobile radios, amateur radio, AM and FM radio broadcast and TV broadcast cannot be predicted theoretically with accuracy. To assess the electromagnetic environment due to fixed RF transmitters, an electromagnetic site survey should be considered. If the measured field strength in the location in which the Tono-Pen is used exceeds the applicable RF compliance level above, the Tono-Pen® XL should be observed to verify normal operation. If abnormal performance is observed, additional measures may be necessary, such as re-orienting or relocating the Tono-Pen® XL. b Over the frequency range 150 kHz to 80 MHz, field strengths should be less than 3 V/m. 195 Medtronic Ophthalmics A Division of Medtronic Xomed, Inc. 6743 Southpoint Drive North Jacksonville, FL 32216-0980 U.S.A. 1-800-535-4646 or 1-904-296-9600 www.medtronicophthalmics.com The information contained in this document was accurate at time of publication. Medtronic Xomed reserves the right to make changes in the product described in this manual without notice and without incorporating those changes in any products already sold. Les informations contenues dans ce document étaient exactes au moment de la publication. Medtronic Xomed se réserve le droit d’apporter des modifications au produit décrit dans ce document, sans préavis et sans aucune obligation d’incorporer ces modifications dans des produits quelconques déjà vendus. Le informazioni contenute nel presente documento erano accurate al momento della pubblicazione. Medtronic Xomed si riserva il diritto di effettuare modifiche sul prodotto descritto nel presente manuale senza preavviso e senza applicare tali modifiche a eventuali prodotti già venduti. Die in dieser Veröffentlichung enthaltenen Informationen waren zum Zeitpunkt der Veröffentlichung exakt. Medtronic Xomed behält sich das Recht vor, das in dieser Gebrauchsanweisung beschriebene Produkt ohne Ankündigung und ohne Einbindung dieser Änderungen in bereits verkaufte Produkte zu ändern. La información contenida en este documento era exacta en el momento de su publicación. Medtronic Xomed se reserva el derecho de realizar cambios en el producto descrito en este manual sin previo aviso, y no tiene la obligación de incorporar dichos cambios en los productos ya adquiridos. 68E3441 B 09/05 © Medtronic 2005