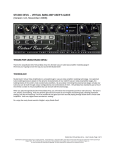
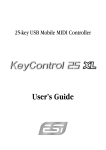
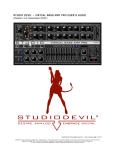
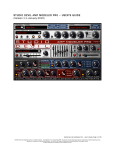
1
Ultra Mobile Guitar & Microphone
24-bit USB Audio Adapter
User’s Guide
ESI - Copyright © 2008
Revision 1, September 2008
www.esi-audio.com
UGM96
ESI
INDEX
1. Introduction.................................................................................................................................. 4
2. Description of UGM96................................................................................................................. 4
2.1 Front Panel........................................................................................................................................................... 4
2.2 Rear Panel ............................................................................................................................................................ 5
2.3 Minimum System Requirements.......................................................................................................................... 5
3. Installation .................................................................................................................................... 5
3.1 Windows XP ........................................................................................................................................................ 6
3.2 Windows Vista..................................................................................................................................................... 7
3.3 Mac OS X ............................................................................................................................................................ 8
4. UGM96 Control Panel ................................................................................................................. 9
5. Audio Applications..................................................................................................................... 10
5.1 Windows Multimedia setup ............................................................................................................................... 10
5.2 Latency setting and ASIO applications under Windows.................................................................................... 10
5.3 Mac OS X Audio MIDI Setup ........................................................................................................................... 10
5.4 Installation of Cubase LE 4................................................................................................................................ 11
5.5 Installation of Studio Devil Virtual Guitar Amp................................................................................................ 13
5.6 Other bundled software...................................................................................................................................... 14
6. Studio Devil Virtual Guitar Amp ............................................................................................. 15
6.1 Controls.............................................................................................................................................................. 15
6.2 Usage with Cubase LE 4.................................................................................................................................... 16
6.3 Standalone operation under Windows ............................................................................................................... 18
6.4 Usage with GarageBand under Mac OS X......................................................................................................... 19
7. Technical Specifications ............................................................................................................ 20
8. General Information .................................................................................................................. 21
3
UGM96
ESI
1. Introduction
Thank you for choosing the ESI UGM96.
The ultra mobile guitar and microphone to USB interface allows you to connect two guitars (via the
Hi-Z instrument inputs) or one guitar and one microphone simultaneously to your PC or Mac. The
backside offers a stereo output that you can use for monitoring, i.e. with headphones. This makes
UGM96 the perfect companion for guitar recording applications on the road or in your studio.
You can use UGM96 to jam with a guitar and microphone, process the signal with your PC or Mac
notebook or desktop in realtime and listen to the mix directly via headphones - no special adapters
or extra power supplies are needed, you simply plug UGM96 between your guitar, headphones, the
microphone and your computer.
UGM96 comes bundled with Cubase LE 4, the professional multichannel audio sequencing
software from Steinberg and the incredible Studio Devil Virtual Guitar Amp plugin for realtime
guitar amplifier simulation from Gallo Engineering. The combination of both eliminates the need
for cabinets, special microphones, and expensive amps for getting professional guitar tone and
directly start laying down your own tracks. It is simply unbelievable how much functions are
provided by this incredible bundle!
2. Description of UGM96
2.1 Front Panel
The front panel of UGM96 contains the following items from left to right:
- left channel Hi-Z instrument input; use this connector to connect your electric guitar with a
standard 1/4" guitar cable to UGM96
- status LED; this LED will show the operation status of UGM96
- microphone preamp switch (0dB ~ +20dB); this switch will enable or disable the microphone
preamplifier for the right channel input
- Hi-Z / microphone selection switch; this switch allows you to select if you connect an electric
guitar (switched turned to the left) or a dynamic microphone (switched to the right) to UGM96
- right channel Hi-Z instrument or microphone input; use this connector to connect an electric
guitar with a standard 1/4" guitar cable or a dynamic microphone with a 1/4" to XLR cable to
UGM96
4
UGM96
ESI
2.2 Rear Panel
The rear panel of UGM96 contains the following items from left to right:
- primary headphone and line level output; use this output to connect UGM96 to your amplifier or
active monitors a using a 1/4" TRS stereo cable or use it to connect a pair of stereo headphones to
UGM96
- mini USB connector; use this connector to connect UGM96 to your PC or Mac using the
supplied USB cable
- secondary headphone output, providing the same signal as the primary headphone output; use
this output to connect a pair of stereo headphones to UGM96
2.3 Minimum System Requirements
PC
- Intel Pentium III 600MHz CPU or equivalent AMD CPU
- 512 MB RAM
- Direct X 8.1 or higher
- one available USB port
- DVD-ROM drive (for Cubase LE 4 installation)
- internet connection (for Cubase LE 4 and Studio Devil VGA activation)
- recent version of Microsoft Windows XP (SP2 or higher) or Windows Vista (32-bit)
Mac
- Power Macintosh G4 or higher
- one available USB port
- 512 MB RAM
- DVD-ROM drive (for Cubase LE 4 installation)
- internet connection (for Cubase LE 4 and Studio Devil VGA activation)
- Mac OS X 10.4 or higher
3. Installation
Before installing the drivers of UGM96, we recommend to check on the download section of
www.esi-audio.com for updated drivers.
5
UGM96
ESI
3.1 Windows XP
Disconnect UGM96 before you install the driver if it has been connected already. Then launch
setup.exe from the Windows folder of the included Installation CD or from a download of a recent
driver from our website.
You will now see a dialog as shown on the left picture below. Click Next. You can define the target
directory for the installation now. Confirm it with Next.
The installer now informs you that the driver installation will start as shown on the left picture
below. Confirm this with Next. During the following process you will see a dialog box once or
several times that informs you that the driver software has not passed Windows Logo testing. Please
be assured that our drivers have been tested in various different ways and are OK to be used.
Confirm any such dialog with Continue Anyway.
You will now be prompted to connect the hardware on the next dialog that is shown below on the
left. Plug in UGM96. Do not click Next yet. During the driver installation, Windows might again
prompt you to confirm the Windows Logo testing dialog once or several times with Continue
Anway before the driver installation is finalized.
6
UGM96
ESI
You can now finally click Next on the ESI U46 Audio Driver Setup dialog. The installation is now
finished. To confirm this, please check if the ESI icon is displayed in the taskbar notification area as
shown below.
If yes, the driver installation has been completed successfully.
3.2 Windows Vista
Disconnect UGM96 before you install the driver if it has been connected already. Then launch
setup.exe from the Windows folder of the included Installation CD or from a download of a recent
driver from our website.
When launching the installation, Windows Vista might prompt a security message. Make sure to
allow the installation. You will then see a dialog as shown on the left picture below. Click Next.
You can define the target directory for the installation now. Confirm it with Next.
The installer now informs you that the driver installation will start as shown on the left picture
below. Confirm this with Next. During the following process you will see a Windows Security
dialog box once or several times that asks you for confirmation to install the driver software.
Confirm any such dialog with Install.
7
UGM96
ESI
You will now be prompted to connect the hardware on the next dialog that is shown below on the
left. Plug in UGM96. Do not click Next yet. Instead, wait a few seconds for the automatic device
driver installation. You can monitor this in the task notification area where Windows Vista informs
that the driver is installed via a bubble message box.
You can now finally click Next on the ESI UGM96 Audio Driver Setup dialog. The installation is
now finished. To confirm this, please check if the ESI icon is displayed in the taskbar notification
area as shown below.
If yes, the driver installation has been completed successfully.
3.3 Mac OS X
Mac OS X already provides support for class compliant USB audio devices such as UGM96. This
means that no software or driver needs to be installed to use UGM96 under Mac OS X. Simply
connect the unit with the supplied USB cable to your Mac and you can start using it.
Controlling the basic options of UGM96 under Mac OS X is mainly done via the Audio MIDI Setup
utility from Mac OS X described in section 5.3 of this manual.
8
UGM96
ESI
4. UGM96 Control Panel
This chapter describes the UGM96 Control Panel under Windows. Under Mac OS X no special
Control Panel is required for UGM96. If you are using UGM96 under Mac OS X, please check
section 5.3 with more details.
To open the control panel double click on the ESI icon in the task notification
area. The following dialog will appear:
The panel has the following functions and sections:
INPUT section: this section controls the input monitoring volume of the incoming signal from the
hardware. A pair of mono faders can be controlled together or individually depending on your
mouse position The left fader controls the signal from the first Hi-Z input, while the right fader
controls the signal from the second Hi-Z or microphone input. The Mute button at the bottom
allows you to mute the signal. A red Mute button indicates that the mute function is enabled. When
disabled, the button is gray.
OUTPUT section: this section controls the playback volume of the playback signal from your audio
applications. The pair of mono faders can be controlled together or individually depending on your
mouse position – perfect for stereo signals. The Mute button at the bottom allows you to mute
playback. A red Mute button indicates that the mute function is enabled. When disabled, the button
is gray.
9
UGM96
ESI
5. Audio Applications
This chapter contains basic configuration examples for some popular software applications. Please
also refer to the manual of the audio software you use for detailed information.
5.1 Windows Multimedia setup
The Windows Multimedia setup is required if you want to use your UGM96 as the main sound
device for Windows multimedia applications. Go to My computer-> Control panel -> Sounds and
Audio Device Properties -> Audio. Select the UGM96 entry as your playback device to make sure
that all standard signals are played via the UGM96 hardware.
5.2 Latency setting and ASIO applications under Windows
Via Config > Latency in the Control Panel it is possible to change the latency setting (also called
“buffer size”) for the ASIO driver of UGM96. A smaller latency is the result of a smaller buffer size.
Depending on the typical application (e.g. for playback of software synthesizers) a smaller latency
is an advantage. At the same time, the best latency setting indirectly depends on the performance of
your system. For recording applications, a typical latency buffer size between 128 and 288 samples
is standard. The default value is 256.
The Config > Buffer Number setting in the Control Panel provides an important fine tuning setting
that allows you to tweak system performance. Depending on your computer hardware, you might
need to adjust this setting if you have problems with noise or drop-outs during playback or
recording . Typically on a modern computer system a value of 4 or slightly more or less is perfect
but you might need to check what is best for your computer as every PC is different.
Note that these values have to be setup before launching any audio application using UGM96.
5.3 Mac OS X Audio MIDI Setup
An important control center of UGM96 and other audio devices under Mac OS X is the Audio MIDI
Setup application that you can find in your Applications folder. When you launch it, you can setup
UGM96 as your Default Input, Default Output or System Output device – if required.
While audio production and editing applications usually provide an option inside their preferences
to select UGM96 as recording and playback device, many general standard applications such as
iTunes for example are usually accessing the Default Output device, selectable in the Audio MIDI
Setup dialog.
If you want to change settings of UGM96, you need to select it under Properties For as shown in
the picture on the following page.
10
UGM96
ESI
Sample Rate
You can change the default sample rate under Audio Input -> Format or Audio Output -> Format.
Audio Quality & Performance
UGM96 can work with either 16-bit or 24-bit data transfer. While 24-bit operation is desired for
better audio quality, 16-bit is enough in many situations and will cause less system load and provide
a better performance especially on older computers. Under Audio Input > Format, you can select
either 2ch-24bit or 2ch-16bit, depending on your requirement.
5.4 Installation of Cubase LE 4
UGM96 ships with a DVD-ROM with Cubase LE 4 from Steinberg. If you are using a different
recording software, you can skip this section.
Installation
To install Cubase LE 4, insert the DVD-ROM into the DVD-ROM drive of your computer. Under
Windows, the installation will normally start automatically – if not, you can launch it manually by
starting the installer from the DVD-ROM drive. To install Cubase LE 4 under Mac OS X, double
click on the installer icon.
To proceed with the installation, follow all instructions on screen. During the installation the
Syncrosoft License Control software will be installed as well. To use Cubase LE 4 for more than a
few weeks, you need register and to activate it with this software via the internet. This means that
you need an active internet connection on the computer you are installing Cubase LE 4. We
recommend you to activate the software as early as possible.
Initial Setup
As most digital audio applications, Cubase LE 4 requires some initial configuration, before it can be
used properly with a new audio interface like UGM96. Start Cubase LE 4 and select Device Setup
11
UGM96
ESI
from the Devices menu. In the dialog (the Windows Version is displayed below, under Mac OS X
the look is slightly different but the functions are identical), select VST Audio System on the tree
structure on the left part of the window.
Make sure to select ESI UGM96 ASIO driver as ASIO Driver entry. You can verify your selection
by selecting the ESI UGM96 ASIO driver device on the left. The dialog (as shown above on the
right), now lists all input and output channels. Note that the Control Panel button has no effect.
Confirm your changes by clicking OK.
Now its time to select the input and output channels. From the Devices menu, select VST
Connection. The VST Connections window appears. Select the Inputs tab:
For every input channel you are intending to use simultaneously, you need to create a separate bus.
Cubase LE 4 allows you add mono or stereo busses – what is better for your application depends on
the situation, however as UGM96 provides two independent mono inputs (left channel Hi-Z and
right channel Hi-Z or microphone), it is strongly recommended by us to add mono busses. Select
Add Bus to add 2 new mono busses and make sure the left and right channels are selected in the
Device Port column accordingly. Once finished, the dialog will look like on the previous picture.
Select the Outputs tab to configure the output busses:
12
UGM96
ESI
As with inputs, your output busses can also be mono or stereo. The example above shows one
stereo output bus which will be the typical setup when using UGM96. Under Device Port you can
assign the physical hardware output channel to each channel of each bus. The two stereo headphone
outputs of UGM96 will both send out the same signal from Cubase LE 4 as assigned in this dialog.
You can now start using Cubase LE 4 by opening an existing project or creating a new project. The
input and output busses you have created can be assigned to the individual tracks of your project.
5.5 Installation of Studio Devil Virtual Guitar Amp
UGM96 ships with the Studio Devil Virtual Guitar Amp from Gallo Engineering. If you are not
using this virtual guitar amplifier plugin, you can skip this section, however we strongly
recommend it. Studio Devil VGA is provided as VST, Audio Unit and RTAS plugin that can be
used (not only) in Cubase LE 4.
Installation
To install the Studio Devil VGA, insert the Installation CD into the DVD-ROM drive of your
computer. Under Windows, please launch the installer setup.exe from the folder
Softwarebundle\Studio Devil\Virtual Guitar Amp\PC. To install it under Mac OS X, open the Studio
Devil VGA disk image file from the Softwarebundle\Studio Devil\Virtual Guitar Amp\Mac folder
and then double click on the installer package.
To proceed with the installation, follow all instructions on screen. Please also check the content of
the readme.txt files in each folder.
Initial Setup
In most cases the installation folders will be automatically recognized by each plugin host
application. In some cases, you will need to add the appropriate folder to your host application’s list
of plugin folders. Consult the documentation of your host application for instructions on how to do
this, if necessary. You can find more information about usage with Cubase LE 4 in section 6.2 of
this manual.
Activation
Before you can use Studio Devil VGA, you need to activate it by getting a LICENSE KEY. You are
entitled to install and activate this software as many times as needed, but you are limited to using it
on one machine at a time. If you plan on using this software on multiple machines at the same time,
you might need to purchase additional serial numbers. Please check the Studio Devil website for
more information.
When you load Studio Devil VGA inside a host software (see sections 6.2 and 6.3 for more
information), it will run in DEMO MODE and you will see the screen on the left below. Click
Activate and the dialog on the right will appear:
13
UGM96
ESI
Enter your serial number and click NEXT. The screen on the left below with your INSTALL CODE
will appear. Write down the code or click on COPY to copy the code into the clipboard. Then click
NEXT and the dialog on the right below will appear:
Now launch your web browser and go to www.studiodevil.com/activate (this can also be done on a
different computer if you do not have internet access at this very moment) to display the product
activation web page for Studio Devil. Enter or paste the INSTALL CODE you just obtained into the
space provided on the web page and click Get License Key. The web server will now respond with
your LICENSE KEY. Write it down or copy it into the clipboard.
Then go back to Studio Devil VGA and click NEXT. In the dialog shown below on the left, enter
the LICENSE KEY or paste it, then click NEXT. The confirmation screen will appear as shown on
the right.
Confirm it by clicking CLOSE. You can start using Studio Devil VGA now, the activation
procedure has been completed. Chapter 6 explains more about the usage.
5.6 Other bundled software
UGM96 comes also bundled with other software and plugins that you can use inside Cubase LE 4,
perhaps in combination with Studio Devil VGA. You can find them in the Softwarebundle folder on
the Installation CD.
Among others, the ESI Atti-Tube plugin (Windows only) is a nice amp simulator that can be used
nicely with electric base guitars. The ESI FX-Pack (Windows only) and the Luxonix LFX1310
multi-effector plugin (Mac OS X and Windows) are great enhancements over the included standard
effect plugins from Cubase LE 4, so it will not hurt to install and check them out.
14
UGM96
ESI
6. Studio Devil Virtual Guitar Amp
Studio Devil’s Virtual Tube Amplification is a breakthrough in vacuum-tube amplifier modeling
technology. The patented tube-modeling process is based on the dynamic characteristics of real
12AX7A vacuum tube preamplifier stages, the building blocks of the world’s most coveted tube
amplifiers.
When you play through Studio Devil Virtual Guitar Amp, you will notice that it responds just like a
real tube amp. The tone is rich, simple, and inspiring. And, the dynamic gain structure reacts to your
fingers and picking style, allowing expressive playing, just like the real thing. You’ll be amazed at
how good your tone sounds playing through Studio Devil’s virtual tube amplifiers!
In order to use Studio Devil VGA, you need to activate it first as described in the previous chapter
of this manual in section 5.5. The following section describes the basics of the user interface, the
PDF file included on the Installation CD in the Studio Devil VGA folder covers more details.
6.1 Controls
Here is the main screen of Studio Devil VGA:
The controls of StudioDevil VGA are pretty easy to understand, especially if you’ve used a guitar
amplifier before. Here are some details:
PREAMP section: the STYLE and CHANNEL switches in combination with the BOOST switch all
work together to select the type of amplifier you’re looking for. The PDF file included on the
Installation CD contains a detailed description and a table with the amplifiers that Studio Devil
VGA is designed to mimic, based on the switch position.
GAIN and TONE section: these sections help you tweak your sound until it’s just right. The GAIN
knob controls the amount of guitar signal that’s fed into the amplifier. The TONE controls (BASS,
MIDS, TREB, PRES) control the bass, mid, treble, and presence frequencies between the preamp
and power amp stages more or less in the same way a four band EQ would do it although the actual
sound depends on the selected amp model.
POWER AMP / CABINET section: this area contains the DRIVE control knob that basically works
like the master volume of the amplifier and the CABINET switch with three distinctive settings:
- STACK: this setting emulates a miked-up 4x12 cabinet with lots of bass and a metallic, flangy
tone characteristic of the typical big stacks.
15
UGM96
ESI
- COMBO: this position is for a sound more like the smaller practice and stage amps featuring
open-back, single 1x12 configurations. This sound is thinner, more mid-rangy, and “boxier” than
the STACK setting.
- D.I. BOX: This setting acts like a speaker simulator bypass and basically allows you to shut off
the Studio Devil cabinet to use your own speaker-modeling plug-ins and impulse modelers in host
applications that can chain multiple plugins.
NOISE GATE section: since Studio Devil VGA mimics the characteristics of a real tube amplifier,
it also generates the same typical hiss, buzz and other noises that are normal for a tube amp. The
built in noise gate allows you to tame this annoying hiss and gets you the quiet sound you need. The
THRESHOLD knob sets the level where the noise gate gets activated and the ON/OFF switch
generally enables or disables the noise gate.
Please always keep in mind that it is usually best to experiment for some time with the controls to
find just the sound that you like.
6.2 Usage with Cubase LE 4
Studio Devil VGA and Cubase LE 4 are a perfect combination. You can not only use the two
utilities with your UGM96 for jam sessions and performances, you can even record your own multi
track projects right away and use other plugin and effects at the same time.
Make sure that both Cubase LE 4 and Studio Devil VGA are installed and setup like described in
section 5.4 and 5.5. The pictures in this section are from Windows, but the operation under Mac OS
X is exactly identical.
Start by creating a new project in Cubase LE 4. Then add an audio track by click with the right
mouse button into the arrangement window as shown on the following picture:
In the left area, you can assign the input and output channels for this new audio track and under
Inserts, you can select and load plugins. Select the Studio Devil VGA entry as shown on the
following picture:
16
UGM96
ESI
Note that depending on your installation of the plugin, Studio Devil VGA might appear in a
different menu section.
To be able to listen to the incoming signal and process it in realtime through the plugin, you need to
enable the monitoring button for this audio track as shown on the following picture:
The monitoring speaker icon will turn from gray to yellow. You can now start playing your guitar
and the signal will be processed by Studio Devil VGA. You can now change the settings inside the
plugin, for example by selecting one of the presets:
17
UGM96
ESI
As Cubase LE can chain multiple plugins after each other, it is also possible to load different
plugins before or after Studio Devil VGA. The following example first loads a Flanger effect, then
Studio Devil VGA, followed by a Reverb, RoomWorks SE that makes your sound even better.
You can play around with the various settings inside the plugins to get the sound you need. Note
that when you record the track, the clean signal (without any plugin effects) gets recorded – this
means that you can change the plugin settings (like the used virtual guitar amplifier) also later and
you do not have to record your track again.
6.3 Standalone operation under Windows
The UGM96 driver package for Windows comes with the UGM96 Band application that allows you
to use and check out the Studio Devil VGA plugin without the need to launch a larger host
application such as Cubase LE 4. You can launch it via its own entry in the Windows Start menu.
Make sure no other program accesses UGM96 at that time.
The VST on NSP window that you can see above will appear. It automatically routes the left Hi-Z
input signal through Studio Devil VGA and plays it back in realtime. Latency and performance can
be directly changed in the Option menu, making this app perfect to find the right Buffer Number and
Latency settings for UGM96 on your system (check section 5.2 for reference and more info).
Use this app to jam using your guitar without launching any major audio application.
18
UGM96
ESI
6.4 Usage with GarageBand under Mac OS X
Unlike Windows, we do not provide an utility to use Studio Devil VGA standalone for Mac OS X.
However, GarageBand is a very nice choice to use Studio Devil VGA and UGM96 in combination.
It is a cool application to jam using your guitar without launching any other major audio application
and it even allows you to record your first tracks right away using UGM96.
Start by launching GarageBand and then by creating a new project. Make sure that UGM96 is
selected as both Audio Input and Audio Output device under Preferences > Audio/MIDI. Add a new
audio track via Track > New Track and confirm it with Real Instrument in the following dialog:
When the track is selected, the lower right corner will show the options for the track and in the
Details section offers the possibility to load plugins. The following picture has selected the left
Input Channel 1, the Monitor option is enabled (to be able to listen to the incoming signal in
realtime) and the Studio Devil VGA plugin has been loaded:
You can now start playing your guitar and the signal will be processed by Studio Devil VGA. If you
click on the edit icon with the pencil, you get a new window that allows you to change the settings
inside the plugin, for example by selecting one of the presets:
19
UGM96
ESI
As GarageBand can chain multiple effects after each other, it is also possible to load other plugins
before or after Studio Devil VGA. A good idea is to add some Reverb with the fader in the lower
right corner to make your sound even better.
7. Technical Specifications
Analog Input
Hi-Z Instrument Input
-
Type: unbalancecd 1/4"
Max Input Level: +4.5dBV max
THD+N: 0.003% A-weighted
Impedance: 500 kOhm
Microphone Preamp
-
Type: TRS 1/4"
Max Input Level: -13dBu max (at +20dB gain)
THD+N: 0.003% A-weighted
Impedance: 2.2 kOhm
A/D Converter
-
Type: 24-bit / 96 kHz
Dynamic Range: 105dB (-60dBFS A-weighted)
S/(N+D) Ratio: -98dB (@ -1dBFS)
Interchannel Isolation: 90dB
Analog Output
Line & Headphone Output
-
Type: Stereo Phone Jack 1/4"
Max Output Level: +4dBV
THD+N: 0.003% A-weighted
Output Power: 100mW Max @ 32 ohm
Impedance: 32 ~ 600 ohm
D/A Converter
- Type: 24-bit / 96 kHz
- Dynamic Range: 103dB (-60dBFS A-weighted)
20
UGM96
ESI
- S/(N+D) Ratio: -90dB (@ -1dBFS)
- Interchannel Isolation: 100dB
Power Consumption
- 0.85W typically
- USB bus powered
- 500mA maximum
Compatibility
- supports Windows XP and Windows Vista with ASIO 2.0, MME, WDM and
DirectSound
- supports Mac OS X (10.4 and above) via the native CoreAudio USB audio
driver from Apple (no driver installation required)
Software
- includes Studio Devil Virtual Guitar Amp from Gallo Engineering for
Windows and Mac OS X
- includes Steinberg Cubase LE 4 for Windows and Mac OS X on separate
DVD-ROM
- internet access required for activation and usage of supplied bundle
software
8. General Information
Trademarks
ESI and UGM96 are trademarks of EGOSYS, Inc. and ESI Audiotechnik GmbH. Windows is a
trademark of Microsoft Corporation. Other product and brand names are trademarks or registered
trademarks of their respective companies.
The FCC and CE Regulation Warning
This device complies with Part 15 of the FCC Rules. Operation is subject to the following two
conditions : (1) this device may not cause harmful interference, and (2) this device must accept any
interference received, including interference that may cause undesired operation. Caution : Any
changes or modifications in construction of this device with are not expressly approved by the party
responsible for compliance, could void the user's authority to operate equipment.
Note: This equipment has been tested and found to comply with the limits for a Class A digital
device, pursuant to Part 15 of the FCC Rules. These limits are designed to provide reasonable
protection against harmful interference when the equipment is operated in a commercial
environment. This equipment generates, uses, and can radiate radio frequency energy and, if not
installed and used in accordance with the instruction manual, may cause harmful interference to
radio communications. Operation of this equipment in a residential area is likely to cause harmful
interference in which case the user will be required to correct the interference at his own expense. If
necessary, consult an experienced radio/television technician for additional suggestions.
21
UGM96
ESI
Correspondence
For technical support inquiries, contact ESI support online at www.esi-audio.com.
Disclaimer
All features and specifications subject to change without notice.
Parts of this manual are continually being updated. Please check our web site www.esi-audio.com
occasionally for the most recent update information.
22