1
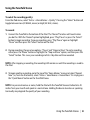
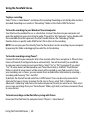
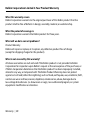
User Manual
TuneTalk™ Stereo for iPod® with
video
Introduction
Introduction
Congratulations and thank you for purchasing this innovative product from Belkin mobility. Please
review this User Manual carefully in order to get the best performance from your TuneTalk Stereo
for iPod with video.
Package Includes:
Compact
iPod Stand
Plastic Spacer
TuneTalk Stereo
for iPod with video
USB Cable
Introduction | 01
iPod not included
Using the TuneTalk Stereo
To select the recording quality:
From the iPod menu, select “Extras > Voice Memos > Quality”. Pressing the “Select” button will
toggle between Low (22.05kHz, mono) or High (44.1kHz, stereo).
To record:
1. Connect the TuneTalk to the bottom of the iPod. The “Record” function will launch when
you do this. With the “Record” option highlighted, press “Play/Pause” or press the “Select”
button to begin recording. To pause recording, press “Play/Pause” again or highlight
“Pause” and then press the “Select” button on the iPod.
2. During recording, there are two options: “Pause” and “Stop and Save”. To end a recording,
either press the “Menu” button or highlight the “Stop and Save” option, and then press the
“Select” button. This saves your recording and lists it by date and time recorded.
NOTE: After stopping a recording, the recording LED remains on until the recording is saved to
the iPod.
3. To begin another recording, go to the top of the “Voice Memos” menu and select “Record
Now”; or, from the iPod menu, select “Extras > Voice Memos > Record Now”. Or simply press
the “Quick Memo” button on the TuneTalk Stereo.
NOTE: For personal memos or notes, hold the iPod with the TuneTalk Stereo attached 6 to 18
inches from your mouth and speak in a normal tone. Holding the device too close or speaking
too loudly may degrade the quality of your recording.
Using the TuneTalk Stereo | 02
Using the TuneTalk Stereo
Mini-B
USB Port
Auto-Gain 3.5mm Auxiliary
Stereo Input
Switch
3.5mm Auxiliary Stereo Input
The auxiliary input can be used with any line-level input, such as amplified microphones or other
audio devices. The TuneTalk Stereo also provides three-volt (3V) “plug-in power” for use with an
external microphone. When the TuneTalk Stereo senses that an auxiliary source is connected, the
on-board microphones are automatically disabled.
Auto-Gain Switch
The TuneTalk Stereo includes a two-level auto-gain switch intended to optimize the quality of
your recorded audio. The OFF setting is activated by moving the switch to the left of the setting
bar. The OFF setting is for line-level input sources, such as amplified microphones, other audio
devices, or microphone recordings in very loud environments. The ON setting is activated by
moving the switch to the right of the setting bar, and is suitable for most microphone recordings.
Auto-Gain Switch
Source
Off
On
Internal
Auto-gain off, low amplification. Useful for
recording in loud situations.
Auto-gain on, with sufficient pre-gain for
normal microphone recordings.
External
Auto-gain off, no amplification.
Useful for recording in very loud situations, or
when the external source is a line-level audio
source, like another MP3 player or a TV set.
Auto-gain on, with sufficient pre-gain for
normal microphone recordings.
NOTE: Recording quality is dependent on the type of microphone used.
Using the TuneTalk Stereo | 03
Using the TuneTalk Stereo
Quick Memo Button
By pressing the “Quick Memo” button on the left side of the TuneTalk Stereo, the iPod will
automatically go to the “record” screen, no matter where you are in the iPod menu system, unless
a recording is already in progress. Simply select “Record” or press “Play/Pause” to begin recording.
Recording LED Indicator
The TuneTalk Stereo features an LED to help you make the best possible recordings. This LED
helps determine if the auto-gain switch is set correctly in conjunction with your microphone
and/or recording setting. The LED will be off when TuneTalk is connected to the iPod but not
recording. The LED will blink twice to verify connection and remain solid red to indicate that the
iPod is recording. The LED will rapidly flash red when the sound level exceeds TuneTalk’s input
range (e.g., when you hear static, distortion, or the audio breaks up [i.e., there is audio clipping]).
It is advisable to perform a quick sound check and playback before making longer recordings to
ensure that you are using the most appropriate setting.
USB Power/Sync Cable
Connect the mini-B USB connector into the TuneTalk Stereo and the other end into any powered
USB port on your computer. iTunes will launch, allowing you to power and sync simultaneously.
You can also power and charge your iPod from a powered USB port on a PC or Mac® computer, or
through an AC Wall Charger for iPod (5V @ 500mA). Not all USB power cords are compatible.
NOTE: In order to power and charge, and continue to use the TuneTalk Stereo, you must first
eject the iPod from within iTunes. The iPod will then exit Extended Mode and return to normal
operation. The iPod should still display the charging icon in the top right-hand corner.
You may find that the battery indicator on your iPod shows that its battery drains very quickly
when you use your TuneTalk Stereo. The battery indicator tends to be very conservative when
the hard drive is under heavy load, as it is when you are using the device to record. Even if your
battery indicator is in the red, you’ll often find that you have lots of recording time left before the
battery is completely drained.
Using the TuneTalk Stereo | 04
Using the TuneTalk Stereo
To play a recording:
Select “Extras > Voice Memos” and choose the recording. Recordings are listed by date and time
recorded. Recordings are saved in a “Recordings” folder on the iPod in WAV file format.
To transfer recordings to your Windows®-based computer:
Your iPod must be enabled for use as a hard drive. Connect the device to your computer and
open the application you use to listen to audio. Through the “My Computer” menu, double-click
the removable drive that represents the iPod. Double-click on the “Recordings” folder.
Double-click on a specific audio (WAV format) file to listen to the recording.
NOTE: You can play your files directly from the iPod and/or transfer recordings to your computer
by opening this folder and dragging the audio files to the desktop.
To transfer recordings using iTunes®:
Connect the iPod to your computer. Wait a few seconds while iTunes recognizes it. When it does,
iTunes will launch (if configured to do so automatically). You will be asked if you would like
to copy your voice memos to your music library. Select “Yes” or “No” to proceed. If you select
“Yes”, all voice memos will be copied to your iTunes Music Library. A default “Voice Memos”
folder, in which all voice memos will be stored, will be created in your iPod source list. Once
your recordings are in iTunes, you can rename them and add other information by selecting a
recording and choosing “File > Get Info”.
By default, the iPod will record audio files in WAV format. These can be easily converted to
alternate file types in iTunes to reduce the file size. In iTunes, select “Edit > Preferences >
Advanced > Importing” and choose the audio compression format you want to use. Then select
one or more recordings from your “Voice Memos” folder, right-click, and choose to convert them
to a new format.
To locate recordings on the iPod after syncing with iTunes:
Disconnect the iPod from the computer. Select “Playlists > Voice Memos”.
Using the TuneTalk Stereo | 05
Using the TuneTalk Stereo
Insert the TuneTalk Stereo
into the iPod
dock connector.
Connect the included USB
cable to the bottom of the
TuneTalk Stereo to power
and/or sync your iPod from
any powered USB port.
Extended connector
provides compatibility with
a case. Use the adapter
when used without a case.
How to Set Up the TuneTalk Stereo and iPod with the Compact Stand
No bigger than a credit card, the iPod stand is small enough to fit in your wallet.
Fig. 1
Fig. 2
Fig. 3
1. Assemble the stand by placing the plastic tab through the rear panel for stability (Fig. 1).
2. Connect the TuneTalk Stereo to the iPod as shown above (Fig. 2).
3. When used with the stand, the TuneTalk Stereo can be positioned toward the source, which
greatly improves the recording quality (Fig. 3).
Using the TuneTalk Stereo | 06
Troubleshooting
The audio recording is distorted or clipping.
Make sure you are using the correct gain setting. Review the chart on page 3 for optimal
recording setting.
There are clicks and other background sounds in my microphone recordings.
To store and access data, your iPod uses a hard drive. By nature, hard drives make audible sounds
when they function. Your TuneTalk Stereo contains two very sensitive microphones that will
sometimes pick up sounds from the nearby hard drive. We suggest using an external microphone
with your TuneTalk Stereo if you wish to reduce or eliminate these sounds in your recordings.
All my voice memos have been deleted from my iPod.
After docking your iPod and importing your voice memos into iTunes, your iPod will automatically
remove your recent voice memos from the Voice Memos menu (listed on your iPod in “Extras >
Voice Memos”). Your iPod saves a copy of all of your recordings in a special playlist, which can be
found by navigating to “Music > Playlists > Voice Memos”.
My iPod does not seem to be charging.
Make sure that the TuneTalk Stereo is correctly connected to a powered USB port with the
included USB cable.
When I attach a USB cable from my computer to the TuneTalk Stereo, the computer does
not recognize that the iPod is attached.
Make sure the iPod is powered on and that the computer is properly connected to the
TuneTalk Stereo.
Troubleshooting | 07
Information
FCC Statement
DECLARATION OF CONFORMITY WITH FCC RULES FOR ELECTROMAGNETIC COMPATIBILITY
We, Belkin Corporation, of 501 West Walnut Street, Compton, CA 90220, declare under our sole responsibility
that the product:
F8Z082 / F8Z082-BLK
to which this declaration relates:
Has been tested and found to comply with the limits for a Class B digital device, pursuant to part 15 of
the FCC Rules. These limits are designed to provide reasonable protection against harmful interference
in a residential installation. This equipment generates, uses, and can radiate radio frequency energy and,
if not installed and used in accordance with the instructions, may cause harmful interference to radio
communications. However, there is no guarantee that interference will not occur in a particular installation.
If this equipment does cause harmful interference to radio or television reception, which can be determined
by turning the equipment off and on, the user is encouraged to try to correct the interference by one or
more of the following measures:
• Reorient or relocate the receiving antenna.
• Increase the separation between the equipment and receiver.
• Connect the equipment into an outlet on a circuit different from that to which the
receiver is connected.
• Consult the dealer or an experienced radio/TV technician for help.
ICES
This Class B digital apparatus complies with Canadian ICES-003. Cet appareil numérique de la classe B
conforme á la norme NMB-003 du Canada.
Information | 08
Belkin Corporation Limited 3-Year Product Warranty
What this warranty covers.
Belkin Corporation warrants to the original purchaser of this Belkin product that the
product shall be free of defects in design, assembly, material, or workmanship.
What the period of coverage is.
Belkin Corporation warrants the Belkin product for three years.
What will we do to correct problems?
Product Warranty.
Belkin will repair or replace, at its option, any defective product free of charge
(except for shipping charges for the product).
What is not covered by this warranty?
All above warranties are null and void if the Belkin product is not provided to Belkin
Corporation for inspection upon Belkin’s request at the sole expense of the purchaser, or
if Belkin Corporation determines that the Belkin product has been improperly installed,
altered in any way, or tampered with. The Belkin Product Warranty does not protect
against acts of God (other than lightning) such as flood, earthquake, war, vandalism, theft,
normal-use wear and tear, erosion, depletion, obsolescence, abuse, damage due to
low voltage disturbances (i.e. brownouts or sags), non-authorized program, or system
equipment modification or alteration.
Warranty | 09
Belkin Corporation Limited 3-Year Product Warranty
How to get service.
To get service for your Belkin product you must take the following steps:
1. Contact Belkin Corporation at 501 W. Walnut St., Compton CA 90220, Attn: Customer
Service, or call (800)-223-5546, within 15 days of the Occurrence. Be prepared to provide
the following information:
a. The part number of the Belkin product.
b. Where you purchased the product.
c. When you purchased the product.
d. Copy of original receipt.
2. Your Belkin Customer Service Representative will then instruct you on how to forward
your receipt and Belkin product and how to proceed with your claim.
Belkin Corporation reserves the right to review the damaged Belkin product. All costs of
shipping the Belkin product to Belkin Corporation for inspection shall be borne solely by
the purchaser. If Belkin determines, in its sole discretion, that it is impractical to ship the
damaged equipment to Belkin Corporation, Belkin may designate, in its sole discretion,
an equipment repair facility to inspect and estimate the cost to repair such equipment.
The cost, if any, of shipping the equipment to and from such repair facility and of such
estimate shall be borne solely by the purchaser. Damaged equipment must remain
available for inspection until the claim is finalized. Whenever claims are settled, Belkin
Corporation reserves the right to be subrogated under any existing insurance policies
the purchaser may have.
Warranty | 10
Belkin Corporation Limited 3-Year Product Warranty
How state law relates to the warranty.
THIS WARRANTY CONTAINS THE SOLE WARRANTY OF BELKIN CORPORATION, THERE
ARE NO OTHER WARRANTIES, EXPRESSED OR, EXCEPT AS REQUIRED BY LAW, IMPLIED,
INCLUDING THE IMPLIED WARRANTY OR CONDITION OF QUALITY, MERCHANTABILITY
OR FITNESS FOR A PARTICULAR PURPOSE, AND SUCH IMPLIED WARRANTIES, IF ANY, ARE
LIMITED IN DURATION TO THE TERM OF THIS WARRANTY.
Some states do not allow limitations on how long an implied warranty lasts, so the above
limitations may not apply to you.
IN NO EVENT SHALL BELKIN CORPORATION BE LIABLE FOR INCIDENTAL, SPECIAL, DIRECT,
INDIRECT, CONSEQUENTIAL OR MULTIPLE DAMAGES SUCH AS, BUT NOT LIMITED TO, LOST
BUSINESS OR PROFITS ARISING OUT OF THE SALE OR USE OF ANY BELKIN PRODUCT, EVEN
IF ADVISED OF THE POSSIBILITY OF SUCH DAMAGES.
This warranty gives you specific legal rights, and you may also have other rights, which may
vary from state to state. Some states do not allow the exclusion or limitation of incidental,
consequential, or other damages, so the above limitations may not apply to you.
Warranty | 11
Belkikn Tech Support
US: 310-898-1100 ext. 2263
800-223-5546 ext. 2263
Europe: 00 800 223 55 460
Australia: 1800 235 546
New Zealand: 0800 235 546
Belkin Corporation
501 West Walnut Street
Los Angeles, CA 90220, USA
310-898-1100
310-898-1111 fax
Belkin Ltd.
Express Business Park, Shipton Way
Rushden, NN10 6GL, United Kingdom
+44 (0) 1933 35 2000
+44 (0) 1933 31 2000 fax
Belkin B.V.
Boeing Avenue 333
1119 PH Schiphol-Rijk, The Netherlands
+31 (0) 20 654 7300
+31 (0) 20 654 7349 fax
Belkin Ltd.
7 Bowen Crescent, West Gosford
NSW 2250, Australia
+61 (0) 2 4372 8600
+61 (0) 2 4372 8603 fax
2006 Belkin Corporation. All rights reserved. All trade names are registered trademarks of
respective manufacturers listed. iPod, iTunes, and Mac are trademarks of Apple Computer,
Inc., registered in the U.S. and other countries. Windows is either a registered trademark or
trademark of Microsoft Corporation in the United States and/or other countries.
F8Z082 / F8Z082-BLK
P75147-A