1
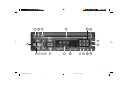
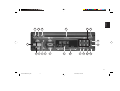
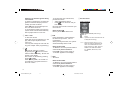
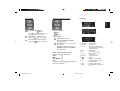
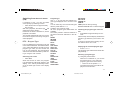
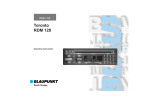
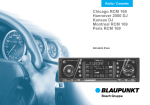
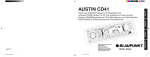
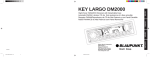
Operating instructions
Toronto RDM 126 US
1
Toronto RDM126 us-gb
1
22.03.2001, 16:38 Uhr
DEUTSCH
17
FRANÇAIS
16 15
ITALIANO
20 19 18
1
NEDERLANDS
14
3
4
5
6
7
8
9
10
11 12
PORTUGUÊS
ESPAÑOL
2
SVENSKA
13
3
Toronto RDM126 us-gb®
3
24.04.2002, 14:35 Uhr
Contents
FCC warning for USA ............................. 4
Key Features: ......................................... 5
Codem IV-US Tuner Features: ............... 5
Audio Features: ...................................... 5
CD Player & DMS CD Changer Control
Feature Highlights: ................................. 5
Other Features: ....................................... 5
Quick reference .............................. 5
Important notes ............................ 11
Precautions ........................................... 11
Traffic safety ......................................... 11
Installation ............................................. 11
Telephone mute .................................... 11
Accessories .......................................... 11
KeyCard theft protection
system ........................................... 12
Putting the unit into operation .............. 12
Removing the KeyCard ........................ 13
Replacing a KeyCard ............................ 13
Loss of both KeyCards ......................... 13
Displaying the radio pass data ............. 13
Optical indication for extra security ...... 13
Care of your KeyCard ........................... 13
Switching the audio source ........ 14
Radio operation with RDS ........... 14
AF - Alternative frequency .................... 14
Selecting a waveband .......................... 14
Station tuning ........................................ 15
Automatic (seek) tuning / ............ 15
Manual tuning with << >> .................. 15
RDS Seek (only FM) ............................. 15
Changing the memory bank (FM) ......... 15
Storing stations ..................................... 15
Automatically storing the strongest
stations with Travelstore ....................... 16
Recalling stored stations ...................... 16
Scanning stored stations with
Preset Scan .......................................... 16
Scanning stations with Radio-Scan ...... 16
Changing the scan time ........................ 16
Selecting the seek tuning sensitivity .... 16
Switching from stereo to mono (FM) .... 17
PTY – Program Type ............................ 17
Switching PTY on/off ......................... 17
Program type ..................................... 17
Checking the program type of the
station ................................................ 17
Displaying the selected program type17
Selecting a program type .................. 17
Storing program types ....................... 18
Scanning stations with PTY-SCAN ... 18
Emergency Alert System ................... 18
CD and CDC changer operation
(optional) ....................................... 19
Switching to CD operation .................... 19
Inserting a CD ....................................... 19
Removing a CD .................................... 19
Selecting a track ................................... 19
MIX playback ........................................ 20
Switching to CDC operation ................. 20
Selecting CDs and tracks ..................... 20
MIX playback ........................................ 20
Selecting the display mode .................. 20
Storing the display mode ...................... 21
SCAN operation .................................... 21
TPM Track Program Memory ............... 21
Storing tracks with TPM .................... 21
CD playback with TPM ...................... 22
Clearing TPM information ................. 22
Entering CD names .............................. 23
Deleting a CD name ............................. 23
Clearing TPM information and CD
names with DSC-UPDATE ................... 23
DSC programming ....................... 24
Overview of the DSC factory
settings .................................................. 26
Appendix ....................................... 27
Specifications ........................................ 27
2
Toronto RDM126 us-gb®
2
24.04.2002, 14:33 Uhr
DEUTSCH
ENGLISH
17
FRANÇAIS
16 15
ITALIANO
20 19 18
1
NEDERLANDS
14
3
4
5
6
7
8
9
10
11 12
PORTUGUÊS
ESPAÑOL
2
SVENSKA
13
3
Toronto RDM126 us-gb®
3
24.04.2002, 14:33 Uhr
FCC warning for USA
The equipment has been tested and found
to comply with the limits for a Class B device, pursuant to Part 15 of the FCC Rules.
These limits are designed to provide reasonable protection against harmful interference in a residential installation. This equipment generates, uses, and can radiate radio frequency energy, and, if not installed
and used in accordance with instructions,
may cause harmful interference with radio
communications. However, there is no guarantee that radio interference will not occur
in particular installation. If this equipment
does cause harmful interference to radio or
television reception, which can be determined by turning the equipment off and on,
the user is encouraged to contact the dealer or an experienced Radio/TV technician
for help.
You are cautioned that any changes or modifications not expressly approved in this
manual could void your authority to operate
this equipment.
The shielded interface cable recommended
in this manual must be used with this equipment in order to comply with limits for a digital device pursuant to Sub-part B of Part 15
of the FCC rules.
Caution
- The use of optical instruments with this
product will increase eye hazard.
-
Because the laser beam in this compact disc player is harmful to the eyes,
do not attempt to disassemble this
cabinet. Refer servicing to qualified
personnel only.
Safety certification
This Compact Disc Player is made and tested to meet exacting safety standards. It
meets FCC requirements and complies with
safety performance standards of the US
Department of Health and Human Services.
Congratulations on your purchase of this
Blaupunkt Radio with CD Changer Control.
Its Codem IV-US RDS tuner and full-featured CD player provide the ultimate in
sound reproduction. Its high-power amplifier and 4-Channel preamp output provide
you with versatility in configuring your car
audio system. In addition, Blaupunkt’s exclusive Direct Software Control menu allows
you to customize many of the features to
your specific personal preferences. And no
other company offers radios with either VarioColour Illumination or the KeyCard Security System.
4
Toronto RDM126 us-gb®
4
24.04.2002, 14:33 Uhr
Codem IV-US Tuner Features:
RDS (Radio Data System) Reception
Station Call Letter Display
PTY Program Type Seek
AF Alternative Frequency Search
Emergency Alert System Capability
Multipath Management
18 FM/6 AM Presets, including 6 FM/6 AM
TravelStore Presets
Station Scan & Preset Scan
3 lo and 3 dx Tuning Sensitivities
ASU Electrical Impulse Noise Suppression
Controls Blaupunkt CDC-A05 or CDCA071 Changer
Disc Naming
Track program memory
Switching on/off with the KeyCard:
The set has to be turned on via the ON
button.
Other Features:
Quick-Release Wire Harness
DIN Chassis, Bracket & Hardware
Dimensions 179 x 50 x 150 mm
Designed, Engineered and Manufactured
by Blaupunkt in Germany
Note:
Read the information in chapter “KeyCard theft protection system”.
Switching on/off via the ignition:
When connected correspondingly, the
set can also be turned on and off via
the vehicle ignition.
After the ignition has been switched
off, a double beep tone will remind you
that you should remove the KeyCard
before leaving your vehicle.
5
Toronto RDM126 us-gb®
5
DEUTSCH
FRANÇAIS
CD Player & DMS CD Changer
Control Feature Highlights:
24.04.2002, 14:33 Uhr
ITALIANO
KeyCard Security System with 2 KeyCards
Each Keycard also holds separate Preset,
Audio and DSC Settings
Flashing LED “Tongue” Warning System &
Window Decals
VarioColour Illumination
Brightness and Viewing Angle Adjustment
17 Direct Software Control Menu Options
Wireless Remote Control Ready
NEDERLANDS
4 x 35 Watts Peak Internal Power
Dual-Level Fader
4-Channel 2.0 V Preamp Out w/75 Ohm
Resistance
Switchable Auxiliary Input
SVENSKA
Key Features:
1 Switching on/off with the ON button:
Press ON.
When switching the set on with the ON
button, the KeyCard has to be inserted. The unit will play with the pre-adjusted volume.
ESPAÑOL
Audio Features:
PORTUGUÊS
Here is a recap of feature highlights:
ENGLISH
Quick reference
Switching on with the ignition being
switched off:
To keep on operating the set when the
ignition is switched off (KeyCard is inserted), proceed as follows:
Press ON after the double beep tone.
The unit will be turned on.
To avoid that the battery goes flat, the
system will be turned off automatically
after a playback time of one hour.
To program the mute volume level,
proceed as follows:
• Adjust the desired volume.
for two seconds until you
• Press
hear a beep.
Now this volume level is stored as your
mute volume.
6 Rocker switch
Radio operation
Extra function
Memory button in the DSC menu.
/
2 VOL+ / VOLTo alter the volume.
Each time the set is switched on, it will
play with the pre-adjusted volume
(VOL FIX).
You may also change the VOL FIX setting (see chapter “DSC programming”).
3
For instantly muting the volume.
button the volume
By pressing the
will be muted immediately. “MUTE” will
appear in the display.
The function is cancelled by pressing
or VOL+.
button
When pressing VOL-, the normal volume will be by one grade lower than
the mute volume.
4 FMT
Press repeatedly to switch between
the FM memory banks I, II and T
(Travelstore).
When pressing this button, the system
will automatically switch to FM.
Extra function FMT
To store the six most powerful stations
automatically with Travelstore:
Press FMT until you hear a beep or
“T-STORE” appears in the display.
Station search (seek tuning)
Up
Down
<</>> Up/Down in short intervals when AF
is off (manual tuning)
<</>> When AF is on, press <</>> to
seek previously-turned RDS stations. Once RDS stations have
been turned in by radio, they are
added to this RDS seek table.
e.g. WNEW, WNYC-FM, THE
WAVE.
5 AMT
AM switch
Extra function AMT
To store the six most powerful stations
automatically with Travelstore:
Press AMT until you hear a beep or
“T-STORE” appears in the display.
6
Toronto RDM126 us-gb®
6
24.04.2002, 14:33 Uhr
DEUTSCH
7 Display
Changer operation (optional)
Fast advance, audible (CUE).
Hold down
as long as required.
Track selection
Fast reverse, audible (REVIEW).
Hold down
as long as required.
b
l
m
Up
Down
n
ITALIANO
CD Disc selection
c
Upwards: Press briefly.
CUE - fast advance (audible):
Keep depressed.
Downwards: Press as many times
as required.
To restart a track: Press briefly.
REVIEW - fast reverse (audible):
Keep depressed.
Extra rocker switch functions:
Further setting functions with
AUD
D
GEO
C
DSC MODE B
PTY
>
Condition: The corresponding function
has to be activated.
a) WNEW - Station name
b) VIVALDI - CD name or
c) 1 : 52
- CD time (playback time)
and number for changer operation (optional)
d) FM
- Waveband
e) 6
- Preset button (1-6)
f) I, II, T
- Memory bank I, II or
Travelstore
g) CD-IN
- A CD is inserted
h)
- Stereo
i) lo
- Seek tuning sensitivity
j) AF
- Alternative frequency for
RDS operation
k) PTY
- Program type function
l) MIX
- CD playback in random order
7
Toronto RDM126 us-gb®
7
24.04.2002, 14:33 Uhr
NEDERLANDS
Up
Down
Press once to go back to the beginning of the current track.
SVENSKA
Track selection
k
ESPAÑOL
/
e f ghi j
FRANÇAIS
d
ENGLISH
a
PORTUGUÊS
CD operation
m) TPM
n) T5
- To select and store CD
tracks
- Track no. 5 is played back
8 KeyCard theft protection system
To operate the set it is necessary that
the KeyCard is inserted.
For this purpose, introduce the KeyCard (with the contact area showing
up) into the slot above the tongue
sticking out of the unit.
To remove the card, press first to unlock.
Read also the information in chapter
“KeyCard theft protection system”.
Flashing KeyCard tongue
When the radio is turned off and the
KeyCard removed, the KeyCard
tongue can be programed to flash for
optical theft protection.
For more information see chapter
“DSC programming”.
This flashlight can be switched off by
pushing in the tongue and lock.
9 SC/MIX
Radio operation
Scan
Press SC/MIX briefly –
“FM SCAN” and the name of the
scanned station will alternately appear
in the display. The unit will scan all stations which can be received.
Preset Scan
Press SC/MIX for approximately two
seconds until you hear a beep.
“SCAN” and the name of the scanned
station will alternately appear in the
display. The unit will scan all stations
stored on the preset buttons.
To stop Scan / Preset Scan:
Press SC/MIX once again.
CD-Scan
Press SC/MIX for approximately two
seconds until you hear a beep.
“CD-SCAN” appears in the display.
The unit will scan all CD tracks.
To stop CD-Scan:
Press SC/MIX once again.
Changer (CDC) operation (optional)
MIX CD
The CD tracks will be played at random.
The individual discs are selected in numeric order.
MIX MAG
The CD tracks will be played at random.
The individual discs are also selected
in random order.
MIX OFF
The Mix function is deactivated.
CD operation
MIX playback
The Mix function is switched on if
“MIX” appears in the display. The CD
tracks will be played at random.
To switch Mix on and off:
Press SC/MIX briefly.
Press SC/MIX as many times until the
desired function briefly appears in the
display.
CD-Scan
Press SC/MIX for approximately two
seconds until you hear a beep.
8
Toronto RDM126 us-gb®
8
24.04.2002, 14:33 Uhr
To switch between the name and time
(playback time) display modes:
Press DIS briefly.
Changer operation (optional)
To switch the display mode and select
between name, time (playback time)
and number (disc number):
• Press DIS briefly.
DEUTSCH
ENGLISH
CD and CDC operation (optional)
To clear CD tracks from the TPM
memory.
; TPM
(Track Program Memory)
To select and store tracks during CD/
CDC playback. In each operating
mode it is possible to manage a maximum of 30 discs. Please refer to chapter “TPM programming”.
= AF
Alternative frequency during RDS operation:
When “AF” lights up in the display, the
system will automatically look for a frequency offering better reception of the
same RDS program.
AF on/off: Press AF briefly.
@ 1, 2, 3, 4, 5, 6 - preset buttons
On FM, you can store six stations for
each of the memory banks I, II and T.
On AM, you can store six stations
each.
To store a station: Press a preset
button during radio operation and hold
down until the set resumes play after
the muting and you hear a beep.
9
Toronto RDM126 us-gb®
9
24.04.2002, 14:33 Uhr
FRANÇAIS
To switch the seek tuning sensitivity
level:
Press button briefly.
To switch between mono and stereo
reception:
Press button for approximately two
seconds (beep).
will disappear for
The stereo symbol
mono playback.
• SRC
SRC (source)
When having a CD inserted you can
switch between the different audio
sources radio, CD, and CDC/AUX (if
activated).
(Eject)
Hold down the button for approximately two seconds (beep) and the CD will
eject.
ITALIANO
?
CD operation
NEDERLANDS
When an RDS station is received,
press the DIS button and the frequency will be displayed for approximately
four seconds.
SVENSKA
Radio operation
Radio operation
> PTY (Program Type)
In the PTY mode, the preset buttons
become program type buttons.
With each preset you can select one
program type, such as for example
NEWS, SPORT, ROCK, CLASSICL,
etc.
ESPAÑOL
: lo•CLR
< DIS
PORTUGUÊS
“CDC-SCAN” will appear in the display. All CD tracks will be scanned
briefly.
To stop CD-Scan:
Press SC/MIX once again.
To recall a station: Select the desired
waveband. On FM, adjust the corresponding memory bank and press the
relevant preset button briefly.
Extra function preset buttons
To store and recall a PTY program
type.
On FM, you can store and recall one
program type on/from each preset button when PTY is active (“PTY” lights
up in the display).
A CD slot
When inserting a disc with the label
side facing up, it will be pulled in automatically and transported to the playback position. CD playback is adjusted
automatically.
B DSC (Direct Software Control)
Use the DSC function to customise
certain programmable, basic settings
to suit your personal needs and preferences. See chapter “DSC programming” for more information.
C GEO
To adjust the balance (left/right) and
fader (front/rear) with the rocker
switch.
D AUD
To adjust the treble and bass frequencies with the rocker switch.
Treble +
Treble –
Bass –
Bass +
Fader front
Fader rear
Balance left
Balance right
The last setting will be stored automatically.
To switch off GEO: Press button once
again.
If the setting remains unchanged within four seconds, the display will switch
back to the previous condition.
The last setting will be stored automatically.
To switch off AUD: Press button once
again.
If the setting remains unchanged within four seconds, the AUD setting will
be terminated automatically.
Extra function AUD
Loudness: When listening at a low level, the Loudness function will create a
more natural sound by emphasising
the low frequency range.
To switch the Loudness on/off:
Press the AUD button for approximately two seconds until you hear a beep.
10
Toronto RDM126 us-gb®
10
24.04.2002, 14:33 Uhr
Traffic safety
As the driver of a motor vehicle, it is your
responsibility to pay attention to the traffic
situation at all times. Never use your car
radio in a way that could distract you.
Please keep in mind that you travel a distance of 15 yards per second at a speed of
only 30 miles per hour.
Should the traffic situation become particularly demanding, we advise you not to use
the radio.
Always make sure that you are still able to
hear any warning signals coming from outside of the vehicle, such as police or fire
engine sirens, so that you can react accordingly.
Therefore, you should always select a moderate volume for playing your car radio while
you are driving.
Telephone mute
If you have a mobile telephone installed in
your vehicle, radio or CD playback can be
muted automatically when using the phone
(telephone mute).
“PHONE” will then appear in the display.
Accessories
Use only the accessories and spare parts
approved by Blaupunkt.
You can use the following Blaupunkt products with this car stereo:
11
Toronto RDM126 us-gb®
11
24.04.2002, 14:33 Uhr
ENGLISH
PORTUGUÊS
Changer
CDC A 05 or CDC A 071
FRANÇAIS
If you would like to install your new car stereo yourself or add other audio components
to existing ones, then please read carefully
the enclosed instructions on installation and
connection.
In order to ensure that the set operates properly it is necessary that the positive power
supply line is connected via the ignition and
the permanent +12 V lead.
Do not ground the loudspeaker outputs!
ITALIANO
Before starting to use your new car radio,
please read the following information carefully.
NEDERLANDS
Installation
SVENSKA
Precautions
ESPAÑOL
The Loudness function is active if “LD”
appears in the display.
For more information see chapter
“DSC programming”.
DEUTSCH
Important notes
KeyCard theft protection system
Remote control
With the infrared steering wheel remote control and its signal-receiving apparatus you
can control all of the important functions of
your car audio system from the steering
wheel.
The Blaupunkt KeyCard Security System
provides an effective and convenient means
of theft deterrence. Each unit operates only
when it’s own card is inserted. No card, no
use. It’s that simple.
The unit’s flashing tongue and security system window stickers emphasize that point
to the potential thief. No bulky release panel to put in your pocket – under your seat –
where thieves know to look for it. Just remove the card and put in your wallet or pocket. It’s that convenient.
This unit is supplied with two Keycards, a
blue “main” card and “screamer” card. The
difference: the warranty/serial number (the
“radio pass data”) has been embedded into
the main card in case you ever need it.
Amplifier
All Blaupunkt amplifiers
Auxiliary Input 7607 890 093
Adapter for portable audio equipment, for
example.
In addition to convenient security, each card
has a personal memory bank for the FM1
and AMT band presets, bass, treble, balance, fader and DSC settings. The benefit:
two drivers, such as a husband and wife,
can store separate settings to their individual likings on their separate cards.
Putting the unit into operation
1. Turn the unit on.
2. Make the orange tongue stick out by
pressing it into the radio so that it pops
out.
3. Insert the KeyCard into the slot with
the gold contact facing up and the arrow pointed into the unit.
The car radio is now ready for operation.
If a wrong KeyCard is inserted, then “CARD
ERR” will appear in the display. In this case
please do not make any further adjustments.
The system will switch off after approximately ten seconds. When inserting another card type (e.g. phone or credit card), the
display will show “WRONG KC” for approximately two seconds.
4. Remove the wrong card and introduce
the correct KeyCard after the display
indications “CARD ERR” or “WRONG
KC” disappear.
5. Press ON to turn the set on.
To replace a lost or stolen card, please
call 1-800-920-2121.
Speakers
All Blaupunkt speakers
12
Toronto RDM126 us-gb®
12
24.04.2002, 14:33 Uhr
3. Press << or >>.
The display will switch to “CHANGE”.
4. Push in the KeyCard. The card is released and put in the proper position
for being removed.
5. Remove the first KeyCard and insert
the new one while “CHANGE” is still
being displayed.
After the display indication “READY” or
“LEARN KC”,
6. press DSC.
Now you can also use the new KeyCard for
operating your unit.
A maximum of two cards can be used for
the set.
Displaying the radio pass data
Using the “Blau” KeyCard supplied with your
set you can have the radio pass data such
as the model name, product number (7 6 ...)
and serial number indicated on the display
panel.
Please refer to chapter “DSC programming
- READ KC”.
Optical indication for extra
security
Care of your KeyCard
For a proper function of the KeyCard it is
important that the contacts are free from any
foreign particles. Avoid direct skin contact.
If necessary, clean the KeyCard contacts
using a cotton swab soaked with alcohol.
Blinking KeyCard tongue
When the vehicle is stationary and the KeyCard removed, the KeyCard tongue can be
switched to blink for extra anti-theft security.
For this it is necessary that the positive power supply line and the permanent +12 V lead
are connected such as described in the installation instructions.
13
Toronto RDM126 us-gb®
13
24.04.2002, 14:33 Uhr
DEUTSCH
ENGLISH
FRANÇAIS
When you insert your KeyCard, the LED is
automatically turned off until the card is removed and the ignition turned off, assuming the unit is connected as described in the
installation instructions.
If you do not want the tongue to blink at any
time, simply access “LED” in the DSC menu,
and press << or >> to turn in off.
ITALIANO
2. Press the DSC button and select
“LEARN KC” with / .
Turning off the blinking LED
Please contact your dealer or in USA call
1-800-920-2121.
NEDERLANDS
1. Insert the remaining KeyCard and turn
on the set.
Loss of both KeyCards
SVENSKA
Replacing a KeyCard
Be sure that “LED ON” is adjusted in the
DSC mode.
If required, please refer to chapter “DSC
programming - LED”.
ESPAÑOL
Never pull out the KeyCard directly!
• First, slightly push in the KeyCard.
This releases the card and puts it in the
proper position for being removed.
• Now you can pull it out.
When trying to “train” a third one, the access authorisation for the KeyCard not used
for the “training” process will be deleted
automatically.
PORTUGUÊS
Removing the KeyCard
Switching the audio source Radio operation with RDS (Radio Data System)
Using the SRC button you can switch between the following audio sources:
radio,
CD, or
CDC (AUX)
CD operation is only available if a CD is inserted.
AUX is only available if no Blaupunkt changer CDC A05 or CDC A 071 is connected.
“AUX ON” must be activated in the DSC
menu.
To switch to another source,
• press SRC briefly.
This radio is equipped to receive Radio Data
System or RDS signals. RDS is a secondary signal used by many FM radio stations
to broadcast additional information. Blaupunkt has been a key player in developing
RDS in Europe.
This radio’s RDS features include program
service name (PS), which automatically displays RDS station’s identification such as
WNYC-FM or THE WAVE. Other RDS features included are alternative frequency
switching (AF), program type identification
and search (PTY), and capability to receive
future Emergency Alert System (EAS) message broadcasted by RDS stations. All are
explained in this section.
AF - Alternative frequency
The AF (Alternative Frequency) function
makes sure that the strongest frequency of
the currently selected program is always
tuned in automatically.
This function is activated when “AF” appears
in the display.
If “SEARCH” appears in the display when
switching on the radio or recalling one of the
stored frequencies, the unit is automatically
searching for an alternative frequency.
“SEARCH” will disappear from the display
when the alternative frequency has been
found or after the frequency band has been
run through completely.
If the reception quality of the selected program becomes too bad:
• Tune into another station.
Selecting a waveband
With this car radio you can select between
the following wavebands:
FM 87.5 - 107.9 MHz
AM 530 - 1710 kHz
• Select the desired waveband by pressing the FMT or AMT button.
In order to switch this function on or off,
• press the AF button briefly.
While searching for the strongest reception
signal, the radio may switch to mute briefly.
14
Toronto RDM126 us-gb®
14
24.04.2002, 14:33 Uhr
Seek tuning
Up
Down
Down in short intervals
(“AF” must be switched off)
Up in short intervals
(“AF” must be switched off)
Manual tuning with << >>
RDS Seek (only FM)
You can use the << >> buttons to tune in
RDS stations.
For this it is necessary that the stations have
been tuned in at least once and that “AF” is
active (lights up in the display).
A quick way to tune in RDS stations is to
use Travelstore:
• Press FMT for two seconds; the system starts to run through the frequency
band.
If “AF” is not displayed,
• press AF.
With this, the requirements for selecting stations with << >> are fulfilled.
Storing stations
On FM, you can store six stations on the
preset buttons 1-6 for each of the memory
banks I, II and T.
On AM, you can store six stations.
• Select the appropriate waveband with
FMT or AMT.
•
Tune in a station with the rocker switch
(either automatically / or manually
<< >>).
•
Press the desired preset button until
the radio resumes play after the muting (takes approximately two seconds,
confirmed by beep).
Now the station has been stored.
The activated preset button is indicated in
the display.
You can also tune in a station manually.
Condition:
AF and PTY must be switched off (i.e. the
symbols do not light up in the display).
If necessary, deactivate these functions:
• Press AF or PTY.
Changing the memory bank (FM) Notice:
You can shift between the memory banks I,
II and T in order to store stations and recall
them later.
Should you tune in a station which has already been stored before on another
memory bank, the corresponding preset
button and the memory bank will briefly flash
in the display.
15
Toronto RDM126 us-gb®
15
24.04.2002, 14:33 Uhr
DEUTSCH
ENGLISH
FRANÇAIS
Press / ; the car radio will automatically search for the next station.
When keeping the upper or lower part /
of the rocker switch depressed, seek tuning
will speed up in upwards or downwards direction.
Press << >>; the frequency will change
in short intervals in downwards or upwards direction.
When holding the right or left part of the rocker switch down, the frequency movement is
speeded up.
ITALIANO
•
•
NEDERLANDS
/
SVENSKA
Automatic (seek) tuning
The currently selected memory bank is indicated in the display.
• Press the FMT button as many times
until the desired memory bank lights
up in the display.
ESPAÑOL
Manual tuning:
PORTUGUÊS
Station tuning
Automatically storing the
strongest stations with Travelstore
You can automatically store the six most
powerful FM and AM stations of your current reception area sorted according to their
signal strength. This function is particularly
convenient on longer trips.
• Press the FMT or AMT button for two
seconds.
“T-STORE” will appear in the display.
The six strongest FM or AM stations will be
automatically stored on the memory bank
“T” (Travelstore). When this process has
been completed, the radio will play the first
station.
If desired, stations can also be stored manually on the Travelstore bank (see “Storing
stations”).
Scanning stored stations with
Preset Scan
You can have all of the stored stations briefly
scanned on all wavebands.
To start Preset Scan:
• Press SC/MIX for approximately two
seconds.
All of the stored stations of the adjusted
waveband will be scanned one after the other “SCAN” and the memory bank and preset position of the currently scanned station
will flash in the display.
To select a scanned station and switch
off Preset Scan:
• Press SC/MIX briefly.
Changing the scan time
The scan time can be changed from between five to a maximum of 30 seconds.
Please refer to chapter “DSC programming
- SCANTIME”.
Selecting the seek tuning sensitivity
Scanning stations with
Radio-Scan
Recalling stored stations
You can also scan all stations which can be
received.
You can recall any stored station at the touch
of a button.
• Select the waveband by pressing FMT
or AMT. On FM, also choose the corresponding memory bank by pressing
the FMT button as many times until the
desired bank appears in the display.
To start the Scan function:
• Press SC/MIX briefly.
The scanned frequency or the station name
will start flashing in the display. During the
actual scanning process “FM-SCAN” or
“AM-SCAN” will be displayed.
•
To select a scanned station and switch
off the Radio-Scan function:
• Press SC/MIX briefly.
If no station is selected, the scan function
will be automatically switched off after the
frequency band has been run through completely. The unit will tune in the station listened to before starting the scan.
You can alter the automatic seek tuning
sensitivity.
If “lo” is displayed, the radio will only pick up
strong, local stations (low sensitivity).
If “lo” does not light up, the radio will also
pick up weaker, distant stations (high sensitivity).
The sensitivity level can be altered in both
modes (see also chapter “DSC programming”).
Press the corresponding preset button
briefly to recall the station.
16
Toronto RDM126 us-gb®
16
24.04.2002, 14:33 Uhr
Switching PTY on/off
• Press PTY.
When the function is active, the program
type selected last will briefly appear in the
display. “PTY” will be permanently indicated in the lower right corner of the display
panel.
Displaying the selected program type
• Press << or >>.
The program type selected last will be displayed briefly.
Selecting a program type
a) Using the preset buttons
When PTY is switched on, you can use
the preset buttons 1-6 to select the
program types stored at the factory.
• Press one of the presets 1 - 6.
The selected program type will be displayed for two seconds.
17
Toronto RDM126 us-gb®
17
ENGLISH
DEUTSCH
Press PTY for approximately two seconds.
After the beep tone the display will show the
program type offered by the tuned in station.
If “NO PTY” appears in the display, the current station has no PTY code.
FRANÇAIS
•
ITALIANO
Checking the program type of the station
NEDERLANDS
PTY is an RDS service offered by more and
more radio broadcasters. This feature allows
you to select FM stations according to their
program type. After you have chosen the
PTY of your preference, the corresponding
stations can be selected either by seek tuning or using the scan function.
NEWS
INFORM
SPORTS
TALK
ROCK
CLS ROCK
ADLT HIT
SOFT RCK
TOP 40
COUNTRY
OLDIES
SOFT
NOSTALGA
JAZZ
CLASSICL
R&B
SOFT R&B
LANGUAGE
PTY 23 to PTY 29 have not been assigned.
SVENSKA
PTY – Program Type
Use << >> to have the last selected program type displayed and to choose a new
one.
You can select any one of the stored types
with the preset buttons 1 - 6.
Condition: PTY must be active.
All of the program types listed below are
available.
The letters printed in bold are identical to
the actual short-time indication in the display.
REL MUSC
REL TALK
PERSNLTY
PUBLIC
TEST (used for factory testing)
24.04.2002, 14:33 Uhr
ESPAÑOL
If reception is poor, you may get better
sound quality by switching to mono:
• Press the lo button for approximately
two seconds.
will
With mono playback, the stereo sign
disappear from the display.
Each time the radio is switched on, stereo
playback is activated.
The unit will automatically switch to mono if
the received signal is not strong enough for
stereo playback.
Program type
PORTUGUÊS
Switching from stereo to mono
(FM)
If you wish to listen to a station with
this PTY,
•
press / to start seek tuning operation.
If the system is unable to find a station offering the selected program type, the display will show “NO PTY” and a beep tone
will be released. The station received before starting seek tuning will be tuned in.
You can assign different program types to
each preset position. Please refer to the next
chapter “Storing program types”.
b) Using the << >> buttons of the rocker
switch
When PTY is switched on, you can select a program type using buttons <<
>>.
•
Press << or >>; the program type
selected last will be displayed for
three seconds.
•
During this period press >> (forwards) or << (backwards) to select
the desired type.
•
Press << or >> as many times as
required.
If you wish to listen to a station offering
the selected PTY,
•
press /
eration.
to start seek tuning op-
If the system is unable to find a station offering the selected program type, the display will show “NO PTY” and a beep tone
will be released. The station received before starting seek tuning will be tuned in.
Storing program types
One program type was assigned to each of
the preset buttons 1-6 at the factory.
If desired, you can also store other available program types.
To do so, make sure that “PTY” lights up in
the display.
• If necessary, press the PTY button to
switch on the function.
•
Select a program type using buttons
<< >> and
•
hold down the desired preset button
(1-6) until you hear a beep.
Now the selected program type can be recalled by pressing this preset. For this the
PTY function must be active.
Emergency Alert System
Your RDS tuner is also able to automatically receive any RDS emergeny announcements broadcast during extraordinary circumstances.
When the PTY feature is on, if your unit
received such a signal, the radio would flash
an alert message and switch to the RDS station broadcasting the emergency announcement, even if you are using a different source
(such as CD), increase the volume to the
level set under DSC (TA volume), and receive the message.
Notice:
As earlier mentioned, these functions are
currently only supported by a limited number
of RDS stations.
Scanning stations with PTY-SCAN
Condition: “PTY” must appear in the display.
• Press the SC button.
All received stations offering the selected
program type will be scanned.
To switch off PTY-SCAN:
• Press SC once again.
18
Toronto RDM126 us-gb®
18
24.04.2002, 14:33 Uhr
Make sure that a disc is inserted, “CD IN”
shows on the display panel.
Press SRC to go through the available audio sources:
• Press as many times until the display
briefly shows “CD”.
Inserting a CD
Track selection
Up
Down
Press once to go back to the beginning of the current track.
Fast advance, audible (CUE).
Hold down
as long as required.
Switch on the radio.
•
Insert a CD with the label facing up
without the use of force.
The CD will be transported to its playing
position automatically. CD playback will
start.
“CD ERROR” – Disc is dirty, damaged,
upside-down or CD-ROM
Fast reverse, audible (REVIEW).
Hold down
as long as required.
Press the rocker switch as many times until
you have reached the desired track.
The number displayed beside “T” indicates
the track number of the currently played
track.
19
Toronto RDM126 us-gb®
19
ENGLISH
PORTUGUÊS
•
/
FRANÇAIS
After having inserted the CD, the activated
CD functions will appear on the display panel. If the TPM indicator is inactive, you can
select and play all CD tracks.
If “TPM” lights up, you can only select and
play the tracks programed with TPM.
Press the
button for approximately
one second (beep). The CD will be
ejected.
To protect the CD mechanism, do not impair or try to help the automatic insertion and
ejection of the disc in any way.
If the CD is not removed within approximately 30 seconds, it will be re-inserted automatically.
ITALIANO
•
NEDERLANDS
Switching to CD operation
Selecting a track
SVENSKA
CD operation
Removing a CD
ESPAÑOL
This car stereo is equipped with a CD drive.
In addition, it offers you convenient control
of a Blaupunkt CD changer CDC-A05 or
CDC-A071. These changers are sold separately and can be purchased through your
Blaupunkt dealer.
DEUTSCH
CD and CDC changer operation (optional)
24.04.2002, 14:33 Uhr
MIX playback
Selecting CDs and tracks
MIX MAG – CDC-A 05 / CDC-A 071
All tracks of the CD will be
played at random.
The next disc will then also
be selected and played randomly, etc.
When the MIX function has been activated,
the CD tracks will be played in random order. “MIX” will then appear in the display.
In order to switch the MIX function on or off,
• press SC/MIX briefly.
CDC operation (optional)
MIX OFF – The Mix function is deactivated. Discs and tracks will be
selected in numeric order.
CD selection
Up
Switching to CDC operation
Make sure that at least one CD has been
inserted into the magazine.
Press SRC to go through the available audio sources:
• Press as many times until the display
briefly shows “CDC ON”.
“CD ERROR” – Disc is dirty, damaged,
upside-down or CD-ROM
“NO CD”
– No magazine in changer
or no disc in selected slot.
Down
Track selection
Upwards: Press briefly.
CUE - fast advance (audible): Keep
depressed.
Downwards: Press as many times as
required.
To restart a track: Press briefly.
REVIEW - fast reverse (audible):
Keep depressed.
To alter the setting:
• Press SC/MIX as many times until the
desired function is briefly displayed.
If the function is active, “MIX” will appear in
the right display corner.
Selecting the display mode
You can select the desired display mode for
CD operation:
“NAME”
– The specified name, for
example “MADONNA”
will be displayed.
“TIME”
– The elapsed playback
time of the track is displayed, for example
“2 : 32”.
MIX playback
You can have the CD tracks played in random order.
MIX CD
– The tracks of the selected
CD will be played at random.
The next disc will be selected
in numeric order.
20
Toronto RDM126 us-gb®
20
24.04.2002, 14:33 Uhr
DEUTSCH
“NUMBER”
Use this function to scan all of the CD tracks.
For CDC operation, the system will scan the
tracks of all discs.
Use this feature to program and play your
favourite CD tracks.
Up to 30 CDs can be managed in the CD
mode, up to 99 discs in the CDC mode.
You can store your preferred display mode
which will then be active each time the radio is switched on.
If required,
• press DIS as many times until the desired setting is displayed.
•
Hold down the DIS button until you
hear a beep.
•
Use / to select a track. The track
number will be displayed.
NEDERLANDS
SCAN will also be terminated by
• pressing one of the buttons AUD,
GEO, DSC, SRC, TPM, ,
<< >> or / .
Make sure that the TPM function is switched
off (“TPM” not shown on the display panel).
If you have not yet stored a track in the TPM,
the function will be unavailable.
If required,
• switch TPM on/off by pressing the
TPM button.
•
Hold down the TPM button until you
hear a beep.
Now the track has been stored.
With CDC operation, a “ “ symbol will appear in front of the CD name.
Then select the next track with / and store
with TPM, as detailed above.
You can also store a track at any time during CD playback. For this it is necessary that
“TPM” and “SCAN” are deactivated.
Program TPM information for other CDs in
the same way.
21
Toronto RDM126 us-gb®
21
24.04.2002, 14:33 Uhr
SVENSKA
Storing the display mode
To stop the Scan function:
• Press SC/MIX once again briefly.
The track currently being scanned is continued to be played.
Storing tracks with TPM
ESPAÑOL
CDC operation
To start the Scan function:
• Press SC/MIX for approximately one
second.
The tracks will be scanned one after the other in ascending order.
PORTUGUÊS
– The CD position in the
magazine (disc number)
is displayed, for example
“CD 8”.
To switch the display mode:
• Press the DIS button during CD playback.
The display mode and the corresponding
setting or value will briefly show on the display panel, e.g. “TIME”, “2 : 32”.
If you have selected “NAME” without having specified a name for the corresponding
disc, “CD PLAY” will appear in the display.
Please read also the chapter “Entering CD
names”.
ENGLISH
TPM Track Program Memory
FRANÇAIS
SCAN operation
ITALIANO
In addition for CDC operation:
CD playback with TPM
b) Clearing a CD from the TPM:
•
The TPM function must be switched on
(TPM on/off with the TPM button).
The tracks stored with TPM will be played
in ascending order. Any tracks which were
not stored will be skipped over.
Clearing TPM information
Using the CLR (clear) button, you can clear
single tracks, all of the tracks for one CD or
the entire Track Program Memory.
For CDC operation, you can also clear the
TPM information of either the inserted magazine or all magazines.
In order to clear any of this information, TPM
must be switched on (“TPM” lights up in the
display). If the TPM contains no data, then
“NO TPM” will appear in the display.
CD operation
b) Clearing a CD from the TPM:
•
Switch on TPM.
•
Switch on TPM.
•
Press the CLR button for approximately four seconds until “CLR
DISC” appears in the display.
•
Press the CLR button for approximately eight seconds until “CLR
CD” appears in the display.
Now this disc has been cleared from
the TPM.
c) Clearing a magazine from the TPM:
c) Clearing all CDs from the TPM:
•
•
Switch on TPM.
•
Switch on TPM.
Press the CLR button for approximately eight seconds until “CLR
TPM” appears in the display.
•
Press the CLR button for approximately 16 seconds until “CLR
MAG” appears in the display.
Now all of the discs have been cleared
from the TPM.
•
Switch on TPM.
Switch on TPM.
•
Select the track with / .
•
Select the track with / .
•
•
Press the CLR button for approximately two seconds until “CLR TR”
appears in the display.
Press the CLR button for approximately two seconds until “CLR TR”
appears in the display.
•
Now this track has been cleared from
the TPM.
Now this magazine has been cleared
from the TPM.
d) Clearing all magazines from the
TPM:
CDC operation
a) Clearing a track from the TPM:
a) Clearing a track from the TPM:
Now this disc has been cleared from
the TPM.
•
Switch on TPM.
•
Press the CLR button for approximately 24 seconds until “CLR TPM”
appears in the display.
Now all magazines have been cleared
from the TPM.
Now this track has been cleared from
the TPM.
22
Toronto RDM126 us-gb®
22
24.04.2002, 14:33 Uhr
• Press .
The first underscore character will flash.
• Select the first character with the help
of the rocker switch / .
You have the choice between the capital
letters A to Z, special characters and the
numbers 0 to 9.
• Use the rocker switch << >> to move
to the next underscore and select a
character.
You can select up to eight characters for CD
and up to seven characters for CDC operation.
Use the DSC feature to delete a CD name.
• Press DSC.
•
Press / as many times until “CD
NAME” or “CDC NAME” shows on the
display panel.
•
Press
•
Press CLR. The name will disappear.
.
again to delete the name.
• Press
To quit the DSC menu:
• Press DSC.
Press the DSC button.
•
Press / to select “CD UPD” or “CDC
UPD”.
• Press << >>.
After the update has been completed,
“NEXT CD” or “NEXT MAG” appears in the
display.
• Press for approximately two seconds (in the CD mode on the car stereo, for CDC operation on the changer).
The CD or magazine will eject.
• Insert the next CD or magazine.
Proceed as described above for all of the
CDs/magazines for which the TPM information and the CD name is to be maintained.
23
Toronto RDM126 us-gb®
23
FRANÇAIS
ENGLISH
DEUTSCH
•
ITALIANO
Deleting a CD name
NEDERLANDS
To start the entry:
• Press the DSC button.
“CD-NAME” or “CDC-NAME” will be
displayed.
With the help of the DSC update function
you can clear CDs from the TPM and delete
their names. Use “CD UPD” or “CDC UPD”
to confirm all of the CDs for which the TPM
information is not to be deleted.
• Insert a CD or magazine with CDs for
which the TPM information is to be
maintained.
SVENSKA
In the CD mode you can name up to 30
discs and up to 99 for CDC operation.
The specified name (e.g. VIVALDI) will appear in the display if you play the disc in the
same operating mode (CD/CDC) that was
active when entering the name.
Be sure to select the display mode “NAME”
using the DIS button.
Clearing TPM information and
CD names with DSC-UPDATE
ESPAÑOL
Entering CD names
Once you have completed the name as desired:
in order to store it.
• Press
To quit the naming mode,
• leave the DSC menu by pressing DSC.
If you would like to name another CD,
• insert a new disc in the CD mode or
select a new one for CDC operation.
You can change any existing name by entering and storing a new one (overwriting).
PORTUGUÊS
CD and CDC operation
24.04.2002, 14:33 Uhr
DSC programming
•
After having updated the last CD or
magazine, press TPM for approximately two seconds (beep).
To quit the function,
• press DSC.
The system has saved the TPM information
for all of the CDs which were inserted. For
all other discs, the TPM information and CD
names have been deleted.
DSC (Direct Software Control) allows you
to customise certain programmable, basic
settings to suit your personal needs and
preferences and then store them.
The basic settings for this audio equipment
were made at the factory.
In the following you can find an overview of
these settings, so that you can always reset
to these if desired.
If you wish to alter any of the programming,
• press DSC.
button to
Use the rocker switch and the
select and adjust the functions described in
the following. The display will show you the
adjusted condition.
/
<< >>
CD/CDC NAME
Only available for CD/CDC
playback.
Use this function to name
your CDs. (See “Entering
CD names”).
LOUDNESS Loudness - When listening
at a low level, the Loudness
function creates a more natural sound by boosting the
low frequency range.
LOUD 1 - Low boost
LOUD 6 - Max. boost
TA VOL
Used in USA for Emergency
Alert System volume level.
SPEECH
In future many RDS radio
stations will differentiate between music and speech
programs.
You can alter the tone for
speech programs from between “SPEECH 0 ... 4”.
Select function
Adjust/recall value
SPEECH 0:
Music and speech as per
AUD bass and treble settings.
24
Toronto RDM126 us-gb®
24
24.04.2002, 14:33 Uhr
ANGLE
Use this setting to alter the
viewing angle to your liking
from -1 to 0 to +1.
BRIGHT
You can adjust the display
brightness from between 1
to 16. You can also select
different values for day and
night.
LED ON
LEARN KC
Here you can choose between LED ON or LED OFF.
With LED ON, the KeyCard
tongue will flash for extra
anti-theft protection when
the unit has been switched
off and the KeyCard removed.
To “train” a replacement
KeyCard.
Please read the information
in chapter “KeyCard theft
protection system - “Replacing” a KeyCard”.
25
Toronto RDM126 us-gb®
25
24.04.2002, 14:33 Uhr
DEUTSCH
To adjust the seek tuning
sensitivity for distant reception.
DX 1 - high sensitivity
DX 3 - low sensitivity
ENGLISH
S-DX
FRANÇAIS
Use this function to set the
scan time for the radio or
CD player from between five
and 30 seconds.
green .............. light orange ................. red
ITALIANO
SCANTIME
COLOUR
(Variocolour) For gradually matching the
radio illumination with the
dashboard lighting.
NEDERLANDS
Acknowledgement tone for
all functions which require a
button to be pressed for
more than one second.
The volume can be adjusted
from between 0 to 9. (0 =
off).
To read out the KeyCard
data.
The card supplied with the
radio is used to display the
model name, type number
(7 6..) and the serial
number.
If you remove the KeyCard
during the reading process,
“READ KC” will show on the
display panel. The unit continues to play but does not
accept any operations except from being switched
off. Re-insert the card.
SVENSKA
BEEP
READ KC
ESPAÑOL
SPEECH 2-4:
Different settings for volume, bass and treble with
the Loudness being
switched off.
Try out which SPEECH setting you like most.
Selecting the night brightness:
Switch on the vehicle lights
and program the brightness
value. The car radio’s lighting connector must be
hooked up to the vehicle’s
electric system for this to
function properly.
PORTUGUÊS
SPEECH 1:
Linear reproduction (bass,
treble and Loudness set to
“0”)
S-LO
To adjust the seek tuning
sensitivity for local reception.
LO 1 - high sensitivity
LO 3 - low sensitivity
The seek tuning sensitivity
values can be separately set
for AM and FM.
CD/CDC UPD
Use this function to clear
TPM information and CD
names during CD and CDC
operation, in order to have
more storage capacity for
new discs available. See
“Clearing TPM information
and CD names with DSCUPDATE”.
AUX
VOL FIX
Use this function to select
the volume at which the radio is set when it is switched
on. Adjust the desired volume level with << >>. When
adjusted to “VOL 0”, the
system will come on with the
volume selected before
switching the radio off.
To quit the DSC programming mode
and store the adjustment:
• Press DSC.
Overview of the DSC factory
settings
CD NAME
LOUDNESS
TA VOL
SPEECH
BEEP
ANGLE
BRIGHT
COLOUR
LED
LEARN KC
READ KC
SCANTIME
S - DX
S - LO
CD UPD
AUX
VOL FIX
This menu item is not available if you have connected
a CD changer (A 05 or
A 071).
The setting made at the factory is AUX OFF.
If you have connected an
external piece of equipment
via AUX, this function must
be set to AUX ON.
26
Toronto RDM126 us-gb®
26
24.04.2002, 14:33 Uhr
3
35
0
4
0
16
green
ON
10 sec.
1
1
OFF
0
DEUTSCH
Appendix
Specifications
FM sensitivity:
ENGLISH
FRANÇAIS
Tuner
Wavebands:
FM
:
AM
:
4 x 23 W RMS power
acc. to DIN 45324 at
14.4 V
4 x 35 W max. power
87.5 – 107.9 MHz
530 – 1710 kHz
0.9 µV at 26 dB signalto-noise ratio
ITALIANO
Amplifier
Output power:
NEDERLANDS
FM frequency response:
30 - 16 000 Hz
SVENSKA
CD player
Frequency response:
5 - 20 000 Hz
PORTUGUÊS
ESPAÑOL
Questions? Problems?
Call 1-800-266-2528
Subject to modifications!
27
Toronto RDM126 us-gb®
27
24.04.2002, 14:33 Uhr
Blaupunkt-Werke GmbH
Postfach 77 77 77
D-31132 Hildesheim
Germany
Robert Bosch Corporation
Sales Group – Blaupunkt Division
2800 South 25th Avenue, Broadview, Illinois 60153
1-800-950-BLAU
Robert Bosch, SA., DE, C. V.
Dr. Lucio 270
Cois. Doctores, Mexico 06720
Made in Germany
Fabriqué en Allemagne
Hecho en Alemania
Fabricado en Alamanha
Copyright 1997 by the Robert Bosch Corporation
No portion of this work may be reproduced in any form without
the written consent of the Robert Bosch Corporation.
BP/VKD-Nr. 8 622 401 061 (Ts)
Toronto RDM126 us-gb®
28
24.04.2002, 14:33 Uhr