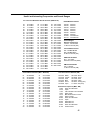
1
Guide to the
AR1000
AOR
AR 1000
SCAN
AM
DELAY
BANK
435 CH
AUX
311.000
MHz
LIGHT
WIDE RANGE MONITOR
PROG
LIMIT
1
2
3
INC
AUX
BANK
4
5
6
AM
WFM
7
8
9
FM
LOCKOUT DELAY
Operations
Applications
Accessories
Reference
•
CLEAR
HOLD
ENT
SEARCH SCAN
MANUAL
KEYLOCK
Howard Bornstein
1
Guide to the
AR1000
A comprehensive guide to the AR1000
family of Wide Range Monitors.
Covers all models of the AR1000, plus the AR2000, the
Fairmate HP100, HP200, HP2000, the Camnis HSC-010,
and the Trident TR1000 and TR1200XLT.
Includes detailed sections on
operations, applications, accessories
and reference.
Howard Bornstein
Design EQ Press
2
Design EQ Press
P.O. Box 1144
Woodstock, NY 12498
Guide to the AR1000 PDF Edition 1.0.
©1994, 1999 Howard Bornstein.
All Rights Reserved.
This PDF version of the Guide to the AR1000 is made available for free download from www.designeq.com. Design EQ retains all distribution rights for this
document and it may not be distributed in any collection of software, in printed
form, or from any other source than the Design EQ website.
No part of this manual may be reproduced, stored in a retrieval system, or
transmitted, in any form or by any means, mechanical, electronic, photocopying,
recording, or otherwise, without prior written permission from the author.
Layout, design, and art by Howard Bornstein.
Disclaimer
There are many controversial legal issues revolving around scanning and communications monitoring, and
there are varied and conflicting laws concerning the reception of different types of radio communications. In
England, for example, it is illegal to monitor police communications while in the United States it is not. In
the United States, it is illegal to monitor cellular phone conversations, while in Canada it is legal. In some
states it is illegal to use a scanner in a car while in other states it is not. While we believe the airwaves belong
to the public, we urge you to be aware of the laws in your community and to use your scanner responsibly.
None of the examples or suggestions cited in this guide should be construed as recommendations to break
the law.
3
Acknowledgements
This guide would not have been possible without the selfless help and support of
the really great crew on CompuServe’s HAMNET—a scanning and shortwave
special interest group. The conversations on HAMNET are full of interesting
facts, vibrant opinions, and hilarious banter.
I especially want to thank my beta testers: Eldor Gemst, Jeff Goldman, Joe
Laakso, Paul Miyashiro, Jason Reimer, Michael Schuster, and Bill Steinberg.
They reviewed the manuscript and offered endless suggestions and corrections, as
well as techniques and insights about the AR1000. While their help was invaluable, I must take responsibility for any errors in this guide.
4
Contents
Acknowledgements 4
Introduction 8
How this guide is organized 10
Operations 12
Introduction 13
Scanning 14
What you cannot pickup 14
The scan banks 14
Selecting a scan channel 15
Programming a scan channel 16
Entering sequential frequencies 17
Locking a scan channel 18
Caution using Lockout 18
Clearing a scan channel 19
Marking a sequential group of channels as “available” 19
Copying a frequency from one channel to another 20
Selecting and locking scan banks 20
Unlocking a scan bank 21
The difference between locking a channel and locking a bank 22
Limiting scan banks 22
Removing scan bank limits 23
Using Delay/Hold 24
Searching 25
Setting up search banks 25
Examining search bank parameters 26
Locking out frequencies within a search bank 27
Caution using Lockout 27
Locking out search banks 28
Unlocking a search bank 29
Unlocking a search bank where previous bank has locked frequencies 30
Limiting search banks 31
Removing search bank limits 32
Holding a frequency during a search 32
Copying a frequency to a scan channel 32
Using Delay/Hold 33
Manual Mode 33
Applications
34
Introduction 35
Quickly setting the starting scan or search bank 36
Finding a hidden frequency in a range 37
Setting up car radio-like buttons on the AR1000 38
Setting up radio buttons in Search mode 38
Setting up radio buttons in Scan mode 38
5
Switching between two frequencies 40
Using the Priority channel to switch between two channels 40
Using two adjacent channels 40
Copying a group of frequencies 41
Stepping through the scan banks 42
How to make the AR1000 come up in the mode you want 43
Listening to the AR1000 in your car 44
Optimizing scan and search banks 45
Scan banks 45
Search banks 45
Example bank allocations 47
Accessories
48
Introduction 49
The power supply 50
Nicads 50
Using the supplied charger 50
Using the supplied cigarette plug 50
Using other chargers 51
The strap/belt clip 52
Antennas 53
Rubber duckies 53
Shortwave antennas 53
Making a simple MW/SW antenna 53
Discone antennas 53
Other ways to customize the AR1000 55
Marking the squelch knob 55
Marking inside of battery compartment 55
Removing the plastic window in the carrying case 55
Extending the frequency coverage 56
Adjusting a unit that is off frequency 58
Reference
60
Introduction 61
The Display 62
MANUAL/SCAN/SEARCH 62
Frequency 63
Mode (AM/FM/WFM) 63
BANK/CH 64
BATT 64
DELAY/HOLD 65
Up/Down Arrows 65
L.OUT 65
With scan channels and banks 65
With search banks 66
AUX 66
PROG 67
LIMIT 67
KHz 68
KEY LOCK 68
FR. ERR 68
6
The Keyboard 69
LIGHT 69
PROG 70
INC 70
AM/FM 71
W-FM 71
LOCKOUT 71
LIMIT/AUX 72
LIMIT 72
AUX (Priority) 72
BANK 74
DELAY/HOLD 74
SEARCH 75
SCAN 75
MANUAL 76
Down Arrow 76
Using the Down arrow while searching 76
Using the Down arrow while scanning 77
Using the Down arrow in Manual mode 77
KEYLOCK 78
CLEAR 78
ENT 79
Number key pad 79
Key mode chart 80
The Top Controls 81
Power switch/Volume knob 81
Squelch 81
Attenuation button 82
Tuning knob 82
Using the Tuning knob while searching 82
Using the Tuning knob while scanning 83
Using the Tuning knob in Manual mode 83
Earphone jack 84
Antenna jack 84
Appendix 85
Frequency Lists 86
Magazines/Newsletters 88
Equipment Sources 89
Frequency Guides and Books 89
On-Line Services 91
7
Introduction
Congratulations on purchasing your AR1000 wide range communications
monitor. This unit is one of the most powerful scanner/receiver packages available as a handheld unit. It will provide countless hours of enjoyment, performance, and excitement.
One of the things you may have noticed is the lack of complete documentation
for your AR1000. This is unfortunate, since the unit is robust in its capabilities
and can be complex in its operations. Many users have figured out the operations
of this scanner through much trial and error. The purpose of this guide is to keep
you from having to spend hours and hours figuring out how to best utilize the
AR1000. We have broken down all of the operations into easily-understood
steps, described features you may not have been aware of, and have provided
“alternate” methods of operation from those given by the factory. We also have
an applications section which will help you to utilize the scanner to your best
advantage. For users with earlier versions of this scanner, the Accessories section
describes a technique that will enable you to extend the coverage of your
AR1000.
The AR1000 comes in many variations and is known by a variety of different
names and model numbers. In the United States, the unit was originally marketed simply as the AR1000. It’s frequency range covered 8 MHz to 600 MHz
and 805 MHz to 1300 MHz. Later units extended the low end frequency range
down to 500 KHz. Still later models included the 600-805 MHz gap. These
additional models have been variously called the AR1000X, AR1000XC, and
AR1000XLT. In the UK, the AR1000XLT is known as the AR2000.
It has been sold under other labels besides AOR. In England and Europe the
scanner was originally sold under the Fairmate label as the HP100, HP200,
HP200E, HP200 Mk II, and HP2000. It has more recently been sold as the
Camnis HSC-010, and as the Trident TR1000XLT and TR1200XLT.
While the AR1000 and its variants are sold by several companies world-wide, the
unit is actually designed by Nisei Corporation.
While this plethora of names is confusing, these units are essentially the same, the
variations being those described above, relating to frequency range. In addition,
some of the English units have their search banks pre-programmed to search
standard bands, such as VHF Air, UHF Air, VHF Amateur, VHF Marine, etc.,
with the names of the pre-programmed bands printed directly on the keyboard.
8
AOR released a scanner following the AR1000 called the AR1500. It has the
features of the AR1000 with the addition of a beat frequency oscillator (BFO) for
decoding sideband transmissions, and a search-and-store feature. However, many
of the tricks and tips in this book are based on certain “anomolies” in the
AR1000’s operations. These “anomolies” were “fixed” in the AR1500 and, thus,
many of the methods described in this guide will not work on the AR1500. We,
therefore, generally don’t recommend this book to owners of the AR1500 (or the
Trident TR1500XLT).
For the sake of simplicity, throughout this guide, the scanner will simply be
referred to as the AR1000, except where specifically noted.
Because this is not an official guide produced by the manufacturer, it covers both
the good and the bad aspects of the AR1000. The AR1000 has extraordinary
capabilities, but it also has many quirks and idiosyncrasies. Its programming
method is a bit complicated and some of the information that comes with the
unit is incomplete. We’ll show you how to best take advantage of the features of
the AR1000 and how to get around the problems you may encounter.
Along with this guide, we have included a handy quick-reference card and a set
of templates for recording the frequencies stored in your scan channels and search
banks.
Here’s wishing you many happy hours of scanning.
9
How this guide is organized
The Guide to the AR1000 is written for both the beginner and the expert user
alike. If you’re new to the AR1000, this guide will get you started and take you
quite a ways along the path. If you’re an experienced scanner user, even with the
AR1000, you will probably find some new tricks and information within.
The guide is divided into four sections: Operations, Applications, Accessories,
and Reference. At the end you’ll find an Appendix containing useful source
material. Because each section is meant to stand on its own, there is, by necessity,
some redundancy of material.
The Operations section shows you how to perform all the AR1000 basic operations. You’ll learn how to program channels with frequencies, scan and lock
banks, and set up search banks so you can search for frequencies within a specific
range. This is where to turn to learn how to operate your scanner.
The Applications section provides higher-level tips and shows you how to take
advantage of your scanner in special circumstances. You’ll learn tricks for finding
hidden frequencies with the search feature, setting up car radio-like buttons for
your favorite frequencies, copying groups of frequencies, using the AR1000 in
your car, and optimizing the memory space in the scanner.
The Accessories section describes the accessories that come with the AR1000 as
well as other readily-available accessories that will enhance your enjoyment of the
scanner. We talk about using the power supply and nicad batteries with the
AR1000, as well as how to remove the belt clip and shoulder strap hooks. This
section also discusses antennas and has a special chapter on customizing the
AR1000 that includes instructions for extending the frequency coverage of earlier
models.
The Reference section is a complete description of every display indicator, button
and control found on the AR1000. It tells you what each button and control
does and what each display indicator means.
The Appendix contains resources that you will find useful in expanding your
scanner horizons. We include a frequency list of useful frequencies and search
ranges and we list frequency guides, scanner-related magazines, and other sources
of information of interest to scanner enthusiasts.
10
We suggest that, rather than just reading about techniques, you actually go
through the steps and try each technique on your scanner. While a technique
may look confusing on paper, once you perform the operation, it will make
much more sense and you will find that it will soon become second nature.
11
1
Operations
AOR
AR 1000
SCAN
AM
DELAY
AUX
BANK
435
CH
311.000
MHz
LIGHT
WIDE RANGE MONITOR
PROG
LIMIT
1
2
3
INC
AUX
BANK
4
5
6
AM
WFM
7
8
9
FM
LOCKOUT DELAY
•
CLEAR
HOLD
ENT
SEARCH SCAN
MANUAL
KEYLOCK
Scanning
Searching
Manual Mode
AR1000 Operations
Introduction
This section will give you simple step-by-step procedures for performing the basic
operations with the AR1000. In particular, it will show you how to use the scan
and search features of the AR1000.
One thing to mention first, however, is a feature of the AR1000 that operates
whenever you try to program a search or scan function. The AR1000 will prompt
you for the next key press it expects by flashing an indicator in its LCD display.
This “prompt” can be very useful if you forget the next step in an operation.
We’ll refer to the AR1000 prompts in the “how-to” parts of this section and in
the Reference section.
The AR1000 uses three operational modes: Manual, Scanning, and Search.
Many of the operations of Manual mode are contained in the section on Scanning, since you use Manual mode primarily to program channels for scanning.
There is also a short review of Manual mode at the end of AR1000 Operations.
13
Scanning
Scanning
Although the AR1000 is a wide range receiver, it is primarily designed as a
scanner. A scanner lets you plug in a group of frequencies and then it scans these
frequencies for activity. If it finds an active channel, it stops, allowing you to
monitor the activity. Once the channel becomes inactive, the AR1000 continues
scanning. With the AR1000, you can scan up to 1,000 channels at one time, but
this would be impractical since it would take quite a long time to scan all 1,000
channels. You want to balance the number of channels scanned with the speed of
the scanner. The AR1000 scans at approximately 20 channels per second. Given
this scanning speed, you may want to limit the number of channels you scan at
any one time. For good success monitoring channels, you usually don’t want to
have more than two or three seconds between checking any given channel. This
means that you may want to limit the number of channels you scan at any one
time to between 40 and 60. This limit is rather arbitrary since it depends on the
level of activity of the scanned channels, how often you need to check each
channel, and other individual factors. Use it as a guide.
If you’re new to scanning, you may wonder how to determine which frequencies
to check. There are many guides of frequencies available for all kinds of activities.
The most popular guides cover things like police, fire, emergency medical,
marine, air, and military frequencies. The Appendix lists some frequency sources
that you may find useful. The AR1000 is also capable of picking up shortwave
transmissions from all over the world, when used with an appropriate antenna.
Because the AR1000XC (and modified AR1000s) have continuous coverage of .5
MHz to 1300 MHz, there is very little that is not available to you with your
scanner and a good antenna.
What you cannot pickup
The things you won’t be able to pick up with the AR1000 are few. You will not
be able to easily decode Single Side Band (SSB) transmissions, because there is no
beat frequency oscillator (BFO) included with the AR1000. For the same reason,
it will be difficult to pick up Continuous Wave (CW or Morse code) transmissions. In addition, you will not be able to decode any digital or otherwise encrypted transmissions. Finally, since the AR1000 is a voice monitor, you won’t
be able to receive or decode RTTY, FAX, or satellite data transmissions. These
limitations are trivial considering the vast range of transmissions you can receive.
The scan banks
The AR1000 comes with ten scan banks that hold 100 channels each. You can
selectively turn on or off any or all of these ten scan banks. This means that, at
the bank level, the smallest unit of selection is a group of 100 channels. This is a
rather cumbersome chunk to deal with. If you want to put your local police
14
AR1000 Operations
department frequencies in one scan bank, you may only fill up six or eight
channels. What do you do with the other 92 channels that are left over?
There are some ways to optimize the usage of this memory structure, although
the real answer is that it is simply an inefficient layout and we, the users, have to
work around it. We’ll address this issue again in the Applications section.
The AR1000 uses a somewhat confusing idea of banks and channels. It has ten
banks with 100 channels per bank. You select an individual channel by pressing a
bank number (0-9) and then a two-digit channel number (00-99). However, you
only need to be concerned about “banks” when you want to deal with the channels as a group. When choosing an individual channel number, you don’t really
have to be concerned with the idea of banks at all. A simpler way to think about
it is that you simply select a three-digit channel number (000-999). Unfortunately, the button you use to select a channel is called the BANK button. Oh,
well. Welcome to the first of many idiosyncrasies with the AR1000.
Selecting a scan channel
There are several ways to select and move from channel to channel. The most
direct method is to enter the channel number from the keyboard. You use the
BANK key to do this.
To select an
individual scan
channel
• Press MANUAL if not in Manual mode.
• Press BANK.
Bank flashes in the display.
• Enter a three-digit channel number.
When you enter the third digit, the channel is selected and its frequency is displayed. You must
always enter three digits. So, to select channel 47, you must enter 047.
Example:
BANK 1 6 8
This selects channel 168 and shows you its frequency and mode.
You can also step sequentially forward from the current scan channel by pressing
the MANUAL key. Each time you press it, you advance one channel, as long as
that channel has a frequency in it (even if the channel is locked). If the channel is
cleared, you will skip over that channel and any other cleared channels until you
arrive at the next channel that contains a frequency. See page 19 for more information about cleared channels.
When you reach the end of one bank, the scanner moves to the first channel of
the next bank. For example, when you are at channel 099 (the last channel in
bank 0) and press MANUAL, you will go to channel 100 (the first channel in
bank 1). This continues through all ten scan banks. When you reach channel
999, you will start over with channel 000.
15
Scanning
Use MANUAL to step through a scan bank to view the frequencies that have
been entered into that bank. This is also a good way to determine which channels
you have locked (see page 18 for details on locking out scan channels).
Note:
You cannot step backward through the scan channels with the MANUAL button, but there is a way to do something similar with the Tuning knob. See the
Applications section for details.
Programming a scan channel
To program a scan channel to hold a specific frequency there are two methods
you can use.
The Factory method:
To enter a
frequency
into a scan
channel
• Press MANUAL.
• Select a mode (AM, FM, WFM).
(Note: Pressing the AM/FM key will toggle between these modes while pressing the WFM key
will toggle between WFM (Wide FM) and FM).
• Enter a frequency from numeric keypad.
Use the CLEAR key if you make a mistake. Then start over by entering the frequency again.
• Press ENT.
• Press PROG.
• Press BANK.
• Enter a three-digit channel number.
We recommend, instead:
• Press MANUAL if not in Manual mode.
• Press BANK.
• Enter the three-digit channel number.
MHZ will flash in the display.
• Enter the frequency from the keypad, using the decimal point where
appropriate.
Use the CLEAR key if you make a mistake. Then start over by entering the frequency again.
• Press the ENT key.
• Press one of the mode keys (AM, FM, or WFM).
(Note: Pressing the AM/FM key will toggle between these modes while pressing the WFM key
will toggle between WFM (Wide FM) and FM).
If the mode you want is the mode that is already selected, toggle the mode (press
the button twice). For example, if you want FM mode and FM is currently
displayed, press the AM/FM key twice. This will switch the display to AM and
then back to FM. The reason for doing this is when you change the mode, this
acts as a termination to your operation and stores the frequency into the channel.
16
AR1000 Operations
If you don’t do this, even though it looks like you have entered the frequency
into the channel, the next time you look at this channel, it will contain the
frequency that was previously in it. While this may seem cumbersome, in actual
practice this is a quite easy operation.
Entering sequential frequencies
If you are going to enter frequencies into a series of sequential channels, after
entering the first channel, simply press MANUAL to step to the next channel
and start again by entering in the new frequency.
In this case the repeating sequence will be:
To enter
sequential
frequencies
• Enter frequency
• Press ENT
• Toggle a mode key
• Press MANUAL
Discussion
We recommend using our method for the following reasons:
♦ It is more consistent to start out indicating the channel you want to deal with
rather than the frequency.
Using the factory method, you start entering a new frequency over an existing
frequency in a channel different than the one you want to finally use. This is very
confusing. Further, if you make a mistake, you may end up reprogramming the
channel you are on rather than the channel you desire.
In addition, using our method, you’ll find that it will add consistency to many
AR1000 operations. You will almost always first specify the channel you are
interested in and second, act on it (i.e. change the frequency). By first going to the
channel, you can see what is in it before you overwrite it. Using the factory
method, when you press PROG, BANK, and the channel number, the frequency
that is currently in the display overwrites whatever is in the channel number
without letting you see it first.
♦ It is easier and more intuitive when entering frequencies in sequential
channels.
Once you set yourself up at the first of the sequential channels, you just follow
these steps: frequency, ENT, mode key (twice if needed), MANUAL. It becomes
very quick and intuitive to program a group of sequential channels.
17
Scanning
♦ This is similar to the method used by other scanners.
If you also use or have used a Uniden Bearcat or Radio Shack scanner, you will
find this method familiar and comfortable.
To change a
frequency in
a scan
channel
• Press MANUAL if not in Manual mode.
• Press BANK.
• Enter the three-digit channel number.
MHz will flash in the display.
• Enter the new frequency from the numeric keypad.
Use the CLEAR key if you make a mistake. Then start over by entering the frequency again.
• Press ENT.
• Press or toggle a mode key (AM, FM, WFM).
This will overwrite the current frequency in the channel. A more general way to
explain this is that you can enter a new frequency when you are at any channel
and make it permanent by toggling a mode key. This fact also means that you
can “try out” frequencies in channels with existing frequencies in them. Plug in
the new frequency and listen. As long as you don’t toggle a mode key, the old
frequency will remain stored in the channel.
Locking a scan channel
You can temporarily lock a channel so that it is skipped during scanning. It’s
frequency remains programmed into the channel, but the channel is not looked
at during scanning.
To lock a
scan channel
• Press MANUAL if not in Manual mode.
• Press BANK.
• Enter the three-digit channel number.
• Press LOCKOUT.
L.OUT will flash in the display, indicating that the channel is now locked.
To remove
the lock on
a channel
• Press MANUAL if not in Manual mode.
• Press BANK.
• Enter the three-digit channel number.
L.OUT will flash in the display, indicating that the channel is locked.
• Press LOCKOUT.
L.OUT disappears from the display.
Caution using Lockout
With the AR1000, the LOCKOUT key is always active. If you are scanning and
press LOCKOUT by accident, the channel that you happen to be scanning when
you press the key will be locked, even if the scanner has not stopped on that
channel. You will probably not even notice that you have locked the channel.
18
AR1000 Operations
Therefore, it is a good idea to periodically go through your scan banks, using the
MANUAL key, to review the status of your channels. If the L.OUT indicator is
flashing while looking at any channel, that channel has been locked.
Clearing a scan channel
You may have noticed when you received your AR1000 that not every channel
had something in it. Often the first ten or so channels of each bank come programmed with some test frequencies that are used during final testing at the
factory. Many of the other channels are empty. There is a difference between a
locked channel and cleared channel.
You can directly clear a channel by going to the channel and pressing CLEAR,
ENT, and a mode key. A cleared channel will contain nothing in it (only the
decimal point is displayed). When you press the MANUAL key to sequentially
move through the channels, the AR1000 will skip overa cleared channel. In other
words, if channels 127 through 134 are cleared and you start on channel 125,
when you press MANUAL the first time, you will move to channel 126. The
next time you press MANUAL, you will move immediately to channel 135. The
only way to get to a cleared channel is with the BANK key.
If, on the other hand, channels 127 through 134 have frequencies programmed
in them but are locked, each time you press MANUAL, you will move to each
channel within the range 127 through 134. In both cases, while scanning, these
channels will be skipped.
While it would be nice to take advantage of cleared channels, users have reported
that if they clear out enough channels, the AR1000 will lock up completely,
requiring a processor reset. This usually involves a trip to the factory, although
we provide instructions for resetting and reprogramming the processor in this
guide.
Because of this nasty tendency, we recommend that you do not clear channels in
the AR1000. Instead, use a “placeholder” frequency to mark the channel as
“available.” A frequency like 10 MHz works well as a placeholder.
Marking a sequential group of channels as “available”
If your scanner contains many no-longer-used channels or for some reason you
want to get rid of a group of existing frequencies, the following technique will be
helpful. You may wonder why you might want to get rid of existing frequencies
when you can just lock them out. With so many channels to keep track of, it is
sometimes easier to plug in a placeholder frequency. For example, let’s say you
19
Scanning
were interested in monitoring the Drug Enforcement Agency (DEA). You might
plug in 20 frequencies in your scanner to monitor them. At some point you
decide you are no longer interested in them. If you leave the frequencies in the
scanner, even if locked out, when you go searching around for “available” channels to plug something else in, you may not remember what these frequencies
were for and whether or not you wanted to keep them. If, instead, they were filled
with a “placeholder” frequency, like 10.000 MHz (or whatever you choose), you
will immediately be able to recognize that these channels are available.
To “mark” a
sequential
group of
channels
• Enter your placeholder value in the first channel of the sequential group.
• Lock the channel by pressing LOCKOUT.
• Press PROG.
• Enter the next three-digit channel number in the sequence.
The placeholder value will automatically be copied to this channel.
Continue with the last two steps, incrementing the channel number each time.
Both the placeholder frequency and the Lockout status will be copied into each
channel.
Copying a frequency from one channel to another
You may want to copy a frequency from one channel to another.
Assuming that you are in a channel that has the desired frequency,
To copy a
frequency
from one
channel to
another
• Press PROG.
• Enter a three-digit channel number.
This is the destination channel that will receive the frequency. Both the frequency and the
transmission mode will be copied to the destination channel.
This method works well for copying a single channel. To copy a group of channels to another area in the scanner, see page 41 in the Applications section.
Selecting and locking scan banks
Because you will probably organize your scan banks according to related groups of
frequencies, it is useful to be able to selectively turn banks on and off for scanning.
To lock a scan bank you must first be in the bank you wish to lock.
To lock a
scan bank
• Press MANUAL if not in Manual mode.
• Press BANK.
• Enter a three-digit channel number that will put you in the bank you wish to
lock.
This gets you to the bank you wish to lock. You can lock a bank from any channel in that bank.
To lock bank 2, go to any channel from 200 to 299.
20
AR1000 Operations
• Press BANK.
• Press LOCKOUT.
Bank and L.OUT will flash in the display. This tells you that the current bank is locked.
Note:
There is one exception to this method of locking out a bank. If the channel you
choose within the bank is, itself, individually locked, you will not be able to lock
the entire bank. You must first unlock that channel (by pressing LOCKOUT)
and then press BANK, LOCKOUT, or go to another channel in the bank that
isn’t locked and press BANK, LOCKOUT.
Shortcut:
If you are scanning several banks at a time, you can quickly force the AR1000 to
start scanning at the beginning of any bank by pressing the bank number on the
keyboard. For example, if you have enabled banks 3, 5, 7, and 8 for scanning,
and if each bank has all of its channels filled with frequencies, during normal
scanning the AR1000 will start scanning with channel 300, move sequentially up
to channel 399, then scan channel 500, scan sequentially through 599, and so
on. By watching the display you can determine which channel (and thus which
bank) is being scanned. If you see that you are currently scanning bank 3 (the
channels being scanned are in the 300s), you can force the scanner to immediately
begin scanning from the beginning of bank 7 simply by pressing the 7 on the
keyboard. The scanner will jump to channel 700 and start scanning from there.
You can use this shortcut with the bank lockout feature by jumping to the bank
you want to lockout, while in scan mode. Once you are in the bank you want to
lock, press BANK (this will cause the scanning to stop) and LOCKOUT. This
eliminates the need to switch to Manual mode and then press BANK and a
three-digit bank number before you perform the lockout sequence.
Unlocking a scan bank
To unlock a scan bank you do have to be in Manual mode at a channel within
that bank. If you are scanning, you must first switch to Manual mode and then
choose any channel within the bank.
To unlock a
scan bank
• Press MANUAL if not in Manual mode.
• Press BANK.
• Enter a three-digit channel number that will put you in the bank you wish to
unlock.
You can unlock a bank from any channel in that bank. To unlock bank 2, go to any channel
from 200 to 299. Bank and L.OUT will flash in the display. This tells you that the current
bank is locked.
• Press LOCKOUT.
Bank and L.OUT will stop flashing. The bank is now unlocked.
21
Scanning
Note:
If the channel you choose when you unlock a bank is, itself, individually locked,
pressing LOCKOUT will still unlock the bank. In this case, however, the
L.OUT indicator in the display will continue to flash, telling you that this
channel is still locked. If you press LOCKOUT again, you will then unlock the
individual channel.
The difference between locking a channel and locking a bank
When you lock an individual channel, that channel, and any others that are
locked, will be skipped when the bank they are in is scanned. For example, if you
lock channels 102, 105, and 167, when you scan bank 1, these three channels
will be skipped, while all the other entered channels in bank 1 will be scanned.
When you lock a bank, the entire bank (i.e. every channel in it) is skipped. There
is an easy way to distinguish when a channel is locked and when an entire bank is
locked. If a channel is locked, when you go to that channel, the L.OUT indicator
in the display will flash. When an entire bank is locked, if you go to any channel
in that bank, both the L.OUT and the BANK indicators in the display flash.
Because of this, you won’t be able to tell, just from the display, if a channel in a
locked bank is also locked. However, after unlocking the bank, if L.OUT continues to flash, then the channel is also locked.
Limiting scan banks
There is a method of limiting the banks that are scanned with the AR1000, but
under normal circumstances, we do not recommended using it. The limited
banks must be sequential, and, more seriously, once you limit a set of banks, you
will not be able to access channels outside these banks in any mode, even in
Manual mode.
The method is as follows:
To limit
scan banks
• Press SCAN.
• Press BANK.
PROG flashes in the display.
• Press PROG.
BANK flashes in the display.
• Press the number of the lower scan bank limit.
BANK and LIMIT flash in the display.
• Press LIMIT.
BANK flashes in the display.
• Press the number of the upper scan bank limit.
BANK flashes in the display. If you want to limit scanning and all access to only one bank,
make the lower and upper limit the same number.
• Press ENT.
22
AR1000 Operations
For example, to restrict access to only banks 4, 5, and 6, follow this sequence:
SCAN, BANK, PROG, 4, LIMIT, 6, ENT.
Once you do this you will only be able to scan, view, or modify channels 400
through 699. All other channels will be unavailable. The one exception to this is
if the Priority channel is in a bank that is not within the bank limits, when you
press AUX, you will still switch to that channel if there is activity on it (see page
72 for more information on the Priority channel).
There may be some circumstances where this method of bank limiting is preferred. For example, if you routinely want to enable three or four contiguous scan
banks, this method may be quicker than locking out the rest of the banks individually. Another reason you may want to use bank limiting is if you have sensitive frequencies in banks that you don’t want anyone to get access to. Bank
limiting will add a layer of protection. Unless someone is very familiar with the
operations of the AR1000, they won’t be able to display or change any of the
frequencies outside the limited banks.
If you find yourself unable to access a particular channel, you may have unintentionally limited your scan banks. For example, if you try to access channel 450 by
pressing BANK, 450, but the display shows channel 700, you may have limited
(by accident) the scanner to only using banks 7 to 10. In a case like this, you will
want to remove all bank limits.
To remove
scan bank
limits
• Press SCAN.
• Press BANK.
PROG flashes in the display.
• Press PROG.
BANK flashes in the display.
• Press 0.
BANK and LIMIT flash in the display.
• Press LIMIT.
BANK flashes in the display.
• Press 9.
BANK flashes in the display.
• Press ENT.
In general, however, we recommend you lock, not limit, individual banks. This
gives you individual access to any bank, in any order. When you lock individual
scan banks, you may still manually view and monitor channels in a locked bank.
23
Scanning
Using Delay/Hold
When the AR1000 stops on an active channel while scanning, it pauses for two
or three seconds after a transmission ends before it continues scanning. This is to
provide time to hear a response before it resumes scanning.
You may alternately instruct the AR1000 to permanently stop scanning instead
of pausing as soon as it hears a transmission. You do this by toggling the Delay
and Hold modes. Delay waits a few seconds and then starts scanning while Hold
stops on a transmission and won’t resume until you manually press SCAN again.
You can tell which mode you are in by looking at the display. It will indicate
either Delay or Hold. This mode applies to all channels in the scanner. You can’t
set Delay or Hold independently for separate channels.
Unfortunately, you can not defeat the delay feature of the AR1000. This becomes a problem if you are trying to monitor trunked systems, because in a
trunked system, the response may come on a channel that is different from that
of the original transmission. On a trunked system you want the scanner to
immediately resume scanning after a transmission ends. Since the AR1000 is
waiting to hear the response on the same channel, you may miss the response on a
different channel by the time the scanner starts scanning again. There is currently
no way around this problem and the AR1000 may not be able to meet your
needs for monitoring trunked systems.
The AR1000 always defaults to Delay mode after powerup.
Note:
When you have enabled Priority mode (AUX is in the display), the scanner will
no longer hold, even if HOLD is selected. After stopping on an active channel,
the scanner will resume scanning after the usual two to three second delay. This
is a bug in the AR1000.
24
AR1000 Operations
Searching
While you may obtain many of the frequencies you’ll scan from frequency guides
or from other scanner enthusiasts, one of the most interesting and exciting
aspects of scanning is to discover these transmissions and frequencies on your
own. This is done by searching through specific frequency bands. The AR1000
will let you specify a lower and upper frequency limit, a step increment, and a
transmission mode, and then will search through the frequencies, using these
limits, for any activity. Once you find an active frequency that you are interested
in, you can easily copy it to a scan channel.
Where should you look, in the vast electromagnetic spectrum for a frequency you
are interested in? Fortunately, most kinds of communications activity are
grouped in frequency bands, so if you search the appropriate band, you will have
a good chance of finding what you are looking for. Check the Applications
section of this guide for more specific tips on how to search for frequencies.
Setting up search banks
There are ten individual search banks in the AR1000. Each bank holds a set of
limits, a step increment, and a transmission mode. These banks come in very
handy if there are several parts of the radio spectrum that you regularly search
through. Just select a search bank you have previously set up and start searching.
Normally, when you press the SEARCH button, the AR1000 will start searching
through the range specified in bank 0 and when it hits the upper limit of the
range, it will then start with the range specified in bank 1. It will continue in this
manner until it hits the upper limit of bank 9 and then start over with the range
specified in bank 0 again. As with the scan banks, you can lock and limit the
search banks that you use. Working with search banks, however, is a bit more
complicated than working with scan banks.
To set up a
search bank
• Press SEARCH.
SEARCH will appear in the display. You can’t set up a search bank while in Scan or Manual
mode. You must be in Search mode.
• Press PROG.
PROG will appear in the display. MHz will flash in the display.
• Enter the lower frequency limit.
LIMIT will flash in the display. Use the CLEAR key if you make a mistake.
• Press LIMIT.
MHz will flash in the display.
• Enter the upper frequency limit.
• Press ENT.
KHz will flash in the display.
• Enter the step increment.
• Press ENT.
The current mode will flash in the display (AM, FM, WFM).
25
Searching
• Press the mode keys until the mode you want is selected.
If the mode you want is already selected, just go on to the next step.
• Press ENT.
BANK will flash in the display.
• Enter the bank number you want to set (0-9).
• Press ENT.
The bank is now set up with the limits you have entered. Any previous parameters that were set up in that search bank will be overwritten by the information
you just entered.
Note:
You can change a couple of the parameters in a search bank without reprogramming the entire bank. You can change the mode that your search bank uses at
any time. If, for example, you are searching the range 230 to 240 MHz in AM
mode and want to see if there is any activity in FM mode, just press the FM
mode key. The mode will switch and be recorded into the search bank parameters.
You can also change the increment value without affecting any of the other
parameters. While searching, press INC, a new increment value, ENT,
SEARCH. You will begin searching with the new increment value and it will be
permanently recorded into the search bank parameters.
Examining search bank parameters
Once you’ve set up your search banks, you can later examine the search bank
parameters. These techniques are for examining unlockedsearch banks.
To see the
lower search
limit
• Open squelch so you can hear the hiss.
• Press SEARCH
• Press the number of the search bank to go to it.
For example, press 6 to go to the beginning of search bank 6.
The scanner will stop at the first frequency of the search bank because of the
open squelch. This is the lower frequency limit. You may want to turn down the
volume to eliminate the hiss.
To see the
upper search
limit
• Open the squelch so you can hear the hiss.
• Press SEARCH
• Press the number of the next higher unlocked search bank.
• Turn the Tuning knob one click counter-clockwise.
Example:
Search banks 1, 2, and 5 are unlocked. To see the upper limit of search bank 2,
open the squelch, press SEARCH, press 5, and rotate the knob a click to the left.
26
AR1000 Operations
To see the
search
increment
To see the
search mode
• Close the squelch so the scanner starts searching.
• Turn the tuning knob one click in either direction.
The scanner will stop searching but stay in search mode. Turn the knob again
one click. Each time you click the tuning knob you will increment or decrement
the displayed frequency by the increment value. You can determine the increment value by watching the frequency change.
You can also determine the mode of the current search bank by simply looking at
the mode indicator in the display.
Locking out frequencies within a search bank
One of the unique features of the AR1000 is the ability to lock individual frequencies in a search range. Sometimes the scanner will stop on a frequency or a
group of sequential frequencies during a search, but these frequencies have no
useful activity. You may hear static, data transmissions, or no sound at all. It
makes the search feature much less powerful if the scanner stops on frequencies
that have no useful activity. With the search frequency lockout feature, you
simply lock out any unwanted frequencies during a search and the scanner
ignores them.
You can lock 100 frequencies per search bank in the AR1000. When you lock
the 101st frequency, it unlocks the first frequency you locked in that bank.
To lock a
frequency
• When the scanner stops on a frequency that you want to lock, press
LOCKOUT.
The frequency will be locked and the scanner will continue searching.
Caution using Lockout
When you are searching, the LOCKOUT key is always active. If you press
LOCKOUT by accident, the frequency that you happen to be on when you press
the key will be locked, even if the scanner has not stopped on that channel. You
will probably not even notice that you have locked the frequency. Therefore, it is
a good idea to periodically go through your search banks, using the method
below, to see if you have inadvertently locked any frequencies you didn’t intend
to lock.
To unlock or
view a locked
frequency
• Press BANK.
• Press PROG.
• Press LOCKOUT.
If you are not in the search bank with the frequencies you want to unlock, press ENT. Continue pressing ENT until you enter the search bank you want.
27
Searching
When you enter that search bank (you’ll see the bank number below the BANK
indicator), the first frequency you’ll see will be the first locked frequency. If you
want to unlock it, press LOCKOUT. If you want to leave it locked, press ENT.
In either case, you’ll be shown the next locked frequency. Continue this process
until you have viewed or unlocked all the locked frequencies in this bank. You
can continue this process for all the locked banks in the scanner if you wish.
When all locked frequencies are unlocked, the scanner will resume searching.
Example:
Assume you have four frequencies locked in search bank 0: 154.25, 154.75,
155.825, and 158.5, and you want to unlock all but the last.
Press:
BANK
PROG
LOCKOUT
The scanner shows 154.25—the first locked frequency.
To unlock it, press LOCKOUT.
The scanner then displays 154.75.
Press LOCKOUT to unlock it.
The scanner now displays 155.825.
Press LOCKOUT once again to unlock this frequency.
The scanner displays the final locked frequency: 158.5.
Press ENT to keep it locked.
If you have quite a few frequencies locked within a search bank, a much quicker
way to unlock them is to simply reprogram the old search bank parameters again.
By entering the same lower and upper limits, you’ll start all over using the same
search range, but with no locked frequencies.
Locking search banks
As with scan banks, you can lock an entire search bank. You can also limit search
banks, which has a different effect than locking them out.
There are advantages and disadvantages to these two methods of managing search
banks. Fortunately, you can use them together very effectively. You may want to
use bank limiting to limit the range of search banks as an organizational tool.
Then you can still lock individual banks within the limited range for even more
control.
28
AR1000 Operations
The basic tradeoffs are these: with bank limiting, you must group the search
banks that you want available as contiguous banks. You can search banks 4, 5,
and 6 with bank limiting, but not banks 2, 5, and 8. Bank lockout is more
flexible because you can selectively lock and unlock banks in any order. However,
with bank lockout, you pay a penalty if you have also locked individual frequencies within your banks. This is described on page 19.
To lock a
search bank
• Press SEARCH.
SEARCH will appear in the display. You can’t lock a Search bank while in Scan or Manual
mode. You must be in Search mode.
Shortcut:
If you are not in the search bank you wish to lock, press the number of the search bank using
the numeric keypad. For example, if you are currently searching with bank 3 and wish to lock
bank 7, press 7 on the keypad. You will immediately begin searching via bank 7.
• Press BANK.
• Press LOCKOUT.
The bank you were in when you pressed LOCKOUT will be locked and the
AR1000 will begin using the search parameters of the next higher bank, if one is
available. The banks will “wrap around” if necessary. For example, if you have
banks 3 and 9 enabled and are searching bank 9, when you lock it out, the
AR1000 will wrap around to bank 3 and start using it for searching.
To lock all
the search
banks
• Press BANK.
• Press LOCKOUT.
Continue using this two-key sequence until the scanner stops searching.
Unlocking a search bank
Unlocking a search bank is a bit more confusing because, if you have locked out
individual frequencies in the previous search bank, you will have to go through
each individual frequency before you can unlock the bank you want. This is
described further on. But first, let’s look at how to unlock search banks if you
haven’t locked out individual frequencies in the previous search bank.
To unlock or
view a locked
search bank
• Press BANK.
PROG will flash in the display.
• Press PROG.
BANK and L.OUT will flash in the display.
• Press LOCKOUT.
BANK will flash in the display.
At this point you are in a mode that will allow you to either unlock or view each bank. You
start with the bank that is currently displayed.
29
Searching
• To cycle through all the locked banks, press ENT.
Each time you press ENT, the current bank will remain locked and the next sequential bank
will be displayed.
• To unlock any bank, press LOCKOUT instead of ENT.
It will unlock and then the next sequential bank will be displayed.
Example:
You have locked all ten search banks. Now to unlock banks 2, 3, and 7, follow
these steps:
• Go to bank 2 by pressing 2.
• Press BANK.
• Press PROG.
• Press LOCKOUT — this puts you in the unlock/view mode.
• Press LOCKOUT
• Press LOCKOUT
• Press ENT
• Press ENT
• Press ENT
• Press LOCKOUT
— this unlocks bank 2 and advances you to bank 3.
— this unlocks bank 3 and advances you to bank 4.
— this leaves bank 4 locked and advances you to bank 5.
— this leaves bank 5 locked and advances you to bank 6.
— this leaves bank 6 locked and advances you to bank 7.
— this unlocks bank 7 and advances you to bank 8.
Press SEARCH to start searching with bank 2.
While this looks involved on paper, it is really very easy to do on the keyboard.
Unlocking a search bank where the previous bank has locked frequencies
Unfortunately in the AR1000, there is no separation between the search banks
you lock and individual frequencieswithin a search bank that you lock. If you
want to unlock a search bank that is locked, you first need to go through all the
locked frequencies in the previous search bank.
Let’s try to make this clearer. Let’s say that you have bank 3 set to search the
cellular phone range starting at 870 MHz, and you have locked 6 individual
digital control frequencies in this range (see above for details about how to lock
individual frequencies). Search bank 4 is set to search from 155 MHz to 156
MHz and it is currently locked. To unlock bank 4, you would press SEARCH, 3,
BANK, PROG, LOCKOUT, and then press the ENT key six times. The ENT
key works the same way it does above when you pass over locked search banks. In
this case, however, the scanner shows you locked search frequencies.Each time
you press the ENT key, the scanner takes you to a locked search frequency in
bank 3. Pressing ENT tells the scanner that you want to keep the frequency
locked and will move you to the next locked frequency. After you pass through
30
AR1000 Operations
all of the locked frequencies in bank 3, you will see bank 4 appear in the display
(both BANK and L.OUT will be flashing). When you press LOCKOUT, bank 4
will become enabled.
If you only have a couple of locked search frequencies (or better yet, none), it is
very easy to get to the bank you want to unlock. Just press ENT a few times until
the bank number you want to unlock shows up on the display. If you have
locked many search frequencies, this method of unlocking search banks may
prove cumbersome. In that case, you may want to use the search bank limiting
feature.
Tip:
You can use search bank limiting to help quickly unlock a bank when the previous bank has many locked frequencies. First, set the bank limits to only the
search bank you want to unlock (see below for a description of how to limit
search banks.) In the above example, if you first limit the search banks only to
bank 4, then when you press SEARCH, BANK, PROG, LOCKOUT you’ll be
right at bank 4 (it’s the only one not limited). Press LOCKOUT to unlock the
bank and then you can start searching it. This procedure avoids having to step
through all of the locked frequencies in the previous search bank.
Limiting search banks
You can limit the banks that get searched by using the bank limiting feature.
With bank limiting, you set a lower and upper bank limit and the search will
only use the search parameters of these banks. Remember, after a search is done
using one bank’s set of limits, the next available bank is used. If you’ve set up all
ten search banks with limits for different frequency ranges, but only want to
search in two of them, you can use bank limiting, only if the two banks are
contiguous. Bank 9 and bank 0 are considered contiguous, since the search starts
over with bank 0 after finishing with bank 9.
To limit bank
searching
• Press SEARCH.
• Press BANK.
PROG flashes in the display.
• Press PROG.
BANK flashes in the display.
• Enter the lower bank limit.
• Press LIMIT.
• Enter the upper bank limit.
• Press ENT.
If you want to limit your search to the parameters in just one bank, you will set
the lower and upper limits to the same bank.
31
Searching
Example:
To limit bank searching to banks 3, 4, and 5, press SEARCH, BANK, PROG, 3,
LIMIT, 5, ENT.
To limit bank searching to just bank 3 press SEARCH, BANK, PROG, 3,
LIMIT, 3, ENT.
Removing search bank limits
To remove all
search bank
limits
• Press SEARCH.
• Press BANK.
• Press PROG.
• Press 0
— This makes the lower limit bank 0.
• Press LIMIT.
• Press 9
— This makes the upper limit bank 9.
• Press ENT.
Staying at a frequency during a search
If the scanner stops at an interesting frequency during a search and you want to
make sure that it stays on that frequency and doesn’t start searching again when
the signal stops, you can use any of the following three ways to keep the scanner
from starting the search again:
To stay at a
frequency
during a
search
1) Open the squelch all the way.
Close the squelch to start searching again.
2) Press the DELAY/HOLD button to put the scanner in Hold mode.
Press HOLD again to start searching normally.
3) Press ENT.
Press SEARCH to resume searching. Pressing ENT also lets you copy the frequency into a
scan channel (described next).
Copying a frequency to a scan channel
During a search you may find an active frequency that you would like to keep
permanently in a scan channel.
To copy a
frequency to
a scan
channel
• Press ENT.
• Enter a three-digit channel number.
As soon as you have entered the last digit you’ll be returned to the search bank.
You do not need to press the BANK key before you enter the channel number
and you do not need to press ENT after you enter the channel number. The
frequency and the transmission mode will both be copied to the channel number.
It is often easier to copy a frequency found during a search if you have enabled
the Hold function.
32
AR1000 Operations
Using Delay/Hold
Delay/Hold works the same during searching as it does during scanning. When
the function is set to Delay (DELAY appears in the display) the scanner will
pause for two or three seconds after an active frequency goes quiet before it
continues searching. When you set it on Hold (HOLD appears in the display),
the scanner will stop permanently after it finds an active frequency. You must
manually press the SEARCH button again to make the scanner start searching.
The Hold feature is useful if you want to be sure you’ll see the frequency each
time you find an active channel. If you leave the scanner in Delay mode, it may
resume searching before you have time to see or copy down the frequency.
When you set Delay or Hold, it applies to all activity of the scanner. That is, if
you are in Hold mode, you will stop operations after an active frequency is found
whether you are scanning or searching. This mode applies to every scan and
search bank. It cannot be set for individual scan or search banks.
Note:
When you have enabled Priority mode (AUX is in the display), the scanner will
no longer hold, even if HOLD is selected. After stopping on an active frequency,
the scanner will resume searching after the usual two to three second delay. This
is a bug in the AR1000 operation.
Manual mode
Manual mode is the mode you will use to program frequencies for individual
scan channels (see page 16 for details). You can also use Manual mode to step
through scan channels to review their contents or simply listen to individual
channels.
You enter Manual mode by pressing the MANUAL button while in Search or
Scan mode. In Manual mode, the scanner sits on an individual channel. Each
time you press the MANUAL button, you advance to the next available channel.
There are two cases where channels will not be available from the MANUAL
button. If you have limited scan banks, MANUAL will not allow you to examine
any scan channels outside the limited banks. In addition, channels that are cleared
(i.e. contain no frequency) will be skipped when you press the MANUAL button. The only way to access these channels is to directly address them with the
BANK button.
When you step through channels using the MANUAL button, you will step to
all available channels; even channels that are locked. Locking out a channel only
applies to scanning. In Manual mode, you can always go to an individual channel
and hear any activity on it, even if it is locked.
33
2
Applications
AOR
AR 1000
SCAN
AM
DELAY
AUX
BANK
435
CH
311.000
MHz
LIGHT
WIDE RANGE MONITOR
PROG
LIMIT
1
2
3
INC
AUX
BANK
4
5
6
AM
WFM
7
8
9
FM
LOCKOUT DELAY
•
CLEAR
HOLD
ENT
SEARCH SCAN
MANUAL
KEYLOCK
Quick-Choosing Banks
Finding Hidden Frequencies
Car Radio-Like Buttons
Toggling Frequencies
Copying Frequencies
Stepping Through Banks
Setting the Startup Mode
The AR1000 in your Car
Optimizing Memory
AR1000 Applications
Introduction
This section describes a number of techniques that will allow you to get the most
use from your AR1000. Once you learn what the scanner’s controls and keystrokes do, the next step is to combine these operations to really take advantage
of the AR1000. This section gives you techniques for moving through scan
channels backwards, copying a group of frequencies from one part of memory to
another, and organizing your memory channels, along with several other useful
ways to use the AR1000. After you become familiar with its operation, you can
begin to develop your own techniques and applications.
35
Quick-Choosing Banks
Quickly setting the starting scan or search bank
Once you have set up your scan and search banks, you can start scanning or
searching with any bank you desire by simply pressing the number of the bank
you want. For example, if you have set up all of your scan banks and you press
SCAN, the AR1000 will start scanning at the beginning of bank 0 and move
sequentially through all the banks. If you want it to start scanning at bank 4, just
press 4 on the keyboard. The scanner will immediately start scanning at channel
400 and proceed sequentially through all of the available scan banks. The scanner
will, of course, skip over locked banks.
If you have locked banks 7 and 8 and start scanning, when you press 6, the
scanner will start scanning at channel 600. When it finishes with bank 6 it will
jump to bank 9, since banks 7 and 8 are locked. If you had pressed 7 or 8, the
scanner would have jumped to bank 9. It will always go to the next highest
available bank if the one you select is locked.
This technique works for search banks as well. While in search mode, simply
press the number of the search bank you want to begin searching through. Of
course, you can not jump to a search bank that is locked or unavailable due to
bank limiting. You will go to the next highest available bank.
36
AR1000 Applications
Finding a hidden frequency in a range
While you may get many of your frequencies from friends or from frequency
guides, one of the most exciting aspects of monitoring is to find those hidden,
interesting frequencies on your own. Frequency allocation and usage change all
the time and even your new frequency guide may be out of date or incomplete.
With the AR1000 search feature, you can search for the new frequencies.
The basic method of using the search features are described in pages 14 to 20.
Here we’ll detail the technique a little more.
If you are looking for a specific frequency or set of frequencies, you can use the
search bank frequency lockout feature to help you. Let’s take an example. Say
you live near a company and you want to find out the frequency or frequencies of
the security department. Often the units used by security companies have one to
five channels. You start by searching the frequency band for this kind of service.
In the United States, many security companies operate in the range of 460.000 to
465.000 MHz. Set your search banks to somewhere in this range. For example,
you might start searching from 460.00 to 461.00 with an increment of 12.5
KHz. Once you’ve exhausted this range, try 461.00 to 462.00.
If you know the frequency of a company’s handheld, but you hear them switch
to “channel 3” it means that their unit probably uses several different frequencies.
Most likely these other frequencies will be close to the one you are listening to.
The challenge in a search is to identify what you pick up. You do this by listening
and logging the intercepts. Usually, you can get enough information from the
broadcasts to identify the type of operation and who it is. When you are searching for a particular company or group, eliminating an identified transmission is as
important as identifying a new transmission, especially if the band is heavily used.
Here’s how to use the AR1000’s search bank frequency lockout feature to help
you. Start searching as described above. When you identify an active frequency,
log it and then press LOCKOUT. It is now locked and the scanner will no
longer stop on this frequency. As you continue doing this, you eliminate the
frequencies you have identified. The scanner will not stop on frequencies you
have already identified so there is more chance it will hear one of the frequencies
you are still searching for. By elimination, you will clear the range of frequencies
you know about and will eventually find the frequencies you are interested in.
When you use this approach, it helps to put your scanner in Hold mode. Then
you will always be able to grab and lock out an active frequency, even if the
transmission is short.
37
Car-Like Radio Buttons
Setting up car radio-like buttons on the AR1000
Because the AR1000 has so many features, and due to it’s somewhat cumbersome
programming scheme, it usually takes four or five key presses to get to a channel
or mode that you want. There is an interesting way you can set up a series of car
radio-like buttons on the AR1000. Then with one button press you can get to a
specific channel. This method is particularly useful for stations that have continuous transmissions, like AM and FM broadcast stations and shortwave stations.
Since the AR1000 will pick up normal radio broadcasts, it is useful to put your
favorites into these radio button channels.
You can set up 10 radio buttons in Search mode and 10 different radio buttons
in Scan mode. The techniques are different, but you use the same method to
selectthem in either mode.
Setting up radio buttons in Search mode
The technique for Search mode is simply to plug in the frequency you are interested in as both the lower and upper frequency for a search bank. Set up the
search bank with this frequency as lower and upper limit. You can put in any
value as the search increment, since it won’t be used. Assign these parameters to
any available search bank.
Here’s how you would use it. Let’s say you have set search banks 6, 7, 8, and 9 as
your radio stations. To use them, first limit the search banks to 6 through 9
(although this is not necessary, it helps to simplify things). Press SEARCH,
BANK, PROG, 6, LIMIT, 9, ENT.
Now all you need to do to select any radio channel while in search mode is press
the corresponding button on the keyboard. If you press 6 you will go directly to
the frequency in Search bank 6. If you press 9 you will go to the frequency in
Search bank 9. You can press these buttons in any random order. Be sure that the
search banks are not locked. If you have an AM radio station in a search bank but
are not using the proper antenna, the scanner will not be able to lock on to a
signal and will jump to the next search bank.
You can set up a radio button for each search bank if you want, giving you 10
radio buttons in search mode.
Setting up radio buttons in Scan mode
You can set up 10 additional buttons in Scan mode. The way to do this is to use
the first channel in a bank for the radio frequency. That is, use channel 000, 100,
200, 300, etc., to hold the frequency you want for your radio buttons. You will
probably also want to lock these channels so they don’t appear when you scan the
rest of the channels in the bank.
38
AR1000 Applications
To select these frequencies, you need to first lock all the scan banks. This is easily
accomplished with the key sequence BANK, LOCKOUT. Keep repeating this
until the scanner stops scanning. When all the banks are locked, you simply press
a number from the keyboard and the scanner will jump to the first channel in
that bank. To jump to channel 500, press 5. To jump to channel 700, press 7.
Even though the bank and the channel are locked, you will still hear any transmissions from the channel you are on.
Remember, if all the scan banks are not locked, this technique won’t work.
Instead you will go to the unlocked scan bank closest to the number you pressed
and the unit will start scanning.
Your choice of whether to use Scan mode or Search mode for radio buttons
depends on how you set up the rest of your scanner and how many radio buttons
you need. Scan mode tends to be a little simpler to use.
This arrangement is very good for any kind of station that is always broadcasting,
since you will not be able to use normal scanning for such stations. If you live in
an apartment complex or a neighborhood with several active baby monitors,
programming their frequencies in the scanner as radio buttons will let you easily
and randomly switch among them to see if there is any interesting activity.
39
Toggling Frequencies
Switching between two frequencies
There may be times when you want to switch between two frequencies. Of
course, you can set up the two frequencies as scan channels and then lock the
other 98 channels in the bank, but this would be a lot of work. You can also use
the radio button techniques described above. Below are two other methods for
switching between two channels.
Using the Priority channel to switch between two channels
Put one of the frequencies in any scan channel and put the second one in a
channel you program as the Priority channel. In Manual mode, go to the first
channel and then press the AUX button. You will listen to the first channel
unless there is activity on the Priority channel, in which case the scanner will
automatically switch. When the transmissions are done, you will be switched
back to the first channel. See page 72 for details on setting up the Priority
channel.
Use two adjacent scan channels
If you put the channels you are interested in within adjacent scan channels you
can switch easily between them by pressing SCAN and then using the Tuning
knob to move to one of the channels. Then to switch, just turn the Tuning knob
one click in either direction. Of course this will work for any number of adjacent
channels, but it is easiest with only two channels.
If the bank is locked, this will still work, but the only channels you will be able to
access will be the first and last channels in each bank. If bank 4 is locked and you
try this, the Tuning knob will toggle you between channel 400 and 499.
40
AR1000 Applications
Copying a group of frequencies
Because the AR1000 memory space is so large, you may periodically want to
rearrange where you keep sets of frequencies. Instead of referring to your bank/
channel records and manually entering in the group of frequencies you want to
move, use this method to copy a group of frequencies from within the scanner.
This method will be less tedious than manually re-keying them in and you will
have less chance of making mistakes and entering incorrect frequencies.
The procedure is simple. Press BANK, then specify your source channel, then
press PROG, and a destination channel for each channel you want to copy.
To copy a
group of
frequencies
• Press BANK and the first channel number of the group you want to move.
For example, to move channels 110 through 120 to channels 830 through 840,
press BANK 110.
• Press PROG and the first channel of the destination group.
In the above example, press PROG 830.
• Repeat the first two steps, incrementing the source and destination
channels by one each time.
The first four copies would be done with this sequence:
BANK 110 PROG 830
BANK 111 PROG 831
BANK 112 PROG 832
BANK 113 PROG 833
You have to remember to increment both the source channels and the destination channels. With this method, the channels need not be sequential channels,
but this operation is much simpler and easier to perform if they are sequential.
When you copy a frequency from a channel into a new channel, both the frequency and the mode are copied automatically. In addition, if the channel is
locked, the locked status is also copied into the new channel. This method will
even allow you to copy channels from one locked bank to another locked bank.
After you copy a group of channels from one area of your scanner memory to
another, you will have two identical sets of frequencies. The chances are that you
only want to use the frequencies in the new location. In this case you need to go
back to the original group and “mark” the channels as available (see page 19).
This is preferable to simply locking the channels, because it will remind you that
the space is available for new frequencies. You can lock a channel at the same
time as you mark it to keep the marked channels from being scanned.
41
Stepping Through Banks
Stepping through the scan banks
While you can’t step backwards through the scan banks with the MANUAL
button, there is a way to do this using the Down arrow button, or the Tuning
knob. This trick comes in handy in many situations, and if you arrange your scan
channels as described in the later section on optimizing scan channels, this
technique will help you access related groups of frequencies.
The way to perform this function is simple. All you need to do is be in Scan
mode and then either press the Down arrow, or turn the Tuning knob one click
in either direction. Either of these actions will stop the scanner from scanning
but keep it in Scan mode. By turning the Tuning knob, you can move forward or
backward within the available scan channels.
The difference between this kind of operation and using the MANUAL button is
that while in Scan mode, you will skip over all locked channels. In Manual mode,
you can step through channels that are locked.
42
AR1000 Applications
How to make the AR1000 come up in the mode you want
You may have noticed that the AR1000 will sometimes turn on in Scan mode,
other times in Search mode, and yet other times in Manual mode. The AR1000
randomly picks a mode when you turn on the power. If you would like it to
come up in a specific mode each time you power it on, use one of these methods.
When using NiCad batteries
Run the AR1000 from the AC adapter, with Nicad batteries in the unit.
Set the AR1000 in the mode you want the scanner to come up in. For example,
if you want the scanner to be searching when you turn it on, press the Search key
as the first step in this method.
Remove one of the batteries from the battery compartment while the unit is in
the desired mode.
Remove the AC adapter power plug from the AR1000. The AR1000 will go
“dead.”
Replace the removed battery. The AR1000 should now start up each time in the
mode you were in when it went dead.
When using alkaline batteries
You need to get an almost-dead AA battery. It can be a lead-acid, alkaline, or
nicad battery, as long as it is almost dead. Remove one of the batteries from the
battery compartment. Replace it with the weak battery. Turn on the scanner and
before the display dies, set the scanner in the mode you desire. Leave it in that
mode until the display fades out due to the dead battery.
Remove the dead battery and replace the good battery into the battery compartment. Now, your scanner will power up in the mode it was in when the power
failed. If you see your normal batteries failing, you can apply this technique
without having to put in a special weak battery.
Be sure that you mark the “near-dead” battery in a special way so you won’t
accidently use it as a regular battery.
While these techniques are not 100% foolproof, they will work most of the time.
43
The AR1000 in your Car
Listening to the AR1000 in your car
Since the AR1000 is a handheld unit, it can travel whereever you go. You can
optimize using it in your car with several accessories.
Use the supplied cigarette adaptor to power it when in your car. This will keep
you from running down the batteries. Be sure to keep the unit powered off
whenever you start the car, to prevent the chance of a dangerous voltage spike
from damaging the unit.
While the AR1000 has very good volume capability, you may still have some
difficulty hearing it over the car and road noise. A very effective way to amplify
the output of the AR1000 is to run it through your car stereo. You will need a
car tape player to use this technique.
Most record shops sell a device that lets you play CDs through your car stereo
even if you don’t have a built-in CD player. The device looks like a typical audio
cassette and plugs into your tape player. A wire comes from the cassette and plugs
into the earphone jack of your portable CD player. The sound is then sent
through your tape player to your stereo.
You can simply put the plug into the earphone jack of the AR1000. Then you
use the volume and tone controls of your car stereo to control the sound of your
scanner. The difference in sound quality is spectacular. These devices sell uniformly for $19.99. Radio Shack also carries one (Cat. 12-1951) for the same
price.
If you don’t have a tape player in your car, you can use the Radio Shack Amplified Speaker (Cat. 21-541) for $24.99. It contains a 7.5 watt amplifier and also
runs off your car cigarette lighter.
You can also use your regular car antenna as a scanner antenna. You can get 30 to
960 MHz reception without adding an additional antenna. All you need to do is
tap off of your car antenna. Grove sells a Mobile Antenna Multicoupler for
$16.95 (Model CPL-63B) which does the trick without requiring you to drill
holes, use magnets or run cables through the window. It splits the car antenna
cable so that one lead goes to your radio and the other goes to your scanner. This
model has BNC connectors. You can also order model CPL-63M which comes
with PL-259 connectors.
With these items, you can run your scanner in your car with great sound, great
reception, and not have to worry about batteries running down.
44
AR1000 Applications
Optimizing your scan and search banks
Because the AR1000 has 1,000 individual scan channels in ten banks and ten
individual search banks, it can be quite a task organizing and optimizing everything. Below you will find some techniques and suggestions for getting the most
out of this large memory space.
Scan banks
You should think of the scan banks as not only holding frequencies that you will
actively scan, but as being a general memory repository for many frequencies—
even ones you won’t actively scan all the time.
Because of the AR1000’s non-volatile memory, you can store infrequently used
frequencies in the scanner and recall them at those rare times when it’s
appropriate.
Search banks
Unless you do a tremendous amount of band searching, you probably won’t need
to permanently assign all ten search banks. Set up four or five of them to the
bands you regularly search, use a couple for AM, FM, or shortwave radio stations, and leave the rest for special searching tasks.
Here are some tips to help you use the AR1000 memory space:
◆ Assign one or more scan banks as non-scanning frequency repositories
You may want to have a set of discrete frequencies in your scanner that you can
easily get to that you won’t scan on a regular basis. For example, the AR1000
picks up both regular AM and FM radio broadcasts. It also (with the right
antenna) picks up many strong shortwave stations. You can assign one bank to
hold these discrete frequencies. You wouldn’t scan this bank because the scanner
would stop on every station (since most radio stations broadcast all the time).
However, you can single step through the channels (better yet, use the techniques
in “Stepping Through the Scan Banks”) to select among these channels.
Alternatively, you can copy a select group of frequencies from the “storage” bank
into an active scan bank. For example, you may keep all of the Marine VHF
frequencies in a storage bank. At some point you can simply copy the port
operations frequencies from the repository bank to an active scanning bank using
the group copy method on page 30.
◆ Assign the scan channel numbers appropriately
If you can, make the scan channel numbers have some relationship to the things
you are storing in them. For example, it makes a lot of sense to program in the
forty Citizens Band channels into scan channels 1 through 40. It becomes very
45
Optimizing Bank Memory
easy in this case to know which CB channel you are listening to. Of course, it
doesn’t literally have to be channels 1 to 40. You might put the CB channels in
bank 6. Then they would be in channels 601 to 640.
◆ Put your related interests in the same scan bank
Put all of the frequencies that relate in the same bank. For example, if you like
listening to air communications, you might assign a scan bank as the air bank. In
it you would put all your local airport frequencies, Air Combat Command
(ACC) frequencies, Civil Air Patrol (CAP) frequencies, NORAD frequencies, etc.
It is a good idea to separate them with “empty” channels so that you will have
space to expand. In addition, if you start a group on a channel that is a multiple
of 10 (like 330, 350, 380, etc.) it will be easier to remember where things are.
You may only want to regularly listen to the local airport. In that case, lock out
the rest of the frequencies. They will be there and will be easy to enable whenever
you want them.
◆ Set up search banks as radio-like scan buttons for AM and FM radio stations
You can put the limits for AM radio broadcasts (540 KHz to 1600 KHz) and FM
(88.1 MHz to 108.1 MHz) into two separate search banks. Then you can scan
through the AM or FM bands just as you might on your car radio. For example,
if you put the frequency limits for the FM band into search bank 6, lock out all
the other search banks or limit the search banks to bank 6. Then, by pressing
SEARCH, the scanner will search through the band stopping on each active FM
station. While you might want to put your favorite FM stations in specific scan
channels, this method lets you scan FM stations whenever you travel to a different city or area.
◆ Use the provided bank templates to keep track of your channel frequencies
The Guide to the AR1000comes with a set of templates that you can use to keep
track of the contents of all 1,000 scan channels. Photocopy these templates and
record your frequencies and descriptions on the forms. Refer to them when you
use your scanner.
The figure on the next page shows a sample setup of the search and scan banks.
There is plenty of room left for expansion, and yet the scanner holds a tremendous amount of useful frequencies that can be accessed easily.
46
AR1000 Applications
Example of bank allocations
BANK 0 CB/Weather/Radio
0 Radio button
1-40 Citizens Band
41-49 Free
50-56 National weather
57-59 Free
60-70 Favorite AM/FM stations
71-99 Free
BANK 4 Military
400 Radio button
401-450 Military comms
451-499 Free
BANK 1 VHF Marine
100 Radio button
101-126 VHF Marine
127-159 Free
160-188 VHF Marine
189-199 Free
BANK 6 Shortwave
600 Radio button
601-620 shortwave stations
621-699 Free
BANK 2 Local PD/Fire
200 Radio button
201-220 Local PD/Fire/EMS
221-230 Free
230-240 County/Sheriff
241-249 Free
250-280 Neighboring cities/counties
281-299 Free
Bank 3 Air
300 Radio button
301-315 Local airport
316-319 Free
320-340 SAC
341-349 Free
350-370 NORAD
371-379 Free
380-390 Civil Air Patrol
391-399 Free
BANK 5 Railroads
500 Radio button
501-598 Railroad
599 Free
BANK 7 Cordless Phones
700 Radio button
701-721 Cordless phone freqs
722-799 Free
BANK 8 Free
800 Radio button
801-899 Free
BANK 9 Free
900 Radio button
901-999 Free
Search Bank Assignments
BANK 0-5 Free
BANK 6 AM Band
BANK 7 FM Band
BANK 8 Cellular mobile
BANK 9 Cellular base
47
3
Accessories
AOR
AR 1000
SCAN
AM
DELAY
BANK
435 CH
AUX
311.000
MHz
LIGHT
WIDE RANGE MONITOR
PROG
LIMIT
1
2
3
INC
AUX
BANK
4
5
6
AM
WFM
7
8
9
FM
LOCKOUT DELAY
•
CLEAR
HOLD
ENT
SEARCH SCAN
MANUAL
KEYLOCK
The Power Supply
The Strap/Belt Clip
Antennas
Customizing the AR1000
AR1000 Accessories
Introduction
The AR1000 comes with some standard accessories and you can purchase others
to enhance the unit. The accessories described here are those that generally come
with the AR1000 in the United States. These include a set of supplied nicad
batteries, an AC transformer power supply, a DC cigarette lighter power supply
for your car, a shoulder carrying strap, a metal belt clip, a vinyl carrying case, and
a standard rubber ducky antenna. Depending on where you purchased the
AR1000, parts of this section may not be applicable to you.
The basic unit, while self-contained, is just the start of your listening experience.
You can significantly enhance the effectiveness and pleasure of using this scanner
by understanding how to use the supplied accessories and by adding some new
ones to your collection. The source for the third-party accessories described in
this section can be found in the Appendix.
49
The Power Supply
The power supply
The AR1000 comes with a supplied charger and a set of four AA nicad rechargeable batteries. The scanner requires a 6 volt DC power source but will run with
anything up to 13.8 VDC.
Using nicads
The AR1000 comes with 4 nicad rechargeable batteries. It will, or course, also
work with regular alkaline dry cells, but nicads are by far the most economical
way to go (be sure not to plug the unit into the charger if you are using alkaline
batteries). You can also run the unit directly from the AC adaptor with no
batteries installed.
While you can simply rely on the built-in charger to keep your nicads charged, it
is useful to have two sets of nicads and a separate charger. One set can be charging while you use the other set in the scanner. With this method, you will almost
always have a charged set of batteries. If you take this approach, be sure to find
some way to distinguish the two sets from each other so you don’t mix up
charged with uncharged batteries. Either use different brands, or mark a set with
paint or tape so you can keep the sets separate.
Nicad batteries are rated in mAh (milli-amp hours). The higher the mAh rating,
the longer the battery will last in the scanner. Most consumer nicads are rated
between 500 and 600 mAh. Radio Shack sells 850 mAh nicads (HiCap) for
$5.99 a pair (Cat. 23-149). The 550 mAh nicads that come with the AR1000
typically last about four to five hours in an active environment.
The speaker drains the batteries the quickest, so expect the operating time to be
reduced if you run the unit at high volume. You can extend the battery life if you
use headphones.
Using the supplied charger
Your AR1000 comes with a wall transformer that plugs into the charger jack on
the side of the unit. The charger is designed to charge the batteries in the unit
when it is off. It will run the unit, but when running, the charge to the batteries
is minimal. The charger should put out at least 12 VDC/ 500 mA. If it is less
than this, you may want to contact your dealer for a replacement. Less capable
units have been found to not properly charge the batteries and often produce an
annoying hum.
Using the supplied cigarette lighter plug
Along with the wall charger, the AR1000 comes with a standard cigarette lighter
adaptor for the car. You may keep the scanner plugged in to the cigarette lighter
50
AR1000 Accessories
adapter all the time as long as the AR1000 is not powered on. If the AR1000 is
turned on when you start the car, the unit may be susceptible to a power surge
that could damage the scanner. One way to guard against this is to solder a small
fast-blow 1 amp or less fuse into the charger.
Using other chargers
As mentioned before, it is very useful to have a separate nicad battery charger so
that you can be charging a second set of batteries while you are using the set in
the AR1000. There are many nicad chargers around and Radio Shack sells several
of them. One model of note is their Deluxe AA quick charger (Cat. 23-242) for
$16.99. It quick-charges four AA nicads in only three hours. There is a lot of
controversy about how quick-charging affects battery life, but our sources tell us
if the charge time is limited, quick-charging has very little effect on battery life.
The Radio Shack quick-charger first discharges the batteries during the first hour
and then charges them during the next two hours. It turns off automatically after
two hours to prevent overcharge.
51
The Strap/Belt Clip
The strap/belt clip
The AR1000 comes with a strong metal belt clip that allows you to clip the
scanner on your belt. While most people will take advantage of this clip, if you
will not be using it, you may want to remove it. By removing the belt clip, the
unit will be less bulky and will go in and out of the carrying case significantly
easier.
The AR1000 also has two lugs at the top of the unit that are used for hooking on
the shoulder strap. If you decide that you don’t want to use the shoulder strap,
you may want to reverse these “Frankenstein” lugs. The unit will be sleeker and
this will also make getting the scanner in and out of the carrying case much
easier.
To remove
the belt clip
The belt clip is held on by two Phillips screws and is very easy to remove. Just
unscrew the screws and keep them in a safe place, in case you want to re-install it.
Put a piece of clear tape over the holes to keep out dirt. Alternatively, if you don’t
mind the extra protrusion, just screw the screws back into the holes on the unit.
To reverse
the strap
lugs
You will want to reverse the strap lugs rather than remove them because you will
be left with two open holes in the case if you simply remove them. The lugs are
asymmetrical, so when you reverse them they lay flush with the case.
First open the case by removing the four Phillips screws that hold the case together. Two are just below the strap lugs in the back and the other two are at the
bottom of the battery compartment.
After removing the screws, separate the back of the case. You will then be able to
slip the silver strap lugs out of their slots. Reverse them and place them back in
the slots so that they lay flush with the side of the case. The lug on the side of the
antenna connector may press against the antenna terminal inside the case. It is a
good idea to put a small piece of electricians tape against the antenna terminal
before reversing this lug, to insulate it from making direct contact with the
antenna terminal.
Be aware that opening the case of the AR1000 may void your warranty.
52
AR1000 Accessories
Antennas
The antenna is probably the most important element for getting good reception
on the AR1000. The AR1000s in the USA come with one general purpose
rubber antenna, while the units available in England and Europe come with
several antennas. While the general rubber ducky is fine for average listening, you
will get the best reception by using an antenna cut for a specific frequency range.
In addition, you will get significantly improved reception by using a roofmounted antenna.
Rubber duckies
The rubber duckies available for the AR1000 will give good general coverage in
the VHF and UHF ranges. You may want to purchase a cellular phone antenna
(with a TNC to BNC adaptor) to get superior coverage in the 800 MHz range.
MetroWest sells a variety of rubber duckies cut for the VHF, UHF, and 800
MHz bands. In addition, Radio Shack sells a center-loaded telescoping antenna
(Cat. 20-006) for $9.99 that gives you selectable coverage from 25 to 1300 MHz.
By collapsing or expanding the antenna, you can optimize it for different frequency bands.
Shortwave antennas
To receive good coverage in the shortwave and medium wave (AM radio) spectrum, you will need a different kind of antenna. The simplest antenna for SW
and MW is simply a long wire attached to the scanner. Get an insulated piece of
wire 10 to 30 feet long. You can attach it to the scanner in several ways. If you
pull off the rubber cap of the included rubber ducky, you can attach the long
wire to the metal tip of the rubber ducky. Solder an alligator clip on one end and
clip it on to the metal end of the rubber ducky.
Making a simple MW/SW antenna
An excellent, low-cost solution for SW and MW reception is to construct a wire
with an alligator clip on one end and a BNC connector on the other. Use a wire
that is 8 to 12 feet long. Attach the connector to the scanner and clip the other
end to a metal door or window frame. Sliding glass door frames are perfect for
this. The frame acts as a very good antenna. You can also clip this to many other
metal objects that will work well as antennas. We’ve found good results attaching
the clip to the door of a refrigerator, a fireplace screen, and even a long metal
ruler. Experiment! All kinds of things act as good antennas.
Discone antennas
For best overall reception, use a discone antenna mounted on your roof. Two
recommended antennas are the Radio Shack discone (Cat. 20-013) for $59.99
and the Grove discone antenna Diamond D-130J for $79.95. Discone antennas
53
Antennas
are omnidirectional antennas that have good coverage over the frequency range of
25 to 1300 MHz. While their listed coverage only goes down to 25 MHz, they
will also pull in reasonable signals in the SW and MW range.
Grove also sells a directional antenna called the Scanner Beam (ANT-1) for
$59.95 that can be used with a rotor to focus in on distant or elusive stations. It
will pick up local stations from any direction.
If you have a local scanner retailer near you, consult with him about your antenna needs. A good antenna will give you the best possibility of taking advantage
of the wide range of the AR1000.
54
AR1000 Accessories
Other ways to customize the AR1000
There are a few other simple customizations of the AR1000 that will make your
life much easier and will enhance the enjoyment of your scanner. At the end of
this section is a detailed description of extending the frequency range of earliermodel AR1000s that only cover 8-600 MHz and 805-1300 MHz. This mod will
provide continuous coverage from .5 MHz to 1300 MHz. It requires some skill
in electronic modification.
Marking the squelch knob
The volume and squelch knobs are ganged, and the volume knob has its register
slot marked in white, but the register slot on the squelch knob is not marked.
This makes it difficult to see where the squelch setting is set at. This is easily
remedied, however. Use a drop of white paint or “Liquid Paper.” Dip the tip of a
small slotted screwdriver into the paint and touch it to the register slot on the
squelch knob. You don’t have to be very precise, but immediately wipe the top of
the squelch knob. Because the slot is recessed, you will wipe away any excess from
the top of the knob but the paint will remain in the slot. When it dries, you will
easily be able to tell where the squelch knob is set.
Marking the inside of the battery compartment
The nicads go into the battery compartment in alternating positions; positive
terminal to the right, then to the left, etc. There is a raised marking in the battery
case that shows you the polarity positions for each slot, but the markings are
difficult to see because they are black on black. A very useful mod is to simply
put a dot of white paint on the side of each battery slot that indicates the position
of the positive terminal of the battery. Then when you go to install a new set of
batteries, it will be very simple to know which way the batteries go into the
compartment. Be sure to put the batteries in on top of the strap. Then you just
pull the strap up to easily remove the batteries.
Removing the plastic window in the carrying case.
The vinyl carrying case that comes with the AR1000 has both good and bad
points. Even though it is relatively thin, it provides good shock protection if the
unit is dropped on a hard surface. However, unless you will be using the unit
outside in a harsh environment, most people will find the plastic window that
covers the keyboard and display an annoyance. Not only does it make pressing
the keys difficult, it reduces the visibility of the AR1000’s already difficult-to-see
LCD display.
A good solution is to simply cut out the plastic window of the case. Turn the case
inside out and use a sharp knife, single-edged razor blade, or X-Acto knife.
Carefully cut along the edge of the plastic and then reverse the case again. It will
55
Extending Frequency Range
be slightly more difficult to get on and off because you will lose some rigidity
provided by the window, but you will have free access to the buttons and display.
If you reverse the carrying strap hooks, the case will be considerably easier to get
on and off.
Extending the frequency coverage
The AR1000 is microprocessor based and the parameters that determine its
coverage are set under software control. If you have an older model AR1000 that
doesn’t have continuous coverage from .5 MHz to 1300 MHz, you may want to
perform this mod. This mod will also reset your unit if you’ve locked it up by
entering in too many “cleared” channels. You should be comfortable with soldering and with working inside electronic devices if you are going to perform this
mod. Also be aware that this procedure will clear out all of the memory channels
in the AR1000.
To do this procedure you need:
• A small Phillips screwdriver
• A small slotted screwdriver
• A soldering iron
• Needle-nose pliers
Here’s how to do it:
1) Remove the batteries.
2) Disconnect the antenna.
3) Pull off the tuning, volume, and squelch knobs. Be aware that there is a small
washer that sits between the volume and squelch knobs.
4) Remove the four screws that hold the case together. Two are in slots on the
top back of the unit and two are near the bottom in the battery compartment.
5) Unplug the battery connector.
Lay the scanner face down (keyboard and display) on the table and the antenna
connector to the top.
6) Unsolder the black wire from the lower right corner of the top board.
7) Unsolder the brown wire from the upper left corner of the same board.
8) Remove the three screws on this board.
Gentlypull this board down and out. The volume, squelch, and tuning knob will
come out with it but not the antenna connector.
9) Unsolder the black wire from the upper left corner of the middle board.
10) Unscrew the brass standoffs that hold this board.
56
AR1000 Accessories
11) Remove the connectors on the lower board. Note which connector goes
where, particularly the orientation of the connectors.
The lower board will look like this figure.
LCD DLC5066P
R405 47K
R404
47K
IC400
µpD 75P308GF
or
D75308GF651
C411
10 µ
D404
272
C409
150p
D403
272
C408
IC401
HN58C65FP-25T
R406 47K
D402
272
D400
272
R422
47K
D401
272
D405
272
12) The next step is to solder a thin wire between resistor 405 and diode 405.
13) Re-connect the connectors on the lower board and solder back all the wires
you unsoldered.
14) Put the batteries back in.
57
Adjusting Off Frequencies
Turn on the unit. The display will be blank. This means that the unit is ready to
be re-programmed. Carefully enter in the following keystrokes from left to right,
top to bottom. Keys are shown within brackets (e.g. [Bank]). The symbol [V]
means press the Down arrow button.
[Bank] 1
2
3
4
5
6
7
[Prog] 0.5
[Prog]
50
[Prog] 108
[Prog] 170
[Prog] 297
[Prog] 805
[Prog] 1110
[Limit]
49.995
[Limit] 107.995
[Limit] 169.995
[Limit] 296.995
[Limit] 804.995
[Limit] 1109.995
[Limit] 1300
[Search]
[Search]
[Search]
[Search]
[Search]
[V]
[V]
561.225
561.225
561.225
561.225
251.575
251.575
561.225
[Enter]
[Enter]
[Enter]
[Enter]
[Enter]
[Enter]
[Enter]
Turn the unit off.
Remove the wire you soldered.
Re-assemble the unit (perform the disassembly steps backwards).
Turn on the unit. It should now be working with full coverage (see caveats
below).
Following is an alternative set of parameters that is recommended with the
AR2000 unit sold in England:
[Bank] 1 [Prog] 0.5 [Limit]
49.995 [Search] 556.325 [Enter]
2 [Prog]
50 [Limit] 107.995 [Search] 556.325 [Enter]
3 [Prog] 108 [Limit] 169.995 [Search] 556.325 [Enter]
4 [Prog] 170 [Limit] 286.995 [Search] 556.325 [Enter]
5 [Prog] 287 [Limit] 599.995 [Search] 249.125 [Enter]
6 [Prog] 800 [Limit] 1109.995 [V]
249.125 [Enter]
7 [Prog] 1110 [Limit] 1300
[V]
556.325 [Enter]
8 [Prog] 600 [Limit] 799.995 [Search] 58.075 [Enter]
Caveat:
While this procedure will set up the parameters to have continuous coverage
from .5 MHz to 1300 MHz, you may not really get full coverage from 600-805
MHz in some older models. Some users report that the scanner will take frequencies between 700 and 805 MHz but will not really pick anything up in this
range.
Thanks to Lionel Ancelet in France for first making this procedure available.
Adjusting a unit that is off frequency
In some of the earlier model AR1000s, the dialed frequency in the lower frequency ranges was off by 5 KHz. To get the frequency adjusted properly, look for
58
AR1000 Accessories
two tiny pots on the underside of the upper board. The lower pot (the one near
the bottom of the board) is for adjusting the 800 MHz FM range. The upper pot
is for adjusting the lower frequency AM range. Attach an antenna that will let
you pick up shortwave and tune to a standard time station like WWV at 15
MHz. Adjust the trimmer until the audio sounds the clearest at 15.000 MHz,
and gets raspy and noisy 5 KHz to either side.
Disclaimer:
While these modifications have been performed successfully by a number of
AR1000 owners, please understand that the author does not warranty these mods
and if you perform them, you do so at your own risk.
59
4
Reference
AOR
AR 1000
SCAN
AM
DELAY
BANK
435 CH
AUX
311.000
MHz
LIGHT
WIDE RANGE MONITOR
PROG
LIMIT
1
2
3
INC
AUX
BANK
4
5
6
AM
WFM
7
8
9
FM
LOCKOUT DELAY
•
CLEAR
HOLD
ENT
SEARCH SCAN
MANUAL
KEYLOCK
The Display
The Keyboard
The Top Controls
AR1000 Reference
Introduction
The AR1000, operationally, consists of the LCD display, the keyboard, the top
panel controls, the power jack, and the battery compartment. The section
AR1000 Operations provides step-by-step instructions for performing the basic
scanning and searching operations. This section is a concise reference for all the
keys, display items, and controls on the unit. We’ll describe each component in
detail.
61
The Display
The Display
The LCD display shows you which channel you are looking at, its frequency and
transmission mode, and a number of status indicators. The illustration shows the
LCD display with all the annunciators turned on.
AOR
AR 1000
MANUAL SCAN SEARCH PROG
WFM AM L.OUT HOLD DELAY BATT
LIMIT AUX
KEY LOCK
BANK
311.000
435 CH
KHz
WIDE RANGE MONITOR
MHz
LIGHT
MANUAL/SCAN/SEARCH
These indicators let you know which operation mode the scanner is in.
MANUAL means the scanner is in Manual mode. It will remain on the current
channel until you manually step to the next channel with the MANUAL key, go
directly to a new channel with the BANK key, or enter either the scan or search
mode by pressing the SCAN or SEARCH keys, respectively.
SCAN means the scanner is in Scan mode, scanning a set of entered frequencies
within one or more scan banks. The BANK indicator shows you the scan bank
the scanner is currently scanning.
SEARCH means the scanner is in Search mode, searching sequentially through a
group of frequencies, using the limits supplied by one of ten search banks. You
can tell which search bank it is using since the search bank number will be
displayed under the BANK indicator.
Notice which mode you are in. You will not be able to perform some operations
in certain modes. For example, if you want to go directly to channel 500, you
press BANK 500. This won’t work, however, if you are in Scan mode. You must
be in Manual mode (first press MANUAL) before performing this operation.
62
AR1000 Reference
Frequency
The frequency area shows you the current frequency in megahertz (MHz). To
enter kilohertz (KHz) frequencies, you must convert them to megahertz. For
example, 14500 KHz would be entered as 14.5 MHz. An AM radio frequency like
960 KHz would be entered .960 MHz.
When you are sitting on a scan channel, the MHz indicator will flash. This tells
you that you can enter a new frequency into the channel. When you press ENT,
the new frequency will become active. You will hear any transmissions on that
frequency (if you are in the correct mode). However, until you press a mode key,
the frequency won’t be permanently programmed into that channel. If you don’t
press a mode key, once you leave the channel, the frequency you entered will be
erased and the previous frequency will be restored.
You can enter a frequency to four decimal places. The frequency coverage for the
AR1000XC is .5 MHz to 1300 MHz. If you enter a frequency outside this range
you will see Fr. Err (frequency error) in the display. Press CLEAR to start over.
Mode (AM/FM/WFM)
There are three transmission modes you can set the AR1000 to receive. These are
AM, FM, and Wide FM. You set each scan channel and each search bank to listen
in a specific mode. When you are scanning or searching, you will see the mode of
the current scan channel or search bank in the display. If you program a scan bank
with channels having different reception modes, you will see the mode indicators
switching rapidly as the scanner scans.
The following is a list of typical mode usage according to frequency range.
AM mode is used for
.5 to 30 MHz
AM Radio broadcast, shortwave, and citizens band
108 to 137 MHz Aircraft
225 to 400 MHz Military aircraft
FM (Narrow FM) mode is used for
30 to 54 MHz
Low band VHF (Very High Frequency)
136 to 174 MHz High band VHF
406 to 1300 MHz
UHF (Ultra High Frequency)
WFM (Wide FM) mode is used for
54 to 88 MHz
Channels 2 through 6 TV audio
88 to 108 MHz FM broadcast radio
174 to 220 MHz Channels 7 through 13 TV audio
63
The Display
These are guides, since different modes can crop up in various bands. Scanneroriented magazines and frequency guides can give you more information on
specific frequencies and transmission modes. While other scanners default to a
transmission mode for a specific range, with the AR1000, you can always set the
mode explicitly, so you’ll never miss out on unusual transmissions.
BANK/CH
The BANK/CH indicator is used to tell you which scan bank and channel or
search bank you are in. If the SEARCH indicator is on, the bank represents the
current search bank. If you are in Scan or Manual mode, it represents the scan
channel.
The AR1000 uses the notion of banks and channels. There are ten banks (0
through 9) with 100 channels per bank (0 through 99). You specify a specific
memory location by pressing BANK, and then entering a bank number and a
channel number. For practical purposes, however, you can simply think of them
as channel numbers from 0 to 999.
BATT
The BATT indicator comes on when you have a low battery condition. It lets
you know that you only have a few minutes of battery power left. The time can
range anywhere from minutes to seconds. In practice, the BATT indicator is not
very useful. Unlike many other scanners, the AR1000 does not give you an
audible warning when you are in a low battery situation, so, unless you are
frequently looking at the display, you may never see the BATT indicator before
the scanner dies. Fortunately, this is not a real problem, because you have very
little to lose if your batteries die. In other scanners, the channel frequencies are
maintained by the batteries and a backup capacitor. You may have an hour after
the batteries die before you lose all your programmed frequencies. With the
AR1000 and its non-volatile memory, you never have this problem. You will
never lose programmed frequencies when the batteries die. The worst problem
you will face is that you may think your scanner has been scanning or searching
for a while, without finding any activity, when, in fact, the scanner has curled up
its toes and died. Once you get used to the life cycle of your batteries, you can
pretty well anticipate when you need to check for dead batteries.
Be aware that you cannot program a frequency into a scan channel or set up a
search bank when BATT is flashing. The scanner will take the values you enter,
but the changes will not be made permanent to the scan channel or search bank.
64
AR1000 Reference
Note:
Your scanner will usually start up in the mode it was in (Search, Scan, or
Manual) the last time the batteries died. See the Applications section for more
information about this feature.
DELAY/HOLD
When the AR1000 stops on an active frequency, it pauses for two or three
seconds after a transmission ends before it continues scanning or searching. This
is to provide time to hear a response before it resumes scanning or searching.
You may alternately instruct the AR1000 to permanently stop instead of pausing
as soon as it hears a transmission. You do this by toggling the Delay and Hold
modes. While in Delay mode, the scanner waits a few seconds and then starts
again, while in Hold mode, it stops on a transmission and won’t resume until
you manually press SCAN or SEARCH.
The display will indicate which mode you are in by showing either DELAY or
HOLD. This mode applies to all channels in the scanner. You can’t set Delay or
Hold independently for scanning and searching or for individual scan channels.
The DELAY/HOLD indicators will disappear while you are in Manual mode.
Up/Down Arrows
To the left of the bank indicator are two triangles, known as the Up and Down
arrows. These indicate the “direction” of a search or scan. When you press the
SEARCH or SCAN buttons you will search or scan in an ascending manner.
Searching will proceed from the lower limit to the upper limit, and scanning will
proceed from the lower scan channels to the higher scan channels. You can
change the direction of searching or scanning by using the Down arrow button
or the Tuning knob. When you switch to searching or scanning downwards, the
Down arrow indicator comes on. In most cases, however, you will see the Up
arrow. See the Keyboard reference for the Down arrow and the section on the
Tuning knob for more details.
L.OUT
The L.OUT indicator appears in the display when the scan channel, scan bank,
search frequency, or search bank you are looking at is locked.
With scan channels and banks
You can see a locked scan channel or a channel in a locked bank by moving to it
with the BANK button or by using the MANUAL button. While in a locked
scan channel, L.OUT will flash in the display. If you are in a bank that is locked,
any channel you look at in that bank will flash both the L.OUT indicator and
65
The Display
the BANK indicator. You may also have an individual channel locked in a locked
bank, but you will not be able to tell that the channel is itself locked by looking
at the indicator. Once you unlock the bank, however, any channels that are
locked will continue to show the flashing L.OUT indicator.
With search banks
When you lock a search bank or individual frequency within a search bank, you
won’t be able to access the bank or frequency without going into Unlock/View
mode. This is done with the key sequence SEARCH, BANK, PROG, LOCKOUT. You are taken to the first locked frequency or the first locked search bank.
You press ENT to keep it locked or LOCKOUT to unlock it. In either case you
are then taken to the next locked frequency or bank.
When a search bank is locked, L.OUT will appear, non-flashing, in the display,
along with a flashing BANK indicator. Even if you are looking at a locked
frequencyin a search bank that is locked, the BANK indicator will flash. But if
you are looking at a search bank that is unlocked but only contains individual
locked frequencies, L.OUT and BANK will both be on, but neither will flash.
To summarize:
After performing the SEARCH, BANK, PROG, LOCKOUT sequence to get
into the Unlock/View mode,
BANK flashing and L.OUT steady
Current search bank is locked,
frequency may also be individually
locked.
BANK steady and L.OUT steady
but current frequency is locked.
Current search bank is unlocked
AUX
The AUX indicator tells you that the Priority mode is enabled. When you see
AUX in the display, it means that the scanner will switch to the Priority channel
any time it detects a transmission on it, whether you are at that channel or not.
You enable and disable Priority mode by pressing the AUX button. When
Priority mode is disabled, AUX disappears from the display. See page 72 for
information on how to program or identify the Priority channel.
66
AR1000 Reference
PROG
PROG appears in the display after you have pressed the PROG button while in
Search mode or Manual mode or after pressing the BANK button while in Scan
mode.
In Search mode, if you press PROG, you are telling the scanner you want to set
up new search bank limits. You are prompted for a lower and upper limit, a step
increment, a transmission mode, and finally, a search bank to assign the limits to.
In Scan mode, if you press the BANK button, PROG appears in the display to
prompt you to enter the lower and upper limits for scan bank limiting. We
recommend you don’t use scan bank limiting for general use. See page 22 for a
discussion of scan bank limiting.
If you are in Manual mode, when you press the PROG button, PROG appears
in the display along with a flashing BANK indicator. This is telling you to enter a
three-digit channel number. If you enter a channel number while the PROG
indicator is on, the frequency that is in the display will be programmed into the
channel you enter as soon as you finish entering the third digit of the channel.
While this is useful for copying a frequency from one channel to another, we
don’t recommend it as a general way to program a scan channel. See page 16 for a
discussion on programming scan channels.
If you press the PROG button by accident or see PROG in the display, you can
get out of program mode by immediately pressing the SEARCH, SCAN, or
MANUAL buttons.
LIMIT
The LIMIT indicator comes on to prompt you to press the LIMIT button when
you are limiting the range of scan banks, search banks, or when you are setting
up the search parameters for a search bank.
You will usually follow this sequence for setting up a range: lower limit, LIMIT,
upper limit, ENT. There may be additional keys you need to press, as with
setting up search bank limits, but in all cases, you will see the LIMIT indicator
flash after you enter the lower limit. Pressing the LIMIT button when you see
LIMIT flash in the display, enters the lower value and prepares the scanner to
receive the upper value.
67
The Display
KHz
The KHz indicator is just below the CH indicator. It appears when you are
setting up search bank limits or anytime you press the INC button. After you
enter the lower and upper search limits, the scanner will flash the KHz indicator
to prompt you to enter a search increment value. This value is in kilohertz and
can be any number between 5 KHz and 955 KHz that is divisible by 5 or 12.5.
After you enter the increment value, be sure to press the ENT button.
You can change the INC value of a search bank at anytime while you are in the
bank. Just press INC, enter a new value, and press ENT. The new value is
permanently stored with the search bank parameters.
Key Lock
When the KEY LOCK indicator is on, it means that the keyboard has been
locked. This is provided as a protection so that you won’t accidentally change
frequencies, interrupt a scan or search sequence, or otherwise modify your
current setup.
See the Key Lock button below for more information.
FR. ERR
You may occasionally see the message FR. ERRin the display. This message
stands for “Frequency Error.” You may encounter this message if you enter an
invalid frequency—something out of the AR1000’s range. It also may occur if
you perform an operation with an incorrect sequence of steps.
To clear the FR. ERRmessage, simply press the CLEAR (decimal) key.
68
AR1000 Reference
The Keyboard
The keyboard, along with the top control panel, contains the controls for running and programming the scanner. The buttons on the keyboard are described
in detail below.
LIGHT
WIDE RANGE MONITOR
PROG
LIMIT
1
2
3
INC
AUX
BANK
4
5
6
AM
WFM
7
8
9
FM
LOCKOUT DELAY
•
CLEAR
HOLD
ENT
SEARCH SCAN
MANUAL
KEYLOCK
LIGHT
The LIGHT button is used to turn on the internal LCD display light. Because
the LCD display depends on reflected light to be visible, the light comes in
handy for viewing the display in dim lighting conditions. When you press the
LIGHT button, the display light comes on for approximately five seconds. Then
it shuts itself off. Unfortunately, there is no way to keep the light on permanently, even when the scanner is plugged into the AC transformer. If you need to
program a sequence in the dark, five seconds may not be enough time to perform
the operation. You can extend the time the light is on, however, by pressing the
LIGHT button again. Each time you press the LIGHT button, the five second
timer starts over. So, to keep the light on for nine seconds, press the LIGHT
button, count to four, and press the LIGHT button again. The light will remain
on continuously for nine seconds.
The LIGHT button will not work in Key Lock mode or when the Priority
channel is operating. See LIMIT/AUX for more information.
69
The Keyboard
PROG
The PROG button is used to program in scan bank limits and search bank
limits. It is also used to lock and unlock individual frequencies within a search
bank and to lock and unlock entire search banks. You can also use it to program
a specific scan channel with a frequency, but we don’t recommend you use this
method. See page 16 for a discussion of the different ways to program a scan
channel.
The PROG button is always used with other buttons in a sequence.
INC
The INC button is used primarily to set a search increment when setting up
search bank limits. Once you choose a lower and upper frequency range, you tell
the scanner to scan the range in a certain size jump. This jump is the search
increment. It is specified in kilohertz (KHz), not megahertz.
The INC button has no meaning while in Scan mode, so it doesn’t do anything.
You will normally use it while programing a search bank limit and will be
prompted for an increment value when the KHz indicator flashes in the display.
But you can use the INC button to change the increment of an existing search
bank. Say you set up search bank 4 to search through 60 MHz to 70 MHz in 5
KHz increments. While searching bank 4, you can press the INC button. You
will be prompted with a flashing KHz in the display and may then enter in a new
search increment, say 100 KHz. Bank 4 will now use the 100 KHz increment for
its search. All the other search parameters for bank 4 stay the same.
In Manual mode you can modify the frequency of the scan channel you are
looking at by pressing the Down arrow button or by using the Tuning knob. The
current frequency will increase or decrease (depending on which way you turn
the knob or if you are using the Down arrow) by a default of 12.5 KHz. By
pressing the INC button and entering a different increment, you can change the
step that these controls will use (if the frequency you enter ends in .5KHz, as in
6.1275, the scanner will automatically default to a 5 KHz increment).
For example, say you are in Manual mode looking at Scan channel 731. It
contains the frequency 9.600 MHz in AM mode. You have a long wire attached
as an antenna, since you are trying to receive shortwave transmissions. You can
move up or down from this frequency by turning the Tuning knob. If you turn it
one click to the right, the scanner will change to 9.6125 MHz. One click to the
left would have changed it to 9.5875 MHz. By pressing INC, 5, ENT, you
change the increment value to 5 KHz instead of 12.5 KHz. Then, from 9.600
MHz, one click to the right of the Tuning knob will change the frequency to
9.605 MHz.
70
AR1000 Reference
5 KHz is the smallest increment value you can use with the AR1000. 995 KHz is
the largest value you can use. The value you choose must be divisible by 5 or
12.5.
AM/FM
This button toggles between the two transmission modes. The AR1000 can pick
up both AM and FM transmissions and this button switches between them. You
can tell which mode you are in by looking at the corresponding indicator in the
display.
This button, as well as the WFM button, acts as an “enter” function when you
change a frequency in a scan channel. You may enter a new frequency into any
scan channel and listen to it, but the frequency will not be made permanent in
that channel until you press either the AM/FM or the WFM mode keys. See page
16 for more details on programming scan channels.
W-FM
The AR1000 can receive two variations of FM transmission—normal (or narrow)
FM (sometimes abbreviated NFM) and wide-mode FM (WFM). Most VHF and
UHF FM transmissions are in NFM, but occasionally, you will find some transmissions, like Military satellite transmissions, in WFM. In addition, standard FM
radio broadcasts and TV channel audio transmissions are in WFM. While the
AR1000 can pick up standard FM radio broadcasts quite nicely, it cannot decode
the stereo signal.
Pressing the W-FM button will toggle the reception mode between FM and
WFM. You can tell which mode you are in by looking at the mode indicator in
the display.
LOCKOUT
The LOCKOUT button is used to lock and unlock individual scan channels,
entire scan banks, individual frequencies within search banks, and entire search
banks.
When you are looking at a specific scan channel, either because the scanner
stopped on it when it was active, or because you are looking at it in Manual
mode, pressing LOCKOUT will lock that channel so it will be skipped during a
scan. When you lock a channel, you will see the L.OUT indicator in the display
when ever you view that channel. You press LOCKOUT again to unlock a
locked channel.
Note that the LOCKOUT button is always active. If you are scanning or searching, and press the LOCKOUT button by accident, it will lock the channel or
71
The Keyboard
frequency you are on at the time you press the button. You will probably have no
indication that this has happened. Therefore, it is a good idea to periodically step
through your scan channels and search banks to check for locked channels and
frequencies.
LIMIT/AUX (Priority)
This button serves two purposes. It is used in a sequence for setting up limits and
it is used to turn the Priority mode on and off (and to program the Priority
channel).
LIMIT
The LIMIT button is used when ever you are going to set an upper and lower
limit. You use this button when you are limiting scan banks, search banks, and
when you are setting up the parameters for individual search banks.
The LIMIT button is always used in a sequence like:
• Enter lower value
• Press LIMIT
• Enter upper value
• Press ENT
The LIMIT button acts as the “enter” command for the lower value, just as the
ENT key enters the number for the upper value.
You always press this button for its LIMIT function within a key sequence.
AUX (Priority)
The AR1000 has one Priority channel that will take precedence over any other
broadcast. If you want to be sure you will hear the transmissions on a certain
channel, even if you are listening to another active channel, make it the Priority
channel. You can assign any channel in the scanner to be the Priority channel.
Unfortunately the AR1000 uses the confusing term AUX to represent the Priority channel. Any time we refer to AUX, we are talking about the Priority channel
or Priority mode.
When you select Priority mode by pressing AUX, the AUX indicator appears in
the display. The Priority channel is checked every two seconds and the scanner
will switch to the Priority channel if it finds activity on it. The Priority mode will
work whether you are in Manual mode, Scan mode, or Search mode.
72
AR1000 Reference
To program a
new Priority
channel
• Press AUX.
• Press PROG.
• Enter the channel number you want as the new Priority channel.
• Press ENT.
To check the
current Priority
channel
• Open up the squelch so you hear the background hiss
• Press AUX
Within two seconds, the scanner will switch channels to the Priority channel.
Press AUX again to turn off Priority mode, once you’ve determined the Priority
channel.
This attribute of the Priority mode may be problematic if you are trying to
capture a very weak signal. Sometimes you can only hear a signal if you open the
squelch so that the signal is audible within the hiss. If you have Priority mode
enabled and adjust the squelch so that you can hear the hiss on a different channel, within two seconds you will be switched to the Priority channel, whether it
has activity or not. Because you have opened the squelch so that you can hear the
hiss, when the scanner checks the Priority channel, it will hear the hiss on it also
and switch. Simply turn off Priority mode to get around this.
Priority mode is turned off each time you turn off the power. You must press
AUX again, each time you power on the scanner, if you want to have the Priority
mode in effect. The Priority channel assignmentremains across power cycles,
however.
Note:
You can’t program a cleared channel as the Priority channel.
There are some unusual problems associated with the Priority channel feature. Be
sure you understand them.
Priority channel problem 1:
Once you have switched to the active Priority channel, while it is active, every key
on the scanner, except AUX, will be locked out.
Even the LIGHT key will not
function. You must press AUX again to turn off Priority mode in order to get
access to the other keys. Of course, when the frequency becomes inactive, the
scanner will leave the Priority channel and you’ll get access back to all the keys.
You can easily test this by assigning the local weather channel (which usually has
continuous transmissions) as the Priority channel.
In the sequence to assign a channel as the Priority channel, after you press AUX
you must press several other keys. If, before you press PROG, the channel that is
73
The Keyboard
currently assigned as Priority has activity, you will be immediately switched to it
(since, by pressing AUX, you have turned on Priority mode) and will not be able
to enter the rest of the key presses for the new Priority channel.
The solution, if this happens, is to press the Attenuation button to reduce the
signal from the current Priority channel. This should keep it from switching
while you are trying to enter a new channel number. You may also have to close
the squelch, or, in the worst case, remove the antenna. However, unless your
Priority channel is very active, you probably won’t see this problem.
Priority channel problem 2:
When you are in Priority mode, the Hold function will no longer operate correctly. When Priority mode is enabled, the scanner will always act as if Delay
mode is set, whether the display reads DELAY or HOLD. After stopping on an
active channel or frequency, the scanner will resume scanning or searching when
the frequency goes inactive. This is a bug associated with the operation of the
Priority feature.
BANK
The BANK button is the primary button you will use to gain direct access to any
scan channel. Once you are in Manual mode, you can look at any channel by
pressing BANK and the three-digit channel number. When you press the BANK
button, the BANK indicator flashes in the display. You would expect this function to work directly from the MANUAL key, but, with the AR1000, you have
to press BANK first. If you make a mistake entering the channel you want to go
to, press the CLEAR button and enter the correct channel. You can get out of the
mode altogether by pressing the MANUAL key again.
If you press the BANK button while in Scan mode, scanning will stop and
PROG will flash in the display. The AR1000 thinks you want to set up scan
bank limiting, a feature we recommend you don’t use for normal activity. Press
the SCAN button to take you out of this mode.
If you press the BANK button while in Search mode, PROG will flash in the
display. The AR1000 is prompting you to press the PROG button so that you
can set up search bank limiting. See page 31 for details about using search bank
limiting. If you pressed BANK by mistake, simply press the SEARCH button
again to return to search mode.
DELAY/HOLD
The DELAY/HOLD button sets scanning or searching mode to either Delay or
Hold. In Delay mode, when an active frequency is encountered, after the trans
74
AR1000 Reference
mission ends, the scanner will delay for approximately three seconds and will
then start scanning or searching. This is useful so that you don’t miss a response
to a transmission. When set to Hold, the scanner will remain on the last active
frequency and will not resume scanning or searching until you press the SCAN
or SEARCH buttons again. Hold mode is useful for snagging those intermittent
or elusive frequencies you are trying to find.
Unfortunately, you can not defeat the delay feature of the AR1000. This becomes a problem if you are trying to monitor trunked systems, because in a
trunked system, the response may come on a channel that is different from that
of the original transmission. On a trunked system you want the scanner to
immediately resume scanning after a transmission ends. Since the AR1000 is
waiting to hear the response on the same channel, you may miss the response on a
different channel by the time the scanner starts scanning again. There is currently
no way around this problem and the AR1000 may not be suitable for monitoring
trunked systems.
The Delay/Hold setting applies to both searching and scanning modes and to all
channels and banks. You can’t set some banks to Delay and others to Hold.
The AR1000 always defaults to Delay mode on power-up.
SEARCH
The large SEARCH button is the primary control for putting your scanner into
Search mode. Once you have programmed in one or more search banks, you start
searching by pressing the SEARCH button. The Up arrow above the SEARCH
button is there to inform you that searches will be done in ascending frequency
order, searching from the lower search limit to the upper limit.
You can switch to Search mode at any time (while in Scan mode or Manual
mode) by pressing the SEARCH button.
SCAN
The large SCAN button is the primary control for putting your scanner into
Scan mode. After you have entered frequencies into the Scan channels, you start
scanning by pressing the SCAN button. The Up arrow above the SCAN button
is there to inform you that the AR1000 will scan in ascending Scan channel
order, scanning from the lower Scan channels to the higher Scan channels.
You can switch to Scan mode at any time (while in Search mode or Manual
mode) by pressing the SCAN button.
75
The Keyboard
MANUAL
The MANUAL button puts the scanner in Manual mode. From Manual mode,
you can examine or program individual scan channels. By repeatedly pressing the
MANUAL button, you will step through all the scan channels that contain
frequencies. Even locked frequencies will appear when you press the MANUAL
key, but if a channel has been cleared, MANUAL will skip over it.
You can switch to Manual mode at any time (while in Search mode or Scan
mode) by pressing the MANUAL button.
Down arrow
Above the SEARCH and SCAN buttons are Up arrows and there is a separate
button to the right of the MANUAL button that is labeled with a Down arrow.
These buttons are used to direct the direction of searching, scanning, and stepping through channels. The use of these buttons is not symmetrical, so it may be
a bit confusing when and how they are used.
The Up arrows above the SEARCH and SCAN buttons are there simply to let
you know that when you do a search or scan, they will occur in an ascending
order. You will move from the lower limit to the upper limit in a search and from
the lower channels to the higher channels in a scan.
The Down arrow, however, can be used to stop searching or scanning without
leaving the modes, and to change the direction of both searching and scanning. It
is also used to step down through a frequency range while in Manual mode.
Using the Down arrow while searching
During a search, if you press the Down arrow, the search will be halted on the
frequency it was searching at the time of the key press, but the scanner will
remain in search mode. If the frequency is active, you will hear it. You now have
two options with the Down arrow button. If you press it briefly, the scanner will
search downward by the search bank increment to the previous (that is, lower)
frequency and stop on it, whether it has activity or not. You can continue stepping downward through the search range in this manner. The scanner will still
skip over any frequencies that have been locked within the search bank.
If you press and hold the Down arrow button for a moment, the scanner will
begin searching through the search bank moving from the upper limit (but
starting at the frequency you were on) to the lower limit. In other words, by
pressing and holding the Down arrow, you can make the scanner search from
high to low instead of its normal search from low to high. This is not a “mode,”
however. That is, if you start searching downwards, the next time you press the
76
AR1000 Reference
SEARCH button, you will still search in the normal upwards manner. If you
want to continue to search downwards, keep pressing the Down arrow button.
Using the Down arrow while scanning
The Down arrow works in a similar manner while scanning as it does while
searching. If you are scanning, pressing the Down arrow button stops the scanner
at the current channel, but keeps it in scan mode. The successive presses of the
Down arrow button will step you backwards through the scan channels. If you
press and hold the Down arrow button for a moment, the scanner will start
scanning backwards through the available scan channels. As with searching, this
does not set up a “mode.” If you want to keep scanning backwards, keep using
the Down arrow. When you press the normal SCAN button, you will always
scan from lower to higher channels.
Tip:
In Manual mode, you can use the MANUAL button to step forward through
each Scan channel, but there is no equivalent method of stepping backwards
through the channels. You can use the Down arrow button to make the scanner
act in this manner. The difference is that, because you are still in Scan mode,
when you step with the Down arrow, you will skip over every locked channel. In
addition, you will only be able to step through unlocked scan banks. In Manual
mode, you can step through every bank in the scanner (as long as it has not been
limited with bank limiting). Even if the bank itself is locked, the MANUAL
button will let you step through it. When you use the Down arrow, you can only
step through the banks (and the channels) that are unlocked.
Using the Down arrow in Manual mode
When you are in Manual mode, you will be looking at one scan channel. You
can temporarily change the frequency of that channel by pressing the Down
arrow. The scanner will decrement the current frequency by the default increment value of 12.5 KHz. You can change this default by pressing the INC
button and entering in a different increment value. For example, if Manual mode
stops you on channel 212, which contains the frequency 460.500 MHz, and you
press the Down arrow, the frequency in channel 212 will change to 460.4875
MHz. If you first changed the increment value to 10 KHz, by pressing INC, 10,
ENT, then when you press the Down arrow, the frequency in channel 212 will
read 460.490 MHz. The Down arrow, in this case, is equivalent to turning the
Tuning knob one click to the left (counter-clockwise). Turning the knob to the
right (clockwise) will increment the frequency by the increment amount. There is
no keyboard equivalent to turning the Tuning knob to the right.
77
The Keyboard
This operation in Manual mode can be useful for fine-tuning a frequency,
particularly frequencies in the shortwave bands, which tend to drift in and out of
frequency. These changes are not permanent. When you press the Manual key
again, the original frequency will return.
See page 82 for information about the Tuning knob.
KEY LOCK
KEY LOCK button locks out the keys on the keyboard so you don’t accidentally
disturb the current setup. After you press KEY LOCK, you will not be able to
stop the scan or search by pressing MANUAL, nor will you be able to change
operation modes. When in Key Lock mode (with KEY LOCK in the display) the
only key that will function is the KEY LOCK key, which will toggle the mode
off. Even the LIGHT key will not function. In addition, the Tuning knob on the
top panel will become inactive. However, the volume, squelch, and ATT button
will continue to function normally.
Key Lock mode can be useful if you are carrying the scanner with you on the belt
clip and you don’t want to change the setup by accidentally bumping the keys. It
is also a good way to keep your children from modifying your current setup. The
KEY LOCK key is protected by a collar to keep it from being accidentally
pressed.
You can run into an interesting situation with Key Lock and AUX modes. When
the scanner switches to the channel set as the Priority channel, you will encounter
a similar locked out keyboard. Only the AUX key will be active in this situation.
If you turn on Priority mode (AUX shows in the display) and then turn on Key
Lock, if the scanner switches to the Priority channel, you will not even be able to
disable Key Lock, since that key will be locked out by the Priority mode. The
only key that will be functioning will be the AUX key.
Fortunately, this is not really a problem because neither the Key Lock mode nor
the AUX mode is carried across power cycles. When you turn off the scanner
while it is in Key Lock mode, it will always power back up with the keyboard
unlocked.
CLEAR
The CLEAR key is used to clear out mistakes or unwanted entries in the display.
You can use it to clear a channel frequency, a bank limit, a bank channel, an
increment value, or anything else you enter from the keyboard. Note that the
CLEAR button is used for both Clear and for entering a decimal point. So if you
go to enter the frequency 154.075 and you enter 155 by mistake, you will have
78
AR1000 Reference
to press CLEAR twice—once to enter the decimal point, which is required for
any frequency, and the second time to clear the entry.
It is possible to program a cleared channel with this key by pressing CLEAR,
ENT, but we recommend against it. Users have found that clearing channels in
this manner may result in a complete processor lockup. See page 19 for a discussion on clearing channels.
ENT
ENT is used to enter numbers into the scanner. When you program a scan
channel with a frequency, you enter the frequency into the channel by pressing
ENT. This lets the scanner know you are done with the entry. It also lets you
enter the minimum number of digits necessary to enter the frequency. For
example, if you want to program a channel with the frequency 123.000 MHz,
you only need to enter 123 and press the ENT button. ENT automatically enters
the decimal point and the remaining zeros.
ENT is used to terminate certain key sequences in the AR1000, particularly limit
sequences.
Number key pad
The number key pad allows you to enter the numeric digits 0 through 9. It is
arranged like a standard touch-tone phone pad, not a normal adding machine or
calculator pad. You use these keys to enter all numeric values into the scanner.
You need to explicitly enter the decimal point for a frequency except as described
above under ENT.
79
The Keyboard
The following chart shows what each key does, depending on the mode you are in.
Key/Control
PROG
INC
AM/FM
LOCKOUT
LIMIT/AUX
BANK
W-FM
DELAY/HOLD
ENT
CLEAR
SEARCH
SCAN
MANUAL
Down Arrow
Tuning knob
Numbers
Manual Mode
Copy a frequency from one channel to another.
Set up tuning increment.
Change modes. Make frequency permanent.
Lock channel.
Toggle Priority mode.
Select channel.
Change modes. Make frequency permanent.
No function.
Enters frequency into channel.
Clear frequency in display.
Change to Search mode.
Change to Scan mode.
Advance one channel.
Tune frequency down by INC.
Tune frequency by INC.
Enter frequency.
Key/Control
PROG
INC
AM/FM
LOCKOUT
LIMIT/AUX
BANK
W-FM
DELAY/HOLD
ENT
CLEAR
SEARCH
SCAN
MANUAL
Down Arrow
Tuning knob
Numbers
Scan Mode
No function.
No function.
No function.
Lock channel being scanned.
Toggle Priority mode.
Set up Scan bank limits.
No function.
Toggle Delay/Hold mode.
No function.
No function.
Change to Search mode.
Start scanning if stopped on channel.
Change to Manual mode.
Stop scan. Stays in Scan mode. Decrements scan channel.
Stop scan. Stays in Scan mode. Changes scan channel.
Jump to numbered scan bank, if unlocked.
Key/Control
PROG
INC
AM/FM
LOCKOUT
LIMIT/AUX
BANK
W-FM
DELAY/HOLD
ENT
CLEAR
SEARCH
SCAN
MANUAL
Down Arrow
Tuning knob
Numbers
Search Mode
Set up search bank parameters.
Change search increment.
Change search mode.
Lock frequency being searched.
Toggle Priority mode.
Set up search bank limits.
Change search mode.
Toggle Delay/Hold mode.
Stop search. Copy to scan channel.
No function.
Start search if stopped on active frequency.
Change to Scan mode.
Change to Manual mode.
Stop search. Stays in Search mode. Decrement frequency by INC.
Stop search. Stays in Search mode. Changes frequency by INC.
Jump to numbered Search bank, if unlocked.
80
AR1000 Reference
The Top Controls
The top panel contains controls for volume, squelch, tuning, and attenuation. In
addition, it contains jacks for earphones and the antenna. These controls are
described below.
ATT
EAR
UP
MIN
ANT
VOL
DN
MAX
SQL
Power Switch/Volume control
The switch in the center of the top panel is a double rotary switch. The inner
knob is the power and volume control while the outer knob is the squelch
control.
You turn on the scanner by turning the power/volume knob clockwise, past the
click. After power comes on, continued turning clockwise increases the volume.
Turning the knob in the opposite direction decreases the volume. When the
knob clicks again, you have turned off power to the unit.
Squelch
The outside knob controls the squelch. The squelch control suppresses the
background hiss that occurs on frequencies that do not contain active transmissions. By setting the squelch control to the proper level, you will filter out the
hiss, but allow transmissions to “break squelch” and be received by the scanner.
The actual setting for the squelch control will depend on several factors, but on
most AR1000s the normal position is between 11 o’clock and 12 o’clock as you
look down, with the display toward you.
You may close the squelch to such an extent that even active signals don’t get
through, so be sure to experiment with this control. In general, you want to close
it enough to eliminate hiss from all the frequencies you scan or search. First turn
the squelch control counter-clockwise until you hear hiss, and then turn it
81
The Top Controls
clockwise until the hiss stops. Once the scanner has gone through a complete
search or scan, without stopping on an inactive frequency, you have the squelch
set properly.
The AR1000 is famous for its touchy squelch controls. The scanner may need a
different squelch setting for different frequency ranges. If you mix frequencies in
a scan bank, you may be compelled to set the squelch at the highest common
denominator, which may cause you to miss other active frequencies. Be sure to
test out the various squelch settings to find the optimum setting for different
frequencies.
Attenuator button
This switch, labeled ATT on the top panel, will reduce the signal received by the
scanner by 10 db (decibels). It can be useful if you receive interference from a
very powerful, nearby station.
You decrease the received signal by depressing the ATT switch. You return
sensitivity to normal by depressing the switch again so it is in the raised position.
If you are searching a band that has a lot of frequencies that stop the scanner,
even with the squelch closed most of the way, you may have better success by
pressing the ATT button and then opening the squelch more. This will let the
strong signals get through but will filter out most of the noise and junk.
Tuning knob
The Tuning knob is a free-turning knob with the labels UP on the left and DN
(down) on the right of the knob. You are tuning up when you turn the knob to
the right, or clockwise. You are tuning down when you turn it to the left or
counter-clockwise.
The tuning knob can be used in three different ways, depending on whether you
are in Search mode, Scan mode, or Manual mode.
Using the Tuning knob while searching
During a search, if you turn the knob in either direction, the search will be halted
on the frequency it was searching at the time you turned the knob, but the
scanner will remain in Search mode. You will also see either the Up or Down
arrow in the display, depending on the direction you turned the knob. If the
frequency you stopped on is active, you will hear it. With each click of the
turning knob you will advance or decrement the frequency by the search bank
increment. You can continue stepping upward or downward through the search
range in this manner. The scanner will still skip over any frequencies that have
been locked within the search bank.
82
AR1000 Reference
Using the Tuning knob while scanning
The Tuning knob works in a similar manner while scanning as it does while
searching. If you are scanning, turning the Tuning knob stops the scanner at the
current channel, but keeps it in scan mode. Successive clicks of the Tuning knob
will step you backwards or forwards through the scan channels.
Tip:
In Manual mode, you can use the MANUAL button to step forward through
each scan channel, but there is no equivalent method of stepping backwards
through the channels. By turning the Tuning knob counter-clockwise, you can
make the scanner act in this manner. The difference between this and using the
MANUAL button is, because you are still in Scan mode, when you step with the
Tuning knob, you will skip over every locked channel. In addition, you will only
be able to step through unlocked scan banks. In Manual mode, you can step
through every bank in the scanner (as long as it has not been limited with bank
limiting). Even if the bank itself is locked, the MANUAL button will let you step
through it. When you use the Tuning knob, you can only step through the banks
(and the channels) that are unlocked.
Using the Tuning knob in Manual mode
When you are in Manual mode, you will be looking at one scan channel. You
can temporarily change the frequency of that channel by turning the Tuning
knob. The scanner will increment or decrement the current frequency by the
default increment value of 12.5 KHz. You can change this default by pressing the
INC button and entering in a different increment value. For example, if Manual
mode stops you on channel 212, which contains the frequency 460.500 MHz,
and you turn the Tuning knob one click counter-clockwise, the frequency in
channel 212 will change to 460.4875 MHz. If you first changed the increment
value to 10 KHz, by pressing INC, 10, ENT, then when you turn the knob one
click counter-clockwise, the frequency in channel 212 will read 460.490 MHz.
Turning the knob to the right (clockwise) will increment the frequency by the
increment amount.
This operation in Manual mode can be useful for fine-tuning a frequency,
particularly frequencies in the shortwave bands, which tend to drift in and out of
frequency. These changes are not permanent. When you press the Manual key
again, the original frequency will return.
You can duplicate all of the functions of turning the Tuning knob counterclockwise, by using the keyboard Down arrow button. There is no keyboard
equivalent for turning the Tuning knob clockwise.
83
The Top Controls
Earphone jack
The earphone jack uses a standard 3.5mm mini-jack that will drive an 8 ohm
speaker or headset. When you put a plug into the earphone jack, sound is cut
from the AR1000 speaker.
You may want to use more comfortable, light-weight stereo headphones with the
AR1000. If you use a stereo mini-jack, you will get sound, but only out of one
ear piece. To comfortably use stereo headphones with the AR1000, you need to
get a stereo-to-mono mini-jack adaptor. These are readily available from Radio
Shack and most electronics stores.
See the Applications chapter for ideas about listening to the AR1000 in your car.
Antenna jack
The antenna jack on the AR1000 uses the standard BNC connector that will fit
most telescoping and “rubber ducky” antennas. You may need an adaptor for an
antenna with a different connector, such as a TNC or PL-259 connector.
The antenna is probably the one most critical element that affects the operation
of the AR1000. The Accessories chapter has more information about antennas
for the AR1000.
84
Appendix
AOR
AR 1000
SCAN
AM
DELAY
BANK
435 CH
AUX
311.000
MHz
LIGHT
WIDE RANGE MONITOR
PROG
LIMIT
1
2
3
INC
AUX
BANK
4
5
6
AM
WFM
7
8
9
FM
LOCKOUT DELAY
•
CLEAR
HOLD
ENT
SEARCH SCAN
MANUAL
KEYLOCK
Frequency Lists
Magazines/Newsletters
Equipment Sources
Frequency Guides and Books
On-Line Services
Useful and Interesting Frequencies and Search Ranges
U.S. Television Broadcast Sound Channels (WFM mode)
NOAA Weather Stations
02
03
04
05
06
07
08
09
10
11
12
13
14
15
16
17
18
19
20
21
22
23
24
25
26
27
28
29
162.400
162.425
162.450
162.475
162.500
162.525
162.550
161.650
161.775
59.75 MHz
65.75 MHz
71.75 MHz
81.75 MHz
87.75 MHz
179.75 MHz
185.75 MHz
191.75 MHz
197.75 MHz
203.75 MHz
209.75 MHz
215.75 MHz
475.75 MHz
481.75 MHz
487.75 MHz
493.75 MHz
499.75 MHz
505.75 MHz
511.75 MHz
517.75 MHz
523.75 MHz
529.75 MHz
535.75 MHz
541.75 MHz
547.75 MHz
553.75 MHz
559.75 MHz
565.75 MHz
30
31
32
33
34
35
36
37
38
39
40
41
42
43
44
45
46
47
48
49
50
51
52
53
54
55
56
57
571.75 MHz
577.75 MHz
583.75 MHz
589.75 MHz
595.75 MHz
601.75 MHz
607.75 MHz
613.75 MHz
619.75 MHz
625.75 MHz
631.75 MHz
637.75 MHz
643.75 MHz
649.75 MHz
655.75 MHz
661.75 MHz
667.75 MHz
673.75 MHz
679.75 MHz
685.75 MHz
691.75 MHz
697.75 MHz
703.75 MHz
709.75 MHz
715.75 MHz
721.75 MHz
727.75 MHz
733.75 MHz
58
59
60
61
62
63
64
65
66
67
68
69
70
71
72
73
74
75
76
77
78
79
80
81
82
83
739.75 MHz
745.75 MHz
751.75 MHz
757.75 MHz
763.75 MHz
769.75 MHz
775.75 MHz
781.75 MHz
787.75 MHz
793.75 MHz
799.75 MHz
805.75 MHz
811.75 MHz
817.75 MHz
823.75 MHz
829.75 MHz
835.75 MHz
841.75 MHz
847.75 MHz
853.75 MHz
859.75 MHz
865.75 MHz
871.75 MHz
877.75 MHz
883.75 MHz
889.75 MHz
Weather
Weather
Weather
Weather
Weather
Weather
Weather
Canadian WX
Canadian WX
Search Ranges:
Railroad Frequencies
160.185 - 161.565 MHz
15 KHz increments (FM)
Cellular Mobile Phones
824 - 849 MHz Mobile
869 - 894 MHz Base
30 KHz increments (FM)
FM Broadcast Radio
88.1 - 107.9 MHz
200 KHz increments (WFM)
AM Broadcast Radio
540 - 1700 KHz
10 KHz increments (AM)
Citizens Band Channels (MHz - AM mode)
U.S. Secret Service-National (FM)
01
02
03
04
05
06
07
08
09
10
11
12
13
14
15
16
17
18
19
20
165.7875
165.3750
166 2125
165.2125
164.8875
164.4000
26.965 MHz
26.975 MHz
26.985 MHz
27.005 MHz
27.015 MHz
27.025 MHz
27.035 MHz
27.055 MHz
27.065 MHz
27.075 MHz
27.085 MHz
27.105 MHz
27.115 MHz
27.125 MHz
27.135 MHz
27.155 MHz
27.165 MHz
27.175 MHz
27.185 MHz
27.205 MHz
21
22
23
24
25
26
27
28
29
30
31
32
33
34
35
36
37
38
39
40
27.215 MHz
27.225 MHz
27.255 MHz
27.235 MHz
27.245 MHz
27.265 MHz
27.275 MHz
27.285 MHz
27.295 MHz
27.305 MHz
27.315 MHz
27.325 MHz
27.335 MHz
27.345 MHz
27.355 MHz
27.365 MHz
27.375 MHz
27.385 MHz
27.395 MHz
27.405 MHz
Baker
Charlie
Hotel
Mike
Oscar
Papa
166.5125
164.6500
164.1000
166.4625
162.6875
171.2875
Sierra
Tango
Victor
X-Ray
Yankey (AF1)
Zulu (AF1)
Shortwave Frequencies (MHz - AM)
5.000
WWV Time Standard
6.120
Japan
7.335
CHU Canadian Time Standard
9.505
Radio Japan
9.515
BBC World Service London
9.635
Radio Canada
10.000
WWV Time Standard
11.910
Japan
12.050
Radio Moscow
15.450
Radio Moscow
15.000
WWV Time Standard
15.155
HCJB Ecuador
86
U.S. VHF Marine Channels
Ch Transmit
1 156.050
2 156.100
3 156.150
4 156.200
5 156.250
6 156.300
7 156.350
8 156.400
9 156.450
10 156.500
11 156.550
12 156.600
13 156.650
14 156.700
15 156.750
16 156.800
17 156.850
18 156.900
19 156.950
20 157.000
21 157.050
22 157.100
23 157.150
24 157.200
25 157.250
26 157.300
27 157.350
28 157.400
60 156.025
61 156.075
62 156.125
63 156.175
64 156.225
65 156.275
66 156.325
67 156.375
68 156.425
69 156.475
70 156.525
71 156.575
72 156.625
73 156.675
74 156.725
77 156.875
78 156.925
79 156.975
80 157.025
81 157.075
82 157.125
83 157.175
84 157.225
85 157.275
86 157.325
87 157.375
88 157.425
Receive
156.050
156.100
156.150
156.200
156.250
156.300
156.350
156.400
156.450
156.500
156.550
156.600
156.650
156.700
156.750
156.800
156.850
156.900
156.950
157.000
157.050
157.100
157.150
161.800
161.850
161.900
161.950
162.000
160.625
160.675
160.725
160.775
160.825
156.275
156.325
156.375
156.425
156.475
156.525
156.575
156.625
156.675
156.725
156.875
156.925
156.975
157.025
157.075
157.125
157.175
161.825
161.875
161.925
161.975
157.425
Cordless phones/baby monitors (FM)
User
Ch. 1 base
46.61 MHz
Vessel Traffic System
Ch. 2 base
46.63
Port Operations
Ch. 3 base
46.67
Port Operations
Ch. 4 base
46.71
Port Operations
Ch. 5 base
46.73
Vessel Traffic System
Ch. 6 base
46.77
Intership Safety
Ch. 7 base
46.83
Commercial
Ch. 8 base
46.87
Commercial - Intership
Ch. 9 base
46.93
Commercial and Non-commercial Ch. 10 base
46.97
Commercial
Ch. 1 handset
49.67
Commercial
Ch. 2 handset (BM) 49.845
Port Operations
Ch. 3 handset (BM) 49.86
Navigational
Ch. 4 handset
49.77
Port Operations
Ch. 5 handset (BM) 49.875
Distress and Safety - Receive
Ch. 6 handset (BM) 49.83
Distress, Safety and Calling
Ch. 7 handset (BM) 49.89
State Control
Ch. 8 handset
49.93
Commercial
Ch. 9 handset
49.99
Commercial
Ch. 10 handset
49.97
Port Operations - Intership
Coast Guard
Coast Guard Liaison
McDonalds Wireless Microphones
Coast Guard
Marine Telephone (Ship/Shore)
165.6000
30.8400
Marine Telephone (Ship/Shore)
169.4450
31.0000
Marine Telephone (Ship/Shore)
170.2450
33.1400
Marine Telephone (Ship/Shore)
170.3050
35.0200
Marine Telephone (Ship/Shore)
171.1050
151.7150
171.9050
151.7750
457.5500
151.8950
464.5125
154.6000
Vessel Traffic System
464.5875
154.5700
467.7750
154.6000
Port Operations
Port Operations
Military Air Comms (AM mode)
Commercial - Intership
Non-Commercial
126.2 Military airfields
Non-Commercial - Working
134.1 Military air radar
Non-Commercial - Shipboard
236.6 Military control towers
Non-Commercial
243.0 Military emergency
Non-Commercial - Intership
257.8 Military/civilian control towers
Port Operations
288.8 Military search & rescue
Port Operations
381.3 ACC primary
Port Operations - Pilots
311.0 STRATCOM primary
Non-Commercial - Working
321.0 STRATCOM secondary
Commercial
287.4 USAF air-to-air refueling
Commercial
352.6 USAF air-to-air refueling
Coast Guard
281.0 Air tanker common
Coast Guard
340.2 Navy control towers
Coast Guard
260.2 Navy control towers
Marine Telephone (Ship/Shore)
364.2 NORAD air intercept control
Marine Telephone (Ship/Shore)
274.4 NORAD Sierra Pete
Marine Telephone (Ship/Shore)
376.1 TAC ACM exercises
Marine Telephone (Ship/Shore)
Commercial - Intership
87
While there are many sources of information for scanner enthusiasts, we
have found the following to be particularly useful.
Magazines/Newsletters
In the United States/Canada
Popular Communications
Tom Kneitel, Editor
76 North Broadway
Hicksville, NY 11801-2953
USA
$21.50 per year/USA
12 issues
Beginner-level coverage of scanning, shortwave, CB, cellular telephone,
satellite, RTTY.
Monitoring Times
Bob Grove, Publisher
P. O. Box 98
300 S. Highway 64 West
Brasstown, NC 28902-0098
USA
$21.95 per year/USA
12 issues
Good in-depth coverage of scanning, shortwave, CB, cellular telephone,
satellite, RTTY.
Intercepts Newsletter
Steve Douglas, Editor
P.O. Box 7176
Amarillo, TX 79114-7176
USA
$18.00 per year/USA
12 issues
Information for the serious military monitor in the USA.
88
In England
Short Wave Magazine
Dick Ganderton, Editor
PW Publishing Ltd.
Arrowsmith Court, Station Approach
Broadstone, Dorset BH18 8PW
England
$45.00 per year for the USA.
12 issues
Good general coverage of scanning, shortwave, satellite, RTTY.
Equipment Sources
Tandy/Radio Shack Corporation
Stores everywhere.
Items listed in this guide are from the 1995 catalog.
Grove Enterprises, Inc.
P.O. Box 98
Brasstown, NC 28902
704-837-9200
704-837-2216 FAX
Scanners, shortwave equipment, accessories. Write for catalog.
MetroWest
822 N. Spring
La Grange Park
IL 60525 USA
1-800-657-1475
708-354-2125
Scanners, antennas, battery packs, and other accessories. Write for catalog.
Frequency Guides and Books
Police Call Radio Guide
Gene Hughes, Editor
Hollins Radio Data
P.O. Box 35002
Los ANgeles, CA 90035
USA
Nine regional volumes for USA
$9.99 per volume.
Available at Radio Shack stores.
Contains police, fire, emergency medical services, aircraft, railroads.
89
CRB Research Books, Inc.
P.O. Box 56
Commack, NY 11725
USA
Books on scanners and communications monitoring, CB radio, COMINT,
clandestine operations, cryptography, electronic surveillance, countermeasures, espionage. Write for catalog.
Passport to World Band Radio
Lawrence Magne, Editor-in-Chief
International Broadcasting Services, Ltd.
P. O. Box 300
Penn’s Park, Pennsylvania 18943
USA
Issued annually. $17.95
Shortwave radio listings and product reviews.
The “Top Secret” Registry of U.S. Government Radio Frequencies. 8th Edition
By Tom Kneitel
CRB Research Books, Inc.
P.O. Box 56
Commack, NY 11725
USA
Covers 25 to 470 MHz. $21.95
Directory of North American Military Aviation Communications VHF/UHF
Jack Sullivan, Editor
Hunterdon Aero Publishers
P.O. Box 754
Flemington, NJ 08822
USA
1-800-542-SCAN
Covers 25-420 MHz.
Four regional volumes. $24.95 each.
Official Aeronautical Frequency Directory, 2nd ed.
Robert A. Colburn, Editor
Official Frequency Directory
P. O. Box 712
Londonderry, NH 03053
USA
Covers HF-VHF-UHF-800-900 MHz. $24.95.
90
Monitor America, third edition.
Richard Barnett, Editor
SMB Publishing
P.O. Box 428
Newton Highlands, MA 02161
1-800-722-6701
Good, up-to-date frequency listings for all 50 states with many special services
listed. $29.95
On-line Services
CompuServe Inc.
5000 Arlington Centre Blvd.
Columbus, OH 43220
HamNet Scanning and Shortwave special interest group.
Electronic bulletin boards and software library.
Type GO HAMNET at the ! prompt.
You may contact the author at [email protected] on the Internet,
however, the author cannot offer any additional online help for the AR1000
other than that which is found in this guide. Look for our web page at
http://www.designeq.com.
91