1
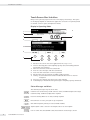
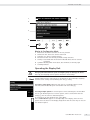
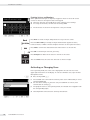
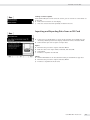
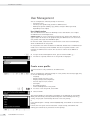
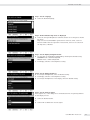
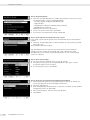
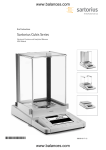
Brief Instructions
Sartorius Cubis Series
Electronic Precision and Analytical Balances
MSU Models
98648-017-12
Information for the User
Contents
Notes on using this manual . . . . . . . . . . . . . . . . . . . . . . . 3
Safety Instructions . . . . . . . . . . . . . . . . . . . . . . . . . . . . . 4
Intended Use . . . . . . . . . . . . . . . . . . . . . . . . . . . . . . . . 4
Operation . . . . . . . . . . . . . . . . . . . . . . . . . . . . . . . . . . . . 5
Turning the Balance On and Off . . . . . . . . . . . . . . . . . . 5
Q-Guide Operating Concept . . . . . . . . . . . . . . . . . . . . . 5
Quick Start: First Weighing Operation. . . . . . . . . . . . . . 7
Touch Screen User Interface . . . . . . . . . . . . . . . . . . . . 8
Using the Touch Sreen . . . . . . . . . . . . . . . . . . . . . . . . . 9
Activating or Changing Users . . . . . . . . . . . . . . . . . . . . 10
Task Management. . . . . . . . . . . . . . . . . . . . . . . . . . . . . . 11
Using Applications with Factory Settings . . . . . . . . . . . 12
Configuring a New Task . . . . . . . . . . . . . . . . . . . . . . . . 12
Executing a Task . . . . . . . . . . . . . . . . . . . . . . . . . . . . . 15
Weighing . . . . . . . . . . . . . . . . . . . . . . . . . . . . . . . . . . . 16
Density Determination . . . . . . . . . . . . . . . . . . . . . . . . . 17
Calibration and Adjustment . . . . . . . . . . . . . . . . . . . . . . 21
Calibration/Adjustment with Built-in
Calibration Weight . . . . . . . . . . . . . . . . . . . . . . . . . . . . 21
Calibration/Adjustment with External
Calibration Weight . . . . . . . . . . . . . . . . . . . . . . . . . . . . 22
System Settings (Menu) . . . . . . . . . . . . . . . . . . . . . . . . . 23
Level the Balance . . . . . . . . . . . . . . . . . . . . . . . . . . . . . 24
Calibration/Adjustment Data . . . . . . . . . . . . . . . . . . . . 24
Timer Controlled Action . . . . . . . . . . . . . . . . . . . . . . . . 25
Device Information . . . . . . . . . . . . . . . . . . . . . . . . . . . 25
Device Parameters . . . . . . . . . . . . . . . . . . . . . . . . . . . . 26
Importing and Exporting Data from an SD Card . . . . . . 29
User Management. . . . . . . . . . . . . . . . . . . . . . . . . . . . . . 30
Creating a User Profile . . . . . . . . . . . . . . . . . . . . . . . . . 30
Activating a User . . . . . . . . . . . . . . . . . . . . . . . . . . . . . 33
Editing a User Profile . . . . . . . . . . . . . . . . . . . . . . . . . . 34
These brief instructions will help familiarize you with
operation of the balance, introduce to you the Q-Guide
operating concept and offer you examples of how to
perform simple tasks.
The user manual additionally contains:
– Safety precautions
– Description of all operating processes
– Description of all applications
– Cleaning and care instructions
– Maintenance and repair instructions
– Information on disposal
– Technical data
enclosed CD-ROM contains the
h The
user manual as a PDF file. To read
and print the file, you require the
program Acrobat Reader, which you
can download for free from the
Adobe website (www.adobe.com).
Software drivers for configuration of USB
interfaces can also be downloaded from
the internet:
http://www.ftdichip.com/FTDrivers.htm
The installation guides for these drivers
can be found here:
http://www.ftdichip.com/Documents/
InstallGuides.htm
Information for the User
Notes on Using this Manual
t Please read these entire instructions carefully before using the balance.
t Please ensure that you read the safety precautions carefully.
t This manual is considered a part of the product. Keep this manual in a safe and
easily accessible location.
t If the manual should be lost or misplaced, please contact Sartorius for a
replacement or download the latest manual from our website:
www.sartorius.com
Symbols and Signs
The following symbols are used in these instructions:
2
Warning symbol for various types of dangers.
This symbol is explained in more detail in the section on safety precautions.
h
This symbol indicates useful information and tips.
This symbol indicates notes on use of the balance in legal metrology.
H
D
This symbol means that the USER key should be pressed.
This symbol means that the TASK key should be pressed.
When individual buttons are displayed (such as the example shown here), press the
associated softkey.
t Indicates a required action
y Describes the result of an action
1. If a procedure has multiple steps...
2. ... the steps are numbered consecutively.
–
Indicates an item in a list
Additional Documents
In addition to this manual (“Brief Instructions”), a set of installation instructions is
included in printed form with the Cubis balance, and full operating instructions are
included as a PDF file on the enclosed CD-ROM.
h
Technical advice / hotline:
Telephone: +49.551.308.4440
Fax:
+49.551.308.4449
Cubis MSU Brief Instructions
3
Information for the User
Safety Instructions
The balance/scale has been constructed in accordance with the European Directives
as well as international regulations and standards for operation of electrical
equipment, electromagnetic compatibility and applicable safety requirements.
However, improper use or handling can result in damage and/or injury.
The equipment may only be operated by trained personnel.
Operators must read these installation instructions, particularly the safety
information, and must be familiar with the operation of the equipment.
The operator must supplement these warnings and safety precautions if necessary
and train operating personnel accordingly.
3
Before operating the balance, be sure to read the section on safety instructions
in the enclosed installation manual.
3
Sharp or pointed instruments (such as ballpoint pens) can
damage the device.
Use only your fingertips and press gently to operate touch screen controls.
Intended Use
Cubis models are fine precision balances with high-resolution. They were specially
developed for exact determination of the mass of materials in liquid, paste, powder
or solid form.
Suitable containers must be used to hold the materials.
The maximum balance capacity depending on the model ranges from 0.01 mg
(smallest mass determination) to 12.0 kg (largest mass determination).
Cubis models are designed specially for use in research, education and day-to-day
laboratory tasks in science, technology and industry.
They are designed to be used exclusively indoors.
Cubis models can be operated standalone, connected to a PC or in a network.
4
Cubis MSU Brief Instructions
Information for the User
Operation
Turning the Balance On and Off
A
t Make sure the balance has been installed and put into operation in accordance
with the installation instructions.
t Press the on/off key A on the control unit.
y The start screen appears briefly on the display, then the user interface appears.
h
On subsequent starts, the most recently active user profile and task are
opened (if at least one user profile has been set up).
t If prompted, level the balance (see “Leveling the Balance” for details).
A t To put the balance in standby mode or switch it off, press the key A.
t Close the draft shield (if present on your model).
Q-Guide Operating Concept
The Cubis precision and analytical balances are controlled by application software
with interactive operator guidance. Once you open a menu or select an application,
brief instructions shown on the display will guide you through the menu or
application step-by-step. At each step along the way, the display shows only those
options that are relevant to your process; this helps prevent unnecessary “detours”
and enables you to reach your goal more quickly.
Although operation of the balance is for the most part intuitive, this manual
includes a section with very detailed, step-by-step instructions where you can learn
about all of the available options (see “Create a user profile” in the chapter entitled
“User Management”).
Basic Operational Structure
Configurable
by user
Configured
at factory
The most basic functions, weighing and taring, can be carried out as soon as the
balance is switched on. The application software is divided into three general areas
in which individual settings can be configured:
Simple Weighing
D TASK
H USER
Task Management (from page 11)
User Management (from page 30)
Select application, start
Select user
Configure application
Create a user profile
Configure task
System Settings
(from page 23)
The Task Management area under (TASK) incorporates numerous preconfigured
applications that can be selected and executed directly. For more complex
requirements, separate tasks can be configured as needed.
The User Management area under (USER) lets you set up user profiles with specific
sets of configuration settings and user rights. You can also set up password
protection to meet your security requirements. If you do not require the user
management features, simply leave this area unconfigured; the balance can be
operated without defining any users.
Cubis MSU Brief Instructions
5
Information for the User
The System Settings area under (Menu) contains all basic settings and parameters
that affect the entire operation of the balance.
The Wizard
In some menus, you can switch between two types of display:
In the Overview, all parameters with configured options are listed; you can select
each individual option to change its setting.
If you activate the Wizard in the same menu, the program guides you forward in
steps: The individual parameters and their options are then displayed in sequence.
Use of the Display and Control Unit
Operating Keys:
D
TASK key: Opens the Task Management menu for selecting applications and
configuring tasks. You can also press the TASK key from this menu at any time
to switch to the operating mode.
H
USER key: Opens the User Management menu, where user settings can be
configured. You can also press the USER key from this menu at any time to
switch to the operating mode.
J
P
TARE keys (left and right): Tares the balance.
A
qwe
O
6
Cubis MSU Brief Instructions
PRINT key: Prints the measurement results currently displayed or an applicationspecific printout.
On/off key: Switches on/off and into standby.
Softkeys: Activate the function indicated directly above them.
Cursor softkeys for navigation on the display.
Keys for operating the electronic draft shield (optional)
Information for the User
Setting Up the Display and Control Unit
You can adjust the angle of the tiltable display and control unit as desired to ensure
optimal readability in every situation. The color and brightness settings can also be
adapted to the prevailing lighting conditions (see “User Management” and “System
Settings” for details).
Inserting a Memory Card in the Display and Control Unit
You can copy data, such as application data or user profiles, to an SD memory card.
This is a quick and easy method of transferring settings between balances. The slot
for the SD card is located on the back of the display and control unit.
2
1
1. Tilt the control unit towards you until it is almost vertical.
2. Lift the cover of the card slot. Hold the card with the metal contacts facing
towards you.
3. Push the card into the slot as far as it will go.
y The card snaps into place.
t To remove the card, push it in and then release. The card will pop out for easy
removal.
4. Press on the position lock and tilt the control unit back to the desired position.
Quick Start: First Weighing Operation
A t Push the on/off key to switch the balance on.
t Close the draft shield (if present on your model).
J t Push the TARE key to tare the balance.
y When the balance has been tared, the readout will show a zero value.
t Open the draft shield (if applicable) and carefully place the sample on the
weighing pan (in a suitable container).
t Close the draft shield (if present on your model).
t Once the readout has stabilized and the unit of measurement is displayed,
you can read off the measurement value.
Cubis MSU Brief Instructions
7
Information for the User
Touch Screen User Interface
Many of the operating steps involve use of the display and softkeys. The layout
of the display depends on whether the application software is in operating mode
or whether a menu is open (configuration mode).
Display in Operating Mode
8
1
2
3
9
4
5
6
7
1
2
3
4
5
6
7
8
9
Function area: Shows the active application (here: step 1 of 2)
Line for metrology data with weighing capacity (left) and reading precision
(resolution) of the balance.
Value area with the current measured value
Area for status messages and alerts (see below)
Task area with instructions on how to proceed
Function bar with the currently available softkey functions.
Softkeys: Associated with the function indicated above them or used for
navigation
User info area: Displays the current user, date and time
Scaled display of measured value (percentage of weighing capacity utilization)
Status Messages and Alerts
The following messages may be shown here:
isoCAL shown continuously: isoCAL function active (extended temperature range)
isoCAL flashing: Calibration/adjustment required
Level me flashing: Balance not level, leveling required
Print: Printout is active; print job not yet completed
GLP: GLP-compliant printing is active (includes header)
SQmin: SQmin value is shown if the weight value is less than SQmin
U or U* or PA: The selected DKD value (measurement uncertainty) is shown
8
Cubis MSU Brief Instructions
Information for the User
1
6
2
7
3
4
5
Display in Configuration Mode
1
2
3
4
5
6
7
Interactive area with instructions on how to proceed
Orientation line: Shows the current menu level
Selection area: Shows available options
Function bar with the currently available softkey functions.
Softkeys: Associated with the function indicated above them or used for
navigation
Symbol indicating which menu (Task, User or Menu) is currently open
Scrolling indicator
Operating the Display Unit
3
Sharp or pointed instruments (such as ballpoint pens) can damage the device.
Use only your fingertips and to operate the buttons and softkeys.
All selectable functions and settings on the display can be reached by navigating
with the cursor softkeys and confirming with the w softkey.
Selecting a single option: Whenever only one out of multiple options can be
selected, select the desired option and confirm with the softkey w.
Selecting multiple options: If several options can be selected, press the checkbox
next to each desired option; To mark an option, select it and confirm with the
softkey w. Do the same for all desired options.
To continue to the next program step, select Next.
If the scroll indicator appears on the right edge of the display, there are more
options than are shown on the display. Page down with the cursor keys to view all
the selection options.
Cubis MSU Brief Instructions
9
Information for the User
Entering Letters and Numbers
When alphanumerical input is required, a keypad is shown on the touch screen.
A cursor is shown in the input line above the keypad.
t Select the character you would like to insert using the cursor softkeys.
t To accept the character, confirm with the softkey Add.
y The characters are shown in the input line as they are entered.
Press Back to cancel the input and go back one step to the last screen.
Press the Shift softkey to change the input mode between uppercase letters,
lowercase letters, numbers and the complete character set with special characters.
Press Add to confirm the selected character and transfer it to the text line.
Press OK to end the input and save your entry.
Press backspace to delete the character to the left of the cursor.
The two arrows move the cursor one character to the left or right.
Activating or Changing Users
H
In the operating mode, the active user is displayed in the user info area in the
upper right-hand corner of the display. To activate a different user, open the User
Management menu.
t Press the key USER H.
y The available users are listed. The currently active user is indicated by an arrow
and the highlighting.
t Use the cursor softkeys to select the user you would like to activate, then
confirm with the softkey w.
y The program returns to the operating mode, the selected user is logged in with
the corresponding rights.
t Selecting Start will activate the currently selected user.
10
Cubis MSU Brief Instructions
Information for the User
Task Management
In the Task Management menu (TASK), you can:
– Start a task
– Configure a new task
– Edit an existing task (change, copy, delete).
Numerous applications are available to you for configuring a task, such as
weighing, part counting, calculating. Every task contains at least one of these
applications, but it can also comprise a combination of multiple applications.
You can use applications with the settings configured at the factory or edit the
settings for your own requirements and preferences. The application Weighing is
present as a basic function for every task.
Which options are available to a given user in the Task Management depends on
that user’s rights: Administrators have access to all options, while normal users
have only limited access (see “User Administration” in the chapter “User Management”). If no users have been defined, the Administrator is automatically active.
Global tasks can be accessed by all users, while local tasks are available only to the
users who create them. Exception: A user can copy global tasks, with or without
modification, to use as a basis for local tasks.
Option
Configure, change, delete local tasks
Configure, change, delete global tasks
Execute, copy local tasks
Execute, copy global tasks
D
Administrator
User
i
i
i
i
i
t To enter the Task Management, press the key TASK D.
y The available tasks are listed as touch screen buttons.
When the balance is delivered, this overview is empty. Only after tasks have been
configured are they displayed here.
t Select Start to start the currently selected task (identifiable based on the
highlighting).
Cubis MSU Brief Instructions
11
Information for the User
Using Applications with Factory Settings
All applications are prepared at the factory with certain configuration settings.
If you wish to use the factory settings, you can use the quick method for
configuring a task:
t Open the Task Management and select Edit..
D
t Select Create
y
t
t
t
y
The list of applications is displayed.
Select the application you wish to use in the new task.
Select Done.
Enter a name and a description for the task and select Save.
The new task is stored with the factory-set application configuration and added
to the task list.
Sorting the Task List
D
New tasks are always added to the end of the task list. Once you have configured
a number of tasks, you may find it helpful to sort the list.
y Open the task list.
t
y
t
t
Select Sort.
The tasks are listed in alphabetical order (A – Z).
To reverse the sort order, select Sort again.
To sort the tasks by the date of the last use, select Sort once more.
Configuring a New Task
The software in your Cubis balance includes the following applications, which you
can configure as tasks according to your requirements and preferences:
–
–
–
–
–
–
–
–
12
Cubis MSU Brief Instructions
Basic Weighing
Mass Unit Conversion
SQmin Function
Individual Identifiers
Density Determination
Statistics
Calculation
Averaging
–
–
–
–
–
–
–
–
Formulation
Weighing in Percent
Timer Controlled Action
Totalizing
DKD Measurement Uncertainty
Second Tare Memory (Manual Tare)
Counting
Checkweighing
Information for the User
The basic process for configuring a task is:
1. Create a new task.
2. Select an application.
3. Work through all subsequent prompts and configure your own values for the
respective parameters, if desired.
4. Perform steps 2 and 3 for additional applications if you would like to combine
multiple applications.
5. Check the general parameters (weighing parameters and printout parameters)
for the new task, and change them if necessary.
6. Enter the name and description for the new task.
7. Save the task.
Create new task
Select application
Enter various parameters
Combine other
applications?
Yes
No
Set weighing parameters
Set printout parameters
Enter name
Save task
h
A detailed description of how to combine tasks as well as an overview of the
combination possibilities can be found in the user manual on the included
CD-ROM.
Cubis MSU Brief Instructions
13
Information for the User
Example: Creating a Task
D
t Open the Task Management and select Edit..
y The list of options is displayed.
t To define a new task, select Create.
The list of applications is displayed.
To see all applications, page down with the cursor softkeys.
Select the application you wish to use in the new task.
Configure the application as desired. The program automatically guides you
through the configuration procedure.
t Configure additional applications for the task, if desired.
y
t
t
t
y After configuring all applications for the new task, two more prompts follow:
Weighing parameters and printout parameters. All settings configured here
affect only the new task.
If the balance is verified for use in legal metrology, some of the options for
modifying parameters may be hidden or limited.
Weighing Parameters Prompt
t Check the settings and modify them as needed.
Explanations of the individual options can be found in the System Settings chapter
in the section Device Parameters.
t Select Next.
Printout Parameters Prompt.
t Check the settings and modify them as needed.
Explanations of the individual options can be found in the System Settings chapter
in the section Device Parameters.
t Select Next.
14
Cubis MSU Brief Instructions
Information for the User
t Enter a short name and a description for the new task.
t Select Save.
y The task list is then shown and now includes the new task.
Executing a Task
D
Once your tasks have been configured, you can select and execute a task.
t Switch to Task Management, if you have not already done so.
y The task list is displayed.
t Select the desired task.
or
t If the desired task is already marked (dark background and arrow on left), select
Start.
y The program switches to the operating mode, and the selected task is activated.
t Follow the instructions on the display.
h
In this brief instruction manual, we only describe the applications Weighing
and Density Determination. For complete descriptions of all applications,
please refer to the full user manual on the included CD-ROM.
Cubis MSU Brief Instructions
15
Information for the User
Weighing
Purpose:
Combination options:
Determination of the weight within the framework of the device-specific
weighing range (see Technical Data).
SQmin Function, DKD Measurement Uncertainty, Mass Unit Conversion,
Second Tare Memory and Individual Identifiers.
Task Configuration: Weighing
D
You cannot combine any other applications with this task.
y The prompt for general weighing parameters is presented.
t Check all the settings and modify them as needed.
y The prompt for general printout parameters is presented.
t Check all the settings and modify them as needed.
t Enter a short name and a description for the new task.
t To save the new task, select Save.
Task Execution: Weighing
D
t
y
t
or
t
Switch to Task Management, if you have not already done so.
The task list is displayed.
Select the desired task.
If the desired task is already marked, select Start.
or
t Select Weighing.
y The program switches to the operating mode, and the task is activated.
t Follow the instructions on the display.
16
Cubis MSU Brief Instructions
Information for the User
Density Determination
Purpose:
Combination options:
Prerequisites:
You can determine the density and volume of liquid, solid or paste-like substances.
Checkweighing, Timer Controlled Action, Totalizing, Statistics, SQmin Function,
DKD Measurement Uncertainty, Second Tare Memory or Individual Identifiers.
In order to perform a density determination, you must have the Sartorius Density
Determination Kit YDK01MS or similar kit. The bases for calculation applied in
density determination are described in the user manual on the included CD-ROM.
There are four methods of density determination to choose from:
– Determining density of liquid (with glass plummet)
– Determining density based on buoyancy with the Sartorius Density Determination
Kit YDK01 (for solids)
– Determining density based on displacement (for solids)
– Determining density with a pycnometer (for liquid, pasty and powdered samples)
h
The bases for calculation applied in density determination are described in
the user manual on the included CD-ROM.
Task Configuration:
Determining the density of a liquid with glass plummet
D
t Select the Determ. density of liquid method.
t Select the measurement conditions
Air density at 20 °C/68 °F: Select this option if analysis is performed under
standard laboratory conditions (20 °C / 68 °C room and sample temperature).
User input: Select this option if performing the measurement under different
conditions.
t Enter data as prompted.
Cubis MSU Brief Instructions
17
Information for the User
t Enter the volume of the glass plummet.
t Select the number of decimal places to be given in the analysis results.
t Review your settings in the overview. To change a setting, press the corresponding button.
t Select No further application function
h
Options for combining applications are described in detail in the user
manual on the included CD-ROM.
Task Configuration: Determining the Density of a Solid
Two methods are available for determining the density of solids: Buoyancy or
Displacement.
D
18
Cubis MSU Brief Instructions
Information for the User
t Select the method you wish to use in your task: Buoyancy or Displacement.
t Select the density determination kit you will be using.
YDK density kit from Sartorius: For analysis with the YDK kit.
Other density kit: If you would like to use a different kit
No density kit, no correction: If you are not using a kit.
t Enter values as prompted (see below for details).
Input Prompts/Settings for the YDK01MS Sartorius Density Determination Kit
and for Density Determination Without a Kit
*= Factory Settings
Liquid
*Water: For determining density relative to water
Ethanol: For determining density relative to ethanol
User input: For density determination relative to a different liquid; enter both the liquid and its
density at the indicated temperature.
Density at 20 °C/68 °F and exp. coefficient: For density determination relative to a different liquid; enter the liquid, its density
at 20 °C/68 °F and the expansion coefficient. The density at the indicated
temperature is calculated automatically.
*Air density at 20 °C/68 °F:
User input:
Air Density
For analysis under standard laboratory conditions
For analysis under other conditions; enter the air density.
No decimal places:
1, *2, 3 or 4 places:
Number of Decimal Places
The analysis result is displayed without decimal places.
The analysis result is displayed with the selected number of decimal places.
No printout
*All results and parameters
Print Output
The results of the measurement are not printed.
The results of the measurement and all configured parameters are printed.
Name:
Number of wires:
Wire diameter:
Vessel diameter:
Input Prompts/Settings for Other Density Determination Kit
Parameters for the Density Kit
Enter the name of the kit
Enter the number of wires in the density kit
Enter the diameter of the wires in mm
Enter the diameter of the vessel in mm
All other prompts are the same as those for the Sartorius density kit (see above).
Cubis MSU Brief Instructions
19
Information for the User
Task Configuration: Determining Density with a Pycnometer
D
t Select the Pycnometer method.
t The subsequent prompts are the same as those described above for the
Sartorius density kit.
Task Execution: Determining Density
D
t
t
y
t
t
Prepare the density determination kit you wish to use.
Switch to application menu, if you have not already done so.
The task list is displayed.
Select the desired task.
Press Start to begin the task.
y The program switches to operating mode.
Follow the instructions on the display.
20
Cubis MSU Brief Instructions
Information for the User
Calibration and Adjustment
Background
When to calibrate
During calibration, a test weight is used to determine how much the displayed
value differs from the value actually measured by the balance. This difference is
compared to a predefined nominal mass value and is eliminated by subsequent
adjustment. During linearization, the difference of the values from the ideal
characteristic curve of the balance is compensated.
Calibration and adjustment should be performed regularly, such as daily after
switching on the balance. Also calibrate after every leveling and whenever the
ambient conditions have changed (temperature, humidity or air pressure) and when
the balance is set up in a new location.
isoCAL is an automatic calibration function built in to every Cubis balance.
You can modify this function for adaptation to your own requirements.
You also have the option of setting up a reminder function that prompts for
calibration/adjustment at user-defined intervals.
h
The process may differ depending on the presets (see System Settings /
Weighing Parameters) for the calibration/adjustment function. The
procedure described below uses the default factory settings.
Calibration/Adjustment
with Built-in Calibration Weight
t Switch to the operating mode, if necessary.
t Make certain that the weighing pan is empty.
t Select Cal./Adj.
t Select Internal calibration/adjustment and then Start.
Cubis MSU Brief Instructions
21
Information for the User
y The procedure is executed; progress is shown on the display.
t Wait until the calibration/adjustment has been completed.
y When the procedure has ended, the selection list is shown again.
t Select Back to return the balance to the operating mode.
Calibration/Adjustment
with External Calibration Weight
h
This function requires an external calibration weight. Please note the
tolerance of the calibration weight you use.
t Switch to the operating mode, if necessary.
t Make certain that the weighing pan is empty.
t Select Cal./Adj.
t Select External cal./adj., factory-defined weight followed by Start
t As soon as you are prompted to do so, lay the calibration weight on the
balance.
y The procedure is executed; progress is shown on the display.
t Wait until the calibration/adjustment has been completed (approximately
15 seconds).
y When the procedure has ended, the selection list is shown again.
t Select Back to return the balance to the operating mode.
22
Cubis MSU Brief Instructions
Information for the User
System Settings (Menu)
All of the settings that directly affect use of the balance are configured in this
menu. These are basic settings; changes are effective as soon as they are stored.
Changed settings do not affect already defined tasks.
Example: You can define the default values presented in the user menu when a
new user profile is created. If you specify a certain color as the default (such as your
company color), this setting will be preset upon creation of a user profile but can
still be individually changed. This will not change already existing user profiles.
h
All system settings are user-independent; in other words, they are applied to
all users.
t To open the System Settings menu, select Menu while in operating mode.
y The list of available system settings is displayed.
t To see all menu items, use the scroll bar on the right-hand side.
t Select the menu item for the settings you wish to edit.
The system settings are divided into the following six menus:
– Level the balance
– Calibration/adjustment data
– Timer controlled action
– Device information
– Device parameters
– Import/export data
– Service
You have already learned how to use the menus. Only the configuration options
and their meanings are described below.
Cubis MSU Brief Instructions
23
Information for the User
Level the Balance (Q-Level)
For precise weighing results, it is essential that the balance be completely level. Any
slight unevenness of the surface on which the balance rests can be compensated for
by adjusting the front feet of the balance. All Cubis balances are equipped with the
automatic leveling function Q-Level. An integrated sensor detects the alignment of
the balance and generates a warning if leveling is required.
The leveling must be performed as soon as the message Level me appears in the
display. This can be done very quickly thanks to the simple user guidance.
t Make certain that the weighing pan is empty.
t Follow the instructions on the display.
Calibration/Adjustment Data
The configuration options are divided into four areas.
t Select the area in which you would like to configure settings.
t Follow the instructions on the display.
y As soon as all options have been configured, the overview of all settings is
displayed.
t To save the settings, select Save.
Defining Calibration and Adjustment Functions
Defining Functions of the CAL button. Options: Lock the button/*Configure the
button selection menu/Select fixed 1-button function.
Defining the Selection Menu of the Cal.Adj. Button. Which calibration/
adjustment functions should be offered after pressing the Cal./Adj. button.
Selecting the Sequence for Calibration/Adjustment. Options: *Calibration and
then automatic adjustment/calibration and then manual adjustment.
Selecting the Unit for Calibration/Adjustment. Options: *Grams/kilograms.
Defining External Calibration Weights
Defining the Number of External Calibration Weights.
Entering the Data for External Calibration Weights. Weight value / identifier /
certificate
24
Cubis MSU Brief Instructions
Information for the User
Defining External Linearization Weights
Entering the Data for External Linearization Weights. Weight values / identifier /
certificate
Configuring the Fully Automatic Adjustment Function isoCAL
Defining the isoCAL Function. Disabled/only warning stage, manual initiation/
*enabled, automatic execution
Defining the isoCAL Warning Stage. *Only isoCAL status field/warning message,
repeated/ alarm message, adjustment mandatory.
Setting the isoCAL Temperature. Enter the temperature in degrees Celsius.
Setting the isoCAL Time Interval. Enter time interval in hours.
Timer Controlled Action
Device Information
Here you can view various information and search directly within the alibi memory.
t Select the area in which you would like to view information.
Viewing Basic Information
Displaying the manufacturer, model, serial number, host name, IP address
t To view the parameters for SQmin and DKD, select SQminDKD.
t To view the version of the balance, display and control unit and application
software, select Version.
Cubis MSU Brief Instructions
25
Information for the User
Information about Technical Service and the Hotline
Contact data for the technical service center, the hotline number and information
about the maintenance contract and maintenance cycle are displayed here.
Viewing Calibration and Adjustment Data
Viewing Error Messages in the Log File
All error messages are saved in the log file. You can view these here.
Alibi Memory
The Alibi memory records weighing results without changing any characteristics
of the data. This is why it can take the place of a data printer.
The Alibi memory uses a ring buffer technique: when the memory is full, the
oldest data records are deleted to make room for new data. You can define a
storage period if desired (default: 3 months; see “Device Configuration” for details).
The Alibi memory can contain approximately 100,000 data records. For further
information on the Alibi memory, please refer to the user manual.
Search in the Alibi memory. You can search the Alibi memory according to various
search criteria: Date, time/memory number/memory ID
Browse Alibi memory. You can search the Alibi memory by paging through the
entries with the arrow buttons.
View available memory. Select this option to see how much capacity is available in
Alibi memory.
Device Parameters
Here you can edit the device configuration settings for the balance. These settings
are user-independent.
26
Cubis MSU Brief Instructions
Information for the User
Defining Balance Properties
General weighing settings: Here you can define the default settings for the general
device parameters. These settings can be changed within specific tasks when a new
task is configured.
h The factory settings are indicated with *.
Adapt filter: This setting defines the measuring time of the balance to filter out
the effects of unfavorable weighing conditions such as drafts or vibration. Options:
Very stable/*stable/unstable/very unstable conditions
Application filter: Compensates for load fluctuations in the display. Options:
*Final readout/filling mode/low filtering/without filtering
Stability: The stability symbol is displayed when the weighing result is constant
within the defined stability range. Options: Maximum precision/very precise/
*precise/fast/very fast.
Stability delay: This setting lets you compensate for slowly abating
disturbances, such as turbulence in the weighing chamber of an analytical balance.
Options: *Very short/short/medium/long delay.
Zero/tare function: Defines conditions for taring the balance. Options:
Without/*after/at stability.
Automatic zeroing: If this option is enabled, changes of a fixed, configured
fraction of scale intervals per second starting from the display zero point are
automatically tared. Options: On/*off
Basic weight unit: Weight unit to be applied for this task. Options: All available
weight units, *gram.
Display accuracy: A lower display accuracy results in faster display of the value.
Options: *All decimal places/disable last decimal place
Tare/zero at power on: The balance is automatically tared when switched on.
Options: *On/off
Configuring the Leveling Function Q-Level
Here you can define the properties of the leveling function. Options: Off, no
function/*status display/warning message, repeated
Defining the Startup Mode of the Balance
Here you can select the mode that the balance should enter into when switched on
and upon repeated presses of the on/off button A. Options: OFF,ON,standby/
on, standby/always on
Configuring Printout Parameters
h The factory settings are indicated with *.
Interface for print output: Connection of the printer used; options:
COM port A, B, C/file/SD memory card
Output protocol: Options: *Print/SBI/XBPI/Web Service/SICS/second display
Standard printout GLP: Defines when ISO/GLP output should be possible.
Options: *Off/enabled for cal.-adjustment/always enabled.
Taring after printout: Defines whether the balance is automatically tared after
a printout is generated. Options: *Off/on
Print event: Defines which event should trigger a printout.
Options: *Print button/start of the task/initialization of the application/result print
Cubis MSU Brief Instructions
27
Information for the User
event/printout of component/results of application/end task/calibrationadjustment protocol event
Configure data output: Options: *Configured print protocol/ FlexPrint
Print button elements: Defines which texts should be printed. Options: GMP
header / GMP footer / empty line / dashed line / date and time / name / weight
block / gross weight / gross2 weight / net weight / increased resolution weight
value / tare weight / tare1 weight / tare2 weight / range 1 / metrol. minimum /
metrol. maximum / metrol. verification scale interval “e” / metrol. scale interval “d”
/ number of areas / manufacturer / model / serial number / balance version / display
version / interface version no. / draft shield version / service contact person /
telephone no.. / email address / technical hotline / Internet address / maintenance
contract / maintenance cycle / IP address / host name / user name / user description
/ task title / task description / leveler result
Setting the Date and Time
The system clock as well as the time setting of the weighing module is displayed.
You can set the current date and time.
Defining Properties of the Display and Control Unit
The following properties of the display and control unit can be changed, as
necessary: Language, help text (on/off), background colors, brightness, acoustic
signal.
Defining Interfaces and Network Settings
Settings for Serial Interfaces. Here you can configure the serial interfaces.
Network Settings (Ethernet)
Here you can configure the network settings: Device name, network IP settings,
IP address, subnet mask and standard gateway.
The device name (max. 24 characters) defined here can be printed on reports.
t To save the settings, select Save.
Remote Network Settings
Enter here the network addresses for the VNC client and the LPR (remote) printer.
t To save the settings, select Save.
Configuring the Alibi Memory
Alibi Memory On/Off. You can switch the Alibi memory on or off.
Auto Delete. You can configure the Alibi memory to be regularly deleted and
define the deletion cycle (in days).
Restoring the Factory Settings (Reset)
You can delete all of your settings and restore the factory settings.
28
Cubis MSU Brief Instructions
Information for the User
Loading a Software Update
After downloading the current software version, you can transfer it to the device via
an SD card.
t Follow the instructions on the display.
y After the software has been updated, the balance restarts.
Importing and Exporting Data from an SD Card
t If you have not already done so, insert the SD card into the available slot (see
“Inserting a Memory Card in the Display and Control Unit”) and select Next.
t Select whether you wish to export or import data.
Export:
t Mark the data you wish to export and select Next.
t Edit the name of the export folder, if desired, and select OK.
t Select Next.
y The data is copied to the SD card.
Import:
t Select the folder on the SD card from which you would like to copy data.
t Mark the data you wish to import and select Next.
y The data is copied from the SD card.
Cubis MSU Brief Instructions
29
Information for the User
User Management
You can configure the following settings in this menu:
– Activating a user
– Creating a user profile (only possible as Administrator)
– Editing user profiles (modify, copy, delete, change or delete password,
depending on user rights)
User Administration
The user administration allows for defining of users with distinct sets of rights:
the Administrator and multiple users.
Administrators can access all functions (except for the Service area) and have all
types of rights in all areas of the program. Only the Administrator can create new
user profiles and assign them individual rights.
On the other hand, a user cannot use all functions. Users have restricted rights,
which are defined in the user profile.
No user profiles exist when the balance is delivered. The balance is in Administrator
mode so that all settings can be modified. The first user profile created is automatically an Administrator account. This account is used to create additional
accounts.
H
t To open the User Management menu, press the button USER H.
y The menu is opened, and the list of user profiles is displayed.
Create a user profile
h This function is only available to an Administrator.
H
You can configure the following settings in a user profile; these settings apply only
to the user defined by this profile:
– Language
– Display of help texts (on or off)
– Display settings (color, brightness)
– Acoustic signal: on/off; volume
– User rights
– Password protection
– Name and designation of the profile
t To create a new user profile, select Edit.
t Select Create.
The program guides you through the procedures for configuring the user profile.
Make your selection by selecting the desired option and confirming with the w
softkey; the program automatically advances to the next prompt.
or
If the desired option is already selected (highlighting), select Next to reach the next
prompt.
If more than one option can be selected for a single setting, select Next after
making your selection(s) to proceed to the next prompt.
30
Cubis MSU Brief Instructions
Information for the User
Step 1: Set the Language
t Select the desired language.
Step 2: Define Whether Help Texts are Displayed
t Select the corresponding button to define whether or not help texts should
be shown.
Help texts are recommended in particular for new users. Once a user has
become familiar with the operation of the balance, the user can switch off
the help texts, if desired.
Step 3: Set the Display Background Color
t Set the color for the display background by selecting the desired setting.
Standard means a black background,
Inverse means a white background.
y The display switches to the brightness setting.
Step 4: Set the Display Brightness
t To change the brightness, select the desired setting.
y The display switches to the brightness setting.
t To change the brightness of the display, select the desired setting.
Step 5: Set the Acoustic Signal
If the signal is on, a short beep-tone is emitted each time an operating element
on the display is used.
t Select the desired volume
or
t Select Off to disable the acoustic signal.
Cubis MSU Brief Instructions
31
Information for the User
Step 6: Assign User Rights
t Select the corresponding options to define which functions the user can access.
The following rights can be assigned individually:
– Creating, copying, modifying and deleting tasks
– Importing data
– Modifying the calibration and adjustment parameters
– Modifying basic parameters
Administrators can access all functions.
t To move to the next menu item, select Next.
y An overview of all selected user settings is displayed.
Step 7: Define Whether Password Protection is Active
If you assign a password, this profile cannot be used until the password has been
entered.
t Select the corresponding option to define whether the user profile is passwordprotected or not.
The password is defined in Step 10.
Only the Administrator can open the user profile without the password (for
example, if the user forgets the password) and assign a different password.
The Administrator can remove the password protection so that a new password
can be set, if desired.
Step 8: Check Your Settings
t Use the scroll bar or the down arrow to view all settings.
t To modify a setting, press the corresponding button. This opens a screen
showing the options for that setting.
t If the settings are correct, select Next.
Step 9: Define the Password (If Password Protection Enabled)
y If you selected the option for password protection in Step 7 (see above), you
are now prompted to enter the desired password twice.
t Select the upper button.
t Enter the desired password (minimum 4 characters, maximum 8; only numbers
and uppercase letters are permitted).
t Press the lower button, and enter the password again.
t Select Next.
32
Cubis MSU Brief Instructions
Information for the User
Step 10: Enter User Name and User Description
t To enter a name for the user profile, select the button User Profile Name.
During operation of the balance, the user name is shown in the upper-right part of
the display as long as the respective user profile is active.
t Enter the name (maximum of 40 characters) and select OK.
t To enter a description for the user profile, select the button User
Description.
t Enter the description and select OK.
t To complete the process, select Save.
y The program switches to the user selection list. The newly created user profile
is added to the end of the list.
t If you wish to activate the new user, select the button with the user's name and
confirm with the softkey w.
y The program switches to the operating mode, and the selected user is activated.
or
t To create additional user profiles, select Edit and repeat the procedure as
described above.
or
t If you would like to switch to the operating mode without changing the user,
select Start.
Activating a User
In the operating mode, the active user is displayed in the user info area in the
upper right-hand corner of the display. To activate a different user, open the
User Management menu and select the desired user.
H
t Press the key USER H.
y The available users are listed. The currently active user is indicated by an arrow
and a darker background.
t Select the user you would like to activate.
y The program switches to operating mode; the selected user is activated and
shown in the user info area on the upper right.
Cubis MSU Brief Instructions
33
Information for the User
Editing a User Profile
H
t If you have not already done so, open the User Management by pressing the
USER H key.
t To open the menu for editing profiles, select Edit from the user selection
screen.
y The list of edit functions is displayed.
h Which options for editing user profiles are available depends on whether or not
you have Administrator rights. The following table shows which changes can be
made by each type of user.
The illustrations in this manual show the screen content listed when an
Administrator profile is used; your screen content may differ.
Option
Modify own profile
Modify other profiles
Copy profile
Delete profile
Change or delete own password
Change or delete passwords of other users
Administrator
i
i
i
i
i
i
User
i
i
Editing a User Profile
t Select Modify.
t If you are logged in as Administrator, you must select the profile you would like
to change and then select Next.
y The overview of all settings for this profile is displayed. Select and edit the
parameters you wish to change one-by-one.
or
t To have the program guide you through all settings step by step, select
Wizard. All setting options are then displayed again in sequence and can be
changed.
t Select Next.
t Edit the user name and description, if desired.
t Select Save.
y The user profile has been changed. The display switches to the user selection list.
Copying a User Profile
h This function is only available to an Administrator.
h When you copy a user profile that is password-protected, the password is not
copied to the new profile!
t
y
t
t
t
t
y
34
Cubis MSU Brief Instructions
Select Copy.
All available user profiles are shown.
Select the profile you wish to copy.
Select Next.
Enter a new profile name and a new description for the copied profile.
Select Save.
The display switches to the user selection list, which now includes the new
(copied) profile.
Information for the User
Deleting a User Profile
h This function is only available to an Administrator.
t Select Delete.
y All available user profiles are shown.
t Mark each profile that you wish to delete and select Next.
or
t To delete all profiles, select All.
y The profiles selected for deletion are listed in a confirmation prompt.
t If you wish to modify the selection, select No.
or
t To confirm the deletion, press Yes.
Changing or Deleting Your Own Password
t
t
t
t
t
t
y
Activate your profile, if it is not already active.
Select Edit from the user selection list.
Select Change or delete own password.
Select Yes.
Select both buttons in order and enter the password twice.
Select Next.
The display switches to the list of functions for modifying profiles.
Deleting the Passwords of Other Users
h This function is only available to an Administrator.
t
t
t
y
t
or
t
y
t
Activate your own user profile.
Select Edit from the user selection list.
Select Delete other passwords.
A list of all users that have passwords is displayed.
Mark each user whose password you wish to delete and select Next.
To delete all passwords, select All.
The users selected for password deletion are listed in a confirmation prompt.
If you wish to modify the selection, select No.
or
t To confirm the deletion, press Yes.
y The display switches to the screen for editing user settings.
Cubis MSU Brief Instructions
35
Sartorius AG
Weender Landstrasse 94–108
37075 Goettingen, Germany
Phone +49.551.308.0
Fax +49.551.308.3289
www.sartorius-mechatronics.com
Copyright by Sartorius AG,
Goettingen, Germany.
All rights reserved. No part of this
publication may be reprinted or
translated in any form or by any
means without the prior written
permission of Sartorius AG.
The status of the information,
specifications and illustrations in this
manual is indicated by the date given
below.
Sartorius AG reserves the right to make
changes to the technology, features,
specifications and design of the
equipment without notice.
Status:
December 2008, Sartorius AG,
Goettingen, Germany
Printed in Germany on paper that has been bleached
without any use of chlorine
W1A000 · KT
Publication No.: WMS6003-e08121