1
Unity Developer Guide
2 | Introduction | Unity
Copyrights and Trademarks
©
2015 Oculus VR, LLC. All Rights Reserved.
OCULUS VR, OCULUS, and RIFT are trademarks of Oculus VR, LLC. (C) Oculus VR, LLC. All rights reserved.
BLUETOOTH is a registered trademark of Bluetooth SIG, Inc. All other trademarks are the property of their
respective owners. Certain materials included in this publication are reprinted with the permission of the
copyright holder.
2| |
Unity | Contents | 3
Contents
Introduction.........................................................................................................5
Requirements..................................................................................................................................................... 5
Installation.......................................................................................................................................................... 6
Preparing for Development: PC SDK................................................................................................................6
Preparing for Development: Mobile SDK.......................................................................................................... 7
Getting Started................................................................................................... 8
Importing the Unity Integration.......................................................................................................................... 8
Importing Sample Applications.......................................................................................................................... 8
Adding VR to an Existing Unity Project............................................................................................................ 9
A Detailed Look at the Unity Integration....................................................... 10
Contents........................................................................................................................................................... 10
Prefabs............................................................................................................................................................. 11
Unity Components........................................................................................................................................... 12
Oculus Mobile SDKExamples..........................................................................................................................15
Control Layout: Mobile.....................................................................................................................................18
Configuring for Build.......................................................................................20
PC Build Target: Microsoft Windows and Mac OS X..................................................................................... 20
Build Settings..............................................................................................................................................20
Quality Settings.......................................................................................................................................... 20
Mobile Build Target: Android........................................................................................................................... 22
Configuring Build Settings.......................................................................................................................... 22
Configuring Player Settings........................................................................................................................22
Configuring Quality Settings.......................................................................................................................24
Configuring Time Settings.......................................................................................................................... 25
Android Manifest File................................................................................................................................. 25
Running the Build.......................................................................................................................................26
Sample Unity Application Demos.................................................................. 27
Running Pre-Built demos: PC......................................................................................................................... 27
Running Pre-Built demos: Mobile....................................................................................................................27
Pre-Built Demo Controls.................................................................................................................................. 27
Best Practices: Mobile.....................................................................................29
General CPU Optimizations.............................................................................................................................29
Rendering Optimization................................................................................................................................... 29
Best Practices.................................................................................................................................................. 31
Design Considerations..................................................................................................................................... 32
Unity Profiling Tools.........................................................................................................................................32
Migrating From Earlier Versions.................................................................... 36
Known Issues and Troubleshooting.............................................................. 39
PC.................................................................................................................................................................... 39
Mobile............................................................................................................................................................... 39
Contact Information..........................................................................................................................................40
4 | Contents | Unity
Revision.............................................................................................................41
Unity | Introduction | 5
Introduction
Welcome to the Oculus Unity Developer Guide.
This document describes developing Unity 3D games and applications for VR devices with the Oculus PC and
mobile SDKs. A Unity integration package, sample Unity applications, and mobile SDK Unity examples are
available for PC and mobile development to help you create virtual reality applications in Unity.
This guide covers:
•
•
•
•
•
Getting started
Downloading and installing the Oculus Unity integration
Contents of the integration package
How to use the provided samples, assets, and sample applications
Configuring Unity VR projects for build to various targets
This Unity Integration is available for use with the PC development environment for the Oculus Rift. It is also
bundled with the mobile SDK for Samsung Gear VR.
The Mobile Unity Integration may build targets for PC or Android; the PC Unity Integration is currently limited
to building targets for PC. When developing for multiple platforms, keep in mind that the requirements and
optimizations for PC and mobile VR applications differ substantially. If you would like to generate builds for
both PC and mobile from a single project, it is important to follow the more stringent mobile development best
practices.
This document describes the mobile Unity integration release 0.5.0. Most information contained in this guide
also applies to the PC Unity integration 0.5.1. Any exceptions are clearly indicated where they occur (e.g., the
Moonlight folder in OVR contains assets relevant only to mobile development).
Requirements
System and Hardware Requirements
Please review the relevant documentation to be sure that you are using supported hardware and that your
development environment and devices are configured and set up properly:
•
•
PC SDK: Oculus Developer Guide
Mobile SDK: Device and Environment Setup Guide
All documentation is available for download here: https://developer.oculus.com/documentation/.
Before beginning Unity development, you should be able to run the available SDK Unity demo applications.
Unity Requirements
The Oculus Unity Integration is compatible with Unity Pro 4.6.3, which includes support for Lollipop (Android
5.0).
Unity Free support is available with Unity 4.6 or higher. A feature set comparison between Unity Pro and Unity
Free may be found here: http://unity3d.com/unity/licenses
Note: There are noteworthy feature support differences between Unity licenses. Please review
the limitations cited below as well as the license comparison on Unity’s website before committing
6 | Introduction | Unity
considerable resources to one path. Your license choice will depend largely on the performance
characteristics and distribution needs of your app.
Gamepad Controller
You may wish to have a compatible gamepad controller for use with the supplied demo applications, such as the
Xbox 360 controller for Windows, an HID-compliant game controller for Mac, or a Samsung EI-GP20 or other
compatible controller for Gear VR.
Installation
All Oculus Unity development materials are available for download at our Developer site (requires login): https://
developer.oculus.com/downloads/
The Oculus Unity Integration is the heart of the supplied development resources - it installs the minimum set of
required files necessary for VR integration into Unity. We have also included various assets, scripts, and sample
scenes to assist with development.
The Mobile SDK also includes Unity example scenes illustrating the use of common resources such as simple
rooms, menus, and more. They may be found in the folder SDKExamples. See Oculus Mobile SDKExamples for
more information.
The PC Unity Integration bundle includes:
•
OculusUnityIntegration
The mobile SDK includes the following:
•
•
•
•
OculusUnityIntegration
BlockSplosion sample application (source and pre-built apk)
Shadowgun sample application (pre-built-apk)
SDKExamples (source)
Preparing for Development: PC SDK
When developing for PC, we recommend beginning with the Oculus Developer Guide and theOculus Best
Practices Guide, which includes information and guidelines for developing great VR experiences, and should be
considered a go-to reference when designing your Oculus-ready games.
Direct Mode Display Driver
On Windows, Oculus recommends users install the Oculus Display Driver, which includes a feature known
as Direct Display Mode. In direct mode, the driver makes your Rift behave as an appliance instead of a
standard Windows display. Applications target the Rift by loading the driver and pointing rendering to it before
initialization. This is the default behavior. For compatibility, the Rift can also still be used as a Windows monitor.
This is known as Extended Display Mode. When extended mode is active, rendering works as usual, with no
Oculus intervention. You can choose the mode from the Oculus Configuration Utility's Rift Display Mode screen.
The direct mode driver is not yet available for platforms other than Windows.
Unity | Introduction | 7
Monitor Setup
To get the best experience, you and your users should always configure the Rift correctly.
In Windows 7 and Windows 8, you can change Windows' display settings by right-clicking on the desktop and
selecting Screen resolution.
•
•
It is possible to clone the same image on all of your displays. To ensure each display uses the correct
frequency, Oculus recommends extending the desktop instead of cloning it.
If you are using the Rift in extended mode, it should be set to its native resolution. This is 1920x1080 for DK2
and 1280x800 for DK1.
On Mac systems open System Preferences, and then navigate to Displays.
•
•
•
As with Windows, it is possible to mirror the same image on all of your displays. Oculus recommends against
mirroring. Click Arrangement and ensure Mirror Displays is not enabled.
Some Unity applications will only run on the main display. In the Arrangement screen, drag the white bar onto
the Rift's blue box to make it the main display.
Always use the Rift's native resolution and frequency. Click Gather Windows. For DK2, the resolution
should be Scaled to 1080p, the rotation should be 90° and the refresh rate should be 75 Hertz. For DK1, the
resolution should be 1280x800, the rotation should be Standard, and the refresh rate should be 60 Hertz.
Recommended Configuration
We recommend the following settings in your project:
•
•
•
•
•
On Windows, enable Direct3D 11. D3D 11 and OpenGL expose the most advanced VR rendering
capabilities. In some cases, using D3D 9 may result in slightly reduced visual quality or performance.
Use the Linear Color Space. Linear lighting is not only more correct for shading, it also causes Unity to
perform sRGB read/write to the eye textures. This helps reduce aliasing during VR distortion rendering,
where the eye textures are interpolated with slightly greater dynamic range.
Never clone displays. When the Rift is cloned with another display, the application may not vsync properly.
This leads to visible tearing or judder (stuttering or vibrating motion).
On Windows, always run DirectToRift.exe. Even in extended mode, DirectToRift.exe makes your application
run full-screen on the Rift.
When using the Unity editor, use extended display mode. Direct mode is currently supported only for
standalone players. Using it with the Unity editor will result in a black screen on the Rift.
Preparing for Development: Mobile SDK
When developing for mobile, please be sure to fully review all of the relevant performance and design
documentation, especially the Best Practices: Mobile. Mobile apps are subject to more stringent limitations and
requirements and computational limitations which should be taken into consideration from the ground up.
Entitlement checking, used to protect apps from unauthorized distribution, is disabled by default in Unity. For
more information and instructions, see "VrPlatform Entitlement Checks" in the Mobile SDK documentation.
We hope that the process of getting your Oculus device integrated into your Unity environment is a fun and easy
experience.
8 | Getting Started | Unity
Getting Started
This section describes steps taken to begin working in Unity.
Importing the Unity Integration
If you are already working in a Unity project, save your work before beginning.
First, create a new project that you can import the Oculus assets into. From the Unity menu, select File > New
Project. Click the Browse button and select the folder where the Unity project will be located.
Make sure that the Setup defaults for: field is set to 3D.
You do not need to import any standard or pro Unity asset packages, as the Oculus Unity integration is fully selfcontained.
Click the Create button. Unity will reopen with the new project loaded.
To import the Integration into Unity, select Assets > Custom Package... and select the Unity
Integration .unitypackage to import the assets into your new project. Alternately, you can locate
the .unitypackage file and double-click to launch, which will have the same effect.
When the Importing package dialog box opens, leave all of the boxes checked and select Import. The import
process may take a few minutes to complete.
Mobile SDK: the mobile Unity Integration includes a Project Settings folder which provides default settings for a
VR mobile application. You may manually copy these files to your [Project]/Assets/ProjectSettings folder.
Importing Sample Applications
In this section we'll describe how to import sample Unity application source into Unity, using BlockSplosion as an
example.
Note: Sample application import is relevant to mobile only. The Room sample application provided for
PC development is included as a scene in the UnityIntegration package.
If you are already working in a Unity project, save your work before beginning.
To import the Integration into Unity, select Assets > Custom Package... and select BlockSplosion.unitypackage
to import the assets into your new project. Alternately, you can locate the BlockSplosion.unitypackage file and
double-click to launch, which will have the same effect.
Each sample application project includes a ProjectSettings folder which provides default settings for the VR
mobile application. Copy these files to your [Project]/Assets/ProjectSettings folder.
The import process may take a few minutes to complete.
Unity | Getting Started | 9
Adding VR to an Existing Unity Project
The Unity Integration package may be used to integrate Oculus VR into an existing project. This may be useful
as a way of getting oriented to VR development, but dropping a VR camera into a Unity game that wasn't
designed with VR best practices in mind is unlikely to produce a great experience.
Note: This is one simple method for adding VR to an existing application, but is by no means the only
way. For example, you may not always wish to use OVRPlayerController.
1. Import package
2. Instantiate OVRCameraRig if you already have locomotion figured out or instantiate OVRPlayerController to
walk around.
3. Copy any scripts from the non-VR camera to the OVRCameraRig. Any image effect should go to both the
Left/RightEyeAnchor GameObjects. These are children of a TrackingSpace GameObject, which is itself a
child of OVRCameraRig. The TrackingSpace GameObject allows clients to change the frame of reference
used by tracking, e.g., for use with a game avatar.
4. Disable your old non-VR camera.
5. Build your project and run normally.
10 | A Detailed Look at the Unity Integration | Unity
A Detailed Look at the Unity Integration
This section examines the Unity integration, including the directory structure of the integration, the Unity prefabs
are described, and several key C# scripts.
Note: There are minor differences between the contents of the Unity Integration provided for PC
development and the version bundled with the mobile SDK.
Contents
OVR
The contents of the OVR folder in OculusUnityIntegration.unitypackage are uniquely named and should be safe
to import into an existing project.
The OVR directory contains the following subdirectories:
Editor
Contains scripts that add functionality to the Unity Editor, and enhance several C#
component scripts.
Materials
Contains materials that are used for graphical components within the integration, such
as the main GUI display.
Moonlight
Contains classes specific to mobile Gear VR development. (mobile only)
Prefabs
Contains the main Unity prefabs that are used to provide the VR support for a Unity
scene: OVRCameraRig and OVRPlayerController.
Resources
Contains prefabs and other objects that are required and instantiated by some OVR
scripts, such as the main GUI.
Scenes
Contains sample scenes.
Scripts
Contains the C# files that are used to tie the VR framework and Unity components
together. Many of these scripts work together within the various Prefabs.
Shaders
Contains various Cg shaders required by some of the OVR components.
Textures
Contains image assets that are required by some of the script components.
Note: We strongly recommend that developers not directly modify the included OVR scripts.
Plugins
The Plugins folder contains the OculusPlugin.dll, which enables the VR framework to communicate with Unity on
Windows (both 32 and 64-bit versions).
Unity | A Detailed Look at the Unity Integration | 11
This folder also contains the plugins for other platforms: OculusPlugin.bundle for MacOS; and Android/
libOculusPlugin.so, vrlib.jar, and AndroidManifest.xml for Android.
Prefabs
The current integration for adding VR support into Unity applications is based on two prefabs that may be added
into a scene:
•
•
OVRCameraRig
OVRPlayerController
To use, simply drag and drop one of the prefabs into your scene.
OVRCameraRig
OVRCameraRig replaces the regular Unity Camera within a scene. You can drag an OVRCameraRig into your
scene and you will be able to start viewing the scene with the Gear VR and Rift.
Note: Make sure to turn off any other Camera in the scene to ensure that OVRCameraRig is the only
one being used.
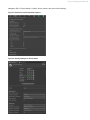
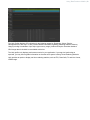
Figure 1: Prefabs: OVRCameraRig, expanded in the inspector
OVRCameraRig contains two Unity cameras, one for each eye. It is meant to be attached to a moving object
(such as a character walking around, a car, a gun turret, etc.) This replaces the conventional Camera.
The following scripts (components) are attached to the OVRCameraRig prefab:
•
•
OVRCameraRig.cs
OVRManager.cs
OVRPlayerController
The OVRPlayerController is the easiest way to start navigating a virtual environment. It is basically an
OVRCameraRig prefab attached to a simple character controller. It includes a physics capsule, a movement
system, a simple menu system with stereo rendering of text fields, and a cross-hair component.
To use, drag the player controller into an environment and begin moving around using a gamepad, or a
keyboard and mouse Note: Make sure that collision detection is active in the environment.
12 | A Detailed Look at the Unity Integration | Unity
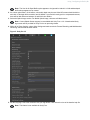
Two scripts (components) are attached to the OVRPlayerController prefab:
•
•
OVRPlayerController.cs
OVRGamepadController.cs
Figure 2: Prefabs: OVRPlayerController, expanded in the inspector
Unity Components
The following section gives a general overview of what each of the scripts within the Scripts folder does.
OVRCameraRig
OVRCameraRig is a component that controls stereo rendering and head tracking. It maintains three child
"anchor" Transforms at the poses of the left and right eyes, as well as a virtual "center" eye that is half-way
between them.
This component is the main interface between Unity and the cameras. This is attached to a prefab that makes it
easy to add VR support to a scene.
Important: All camera control should be done through this component. You should understand this script when
implementing your own camera control mechanism.
Unity | A Detailed Look at the Unity Integration | 13
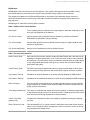
OVRManager
OVRManager is the main interface to the VR hardware. It is a singleton that exposes the Oculus SDK to Unity,
and includes helper functions that use the stored Oculus variables to help configure camera behavior.
This component is added to the OVRCameraRig prefab. It can be part of any application object. However, it
should only be declared once, because there are public members that allow for changing certain values in the
Unity inspector.
OVRManager.cs contains the following public members:
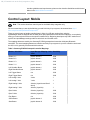
Table 1: Mobile and PC Public Members
Monoscopic
If true, rendering will try to optimize for a single viewpoint rather than rendering once for
each eye. Not supported on all platforms.
Eye Texture Format
Sets the format of the eye RenderTextures. Normally you should use Default or
DefaultHDR for high-dynamic range rendering.
Eye Texture Depth
Sets the depth precision of the eye RenderTextures. May fix z-fighting artifacts at the
expense of performance.
Eye Texture Antialiasing
Sets the level of antialiasing for the eye RenderTextures.
Table 2: PC-Only Public Members
Native Texture Scale
Each camera in the camera controller creates a RenderTexture that is the ideal size for
obtaining the sharpest pixel density (a 1-to-1 pixel size in the center of the screen post
lens distortion). This field can be used to permanently scale the cameras' render targets
to any multiple ideal pixel fidelity, which gives you control over the trade-off between
performance and quality.
Virtual Texture Scale
This field can be used to dynamically scale the cameras render target to values lower
then the ideal pixel delity, which can help reduce GPU usage at run-time if necessary.
Use Position Tracking
If disabled, the position detected by the tracker will stop updating the HMD position.
Use Rotation Tracking
If disabled, the orientation detected by the tracker will stop updating the HMD orientation.
Mirror to Display
If the Oculus direct-mode display driver is enabled and this option is set, the rendered
output will appear in a window on the desktop in addition to the Rift. Disabling this can
slightly improve performance.
Time Warp (desktop only)
Time warp is a technique that adjusts the on-screen position of rendered images based
on the latest tracking pose at the time the user will see it. Enabling this will force verticalsync and make other timing adjustments to minimize latency.
Freeze Time Warp
(desktop only)
If enabled, this illustrates the effect of time warp by temporarily freezing the rendered
eye pose.
Reset Tracker On Load
This value defaults to True. When turned off, subsequent scene loads will not reset the
tracker. This will keep the tracker orientation the same from scene to scene, as well as
keep magnetometer settings intact.
14 | A Detailed Look at the Unity Integration | Unity
Helper Classes
In addition to the above components, your scripts can always access the HMD state via static members of
OVRManager.
OVRDisplay
Provides the pose and rendering state of the HMD.
OVRTracker
Provides the pose, frustum, and tracking status of the infrared tracking camera.
OvrCapi
OvrCapi is a C# wrapper for LibOVR (specifically, CAPI). It exposes all device functionality, allowing you to
query and set capabilities for tracking, rendering, and more. Please refer to the Oculus Developer Guide and
reference manual for details.
Note: OvrCapi is available for the PC Unity Integration only.
OVRCommon
OVRCommon is a collection of reusable static functions, including conversions between
Unity and OvrCapi types.
Utilities
The following classes are optional. We provide them to help you make the most of virtual reality, depending on
the needs of your application.
OVRPlayerController
OVRPlayerController implements a basic first-person controller for the VR framework. It
is attached to the OVRPlayerController prefab, which has an OVRCameraRig attached
to it.
The controller will interact properly with a Unity scene, provided that the scene has
collision detection assigned to it.
OVRPlayerController contains a few variables attached to sliders that change the
physics properties of the controller. This includes Acceleration (how fast the player will
increase speed), Dampening (how fast a player will decrease speed when movement
input is not activated), Back and Side Dampen (how much to reduce side and back
Acceleration), Rotation Amount (the amount in degrees per frame to rotate the user in
the Y axis) and Gravity Modifier (how fast to accelerate player down when in the air).
When HMD Rotates Y is set, the actual Y rotation of the cameras will set the Y rotation
value of the parent transform that it is attached to.
The OVRPlayerController prefab has an empty GameObject attached to it called
ForwardDirection. This game object contains the matrix which motor control bases it
direction on. This game object should also house the body geometry which will be seen
by the player.
OVRGamepadController
OVRGamepadController is an interface class to a gamepad controller.
On Windows systems, the gamepad must be XInput-compliant.
Note: currently native XInput-compliant gamepads are not supported on Mac OS. Please
use the conventional Unity input methods for gamepad input.
Unity | A Detailed Look at the Unity Integration | 15
OVRMainMenu
OVRMainMenu is used to control the loading of different scenes. It also renders a menu
that allows a user to modify various settings in the VR framework, and allows storage of
these settings for later use.
A user of this component may add as many scenes that they would like to be able to
have access to.
OVRMainMenu may be added to both OVRCameraRig and OVRPlayerController
prefabs for convenience.
OVRCrosshair
OVRCrosshair is a helper class that renders and controls an on-screen cross-hair. It is
currently used by the OVRMainMenu component.
OVRGUI
OVRGUI is a helper class that encapsulates basic rendering of text in either 2D or 3D.
The 2D version of the code will be deprecated in favor of rendering to a 3D element
(currently used in OVRMainMenu).
OVRGridCube
OVRGridCube is a helper class that shows a grid of cubes when activated. Its main
purpose is to be used as a way to know where the ideal center of location is for the
user's eye position. This is especially useful when positional tracking is activated. The
cubes will change color to red when positional data is available, and will remain blue if
position tracking is not available, or change back to blue if vision is lost.
OVRPresetManager
OVRPresetManager is a helper class to allow for a set of variables to be saved and
recalled using the Unity PlayerPrefs class.
OVRVisionGuide
Currently being used by the OVRMainMenu component.
Oculus Mobile SDKExamples
The SDK Examples project (included with the mobile SDK only) demonstrates useful scenarios and functionality.
To import SDKExamples into Unity, begin by creating a new, empty project. Then select Assets > Custom
Package... and select SDKExamples.unityPackage to import the assets into your project. Alternately, you can
locate the SDKExamples.unityPackage and double-click to launch, which will have the same effect.
Once imported, replace your Unity project's ProjectSettings folder with the ProjectSettings folder included with
SDKExamples.
16 | A Detailed Look at the Unity Integration | Unity
You will find the following sample scenes located in Assets/Scenes:
30Hz_Sample
An example of how to set the TimeWarp vsync rate to support 30Hz apps, as well as
how to enable Chromatic Aberration Correction and Monoscopic Rendering for Android.
For more information on 30Hz TimeWarp and Chromatic Aberration Correction for
Android, please review the TimeWarp technical note in the Mobile SDK documentation.
Box_Room
A simple box room for testing.
Crosshair_Sample
An example of how to use a 3D cursor in the world with three different modes.
FirstPerson_Sample
An example of how to attach avatar geometry to the OVRPlayerController.
GlobalMenu_Sample
An example demonstrating Back Key long-press action and the Universal Menu.
Additionally demonstrates a gaze cursor with trail. For more information on Interface
Guidelines and requirements, please review the following documents: Interface
Guidelines and Universal Menu in the Mobile SDK documentation.
Menu_Sample
An example demonstrating a simple in-game menu activated by Back Key short-press
action. The menu also uses the Battery Level API for displaying the current battery level
and temperature.
MoviePlayer_Sample
An example demonstrating basic in-game video using Android MediaPlayer.
Multicamera_Sample
An example of switching cameras in one scene.
Unity | A Detailed Look at the Unity Integration | 17
SaveState_Sample
An example demonstrating saving the state of the game on pause and loading it on
resume. Click on the objects in the scene to change their color. When you run the scene
again, the objects should be in the color you had selected before exiting.
Startup_Sample
An example of a quick, comfortable VR app loading experience utilizing a black splash
screen, VR enabled logo scene, and an async main level load. For more information
on interface guidelines, please review Interface Guidelines and Universal Menu in the
Mobile SDK documentation.
The example scripts are located in Assets/OVR/Moonlight/:
Crosshair3D.cs
Detailed code for how to create judder-free crosshairs tied to the camera view.
StartupSample.cs
Example code for loading a minimal-scene on startup while loading the main scene in
the background.
TimeWarp30HzSample.cs Example code for setting up TimeWarp to support 30Hz apps as well as toggling
Chromatic Aberration Correction and Monoscopic Rendering on and off.
HomeMenu.cs
Example code for an animated menu.
HomeButton.cs
Example code which provides button commands (used in conjunction with
HomeMenu.cs).
HomeBattery.cs
Example code for using the SDK Battery Level API and interactively modifying a visual
indicator.
MoviePlayerSample.cs
Example code and documentation for how to play an in-game video on a textured quad
using Android MediaPlayer.
OVRChromaticAberration.csDrop-in component for toggling chromatic aberration correction on and off for Android.
OVRDebugGraph.cs
Drop-in component for toggling the TimeWarp debug graph on and off. Information
regarding the TimeWarp Debug Graph may be found in the TimeWarp technical note in
the Mobile SDK documentation.
OVRModeParms.cs
Example code for de-clocking your application to reduce power and thermal load as well
as how to query the current power level state.
OVRMonoscopic.cs
Drop-in component for toggling Monoscopic rendering on and off for Android.
OVRResetOrientation.cs
Drop-in component for resetting the camera orientation.
OVRWaitCursor.cs
Helper component for auto-rotating a wait cursor.
OVRPlatformMenu.cs
Helper component for detecting Back Key long-press to bring-up the Universal Menu
and Back Key short-press to bring up the Confirm-Quit to Home Menu. Additionally
implements a Wait Timer for displaying Long Press Time. For more information on
18 | A Detailed Look at the Unity Integration | Unity
interface guidelines and requirements, please review Interface Guidelines and Universal
Menu in the Mobile SDK documentation.
Control Layout: Mobile
Note: This section describes control layout for the Mobile Unity Integration only.
We recommend that you start by familiarizing yourself with Unity’s input system, documented here: http://
docs.unity3d.com/ScriptReference/Input.html
There are several ways to handle controller input in Unity for a VR app, ranging from using the
InputManager.asset file shipped with the SDK, which pre-populates all of the controller mappings, to completely
writing your own script that refers to the specific hardware keys. Beginning developers may find it easiest to set
up their own InputManager settings and then write their own controller code.
The mappings below are used by the Samsung El-GP20 gamepad and most other third-party Bluetooth
controllers. The actual mapping between a controller and Unity’s input system is up to the controller vendor and
the OS, but it is generally consistent with this schema.
Table 3: Samsung EI-GP20 Gamepad Controller Mappings
Button / Axis Name
Input Manager Mapping / Axis Sensitivity
Value
Button A / 1
joystick button 0
1000
Button B / 2
joystick button 1
1000
Button X / 3
joystick button 2
1000
Button Y / 4
joystick button 3
1000
Left Shoulder Button
joystick button 4
1000
Right Shoulder Button
joystick button 5
1000
Left Trigger Button
n/a
1000
Right Trigger Button
n/a
1000
Left Analog X Axis
X axis
1
Left Analog Y Axis
Y axis
1
Right Analog X Axis
3rd axis (Joysticks and Scroll
wheel)
1
Right Analog Y Axis
4th axis (Joysticks)
1
Dpad X Axis
5th axis (Joysticks)
1000
Dpad Y Axis
6th axis (Joysticks)
1000
Play Button
n/a
1000
Select Button
joystick button 11
1000
Start Button
joystick button 10
1000
Unity | A Detailed Look at the Unity Integration | 19
Table 4: Gear VR Touchpad Controller Mappings
Button / Axis Name
Input Manager Mapping / Axis Sensitivity
Value
Mouse 0 / Button 1
mouse 0 and joystick button 0
1000
Mouse 1 / Button 2
mouse 1 and joystick button 1
1000
Mouse X
Mouse Movement X axis
0.1
Mouse Y
Mouse Movement Y axis
0.1
These controller and touchpad input mappings can be set up in Unity under Project Settings > Input Manager.
The touchpad and the Back Button are mapped as Mouse 0 and Mouse 1, respectively.
Note: An InputManager.asset file with default input settings suitable for use with the Moonlight
OVRInputControl script is included with the Oculus Unity Integration Package.
20 | Configuring for Build | Unity
Configuring for Build
This section describes building your project to PC and mobile targets.
PC Build Target: Microsoft Windows and Mac OS X
This section describes targeting Unity project builds to Microsoft Windows and Mac OS X.
Build Settings
To build the demo as a standalone full screen application, you will need to change a few project settings to
maximize the fidelity of the demo.
Click on File > Build Settings... and select one of the following:
•
For Windows, set Target Platform to Windows and set Architecture to either x86 or x86 64.
•
For Mac, set Target Platform to Mac OS X.
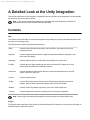
Within the Build Settings pop-up, click Player Settings. Under Resolution and Presentation, set the values to the
following:
In the Build Settings pop-up, select Build and Run. If prompted, specify a name and location for the build.
If you are building in the same OS, the demo should start to run in full screen mode as a standalone application.
Quality Settings
You may notice that the graphical fidelity is not as high as the pre-built demo. You will need to change some
additional project settings to get a better looking scene.
Unity | Configuring for Build | 21
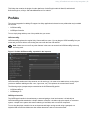
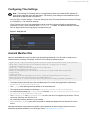
Navigate to Edit > Project Settings > Quality. Set the values in this menu to the following:
Figure 3: Resolution and Presentation options
Figure 4: Quality settings for Oculus demo
22 | Configuring for Build | Unity
The most important value to modify is Anti-aliasing. The anti-aliasing must be increased to compensate for the
stereo rendering, which reduces the effective horizontal resolution by 50%. An anti-aliasing value of 4X or higher
is ideal. However, if necessary, you can adjust to suit your application needs.
Note: A quality setting called Fastest has been added to address a potential performance issue
with Unity 4.5 and OS X 10.9. This setting turns off effects and features that may cause the drop in
performance.
Now rebuild the project again, and the quality should be at the same level as the pre-built demo.
Mobile Build Target: Android
This section describes targeting Unity project builds to Android.
Configuring Build Settings
From the File menu, select Build Settings…. From the Build Settings… menu, select Android as the platform.
Set Texture Compression to ETC2 (GLES 3.0).
Configuring Player Settings
1. Click the Player Settings… button and select the Android tab. Set Default Orientation to Landscape Left.
Unity | Configuring for Build | 23
Note: The Use 24-bit Depth Buffer option appears to be ignored for Android. A 24-bit window depth
buffer always appears to be created.
2. As a minor optimization, 16 bit buffers, color and/or depth may be used. Most VR scenes should be built to
work with 16 bit depth buffer resolution and 2x MSAA. If your world is mostly pre-lit to compressed textures,
there will be little difference between 16 and 32 bit color buffers.
3. Select the Splash Image section. For Mobile Splash image, choose a solid black texture.
Note: Custom Splash Screen support is not available with Unity Free v 4.6. A head-tracked Unity
logo screen will be provided for Unity Free in an upcoming release.
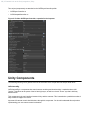
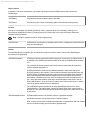
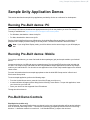
4. While still in Player Settings, select Other Settings and make sure both Forward Rendering and Multithreaded
Rendering* are selected as shown below:
Figure 5: Unity Pro 4.5
5. Set the Stripping Level to the maximum level your app allows. It will reduce the size of the installed .apk file.
Note: This feature is not available for Unity Free.
24 | Configuring for Build | Unity
Checking Optimize Mesh Data may improve rendering performance if there are unused components in your
mesh data.
Configuring Quality Settings
1. Go to the Edit menu and choose Project Settings, then Quality Settings. In the Inspector, set Vsync Count
to Don’t Sync. The TimeWarp rendering performed by the Oculus Mobile SDK already synchronizes with the
display refresh.
Figure 6: Unity Pro 4.5
Note: Antialiasing should not be enabled for the main framebuffer.
2. Antialiasing should be set to Disabled. You may change the camera render texture antiAliasing by modifying
the Eye Texture Antialiasing parameter on OVRManager. The current default is 2x MSAA. Be mindful
of the performance implications. 2x MSAA runs at full speed on chip, but may still increase the number of
tiles for mobile GPUs which use variable bin sizes, so there is some performance cost. 4x MSAA runs at half
speed, and is generally not fast enough unless the scene is very undemanding.
3. Pixel Light Count is another attribute which may significantly impact rendering performance. A model is rerendered for each pixel light that affects it. For best performance, set Pixel Light Count to zero. In this case,
vertex lighting will be used for all models depending on the shader(s) used.
Unity | Configuring for Build | 25
Configuring Time Settings
Note: The following Time Settings advice is for applications which hold a solid 60FPS, updating all
game and/or application logic with each frame. The following Time Settings recommendations may be
detrimental for apps that don’t hold 60FPS.
Go to the Edit -> Project Settings -> Time and change both Fixed Timestep and Maximum Allowed Timestep
to “0.0166666” (i.e., 60 frames per second).
Fixed Timestep is the frame-rate-independent interval at which the physics simulation calculations are
performed. In script, it is the interval at which FixedUpdate() is called. The Maximum Allowed Timestep
sets an upper bound on how long physics calculations may run.
Figure 7: Unity Pro 4.5
Android Manifest File
Open the AndroidManifest.xml file located under Assets/Plugins/Android/. You will need to configure your
manifest with the necessary VR settings, as shown in the following manifest segment:
<application android:theme="@android:style/Theme.Black.NoTitleBar.Fullscreen" >
<meta-data android:name="com.samsung.android.vr.application.mode"
android:value="vr_only"/>
<activity android:screenOrientation="landscape"
android:launchMode="singleTask"
android:configChanges="screenSize|orientation|keyboardHidden|keyboard">
</activity>
</application>
<uses-sdk android:minSdkVersion="19" android:targetSdkVersion="19" />
<uses-feature android:glEsVersion="0x00030000" />
<uses-permission android:name="android.permission.READ_EXTERNAL_STORAGE" />
•
•
•
•
•
The Android theme should be set to the solid black theme for comfort during application transitioning:
Theme.Black.NoTitleBar.Fullscreen
The vr_only meta data tag should be added for VR mode detection.
The required screen orientation is landscape: android:screenOrientation="landscape"
We recommended setting your configChanges as follows: android:configChanges="screenSize|
orientation|keyboardHidden|keyboard"
The minSdkVersion and targetSdkVersion are set to the API level supported by the device. For the
current set of devices, the API level is 19.
•
Do not add the noHistory attribute to your manifest.
•
READ_EXTERNAL_STORAGE permission is needed for reading the appropriate lens distortion file for the
device.
Note that submission requirements will stipulate a few adjustments to these settings. Please refer to the
submission guidelines available in our Developer Center: https://developer.oculus.com
26 | Configuring for Build | Unity
Running the Build
Now that the project is properly configured for VR, it’s time to install and run the application on the Android
device.
Note: Your application must be appropriately signed or it will not run. See "Create Your Signature Files"
in the Oculus Mobile Submission Guidelines for more information.
1. First, make sure the project settings from the steps above are saved with File > Save Project.
2. From the File menu, select Build Settings…. While in the Build Settings menu, add the Main.scene to Scenes
in Build. Next, verify that Android is selected as your Target Platform and select Build and Run. If asked,
specify a name and location for the .apk.
The .apk will be installed and launched on your Android device.
Unity | Sample Unity Application Demos | 27
Sample Unity Application Demos
This section describes the sample Unity applications provided by Oculus as a reference for development.
Running Pre-Built demos: PC
To run the pre-built demos, download the appropriate demo zip file for the platform you need. For example,
Tuscany is available here: https://share.oculus.com/app/oculus-tuscany-demo.
•
•
For Windows, download the *demo win.zip file.
For Mac, download the *demo mac.zip file.
Run the OculusUnityDemoScene.exe (Windows) or OculusUnityDemoScene.app (Mac) pre-built demo. If
prompted with a display resolution dialog, hit the Play button. The demo will launch in full-screen mode.
Note: If you using Direct Display mode, you will be able to see the stereo image on your 2D display as
well.
Running Pre-Built demos: Mobile
To run the pre-built demos, you must first install the demo packages (.apk) and sample media to your Android
device.
Connect to the device via USB and open a command prompt. Run the installToPhone.bat script included with
the SDK. This script will copy and install both the Unity and Native sample applications as well as any sample
media to your Android device. You should now see application icons for the newly-installed apps on the Android
Home screen.
For more information about these sample apps please review the Initial SDK Setup section in Device and
Environment Setup Guide.
To test a sample application, perform the following steps:
•
•
•
From the Android Home screen, press the icon of the VR app you wish to run.
A toast notification will appear with a dialog like the following: “Insert Device: To open this application, insert
your device into your Gear VR”
Insert your device into the supported Gear VR hardware.
The app should now launch.
Pre-Built Demo Controls
BlockSplosion (mobile only)
In BlockSplosion, the camera position does not change, but the user's head orientation will be tracked, allowing
them to aim before launching a block. * 1-dot Button or Samsung gamepad tap launches a block in the facing
direction. * 2-dot Button resets the current level. * Left Shoulder Button (L) skips to the next level.
28 | Sample Unity Application Demos | Unity
Tuscany (PC only)
Gamepad Control
•
If you have a compliant gamepad controller for your platform, you can control the movement of the player
controller with it.
•
•
•
•
The left analog stick moves the player around as if you were using the W,A,S,D keys.
The right analog stick rotates the player left and right as if you were using the Q and E keys.
The left trigger allows you move faster, or run through the scene.
The Start button toggles the scene selection. Pressing D-Pad Up and D-Pad Down scrolls through available
scenes. Pressing the A button starts the currently selected scene.
If the scene selection is not turned on, Pressing the D-Pad Down resets the orientation of the tracker.
•
Keyboard Control
For the key mappings for the demo that allow the user to move around the environment and to change some Rift
device settings, see Control Layout.
Mouse Control
Using the mouse will rotate the player left and right. If the cursor is enabled, the mouse will track the cursor and
not rotate the player until the cursor is off screen.
Shadowgun
In Shadowgun, locomotion allows the camera position to change.
•
•
Left Analog Stick will move the player forward, back, left, and right.
Right Analog Stick will rotate the player view left, right, up, and down. However, you will likely want to rotate
your view just by looking with the VR headset.
Unity | Best Practices: Mobile | 29
Best Practices: Mobile
This section provides simple guidelines to help your Android Unity app perform well.
Good performance is critical for all VR applications, but the limitations inherent to mobile development warrant
special consideration.
Please review “Performance Advice for Early Titles” in Design Guidelines and Mobile VR Design and
Performance Guidelines before reading this documentation - they may be found in the Mobile SDK
documentation..
General CPU Optimizations
To create a VR application or game that performs well, careful consideration must be given to how features are
implemented. Scene should always run at 60 FPS, and you should avoid any hitching or laggy performance
during any point that the player is in your game.
•
•
•
•
•
•
•
•
•
•
•
•
•
•
Be mindful of the total number of GameObjects and components your scenes use.
Model your game data and objects efficiently. You will generally have plenty of memory.
Minimize the number of objects that actually perform calculations in Update() or FixedUpdate().
Reduce or eliminate physics simulations when they are not actually needed.
Use object pools to respawn frequently-used effects or objects instead of allocating new ones at runtime.
Use pooled AudioSources versus PlayOneShot sounds, as the latter allocate a GameObject and destroy it
when the sound is done playing.
Avoid expensive mathematical operations whenever possible.
Cache frequently-used components and transforms to avoid lookups each frame.
Use the Unity Profiler to identify expensive code and optimize as needed.
Use the Unity Profiler to identify and eliminate Garbage Collection allocations that occur each frame.
Use the Unity Profiler to identify and eliminate any spikes in performance during normal play.
Do not use Unity’s OnGUI() calls.
Do not enable gyro or the accelerometer. In current versions of Unity, these features trigger calls to
expensive display calls.
All best practices for mobile app and game development generally apply.
Note: The Unity Profiler is not available for Unity Free.
Rendering Optimization
While building your app, the most important thing to keep in mind is to be conservative on performance from the
start.
•
•
•
•
Keep draw calls down.
Be mindful of texture usage and bandwidth.
Keep geometric complexity to a minimum.
Be mindful of fillrate.
30 | Best Practices: Mobile | Unity
Reducing Draw Calls
Keep the total number of draw calls to a minimum. A conservative target would be less than 100 draw calls per
frame.
Unity provides several built-in features to help reduce draw calls such as batching and culling.
Draw Call Batching
Unity attempts to combine objects at runtime and draw them in a single draw call. This helps reduce overhead
on the CPU. There are two types of draw call batching: Static and Dynamic.
Static batching is used for objects that will not move, rotate or scale, and must be set explicitly per object. To
mark an object static, select the Static checkbox in the object Inspector.
Note: Static batching is not available for Unity Free.
Dynamic batching is used for moving objects and is applied automatically when objects meet certain criteria,
such as sharing the same material, not using real-time shadows, or not using multipass shaders. More
information on dynamic batching criteria may be found here: https://docs.unity3d.com/Documentation/Manual/
DrawCallBatching.html
Culling
Unity offers the ability to set manual per-layer culling distances on the camera via Per-Layer Cull Distance.
This may be useful for culling small objects that do not contribute to the scene when viewed from a given
distance. More information about how to set up culling distances may be found here: https://docs.unity3d.com/
Documentation/ScriptReference/Camera-layerCullDistances.html.
Unity also has an integrated Occlusion Culling system. The advice to early VR titles is to favor modest “scenes”
instead of “open worlds,” and Occlusion Culling may be overkill for modest scenes. More information about the
Occlusion Culling system can be found here: http://blogs.unity3d.com/2013/12/02/occlusion-culling-in-unity-4-3the-basics/.
Reducing Memory Bandwidth
•
Texture Compression: Texture compression offers a significant performance benefit. Favor ETC2
compressed texture formats.
•
Texture Mipmaps: Always use mipmaps for in-game textures. Fortunately, Unity automatically generates
mipmaps for textures on import. To see the available mipmapping options, switch Texture Type to Advanced
in the texture inspector.
•
Texture Filtering: Trilinear filtering is often a good idea for VR. It does have a performance cost, but it is worth
it. Anisotropic filtering may be used as well, but keep it to a single anisotropic texture lookup per fragment.
•
Texture Sizes: Favor texture detail over geometric detail, e.g., use high-resolution textures over more
triangles. We have a lot of texture memory, and it is pretty much free from a performance standpoint. That
said, textures from the Asset Store often come at resolutions which are wasteful for mobile. You can often
reduce the size of these textures with no appreciable difference.
•
Framebuffer Format: Most scenes should be built to work with a 16 bit depth buffer resolution. Additionally, if
your world is mostly pre-lit to compressed textures, a 16 bit color buffer may be used.
•
Screen Resolution: Setting Screen.Resolution to a lower resolution may provide a sizeable speedup for most
Unity apps.
Unity | Best Practices: Mobile | 31
Reduce Geometric Complexity
Keep geometric complexity to a minimum. 50,000 static triangles per-eye per-view is a conservative target.
Verify model vert counts are mobile-friendly. Typically, assets from the Asset Store are high-fidelity and will need
tuning for mobile.
Unity Pro provides a built-in Level of Detail System (not available in Unity Free), allowing lower-resolution
meshes to be displayed when an object is viewed from a certain distance. For more information on how to set up
a LODGroup for a model, see the following: https://docs.unity3d.com/Documentation/Manual/LevelOfDetail.html
Verify your vertex shaders are mobile friendly. And, when using built-in shaders, favor the Mobile or Unlit version
of the shader.
Bake as much detail into the textures as possible to reduce the computation per vertex, for example, baked
bumpmapping as demonstrated in the Shadowgun project: https://docs.unity3d.com/430/Documentation/Manual/
iphone-PracticalRenderingOptimizations.html
Be mindful of GameObject counts when constructing your scenes. The more GameObjects and Renderers in the
scene, the more memory consumed and the longer it will take Unity to cull and render your scene.
Reduce Pixel Complexity and Overdraw
Pixel Complexity: Reduce per-pixel calculations by baking as much detail into the textures as possible. For
example, bake specular highlights into the texture to avoid having to compute the highlight in the fragment
shader.
Verify your fragment shaders are mobile friendly. And, when using built-in shaders, favor the Mobile or Unlit
version of the shader.
Overdraw: Objects in the Unity opaque queue are rendered in front to back order using depth-testing to minimize
overdraw. However, objects in the transparent queue are rendered in a back to front order without depth testing
and are subject to overdraw.
Avoid overlapping alpha-blended geometry (e.g., dense particle effects) and full-screen post processing effects.
Best Practices
•
Be Batch Friendly. Share materials and use a texture atlas when possible.
•
Prefer lightmapped, static geometry.
•
Prefer lightprobes instead of dynamic lighting for characters and moving objects.
•
Bake as much detail into the textures as possible. E.g., specular reflections, ambient occlusion.
•
Only render one view per eye. No shadow buffers, reflections, multi-camera setups, et cetera.
•
Keep the number of rendering passes to a minimum. No dynamic lighting, no post effects, don't resolve
buffers, don’t use grabpass in a shader, et cetera.
•
Avoid alpha tested / pixel discard transparency. Alpha-testing incurs a high performance overhead. Replace
with alpha-blended if possible.
•
Keep alpha blended transparency to a minimum.
•
Use Texture Compression. Favor ETC2.
•
Do not enable MSAA on the main framebuffer. MSAA may be enabled on the Eye Render Textures.
32 | Best Practices: Mobile | Unity
Design Considerations
Please review Design Guidelines in the Mobile SDK documentation if you have not already done so.
Startup Sequence
For good VR experiences, all graphics should be rendered such that the user is always viewing a proper threedimensional stereoscopic image. Additionally, head-tracking must be maintained at all times.
An example of how to do this during application startup is demonstrated in the SDKExamples Startup_Sample
scene:
•
•
•
•
Solid black splash image is shown for the minimum time possible.
A small test scene with 3D logo and 3D rotating widget or progress meter is immediately loaded.
While the small startup scene is active, the main scene is loaded in the background.
Once the main scene is fully loaded, the start scene transitions to the main scene using a fade.
Universal Menu Handling
Applications will need to handle the Back Key long-press action which launches the Universal Menu as well
as the Back Key short-press action which launches the “Confirm-Quit to Home” Menu which exits the current
application and returns to the Oculus Home application.
An example of demonstrating this functionality is in the SDKExamples GlobalMenu_Sample scene.
More information about application menu options and access can be found in Universal Menu in the Mobile SDK
documentation.
Unity Profiling Tools
Even following the guidelines above, you may find you are not hitting a solid 60 FPS. The next section details the
various tools provided by Unity to help you diagnose bottlenecks in Android applications. For additional profiling
tools, see the the Performance Analysis document.
Unity Profiler
Unity Pro comes with a built-in profiler. The profiler provides per-frame performance metrics, which can be used
to help identify bottlenecks.
You may profile your application as it is running on your Android device using adb or WIFI. For steps on how to
set up remote profiling for your device, please refer to the Android section of the following Unity documentation:
https://docs.unity3d.com/Documentation/Manual/Profiler.html.
Unity | Best Practices: Mobile | 33
The Unity Profiler displays CPU utilization for the following categories: Rendering, Scripts, Physics,
GarbageCollector, and Vsync. It also provides detailed information regarding Rendering Statistics, Memory
Usage (including a breakdown of per-object type memory usage), Audio and Physics Simulation statistics.
GPU Usage data for Android is not available at this time.
The Unity profiler only displays performance metrics for your application. If your app isn’t performing as
expected, you may need to gather information on what the entire system is doing. Show Rendering Statistics
Unity provides an option to display real-time rendering statistics, such as FPS, Draw Calls, Tri and Vert Counts,
VRAM usage.
34 | Best Practices: Mobile | Unity
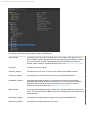
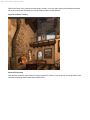
While in the Game View, pressing the Stats button (circled in red in the upper-right of the following screenshot)
above the view window will display an overlay showing realtime render statistics.
Figure 8: VrScene: Tuscany
Show GPU Overdraw
Unity provides a specific render mode for viewing overdraw in a scene. From the Scene View Control Bar, select
OverDraw in the drop-down Render Mode selection box.
Unity | Best Practices: Mobile | 35
In this mode, translucent colors will accumulate providing an overdraw “heat map” where more saturated colors
represent areas with the most overdraw.
Figure 9: VrScene: Tuscany
36 | Migrating From Earlier Versions | Unity
Migrating From Earlier Versions
The 0.4.3+ Unity Integration’s API is significantly different from prior versions. This section will help you upgrade.
For changes pertaining to Mobile SDK v 0.5, see the section at the bottom.
API Changes
The following are changes to Unity components:
Table 5: Unity Components
OVRDevice → OVRManager
Unity foundation singleton.
OVRCameraController → OVRCameraRig
Performs tracking and stereo rendering.
OVRCamera
Removed. Use eye anchor Transforms instead.
The following are changes to helper classes:
Table 6: Helper Classes
OVRDisplay
HMD pose and rendering status.
OVRTracker
Infrared tracking camera pose and status.
OVR.Hmd → Ovr.Hmd
Pure C# wrapper for LibOVR.
The following are changes to events:
Table 7: Events
HMD added/removed
Fired from OVRCameraRig.Update() on HMD connect
and disconnect.
Tracking acquired/lost
Fired from OVRCameraRig.Update() when entering
and exiting camera view.
HSWDismissed
Fired from OVRCameraRig.Update() when the Health
and Safety Warning is no longer visible.
Get/Set*(ref *) methods
Replaced by properties.
Behavior Changes
•
•
•
•
•
•
•
•
OVRCameraRig’s position is always the initial center eye position.
Eye anchor Transforms are tracked in OVRCameraRig’s local space.
OVRPlayerController’s position is always at the user’s feet.
IPD and FOV are fully determined by profile (PC only).
Layered rendering: multiple OVRCameraRigs are fully supported (not advised for mobile).
OVRCameraRig.*EyeAnchor Transforms give the relevant poses.
For OrientationOffset, set rotation on the TrackingSpace game object instead.
FollowOrientation is no longer necessary since OVRCameraRig applies tracking in local space. You are free
to script the rig’s pose or make it a child of another GameObject.
Upgrade Procedure
To upgrade, follow these steps:
Unity | Migrating From Earlier Versions | 37
1. Ensure you didn’t modify the structure of the OVRCameraController prefab. If your eye cameras are on
GameObjects named “CameraLeft” and “CameraRight” which are children of the OVRCameraController
GameObject (the default), then the prefab should cleanly upgrade to OVRCameraRig and continue to work
properly with the new integration.
2. Write down or take a screenshot of your settings from the inspectors for OVRCameraController,
OVRPlayerController, and OVRDevice. You will have to re-apply them later.
3. Remove the old integration by deleting the following from your project:
•
•
•
•
•
4.
5.
6.
7.
8.
9.
OVR folder
OVR Internal folder (if applicable)
Moonlight folder (if applicable)
Any file in the Plugins folder with “Oculus” or “OVR” in the name
Android-specific assets in the Plugins/Android folder, including: vrlib.jar, libOculusPlugin.so, res/raw and
res/values folders
Import the new integration.
Click Assets -> Import Package -> Custom Package…
Open OculusUnityIntegration.unitypackage
Click Import All.
Fix any compiler errors in your scripts. Refer to the API changes described above. Note that the substitution
of prefabs does not take place until after all script compile errors have been fixed.
Re-apply your previous settings to OVRCameraRig, OVRPlayerController, and OVRManager. Note that the
runtime camera positions have been adjusted to better match the camera positions set in the Unity editor. If
this is undesired, you can get back to the previous positions by adding a small offset to your camera:
a. Adjust the camera's y-position.
a. If you previously used an OVRCameraController without an OVRPlayerController, add 0.15 to the
camera y-position.
b. If you previously used an OVRPlayerController with Use Player Eye Height checked on its
OVRCameraContoller, then you have two options. You may either (1) rely on the new default player
eye-height (which has changed from 1.85 to 1.675); or (2) uncheck Use Profile Data on the converted
OVRPlayerController and then manually set the height of the OVRCameraRig to 1.85 by setting its yposition. Note that if you decide to go with (1), then this height should be expected to change when
profile customization is added with a later release.
c. If you previously used an OVRPlayerController with Use Player Eye Height unchecked on its
OVRCameraContoller, then be sure uncheck Use Profile Data on your converted OVRPlayerController.
Then, add 0.15 to the y-position of the converted OVRCameraController.
b. Adjust the camera's x/z-position. If you previously used an OVRCameraController without an
OVRPlayerController, add 0.09 to the camera z-position relative to its y rotation (i.e. +0.09 to z if it has
0 y-rotation, -0.09 to z if it has 180 y-rotation, +0.09 to x if it has 90 y-rotation, -0.09 to x if it has 270 yrotation). If you previously used an OVRPlayerController, no action is needed.
10.Re-start Unity
Common Script Conversions
Deprecated
Use Instead
OVRCameraController
OVRCameraRig
cameraController.GetCameraPosition()
cameraRig.rightEyeAnchor.position
cameraController.GetCameraOrientation()
cameraRig.rightEyeAnchor.rotation
cameraController.NearClipPlane
cameraRig.rightEyeCamera.nearClipPlane
38 | Migrating From Earlier Versions | Unity
Deprecated
Use Instead
cameraController.FarClipPlane
cameraRig.rightEyeCamera.farClipPlane
cameraController.GetCamera()
cameraRig.rightEyeCamera
OVRDevice.ResetOrientation();
OVRManager.display.RecenterPose();
cameraController.ReturnToLauncher();
OVRManager.instance.ReturnToLauncher();
OVRDevice.GetBatteryTemperature();
OVRDevice.GetBatteryLevel();
OVRManager.batteryTemperature
OVRManager.batteryLevel
if ( cameraController.GetCameraForward( ref cameraForward ) &&
cameraController.GetCameraPosition( ref cameraPosition ) )
{
...
to
if (OVRManager.display.isPresent)
{
// get the camera forward vector and position
Vector3 cameraPosition = cameraController.centerEyeAnchor.position;
Vector3 cameraForward = cameraController.centerEyeAnchor.forward;
...
Mobile SDK v 0.5
The Universal Menu is now no longer a part of VrLib. This allows modifications to the Universal Menu without
requiring each app to upgrade to the latest SDK. The Universal Menu is now part of the Oculus System Activities
application and is downloaded and updated alongside Oculus Home and Horizon. Make sure you update your
version of Home in order to test your application with the new Universal Menu.
One benefit of moving the Universal Menu out of VrLib into the Oculus System Activities application is that you
will no longer need to include the Universal Menu resources in your Unity app.
It is no longer necessary to include the following folders in your app, and they are no longer included with the
Unity Integration package provided with this SDK:
•
•
Plugins/Android/res/raw
Plugins/Android/rew/values
Additionally, the following activity should be removed from your AndroidManifest.xml file:
<activity android:name="com.oculusvr.vrlib.PlatformActivity"
android:theme="@android:style/Theme.Black.NoTitleBar.Fullscreen"
android:launchMode="singleTask"
android:screenOrientation="landscape"
android:configChanges="screenSize|orientation|keyboardHidden|keyboard">
The following permission is no longer required by VrLib and can be removed from your AndroidManifest.xml file
if your app does not rely on it for other purposes:
<uses-permission android:name="android.permission.CAMERA" />
Unity | Known Issues and Troubleshooting | 39
Known Issues and Troubleshooting
This section outlines some currently known issues with Unity integration that will either be fixed in later releases
of Unity or the Integration package.
A work-around may be available to compensate for some of the issues at this time.
PC
Targeting a Display
To run your application on the Rift in full-screen mode, use the <<AppName>>_DirectToRift.exe file located next
to your standard binary. It works in direct and extended modes. You should include both of these files and the
<<AppName>>_Data folder when publishing builds.
To enable Rift support, the internal OVRShimLoader script forces your builds to 1920x1080 full-screen resolution
and suppresses Unity's start-up splash screen by default. You can still access it and change the settings when
running your plain executable (<<AppName.exe>>) by holding the ALT key immediately after launch. To disable
this behavior, navigate to Edit Preferences... > Oculus VR and uncheck the Optimize Builds for Rift box.
Direct-Mode Display Driver
When the driver is in direct mode, Rift applications run in a window and are mirrored to the Rift. You can disable
this behavior by turning off OVRManager.mirrorToMainWindow.
Editor Workflow
If you plan to run your application in the Unity editor, you must use extended mode. A black screen will appear if
you run it in direct mode.
The Build & Run option (CTRL + B) is not recommended in any driver mode. We recommend you build a
standalone player without running it and then run the <<AppName>>_DirectToRift.exe file produced by the build.
Mobile
Game scene is missing or just renders the background color when pressing Play in Unity.
Check the [Project Path]/Assets/Plugins/ folder and make sure that the Oculus plugins have not moved. See the
Unity console for additional information.
After importing the latest Oculus Unity Integration package, your game is generating exceptions.
It is possible there were changes made to the OVR framework that require you to update your camera prefabs.
The easiest way to do this is to compare the changes between the Camera Controller preb you were using
(OVRCameraController or OVRPlayerController) and the new one and compare changes.
After importing the latest Oculus Unity Integration package your existing OVRPlayerController transform is
changed.
It is possible there were changes made to the OVR framework that may cause the OVRPlayerController
transform to be swapped with the child OVRCameraController transform. Swapping the values back should
fix the issue.
40 | Known Issues and Troubleshooting | Unity
After importing the latest Oculus Unity Integration package the rendering is corrupted.
We require the orientation to be landscape. Check that your defaultOrientation in Player Settings is set to
Landscape Left.
After importing the latest Oculus Unity Integration package the app does not launch as a VR app.
Ensure you have administrator rights to the system you are installing the integration to.
Issues with updating to the latest Oculus Unity Integration with Team Licensing and Perforce Integration
enabled.
If you have Team Licensing and Perforce Integration enabled, you may need to check out the OVR and Plugins
folders manually before importing the updated unity package.
Building Application for Android may fail with Zipalign Error.
If you have build failures with the following error about zipalign:
Error building Player: Win32Exception: ApplicationName='D:/Android/sdk\tools
\zipalign.exe', CommandLine='4 "C:\Users\Username\Documents\New Unity Project
1\Temp/StagingArea/Package_unaligned.apk" "C:\Users\Username\Documents\New Unity
Project 1\Temp/StagingArea/Package.apk"', CurrentDirectory='Temp/StagingArea'
This can be fixed by copying the zipalign.exe from the API level you’re building for into the sdk\tools directory. To
find this, look in the build-tools directory in your SDK installation, in the folder for the API level you’re building for.
For example, if you’re targeting API level 19, the directory is sdk\build-tools\19.1.0. Copy zipalign.exe into sdk
\tools and try building your project again.
Contact Information
Questions?
Visit our developer support forums at https://developer.oculus.com
Our Support Center can be accessed at https://support.oculus.com.
Unity | Revision | 41
Revision
Released March 31, 2015