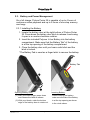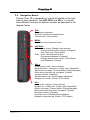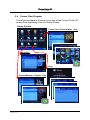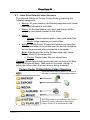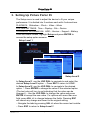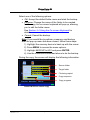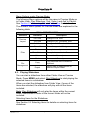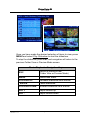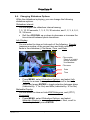
1
Picture Porter 35 3.5” DIGITAL PHOTO MANAGER User’s Guide Note Digital Foci, Inc. reserves the right to make improvements and/or changes to the products and programs described in this User’s Guide at any time without notice. Please read the entire User’s Guide before operating the device. Digital Foci, Inc. assumes no responsibility for errors or omissions in this User’s Guide. Nor does Digital Foci, Inc. make any commitment to update the information contained herein. Trademarks Picture Porter 35, PhotoMemo, and Digital Foci are trademarks of Digital Foci, Inc. All names and products mentioned within this document are registered trademarks of their respective companies. ©2009 Digital Foci, Inc. All rights reserved. This publication is intended for sole use by the owner of the associated device. Neither this publication nor any part of this publication may be printed and distributed, electronically distributed, reproduced, translated, or reduced to any other electronic medium or machine readable form without the prior written permission of Digital Foci, Inc. Digital Foci, Inc., 3111 E. Via Mondo, E. Rancho Dominguez, CA 90221 USA Recycling Digital Foci is committed to designing and manufacturing products with a sense of environmental awareness that minimizes the overall environmental impact of our products. Our product designs minimize material usage and waste, encourage longer product lifecycles, and utilize recyclable components and material wherever possible. We comply with global and local guidelines and restrictions on hazardous substances usage. For assistance with disposal and recycling of any Digital Foci product, please email us at [email protected] or call (310) 763-9100. More information about our policies on recycling and environmental stewardship can be found at the Company page of our website at www.digitalfoci.com. Warranty Policy As the original owner of this product, you receive these warranties from Digital Foci. Your Picture Porter 35 (hereafter referred to as “Device”) will be free from defects in material and workmanship and will perform in substantial compliance with your user documentation accompanying the Device for 1 year from the purchase date providing proper use of the Device. Your warranty rights will be honored so long as you read and follow your user documentation for all aspects of operating the Device. Any unauthorized or improper use of the Device may cause your warranty to become void. If there is a problem or defect with your Device, please contact Digital Foci, Inc. See Section 17 Troubleshooting and Technical Support for more details and contact information. Disclaimer This limited warranty is the only warranty Digital Foci, Inc. makes for the Device. To the extent allowed by Law, no other warranty applies, whether expressed, implied, or statutory, including any warranty of merchantability, of fitness for a particular purpose, or of non-infringement. This warranty does not cover accidental damage, wear and tear, or consequential or incidental loss. Under no conditions is Digital Foci, Inc. liable for loss of or damage to, a computer; nor loss of, or damage to, programs, records, or data; nor any consequential or incidental damages, even if Digital Foci, Inc. has been informed of their possibility. Additional Rights Some states or countries do not allow exclusion or limitation of incidental or consequential damages, or limitations on the length of an implied warranty. Under these circumstances, the above limitations or exclusions may not apply. This warranty includes specific legal rights, and other rights may be available from state to state or country to country. Safety and Regulatory Compliance This device and it’s accessories have been tested to comply with relevant safety and regulatory standards including, but not limited to, FCC Part 15 Class B (15.107, 15.109), CE for EMC/ITE (EN55022, EN55024), CE for EMC/AV (EN55013, EN55020), C-Tick (AS/NZS CISPR 22), and VCCI. Caring for Your Picture Porter 35 To keep Picture Porter 35 in good condition and working properly, follow these basic guidelines: • Keep Picture Porter 35 in its carrying case for safe transport and storage. • When cleaning Picture Porter 35, do not use abrasive cloths or harsh chemicals. • Do not drop, jar, bump, shock or expose Picture Porter 35 to severe vibration. • Do not handle or shake Picture Porter 35 while data is being transferred. • Do not operate or store Picture Porter 35 in dusty environments. • Do not leave Picture Porter 35 under direct sunlight, in a parked car, or in other situations where the temperature may be above 140°F (60°C). • To prevent risk of short circuit and damage, do not expose Picture Porter 35 to liquids, precipitation or moisture. • To avoid bodily injury or damage to internal components, do not take apart Picture Porter 35. • Never force the USB cable if it does not plug in smoothly. Instead, examine the head of the cable to mak sure that the plug orientation is correct. • Never force insertion of the memory card if it does not insert smoothly. Instead, examine to see if the memory card is facing the correct direction and the memory card slot is correct. • Run file management tools such as Scan Disk, Disk Defragmentation, and other similar tools on the Picture Porter 35 hard drive periodically for optimal performance. • Do not attach or remove memory cards or the USB cable while Picture Porter 35 is accessing data. Picture Porter 35 User’s Guide Table of Contents 1. 2. 3. 4. 5. Welcome! ..........................................................................................................................1 1.1. Ways to Use Picture Porter 35 ...................................................................................... 1 1.2. System Requirements ..................................................................................................... 3 1.3. Supported Memory Card Formats................................................................................ 3 1.4. Supported File Formats .................................................................................................. 4 1.5. Package Contents............................................................................................................. 4 1.6. Latest Firmware ................................................................................................................ 4 Understanding the Basics ................................................................................................5 2.1. Picture Porter 35 Data Flow Overview......................................................................... 5 2.2. Device Layout .................................................................................................................... 6 2.3. Battery and Power Management................................................................................... 7 2.4. Home Screen Layout ..................................................................................................... 10 2.5. Navigation Basics........................................................................................................... 11 2.6. Screen Flow Diagram..................................................................................................... 12 2.7. Hard Drive Default Folder Structure .......................................................................... 13 Setting Up Picture Porter 35..........................................................................................14 3.1. Setting Playback Options ............................................................................................. 15 3.2. Setting System Settings ............................................................................................... 18 3.3. Viewing Technical Information.................................................................................... 20 Copying Memory Card to Picture Porter 35 .................................................................21 4.1. Connecting Memory Cards or USB Flash Drive ..................................................... 21 4.2. Copying from Memory Card or USB Flash Drive to Picture Porter 35 ............. 22 4.3. Understanding Default Backup Folder Name Assignments................................ 25 4.4. Copying Selected Folders or Files............................................................................. 26 4.5. Accessing Your Copied Photos on Picture Porter 35 ........................................... 26 Basic Operations ............................................................................................................27 5.1. Navigating Folder View ................................................................................................. 27 Page iv Revision 1.1.1-1 Picture Porter 35 User’s Guide 5.2. Selecting Items................................................................................................................ 28 5.3. Sorting in Folder View or Preview Mode .................................................................. 29 5.4. Using the On-screen Keyboard................................................................................... 29 6. Enjoying Slideshow with Photos, Video, Music............................................................30 6.1. Accessing Files in Folder View................................................................................... 30 6.2. Viewing Photos, Video, Music in Preview Mode..................................................... 32 6.3. Playing Slideshow .......................................................................................................... 34 6.4. Changing Slideshow Options...................................................................................... 36 6.5. Changing View Mode ..................................................................................................... 38 6.6. Pausing Slideshow, Scrolling Manually, Zooming & Panning............................ 39 6.7. Rotating Photos .............................................................................................................. 41 6.8. Viewing IPTC Metadata.................................................................................................. 42 6.9. Playing PhotoMemoTM ................................................................................................... 42 7. Enjoying Video ...............................................................................................................43 8. Enjoying Music ..............................................................................................................46 9. Folder View – File Management Options .....................................................................48 9.1. Renaming a File or Folder ............................................................................................ 48 9.2. Creating a New Folder ................................................................................................... 48 9.3. Copying and Pasting Files and/or Folders .............................................................. 49 9.4. Moving Files or Folders ................................................................................................ 49 9.5. Deleting Files and/or Folders ...................................................................................... 50 10. Recording and Playing PhotoMemoTM .........................................................................51 10.1. MemoRec Menu Options .......................................................................................... 52 10.2. Recording PhotoMemo ............................................................................................. 52 10.3. Playing Back PhotoMemo ........................................................................................ 53 11. Exporting Selection to Export Folder ...........................................................................54 11.1. Copying Files to the Export Folder ............................................................................ 54 11.2. Understanding Default Export Folder Name Assignments.................................. 56 Page v Revision 1.1.1-1 Picture Porter 35 User’s Guide 11.3. 12. Access Files in Export Folder on Picture Porter 35 .............................................. 56 Managing Playlists.........................................................................................................57 12.1. Playlist Manager Screen........................................................................................... 58 12.2. Playlist Manager Menu Options.............................................................................. 59 12.3. Playlist (contents) Screen ........................................................................................ 61 12.4. Playlist (contents) Menu Options........................................................................... 62 12.5. Changing the File Sequence of a Playlist ............................................................ 62 12.6. Adding Entries to a Playlist ..................................................................................... 63 12.7. Understanding the Playlist File............................................................................... 64 13. Using Picture Porter 35 with Your Computer ...............................................................65 13.1. Connecting Picture Porter 35 to Your Computer ............................................... 65 13.2. Accessing Picture Porter 35 Data on Your Computer ...................................... 66 13.3. Disconnecting Picture Porter 35 From Your Computer ................................... 67 14. Using Picture Porter 35 with Other Devices .................................................................69 14.1. Using Picture Porter 35 with A/V Devices............................................................ 69 14.2. Using Picture Porter 35 with Another Picture Porter 35 .................................. 70 14.3. Using Picture Porter 35 with an USB Flash Drive.............................................. 71 14.4. Using Picture Porter 35 with an External Hard Drive........................................ 72 15. Using Additional Features .............................................................................................73 15.1. Updating Firmware..................................................................................................... 73 15.2. Checking Remaining Hard Drive Space ............................................................... 73 15.3. Resetting Picture Porter 35...................................................................................... 74 15.4. Reformatting Picture Porter 35............................................................................... 74 15.5. Creating Multiple Partitions Picture Porter 35.................................................... 75 16. Frequently Asked Questions ..........................................................................................77 17. Troubleshooting and Technical Support .......................................................................83 18. Appendix: Technical Specifications ..............................................................................87 19. Appendix: RAW Formats Supported .............................................................................89 Page vi Revision 1.1.1-1 Picture Porter 35 User’s Guide Page vii Revision 1.1.1-1 Picture Porter 35 User’s Guide 1. Welcome! Congratulations on purchasing your Picture Porter 35 – 3.5” Digital Photo Manager. 1.1. Ways to Use Picture Porter 35 Bring Picture Porter 35 with you anywhere you go to enjoy, share, back up, and manage your photos, videos, music, and other data in many different ways. • View and review photos on the 3.5” color LCD display: o Display photos on the full screen or in thumbnail view with 3x2, 5x4, and List display settings. o Use PhotoMemoTM recording feature to make notes for individual photos while the thoughts are fresh in your mind or add personal messages to introduce each photo in a slideshow. o See detailed views of your photos (including RAW photos) by using zoom, pan, and rotate functions. o View EXIF information and histograms of your photos. o View photo IPTC details and show photo IPTC comments of the photos in full screen display mode. o Play your photos in an automatic slideshow or control the slideshow manually. o Add music to play in the background along with the photo slideshow. • Securely back up your precious digital photos: o Copy and store photos directly from digital camera memory cards to Picture Porter 35 so you can free up memory card space and keep shooting more photos. o USB-host capability lets you create a second backup from Picture Porter 35 to USB flash drive or external hard drive for extra security. Page 1 Revision 1.1.1-1 Picture Porter 35 User’s Guide • Manage your photos: o Copy, move, delete, and rename files and folders. o Create new folders. o Sort files by name, date, file size, file type, and random shuffle. o Review and export selected photos and other files to a designated Export folder for quick and easy retrieval. o Create, sequence, and playback Playlist items directly on the device. o Export Playlists to a designated Export folder or another Picture Porter 35. • View videos and play music on Picture Porter 35: o Play MPEG-4/Simple Profile, MPEG-1, MJPEG videos. o Play MP3, WMA, AAC music files. • Output Picture Porter 35 display to TV or projector: o Connect to TV or projector via the audio/video output to enjoy and share photos and videos on a big screen. • Record and Playback PhotoMemoTM : o Make PhotoMemo voice recordings as you review each photo. o Play slideshow with PhotoMemo introduction of each photo or choose to play PhotoMemo on cue. • Back up, transport, and archive data: o Use Picture Porter 35 as a portable hard drive for backing up important files from your computer. o Move data between computers with different operating systems (Windows, Mac, Linux) by using the USB connection as a common bridge. o Organize and archive your photos, video, and music library on Picture Porter 35. Page 2 Revision 1.1.1-1 Picture Porter 35 User’s Guide • Access and transfer memory card and USB flash drive data: o Use Picture Porter 35 as a multi-format memory card reader for your computer to access data from memory cards used by your digital camera, music player, mobile phone, and PDA. o Copy files directly from memory cards and USB flash drives to Picture Porter 35, and vice versa, without needing a computer. 1.2. System Requirements 1) Computer running any of the following operating systems: o Windows – 7, Vista, XP o Macintosh – OS 10.6, 10.5, 10.4 o Linux – OS kernel versions 2.4.x & later 2) One available USB Port 1.3. Supported Memory Card Formats Picture Porter 35 has been tested to support the following memory card formats: Directly without adapter: CompactFlash (CF) Memory Stick (MS), MS PRO, MS Duo, MS PRO Duo Secure Digital Card (SD), SDHC MultiMedia Card (MMC) miniSD, RS-MMC xD-Picture card With appropriate adapter*: MicroSD, TransFlash MMCmicro, MMCmobile M2 * Adapters are typically sold with these memory cards or are separately available for purchase. Page 3 Revision 1.1.1-1 Picture Porter 35 User’s Guide 1.4. Supported File Formats Picture Porter 35 supports the following file formats: Image formats: JPEG, TIFF, BMP, GIF, RAW* Video formats: MPEG-4/Simple Profile, MPEG-1, MJPEG Audio format: MP3, WMA, AAC * Refer to Section 19. Appendix – RAW Formats Supported for details. 1.5. Package Contents Before using your Picture Porter 35, check that your package contains the following items: Picture Porter 35 Rechargeable Polymer Li-Ion battery AC power adapter USB cable (to computer) USB-OTG cable (to USB Mass Storage Device) RCA cable for audio/video output Earphones Custom carrying case Wrist strap User’s Guide Quick Start Guide 1.6. Latest Firmware New versions of the Picture Porter 35 firmware are periodically released with new features and format support to enhance your user experience. Check the Digital Foci website (http://www.digitalfoci.com/support) for the latest available firmware updates and instructions. Page 4 Revision 1.1.1-1 Picture Porter 35 User’s Guide 2. Understanding the Basics 2.1. Picture Porter 35 Data Flow Overview Here is an overview of the Picture Porter 35 data flow: Input Source Picture Porter 35 Connection Memory card Memory card slots Computer USB port USB flash drive USB port with USB-OTG cable Voice Built-in microphone Output Type Picture Porter 35 Output Method Photo and video Color LCD screen Mono sound Built-in speaker Stereo sound Earphones or RCA audio out Memory cards Memory card slots TV or projector RCA audio and video out USB flash drive USB port with USB-OTG cable USB external HDD* USB port with USB-OTG cable Data transfer to computer USB port Photo printing to photo kiosk USB port * Some external hard drives may not be compatible. Page 5 Revision 1.1.1-1 Picture Porter 35 User’s Guide 2.2. Device Layout Top Power Button Audio/Video Out Jack Mic Memory Card Slot Doors Power LED HDD LED ESC MENU JOG DIAL VAL +/- Battery Door Left Front Right Speaker Power Jack Bottom USB Page 6 Revision 1.1.1-1 Wrist Strap Anchor Picture Porter 35 User’s Guide 2.3. Battery and Power Management On a full charge, Picture Porter 35 is capable of up to 4 hours of continuous video playback and up to 3 hours of non-stop memory card copy. 2.3.1. Installing the Battery 1. Locate the battery door at the right bottom of Picture Porter 35. Press down the battery door latch to release it and swing it open in a counter-clockwise rotation. 2. Insert the included Polymer Li-Ion Battery into the battery compartment. Make sure that the Battery Tab* of the battery is at the top opening of the battery compartment. 3. Close the battery door until you hear a solid click and the latch is locked. * The Battery Tab is used as a finger latch to remove the battery. Battery Tab c d Opening Battery Door: (1) With your index finger, press down and release the latch as shown. (2) With your thumb, catch the bottom edge of the battery door to rotate out. Page 7 Revision 1.1.1-1 Inserting Battery: When inserting the battery, make sure the tab of the battery is at the top opening as shown in the circle above. Picture Porter 35 User’s Guide 2.3.2. Charging the Battery via AC power adapter For best battery performance, charge the new battery to full before first use. With the battery installed in Picture Porter 35, connect the AC power adapter to charge the battery. It takes approximately 3 hours to fully charge an empty battery. 2.3.3. Charging the Battery via USB Port You can also charge the Picture Porter 35 battery through the USB port by connecting it to a computer or USB charging device. USB power charges at a slower rate than the AC power adapter. When charging through the USB port, make sure that the Picture Porter 35 is turned off for faster charging. Note: Most computers must be turned on for the USB port to supply power. Check the documentation for your computer to see if the USB port can provide power while the computer is off. 2.3.4. Power Indicator LED The power indicator (left) LED shows the power status. Green: Picture Porter 35 is turned on and using battery power. Red: Picture Porter 35 is turned off and the battery is charging. When the battery is fully charged, the LED will turn OFF. Orange: Picture Porter 35 is turned on and charging. The onscreen battery indicator will flash to show that the battery is charging. 2.3.5. Powering On/Off To turn on Picture Porter 35, press the Power Button. The Power indicator LED will turn green (or orange if the battery is charging) and the operating system will start up. When the Home Screen is displayed after the Startup Screen, it will take a few seconds for the hard drive to spin up. The HD1 icon will appear on the Home Screen after the hard drive is mounted and becomes accessible. To turn off the device, press and hold the Power Button for 3 seconds. Picture Porter 35 will indicate that it is shutting down at the bottom of the screen and the power indicator LED will turn off (or become red if the battery is charging). Page 8 Revision 1.1.1-1 Picture Porter 35 User’s Guide 2.3.6. On-screen Battery Indicator The battery status is shown at the lower-right corner of the screen. ¨ Flashing battery: Charging Solid full battery: Full charge Solid partial battery: Remaining charge Red almost empty battery: Low battery Empty battery: Power will run out soon Picture Porter 35 will soon force a shut down*. Quickly finish any uncompleted tasks and safely turn off the device or connect to AC power immediately. * In the event that you are in the middle of a copy task when the Picture Porter 35 shuts down, the Picture Porter 35 will safely stop your copy in the middle of the task before shutting down. Note that in this case the copy task will be incomplete and contain only part of the entire set of files that were supposed to be copied. To avoid accidental data loss, remember to do the copy task again after you have sufficient power. Under Setup > TECHNICAL INFORMATION > Battery, the remaining battery life will be indicated as a percentage. 2.3.7. Battery Saving Features There are two power saving features to help maximize battery life. 1. Screen Saver Timer: If no button has been pressed and there is no activity for 30 seconds (default setting), Picture Porter 35 will turn off the LCD screen. Pressing any button will turn the screen back on. 2. Auto Shutdown Timer: If no button has been pressed and there is no activity for 10 minutes (default setting), Picture Porter 35 will automatically shut down. Picture Porter 35 will resume operation with the most recently accessed navigation screen when turned on again. You can adjust the above power saving features to best match your needs by accessing Setup. Refer to Section 3 Setting up Picture Porter 35 for detailed instructions. Page 9 Revision 1.1.1-1 Picture Porter 35 User’s Guide 2.4. Home Screen Layout The Home Screen on Picture Porter 35 allows you to navigate the icons and select your desired function. The following diagram gives an overview of the available selections. Press ENTER on the JOG DIAL to select the desired icon. Note: The Memory Source icons will only appear when the associated memory device is connected. Hard Disk Access: View and access contents of the Picture Porter 35 hard drive. Memory Source Access: View and access the contents of inserted memory cards or connected USB flash drive. * Not all icons are shown here. Shortcuts: View and access contents of related folders on the hard drive. System Setup: Enter setup options for Playback Settings, System Settings, and Technical Information. PhotoMemoTM Voice Memo Tool: Record and playback voice memos using the PhotoMemo feature. Playlist: Manage and select Playlists for playback. Page 10 Revision 1.1.1-1 Picture Porter 35 User’s Guide 2.5. Navigation Basics Picture Porter 35 is operated by 7 inputs all located on the right side for easy operation. The JOG DIAL and VAL + / - buttons have different functions for different screens as described in the diagram below. ESC: Stop current operation. Go back to previous screen/function. Cancel zoom. (Zoom Mode) MENU: Open and cancel onscreen menu. JOG DIAL: Roll – Move cursor. Change value selection. Change slideshow time interval. (Playback) Pan zoom area. (Zoom Mode) Push – Enter. Select/de-select item. Play/pause slideshow. (Playback) Change axis direction of pan. (Zoom Mode) Start Slideshow. (Playlist) VAL +: Jump cursor to HD1. (Home Screen) Navigate down 1 folder level. (Folder View / MemoRec) Skip to previous page. (Preview Mode / Playlist Manager) Move photo sequence up one space. (Playlist) Increase volume. (Playback) Start/increase zoom. (Paused photo slideshow) Navigate to next tab. (Setup / IPTC details) VAL -: Jump cursor to Setup. (Home Screen) Navigate up 1 folder level. (Folder View / MemoRec) Skip to next page. (Preview Mode / Playlist Manager) Move photo sequence down one space. (Playlist) Decrease volume. (Playback) Decrease zoom. (Paused photo slideshow) Navigate to previous tab. (Setup / IPTC details) Page 11 Revision 1.1.1-1 Picture Porter 35 User’s Guide 2.6. Screen Flow Diagram The following diagram shows an overview of the Picture Porter 35 screen flow originating from the Home Screen. Home Screen Folder View / Preview Mode - Play MemoRec Setup Playlist Manager / Playlist - Play Page 12 Revision 1.1.1-1 Picture Porter 35 User’s Guide 2.7. Hard Drive Default Folder Structure The required folders on Picture Porter 35 are grouped by the following categories: • Backup: All your memory card Backup operations will create new folders located in this folder. • Export: All the files/folders you select and Export will be copied to new folders created in this folder. • Media o Albums: Helps organize photo, video, and other files. o Music: Helps organize your music files. • System: Picture Porter 35 uses this folder for system files. The System folder is not visible from the device navigation, but can be accessed when connected to computer. Note: Altering any files in the System folder may cause Picture Porter 35 to malfunction. o Playlist: Playlist index files are stored here. Caution: When data is being accessed from hard drive the Blue (right) LED light will flash. Take care not to shake, vibrate, or bump the device when the hard drive is being accessed. Picture Porter 35 Hard Drive Folder Structure From the Home Screen these (4) shortcuts will take you directly to the indicated folders. SYSTEM folder is not visible on the Picture Porter 35 screen. Access by connecting Picture Porter 35 to computer by USB. Page 13 Revision 1.1.1-1 Picture Porter 35 User’s Guide 3. Setting Up Picture Porter 35 The Setup menu is used to adjust the device to fit your unique preferences. It is divided into 3 sections each with 4 sub-sections. PLAYBACK: Slideshow – Photo – Video – Music SYSTEM SETTINGS: Time – Display – File – Device TECHNICAL INFORMATION: HDD – Version – Support – Battery From the Home Screen, highlight Setup and press ENTER to access the setup option screens. Setup Level 1 Setup Level 2 In Setup Level 1, use the JOG DIAL to navigate to and select the desired Setup Level 2 option. – Press ESC to return to HOME. In Setup Level 2, use the JOG DIAL to navigate to the desired option. – Press ENTER to change the value of the selected option (The text color will turn to red indicating that the value can be changed.) – Use the JOG DIAL to change the value and press ENTER to accept the new value. For options with more than one field, press VAL +/- to change between the fields. Pressing ESC will cancel any change and revert to the original setting. – Navigate the tabs by pressing VAL +/- when the cursor text is white. – Press ESC to return to Setup Level 1. Page 14 Revision 1.1.1-1 Picture Porter 35 User’s Guide 3.1. Setting Playback Options From Setup Level 1, highlight PLAYBACK and press ENTER to enter PLAYBACK Options. 3.1.1. Slideshow Options The following chart shows the available Slideshow options: SETUP MENU – Slideshow – MENU ITEM Slideshow Time Interval Transition Effect SELECTION 1, 5, 10, 30 sec, Time interval between photo 1, 3, 5, 10, 30 min, transitions in the slideshow. 1, 2, 3, 4, 5, 6,12, 24 hrs No Effect, Fly In, Erase, Transition effect for slideshow. Blocking, Random Music Background Audio PhotoMemo None Repeat All Playback Sequence Description Random Repeat Off Available music files will play in the background with slideshow. PhotoMemo will be played as each photo is displayed in slideshow. Audio will not play with slideshow. Play photos in listed order in a repeating loop. Play photos in random order. Play photos in listed order and stop after playing last photo. Counter Show, Hide Display/Hide sequence number and total number of photos during slideshow. File Name Show, Hide Display/Hide file name of the photo during slideshow. * Underlined bold selections indicate the default setting. Note: These settings can also be changed during slideshow through the MENU option. Refer to Section 6.4. Changing Slideshow Options. Page 15 Revision 1.1.1-1 Picture Porter 35 User’s Guide 3.1.2. Photo Options The following chart shows the available Photo options: SETUP MENU – Photo – MENU ITEM SELECTION Fit Screen Fill screen View Mode Max Visible Fit Width Auto-rotate by EXIF On Off Comments (IPTC) Metadata Display Description Device will automatically resize the photo for best display without changing the aspect ratio1. Device will stretch the photo to fill the entire area on the screen. The photo may become distorted. Device will automatically rotate the photo 90 degrees if a different orientation will better fit the screen. Device will rescale the photo so that the width of the photo extends to the width of the screen. Photos will be displayed according to the photo orientation information available in the photo EXIF data2. Auto-rotate by EXIF function will be turned off2. Display IPTC information3 when playing photos. EXIF/Histogram Display EXIF information4 and histogram when playing photos. None Hide IPTC, EXIF information and histogram when playing photos. * Underlined bold selections indicate the default setting. 1 Most digital cameras will capture photos in a 4:3 aspect ratio. The aspect ratio determines the width and height of the photo. The screen on the Picture Porter 35 is 4:3 and will display 4:3 photos completely on the full screen. Other aspect ratios will show in a letterbox under Fit Screen. 2 Most digital SLR cameras will record the orientation information in the photo EXIF data. Photos taken in portrait will be auto-rotated on the display. If this information is not available, the photo display in its original orientation. 3 IPCT is a metadata standard used by some photographers to include identifying and descriptive information with each photo. To learn more about IPTC, visit the IPTC website at www.iptc.org. 4 EXIF information is additional information (metadata) associated with each photo taken by your digital camera. It identifies information such as digital camera model, camera settings, exposure, resolution, date, and time. Page 16 Revision 1.1.1-1 Picture Porter 35 User’s Guide 3.1.3. Video Options The following chart shows the available Video options: SETUP MENU – Video – MENU ITEM SELECTION Audio Mode Stereo, Left channel, Right channel Video View Mode Playing Time Description Select audio mode. Fit Screen Device will resize the video for best display with original aspect ratio. Video resolutions lower than 320x240 may appear grainy. Fill Screen Device will stretch the video to fill the entire area on the screen. The video may become distorted. 50%, 100% Display video at selected percentage of original resolution. Elapsed, Remaining Select to show time elapsed or time remaining for the video. Repeat All Play video files in listed order in a repeating loop. Repeat Off Play video files in listed order once. Video Sequence Repeat Current Random Play current/selected video repeatedly. Play video files in random order. * Underlined bold selections indicate the default setting. Page 17 Revision 1.1.1-1 Picture Porter 35 User’s Guide 3.1.4. Music Options The following chart shows the available Music options: SETUP MENU – Music – MENU ITEM SELECTION Repeat All Play all music files in a repeating loop. Random Play music files in random order. Music Sequence Repeat Off Repeat Current Playing Time Description Elapsed, Remaining Play music files in listed order once. Play the current music file repeatedly. Select to show time elapsed or time remaining for the music file. * Underlined bold selections indicate the default setting. 3.2. Setting System Settings From Setup Level 1, highlight SYSTEM SETTINGS and press ENTER to enter SYSTEM SETTING Options. 3.2.1. Time Options It is helpful to set the correct time and date as this information is used when creating the folders for the Backup, Export, and Create Folder functions. Each of the Time options is explained below. • Time Set: Set the system time by adjusting the hour and minute. 1. Navigate to Time Set and press ENTER to set the time. 2. Roll the JOG DIAL up or down to set the hour. Press VAL +/- to change between the hour and minute fields. Note: Picture Porter 35 uses a 24-hour clock. The clock starts at 0:00 as 12:00 AM (midnight), 12:01 AM will display as 00:01, 12:30 PM will be 12:30, 1:25 PM will be 13:35, and 11:59 PM is 23:59. 3. Press ENTER to accept your setting for the time setting. Page 18 Revision 1.1.1-1 Picture Porter 35 User’s Guide • Date Set: Set the system date by adjusting the month, day, and year. 1. Navigate to Date Set and press ENTER to set the date. 2. Roll the JOG DIAL to change the current value and the VAL +/- buttons to change between the date fields. 3. Press ENTER to accept your setting for the date setting. Note: Date is listed as MM/DD/YYYY (month/day/year). • Time Display: Choose to Show or Hide the time on the screen during the slideshow. • Date Display: Choose to Show or Hide the date on the screen during the slideshow. 3.2.2. Display Options Each of the Display options is explained below. • Screen Brightness: Select screen brightness setting from 1 to 10 (with 10 being the brightest). • Screen Saver: Adjust the device idle time allowed before the screen turns off to conserve battery life. You can set the timer to a value between 1 second and 180 seconds or Off. Select Off to disable this feature. • Language: Select among different languages available. • Video Out: Switch between NTSC and PAL TV standards for operation on your TV or display device. Note: NTSC and PAL refer to television broadcast standards. All televisions purchased and used in the US use the NTSC standard. The PAL standard is used in Europe. 3.2.3. File Options Each of the File options is explained below. • Show Unsupported Files: Choose to Show or Hide unsupported files on device. If Hide is selected, Picture Porter 35 will only show the file formats that can be played on the device. All files will be displayed when accessing the Picture Porter 35 hard drive by computer. Page 19 Revision 1.1.1-1 Picture Porter 35 User’s Guide Note: Show Unsupported Files only applies to files that are viewed through HD1 or the memory card icons from the Home Screen. • Lock Files: Choose Locked to disable the File Management Delete option. Files and folders cannot be deleted from Picture Porter 35. Unlocked allows deletion. 3.2.4. Device Options Each of the Device options is explained below. • Auto Shutdown: Adjust the amount of idle time allowed before Picture Porter 35 automatically shuts down to conserve battery life. You can set the timer to a value between 1 minute and 30 minutes or Off. Select Off to disable this feature. • Restore All Settings: Reset all settings to default values. 3.3. Viewing Technical Information From Setup Level 1, highlight TECHNICAL INFORMATION and press ENTER to enter TECHNICAL INFORMATION Options. 3.3.1. Viewing HDD Information The Remaining Capacity and Total Capacity of the Picture Porter 35 hard drive (HD1) are displayed. 3.3.2. Viewing Version Information The production information including Production Number, Hardware Version, and Firmware Version are displayed. 3.3.3. Viewing Support Information Contact information for Digital Foci Tech Support is displayed. 3.3.4. Viewing Battery Information The battery life information is displayed as a percentage of total available capacity. When the AC adapter is connected and the battery is charging, the percentage information will not be available (it will show 50%). Page 20 Revision 1.1.1-1 Picture Porter 35 User’s Guide 4. Copying Memory Card to Picture Porter 35 You can transfer photos and other data on memory cards directly to Picture Porter 35 and vice versa. Here are some situations where this can be useful: • While on vacation, you can copy pictures directly from your digital camera memory card to free up limited memory card space and keep taking pictures. • When with family, friends, or co-workers using any digital camera model, you can easily get your own copy of their pictures with the multi-format memory card slots. • When sharing photos and other files with friends, you can conveniently transfer files from your Picture Porter 35 to their memory cards or USB flash drive and vice versa. 4.1. Connecting Memory Cards or USB Flash Drive Picture Porter 35 has three different memory card slots, each designed to support a specific set of memory card formats. On the memory card slot cover and right under each slot you can see text labels of the memory card format for that slot: 1. CF: supports CompactFlash (Type-1). 2. SD/MMC/miniSD*: supports SD Card, SDHC card, miniSD, MultiMedia card, and RS-MMC. 3. MS/MS Duo/xD*: supports Memory Stick, MS PRO, MS Duo, MS PRO Duo, and xD-Picture Card. * Only one card can be inserted in either of these two slots at any time. Insert the memory card into its designated slot with the front label of the card facing up. Warning: Take special care to insert the memory card in its designated slot. If the memory card does not slide in easily, double-check that you are inserting it in the correct slot and in the correct manner. Do not use excessive force when inserting cards. Page 21 Revision 1.1.1-1 Picture Porter 35 User’s Guide To connect a USB flash drive: 1. Connect your USB flash drive to the large end of the included USB-OTG cable. 2. Connect the mini-USB (small) end of the USB-OTG cable into the USB port on the Picture Porter 35. Once a memory card is inserted or a USB flash drive is connected, Picture Porter 35 will automatically recognize the device and display a picture icon of the inserted device on the Home Screen. 4.2. Copying from Memory Card or USB Flash Drive to Picture Porter 35 1. Once the memory card or USB flash drive is inserted, Picture Porter 35 will automatically show the Menu options. Note: The pop-up menu only appears if the memory device is inserted at the Home Screen. Page 22 Revision 1.1.1-1 Picture Porter 35 User’s Guide • BACKUP to HD1: Copy the entire contents of the memory card or USB flash drive to Picture Porter 35. All files and folders will be copied with the same folder structure in their entirety. The names of the copied files and folders will be the same as the originals, not altered in any way. • View Contents: View the memory device contents in Folder View. • Display Info: View memory device info (total and used capacity). • Format: Format memory card or USB flash drive. Note: It is recommended that you use the setup option on your digital camera to format the memory card. • No Action: Close the pop-up menu and do nothing. Note: A BACKUP to USB option will be available if both a memory card and a USB flash drive are connected at the same time. This function allows you to copy the entire contents of the memory card to the connected USB flash drive. 2. After BACKUP to HD1 is selected, Picture Porter 35 will show you: (1) Target Device, (2) Folder Path, (3) default Folder Name that will be created for the backup, (4) Free Capacity on Picture Porter 35, (5) Source device, and (6) Total Capacity of the files to be copied from the Source Device. Page 23 Revision 1.1.1-1 Picture Porter 35 User’s Guide Select one of the following options: • OK: Accept the default folder name and start the backup. • Rename: Change the name of the folder to be created for the copy. An on-screen keyboard will pop up, allowing you to edit the folder name. See Section 5.4 Using the On-screen Keyboard for details. • Cancel: Cancel the backup. Note: If you would like to perform a memory card backup after the pop-up menu has been closed, follow these steps: 1) Highlight the memory device to back up with the cursor. 2) Press MENU to access the menu options. 3) Highlight BACKUP to HD1 and press ENTER. 4) Use the instructions described above to do the backup. During the copy, the screen will display the following information. Source folder Target folder File being copied Copy sequence Copy progress Press ENTER to cancel copy. Page 24 Revision 1.1.1-1 Picture Porter 35 User’s Guide 3. Upon copy completion, you will see the Backup Summary screen, which shows the name of the created folder, total number of Files Copied, Total Size Copied, Copy Speed, and Total Time for the copy. Select one of the following options: • View: Directly open the backup folder and view the copied files in Folder View. • Confirm: Verify that each file on the memory device matches each file copied to the Picture Porter 35 bit for bit. This will ensure that there were no errors during the copy. • OK: Close the Backup Summary and go to Home Screen. The created folder and all copied subfolders and files will be located in the Backup folder of Picture Porter 35. Navigate to the Backup folder to access and view the copied files. Note: To safely remove memory cards or USB flash drive from Picture Porter 35, take special precaution to ensure that there is no data being written to or read from the memory device at the time of removal. 4.3. Understanding Default Backup Folder Name Assignments Each time you use the Backup to HD1 function, a new folder will be created on the Picture Porter 35 hard drive to store your copied files. The default folder name assigned includes information showing the date, copy source, and copy sequence number. Page 25 Revision 1.1.1-1 Picture Porter 35 User’s Guide Each folder name is made up of 3 pieces of information: • The first 8 characters will indicate the date as YY-MM-DD. • The next few characters will be letters indicating the type of memory. • The final 2 digits are sequential numbers starting from ‘01’ (followed by ‘02’, ‘03’,…) that indicate the order of the folders created for the same date and same memory type. The types of memory devices are represented as follows: o o o o CF = CompactFlash o SD = Secure Digital MS = Memory Stick, MS Duo o MMC = MultiMedia Card MSPRO = MS PRO, MS PRO Duo o XD = xD-Picture Card USB = USB flash drive / hard drive For example: Date of copy /HD1/BACKUP/09-08-02–CF–02/ 2nd folder created of this format on this date CompactFlash format Folder is created in the Backup folder on Picture Porter 35 4.4. Copying Selected Folders or Files You can copy selected folders or files from the memory card or USB flash drive to Picture Porter 35 or vice versa. When copying a folder, all of the folders, subfolders, and files contained in the selected folder will also be copied. Refer to Section 9 Folder View – File Management Options for detailed instructions. 4.5. Accessing Your Copied Photos on Picture Porter 35 Navigate to and select Backup from the Home Screen to access the photos that you copied from your memory card or USB flash drive. You can identify each backup by the folder names listed. Page 26 Revision 1.1.1-1 Picture Porter 35 User’s Guide 5. Basic Operations 5.1. Navigating Folder View The Folder View will be the most used screen on your Picture Porter 35. Through the Folder View you will access and manage the contents of the hard drive and connected memory devices. Enter Folder View by selecting a memory device or any of the folder shortcuts on the Home Screen. Folder path Current cursor location: Shown with highlight Preview of highlighted file File/folder information of highlighted item Page X of total # pages Total number and size of files selected Folder View indicator Folder View Screen - Navigation Keys ESC Return to Home Screen MENU Show/close menu JOG DIAL UP Move cursor up ENTER Select/de-select item JOG DIAL DOWN Move cursor down VAL + Navigate into highlighted folder VAL - Return to previous folder level A thumbnail image of the current cursor location will be displayed. Select a folder or file by highlighting it and pressing ENTER. When navigating into a selected folder, all the items inside the folder will appear as selected. Page 27 Revision 1.1.1-1 Picture Porter 35 User’s Guide 5.2. Selecting Items In Folder View or Preview Mode – List View, the selected photos are shown with a checkmark in the checkbox. In Preview Mode – Thumbnail Views, the selected photos are shown with a solid yellow box around the thumbnail. Selected file/folder: Shown with X in the checkbox Selected photo with yellow box Current cursor location: Shown with green box To select / de-select an item, press ENTER with the item highlighted. To select / de-select multiple items, press MENU, choose Select, and select the desired action. For the Select Range option: 1. Highlight the first item in the range you would like to select before pressing MENU. 2. Press MENU and select Select. 3. Next, select Select Range. A Select Range window will pop up with instructions. Press ENTER to confirm. 4. The screen will return to Folder View or Preview Mode with the first item selected. Now, roll the JOG DIAL up or down to determine the desired range to select. 5. Press ENTER on the JOG DIAL to end the selection. Page 28 Revision 1.1.1-1 Picture Porter 35 User’s Guide 5.3. Sorting in Folder View or Preview Mode By default, when the contents of a folder are displayed, the files will be sorted by File Name in alphabetically order. You can choose to change to sort by Date (created date), by File Size (in ascending order), by File Type, and by Shuffle (random order). To re-sort the photos, press MENU, select Sort, and select the desired Sort Mode. 5.4. Using the On-screen Keyboard The on-screen keyboard will allow you to create and change the names of folders, files, and playlists. Onscreen Keyboard - Navigation Keys ESC Cancel and close keyboard MENU Delete/backspace JOG DIAL UP Move keyboard cursor back ENTER Select current letter (Press and hold) Change case JOG DIAL DOWN Move keyboard cursor forward VAL + Move file name cursor right VAL - Move file name cursor left • CAPS : Change the case of the letters. • CANCEL: Cancel and close the keyboard. • OK : Confirm and accept the entry. Page 29 Revision 1.1.1-1 Picture Porter 35 User’s Guide 6. Enjoying Slideshow with Photos, Video, Music You can use Picture Porter 35 to view photos stored on Picture Porter 35 or on inserted memory cards or USB flash drive. As you view the photos, you can rotate, zoom, and pan the photos, view EXIF information, view histogram, view IPTC details, display IPTC comments with the photos, and play them as a slideshow. The following image formats are supported by Picture Porter 35: File Format Details JPEG Baseline TIFF 1 & 8 bits Grayscale; 8, 16, & 24 bits Color BMP Monochrome, 8 bits Color GIF Standard format RAW Refer to Section 19 Appendix – RAW Formats Supported for details Note: Make sure your JPEG images are in “Baseline” format. Picture Porter 35 supports display of Baseline JPEG files and does not support other JPEG formats like Progressive JPEG. You may use imaging software such as Adobe Photoshop to check this: 1) When saving images in Adobe Photoshop: Click Save As, and Click OK. 2) The JPEG Options Dialogue Box will appear. 3) Choose Baseline (“Standard”) from the Format Options sections and click OK. 6.1. Accessing Files in Folder View Browse to the folder containing the photos you want to view. Use VAL +/- to navigate through the folder levels as explained in Section 5.1. Navigating Folder View. Menu Options under Folder View: Press MENU to display the pop-up menu screen. Use the JOG DIAL to browse through the menu selection and press ENTER to make your selection. Page 30 Revision 1.1.1-1 Picture Porter 35 User’s Guide Helpful Tip: Press MENU or ESC to cancel menu without selection. MENU – FOLDER VIEW Selection Play Slideshow Go to Preview Mode Submenu Description ––– Start playing slideshow of selected photos. If no items are selected, all the photos in the folder will be included. Note: This will only works if there are individual photo, video, or music files in the selected folder. ––– Enter Preview Mode. The default view show photo thumbnails in a 3x2 matrix. Press MENU to change the Preview Layout to 5x4 View or List View. File Name Sort by file name in alphabetical order. File Date Sort by file date (created date). File Size Sort by file size (from small to large). File Type Sort by file type. Sort Shuffle files in a random order. Shuffle Select All Select all files or folders. De-select All De-select all files or folders. Select Page Select all files or folders on current page. Select De-select Page De-select all files or folders on current page. Select Range1 Use the JOG DIAL to select a range of files or folders. Rename Rename highlighted file or folder. Create Folder File Management Create a new folder. Copy Copy selected files/folders to clipboard. Move2 Move selected files/folders to clipboard. Paste Paste files or folders from clipboard. Export3 Export selected files or folders to Export folder. Delete Delete selected files or folders. Page 31 Revision 1.1.1-1 Picture Porter 35 User’s Guide MENU – FOLDER VIEW Selection Submenu Description Current Add to Playlist Add highlighted file to Playlist. Selection Page Selection All Add selected files on the page to Playlist. Add all selected files to Playlist. 1 To use Select Range, navigate the cursor to highlight the start of the range to be selected before accessing Select Range in the menu. 2 Selecting Paste to complete the Move command will remove selected files from the original location. 3 The Export function is explained in Section 11 Exporting Selection to Export Folder. 6.2. Viewing Photos, Video, Music in Preview Mode The Preview Mode is a convenient way to view the contents (photos, video, music) within a specific folder. From the Preview Mode, you gain the benefit of having: • Thumbnail views (5x4 and 3x2) • Filter (by any combination of photo, video, music) • Navigation by skipping to next and previous pages Enter the Preview Mode from the Folder View by pressing MENU and selecting Go to Preview Mode. The photos within the current folder will be displayed in the Preview Mode. Note: In Preview Mode, only the contents of the current folder location are shown. Folders within the current folder and their contents are not shown. Navigation to different folder levels is not possible and must be done in Folder View. Page 32 Revision 1.1.1-1 Picture Porter 35 User’s Guide The following screens show the different Preview Mode layouts. Page X of total # pages Photo X of total # photos Selected item: Shown with solid box Total number and size of files selected Current selection: Shown in dashed box Filter selection Helpful Tip: Press VAL +/- to skip to previous/next page. Preview Mode - Navigation Keys ESC Return to Folder View MENU Show/close menu JOG DIAL UP Move cursor up ENTER Select/de-select item JOG DIAL DOWN Move cursor down VAL + Go to previous page VAL - Go to next page Page 33 Revision 1.1.1-1 Picture Porter 35 User’s Guide Menu Options under Preview Mode: The following Menu options will be the same in Preview Mode as in Folder View: Play Slideshow, Sort, Select, and Add to Playlist. See Section 6.1 Accessing Files in Folder View for details. The different Menu options for Preview Mode are explained in the following table: MENU – PREVIEW MODE Selection Preview Layout Submenu List View Change to List View. 3x2 View Change to 3x2 Thumbnail View. 5x4 View Change to 5x4 Thumbnail View. Show All Show all supported file types. Photo Filter File Management Description Photo/Video Show photos only. Show photos and video files. Video Show video files only. Music Show music files only. Copy Copy selected files or folders to clipboard. Export Send a copy of selected files or folders to Export folder. 6.3. Playing Slideshow You can start a slideshow from either Folder View or Preview Mode. Press MENU and select Play Slideshow to start playing the selected items in a slideshow. When you start the slideshow from Folder View, if none of the items are selected, the slideshow will play with all the items included. Note: Play Slideshow will only play the items within the current folder. Items within a folder in the current folder will not be included. Selecting Items for the Slideshow See Section 5.2 Selecting Items for details on selecting items for slideshow. Page 34 Revision 1.1.1-1 Picture Porter 35 User’s Guide Once you have made the desired selection of items to view, press MENU and select Play Slideshow to start the slideshow. To stop the slideshow, press ESC and navigation will return to the previous Folder View or Preview Mode screen. Photo Playback - Navigation Keys ESC Return to previous view (Folder View or Preview Mode) MENU Show/close menu JOG DIAL UP Decrease slideshow time interval ENTER Pause slideshow JOG DIAL DOWN Increase slideshow time interval VAL + Adjust volume up VAL - Adjust volume down Page 35 Revision 1.1.1-1 Picture Porter 35 User’s Guide 6.4. Changing Slideshow Options While the slideshow is playing, you can change the following slideshow options. Slideshow interval: You can adjust the slideshow interval among: 1, 5, 10, 30 seconds; 1, 3, 5, 10, 30 minutes; and 1, 2, 3, 4, 5, 6, 12, 24 hours. Roll the JOG DIAL up or down to decrease or increase the time interval between photo transitions. Info Display: You can select to show or hide each of the following: Counter (sequence number of the current item and total number of items in the slideshow), File Name, Time, and Date. File counter: Photo X of total # photos selected for slideshow File name Date Time Press MENU, select Slideshow Options, and select Info Display to access these options. Next, scroll to desired option and press ENTER to toggle selection between show (indicated by ‘Y’ for Yes) and hide (indicated by ‘N’ for No). Metadata Display: You can select to show or hide EXIF/Histogram, and (IPTC) Comments. Press MENU, select Slideshow Options, and select Metadata Display to access these options. Next, scroll to desired option and press ENTER. Page 36 Revision 1.1.1-1 Picture Porter 35 User’s Guide o Show EXIF/Histogram: Displays EXIF info and histogram. EXIF & Histogram o Show Comments: Displays the text from the IPTC comment field along with each photo in the slideshow. This can be used to create a slideshow with labels or descriptions. Comment/ Description field from IPTC metadata shown with each photo o Show None: Do not show any metadata with each photo. Playback Sequence: You can select to play the slideshow items in listed order once, in a repeating loop, or randomly. Press MENU select Slideshow Options, and select Playback Sequence to access these options. Next, scroll to the desired option and press ENTER. o Repeat All: Play slideshow items in listed order in a repeating loop. Page 37 Revision 1.1.1-1 Picture Porter 35 User’s Guide o Random: Play slideshow items continuously in random order. o Repeat Off: Play slideshow items in listed order once and stop. Background Audio: You can select to play the slideshow with music in the background or with recorded PhotoMemo files associated with each photo. Press MENU, select Slideshow Options, and select Background Audio to access these options. Next, scroll to the desired option and press ENTER. o Music: If you have music files in the current set of items and they are selected, the selected music files will play in the background along with the slideshow. o PhotoMemo: If you have PhotoMemo files recorded for the photos in the slideshow, they will be played with each of the photos as they are displayed. See Section 10 Recording and Playing PhotoMemo to learn more about using the PhotoMemo feature. o No Audio: No audio will play along with the slideshow. Transition Effect: You can change the transition effects among: No Effect, Random, Fly In, Erase, and Blocking. Press MENU, select Slideshow Options, and select Transition Effect to access these options. Next, scroll to the desired transition effect and press ENTER. 6.5. Changing View Mode While the slideshow is playing, you can change the view mode among: Fit Screen, Fill Screen, Max Visible, and Fit Width. Fit Screen: The image will be automatically resized to fit the screen while keeping its original aspect ratio. If the aspect ratio of the photo is not the common 4:3 aspect ratio, the photo will be displayed in a letterbox view. Page 38 Revision 1.1.1-1 Picture Porter 35 User’s Guide Fill Screen: The image will be stretched horizontally and vertically to fill the screen while eliminating any black bars showing on top/bottom or sides of the screen. This will cause the image to be distorted if it is not a 4:3 aspect ratio. Max Visible: The image will be rotated 90 degrees if a larger area can be shown by rotating. Fit Width: The image will be rescaled so that the width of the photo extends to the width of the screen. Press MENU and select View Mode to access these options. Next, scroll to the desired view mode and press ENTER. 6.6. Pausing Slideshow, Scrolling Manually, Zooming & Panning During the slideshow, you can select pause to view a particular photo in more detail. While the photo is paused, you can manually scroll through the other photos in the slideshow according to your own timing. Or you can zoom and pan to see parts of a photo in more detail. After pressing ENTER to pause the slideshow, the pause icon will appear in the upper-left corner. It disappears after a few seconds. 6.6.1. Scrolling Through Photos Manually While the slideshow is paused, you can manually scroll through the photos according to your own timing. Photo Playback Paused - Navigation Keys ESC Return to previous view (Folder View or Preview Mode) MENU Show/close menu * Note slideshow will resume playing after menu selection is made or closed without selection. JOG DIAL UP Go to previous photo ENTER Resume slideshow JOG DIAL DOWN Go to next photo VAL + Initiate Zoom Mode VAL - Initiate Zoom Mode Page 39 Revision 1.1.1-1 Picture Porter 35 User’s Guide 6.6.2. Zooming and Panning Photos From Pause Mode, you can initiate the zoom by pressing VAL +/-. Pan the zoom area by rolling the JOG DIAL and pressing ENTER. When you are in Zoom Mode, a ‘zoom window’ will appear at the lower-right corner to show the current position and scope of your zoom relative to the entire photo. The zoom window will disappear if no button is pressed for 5 seconds. The following screen layout shows the View Photo – Zoom View. Zoom window Note: Zoom window will disappear after 5 seconds Photo Zoom Mode - Navigation Keys ESC Cancel Zoom Mode MENU Show/close menu JOG DIAL UP Pan zoom region Up/Left ENTER Toggle pan Up/Down and Left/Right JOG DIAL DOWN Pan zoom region Down/Right VAL + Increase zoom level VAL - Decrease zoom level Page 40 Revision 1.1.1-1 Picture Porter 35 User’s Guide 6.7. Rotating Photos Photos on Picture Porter 35 will be displayed according to the photo orientation information in the EXIF data captured with the photo – if Auto-rotate by EXIF is set to On in the Setup options. Most digital SLR cameras will have this photo orientation information. Photos taken with portrait orientation will be automatically rotated when displayed. If this information is not captured, the photo will be displayed in its original orientation. While the photo is displayed in the slideshow, you can manually rotate the photo. To rotate the photo, press MENU and select Rotate. The photo will be rotated 90 degrees clockwise. When the slideshow transitions to the next photo, the rotation will be cancelled and the photo will return to its original display orientation the next time it is displayed. Note: Rotating the photo will only change its display on the Picture Porter 35 screen and will not alter your original photo file. Page 41 Revision 1.1.1-1 Picture Porter 35 User’s Guide 6.8. Viewing IPTC Metadata If the displayed photo has information in the IPTC metadata fields, you can view this information by selecting View IPTC from the menu. IPTC is a metadata standard used by some photographers to include identifying and descriptive information with each photo. Press MENU and select View IPTC. IPTC data will be grouped for display in 4 separate tabs labeled as: Contact – Image – Content – Status View IPTC Display - Navigation Keys ESC Close IPTC display MENU - Not Used - JOG DIAL UP Scroll content of current tab up ENTER - Not Used - JOG DIAL DOWN Scroll content of current tab down VAL + Select next tab VAL - Select previous tab 6.9. Playing PhotoMemoTM You can choose to play PhotoMemo files for the current photo without changing the Background Audio setting. By pressing MENU and selecting Play PhotoMemo, the PhotoMemo file for the current photo will be played once. You can repeat this as needed. Page 42 Revision 1.1.1-1 Picture Porter 35 User’s Guide 7. Enjoying Video The following video file formats are supported by Picture Porter 35: File Extension Video Codec Audio Codec Resolution .mp4/.avi MPEG-4 SP MP3, AAC, 720x480@30fps (Simple Profile) PCM .avi/.dat/.vob/.mpg MPEG-1 MP2 .avi/.mov MJPEG MP3, PCM 720x480@30fps 720x480@30fps * Sample frequency (audio): 48 KHz Max bit rate (video): 8 mpbs Max bit rate (audio): 1536 kpbs Check the Digital Foci website (http://www.digitalfoci.com/support) periodically to see the latest format support information and download firmware updates. Note: Picture Porter 35 does not support playback of high-definition videos with resolutions of 720 or 1080, but you can still use Picture Porter 35 to back up these video files in their original format and resolution. The HD video files will be copied without any change in the quality, file name, or folder structure. You can transfer the videos to your computer for archiving, editing, and viewing. After you copied the video file onto your computer, you can use video conversion software to convert the video into a compatible format for playback on Picture Porter 35. Below is an example of the video conversion output specs that is compatible with Picture Porter 35: Output Container: mp4 Output Video Codec: DivX Output Audio Codec: AAC Video Scale Size: 320x240 pixels Video Bitrate: 1152 kbps Audio Sampling Frequency – 32000 Hz Audio Bitrate – 64 kpbs Page 43 Revision 1.1.1-1 Picture Porter 35 User’s Guide Playing Videos While the video is playing, you can perform the following functions: Video Playback - Navigation Keys ESC Return to previous view (Folder View or Preview Mode) MENU Show/close menu JOG DIAL UP Scan backward 10 seconds Paused – Go to previous video ENTER Pause/resume slideshow JOG DIAL DOWN Scan forward 10 seconds Paused – Go to next video VAL + Adjust volume up VAL - Adjust volume down As the video file is playing, press MENU to access the different playback options. Audio Mode: Press MENU, select Audio Mode, and scroll to desired option among Left Channel, Right Channel, and Stereo. Video Scale: Press MENU, select Video Scale, and scroll to and select the desired video display size. o Fit Screen1 resizes the video to fit the full screen size while keeping the aspect ratio the same. o Fill Screen2 stretches the video to fill the entire screen even if the aspect ratio is changed. o 50% displays the video as half of original resolution3. o 100% shows the video in its original resolution3. 1 Videos with an aspect ratio other than 4:3 will be displayed in a letterbox. 2 Videos not recorded in a 4:3 aspect ratio will be distorted to fit the 4:3 aspect ratio. 3 The screen resolution on Picture Porter 35 is 320x240. Videos with a resolution larger than 320x240 will be scaled down to fit 320x240. Page 44 Revision 1.1.1-1 Picture Porter 35 User’s Guide Info Display: Press MENU and select Info Display to access these options. Scroll to the desired option and press ENTER to toggle between show (indicated by ‘Y’ for Yes) and hide (indicated by ‘N’ for No). o Counter (sequence number of the item displayed relative to total number of items in the slideshow) o File Name o Time o Date Time Display: Press MENU and select Playing Time to change desired time display for the video file between the two available choices of Elapsed and Remaining. Playback Sequence: You can select to play all the video files in listed order once, in a repeating loop, randomly, or to play the current video repeatedly. Press MENU and select Playback Sequence to access these options. Next, scroll to the desired option and press ENTER. o Repeat All: Play video files in listed order in a repeating loop. o Repeat Current: Play current video file repeatedly. o Random: Play selected video files continuously in random order. o Repeat Off: Play video files in listed order once. Page 45 Revision 1.1.1-1 Picture Porter 35 User’s Guide 8. Enjoying Music Picture Porter 35 can be used to playback music files that are stored on its hard drive or from memory cards. You can listen to music and PhotoMemo files through the built-in speaker, via connected earphones, or by connecting Picture Porter 35 to a stereo or pair of external speakers. The following music file formats are supported by Picture Porter 35: File Extension Audio Codec Sampling Rate .mp3 MP3 .wma .aac/.m4a Bit Rate Notes Max 48KHz Max 384kbps CBR/VBR MPEG-1 L1/2/3 MPEG-2 L1/2/2.5 WMA Max 44KHz Max 192kbps CBR WMA v7/8/9 AAC Max 44KHz Max 320kbps MPEG-4 AAC CBR/VBR/ABR Check the Digital Foci website (http://www.digitalfoci.com/support) to see the latest format support information and download firmware updates. Helpful Tip: You can use the default Music folder to organize your music files for access by the Home Screen Music shortcut. By saving your music files into the Music folder (located inside the Media folder on the hard drive), you can directly access your music files by selecting the Music icon from the Home Screen. The following screen layout shows the Play Music – Jukebox View. Play progress Counter Song information Playing time Volume Repeat / Random settings Music Mode indicator Page 46 Revision 1.1.1-1 Picture Porter 35 User’s Guide Playing Music During music playback, you can perform the following functions: Music Playback - Navigation Keys ESC Return to previous view (Folder View or Preview Mode) MENU Show/close menu JOG DIAL UP Scan backward 5 seconds Paused – Go to previous music file ENTER Pause/resume slideshow JOG DIAL DOWN Scan forward 5 seconds Paused – Go to next music file VAL + Adjust volume up VAL - Adjust volume down Press MENU to access the playback options. Sequence: You can select to play all the music files in listed order once, in a repeating loop, randomly or to play the current song repeatedly. Press MENU and select Sequence to access these options. Next, scroll to the desired option and press ENTER. o Random: Play music files in random order in a continuous loop. o Repeat All: Play music files in listed order in a repeating loop. o Repeat Current: Play current music file repeatedly. o Repeat Off: Play music files in listed order once. Equalizer: Press MENU, select Equalizer and select among Normal, Bass, Classic, Dance, Treble, and User. Time Display: Press MENU and select Playing Time to change desired time display for the music file between the two available choices of Elapsed and Remaining. Page 47 Revision 1.1.1-1 Picture Porter 35 User’s Guide 9. Folder View – File Management Options Picture Porter 35 has a full set of file management functions to help you manage your photos and other data. MENU – FOLDER VIEW1 (File Management Section) Selection Submenu Description Rename Rename highlighted file or folder. Create Folder File Management Create a new folder. Copy Copy selected files or folders to clipboard. Move2 Move selected files or folders to clipboard. Paste Paste files or folders from clipboard. Export3 Export selected files or folders to Export folder. Delete Delete selected files or folders. 1 From Preview Mode you have access to only Copy and Export. 2 Selecting Paste to complete the Move command will remove selected files from the original location. 3 The Export function is explained in Section 11 Exporting Selection to Export Folder. 9.1. Renaming a File or Folder 1. Navigate to the file or folder you want to rename. 2. With the item highlighted, press MENU and select Rename. 3. An on-screen keyboard will pop up for you to edit the name. See Section 5.4 Using the On-screen Keyboard for details. 9.2. Creating a New Folder 1. Navigate to the location where you will create the new folder. 2. Press MENU and select Create Folder. 3. An on-screen keyboard will pop up to input the folder name. See Section 5.4 Using the On-screen Keyboard for details. Page 48 Revision 1.1.1-1 Picture Porter 35 User’s Guide 9.3. Copying and Pasting Files and/or Folders This operation will allow you to make a copy of your photos, videos, music, and other files and paste them to another location. You can perform the Copy and Paste operation between different locations on Picture Porter 35, between inserted memory cards or USB flash drive, or between Picture Porter 35 and an inserted memory card or USB flash drive. 1. Navigate to and select the files and/or folders you want to copy. See Section 5.2 Selecting Items for instructions. 2. Press the MENU button – first select File Management then select Copy. Next, you can select one of the following options: Current: Copy the individual item that is currently highlighted. Selection Page: Copy the selected items on the current page. Selection All: Copy all selected items. 3. A confirmation message, ‘Copy to Clipboard,’ will pop up. It will show you the number of files or folders that are copied to the clipboard. Press ENTER to acknowledge. 4. Next, navigate to the target location where you want to place the copied items. 5. Press the MENU button – first select File Management then select Paste. 6. Upon completion, the screen will show the total number of files or folders pasted to the new location. The copied files and/or folders now exist in both the original location and the target location. 9.4. Moving Files or Folders You can move selected files and/or folders from its original location to a target location. Moving, instead of copying, will remove the files or folders from the original location. To move files and/or folders, follow the same steps as the copy function described in Section 9.3 Copying and Pasting Files and/or Folders, with the exception of substituting Move in the place of Copy in Step 2. Page 49 Revision 1.1.1-1 Picture Porter 35 User’s Guide 9.5. Deleting Files and/or Folders You can delete files and/or folders from either Picture Porter 35 or an inserted memory card or USB flash drive. 1. Navigate to and select the files and/or folders you want to delete. 2. Once the items to delete are selected, press MENU, select File Management, and select Delete. 3. Next, you can select one of the following options: Current: Delete the individual item that is currently highlighted. Selection Page: Delete all selected items on current page. Selection All: Delete all selected items. 4. At the confirmation pop-up, ‘DELETE Confirmation,’ select Yes and press ENTER to confirm the deletion. Page 50 Revision 1.1.1-1 Picture Porter 35 User’s Guide 10. Recording and Playing PhotoMemoTM The PhotoMemo feature on Picture Porter 35 allows you to make audio memos for each photo you have stored on the device. This may be useful for you to make comments and notes about your photos while the details are fresh in your mind. You can also record greetings and announcements for your audience to hear during the slideshow playback. Manage the PhotoMemo feature by selecting MemoRec from the Home Screen. The following screen layout shows the MemoRec screen. MemoRec - Navigation Keys ESC Return to Home Screen (During recording) Cancel recording MENU Show/close menu JOG DIAL UP Move cursor up ENTER Start recording for highlighted photo Press again to complete recording JOG DIAL DOWN Move cursor down VAL + Navigate into highlighted folder VAL - Return to previous folder level (During recording) Adjust recording level Page 51 Revision 1.1.1-1 Picture Porter 35 User’s Guide 10.1. MemoRec Menu Options From the MemoRec screen, the available Menu options are: MENU – MemoRec Selection Description Delete PhotoMemo Delete PhotoMemo from highlighted photo. Only the PhotoMemo will be deleted, the photo will not be affected. Play PhotoMemo Playback the PhotoMemo for the highlighted photo. Stop PhotoMemo Stop the PhotoMemo currently being played. Adjust Record Level Select the recording level among Low, Middle, and High to suit your environment and requirements. Folder View Go to the Folder View of the current folder location. 10.2. Recording PhotoMemo The built-in microphone on Picture Porter 35 is located behind the pinhole in the upper-left corner on the front face of the device. For best results, try to direct your voice towards the microphone when making your PhotoMemo recordings. 1. Navigate to the target photo for the PhotoMemo recording. 2. Press ENTER to start recording PhotoMemo for the highlighted photo. A pop-up window will show the sound waves of the recording as you record your PhotoMemo through the microphone. 3. When you finish your recording, press ENTER again to save the PhotoMemo. * Press ESC to cancel the recording without saving. 4. A PhotoMemo icon will appear next to the file name of the photo to indicate that there is a PhotoMemo attached to that photo. The PhotoMemo will be recorded as an AAC audio file using the same name as your photo with the extension ‘.PTM.AAC’. Recording Level: To adjust the default recording level, press MENU and select Adjust Record Level. You can select among Low, Middle, and High. The recording level can also be adjusted during a recording by pressing VAL +/-. Page 52 Revision 1.1.1-1 Picture Porter 35 User’s Guide 10.3. Playing Back PhotoMemo You can playback your PhotoMemo recording from either the MemoRec screen or during the slideshow playback. 10.3.1. Playing Back PhotoMemo from MemoRec View 1. Select MemoRec from the Home Screen. 2. Navigate to the target photo for PhotoMemo playback. Note: When there is a PhotoMemo available, a PhotoMemo icon will be displayed next to the file name of the photo. 3. Press MENU and select Play PhotoMemo to playback the PhotoMemo for the highlighted photo. To stop the PhotoMemo in the middle of playing back, press MENU and select Stop PhotoMemo. 10.3.2. Playing Back PhotoMemo during Slideshow Playback From the Slideshow, you can choose to have all PhotoMemos played with each photo in the slideshow automatically or to manually select photos for PhotoMemo playback. Playing PhotoMemo as part of the slideshow: 1. With the slideshow playing, press MENU and select Slideshow Options. 2. From the sub-menu, select Background Audio. 3. Then select PhotoMemo. This option lets you play available PhotoMemo files with each photo as they are displayed in the automatic slideshow. Playing PhotoMemo manually during the slideshow: 1. With the slideshow playing or paused, press MENU and select Play PhotoMemo. The PhotoMemo for the current photo displayed, if available, will be played. To stop the PhotoMemo in the middle of playing back, press ESC. Page 53 Revision 1.1.1-1 Picture Porter 35 User’s Guide 11. Exporting Selection to Export Folder Picture Porter 35 has a unique Export function, which allows you to browse through your photos on Picture Porter 35 to make a selection and copy to a dedicated Export folder. This time saving feature allows you to do your rough editing on the Picture Porter 35. When you get to computer, you can archive the full set of original photos in the Picture Porter 35 Backup folder to your computer hard drive. Then you can copy the pre-screened photos in the Picture Porter 35 Export folder to your working directory. 11.1. Copying Files to the Export Folder 1. Browse through your files and select the files and folders you want to Export. 2. Press the MENU button, select File Management, and then Export. Next, you can select one of the following options: Current: Copy the highlighted file or folder. Selection Page: Copy the selected files and folders on the current page. Selection All: Copy all selected files and folders. Page 54 Revision 1.1.1-1 Picture Porter 35 User’s Guide 3. The ‘Export’ window will pop up to show you: (1) Target Device, (2) Folder Path, (3) default Folder Name that will be created for the copy, (4) number of files to be copied, and (5) total size of the files to be copied. Select one of the following options: • OK: Accept the default Export folder name that will be created and start the copy. • Rename: Change the name of the target folder created. See Section 5.4 Using the On-screen Keyboard for details. • Cancel: Cancel the copy. 4. Upon copy completion, you will see the Summary screen, which shows the name of the folder created, total number of Files Copied, Total Size of Copied, Copy Speed, and Total Time for the copy. Page 55 Revision 1.1.1-1 Picture Porter 35 User’s Guide 5. From the Summary screen, you can select one of the following: • View: Directly open the Export folder and view the copied files in Folder View. • OK: Close the Summary screen. The created folder and all copied subfolders and files will be located in the Export folder of Picture Porter 35. You can navigate to the Export folder to access the copied files. 11.2. Understanding Default Export Folder Name Assignments Each time you use the Export function on Picture Porter 35, a new folder will be created on the Picture Porter 35 hard drive to store your copied files. Every new folder is automatically assigned a folder name showing the date and copy sequence. Each folder name is made up of 3 pieces of information. • The first 8 characters will indicate the date as YY-MM-DD. • The next character will be ‘x’, designating that it is an Export. • The final 2 digits are sequential numbers starting from ‘01’ (followed by ‘02’, ‘03’,…) that show the order in which the Export folders were created on that date. For example: Date of copy / HD1 / EXPORT / 09-08-02–x–02 / 2nd Export folder created on this date Designates Export Folder is created in the Export folder on Picture Porter 35 11.3. Access Files in Export Folder on Picture Porter 35 Navigate to and select Export from the Home Screen to access the photos that you copied to the Export folder. You can identify each export by the folder names listed. Page 56 Revision 1.1.1-1 Picture Porter 35 User’s Guide 12. Managing Playlists Picture Porter 35 supports user-created Playlists. You can create, edit, and sequence multiple Playlists directly on the device. The photo, music, and video files that make up your Playlists can be added from different folder locations on your Picture Porter 35. By using Playlists, you can include the same file in different Playlists without increasing the amount of memory space used. The Playlist function lets you easily create different collections and themed slideshows for viewing or export. These Playlists can be played back on Picture Porter 35, copied to another Picture Porter 35, or copied to an Export folder. The Playlist function consists of 2 screens: • First is the Playlist Manager screen that you access by selecting the Playlist icon from the Home Screen. • Then by selecting a Playlist from the Playlist Manager screen, you can access the Playlist screen to view the Playlist contents. Note: The Playlist contains links to the locations of the files rather than the actual files. Make sure the actual file is available on the Picture Porter 35 hard drive or the inserted memory card for the Playlist to play. If Picture Porter 35 cannot find a specific file, it will skip over it and play the next available file. To learn technical information about Playlist files, see Section 12.7 Understanding the Playlist File. Page 57 Revision 1.1.1-1 Picture Porter 35 User’s Guide 12.1. Playlist Manager Screen Access the Playlist Manager screen by selecting the Playlist icon from the Home Screen. The Playlist Manager will list all the Playlists that are available on Picture Porter 35. The following screen layout shows the Playlist Manager screen. Playlist name and total # of items Thumbnail of first photo in Playlist Detailed list of Playlist items Playlist Manager - Navigation Keys ESC Return to Home Screen MENU Show/close menu JOG DIAL UP Move cursor up ENTER View contents of highlighted Playlist JOG DIAL DOWN Move cursor down VAL + Go to previous page VAL - Go to next page To view the contents of a particular Playlist, roll the JOG DIAL to highlight the desired Playlist and press ENTER. When a Playlist is highlighted, the first photo of the Playlist will be displayed in the thumbnail screen at the upper-right corner of the Playlist Manager screen. You can also see information about the number of photo, music, and video files included in the highlighted Playlist. Note: Any file originally included in the Playlist that has been deleted, moved, or renamed, will not be included in the Playlist. Page 58 Revision 1.1.1-1 Picture Porter 35 User’s Guide 12.2. Playlist Manager Menu Options From the Playlist Manager screen, the available Menu options are: MENU – PLAYLIST MANAGER Selection Description New Playlist Create a new (empty) Playlist. Duplicate Duplicate an existing Playlist. Rename Rename a Playlist. Export to Folder Make a copy of the Playlist contents to the Export folder. Export to Device* Export Playlist with contents to a connected Picture Porter 35. * This option is only visible when a target Picture Porter 35 is connected and accessible. Delete Delete Playlist. You will have an option to delete the original files or to delete only the Playlist and leave the original files intact. New Playlist: 1. Press MENU and select New Playlist. 2. Next, use the on-screen keyboard to name the new Playlist. An empty Playlist will be created. See section 12.6. Adding Entries to a Playlist for instructions on adding contents to your Playlist. Duplicate: 1. Navigate to the Playlist you want to duplicate. 2. Press MENU and select Duplicate. 3. The on-screen keyboard will appear with the original Playlist name followed by ‘_dup’ at the end. You can change the name of the duplicate Playlist before selecting OK to confirm and create a duplicate of the selected Playlist. A duplicate Playlist will be created with the assigned Playlist name. Page 59 Revision 1.1.1-1 Picture Porter 35 User’s Guide Rename: 1. Navigate to the Playlist you want to rename. 2. Press MENU and select Rename. 3. Next, use the on-screen keyboard to rename the Playlist. The selected Playlist will be renamed. Export to Folder: 1. Navigate to the Playlist you want to export. 2. Press MENU and select Export to Folder. 3. The Export screen will appear. See Section 11.1. Copying Files to the Export Folder for details on this function. The original files of the Playlist will be copied to a new folder in the Export Folder. Note that only the contents of the Playlist will be exported and the Playlist file will not be included. Export to Device: This menu option will only be visible if a Target Picture Porter 35 is connected and accessible. See Section 14.2 Using Picture Porter 35 with Another Picture Porter 35 for details on using this function. Delete: 1. Navigate to the Playlist you want to delete. 2. Press MENU and select Delete. 3. At the ‘Remove Playlist Confirmation’ screen, select Yes and press ENTER to confirm the deletion. 4. Next, a ‘Remove Playlist Complete’ screen will pop up to confirm that the Playlist has been removed from the Playlist Manager. 5. You will be prompted to decide whether to keep the original photo, music, and video files of the Playlist or to delete them. Select KEEP to keep the original files. Select DELETE to delete the original files. Page 60 Revision 1.1.1-1 Picture Porter 35 User’s Guide 12.3. Playlist (contents) Screen The Playlist screen will display the photos, music, and videos contained in the Playlist selected from the Playlist Manager. If the original file are been deleted, moved, or renamed and cannot be located, it will not be included in the Playlist. The following screen layout shows the Playlist (contents) screen. File counter: Photo X of total # photos selected for slideshow Preview of highlighted photo Information of highlighted item Playlist - Navigation Keys ESC Return to Playlist Manager MENU Show/close menu JOG DIAL UP Move cursor up ENTER Start slideshow of Playlist (starting from cursor location) JOG DIAL DOWN Move cursor down VAL + Change position of current up one VAL - Change position of current down one Page 61 Revision 1.1.1-1 Picture Porter 35 User’s Guide 12.4. Playlist (contents) Menu Options From the Playlist screen, the available Menu options are: MENU – PLAYLIST (Contents) Selection Description Playlist Layout Change the display of the Playlist contents among List View, 3x2 View, and 5x4 View. Remove Remove current item from Playlist. You will have an option to delete the original file or to remove it from the Playlist only and leave the original file intact. Playlist Layout: 1. Press MENU and select Playlist Layout. 2. Next, select the desired layout from the list of options. The layout of the current Playlist will change to the selected layout. Remove: 1. Navigate to the item you want to remove from the Playlist and press ENTER. 2. At the ‘Remove Playlist Item Confirmation’ screen, select Yes and press ENTER to confirm the removal. 3. Next, a ‘Remove Playlist Item Complete’ screen will pop up to confirm that the Playlist item has been removed from the Playlist. 4. You will be prompted to decide whether to keep or delete the original file. Select KEEP to keep the original file. Select DELETE to delete the original file. 12.5. Changing the File Sequence of a Playlist From the Playlist (contents) screen, you can change the sequence of how the photos and videos in the Playlist appear in the slideshow. Press VAL+ to move the highlighted item up one position. Press VAL - to move the highlighted item down one position. Page 62 Revision 1.1.1-1 Picture Porter 35 User’s Guide 12.6. Adding Entries to a Playlist Entries can be added to a Playlist from Folder View or Preview Mode. When adding entries to a Playlist, you will be able to choose between adding the selected items to an existing Playlist or to create a new Playlist containing the selected items. 1. From Folder View or Preview Mode, select the file(s) you want add to the Playlist. 2. After your selection is complete, press MENU and select Add to Playlist. Next, you can select one of the following options: Current: Add the highlighted items to a playlist. Selection Page: Add the selected items on the current page to a playlist. Selection All: Add all selected items to a playlist. 3. The ‘Select Target Playlist ‘window will pop up. It will let you select the target Playlist or create a new Playlist. Select an existing Playlist Press VAL +/- to move the cursor up/down among the existing Playlists. With the desired target Playlist highlighted, use the JOG DIAL to highlight OK and press ENTER. The items will be added to the selected Playlist. Page 63 Revision 1.1.1-1 Picture Porter 35 User’s Guide Create a new Playlist Use the JOG DIAL to highlight NEW and press ENTER. Use the on-screen keyboard to enter a name. See Section 5.4 Using the On-screen Keyboard for details. 4. After you select the target Playlist, a ‘Playlist Add Completed’ confirmation screen will appear. Press ENTER to acknowledge. 12.7. Understanding the Playlist File This section explains how to find the Playlist MPL files on the computer and the structure of the MPL file for editing. If you are a programmer, you might find this information helpful for you to create a script to work with your photo management software when creating complicated playlists more easily. When a Playlist is created, it makes a text file with the extension ‘.MPL’. This text file contains the paths of all the photos, music, and video files of the Playlist. All the Playlist files are located within the ‘SYSTEM’ folder in a folder called ‘PLAYLIST’. This folder location is not visible through the Picture Porter 35 screen, but can be accessed when Picture Porter 35 is connected to a computer. You can view and edit these files manually by opening the MPL files though your computer using a text editor. Each entry in the playlist consists of two lines. The first line begins with the ‘#’ symbol followed by the path of the file it designates. The second is the same file path without the ‘#’ symbol at the front. Spaces are allowed in the path. Note that the files in the same Playlist can come from many different folder locations. The following is an example of what a Playlist MPL file looks like: #/HD1/MEDIA/ALBUMS/Folder 1/Photo 1.jpg /HD1/MEDIA/ALBUMS/Folder 1/Photo 1.jpg #/HD1/MEDIA/ALBUMS/Folder 1/Photo 2.jpg /HD1/MEDIA/ALBUMS/Folder 1/Photo 2.jpg #/HD1/MEDIA/MUSIC/Collection 1/Music 1.mp3 /HD1/MEDIA/MUSIC/Collection 1/Music 1.mp3 Page 64 Revision 1.1.1-1 Picture Porter 35 User’s Guide 13. Using Picture Porter 35 with Your Computer When connected to your computer, Picture Porter 35 becomes an external hard drive and a multi-format memory card reader/writer to your computer. 13.1. Connecting Picture Porter 35 to Your Computer 1. Turn on Picture Porter 35. 2. Connect Picture Porter 35 to the USB port on your computer using the provided or a compatible USB cable. Note: It is recommended that you use the AC power adapter when Picture Porter 35 is connected to your computer. This will ensure a stable power supply to Picture Porter 35 and prevent data corruption resulting from insufficient or unstable power supplied by the computer USB port to Picture Porter 35. 3. Picture Porter 35 will display a computer connection icon on its screen to indicate that it is connected to your computer. While it is connected to the computer, the Picture Porter 35 will display the USB connect screen and will not be accessible. For Windows users, once connected, your computer will automatically recognize Picture Porter 35 to show three devices: • Picture Porter 35 hard drive (with device label ‘HD1’) • Two removable devices (corresponding memory card slots) For Mac users, once connected, your computer will display a ‘HD1’ icon on the Desktop for the Picture Porter 35 hard drive. Icons for memory cards will only appear if a memory card is inserted. These devices will function like any other storage device on your computer. You can now access files on Picture Porter 35 and connected the memory cards to transfer files between the various memory locations. Note: 1) The Picture Porter 35 hard drive and memory card icon labels may vary by device and can be renamed. 2) The device drive letters may vary based on your specific computer configuration. Page 65 Revision 1.1.1-1 Picture Porter 35 User’s Guide 13.2. Accessing Picture Porter 35 Data on Your Computer Once Picture Porter 35 is connected to your computer, you can access the photos and other files you copied to it, as well as copy photos and other files from your computer to Picture Porter 35 for storage, transport, and viewing. Copying files from Picture Porter 35 to your computer: • Navigate to the Backup folder on Picture Porter 35 hard drive (labeled ‘HD1’) to access all the backups you made from your memory cards. • Navigate to the Export folder on Picture Porter 35 hard drive (labeled ‘HD1’) to access the files that you have copied using the Export function. • Use the Copy and Paste function on your computer to copy the files from Picture Porter 35 to the desired location on your computer hard drive. Copying files from your computer to Picture Porter 35: • Use the Copy and Paste function on your computer to copy files from your computer to the Picture Porter 35 hard drive. • Use the default Albums folder to organize your photos and videos files in order to utilize the Albums shortcut from the Home Screen. By copying your photos and video files into the Albums folder (located inside the Media folder on your Picture Porter 35 hard drive), you can have direct access to your photos and video files by selecting Albums icon from the Home Screen. • Use the default Music folder to organize your music files in order to utilize the Music shortcut from the Home Screen. By copying your music files into the Music folder (located inside the Media folder on your Picture Porter 35 hard drive), you can have direct access to your music files by selecting Music icon from the Home Screen. For more details on these pre-created folders on the Picture Porter 35 hard drive, see Section 2.7 Hard Drive Default Folder Structure. Page 66 Revision 1.1.1-1 Picture Porter 35 User’s Guide 13.3. Disconnecting Picture Porter 35 From Your Computer To properly disconnect Picture Porter 35 from the computer, disable the device before unplugging it. The method to disable the device will vary based on the operating system of your computer. Refer to the instruction manual of your computer for details on how to do this. Disabling devices in Windows OS: 1. Make sure that there are no programs or open windows accessing any of the three Picture Porter 35 drive locations. 2. Locate the ‘Safely Remove Hardware’ icon in the icon tray at the lower-right corner of your computer screen. You can move the mouse pointer over the icons until you see the ‘Safely Remove Hardware’ label. 3. Double-click on this icon to open the ‘Safely Remove Hardware’ window. 4. Select the hardware device named ‘USB Mass Storage Device’ by double-clicking the left mouse button. 5. Confirm that the drive letters for the selected ‘USB Mass Storage Device’ match with the drive letters assigned by your computer for the Picture Porter 35 and click ‘Ok’. If the drive letters for the selected ‘USB Mass Storage Deice’ does not match, click ‘Cancel’ and select a different ‘USB Mass Storage Device’. 6. After your computer displays a pop-up saying, ‘Safe to Remove Hardware’, you can safely remove the device. Close the ‘Safely Remove Hardware’ window by clicking ‘Close’ and disconnect the USB cable between Picture Porter 35 and the computer. Note: In some cases, if the Picture Porter 35 hard drive is sleeping when you attempt to disconnect it, your computer may indicate that it cannot disconnect the Picture Porter 35. If this happens, repeat the same process again. Page 67 Revision 1.1.1-1 Picture Porter 35 User’s Guide If you are still not able to use the ‘Safely Remove Hardware’ process, here is an alternate method to disconnect Picture Porter 35 from your computer: 1. Make sure that there is no data being written to or from Picture Porter 35. 2. Manually turn off Picture Porter 35 by pressing and holding the Power Button for 3 seconds. This will safely shut down the Picture Porter 35 hard drive. 3. After the Green LED on Picture Porter 35 goes off, disconnect the USB cable between Picture Porter 35 and your computer. Disabling devices in Mac OS: 1. Locate the icons for Picture Porter 35 hard drive and inserted memory cards on the Desktop of your Mac. 2. Click and drag the icon to Trash. 3. After the icon disappears from the desktop, it is safe to disconnect the USB cable between Picture Porter 35 and your Mac. Warning: Unplugging Picture Porter 35 before properly disabling it increases the risk of disrupting data transmission between Picture Porter 35 and your computer. This might crash your computer and Picture Porter 35 and cause data loss. Page 68 Revision 1.1.1-1 Picture Porter 35 User’s Guide 14. Using Picture Porter 35 with Other Devices Picture Porter 35 can operate with a variety of complementary devices. These devices connect to Picture Porter 35 through its different input/output ports. 14.1. Using Picture Porter 35 with A/V Devices 14.1.1. Viewing Photos and Videos on TV or Projector You can connect Picture Porter 35 to a TV or projector with its audio/video output to enjoy and share photos and videos on a large screen. Use the included RCA audio/video cable to connect Picture Porter 35 to your TV or projector. 1. Connect the end of the audio/video cable with the one black plug to the A/V output jack at the top of Picture Porter 35. 2. Connect the RCA audio connectors (colored white and red) to the audio input jacks of the TV. 3. Connect the RCA video connector (colored yellow) to the video input jack that corresponds to the selected video input of the TV. 4. Turn on Picture Porter 35 and the TV. On the TV, select the proper video input mode for the input that Picture Porter 35 is using. You can now view the photos and videos stored on Picture Porter 35 on your TV or projector. Note: When Picture Porter 35 is connected to the TV, use both sets of volume control to find the most suitable volume setting. Page 69 Revision 1.1.1-1 Picture Porter 35 User’s Guide 14.1.2. Playing Music through Stereo System You can connect Picture Porter 35 to a stereo or pair of powered external speakers to improve the quality of the audio being played. 1. Connect the appropriate end of the audio cable to the A/V output jack at the top of Picture Porter 35. 2. For powered external speakers, the audio from the Picture Porter 35 will play through the connected speakers. For a stereo system, connect the RCA audio connectors (colored white and red) to the audio input ports on the stereo system. The audio output will be directed through the connected device. Note: When Picture Porter 35 is connected to a stereo system or powered external speakers, use both sets of volume controls to find the most suitable volume setting. 14.2. Using Picture Porter 35 with Another Picture Porter 35 You can connect another Picture Porter 35 to your Picture Porter 35 by using the USB-OTG cable and the USB cable. With the Target Picture Porter 35 connected, the Main Picture Porter 35 will be able to view and access the hard drive of the Target Picture Porter 35 as a USB device. The Target Picture Porter 35 will be in USB mode and cannot be operated. 1. Turn on the Main Picture Porter 35. 2. Connect the USB-OTG cable to the Main Picture Porter 35. 3. Connect the USB cable to the USB-OTG cable. 4. Connect the free end of the USB-OTG cable to the Target Picture Porter 35. 5. Turn on the Target Picture Porter 35. Note: To ensure stable power supply, it is recommended to have both Picture Porter 35 devices connected to AC power. After the Target Picture Porter 35 starts up, it will show the USB connection screen. The Main Picture Porter 35 will display on the Home Screen a USB icon for the Target Picture Porter 35 hard drive. Page 70 Revision 1.1.1-1 Picture Porter 35 User’s Guide Playlist Export to Device: With the Target Picture Porter 35 connected, the Main Picture Porter 35 will enable the Export to Device menu selection in the Playlist Manager screen. To export a Playlist from the Main Picture Porter 35 to the Target Picture Porter 35: 1. On the Main Picture Porter 35, navigate to the Playlist you would like to export to the Target Picture Porter 35. 2. Press MENU and select Export to Device. 3. The Export screen will appear. See Section 11.1. Copying Files to the Export Folder for detailed instructions on how to navigate the Export screen. The original files will be exported to a new folder in the Albums folder on the Target Picture Porter 35. In addition, the Playlist file will be added to the Playlist Manager of the Target Picture Porter 35. 14.3. Using Picture Porter 35 with an USB Flash Drive You can connect a USB flash drive to Picture Porter 35 with the USB-OTG cable. Once connected, the USB flash drive will be accessible through the USB icon on the Home Screen. Back up contents of USB flash drive to Picture Porter 35: 1. From the Home Screen, navigate to the USB icon. 2. Press MENU and select BACKUP to HD1. Back up contents of memory card to USB flash drive: 1. From the Home Screen with the memory card inserted, navigate to the Memory Card icon. 2. Press MENU and select BACKUP to USB. Page 71 Revision 1.1.1-1 Picture Porter 35 User’s Guide 14.4. Using Picture Porter 35 with an External Hard Drive You can also connect an external hard drive* to Picture Porter 35 with the USB-OTG cable and USB cable. This function allows you to make a complete backup of all your data on Picture Porter 35 or copy selections of files and folders to the external drive. * Not all USB external hard drives will be compatible with Picture Porter 35. To connect a USB external hard drive: 1. Connect the standard USB cable to your USB hard drive. 2. Connect the USB-OTG cable to the UBS cable from your USB external hard drive. 3. Connect the mini-USB (small) end of the USB-OTG cable into the USB port on the Picture Porter 35. 4. Once connected, the external hard drive will be accessible through the USB icon on the Home Screen. Note: When connecting an external hard drive to Picture Porter 35, make sure to have the Picture Porter 35 connected to AC power to ensure a stable power supply for the Picture Porter 35. Make sure to connect your external hard drive to a dedicated power supply if required by the external hard drive manufacturer. Back up entire Picture Porter 35 to external hard drive: 1. From the Home Screen, navigate to the HD1 icon. 2. Press MENU and select BACKUP to USB. The entire Picture Porter 35 will create a folder called Backup on the external hard drive and copied its entire contents into a new folder in Backup. The folder naming convention will follow the same one used for the memory card Backup function. Page 72 Revision 1.1.1-1 Picture Porter 35 User’s Guide 15. Using Additional Features 15.1. Updating Firmware New versions of the Picture Porter 35 firmware will be periodically released with improved features to further enhance your user experience. Any new updates will be available for download from the Digital Foci website support page. Please make sure to register your Picture Porter 35 so that you will receive product support emails regarding new firmware releases and other important product information. To register your product, go to: www.digitalfoci.com/registration Alternatively, periodically check the support page on the Digital Foci website (www.digitalfoci.com/support) for the latest firmware update. 15.2. Checking Remaining Hard Drive Space You can check the total and remaining hard drive capacity on Picture Porter 35 from the Home Screen. Navigate to the HD1 icon, press MENU, and select Display Info. Picture Porter 35 will display the total capacity, used capacity, and available capacity of the hard drive. You can also check hard drive space by going to Setup and view Technical Information. Note: Based on variations of how available capacity is calculated by different file systems, the available hard drive storage space is approximately 233 GB for the 250GB Picture Porter 35, and approximately 466 GB for the 500GB Picture Porter 35. Page 73 Revision 1.1.1-1 Picture Porter 35 User’s Guide 15.3. Resetting Picture Porter 35 In the case that Picture Porter 35 encounters an erroneous operation and freezes, you can reset it by pressing the Reset Button. This button is located in the pinhole at the bottom-right side on the back of Picture Porter 35. Press the Reset Button by using a paper clip or similar pointy object. This will reset the operating system. You can power on Picture Porter 35 and return to normal operations. Your data on the hard drive will not be affected. In the case that you do not have a paper clip or other suitable object at hand to press the Reset Button, as an alternative, you can open the Battery Door and disconnect the battery from the connector. This will cut the power to Picture Porter 35 and force it to shut down. Be sure to disconnect Picture Porter 35 from AC power when you do this. After Picture Porter 35 is off, push the battery back into the battery compartment, close the Battery Door, and power on the device. 15.4. Reformatting Picture Porter 35 To reformat Picture Porter 35, navigate to the HD1 icon on the Home Screen. Press MENU and select Format. At the ‘Format Confirmation’ message, select Yes to reformat the hard drive. All the data on Picture Porter 35 will be deleted. Warning: Formatting Picture Porter 35 will erase all data stored on the device. Picture Porter 35 is provided to you pre-formatted and ready to use. We recommend that you always use the Format function on Picture Porter 35 to format the hard drive. Note that Picture Porter 35 has to be formatted in the FAT32 (or MS-DOS) file system for the device to be able to recognize and access the hard drive. Formatting Picture Porter 35 on a Windows computer using the NTFS format will cause your Picture Porter 35 to malfunction and not be able to access the hard drive. Page 74 Revision 1.1.1-1 Picture Porter 35 User’s Guide 15.5. Creating Multiple Partitions Picture Porter 35 Advanced users may choose to divide the hard drive on Picture Porter 35 into multiple partitions. When the Picture Porter 35 hard drive has 2 partitions, each partition will be seen as a separate device. On the Picture Porter 35 screen, you will see two icons labeled HD1 and HD2. When you connect Picture Porter 35 to your computer, each partition will be displayed as a separate drive. If you connect Picture Porter 35 to another Picture Porter 35 as the Target device, the Main Picture Porter 35 will show 2 USB icons on the Home Screen. Practical benefits of using multiple partitions: One benefit to make separate partitions is to help you better organize your data. You may want to use HD1 to hold your permanent collection and use HD2 as a working directory. With this structure, you can easily format HD2 and reset it after finishing one event to give you a blank slate before starting the next. It’s easy to use the file management features on Picture Porter 35 to copy folders and files between your working directory on HD2 to your permanent collection on HD1. Working with multiple partitions on Picture Porter 35: When you insert a memory card or USB device and have 2 partitions on your Picture Porter 35, the menu will include options to back up to either HD1 or HD2. The BACKUP to HD2 will use the same Backup folder structure and naming convention as the regular backup to HD1. With multiple partitions, the Backup, Albums, Music, and Export icons on the Home Screen and the Playlist and MemoRec functions, will still correspond with HD1, the primary drive partition. To access the contents of HD2, press ENTER on the HD2 icons from the Home Screen. When you have only HD1 on your Picture Porter 35, you can simultaneously connect 3 external memory devices. You can insert a memory card into one of the two slots between the mulit-card slot (SD or MS/xD), a CF card, and you can connect a USB flash drive with the USB-OTG cable. With this configuration, on the Home Screen you will see HD1 along with 3 icons next to it for each of the connected memory devices. Page 75 Revision 1.1.1-1 Picture Porter 35 User’s Guide With 2 partitions, you will have icons for HD1 and HD2 on the Home Screen. Since there is one less available icon space, you will only be able to connect up to 2 external memory devices at the same time. When formatting HD2 with the Format menu option, the same formatting process will be applied to HD2 as HD1. The result is that the default folder structure will also be created in HD2, but only the Backup folder will be used. Also, the drive label will be changed to HD1. To reduce possible confusion, it is recommended to use your computer to format the HD2 drive partition. The Backup folder will be automatically created. Creating multiple partitions: To prepare your Picture Porter 35 for multiple partitions, make sure that you do not have any important data on the hard drive as you will need to reformat the hard drive. For Windows users, the Windows operating system will not allow you to format the Picture Porter 35 hard drive in the required file system. You will need to use a ‘disk management utility’ to make the partitions and format each partition in the FAT32 file system. For Mac users, use Disk Utility to format the Picture Porter 35 hard drive in MS-DOS file system. 1. Connect Picture Porter 35 to your Mac with the USB cable. Please make sure you have AC power plugged in. 2. On Mac, select Finder > Applications > Utilities > Disk Utility. Double-click to open the Disk Utility application. 3. In Disk Utility, select the appropriate drive for Picture Porter 35, and select Erase. 4. Next, select Partition. 5. From the Volume Scheme pop-up menu, choose the number of partitions you would like to create. 6. Click each partition and type a name* for it, choose the MS-DOS file system, and type a size. You can also drag the divider between the partitions to change their sizes. * This is the name that will show up under the drive icon on your Desktop. 7. Click the Partition button in the lower-right corner of the window. 8. The created drives will now appear in the list of disks and volumes. They will also appear in the sidebar of the Finders window. Page 76 Revision 1.1.1-1 Picture Porter 35 User’s Guide 16. Frequently Asked Questions Questions about capacity, memory card, USB port: How many photos, music, and video files can I store on Picture Porter 35? 250 GB (actual storage space 233 GB): ~ 70,000 pictures, 58,000 songs, or ~ 1,000 hours of video 500 GB (actual storage space 466 GB): ~ 140,000 pictures, 116,000 songs, or ~ 2,000 hours of videos Photo capacity based on 10-mega-pixel photos (approx. 3.3 MB each). Music capacity based on 4 minute songs at 128 kbps MP3 encoding. Video capacity based on videos at 500 kbps encoding. What types of memory cards can Picture Porter 35 support? You can use the following memory cards with Picture Porter 35 directly without an adapter: CompactFlash (Type I), SD card, SDHC card, Multi-Media Card, mini SD, RS-MMC, Memory Stick, MS PRO, MS Duo, MS PRO Duo, and xD-Picture card. With an adapter, you can use: MicroSD, MicroMMC, and Sony M2 cards. What is the copy speed from memory card to Picture Porter 35? As a benchmark, it took less than 90 seconds to copy 1GB from a UDMA 300x CF card to Picture Porter 35. The actual copy speed depends on a variety of factors including the type of memory card used, the size of the files, and the number of files copied. My camera is not listed on your supported RAW format list. Does this mean it is not supported by Picture Porter 35? For the RAW images, the absence of a particular camera model does not necessarily mean that it is not supported by Picture Porter 35. Since the specifications for RAW images differ from manufacturer to manufacturer and even from camera to camera for the same manufacturer, Digital Foci has to constantly update the RAW image support to keep current with new digital camera models. Page 77 Revision 1.1.1-1 Picture Porter 35 User’s Guide If you do not see your camera model listed, you can send the RAW and JPEG files from your camera to Digital Foci at [email protected]. After verification, you will receive confirmation by email whether your camera model is already supported or when it will be supported. My computer only has USB 1.1 ports available. Can Picture Porter 35 still be connected? Yes, Picture Porter 35 is backward compatible with USB 1.1. What is the purpose of the Reset Button on Picture Porter 35? In the case that Picture Porter 35 encounters an erroneous operation and freezes, you can reset it with the Reset Button. Press it by using a paper clip or similar pointy object. As an alternative, you can also achieve the same result by taking out the battery to cut the power to Picture Porter 35 and force it to shut down. Be sure to disconnect Picture Porter 35 from AC power when you do this. Can I format Picture Porter 35 with file systems other than FAT or FAT32 (i.e., NTFS / HFS / HFS + / EXT2)? No, data transfer from memory cards to hard drive is compatible only with the FAT and FAT32 file systems. On the Mac OS, this is called ‘MS-DOS format’. If you format your Picture Porte 35 hard drive in NTFS format, you can still use it as an external hard drive to back up data from your computer, but you will no longer be able to access the Picture Porter 35 hard drive as a standalone nor use it to copy from memory cards. It is strongly recommended that you do not do this. How long is the battery life of Picture Porter 35 on a full charge? A full battery charge is capable of up to 4 hours of continuous video playback and up to 3 hours of photo backup. Does Picture Porter 35 have a USB port for reading from a USB flash drive or digital camera? You can use a USB-OTG cable to connect a USB flash drive, a compatible USB external hard drive, or another Picture Porter 35 to Picture Porter 35. It does not connect directly to a digital camera. Page 78 Revision 1.1.1-1 Picture Porter 35 User’s Guide I have photos stored on my computer. How do I go about displaying those photos on Picture Porter 35? You can connect Picture Porter 35 to your computer via USB and copy your photos from your computer onto the Picture Porter 35 hard drive. Questions about screen size, resolution, and display: What is the screen size and resolution of the LCD screen? 3.5” diagonal LCD screen with LED backlight and 320 x 240 screen resolution. What is the aspect ratio of the screen? If I have photos with 3:2 or 16:9 aspect ratios, how will they be displayed on the device? The aspect ratio on Picture Porter 35 is 4:3. If you have photos in a 3:2 or 16:9 aspect ratio, the photo will be displayed in a letterbox with black bars on top and bottom of the screen in the default view mode. There will be no rescaling or distortion of your photos in this view mode. If you want to eliminate the black bars on the top and bottom of the screen, you can select View Mode: Fill Screen. Under the Fill Screen Mode, the image will be ‘stretched’ to fill the screen. Please note that if you choose to do this, there will be distortion of your 3:2 and 16:9 aspect ratio photos. Can I adjust the screen brightness on Picture Porter 35? Yes, you can adjust screen brightness on the screen under Setup > SYSTEM SETTINGS > Display > Screen Brightness. Questions about slideshow and photo display options: What is the difference between Folder View and Preview Mode? Folder View is for navigating through the folder structure to find the desired folder. In Folder View, you are able to navigate between different folder levels by pressing VAL +/-. The only available viewing mode is List View. Page 79 Revision 1.1.1-1 Picture Porter 35 User’s Guide Preview Mode is more suitable for browsing through the files in a specific folder. In Preview Mode, you are able to view only the files within the current viewing folder. VAL +/- allows you to quickly browse through all the files by skipping pages forward and backward. You can choose between List View, 3x2 View, and 5x4 View. Also, in Preview Mode, you can filter the files to show All, Photo only, Photo/Video, Video only, or Music. How can I adjust the slideshow interval? You can change the slideshow interval during a slideshow while it is playing by rolling the JOG DIAL up/down to decrease/increase the interval. Available slideshow intervals times are: 1, 5, 10, 30 seconds; 1, 3, 5, 10, 30 minutes; and 1, 2, 3, 4, 5, 6, 12, 24 hours. How can I scroll through the photos manually? During a slideshow, press ENTER to pause the slideshow. Next, roll the JOG DIAL up/down to select the previous/next photo. What is the difference between the Shuffle option under Sort and the Random option in Playback? The Shuffle option under Sort will re-sort all the files in a random order. All of the files will be listed, but the order will be determined randomly each time Shuffle is selected. The Random option in Playback will playback the slideshow selection randomly. With this setting, since it is random, you may see duplicates of the same photos before everything has been played once. Can I rotate photos on Picture Porter 35? How does Picture Porter 35 handle photos shot in portrait? Photos on Picture Porter 35 will be displayed according to the photo orientation information available in the EXIF data captured with the photo. Most digital SLR cameras will have this photo orientation information. Photos taken in portrait orientation will be automatically rotated when it is displayed on Picture Porter 35. If the digital camera does not capture this information with the photo, the photo will be displayed in its original orientation. Page 80 Revision 1.1.1-1 Picture Porter 35 User’s Guide You can also manually rotate the photo on the screen. When you have the picture on display, you can press MENU and select Rotate to rotate the picture 90 degrees clockwise. Note that the rotated image will return to its original orientation the next time you view it. To retain the orientation settings for the pictures, you can rotate the images in your computer and copy the edited images onto Picture Porter 35. Can I play music in the background while viewing slideshow? To play music along with your photos slideshow, copy your music (MP3, WMA, or AAC) files onto Picture Porter 35 in the same folder as the photos for the slideshow. Make sure that Background Audio is set to Music under Slideshow Options. Questions about power: Is the battery user-replaceable? Yes, you can easily change the rechargeable Polymer Li-Ion battery by opening up the battery compartment at the bottom-right side of Picture Porter 35. Can Picture Porter run on AC power instead of battery? Yes, Picture Porter 35 runs on either battery or AC power. It is recommended that you use the AC power whenever possible so that you can make sure that your battery is fully charged when you need it. In addition, you can use a car adapter/battery charger that plugs into the power socket in your car to charge the battery. The car battery charger is available at the Digital Foci website (http://www.digitalfoci.com). Is the AC power adapter compatible in other countries? The standard AC power adapter that comes with your Picture Porter 35 can support power ranging from 100 to 240 volts. This will allow you to use the AC power adapter worldwide. Since the plug type on the standard AC power adapter is the North American standard, you may need a plug converter when traveling outside of North America. Page 81 Revision 1.1.1-1 Picture Porter 35 User’s Guide Can Picture Porter 35 receive power from the USB port? Picture Porter 35 is able to use the power from the USB port to charge the battery when turned off. The red LED will turn on to indicate that the battery is charging. When Picture Porter 35 is connected to the computer USB port and turned on, it will rely on the power from the USB port when possible. If it does not receive sufficient power from the USB port, it will use battery power. To ensure that Picture Porter 35 has sufficient and stable power supply and prevent power interruption, use the AC power adapter. Note: Situations with unstable power conditions may cause Picture Porter 35 to turn off unexpectedly and corrupt your data. Questions about firmware and hard drive maintenance: Is Picture Porter 35 firmware upgradeable? How can I update the firmware? Yes, Picture Porter 35 is firmware upgradeable. You can read download instructions and download the latest firmware from the Digital Foci website at: http://www.digitalfoci.com/support How can I help maintain the data on Picture Porter 35? • There are two ways you can help maintain your Picture Porter 35 contents. - First, make sure to keep Picture Porter 35 away from hot and dusty environments. Be careful not to drop or bump Picture Porter 35. Do not touch or move Picture Porter 35 while it is transferring data or connected to your computer. - Second, periodically run Error-checking, Scan Disk, Defragmentation, and other hard drive maintenance programs on Picture Porter 35. Your computer should have adequate tools included with its operating system software. Check the instruction manual of your computer for details. Page 82 Revision 1.1.1-1 Picture Porter 35 User’s Guide 17. Troubleshooting and Technical Support My computer does not recognize Picture Porter 35. • Make sure that the Main USB connector is properly connected to your computer and the Mini USB connector is properly connected to Picture Porter 35. • Plug in the AC power adapter to Picture Porter 35. Picture Porter 35 might not be getting enough power from your USB port to power the hard drive. • Make sure your computer USB port is working properly. • Check to see if your computer has any network drive mappings or other connected external devices that might be conflicting with the Picture Porter 35 drive mappings. • Reset Picture Porter 35 and try again. • Restart your computer and try again. My Picture Porter 35 froze and would not respond. • Reset Picture Porter 35 by pressing the Reset Button, located in the pinhole at the bottom-right side on the back of Picture Porter 35, with a paper clip or similar pointy object. • Picture Porter 35 may freeze if it is not properly disabled before disconnected from your computer. Make sure that you always disable the device first. Refer to Section 13.3 Disconnecting Picture Porter 35 from Your Computer for details. The data transfer between my computer and Picture Porter 35 is slow. • Picture Porter 35 might be connected to a USB 1.1 port instead of a USB 2.0 port. The device can work on both USB 1.1 and USB 2.0 ports. However, a USB 2.0 port is required to achieve high speed transfer rates up to 480 Mbps. If your computer does not have USB 2.0 ports, you can consider adding a USB 2.0 card to your computer. Visit your local computer store for more help. • Plug in the AC power adapter to Picture Porter 35 to ensure a stable and sufficient power supply. Insufficient power from the USB port can affect the hard drive performance and cause data transfer to be slow. Page 83 Revision 1.1.1-1 Picture Porter 35 User’s Guide The USB external hard drive or Target Picture Porter 35 is not recognized (the USB icon does not appear) or is unstable when connected to the Main Picture Porter 35 by the USB-OTG cable. The hard drive device connected to the Main Picture Porter 35 might not be getting enough power to start the hard drive or keep it spinning. Connect the USB external hard drive or Target Picture Porter 35 to AC power. I’ve deleted items from the Picture Porter 35 hard drive, but the space is still being used (it is not available). • There are two ways to delete items from the Picture Porter 35 hard drive. You can delete files and folders directly on the Picture Porter 35 using the Menu - File Management option. Or you can delete items with your computer when Picture Porter 35 is connected to the computer. • When you delete items directly on the Picture Porter 35 through the Menu option, the files will be deleted immediately and cannot be recovered. The capacity being used by the deleted files will become available right away. • When you delete items through your computer, the computer might put the deleted items in a temporary location. This gives you an opportunity to recover those files in the case that you deleted anything by accident. When the files are put in the temporary location, the same amount of capacity is still being used on the Picture Porter 35 hard drive, but you will not be able to view or access the deleted files on through the Picture Porter 35 screen. You will need to access the temporary location through your computer to view and retrieve the deleted files. On Windows OS, the temporary location is called the Recycle Bin. On Mac OS, it's called the Trash. To delete these items and make the space available on the Picture Porter 35, access the Recycle Bin or the Trash and select the option for Empty Recycle Bin or Empty Trash. Page 84 Revision 1.1.1-1 Picture Porter 35 User’s Guide When disconnecting Picture Porter 35 from my computer, I get a message that the device was disconnected unsafely. • You did not properly disable Picture Porter 35 before disconnecting it from your computer. This might cause data loss or cause your Picture Porter 35 to freeze. Refer to Section 13.3 Disconnecting Picture Porter 35 from Your Computer for detailed instructions on safely disconnecting Picture Porter 35. Some of my JPEG picture files are not showing up on Picture Porter 35. • Make sure that the JPEG file is in Baseline JPEG format. Picture Porter 35 does not support other formats such as Progressive or Arithmetical JPEG formats. I cannot play a video that is in a format supported by Picture Porter 35. • Since there are so many different video standards and specifications, even within the same format or files extension, it is possible to have incompatibilities. Picture Porter 35 plays Simple Profile MPEG-4 videos. It does not support playback for high definition (HD) videos. • To resolve this, use video conversion software to convert your video file to one of the formats supported by Picture Porter 35. See Section 7 Enjoying Video for recommended video specs. I see no images or only distorted images on my TV after connecting Picture Porter 35. • Make sure your TV is set to proper video input mode that will display the signal from the input source Picture Porter 35 is using. Check the documentation that came with your TV for more information about the different video input settings. • Make sure all the cables are connected correctly. Refer to Section 14.1.1 Viewing Photos and Videos on TV or Projector for detailed instructions. • Go to Setup and access SYSTEM SETTINGS. Go to Display tab, and change the Video Out setting to NTSC or PAL, depending on the type of TV you are using. If you are unsure about which setting is correct for your TV, try different settings until you find one that displays clearly. NTSC is the TV standard used in North America. PAL is used in Europe. Page 85 Revision 1.1.1-1 Picture Porter 35 User’s Guide • Try a different or shorter audio/video cable. Your TV may not be able to detect the signal from Picture Porter 35. When connecting Picture Porter 35 to my computer, my computer gives me a warning about a power surge. • Your computer USB port is unable to provide stable power to Picture Porter 35. Attach the AC power adapter to make sure that Picture Porter 35 gets a sufficient and stable power supply. My photos are displayed with black bars on the screen. The aspect ratio on Picture Porter 35 is 4:3. If you have photos in a 3:2, 16:9, or other aspect ratio, the photo will be displayed in a letterbox with black bars on top and bottom of the screen in the default view mode. There will be no rescaling or distortion of your photos. If you want to eliminate the black bars on the top and bottom of the screen, you can select View Mode: Fill Screen. Under the Fill Screen Mode, the image will be ‘stretched’ to fill the screen. Please note that if you choose to do this, there will be distortion of your photos. Picture Porter 35 will not recognize my memory card. Check to see that your memory card is inserted in the correct slot and with the correct orientation. Technical Support If you have any questions about using your Picture Porter 35, please contact Digital Foci, Inc. Toll-free in the US: 1-888- NOW-FOCI (669-3624) International: 1-310-763-9100 Email: [email protected] Website: www.digitalfoci.com Page 86 Revision 1.1.1-1 Picture Porter 35 User’s Guide 18. Appendix: Technical Specifications Model no. PPR-350 Direct (without adapter): CompactFlash, MultiMedia Card, RS-MMC, SD Card, SDHC Memory cards supported card, miniSD, Memory Stick, MS PRO, MS Duo, MS PRO Duo, xD-Picture card With appropriate adapter: MicroSD/TransFlash, MMCmicro/MMCmobile, M2 LCD screen 3.5" color TFT LCD screen with LED backlight (320 x 240 pixels) Hard drive 2.5" SATA hard drive Computer interface USB 2.0 (compatible with USB 1.1) USB device interface USB Host (to USB Mass Storage Device) Transfer rate (PPR to computer) Transfer rate (memory card to PPR) Up to USB 2.0 limit of 480 Mb/s 1GB in under 90 seconds from CF card* * Actual copy speeds will vary by card type and file composition. JPEG (baseline); BMP (Monochrome, 8 bits color); GIF; Image format support TIFF (1 & 8 bits Grayscale, 8, 16, 24 bits color); RAW – see list at: http://www.digitalfoci.com/picture_porter_RAW_support.html MPEG-4 Simple Profile (720x480@25fps / 640x480@30fps); Video format support MPEG-1 (640x480@30fps); MJPEG (640x480@30fps) Music format support MP3; WMA 7, 8, 9; AAC Zoom, Pan, Rotate, Thumbnail view, EXIF & histogram display, Photo viewing options Manual slideshow, IPTC information viewing, IPTC description display with photo slideshow, Slideshow with sequential and random playback options, Playlist slideshows File management Yes (copy, delete, rename files and create new folders, export features selection) Page 87 Revision 1.1.1-1 Picture Porter 35 User’s Guide Model no. PPR-350 Create, Duplicate, Export to folder, Export to secondary Picture Playlist management Porter 35, Remove, Delete, Append, Rename, Change playback sequence PhotoMemoTM Audio recording format support Record and playback of audio memos for each individual photo AAC Video TV-Out NTSC, PAL Embedded speaker 8 Ohm 1 Watt Embedded microphone Unidirectional mono mic Battery power Battery life External power 3.7V 2800mAh user-replaceable rechargeable Polymer Li-Ion battery Up to 4 hours of continuous video playback Up to 3 hours of memory card copy AC 100-240V to DC 5V/2.0A power adapter Windows: 7, Vista, XP OS compatibility Macintosh OS: 10.6, 10.5 & 10.4 Linux OS kernel versions: 2.4.x and later File system support FAT32 Dimensions 5.4” (L) x 3.8” (W) x 1.2” (H) Weight 14 oz. (with hard drive and battery) Picture Porter 35, AC power adapter, User-replaceable rechargeable Polymer Li-Ion battery, USB cable (to computer), Package contents USB-OTG cable (to USB Mass Storage Device), Earphones, RCA cable for audio/video output, Custom carrying case, Wrist strap, User’s Guide, Quick Start Guide Page 88 Revision 1.1.1-1 Picture Porter 35 User’s Guide 19. Appendix: RAW Formats Supported RAW image formats supported .CR2: 1Ds, 1Ds Mark2, 1Ds Mark3, 1D Mark3, 1D Mark2N, 1D Mark2, 1D, 5D, 5D Mark2, 10D, 20D, 30D, 40D, 50D, Canon 1000D, D30, D60, D400, 300D(Rebel), 350D(Rebel XT), 400D(Rebel Xti), 450D (rebel XSi) .CRW: G1, G2, G3, G5, G6, G9, G10, S30, S40, S45, S50, S60, S70, Pro1 .NEF: D300, D3, D2H, D2Xs, D2X, D1H, D1X, D1, D200, D100, Nikon D90, D80, D70s, D70, D60, D50, D40, D40X, D700, E5700 Kodak Fujifilm Olympus Minolta Leica Sony .DCR: DSC Pro SLR/c, DSC Pro SLR/n, DSC Pro 14n, P850, P880 .RAF: S2 Pro, S3 Pro, S5 Pro, S5600, S9500, S6500fd, E550, F700 .ORF: E-1, E-3, E-20, E-300, E-330, E-410, E-500, E-510, E-550, C5050, C7070, C8080, SP500UZ, SP510, SP550 .MRW: DiMage 7, A1, A2, A200, DYNAX 5D, 7D, MAXXUM 5D, MAXXUM 7D, 7i, 7Hi .RAW: D-Lux3, V-Lux1 .DNG: M8, R9 .SR2: DSC-R1 .ARW: Alpha A100, A200, A350, A700, A900 PhaseOne .TIF: P45+, P30+, P25+, P21+, P20+ Pentax .PEF: *istD, *istDL, *istDS, K100D, K10D,K200D, K20D Samsung .DNG: GX-10, Pro815 Panasonic .RAW: FZ50, FZ30, FZ18, Lumix-L1, LX2, L10 .RW2: FZ28, G1, LX3 * Visit http://www.digitalfoci.com/support to view most current updates. Page 89 Revision 1.1.1-1 3111 E. Via Mondo, E. Rancho Dominguez, California, 90221 USA Copyright 2009 Digital Foci, Inc. All rights reserved.