1
E-PRACTICE PAD
ELECTRONIC DRUM
PRACTICE PAD
QUICKSTART GUIDE
::: ENGLISH ( 1 – 3 ) :::
USER'S MANUAL
::: ENGLISH ( 4 – 7 ) :::
MANUAL DE INICIO RÁPIDO
::: ESPAÑOL ( 8 – 10 ) :::
GUIDE D’UTILISATION RAPIDE
::: FRANÇAIS ( 11 – 13 ) :::
GUIDA RAPIDA
::: ITALIANO ( 14 – 16 ) :::
KURZANLEITUNG
::: DEUTSCH ( 17 – 19 ) :::
INTRODUCTION
Welcome to the Alesis E-Practice Pad! This digital drum is a fun way to learn
and practice the drums. Included are 65 drum sounds and 60 songs and
exercises, all designed to make you a better drummer. It feels great and gives
you a full range of dynamics from the lightest touches to the loudest accents.
Here are several features you'll come to love about the E-Practice Pad:
y
y
y
y
y
y
y
y
y
65 different drum sounds
BOX CONTENTS
E-Practice Pad
Power Adapter
Quickstart Guide
Safety Instructions &
Warranty Information
Booklet
Metronome with six sounds, adjustable time signatures and subdivisions
60 practice games and exercises
Natural feel and performance with full dynamic range
Headphone jack for silent practice or amplifier output for playing with other musicians
Mountable on standard 8mm cymbal stand or snare stand
Recording and playback for listening to your playing
Runs on batteries for portability or on wall power with included power adapter
Expandable with optional bass drum and hi-hat pedal
Please refer to this manual to take full advantage of E-Practice Pad's numerous features, and have fun
playing!
Sincerely,
The People of Alesis
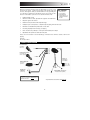
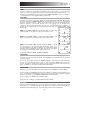
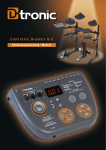
CONNECTION DIAGRAM
Kick Drum Pedal *
(footswitch;
1/4” mono)
Hi-Hat Control Pedal *
(footswitch; 1/4”
stereo; optional)
Power (or 4
AA batteries;
not included)
Hi-Hat Cymbal Pad *
(1/4” mono;
optional)
Headphones
or Monitors
(1/4” stereo)
Cymbal Stand (standard 8mm
threaded mount; optional)
WARNING: Only put on your headphones
or turn on your monitors AFTER turning on
the E-Practice Pad.
* To purchase these accessories, visit alesis.com.
1
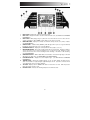
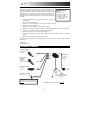
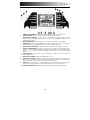
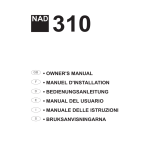
TOP PANEL FEATURES
1.
VOLUME – Adjusts the volume level.
2.
START / STOP – Starts or stops the metronome.
3.
RECORD – Enters Record Mode.
4.
METRO – Press this button to select metronome settings or change the pad sound.
5.
TEMPO / TAP – Press this button to enter Tempo Mode, then use the VALUE +/- buttons to adjust the
tempo. You can also press and hold this button for three seconds then strike the PAD (four times) to
the beat of the new tempo you wish to enter.
6.
BEAT INDICATOR – These LEDs flash in time with the quarter notes of the pattern being played. The
red LED flashes on the downbeat of each bar.
7.
LCD – Displays the current parameters and other operations.
8.
VALUE +/- – Decreases or increases the value of each parameter.
9.
TRAINING – Enters Training Mode.
10.
GAME / TIMER – Enters Game Mode when pressed. Hold down this button to enter Timer Mode.
11.
PAD – Strike this single-zone pad with a drumstick.
12.
METRONOME SPEAKER – This speaker plays the metronome sound only unless headphones are
connected to the rear panel.
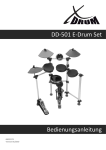
REAR PANEL FEATURES
1.
HEADPHONES – Connect a set of 1/4" headphones to
this input.
2.
HI-HAT INPUT – Connect an optional hi-hat cymbal trigger
pad here with a 1/4" mono cable to use as a hi-hat trigger
while playing.
3.
HI-HAT CONTROL INPUT – If you connected a hi-hat
trigger pad to the HI-HAT INPUT, connect an optional footswitch here with a 1/4" stereo cable to this
input to use both "open" and "closed" hi-hat sounds.
4.
KICK PEDAL INPUT – Connect an optional footswitch here with a 1/4" mono cable to use as a bass
drum trigger while playing.
SIDE PANEL FEATURES
1.
DC INPUT – Connect the included power adapter
here, then connect the adapter to wall power.
2.
POWER SWITCH – Turns the E-Practice Pad on
and off.
2
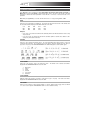
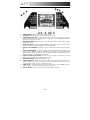
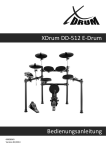
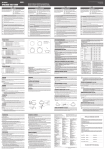
LCD FEATURES
1.
BEAT COUNT – Displays the count of the current beat (1-9).
2.
BEAT TYPE – Displays the number of beats the metronome will count. (See BEAT under CHANGING
PARAMETERS.)
3.
BEAT CHECK – When playing along to a pattern, the closer the lit arrows are to the center, the more
accurate your timing is. When "GOOD" is lit, the timing of your strokes is accurate.
4.
MODE INDICATOR – Displays the currently selected mode: Tempo, Record, Score, Timer, or Game.
(See OTHER MODES.)
5.
GAME OK ICON – In Game Mode ("GAME2"), "OK" will appear when your score is greater than 60,
indicating the pattern will change to one of greater difficulty.
6.
PARAMETER DISPLAY – Displays the current parameter values (tempo, score, etc.).
7.
METRONOME NEEDLE – Moves left and right in time with the current tempo. During the "Balance"
exercise, this area becomes a meter, measuring the force of each hit of the pad. During the "Count"
exercise, this area becomes a meter, indicating the time remaining or the number of hits remaining.
(See TRAINING MODE.)
8.
GAME NOTE DISPLAY – While in Game Mode, horizontal bars on the left and right edges of the LCD
will prompt you to hit the pad. (See GAME MODE under OTHER MODES.)
9.
RHYTHM INDICATOR – Displays the current rhythmic figure.
PARAMETERS.)
10.
TRIGGER ICONS – Indicates the available triggers you can use while playing and when they are
struck. A snare drum icon (representing the pad) will always be shown. If you have connected a hi-hat
or kick drum trigger, these icons will be displayed.
11.
TAP ICON – Displays after the TEMPO / TAP button is held for three seconds. Strike the pad four
times at the tempo you wish to enter.
12.
BATTERY LEVEL – Indicates the remaining battery life of the E-Practice Pad.
3
(See RHYTHM under CHANGING
USING THE E-PRACTICE PAD
CHANGING PARAMETERS
Press METRO to select a parameter to adjust: Beat, Rhythm, Click Sound, Click Volume, Pad Sound, or
Metronome. Keep pressing METRO to toggle through these options. An arrow on the left edge of the LCD
will appear to indicate the selected parameter. Press VALUE +/- to increase or decrease the value of the
parameter.
Note: After pressing METRO, you can also turn the metronome on or off by pressing START / STOP.
BEAT
Select any of the following beat combinations. The metronome will count beats based on this number, and
the selected beat will be displayed in the BEAT TYPE area of the LCD.
0–9
2+3
3+2
3+4
4+3
4+5
5+4
5+6
6+5
6+7
7+6
7+8
8+7
8+9
9+8
Examples:
y If you select "4," the metronome will mark the downbeat (with the red LED and a different "click" sound)
every four beats.
y If you select "5+6," the metronome will mark the downbeat (with the red LED and a different "click"
sound) every five beats then six beats.
RHYTHM
Select any of the following 24 rhythmic figures. The selected rhythmic figure will be played on every beat
counted by the metronome. The exceptions are the clave figures, which are played across two bars (as
opposed to every beat). The RHYTHM INDICATOR of the LCD will display the current rhythmic figure.
CLICK SOUND
Select any of six sounds to serve as the metronome "click." The number of the selected sound will be
displayed in the PARAMETER DISPLAY area of the LCD.
1.
2.
3.
4.
5.
6.
Metronome
Claves
Sticks
Cowbell
Voice Count
Electronic
CLICK VOLUME
Adjust the metronome volume by selecting a setting from "0" (off) to "4" (loud). The volume level will be
displayed in the PARAMETER DISPLAY area of the LCD.
PAD SOUND
Select one of 65 sounds for a pad or attached trigger. To do this, strike the pad or trigger, then use VALUE
+/- to select a sound. (See the PAD SOUNDS section for a list of available sounds.)
4
TRAINING MODE
E-Practice Pad's Training Mode contains a set of exercises designed to help you improve your speed,
stamina, and accuracy as a drummer. This section outlines how to use the different Training Mode features.
To enter Training Mode, press TRAINING then use the VALUE +/- buttons to select the type of exercise,
which will be indicated by an arrow on the right-hand side of the LCD. Available exercises include: Beat
Check, Balance, Pattern, Follow Me, Gradual Up / Down, and Count.
To begin each exercise, select it, then press START / STOP. Press it again to end the exercise.
BEAT CHECK
Beat Check is actually more of a setting than an "exercise." It is always enabled regardless of what other
exercise is selected.
While playing, Beat Check measures the accuracy of your strokes. If you see arrows on the left (pointing to
the right), you are striking the pad "behind the beat" or slightly slower than the actual tempo. If you see
arrows on the right (pointing to the left), you are striking the pad "ahead of the beat" or slightly faster than the
actual tempo. When the "Good" icon in the center is displayed, your strokes are accurately timed.
Use the VALUE +/- buttons to increase or decrease the tolerance of Beat Check (how "strictly" it measures
your accuracy). The higher the number, the stricter the Beat Check will be. The levels are as follows:
L-1: Quarter note (easier timing)
L-2: Quarter note (more exact timing)
L-3: Eighth notes (easier timing)
L-4: Eighth notes (more exact timing)
L-5: Sixteenth notes (easier timing)
L-6: Sixteenth notes (more exact timing)
L-7: Sixteenth note triplets (easier timing)
L-8: Sixteenth note triplets (more exact timing)
BALANCE
This exercise measures the differences in dynamics (i.e. force and,
therefore, volume) between different strokes, especially between your
left and right hands.
In this exercise, the metronome needle acts as a "meter" to indicate the
force of each hit of the pad while the BEAT CHECK meter acts as a
"force check": the "GOOD" icon means a stroke is of equal force to the
previous one. If it is a heavier stroke than before, arrows will appear to
the right (pointing left) to indicate you should hit the pad with less force.
If it is a lighter stroke than before, arrows will appear to the left (pointing
right) to indicate you should hit the pad with more force.
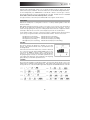
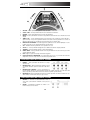
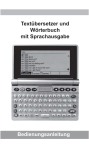
PATTERN
This exercise helps familiarize you with different rhythms. The metronome will play through a series of four
rhythmic figures constituting a pattern (pictured here). Each rhythmic figure is played for two bars before
moving to the next one. The current rhythmic figure will be displayed in the RHYTHM TYPE area of the LCD.
5
FOLLOW ME
This exercise improves your familiarity with rhythmic figures and sense of timing without a metronome. The
metronome will play a rhythmic figure for one, two, four, or eight measures. For the following one, two, four,
or eight measures (respectively), the metronome will be muted while you play the rhythm yourself. This cycle
will repeat until you stop the exercise.
This exercise has four levels of difficulty:
F-1: one-measure cycle
F-2: two-measure cycle
F-3: four-measure cycle
F-4: eight-measure cycle
GRADUAL UP / DOWN
This exercise helps improve your stamina and timing by gradually increasing the tempo of a rhythmic figure
then decreasing it to the original tempo. This cycle will repeat until you stop the exercise.
Assign the original (minimum) tempo of the exercise before beginning by pressing TEMPO / TAP and using
VALUE +/- to adjust the tempo. Assign the maximum tempo of the exercise during the exercise by pressing
TEMPO / TAP when the exercise has reached the highest tempo you want. The rate at which the tempo
increases is as follows:
G-1: The tempo will increase/decrease by 1 BPM each beat.
G-2: The tempo will increase/decrease by 1 BPM every two beats.
G-3: The tempo will increase/decrease by 2 BPM every eight measures.
G-4: The tempo will increase/decrease by 5 BPM every eight measures.
G-5: The tempo will increase/decrease by 5 BPM after every eight
measures you play correctly.
"BPM" is a stands for "beats
per minute" or the number of
quarter note beats that occur
in
one
minute,
which
designates the tempo.
COUNT
This exercise has two modes to help improve your speed.
available options with the VALUE +/- buttons.
After selecting "Count," toggle through all
Fixed Time: You can select a fixed amount of time – 15 seconds, 30 seconds, or 60 seconds – to hit
the pad as many times as you can. After a one-measure count-in, the designated amount of time will
be represented by the metronome needle "meter" (as time remaining). The number of times you hit the
pad will be counted and shown at the top of the LCD.
Fixed Hits: You can select the number of times you need to hit the pad – 200 times, 500 times, or
1,000 times – while you are being timed. After a one-measure count-in, the designated number of
times you need to hit the pad will be represented by the metronome needle "meter" (as hits remaining).
The amount of time you take to hit the pad for the designated number of times will be shown on the
LCD.
After you are done with either of these exercises, you may press VALUE +/- to exit the exercise or START /
STOP to repeat it.
6
OTHER MODES
TIMER
You can set a timer from 1 to 60 minutes to designate a period of time to practice. You can enter other
modes or use all other pad functions while the timer is running. The timer will go off when it runs out. To set
the timer, hold down GAME for three seconds until the "Time" MODE INDICATOR is shown. Use VALUE +/to set the amount of time. Press START / STOP to start the timer.
GAME MODE
In this mode, you can learn to play various rhythms by following visual prompts on the LCD. On the left and
right edges of the LCD – the GAME NOTE DISPLAY – horizontal bars will move from the top of the display to
the bottom, toward the drum icons. When a bar reaches a drum icon, strike the actual pad with your
drumstick. (The bars on the left and right side of the screen represent your left and right hands,
respectively.) When you strike a pad at the correct time, an "L" or "R" will appear next to the drum icon on
the LCD. There are three different ways to play this game in Game Mode. Press GAME / TIMER to toggle
through them:
GAME: Pressing GAME / TIMER once will enter Game Mode. You will be able
to hear the pattern you are supposed to play, but you will not be scored.
GAME 1: Pressing GAME / TIMER a second time will display "GAME 1." You
will not hear the pattern you are supposed to play and you will be scored.
GAME 2: Pressing GAME / TIMER a third time will display "GAME 2." You will
not hear the pattern you are supposed to play and you will be scored. If you
score at least 60 points, the "OK" icon will appear on the LCD and the pattern
will change. (There are 60 patterns for this game, which become more difficult
as you progress.) Press START / STOP to begin the new pattern.
To exit Game Mode, press METRO, TRAINING, or RECORD.
TEMPO MODE
In this mode, you can set the tempo of a pattern. Press TEMPO to enter Tempo Mode then use the VALUE
+/- buttons to adjust it.
You can also enter a tempo by tapping the TEMPO / TAP button. The E-Practice Pad will automatically
detect the new tempo from how quickly you press it. To do this, hold the TEMPO / TAP button for three
seconds. The "TAP" icon will appear at the bottom of the LCD. Tap the pad four times at the new tempo you
want to set. (Note: You can not tap a new tempo while in Game Mode.)
RECORD MODE
In this mode, you can record a pattern of your own to play back. Press RECORD to enter Record Mode.
To start recording, press RECORD (while already in Record Mode). If a pattern is selected, it will play as you
record. You can play along to this pattern if you want, or you can mute the background pattern by setting the
metronome volume to "0." (See CHANGING PARAMETERS for more information.)
To stop recording, press RECORD again or START / STOP.
To play back your recording, press START / STOP while in Record Mode.
SETTINGS
E-Practice Pad will automatically save your current settings (beat and rhythm settings, metronome sound,
tempo values, etc.). To return E-Practice Pad to its original factory settings, press and hold both VALUE +
and VALUE – buttons while turning it on. All previous settings will return to their original state.
7
INTRODUCCIÓN
¡Bienvenido a E-Practice Pad de Alesis! Esta batería digital es una
manera muy divertida de aprender y practicar batería. Incluye 65 sonidos
de batería y 60 temas y ejercicios, todos diseñados para convertirle en un
baterista mejor. La sensación es perfecta y le brinda una gama completa
de dinámica desde los toques más ligeros a los acentos más intensos. He
aquí algunas de las características de E-Practice Pad que usted disfrutará
sin duda:
y
Pad electrónico para práctica de batería con metrónomo y ejercicios
de aprendizaje
y
y
y
y
y
y
y
y
65 sonidos de batería diferentes
y
Expandible con pedales opcionales de bombo y hi-hat
CONTENIDO DE LA
CAJA
E-Practice Pad
Adaptador de alimentación
Guía de inicio rápido
Folleto de instrucciones de
seguridad e información
sobre la garantía
Metrónomo con seis sonidos, firmas y subdivisiones de tiempo ajustables
60 juegos y ejercicios de práctica
Sensación y ejecución natural con rango dinámico completo
Jack para auriculares para practicar en silencio o salida para amplificador para tocar con otros músicos
Para montar en un soporte de snare o platillos de 8 mm estándar
Grabación y reproducción para escuchar su interpretación
Funciona con baterías para usar como equipo portátil o en el tomacorriente de pared con el adaptador
incluido
Consulte este manual para aprovechar plenamente las muchas funciones de E-Practice Pad y divertirse
mientras toca.
Atentamente,
La Gente de Alesis
DIAGRAMA DE CONEXIÓN
Pedal de kick (bombo)*
(interruptor de pedal,
1/4” mono)
Alimentación
(o 4 baterías
AA, no
incluidas)
Pedal de control
de Hi-Hat *
(interruptor de
pedal; 1/4”
estéreo, opcional)
Pad de platillo Hi-Hat *
(1/4” mono,
opcional)
Auriculares o monitores
(1/4” estéreo)
ADVERTENCIA:
Colóquese
los
auriculares o encienda sus monitores sólo
DESPUÉS de encender el E-Practice Pad.
Soporte de platillos (montaje
roscado de 8 mm estándar,
opcional)
* Para comprar estos accesorios, visite alesis.com.
8
CARACTERÍSTICAS DEL PANEL SUPERIOR
1.
VOLUMEN – Ajusta el nivel de volumen.
2.
ARRANQUE / PARADA – Arranca o detiene el metrónomo.
3.
GRABAR – Activa el modo de grabación.
4.
METRO – Pulse este botón para seleccionar los valores del metrónomo o cambiar el sonido del pad.
5.
TEMPO / TAP – Pulse este botón para activar el modo de tempo y use entonces los botones VALUE
+/- para ajustarlo. También puede pulsar y retener este botón tres segundos y golpee el PAD (cuatro
veces) de acuerdo al beat del nuevo tiempo que desea introducir.
6.
INDICADOR DE BEAT – Estos LED destellan en sincronismo con las negras del patrón que se toca.
El LED rojo destella en el downbeat de cada barra.
7.
LCD – Muestra los parámetros y otras operaciones actuales.
8.
VALOR +/- – Disminuye o aumenta el valor de cada parámetro.
9.
ENTRENAMIENTO – Activa el modo de entrenamiento.
10.
JUEGO / TEMPORIZADOR – Activa el modo de juego cuando se pulsa. Mantenga pulsado este
botón para activar el modo de temporizador.
11.
PAD – Golpee este pad de una sola zona con una baqueta.
12.
ALTAVOZ DEL METRÓNOMO – Este altavoz reproduce el sonido del metrónomo únicamente a
menos que se hayan conectado los auriculares al panel trasero.
CARACTERÍSTICAS DEL PANEL TRASERO
1.
AURICULARES –
auriculares de 1/4".
Conecte
aquí
un
juego
de
2.
ENTRADA DE HI-HAT – Conecte aquí un pad de
disparo de platillo hi-hat opcional con una cable mono
de 1/4" para usarlo como mono disparo de hi-hat
mientras toca.
3.
ENTRADA DE CONTROL DE HI-HAT – Si conectó un
pad de disparo de hi-hat a la ENTRADA DE the HI-HAT, conecte a esta entrada un interruptor de pedal
opcional con un cable estéreo de 1/4" para usar los sonidos “abierto” y “cerrado” del hi-hat.
4.
ENTRADA DE PEDAL DE KICK (BOMBO) – Conecte aquí un interruptor de pedal opcinoal con un
cable mono de 1/4" para usar como disparo de bombo cuando toca.
CARACTERÍSTICAS DEL PANEL LATERAL
1.
ENTRADA DE CC – Conecte aquí el adaptador de
alimentación incluido y conecte luego el adaptador al
tomacorriente de pared.
2.
INTERRUPTOR DE ENCENDIDO – Enciende y apaga el EPractice Pad.
9
CARACTERÍSTICAS DE LA PANTALLA LCD
1.
CONTEO DE BEAT – Muestra el conteo del beat actual (1-9).
2.
TIPO DE BEAT – Muestra el número de beats que cuenta el metrónomo.
3.
COMPROBACIÓN DEL BEAT – Cuando toca un patrón, cuanto más cerca del centro están las
flechas encendidas, más exacta es su temporización. Cuando se enciende "GOOD", significa que la
temporización de sus golpes es exacta.
4.
INDICADOR DE MODO – Muestra el modo seleccionado en ese momento: Tempo, Grabar, Puntaje,
Temporizador o Juego.
5.
ICONO DE JUEGO OK – En modo de juego ("GAME2"), aparece "OK" cuando su puntaje es mayor
que 60, lo que indica que el patrón cambiará a otro de mayor dificultad.
6.
PANTALLA DE PARÁMETROS – Muestra los valores actuales de los parámetros (tempo, puntaje,
etc.).
7.
AGUJA DEL METRÓNOMO – Se mueve a izquierda y derecha en sincronismo con el tempo actual.
Durante el ejercicio "Balance", esta área se transforma en un instrumento que mide la fuerza de cada
golpe dado al pad. Durante el ejercicio "Count", esta área se transforma en un instrumento que mide
el tiempo remanente o la cantidad de golpes remanentes.
8.
PANTALLA DE NOTAS DEL JUEGO – En modo de juego, las barras horizontales de los bordes
izquierdos y derechos de la LCD le indican que golpee el pad.
9.
INDICADOR DE RITMO – Muestra la figura rítmica actual.
10.
ICONOS DE DISPARO – Indican los disparos disponibles que usted puede usar mientras toca y
cuando se golpean. Se muestra siempre el icono de un snare drum (que representa el pad). Si
conecta un disparo de hi-hat o bombo, se muestran estos iconos.
11.
ICONO DE TAP – Se muestra después de que se mantiene pulsado el botón TEMPO / TAP tres
segundos. Golpee el pad cuatro veces al tempo que desea introducir.
12.
NIVEL DE BATERÍA – Indica la vida remanente de la batería del E-Practice Pad.
10
INTRODUCTION
Voici le E-Practice Pad de Alesis. Cette batterie numérique permet
d’apprendre à jouer de la batterie et à pratiquer tout en s’amusant. Elle est
dotée de 65 sonorités de batterie et de 60 chansons et exercices, afin de faire
de vous un meilleur batteur. Elle offre une grande plage dynamique, du touché
le plus léger aux accents les plus forts. Voyez ci-dessous quelques-unes des
caractéristiques que vous apprécierez du E-Practice Pad :
y
Pad de batterie électronique de pratique avec métronome et exercices
d’apprentissages
y
y
y
y
y
65 sonorités de batterie différentes
y
y
y
y
Se monte sur support standard pour cymbale ou caisse claire de 8 mm
CONTENU DE LA BOÎTE
E-Practice Pad
Câble d'alimentation
Guide d’utilisation
simplifié
Consignes de sécurité
et informations
concernant la garantie
Métronome doté de six sonorités, signatures et subdivisions temporelles
60 jeux et exercices d’apprentissages
Toucher naturel et plage de performance dynamique étendue
Entrée casque d’écoute pour une pratique silencieuse ou sortie d’amplification permettant de jouer
avec d'autres musiciens
Enregistrement et lecture de vos prestations
Peut être alimenté par bloc d'alimentation (inclus) ou par piles pour plus de mobilité
Expansible avec pédales optionnelles pour grosse caisse et charleston pad
Veuillez consulter ce guide afin de profiter pleinement des nombreuses caractéristiques qu’offre le E-Practice
Pad, et amusez-vous bien!
Cordialement,
L’équipe de chez Alesis
SCHÉMA DE CONNEXION
Pédale pour
grosse caisse*
(pédale; ¼ po mono)
Alimentation
(ou 4 piles de
format AA;
non incluses)
Pédale pour cymbale
charleston* (pédale;
¼ po stéréo, optionnelle)
Pad pour cymbale
charleston* (¼ po
mono, optionnel)
Casque d’écoute ou
moniteurs
(¼ po stéréo)
MISE EN GARDE : Ne mettre votre
casque d’écoute ou vos moniteurs sous
tension QU’APRÈS avoir mis le E-Practice
Pad sous tension.
Support pour cymbale
(standard fileté de 8 mm; optionnel)
* Visitez alesis.com pour vous procurer ces accessoires.
11
CARACTÉRISTIQUES DU PANNEAU SUPÉRIEUR
1.
VOLUME – Touche permettant d'ajuster le niveau du volume.
2.
START / STOP – Touche permettant d'activer ou de désactiver le métronome.
3.
RECORD – Touche permettant de lancer le mode enregistrement.
4.
METRO – Touche permettant de sélectionner les paramètres du métronome ou de modifier la sonorité
du pad.
5.
TEMPO / TAP – Touche permettant d’entrer en mode Tempo, puis à l’aide des touches VALUE +/-,
ajuster le tempo. Vous pouvez également maintenir cette touche enfoncée pendant trois secondes et
frappez le PAD (quatre fois) au rythme du nouveau tempo que vous désirez entrer.
6.
INDICATEURS RYTHMIQUE – Ces DEL clignotent au rythme des noires du motif rythmique en cours.
La DEL rouge clignote sur le premier battement de chaque mesure.
7.
ACL – Affiche la valeur des paramètres et les opérations en cours.
8.
VALUE +/- – Touche permettant d’augmenter ou de diminuer la valeur de chaque paramètre.
9.
TRAINING – Touche permettant d’entrer en mode d’entraînement.
10.
GAME / TIMER – Touche permettant d’entrer en mode jeux. Maintenez la touche enfoncée pour entrer
en mode minuterie (Timer).
11.
PAD - Frappez ce pad à zone unique à l’aide d’une baguette.
12.
HAUT-PARLEUR DU MÉTRONOME – Ce haut-parleur fait jouer le son provenant du métronome
uniquement, sauf si un casque d’écoute est branché au panneau arrière.
CARACTÉRISTIQUES DU PANNEAU ARRIÈRE
1.
PHONES – Sortie permettant de brancher un casque
d’écoute ¼ po.
2.
ENTRÉE HI-HAT – Entrée permettant de brancher un pad
de cymbale charleston optionnel à l’aide d'un câble mono
¼ po.
3.
ENTRÉE HI-HAT CONTROL – Si vous avez branché un
pad de cymbale charleston à l’entrée HI-HAT, branchez une pédale optionnelle ici à l’aide d’un câble
stéréo ¼ po afin de pouvoir utiliser les deux sonorités de la cymbale (ouverte/fermée).
4.
ENTRÉE KICK – Entrée permettant de brancher une pédale optionnelle à l’aide d'un câble mono ¼ po
afin de l’utiliser comme déclencheur pour grosse caisse.
CARACTÉRISTIQUES DU PANNEAU LATÉRAL
1.
ENTRÉE c.c. – Branchez le câble d'alimentation inclus à
cette entrée, puis branchez l’extrémité à une prise de
courant.
2.
POWER - Commutateur permettant de mettre le EPractice Pad sous et hors tension.
12
CARATÉRISTIQUES DE L’AFFICHEUR ACL
1.
NOMBRE DE BATTEMENTS – Affiche le nombre de battements du rythme en cours (1 à 9).
2.
TYPE DE RYTHME – Affiche le nombre de battements que le métronome compte.
3.
VÉRIFICATION RYTHMIQUE – Lorsque vous vous accompagnez d’un motif rythmique, plus les
flèches du centre sont allumées, plus votre rythme est précis. Lorsque « GOOD » s’affiche, c'est que
votre frappe suit le rythme.
4.
INDICATEUR DE MODE – Affiche le mode en cours : Tempo, Record, Score, Timer ou Game.
5.
ICÔNE GAME OK – En mode jeux (GAME2), l’icône « OK » s’affiche lorsque votre score atteint plus
de 60, indiquant que le motif rythmique passera à un niveau de difficulté supérieur.
6.
AFFICHAGE DES PARAMÈTRES – Affiche la valeur des paramètres en cours (tempo, score, etc.).
7.
AIGUILLE DU MÉTRONOME – Se déplace de gauche à droite au rythme du tempo. Durant l’exercice
« Balance », cette zone devient un vumètre, mesurant la force de frappe sur le pad. Durant l’exercice
« Count », cette zone devient un vumètre, indiquant le temps restant ou le nombre de frappes
restantes.
8.
AFFICHAGE JEUX – En mode jeux, les barres horizontales à gauche et à droite de l'écran vous
invitent à frapper le pad.
9.
INDICATEUR RYTHMIQUE – Affiche le motif rythmique en cours.
10.
ICÔNES DES CAPTEURS – Indique les capteurs de déclenchement disponibles et lorsqu’ils sont
frappés. L’icône d'une caisse claire (représentant le pad) sera toujours affichée. Si vous avez branché
une cymbale charleston ou une grosse caisse, ces icônes seront affichées.
11.
ICÔNE TAP – S'affiche lorsque la touche TEMPO / TAP est maintenue enfoncée pendant trois
secondes. Frappez le pad quatre fois au rythme du nouveau tempo que vous désirez entrer.
12.
NIVEAU DE CHARGE DE LA PILE – Indique le niveau de charge de la pile du E-Practice Pad.
13
INTRODUZIONE
Benvenuti all’E-Practice Pad di Alesis! Questa batteria digitale è un modo
divertente di imparare a suonare la batteria ed esercitarsi. Comprende 65
suoni di batteria e 60 canzoni ed eserciti, tutti concepiti per rendervi un
batterista migliore! Dona fantastiche sensazioni e offre una gamma completa
di dinamiche, dai tasti più leggeri agli accenti più sonori. Ecco alcune funzioni
che imparerete ad amare dell’E-Practice Pad:
y
Pad di pratica per batteria elettronica con metronomo ed esercizi di
apprendimento
y
y
y
y
y
y
y
y
65 suoni diversi di batteria
y
Espansibile con pedali opzionali per grancassa e hi-hat pad de batterie
CONTENUTI DELLA
CONFEZIONE
E-Practice Pad
Adattatore di
alimentazione
Guida rapida
Istruzioni di sicurezza e
garanzia
Metronomo con sei suoni, segnature di tempo e suddivisioni regolabili
60 giochi ed esercizi per fare pratica
Sensazioni e prestazioni naturali con una gamma dinamica completa
Jack cuffie per fare esercizio in silenzio o uscita amplificatori per suonare con altri musicisti
Montabile su un supporto standard da 8mm per piatti o snare
Registrazione e riproduzione per l'ascolto mentre si suona
Il funzionamento a batterie garantisce la portatilità, ma può anche essere alimentato a parete grazie
all'adattatore in dotazione
Fate riferimento al presente manuale per godere appieno delle numerose funzioni di E-Practice Pad e
divertitevi a suonare!
Cordialmente,
Il team Alesis
SCHEMA DEI COLLEGAMENTI
Pedale grancassa *
(interruttore a pedale;
1/4” mono)
Alimentazione (o
4 batterie AA; non
in dotazione)
Pad piatto Hi-Hat *
(1/4” mono;
opzionale)
Pedale di controllo Hi-Hat *
(interruttore a pedale; 1/4”
stereo; opzionale)
Cuffie o Monitor
(1/4” stereo)
AVVERTENZA: inserire le cuffie o
accendere i monitor DOPO aver acceso
l’E-Practice Pad.
Supporto piatti (montaggio
standard da 8mm filettato;
opzionale)
* Per acquistare questi accessori, visitare la pagina alesis.com.
14
CARATTERISTICHE PANNELLO SUPERIORE
1.
VOLUME – Regola il livello del volume.
2.
START / STOP – Lancia o interrompe il metronomo.
3.
RECORD – Entra in modalità di registrazione.
4.
METRO – Premere questo tasto per selezionare le impostazioni del metronomo o modificare il suono
del pad.
5.
TEMPO / TAP – Premere questo tasto per entrare in modalità Tempo, quindi servirsi dei tasti VALUE
+/- per regolare il tempo. Si può inoltre tenere premuto questo tasto per tre secondi e battere il PAD
(quattro volte) al ritmo del nuovo tempo che si desidera immettere.
6.
INDICATORE DEL BEAT – Questi LED lampeggiano a tempo con le semicrome del pattern che si sta
suonando. Il LED rosso lampeggia sull’attacco di ciascuna battuta.
7.
LCD – Mostra a display i parametri correnti e altre operazioni.
8.
VALUE +/- (valore +/-) – Diminuisce o aumenta il valore di ciascun parametro.
9.
TRAINING – Entra in modalità di addestramento.
10.
GAME / TIMER – Quando premuto, entra in modalità di gioco. Tenere premuto questo tasto per
entrare in modalità Timer.
11.
PAD – Battere questo pad a zona singola con una bacchetta.
12.
CASSA DEL METRONOMO – Questa cassa riproduce il suono del solo metronomo, a meno che le
cuffie non siano collegate a livello del pannello posteriore.
CARATTERISTICHE PANNELLO POSTERIORE
1.
CUFFIE – Collegare a questo ingresso cuffie da 1/4".
2.
INGRESSO HI-HAT – Collegare un pad trigger opzionale
per piatto hi-hat a questo livello, servendosi di un cavo
mono da 1/4" per utilizzarlo come trigger hi-hat mentre si
suona.
3.
INGRESSO DI CONTROLLO HI-HAT – Se è stato
collegato un pad trigger hi-hat all’INGRESSO HI-HAT, collegare un interruttore a pedale opzionale a
questo livello servendosi di un cavo stereo da 1/4" per servirsi di suoni hi-hat sia "aperti" che "chiusi".
4.
INGRESSO PEDALE KICK – Collegare un interruttore a pedale opzionale a questo livello servendosi
di un cavo mono da 1/4" da utilizzare come trigger di grancassa mentre si suona.
CARATTERISTICHE PANNELLO LATERALE
1.
INGRESSO CC – Collegare l’adattatore di alimentazione
in dotazione a questo livello, quindi collegarlo ad una
presa elettrica a parete.
2.
INTERRUTTORE DI ALIMENTAZIONE
Accende e spegne l’E-Practice Pad.
(POWER)
15
–
CARATTERISTICHE LCD
1.
BEAT COUNT (contabattiti) – Mostra a display il conteggio del beat corrente (1-9).
2.
BEAT TYPE (tipo di beat) – Mostra a display il numero di battiti che verrà contato dal metronomo.
3.
BEAT CHECK (verifica del beat) – Quando si suona a tempo con un pattern, più le frecce accese
sono vicine al centro, più il tempo è preciso. Quando "GOOD" (bene) è acceso, il tempismo dei battiti è
preciso.
4.
INDICATORE di MODALITÀ – Mostra a display la modalità selezionata attualmente: Tempo, Record,
Score, Timer, o Game.
5.
ICONA GAME OK – In modalità di gioco ("GAME2"), "OK" apparirà quando il punteggio ottenuto è
superiore a 60, a indicare che il pattern passerà ad uno di maggiore difficoltà.
6.
DISPLAY PARAMETRI – Mostra a display i valori del parametro corrente (tempo, punteggio, ecc.).
7.
AGO DEL METRONOMO – Oscilla a sinistra e a destra a tempo con il tempo attuale. Durante
l’esercizio di "Equilibrio" (Balance), questa area diventa un misuratore, che misura la forza di ciascun
battito del pad. Durante l’esercizio di “Conteggio ("Count"), quest’area diventa un misuratore che indica
il tempo rimanente o il numero di hit rimanenti.
8.
VISUALIZZAZIONE NOTE del GIOCO – In modalità di gioco, barre orizzontali ai margini sinistro e
destro dell’LCD vi indicherà di battere il pad.
9.
INDICATORE del RITMO – Mostra a display la cifra ritmica corrente.
10.
ICONE TRIGGER – Indicano i trigger disponibili che si possono utilizzare quando si suona e quando
vengono battuti. Un’icona rullante (che rappresenta i pad) sarà sempre mostrato. Se è stato collegato
un trigger hi-hat o grancassa, queste icone appariranno a display.
11.
ICONA TAP – Appare a display dopo che il tasto TEMPO / TAP è stato tenuto premuto per tre secondi.
Battere il pad quattro volte al tempo che si desidera inserire.
12.
LIVELLO BATTERIA – Indica la durata rimanente della batteria dell’E-Practice Pad.
16
EINFÜHRUNG
Willkommen beim Alesis E-Practice Pad! Dieses digitale Schlagzeug ist eine
unterhaltsame Art und Weise das Schlagzeugspiel zu erlernen und zu üben.
Es sind 65 Drum-Sounds, 60 Songs und Übungen inkludiert, die alle darauf
ausgerichtet sind, Ihr Spiel zu verbessern. Es macht Spass und gibt Ihnen die
ganze Dynamik-Spanne von der leichtesten Berührung bis hin zum lautesten
Akzent. Hier sind einige Features des E-Practice Pads, die Ihnen gefallen
werden:
y
y
y
y
y
y
Elektronisches Übungsdrumpad mit Metronom und Lernübungen
y
y
y
y
Montage auf normale 8 mm Becken- oder Snareständer möglich
SCHACHTELINHALT
E-Practice Pad
Stromadapter
Schnellstartanleitug
Sicherheitshinweise &
Garantie-Booklet
65 verschiedene Drumsounds
Metronom mit 6 Sounds
60 Übungsspiele und -lektionen
Natürliches Spielgefühl und Performance über den gesamten Anschlagbereich
Kopfhörerausgang ermöglicht lautloses Üben oder Verstärkerbuchse zum Spielen mit anderen
Musikern
Aufnahme- und Wiedergabefunktion zum Überprüfen das eigenen Spiels
Batterie- oder Netzteilbetrieb (Netzteil im Lieferumfang enthalten)
Erweiterbar mit optionalen Bassdrum- und HiHat Pedalen
Bitte sehen Sie in dieser Anleitung nach, um von den zahlreichen Vorteilen des E-Practice Pads zu
profitieren. Viel Spass beim Spielen!
Mit besten Grüßen,
Ihr Alesis-Team
ANSCHLUSSPLAN
Kick Drum Pedal *
(Fußtaster;
6.3 mm Mono)
Hi-Hat Control Pedal *
(Fußtaster; 6.3 mm
Stereo; Optional)
Netzstrom
(Oder 4 AA
Batterien;
nicht
inkludiert)
Hi-Hat Becken Pad *
(6.3 mm Mono;
Optional)
Kopfhörer
oder Monitore
(6.3 mm Stereo)
ACHTUNG: Schalten Sie ZUERST das EPractice Pad ein, und setzen Sie erst dann
Ihre Kopfhörer auf oder drehen die
Monitore auf.
Beckenständer (Standard 8mm
Gewindefassung; Optional)
* Besuchen Sie alesis.com, um dieses Zubehör zu kaufen.
17
FEATURES DER OBEREN KONSOLE
1.
VOLUME – Adjustiert die Lautstärke.
2.
START / STOP – Startet oder stoppt das Metronom.
3.
RECORD – Aktiviert den Aufnahmemodus.
4.
METRO – Drücken Sie diesen Button, um die Metronom-Einstellungen auzuwählen oder den PadSound zu ändern.
5.
TEMPO / TAP – Drücken Sie diesen Button, um den Tempo-Modus zu aktivieren. Verwenden Sie dann
die VALUE +/- Buttons, um das Tempo zu adjustieren. Sie können diesen Button auch drei Sekunden
lang gedrückt halten, und ihn dann (vier Mal) im gewünschten PAD schlagen.
6.
BEAT INDICATOR – Diese LEDs blinken im Takt der Viertelnoten des gespielten Patterns. Die rote
LED leuchtet bei jedem Taktanfang kurz auf.
7.
LCD – Zeigt die aktuellen Parameter und andere Abläufe an.
8.
VALUE +/- – Vermindert oder erhöht den Wert des entsprechenden Parameters.
9.
TRAINING – Aktiviert den Trainingsmodus.
10.
GAME / TIMER – Drücken Sie diesen Button, um den Game-Modus zu aktivieren. Halten Sie diesen
Button gedrückt, um den Timer-Modus zu aktivieren.
11.
PAD – Schlagen Sie dieses Einzel-Zonen-Pad mit einem Drumstick.
12.
METRONOME SPEAKER – Aus diesem Lautsprecher ertönt das Metronom, es sei denn, es sind an
der Rückseite Kopfhörer angeschlossen.
FEATURES AN DER KONSOLENRÜCKSEITE
1.
HEADPHONES – Schließen Sie einen Satz 6.3 mm
Kopfhörer an diese Buchse an.
2.
HI-HAT INPUT – Schließen Sie hier ein optionales Hi-Hat
Becken-Trigger-Pad mit einem 6.3 mm Monokabel an, um
dies beim Spiel als Hi-Hat-Trigger zu verwenden.
3.
HI-HAT CONTROL INPUT – Falls Sie ein Hi-Hat TriggerPad an den HI-HAT INPUT angeschlossen haben, schließen Sie hier einen optionalen Fußtaster mit
einem 6.3 mm Stereokabel in dieser Buchse an, um sowohl “offene” als auch “geschlossene” Hi-HatSounds zu verwenden.
4.
KICK PEDAL INPUT – Schließen Sie hier einen optionalen Fußtaster mit einem 6.3 mm Monokabel
an, um dies beim Spiel als Bass-Drum-Trigger zu verwenden.
FEATURES DER KONSOLENSEITE
1.
DC INPUT – Schließen Sie den inkludierten
Stromadapter hier an, und verbinden ihn dann mit dem
Netzstrom.
2.
POWER SWITCH – Schaltet das E-Practice Pad ein und
aus.
18
FEATURES DER LCD-ANZEIGE
1.
BEAT COUNT – Zeigt den Zählerstand des aktuellen Beat (1-9) an.
2.
BEAT TYPE – Zeigt die Anzahl der Beats an, die das Metronom zählen wird.
3.
BEAT CHECK – Wenn Sie mit einem Pattern mitspielen: Je mehr sich die aufleuchtenden Pfeile der
Mitte nähern, desto genauer ist Ihr Timing. Wenn “GOOD” aufleuchtet, spielen Sie genau im Takt.
4.
MODE INDICATOR – Zeigt den aktuell angewählten Modus an: Tempo, Aufnahme, Punktestand,
Timer oder Game.
5.
GAME OK ICON – Wenn Ihre Punktezahl im Game-Modus ("GAME2") größer als 60 ist, erscheinen
die Buchstaben "OK", was darauf hinweist, dass das Pattern auf ein schwierigeres Pattern wechselt.
6.
PARAMETER DISPLAY – Zeigt die aktuellen Parameterwerte an (Tempo, Punktestand etc.).
7.
METRONOME NEEDLE – Schwenkt im aktuellen Tempo von links nach rechts. Bei der
“Balanceübung” verwandelt sich dieser Bereich in einen VU-Messer, welcher die Kraft jedes einzelnen
Schlags auf das Pad misst. Bei der “Zählübung” verwandelt sich dieser Bereich in einen Zähler, der die
verbleibende Zeit oder die Anzahl der verbleibenden Schläge anzeigt.
8.
GAME NOTE DISPLAY – Im Game-Modus fordern Sie horizontale Balken in den linken und rechten
Ecken der LCD-Anzeige auf, auf das Pad zu schlagen.
9.
RHYTHM INDICATOR – Zeigt die aktuelle rhytmische Figur an.
10.
TRIGGER ICONS – Zeigen die verfügbaren Trigger an, die Sie beim Spiel verwenden können sowie
den Zeitpunkt zu dem sie geschlagen werden. Das Snare-Drum-Symbol (welches das Pad darstellt) ist
permanent zu sehen. Falls Sie einen Hi-Hat oder Kick-Drum-Trigger angeschlossen haben, werden
diese Symbole aufscheinen.
11.
TAP ICON – Wird angezeigt, nachdem Sie den TEMPO / TAP Button drei Sekunden lang gedrückt
halten. Schlagen Sie vier Mal im Tempo, das Sie einstellen möchten, auf das Pad.
12.
BATTERY LEVEL – Zeigt die verbleibende Lebensdauer der Batterie des E-Practice Pad an.
19
PAD SOUNDS
01:
02:
03:
04:
05:
06:
07:
08:
09:
10:
11:
12:
13:
14:
15:
16:
17:
18:
19:
20:
21:
22:
Standard Snare
Standard Snare Rim
Rock Snare
Rock Snare Rim
Room Snare
Room Snare Rim
Jazz Snare
Jazz Snare Rim
Funk Snare
Funk Snare Rim
Hip-Hop Snare
Hip-Hop Snare Rim
Electronic Snare 1
Electronic Snare 2
Electronic Snare 3
Electronic Snare 4
Electronic Snare 5
Electronic Snare 6
Electronic Snare 7
Electronic Snare 8
Electronic Snare 9
Electronic Snare 10
23:
24:
25:
26:
27:
28:
29:
30:
31:
32:
33:
34:
35:
36:
37:
38:
39:
40:
41:
42:
43:
44:
Standard Kick
Rock Kick
Room Kick
Jazz Kick
Funk Kick
Hip-Hop Kick
Electronic Kick 1
Electronic Kick 2
Electronic Kick 3
Electronic Kick 4
Standard Tom 1
Standard Tom 2
Standard Tom 3
Standard Tom 4
Standard Tom 5
Standard Tom 6
Electronic Tom 1
Electronic Tom 2
Electronic Tom 3
Electronic Tom 4
Electronic Tom 5
Electronic Tom 6
45:
46:
47:
48:
49:
50:
51:
52:
53:
54:
55:
56:
57:
58:
59:
60:
61:
62:
63:
64:
65:
Standard Hi-Hat Closed
Standard Hi-Hat Pedal
Standard Hi-Hat Open
Rock Hi-Hat Closed
Rock Hi-Hat Pedal
Rock Hi-Hat Open
Standard Hi-Hat Closed/Open
Rock Hi-Hat Closed/Open
Jazz Hi-Hat Closed/Open
Standard Crash
Rock Crash
Standard Ride
Rock Ride
Metronome 1
Metronome 2
Claves 1
Claves 2
Sticks 1
Sticks 2
Cowbell 1
Cowbell 2
GAME MODE SONGS
EASY
#
NAME
TIME SIGNATURE (BEAT)
STYLE
1
2
3
4
5
Country – Easy
Country – Hard
6/8 Ballad – Easy
6/8 Ballad – Hard
8-Beat Ballad – Easy
4/4
4/4
6/8
6/8
4/4
Country
Country
Ballad
Ballad
Ballad
6
7
8
9
10
8-Beat Ballad – Hard
Pop Bossa – Easy
Pop Bossa – Hard
Funk 1 – Easy
Funk 1 – Hard
4/4
4/4
4/4
4/4
4/4
Ballad
Latin
Latin
Funk
Funk
11
12
13
14
15
8-Beat Pop – Easy
8-Beat Pop – Hard
Ballad – Easy
Ballad – Hard
Blues 1 – Easy
4/4
4/4
4/4
4/4
4/4
Pop
Pop
Ballad
Ballad
Blues
16
17
18
19
20
Blues 2 – Hard
Bossa – Easy
Bossa – Hard
Dance 1 – Easy
Dance 2 – Hard
4/4
4/4
4/4
4/4
4/4
Blues
Latin
Latin
Dance
Dance
20
MEDIUM
#
NAME
TIME SIGNATURE (BEAT)
STYLE
21
22
23
24
25
Big Band – Easy
Big Band – Hard
Dance 2 – Easy
Dance 2 – Hard
Funk 2 – Easy
4/4
4/4
4/4
4/4
4/4
Jazz
Jazz
Dance
Dance
Funk
26
27
28
29
30
Funk 2 – Hard
Funk 3 – Easy
Funk 3 – Easy
Fusion – Easy
Fusion – Hard
4/4
4/4
4/4
4/4
4/4
Funk
Funk
Funk
Fusion
Fusion
31
32
33
34
35
Jazz 1 – Easy
Jazz 1 – Hard
Jazz 2 – Easy
Jazz 2 – Hard
March 1 – Easy
4/4
4/4
4/4
4/4
4/4
Jazz
Jazz
Jazz
Jazz
March
36
37
38
39
40
March 1 – Hard
Reggae – Easy
Reggae – Hard
Latin Jazz – Easy
Latin Jazz – Hard
4/4
4/4
4/4
4/4
4/4
March
Reggae
Reggae
Latin
Latin
TIME SIGNATURE (BEAT)
STYLE
HARD
#
NAME
41
42
43
44
45
March 2 – Easy
March 2 – Hard
Rock Shuffle – Easy
Rock Shuffle – Hard
Metal – Easy
4/4
4/4
4/4
4/4
4/4
March
March
Rock
Rock
Rock
46
47
48
49
Metal – Hard
Pop – Easy
Pop – Hard
R&B – Easy
4/4
4/4
4/4
4/4
Rock
Pop
Pop
R&B
50
51
52
53
54
55
R&B – Hard
Rock 1 – Easy
Rock 1 – Hard
Rock 2 – Easy
Rock 2 – Hard
Samba – Easy
4/4
4/4
4/4
4/4
4/4
4/4
R&B
Rock
Rock
Rock
Rock
Latin
56
57
58
59
60
Samba – Hard
Shuffle – Easy
Shuffle – Hard
Swing – Easy
Swing – Hard
4/4
4/4
4/4
4/4
4/4
Latin
Fusion
Fusion
Jazz
Jazz
21
www.alesis.com
7-51-0282-B