1
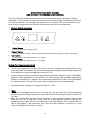
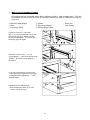
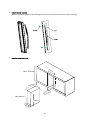
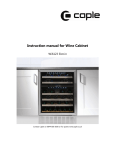
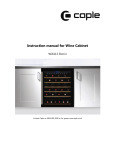
Instruction manual for Slot-in Wine cabinet
Model code: Wi153
Contact Caple on 0844 800 3830 or for spare parts www.4caple.co.uk
1
Thank you for buying your new Caple Wine Cabinet. To ensure that you get the best results from
your new purchase, we strongly suggest that you read this instruction manual thoroughly before use.
This manual contains installation advice, usage instructions and other important facts about your
CAPLE Wine Cabinet. If treated with care your CAPLE Wine Cabinet should give you many years of
trouble free use.
IMPORTANT WARNINGS AND ADVICE
•
Unpack your wine cabinet carefully and remove all of the protective packing from inside
and outside.
•
Packing (plastic bags, polystyrene, nails, metal, etc.) must not be left within the reach of
children as they are a potential source of danger.
•
After unpacking, make sure that the appliance is in perfect order. If you have any doubt,
do not use it and contact your retailer.
•
Check that all the fittings are in the correct position on the inside of the cabinet.
•
Release the mains lead which is fitted with a 13 amp UK type plug.
•
Move your wine cabinet to its final location.
•
DO NOT MOVE YOUR CABINET WHILE LOADED WITH WINE as this could distort the
cabinet.
•
Ensure that the specified ventilation instructions are adhered to.
• Do not try to modify the appliance's technical characteristics as this could be dangerous.
•
This appliance is intended to be used exclusively for the storage of wine.It is not designed
for food storage.
• Do not clean or maintain the appliance without disconnecting it first.
•
To prevent damaging the door gasket, make sure that the door is fully open when
pulling shelves out.
•
Ensure that you fully understand these instructions before operating this
appliance.
Caple are NOT responsible for: 1. Damage caused by incorrect, mistaken or irrational use.
•
2. Any errors in this manual, or for any damage linked to or following the provision,
performance or use of any wine cabinet.
•
The information in this document is subject to modification without prior notice.
DISPOSAL OF OLD APPLIANCE
Discarded appliances are potentially dangerous to CHILDREN.
Before you throw away your old Wine Cabinet:
• Remove the door. Leave the shelves in place so that children cannot easily climb inside.
• Never allow children to operate, play with, or climb inside the appliance.
2
INSTALLATION INSTRUCTIONS
BEFORE TURNING THE WINE CABINET ON ENSURE IT IS PERFECTLY LEVEL. This will minimise
any vibrations.
Your cabinet is equipped with 4 adjustable feet. However, we recommend that you tighten
the back feet to the maximum and then use the front feet to level the cabinet.
IMPORTANT: WAIT 12 HOURS BEFORE TURNING THE WINE CABINET ON FOR THE FIRST TIME.
Safety Instructions
• A fan evacuates heat via the bottom vents.
• It must be installed well away from any heat source.
• It must not be placed in direct sun light.
• It must not be in a damp location (laundry, pantry, bathroom, etc)
• It must be perfectly level.
• It must have a correctly installed and reliable electricity supply correctly earthed.
• Use of a multi-socket or extension lead is not recommended.
• This wine cabinet must be earthed to provide protection in the event of an electrical
short circuit.
• It is fitted with a power cord having an earth wire terminating in a 13amp plug.
• Consult a qualified electrician or service engineer if the earthing instructions are not
completely understood.
WARNING: INCORRECT EARTHING CAN RESULT IN THE RISK OF ELECTRIC SHOCK.
3
OPERATING YOUR WINE CABINET
AND SETTING THE TEMPERATURE CONTROL
The wine cabinet should be placed where the ambient temperature is between 5-32 deg
centigrade. If the ambient temperature is above or below this range, the performance of the
unit may be affected. For example, placing your unit in extreme cold or hot conditions may
cause interior temperatures to fluctuate and may not reach the set temperature.
¾ Control System Instruction
•
•
•
•
“Light” Button
To control the interior light, on/off.
“Power” Button
To control this unit power, on/off. (Press and hold this button for approximately 3 seconds);
“Up” Button
To raise (warm) the temperature in 1 ºC stages.
“Down” Button
To lower (cool) the temperature in 1 ºC stages.
Setting The Temperature Controls
•
To set the temperature, Connect the power cord to a properly grounded outlet In the
event of power interruption, the previous temperature setting is automatically erased and
it will default to a preset temperature setting of 12°C
•
Set the desired cooling temperature by pressing the buttons adjacent to the “UP/DOWN"
program. Each depression of the buttons will scroll through the available temperature
setting in increments of 1 degree. The temperature selected will flash in the LED display
for approximately 5 seconds, then revert back to display the setting temperature.
•
The temperature setting can be adjusted from 5°C ~18°C
¾ Note
• If the unit is unplugged, power lost, or turned off, you must wait 3 to 5 minutes before
restarting the unit. If you attempt to restart before this time delay, the Wine cabinet will
not start.
• When you use the Wine cabinet for the first time or restart the Wine cabinet after having
been shut off for a long time, there could be a few degrees variance between the
temperature you select and the one indicated on the LED readout. This is normal and it is
due to the length of the activation time. Once the Wine cabinet is running for a few
hours everything will be back to normal.
4
¾
How to change the door opening
This appliance has reversible doors but is delivered with a right hinged door. The left
hand hinge kit comes with the unit (in the box), should you wish to reverse the hinge on
your unit.
① Bottom hinge (Right)
④ Door
⑦ Top hinge (Left)
② Screws
⑤ Top hinge (Right)
⑧ Bottom hinge (Left)
1.Remove 2 screws ②, then pull
door④ as per arrowhead direction, You
will remove the door. Please remove
bottom hinge(Right) ① as well for the
assembly. (Fig.A & Fig.B)
2.Remove 3 Lock screws⑥ of Top
hinge (Right) ⑤, then removeTop hinge
(Right)⑤ & Bottom hinge (Right)①;
(See fig.C)
3. Use the screws which you removed
From right side hinges to fix Top hinge
(Left)& bottom hinges(Left)⑦⑧ (See
Fig.D & Fig.E)
4. Rotate door at 180 degrees,
then assemble the door as per the
reverse way of removal.
5
③ Door axis
⑥ Lock screws
¾
Install the bar handle
Remove the door gasket on the drilling holes side to install the handle. (see below drawing)
¾
Installation dimensions
15
Min 870mm
47
m
m
5m
m
5m
8
4 r
o
in
M do
c
in
865 - 885mm
716mm
730mm
14
0m
5m
m
6
CARE AND MAINTENANCE
¾ Cleaning
• Turn off the power, unplug the appliance, and remove all items including shelves and
rack.
• Wash the inside surfaces with a warm water and baking soda solution. The solution
should be about two tablespoons of baking soda to one litre of water.
• Wash the shelves with a mild detergent solution.
• Wring excess water out of the sponge or cloth when cleaning the control panel, or any
electrical parts.
• Wash the outside cabinet with warm water and mild liquid detergent. Rinse well and
wipe dry with a clean soft cloth.
¾ Power Failure
• Most power failures are corrected within a few hours and should not affect the
temperature of your appliance if you minimise the number of times the door is opened. If
the power is going to be off for a longer period of time, you need to take action to
protect the contents.
¾ Vacation Time
• Short vacations: Leave the wine cabinet operating during vacations of less than three
weeks.
• Long vacations: If the wine cabinet will not be used for several months, remove all items
and disconnect. Clean and dry the interior thoroughly. To prevent odour and mould
growth, leave the door open slightly (blocking it open if necessary).
¾ Moving Your Wine Cabinet
• Remove all bottles.
• Securely tape down all shelves inside the cabinet.
• Turn the adjustable legs up to the base to avoid damage.
• Tape the door shut.
• Be sure the appliance stays secure and upright during transportation. Also protect the
outside of the wine cabinet. (e.g. with a blanket).
¾ Energy Saving Tips
The wine cabinet should be located in the coolest area of a room, away from heat producing
appliances, and out of the direct sunlight.
7
PROBLEMS WITH YOUR WINE CABINET?
You can solve many common Wine cabinet problems easily, saving you the cost of a possible
service call. Try the suggestions below to see if you can solve the problem before calling the
servicer.
TROUBLESHOOTING GUIDE
PROBLEM
Wine cabinet does not operate.
Wine cabinet is not cold enough.
Turns on and off frequently.
The light does not work.
Vibrations.
The Wine cabinet seems to make too
much noise.
The door will not close properly.
POSSIBLE CAUSE
Not plugged in.
The appliance is turned off.
The circuit breaker tripped or a blown
fuse.
Check the temperature control setting.
External environment may require a
higher setting.
The door is opened too often.
The door is not closed completely.
The door gasket does not seal properly.
The room temperature is hotter than
normal.
A large amount of contents has been
added to the Wine cabinet.
The door is opened too often.
The door is not closed completely.
The temperature control is not set
correctly.
The door gasket does not seal properly.
Not plugged in.
The circuit breaker tripped or a blown
fuse.
The bulb has burned out.
The light button is “OFF”.
Check to assure that the Wine cabinet is
level.
The rattling noise may come from the flow
of the refrigerant, which is normal.
As each cycle ends, you may hear gurgling
sounds caused by the flow of refrigerant
in your Wine cabinet.
Contraction and expansion of the inside
walls may cause popping and crackling
noises.
The Wine cabinet is not level.
The Wine cabinet is not level.
The door was reversed and not properly
installed.
The gasket is dirty.
The shelves are out of position.
8
DEFROSTING/CONDENSATION
Your wine cellar is designed with an “Auto-cycle” defrost system. When the RUN cycle is OFF, the
refrigerated surface of the wine cabinet (interior rear wall) defrosts automatically. The defrosted water
is channelled into a drain pan which is located at the back of the wine cabinet next to the compressor
from where it evaporates.
HUMIDITY MAINTENANCE SYSTEM
The wine cabinet is equipped with a system for maintaining the correct level of humidity. If humidity is
too low, insert the small plastic reservoir on to the top shelf. Fill this reservoir 3/4 full with water.
Check the water level occasionally and refill as necessary.
RECOMMENDED TEMPERATURE SETTINGS
12 oc to 14 oc
For storing ALL TYPES OF WINES
RECOMMENDED DRINKING TEMPERATURE
Dry White Semillon, Sauvignon Blanc
8 oc
Dry White Gewürztraminer, Riesling
10 oc
Dry White Chardonnay
10 oc
Vintage Chardonnay
14 oc
Sweet White Sauternes Monbazillac, Late Harvest ice wine
10 oc
14 oc
Sweet whites vintage Sauternes
13 oc
Beaujolais
16 oc
Red Pinot Noir
Vintage Pinot Noir red
18 oc
Red Cabernet, Merlot, French, Australian, New Zealand, Chilean,
Argentinean, Italian, Spanish, Californian
18 oc
Red Grenache, Syrah
16 oc
9