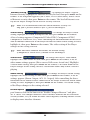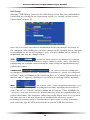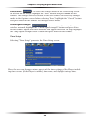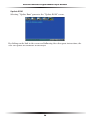
1
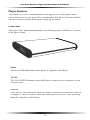
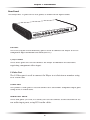
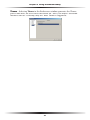
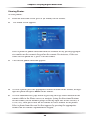
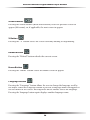
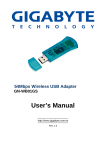
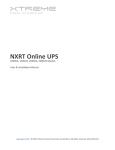
Wireless
Digital Media
Player
User Manual
Table of Contents
1 Introduction
1
Package Contents
Minimum System Requirements
Player Features
Technical Support
2 Setting Up the Player
Connecting the Player to a Television/Stereo
Installing the Actiontec Media Buddy
Setting up the Wireless Connection
Setting Up the Media Buddy
Redirecting the Media Buddy
3 Using the Media Buddy
Home
Menu
1
1
2
5
7
7
12
15
18
20
23
23
26
4 Playing Digital Media
Remote Control
Login Screen
Accessing Media Files
Actiontec Link
Options Bar
33
33
37
41
49
49
5 Troubleshooting
and Frequently Asked Questions
A Specifications
General
Wireless
Environmental
57
59
59
60
60
B Setting Up the Player via Ethernet
61
Connecting to a Wired Network
Connecting to a Single Computer
61
61
Notices
63
Regulatory Compliance Notices
Modifications
Limited Warranty
63
63
65
i
Actiontec Wireless Digital Media Player User Manual
ii
1
Introduction
Thank you for purchasing the Actiontec Digital Media Player. The Digtal Media
Player is the simplest way to connect your computer to your home entertainment
system, creating a central location to store all of your digital music, movies, and
photos. Using your television as a monitor, you can play all of your digital entertainment with just a few clicks of the Player’s Remote Control. You can even surf
the Web from the comfort of your couch. If you want to organize and instantly
access your digital movies, photos, and music, the Actiontec Digital Media Player is
the right product for you.
Package Contents
s
Actiontec Digital Media Player
s
Power Cord
s
RCA Cable
s
S-Video Cable
s
11 Mbps Wireless PC Card
s
Installation CD (includes User Manual)
s
Quick start guide
s
Remote control
Minimum System Requirements
s
Television with composite video input
s
Stereo or A/C receiver with RCA audio input
s
Computer equipped with 300 Mhz Pentium II or higher (700 Mhz or
higher for video playback), TCP/IP installed, and 60 Mb of hard drive space
available
s
Windows 98 Second Edition (SE), Millennium Edition (Me), 2000, or XP
1
Actiontec Wireless Digital Media Player User Manual
Player Features
The Player has a series of informational LEDs (lights) on its front panel, and a
variety of ports on its rear panel. It is recommended that the user become familiar
with these features before installing or setting up the Player.
Front Panel
There are 3 LEDs (light emitting diodes) on the front panel of the Player, as shown
in the figure, below.
WIR
ELE
SS
Power
10/100
ct
Link/A
Power
The Power LED illuminates when power is supplied to the Player.
LINK
LINK
10/100
The 10/100 LED illuminates when the Player is connected to a computer via an
Ethernet cable.
Link/Act
The Link/Act LED iluminates when the Player is connected via Ethernet cable to
a computer. The LED flickers when the connection is active (i.e., data is passing
from the computer to the Player).
2
Chapter 1 Introduction
Rear Panel
The Player has 12 ports on its rear panel, as shown in the figure below.
AUDIO
VIDEO
DVI
Pb
Y
OUT
OUT
Pr
o
S-Vide
COMP.
L
R
S/P DIF
AL
OPTIC
DVI Port
The DVI (Digital Visual Interface) port is used to connect the Player to a DVIcompatible high-definition television (HDTV).
Y, Pb, Pr Ports
These three ports are used to connect the Player to monitors or televisions
requirring component video input.
S-Video Port
The S-Video port is used to connect the Player to a television or monitor using
an S-Video cable
COMP Port
The yellow COMP port is used to connect to a television’s composite input port
using an RCA video cable.
Audio Out L and R
These two ports (L is red, R is white) are used to connect to the television or stereo audio input ports, using RCA audio cables.
3
Actiontec
Action
tec Wireless Digital Media Player User Manual
S/P Dif, Optical Ports
The S/P Dif (Sony/Philips Digital Interface) port is used to connect the Player to
a compatible S/P Dif audio receiver. The S/P Dif uses an RCA cable to connect,
while the Optical port uses an optical cable.
Ethernet Port
The Ethernet port is used to connect the Player to a computer or hub/router
using a crossover Ethernet cable. A crossover Ethernet cable must be used to
connect the Player to a computer. A standard, straight-through Ethernet cable
will not connect the Player to a computer.
Power Port
The Power port is used to connect the Player to a standard electrical outlet using
the included Power cord.
Side Panel
On the left side panel of the Player (when viewing from the front) includes a PC
Card slot, which is used to connect the wireless PC Card included with the Digital
Media Player kit. To install the card, see chapter 2, “Setting up the Player.”
4
Chapter 1 Introduction
Technical Support
Actiontec Electronics prides itself on making durable, high-quality, high-performance products. If you need assistance, the Actiontec Technical Support Department
is available all day every day to provide professional support.
Actiontec Electronics, Inc.
760 N. Mary Avenue
Sunnyvale, CA 94085
Technical Support
Phone: 1.888.436.0657
E-mail: http://support.actiontec.com/email_support/support_form.php
Internet: www.actiontec.com/support
5
Actiontec Wireless Digital Media Player User Manual
6
Setting Up the Player
2
The instructions that follow parallel the steps contained in the Actiontec Installation
Buddy®, which provides a visual guide to setting up the Player. It is recommended the
user run the Installation Buddy first, before attempting any other procedures.
To use the Player, it must be connected to a television and/or stereo, the wireless
connection must be set up, the Actiontec Media Buddy must be installed, and the
computer must be set up to find the media files.
Connecting the Player to a Television/Stereo
The first step in using the Digital Media Player is connecting it to a television and/
or stereo.
1. Remove the Wireless Digital Media Player from its box and place near or on
top of the television.
2. Remove the Power Cord from its white box.
7
Actiontec
Action
tec Wireless Digital Media Player User Manual
3. Plug the smaller end of the Power Cord into the Power Port on the back of the
Player. The Power Port is on the far right side of the rear panel of the Player.
4. Plug the larger end of the Power Cord into a Power Outlet.
5. Make sure the Power light on the front panel of the Player is illuminated.
8
Chapter 2 Setting Up the Player
6. Remove the Black Audio/Video Cable (with one white, one yellow, and one
red RCA plug on both ends of the cable) from the package.
7. Plug one White RCA Plug into the White Left (“L”) Audio Out Port on the
rear panel of the Player.
8. Plug the other White RCA Plug into the White Audio In Port on the television or stereo.
9
Actiontec Wireless Digital Media Player User Manual
9. Plug one Red RCA Plug into the Red Right(“R”) Audio Out Port on the
rear panel of the Player.
10. Plug the other end of the Red RCA Plug into the Red Audio In Port on the
television or stereo.
11. Plug one Yellow RCA Plug into the Yellow Video Out Comp Port on the
rear panel of the Player.
10
Chapter 2 Setting Up the Player
12. Plug the other Yellow RCA Plug into the Yellow Video In Port on the television or stereo.
13. Remove the 11 Mbps Wireless Card from the package.
14. Remove the cover from the wireless card slot on the side of the Player and
plug the Wireless Card into the slot.
Next, go to “Installing the Actiontec Media Buddy” on the next page.
11
Actiontec Wireless Digital Media Player User Manual
Installing the Actiontec Media Buddy
The Actiontec Media Buddy organizes and displays the media files on the computer, all from one easy interface. To install:
1. Get the Installation CD from the Player’s package and insert it in the CDROM drive of the computer.
2. When the window shown below appears, click the box next to “Install the
Actiontec Media Buddy.”
3. When the next window appears, click Yes to install the Media Buddy.
4. In the next window, click Next.
12
Chapter 2 Setting Up the Player
5. In the next window, read the License Agreement. Click in the circle next to “I
accept the agreement,” then click Next.
6. In the next window, click Next.
7. In the next window, click Next.
13
Actiontec Wireless Digital Media Player User Manual
8. In the next window, click Next.
9. In the next window, click Install.
11. Wait until the next window appears, then click Finish. The Media Buddy
is installed.
12. Turn the Player off and on.
14
Chapter 2 Setting Up the Player
If the Player is set up to join an already existing wireless network, go to “Setting Up
the Media Buddy” on page 18.
If the Player is set up to wirelessly connect to a single computer only (ad hoc connection), see the computer’s documentation to set up the computer to connect.
Setting up the Wireless Connection
After connecting the Player to a television/stereo, the wireless connection must be
set up to share the digital media between the computer and the Player.
There are two ways to do this, depending on whether or not there is a wireless network already in use. If a wireless network already exists, follow the procedure outlined in “Connecting to an Existing Wireless Network,” below. If no wireless network exists, follow the procedure outlined in “Connecting to a Single Computer”
on page 16.
Connecting to an Existing Wireless Network
1. Turn on the television and the Player. The following screen appears.
2. After a few moments, the “Login” screen appears. Press Setup on the remote.
The “Options” screen appears.
15
Actiontec Wireless Digital Media Player User Manual
3. Highlight “WIFI Setup” at the top of the screen. The Wireless Setup screen
appears.
4. Enter the name of the wireless network to which the computer is connected.
5. Make sure the box next to “Direct to a computer (ad hoc)” is NOT active (no
“x” is visible in the box).
6. Enter any WEP information (type of encryption and encryption key) the network may require in the rest of the text boxes.
7. Highlight “Save,” then press Enter on the remote.
8. In the “System Reboot” window that appears, click “OK” by pressing Enter on
the remote.
9. The Player reboots.
Next, go to “Setting Up the Media Buddy” on page 18.
16
Chapter 2 Setting Up the Player
Connecting to a Single Computer
If no existing wireless network exists, the Player can be connected directly to a
wireless-enabled computer to play media files. To do this:
1. Turn on the television and the Player. The following screen should appear.
2. After a few moments, the “Login” screen appears. Press Setup on the remote.
The “Options” screen appears.
3. Highlight “WIFI Setup” at the top of the screen. The Wireless Setup screen
appears.
17
Actiontec Wireless Digital Media Player User Manual
4. Enter the name of choice for the wireless network (using the alphanumeric
keypad on the remote) in the “SSID” text box.
5. Highlight “Connection” and place an “x” in the box next to “Direct to a computer (ad-hoc)” by pressing the Enter button on the remote.
6. Highlight “Save,” then press the Enter button on the remote.
7. In the “System Reboot” window that appears, click “OK” by pressing the Enter
button on the remote.
8. The Player reboots.
Next, go to “Setting Up the Media Buddy,” below.
☞
Note: To set up the Player via Ethernet, see Appendix B, “Setting
Up the Player via Ethernet,” on page 61.
Setting Up the Media Buddy
After connecting the Player and installing the Media Buddy, the computer must be
set up to locate the media files. To do this:
1. The Welcome window should already appear. If not, click the Media Buddy
icon on the desktop.
18
Chapter 2 Setting Up the Player
2. Click Video, and make sure the Media Buddy locates the video files (the default
folder is “My Videos” inside the “My Documents” directory). If the video files are in
a different folder, see “Redirecting the Media Buddy” on page 20.
3. Click Music, and make sure the Media Buddy locates the music files (the default
folder is “My Music” inside the “My Documents” directory). If the m usic files are in
a different folder, see “Redirecting the Media Buddy” on page 20.
4. Click Photos. If the digital photos are already in the “My Pictures” folder inside the
“My Documents” directory, click Update Photo. If the digital photos are in a different folder, see “Redirecting the Media Buddy” on page 20.
19
Actiontec Wireless Digital Media Player User Manual
Redirecting the Media Buddy
If the digital media files have been stored in folders other than the My Pictures, My
Music, and My Videos folders, the Media Buddy must be redirected to the alternate
folders.
☞
Note: To temporarily designate a folder the Player can recognize
and play files from, a watch folder can be created for video and
music files. See “Video” on page 28, or “Music” on page 29 for
more information.
To redirect the Buddy to another folder:
1. Make sure the Player, computer, and television have been properly configured,
then, on the computer, right-click the Media Server icon in the system tray of
the desktop, next to the clock, and select Manage Media Files from the list
that appears.
2. The Media Buddy Home window appears. Click Edit from the menu at the
top of the window, and select Preferences from the list that appears.
20
Chapter 2 Setting Up the Player
3. The Preferences window appears. Select the type of media (Music, Video,
or Photos) the alternate folder contains from the list on the right side of the
window.
4. In the next screen, click Browse.
21
Actiontec Wireless Digital Media Player User Manual
5. Locate the alternate folder, highlight it, then click Open.
The Media Buddy displays the media files in the selected folder on the Player.
☞
Note: To view all videos, music files, or photos through the
Media Buddy without redirecting to different folders, all media
files must be consolidated in one folder (i.e., videos into one
video folder, music files into one music file folder, etc.)
22
Using the Media
Buddy
3
The Actiontec Media Buddy is the software component of the Player that organizes
the media files stored on computers. After installing the Media Buddy on the computer, the Media Buddy places an Actiontec Media Buddy icon in the system tray of
the desktop (next to the clock).
Home
Right-click on the Actiontec Media Buddy icon, then select Manage Media Files to
generate the “Actiontec Media Buddy” Home window.
23
Actiontec Wireless Digital Media Player Manual
From the Home window, the user can browse through all the media files currently
associated with the Media Buddy (these files are either set up using the Installation
Buddy, or by redirecting the Media Buddy to an alternate folder). Click a media
type (Video, Music, or Photo) to display the chosen type of media file.
Video screen:
Music screen:
Photo screen:
24
Chapter 3 Using the Media Buddy
☞
Note: The files will be viewed in the same manner in which
they are organized in the folder. For example, if all music files
are contained in one folder, they will all be displayed as one
list in the Media Buddy window, by file title. However, if the
media folder is organized into subfolders, the files will be displayed in two panes: on the left, the subfolders (listed by artist, for example), and on the right, the files contained in the
chosen subfolder (songs listed by title, for example).
Displaying Photos While Playing Music
To display photos while music is playing:
1. From the Home window, select Music.
2. The “Music” window appears. At the bottom of the window, click the down
arrow next to the “Photo Albums” text box.
3. Select the photo album to be displayed while the music plays.
4. Close the Media Buddy. Photos from the selected photo album will display on
the television screen while music plays.
Playing Music While Viewing a Slide Show
To play music while viewing a slide show:
1. From the Home window, select Photo.
2. The “Photo” window appears. At the bottom of the window, click the down
arrow next to the “Playlist” text box.
3. Select the music playlist to be played while viewing the slide show.
25
Actiontec Wireless Digital Media Player Manual
4. Close the Media Buddy. Photos from the selected music playlist will play while
viewing a slide show.
Additionally, the amount of time a photo remains onscreen during a slide show is
controlled from the “Photo” window. Next to the “Playlist” list box is another
text box. Enter the onscreen duration (in seconds) in the list box, and each
photo played during a slide show will stay onscreen for the selected time.
Menu
The Media Buddy window contains a menu bar with the following items: File,
Edit, and Help.
File
The File menu contains one item, Exit, which closes the Media Buddy. Click Yes in
the window that appears to close the Buddy.
Edit
The Edit menu contains two items: Refresh Media Files, and Preference.
Refresh Media Files
When viewing one of the media file types in the Media Buddy window, the user
can refresh the file list, if additional files have been added. Select the type of
media file (Video, Music, or Photo), select Edit from the menu bar, then select
Refresh Media Files from the menu that appears. Any new files added since the
last refresh will be added.
26
Chapter 3 Using the Media Buddy
Preference
Selecting Preference from the Edit menu generates the Preference window.
On the left side of the window, there is a list of options (Security, Video, Music,
Photo, Language, and Theme).
Security - Selecting Security in the Preference window allows the user to create a password so that only individuals who know the password can access the
Media Player.
To create or change a password:
1. Make sure the box next to “Enable Password” is checked. If not, click in it to
activate.
2. Enter the password in the “New Password” text box. The password must be
alphanumeric and at least three characters long.
27
Actiontec Wireless Digital Media Player Manual
3. Enter the password again in the “Retype Password” text box.
4. Click Save.
The next time Media Player is accessed, the user must enter this password
Video - Selecting Video in the Preference window allows the user to redirect
the Buddy to a new video folder, or configure a watch folder.
To redirect the Buddy to a new video folder:
1. Click Browse, navigate to the folder, and click Open.
2. Click OK. The Buddy will now search for video files in the folder selected in
step 1.
Additionally, watch folders can be set up to play videos from the CD drive,
without having to redirect the video folder.
☞
Note: DVD movies cannot be shown on the Player.
To set up a watch folder :
1. Click in the “Enable watch folder” check box.
2. Press +.
3. Browse to the folder or drive to be watched, highlight it, then press Open. The
file or drive will appear in the “Please Select” list box.
4. In the Video screen on the Player’s television interface, the new folder appears.
If not, press “Refresh” on the remote.
☞
Note: If a designated watch folder exists on a removable drive,
it will disappear from the watch folder list when the removable drive is disconnected or removed.
28
Chapter 3 Using the Media Buddy
Music - Selecting Music in the Preference window allows the user to redirect the
Buddy to a new music folder, or configure a watch folder.
To redirect the Buddy to a new music folder:
1. Click Browse, navigate to the folder, and click Open.
2. Click OK. The Buddy will now search for music files in the folder selected in
step 1.
Additionally, watch folders can be set up to play music from the CD drive,
without having to redirect the video folder.
☞
Note: Standard audio CDs cannot be played on the Player. The
Player only plays files in the following formats: mp3, Ogg Vorbis,
AAC, WMA, and wav. Also, any files encrypted with Digital
Rights Management (DRM) software will not play on the Player.
To set up a watch folder:
1. Click in the “Enable watch folder” check box.
2. Press +.
3. Browse to the folder or drive to be watched, highlight it, then press Open. The
file or drive will appear in the “Please Select” list box.
4. In the Music screen on the Player’s television interface, the new folder appears.
If not, press Refresh on the remote.
☞
Note: If a designated watch folder exists on a removable drive,
it will disappear from the watch folder list when the removable drive is disconnected or removed.
29
Actiontec Wireless Digital Media Player Manual
Photo - Selecting Photo in the Preference window allows the user to redirect
the Buddy to a new photo folder.
To redirect the Buddy to a new photo folder:
1. Click Browse, navigate to the folder, and click Open.
2. Click OK. The Buddy will now search for photo files in the folder selected in
step 1.
Language - Selecting Language in the Preferences window generates the
Language pane. From here, the user selects the language the Buddy will use.
Currently, only English is supported.
30
Chapter 3 Using the Media Buddy
Theme - Selecting Theme in the Preferences window generates the Theme
pane. From here, the user selects the theme (or “skin”) the Player’s television
interface will use. Currently, only the “Blue” theme is supported.
31
Actiontec Wireless Digital Media Player Manual
32
Playing Digital Media
4
The Actiontec Wireless Digital Media Player is designed to play media files stored
on a computer through the television or stereo to which it is connected. After the
Player has been properly connected and set up, the Login screen appears.
From this screen, the user can access all digital media files from a properly configured computer.
Remote Control
To interface with the Player, the included remote control is used.
33
Actiontec
Action
tec Wireless Digital Media Player Manual
Power Button
The red button in the upper left corner is the power button. Pressing this button
causes the Player to turn on and off.
Alphanumeric Keypad
This alphanumeric keypad is used to enter numerals or letters while using the
Player’s television interface. To enter the letter “n” in an active text box onscreen,
for example, press the alphanumeric keypad button marked “6mno” three times in
succession. The character next to the insertion bar will change from “6” to “m” to
“n.” After pausing for a moment, the insertion bar will move past the entered character, ready for the next character.
BKSP (Backspace) Button
The “BKSP” button deletes entries in the active text box, one character at a time.
Cap/Num (Capitals/Numerals) Button
The “CAP/NUM” button enters capitalized letters in an active text box (after pressing the button once; “CAP” in the bottom right corner of the television will be
highlighted) or numerals only (after pressing the button twice; “NUM” in the
bottom right corner of the television screen will be highlighted) using the alphanumeric keyboard. Pressing the button three times returns the alphanumeric keyboard to its default operation (lower case letters, numerals, etc.)
Zoom Button
The “ZOOM” button changes the view of the video displayed.
Mode Button
The “MODE” button cycles the Player through the various Video Setting options.
See “Video Settings” on page 52 for more information.
Setup Button
Pressing the “SETUP” button generates the Option screen. See “Option Bar” on
page 49 for more information.
34
Chapter 4 Playing Digital Media Files
Mute Button
Pressing the MUTE button mutes all audio from the Player.
Page Up, Page Down Buttons
When viewing a long file list, use the Page Up and Page Down buttons to quickly
scroll through the list.
Directional Keypad
The four Directional keypad buttons are used to navigate around the Player’s television interface screens. When an item is highlighted on a screen, press the appropriate direction button to move the highlight to a different option.
Enter Button
The “ENTER’ button activates the highlighted item on the television screen.
Frame Button
The “FRAME” button activates different frames within the currently active window,
and can only be used while surfing the Internet via the Player.
Tab Button
The “TAB” button moves the cursor laterally (left to right) in the television interface screen, or when surfing the Internet via the Player.
Video, Music, Photo, and Internet Buttons
These buttons generate the Video (see page 41), Music (see page 43), Photo (see
page 45), and Internet (see page 47) screens, respectively.
35
Actiontec Wireless Digital Media Player Manual
Action (Prev, Play, Next, Rew, Stop, Fwd) Buttons
These buttons are used, when viewing a video, in much the same way as the buttons on a DVD player. The “Prev” and “Next” buttons move the video to the next/
previous chapter (if applicable), the “Fwd” and “Rew” fast forward and rewind the
video.
While viewing photos or playing music, the Prev and Next buttons will cause the
next photo to appear, or the next song on the list to begin playing. The “Stop” button causes the song or slide show playing to stop.
URL Button
The URL Button causes the URL section of the Internet pane to appear. In the
URL pane, enter the address in the URL text box to visit a particular Web site.
Home Button
Pressing the “HOME” button causes the Home screen (see page 41) to appear,
unless no computer has been logged into, in which case the Login screen (see page
37) will appear.
Login Button
Pressing the “LOGIN” button causes the Login screen (see page 37) to appear.
Options Button
Pressing the “OPTIONS” button causes the Options bar (see page 51) to appear.
36
Chapter 4 Playing Digital Media Files
Login Screen
When the Login screen appears, a list of previously added computers appears on
the television screen.
If the computer icon is gray, the computer is currently disconnected. If it is blue,
the computer is connected.
Selecting a Computer
To select one of the computers, use the direction buttons on the remote to highlight a computer, then press the Enter button on the remote. Another Login
screen appears. If a password has been set up, enter it using the alphanumeric
buttons on the remote, then press the Tab button on the remote to highlight the
green right arrow button on the television screen. Press the Enter button, and the
Home screen appears.
37
Actiontec Wireless Digital Media Player Manual
Adding Another Computer
☞
Note: Since the Player automatically finds computers running
the Media Buddy on the selected network, adding another computer manually is not recommended.
To add another computer to the Login Screen list:
1. In the Login screen, use the direction keys on the remote to highlight “Add”,
then click the Enter button.
2. Another Login screen appears. Enter the name of the computer as it will
appear in the initial Login screen in the “Name” text box.
3. Enter the IP address of the computer in the “IP” text box.
☞
Note: Enter the IP address of the of the computer here only if it
will not change (i.e., it is not set up to connect via DHCP).
4. If this computer will be connected to the Player every time the Player is
turned on, click in the “Always Connect” text box.
5. Use the direction buttons on the remote to highlight the Save button, then
click the Enter button on the remote. The computer is added to the Login
screen list.
38
Chapter 4 Playing Digital Media Files
Editing a Computer’s Login Profile
To edit a computer’s Login profile:
1. In the Login screen, use the direction keys on the remote to highlight Edit,
then click the Enter button.
2. An Edit screen appears. Highlight the computer profile to be edited, then press
the Enter button on the remote.
3. Another Edit screen appears. Change the computer’s IP address in the IP text
box.
4. Use the direction buttons on the remote to highlight the Save button, then
click the Enter button on the remote. The computer’s profile has been
changed.
39
Actiontec
Action
tec Wireless Digital Media Player Manual
Deleting a Computer
To delete a computer on the Login list:
1. In the Login screen, use the direction keys on the remote to highlight Delete,
then click the Enter button.
2. Another Login screen appears, with a list of computers. Highlight the box
next to the computer’s name, then click the Enter button on the remote. An
“X” appears in the box.
3. Using the direction buttons on the remote, highlight “Delete” and then click
the Enter button on the remote. The computer is deleted.
40
Chapter 4 Playing Digital Media Files
Accessing Media Files
Once a computer has been chosen in the Login screen (see “Selecting a Computer”
on page 37), the Home screen appears.
Playing Videos
To play a video:
1. From the Selection screen, press 1 (or Video) on the remote.
2.
The Video screen appears. Select a video from the available list by pressing the
appropriate number on the numeric keypad on the remote. For instance, if
the user wants to play video 3, press 3 on the numeric keypad.
41
Actiontec Wireless Digital Media Player Manual
3. To view additional lists, page down by pressing the Page Down button on the
remote, or navigate (using the direction buttons on the remote) to the number groups at the top right side of the screen (1-9 10-18, etc.), then press the
Enter button on the remote to select another list of videos. Select a video from
the next list that appears by pressing the appropriate number on the remote’s
numeric keypad.
While the video is playing, the controls on the bottom of the remote behave similarly to the controls on a DVD player (see “Action Buttons” on page 36).
Search for Videos
To search for a particular video:
1. Use the direction buttons on the remote to highlight “Search” at the top of the
Video screen, then press Enter on the remote.
2. A Search screen appears. Use the direction keys to highlight the Search text
box, then enter the first few letters of the video title.
3. Highlight “Search” on the screen, then press Enter on the remote.
4. A list of videos appears. Select a video to play by pressing the appropriate
number on the numeric keypad.
42
Chapter 4 Playing Digital Media Files
Playing Music
To play music files:
1. From the Selection screen, press 2 (or Music) on the remote.
2.
The Music screen appears. Select a song from the available list by pressing the
appropriate number on the numeric keypad on the remote. For instance, if
the user wants to play song file 3, press 3 on the numeric keypad.
3. To view additional lists, page down by pressing the Page Down button on the
remote, or navigate (using the direction buttons on the remote) to the number groups at the top right side of the screen (1-9 10-18, etc.), then press Enter
on the remote to select another list of music files. Select a music file from the
next list that appears by pressing the appropriate number on the remote’s
numeric keypad.
While playing a single song (i.e., selecting one song from a list), the “Prev” and
“Next” buttons restart the song, while “Stop” stops the song and return the Player
to the Music screen. While playing a song from a list (i.e., using the “Play” or “Play
Random” options at the top of the screen), the “Prev” and “Next” buttons will play
the previous and next songs on the list, respectively.
Play Entire List in Order
To play an entire list of music files in alphabetic order:
1. Locate a list of music files to be played.
2. Using the direction buttons, navigate to “Play” at the top of the Music screen.
3. Press Enter on the remote. The first song on the list plays.
43
Actiontec Wireless Digital Media Player Manual
Play Entire List Randomly
To play an entire list of song files at random:
1. Locate a list of song files to be played.
2. Using the direction buttons, navigate to “Random” at the top of the Music
screen.
3. Press Enter on the remote. A random song from the chosen list plays.
Search
To search for a particular song file:
1. Use the direction buttons on the remote to highlight Search at the top of the
Video screen, then press Enter on the remote.
2. A “Search” screen appears. Use the direction keys to highlight the Search text
box, then enter the first few letters of the song file title.
3. Highlight Search on the screen, then press Enter on the remote.
4. A list of music files appears. Select a music file to play by pressing the appropriate number on the numeric keypad, or navigate to the additional lists at the
upper right of the screen.
44
Chapter 4 Playing Digital Media Files
Viewing Photos
To view photos:
1. From the Selection screen, press 3 (or Photo) on the remote.
2.
The Photo screen appears.
Select a photo or photo collection from the available list by pressing appropriate number on the numeric keypad on the remote. For instance, if the user
wants to view photo list 2, press 2 on the remote.
3. The selected photo collection appears.
4. To view a photo, press the appropriate number button on the remote, or highlight the photo and press Enter on the remote.
5. To view additional lists, page down by pressing the Page Down button on the
remote while in the Photo screen, or navigate (using the directional buttons
on the remote) to the number groups at the top right side of the screen (1-9
10-18, etc.), then press Enter on the remote to select another list of photos.
Select a photo from the next list that appears by pressing the appropriate
number on the remote’s alphanumeric keypad.
45
Actiontec Wireless Digital Media Player Manual
While a photo is being displayed, the Previous and Next buttons on the remote
cause the previous or next photo in the photo collection to appear.
Play Entire List in Order
To play an entire list of photo files in order:
1. Locate a list of photos to be displayed.
2. Using the direction buttons, navigate to Play Slides at the top of the Photo
screen.
3. Press Enter on the remote. The first photo on the list is displayed. After a few
seconds, the next photo is displayed.
Play Entire List Randomly
To display an entire list of photos at random:
1. Locate a list of photos to be displayed.
2. Using the direction buttons, navigate to Random Slides at the top of the
Photo screen.
3. Press Enter on the remote. A random photo from the chosen list is displayed.
After few seconds, another photo is displayed
46
Chapter 4 Playing Digital Media Files
Using the Internet
To access various Internet services:
1. From the Selection screen, press the 4 button on the remote.
2.
The Internet screen appears. Select an Internet service from the available list
by pressing appropriate number on the numeric keypad on the remote. For
instance, to listen to Internet radio, press 4.
Web Bookmarks
Pressing 1 on the remote when in the Internet screen generates the Web
Bookmarks screen.
Here, the list of bookmarks included in the “Favorites” folder of Internet
Explorer running on the computer is displayed. Clicking on a link generates the
Web page selected.
47
Actiontec Wireless Digital Media Player Manual
Web Directory
Pressing 2 on the remote when in the Internet screen generates the Web
Directory screen.
Here, the user can visit various popular Internet destinations, including entertainment, shopping, and tech gear Web sites. Simply use the numeric keypad on
the remote to navigate.
Radio
Pressing 3 on the numeric keypad of the remote when in the Internet screen
generates the Internet Radio screen.
Here, the user can visit listen to popular Internet radio stations, in a variety of
music genres. Use the alphanumeric keypad on the remote to navigate to the
music category of choice, then select a station. To stop listening to a particular
48
Chapter 4 Playing Digital Media Files
station, press Stop on the remote.
News
Pressing 4 on the remote when in the Internet screen generates the Internet
News screen.
Here, the user can visit various Internet news Web sites. Simply use the numeric
keypad on the remote to navigate to the news Web site of choice.
Actiontec Link
Pressing the “MISC” button, or choosing “Actiontec” in the Home screen, causes
the Actiontec Internet link page to open.
Options Bar
Pressing the Options button on the remote generates the Options bar at the bottom of the television screen.
Web Button
Pressing the Web Button in the Options bar causes the URL bar to appear. Enter a
URL address to visit a particular Web site (www.actiontec.com. for example), then
press Enter on the remote to visit the Web site.
49
Actiontec Wireless Digital Media Player Manual
Arrow Buttons
Pressing the Arrow buttons (Back and Forward) cause the previous screen to
appear (left arrow), or, if applicable, the next screen to appear.
X Button
Pressing the “X” button causes the screen currently loading to stop loading.
Reload Button
Pressing the “Reload” button reloads the current screen.
Home Button
Pressing the “Home” button causes the Home screen to appear.
Language Button
Pressing the “Language” button allows the user to change the language used by
the Player. When the Language button is pressed, a language name will appear in
the left corner of the screen. Pressing Enter on the remote selects the language.
Pressing the Language button again displays another language name.
50
Chapter 4 Playing Digital Media Files
Options Button
Pressing the “Options” button causes the “Options” screen to appear.
At the top of the Options screen are five links: Options, IP Config, WIFI Setup,
Time Setup, and Update ROM.
Options
In the Options screen (shown above), which opens automatically when the
“Options” button is pressed, has various settings that can be changed by clicking
on the menus. After making one or more changes in the Options screen, navigate to the bottom of the screen, highlight “Save,” and press Enter on the remote
to implement and save the changes made.
Screen Saver -
- To change the time period until the
Player’s screen saver activates, highlight the Screen Saver list box, then press
Enter on the remote. A list (1-60) appears. Select the number of minutes, then
press Enter on the remote. The screen saver will activate after the number of
minutes selected.
Default Language -
- To change the language of the
Player’s television interface, highlight the Default Language list box, then press
Enter on the remote. A list of languages appears. Select a language, then press
Enter on the remote. The default language of the interface changes to the language selected.
51
Actiontec Wireless Digital Media Player Manual
Internet Security -
- To change the Player’s type of
Internet Security, highlight the Internet Security list box, then press Enter on the
remote. A list of options appears (SSL2, SSL3, TLSV1/SSL2/SSL3). Select a level
of Internet security, then press Enter on the remote. The level of Internet security of the Player changes to the level of security selected.
☞
Note: It is recommended that the default Internet security setting (SSL2 [Secure Sockets Layer 2]) be left unchanged.
Video Setting -
- To change the Player’s video
setting, highlight the Video Setting list box, then press Enter on the remote.
A list of settings appears (Composite/S-Video NTSC, Component NTSC,
Composite/S-Video PAL, etc.). After consulting the documentation of the television or monitor connected to the Player to find out which video setting to select,
highlight it, then press Enter on the remote. The video setting of the Player
changes to the setting selected.
☞
Note: For most standard televisions, the default setting
(Composite/S-Video NTSC) should be left unchanged.
Video Zoom -
- To change the Player’s video zoom,
highlight the Video Zoom list box, then press Enter on the remote. A list of
video zoom settings appears (Fit to screen, Full screen, Actual size). Highlight
a video zoom setting, then press Enter on the remote. The video zoom of the
Player changes to the setting selected. Video zoom works only when a video is
playing
Audio Setting -
- To change the Player’s audio setting,
highlight the Audio Setting list box, then press Enter on the remote. A list of
settings appears (Stereo Output, AC3 5.1 Output). After consulting the documentation of the audio receiver connected to the Player to find out which audio
setting to select, highlight it, then press Enter on the remote. The audio setting
of the Player changes to the setting selected.
Browse Option -
- To enable the Player’s compact browser, click in the box next to “Enable Compact Browser” and place
an “x” there. The compact browser causes interface elements on the television
screen (buttons, etc.) to shrink or move closer together, enabling smaller screens
to display more interface elements
52
Chapter 4 Playing Digital Media Files
Sound Option -
- To select a sound while typing or navigating in the Player’s television interface, or a sound when a system
alert occurs, highlight the appropriate Sound Option box and place an “x” there
by pressing Enter on the remote. The selected sound will play when the action
occurs.
Restore Factory Settings -
- To restore the Player’s factory
default settings, highlight the “Restore Factory Settings” button and press Enter
on the remote. The factory settings will be restored on the Player.
Save/Cancel -
- To cause the changes made in the Options screen
to activate on the Player, highlight the “Save” button and press Enter on the
remote. The changes will be activated. If the user chooses to cancel any changes
made in the Options screen before selecting “Save,” highlight the “Cancel” button
and press Enter on the remote. No changes will be made.
IP Config
Clicking “IP Config” in the “Options” screen causes the “IP Config” screen to
appear.
This screen shows the various addresses the Player is using while in its current
network setup. Highlighting “Switch to Manual” and pressing Enter on the remote
causes the fields to become modifiable.
☞
Note: It is recommended that the default IP Config settings be
left unchanged.
53
Actiontec Wireless Digital Media Player Manual
WiFi Setup
Selecting “WIFI Setup” generates the WiFi Setup screen. For more information
concerning the settings in the WIFI Setup screen, see “Setting Up the Wireless
Connection” on page 15.
Here, the user enters the wireless information needed to connect the Player to
the computer. After making one or more changes in the Options screen, navigate
to the bottom of the screen, highlight “Save,” and press Enter on the remote to
implement and save the changes made.
SSID -
- Enter the SSID (Service Set Identifier), or name,
of the wireless network to which the Player connects in the “SSID” text box by
highlighting the text box, then entering the name using the alphanumeric keypad on the remote.
Connection-
- To create an ad hoc (computerto-computer) wireless network, highlight the box next to “Direct to a computer
(ad-hoc)” and press Enter on the remote to place an “x” there. When this box is
inactive (no “x” appears), the Player is set to join an existing wireless network.
WEP -
- To activate WEP (Wired Equivalent Privacy) security on the Player’s computer-to-computer network, highlight the box next to
either “64-bit” or “128-bit” and press Enter on the remote. Then, highlight the
“WEP key” text box and enter the hexadecimal key using the alphanumeric keypad on the remote. The computer connecting to the Player must be set up with
the same type of WEP and WEP key to communicate wirelessly with it.
If joining an existing wireless network that requires WEP security authentication, select the type of WEP and enter the key in the WEP key text box.
54
Chapter 4 Playing Digital Media Files
Save/Cancel -
- To cause the changes made in the WIFI Setup screen
to activate on the Player, highlight the “Save” button and press Enter on the
remote. The changes will be activated. If the user chooses to cancel any changes
made in the Options screen before selecting “Save,” highlight the “Cancel” button
and press Enter on the remote. No changes will be made.
Check Signal Strength -
- To check the signal strength of the
wireless network, highlight the “Check signal strength” button and press Enter
on the remote. Signal and noise amounts will appear onscreen. To stop, highlight
the “Stop signal strength check” button and press Enter on the remote.
Time Setup
Selecting “Time Setup” generates the Time Setup screen.
Here, the user can change various aspects of the time settings of the Player, including time servers (if the Player is online), time zone, and daylight savings time.
55
Actiontec Wireless Digital Media Player Manual
Update ROM
Selecting “Update Rom” generates the “Update ROM” screen.
By clicking on the link in the screen and following the subsequent instructions, the
user can update the firmware of the Player.
56
Troubleshooting and
Frequently Asked
Questions
5
This chapter details some troubleshooting strategies, as well as frequently asked questions and their answers.
How far can I be from a computer or access point and maintain a
connection?
The wireless card range depends on the environment. Indoor range is approximately 100 feet or more; outdoor range can reach up to 300 feet.
How fast is the wireless connection with the Digital Media Player?
The rated speed of the wireless connection under optimal conditions is 11Mbps.
This speed does vary, depending on distance from the access point or computer
and the amount of attenuation (physical barriers, such as walls, glass, etc.) the
wireless signal must go through.
I’m getting skips and stops while watching movies from my computer using
the Digital Media Player. What should I do?
Movies contain a very large amount of data. The speed and power of the computer controls how well you are able to watch movies using the Digital Media
Player. If you are having problems, make sure that you close out of all unneeded
programs on your computer. Other programs can take up processing time and
slow down the movie you’re watching.
What can I connect the Digital Media Player to?
The Digital Media Player can connect wirelessly to a computer or an access
point. It can also connect to a router or hub via Ethernet.
Does the access point provide load-balancing capabilities?
No, the access point is not designed to track the load on the network resources;
it is a data transport device only.
57
Actiontec
Action
tec Wireless Digital Media Player User Manual
Will cordless phones interfere with the Digital Media Player?
The 802.11b Wireless Card uses 2.4 GHz frequency. If your cordless phone
uses this frequency, problems may occur. Different cordless phones use different frequencies, and generally include a label stating which frequency they
use. If you are having problems with interference caused by your cordless
phone, try changing the wireless card’s channel. This can sometimes clear
up interference issues. Any wireless device using the 2.4 GHz frequency can
cause wireless interference.
Can my wireless signal pass through floors, walls, and glass?
The effect of the physical environment can have varying effects on signal
strength and quality. The denser an object (a concrete wall compared to a
plaster wall, for example), the greater the interference will be. Concrete or
metal-reinforced structures cause a higher degree of wireless signal loss than
those made of wood, plaster, or glass.
What is WEP?
Wired Equivalent Privacy (WEP) is the standard encryption mode for
802.11b communications.
How do I make a HEX-based WEP key?
64-bit WEP Key – Composed of 10 alphanumeric characters (0-9, a-f); exam-
ple: 843c29a562
128-bit WEP Key – Composed of 26 alphanumeric characters (0-9, a-f);
example: 3c29f2536bef3276d32e364a2c
What is the difference between 40-bit and 64-bit encryption?
There really is no difference between the two. They are different terminologies used throughout the industry for the same level of encryption.
58
A
Specifications
General
Model Number
DMP011000-01 (Wireless Digital Media Player)
Standards
IEEE 802.11b (2.4 Ghz-DSSS); IEEE802.3 (10 BASE-T Ethernet); IEEE 802.3u
(100 BASE-T Fast Ethernet)
Certifications
FCC; CE; UL; WiFi
LAN
10/100 Mbps (auto-sensing and auto-crossover) Ethernet (RJ-45) port
Audio
S/P DIF Port (RCA and Optical)
Left and Right Channel RCA Output Ports
Video
Composite Video Port
S-Video Port
Component Video Port
59
Actiontec Wireless Digital Media Player User Manual
Other Input/Output
DVI (Digital Visual Interface)
Infrared Remote
Wireless PC Card slot
Visual Indicators
Power LED
Ethernet (10/100) LED
Link/Activity LED
Wireless
Operating Range
Up to 100 meters indoors
Up to 400 meters outdoors
Data Rates
11, 5.5, 2, and 1 Mbps
Environmental
Operating Temperature
0˚ to 65˚ Celsius
Storage Temperature
-20˚ to 85˚ Celsius
Operating and Storage Humidity
95%
60
Setting Up the
Player via Ethernet
B
While it is recommended that the Player connect wirelessly to another computer to share digital media files, it can also be connected to an existing wired
network or computer via Ethernet.
☞
Note: Do not install the wireless PC Card when connecting via
Ethernet.
Connecting to a Wired Network
To connect the Player to an existing wired network via Ethernet:
1.
Plug a standard, straight-through Ethernet cable into the Ethernet port on the
rear panel of the Player.
2.
Plug the other end of the Ethernet cable into an open Ethernet port on a
router or hub connected to the wired network.
3.
Reboot the Player.
4.
When the Player has rebooted, all computers on the wired network with a
Media Buddy properly intstalled and configured will display on the Login
page.
Connecting to a Single Computer
To connect the Player to a single computer via Ethernet:
1.
Plug a crossover Ethernet cable into the Ethernet port on the rear panel of the
Player.
2.
Plug the other end of the crossover Ethernet cable into an Ethernet port on
the computer with a properly installed and configured Media Buddy.
3.
Start up the Player and the computer. After attempting to connect to each
other, the process will timeout. At this point, both the Player and computer
revert to default connection mode, and locate each other.
4.
The computer displays in the Login screen of the Player.
61
Actiontec Wireless Digital Media Player User Manual
62
Notices
Regulatory Compliance Notices
Class B Equipment
This equipment has been tested and found to comply with the limits for a Class B
digital device, pursuant to Part 15 of the FCC Rules. These limits are designed to
provide reasonable protection against harmful interference in a residential installation. This equipment generates, uses, and can radiate radio frequency energy and,
if not installed and used in accordance with the instructions, may cause harmful
interference to radio communications. However, there is no guarantee that interference will not occur in a particular installation. If this equipment does cause
harmful interference to radio or television reception, which can be determined
by turning the equipment off and on, the user is encouraged to try to correct the
interference by implementing one or more of the following measures:
s
Reorient or relocate the receiving antenna;
s
Increase the separation between the equipment and receiver;
s
Connect the equipment to an outlet on a circuit different from that to
which the receiver is connected;
s
Consult the dealer or an experienced radio or television technician for help.
Modifications
The FCC requires the user to be notified that any changes or modifications made
to this device that are not expressly approved by Actiontec Electronics, Inc., may
void the user’s authority to operate the equipment.
Declaration of conformity for products marked with the FCC logo – United States
only.
This device complies with Part 15 of the FCC Rules. Operation is subject to the following two conditions:
1.
This device may not cause harmful interference;
63
Actiontec Wireless Cable/DSL Router User Manual
2. This device must accept any interference received, including interference that
may cause unwanted operation.
To comply with FCC RF exposure compliance require☞ Note:
ments, the antenna used for this transmitter must be installed to
provide a separation distance of at least 20 cm from all persons
and must not be co-located or operating in conjunction with
any other antenna or transmitter.
For questions regarding your product or the FCC declaration, contact:
Actiontec Electronics, Inc.
760 North Mary Ave.
Sunnyvale, CA 94086
United States
Tel: (408) 752-7700
Fax: (408) 541-9005
64
Limited Warranty
Hardware: Actiontec Electronics, Inc., warrants to the end user (“Customer”) that
this hardware product will be free from defects in workmanship and materials,
under normal use and service, for twelve (12) months from the date of purchase
from Actiontec Electronics or its authorized reseller.
Actiontec Electronics’ sole obligation under this express warranty shall be, at
Actiontec’s option and expense, to repair the defective product or part, deliver to
Customer an equivalent product or part to replace the defective item, or if neither
of the two foregoing options is reasonably available, Actiontec Electronics may, in its
sole discretion, refund to Customer the purchase price paid for the defective product. All products that are replaced will become the property of Actiontec Electronics,
Inc. Replacement products may be new or reconditioned. Actiontec Electronics warrants any replaced or repaired product or part for ninety (90) days from shipment,
or the remainder of the initial warranty period, whichever is longer.
Software: Actiontec Electronics warrants to Customer that each software program
licensed from it will perform in substantial conformance to its program specifications, for a period of ninety (90) days from the date of purchase from Actiontec
Electronics or its authorized reseller. Actiontec Electronics warrants the media containing software against failure during the warranty period. The only updates that
will be provided are at the sole discretion of Actiontec Electronics and will only
be available for download at the Actiontec Web site, www.actiontec.com. Actiontec
Electronics’ sole obligation under this express warranty shall be, at Actiontec
Electronics’ option and expense, to refund the purchase price paid by Customer
for any defective software product, or to replace any defective media with software
which substantially conforms to applicable Actiontec Electronics published specifications. Customer assumes responsibility for the selection of the appropriate applications program and associated reference materials. Actiontec Electronics makes
no warranty or representation that its software products will meet Customer’s
requirements or work in combination with any hardware or applications software
products provided by third parties, that the operation of the software products will
be uninterrupted or error free, or that all defects in the software products will be
corrected. For any third-party products listed in the Actiontec Electronics software
product documentation or specifications as being compatible, Actiontec Electronics
will make reasonable efforts to provide compatibility, except where the non-compatibility is caused by a “bug” or defect in the third party’s product or from use of
the software product not in accordance with Actiontec Electronics published specifications or user guide.
65
Actiontec Wireless Cable/DSL Router User Manual
THIS ACTION
ACTIONTEC ELECTRONICS PRODUCT MAY INCLUDE OR BE BUNDLED
WITH THIRD-PARTY SOFTWARE, THE USE OF WHICH IS GOVERNED BY A
SEPARATE END-USER LICENSE AGREEMENT.
THIS ACTION
ACTIONTEC ELECTRONICS WARRANTY DOES NOT APPLY TO SUCH THIRDPARTY SOFTWARE. FOR THE APPLICABLE WARRANTY, PLEASE REFER TO THE
END-USER LICENSE AGREEMENT GOVERNING THE USE OF SUCH SOFTWARE.
Obtaining Warranty Service: Customer may contact Actiontec Electronics
Technical Support Center within the applicable warranty period to obtain warranty service authorization. Dated proof of purchase from Actiontec Electronics or
its authorized reseller may be required. Products returned to Actiontec Electronics
must be pre-authorized by Actiontec Electronics with a Return Merchandise
Authorization (RMA) number marked on the outside of the package, and sent
prepaid and packaged appropriately for safe shipment, and it is recommended that
they be insured or sent by a method that provides for tracking of the package. The
repaired or replaced item will be shipped to Customer, at Actiontec Electronics’
expense, not later than thirty (30) days after Actiontec Electronics receives the
defective product.
Return the product to:
(In the United States)
Actiontec Electronics, Inc.
760 North Mary Avenue
Sunnyvale, CA 94085
Actiontec Electronics shall not be responsible for any software, firmware, information, memory data, or Customer data contained in, stored on, or integrated with
any products returned to Actiontec Electronics for repair, whether under warranty
or not.
WARRANTIES EXCLUSIVE: IF AN ACTION
ACTIONTEC ELECTRONICS’ PRODUCT DOES
NOT OPERATE AS WARRANTED ABOVE, CUSTOMER’S SOLE REMEDY FOR
BREACH OF THAT WARRANTY SHALL BE REPAIR, REPLACEMENT, OR REFUND
OF THE PURCHASE PRICE PAID, AT ACTION
ACTIONTEC ELECTRONICS’ OPTION. TO
THE FULL EXTENT ALLOWED BY LAW, THE FOREGOING WARRANTIES AND
REMEDIES ARE EXCLUSIVE AND IN LIEU OF ALL OTHER WARRANTIES, TERMS OR
CONDITIONS, EXPRESS OR IMPLIED, EITHER IN FACT OR BY OPERATION OF LAW,
STATUTORY OR OTHERWISE, INCLUDING WARRANTIES, TERMS OR CONDITIONS
OF MERCHANTABILITY, FITNESS FOR A PARTICULAR PURPOSE, SATISFACTORY
QUALITY, CORRESPONDENCE WITH DESCRIPTION, AND NON-INFRINGEMENT,
ALL OF WHICH ARE EXPRESSLY DISCLAIMED. ACTION
ACTIONTEC ELECTRONICS
66
Limited Warranty
NEITHER ASSUMES NOR AUTHORIZES ANY OTHER PERSON TO ASSUME FOR
IT ANY OTHER LIABILITY IN CONNECTION WITH THE SALE, INSTALLATION,
MAINTENANCE OR USE OF ITS PRODUCTS.
ACTION
ACTIONTEC
ELECTRONICS SHALL NOT BE LIABLE UNDER THIS WARRANTY
IF ITS TESTING AND EXAMINATION DISCLOSE THAT THE ALLEGED DEFECT
OR MALFUNCTION IN THE PRODUCT DOES NOT EXIST OR WAS CAUSED BY
CUSTOMER’S OR ANY THIRD PERSON’S MISUSE, NEGLECT, IMPROPER INSTALLATION
OR TESTING, UNAUTHORIZED ATTEMPT TO OPEN, REPAIR OR MODIFY THE
PRODUCT, OR ANY OTHER CAUSE BEYOND THE RANGE OF THE INTENDED USE, OR
BY ACCIDENT, FIRE, LIGHTNING, OTHER HAZARDS, OR ACTS OF GOD.
LIMITATION OF LIABILITY: TO THE FULL EXTENT ALLOWED BY LAW,
ACTIONTEC ELECTRONICS ALSO EXCLUDES FOR ITSELF AND ITS SUPPLIERS
ACTION
ANY LIABILITY, WHETHER BASED IN CONTRACT OR TORT (INCLUDING
NEGLIGENCE), FOR INCIDENTAL, CONSEQUENTIAL, INDIRECT, SPECIAL, OR
PUNITIVE DAMAGES OF ANY KIND, OR FOR LOSS OF REVENUE OR PROFITS,
LOSS OF BUSINESS, LOSS OF INFORMATION OR DATA, OR OTHER FINANCIAL
LOSS ARISING OUT OF OR IN CONNECTION WITH THE SALE, INSTALLATION,
MAINTENANCE, USE, PERFORMANCE, FAILURE, OR INTERRUPTION OF ITS
PRODUCT, EVEN IF ACTION
ACTIONTEC ELECTRONICS OR ITS AUTHORIZED RESELLER
HAS BEEN ADVISED OF THE POSSIBILITY OF SUCH DAMAGES, AND LIMITS ITS
LIABILITY TO REPAIR, REPLACEMENT,OR REFUND OF THE PURCHASE PRICE
PAID, AT ACTION
ACTIONTEC ELECTRONICS’ OPTION. THIS DISCLAIMER OF LIABILITY
FOR DAMAGES WILL NOT BE AFFECTED IF ANY REMEDY PROVIDED HEREIN
SHALL FAIL OF ITS ESSENTIAL PURPOSE.
Disclaimer: Some countries, states or provinces do not allow the exclusion or
limitation of implied warranties or the limitation of incidental or consequential
damages for certain products supplied to consumers, or the limitation of liability
for personal injury, so the above limitations and exclusions may be limited in their
application to you. When the implied warranties are not allowed to be excluded in
their entirety, they will be limited to the duration of the applicable written warranty.
This warranty gives you specific legal rights which may vary depending on local law.
Dispute Resolution: The customer may contact the Director of Technical Support
in the event the Customer is not satisfied with Actiontec Electronics’ response to
the complaint. In the event that the Customer is still not satisfied with the response
of the Director of Technical Support, the Customer is instructed to contact the
Director of Marketing. In the event that the Customer is still not satisfied with the
response of the Director of Marketing, the Customer is instructed to contact the
Chief Financial Officer and/or President.
67
Actiontec Wireless Cable/DSL Router User Manual
Governing Law: This Limited Warranty shall be governed by the laws of the State
of California, U.S.A., excluding its conflicts of laws and principles, and excluding
the United Nations Convention on Contracts for the International Sale of Goods.
68