1
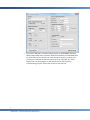
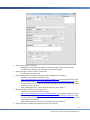
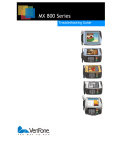
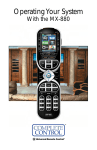
ChargeLogic Microsoft Dynamics NAV Using PIN Pads and Swipe Device Hardware with ChargeLogic Date: January 19, 2015 http://www.chargelogic.com Contents Entering Account Information at the POS ...................................................................... 3 Ordering VeriFone MX Devices ........................................................................................ 3 Programming Encrypted VeriFone MX Devices ............................................................. 4 ChargeLogic System Setups for Hardware ..................................................................... 6 Non-OPOS MSR ............................................................................................................................................................................... 6 VeriFone MX PIN Pads ................................................................................................................................................................... 6 Troubleshooting VeriFone MX PIN Pads ........................................................................ 8 2 CHARGELOGIC – USING PIN PADS AND SWIPE DEVICES Entering Account Information at the POS Account information can be entered using only the keyboard or a non-OPOS wedge-style swipe device, so long as you do not need to take PIN-secured debit cards and can configure the swipe device to use Track 2 data. In these scenarios, only the ChargeLogic Basic EFT granule is required. If you have an OPOS swipe device or a hardware PIN pad, you must purchase the ChargeLogic Basic and Advanced granules. The Debit Card Processing granule is additionally required for processing PIN-secured debit cards. OPOS devices do not work over terminal services. The standard configuration for remote PIN pad usage is RTC over WAN. The VeriFone drivers are OPOS-based. OPOS drivers use the Computer registry hive to maintain setup and state data; they only expect one device to be connected to the computer at one time. It can be set up with a terminal server and map the COM port through, but, while the first user’s PIN pad will work, the subsequent PIN pads will not. Remote Classic users cannot be supported unless there are multiple instances of the NAV database with replication occurring, as happens with LS Retail. The VeriFone MX900 series pin pads can be configured for use with a network cable, which can enable them to work over terminal services; however, the current form agent is not compatible with this setup. Ordering VeriFone MX Devices ChargeLogic is compatible with the following VeriFone PIN pads: VeriFone MX830, VeriFone MX850, VeriFone MX860, VeriFone MX870, VeriFone MX880, and VeriFone MX915. If they are ordered through ChargeLogic, we will: 1) Order the PIN pad and accessories from a VeriFone distributor; 2) Have the PIN pad drop-shipped to a key injection facility; 3) Prepare the key injection request forms and send them to the injection facility; 4) Pay for shipping costs to the injection facility; 5) Load the software onto the PIN pads using the VeriFone DDL.exe tool and the ChargeLogic application package; and 6) Ship the PIN pad directly to the customer. Prepayment must be received prior to ChargeLogic ordering the hardware from their vendor. The end user must know what processor is being used, and, for most, the encryption key must be acquired from the end user’s merchant services representative. The PIN pad order should include the PIN pads themselves, their power supplies, and the connecting cables. By default, ChargeLogic will order “smart card” terminals, or PIN pads that are capable of processing credit cards with integrated chips (also known as EMV and “chip and PIN”). Although American merchants are not yet required to take EMV cards, VISA has been encouraging EMV Chip adoption, hoping to have it in place by 2017. PIN pads without EMV capability can also be purchased. Most merchants will need to purchase power supplies (“VeriFone Power Pack” or “VeriFone 900 Power Pack” on the Partner Order Form) and separate cables to connect the PIN pads to the terminals (“VeriFone USB Multiport Cable” on the Partner Order Form, also known in the industry as the “blue cables,” or the “VeriFone USB Cable – 900 series”). Two other options available on the Partner Order Form for the MX800 series terminals are the VeriFone Serial Multiport Cable, if a terminal contains a serial port (not common any more), and the VeriFone Powered USB Multiport Cable (also known in the industry as the “yellow 3 CHARGELOGIC – USING PIN PADS AND SWIPE DEVICES cables”). The yellow cables are a combination of the connecting cable and the power supply. They require a special connection to the terminal, generally only found on POS machines. More details about power supplies and MX800 series connecting cables can be found in the Knowledge Base article, “VeriFone PIN Pad Power and Cabling Options.” If you choose to order the PIN pads through another vendor, you can use the below instructions, Programming Encrypted VeriFone MX Devices, to load the appropriate software after the PIN pads have been encrypted. Note that ChargeLogic will not send PIN pads that were not ordered through us for injection or repair. Programming Encrypted VeriFone MX Devices Note: If the PIN pads were ordered through ChargeLogic, they have already been programmed by ChargeLogic and the below programming steps may be bypassed. VeriFone MX800 Series Pin Pads On the Computer 1. Browse to the following location and download the latest ChargeLogic file: https://www.chargelogic.com/system/4.00.04/ChargeLogic.msi. 2. Install it. On the PIN Pad 3. Select “Secure USR1” on the touchscreen. If this is not an option, you may have to put the unit in configuration mode by pressing the recessed button near the top of the Magnetic Stripe Reader (MSR) with a paperclip and hold while three LEDs in the MSR track turn on. Release the button until the prompts appear for password entry. 4. Enter the password. The default password is 166831 on older models. On newer models (M094), the default password is 166832. If neither default password works, use 6547649 or 9467456. 5. Click the “Configure” icon on the menu. 6. Click the “USB Port” icon on the menu. 7. Choose the “Serial Port (Com5)” option. 8. Finally, click the left arrow key until you get the main screen, where you should select “File Manager” and then “Restart.” On the Computer 10. Copy the ChargeLogic file from C:\Program Files (x86)\ChargeLogic\ChargeLogic Controls\Verifone Mx\APP on 64-bit machines or C:\Program Files\ChargeLogic\ChargeLogic Controls\Verifone Mx\APP on 32-bit machines to your desktop or folder on your PC or contact [email protected] for the right tgz file to be injected. 11. Plug the PIN pad unit into the computer. Windows should assign a COM port number 3 as a default. On the PIN Pad 12. Make sure that the PIN pad is in download mode. 4 CHARGELOGIC – USING PIN PADS AND SWIPE DEVICES a. On the PIN pad main menu, select File Transfer, Download (Serial Port option). Select USB port and Full Mode for download type. If the PIN pad begins a partial download automatically, simply Abort and then select the correct options. On the Computer 13. Run the ddl.exe under a command line. It is located under C:\Program Files (x86)\ChargeLogic Controls\Verifone Mx on a 64-bit Windows 7 PC. 14. Run the following command under the tgz file location: ddl –p3 app\ChargeLogic_USB_files.tgz (Example: C:\Program Files (x86)\ChargeLogic\ChargeLogic Controls\Verifone Mx>ddl –p3 app\ChargeLogic_USB_files.tgz). Press Enter. On the PIN Pad 15. After the download, the unit will decompress and process the file. Restart the unit and wait until you see the ChargeLogic logo. VeriFone MX900 Series Pin Pads In order to use a USB cable with the VeriFone MX900 series pin pads, a Downloader utility must be installed and the operating system must be upgraded. Once the upgrade is performed, the form agent can be downloaded. To install the Downloader Utility: 1. Right click on the Mx800Downloader_2.6.4_Setup file. 2. Select Run as Administrator. A Setup Wizard will run to install the Downloader. To determine if an upgrade is necessary: 1. Boot up the pin pad into configuration mode. If the pin pad does not boot up into configuration mode, hold down the 1-5-9 keys together for a second and then release. 2. On the password screen, enter “166832” for the password. If this password does not work, try “166831,” “6547649,” or “9467456.” 3. Select the Information tab, and then select Basic System. 4. Scroll down to the Build (second line from the bottom). The un-upgraded build is release20120625. If there is extra data after that (such as “SC-3.0.3-B”), then the upgrade hotfix has been applied. To perform an operating system upgrade: On the PIN Pad 1. From the configuration mode home screen, select the Transfer tab, and then select the Serial/USB tab. 2. Touch the value COM2 and use the selector to change this value to COM5 (USB) and apply these settings. 3. Touch the GO button. On the Computer 1. Select the appropriate file (dl.v2-0625or0625SC1or0625SC2to0625SC3.0.3-B-20140108PROD.tgz). Right click this file and select “Download to Mx device (serial).” 2. Select COM9 (this is the default port to which the USB driver installs. You can verify this COM port using Windows’ Device Manager in the Control Panel). 5 CHARGELOGIC – USING PIN PADS AND SWIPE DEVICES 3. Press the Send button on the popup window. A window will appear with file download progress. 4. After the file is sent, the window will go away. On the PIN Pad 1. There will be a SUCCESS message once the full installation is complete (this may take an additional minute or so). 2. Reboot the device by returning to the Home screen, and then selecting the reboot button. To load the ChargeLogic (form agent) application: On the Computer Select the appropriate file (dl-USB_FA3.0.0W_130521.tgz). Right click this file and select “Transmit to Device.” On the PIN Pad The PIN pad will open in Form Agent. On the Computer 1. Select the appropriate file (dl-unsigned.tgz). Right click this file and select “Download to Mx800 (serial).” 2. The Downloader utility will appear. Check the box “Send XDLD Command,” and then select “Partial” and “Restart Device.” 3. Click Send. ChargeLogic System Setups for Hardware Non-OPOS MSR There is very little setup to be done in ChargeLogic in order to use a non-OPOS magnetic stripe reader. Most of these readers are designed to be plug and play, but, inevitably, there are situations where a plug and play device does not work as expected. In order to use a non-OPOS MSR, here are some standard instructions: 1. Plug in the reader. 2. Download the required drivers. This may happen automatically or you may have to go to the manufacturer’s website to find the driver. 3. Specify on the MSR whether or not you will be only sending Track 1 or Track 2 data. In ChargeLogic, only one Track should be sent. Processors tend to prefer Track 2, while many merchants prefer Track 1, as it contains the customer name. You may need to locate the manufacturer programming tools on the website in order to accomplish this. 4. In ChargeLogic, set the Industry Type on the Store card to “Retail.” 5. In ChargeLogic, check “Track 1 Capable” or “Track 2 Capable” on the Capabilities tab on the Terminal card. The MSR might have multiple modes; select Keyboard Emulation mode, where the data is sent as if the MSR were a USB keyboard. This is PCI-compliant so long as the data are not retained. VeriFone MX PIN Pads Once the PIN pads are programmed, there are setups within ChargeLogic that must be performed. The below instructions and more details are found in the ChargeLogic User Guide for your version. 6 CHARGELOGIC – USING PIN PADS AND SWIPE DEVICES Terminal Setup 1. 2. 3. 4. If the end user is using Windows 7 or Windows 8, they will need the Microsoft Visual C++ 2008 Redistributable Package (x86) installed on the terminal prior to the ChargeLogic installer (this is the prerequisite for one of ChargeLogic’s libraries). They will also need to either turn off User Account Control (not recommended in a POS environment) – or –modify the Active Payments file. To modify the Active Payments file: a. Run Notepad as the Administrator. b. Using Notepad, edit C:\Windows\activepayments.ini. c. In the [Logging] section, change the EventLog property from EventLog=vfievent.log to a value that includes a fully qualified path to a file that the limited user has write permission (e.g., EventLog=C:\Temp\vfievent.log). i. Make sure that the POS user has write access to the specified path and that the path does not exist in a directory that is protected by User Account Control (e.g., C:\Program Files). Download the ChargeLogic msi file from https://www.chargelogic.com/system/4.00.04/ChargeLogic.msi or at https://www.chargelogic.com/partners/software/hardware . This will install the ChargeLogic Controls. If using a 32-bit machine, install the VeriFone USB drivers from https://www.chargelogic.com/system/4.00.04/installvfi.msi or at https://www.chargelogic.com/partners/software/hardware before plugging in the PIN pad. If you are using a 64-bit machine, plug in the PIN pad first and then download the driver off the Partner Portal at https://www.chargelogic.com/partners/software/hardware. Save it to your computer. Save and exit all other open programs. Select the PIN pad on the device manager and point it toward the driver’s location. Click on the Hardware tab and select the VeriFone PIN pad model that you are using in the OPOS PIN Pad Profile. Click on the Capabilities tab and place a check mark in the Track 2 Capable field. Each time a user logs in on a properly configured terminal, the system will attempt to initialize the PIN pad. If the ChargeLogic OPOS CCO controls cannot be found, the system will prompt the user to install them now. ChargeLogic contains an automated installer that will launch with the consent of the user. After installation completes successfully, the PIN pad will be ready for use. Additional Setup for the Role-Tailored Client In the Classic client, automation controls, such as the OPOS drivers, can be used to initiate workflow events. However, the RTC requires client add-ins as well as automation controls for workflow events. In ChargeLogic versions prior to 4.00.04, lines must be created in the client add-in tables; in 4.00.04, they are created automatically. Files need to be copied into the client add-in folder in versions prior to NAV 2013. The file can be located here (if the ChargeLogic Controls have already been downloaded): C:\Program Files (x86)\ChargeLogic\ ChargeLogic Controls. Copy the file “ChargeLogic Timer Control.” Copy the timer control file manually into the Client add-ins folder of the 2009 SP1 or R2 RTC folder. 7 CHARGELOGIC – USING PIN PADS AND SWIPE DEVICES In Object Designer, open the Client Add-in table and add the following control in a new line: Control Add-in Name ChargeLogic.TimerControl Public Key Token e8ecf5008582ad7a Version Description ChargeLogic Timer Control Troubleshooting VeriFone MX PIN Pads Even if you have purchased the PIN pads through ChargeLogic, you may need some assistance with troubleshooting. Below are common scenarios with resolutions: The tamper sensor on the PIN pad has been triggered. o PIN pad will display “Tamper Detected and Cleared” on power-on. o PIN pad will not go into PIN entry mode when the tamper sensor has been triggered. o The PIN pad must be sent for repair. The ChargeLogic logo does not appear when the PIN pad boots up, but there is no error message. o The PIN pad must be programmed with the ChargeLogic application. o Configure the communications settings. Click the Setup menu button and select the Upload Terminal Software item. On programmed PIN pads, instead of the ChargeLogic logo, an error message saying that the PIN pad cannot locate a port appears. o Install the 32-bit VeriFone USB drivers from https://www.chargelogic.com/system/4.00.04/installvfi.msi or download the 64-bit driver off the Partner Portal at https://www.chargelogic.com/partners/software/hardware. Save the 64-bit driver to your computer. Select the PIN pad on the device manager and point it toward the driver’s location. o After installing the driver, power off the PIN pad and power back on. o If a different port must be selected, use the OPOS Demo. Navigate to C:\Program Files (x86)\ChargeLogic\ChargeLogic Controls\Verifone MX and run OPOSDEMO as Administrator. Select File, Editor. Select the port used by the PIN pad as indicated by in the Device Manager in the Control Panel. 8 CHARGELOGIC – USING PIN PADS AND SWIPE DEVICES To test if the PIN pad is communicating properly, run OPOSDEMO and select FORM. Select OPEN, Claim, and then check Device Enabled. If OPOSDEMO does not allow Claim to be selected, one of the settings is incorrect; recheck if the correct port is selected, that the PIN pad is set up for USB cable, etc. Select Display Test, if an item appears on the PIN pad screen, the PIN pad is communicating properly. Select Clear Screen to clear the item. 9 CHARGELOGIC – USING PIN PADS AND SWIPE DEVICES The touch screen is not working. o Navigate the screen menu by using the buttons and select Calibrate to enable the touchscreen functionality. You may have to restart the PIN pad. Nothing happens when the USB icon is selected. o A USB cord is not being used. The computer does not recognize the PIN pad when plugged into a USB port. o Install the 32-bit VeriFone USB drivers from https://www.chargelogic.com/system/4.00.04/installvfi.msi or download the 64-bit driver off the Partner Portal at https://www.chargelogic.com/partners/software/hardware. Save the 64-bit driver to your computer. Select the PIN pad on the device manager and point it toward the driver’s location. o After installing the driver, power off the PIN pad and power back on. The PIN pad does not have the VeriFone drivers. o Install the 32-bit VeriFone USB drivers from https://www.chargelogic.com/system/4.00.04/installvfi.msi or download the 64-bit driver off the Partner Portal at https://www.chargelogic.com/partners/software/hardware. Save the 64-bit driver to your computer. Select the PIN pad on the device manager and point it toward the driver’s location. o After installing the driver, power off the PIN pad and power back on. The PIN pad does not have the ChargeLogic OPOS CCO Controls. 10 CHARGELOGIC – USING PIN PADS AND SWIPE DEVICES Download the ChargeLogic msi file from https://www.chargelogic.com/system/4.00.04/ChargeLogic.msi or off the Partner Portal at https://www.chargelogic.com/partners/software/hardware. This will install the files. After logging into NAV, the PIN pad still displays the ChargeLogic splash screen instead of “Welcome to StoreName / Register Closed.” o Check that the Hardware tab on the Terminal Setup has the appropriate VeriFone MX device selected in the OPOS PIN Pad Profile field. o Check that there is a check mark in the Track 2 Capable field on the Capabilities tab. The EFT Local Setup controls are disabled. o If the device is connected, click the Setup menu button and select the Install ChargeLogic Components item. Where do I define the hardware profiles? o ChargeLogic Payments comes pre-populated with hardware profiles and they do not need to be created. o If you still want to create or modify the hardware profiles: Go to Administration – Application Setup – Sales & Marketing – EFT – Hardware. Select the Profiles page. I purchased a MX860 or a MX880 and there are no pre-configured setups for these. o Use the profile for MX850 for the 860 or the MX870 for the MX880 My terminal/computer is using Windows 7 or 8. o Either turn off User Account Control (not recommended in a POS environment) – or – o Modify the ActivePayments file: Run Notepad as Administrator. Using Notepad, edit C:\Windows\activepayments.ini In the [Logging] section, change the EventLog property from EventLog=vfievent.log to a value that includes a fully qualified path to a file that the limited user has write permission (e.g., EventLog=C:\Temp\vfievent.log). Make sure that the POS user has write access to the specified path and that the path does not exist in a directory that is protected by User Account Control (e.g., C:\Program Files). How do I activate the pin pad for a transaction? o To activate the pin pad from a Sales Order or a Customer Card, select Credit Card – Authorize to open a transaction card (this is on the ribbon or Action menu in RTC; in Classic, it may be the Sales or Function button – Credit Card – Authorize). The End User will enter the amount to authorize, but no credit card number, and then select Collect Data and Submit (on the Function button in Classic). This will activate the pin pad and the End User can proceed from there in the same method as they would authorizing by keying in a number. o If the credit card data is not populated, check that the Hardware tab on the Transaction card is expanded. o 11 CHARGELOGIC – USING PIN PADS AND SWIPE DEVICES