1
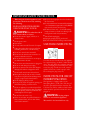
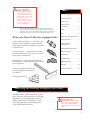
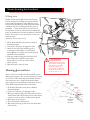
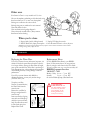
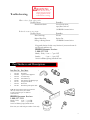
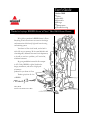
User’s Guide
Series 1860
Safety
■ Assembly
■ Operation
■ Storage
■ Maintenance
■ Troubleshooting
■
Thanks for buying a BISSELL Steam ‘n Clean ™ Hand Held Steam Cleaner.
We’re glad you purchased a BISSELL Steam ‘n Clean.
Everything we know about home care went into the design
and construction of this handy, high-tech home cleaning
and sanitizing system.
Your Steam ‘n Clean is well made, and we back it
with a full one-year warranty. We also stand behind it with
a knowledgeable, dedicated Consumer Service department,
so, should you ever have a problem, you’ll receive fast,
considerate assistance.
My great-grandfather invented the floor sweeper
in 1876. Today, BISSELL is a global leader in the
design, manufacture, and service of high quality homecare
products like your Steam ‘n Clean.
Thanks again, from all of us
at BISSELL.
Mark J. Bissell
President and Chief Executive Officer
IMPORTANT SAFETY INSTRUCTIONS
Do not use for any purpose other than described in
this User’s Guide
■ Use only manufacturer’s recommended attachments
- use of attachments not provided or sold by BISSELL
READ ALL INSTRUCTIONS BEFORE
may cause fire, electric shock or injury
USING YOUR STEAM ‘N CLEAN.
■ Fill with cool water only — do not add anything
except cool water or you will cause damage to the
To reduce the risk of
heating element and void your warranty
fire, electric shock, or injury:
■ Turn off before unplugging
■ Do not direct steam at people, animals, or at
■ Unplug by grasping the plug, not the cord
electrical outlets
■ Pay close attention when working around children
■ Do not expose to rain
■ Store indoors
■ Use only extension cords UL-rated at 15 amperes
■ Unplug from outlet when not in use and before
conducting maintenance or troubleshooting
■ Do not leave steam cleaner unattended
■ Do not leave the steam cleaner connected to an
electrical outlet when not in use
■ Do not switch the steam cleaner on or attempt to
To reduce the risk of electric shock, this appliance
use without water in the tank
has
a polarized plug (one blade is wider than the
■ Do not service steam cleaner when it is plugged in
other). This plug will fit in a polarized outlet only
■ Do not use with damaged cord or plug
one way. If the plug does not fit fully in the outlet,
■ Do not use steam cleaner if it has been dropped,
reverse the plug. If it still does not fit, contact a
damaged, left outdoors or dropped into water
qualified electrician to install a proper outlet.
Do not change the plug in any way.
■ Do not handle steam cleaner with wet hands
■ Do not pull or carry by cord, use cord as a handle,
close door on cord, pull cord around sharp corners
or edges, or expose cord to heated surfaces
■ Do not unplug by pulling on cord
This appliance is equipped with a Circuit
■ Do not put any object into appliance openings, use
Interrupting Device (C.I.D.) The C.I.D. shuts off
with blocked opening, or restrict air flow
the unit in potentially hazardous situations. The
■ Do not use appliance in an enclosed space filled
C.I.D. has Test (Yellow) and Reset (Red) buttons
with vapors given off by oil base paint, paint thinner, which should be operated each time the unit is
some moth proofing substances, flammable dust,
plugged in.
or other explosive or toxic vapors
■ Do not allow to be used as a toy
No plug adapter
■ Do not use on leather, wax polished furniture or
should be used with this appliance.
floors, synthetic fabrics, velvet or other delicate,
This model is for household use only.
steam-sensitive materials
When using an electrical appliance, basic
precautions should be observed, including
the following:
■
WARNING:
SAVE THESE INSTRUCTIONS.
INSTRUCTIONS FOR CIRCUIT
INTERRUPTING DEVICE
WARNING:
CAUTION:
To
reduce risk of injury
from steam, never point
product at people, animals
or electrical outlets.
Warm
100°F
4”
Clean
130°F
3”
Sanitize
160°F
HOT!
200°F
Indicator Light
Steam Switch
2”
Safety Lock
Salmonella
E. coli &
Dust Mites
Water
Filter
Handle
C.I.D. Plug
Power Cord
Water Tank
CAUTION:
Do
not add anything except
cool water or you will
cause damage to the
heating element and
void your warranty.
3
How to use this guide
This User’s Guide has been designed to help you get
the utmost satisfaction from your Steam ‘n Clean
hand-held steam cleaner. You’ll find assembly
instructions for all cleaning tasks, safety precautions,
pre-cleaning tips, maintenance and troubleshooting
instructions. Please read this Guide thoroughly
before using your steam cleaner. Pay particular
attention to the parts diagram, assembly instructions,
and part names. Familiarize yourself with the tools
and how they’re used. Following the Guide will greatly
enhance your ability to get the best performance from
your Steam ‘n Clean for many years.
Your Steam ‘n Clean comes assembled and
ready to use. The drawing on page 3 and
part names may come in handy should you
need to order a part.
How to fill prior to sanitizing
Water Tank
Power Cord
The Water Tank is the translucent tank at the end of
the Steam ‘n Clean.
1. Remove the Tank by unscrewing it from the
handle in a counter clockwise motion.
2. Remove the Water Fill Cap by unscrewing it from
the Water Tank in a counter clockwise motion.
3. Remove the Cap and the attached water tube
and siphon.
4. Fill Water Tank completely with cool tap water,*
insert water tube/siphon, and replace Water Fill
Cap, turning in a clockwise motion until snug.
5. Reattach Water Tank by turning in a clockwise
motion until snug.
Unwrap Power Cord [with C.I.D. plug] completely
before operating unit.
*NOTE: You may substitute distilled or demineralized water for tap
water. Doing so may reduce the need to change the Water Filter to
just once a year.
Do not add anything except cool water
or you will cause damage to the heating
element and void your warranty.
Water Filter
This filter removes minerals and other impurities
from tap water, preventing water deposits from
damaging your Steam ‘n Clean. It should be replaced
when the bright green grains turn dark blue in the
whole filter except the last strip.
Indicator Light
This will glow to indicate when tap water has been
converted to steam, and machine is ready to use.
Safety Lock
Slide forward to lock the Steam Switch OFF when the
Steam ‘n Clean is plugged in but not in immediate
use. When ready to use, slide back to activate the
Steam Switch.
Steam Switch
Push to release steam. To lock steam on, hold steam
switch down while sliding safety lock forward to
locking position.
Safety Valve
Your steam cleaner is equipped with a safety valve
which will open if the steam nozzle is blocked. When
the safety valve opens, water will be released from the
small outlet hole at the bottom of the unit (below the
handle). If release continues, turn off your steam
cleaner, empty the Water Tank and call
BISSELL Consumer Services
1-800-237-7691
for repair/return instructions.
4
CAUTION:
Before disconnecting a
tool from the steam
c l e a n e r, make certain
that steam is no longer
coming from the
nozzle. Use an oven
mitt to remove tools,
or wait until they cool
before removing.
All tools attach the same way. Align the two tabs on the tool you
choose with the two notches in the nozzle. Insert tabs into notches
completely, then turn the tool a half rotation clockwise until it locks.
Always check to make certain the tool is fitted firmly before using.
Tools your Steam ‘n Clean is equipped with:
Index
Safety instructions . . . . . . . . . .2
Product view . . . . . . . . . . . . . .3
How to fill prior
to sanitizing . . . . . . . . . . . . . . .4
Index . . . . . . . . . . . . . . . . . . . .5
Tools . . . . . . . . . . . . . . . . . . . .5
Steam cleaning hard surfaces . .6
Killing dust mites . . . . . . . . . . .7
A 2-position Steam Applicator — this tool has two
positions. Use the compressed or ‘short’ position for
concentrated steam and the extended or ‘long’ position
for diffused steam.
A Curved Steam Jet — concentrates steam to clean
and sanitize small, hard to reach areas, or for intense
steam cleaning of stubborn soil.
Steam sanitizing
hard surfaces . . . . . . . . . . . . . .7
Steaming/freshening clothes . . .7
When you’re done . . . . . . . . . . .8
Maintenance . . . . . . . . . . . . . .8
Troubleshooting . . . . . . . . . . . .9
Steam Brushes — attach to the end of the Steam
Concentrator for scrubbing stubborn soil. Color-coded
for your specific use.
A Glass Cleaning Scrubber/Squeegee —
for cleaning windows and other large
glass surfaces.
Replacement parts . . . . . . . . . .9
Warranty . . . . . . . . . . . . . . . .10
Consumer services . . . . . . . . . .10
A Triangle Steam Brush
Sanitizing and cleaning throughout your home
Your BISSELL Steam ‘n Clean steam cleaner can help
make your home a cleaner, safer place to live. The high
temperature “dry” steam destroys germs, mold and
mildew on hard surfaces in every living area of your
home. Proper application of steam kills germs like
E. coli, and Salmonella choleraesuis.
CAUTION:
Keep
face and all exposed skin
away from steam. Failure to
do so may result in personal
injury.
5
Steam cleaning hard surfaces
All living areas
Stubborn soil that resists traditional hot water, cleaning
solutions and vigorous scrubbing can often be effectively
removed with high temperature steam. Baked-on-grease
on the stovetop, dried fruit juice in the refrigerator, mildew
or stubborn soap scum on sliding shower doors, gum on
countertops — steam makes all these far easier to clean.
Use your Steam ‘n Clean to soften and remove stubborn dirt,
grime, dry, hardened food, and other household soil from hard
surfaces. You can also use your steam cleaner to clean and
sanitize pet cages. *
*NOTE: Always remove pets before cleaning.
1. Fill the Water Tank with cool tap water or distilled/
demineralized water.
2. Connect the C.I.D. plug to an appropriate outlet.
3. Attach tool. For large surface sanitizing, such as
countertops, basins and sinks, use the 2-Position
Steam Applicator. For smaller areas, use the Steam Jet
with/without the Steam Brush.
4. When green indicator light glows, slide Safety Lock
back and press Steam Switch to release steam.
Steam continues to come out of the tool while
switch is pressed.
5. Wipe surface with a clean, dry cloth.
Cleaning glass surfaces
CAUTION:
Thermal shock can shatter
glass. Before cleaning cold
glass surfaces, carefully
warm the surface by
directing the steam jet on
the glass from a distance
of no less than 4 - 6”.
Steam ‘n Clean leaves windows and mirrors sparkling clean.
Although glass appears to be a hard, smooth surface, it actually
has an uneven surface which traps and holds dirt. Chemical
glass cleaners can leave a residue which attracts airborne
grease and grime to make windows look dirty faster. Steam ‘n
Clean dissolves deep down dirt and leaves no residue.
1. Fill the Water Tank with cool tap water or distilled/
demineralized water.
2. Connect the C.I.D. plug to an appropriate outlet.
3. When green indicator light glows, slide Safety Lock back to
activate Steam Switch. Press switch to release steam. Steam
continues to come out of the tool while switch is pressed.
4. Spread steam evenly over glass.
5. Clean with scrubber side of glass tool.
6. Wipe surface with squeegee side of tool, then finish with a
clean, dry cloth.
6
Warm
100°F
Clean
130°F
4”
3”
2”
Salmonella
E. coli &
Dust Mites
Sanitize
160°F
HOT!
200°F
Killing dust mites
Steam sanitizing hard surfaces
Mattresses and pillows
Kitchen/Bathroom/Nursery
Dust mites are microscopic creatures, too small
to be seen by the naked eye. Yet the average
mattress may hold over two million dust mites,
a major cause of many indoor allergies.
Use your Steam ‘n Clean to kill dust mites on
the surface of your mattresses and pillows.
The kitchen, bathroom and nursery are the three areas of your
home most likely to harbor harmful fungus, bacteria and
viruses. Routinely sanitizing the hard surfaces in these areas,
particularly the areas you use frequently, can significantly
reduce bacteria and odors. Use your Steam ‘n Clean regularly
to sanitize sinks, countertops, toilet bowls, changing tables,
diaper pails and other hard, non-porous surfaces.
1. Fill the Water Tank with cool tap water or
distilled/demineralized water.
2. Connect the C.I.D. plug to an appropriate
outlet.
3. Attach the 2-Position Steam Applicator,
set to the extended or ‘long’ position for
diffused steam.
4. When green indicator light glows, slide
Safety Lock back to activate Steam Switch.
Press switch to release steam. Steam
continues to come out of the tool while
switch is pressed.
5. To kill dust mites treat surfaces with
steam for 20 seconds, holding the
applicator no more than 2 inches
from the surface.
6. Make sure the surface is completely dry, then
vacuum thoroughly.
1. Fill the Water Tank with cool tap water or distilled/
demineralized water.
2. Connect the C.I.D. plug to an appropriate outlet.
3. Attach a sanitizing tool. For large surface sanitizing,
such as countertops, basins, toilets, bidets, crib surfaces,
changing tables or diaper pails, use the 2-Position Steam
Applicator. For smaller areas, use the Steam Jet with or
without the Steam Brush.
4. When green indicator light glows, slide Safety Lock back to
activate Steam Switch. Press switch to release steam. Steam
continues to come out of the tool while switch is pressed.
5. To sanitize, treat surfaces with steam for 20
seconds, holding the applicator no more than
2 inches from the surface.
6. Wipe surface with a clean dry cloth.
NOTE: Steam will not remove stains from fabric or other porous surfaces.
Steaming/freshening clothes
CAUTION:
Never
attempt this procedure
while wearing clothing.
Severe burns could result.
Use your Steam ‘n Clean to remove wrinkles from clothes, and
“freshen” clothing that has been stored.
1. Hang clothing from a shower rod or clothes hook using a
sturdy clothes hanger.
2. Fill the Water Tank with cool tap water or distilled/
demineralized water.
3. Connect the C.I.D. plug to an appropriate outlet.
4. Attach the 2-Position Steam Applicator, set to the extended
or ‘long’ position for diffused steam.
5. When green indicator light glows, slide Safety Lock back to
activate Steam Switch. Press switch to release steam. Steam
continues to come out of the tool while switch is pressed.
6. Treat clothing until wrinkles loosen. Use a clothes brush as
you steam.
7
Other uses
Your Steam ‘n Clean is a very versatile tool. Use it to:
Give your houseplants a refreshing cool cloud mist by using
the steam selector at 12” or more away from plants.
Soften gum or adhesives for easier removal.
Soften glazing putty on windows for easier removal.
Clean and sanitize coolers.
Clean and sanitize sink garbage disposals.
Clean exhaust fan reusable filters. (Always remove
from fixture before cleaning.
When you’re done
1. Engage Safety Lock by sliding forward. 2. Unplug C.I.D. plug from outlet.
3. Remove Water Tank, empty, then replace. 4. Store the steam cleaner in a clean, dry area.
NOTE: You do not need to empty the Water Tank if you plan to use the steam cleaner within a matter of hours.
For longer storage, always empty the tank.
Maintenance
Replacing the Water Filter
Replacement Filters
If you fill your steam cleaner with normal tap water, it is
essential to check the water filter and replace it when it
is no longer effective. Change the filter when the bright
green grains turn dark blue. If the filter is not changed
at the appropriate time, calcium deposits will accumulate
on the heating element, causing damage or reduced
performance.
If you fill your steam cleaner with distilled or
demineralized water, you may only need to change
your filter once a year.
Use only BISSELL Water filters in your BISSELL
Steam ‘n Clean steam cleaner. You may purchase
filters by using the order form in this User’s Guide.
To locate a retailer near you, or to place an order, call
To replace your filter:
Unscrew (counterclockwise)
the Water Tank from the
steam cleaner.
Remove the used filter by
lifting it straight from the
steam cleaner.
Insert new filter by aligning
water inlet and outlet plugs
with holes in steam cleaner
body. Press filter down until
it clicks firmly into place.
Replace Water Tank.
8
BISSELL Consumer Services
1-800-237-7691
Monday - Friday 8 a.m. — 7 p.m. EST
Saturday
9 a.m. — 1 p.m. EST
Or visit out Website @ http://www.bissell.com
CAUTION:
Do
not add anything except
cool water or you will
cause damage to the
heating element and
void your warranty.
REMOVE
REPLACE
WARNING:
To
reduce the risk of fire,
electric shock or injury,
unplug appliance from
outlet before servicing.
Troubleshooting
Water release from safety valve.
Possible Causes
Remedies
Blocked Steam Nozzle
Turn off steam cleaner,
empty Water Tank and
Call BISSELL Consumer Services
Reduced steam or no steam.
Possible Causes
Remedies
Water Tank empty
Depleted Water Filter
Damage to Heating Element
Fill tank
Replace filter
Call BISSELL Consumer Services
If suggested solutions for this or any function of your steam cleaner do
not correct the problem, call:
BISSELL Consumer Services
1-800-237-7691
Monday - Friday 8 a.m. — 7 p.m. EST
Saturday
9 a.m. — 1 p.m. EST
Or visit out Website @ http://www.bissell.com
Part Numbers and Descriptions
Item Part No. Part Name
1
2
3
4
5
6
7
8
010-3504
010-0009
010-6104
010-1166
010-8441
010-1167
010-9102
010-1642
2
1
Water Filter
2-position Steam Applicator
Curved Steam Jet
Steam Brushes (3)
Glass Cleaning Scrubber/Squeegee
Triangle Steam Brush
Water Tank
Water Fill Cap with Siphon Tube
NOTE: Not all attachments pictured are included
with every model, but they are available.
To order replacement parts or additional
attachments call:
3
4
5
6
BISSELL Consumer Services
1-800-237-7691
Monday - Friday 8 a.m. — 7 p.m. EST
Saturday
9 a.m. — 1 p.m. EST
Or visit our Website @ http://www.bissell.com
Please have your model and part numbers of unit ready.
7
8
9
About your warranty
This warranty gives you specific legal rights, and you may also have other
rights which may vary from state to state. If you need additional instruction
regarding this warranty or have questions regarding what it may cover, call
BISSELL Consumer Services.
One Year Warranty
BISSELL Inc., upon receipt of the product, will repair or replace, free of charge,
any part which is defective or malfunctioning within one year of the purchase
date, provided that it is used for personal and not commercial or rental service.
If the unit cannot be repaired, BISSELL Inc. will replace or refund the full
price, at your option. Use of anything other than cool water in this unit
will cause damage to the heating element and void your warranty.
If your BISSELL product should require service:
1. Call BISSELL Consumer Services at 1-800-237-7691 and we will give
you the name and address of an authorized BISSELL Service Center in
your area.
2. If there is not an authorized BISSELL Service Center in your
area, a BISSELL Consumer Services Representative will issue you
a Return Authorization Number and a pre-paid mailing label to
return the unit to BISSELL.
— The machine should be returned with a photocopy of
your proof of purchase. (Your dated sales receipt is your
warranty - do not send original.)
— Insure the machine when shipping for your protection
from loss.
BISSELL Consumer Services
If you need information about repairs or replacement parts, or
questions about your warranty, call:
BISSELL Consumer Services
1-800-237-7691
Monday - Friday 8 a.m. — 7 p.m. EST
Saturday
9 a.m. — 1 p.m. EST
Or write:
BISSELL INC
PO Box 3606
Grand Rapids MI 49501
ATTN: Consumer Services
When contacting BISSELL, have model number of unit available.
Please record your Model Number: ___________________
Please record your Purchase Date: ___________________
NOTE: Please keep your original sales receipt. It is your warranty.
Tape or staple here for easy reference.
10
©1997 BISSELL Inc
Grand Rapids, Michigan
All rights reserved. Printed in USA
Part Number 010-5739
Visit our web site at:
http://www.bissell.com