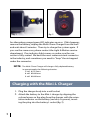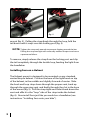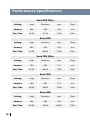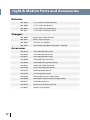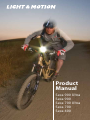
1
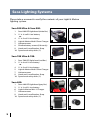
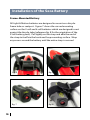
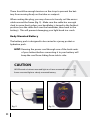
Product
Manual
Seca 900 Ultra
Seca 900
Seca 700 Ultra
Seca 700
Seca 400
CAUTION
A good lighting system can make cycling in the dark safer, but the best way
to be safe is to ride defensively.
• When not in use, ALWAYS unplug the light head from the battery.
When unplugging the light head cable from the battery, always pull
the connector, not the cable.
• ONLY use Light & Motion chargers to charge your Light & Motion batteries. Failure to do so will void the warranty and damage the system.
Congratulations!
You’ve purchased what we consider the best multi-emitter bicycle
lighting system available – the Light & Motion Seca. We hope that
your new light will inspire you to leave your car at home, rediscover
your old stomping grounds, and ride your bike year-round.
To receive maximum benefit from your Light & Motion system,
please take a moment to read these instructions.
2
Warranty
Light & Motion provides warranties against manufacturer defects
for 2 years on all Seca light heads, and for 6 months on batteries
starting from the date of purchase. While the warranty is non-transferable and does not cover failures from misuse, damaged lights
can usually be repaired for a nominal fee.
Returning Products for
Warranty Evaluation & Repair
Should your system malfunction for any reason, please submit a
service request to the Light & Motion service department at:
www. bikelights.com/service. We will contact you within 24 business hours to finalize the arrangements for your repair. When returning your system, please make sure to unplug the battery from
the light before shipping. All warranty and repair products should
be returned, with proof of purchase from an authorized dealer to:
Light & Motion
RMA#_________
300 Cannery Row
Monterey, CA 93940
International customers, please contact your local bicycle dealer for
warranty and return instructions. A list of international distributors
can be found on the Light & Motion website at www.bikelights.com.
3
Table of Contents
Caution................................................................................................................2
Warranty.............................................................................................................3
Returning Products for Warranty Evaluation & Repair.......................3
Seca Lighting Systems...................................................................................5
Seca 900 Ultra & Seca 900......................................................................5
Seca 700 Ultra & Seca 700.......................................................................5
Seca 400........................................................................................................5
Charging.............................................................................................................6
Charging with the Multi-Chem Charger............................................6
Charging with the Mini-L Charger.......................................................7
Installation of the Seca Light System........................................................8
Installing Seca on Your Bicycle..............................................................8
Installing Seca on a Helmet....................................................................9
Installing of the Seca Battery.................................................................... 10
Frame-Mounted Battery....................................................................... 10
Body-Mounted Battery..........................................................................11
Plugging Seca into the Battery........................................................... 12
Break-Away Disc Replacement................................................................ 12
Seca Light System Operation................................................................... 13
Normal Operation................................................................................... 13
Aiming Your Light................................................................................... 13
Battery Discharge Protection.............................................................. 14
Recycling Instructions................................................................................. 15
Seca Performance Specifications............................................................ 16
Light & Motion Parts & Accessories.........................................................17
4
Seca Lighting Systems
Please take a moment to verify the contents of your Light & Motion
lighting system.
Seca 900 Ultra & Seca 900:
1. Seca 900 LED light head (white fins)
3. 11.1v 6-cell Li-ion battery
or
4. 11.1v 9-cell Li-ion battery
5. Light & Motion Multi-Chem Charger
7. Helmet mount
8. Slimline battery mount (Ultra only)
9. Hook-and-Loop Bomber Strap
10. Spare break-away disks (2)
Seca 700 Ultra & 700:
1.
3.
4.
5.
7.
9.
10.
Seca 700 LED light head (red fins)
11.1v 6-cell Li-ion battery
or
11.1v 9-cell Li-ion battery
Light & Motion Multi-Chem Charger
Helmet mount
Hook-and-Loop Bomber Strap
Spare break-away disks (2)
1
2
3
4
5
6
7
8
9
10
Seca 400:
1.
2.
6.
7.
9.
10.
5
Seca 400 LED light head (grey fins)
11.1v 3-cell Li-ion battery
Light & Motion Mini-L Charger
Helmet mount
Hook-and-Loop Bomber Strap
Spare break-away disks (2)
Charging
Always fully charge your battery before its first use. Batteries
are shipped only partially charged and must be fully charged to
achieve the proper run time. Take this time to familiarize yourself
with our smart charger and what the status indictor LED’s mean.
NOTE:
All Light & Motion Li-ion chargers are ONLY compatible with
Light & Motion batteries.
The battery may be left on the Multi-Chem or Mini-L charger indefinitely, without harming the battery.
NOTE:
All Lithium-Ion batteries lose charge very slowly over time. And,
Lithium-Ion batteries retain their charge best when stored at
about 40-60% capacity. For maximum performance, charge your
battery immediately after a ride, remove it from the charger for
storage, and then top it up the day of your next ride. If storing for
extended periods, we recommend a top-up charge once a month.
Charging with the Multi-Chem Charger
1. Plug the power cord into the charger and then into the appropriate wall socket.
2. Attach the battery to the Multi-Chem Charger by aligning
the colored arrow on the plug from the charger with the
red dot or arrow on the Li-ion batteries (fig. 1), inserting the
plug into the battery’s socket.
3. Once the battery is attached to the Multi-Chem Charger,
an orange LED will illuminate on the right side and a green
LED will illuminate on the left side of the charger indicating
the battery is receiving a charge.
4. When both LED’s illuminate green, this is an indication the
battery is fully charged.
6
fig. 1
fig. 2
An alternating orange/green LED indicates an error. If this happens,
remove the battery, unplug the Multi-Chem Charger from the wall
and wait about 5 minutes. Then try to charge the system again. If
you see the same error, please contact the Light & Motion service
department. If no indicator light comes on, make sure the connector is fully seated. We have the most water-resistant connector
in the industry, and sometimes you need to “burp” the air trapped
under the connector.
NOTE:
The Multi-Chem Charger will charge a fully depleted battery
in approximately the following duration:
3-cell 01:75 hours
6-cell 02:00 hours
9-cell 03:00 hours
Charging with the Mini-L Charger
1. Plug the charger body into a wall socket
2. Attach the battery to the Mini-L charger by aligning the
colored arrow on the plug from the charger with the orientation indicator on the battery (red dot, or groove), inserting the plug into the battery’s socket (fig. 2).
7
Charging with the Mini-L Charger (cont’d)
3. A red LED will illuminate, indicating the battery is receiving
a charge.
4. When the indicator LED turns green your battery is fully
charged.
A quick flash (0.1 seconds every second) indicates the battery has
very low voltage, and the charger is attempting to recondition the
battery for charging.
A slow blink (0.5 seconds every 4 seconds) indicates a defective
battery, and you should contact the Light & Motion service department. If no indicator light comes on, make sure the connector is
fully seated. We have the most water-resistant connector in the industry, which requires a firm insertion to burp the trapped air and
complete the sealed connection. If the LED on the charger still
does not illuminate, the charger does not recognize the attached
battery as valid for charging (older NiMH batteries).
The Mini-L Charger will charge a fully depleted 2 or 3 cell battery in
about 6 hours.
Installation of the Seca Light System
Installing Seca On Your Bicycle
Your Light & Motion Seca light head comes with a universal bar
mount. Ideally, Seca should be mounted as close to the stem as
possible without interfering with your brake and shifter layout. Ideally, Seca should be mounted as close to the stem as possible. After
determining the proper location, wrap the strap under and around
the handlebar, feeding it back up through the buckle loop on the
8
fig. 3
fig. 4
mount (fig. 3). Pulling the strap firmly through the loop, fold the
tail down until it snaps over the locking post (fig. 4).
NOTE: Tighten the strap only enough to prevent slipping around the bar.
Pulling the strap too tight can eventually weaken the part and cause
a premature failure.
To remove, simply release the strap from the locking post and slip
the tail completely through the buckle loop, feeding the light from
the handlebar.
Installing Seca on a Helmet
The Helmet mount is designed to be mounted on any standard,
vented bicycle helmet. Position the base of the light head on top
of the helmet, in the middle and slightly forward of center. Slide
the hook and loop strap down through the proper vent, back up
through the opposing vent, and finally through the slot in the base
of the mount (fig. 5). Pull the strap tight and slide it back down the
vent and affix it to the “loop” side of the strap inside the helmet
(fig. 6). Now install Seca just like you would on a handlebar (see
instructions “Installing Seca onto your bike”).
9
Installation of the Seca Battery
Frame-Mounted Battery
All Light & Motion batteries are designed to mount on a bicycle
frame tube or seatpost. Figure 7 shows the curved mounting
surface on the 3-cell and 6-cell batteries which are designed to rest
against the bicycle tube (reference fig. 8 for the orientation of the
9-cell battery pack). Pull tightly on the strap and affix the end of
the strap to itself via the hook-and-loop mounting surface. Wrap
any excess around the battery until the entire strap is secured.
10
fig. 5
fig. 6
fig. 7
fig. 8
There should be enough tension on the strap to prevent the battery from moving freely on the tube or seatpost.
When routing the plug, you may choose to loosely coil the excess
cable around the frame (fig. 9). Make sure the cable has enough
slack to move freely when your handlebar is turned in the furthest
position (run the cable first over the handlebar, then back to the
battery). This will prevent damaging your light head in a crash.
Body-Mounted Battery
The battery pack is designed to be carried in a jersey pocket or
hydration pack.
HINT: Running the power cord through one of the back vents of your helmet before connecting it to your battery will keep the cord from sliding from side to side.
CAUTION
NEVER attach a helmet mounted light to a frame mounted battery, or a
frame mounted light to a body mounted battery.
fig. 9
11
fig. 10
Plugging Seca into the Battery
Plug the light head cable into the socket on top of the battery by
aligning the cable’s arrow to the battery’s orientation mark (a dot,
groove, or arrow – fig. 10). Due to the high quality seal of our connector, occasionally air compressed within the battery socket can
push the cable back out. Make sure the socket has “burped” this air
for the reliable, trouble free connection Light & Motion lights are
CAUTION
NEVER attach a helmet mounted light to a frame mounted battery, or a
frame mounted light to a body mounted battery.
known for.
The adjustability of the Light & Motion bar mount and light head
allow it to resist varying degrees of impact. If the light head receives a hard enough impact, it is designed to break away from the
mount, thus protecting the main components.
To replace the break-away disk, remove the Phillips head screw
from the underside of the mount, and replace the break-away disk
(two additional disks are included). Align the track on the disk with
Break-Away Disc Replacement
the cut out on the light head and secure using the supplied Phillips
head screw.
For additional replacement parts, contact Light & Motion via our
website at www.bikelights.com.
12
Seca Light System Operation
Normal Operation
The Light & Motion Seca LED lights all have one switch on the top
of the head that controls power. A brief button push activates
“Cruise” mode where you will find 4 settings: High, Medium, Low,
and Flash. A single click cycles through each of these settings.
Because our riders are versatile cyclists, we design our lights to
accommodate those needs. Seca also has a “Race” mode you can
enter by pushing and holding the button to turn on. Race mode
has only 2 settings: High and Low, with a single click cycling between them. In either mode, pushing and holding the button for
1-2 seconds will turn off the light.
NOTE: The LED emitters and supporting circuitry used in Seca emit a weak
electromagnetic field and may interfere with some wireless cycle
computers and heart rate monitors.
Aiming Your Light
Light & Motion creates lights with optics designed to reflect the
maximum amount of light and direct to where a rider needs it
most. Seca takes this one step further and introduces our proprietary Gem-Beam footprint of light, which clips light from where you
don’t need it and redistributes it where you do.
For best results at lower speeds, position your light so that you get
ample fill/peripheral light in front of the tire from the flood portion
of the beam. For faster speeds, you can position it slightly higher
so that the spot portion of the beam shoots farther down the road
giving you enhanced depth perception and a long line of site.
13
Seca Light System Operation (cont’d)
Battery Discharge Protection
All Light & Motion lights incorporate a battery discharge protection
circuit. If the battery becomes discharged, the light head will automatically dim down to try and preserve battery life, and eventually
shut off to protect the battery.
Low Battery:
Seca lets you know your battery is low in three ways:
1. A drop in light output,
2. A slow steady blink from the indicator light in the button,
3. A warning flash from the main LED’s.
Once in low battery mode, the indicator light will blink for
the remainder of the ride, and the main LED’s will flash every
minute as a warning (for when your light is helmet mounted).
You can easily over-ride this main LED warning flash by simply
pressing the button. We don’t want you to be surprised by a
low battery.
Dead Battery:
Seca also lets you know when you only have a few minutes left
of burn time, similar to the low battery warning. You will see another drop in light output, another warning flash from the main
LED’s, and the button indicator will begin blinking rapidly. As
with the low battery mode, you can over-ride the warning flash
from the main LED’s and select any light output level you want.
Auto Shut-off:
When Seca can’t stay on any longer without damaging the battery, it will shutoff with a slow fade out to give you time to hit
the brakes and stop safely.
14
Recycling Instructions
This product contains components that may not be disposed of
as unsorted municipal waste and must be reused or recycled per
the requirements of the European Union Directive 2002/96/EC on
waste electrical and electronic equipment (WEEE). The logo to the
right indicates that the product must be returned for the reuse or
recycling.
Please contact the store where your product was purchased to
determine how and where to return the product for recycling.
Light & Motion thanks you for helping us manage the recycling of
these components in order to keep the environment clean.
15
Performance Specifications
Seca 900 Ultra
Setting
High
Medium
Low
Flash
Lumens
900
450
225
n/a
Run Time
03:30
07:00
14:00
100+
Seca 900
Setting
High
Medium
Low
Flash
Lumens
900
450
225
n/a
Run Time
02:30
05:00
10:00
100+
Seca 700 Ultra
Setting
High
Medium
Low
Flash
Lumens
700
350
175
n/a
Run Time
04:25
08:30
17:00
100+
Seca 700
Setting
High
Medium
Low
Flash
Lumens
700
350
175
n/a
Run Time
03:00
06:00
12:00
100+
Seca 400
16
Setting
High
Medium
Low
Flash
Lumens
400
200
100
n/a
Run Time
02:00
04:00
08:00
100+
Light & Motion Parts and Accessories
Batteries
804-0079
11.1v 9-cell Li-ion Ultra Battery
804-0065
11.1v 6-cell Li-ion Battery
804-0087
11.1v 3-cell Li-ion Cub Battery
804-0118
7.4v 2-cell Li-ion Battery Pack
Chargers
804-0090
Multi-Chem Turbo Charger
804-0107
Mini-L Smart Charger
804-0056
DC to AC Car Adapter
804-0122
International Adapter Kit for Mini -L Charger
Accessories
17
826-0277
Seca 900 Light Head only
826-0263
Seca 700 Light Head only
826-0271
Seca 400 Light Head only
826-0266
Stella 200 Light Head only
826-0282
Stella 300 Dual Light Head only
826-0281
Stella 150L Light Head only
804-0108
Seca/Vega Spare Bar Mount
804-0110
Stella Spare Bar Mount
804-0120
Seca/Vega Spare Strap
804-0109
Helmet Mount (Seca/Vega/Stella)
804-0095
Multi-Sport Head Strap (Seca/Vega/Stella)
804-0111
Travel/Storage Case
826-0150
Break Away Disk Kit (2 per kit)
634-0012
Battery Strap (Velcro)
Additional Light & Motion Products
Light and Motion designs and manufactures innovative, high performance bike lighting systems for commuting, pleasure riding, and
racing both on-road and off. Currently our lighting systems range
in light output from 120 to over 900 lumens.
Our Lithium-ion batteries are for the most part interchangeable
across our line of Li-ion light heads. This means you can add a Seca
or Stella Li-ion light head to your current Light and Motion battery/
charging system and/or vice-versa.
Please visit our website www.bikelights.com for information on
new products and opportunities to further enhance your lighting
system.
300 Cannery Row
Monterey, CA 93940
(831) 645-1538
[email protected]
www.bikelights.com
905-0304-A