1
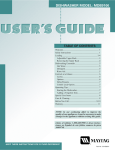
Owner’s Guide
24-inch Electric Wall Oven
with
Time-Of-Day Clock and Timer
TABLE OF CONTENTS
IMPORTANT SAFETY INSTRUCTIONS . . . . . . . . . 2-3
CLOCK AND TIMER . . . . . . . . . . . . . . . . . . . . . . . . . . . . 4
USING YOUR OVEN . . . . . . . . . . . . . . . . . . . . . . . . . 5-10
Oven characteristics . . . . . . . . . . . . . . . . . . . . . . . . . . . 5
Fan . . . . . . . . . . . . . . . . . . . . . . . . . . . . . . . . . . . . . . . . . 5
Oven indicator light . . . . . . . . . . . . . . . . . . . . . . . . . . . . 5
Use of aluminum foil . . . . . . . . . . . . . . . . . . . . . . . . . . . 5
Preheating . . . . . . . . . . . . . . . . . . . . . . . . . . . . . . . . . . . 5
Oven controls . . . . . . . . . . . . . . . . . . . . . . . . . . . . . . . . 5
How to set oven controls . . . . . . . . . . . . . . . . . . . . . . . 6
Double wall oven - lower oven . . . . . . . . . . . . . . . . . . 6
Oven racks . . . . . . . . . . . . . . . . . . . . . . . . . . . . . . . . . . . 7
Baking tips . . . . . . . . . . . . . . . . . . . . . . . . . . . . . . . . . . . 8
Roasting tips . . . . . . . . . . . . . . . . . . . . . . . . . . . . . . . . . 8
INSTALLER Please leave
this manual with this appliance.
Common baking problems chart . . . . . . . . . . . . . . . . . 9
Broil tips and broil chart . . . . . . . . . . . . . . . . . . . . . . . 10
CONTINUOUS CLEANING OVEN . . . . . . . . . . . . . . . . 11
CARE AND CLEANING CHART . . . . . . . . . . . . . . . . . 12
MAINTENANCE . . . . . . . . . . . . . . . . . . . . . . . . . . . . . . .
Oven door . . . . . . . . . . . . . . . . . . . . . . . . . . . . . . . . . .
Oven light . . . . . . . . . . . . . . . . . . . . . . . . . . . . . . . . . . .
Oven vent . . . . . . . . . . . . . . . . . . . . . . . . . . . . . . . . . . .
Oven window . . . . . . . . . . . . . . . . . . . . . . . . . . . . . . . .
13
13
13
13
13
SERVICE . . . . . . . . . . . . . . . . . . . . . . . . . . . . . . . . . . 14-15
Troubleshooting chart . . . . . . . . . . . . . . . . . . . . . . 14-15
WARRANTY . . . . . . . . . . . . . . . . . . . . . . . . . . . . . . . . . . 16
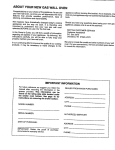
Model Number:
Serial Number:
Date of Purchase:
CONSUMER To save you
time, energy and money, read
and keep this manual for future
reference.
Model and serial numbers are on the rating plate located on the front oven
frame for single wall ovens. For double wall ovens, the rating plate is
located on the front oven frame of the lower oven. Open the oven door to
see the rating plate.
-FOR CUSTOMER ASSISTANCE CALL
1-800-688-9900
USA
1-800-688-2002 Canada8112P322-60
(02-99-00)
8112P322-60
A/01/06
2
IMPORTANT SAFETY INSTRUCTIONS
Thank You . . . for purchasing our cooking
appliance. To help you obtain the maximum in cooking
satisfaction, we offer these suggestions:
. Read this manual before using the appliance.
. Review all safety and caution instructions.
. Review the Troubleshooting Chart on
pages 14 and 15 if service becomes necessary.
. Include the model and serial numbers of your
appliance when requesting service.
S Proof of purchase such as sales receipt
will be needed for warranty service.
. You can contact us at:
Maytag Appliances Sales Company
Attn: CAIRSM Center
P. O. Box 2370
Cleveland, TN 37320-2370
1-800-688-9900 USA 1-800-688-2002 Canada
In our continuing effort to improve the quality and
performance of our cooking appliances, it may be
necessary to make changes to the appliance without
revising this manual.
IMPORTANT INSTRUCTIONS
Read and follow all instructions before using this
appliance to prevent the potential risk of fire, electric
shock, personal injury or damage to the appliance as a
result of improper usage of the appliance. Use appliance
only for its intended purpose as described in this manual.
To ensure proper and safe operation: Appliance must
be properly installed and grounded by a qualified
technician.
IN CASE OF FIRE
1. Turn off appliance to avoid spreading the flame.
2. NEVER pick up or move a flaming pan.
3. Smother fire or flame by closing the oven door.
4. Do not use water on grease fires. Use baking soda, a
dry chemical or foam-type extinguisher to smother fire
or flame.
GENERAL INSTRUCTIONS
WARNING: NEVER use appliance
door, as a step stool or seat as this
may result in possible tipping of the
appliance, damage to the appliance,
and serious injuries.
If appliance is installed near a
window, proper precautions should
be taken to prevent curtains from
blowing over elements.
NEVER use appliance to warm or
heat the room. Failure to follow this
instruction can lead to possible
burns, injury, fire, or damage to the
appliance.
NEVER wear loose-fitting or
hanging garments while using the
appliance. Clothing could catch
utensil handles or ignite and cause
burns if garment comes in contact
with hot heating elements.
To ensure proper operation and to avoid damage to the
appliance or possible injury, do not adjust, service, repair
or replace any part of the appliance unless specifically
recommended in this manual. Refer all other servicing to a
qualified technician.
NEVER store or use gasoline or other combustible or
flammable materials in the oven or in the vicinity of this
appliance as fumes could create a fire hazard or an
explosion.
To prevent grease fires, do not let cooking grease or other
flammable materials accumulate in or near the appliance.
Use only dry potholders. Moist or
damp potholders on hot surfaces
may result in a steam burn. Do not
let potholder touch hot heating
elements. Do not use a towel or
other bulky cloth which could
easily touch hot heating elements
and ignite.
Always turn off all controls when cooking is completed.
NEVER heat unopened containers in the oven. Pressure
build-up in the container may cause container to burst
resulting in burns, injury or damage to the appliance.
NEVER use aluminum foil to cover an oven rack or oven
bottom. Misuse could result in risk of electric shock, fire,
or damage to the appliance. Use foil only as directed in
this manual.
IMPORTANT SAFETY INSTRUCTIONS
CHILD SAFETY
HEATING ELEMENTS
NEVER leave children alone or unsupervised in area
where appliance is in use or is still hot.
NEVER touch oven heating
elements, areas near elements or
interior surfaces of oven.
NEVER allow children to sit or stand
on any part of the appliance as they
could be injured or burned.
CAUTION: NEVER store items of
interest to children in cabinets above
an appliance. Children climbing on
appliance or door to reach items could
damage the appliance or be burned or seriously injured.
Children must be taught that the appliance and utensils in
or on it can be hot. Let hot utensils cool in a safe place,
out of reach of small children. Children should be taught
that an appliance is not a toy. Children should not be
allowed to play with controls or other parts of the unit.
3
Heating elements may be hot even
though they are dark in color.
Interior surfaces of an oven may
become hot enough to cause burns. During and after
use, do not touch or let clothing or other flammable
materials contact heating elements, areas near
elements, or interior surfaces of oven until they have had
sufficient time to cool.
Other potentially hot surfaces include: Oven vent opening,
surfaces near the vent opening, oven door, areas around
the door, and oven window.
ABOUT SPECIALTY COOKWARE
OVEN
Use care when opening door. Let hot
air or steam escape before removing
or replacing food.
For proper oven operation and
performance, do not block or obstruct
oven vent duct.
Always place oven racks in desired locations while oven is
cool. If rack must be moved while oven is hot, do not let
potholder contact hot heating element in oven.
Only certain types of glass, glass/ceramic, ceramic,
earthenware, or other glazed utensils are suitable for oven
service without breaking due to the sudden change in
temperature. Follow utensil manufacturer’s instructions
when using glass.
This appliance has been tested for safe performance
using conventional cookware. Do not use any devices or
accessories that are not specifically recommended in this
manual. Do not use add-on oven convection systems.
The use of devices or accessories that are not expressly
recommended in this manual can create serious safety
hazards, result in performance problems, and reduce the
life of the components of the appliance.
CLOCK AND TIMER
4
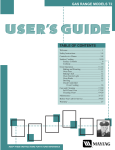
Clock
Y
Timer
B
The display will flash when the appliance is first connected to power or if
power is interrupted. The display will stop flashing once the time-of-day clock
has been set.
TIME-OF-DAY CLOCK
TIMER FEATURE
The display will flash when electrical power is first
supplied to the appliance or if there has been a power
failure.
The timer can be set from one minute (0:01) up to 12
hours (12:00). The timer does NOT control the oven.
To set the clock:
1. Press the CLOCK pad.
To set the timer:
1. Press the TIMER pad.
S A beep will sound when the CLOCK pad is pressed.
2. Press or press and hold the Y or B pad until the
correct time of day appears in the display.
S Press to change the time in 1 minute increments.
S Press and hold to change the time in 10 minute
increments.
To recall the time of day when the timer operation is
displayed, press the CLOCK pad.
S A beep will sound when the TIMER pad is pressed.
S 0:00 will appear in the display.
2. Press or press and hold the Y or B pad until the
correct time appears in the display.
S Press to change the time in 1 minute increments.
S Press and hold to change the time in 10 minute
increments.
S The timer will start automatically after a few seconds.
The flashing colon indicates that the timer is in use.
S If the CLOCK pad is pressed, the colon will continue
to flash to indicate the timer is in use.
3. A beep will sound at 1 minute (0:01).
4. At the end of the timer operation, 0:00 will appear in the
display and three beeps will sound.
S One beep will sound every 10 seconds for 10
minutes or until the timer operation is canceled.
To cancel the timer, press the TIMER pad and the current
time of day will reappear in the display. NOTE: When 0:00
is displayed, pressing either the TIMER or CLOCK pad
will also cancel the timer operation.
USING YOUR OVEN
5
CAUTION
S Be sure all packing material is removed from oven
before turning on.
S Do not use oven for storing food or cookware.
S Many aerosol-type spray cans are EXPLOSIVE
when exposed to heat and may be highly flammable.
Avoid their use or storage near the oven.
S Allow steam and hot air to escape before reaching
into oven to check, add, or remove food.
S Prepared Food Warning: Follow food manufacturer’s
instructions. If a plastic frozen food container and/or
its cover distorts, warps, or is otherwise damaged
during cooking, immediately discard the food and its
container. The food could be contaminated.
S Follow the manufacturer’s directions when using
oven cooking bags.
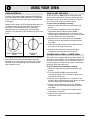
OVEN CHARACTERISTICS
USE OF ALUMINUM FOIL
Every oven has its own characteristics. You may find that
the cooking times and temperatures you were
accustomed to with your previous oven may need to be
altered slightly with your new oven. It is normal to notice
some differences between this oven and your previous
oven.
Do not cover entire rack with aluminum foil or place foil
directly under cookware. To catch spillovers, place a piece
of foil, a little larger than the pan, on the rack below the
pan. Do not place aluminum foil across the bottom of the
oven.
FAN
A fan automatically turns on whenever the oven is set for
a cooking operation. The fan will turn off when the oven is
turned off. (Note: The lower oven of the double wall oven
model has a fan and operates as described above.)
OVEN INDICATOR LIGHT
The OVEN indicator light, located on the control panel
below the knob, turns on whenever the oven is turned on.
When the oven reaches the preset temperature, the
indicator light will turn off and then cycle on and off as the
oven elements cycle on and off.
PREHEATING
Preheating is necessary for proper baking results. It is not
necessary for broiling or roasting. Allow the oven to heat
until the desired oven temperature is reached,
approximately 10 to 15 minutes.
Selecting a temperature higher than desired will not
preheat the oven any faster. Preheating at a higher
temperature may have a negative effect on baking results.
USING YOUR OVEN
6
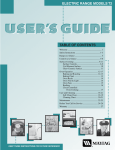
OVEN CONTROLS
HOW TO SET THE OVEN
The Oven Temperature knob is marked “UPPER OVEN”
for double ovens and “OVEN & BROILER” for single wall
ovens. This knob is used to select and maintain the oven
temperature.
To turn the oven on, both the Oven Temperature and
Selector knobs must be set. The oven will not operate if
the Selector knob is left in the OFF position. To turn the
oven off, turn both knobs to the OFF position.
Always turn this knob just TO the desired temperature not
to a higher temperature and then back. This allows for
more precise oven temperatures and is especially
important if the oven is being set for a critical baking
operation. Turn this knob to OFF whenever the oven is not
in use.
BROIL
BAKE
BROIL
To set the oven for baking or roasting:
1. When cool, place the oven rack in the desired rack
position.
2. Turn the Oven Temperature knob to the desired
temperature and the Selector knob to BAKE.
3. Allow the oven to preheat for 10 to 15 minutes. The
indicator light, located below the knob, will turn off when
the oven reaches the preset temperature.
4. Place the food in the center of the oven, allowing a
minimum of two inches between the utensil and the
oven walls.
5. Check the food for doneness at the minimum time in
the recipe. Cook longer if necessary.
6. Remove food from the oven and turn the Oven
Temperature knob and Selector knob to OFF.
OVEN TEMPERATURE
KNOB
SELECTOR
KNOB
The Selector knob determines the type of oven operation.
Turn this knob to the desired setting. Each setting is
identified by an indent (stop) and a “click” sound. (Note:
The lower oven for double wall oven models does not
have a Selector knob.)
DOUBLE WALL OVEN -- LOWER OVEN
The lower oven is equipped with only a bake element. For
best results, use the upper oven for delicate cooking such
as cakes, cookies, biscuits, or pies. Use either oven for
non-critical type of cooking such as meats or casseroles.
Broiling is done in the upper oven.
To set the lower oven for baking or roasting:
1. When cool, place the oven rack in the desired rack
position.
2. Turn the LOWER OVEN knob to the desired
temperature setting. (Note: The Selector knob is not
used with the lower oven.)
3. Allow the oven to preheat for 10 to 15 minutes. The
indicator light, located below the knob, will turn off when
the oven reaches the preset temperature.
4. Place the food in the center of the oven, allowing a
minimum of two inches between the utensil and the
oven walls.
5. Check the food for doneness at the minimum time.
Cook longer if necessary.
6. Remove food from the oven and turn the LOWER
OVEN knob to OFF.
USING YOUR OVEN
7
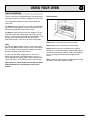
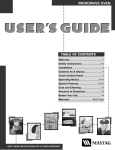
RACK POSITIONS
The two oven racks are designed with a lock-stop position
to keep the racks from coming completely out of the oven.
Do not attempt to change the rack positions when the
oven is hot.
To remove: Be sure the rack is cool. Pull the rack straight
out to the lock-stop position. Tilt the front of the rack up
and continue pulling the rack out of the oven.
Rack Positions:
~
}
|
{
To replace: Place the rack on the rack supports. Tilt the
front end up and slide it back until it clears the lock-stop
position. Lower the front and slide the rack straight in. Pull
the rack out to the lock-stop position to be sure it is
positioned correctly. Then return it to its normal positon.
Hints:
For optimum baking results of cakes, cookies or biscuits,
bake on one rack. Position rack so food is in the center of
the oven. Allow 2 inches between the edge of the utensil
and the oven walls or adjacent utensils.
If cooking on two racks, stagger pans so one is not
directly over the other. Use rack positions 2 and 4, or 1
and 4, depending on baking results, when cooking on two
racks. Use racks 1 and 4 when using two cookie sheets.
Never place two cookie sheets on one rack and never
place aluminum foil or pans directly on the oven
bottom.
Rack 4 (top of oven) used for two-rack cooking.
Rack 3 used for two-rack baking or most broiling.
Rack 2 used for most one-rack baking of cookies or
biscuits on a cookie sheet; baking cakes, bundt cakes or
breads; two-rack baking; roasting meats; cooking larger
food; or, broiling thicker items such as split chicken
halves.
Rack 1 used for roasting turkey, baking angel food cake,
pie shells, frozen pies, souffles or bread.
8
USING YOUR OVEN
BAKING TIPS
ROASTING TIPS
Use a reliable recipe and accurately measure fresh
ingredients. Carefully follow directions for oven
temperature and cooking time. Preheat oven if
recommended.
Roasting is the method for cooking large, tender cuts of
meat uncovered, without adding moisture. Most meats are
roasted at 325°F. It is not necessary to preheat the oven.
Use the correct rack position. Baking results may be
affected if the wrong rack position is used.
S Top browning may be darker if food is located
toward the top of the oven.
S Bottom browning may be darker if food is located
toward the bottom of the oven.
Bakeware material plays an important part in baking
results. Always use the type and size of pan called for in
the recipe. Cooking times or cooking results may be
affected if the wrong size is used.
S Shiny metal pan reflects heat away from the food,
produces lighter browning and a softer crust. Use shiny
pans for baking cakes or cookies.
S Dark metal pan or a pan with an anodized (dull)
bottom absorbs heat, produces darker browning and a
crisper crust. Use this type of pan for pies, pie crusts or
bread.
S For optimum baking results, bake cookies and biscuits
on a flat cookie sheet. If the pan has sides, such as a
jelly roll pan, browning may not be even.
S If using oven-proof glassware, or dark pans such as
Baker’s Secret reduce the oven temperature by 25°F
except when baking pies or bread. Use the same
baking time as called for in the recipe.
S If using insulated bakeware, expect cooking times to
increase slightly. It is not necessary to adjust the oven
temperature.
Check the cooking progress at the minimum time
recommended in the recipe. If necessary, continue
checking at intervals until the food is done. If the oven
door is opened too frequently, heat will escape from the
oven; this can affect baking results and wastes energy.
If you add additional ingredients or alter the recipe,
expect cooking times to increase or decrease slightly.
S For best results use tender cuts of meat weighing 3-lbs.
or more.
S Some good choices are: Beef rib, ribeye, top round,
high quality tip and rump roast, pork loin roast, leg of
lamb, veal shoulder roast and cured or smoked hams.
S Place the meat fat-side-up on a rack in a shallow
roasting pan. Placing the meat on a rack holds it out of
the drippings, thus allowing better heat circulation for
even cooking. As the fat on top of the roast melts, the
meat is basted naturally, eliminating the need for
additional basting.
S The cooking time is determined by the weight of the
meat and the desired doneness.
S For more accurate results, use a meat thermometer.
Insert it so the tip is in the center of the thickest part of
the meat. It should not touch fat or bone.
S Remove the meat from the oven when the thermometer
registers the desired doneness.
NOTE: For more information about food safety, call
USDA’s Meat & Poultry Hotline at 1-800-535-4555.
For cooking information, write to the National Cattlemen’s Beef Association, 444 North Michigan Avenue,
Chicago, Illinois 60611, or call 1-800-368-3138.
USING YOUR OVEN
9
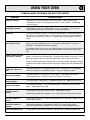
COMMON BAKING PROBLEMS AND WHY THEY HAPPEN
PROBLEM
POSSIBLE CAUSES
Cakes are uneven.
• Pans too close or touching each other or oven walls. • Batter uneven in pans.
• Temperature set too low or baking time too short. • Oven not level. • Undermixing.
• Too much liquid.
Cake high in middle.
• Temperature set too high. • Baking time too long. • Overmixing. • Too much flour.
• Pans touching each other or oven walls. • Incorrect rack position.
Cake falls.
• Too much shortening or sugar. • Too much or too little liquid. • Temperature set too
low. • Old or too little baking powder. • Pan too small. • Oven door opened frequently.
• Added incorrect type of oil to cake mix. • Added additional ingredients to cake mix or
recipe.
Cakes, cookies, biscuits
don’t brown evenly.
• Incorrect rack position. • Oven door not closed properly. • Door gasket not sealing
properly or properly attached to door. • Incorrect use of aluminum foil. • Oven not
preheated. • Pans darkened, dented or warped.
For optimum results, bake on one rack. If baking cakes on two racks, place pans toward
the front of the oven on the upper rack and toward the back of the oven on the lower
rack.
Cakes, cookies, biscuits
too brown on bottom.
• Oven not preheated. • Pans touching each other or oven walls. • Incorrect rack
position. • Incorrect use of aluminum foil. • Placed 2 cookie sheets on one rack. • Used
glass, dark, stained, warped or dull finish metal pans. (Use a shiny cookie sheet.)
Follow cookware manufacturer’s instructions for oven temperature. Glassware and dark
cookware such as Ecko’s Baker’s Secret may require lowering the oven temperature by
25°F.
Cakes don’t brown on
top.
• Incorrect rack position. • Temperature set too low. • Overmixing. • Too much liquid.
• Pan size too large or too little batter in pan. • Oven door opened too often.
Excessive shrinkage.
• Too little leavening. • Overmixing. • Pan too large. • Temperature set too high.
• Baking time too long. • Pans too close to each other or oven walls.
Uneven texture.
• Too much liquid. • Undermixing. • Temperature set too low. • Baking time too short.
Cakes have tunnels.
• Not enough shortening. • Too much baking powder. • Overmixing or at too high a
speed. • Temperature set too high.
Cake not done in
middle.
• Temperature set too high. • Pan too small. • Baking time too short.
If additional ingredients were added to mix or recipe, expect cooking time to increase.
Pie crust edges too
brown.
• Temperature set too high. • Pans touching each other or oven walls. • Edges of crust
too thin; shield with foil.
Pies don’t brown on
bottom.
• Used shiny metal pans. • Temperature set too low. • Incorrect rack position.
• Some frozen pies should be placed on a cookie sheet, check package directions.
Pies have soaked crust.
• Temperature too low at start of baking. • Filling too juicy. • Used shiny metal pans.
USING YOUR OVEN
10
BROILING
Broiling is a method of cooking tender meats by direct
heat. The cooking time is determined by the distance
between the meat and the broil element, the desired
degree of doneness and the thickness of the meat. (Note:
On double oven wall ovens, only the upper oven can be
used for broiling.)
Broiling Tips:
Broiling requires the use of the broiler pan and insert. The
broiler insert must be in place to allow fat and liquid to
drain to the pan below to prevent spatters, smoke and
flare-ups. Improper use may cause grease fires.
Do not cover the broiler insert with aluminum foil as this
prevents fat from draining into pan below. For easier clean
up, line the broiler pan with foil and spray the insert with a
non-stick vegetable spray.
Remove excess fat and slash remaining fat to help keep
meat from curling. This also reduces smoking and
spattering.
Place oven rack in the correct rack position when oven is
cool. For darker browning, place meat closer to the broil
element. Place meat further down if you wish meat to be
well done or if excessive smoking and flaring occurs.
If meat is cooking or browning too quickly, you can reduce
the temperature of the broiling operation. Turn the Oven
Temperature knob to 350°F. Leave the Selector knob set
at BROIL. Expect cooking times to increase slightly.
See Care and Cleaning Chart on page 11 for instructions
on cleaning the broiler pan and insert.
To set oven to broil:
1. Turn both the Oven Temperature and Selector knobs
to BROIL. NOTE: To broil at a lower temperature,
turn the Selector knob to BROIL and the Oven
Temperature knob to 350°F.
2. For optimum results, remove broiler pan and preheat
broil element 3 minutes. Broil times in the chart below
are based on a 3 minute preheat.
3. Broil with the oven door opened to the broil stop
position (opened about 6-inches). Turn meat once
about half way through cooking. Check for doneness
by cutting a slit in the meat near the center for
desired color.
4. At the end of cooking, turn both the Oven
Temperature and Selector knobs to OFF.
Broil times may need to be increased if wall oven is
installed on a 208-volt circuit.
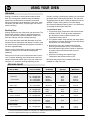
BROILING CHART
SETTING
TOTAL TIME
(MINUTES)**
Well Done
Broil at 350°F
6 to 9
#3 -- Straight Rack
#3 -- Straight Rack
#3 -- Off-set Rack
#3 -- Off-set Rack
Medium
Well Done
Medium
Well Done
Broil
Broil
Broil
Broil
15 to 18
18 to 21
29 to 31
32 to 35
#2 -- Off-set Rack
Well Done
Broil at 350°F
35 to 45
#3 -- Straight Rack
#3 -- Straight Rack
Flaky
Flaky
Broil
Broil
7 to 10
12 to 18
#3 -- Straight Rack
Well Done
Broil
15 to 19
#3 -- Straight Rack
Heated
(140°F)
Broil
8 to 15
#3 -- Straight Rack
Medium
Well Done
Broil
Broil
11 to 16
13 to 18
TYPE OF MEAT
RACK POSITION*
DONENESS
BACON
#3 -- Off--set Rack
BEEF STEAKS
1-inch thick
1 1/2-inch thick
CHICKEN
Whole, split
FISH STEAK OR FILLET
fillet
steak
GROUND BEEF PATTIES
3/4 to 1-inch thick
HAM SLICE, fully cooked
1/2-inch thick
PORK CHOPS
1/2 to 3/4-inch thick
* The top rack position is position #4. See page 6 for additional information on oven racks.
** Times are approximate and may vary depending on the meat.
CONTINUOUS CLEANING OVEN
11
NOTE: The oven door liner is porcelain enamel. For
cleaning instructions, refer to the cleaning chart on page
12.
These crusty or varnish-like stains must either be
removed or broken up before cleaning can effectively take
place.
WHAT IS THE CONTINUOUS CLEANING OVEN?
TO MANUALLY CLEAN HEAVY SPILLOVERS
The finish of the Continuous Cleaning Oven is identified
by its dark gray color, white stipple and rough, porous
texture. The rough texture prevents grease spatters from
forming beads which run down the walls leaving unsightly
streaks. Rather, the rough texture absorbs spatters and
allows them to spread, thus exposing a larger area to the
hot oven air. The catalyst, when exposed to heat, speeds
the oxidation of soil.
Brush off heavy soil with a nylon brush or plastic pad. DO
NOT USE paper towels, cloths or sponges for the oven
walls are porous and particles of these materials will rub
off on the walls. Rinse area with clear water only.
Cleaning action automatically begins whenever the oven
is turned on for baking or roasting. The oven MUST be on
for cleaning to take place. No cleaning will occur when the
oven is off. The special catalytic finish must be exposed to
hot oven air before soil will begin to gradually reduce in
size.
FACTORS AFFECTING LENGTH OF CLEANING
TIME
The higher the oven temperature, the faster the cleaning
action. The length of cleaning time will depend on these
factors: Type of soil, amount or size of soil, oven
temperature and length of time oven is in use. Time may
vary from a few minutes to several hours. Soil deposited
at the end of a cycle may still be visible. This will usually
fade with continued oven use until the soil gradually
disappears or can be wiped up manually. The oven will
appear presentably clean, even though some spatters
may be present.
MANUALLY CLEANING HEAVY SPILLOVERS
The special finish will clean most spatters during normal
oven use unless there is a heavy buildup of soil. Heavy
spillovers such as pie or casserole boilovers will not clean
effectively without some manual help. The crusty or
varnish-like stains that form from these spillovers clog the
pores and prevent the special finish from being exposed
to the hot oven air. This greatly reduces the cleaning
effectiveness of the finish.
HINTS
Brittle crusts or stains can be loosened by GENTLY
tapping stain with a wooden or plastic utensil. Brush away
any loose soil that flakes off. Varnish type stains usually
need to be softened with a small amount of water or damp
cloth. Remaining soil will gradually reduce with continued
oven use at normal baking temperatures.
DO NOT USE ANY TYPE OF OVEN CLEANER,
POWDERED CLEANSERS, SOAP, DETERGENT OR
PASTE ON ANY CONTINUOUS CLEANING SURFACE,
ALSO, DO NOT USE ANY ABRASIVE MATERIALS,
STEEL WOOL, SHARP INSTRUMENTS OR SCRAPERS
FOR THEY WILL DAMAGE THE FINISH.
Avoid spillovers by using utensils that are large enough to
hold food. A cookie sheet or piece of aluminum foil, just a
little larger than the pan, can be placed on the rack
directly below the rack holding the utensil to catch spills.
Over a period of time, wear marks may appear on the
embossed rack supports. This is normal and results from
sliding the racks in and out of the oven. Wear marks will
not affect the cleaning action of the oven.
12
CARE AND CLEANING
Many different cleaning agents are recommended for the various parts of the wall oven. The following brands may help
you to make an appropriate selection: Mild abrasive cleaners (Bon Ami, Cameo, Soft Scrub, Comet or Ajax); mild liquid
sprays (Fantastik, Formula 409); glass cleaners (Windex, Glass Plus, Cinch); non-abrasive scouring pad (Tuffy). If a
cleaning product is recommended for use on plastic, glass or porcelain, it can be used on the same appliance finish.
Be sure oven is off and all parts are cool before cleaning.
PARTS
CLEANING AGENTS
DIRECTIONS Be sure all parts are properly replaced after cleaning.
Broiler pan &
insert
Soap & water. Plastic
scouring pad. Soap
filled scouring pad.
Dishwasher.
Remove from oven after use. Cool then pour off grease. Place soapy
cloth over insert and pan; let soak to loosen soil. Wash in warm
soapy water. Use soap filled scouring pad to remove stubborn soil.
Clean in dishwasher if desired.
Baked Enamel:
Oven door
Soap & water. Paste of
baking soda & water.
Glass cleaner.
Use a dry paper towel or cloth to wipe up spills, especially acidic
spills, as soon as they occur. This is especially important for white
surfaces. When surface is cool, wash with soap and water. Do not
use abrasive or harsh cleaning liquids and powders or oven
cleaners. These will scratch and permanently damage the finish. Dry
with a soft cloth.
Control knobs
Mild detergent & water.
To remove knobs, gently pull forward. Wash in mild detergent and
water. Do not use abrasive cleaning agents. They will scratch finish
and remove markings. Rinse, dry and replace. Turn each knob ON
to see if knobs have been replaced correctly.
Glass:
Oven window
Soap & water. Paste
of baking soda &
water. Window
cleaner.
Wash with soap and water. Remove stubborn soil with paste of
baking soda and water. Do not use abrasive materials such as
scouring pads, steel wool or powdered cleaning agents. They will
damage glass. Rinse with clear water and dry. To prevent staining of
oven window, never use excessive amounts of water which may
seep under or behind glass.
Metal finishes:
Trim parts
Soap & water. Paste of
baking soda & water.
Wash with soap and water. Remove stubborn soil with paste of
baking soda and water. Do not use oven cleaner, abrasive or caustic
agents. They will damage the finish.
Elements are self-cleaning. Soil will burn off as elements are used.
Do not spray oven cleaner on elements, electrical hook up or
connection.
Oven Elements
Oven racks
Soap & water.
Cleansing powders &
plastic pads. Soap filled
scouring pad.
Clean with soapy water. Remove stubborn soil with cleansing
powder or soap filled scouring pad. Rinse and dry.
Plastic finishes:
Door handle, trim
Soap & water. Paste
of baking soda &
water. Non-abrasive
plastic pad or sponge.
Do not use oven cleaner, powder or liquid cleansers, abrasive or
caustic cleaning agents on plastic finishes. These cleaning agents
will scratch or marr finish. To prevent staining or discoloration, wipe
up fat, grease or acid (tomato, lemon, vinegar, milk, fruit juice,
marinade) immediately with a dry paper towel or cloth. When surface
is cool, clean with soap and water; rinse, and dry.
Porcelain enamel:
Oven,
Door liner.
Mild liquid cleaners,
detergent or soap &
water. Cleansing
powders and non
abrasive nylon or
plastic pads.
Porcelain enamel is glass fused on metal. It may crack or chip with
misuse. Porcelain enamel is acid resistant, not acid proof. All
spillovers, especially acidic or sugar spillovers, should be wiped up
immediately with a dry cloth. Surface may discolor or dull if soil,
especially acid soil, is not removed. Never wipe off a warm or hot
surface with a damp cloth. This may cause cracking and chipping.
Never use oven cleaners, abrasive or caustic cleaning agents on
exterior finish of wall oven. Oven cleaner can be used on the
porcelain enamel oven. Do not use oven cleaner on the continuous
cleaning oven.
Soap & water.
Wash with soap. Rinse thoroughly. DO NOT REMOVE.
See page 11 for
Continuous
Cleaning Oven.
Silicone rubber
door gaskets
MAINTENANCE
OVEN DOOR
13
OVEN LIGHT
CAUTION
CAUTION
S WARNING: NEVER place excessive weight on or
stand on an open oven door. This could cause the
range to tip over, break the door, or injure the user.
S NEVER place fingers between hinge and front oven
frame. Hinge arms are spring mounted. If accidently
hit, the hinge will slam shut against oven frame and
could injure your fingers.
When baking, be sure oven door is completely closed.
Baking results will be affected if door is not closed.
NOTE: When oven is new, the oven door may feel
“spongy” when you close the door. This is normal and will
become less “spongy” with use.
To remove lift-off oven door:
1. When cool, open oven door to the broil stop position
(opened about 4-inches).
2. Grasp door at each side.
3. Lift up evenly until door clears hinge arms. Do not use
door handle to lift door.
S Disconnect power to wall oven by tripping circuit
breaker or removing fuse before replacing light
bulb.
S Be sure bulb is cool before touching or replacing
bulb.
S Use a dry potholder to prevent possible harm to
hands when replacing bulb.
S Do not touch hot bulb with a damp cloth as this may
cause the bulb to break.
To replace oven light bulb: Be sure bulb is cool. Use a
dry potholder, to prevent possible harm to hands, and very
carefully unscrew the light bulb.
Replace with a 40 watt appliance bulb and reconnect
power to oven. Reset the clock.
To turn on the oven light: Push the rocker switch
located on the control panel.
OVEN VENT
CAUTION
OVEN FRAME
When oven is in use, the area near the oven vent
opening may feel warm or hot to the touch.
DOOR HINGE
To place oven door back on wall oven:
1. Grasp door at each side.
2. Align slots in door with hinge arms on range.
3. Slide door down onto hinge arms until door is
completely seated on hinges. Then push down on top
corners of door to completely seat door on hinges.
Door is not completely seated if one side is higher or if
door appears to be crooked.
Do not attempt to open or close door or operate oven until
door is properly replaced.
The oven vent is located between the oven door and the
control panel.
When the oven is in use, this area may feel warm or hot to
the touch.
To prevent baking problems, do not block the vent
opening.
OVEN WINDOW
To protect the oven door window:
1. Do not use abrasive cleaning agents such as steel wool
scouring pads or powdered cleansers as they may
scratch the glass.
2. Do not hit the glass with pots, pans, furniture, toys, or
other objects.
3. Do not close the oven door until the oven racks are in
place.
Scratching, hitting, jarring or stressing the glass may
weaken its structure causing an increased risk of
breakage at a later date.
14
SERVICE
CAUTION
S Do not attempt to service this appliance yourself
unless directed to do so in this manual or the
chart below. Refer all other servicing to a
qualified servicer or call us at 1-800-688-9900.
S Locate and mark circuit breaker or fuse. Never
replace a blown fuse or reset a circuit breaker
until you know what caused the problem. Always
replace a blown fuse with one of the correct
amperage, do not use a substitute.
S Always disconnect power to unit before any
servicing by tripping circuit breaker to the OFF
position or by removing the fuse.
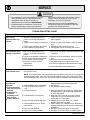
TROUBLESHOOTING CHART
PROBLEM
POSSIBLE CAUSES
SUGGESTED CORRECTIONS
Part or all of
appliance does not
operate.
1. Check to be sure plug is securely inserted into
1. Wall oven is disconnected from
wall receptacle.
power or is loosely connected to
power.
2. Tripped circuit breaker or blown fuse. 2. Check or re-set circuit breaker. Check or replace
fuse.
3. Power supply has been interrupted. 3. Wait until power has been restored.
4. See pages 6 and 10 for setting oven control.
4. Oven controls not set properly.
Oven elements fail to
operate or heat food.
1.Wall oven is disconnected from
power or is loosely connected to
power.
2.Tripped circuit breaker or blown fuse.
3.Power supply has been interrupted.
4.Oven controls not set properly.
5.Oven was not set to correct
temperature.
6.Defective part.
1.Check to be sure plug is securely inserted into wall
receptacle.
1. Oven seems hotter or cooler than
your previous oven.
1. See page 5.
Baking results differ
from previous oven.
2.Check or re-set circuit breaker. Check or replace
fuse.
3.Wait until power has been restored.
4.See pages 6 and 10 for setting oven control.
5.Set oven to temperature recommended in recipe.
6.Have authorized servicer replace part.
NOTE: Oven temperatures may vary between the new and the old oven. As ovens age, the
oven temperature often “drifts” and may become hotter or cooler. Also, newer ovens may
operate differently from older ovens. You should expect some differences in baking results.
Baking results are
not what you
expected.
S Uneven browning
(too dark on top or
bottom).
S Underdone or
overdone.
S Browning is too
dark or light.
S Cake is not level.
1. Oven is too hot or too cool.
2. Selected BROIL rather than BAKE.
3. Food not positioned correctly in
oven.
4. Used incorrect pan.
5. Used aluminum foil incorrectly.
6. Oven rack was crowded with pans.
7. Used unreliable recipe or did not
follow recipe.
8. Oven vent was blocked.
9. Door is not correctly installed.
1. Select correct oven temperature. When baking,
always preheat oven before adding food.
2. See page 6.
3. See rack placement on page 7.
4. Dark pans produce dark browning. Select shiny
aluminum pans or reduce the oven temperature
by 25°F. See page 8.
5. Never use foil to cover an oven rack. Place a
small piece of foil on the rack below the rack
holding the pan. See page 5.
6. Stagger pans on rack. Allow 1 to 2-inches
between pans and oven walls.
7. Select recipes from reliable sources. Read and
carefully follow instructions and do not substitute
ingredients.
8. See page 13 for information on oven vent.
9. See page 13 for instructions on replacing door.
(Continued next page)
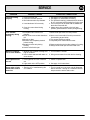
SERVICE
PROBLEM
Food not broiling
properly.
POSSIBLE CAUSES
1. Oven incorrectly set.
2. Used incorrect rack position.
3. Broil element was not preheated.
4. Used aluminum foil incorrectly.
5. Oven door was closed during
broiling.
Oven smokes
excessively during
broiling.
1.Food placed too close to broil
element.
2.Broiler insert covered with aluminum
foil.
3.Meat is too fatty.
4.Marinade not completely drained
before broiling.
5.Basted meat too early during
broiling.
6.Used a soiled broiler pan.
Moisture condensa1. Window may fog when cooking food
high in moisture.
tion on oven window.
2. Used a cloth saturated with water to
clean window.
15
SUGGESTED CORRECTIONS
1. See page 10 for operating instructions.
2. See page 7 for information on broiling.
3. For optimum browning, preheat the broil element
for 3 to 4 minutes before placing food in the oven.
4. The broiler pan can be lined with foil; never line
the broiler insert with foil.
5. Always leave door opened to the broil stop
position (opened about 4-inches) during broiling.
1.Move broiler pan down one rack position.
2.Never cover insert with foil as this prevents fat
from draining to pan below.
3.Trim excess fat before broiling.
4.Completely drain marinade from meat.
5.Baste meat during the last few minutes of cooking.
6.Always clean broiler pan and insert after use.
1. This condition is normal.
2. Wring excess water from cloth before cleaning.
Oven light does not
turn on.
1. Oven light bulb is loose or burned
out.
2. Light switch in the OFF position.
1. Check or replace bulb.
Strong odor or light
smoke when oven is
turned on.
1. “Burning off” of manufacturing oils
or insulation.
1. This is normal for a new oven and will disappear
after a few uses. Turning on a ventilation fan will
help remove the smoke and/or odor.
2. See page 13 for instructions.
WARRANTY & SERVICE
What is Not Covered By These Warranties
Warranty
Limited One Year Warranty Parts and Labor
For one (1) year from the original retail
purchase date, any part which fails in
normal home use will be repaired or
replaced free of charge.
Canadian Residents
The above warranties only cover an
appliance installed in Canada that has been
certified or listed by appropriate test
agencies for compliance to a National
Standard of Canada unless the appliance
was brought into Canada due to transfer of
residence from the United States to
Canada.
The specific warranties expressed above
are the ONLY warranties provided by the
manufacturer. These warranties give you
specific legal rights, and you may also have
other rights which vary from state to state.
CUSTOMER'S SOLE AND EXCLUSIVE
REMEDY UNDER THIS LIMITED WARRANTY
SHALL BE PRODUCT REPAIR AS PROVIDED
HEREIN. IMPLIED WARRANTIES, INCLUDING
WARRANTIES OF MERCHANTABILITY OR
FITNESS FOR A PARTICULAR PURPOSE, ARE
LIMITED TO ONE YEAR OR THE SHORTEST
PERIOD ALLOWED BY LAW. MAYTAG
CORPORATION SHALL NOT BE LIABLE FOR
INCIDENTAL OR CONSEQUENTIAL
DAMAGES. SOME STATES AND PROVINCES
DO NOT ALLOW THE EXCLUSION OR
LIMITATION OF INCIDENTAL OR
CONSEQUENTIAL DAMAGES, OR
LIMITATIONS ON THE DURATION OF IMPLIED
WARRANTIES OF MERCHANTABILITY OR
FITNESS, SO THESE EXCLUSIONS OR
LIMITATIONS MAY NOT APPLY TO YOU.
THIS WARRANTY GIVES YOU SPECIFIC
LEGAL RIGHTS AND YOU MAY ALSO HAVE
OTHER RIGHTS, WHICH VARY STATE TO
STATE OR PROVINCE TO PROVINCE.
1. Conditions and damages resulting from any of the following:
a. Improper installation, delivery, or maintenance.
b. Any repair, modification, alteration, or adjustment not authorized by the
manufacturer or an authorized servicer.
c. Misuse, abuse, accidents, or unreasonable use, or acts of God.
d. Incorrect electric current, voltage, electrical and/ or gas supply.
e. Improper setting of any control.
2 Warranties are void if the original serial numbers have been removed, altered,
or cannot be readily determined.
3. Light bulbs, water filters and air filters.
4. Products purchased for commercial or industrial use.
5. The cost of service or service call to:
a. Correct installation errors. For products requiring ventilation, rigid metal
ducting must be used.
b. Instruct the user on the proper use of the product.
c. Transport the appliance to and from the servicer.
6. Any food loss due to refrigerator or freezer product failures.
7. Expenses for travel and transportation for product service in remote locations.
8. Outside of the United States and Canada this warranty does not apply. Contact
your dealer to determine if another warranty applies.
9. Consequential or incidental damages sustained by any person as a result of any
breach of these warranties. Some states do not allow the exclusion or limitation
of consequential or incidental damages, so the above exclusion may not apply.
If You Need Service
First see the Troubleshooting section in your Use and Care Guide or call the dealer
from whom your appliance was purchased or call Maytag Services, LLC, Customer
Assistance at 1-800-688-9900 USA and 1-800-688-2002 Canada to locate an
authorized servicer.
• Be sure to retain proof of purchase to verify warranty status. Refer to
WARRANTY for further information on owner’s responsibilities for warranty
service.
• If the dealer or service company cannot resolve the problem, write to Maytag
Services, LLC, Attn: CAIR® Center, P.O. Box 2370, Cleveland, TN 37320-2370, or
call 1-800-688-9900 USA and 1-800-688-2002 Canada. U.S. customers
using TTY for deaf, hearing impaired or speech impaired, call 1-800-688-2080.
• User’s guides, service manuals and parts information are available from Maytag
Services, LLC, Customer Assistance.
Notes: When writing or calling about a service problem, please include:
a. Your name, address and telephone number;
b. Model number and serial number;
c. Name and address of your dealer or servicer;
d. A clear description of the problem you are having;
e. Proof of purchase (sales receipt).
Form No. A/01/06
Part No. 8112P322-60
©2006 Maytag Appliances Sales Co.
Litho U.S.A .