1
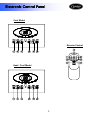
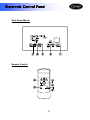
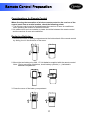
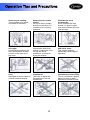
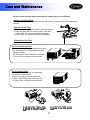
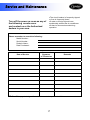
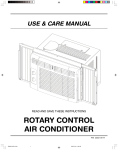
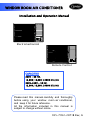
WINDOW ROOM AIR CONDITIONER
Installation and Operation Manual
Electromechanical
Remote Control
CAPACITIES
220V - 60 HZ.
12,000; 18,000; 24000 BTU/HR
220V-240V - 50 HZ.
12,000; 18,000; 24000 BTU/HR
Please read this manual carefully and thoroughly
before using your window room air conditioner,
and keep it for future reference.
All the information included in this manual is
subject to change without notice.
035-7952-2871B Rev, A
Contents
Main Features
2
Air Conditioner Installation
Preparations before installation…………………………………………………
Installation Procedures………………………………………………………………
Condensed water drainage……………………………………………………………
IAQ Filters ( OPTIONAL )……………………………………………………………
3
4
5
5
Part Identification
For Front Opening Filter Model……………………………………………………
For Pull Down Filter Model…………………………………………………………
6
Control Panel Mechanical (Cool & Heat/Cool Models)
Control Panel - Cool Model……………………………………………………………
Control Panel - Heat / Cool Model……………………………………………………
Operation……………………………………………………………………………
7
7
8
Control Panel Electronic (Cool & Heat/Cool Models)
Control Panel - Cool Model……………………………………………………………
Control Panel - Heat / Cool Model……………………………………………………
Operation……………………………………………………………………………
9
9
10
Control Panel Electronic (Heat Pump Model)
Control Panel - Heat Pump Model……………………………………………………
Operation…………………………………………………………………………………
12
Remote Control Preparation………………………………………………………
13
Operation Tips and Precautions…………………………………………………
14
Care and Maintenance……………………………………………………………
15
Before Calling the Serviceman…………………………………………………
16
Service and Maintenance………………………………………………………
17
1
11
Main Features
•Anti-Rust Design
This state-of-the-art technology incorporates the use of specially developed noncorrosive materials together with advanced powder coating system that ensures
optimum resistance to rust.
•Superior Air Distribution
The multi-blades condenser fan and blower wheel are made of special
engineering plastic, ideal for maximum airflow and smooth, operation. The entire
airflow chamber is made of high density EPS insulation material to cut on the
blower noise, as well as to improve the unit cooling efficiency.
•Durable Quiet Fan Motor
The fan motor is totally enclosed and highly energy efficient. Its resilient
mounting reduces the transfer of noise to the unit and ensures quiet operation.
•Heavy Duty Compressor
Compressor has proven heavy duty and durable through years of the most
demanding field test. Can withstand up to 54°C temperature.
•Slide-Out Chassis
This Room Air Conditioner is designed so that the chassis can be released from
the cabinet and then moves forward. This provides ready access for inspection
and/or servicing of units.
•Water Drip Free
A condensate removal system slings condensate water out of the base pan and
disperses it into a fine mist onto the condenser coil where it evaporates. This unit
is drip free up to 70% relative humidity (RH).
•4 Way Air Deflection System
Adjustable horizontal and vertical vanes give you total control over air direction,
and ensure even cooling.
•Indoor Air Quality ( IAQ ) Filter - OPTIONAL
The state of the art filter consists of Active carbon filter, Electrostatic filter and
Zeolite filter.
2
Air Conditioning Installation
Preparations Before Installation
• The air conditioner is heavy and we recommend two people during installation. The wall
or window of the installation area should have sufficient strength and durability for any
vibration or noise. If it is weak, reinforcement work should be performed.
• Install the unit at downward angle outward so as not to leak the condensed water into
the room. See the illustration below.
• Avoid locations with salty or sulphurous air, draughts, dampness and flammable gas.
• On Outdoor side of air conditioner, be sure to obtain sufficient space on both sides for
smooth flow of air. Restriction of outside air will be greatly reducing the cooling
efficiency of the air conditioner. See the illustration below.
3
Air Conditioning Installation
Installation Procedures
1. Remove the Frame grille from the carton and put it
in a safe place until the unit is installed.
2. Remove 2 bolts under the air conditioner and
pull out the skid.
3. Remove 2 shipping screws at the back of
air conditioner.
4. Slide the air conditioner from the cabinet by
gripping the base pan handle and pulling
forward while one person holds the back
of cabinet.
5. Place the cabinet into the installation hole and secure it with screws or nails.
6. Slide the chassis back into the cabinet.
7. Attach the Front grille to the cabinet by inserting the tabs of the grille into the slots
on the front of cabinet. Push the grille until it snaps into place and fasten it with
screws.
4
Air Conditioning Installation
Condensed Water Drainage
In very humid weather, excess water (condensate) may cause the base pan to overflow.
You can install an outside drainage by using the following procedures:
(Please note that it is necessary to install the outside drainage in case of heat pump)
1. Remove the cap from the drain pipe
located at the back of unit.
2. Connect drain hose or tubing to the outlet
of drain pipe. You can purchase the drain
hose or tubing to satisfy your particular
needs. ( Drain hose is not supplied )
IAQ Filters - OPTIONAL
1. Open the inlet grille upward by pulling out the bottom of the inlet grille.
2. Remove air filter by lifting the holders and pull outwards.
3. Attache the IAQ filters into the slot of frame grille.
4. Return air filter into the frame grille.
Zeolite Filter - traps and kills harmful bacteria.
Electrostatic Filter - removes minute particles of dust and smoke. These particles
get deposited in the lungs and cause infections and other respiratory problems.
Active Carbon Filter takes care of the various odors of the room environment.
Note : The filters can be obtained separately from your nearest service center.
Caution :
Do not try to remove/clean/repair the IAQ filters. Contact your dealer for
the replacement of IAQ filters.
5
Part Identification
For Front Opening Filter Model.
For Pull Down Filter Model.
Exhaust Command
This control must be in CLOSE position in order to maintain the best cooling conditions .
OPEN : Exhaust some air to outside
CLOSE : No Exhaust
6
Mechanical Control Panel
Cool Model
Heat / Cool Model
7
Mechanical Control Panel
Operation
Off ( )
Stops all operation.
High Heat (
)
For Heat / Cool Model only
Switches ON the Electric Heater
and air heating operation at high
fan speed.
Fan ( )
Re-circulates filtered air.
Low Cool (
)
Switches ON the compressor
and air cooling operation at low
fan speed.
Thermostat Control switch :
Automatically
controls
cooling/heating in the room when
set to a desired temperature.
Turn the knob clockwise for
cooler
temperature
and
counterclockwise for warmer
temperature settings.
Medium Cool (
)
Switches ON the compressor
and air cooling operation at
medium fan speed.
Air Flow Switch:
I – Activate the vertical louvers
to automatically distribute air
from side to side for uniform
cooling.
0 – Stop the operation of air
swing
High Cool (
)
Switches ON the compressor
and air cooling operation at high
fan speed.
Low Heat (
)
For Heat / Cool Model only
Switches ON the Electric Heater
and air heating operation at low
fan speed.
Pilot Light:
The pilot light illuminates only
when the compressor is in
operation.
Caution:
When the air conditioner has been performing its
cooling operation and turned "OFF" or set to "FAN"
position, wait at least 3 minutes before re-setting to
cooling operation.
8
Electronic Control Panel
Cool Model
Remote Control
Heat / Cool Model
9
Electronic Control Panel
Operation
1- On/Off
If you press this button, the unit will begin operation, Press the button again and
operation stops. If you press this button immediately after turning off the unit, the
compressor will not operate for 3 minutes to prevent overloading.
2- Temperature
Automatically controls cooling/heating in the room when set to a desired
temperature. You can set the temperature using the up/down keys.
3- Mode
Press this button to select the desired Mode.
FAN Mode – Re-circulates filtered air at selected Fan speed.
Cool Mode - Switches ON the compressor and air cooling operation at selected.
Heat Mode - Switches ON the Electric Heater and air heating operation at selected.
4- Fan
Press this button to select the desired Fan speed of AUTO, LOW, MED. and HIGH
and the indoor fan will operate at the selected fan speed. If you select AUTO, the
fan speed will be controlled by microcomputer of the unit. If the compressor or
heater are off, Fan will operate at low speed.
5- Swing
Press this button to automatically distribute air from left to right for uniform cooling.
6- Timer
Press this button to activate the timer-setting mode. The timer LED will be lighted
up when the ON/OFF delay timer is activated.
On Timer - When the unit is switched OFF and timer is set to desired time, Unit will
OFF Timer - When the unit is switched ON and timer is set to desired time, Unit will
7- Sleep
Press this button to increase or decrease the set temperature with time for Energy
saving.
Note: This function can be activated by remote control only.
10
Electronic Control Panel
Heat Pump Model
Remote Control
11
Electronic Control Panel
Operation – Heat Pump Models
1- On/Off
If you press this button, the unit will begin operation, Press the button again
and operation stops. If you press this button immediately after turning off the
unit, the compressor will not operate for 3 minutes to prevent overloading.
2- Temperature
Automatically controls cooling/heating in the room when set to a desired
temperature. You can set the temperature using the up/down keys.
3- Mode
Press this button to select the desired Mode.
FAN Mode – Re-circulates filtered air at selected Fan speed.
Cool Mode - Switches ON the compressor and air cooling operation at
selected
Heat Mode - Switches ON the compressor and air heating operation at
selected
4- Fan
Press this button to select the desired Fan speed of AUTO, LOW, MED. and
HIGH and the indoor fan will operate at the selected fan speed. If you select
AUTO, the fan speed will be controlled by microcomputer of the unit. If the
compressor or heater is off, Fan will operate at low speed.
5- Swing
Press this button to automatically distribute air from left to right for uniform
cooling.
12
Remote Control Preparation
Considerations for Remote Control
When directing the transmitter of wireless remote control to the receiver of the
control panel from a certain location, check the following points:
1. The remote control must be directed toward the receiver of room air conditioner
when pressing the buttons of desired functions.
2. No obstructions such as curtains or plants should be between the remote control
and the receiver of room air conditioner.
Replacing Batteries :
1. Remove the cover of battery compartment at the bottom back of the remote control
by sliding it out in the direction of the arrow.
2. Mount the two battery size AAA 1.5 Volt batteries supplied with the remote control.
Note : During mounting of batteries, check battery symbols (+,-) indicated in
batteries compartment.
3. Close the cover of the battery compartment.
13
Operation Tips and Precautions
Avoid excess cooling.
This will affect your health
and waste of electricity.
Keep blinds or curtain
closed.
Do not let direct sunlight
enter the room when air
conditioner is in cooling
operation
Ventilate the room
occasionally.
Since windows are kept
closed, it is good to open
them and ventilate the room
now and then.
Doors and windows must
shut tight.
Avoid frequent opening the
door and windows to keep
cool air or the warm air in
the room.
Do not use the air conditioner
for purposes other than
cooling / heating the room.
Do not use the air
conditioner, such as for
drying the clothes.
Restrictions of the intake
and outlet vents.
This causes lowered
performance and irregular
operation.
Do not pull the power
cord.
Damaged cord may cause in
serious electrical shocks.
Select the most suitable
temperature.
Take care to adjust the
temperature to suit the
conditioned
Do not use the heating
instruments in the vicinity.
The air conditioner’s plastic
parts may melt or dent if
exposed to excessive heat.
14
Care and Maintenance
Be sure to turn off the main power before cleaning the air conditioner.
Cleaning the Front Grille
Front grille may be wiped off with a cloth, either dry or dampened in a mild detergent
solution.
Cleaning the Air Filter
1. Remove all dust of air filter with a vacuum cleaner.
2. Wash the filter with luke warm water. If the filter
is very dirty, use a mild household detergent.
3. Let the filter dry completely before reinstalling.
Removing of Air Filter
For Front Opening Filter
•Open the inlet grille upward gently by pulling
out the bottom of the inlet grille with both
hands as shown.
•Lift filter by the holders and pull outwards.
•To return filter, reverse the procedures.
For Pull Down Filter
•Place your fingers inside the openings
on bottom of filter frame.
•Press your fingers inward toward the
center, while pulling filter down and out.
•To return filter, reverse the procedures.
15
Before Calling the Serviceman
Check the following points before calling for repairs and service. If the
malfunction persists, please contact your nearest service center.
Normal Operation
• A sound like a "gurgle" can sometimes be heard during operation or when the unit stops.
It
is the sound of the refrigerant flowing through the unit.
• You may hear a splashing sound caused by water being picked up and thrown against
the condenser on rainy days or when the humidity is high. In that case you may connect
drain pipe, refer to page 4.
Abnormal Operation
Trouble
Unit does not
Operate
Cooling is
abnormally
low
Check Points
Has the circuit breaker
tripped or has the fuse blown?
Has there been a power failure?
Is the voltage too low?
Is the filter blocked with dust?
Has the temperature been set
properly?
Are the windows or doors open?
Is anything obstructing the
indoor and outdoor unit?
Is the fan speed too low?
Is the operation mode FAN?
Heating is
abnormally
low
Cooling or
Heating unit
stops during
Operation.
Action
Reset the circuit breaker or replace
the
fuse.
Clean the filter.
Check and reset if necessary.
Close the windows and doors.
Remove the obstruction.
Change the speed selection.
Change to cooling operation or reset
the temperature.
Is the filter blocked with dust?
Has the temperature been too
low?
Are the windows or doors open?
Is anything obstructing the
indoor and outdoor unit?
Clean the filter.
Is the operation mode FAN?
Change to heating operation or
reset the temperature
Has the room temperature
reached the set temperature?
16
Check and reset if necessary.
Close the windows and doors.
Remove the obstruction.
Normal operation.
Service and Maintenance
Turn off the power as soon as any of
the following events occur
and contact us or the Authorized
dealers in your area.
•The circuit breaker is frequently tripped
or fuse is frequently blown.
•If water or foreign objects have
accidentally entered the air conditioner.
•If there is abnormal sound during
operation.
Please remember to record the following :
Model Number :
Serial Number :
Dealer's Name :
Date Purchased :
Date of Service
Name and
Signature
of Technician
Remarks
Note : This page is designed for our costumer to keep a Service/Maintenance record.
17
Notes
18
2006
035-7952-2871B Rev, A