1
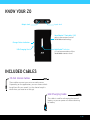
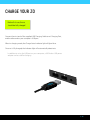
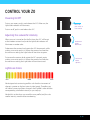
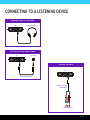
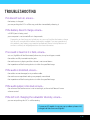
the zo™
personal subwoofer
user guide
®
WHAT’S INSIDE
Introduction
1
Know your zo
2
Accessories
2
Charge your zo
3
Neutralize your audio source
4
Control your zo
5
Insider Secrets
6
Connecting to an audio source
7
Connecting to a listening device
8
Troubleshooting
9
Warnings
10
Caring for your zo
10
Warranty and Returns
10
Introduction
The digiZoid® zo™ personal subwoofer is unlike any other audio
enhancement device you’ve experienced before. It’s not your conventional headphone amplifier, equalizer, or artificially produced 3D
sound effect. Instead, the zo defines a new category of sound system – an electronic subwoofer.
Knowing the human ear does not perceive all frequencies of sound
with equal loudness, and that people have different listening preferences, we’ve applied isophonic science to solve these problems.
The result is the zo personal subwoofer, featuring digiZoid® SmartVector™ technology – a first of its kind, user-controlled sound contouring system, which delivers optimum sound reproduction from
any speaker with matched acoustic response to the human ear.
There is one other thing before getting started: the zo only responds
to frequencies that are passed to it; therefore, if bass frequencies are
not contained within the source signal, zo will not create them.
1 : 10
KNOW YOUR ZO
Output Jack
Input Jack
SmartVector™ Controller (SVC)
adjusts the contour level of
SmartVector technology
Charge Status Indicator
USB Charging Port
LightScale™ Indicator
a visual representation of the
SmartVector contour level
INCLUDED CABLES
3.5 mm Stereo Cables
These cables connect your zo to an audio source.
Depending on the application, you can choose which
length best fits your needs (i.e., the shorter length is
ideal when you need zo on the go).
USB Charging Cable
This cable is used for recharging the internal
battery, or you can power zo without draining
its battery.
2 : 10
charge your zo
Before first use, the zo
should be fully charged
Connect the mini-end of the supplied USB Charging Cable to zo’s Charging Port,
and the other end to your computer’s USB port.
When in charging mode, the Charge Status Indicator light will glow blue.
Once zo is fully charged, the Indicator light will automatically deactivate.
In addition to using the USB port on your computer, a USB hub or USB power
adapter can be used for charging.
3 : 10
neutralize your audio source
For optimum audio performance, this
section should NOT be skipped!
When initially connecting zo to an audio
source, it is important to start with neutral
source equalizer (EQ) settings, as recommended below:
Portable Media Players or a
Computer’s Music Player
Turn off all EQ settings, which are typically
found in the player’s main menu.
Computer’s Hardware
If you are able to access your computer’s
sound card settings (typically Windows OS
only), turn off any associated EQ settings.
Additionally, if you are using external computer speakers, be sure to turn down the
bass and treble levels.
The volume of the audio source
should be reduced to at least 25% of
its max level, especially before putting
on your headphones.
Car Stereo
When connecting to a car stereo through
the auxiliary jack, be sure the stereo’s bass
and treble settings are turned down to a low
level.
If you have an aftermarket stereo, turn off all
sound effect functions, and set the EQ to the
“flat” preset.
It is not advised to use the zo with an
interfacing cable, as the cable’s internal preamp can overamplify the signal,
thereby resulting in a distorted output.
Home Entertainment System
For additional details about neutralizing a particular audio source, please
consult that source’s manual, or ask
us at:
www.getsatisfaction.com/digizoid
The bass and treble EQ settings on the receiver should be turned down to a low level,
and any sound effects (such as simulated
surround sound) should be turned off.
4 : 10
control your zo
Powering On/Off
To turn your zo on, push in and release the SVC. When on, the
LightScale indicator will illuminate.
to turn on
push switch in
then release
To turn zo off, push in and release the SVC.
Adjusting the subwoofer intensity
When your zo is turned on for the first time, the SVC will be set
at the median contour level, and the LightScale indicator will
illuminate an amber color.
to decrease
rotate
downwards
To decrease the contour level, rotate the SVC downwards, while
making sure not to push it in. When the contour level reaches
the minimum setting, the LightScale will transition to green.
To increase the contour level, rotate the SVC upwards, again
making sure not to push it in. When the contour level reaches
the maximum setting, the LightScale will transition to red.
to increase
rotate
upwards
LightScale Colors
min
med
max
We designed zo’s contouring profiles such that the increment of
change is greater on the low intensity side (green). Therefore, you
will notice a more significant change in the LightBar’s color and the
corresponding subwoofer intensity as you step up.
We did this so that when you reach the max profile (red); the subwoofer intensity would not be overbearing.
5 : 10
insider secrets
Stepwise vs. Continuous SVC Selections
The SVC can change the 32 contour levels in steps or continuous
mode. When rotated briefly (less than 1 sec), contour changes by
one level. When held rotated, zo activates its continuous mode,
changing four levels per second.
zo’s Memory
zo retains your last SVC setting in memory eliminating the need
to re-adjust after being turned off.
zo’s Bypass Function
When zo is turned off, circuitry automatically connects the
listening device to the audio source. This feature temporarily
“bypasses” zo without the need to disconnect and reconnect
cables.
Final Tweaking
Try using the bypass function while
listening to your music to obtain a full
appreciation of zo’s sound enhancement capabilities.
When connection and adjustment of your zo has been
completed, additional fine tuning can then be accomplished by
tweaking your audio source equalizer, or treble and bass settings
to preference.
Sharing your zo
You can use a splitter to share your music from the zo with a
friend. Just make sure both you and your friend’s headphones
have the same impedance.
Headphones
Any type of headphone or earbud can be used with the zo, as
long as its specified impedance is under 200 ohms.
6 : 10
CONNECTING TO AN AUDIO SOURCE
Source with Headphone Output
AUDIO SOURCE
ZO
Stereo Source
3.5mm STEREO CABLE
ZO
3.5mm
STEREO CABLE
STEREO SOURCE
(i.e., computer)
7 : 10
connecting to a listening device
Headphones or Earbuds
ZO
LISTENING DEVICE
Car Stereo with AUX Input
ZO
CAR’S AUX
Stereo System
ZO
3.5mm STEREO CABLE
MALE RCA TO 3.5mm
STEREO CABLE
STEREO RECEIVER
8 : 10
troubleshooting
If zo doesn’t turn on, ensure...
the battery is charged.
you are pushing the SVC in all the way, and then immediately releasing it.
If the battery doesn’t charge, ensure...
a USB 2.0 port is being used.
your computer is not turned off or in sleep mode.
Depending on how long you’ve had your zo, you may find that the battery charge
lasts for only a couple hours before a recharge is needed. If you are experiencing
this problem, your battery may need to be replaced. Please visit digiZoid.com or
contact us directly at [email protected] for more information.
If no sound is heard or it is faint, ensure...
zo is on (LightBar will be illuminated); otherwise, it may be in bypass mode.
the cables are fully inserted into the jacks.
the audio source is playing and the volume is not turned down.
the impedance of the listening device is within the specified range.
If the audio is distorted, ensure...
the cables are not damaged, or try another cable.
the audio source equalized settings are properly neutralized.
the impedance of the listening device is within the specified range.
If the audio output is too loud, ensure...
the volume of the audio source is not set too high, as the zo itself doesn’t have a
volume control
If the SVC isn’t changing the subwoofer intensity, ensure...
you are not pushing the SVC in while rotating
If you are still unable to resove your problem, please visit:
www.getsatisfaction.com/digizoid
9 : 10
warnings
Always adjust the volume of your audio source to a safe level before putting on headphones or
earbuds.
Do not connect zo to a mono channeled system.
Do not make repairs to the zo yourself.
Do not leave the zo in your car, or any other environment where temperatures could exceed 120°F.
To reduce the chance of shock or injury, do not use the zo near or in water or wet locations.
Even though SmartVector technology optimizes audio signals to the ear’s sensitivity, potential
hearing damage may occur if listening at high volume levels from your audio source for
extended periods. If you experience ringing in your ears, reduce the volume level of your audio
source to prevent permanent damage.
caring for your zo
Before cleaning, make sure the zo is off, and not plugged in to anything. To clean zo’s exterior, use
a damp, lint-free, soft cotton cloth. Be careful not to get moisture inside the zo. Do not use any
abrasives, alcohol, or aerosol sprays!
warranty and returns
digiZoid offers a 60-day return policy, as well as a one year warranty on parts and labor from the
date of purchase. To obtain more information on returns and our warranty policy, please visit
www.digiZoid.com.
10 : 10
®®
zo Product Manual Ver. 1
© 2010 digiZoid inc. All rights reserved.
SmartVector™ and LightScale™ are patent pending technologies of digiZoid inc.
zo™, SmartVector™, and LightScale™ are trademarks of digiZoid inc.