1
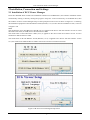
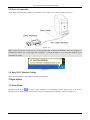
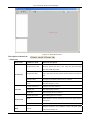
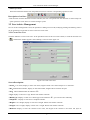
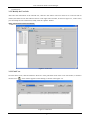
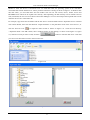
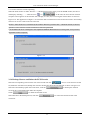
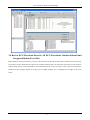
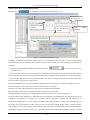
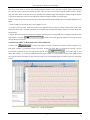
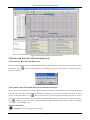
ECG Viewer Manager User Manual User manual for ECG Viewer Manager Introductions to User Dear Users, Thank you very much for purchasing our Easy ECG Monitor series products. This manual is intended to assist the user in uploading ECG Data from Easy ECG Monitor to PC in a safe and effective manner. Please read this manual carefully before running the system, and follow it to operate. The Manual is published in English and we have the ultimate right to explain the Manual. No part of this manual may be photocopied or modified without the prior written consent. We reserve the right to improve and amend it at any time without prior notice. ECG Viewer Manager is application software running on a personal computer with Microsoft Windows operating system, so the user should be acquainted with some knowledge to operate computer. Version of the Manual: Ver1.1 All Rights Reserved. The version of this user manual is applicable to the PC software “ECG Viewer Manage” with version V4.1 or higher which can be used to connect the “Easy ECG Monitor” device with version V4.0-10-10 or higher.. 3502-3430016 I User manual for ECG Viewer Manager Information for Operation ¾ Please make sure the well connection of the data cable between PC and Easy ECG Monitor before uploading data, do not pull out the data cable arbitrarily during the data upload. ¾ Data transmission may be interrupted during uploading the data in case of low battery voltage for Easy ECG monitor. ¾ Do not do the key operation on Easy ECG Monitor during the data upload. ¾ While installing printer driver on PC, please quit “ECG Viewer Manager” software firstly if it's running. Notes: ¾ 1. Connect/Disconnect the data cable to Easy ECG Monitor gently and carefully, do not bring or shake the data cable plug with force to insert into or unplug from data interface port. ¾ 2. Before updating the software “ECG Viewer Manager”, please uninstall the previous version if there is and manually delete all the files in the default installation folder (“C: \ECG Viewer Manager\”) or your customized installation folder. For example: “ECG Viewer Manager” is installed under the file folder of “C:\ECG Viewer Manager”. At first, uninstall the “ECG Viewer Manager” software from “Control Panel→Add/Uninstall Programs”, and then manually delete the all files under the directory “C:\ECG Viewer Manager”. Next, install the new version of “ECG Viewer Manager”. II User manual for ECG Viewer Manager Table of Contents 1 Overview .......................................................................................................................................... 1 1.1 Features............................................................................................................................................................ 1 1.2 Operating Condition ........................................................................................................................................ 1 1.3 Procedure of Data Uploading .......................................................................................................................... 1 2 Installation, Connection and Settings ........................................................................................... 2 2.1 Installation of ECG Viewer Manager .............................................................................................................. 2 2.2 Display Setting for PC ..................................................................................................................................... 5 2.3 Device Connection .......................................................................................................................................... 6 2.4 Easy ECG Monitor Setting .............................................................................................................................. 6 3 Operations........................................................................................................................................ 6 3.1 Main Menu ...................................................................................................................................................... 6 3.2 User Archive Management .............................................................................................................................. 8 3.2.1 Create New User ....................................................................................................................................... 8 3.2.2 Modify the User Info ................................................................................................................................ 9 3.2.3 Find User .................................................................................................................................................. 9 3.2.4 Delete User ............................................................................................................................................. 10 3.3 Device Management ...................................................................................................................................... 10 3.3.1 Import Disk Data .................................................................................................................................... 10 3.3.2 Import Device Data................................................................................................................................. 13 3.3.3 Wireless Reception ................................................................................................................................. 13 3.3.4 Backup, Restore and Delete the ECG Records ....................................................................................... 14 3.4 Review ECG Waveform Records, All ECG Waveforms, Statistical Result and Irregular Rhythm Event Plot ............................................................................................................................................................................. 15 3.4.1 Review ECG Waveform Records ........................................................................................................... 16 3.4.2 Browse All ECG Waveforms for a Given Record .................................................................................. 17 3.4.3 Statistical Result ..................................................................................................................................... 18 4.4.4 Irregular Rhythm Event Plot ................................................................................................................... 18 3.5 Delete and Print ECG Waveform Records ..................................................................................................... 19 3.5.1 Delete the ECG Waveform Records ....................................................................................................... 19 3.5.2 Print the ECG Waveform Records and Statistical Analysis .................................................................... 19 3.6 About ............................................................................................................................................................. 22 3.7 Exit the System .............................................................................................................................................. 23 3.8 Troubleshooting ............................................................................................................................................. 23 III User manual for ECG Viewer Manager 1 Overview 1.1 Features The waveforms and data saved in Easy ECG Monitor which have been uploaded to PC through ECG data cable can be archived and reviewed by ECG Viewer Manager. It is convenient for user to browse the stored data records, review the ECG waveforms and back up the uploaded data. 1.2 Operating Condition Computer Hardware Requirement: PC with Intel Pentium Ⅲ CPU, 800MHz speed or higher; 256MB or higher memory; CD-ROM drive; at least 1GB space available in the hard disk to install “ECG Viewer Manager” software. Requirement for Operating System: Microsoft Windows XP, Windows 2000 or Windows Vista and Windows 7 1.3 Procedure of Data Uploading 1. Install “ECG Viewer Manager” software and “USB Driver”. 2. Set the resolution of screen display as “1024×768” pixel or higher. 3. Connecting the Easy ECG monitor to PC with the data cable provided. ( As shown in the figure 2-8); 4. Double-click the icon “ ” on desktop to start running “ECG Viewer Manager” Software and click “ ” (button for user info) on the main menu screen to add a new user. 5. Click “ ” (button for data import) on the main menu screen to preview the ECG records to be uploaded, select the record needed to upload, click the “ ” button to load the data into PC. After that the user can do further review and analysis on those records dumped into PC. Notes: The software “ECG Viewer Manager” described in this manual supports wireless transmission function. More information about the operation refers to the following sections in detail. 1 User manual for ECG Viewer Manager 2 Installation, Connection and Settings 2.1 Installation of ECG Viewer Manager Insert the CD-ROM which contains the installation software into CD-ROM drive, the software installation will be automatically running or directly running the program "setup.exe" in the root directory of CD-ROM drive, then the window of "ECG Viewer Manager Setup" will be prompted on the screen as shown in Figure 2-1A. Selecting the installation equipment of PC-80 B/Prince 180 B (Wireless, V4.1) to enter into the installation screen, as shown in Figure 2-1B. Note: The model name of PC-80A B/Prince 180A B (V2.4) is applied to the device with the software version V2.4 and the model of PC-80A, PC-80B, Prince 180A and Prince 180B. The model name of PC-80D/ Prince 180D (V3.5) is applied to the device with the software version V3.5 the model of PC-80D and Prince 180D. The model name of PC-80 B/Prince 180 B (Wireless, V4.1) is applied to the device with the software version V4.1, the model of PC-80B and Prince 180B as well as the wireless transmission function. Figure 2-1 ECG Viewer Manager Setup Screen Figure 2-1B ECG Viewer Manager Setup Screen 2 User manual for ECG Viewer Manager According to the prompts of installation of ECG Viewer Manager to operation, as shown in figure 2-2—figure 2-6; Figure 2-2 Figure 2-3 3 User manual for ECG Viewer Manager Figure 2-4 Figure 2-5 4 User manual for ECG Viewer Manager Figure 2-6 Note: If “Complete” (default) installation is selected,the installed program files will be located in the disk path “C: \Ecg Data Manager” If user doesn’t want to use default installation, please select "Custom" and click "Next" to choose the root directory for locating the program files as shown in Figure 2-3. 2.2 Display Setting for PC 1. Setting Display Properties On desktop screen of Windows operating system, click the right button of the mouse, it will bring up a quick menu, then move the cursor to select "Properties". Choose "Settings" on the "Display Properties" window, then set the "Screen resolution" option as "1024 by 768 pixels", and set the "Color quality" option as 16bit or higher, as shown in Figure 2-7. . Figure 2-7 Display Properties Setup 5 User manual for ECG Viewer Manager 2.3 Device Connection After “ECG Viewer Manager” software is installed, refer to Figure 2-11 to perform cable connection: Figure 2-8 Note: connect the device at first time, the system prompts that “Found New Hardware Your new hardware is installed and ready to use.” on the right side of task bar,as shown in Figure 2-12, it means that USB Driver is installed successfully. Figure 2-9 2.4 Easy ECG Monitor Setting Please power on the Easy ECG Monitor before uploading data. 3 Operations 3.1 Main Menu Double-click the icon “ ” of “ECG Viewer Manager” on the desktop with the Mouse, then ECG Viewer Manager will run automatically and the main menu screen pops up on the desktop, as shown in Figure 3-1. 6 User manual for ECG Viewer Manager Figure 3-1 Main Menu Screen Description of menu bar: Menu items Menu name pull-down menu Function description Import device data Directly upload the data to PC from the device through provided USB data cable. Import disk data ECG Device User info PC. Wireless data Upload or transmit the data to PC by wireless. Exit Exit the manager system Create a new user Create a new user archives Delete user For deleting the archives Find user For browsing the user archives Delete ECG info For deleting the ECG records Print Print the ECG records, statistical result and irregular rhythm ECG record event plot. Print all ECG Help Copy data from the disk which contains the ECG records to About Print all ECG waveforms Display the ECG view manager version, the disk space information and so on. 7 User manual for ECG Viewer Manager Menu operations: Select the functional buttons from the pull-down menu to enter the corresponding operation screen. Description of tool bar: The Tool bar contains shortcuts for menu selection, the user can operate from the menu bar or shortcut keys for quick operation. Click “Exit” to exit the manager system. 3.2 User Archive Management On user archive management screen, the operations: adding new user ID, modifying, finding and deleting archive can be performed. On the left of screen is the list of user name. 3.2.1 Create New User Click the submenu “Create a new user” in the pull-down menu of the "User info" button, or click the Tool bar icon “ ”, and then the window appears on the desktop, as shown in the figure 3-2. Figure 3-2 Create a new user Screen Description: Name:User name; display or enter user name; length of name is less than 30 bytes or 15 characters. ID:Identification number; display or enter ID number; length of ID is less than 30 bytes. Sex:Choose Male/Female in submenu “▼” Age: display or enter user’s age. Please enter Arabic numerals. Blood type: Display or enter user’s blood type in the submenu “▼”, you can also enter manually. Telephone:Display or enter User’s telephone number. Height: User’s height; display or enter user’s height. Please enter Arabic numerals. Weight: User’s weight; display or enter user’s weight. Please enter Arabic numerals. Remark: Display or enter the contents of the note; the length of the contents is less than 160 bytes or 8 User manual for ECG Viewer Manager 80 characters. 3.2.2 Modify the User Info After enter the information of the selected user, click the “Ok” button. The user name list is on the left side of window, the detail of User Info and ECG Info is on the right side of window, as shown in figure 3-3, in this screen, you can modify the user information, finally click the “update” buttons. Note:ID and name cannot be modified. Figure 3-3 User info 3.2.3 Find User On main menu screen, click the submenu “find user” in the pull-down menu of the "User info" button, or click the Tool bar icon “ ”, then window appears on the desktop, as shown in the figure 3-4 . Figure 3-4 Find User 9 User manual for ECG Viewer Manager Figure 3-5 Found User Screen Description: Field: “ID” and “Name” are optional: you can search user by ID or by name. String: Key word to be searched. Enter the ID and the full name or the first alphabet or character of the name or the first ID number to search the user. If no key word is entered into the “String” field, all the user info will be displayed after clicking “Find”. Result: Click the “find” after enter the Search criteria, if the user exists, it will prompt “Found the user” and spring the information of the archive in the screen as shown in the figure 3-5. If the user does not exist, it will prompt “the user information is not being found”. 3.2.4 Delete User On the left of main menu screen is user name list, click the user information which you want to delete. On main menu screen, click the submenu “Delete” in the pull-down menu of the “User info”, or click the Tool bar icon “ ”, then a window appears on the desktop, as shown in the figure 3-6. Note: this operation will delete all records under this user and can not be recovered. Figure 3-6 Delete User 3.3 Device Management 3.3.1 Import Disk Data Method 1: Ensure correct connection between the device and PC via USB data cable, select the ECG record you want to upload from the user name list, click the submenu “Import disk data” in the pull-down menu of the “ECG device”, or click the Tool bar icon “ ”, the system will add a disk named “ECG Viewer Manager” after it performs automatic scanning as shown in Figure 3-7. Click the root directory “ECG Viewer Manager” and “OK” 10 User manual for ECG Viewer Manager button, then a window appears on the desktop, as shown in the figure 3-8, figure 3-9, select the record you want to read, click the “ ” button to read the data on PC. After that you can review these data records in the user name list. Figure 3-7 Read Figure 3-8 Read Note: The scanning time of ECG information will be different depending on the data size and computer speed; it would last for 6 minutes at most if the device contains large amounts of data. Please wait for a moment! Figure 3-9 Read 11 User manual for ECG Viewer Manager Method 2: After the device is connected to PC via USB data cable, the operating system of PC will add a removable disk named “EASY ECG” after it performs automatic scanning as shown in Figure 3-10. Double click this disk name, you will find there four file folders and one text file: ECG0, ECG1, ECG2, ECG3 and README.TXT” which can be copied to PC directly. After uploading, the data memory can be cleared at device side, meanwhile, the user can use software “ECG Data Manager” to review and analyze the imported data records while the device isn’t connected to PC. For example, copy these four file folders and the text file to a local file folder named “ September ECG” in disk D with volume DATA, then click the submenu “Import disk data” in the pull-down menu of the “ECG device”, or click the Tool bar icon “ ” to import the data records as shown in Figure 3-11. Click the root directory “ September ECG” and “OK” button, then a window appears on the desktop, as shown in the figure 3-8, figure ” button to read the data on PC. After that 3-9, select the record you want to read, click the “ you can review these data records in the user name list. Figure 3-10 Figure 3-11 12 User manual for ECG Viewer Manager 3.3.2 Import Device Data Ensure correct connection between the device and PC via USB data cable, select the ECG records you want to upload from the user name list, click the submenu “Import device data” in the pull-down menu of the “ECG device” or click the Tool bar icon “ ”, then a window appears on the desktop, as shown in the figure 3-8, figure ” button to load the data into PC. After 3-9, select the records needed to upload, click the “ that the user can review the records in the user name list. 3.3.3 Wireless Reception If the wireless transmission function is needed, plug the provided wireless adapter to PC firstly, then restart the ECG monitor. The PC prompts that “Found New Hardware. Your new hardware is installed and ready to use” (as shown in Figure 3-12) on the right lower corner, which indicates that the wireless device is found and being connected to PC. The icon “ “ ” reminds the user of a successful connection, and the gray icon “ ” will change into “ ” and “ ” and ”. Figure 3-12 3.3.3.1. Real-time wireless transmission When the device is in continuous measurement mode, after click the icon “ ” or “ ”, the screen of real-time wireless reception displays on the interface, meanwhile, it dynamically draws the real-time ECG waveform (As shown in Figure 3-13). Figure 3-13 13 User manual for ECG Viewer Manager 3.3.3.2 Non-real-time wireless uploading When the ECG monitor is under “Review” → “Measurement result” status, press the “■ OK” button, the device ” or “ will display “Sending…….” Click the icon “ ” on PC side, the non-real-time wireless reception screen appears on the interface with a display of “user (sb) is receiving the wireless data” as shown in Figure 3-14. The appearance of Figure 3-15 means the data record has been received and saved in PC successfully. The user can review it later in the user name list. NOTE: 1.After the device is switched off, the window “Receiving wireless data…”should be closed, or the next operation of non-real-time wireless transmission cannot be performed. 2. If the Bluetooth driver is damaged or the simplified GOHOST Bluetooth driver is being used, it may result in inoperable wireless reception. Figure 3-14 Figure 3-15 3.3.4 Backup, Restore and Delete the ECG Records Select the corresponding user ID in the user name list and click the “ ” icon to review the ECG record list, delete the selected record, backup the record to the data file and restore the data file as shown in Figure 3-16. Select the “ECG Backup” path on the left corner, click the “ ” to back up the selected record to the corresponding path under the computer. Click “ ” to delete the selected record. ” to restore the selected record in the Select data file in the backup file list, click the “ current list. 14 User manual for ECG Viewer Manager Figure 3-16 3.4 Review ECG Waveform Records, All ECG Waveforms, Statistical Result and Irregular Rhythm Event Plot Select the ECG record you want to review in user name list on the left of main menu, and then you can not only review this record in detail, but also enter some remarks and store them. On the left of main menu is user name list and the detail of ECG record information. The information such as ECG waveform record, all ECG waveforms, statistical result, irregular rhythm event plot zoom of QRS complex ect. is displayed on the right of the main menu. 15 User manual for ECG Viewer Manager 3.4.1 Review ECG Waveform Records Click the icon “ ” to view the ECG waveform as shown in Figure 3-17 Waveform area The new movable window The upside-down The triangle triangle Waveform zooming area Figure 3-17 the ECG Waveform Screen According to different measurement modes, there are two display modes for ECG waveform record: Quick measurement by built-in electrodes and continuous measurement by lead wire. Corresponding specifications are as follows: ① Select the waveform gain through the pull-down submenu “ ” above the right corner of waveform area. ② Click any point within the ECG waveform area, a dashed box will display on waveform area, and the zoomed signal within this box will show on the waveform zooming area. Right click this dashed box, the waveform within it can be fixedly displayed on a new movable window. The doctor or professionals can observe the detail of the ECG waveform by moving two vertical lines. Vertical (amplitude in mV): the vertical distance between the cross point of two vertical lines and the waveform; Horizontal (time interval in ms): the horizontal distance of two vertical lines. The heart rate value will be displayed for the records of continuous measurement; HR: the average heart rate value of ECG waveform in waveform zooming area. Irregular Rhythm List: the type of irregular rhythm of ECG waveform in waveform zooming area. If the waveform on this dashed box is identified with any irregularity, Irregular Rhythm List will show the type of irregularity. The segment of irregular ECG waveform will be displayed in striking red and marked by an upside-down triangle above it. If you want to cancel this mark, click the button “Cancel”, then a dialog box pops up on the screen and reminds you that “Are you sure to cancel the irregular rhythm mark?”, finally, click the “OK” button to cancel this mark and corresponding event. After that a normal triangle will be shown beside the upside-down triangle as shown in figure 3-17, and the statistical result and irregular rhythm event plot will skip 16 normal User manual for ECG Viewer Manager this event. If you want to re-mark the cancelled irregular rhythm event, click the “Cancel” button, then a dialog box pops up on the screen and reminds you that “Are you sure to restore this irregular rhythm mark?”, finally, click the “OK” button to remark this event. After that the normal triangle will disappear, and this irregular rhythm event will be taken into account in the statistical result and irregular rhythm event plot again. If the waveform is normal, only the heart rate value will be shown and the display area of Irregular Rhythm List is blank. ③ Enter remarks on the remark area, click “update” to save. ④ On the lower left corner of the ECG info screen displays the record time, period, measurement mode, filter mode and device type. (No HR calculation and measurement interpretation during real-time wireless ECG data transmission) ⑤ Below the ECG waveform record screen, display the record time, average HR value, total pages and the current ” button can turn the page up and down. One page contains page number. Click the “ 30-second ECG waveform. 3.4.2 Browse All ECG Waveforms for a Given Record Click the icon “ ” to browse all signal waveforms for this ECG record as shown in figure 3-18. Each page contains 15 segments of ECG waveform. If there are more than 15 segments for display, you can review other segments on the next page by moving the slid “ ” to turn the page up and down. The number “1” on this bar indicates the first page, and the “2” is the number of total pages. Double click any segment of ECG waveform on this screen to return to its corresponding ECG waveform screen for a particular review. Figure 3-18 All ECG Waveforms 17 User manual for ECG Viewer Manager 3.4.3 Statistical Result The statistical result is for ECG records which are uploaded by the method of non-real-time wireless reception and measured by mode of continuous measurement. Click the icon “ ” to get the statistical result for this ECG record as shown in Figure 3-19. In the statistical result screen, you can not only browse the HR trend graph and the irregular rhythm event list, but also read the maximal, minimal and average heart rate value which is displayed within the time in current trend graph. Move the blue line to browse the HR value measured in different time. The number “87” is the current HR value. Right click the mouse at this time to shift the screen to the corresponding ECG waveform screen. Click the pull-down button of “Scale” to select the time scale of horizontal coordinate, move the slide “ ” to turn the page up and down so as to view the HR trend graph. The irregular rhythm event list displays all irregular rhythm events and whether the listed events occur or not. Figure 3-19 Statistical Result 4.4.4 Irregular Rhythm Event Plot Click the icon “ ” to enter the irregular rhythm event plot screen where the distribution and types of irregular rhythm event can be reviewed as shown in Figure 3-20. Move the blue line to browse the irregular rhythm event occurring in different time, “Type No: 4” in the screen indicates the irregular rhythm type “Suspected a little slow beat” which is displayed with yellow background in the list. Right click any point in the event plot at this time, the screen will be shifted to ECG waveform screen whose measuring time is corresponded with that the blue line pointed. Meanwhile, click the pull-down button of “Scale” to select the time scale of horizontal coordinate, move the slide “ down so as to view the HR trend graph. 18 ” to turn the page up and User manual for ECG Viewer Manager Figure 2-20 Irregular Rhythm Trend Graph Screen 3.5 Delete and Print ECG Waveform Records 3.5.1 Delete the ECG Waveform Records Select the corresponding record, click the submenu “Delete” in the pull-down menu of the “ECG record” or click the Tool bar icon “ ”, then a window appears on the desktop, as shown in the Figure 3-21. Please follow the prompts to operate. Figure 3-21 Delete the Records 3.5.2 Print the ECG Waveform Records and Statistical Analysis At first, select a record, then if you want to print the ECG waveform record, statistical result or irregular rhythm event plot, the next step you should take is clicking the submenu “print record” in the pull-down menu of “ECG record” or click the Tool bar icon “ ”. But if your choice is to print the all ECG waveforms for this record, the next step is clicking the submenu “Print all ECG” in the pull-down menu of “ECG record” or click the Tool bar icon “ ”, finally, their preview screen windows will appear on the desktop, as shown in the Figure 3-22, Figure 3-23, Figure 3-24 and Figure 3-25. Operation Description: “ ”: Actual Size: Preview the report in actual size 19 User manual for ECG Viewer Manager “ ”: Full screen displays the records. “ ”: Print the current report displayed. If the content of records is more than one page, click this button to set the start, end page and the printing copies according to your need. “ “ ”: Save. Click this button can save the ECG records in picture format on PC. ”: If the content of records is more than one page, click this button to turn the page up and down so as to preview all records. “ ”: Close. Close the current preview. Figure 3-22 Print Preview (ECG Waveform) 20 User manual for ECG Viewer Manager Figure 3-23 Print Preview (ECG Statistical Result) Figure 3-24 Print Preview (Irregular Rhythm Event Plot) 21 User manual for ECG Viewer Manager Figure 3-25 Print Preview (All ECG Waveforms) 3.6 About Click the submenu “About” in the pull-down menu of the “Help”, or t or click the Tool bar icon “ ”, and then the dialog box about the system appears, as shown in the figure 3-26. Figure 3-26 About System 22 User manual for ECG Viewer Manager 3.7 Exit the System Click the submenu “Exit” in the pull-down menu of the “ECG device”, or click the Tool bar icon “ ”, and then the dialog box about the system appears, as shown in the figure 3-27. Figure 3-27 Exit the System 3.8 Troubleshooting No. Misinformation 1 Failing to search the device! 2 No searched ECG information! 3 4 5 (for wireless reception) No searched the ECG device! No found printer in the system, Possible Reason Solution 1. The ECG monitor and the PC USB interface dose not contact well! 2. The device isn’t switched on! 3. The PC USB interface is damaged. 4. The provided PC USB cable is damaged! 5. The device is in trouble. 1. Please try again to check whether the USB cable is well contacted with the PC and the unit. 2. Please switch on the device. 3. Please upload the data again after replacing a USB interface 4. Please contact the local dealer in case of any problems. 5. Please contact the local dealer in case of any problems. No ECG waveform record is detected in the device. Please upload the data after the device detects the ECG waveforms. 1. The USB cable is damaged. 2. The device is in trouble! 3. The PC USB interface damaged. 1. Please contact the local dealer in case of any problems. 2. Please contact the local dealer in case of any problems. 3. Please upload the data again after replacing the USB in interface. is The system does not install the printer. Please install a printer. 1. The device is not switched on 2. Plug or unplug the wireless adapter while the software “ECG Viewer Manager” is being used. 3. The USB interface is damaged 1. Please switch on the device 2. Please restart the computer 3. Please restart the computer after replacing the interface. please try again after installing! Please check whether the device is in communication status 23