1
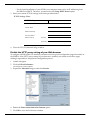
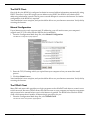
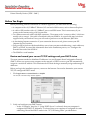
Installation Procedure
Macintosh with Netscape 6
Printer Friendly Version [ PDF | 244K ]
Before You Begin
Before proceeding with the installation of a SOHO 6 appliance, you must have the following:
• A computer with a 10/100BaseT Ethernet I/O card and a Web browser, such as Internet Explorer.
• A cable or DSL modem with a 10/100BaseT port or an ISDN router. This is unnecessary if you
connect to the Internet using a LAN connection.
• Two Ethernet network cables with RJ45 connectors. These must not be “crossover cables” (which are
usually red or orange). One cable is furnished with your SOHO 6. A second cable may have been
supplied with your modem. If not, you will need to purchase a second Ethernet, RJ45 cable.
• A functioning Internet connection. If your connection does not work, please contact your ISP
(Internet Service Provider).
• Call your ISP to find out which method they use to issue your network addressing–static addresses,
DHCP, or PPPoE. You need this information later in the installation process, see “Configure the
External Network of the SOHO 6”.
• The SOHO 6 6 serial number.
Review and record your current TCP/IP settings and your DHCP status
The most common method to distribute IP addresses is to use Dynamic Host Configuration Protocol
(DHCP). When you connect your computer to the network, a DHCP server at your ISP automatically
assigns it a network IP address. This eliminates the ISP from having to manually assign and manage IP
addresses.
Before you begin the installation process, connect to the Internet. You need to determine your current
TCP/IP settings and DHCP status.
1
Click Apple menu => Control Panels => TCP/IP.
The TCP/IP (internetConfig) window appears.
2
Verify and configure your DHCP status:
- At the “Configure” drop list, if “Using DHCP Server” is selected, then your computer is
configured for DHCP. If “Manually” is selected, then your computer is configured for static
addressing. Record the DHCP status in the “TCP/IP Setting Chart” provided above.
Installation Procedures: Macintosh with Netscape 6
1
Before You Begin
- For the initial installation of your SOHO, your computer must receive its IP addressing from
the SOHO via DHCP. Therefore, you must select the Using DHCP Server option.
3
Enter your current TCP/IP settings in the chart provided below.
TCP/IP Settings Chart:
TCP/IP Setting
Value
IP Address
Subnet Mask
Default Gateway
.
.
.
.
.
.
.
.
.
DHCP Enabled
DNS Server(s)
Yes
Primary
Secondary
4
No
.
.
.
.
.
.
Close the TCP/IP (internetConfig) window.
Disable the HTTP proxy setting of your Web browser
To configure a SOHO 6 after it is installed, you must access the special configuration pages that reside on
the SOHO 6. If the HTTP proxy setting in your browser is enabled, you cannot access these pages,
making it impossible to complete the configuration process.
1
Launch Navigator.
2
Click on Edit => Preferences.
3
Expand the Advanced category and select Proxies.
4
Enable the Direct connection to the Internet option.
5
Click OK to close the Preferences window.
The Preferences window appears.
Installation Procedures: Macintosh with Netscape 6
2
Install the SOHO 6 6 appliance
Install the SOHO 6 6 appliance
Each of the Trusted Network ports (numbered 0-3) is able to connect to a variety of appliances. These
include computers, printers, scanners, or other network peripherals.
1
Shut down your computer. If you connect to the Internet using a DSL/cable modem, disconnect the
power from this device
2
Disconnect the Ethernet cable that runs from your DSL/cable modem or other Internet connection to
your computer and connect it to the WAN port on the SOHO 6 6.
3
Connect one end of the straight-through Ethernet cable supplied with your SOHO 6 6 into any one
of the four, numbered, Ethernet ports (labeled 0-3) on the SOHO 6 6. Connect the other end into the
Ethernet port of your computer.
4
If you connect to the Internet using a DSL/cable modem, restore the power to this device. When the
indicator lights of the modem stop flashing the modem is ready for use.
If you connect to the Internet using a LAN connection, ignore this step.
5
Attach the AC adapter to the SOHO 6 6 and connect it to a power source.
6
Restart your computer.
Configure the External Network of the SOHO 6
Follow the instructions below to begin configuring the external network of your SOHO 6. Proceed to the
specific, IP address assignment method utilized by your system: the DHCP client, Manual
Configuration (static addressing), or the PPPoE client.
Contact your ISP to determine which method they use to assign your IP address.
1
With your Web browser, go to the System Status page using the Trusted IP address of the SOHO 6.
2
From the navigation bar on the left side, select Network => External.
3
Proceed to the following configuration instructions as appropriate to your system.
For example, go to: http://192.168.111.1
Installation Procedures: Macintosh with Netscape 6
3
Configure the External Network of the SOHO 6
The DHCP Client
Out of the box, the SOHO 6 is configured to obtain its external address information automatically, using
DHCP. Therefore, if your ISP assigns you an address using DHCP, the SOHO 6 will obtain all the
addressing information it needs when it powers on and attempts to connect to the Internet. No further
configuration of the SOHO 6 is required.
Your installation is now complete, and you should be able to use your Internet connection. Verify this by
accessing the Internet.
Manual Configuration
If your Internet service only supports static IP addressing, you will need to enter your computer's
original static TCP/IP values into the SOHO 6 device manually.
1
From the Configuration Mode drop list, select Manual Configuration.
2
Enter the TCP/IP settings which you copied from your computer when you started the install
process.
The Manual Configuration page appears.
3 Click the Submit button.
Your installation is now complete, and you should be able to use your Internet connection. Verify this by
accessing the Internet.
The PPPoE Client
Many DSL and some cable providers use login programs such as WinPoET and others to control access
to their network. Known as PPPoE clients, this software runs on your computer and requires a username
and password to be entered before access to the Internet is granted. The SOHO 6 has a built in PPPoE
client, which means that it handles all Internet login processing for you.
1
From the Configuration Mode drop list, select PPPoE Client.
The PPPoE Client configuration page appears.
Installation Procedures: Macintosh with Netscape 6
4
Troubleshooting the Connection
2
Enter the PPPoE login name and password supplied by your ISP.
3
Enable the Automatically restore lost connections checkbox.
This enables a constant flow of “heartbeat’ traffic between the SOHO 6 and the PPPoE server. In the event of routine
packet loss, this option allows the SOHO 6 to maintain it’s PPPoE connection. The SOHO 6 may reboot to recover the
PPPoE connection if the heartbeat fails. This provides for a more consistent Internet connection but will be seen as
continuous traffic by the ISP and regulated as such.
4 Click the Submit button.
Your installation is now complete, and you should be able to use your Internet connection. Verify this by
accessing the Internet.
Troubleshooting the Connection
You can monitor the progress of connection traffic through the SOHO 6 using the Event Log.
1
With your Web browser, go to the System Status page using the Trusted IP address of the SOHO 6.
2
From the navigation bar on the left side, select Logging.
For example, go to: http://192.168.111.1
Install additional computers
To add an additional computer to the Trusted network, verify that it has an Ethernet card installed.
Perform the following on each computer installed on the Trusted network:
• Disable the HTTP proxy setting of your Web browser
• Enable the computer for DHCP.
• Shut down and restart the computer.
Up to four computers can be plugged directly into the four (numbered 1-4) Ethernet ports of the
SOHO 6 unit. A larger number of computers can be accommodated by using one or more 10/100BaseT
Ethernet hubs with RJ-45 connectors.
Installation Procedures: Macintosh with Netscape 6
5
Register your SOHO 6 and Activate the LiveSecurity Service
Register your SOHO 6 and Activate the LiveSecurity Service
Once the SOHO 6 is installed and configured, you need to register the unit and activate your bundled
LiveSecurity Service subscription. Activation entitles you to receive threat alert notifications, expert
security advice, free anti-virus protection, software updates, technical support by web or phone, and
access to extensive online help resources and our user forum. You must also activate to retrieve feature
keys for any upgrades you have purchased.
Be sure that you have the SOHO 6 serial number handy. You will need this during the registration
process.
To register with the LiveSecurity Service:
1
Using your Web browser, go to:
h t t p : \ \ w w w. w a t c h g u a r d . c o m \ a c t i v a t e
NOTE
You must have JavaScript enabled on your browser to be able to activate LiveSecurity Service.
If you are a returning customer, log in with your user name and password then choose your product and
continue by following the instructions on screen.
If you are a new WatchGuard customer, begin by creating a profile, then follow the instructions on
screen for activating a product.
Please use the table below to record your LiveSecurity Service identification information:
Serial Number:
LiveSecurity User Name:
Password:
The SOHO 6 serial number is located on the bottom of the appliance. You create a LiveSecurity Service
user name and password when you register your SOHO 6.
Please keep this information in a secure place.
2
Installation Procedures: Macintosh with Netscape 6
6