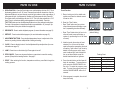
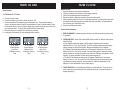
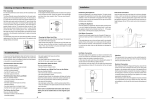
1
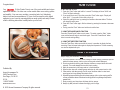
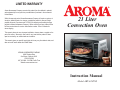
LIMITED WARRANTY
Aroma Housewares Company warrants this product free from defects in material
and workmanship for one year from provable date of purchase in the continental
United States.
Within this warranty period, Aroma Housewares Company will repair or replace, at
its option, defective parts at no charge, provided the product is returned, freight
prepaid with proof of purchase and U.S. $8.00 for shipping and handling charges,
payable to Aroma Housewares Company. Before returning an item, please call the
toll free number below for a return authorization number. Allow 2-4 weeks for
return shipping.
21 Liter
Convection Oven
This warranty does not cover improper installation, misuse, abuse or neglect on the
part of the owner. Warranty is also invalid in any case that the product is taken
apart or serviced by an unauthorized service station.
This warranty gives you specific legal rights which may vary from state to state, and
does not cover areas outside the United States.
AROMA HOUSEWARES COMPANY
6469 Flanders Drive
San Diego, California 92121
1-800-276-6286
M-F, 8:30 AM - 5:00 PM, Pacific Time
Website: www.aromaco.com
Instruction Manual
Model ABT-419DNS
Congratulations!
Your
19-Liter Toaster Oven is one of the most vertsitile and unique
appliances available. No other oven on the market offers more cooking options
and usability. Your new oven can bake, convection bake, broil, dehydrate,
defrost, toast and accommodates a 12” pizza. It will become the most utilized
appliance in your home for preparing delicious meals quickly and easily. Please
read the following instructions carefully before your first use.
HOW TO USE
4. SETTING THE CLOCK
1. Press the “Clock” button and hold for 1 second. The display will show "Hr24" and
"Clock" will flash continually.
2. If you would like to use 12 hour time, press the “Clock” button again. Display will
show “Hr12”. If you prefer 24 hour time, skip to (a).
a. Start off by setting the hour by pressing the increase or decrease button. The time
will change for each press.
b. Press the “Clock” button again. Set the mintues by pressing the increase or decrease
button.
c. Finally, press the “Clock” button one last time to confirm time.
5. USING THE PAUSE/CANCEL FUNCTION
Press the “Pause/Cancel” button once to pause. To restart, press the “Start” button
once and the time will begin to count down again. Press the “Pause/Cancel” button
twice to cancel cooking setting.
6. USING THE TIMER/TEMP. FUNCTION
Press the Timer/Temp. button once while the oven is in operation to display the time
remaining. Press the same button again to display the temperature. The time remaining
can also be adjusted mid-cycle.
HOW TO CLEAN
Always unplug unit and allow to cool before cleaning.
Published By:
Aroma Housewares Co.
6469 Flanders Drive
San Diego, CA 92121
U.S.A.
1-800-276-6286
www.aromaco.com
© 2005 Aroma Housewares Company All rights reserved.
1. Your oven features a non-stick interior coating for easier cleaning. If desired, wipe the
walls with a damp sponge, cloth or nylon scouring pad and mild detergent.
2. Do not use abrasive scouring pads, abrasive cleaners or scrape interior with metal
untensils. This could damage the non-stick interior coating.
3. Wash all accessories in hot soapy water or in the dishwasher.
4. Wipe the door clean with a damp sponge and wipe dry with a paper towel or cloth.
5. Clean exterior with damp sponge. Do not use an abrasive cleaner or steel wool
scouring pad as it may damage the exterior finish.
6. Wipe baking trays and broiling pan with a damp sponge, cloth or nylon scouring pad. Do
not use an abrasive cleaner or steel wool scouring pad as it may damage the porcelain
enamel finish.
7. Empty crumb try and wipe clean with damp cloth or sponge.
8. Always dry ALL parts and surfaces thoroughly prior to usage.
13
HOW TO USE
IMPORTANT SAFEGUARDS
2. USING THE DEHYDRATE FUNCTION
Basic safety precautions should always be followed when using electrical appliances,
including the following:
a. Connect to power supply.
b. Press the Dehydrate button to enter the dehydrate program.
c. Press the time button. Set the time by pressing the increase or decrease button. The
time will change for each press. Holding the button will cause the time to change rapidly.
d. The temperature default is 185 degrees (temp. will not show in display).
e. Open the door and place your food in the oven and press Start.
f. When the program is complete, the unit will beep continually.
g. Unplug the unit and allow it to cool completely before cleaning.
h. To cancel during the cooking process press the Pause/Cancel button twice.
1.
2.
3.
4.
3. USING THE DEFROST FUNCTION
a. Connect to power supply.
b. Press the defrost button to enter the defrost program.
c. Press the time button. Set the time by pressing the increase or decrease button. The
timer will change for each press. Holding the button will cause the time to change
rapidly.
d. The temperature default is 150 degrees (the temp. will not show in the display).
e. Open the door and place your food in the oven and press Start .
f. When the program is complete, the unit will beep continually.
g. Unplug the unit and allow it to cool completely before cleaning.
h. To cancel during the cooking process press the Pause/Cancel button twice.
12
Read all instructions before first use.
Do not touch hot surfaces. Use handles or knobs.
Close supervision is necessary when any appliance is used by or near children.
To protect against electric shock, do not immerse cord, plug, or any other parts of the
oven in water or other liquids.
5. Do not let cord hang over the edge of tables and counters, or touch hot surfaces.
6. Do not operate appliance with damaged cord or plug or after the appliance
malfunctions. If the oven has been damaged in any manner, return the appliance to
the nearest Authorized Service Center for examination, repair or adjustment.
7. The use of accessory attachments not recommended by the appliance manufacturer
may cause hazard or injury.
8. Do not place on or near a hot gas or electric burner, or in a heated oven or
microwave oven.
9. When operating the oven, keep at least four inches of space on all sides to allow for
adequate air circulation.
10. Unplug from outlet when not in use, or before cleaning. Let the unit cool completely
before putting on or taking parts off, or before cleaning.
11. To disconnect, press the Stop/Cancel button twice, then unplug the plug. Always hold
the plug. Never pull the cord.
12. Extreme caution must be used when moving an appliance containing hot oil or other
hot liquids.
13. Do not cover the crumb tray or any part of the oven with foil. This may cause the
oven to overheat.
14. Use extreme caution when removing crumb tray or disposing of hot grease or other
hot liquids.
15. Do not clean with metal scouring pads. Pieces of the pad can break off and touch
electrical parts, creating a risk of electric shock.
16. Oversized foods or metal utensils must not be inserted in a toaster oven as they may
create a fire or risk of electric shock.
17. A fire may occur if the oven is covered or touching flammable material, including curtains, draperies, walls and things of the sort, while in operation. Do not store any
item on top of the oven during operation.
1
IMPORTANT SAFEGUARDS
18. Extreme caution should be exercised when using containers constructed of anything
other than metal or glass inside the unit.
19. Do not place any of the following materials in the oven: cardboard, plastic, paper or
anything similar.
20. Do not store any materials other than manufacturer's recommended accessories in
this oven when not in use.
21. Always wear protective, insulated oven mitts when inserting or removing items from
the hot oven.
22. This appliance uses a tempered, safety glass door. The glass is stronger than
ordinary glass and more resistant to breakage. Tempered glass can break, but the
pieces will not have sharp edges. Avoid scratching door surface or nicking edges. If
the door has a scratch or chip, contact customer service before using the oven.
23. Do not use outdoors.
24. Do not use the appliance for anything other than its intended use.
25. The temperature of the door and the outer surface will be hot when the appliance
is working. Please exercise caution.
26. Temperature of accessible surfaces will be high when the appliance is operating.
27. Do not rest food on the tempered glass door at any time. It will not support the
weight and can possibly be chipped or scratched.
CAUTION: Surfaces are hot during and after use. Always wear protective, insulated
oven mitts when touching hot oven or hot dishes and food, or when inserting or
removing racks, pans or baking dishes.
z
HOW TO USE
C. Using the Fan Broil Function (Broil with Convection Heating)
a. Connect to power supply.
b. Press Oven button three times into the Fan Broil program.
c. Press Time button. Set the time by pressing the increase or decrease button. The
time will change for each press. Holding the button will cause the time to change rapidly.
d. Press the TEMP button. The default temperature is 300 degrees (this can be
adjusted). To change this temperature, press the increase or decrease button to
move to the desired temperature. The temperature will increase or decrease in 50
degree increments.
e. Place your food on the broil pan, and the broil pan on the bake pan. Open the door
and slide the tray into the middle or top oven position depending on thickness of
food. Close the door, press Start . The timer will begin its countdown.
f. When the program is complete, the unit will beep continually.
g. Unplug the unit and allow it to cool completely before cleaning.
h. To cancel during the cooking process press the Pause/Cancel button twice.
Note: Foods that are irregular in shape, like fish or chicken breasts, take longer to cook
in the thicker parts. To help them cook evenly, place the thickest parts to the outer
rim of the food tray where they will receive more heat.
SAVE THESE INSTRUCTIONS
2
11
HOW TO USE
1. USING THE OVEN FUNCTION:
A. Using the Bake Function
a. Connect to power supply.
b. Press the Oven button to activate the oven program. Press once for the bake function. The words “Oven Bake” should appear in the display window.
c. PressTime button and set the time by pressing the increase or decrease button. The timer
will change for each press. Holding the button will cause the time to change rapidly.
d. Press the Temp. button. The default temperature is 300 degree (this can be
adjusted). To change this temperature, press the increase or decrease button to
move to the desired temperature. The temperature will increase or decrease in 50
degree increments until your desired level is reached. Maximum temperature is 400
degrees for the bake function.
e. Open the door and place your food in the oven and press the Start button to begin.
f. When the program is complete, the unit will beep continually.
g. Unplug the unit and allow it to cool completely before cleaning.
h. To cancel during the cooking process press the Pause/Cancel button twice.
B. Using the Fan Bake Function (Convection Heating)
a. Connect to power supply.
b. Press Oven button two times into the Fan Bake program. The words “Oven”, “Fan”
and “Bake” will appear in the display window.
c. Press Time button. Set the time by pressing the increase or decrease button. The
timer will change for each press. Holding the button will cause the time to change
rapidly
d. Press the Temp button. The default temperature is 300 degrees (this can be
adjusted). To change this temperature, press the increase or decrease buttons to
move to the desired temperature. The temperature will increase or decrease in 50
degree increments. The maximum temperature is 400 degrees for the fan bake function.
e. Open the door and place your food in the oven and press Start.
f. To cancel during the cooking process press the Pause/Cancel button twice.
SHORT CORD INSTRUCTION
1. A short power-supply cord is provided to reduce risks that result from becoming
entangled in or tripping over a longer cord.
2. Longer extension cords are available and may be used if care is exercised in their
use.
3. If a longer extension cord is used:
a. The marked electrical rating of the extension cord should be at least as great as
the electrical rating of the appliance.
b. The longer cord should be arranged so that it will not drape over the counter top
or tabletop where it can be pulled by children or tripped over unintentionally.
POLARIZED PLUG
This appliance has a polarized plug (one blade is wider than the other); follow the
instructions below:
To reduce the risk of electric shock, this plug is intended to fit into a polarized outlet
only one way. If the plug does not fit fully into the outlet, reverse the plug. If it still does
not fit, contact a qualified electrician. Do not attempt to modify the plug in any way.
This appliance is for household use only.
10
3
PARTS IDENTIFICATION
HOW TO USE
1
"b-12" Mode for 9”- 12” Pizza
8
2
9
a. Connect to power supply.
b. Press Pizza button twice and the display will show "b-12".
c. This is the timer selector for a 9”-12” pizza. There is no darkness setting and temperature is set
by default. Press the TIME/TEMP button and use the Adjustment Buttons to set your preferred cooking time.
d. When the program is complete, the unit will beep ten seconds continually.
e. Unplug the unit and allow it to cool completely before cleaning.
NOTE: ALWAYS REMOVE FOOD FROM OVEN WITH PROTECTIVE OVEN MITTS.
OVEN, FOOD AND OVEN DOOR WILL BECOME VERY HOT WITH USE.
3
Pizza Cooking Suggestions:
1. Place a baking rack to the desired height. It is strongly recommended that the center rack
be used for even cooking and browning results.
** When cooking a name brand frozen pizza for the first time, carefully monitor cooking
process to get the desired results.
4
2. Preheat the oven on the “Bake with Fan” function for 10 minutes at 400°F, then follow
cooking instructions for pizza functions above.
7
3. Crust type:
• For a softer crust use the pizza pan supplied with your oven.
• For a crispier crust, place the pizza directly on the oven rack.
5
6
NOTE: For homemade or dough crusts, you will need to use the pizza pan. There are
two pizza settings on your oven, A-9 and b-12. Follow whichever directions above apply
to your pizza size and preference.
1.
3.
5.
7.
9.
Convection Fan
Removable Crumb Tray
Broil Pan
Pizza Pan
Tempered Glass Door
2.
4.
6.
8.
4
Digital Control Panel
2 Baking Pans
Rack Handle
Baking Racks
9
HOW TO USE
Pizza Function:
"A-9" Mode for 9”- 12” Pizza
a. Connect to power supply.
b. Press Pizza button once and the display will show "A-9".
c. To select the desired Pizza browning press adjustment keys. The light default setting
shows in the display window. Press the increase button to move to a darker setting. Press
the decrease button to move to a lighter setting. Open the door and place your pizza in the
oven and press Start . To cancel press the Pause/Cancel button twice.
d. When the program is complete, the unit will beep continually.
e. Unplug the unit and allow it to cool completely before cleaning.
9”-12” Pizza
2 Red Squares
Light Crust
15-Minute Cooking
Time
9”-12” Pizza
4 Red Squares
Medium Crust
18-Minute Cooking
Time
9”-12” Pizza
6 Red Squares
Dark Crust
21-Minute Cooking
Time
HOW TO USE
Before first use:
1. Read all instructions and important safeguards.
2. Unpack the toaster oven and remove all packaging materials.
3. Check the contents against the accessories list.
4. Remove all labels including the protective film on the control panel.
5. Select a suitable position for the unit on a flat surface close to a power socket but far away
from another heat producing appliance. Make sure there is at least 4” of space between
the convection oven and kitchen walls.
6. Plug into a suitable power outlet.
Control Panel Operations:
1. DISPLAY WINDOW - Indicates program currently in use and time remaining until process
is completed.
2. OVEN FUNCTION - Press once to select Bake, twice to select Fan Bake or three times to
select Fan Broil.
a. Bake: Default temperature setting is at 300 degrees. Default time is 30 minutes.
Maximum Time is 1 hour and 30 minutes. The lower heating element and upper square
heating element are working during bake. Maximum temperature is 400 degrees.
b. Fan Bake: Default temperature setting is at 300 degrees. Default time is 30 minutes.
Maximum Time is 1 hour and 30 minutes. The lower heating element and upper square
heating element are working along with the convection fan. Maxiumum temperature is 400
degrees. (for more information on bake and fan bake see page 10)
c. Fan Broil: Fixed temperature setting is at 450 degrees. Default time is 30 minutes.
Maximum Time is 1 hour 30 minutes. The lower heating element and upper square heating element are working along with the convection fan. Maximum temperature is 450
degrees. (for more information on fan broil see page 11)
3. TOAST FUNCTION - Use the Adjustment Buttons to select toast color. There are six levels to choose from, each making the toast progressively darker. (for more information on
toasting see page 7)
8
5
HOW TO USE
4. PIZZA FUNCTION - Press the Pizza button once and the display will show "A-9". This is
the browning selector for a 9”-12” pizza. There are three levels to choose from. Use the
Adjustment Buttons to set your browning control to light, medium or dark crust settings. (2
red squares for light, 4 red squares for medium and 6 red squares for dark) Press the
PIZZA button twice, and the display will show "b-12". This is the timer selector for a 9”-12”
pizza. There is no darkness setting and temperature is set by default. Press the
TIME/TEMP button and use the Adjustment Buttons to set your preferred cooking time.
The back of the appliance is shaped specifically to accommodate a 12” pizza pan. (for
more information on the pizza function see pages 8-9)
5. DEHYDRATE - Press to select dehydrate program. (for more information see page 12)
6. DEFROST - Press to select defrost program. (for more information see page 12)
7. ADJUSTMENT BUTTONS - Press to adjust temperature, time or to adjust color of the
toast or any cooking that has multiple levels of baking or toasting.
8. CLOCK - Press to display the clock. Use the Adjustment Keys to adjust time. (for more
information see page 13)
9. LAMP - Press to turn on the interior light. Press again to turn off.
10. STOP/CANCEL - Press once to pause the timer or press twice to cancel the cooking
process. (Except for the toasting function. See page 7.
11. START - After selecting the function, temperature and time, press Start to begin the
cooking process.
HOW TO USE
Toast Function:
1. Place a baking rack in the middle rack
position and place the desired amount
of toast on rack.
2. Press the “Toast” button:
• Press “Toast” button once for up to two
slices of bread (screen will display a number 2, representing two slices of bread.)
• Press “Toast” button twice for four to six
slices of bread (screen will display a
number 4, representing four to six slices
of bread.)
3. Note that under the number of toast
selected (2 or 4) there will be three
small red squares representing the level
of toasting - light to dark. Oven is set by
default to three squares, which represents “medium light” toast. Adjust with
the up and down adjust arrows for
desired toast darkness or lightness.
4. Press the start button and the timer will
begin its countdown. To pause the program, press the PAUSE/CANCEL button once. To restart the program, press
start. To cancel the program press and
hold the PAUSE/CANCEL button for 2
seconds
5. When program is complete, the unit will
beep continually.
6
7
Very light toast
Light toast
Medium light toast
(default setting)
Medium toast
Medium dark toast
Dark toast
Toasting Chart
1 square
2 squares
3 squares
4 squares
5 squares
6 squares
Very Light
Light
Medium Light
Medium
Medium Dark
Dark
HOW TO USE
Pizza Function:
"A-9" Mode for 9”- 12” Pizza
a. Connect to power supply.
b. Press Pizza button once and the display will show "A-9".
c. To select the desired Pizza browning press adjustment keys. The light default setting
shows in the display window. Press the increase button to move to a darker setting. Press
the decrease button to move to a lighter setting. Open the door and place your pizza in the
oven and press Start . To cancel press the Pause/Cancel button twice.
d. When the program is complete, the unit will beep continually.
e. Unplug the unit and allow it to cool completely before cleaning.
9”-12” Pizza
2 Red Squares
Light Crust
15-Minute Cooking
Time
9”-12” Pizza
4 Red Squares
Medium Crust
18-Minute Cooking
Time
9”-12” Pizza
6 Red Squares
Dark Crust
21-Minute Cooking
Time
HOW TO USE
Before first use:
1. Read all instructions and important safeguards.
2. Unpack the toaster oven and remove all packaging materials.
3. Check the contents against the accessories list.
4. Remove all labels including the protective film on the control panel.
5. Select a suitable position for the unit on a flat surface close to a power socket but far away
from another heat producing appliance. Make sure there is at least 4” of space between
the convection oven and kitchen walls.
6. Plug into a suitable power outlet.
Control Panel Operations:
1. DISPLAY WINDOW - Indicates program currently in use and time remaining until process
is completed.
2. OVEN FUNCTION - Press once to select Bake, twice to select Fan Bake or three times to
select Fan Broil.
a. Bake: Default temperature setting is at 300 degrees. Default time is 30 minutes.
Maximum Time is 1 hour and 30 minutes. The lower heating element and upper square
heating element are working during bake. Maximum temperature is 400 degrees.
b. Fan Bake: Default temperature setting is at 300 degrees. Default time is 30 minutes.
Maximum Time is 1 hour and 30 minutes. The lower heating element and upper square
heating element are working along with the convection fan. Maxiumum temperature is 400
degrees. (for more information on bake and fan bake see page 10)
c. Fan Broil: Fixed temperature setting is at 450 degrees. Default time is 30 minutes.
Maximum Time is 1 hour 30 minutes. The lower heating element and upper square heating element are working along with the convection fan. Maximum temperature is 450
degrees. (for more information on fan broil see page 11)
3. TOAST FUNCTION - Use the Adjustment Buttons to select toast color. There are six levels to choose from, each making the toast progressively darker. (for more information on
toasting see page 7)
8
5
PARTS IDENTIFICATION
HOW TO USE
1
"b-12" Mode for 9”- 12” Pizza
8
2
9
a. Connect to power supply.
b. Press Pizza button twice and the display will show "b-12".
c. This is the timer selector for a 9”-12” pizza. There is no darkness setting and temperature is set
by default. Press the TIME/TEMP button and use the Adjustment Buttons to set your preferred cooking time.
d. When the program is complete, the unit will beep ten seconds continually.
e. Unplug the unit and allow it to cool completely before cleaning.
NOTE: ALWAYS REMOVE FOOD FROM OVEN WITH PROTECTIVE OVEN MITTS.
OVEN, FOOD AND OVEN DOOR WILL BECOME VERY HOT WITH USE.
3
Pizza Cooking Suggestions:
1. Place a baking rack to the desired height. It is strongly recommended that the center rack
be used for even cooking and browning results.
** When cooking a name brand frozen pizza for the first time, carefully monitor cooking
process to get the desired results.
4
2. Preheat the oven on the “Bake with Fan” function for 10 minutes at 400°F, then follow
cooking instructions for pizza functions above.
7
3. Crust type:
• For a softer crust use the pizza pan supplied with your oven.
• For a crispier crust, place the pizza directly on the oven rack.
5
6
NOTE: For homemade or dough crusts, you will need to use the pizza pan. There are
two pizza settings on your oven, A-9 and b-12. Follow whichever directions above apply
to your pizza size and preference.
1.
3.
5.
7.
9.
Convection Fan
Removable Crumb Tray
Broil Pan
Pizza Pan
Tempered Glass Door
2.
4.
6.
8.
4
Digital Control Panel
2 Baking Pans
Rack Handle
Baking Racks
9
HOW TO USE
1. USING THE OVEN FUNCTION:
A. Using the Bake Function
a. Connect to power supply.
b. Press the Oven button to activate the oven program. Press once for the bake function. The words “Oven Bake” should appear in the display window.
c. PressTime button and set the time by pressing the increase or decrease button. The timer
will change for each press. Holding the button will cause the time to change rapidly.
d. Press the Temp. button. The default temperature is 300 degree (this can be
adjusted). To change this temperature, press the increase or decrease button to
move to the desired temperature. The temperature will increase or decrease in 50
degree increments until your desired level is reached. Maximum temperature is 400
degrees for the bake function.
e. Open the door and place your food in the oven and press the Start button to begin.
f. When the program is complete, the unit will beep continually.
g. Unplug the unit and allow it to cool completely before cleaning.
h. To cancel during the cooking process press the Pause/Cancel button twice.
B. Using the Fan Bake Function (Convection Heating)
a. Connect to power supply.
b. Press Oven button two times into the Fan Bake program. The words “Oven”, “Fan”
and “Bake” will appear in the display window.
c. Press Time button. Set the time by pressing the increase or decrease button. The
timer will change for each press. Holding the button will cause the time to change
rapidly
d. Press the Temp button. The default temperature is 300 degrees (this can be
adjusted). To change this temperature, press the increase or decrease buttons to
move to the desired temperature. The temperature will increase or decrease in 50
degree increments. The maximum temperature is 400 degrees for the fan bake function.
e. Open the door and place your food in the oven and press Start.
f. To cancel during the cooking process press the Pause/Cancel button twice.
SHORT CORD INSTRUCTION
1. A short power-supply cord is provided to reduce risks that result from becoming
entangled in or tripping over a longer cord.
2. Longer extension cords are available and may be used if care is exercised in their
use.
3. If a longer extension cord is used:
a. The marked electrical rating of the extension cord should be at least as great as
the electrical rating of the appliance.
b. The longer cord should be arranged so that it will not drape over the counter top
or tabletop where it can be pulled by children or tripped over unintentionally.
POLARIZED PLUG
This appliance has a polarized plug (one blade is wider than the other); follow the
instructions below:
To reduce the risk of electric shock, this plug is intended to fit into a polarized outlet
only one way. If the plug does not fit fully into the outlet, reverse the plug. If it still does
not fit, contact a qualified electrician. Do not attempt to modify the plug in any way.
This appliance is for household use only.
10
3
IMPORTANT SAFEGUARDS
18. Extreme caution should be exercised when using containers constructed of anything
other than metal or glass inside the unit.
19. Do not place any of the following materials in the oven: cardboard, plastic, paper or
anything similar.
20. Do not store any materials other than manufacturer's recommended accessories in
this oven when not in use.
21. Always wear protective, insulated oven mitts when inserting or removing items from
the hot oven.
22. This appliance uses a tempered, safety glass door. The glass is stronger than
ordinary glass and more resistant to breakage. Tempered glass can break, but the
pieces will not have sharp edges. Avoid scratching door surface or nicking edges. If
the door has a scratch or chip, contact customer service before using the oven.
23. Do not use outdoors.
24. Do not use the appliance for anything other than its intended use.
25. The temperature of the door and the outer surface will be hot when the appliance
is working. Please exercise caution.
26. Temperature of accessible surfaces will be high when the appliance is operating.
27. Do not rest food on the tempered glass door at any time. It will not support the
weight and can possibly be chipped or scratched.
CAUTION: Surfaces are hot during and after use. Always wear protective, insulated
oven mitts when touching hot oven or hot dishes and food, or when inserting or
removing racks, pans or baking dishes.
z
HOW TO USE
C. Using the Fan Broil Function (Broil with Convection Heating)
a. Connect to power supply.
b. Press Oven button three times into the Fan Broil program.
c. Press Time button. Set the time by pressing the increase or decrease button. The
time will change for each press. Holding the button will cause the time to change rapidly.
d. Press the TEMP button. The default temperature is 300 degrees (this can be
adjusted). To change this temperature, press the increase or decrease button to
move to the desired temperature. The temperature will increase or decrease in 50
degree increments.
e. Place your food on the broil pan, and the broil pan on the bake pan. Open the door
and slide the tray into the middle or top oven position depending on thickness of
food. Close the door, press Start . The timer will begin its countdown.
f. When the program is complete, the unit will beep continually.
g. Unplug the unit and allow it to cool completely before cleaning.
h. To cancel during the cooking process press the Pause/Cancel button twice.
Note: Foods that are irregular in shape, like fish or chicken breasts, take longer to cook
in the thicker parts. To help them cook evenly, place the thickest parts to the outer
rim of the food tray where they will receive more heat.
SAVE THESE INSTRUCTIONS
2
11
HOW TO USE
IMPORTANT SAFEGUARDS
2. USING THE DEHYDRATE FUNCTION
Basic safety precautions should always be followed when using electrical appliances,
including the following:
a. Connect to power supply.
b. Press the Dehydrate button to enter the dehydrate program.
c. Press the time button. Set the time by pressing the increase or decrease button. The
time will change for each press. Holding the button will cause the time to change rapidly.
d. The temperature default is 185 degrees (temp. will not show in display).
e. Open the door and place your food in the oven and press Start.
f. When the program is complete, the unit will beep continually.
g. Unplug the unit and allow it to cool completely before cleaning.
h. To cancel during the cooking process press the Pause/Cancel button twice.
1.
2.
3.
4.
3. USING THE DEFROST FUNCTION
a. Connect to power supply.
b. Press the defrost button to enter the defrost program.
c. Press the time button. Set the time by pressing the increase or decrease button. The
timer will change for each press. Holding the button will cause the time to change
rapidly.
d. The temperature default is 150 degrees (the temp. will not show in the display).
e. Open the door and place your food in the oven and press Start .
f. When the program is complete, the unit will beep continually.
g. Unplug the unit and allow it to cool completely before cleaning.
h. To cancel during the cooking process press the Pause/Cancel button twice.
12
Read all instructions before first use.
Do not touch hot surfaces. Use handles or knobs.
Close supervision is necessary when any appliance is used by or near children.
To protect against electric shock, do not immerse cord, plug, or any other parts of the
oven in water or other liquids.
5. Do not let cord hang over the edge of tables and counters, or touch hot surfaces.
6. Do not operate appliance with damaged cord or plug or after the appliance
malfunctions. If the oven has been damaged in any manner, return the appliance to
the nearest Authorized Service Center for examination, repair or adjustment.
7. The use of accessory attachments not recommended by the appliance manufacturer
may cause hazard or injury.
8. Do not place on or near a hot gas or electric burner, or in a heated oven or
microwave oven.
9. When operating the oven, keep at least four inches of space on all sides to allow for
adequate air circulation.
10. Unplug from outlet when not in use, or before cleaning. Let the unit cool completely
before putting on or taking parts off, or before cleaning.
11. To disconnect, press the Stop/Cancel button twice, then unplug the plug. Always hold
the plug. Never pull the cord.
12. Extreme caution must be used when moving an appliance containing hot oil or other
hot liquids.
13. Do not cover the crumb tray or any part of the oven with foil. This may cause the
oven to overheat.
14. Use extreme caution when removing crumb tray or disposing of hot grease or other
hot liquids.
15. Do not clean with metal scouring pads. Pieces of the pad can break off and touch
electrical parts, creating a risk of electric shock.
16. Oversized foods or metal utensils must not be inserted in a toaster oven as they may
create a fire or risk of electric shock.
17. A fire may occur if the oven is covered or touching flammable material, including curtains, draperies, walls and things of the sort, while in operation. Do not store any
item on top of the oven during operation.
1
Congratulations!
Your
19-Liter Toaster Oven is one of the most vertsitile and unique
appliances available. No other oven on the market offers more cooking options
and usability. Your new oven can bake, convection bake, broil, dehydrate,
defrost, toast and accommodates a 12” pizza. It will become the most utilized
appliance in your home for preparing delicious meals quickly and easily. Please
read the following instructions carefully before your first use.
HOW TO USE
4. SETTING THE CLOCK
1. Press the “Clock” button and hold for 1 second. The display will show "Hr24" and
"Clock" will flash continually.
2. If you would like to use 12 hour time, press the “Clock” button again. Display will
show “Hr12”. If you prefer 24 hour time, skip to (a).
a. Start off by setting the hour by pressing the increase or decrease button. The time
will change for each press.
b. Press the “Clock” button again. Set the mintues by pressing the increase or decrease
button.
c. Finally, press the “Clock” button one last time to confirm time.
5. USING THE PAUSE/CANCEL FUNCTION
Press the “Pause/Cancel” button once to pause. To restart, press the “Start” button
once and the time will begin to count down again. Press the “Pause/Cancel” button
twice to cancel cooking setting.
6. USING THE TIMER/TEMP. FUNCTION
Press the Timer/Temp. button once while the oven is in operation to display the time
remaining. Press the same button again to display the temperature. The time remaining
can also be adjusted mid-cycle.
HOW TO CLEAN
Always unplug unit and allow to cool before cleaning.
Published By:
Aroma Housewares Co.
6469 Flanders Drive
San Diego, CA 92121
U.S.A.
1-800-276-6286
www.aromaco.com
© 2005 Aroma Housewares Company All rights reserved.
1. Your oven features a non-stick interior coating for easier cleaning. If desired, wipe the
walls with a damp sponge, cloth or nylon scouring pad and mild detergent.
2. Do not use abrasive scouring pads, abrasive cleaners or scrape interior with metal
untensils. This could damage the non-stick interior coating.
3. Wash all accessories in hot soapy water or in the dishwasher.
4. Wipe the door clean with a damp sponge and wipe dry with a paper towel or cloth.
5. Clean exterior with damp sponge. Do not use an abrasive cleaner or steel wool
scouring pad as it may damage the exterior finish.
6. Wipe baking trays and broiling pan with a damp sponge, cloth or nylon scouring pad. Do
not use an abrasive cleaner or steel wool scouring pad as it may damage the porcelain
enamel finish.
7. Empty crumb try and wipe clean with damp cloth or sponge.
8. Always dry ALL parts and surfaces thoroughly prior to usage.
13
LIMITED WARRANTY
Aroma Housewares Company warrants this product free from defects in material
and workmanship for one year from provable date of purchase in the continental
United States.
Within this warranty period, Aroma Housewares Company will repair or replace, at
its option, defective parts at no charge, provided the product is returned, freight
prepaid with proof of purchase and U.S. $8.00 for shipping and handling charges,
payable to Aroma Housewares Company. Before returning an item, please call the
toll free number below for a return authorization number. Allow 2-4 weeks for
return shipping.
21 Liter
Convection Oven
This warranty does not cover improper installation, misuse, abuse or neglect on the
part of the owner. Warranty is also invalid in any case that the product is taken
apart or serviced by an unauthorized service station.
This warranty gives you specific legal rights which may vary from state to state, and
does not cover areas outside the United States.
AROMA HOUSEWARES COMPANY
6469 Flanders Drive
San Diego, California 92121
1-800-276-6286
M-F, 8:30 AM - 5:00 PM, Pacific Time
Website: www.aromaco.com
Instruction Manual
Model ABT-419DNS