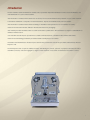
1
Contents General data 3 Important safeguards 4 Introduction 5 Instruction for use 6 Description of external components 8 Installation 9 Technical data 10 Start up 11 Operating instructions 15 Dispensing steam 18 Dispensing hot water 19 How to make great espresso 21 How to texture milk 22 How to clean your Giotto/Cellini 24 How to disassemble/dismantle the machine 26 Espresso glossary and recipes 28 Trouble shooting 29 For European Community countries: declaration of CE conformity 32 Subject to change without notice. 2 General data Manufacturer: Rocket Espresso Limited Viale Delle Industrie 26 20090 Settala Milano Italy Email: [email protected] Model: Giotto and Cellini Distributed by: 3 Important Safeguards 1. Read all Instructions 2. Do not touch hot surfaces. Use handle or knobs. 3. To protect against electric shock do not immerse cord and plugs in water or other liquid. 4. Close supervision is necessary when any appliance is used by or near children. 5. Unplug from outlet when not in use and before cleaning. Allow to cool before putting on or taking off parts. 6. Do not operate any appliance with a damaged cord, plugs, or after the appliance malfunctions or has been damaged in any manner. Return appliance to the nearest authorized service facility for examination, repair, or adjustment. 7. The use of accessory attachments not recommended by the appliance manufacturer may cause injuries. 8. Do not use outdoors. 9. Do not let cord hang over edge of table or counter, or touch hot surfaces. 10. Do not place on or near a hot gas or electric burner or in a heated oven. 11. Extreme caution must be used when moving an appliance containing hot oil or other hot liquids. 12. Always attach plug to appliance first, then plug cord into wall outlet. To disconnect, turn any control to “off”, then remove plug from wall outlet. 13. Do not use appliance for other than intended use. 14. Save these instructions. 4 Introduction Please read this technical handbook carefully since it provides important information on the correct installation, use and maintenance of your coffee machine. The information contained in this manual is necessary for the safe installation and operation of your coffee machine. It should be retained in a safe place for future reference. Copies are available from your local dealer. The information contained in this manual relating to installation and operation is not a substitute for safety instructions and technical data affixed to the machine and/or its packaging. The manual provides information that is current at the time of publication. The information is subject to amendment or alteration without notice. Your machine should only be operated in accordance with instructions contained in this manual and verbal instructions and training provided by an authorised Rocket Espresso Ltd. dealer. Installation and maintenance should only be carried out by technicians and service providers authorised by Rocket Espresso Ltd. Rocket Espresso Ltd. accepts no liability for injury and damage to person, persons or property caused by incorrect installation, misuse, and user negligence, neglect of the machine or any other circumstances beyond its control. 5 Instructions for use This machine has been designed for the sole purpose of producing coffee, hot water and steam for hot beverages. All other uses are outside of the scope of this machine and, therefore, dangerous and hazardous. The machine has been designed from safe, accessible, durable components and materials and manufactured to the highest standards for use only in home / domestic environment. The machine should not be exposed to elements such as sunlight, rain, snow, extreme temperatures etc. The machine must be operated by responsible adult persons who know the use of the equipment and should not be used by children, minors or untrained persons. To protect against electric shock do not immerse machine, cord and plugs in water or other liquid and do never let machine’s internal parts get in touch with liquids. The user should be fully conversant with safety operating procedures contained in the manual and should follow the instructions and advice provided with. To ensure maximum performance efficiency, it is essential that technical service and maintenance is carried out exclusively by Rocket Espresso Ltd. authorised technicians. It is the responsibility of the user to notify the manufacturer of any defects or damages which may affect the safety of the original installation or future safe operation of the machine. The user must respect the safety regulations at the point of installation. The user must check the surrounding areas to ensure safe and hygienic use is guaranteed. The machine component’s manufacturers are responsible for the parts supplied by them. The customer is responsible for the personal use of the equipment. It is the responsibility of the user to ensure that the location of the machine is hygienic, and that its continued safe operation can be guaranteed. When the machine is not being used for long periods of time, the hydraulic systems should be drained completely and the machine stored in a temperature above freezing (0°C or 32°F). This will prevent the hydraulic system from freezing which could damage internal pipes and boiler. 6 All spare parts fitted to the machine must be original Rocket Espresso Ltd. components. Before any cleaning or maintenance the machine should be disconnected from the electric supply. Never pull the electrical supply cable. When cleaning the machine never use caustic or abrasive cleaning chemicals. To avoid electric shocks: s $O NOT IMMERSE MACHINE ITSELF CORD AND PLUGS IN WATER OR OTHER LIQUID AND DO NEVER LET MACHINES INTERNAL PARTS get in touch with liquids. s %NSURE THAT THE MACHINE IS INSTALLED WITH A PROPER EARTHGROUND IN ACCORDANCE TO LOCAL SAFETY PRACTISES CODES AND legislation. s 0REVENT THE POWER CABLE FROM BEING STRETCHED OR PULLED TIGHT s !VOID USING THE MACHINE WITH WET HANDS s .EVER OPERATE THE MACHINE WITH BARE FEET Never operate the machine without ensuring the water reservoir contains water. The machine must be operated with soft, clean drinking water. If the local water supply has a high mineral content use a water softener. A build up of mineral deposit may restrict the flow of water within the hydraulic systems causing damage to the machine and risking personal injury. The machine must be switched off whenever it is left unattended. 7 Description of external components 13 14 1 12 6 7 3 9 11 2 4 5 8 10 1. Steam valve handle. Turn left to open steam; turn right to shut. 2. Steam wand. Can become hot and cause burns. Caution! 3. Boiler pressure gauge. Boiler pressure should be around 1 Bar. 4. Machine’s on/off switch. Position “0” = off; position “1” = on. 5. Control lamp ”machine on” when illuminated and water level low when light flashing. 6. Brewing head. It’s very hot and can cause burns! Caution! 7. Filter holder. Its metal parts can become hot and cause burns. Caution! 8. Brewing head’s (or group’s) progressive infusion piston. Unloads hot water into drip tray once brewing process is terminated. Caution: its metal parts can become very hot and cause serious burns. Attention to hot water flow coming out beneath after brewing process is terminated! 9. Lever for brewing process control. Caution: its metal parts can become very hot and cause burns! 10. Drip tray and grid. 11. Hot water wand. Can become very hot and cause serious burns. Caution! 12. Hot water handle. Turn left to open. Turn right to shut. 13. Cups frame. 14. Cups tray. Do never pour any liquid on this tray! It will filter inside the equipment and can cause electrical shocks and serious injuries. Danger! 8 Installation All machines are designed to ensure maximum possible user safety. It is, however, an important responsibility of the user to observe the following safety codes to further enhance safe installation and operation. s !LWAYS ENSURE THAT HAZARDOUS PACKING ITEMS SUCH AS PLASTIC BAGS 3TYROFOAM NAILS ETC ARE PROPERLY DISPOSED OF to prevent accidental injury to children or other persons. s )F THERE IS EVIDENCE OF DEFECT OR DAMAGE TO THE MACHINE AN AUTHORISED 2OCKET %SPRESSO ,TD DEALER OR TECHNICIAN should be notified immediately so that remedial action can be taken... s 4HIS MACHINE IS SAFE ONLY WHEN IT HAS BEEN CORRECTLY CONNECTED TO AN EFlCIENT EARTHINGGROUNDING SYSTEM 4HIS should conform to local safety standards and legislation in force at the time of installation. s )NSTALLATION OF ANY 2OCKET %SPRESSO ,TD PRODUCT SHOULD ONLY BE UNDERTAKEN BY DULY AUTHORISED PROPERLY TRAINED and qualified personnel s $ANGEROUS OR IMPROPER ELECTRICAL CONNECTIONS ARE EXTREMELY HAZARDOUS AND SHOULD NEVER OCCUR s !LWAYS CHECK THE INTEGRITY OF THE COMPONENTS ELEMENTS OF THE MACHINE s .EVER lT DEFECTIVE OR DAMAGED SPARE PARTS !LWAYS REQUEST REPLACEMENT FROM 2OCKET %SPRESSO ,TD s "EFORE CONNECTING THE MACHINE TO ELECTRIC SUPPLY ALWAYS CHECK THAT CAPACITY AND POWER RATING AT LEAST EQUALS THE power requirement of the machine. s 0ROTECT THE USER BY lTTING A CIRCUIT BREAKER TO ELECTRIC SUPPLY FEEDING THE MACHINE s .EVER ATTEMPT TO RUN THE MACHINE WITH WATER THAT IS HARDER THAN & This equipment is to be installed to comply with the applicable Federal, state, or local plumbing codes having jurisdiction. 9 Technical Data Brewing groups: 1 Hot steam wands: 1 Hot water wands: 1 Coffee portion control: Manual Boiler water level control: Automatic Voltage: Please see machines data plate Frequency: Please see machines data plate Wattage: 1300 W Dimensions: Width 330 mm (13 inches) Depth 425 mm (16.8 inches) Height 350 mm (13.8 inches) Weight: 10 23 kg (app. 29 lbs) Start up Parts which can become hot and cause injuries. Caution! 1 12 6 7 9 11 2 8 Never touch the following parts. They are or can become hot and could cause burns: 1. Metal parts of steam handle 2. Hot steam wand and spout 6. Coffee brewing group 7. Not insulated metal parts of filter holder 8. Infusion piston 9. Not insulated parts of lever 11. Hot water wand and spout 12. Not insulated metal parts of hot water handle 11 We assume the machine is properly installed Before starting using the machine, please control the following: (A) 1 12 9 4 5 10 1. Lever (A-9) is completely down. 2. Steam handle (A-1) is closed. 3. Hot water handle (A-12) is closed. 4. On/off switch (A-4) is on position “0” =machine switched off 5. Machine is unplugged. 6. Drip tray (A-10) and its grid are properly positioned into the machine. 12 Now please proceed as follows: (A) (B) 14 1 2 4 1. Remove the cover from the water reservoir Fig. B-2 2. Remove the water reservoir (Fig. B-2 and clean it carefully with food quality cleaning products. It’s very important that the water reservoir is always clean! Please repeat this operation every day and whenever necessary. 3. Fill the water tank with fresh drinking water to just over ¾ full. 4. Place the tank inside the machine taking care not to spill water. 13 5. Put on the cover on top of the water reservoir. 6. Plug in the machine. 7. Turn the on/off switch (A-4) to the on position “1” and open the steam handle (A-1). Boiler water fill starts (you will hear the pump’s noise). 8. When the boiler is properly filled with water, the pump will stop (=no more noise). Now close the steam handle (A-1). 9. The heating up of the boiler water starts. 10. Wait till the boiler pressure gauge (A-3) reads approximately 1 bar. 11. Now open the steam handle (A-1) for 5 seconds to let out some steam. This operation is very important as it removes possible vacuum inside the boiler which will reflect in suction of milk inside the boiler itself once starting to steam milk. Close the steam handle (A-1) again. 12. Wait until the boiler pressure gauge (A-3) reaches again 1 Bar. 13. Pull the lever (A-9) completely up. 14. Allow a cup of water to come out of the coffee brewing group (A-6). 15. Pull the lever (A-9) completely down (water will stop flowing). Now the machine is ready for operation. 14 Operating Instructions The below shown components are supplied with your machine (the one cup filter holder comes typically on special order) (A) Tamper A (B) Measuring spoon B (C) Two cups metal filter basket (D) Two cups filter handle (E) One cup metal filter basket D F (F) One cup filter handle E C Suggestion: We strongly suggest that you train how to tighten the filter holder (with the metal filter basket firmly plugged in) into the brewing head (A-6). It seems to be an easy operation. Nevertheless we think it may need some exercise. 1 2 3 4 15 Preparing one or two cups of espresso. For the correct espresso preparation technique see page 30 Preparing a single espresso 25ml 1. Use one cup filter handle (with 1 spout) 2. Position the metal one cup filter basket firmly inside the filter holder 3. Fill the single filter basket with freshly ground coffee and tamp the coffee until the finished height, is level with the internal reference line in the filter basket. 4. Tamp the ground coffee gently using the tamper supplied with the machine 5. Tighten the filter holder firmly into the brewing head (A-6). 6. Put one cup under the filter holder spout. 7. Pull the lever (A-9) completely upwards. Hot coffee flows into the cups from the filter handle’s coffee spouts. 8. When the MAXIMUM extraction of 25 to 30 ml of espresso has been dispensed, position the lever (A-9) completely down to stop the coffee dispensing process. For safety reasons and to avoid personal injury it’s extremely important that the lever (A-9) is positioned completely down and not just to the position where the coffee stops to flow out and the pump’s noise can’t be heard any more. Never leave lever (A-9) in the position as shown here below: 9. Remove the filter holder (A-7) from the machine and empty used coffee grounds. 10. Clean the filter holder. 16 Preparing TWO cups or a double espresso coffee. 50 to 60 mls. 1. Use the two cup filter handle (with 2 spouts) 2. Position the metal two cups filter basket firmly inside the filter holder 3. Fill the single filter basket with freshly ground coffee and tamp the coffee until the finished height, is level with the internal reference line in the filter basket. 4. Tamp the ground coffee gently using the tamper supplied with the machine 5. Tighten the filter holder firmly into the brewing head (A-6). 6. Put two cups under the filter holder spouts. Or one cup for a double. 7. Pull the lever (A-9) completely upwards. Hot coffee flows into the cups from the filter handle’s coffee spouts. 8. When the maximum extraction of 50 to 60 mls, or 25 to 30 ml per cup has been achieved, position the lever (A-9) completely down to stop the coffee dispensing process. For safety reasons and to avoid personal injury it’s extremely important that the lever (A-9) is positioned completely down and not just to the position where the coffee stops to flow out and the pump’s noise can’t be heard any more. Never leave lever (A-9) in the position as shown here below: NO! DANGER ! 9. Remove the filter holder (A-7) from the machine and empty used coffee grounds. 10. Clean the filter holder. 17 Dispensing steam to froth or heat up liquids 1. Fill a suitable ideally stainless steel pitcher (used for food only) with an insulated grip with the liquid to be heated up or frothed. 2. Position the steam nozzle of the steam wand (A-2) just below the surface of the liquid inside the liquid in the recipient. To avoid personal injury always ensure that the end nozzle of the steam pipe (A-2) is below the surface of the liquid to be steamed. 3. Turn on steam valve (A-1) fully. 4. Heat up or froth the liquid inside the pitcher. Pay attention to hot sprays! They may cause injuries. 5. When you’re done, close the steam valve (A-1). Clean the steam wand (A-2) and the steam wand’s end nozzle carefully with a non abrasive damp cloth after each single use without touching it directly with any part of the body to avoid injury or damage due to the hot surface of steam wand end nozzle. Caution: Hot surface. Example: Steaming milk. For the correct milk texturing and heating technique see page 28. 1. Use a clean, cold pitcher and fill 1/3 with cold, fresh milk. If milk has previously been steamed and stored in the refrigerator, we suggest adding some fresh milk in order to achieve optimum foam. Milk should be stored at a temperature around 4-5°C (app. 40°F). 2. Insert steam nozzle (A-2) into the centre milk just below the surface of the milk. 3. Open steam valve (A-1) rapidly. 4. Steam will come out of the nozzle and froth the milk. The milk volume will increase rapidly. Please lift the pitcher progressively to make sure that the steam nozzle is always right below the surface of the milk. 18 5. When enough foam is achieved, submerge nozzle (going sidewise) and keep it in that position finishing heating milk until the pitcher is too warm to touch. Please remember that milk should never be steamed over app. 76°C (168°F). Milk steamed to over this temperature is scalded. 6. Close steam valve (A-1) rapidly, then remove milk pitcher from steam wand. 7. Wipe the steam wand (A-2) immediately after using with a non abrasive clean damp towel without touching the steam wand (A-2) directly with any part of the body to avoid injury or damage due to the hot surface of steam wand end nozzle. Use a towel that is designated for the steam wand only. Do not cross contaminate kitchen towels by using the same towel for cleaning the steam wand and i.e. kitchen tops. Do not let the milk bake onto the steam wand. Clogged wands and steam valves can be expensive to repair or to replace. 8. Burp your steam wand (A-2) immediately after using opening and closing immediately after the steam valve (A-1). Caution: Hot steam will come out of steam wand (A-2). Burping the wand will remove the milk residue from the inside of the nozzle. 9. Finish espresso drinks with correct portions of milk and foam. 10. Clean steam pitcher and store for next drink. Dispensing of hot water 1. Position the end nozzle of the hot water wand (A-11) inside a suitable pitcher used for food only. 2. Open the hot water valve (A-12). 3, Hot water will be dispensed into the pitcher. 4. Close the hot water valve (A-12) when you’re done. 19 20 How to make great espresso. This is the one method of making coffee that borders on being an art form. The better the machine you have (yes, often the more expensive) the better result you will achieve. In my opinion you are better serving great Stove Top Espresso or Plunger than bad Espresso. So how do you master the art of making the best tasting Espresso cup after cup? Simple, follow our 4 step guide. Put your heart and soul into the process and you will be the equal of any Your Espresso machine needs to be CLEAN, VERY, VERY CLEAN. Use filtered water if you can and fresh water if you can’t. Use a conical burr grinder and grind your coffee really fresh ie; just seconds prior to use. If your beans are getting old throw them out and buy a fresh batch. Buy and use a professional quality tamp. professional barista. TROUBLE SHOOTING. Thin and dirty tasting coffee. Your grind setting is too fine or it’s too tightly packed. The water is struggling to flow through the coffee. The resulting coffee tastes dirty and is overly dark. This is known as over extracted coffee. To fix it, make your grind setting more coarse, so you extract 50/60ml of coffee over the 25 to 30 Fill the handle of the machine with your freshly ground coffee to within 3mm of the top of the basket. Use a FIRM tamp, by firm I mean a decent push but no more than that. The tamp pressure must be the same, cup after cup. Along with the grind setting, this controls the rate at which the water flows through the ground coffee. THIS IS THE SECRET TO GREAT ESPRESSO. second time frame. Sharp and metallic tasting coffee. Your grind setting is too coarse or it’s too loosely packed. The water is flowing through too fast. The resulting coffee looks thin with little or no crema. This is under extracted coffee with a sharp, metallic taste. To fix it, make your grind setting finer – remember 50/60ml over 25 to 30 seconds. A dirty machine will always lead to poor results. www.rocket-espresso.com Fit the coffee filled handle to the machine and start the extraction process. The time of the extraction (the pour) should be no more than 25 to 30 seconds before you turn the machine off. You’re looking for a good heavy, viscous pour, we call it a mouse tail. Now you should have 50 to 60 ML of fine dark, oily espresso. PERFECT. Remember that 50 to 60 ml is the maximum amount of your extraction, from this point on there is no flavour left in the ground coffee. For milk based coffee, simply add the hot milk to the desired amount, or for a long black add hot water. 50 – 60ml 21 How to texture milk. If making espresso is an art form this is like learning a craft, but once mastered it’s easy enough. The heat and texture of the milk you add to your espresso base will determine the quality and the temperature of your finished coffee. The milk texture that you are aiming for is best described as velvet. That means it’s about 70°C with a nice fine bead of bubbles. Follow the 4 steps and you’ll be producing great milk every time. THE MILK. We’ll assume you can make an excellent espresso (the base for latte’s and flat whites), so now let’s talk milk. Using a stainless steel jug, fill the milk to around half way, refrigerated or room temperature milk is fine. Place the steam wand of your espresso machine under the surface of the milk and turn the steam tap fully on. STRETCHING AND TEXTURISING. Now gently lower the milk jug so the tip of the steam wand is just under the milk’s surface. Keeping the jug as steady as possible allow the steam wand to gently gasp the air right on the surface of the milk. Slowly change the angle between the surface of the milk and the steam wand until you create a whirlpool effect. Listen for the gentle sound of the air being drawn into the milk. 22 If the noise is too loud then the milk surface is too far away from the tip of the steam wand and rather than a fine bead of bubbles you will see a very frothy texture being created. Try for an effect similar to that of beating cream, gently folding air through the milk. At all times keep a steady hand, do not jiggle the jug up and down. Once textured, the volume of milk should have almost doubled. HEATING. Once you have the milk texture correct, lower the steam wand into the milk and complete the heating process. If you can hold your fingers against the bottom of the jug for around 3 to 4 seconds, the milk temperature will be around 70°C.That’s the milk texture taken care of. Now let’s talk espresso temperature and why it’s important. The espresso when it is extracted into your cup has a temperature of approximately 90°C. When you heat your milk it will be about 70°C - any hotter and it will scorch, ruining the taste. So how do you now add the milk to the espresso without making the resulting latte or flat white stone cold? You MUST heat the cups. If your espresso machine has a facility to heat cups, great, if not heat them with hot water prior to use. THE POUR. Once you have heated and textured the milk, you’re ready to pour it into your espresso base. With a spoon, gently groom the surface of the milk, skimming off any overly frothy milk. The milk surface should now be glossy and have a nice fine bead of bubbles. Gently bang the bottom of the jug on the bench top to settle the milk. Very slowly, with the jug close to the top of the cup, allow the milk to slowly roll off the lip of the jug and into the cup. Continue the pour in a gentle continuous motion. Remember to watch what’s happening at the lip of the jug, as this determines the quality of the milk going into your espresso. If the milk becomes too thin or thick, stop the pour, gently bang the jug on the counter top, groom the surface again with your spoon until it’s shiny and resume the pour. This all sounds more difficult than it actually is. Try it. You will throw out a few coffees to begin with, but once you’ve mastered the craft of making lattes and flat whites, you’ll enjoy some of the most luxurious coffees to be had. TROUBLE SHOOTING. Overly bubbly and frothy milk is caused by allowing too much air into the milk as you heat it. Thin flat milk is the result of not introducing any air into the milk as you heat it, or using milk that has previously been heated. If you are still having problems bring in a pint of milk and we will be happy to show you how it’s done. 23 How to clean your Giotto or Cellini. The importance of a clean espresso machine can not be under estimated when trying to produce great espresso. flavour of the espresso you make, if they are allowed to build up and become rancid when exposed to the environment. You have the key ingredients with which to make great espresso, a quality espresso machine, a quality burr grinder and of course, fresh and well roasted coffee. Whilst cleaning can be a chore it is an essential part of espresso preparation. Yet with these 3 essential ingredients, all your hard work will come undone should your espresso machine not be clean. REQUIREMENTS Nylon brush, small screwdriver or teaspoon, head shampoo and back flush cap Coffee is full of oils, these oils give espresso that lovely viscous feel in the mouth, but will also severely taint the The cleaning procedure can be broken down into two main areas, the handle and the group. THE HANDLE. The easiest part to clean. With a small screw driver or teaspoon, flick out the filter basket from the handle. Once you have the filter basket out, clean both the filter basket and the internal surface of the handle with a pot scourer until both surfaces are clean from the black coffee oils. Remove filler basket with Should the oils in the handle have built up to teaspoon or small srewdriver. excessive amounts, it may be necessary to soak the handle in hot water with a cap full of head shampoo for 30 minutes or so and then rinse thoroughly in fresh water. Clean internal surface of handle with a pot scourer. 24 THE GROUP. With a small hard brush, give the inside of the group a good scrub. The group should be back flushed Regularly. Scrub inside of group. This means after each day, firstly, remove the filler basket and then fit the blind filter into the handle. Next fit the handle into the espresso machine. NOTE: This filter basket has no holes so the water pressure will build up and the water is very hot. Turn the brewing lever on and then off after about 15 seconds or so. The purpose of this is too push fresh brewing Remove filler basket with water back through the head of the machine teaspoon or small srewdriver. and back out through the exhaust solenoid thus cleaning the head or group of the machine. Repeat this procedure several times, and each time you turn off the machine, remove the handle and empty the water sitting in the blind filter. Repeat until the discarded water is clean and fresh. Next or weekly, put a small amount of head shampoo into the blind filter and repeat the process Fit blind filter. as above. Repeat this process until the shampoo runs clean into the drain tray via the exhaust solenoid. Ensure that you back flush the machine once again so the shampoo residues are washed away. Refit the correct filter basket back into the handle Back flush machine. and taste the difference in the flavour of the coffee, job well done. Additionally, make sure that the steam nozzles are wiped clean and check that the steam tip holes are not blocked. Likewise polish the exterior of your machine with a clean cloth or better a stainless steel cloth. 25 How to disassemble/dismantle the machine The machine has to be disassembled and dismantled by an authorized technician. Disassembling of the machine: Operations to be effected with machine in working conditions at operating temperature. 1. Place a recipient (with insulated grip) under the hot water wand (A-11). 2. Open the hot water valve (A-12) and let hot water flow in the recipient. 3. When no more hot water comes out, close the hot water valve (A-12). 4. Put on/off switch (A-4) to position “O” (machine off). 5. Unplug the machine from the electrical mains. Operations to be effected with machine switched off and cooled down to room temperature. 1. Empty the fresh water reservoir and clean it carefully before replacing it back into the machine. 2. Make sure that the lever (A-9) is completely down. 3. Store the machine in a safe, dry place. 26 How to disassemble/dismantle the machine Simple, routine care of your espresso machine is your best defence against poor quality shots, as well as preventing breakdowns or, even worse, personal injuries. After each use: 1. Wipe the steam wand (A-2) immediately after using with a non abrasive clean damp towel without touching it directly with any part of the body to avoid injury or damage due to the hot surface of steam wand end nozzle. Do not let the milk bake onto the steam wand. Clogged wands and steam valves can be expensive to repair or to replace. 2. Burp your steam wand (A-2) immediately after using opening and closing immediately after the steam valve (A-1). Caution: Hot steam will come out of steam wand (A-2). Burping the wand will remove the milk residue from the inside of the nozzle. 3. Knock used coffee grounds from filter holder and rinse. Re-use or store in brewing head (group) to keep the filter holder warm. (Please remember to take out filter holders when machine is not operating for some hours (i.e. at night). Throughout the day: 1. Wipe the screens inside your group head with a damp clean towel to remove excess grounds. Before shutting down the machine (i.e. at night): Caution: For the following operations the machine has to be switched off, unplugged and completely cooled down 1. Clean showers, group gaskets and group flange with a clean brush (to be used only for this purpose). 2. Wash metal filter baskets and filter handle in warm water adding a special detergent product following the instruction’s of the specific product. It has to be food quality and for this specific use with coffee machines. 3. Clean the drip tray (A-10) and grid with a non abrasive damp cloth. Make sure to empty the drip tray (A-10) before it flows over. 4. Wipe down surface of machine with non-abrasive clean cloth. Do never use aggressive cleaners or scouring powders! This operation has to be done when necessary. 5. Remove the water reservoir (B-4) and clean it carefully with food quality cleaning products. It’s very important that the water reservoir is always clean! Please repeat this operation every day and whenever necessary. 27 Espresso Glossary and recipes Please use for the following, properly ground and portioned espresso coffee. Please use app. 6, 5 to 7 grams for each shot. You should consider a brewing time of app. 25” for a proper shot of espresso (or the part of espresso in a latté or other espresso based beverage. Espresso 25 ml for a single or 50ml for a double, served in a small pre-warmed espresso cup. Brewing time is around 25 seconds. Ideally served in a 70ml cup. Cappuccino 125 ml. Consists of 1 part espresso (25ml) and 4 parts of frothed milk (100 ml). Serve in a 190ml cup. Caffe Latte A single (25ml) or a double espresso (50ml) topped with heated and textured, but not frothed milk. Served in a 190ml glass. Americano / ong Black Depending on the desired strength, a single or a double espresso topped with hot water, generally served in a 150 to 190 ml cup. Caffe Mocha 1 part of chocolate syrup, 1 part of espresso, 5 parts of topped with a Caffé Latté. Caffé Macchiato A single espresso (25ml) with a stain of heated milk. Generally served in a 70 ml cup. Espresso con Panna 1 shot of espresso topped with whipped cream. Flavoured Latte A Caffe Latté with 25ml of flavoured syrup (i.e. almond, hazelnut etc.) 28 Trouble Shooting Problem Possible causes Solutions Light flashing Low water level in the reservoir Add water No water / coffee from the group Coffee grind is to fine and/or Use a coarser ground coffee and reduce or coffee pouring slowly coffee is tamped too much tamping pressure Group shower screen is clogged Clean the screen with a clean damp towel or contact your authorized service rep. for replacement of the screen Group restrictor is clogged Contact your authorized service rep. Blind filter (special order feature Remove the blind filter for some markets) is in the filter holder No steam from steam wand Steam nozzle is clogged with Unscrew nozzle and clean. dried milk Boiler pressure is too low Check pressure at approximately 1 bar. If pressure is low, check on/off switch is “on” No water from hot water nozzle Boiler is overfilled Contact your authorized service rep. Boiler is empty Contact your authorized service rep. Heating element defective Contact your authorized service rep. Boiler pressure is too low Check pressure at approximately 1 bar. If pressure is low, check on/off switch is “on” Water leaking from machine Pump is making loud noise Boiler is overfilled Contact your authorized service Several causes. I.e. boiler is Switch machine off and unplug machine. overfilling. Contact your authorized service Pump is running without water Switch machine off and unplug machine and contact your authorized service rep On/off switch is off Turn switch on 29 Trouble Shooting Problem Possible causes Solutions Pump is not running Pump is faulty Switch off and unplug machine and contact your authorized service rep Water from water nozzle is brown and smells bad Milk in boiler Switch off and unplug machine and contact your authorized service rep Steam pressure is low to recover Low voltage at power supply Verify proper voltage to machine Heating element damaged Contact your authorized service rep Hard water build up in boiler Contact your authorized service rep. Steam pressure is low Verify boiler pressure is at approximately 1 bar. If pressure dropped during steaming, allow pressure to recover. Steam nozzle partially clogged Remove and clean steam nozzle Milk in steam wand and/or valve Contact your authorized service rep. Shots pouring too fast Coffee grind too coarse Use finer coffee grind Shots taste bad Coffee is not fresh or not freshly ground Ensure your coffee is fresh and freshly ground Group and/or filter holders and/ or filter baskets and or group showers/screens need to be cleaned or replaced Please provide or contact your authorized service rep. Coffee grind is incorrect Use properly ground coffee Grindstones are dull Contact your authorized service rep. Boiler pressure is to high or to low Contact your authorized service rep. No “Crema” on espresso (“Crema”= emulsion on top of the espresso) Grind to coarse Please use properly ground coffee Coffee is not fresh Use fresh and freshly ground coffee Filterholder won’t fit in group Gasket need to be replaced Contact author. service rep Too much coffee in filter Use correct portion Steam flow from wand is low 30 (The following declaration is applicable for machines distributed in the European Community only) Declaration of CE conformity Manufacturer: Rocket Espresso Limited Italian Branch Viale Delle Industrie 26 20090 Settala Milano Italy This is to confirm that the Giotto series of espresso machines has been manufactured according to the following standards: DIR. 89/336 s %. s %. s %. s %. DIR. 73/23 s %. s %. DIR. 89/392 s %. s %. 31 www.rocket-espresso.com