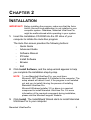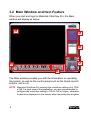
1
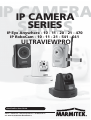
IP IPCAMERA CAMERA SERIES SERIES IP Eye Anywhere - 10 - 11 - 20 - 21 - 470 IP RoboCam - 10 - 11 - 21 - 541 - 641 ULTRAVIEWPRO 3 UltraViewPro User Guide 20372 / 20101123 • IP Eye Anywhere™ / IP RoboCam™ ALL RIGHTS RESERVED MARMITEK © Contents CHAPTER 1 .............................................................. INTRODUCTION.......................................................... CHAPTER 2 .............................................................. INSTALLATION ........................................................... CHAPTER 3 .............................................................. USING MARMITEK ULTRAVIEW PRO ................................ 3.1 3.2 3.3 3.4 2 2 3 3 5 5 STARTING THE PROGRAM .............................................. 5 MAIN WINDOW AND ITEM FEATURE ................................ 6 ACCESSING THE CAMERA ............................................ 10 RECORDING / PLAYING VIDEO ...................................... 16 CHAPTER 4 .............................................................21 CONFIGURING MARMITEK ULTRAVIEW PRO ..................... 21 4.1 4.2 4.3 4.4 CONFIGURING THE EMAP VIEW SETTING ...................... 21 CONFIGURING THE SYSTEM ......................................... 26 EVENT CONFIGURATION .............................................. 27 TERMINATING OPERATION ........................................... 31 CHAPTER 5 .............................................................32 USING IPFINDER ......................................................32 Marmitek UltraViewPro 1 C HAPTER 1 INTRODUCTION This Software User Guide provides detailed instructions on operating Marmitek UltraView Pro, a customized software application with a user-friendly interface allowing you to access and control your camera(s). You can connect up to 32 cameras to monitor different places and record events for each camera. With Marmitek UltraView Pro, you can also change some basic settings of the camera, such as schedule profiles and motion detecting. In addition, if your camera supports advanced features, such as audio or pan/tilt function, you can use these functions through the control panels of Marmitek UltraView Pro. To use Marmitek UltraView Pro, you have to install it in your computer. It is recommended to use a high performance computer if you want to connect multiple cameras simultaneously. z Platform: Microsoft® Windows® XP/Vista*, and Windows 7/8 z Hard Disk: 80GB or above z Resolution: 1024x768 or above z Hardware Requirement 1~8 cameras: Intel Core 2 Duo; 2GB RAM 9~32 cameras: Intel Core 2 Quad; 4GB RAM * For Windows Vista users: please go to User Accounts and Family Safety > User Accounts > Turn User Account Control on or off, then uncheck the “Use User Account Control (UAC) to help protect your computer checkbox. Restart your computer to validate the setting. For additional information of User Account Control, please go to http://www.microsoft.com/windows/products/windowsvista/features/detail s/useraccountcontrol.mspx 2 C HAPTER 2 INSTALLATION IMPORTANT! Before installing the program, make sure that the Avira AntiVir (the anti-virus application) is not installed in your computer system. Otherwise, Marmitek UltraView Pro might be malfunctioned while operating in your system. 1. Insert the Installation CD-ROM into the CD drive of your computer to initiate the Auto-Run program. The Auto-Run screen provides the following buttons: - Quick Guide - Advanced Guide - Software Manual - IPFinder - Install Software - Browse - Exit 2. Click Install Software, and the setup wizard appears to help you complete the installation step-by-step. NOTE To use Marmitek UltraView Pro, you must have Microsoft .NET Framework 2.0 installed in the computer. The setup wizard will detect it and, if the program is not installed yet, ask you to install it during the process of installing Marmitek UltraView Pro. Microsoft Windows Installer 3.0 or above is a required component to install Marmitek UltraView Pro. For more information of the required component during installation, please visit the Microsoft support Website. 3. Click Install. The InstallShield Wizard starts to install Marmitek UltraView Pro to your computer. Marmitek UltraViewPro 3 The Status bar indicates the installation process. 4. When done, click Finish to complete the installation. You will see the program icon appeared on the desktop of your computer. TIP The IPFinder program will be installed in your computer simultaneously when you install Marmitek UltraView Pro. For more information of using IPFinder, refer to Chapter 5 or the User Guide provided by your camera. 4 C HAPTER 3 USING MARMITEK ULTRAVIEW PRO 3.1 Starting the Program 1. Click Start Æ Programs Æ UltraView Pro Æ UltraView Pro. Alternatively, you can start the program by double-clicking the program icon on the desktop of your computer. 2. On the login window, enter the User name/Password and click OK to login. If this is the first time you start the program and login, use the default User name / Password: admin / admin. NOTE For security purpose, you are highly recommended to change the default user name and password after login. For more information, see the Configuring the System > User Management section. Marmitek UltraViewPro 5 3.2 Main Window and Item Feature When you start and login to Marmitek UltraView Pro, the Main window will display as below: X [ \ ] Y Z The Main window provides you with the information on operating the system, as well as the control panel such as the Quick Launch buttons, and so on. NOTE Marmitek UltraView Pro requires the resolution setting up to 1024 x 768. For best view of the application, you are recommended to configure the resolution setting to 1024 x 768 or higher; otherwise, it cannot be displayed on the screen when launching the program. 6 X Live View Window displays the live video of the connected camera(s). Y Quick Launch Buttons are located below the Live View Window, providing you with the following quick-launch functions: Button Function Click to select Logout or Close UltraView Pro. Click to select Restore Recording Type, All Continuous Recording, or Stop All Recording. Click and then select to display the View Setting window, switch to the eMap View window, or check the Camera Status. Click to display the Playback window. Click to display the Schedule Configuration window. Click to configure the event settings: Event Server, Address Book, and Event Trigger. Click to configure Device Setting and Recording Setting. Click to set the Account, Language, and System Setting; or view the Version or the program. Z Camera View Mode buttons in this area allow you to switch the camera view mode. Button Function Display the connected camera(s) in single camera view mode. Display the connected camera(s) in quad view mode. Display the connected camera(s) in 3 x 3 grid view mode. Marmitek UltraViewPro 7 Display the connected camera(s) in 13-camera view mode using a split window. The first camera is displayed as the major view. Display the connected camera(s) in 17-camera view mode using a split window. The first camera is displayed as the major view. Display the connected camera(s) in N x N grid view mode, supporting up to 32 cameras. Display the live view of the selected camera in full screen mode. Press the ESC key on the PC keyboard to resume the Main window. Automatically switch the live view of each connected cameras in single camera view mode by 30 seconds*. Click once to start and click again to stop. * The auto-switch time is set as 30 seconds by default, Æ System which can be changed by clicking the Setting and then change the value from the pull-down list of the Auto Switch time interval option. [ System Information displays the system information, including the date and time, and the available storage space of the system. \ Live View Status provides the status of live view mode, including Camera List and eMap. z Camera List displays the status of the connected cameras. If multiple cameras are connected, you can switch to the live view of each camera by simply selecting the camera from the list. z eMap allows you to select the desired camera to the view from the map easily. Please note that you have to set up the eMap for monitoring in advance. 8 ] Camera Control Buttons provides the control buttons that allow you to control the selected camera. Button Function Talk On/Off. Click to enable/disable the speaker function of the connected camera. This option is available only in single camera view mode. Listen On/Off. Click to enable/disable the microphone function of the connected camera. This option is available only in single camera view mode. If the connected camera features pan/tilt functions, you can use this control panel to set the preset positions (up to 8 positions). Once configured, you can move the camera lens to the desired position quickly. To set the preset positions, adjust the camera lens to the desired position using the Navigation buttons, and then select the position number (1~8) from the Set button. To move to the preset position, simply select the position number (1~8) from the Go button. Navigation Buttons (Left/Right/Up/Down/Home). If the connected camera features pan/tilt functions, the Navigation buttons allow you to move the camera lens position. Clicking the Home (center) button will move the camera lens to the assigned home position. / The Patrol/Stop buttons are used to enable/disable the swinging function of the camera. Click Patrol to start patrolling through the preset positions once. Click Stop to stop patrolling. Marmitek UltraViewPro 9 3.3 Accessing the Camera Before you can access the camera, you have to add the camera to the system. Adding a Camera 1. Click the button and select Device Setting to display the Device Setting window. 2. Click New. 10 3. Click Device Search to search the camera(s) within your network. 4. Click Search to find the IP address of the connected camera(s). When search is finished, select the camera and click Add. Marmitek UltraViewPro 11 5. The information of the camera will be displayed on the window. 12 Option Description Camera Title You have to assign a descriptive name for the camera. IP Address Display the IP address of the camera. Port Display the port path of the camera. Account Display the user name for accessing the camera. Password The password for accessing the camera will not be displayed. Stream Select the stream type as MPEG4, MJPEG, or H.264. Record Select Yes or No to set up recording function of the camera. Preview Window This window allows you to preview the image of the camera. NOTE You MUST click Preview to display the image before clicking Motion detection area and Save to complete the camera installation; click Disconnect to stop previewing. 6. When done, click Save and then click OK to return to the Device Setting window. The added camera will be displayed in the Device List. 7. Click the “X” button on the Device Setting window to return to the Main window. The image of the camera will be displayed. Marmitek UltraViewPro 13 Editing / Deleting a Camera Since you have added camera(s) to the system, you can select one to edit or remove. button and select Device Setting to display the Click the Device Setting window. 1. On the Device Setting window, the connected camera(s) will be displayed in the Device List. 2. To delete the camera: select the desired one and then click Remove. When prompted, click Yes and then select OK to confirm deletion. To change the configuration of the camera: select the desired one and then click Modify. The Modify Camera window will appear that allows you to change the configuration of the camera. When completed, click Preview to display the image before clicking Save and then click OK to return to the Device Setting window. 14 Viewing Image of the Camera Since you have added camera(s) to the system, the image of the selected camera(s) will be displayed on the Live View Window automatically. You can view a maximum of 32 cameras simultaneously. Additionally, you can select one-camera or other view mode to display the video from the Camera View Mode buttons. For example, if you use only one camera, select single camera ), and the Live View Window will display the view view mode ( as below. You can select the other modes according to your need. ) on the top-right corner of the window The Information icon ( provides you with the options to connect/disconnect the camera, select a camera to be displayed in the window, capture a still image of the camera live video, or switch to eMap mode. Click the Information icon to pop up the shortcut menu and select the desired option. Marmitek UltraViewPro 15 3.4 Recording / Playing Video You have to assign the target folder for saving the recorded files before recording. Configuring the Recording Settings 1. Click the button and then select Record Setting. 2. To assign the target folder for saving the recorded files, click the Browse button next to the Recording Path option, and then select the desired directory. To change the time of recording, select the desired time setting from the Record File pull-down menu. When completed, click Save 16 Enabling / Disabling Recording While you are adding/editing the camera, you can enable the recording function for the camera by selecting the Record option. Alternately, you can set all cameras to start/stop recording when you connect multiple cameras. Click the button and select All Continuous Recording to set all cameras to start recording, or select Stop All Recording to set all cameras to stop recording. Since you have enabled the recording function of the camera, it will automatically start recording and save the video clips. The recording time of each file is set to 60 seconds by default. NOTE The system will automatically delete the oldest files when storage space is running out. Marmitek UltraViewPro 17 Setting up Schedule for Recording The system features the schedule recording so that you can set up the schedule to record as you need. button to display the Schedule Configuration window, Click the which allows you to configure the recording schedule. 1. Click New, and then enter the Schedule Title. 2. Select the checkboxes below the Schedule Title to set the time to record video. One checkbox stands for 30 minutes of recording time. You can choose to assign the single checkbox repeatedly by using Click, or assign a period of time by using Slide. Alternately, you can quickly select/cancel the checkboxes by clicking Select All or Delete All. 3. When completed, click Save. The schedule profile will be added to the Schedule List. 4. To edit the schedule, select the desired schedule profile from the list, and then change the settings by using the Modify or Remove button. 18 Playback the Recording Files 1. Click the button to display the Playback window. 2. On the Playback window, set the conditions for search, such as selecting the camera and setting the begin/end date and begin/end time. When the search condition has been set, click Search. The search result will be displayed in the Record File list. Marmitek UltraViewPro 19 3. To playback the video clip, select the desired file and click Play. NOTE Codec is required for the system to play the video files. If the video clips cannot be displayed in the Playback window normally, click link on the screen. 20 C HAPTER 4 CONFIGURING MARMITEK ULTRAVIEW PRO 4.1 Configuring the eMap View Setting Click the button and select View Setting to configure the camera view setting of eMap mode. eMap refers to the geography and device scope of the UltraView Pro, which visually presents the devices in your security system. It uses a background of the area (e.g. a picture or a map) as the interface for monitoring. 1. On the View Setting window, click New. Marmitek UltraViewPro 21 2. Enter the eMap Name. 3. Click Browse to select a Picture File from your computer. The selected picture will be displayed in the Preview window. When completed, click Save. 22 4. On the following window, you can assign the camera position in the eMap. Click the Camera Location button to display the Edit window. Select the camera from the Camera List, and then click the mouse on the desired position of the map. The camera icon will be displayed on selected position of the map. Marmitek UltraViewPro 23 5. When completed, click Save. 6. To view from eMap: a. Click the button and select eMap View. b. Select the map from the eMap Name list. 24 c. Click the camera icon, the camera window will then pop up to display the on-the-spot image. Editing / Deleting the eMap 1. Click the button and select View Setting. 2. To edit the eMap: In the eMap List, select the desired map and click Modify. The map’s information will be displayed, where you can change the map’s information and then click Save when completed. 3. To delete the eMap: In the eMap List, select the desired one and click Remove. The selected map will be removed from the list. Marmitek UltraViewPro 25 4.2 Configuring the System User Management Click the button and select Account to change the administrator password for the system. Enter the Current password, and then enter the new password twice (in the Type new password and Retype password boxes). When completed, click Save. 26 4.3 Event Configuration Configuring Event Trigger Click the button and select Event Trigger to configure the trigger out function of the camera. 1. On the Event Trigger window, select the desired camera from the Camera List. 2. Do one of the following: z SMTP: Select this option and enter the Subject and Message, the system will send an email message to the selected user(s) in the Address Book List. Marmitek UltraViewPro 27 z Play Sound: Select this option select a sound file from the computer, so that the system will alarm by the sound while triggering out. z eMap Popup: Select this option and select the eMap profile from the pull-down menu. The camera view of the eMap will be displayed while triggering out. Setting up Event Server Click the button and select Event Server to configure the SMTP server, so that you can send emails that include still images as notification. 28 Select the Enable SMTP option to start the email service of the system. When you enable the service, you have to complete the following settings. z SMTP Server Address: Enter the mail server address. For example, mymail.com. z Sender Email Address: Enter the email address of the user who will send the email. For example, [email protected]. z Authentication Mode: Select None or SMTP according to the mail server configuration. z Sender User Name: Enter the user name to login the mail server. z Sender Password: Enter the password to login the mail server. z Port Number: Enter the port number used for the email server. When completed, click Save and then select OK. The system will automatically start the Event Service. Marmitek UltraViewPro 29 Sending Notification to the User Click the button and select Address Book to assign the user to the Address Book of the camera. The user will receive a real-time notification from the system while triggering out. 1. On the Address Book window, click New. 2. In the Address Book Information field, enter the Name and Email of the user. 3. When completed, click Save. The user will be displayed in the Address Book List. 4. To edit the user: In the Address Book List, select the desired user and click Modify. The user’s information will be displayed, where you can change the user’s information and then click Save when completed. 5. To delete the user: In the Address Book List, select the desired user and click Remove. The selected user will be removed from the list. 30 4.4 Terminating Operation When you have finished operating, click the button and select Logout to logout the system or Close to exit the program. Marmitek UltraViewPro 31 Chapter 5 USING IPFINDER IPFinder allows you to easily search the device, such as the Internet camera and video server, within your network. 1. Click Start Æ Programs Æ UltraView Pro Æ IPFinder. Alternatively, you can start the program by double-clicking the program icon on the desktop of your computer. Display the connected video server(s). Double click to link the device. Click About to get the Version information of IPFinder. Click Link to connect the selected device. Click Change IP to modify the IP address of the selected device. Click Search to find the IP address of the connected device(s). Click Exit to close the utility. 2. Once you get the IP address of the device, launch the Web browser or Marmitek UltraView Pro to access your device. 32