1
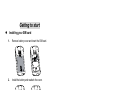
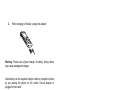
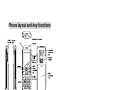
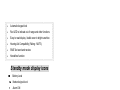
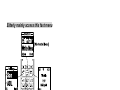
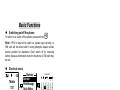
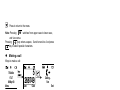
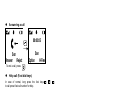
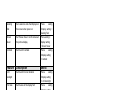
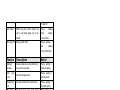
Elderly Friendly GSM Phone E110S User’s Guide Safety precaution Thank you for purchasing Alcom E110S Elderly Friendly GSM Phone. Read these simple guidelines. Not following them may be dangerous or illegal. Read the complete user guide for further information. ·SWITCH ON SAFELY Do not switch the device on when wireless phone use is prohibited or when it may cause interference or danger. ·ROAD SAFETY COMES FIRST Obey all local laws. Always keep your hands free to operate the vehicle while driving. Your first consideration while driving should be road safety. ·INTERFERENCE All wireless devices may be susceptible to interference, which could affect performance. ·SWITCH OFF IN HOSPITALS Follow any restrictions. Switch the device off near medical equipment. ·SWITCH OFF IN AIRCRAFT Follow any restrictions. Wireless devices can cause interference in aircraft. ·SWITCH OFF WHEN REFUELLING Do not use the device at a refueling point. Do not use near fuel or chemicals. ·SWITCH OFF NEAR BLASTING Follow any restrictions. Do not use the device where blasting is in progress. ·USE SENSIBLY Use only in the normal position as explained in the product 2 documentation. Do not touch the antennas unnecessarily. ·QUALIFIED SERVICE Only qualified personnel may install or repair this product. ·ENHANCEMENTS AND BATTERIES Use only approved enhancements and batteries. Do not connect incompatible products. ·WATER-RESISTANCE Your device is not water-resistant. Keep it dry. ·BACK-UP COPIES Remember to make back-up copies or keep a written record of all important information. ·CONNECTING TO OTHER DEVICES When connecting to any other device, read its user guide for detailed safety instructions. Do not connect incompatible products. ·EMERGENCY CALLS Ensure the phone function of the device is switched on and in service. Press the end key as many times as needed to clear the display and return to the standby mode. Enter the emergency number, then press the call key. Give your location. Do not end the call until given permission to do so. About your device the wireless device described in this guide is approved for use on the EGSM900/1800. Contact your service provider for more information about networks. When using the features in this device, obey all laws, and respect privacy and legitimate rights of others. 3 Warning: To use any features in this device, other than the alarm clock, the device must be switched on. Do not switch the device on when wireless device use may cause interference or danger. ·NETWORK SERVICES To use the phone you must have service from a wireless service provider. Many of the features in this device depend on features in the wireless network to function. These network services may not be available on all networks or you may have to make specific arrangements with your service provider before you can utilize network services. Your service provider may need to give you additional instructions for their use and explain what charges will apply. Some networks may have limitations that affect how you can use network services. For instance, some networks may not support all language-dependent characters and services. Your service provider may have requested that certain features be disabled or not activated in your device. If so, they will not appear on your device menu. Your device may also have been specially configured. This configuration may include changes in menu names, menu order and icons. Contact your service provider for more information. Warning: Use only batteries, chargers, and enhancements approved by Manufacturer for use with this particular model. The use of any other types may invalidate any approval or warranty, and may be dangerous. For availability of approved enhancements, please check with your dealer. When you disconnect the power cord of any enhancement, grasp and pull the plug, not the cord. Your device and its enhancements may contain small parts. Keep them out of reach of small children. 4 Getting to start Installing your SIM card 1. Remove battery cover and insert the SIM card. 2. Install the battery and reattach the cover. Charging your battery 1. Plug the supplied travel adapter. 5 2. When charging is finished, unplug the adapter. Warning: Please use original charger & battery. Using others may cause damage and danger. Alternatively use the supplied charger cradle to charge the phone by just placing the phone on the cradle. Ensure adaptor is plugged to the cradle. This packing includes the following ·GSM Handset x 1 ·Charger cradle x 1 ·AC adaptor x 1 ·3.7V 750mAh LI-ION Battery x 1 ·Earphone x 1 ·Warranty card x 1 6 Phone layout and key functions Main Features • Easy to use with Big Buttons • Extra loud sound levels • SOS button with up to 5 numbers for auto dialing • Vibration Alarm • 3 Short dial numbers – M1, M2, M3 • 250 name and number phone book 7 • Automatic keypad lock • Red LED to indicate out of range and other functions • Easy to read display / visible even in bright sunshine • Hearing Aid Compatibility (Rating : M3/T3) • SMS Text send and receive • Handsfree function Standby mode display icons Battery Level Network signal level Alarm ON Earphone plugged Keypad lock ON Roaming network Call Divert ON Missed call New SMS received Mute ON No alert Ring only alert Vibrate only alert Vibrate then ring alert Vibrate and ring alert 8 Elderly mainly access this fast menu 9 Basic Functions Switching on/off the phone To switch on or switch off the phone, press and hold . Note: If PIN is required for switch on, please input correctly, or SIM card will be locked after 3 wrong attempts; please contact service provider for assistance. Don’t switch off by removing battery, because information stored in the phone or SIM card may be lost. Shortcut menu To use T-Mobile 17:27 08-May-08 Menu Shortcuts Calendar Write Message Quick Setting Open To change shortcut : Shortcuts Calendar Write Message Quick Setting Open Back Shortcuts 2 0 0 8 M AY 1 2 3 4 5 6 7 8 9 10 11 12 13 14 15 16 17 18 19 20 21 22 23 24 25 26 27 28 29 30 31 Option Back Shortcuts Write Message Quick Setting Open Back 10 Back Phonebook 0/5 abc Son TEST3 TJJ Option Ba ck Entry Option View Edit Delete Copy OK Back Name Son 5268749 3547869 Giant Back To add a new entry into phonebook, enter number in normal call . You have an option to save in SIM or dial screen and press PHONE. Note: Some SIM cards might not allow you to save in the SIM Memory. Messages (SMS) SMS can be entered, sent and received with mobile phones. A signal tone and the message “New Message!” in the display indicate that a new SMS message has been received. Press to display the message Press to scroll down and display the rest of the text Press to go to “Message Option” Press to open the window for replying to the SMS message Use the number keys to enter the desired text (e.g. HELLO = 4 twice for H, 3 twice for E, 5 three times for L, brief pause, 5 three times for L and 6 three times for O) Press to delete and incorrect entry Press to send the reply 11 Press to return to the menu switches from upper case to lower case, Note: Pressing and vice versa. Pressing key enters a space,0 and to new line. And press key to select special characters. Making a call Ways to make a call: T-Mobile 17:27 08-May-08 Menu 5 268749 Save 17:27 08-May-08 Menu End Clear 0/5 abc T-Mobile Calling... Son Son Calling... Son Option Back End Call Logs T-Mobile 17:27 08-May-08 Menu Son ADL OK Calling... Son Back 12 End Answering a call 00:00:05 Son Son Answer Reject Option To end a call, press H-Free . Help call (Fast dial keys) In case of normal, long press the fast keys to call preset fast call number for help. Useful Hot keys In standby mode: once for *, twice for +, three times for P and Press four times for W. - switches alert type to No Alert. Long Long press press again to resume previous alert type - Long press then switches on the keypad lock. Press to switch off During a call: - Press to do option of Hold, hand free and mute etc. to switch on the hand free mode. Press again Press to switch off will temporarily When there is incoming call, long press switch off all of the alert and vibration for that call. - 13 Main Menu Messages ¾ ¾ ¾ ¾ Write Message Inbox Outbox Message Settings - Voice Mail - Broadcast Message - Profile Setting Calendar Phone Setting ¾ - Set M1/M2/M3 ¾ ¾ ¾ M1 Call Number M2 Call Number M3 Call Number Clock & Alarm ¾ ¾ ¾ Time & Date Set Alarm Show Time & Date Phonebook ¾ ¾ ¾ ¾ ¾ ¾ Search Add New Delete All Copy All Caller Group Settings - ¾ ¾ ¾ ¾ ¾ 14 Display Setting Language Greeting Text Screen Saver Contrast LCD Backlight Font size File Manager(not is use) Sound Setting Set Sound Set Volume Alert Type Help Tone Call setting Call ID Call Waiting Call Divert Call Barring Auto Redial Key LED Flash Network Setting Network Selection Preferred Networks Set Fast Key 2-9 Security Setting Main Lock Menu SIM Lock Help Setting ¾ ¾ ¾ Set Help Numbers Help Call Duration Predefine Help Message ¾ ¾ Phone Lock Change Password Auto Key Lock Restore Factory Setting SIM Toolkit (should be supported by operator) Quick feature reference This section provides brief explanations of features on your phone. Feature Description Send SMS messages Create and send othermobile phones Read SMS messages Read received, sent, or saved messages Menu>Messages >Inbox, Outbox Delete messages Delete messages in each message box, or all messages at once Menu>Messages >Inbox, Outbox > Delete Set M1/M2/M3 Set 3 direct dial phone numbers of your families or friends to fast-keys M1/M2/M3 Set the current time and date manually and set your local time zone Menu > Set M1/M2/M3 Menu > Clock & Alarm > Time & Date Set an alarm to sound at specific times Menu > Clock & Alarm >Set Alarm Search for contact in Phonebook Phonebook>Search Time Date & Alarm Find contact a Select messages 15 to Menu>Messages > Write Message Add a new contact Add a new contact to Phonebook Phonebook > Add new Delete Delete contact entries (The password is the same as Phone lock, and default is 1122 ) Copy all the contacts from SIM card to phone or phone to SIM card Create group of contacts and assign specific ring tone and picture for each group Phonebook delete Phonebook > Copy all Feature Description Select Memory status Show phonebook memory status inside the phone and SIM card Phonebook > Settings > Memory status Set information of a contact Set user-defined information of a contact which saved to phone(e.g. Email address and company name) Phonebook > Settings > Fields Edit personal information such as name and phone numbers, and send this information to others using vCard format Phonebook > Setting >My vCard Set Help Numbers Set the Five phone numbers to be automatically dialed out during Help mode Help setting > Set Help Numbers Predefine Help message Define the message to be displayed on LCD screen during Help mode Help setting > Predefine Help message Calendar Keep track of daily or monthly schedules Menu > Calendar Language Select a language to be used for the display text and input method Menu > Phone setting > Display setting>Language Copy all Caller group My vCard 16 Phonebook Caller group > > Greeting Text Set a welcome note that displays on the screen when power on Phone setting >Display setting > Greeting Text Screen Saver Set “Screen Saver” on/off and select the picture display Phone setting > Display setting > Screen Saver Contrast Set the LCD contrast Phone setting >Display setting > Contrast Feature Description Select LCD backlight Set the LCD turn on duration Phone setting >Display setting > LCD backlight Font size Set the size of the display font Phone setting >Display setting > Font size Sound setting Set ring tone type and volume for various alerts and system sound. Also set alert type and help tone on/off Phone setting >Sound setting Call waiting Set Call waiting on/off and check status Phone setting >Call setting > Call waiting Call divert Set various Call divert mode on/off and check status Phone setting >Call setting > Call divert Call barring Select Call barring mode Phone setting >Call setting > Call barring Caller ID Select to hide or send the Caller number Phone >Call 17 setting setting > Caller ID Auto redial When the party didn’t answer the call, it will redial again. (Up to six times) Phone setting >Call setting > Auto redial Set key LED Set key LED on/off Phone setting > Call setting > Key LED Flash Feature Description Select Network services Access network services offered by your service provider Phone setting > Network setting Set Auto Keypad Lock Phone setting > Auto KeyLock Auto Lock Key Set fast key 2-9 Set and edit shortcut of part menu Phone setting > Set fast key 2-9 Main menu Lock Set Main menu Lock on/off. Main menu and Phone lock use the same password Phone setting > Security setting > Main menu Lock SIM lock Set SIM card lock on or off (SIM Card PIN code) Phone setting > Security setting >SIM lock Phone Lock Set Phone Lock on/off Default password is 1122 Phone setting > Security setting > Phone Lock Change Password Change the password of PIN, PIN2, Phone lock and help password Phone setting > Security setting> Change password Restore factory setting Restore some settings to default ones. The default password is “1122” Phone setting > Security setting > Restore factory setting 18 Help button When HELP Switch is activated: - LED light flashes continuously - Emergency tone continues to sound (if enabled) - Automatically dials the user-defined Help numbers; if there is no number defined, phone will dial international emergency number 112 instead Note: Please check with your GSM service provider if 112 is supported for emergency. - The automatic dial sequence is based upon the Reach setting selected: For Reach All, phone dials to every Help number and tries to get all connected. For Reach One, if phone dials to any one number and get connected successfully, then the dial sequence will end For call failures, both reach settings will retry the dial sequence up to 3 times before abort. - Once a call is connected, handsfree mode will automatically activate to facilitate an easier voice communication ① no number set End 19 ② Preset Help number Calling... Son End To disable the Help mode - When you have finished the call or want to interrupt the emergency call, slide the emergency call switch upwards again and then press the button. Otherwise, the emergency call starts up again automatically. Optional Accessories The following genuine optional accessories are available for the Senior phone: - Desktop charging cradle - High capacity battery (750mAh / 1050mAh) - Wired earphone with microphone and one touch receive call button Technical Specifications • 4.3 cm Display white back light • Dual Band GSM (900 / 1800MHz) • Earphone socket(2.5 mm) • Mains charger with Mini-USB connector • Talk Time up to 120 Minutes • Standby Time up to 170 Hours • Battery Li-ION 750 mAh 20 • SAR value < 0.526 W/Kg • Weight incl. battery <100g Troubleshooting Troubles The phone can‘t be switched on Possible reasons 1. Any power in battery? 2. Battery is installed properly? 1. Check if the charger is connected with the phone correctly. 2. Check if the charger is connected with Battery can’t be the socket correctly. charged 3. Is the battery usable? The performance of the battery will degrade after used for several years. 1. The signal is too weak, or there may be some radio interference round. Fail to link the 2. Is the SIM card installed improperly, network poorly contacted or damaged? If the SIM card is damaged, please ask your network operator for replacement. 1. Is the SIM card registered in the Can’t make a call network? 2. Is the “bar outgoing” function enabled? 1. Is the “call diverting” function enabled? Can’t answer a call 2. Is the “bar incoming” function enabled? Input the PUK code provided with the SIM PIN locked card to unlock, or contact your network operator. 21 Additional safety information ·Operating environment Remember to follow any special regulations in force in any area, and always switch off your device when its use is prohibited or when it may cause interference or danger. Use the device only in its normal operating positions. This device meets RF exposure guidelines when used either in the normal use position against the ear or when positioned at least 1.5 centimeters (5/8 inches) away from the body. When a carry case, belt clip or holder is used for body-worn operation, it should not contain metal and should position the device the above-stated distance from your body. To transmit data files or messages, this device requires a quality connection to the network. In some cases, transmission of data files or messages may be delayed until such a connection is available. Ensure that the above separation distance instructions are followed until the transmission is completed. Parts of the device are magnetic. Metallic materials may be attracted to the device. Do not place credit cards or other magnetic storage media near the device, because information stored on them may be erased. ·Medical devices Operation of any radio transmitting equipment, including wireless phones, may interfere with the functionality of inadequately protected medical devices. Consult a physician or the manufacturer of the medical device to determine if they are adequately shielded from external RF energy or if you have any questions. Switch off your device in health care facilities when any regulations posted in these areas instruct you to do so. Hospitals or health care facilities may be using equipment that could be sensitive to external RF energy. 22 ·Pacemakers Pacemaker manufacturers recommend that a minimum separation of 15.3 centimeters (6 inches) be maintained between a wireless phone and a pacemaker to avoid potential interference with the pacemaker. These recommendations are consistent with the independent research by and recommendations of Wireless Technology Research. Persons with pacemakers should do the following: • Always keep the device more than 15.3 centimeters (6 inches) from the pacemaker • Not carry the device in a breast pocket • Hold the device to the ear opposite the pacemaker to minimize the potential for interference. • If you suspect interference, switch off your device, and move the device away. ·Vehicles RF signals may affect improperly installed or inadequately shielded electronic systems in motor vehicles such as electronic fuel injection systems, electronic antiskid (antilock) braking systems, electronic speed control systems, and air bag systems. For more information, check with the manufacturer, or its representative, of your vehicle or any equipment that has been added. Only qualified personnel should service the device, or install the device in a vehicle. Faulty installation or service may be dangerous and may invalidate any warranty that may apply to the device. Check regularly that all wireless device equipment in your vehicle is mounted and operating properly. Do not store or carry flammable liquids, gases, or explosive materials in the same compartment as the device, its parts, or enhancements. For vehicles equipped with an air bag, remember that air bags inflate 23 with great force. Do not place objects, including installed or portable wireless equipment in the area over the air bag or in the air bag deployment area. If in-vehicle wireless equipment is improperly installed, and the air bag inflates, serious injury could result. Using your device while flying in aircraft is prohibited. Switch off your device before boarding an aircraft. The use of wireless teledevices in an aircraft may be dangerous to the operation of the aircraft, disrupt the wireless telephone network, and may be illegal. ·Potentially explosive environments Switch off your device when in any area with a potentially explosive atmosphere, and obey all signs and instructions. Potentially explosive atmospheres include areas where you would normally be advised to turn off your vehicle engine. Sparks in such areas could cause an explosion or fire resulting in bodily injury or even death. Switch off at refueling points such as near gas pumps at service stations. Observe restrictions on the use of radio equipment in fuel depots, storage, and distribution areas; chemical plants; or where blasting operations are in progress. Areas with a potentially explosive atmosphere are often, but not always, clearly marked. They include below deck on boats, chemical transfer or storage facilities, vehicles using liquefied petroleum gas (such as propane or butane), and areas where the air contains chemicals or particles such as grain, dust, or metal powders. ·Hearing Aid Compatibility with Mobile Phones Some phones are measured for compatibility with hearing aids. If the box for your particular model has “Rated for Hearing Aids” printed on it, the following explanation applies. When some mobile phones are used near some hearing devices (hearing aids 24 and cochlear implants), users may detect a buzzing, humming, or whining noise. Some hearing devices are more immune than others to this interference noise, and phones also vary in the amount of interference they generate. The wireless telephone industry has developed ratings for some of their mobile phones, to assist hearing device users in finding phones that may be compatible with their hearing devices. Not all phones have been rated. Phones that are rated have the rating on their box or a label on the box. The ratings are not guarantees. Results will vary depending on the user’s hearing device and hearing loss. If your hearing device happens to be vulnerable to interference, you may not be able to use a rated phone successfully. Trying out the phone with your hearing device is the best way to evaluate it for your personal needs. * This Senior mobile phone complies with the M3/T3. ·CERTIFICATION INFORMATION (SAR) THIS MOBILE DEVICE MEETS GUIDELINES FOR EXPOSURE TO RADIO WAVES. Your mobile device is a radio transmitter and receiver. It is designed not to exceed the limits for exposure to radio waves recommended by international guidelines. These guidelines were developed by the independent scientific organization ICNIRP and include safety margins designed to assure the protection of all persons, regardless of age and health. The exposure guidelines for mobile devices employ a unit of measurement known as the Specific Absorption Rate or SAR. The SAR limit stated in the ICNIRP guidelines is 2.0 watts/kilogram (W/kg) averaged over 10 grams of tissue. Tests for SAR are conducted using standard operating positions with the device transmitting at its highest certified power level in all tested 25 frequency bands. The actual SAR level of an operating device can be below the maximum value because the device is designed to use only the power required to reach the network. That amount changes depending on a number of factors such as how close you are to a network base station. The highest SAR value under the ICNIRP guidelines for use of the device at the ear is 0.526 W/kg. Use of device accessories and enhancements may result in different SAR values. SAR values may vary depending on national reporting and testing requirements and the network band. Due to continuous product development all features and specifications are subject to change without prior notice, please register your warranty online at http://www.alcomonline.com/warranty.html. For more Information on Warranty and Product Support in Singapore please call (65) 6841 2668 or Fax to (65) 6841 2628. Email : [email protected] Web : www.alcomonline.com All registered names and trademarks are property of their respective owners. Copyright © 2009 Giant Electronics Ltd. All rights reserved. 26