1
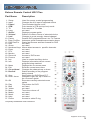
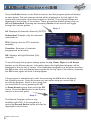
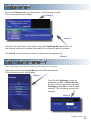
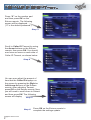
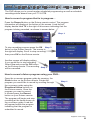
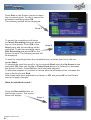
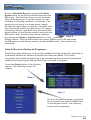
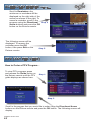
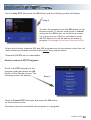
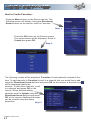
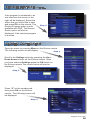
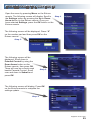
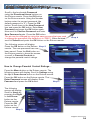
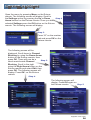
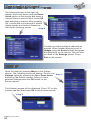
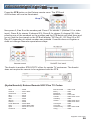
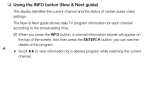
TV User Guide
Connecting at the Speed of Life
support.scrtc.com
TABLE OF CONTENTS
Version as of May 2011
Welcome.
This instructional TV Guide is provided by South Central Rural Telephone
Cooperative, Inc. and South Central Telcom, LLC as a helpful tool to assist
our TV subscribers in navigating throughout their on-screen TV Guide, and
the operation of their Set Top Box (STB) and Remote Control.
Remote Control................................................................. 2
Electronic Program Guide................................................. 3 - 4
Enable Caller ID................................................................ 5
Caller ID Log..................................................................... 6
Set Caller ID Timeout........................................................ 6 - 7
Digital Video Recorder (DVR)............................................ 8 - 12
Pause Live TV (PLT)......................................................... 13
Schedule Event from Program Guide................................ 13 - 14
Scheduled Events............................................................. 14 - 15
Pay Per View (PPV).......................................................... 15 - 16
Create & Edit Favorites..................................................... 17 - 18
Search Feature.................................................................. 19 - 20
Closed Captioning............................................................. 20 - 21
Parental Control (Enable & Edit)....................................... 22 - 25
Channel Blocking.............................................................. 26 - 27
Themes............................................................................. 27 - 28
Programming Remote....................................................... 28 - 32
Troubleshooting................................................................. 32 - 33
Contact Information: Technical Assistance Center
Websupport.scrtc.com
[email protected]
Phone
678-2615 / 528-2615 / 407-5615
SCTV
Channel 100 (Instructional Channel)
Hours:
Monday - Friday
Saturday
Sunday
support.scrtc.com
1
7 a.m. - 9 p.m.
8 a.m. - 9 p.m.
1 p.m. - 9 p.m.
REMOTE CONTROL
Entone Remote Control URC Plus
Part Name
Description
1. Setup
Used for remote control programming
2. Input
Changes the A/V input of selected device
3. Power*
Turns selected device on/off
4. STB*
Puts remote in STB (set top box) mode
Puts remote in TV mode
5. TV
6. Lang
not used
7. Guide* Displays program guide
Raises or lowers volume of selected device
8. Volume*
9. Last*
Changes to most recently viewed channel
Pauses DVR playback/Pause Live TV Feature
10. Pause
11. Page For/Rev Advances guide forward/reverse twelve hours
12. Fast Rev/For Starts fast reverse and fast forward for DVR
not used
13. Red
14. Green
not used
15. Numbers Keys Allows direct access to specific channels
16. Enter
not used
17. DTV
not used
not used
18. Movies
19. Record-It
Access to DVR menu
not used
20. Promos
21. Aux
Used to control auxiliary device
22. Info
Displays information about current program being watched
23. Menu
Displays the on-screen menu
Exits the current menu item
24. Exit 25. Ch up/down* Changes the channels up or down
26. Record*
Starts recording of the program
being viewed
27. Stop
Stop button for DVR/Reset PLT
Navigates right, left, up or down in 28. Direc. Arrow
the on-screen guide
29. OK
Executes currently selected menu option
30. Play Play button for DVR
31. Blue
not used
32. Yellow
not used
Turns the volume off
33. Mute
not used
34. Media
35. Music
not used
36. Help
not used
37. Phone
Access to caller ID log
*Frequently Used Remote Control Functions
support.scrtc.com
2
ELECTRONIC PROGRAM GUIDE
Press the Guide button on the Entone remote, and the program guide will display
as seen below. The last channel viewed will be displayed at the top right of the
screen with information about the program on the left. The program listings are
displayed at the bottom of the screen. There are multiple preset guides such as
All and Subscribed. Pressing and releasing Guide on the remote will toggle
through the various guides.
Step 1
All: Displays all channels offered by SCRTC
Subscribed: Displays only the channels
subscribed to
PPV: Displays the six PPV channels
available
Favorites: Selection of channels
programmed as favorites
HD: Displays all High-Definition (HD)
channels
To scroll through the program listings press the Up, Down, Right or Left Arrow
buttons on the Entone remote. Information about the highlighted program will be
displayed at the top left of screen. If the highlighted program is in progress pressing
the OK button once will display that program on the top right of the screen, pressing
the OK button again will tune to that program.
If the program is scheduled at a later time pressing the OK button will display
the following screen. From this screen you can select what you would like to
do with the program. Scroll to the option that
you would like to use by pressing the UP
or Down Arrow buttons then press the OK
button. Press the Exit button on the Entone
remote to leave the guide.
Step 2
The Record Program option is only
available with DVR. If the program is a
series the Record Series option will also be
displayed on this screen.
support.scrtc.com
3
ELECTRONIC PROGRAM GUIDE
CONTINUED...
Press the Menu button on the Entone Remote. The Menu will open as shown below.
To open a Menu option scroll to that option using the Up or Down Arrow buttons and
press the OK button on the Entone remote.
Guide will display the program guide.
DVR will display recorded programs, programs
scheduled to record, and other DVR functions.
(will only show if DVR is part of service)
My Library wil display Caller ID, video, PPV event pay
per block, reminders and message menus.
Control On lets you temporarily disable parental
controls. This option only displays in the menu if you
have parental controls set.
Settings will allow access to enable Caller ID, block
channels, and set up parental controls.
Favorites gives you the option to chose, edit, create or delete favorites.
Search will allow you to search the guide and recordings for a program
or movie by title.
Program Guide Icons
Indicates New Program
Indicates that Program is in HD Format
Scheduled to Record
Series Recording
Reminder
Autotune
Purple Background Indicates Movie
support.scrtc.com
4
ENABLE CALLER ID
Open the menu by pressing Menu
on the Entone remote. The following
screen will display.
Step 1
Scroll to the Settings option by pressing
the Up or Down Arrow buttons on the
Entone remote. Once you have selected
Settings, press the OK button on the
Entone remote. The following screen will
be displayed.
Step 2
Press “0” on the number pad
and then press OK on the
Entone remote. The following
screen will be displayed.
(“0” is the default password.)
Scroll down to Enable Caller ID
by using the Down Arrow
button on the Entone remote,
then press OK on the remote.
There should now be a check
mark beside Enable Caller ID.
Now you will need to scroll
over and down to Submit and
then press OK on the Entone
remote. The following screen
will be displayed.
Step 5
support.scrtc.com
5
Step 3
Step 4
Press OK on the Entone remote to
complete the settings update.
CALLER ID LOG
Press the Phone button at the bottom of the Entone remote.
The screen below will display.
Step 1
Information about selected
call will display here
Calls Logged will be displayed here
Step 2
Scroll to the right then scroll down using the Up/Down Arrow button, on
the Entone remote to display information for a specific phone number.
Press Exit on the remote to return to television programming.
Step 3
SET CALLER ID TIMEOUT
(This is the length of time that the calling number displays on the screen)
Open the menu by pressing Menu on the Entone remote.
The following screen will display.
Step 1
Scroll to the Settings option by
pressing the Up or Down Arrow
buttons. Once you have selected
Settings press OK on the Entone
remote. The following screen will
display.
Step 2
support.scrtc.com
6
SET CALLER ID TIMEOUT
CONTINUED...
Press “0” on the number pad
and then press OK on the
Entone remote. The following
screen will be displayed.
(“0” is the default password.)
Step 3
Scroll to Caller ID Timeout by using
the Arrow buttons on the Entone
remote, then press OK. You should
now have an arrow on each side of
Caller ID Timeout, as shown below.
Step 4
You can now adjust the amount of
time that the Caller ID displays on
the screen by pressing the Right or
Left Arrow buttons on the Entone
remote. After adjusting Timeout,
press OK on the Entone remote. Now
you will need to scroll down to Submit
and then press OK. The following
screen will display.
Step 5
Step 6
support.scrtc.com
7
Press OK on the Entone remote to
complete the settings update.
DVR (DIGITAL VIDEO RECORDER)
OPTIONAL FEATURE
The DVR allows you to record regular scheduled programming as well as schedule
recordings while absent from your TV & STB.
How to record a program that is in progress...
Press the Record button on the Entone remote control. The program
information will display at the bottom of the screen. A red dot will
display beside Live TV to the right of this screen indicating that the
program is being recorded, as shown in screen below.
Step 1
To stop recording program press the OK Step 2
button on the Entone remote. The screen to
the right will display. Scroll to stop recording,
then press OK on the Entone remote.
Another screen will display asking
if you would like to stop recording.
Select Yes and press the OK button
on the Entone remote. The recording Step 3
will be cancelled.
How to record a future program using your DVR...
Open the on-screen program guide by pressing the
Guide button on the Entone remote. Locate the
program you would like to record by scrolling through
the on-screen guide using the
Directional Arrow buttons on
the Entone remote. Once the
program you want to record
is located press the Record
button on your Entone remote.
The program will begin and stop
recording at the times shown on
the on-screen guide. A red dot
will appear beside the program
indicating that the program is
scheduled to record.
Step 1
support.scrtc.com
8
DVR
CONTINUED...
Press Exit on the Entone remote to leave
the on-screen guide. To edit or cancel the
scheduled recording press OK.
The following screen will be displayed.
Step 2
To cancel the recording scroll down
to Cancel Recording using the arrow
keys on the remote. Press OK or the
Stop button and the recording will be
cancelled. To edit the recording select
Edit Recording and press OK on the
Entone remote. The following screen will
be displayed.
Step 3
To start the recording before the scheduled time, increase the time in the box
beside Start.
To change the start time scroll to the box beside Start using the Up Arrow button
and press OK, then use the Up or Down Arrow buttons to increase or decrease
the amount of time. Press OK after time has been adjusted.
To allow the program to continue to record after the scheduled time, increase the
time in the box beside End.
After times have been adjusted scroll down to OK and press OK on the Entone
remote to apply changes.
How to schedule event...
Press the Record-It button on
the Entone remote. The screen
below will display.
support.scrtc.com
9
Step 1
DVR
CONTINUED...
Scroll to Schedule Event by pressing the Down
Arrow button on the Entone remote and press the
OK button. The Schedule Event screen as shown
here will be displayed. From this screen you can
schedule a recording, reminder, or autotune. The
frequency can be set to a single event, weekly,
Monday through Friday or everyday. The date, start
time and length of time can also be set. To change
a field entry scroll to that field using the Directional
arrow buttons on the Entone remote, and press the
OK button. Now, the field entry can be changed
Step 2
by pressing the Right or Left Arrow button on the
Entone remote. Once all field entries have been made scroll to OK and press
the OK button on the Entone remote. Press the Exit button. The event is now
scheduled.
How to Record a Series of Programs...
Series Recording allows you to record all available (including duplicate) episodes on
a particular channel for different scheduled air-times and dates. The system
recognizes the desired programming to be recorded by titles and will automatically
adjust should the program change Date/Time on length of program.
Press the Guide button on the Entone
remote. The following screen will
display.
Step 1
Step 2
Scroll to the series program you would
like to record then press the OK button
on the Entone remote. The following
screen will be displayed.
support.scrtc.com
10
DVR
CONTINUED...
A double red ball will be displayed
beside the series to be recorded as
shown in the following screen-shot.
Press Exit on the Entone remote.
Step 3
How to Cancel a Series Recording...
Press the Record It button on the Entone Step 1
remote, then scroll down to Record. Any
programs that are scheduled to record will be
listed at the right. Scroll to the program that you
would like to edit and press the OK button on the
Entone remote. The following screen will display.
To cancel the series recording scroll to Cancel Series Recording and press OK on
the Entone remote. A screen will display asking if you want to delete the series
recording. Scroll to Yes and press the OK button on the Entone remote.
How to Edit a Series Recording...
To edit the series recording scroll to Edit Series
Recording and press OK on the Entone remote.
The following screen will be displayed.
Step 1
Scroll to the field that you would like to edit
and press the OK button on the Entone remote.
Press the Up or Down Arrow buttons on the
Entone remote to change the entry in the field.
After making changes press the OK button on
the Entone remote. Scroll down to OK and press
the OK button on the Entone remote again.
support.scrtc.com
11
DVR
CONTINUED...
How to playback a recorded program...
Press the Record-It button on
the Entone remote. The following
Step 1
screen will display. Using the
Directional Arrow buttons on the
Entone remote, scroll to the program
that you would like to play. Then
press OK on the Entone remote.
The following screen will display.
Use the Up or Down Arrow Buttons
on the Entone remote to scroll to
Play Recording, then press OK on
Step 2
the Entone remote. The program
will begin playback.
Once playback has started you can fast forward, rewind, pause, and
stop playback by pressing the buttons on the Entone remote as indicated
below. Press Fast Forward or Fast Reverse up to four times to forward
or reverse at
Record
increasing speeds
Pause
Stop
(2x,4x,10x or 25x). Press
Play to resume playback.
Step 3
Fast Reverse
Fast Forward
Play
support.scrtc.com
12
PAUSE LIVE TV (PLT)
OPTIONAL FEATURE
Must have DVR service to use this feature. (part of DVR service)
The PLT feature will allow you to pause, rewind, fast foward and playback the
program that is in progress. Pressing the Pause button on the Entone remote will
pause the program. To resume play, press either the Pause button again or the Play
button. To rewind the program press
the Fast Reverse button on the Entone
remote. To resume play press the Play
button on the Entone remote. When
using this feature the Time Bar as
shown to the right will display at the top of your screen. The green colored section
indicates the time frame which can be navigated. Changing channels will cause a reset
of time and will restart on new channel.
Pressing the Fast Reverse or Fast
Forward button multiple times will
advance speed up to 300x.
Record
Pause
Stop
Step 2
Fast Reverse
Fast Forward
Play
SCHEDULE EVENT FROM PROGRAM GUIDE
Press the Guide button on the Entone remote, and
the program guide will display as seen below. The last
channel viewed will be displayed at the top left of the
screen with information about the program on the right.
The program listings are displayed
at the bottom of the screen. To scroll
through the program listings press
the Directional Arrow buttons on the
Entone remote. Info about the highlighted program will be displayed at
top left of screen. Scroll to a program
that is scheduled at a later time and
press the OK button. The options
screen will be displayed. Scroll to
Schedule Event then press the OK
button on the Entone remote.
support.scrtc.com
13
Step 1
SCHEDULE EVENT FROM PROGRAM GUIDE
CONTINUED...
The following screen will display. From this screen you
can schedule a recording, reminder or autotune. The
frequency can be set to a single event, weekly, Monday
through Friday or everyday. The date, start time, and length
of time can also be set. To change a field entry, scroll to
that field using the Directional Arrow buttons on the
Entone remote, then press the OK button. After pressing
the OK button the field entry can be changed by pressing
the Right or Left Arrow button on
the Entone remote. Once all field
entries have been made, scroll to OK
then press the OK button on the
Entone remote. Press the Exit
button. The event is now scheduled.
Step 2
SCHEDULED EVENTS
How to Check & Cancel Scheduled Events...
Open the menu by pressing
Menu on the Entone remote.
The following screen will display.
Scroll to My Library and press
the OK button on the Entone
Remote.
Step 1
support.scrtc.com
14
SCHEDULED EVENTS
CONTINUED...
Scroll to Reminders: Any
autotunes or reminders will be
displayed on the right side of the
screen as shown to the right. To
cancel a reminder, scroll to the
Step 2
program using the Directional
Arrow buttons and press the OK
button on the Entone remote.
The following screen will be
displayed. To remove the
reminder press the OK
button, then press Exit on the
Entone remote.
Step 3
PPV (PAY PER VIEW)
How to Order a PPV Program...
To view PPV programs press
and release the Guide button on
the Entone remote until the PPV
guide displays as shown here.
Step 1
Step 2
Scroll to the progam that you would like to order using the Directional Arrow
buttons on the Entone remote and press the OK button. The following screen will
display.
support.scrtc.com
15
PPV (PAY PER VIEW)
CONTINUED...
Scroll to Buy PPV then press the OK button and the following screen will display.
Step 3
To order the program press the OK button on the
Entone remote. To cancel order scroll to Cancel
and press the OK button on the Entone remote.
If you have set up a PIN you will need to enter
the PIN before you will be able to purchase a
program. (See page 24 on how to set up a PIN.)
All day movie ticket channels 805 and 806 programs can be purchased at any time; all
other channel purchases must be made before the program starts.
Channels 805/806 are not cancelable.
How to cancel a PPV Program...
Scroll to the PPV program in the
program guide and press the OK
button on the Entone remote. The
following screen will display.
Step 1
Scroll to Cancel PPV Purchase and press the OK button
on the Entone remote.
Purchase cannot be cancelled after program is in progress.
support.scrtc.com
16
CREATE & EDIT FAVORITES
How to Create Favorites...
Press the Menu button on the Entone remote. The
following screen will display. Using the Directional
Arrow buttons on the remote, scroll to Favorites.
Step 1
Press the OK button on the Entone remote.
The screen below will be displayed. Scroll to
Create then press OK.
Step 2
The following screen will be displayed. Favorites1 is automatically created at this
time. To add channels to Favorites1 scroll to a channel that you would like to add
using the Directional Arrow buttons and press OK on the remote, a favorites icon
will be displayed beside the
channel. To add other channels, scroll
to a channel and press OK on the
remote. When finished adding
channels scroll to Update using the
Directional Arrow buttons and press
OK on the remote. Additional favorites
can be created using this same
procedure.
Step 3
support.scrtc.com
17
CREATE & EDIT FAVORITES
CONTINUED...
How to Edit Favorites...
Press the Menu button on the Entone remote. The
following screen will display. Using the Directional
Arrow buttons on the remote, scroll to Favorites.
Step 1
Press the OK button on the Entone
remote. The screen below will be
displayed. Scroll to Edit and press OK.
Step 2
The following screen will be displayed. To add or remove channels, scroll
to the channel that you would like to add or remove using the Directional
Arrow buttons and press OK on the remote. A favorites icon
will be
added or removed beside the channel.
When finished adding channels, scroll
to Update using the Directional Arrow
buttons and press OK on the remote.
Step 3
support.scrtc.com
18
SEARCH FEATURE
Press the Menu button on the Entone remote. The following
screen will display. To use the search feature scroll to Search
using the Up or Down Arrow button on the Entone remote.
Then press the OK button on the remote.
Step 1
The screen below should display.
Press the OK button again to display
the keypad as shown in this screen.
Using the keypad enter the text that
you would like to search for. Use the
Directional Arrow buttons on the
Entone remote to scroll to a key on
Step 2
the keypad and press the OK
button on remote. After all entries
have been made in the text box
press Exit on the remote.
Now scroll to Search Guide or one
of the other search options list. Press
OK on the remote and any programs
containing the text will be listed at
the lower right of the screen as shown
Step 3
here. Scrolling to a program in the
list displays the information for that
program in the upper left section of the
screen. If the program is in progress,
pressing the OK button on the remote
will tune to that program.
support.scrtc.com
19
SEARCH FEATURE
CONTINUED...
If the program is scheduled to air
at a later time the screen to the
right will be displayed. Select the
action that you would like to take
and press OK on the remote. The
Record Program option is only
available with DVR. The Record
Series option will also be
displayed, if the selected program
is a series.
Step 4
CLOSED CAPTIONING
Open the menu by pressing Menu on the Entone remote.
The following screen should display.
Step 1
Scroll to the Settings option by pressing the Up or
Down Arrow buttons on the Entone remote. Once
you have selected Settings press the OK button on
the Entone remote.The screen below will now be
displayed.
Step 2
Press “0” on the number pad,
then press OK on the Entone
remote. The following screen will
be displayed.
Step 3
support.scrtc.com
20
CLOSED CAPTIONING
CONTINUED...
Scroll to Hardware Settings at the
bottom of the screen. Then press the OK
button on the Entone remote.
The following screen will be displayed.
Step 4
Scroll to Closed Caption ON and press the
OK button on the Entone remote. Now press
the Up or Down Arrow buttons to turn on
Closed Captioning. If the TV is connected with
component or HDMI cables, set Closed Captioning to ON STB CC1. If TV is
connected with coaxial or composite cables, set Closed Captioning to ON TV. If the
ON TV setting is used, the Closed Caption feature will also need to be enabled on the
TV. Refer to your TV user manual to enable the Closed Captioning feature on the
TV. After changing the Closed
Step 5
Caption On setting press the OK button on
the Entone remote. Now scroll down using
the Down Arrow button until you get to the
Submit option as shown here.
Now press the OK button on the Entone
remote and the following screen will
display.
Step 5
Press the OK button again. Then scroll to Exit and press OK.
support.scrtc.com
21
ENABLE PARENTAL CONTROLS
Open the menu by pressing Menu on the Entone
remote. The following screen will display. Scroll to
Step 1
the Settings option by pressing the Up or Down
Arrow button on the Entone remote. Once you
have selected Settings, press the OK button on the
Entone remote.
The following screen will be displayed. Press “0”
on the number pad and then press OK on the
Entone remote.
Step 2
The following screen will be
displayed. Scroll down to
Parental Control by using the
Down Arrow button on the
Entone remote, then press OK.
There will now be a check mark
beside Parental Control. Scroll
over and down to Submit and
press OK.
Step 3
The following screen will display. Press OK
on the Entone remote to complete the
settings update.
Step 4
support.scrtc.com
22
EDIT PARENTAL CONTROLS
How to Turn Parental Controls On & Off after it has been enabled...
Press the Menu button on the Entone remote. The
following screen will display. To turn Parental Control
off, scroll to Control On using the Up or Down
Arrow button on the Entone remote, then press the
OK button on remote. The Enter Password
screen will display. Enter Password (default
password is “0”) using the Number buttons. Then
press the OK button on the Entone remote. Parental
Controls are now turned off. To turn Parental
Controls back on press the Menu button on the
Entone remote. Scroll to Control Off using the Up
or Down arrow button on the Entone remote. Then
press the OK button on remote. Parental
Contols are now on.
Step 1
How to Change Parental Control Password...
Press the Menu button on the Entone
remote. The following screen will display.
Scroll to Settings using the Up or Down
Arrow button on the Entone remote.
Press the OK button on the Entone
remote and the Enter Password screen
will display. Enter Password and press
the OK button.
The following screen will
display. Scroll to Users by
pressing the Right or Left
Arrow button on the Entone
remote. Press the OK button on
the Entone remote.
Step 2
The following screen will display.
Scroll down to Edit by
using the Directional Arrow
buttons on the Entone remote, then Step 3
press the OK button on the remote.
support.scrtc.com
23
Step 1
EDIT PARENTAL CONTROLS
CONTINUED...
Scroll to the box beside Password
using the Directional Arrow buttons on
the Entone remote. Press the OK button
on the Entone remote. Using the Number
buttons enter the current password (the
default password is “0”). Press the OK
button. Scroll down to the New Password
box and press the OK button. Enter New
Password and press the OK button again.
Now scroll to Confirm Password and enter
New Password again. Press the OK button.
The pin can be changed by using the same process that was used
to change the password (the default pin is “0000”). When finished
scroll to Submit and press the OK button on the Entone remote.
Step 4
The following screen will display.
Press the OK button on the Entone Step 5
remote. The new password has now
been saved. Press the Exit button on
the Entone remote to leave the screen,
or scroll to Parental Controls to
change the parental control ratings.
How to Change Parental Control Ratings...
Press the Menu button on the Entone remote. The
following screen will display. Scroll to Settings using
the Up or Down Arrow button on the Entone remote.
Press the OK button on the Entone remote. The
Enter Password screen will display. Enter
Password and press the OK button.
Step 1
The following
screen will display.
Scroll to Users by
pressing the Right
or Left Arrow
button on the
Entone remote.
Press the OK
button on the
Entone remote.
Step 2
support.scrtc.com
24
EDIT PARENTAL CONTROLS
The following screen will display.
Scroll down to Parental Control by Step 3
using the Directional Arrow buttons
on the Entone remote, then press
the OK button on the remote.
The screen to the right will be
displayed. From this screen the
ratings can be changed by scrolling
to the option that you would like to
Step 4
change. When you have the option
selected that you want to change
press the OK button on the Entone
remote. If it is a Movie or TV rating
press the Right or Left Arrow button
on the Entone remote to change.
After all changes have been made
scroll to Submit and press the OK
button.
Press the OK button,
then press the Exit button
on the Entone remote to
save changes and exit the
Settings screen.
support.scrtc.com
25
Step 5
CONTINUED...
CHANNEL BLOCKING
Open the menu by pressing Menu on the Entone
remote. The following screen will display. Scroll to
Step 1
the Settings option by pressing the Up or Down
Arrow buttons on the Entone remote. Once you have
selected Settings press the OK button on the Entone
remote. The following screen will display.
Step 2
Press “0” on the number
pad and press OK on the
Entone remote.
The following screen will be
displayed. Scroll down to Channel
Blocking by using the Down Arrow
button on the Entone remote, then
press OK. There will now be a
Step 3
check mark beside Channel
Blocking. Scroll to the right
using the Right Arrow button on the
Entone remote and select Edit, then
press OK. The following screen will
display. Press OK on the Entone
remote.
Step 4
The following screen will
display. Press OK again on
the Entone remote.
Step 5
support.scrtc.com
26
CHANNEL BLOCKING
CONTINUED...
The following screen to the right will
display. Now scroll down using the Down
Arrow button on the remote and select a
channel that you want to block. press OK
after selecting a channel. After pressing
OK, a circle with a line through it should
display beside the blocked channel as
seen in the following screen.
Step 6
Continue to select and block channels as
needed. When finished blocking scroll to
Update using the Arrow buttons and press
the OK button on the remote. This will take
you back to the Settings screen. Press
Exit on the remote.
THEMES
Open the menu by pressing Menu on the Entone
remote. The following screen will display. Scroll to the
Step 1
Settings option by pressing the Up or Down Arrow
buttons on the Entone remote. Once you have
selected Settings press the OK button on the
Entone remote.
The following screen will be displayed. Press “0” on the
number pad and then press OK on the Entone remote.
Step 2
support.scrtc.com
27
THEMES
CONTINUED...
The following screen will be
displayed. Scroll to the Theme field
by using the Arrow buttons on the
Entone remote, then press OK on
the remote. To change between
themes press the Right or Left
Step 3
Arrow button. After selecting the
theme that you would like to use
press the OK button on the Entone
remote and scroll down to Submit.
The following screen will be displayed. Press the
OK button again. The new theme will be applied
when the Entone STB reboots.
Step 4
PROGRAMMING REMOTE
How to Program Remote to TV using Codes
1. Turn TV on.
2. Locate the code for your TV from the code list. (See pages 30-32)
3. Press and release the TV button on remote.
4. Press and hold the setup button on remote until the TV button flashes twice;
release the setup button; the TV button will stay on.
5. Enter the four digit code for your TV.
6. Try turning off TV using the power button on the remote. If TV shuts off press the STB button on remote, if TV doesn’t shut off repeat previous steps using a
different code from list.
7. If your TV doesn’t respond after trying all the codes for that brand, or your brand is not listed you can try programming using the auto-scan method.
support.scrtc.com
28
PROGRAMMING REMOTE
CONTINUED...
How to Program Remote to TV using Auto-Scan Method
1. Turn TV on.
2. Press TV button on remote.
3. Press and hold the setup button on remote until TV button blinks twice, release the setup button, the TV button will stay on.
4. Press the power button once.
5. Press the channel up or channel down button once. The TV button will start
blinking.
6. Point the remote toward TV.
7. When the TV shuts off press the OK button to save code.
8. Press the STB button.
Note: If all codes are exhausted the TV button will blink rapidly 7 times and auto-scan
will stop.
How to Program Remote to Set Top Box (Hydra Only)
Press and hold the OK button on the front panel of the STB for 5 seconds.
The front panel on the STB will now display “RC REG”.
Step 1
Now press and hold the STB button on the Entone remote for 5 seconds.
The STB button will now be illuminated.
Step 2
support.scrtc.com
29
PROGRAMMING REMOTE
CONTINUED...
Press the STB button on the Entone remote once. The STB and
AUX buttons will now be illuminated.
Step 3
Now press 1, 2 or 3 on the number pad. Press 1 for stream 1 (channel 10 or video
input); Press 2 for stream 2 (channel 23); Press 3 for stream 3 (channel 39). After
pressing one of the numbers on the number pad the STB button will blink twice and
go out, and the front panel on the STB will display "RC Reg 01, RC Reg 02 or RC
Reg 03" depending on which number was pressed. If remote does not register or
does not change channels repeat above steps.
The Amulet is another STB SCRTC offers for certain TV customers. The Amulet
does not require the remote to be registered with the STB.
(Hydra/Amulet): Entone Remote URC Plus TV Codes
Abex ..................... 0098
Admiral ................ 0001 0099
Adventura.............. 0100
Aiko....................... 0015
Aiwa....................... 0034
Akai....................... 0002
Alleron................... 0044
Amtron................... 0036
Anam National....... 0003 0036
AOC....................... 0004 0005 0053
Apex...................... 0074 0111 0119
Audiovox................ 0036
Bell & Howell......... 0001 0045
Benq...................... 0042
Bradford................. 0036
Broksonic............... 0114 0121
Candle................... 0004 0007 0100
Celebrity................ 0002
Citizen................... 0004 0007 0015
0036 0073 0097
Colortyme.............. 0004
Concerto................ 0004
Contec/Cony.......... 0011 0012 0036
Craig...................... 0036
support.scrtc.com
30
PROGRAMMING REMOTE
Crown.................... 0036 0053
Curtis Mathes........ 0000 0004 0014
0045 0073 0097
CXC....................... 0036
Daewoo................. 0004 0005 0013
0015 0016 0097
0106
Daytron.................. 0004 0097
Dell........................ 0141 0142 0146
Dimensia............... 0000
Electroband........... 0002
Electrohome.......... 0002 0003 0004
0018 0021
Element................. 0004 0018
Emerson................ 0004 0011 0013
0024 0025 0031
0033 0036 0044
0045 0080 0097
0102 0107
Envision................. 0004
Fisher.................... 0043 0045 0047
0103
Fujitsu.................... 0044
Funai..................... 0036 0044
Futuretech............. 0036
GE......................... 0000 0003 0004
0008 0021 0048
0049 0063 0068
0070 0144
Goldstar................. 0004 0005 0011
0018 0050 0090
0091 0097 0098
Grunpy................... 0036 0044
Hallmark................ 0004
Harvard.................. 0036
Haier...................... 0004
Hisense................. 0112
Hitachi................... 0004 0011 0012
0030 0051 0084
0085 0086 0102
0133
IMA........................ 0036
Infinity.................... 0053
Janeil..................... 0100
JBL........................ 0053
JC Penney............. 0000 0004 0005
0007 0012 0021
0048 0049 0058
0063 0068 0072
0073 0075 0097
0098
JCB........................ 0002
Jensen................... 0004
JVC........................ 0011 0012 0026
0049 0054 0055
0080 0117
Kawasho................ 0002 0004
Kenwood............... 0004 0018
Kloss Novabeam... 0036 0056 0057
0100
support.scrtc.com
31
CONTINUED...
KTV.......................... 0036 0097
LG............................. 0004 0005 0018
Loewe....................... 0053
Logik......................... 0001
Luxman..................... 0004
LXI............................ 0000 0004 0045
0053 0058 0068
0075
Magnavox................. 0004 0007 0018
0053 0056 0057
0059 0060 0110
0147
Majestic.................... 0001
Marantz.................... 0004 0051 0053
Megatron.................. 0004 0051
Memorex.................. 0001 0004 0005
0022 0045
MGA......................... 0004 0005 0018
0021 0047 0061
Midland..................... 0049 0068 0097
0098
Minutz....................... 0048
Mitsubishi................. 0004 0005 0018
0021 0032 0047
0061
Montgomery Ward.... 0001
Motorola................... 0003 0099
MTC.......................... 0004 0005 0073
Multitech................... 0036
NAD.......................... 0004 0058 0075
0085
NEC.......................... 0003 0004 0005
Nikko........................ 0004 0015
NTC.......................... 0015
Onwa........................ 0036
Optimus.................... 0085
Optonica................... 0064 0099
Orion......................... 0023 0033 0107
Panasonic................. 0003 0049 0053
0096 0123 0140
0152
Philips....................... 0003 0007 0011
0017 0018 0053
0056 0057 0059
0063 0095 0126
0129 0148
Philips Magnavox..... 0148
Pilot.......................... 0097
Pioneer..................... 0004 0085 0102
Portland.................... 0004 0005 0015
0097
Price Club................. 0073
Prima........................ 0113
Prism........................ 0049
Proscan.................... 0000 0008 0068
Proton....................... 0004 0011
Quasar...................... 0003 0039 0049
0062 0069
Radio Shack............. 0000 0045
PROGRAMMING REMOTE
Radio Shack/Realistic....0004
0011 0036 0045
0064 0097 0098
RCA............................0000 0003 0004
0005 0008 0018
0028 0052 0065
0067 0068 0071
0076 0082 0102
0104 0106 0108
0115 0151
Realistic......................0000 0045
Sampo........................0004 0097 0098
0120
Samsung....................0004 0005 0011
0014 0018 0019
0072 0073 0078
0094 097 0098
Sansui........................0023 0107 0122
Sanyo.........................0045 0103
Scotch........................0004
Scott...........................0004 0011 0033
0036 0044
Sears..........................0000 0004 0012
0018 0044 0045
0047 0055 0058
0068 0075 0103
0105
Sharp..........................0004 0009 0011
0025 0064 0077
0092 0097 0099
0153
Signature....................0001
Simpson.....................0007
Sony...........................0002 0109
Soundesign................0004 0007 0036
0044
Squareview.................0105
SSS............................0036
Starlite........................0036
Supre-Macy................0100
CONTINUED...
Supreme.....................0002
Sylvania......................0004 0007 0018
0027 0053 0056
0057 0059 0060
0124 0145 0150
Symphonic..................0024 0031 0036
0105
Tandy..........................0099
Tatung.........................0003
Technics.....................0049
Techwood...................0004 0049
Teknika.......................0001 0004 0005
0007 0011 0012
0015 0036 0044
0060 0073 0096
0097
TMK............................0004
Toshiba.......................0006 0045 0058
0073 0075 0079
0083 0087 0093
0101
Totevision...................0097
Universal....................0048 0063
Venturer......................0018
Victor..........................0055
Vidtech........................0004 0005
Viking..........................0100
Vizio............................0004
Wards.........................0000 0001 0004
0005 0018 0031
0044 0048 0053
0056 0057 0059
0060 0063 0064
White Westinghouse....0013
Yamaha......................0004 0005 0018
Zenith.........................0001 0081 0089
0118 0125
Zen Zen......................0146
TROUBLESHOOTING
Problem
Possible Solutions
No picture or getting no signal on TV
Make sure TV is on the right channel or
input. (stream 1 on channel 10 or one of the
video inputs, stream 2 on channel 23 and
stream 3 on channel 39)
Reboot the STB (to reboot unplug the
power cord from the STB, leave unplugged
for five seconds and plug back in)
support.scrtc.com
32
TROUBLESHOOTING
CONTINUED...
Remote not changing channels
Press the STB button on remote
Make sure TV is on the right channel or
input. (stream 1 on channel 10 or one of the
video inputs, stream 2 on channel 23 and
stream 3 on channel 39)
Program remote to STB (hydra only). See
pages 29-30
Reboot the STB (to reboot unplug the
power cord from the STB, leave unplugged
for five seconds and plug back in)
Remote changes TV channel not the
cable channel
Press the STB button on remote
Remote not controlling volume
and power
Press the STB button on remote.
Program remote to TV. See page 29
Skips channels when pressing the
channel button
Set guide to All or Subscribed. See page 3
Caller ID not displaying on TV screen
Enable Caller ID. See page 5
Caller ID displays then goes off
immediately
Increase Caller ID Timeout. See pages 6-7
Channel doesn’t display in program
guide
Set guide to All or Subscribed. See page 3
Unblock channel. See pages 26-27
Program guide displays restricted
Change Parental Control setting.
See pages 23-25
This channel is currently playing
restricted content displays across
screen
Change Parental Control setting.
See pages 23-25
Video signal blocked displays on screen
No channel subscription:.Call 678-2111,
528-2361 or 407-5111 to add channel
support.scrtc.com
33
Technical Assistance Center
678-2615
528-2615
407-2615
support.scrtc.com