1
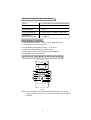
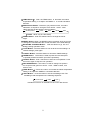
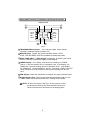
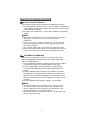
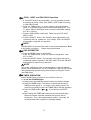
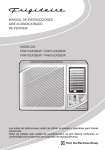
YDS-R51-0408
ENGLISH
OWNER’S MANUAL
REMOTE CONTROLLER R51
Please read this installation manual carefully before installing your air conditioner.
Please keep this manual in a safe place for future reference.
This manual many be subject to change without notice for purpose of improvement.
CONTENTS
Remote Controller Specifications---------------------------------------1
Performance Features----------------------------------------------------- 1
Introduction of Function Buttons on the Remote Controller---1
Names and Functions of indicators on Remote Controller---- 3
Operating the Remote Controller---------------------------------------4
Warning--------------------------------------------------------------------------7
Remote Controller Specifications
Model
R51, R51/BG,R51/E,R51/CE,R51/BGE,R51/CBGE
Rated Voltage
3.0V
Lowest Voltage of CPU
Emitting Signal
2.0V
8m (when using 3.0 voltage, it Gets 11m)
Reaching Distance
Environment
Temperature Range
。
。
-5 C 60 C
Performance Features
1. Operating Mode: COOL、HEAT、DRY、FAN and AUTO .
2. Timer Setting Function in 24 hours.
。
。
3. Indoor Setting Temperature Range : 17 C~30 C.
4. LCD (Liquid Crystal Display) of all functions.
5. Night Light Function (only R51/BG model available)
6. Compatible with the former R11.
Introduction of Function Buttons on the Remote Controller
SET TEMPERATURE
。
C
AUTO
COOL
FAN
HIGH
DRY
HEAT
MED
LOW
TEMP
1
11
MODE
ON/ OFF
FAN SPEED
2
SWING ECONOMIC RUNNING
TIMER
9
8
3
VENT
12
4
10
RESET
LOCK CANCEL
7
6
5
Fig. 1
Note: This illustration is for explanation purposes only. The actual
shape or button names of the remote controller may be slightly
different.
1
1
TEMP Button : Push the TEMP button to decrease the indoor
temperature setting or to adjust the TIMER in a counter-clockwise
direction.
2
MODE Select Button: Each time you push the button, a mode is
selected in a sequence that goes from AUTO、 COOL、 DRY、
HEAT and FAN as the following figure indicates:
AUTO(COOL)
COOL
DRY
HEAT
FAN
NOTE: HEAT only for Heat Pump
3
SWING Button: Push this switch button to change the louver
angle .
4
RESET Button: When the RESET button is pushed, all of the current
settings are cancelled and the control will return to the initial settings.
ECONOMIC RUNNING Button: Push this button to go into the
Energy-Saving operation mode.
LOCK Button: Push this button to lock in all the current settings. To
release settings, push again.
5
6
7
CANCEL Button: Push this button to cancel the TIMER settings.
8
TIMER Button: This button is used to preset the time ON (start
to operate) and the time OFF (turn off the operation).
9
ON/OFF Button: Push this button to start the unit operation. Push
the button again to stop the unit operation.
10
FAN SPEED Button: This button is used for setting Fan Speed in
the sequence that goes from AUTO 、LOW 、MED to HIGH, then
back to Auto.
11
TEMP Button
: Push the button to increase the indoor temperature
setting or to adjust the TIMER in a clockwise direction.
12
VENT Button : Push this button to set the ventilating mode. The
ventilating mode will operate in the following sequence :
Continuous
Auto
Off
Ventilation Function is available for the Fresh Star Series.
2
Names and Functions of indicators on Remote Controller
Display Panel
1
6
2
5
AUTO
COOL
DRY
HEAT
FAN
HIGH
MED
LOW
3
4
Fig. 2
1
TRANSMISSION Indicator: This indicator lights when remote
controller transmits signals to indoor unit.
2
MODE Display: Shows the current operation modes-- AUTO,
COOL, DRY and HEAT. HEAT only available for heat pump model.
3
HEAT PUMP ONLY - LOCK display is displayed by pushing the LOCK
button. Push the LOCK button again to clear display.
4
TIMER Display: This display area shows the settings of TIMER.
That is, if only the starting time of operation is set, it will display the
TIMER ON. If only the turning off time of operation is set, it will display
the TIMER OFF. If both operations are set, it will show TIMER ON OFF
which indicates you have chosen to set both the starting time and off
time.
5
FAN Display: When the FAN button is pushed, this signal indicator lights.
6
Digital Display Area: This area will show the temperature and, if in the
TIMER mode, will show the ON and OFF settings of the TIMER.
NOTE: All items are shown in the Fig.2 for the purpose of clear
presentation But during the actual operation only the relative functional items are shown on the display panel.
3
Operating the Remote Controller
Install / Replace Batteries
The Remote Controller uses two alkaline dry batteries(R03/Ir03X2).
1. To install batteries, slide back the cover of the battery compartment
and install the batteries according to the directions (+and -) shown
on the Remote Controller.
2. To replace the old batteries , use the same method as mentioned
above.
NOTE
1. When replacing batteries, do not use old batteries or a different
type battery. This may cause the remote controller to
malfunction.
2. If you do not use the remote controller for several weeks
remove the batteries. Otherwise battery leakage may damage
the remote controller.
3. The average battery life under normal use is about 6 months.
4. Replace the batteries when there is no answering beep from the
indoor unit or if the Transmission Indicator light fails to appear.
AUTOMATIC OPERATION
When the Air Conditioner is ready for use, switch on the power
and the OPERATION indicator lamp on the display panel of the
indoor unit starts flashing.
1. Use the MODE select button to select AUTO.IN the multi system,
to avoid mode conflict, auto-mode is taken as cool mode.
2. Push the TEMP button to set the desired room temperature.
。
The most comfortable temperature settings are between 21 C
。
to 28 C.
3. Push the ON/OFF button to start the air conditioner. The OPERATION lamp on the display panel of the indoor unit lights. The
operating mode of AUTO FAN SPEED is automatically set and
there are no indicators shown on the display panel of the remote
controller.
4. Push the ON/OFF button again to stop the unit operation.
NOTE
1. In the AUTO mode, the air conditioner can logically choose
the mode of COOL, FAN, HEAT and DRY by sensing the difference between the actual ambient room temperature and
the set temperature on the remote controller..
2. If the AUTO mode is not comfortable for you , the desired mode
can be selected manually.
4
COOL , HEAT, and FAN ONLY Operation
1. If the AUTO mode is not comfortable , you may manually override
the settings by using COOL, DRY, HEAT( HEAT PUMP units only),
or FAN ONLY modes.
2. Push the TEMP button to set the desired room temperature.
。
When in COOLING mode, the most comfortable settings are 21 C
or above. When in HEATING mode, the most comfortable settings
。
are 28 C or below.
3. Push the FAN SPEED to select the FAN mode of AUTO, HIGH,
MED or LOW.
4. Push the ON/OFF button. The operation lamp lights and the air
conditioner starts to operate per your settings. Push the ON/OFF
button again to stop this unit operation.
NOTE
The FAN ONLY mode cannot be used to control the temperature. While
in this mode, only steps 1、 3 and 4 may be performed.
DRY OPERATION
1. Push the MODE button to select DRY.
2. Push the TEMP button to set the desired temperature from
。
。
21 C to 28 C.
3. Push the ON/OFF button. The operation lamp lights and the air
conditioner starts to operate in the DRY mode. Push the ON/OFF
button again to stop this unit operation.
NOTE
Due to the difference of the set temperature of the unit and the
actual indoor temperature, the Air Conditioner when in DRY mode
will automatically operate many times without running the COOL
and FAN mode.
TIMER OPERATION
PUSH TIMER button to set the on and off times of the unit.
1. To set the STARTING time.
1.1 Please push the CANCEL button to cancel any former settings.
1.2 Push the TIMER button. The remote controller will show the
TIMER and the signal "h" is shown on the display panel. The
control is now ready to reset the TIMER ON to start the operation.
1.3 Push the TEMP button ( or ) to set desired unit START
time .
1.4 After setting the TIMER there will be a one-half second delay
before the remote controller transmits the signal to the Air
Conditioner. Then, after approximately another 2 seconds ,the
set temperature will re-appear on the digital display.
5
2. To set the STOPPING time.
2.1 Please press the CANCEL button to cancel any former settings.
2.2 Push the TIMER button and the remote controller will show the
last set time for the START operation and the signal "h"
will be shown on the display panel. You are now ready to readjust the TIMER OFF to stop the operation.
2.3 Push the TEMP button to cancel the TIMER ON setting. The
digital area will show "00".
2.4 Push the TIMER button and the remote controller will show the last
set time for the STOP operation and the signal "h" will be shown
on the display panel. You are now ready to reset the time of the
STOP operation.
2.5 Push the TEMP button ( or ) to set the time you want to
stop the operation.
2.6 After setting the TIMER there will be a one-half second delay before
the remote controller transmits the signals to the Air Conditioner.
Then after approximately another 2 seconds, the set temperature
will re-appear on the digital display.
3. Set the STARTING & STOPPING time
3.1 Please press the CANCEL button to cancel any former settings.
3.2 Push the TIMER button and the remote controller will show the
last set time for START operation and the signal "h" will
be shown on the display panel. You are now ready to readjust
the TIMER ON to start the operation.
3.3 Push the TEMP button ( or ) to set the time you want to
start the operation.
3.4 Push the TIMER button and the remote controller will show
the last set time for STOP operation and the signal "h" will be
shown on the display panel. You are now ready to reset the
time of the STOP operation.
3.5 Push the TEMP button ( or ) to set the time you want to
stop the operation.
3.6 After setting the TIMER there will be a one-half second delay
before the remote controller transmits the signal to the Air
Conditioner. Then, after approximately another 2 seconds ,the
set temperature will re-appear on the digital display.
NOTE
1. Please reset the TIMER after cancelling the former time
settings.
2. The setting time is relative time. That is the time set is based on
the delay of the current time.
6
Warning
1. Be sure there are no barriers between the remote controller and
the receiver of indoor unit otherwise the air conditioner will not
work.
2. Keep the Remote Controller away from all liquids.
3. Protect the Remote Controller from high temperatures and exposure
to radiation.
4. Keep the indoor receiver out of direct sunlight or the Air Conditioner
may malfunction.
5. Keep controller away from EMI (Electro-Magnetic Interference)
supplied by other household appliances.
7
DE - COMMISSIONING DISMANTLING & DISPOSAL
This product contains refrigerant under pressure, rotating parts, and electrical connections which
may be a danger and cause injury!
All work must only be carried out by competent persons using suitable protective clothing and safety precautions.
Read the Manual
Risk of electric shock
Unit is remotely controlled
and may start without warning
1. Isolate all sources of electrical supply to the unit including any control system supplies switched by the unit. Ensure that all points of electrical and gas
isolation are secured in the OFF position. The supply cables and gas pipework may then be disconnected and removed. For points of connection refer
to unit installation instructions.
2. Remove all refrigerant from each system of the unit into a suitable container using a refrigerant reclaim or recovery unit. This refrigerant may then be
re-used, if appropriate, or returned to the manufacturer for disposal.Under No circumstances should refrigerant be vented to atmosphere. Where
appropriate, drain the refrigerant oil from each system into a suitable container and dispose of according to local laws and regulations governing
disposal of oily wastes.
3. Packaged unit can generally be removed in one piece after disconnection as above. Any fixing down bolts should be removed and then unit lifted from
position using the points provided and equipment of adequate lifting capacity. Reference MUST be made to the unit installation instructions for unit
weight and correct methods of lifting. Note that any residual or spilt refrigerant oil should be mopped up and disposed of as described above.
4. After removal from position the unit parts may be disposed of according to local laws and regulations.
YDS-R51-0408
ENGLISH