1
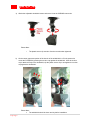
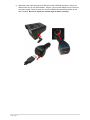
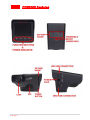
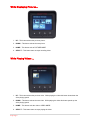
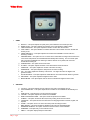
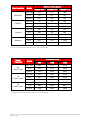
Table of Contents Table of Contents 1 Welcome 2 Package Contents 2 Installation 3 Basic Quick Functions 5 CCR2000 Features 6 Operation 7 While Under Video Mode Idle … 7 While Under Picture Mode Idle … 8 While Recording Video … 8 While Displaying Pictures… 9 While Playing Videos … 9 Picture Menu 10 Video Menu 11 Additonal Functions 12 Maintenance Troubleshooting Specifications 16 FCC Information 18 1|Page Troubleshooting Specifications 14 Specifications 13 Welcome Dear Sceptre Customer, Congratulations on your new SCEPTRE CCR2000 dashboard camcorder purchase. Thank you for your support. To ensure safety and many years of trouble free operation of your camcorder, please read the guide carefully before making any adjustments, and keep them in a safe place for future references. We hope you enjoy your new SCEPTRE CCR2000. PLEASE CHARGE THE CCR2000 FOR 8 HOURS BEFORE YOUR FIRST USE, THANK YOU. The full manual is included digitally in the SD card. You can also download the full manual online at http://www.sceptre.com. For technical assistance, please call 1800-788-2878 and select option 3 or email our tech support group at [email protected]. For all other inquiries, please call 1800-788-2878 and select option 4 or email our customer service group at [email protected]. We recommend you register your SCEPTRE CCR2000 on the web at the address http://www.sceptre.com/Support/Register.htm. Package Contents Sceptre CCR2000 Camcorder Device x 1 Power Cable x 1 12V Car Power Adapter x 1 SD Memory Card (with full user manual inside) x 1 Adjustable Windshield Mount x 1 Mini-USB data cable x 1 Battery (Pre-installed) x 1 Screw Driver x 1 Quick User Guide / Warranty Card Cloth Pouch 2|Page Installation a) Obtain the adjustable windshield mount and screw it into the CCR2000 camcorder. Please Note: The plastic secure clip needs to face the controls when tightened. b) On the center uppermost portion of the interior of the windshield in a 5 inch square size mount the CCR2000 by pressing the suction cup against the windshield. After the suction cup is attached firmly to the windshield, clip the plastic secure clip to strengthen the suction cup against the windshield. Please Note: The windshield should be clean and dry before installation. 3|Page c) Obtain the power cable and plug in the DC end into the CCR2000 camcorder. Plug in the USB end into the 12V car power adapter. Plug the 12V car power adapter into your vehicle’s 12V power supply. When you start your car the CCR2000 will automatically power up and start recording. Be sure to adjust your camera angle for better recording. 4|Page Basic Quick Functions When you start your car, the camcorder will automatically power on and start recording at the default setting of 1080P at 30 frames per second. Video files will be stored in 5 minute intervals. When the memory is full the older files will be overwritten. You can retrieve the video files by either connecting a mini-USB cable to the CCR2000 or removing the SD memory card and using it with a card reader. Please note the default recording mode also records sound. WHEN THE CAMCORDER IS RECORDING 5|Page CCR2000 Features 6|Page Operation The Sceptre CCR2000 is a vehicle video recorder that can record video, audio, and take pictures. The following are descriptions of CCR2000’s function buttons. While Under Video Mode Idle … 1. UP – This button plays stored videos in the SD card recorded by the CCR2000. 2. DOWN – This button changes between PICTURE and VIDEO mode. 3. HOME – This button opens up the VIDEO MENU. 4. SELECT – This button starts or stops recording video. 7|Page While Under Picture Mode Idle … 1. UP – This button displays the pictures in the SD card taken by the CCR2000. 2. DOWN – This button changes between PICTURE and VIDEO mode. 3. HOME – This button opens up the PICTURE MENU. 4. SELECT – Press this button to takes a picture. While Recording Video … 1. UP – This button enables or disables sound to be recorded in the video. 2. DOWN – This button takes a picture while the CCR2000 is recording video. 3. HOME – This button locks the current video file so it will not be overwritten. 4. SELECT – This button stops the CCR2000 from recording video. 8|Page While Displaying Pictures… 1. UP – This button selects the previous picture. 2. DOWN – This button selects the next picture. 3. HOME – This button exits to PICTURE MODE. 4. SELECT – This button starts or stops recording video. While Playing Videos … 1. UP – This button selects the previous video. While playing the video this button slows down the video playing speed. 2. DOWN – This button selects the next video. While playing the video this button speeds up the video playing speed. 3. HOME – This button exits the video to VIDEO MODE. 4. SELECT – This button starts or stops playing the video. 9|Page Picture Menu 1. PICTURE QUALITY – This option adjusts the compression of the JPEG picture. SIZE – This option adjusts the resolution of the picture between 3 – 8 megapixel. CONTRAST – This option adjusts the contrast of the picture. SHARPNESS – This option adjusts the sharpness of the picture. ISO – This option adjusts the ISO value (the higher it is the brighter the picture but the grainier the picture quality). f. WHITE BALANCE – This option adjusts the white balance of the picture (changing it between bluish to greenish). g. EXPOSURE – This option adjusts exposure of the picture (changing it between dark and bright). The higher the value the softer the picture. h. METER MODE – This option adjusts the way the digital sensor inside evaluates the brightness of the picture. a. b. c. d. e. 2. SETTINGS a. LCD OFF – This option adjusts the time it takes for the LCD to automatically turn off. b. AUTO POWER OFF – This option adjusts the time it takes for the CCR2000 to automatically turn off. c. TIME SETUP – This option lets you set up the time and date. d. VOLUME – This option adjusts the volume of the CCR2000. e. RESET SYSTEM SETTINGS – This option resets all options back to default. f. FORMAT – This option formats the SD card, thereby erasing all it’s internal contents. g. LANGUAGE – This option lets the user select the menu language between Chinese, English, and Spanish. h. STAMP – This option turns on or off the time stamp while recording the video. i. BEEP SOUND – This option enables or disables the all sound the CCR2000 makes. j. FIRMWARE VERSION – This option checks the firmware version of the CCR2000. k. TIMEZONE – This option lets you check the timezone. l. ABOUT – This option displays Sceptre’s information. 10 | P a g e Video Menu 1. VIDEO QUALITY – This option adjusts the quality of the picture between normal and super fine. RESOLUTION – This option adjusts the resolution of the video between 1080P to 480P. VIDEO DURATION – This option adjusts the duration of each video file recorded. LOOP VIDEO – This option disables or enables video files to be recorded over when the SD card memory is full. e. CRASH SENTIVITY – This option adjusts how sensitive the CCR2000’s G sensor will be in detecting a collision. f. PARKING MODE – This option turns on or off the sensor automated recording function where if the car is struck while parked, the CCR2000 will automatically start recording. The one minute option tells you that the CCR2000 once detecting a collision while the car is parked, will record for 1 minute before shutting off. g. UPSIDE DOWN – This option will invert the video. h. FLICKER – This option adjusts the flicker of the video between 60 Hz and 50 Hz. i. CONTRAST – This option adjusts the contrast of the video recording. j. SHARPNESS – This option adjust the sharpness of the video recording. k. ISO – This option adjusts the sensitivity of the sensor. The higher the value the brighter and grainier the video. l. WHITE BALANCE – This option adjusts the white balance of the video between bluish to greenish. m. EXPOSURE – This option adjusts the brightness of the video. n. METER MODE – This option adjusts how the sensor evaluates the brightness of the video. a. b. c. d. 2. SETTINGS a. b. c. d. e. f. g. h. i. j. k. l. 11 | P a g e LCD OFF – This option adjusts the time it takes for the LCD to automatically turn off. AUTO POWER OFF – This option adjusts the time it takes for the CCR2000 to automatically turn off. TIME SETUP – This option lets you set up the time and date. VOLUME – This option adjusts the volume of the CCR2000. RESET SYSTEM SETTINGS – This option resets all options back to default. FORMAT – This option formats the SD card, thereby erasing all its internal contents. LANGUAGE – This option lets the user select the menu language between Chinese, English, and Spanish. STAMP – This option turns on or off the time stamp while recording the video. BEEP SOUND – This option enables or disables the all sound the CCR2000 makes. FIRMWARE VERSION – This option checks the firmware version of the CCR2000. TIMEZONE – This option lets you check the time zone. ABOUT – This option displays Sceptre’s information. Additonal Functions 1. OUTPUTTING TO HDMI a. b. Obtain an USB to mini-USB cable and connect the USB end to your computer and the mini-USB end to the CCR2000. Your computer will detect an additional drive where you can access your recorded files. 2. CONNECTING THE CCR2000 TO A PC TO RETRIEVE VIDEO a. Obtain a mini-HDMI to HDMI cable and connect the mini-HDMI to the CCR2000 and connect the HDMI end to your HDTV. b. Turn on the CCR2000 and change your HDTV source to the HDMI port you have connected to. Use the UP button to play your video or picture files and they will show up on the HDTV. 3. READING THE SD CARD DIRECTLY a. Eject the SD memory card by pushing the card in until you hear a minor click sound and the card will eject automatically. b. Insert the SD memory card to your SD memory card reader and connect the reader to your computer. c. Turn on your computer and the computer will detect an additional drive where you can access your recorded files. 4. Setting G Sensor Automatic Functions a. The CCR2000 will automatically lock the currently recording video file if the sensor detects a collision. i. Make sure CRASH SENSITIVITY is turned on under the VIDEO menu. ii. The locking function will lock video files 5 minutes prior to the collision, 5 minutes during the collision and 5 minutes after the collision. b. While your car is parked, if the CCR2000 detects a collision, it will automatically start recording. i. Make sure CRASH SENSITIVITY is turned on under the VIDEO menu. ii. Make sure PARKING MODE is turned to 1 min or 2 min under the VIDEO menu. iii. Make sure LCD OFF under the SETTINGS menu is turned OFF. iv. Make sure AUTO POWER OFF under the SETTINGS menu is turned OFF. v. Make sure the battery power is fully charged (a full charge will last 2-3 hours). vi. If this function is on, the indicator light is solid blue. When the CCR2000 is recording the indicator light is blinking blue. vii. This function will only be turn on after the car engine shut off and the CCR2000 is connected to car charger. this function will not turn on if user manually stop the recording. 5. SYSTEM RESET a. In the event that the unit is not working correctly you can always reset the device by inserting a metallic pin to the RESET hole next to the SD card. After 3-5 seconds the device will reset. 12 | P a g e Maintenance 1. LENS – Having clean lens will give you clearer picture. Fingerprints, dust particles will reduce picture quality. To clean lens of the CCR2000 please do the following. a. Obtain a piece of microfiber cloth or cloth designed to clean prescription glasses. b. Mix isopropyl alcohol with water (1 part isopropyl alcohol, 9 part water) to form the lens cleaning solution. c. Dampen the microfiber cloth with the solution and wipe the lens clean. d. Dry the lens with another piece of microfiber cloth. 2. BATTERY – Batteries are considered a wear and tear item and will eventually fade out in terms of battery power. If the battery does not work, you can always replace it by doing the following. a. b. c. d. Order your replacement battery through Sceptre. Obtain a precision cross-type screw driver. Remove the two screws on the battery cover and remove the battery. Insert the new battery in and secure the battery cover with the two screws. 3. SD CARD – It is possible for a SD card’s memory to fail or not work. You can replace them by doing the following. a. On the CCR2000 SD memory slot push in the SD memory card until you hear a mini-click sound then release. The memory card will eject automatically. b. Obtain a new SD memory card. We recommend class 6 or higher. SD card adapters (using mini SD or micro SD) are NOT recommended. c. Insert it into the SD memory slot with the metallic pins facing away from the LCD screen. 4. SD CARD (expansion) – It is possible to insert a larger memory SD card in order to increase recording time of the CCR2000. a. Purchase a larger memory size SD card and insert it into the SD memory slot. b. Keep in mind the largest size the CCR2000 will read is 32 gigabyte. 5. OPERATION CONDITION – Under different humidity / temperature the unit might have different performances. a. The CCR2000 operates between 45 °F - 120 °F. However near the extreme temperatures the performance of the unit will diminish. b. The CCR2000 operates between 10% - 80% humidity. c. You can store the CCR2000 between 14 °F - 140 °F. d. The CCR2000 is not for sports or water sports, it is NOT shock proof or water proof. 13 | P a g e Troubleshooting Problems Solutions THE CCR2000 IS Make sure the CCR2000 has power in the battery or is plugged in with a power NOT cord. RECORDING Make sure the SD memory card itself is not in write protect mode. Make sure the CCR2000 is turned on by pressing and holding the power button for 3 seconds. Make sure the CCR2000 is not connected to a computer. Make sure the SD card is not full of data. Make sure the option LOOP VIDEO is enabled in the CCR2000 video menu. Make sure the SD card is working. If not replace the SD card with a new one to see if it works. THE CCR2000 IS Make sure the CCR2000 has power in the battery or is plugged in with a power NOT TURNING cord. ON Make sure the weather condition is not extremely cold (under 50 F). THE VIDEOS AND PICTURES ARE BLURRY Clean the CCR2000’s lens by following the methods stated under MAINTENANCE. THE SOUND IS NOT BEING RECORDED Make sure when you are recording video with the CCR2000 there is no red X mark on the speaker icon on the LCD screen. Press the UP direction button to remove the red X. 14 | P a g e Call US If You Need Help Products are often returned due to a technical problem rather than a defective product that may result in unnecessary shipping charges billed to you. Our trained support personnel can often resolve the problem over the phone or email. For more information on warranty services or repairs after the warranty period, please contact our support department at the number below. For technical help, contact our Sceptre Technical Support Group via email or phone. Please have your Sceptre p/n number, serial number, and date of purchase available before you call. Tech Support E-mail: [email protected] Customer Service Email: [email protected] Live Chat via WEB: www.sceptre.com TEL: 1800-788-2878 Operation Hours: Mon - Fri at 8:30 AM – 5:30 PM (PST) 16800 East Gale Ave. City of Industry, CA 91745 TEL: 626-369-3698 FAX: 626-855-5711 Website: www.SCEPTRE.com 15 | P a g e Specifications SPECIFICATION OPTICS DESCRIPTION Values ULTRA WIDE ANGLE 120º(1080P) / 140º(720P, 480P) LENS Anti-reflective, High transmittance, Ultra sharp ƒ/3.6 lens IMAGE SENSOR 5 Mega Pixel CMOS (Complementary Metal-Oxide Semiconductor) Sensor VIEWABLE SIZE 2” TYPE LPTS (Low Temperature PolySilicon) RESOLUTION 1920 × 1080 @ 30fps (HD) 1280 × 720 @ 60fps (HD) 1280 × 720 @ 30 fps (HD) 800 × 480 @ 30fps (WVGA) VIDEO FORMAT H.264 CODEC, MP4 file format VIDEO QUALITY Super Fine, Fine, Normal VIDEO DURATION 3 Min / 5 Min / 10 Min RESOLUTION 8M (3200×2400) 5M (2592×1944) 3M (2048×1536) PICTURE FORMAT JPEG PICTURE QUALITY Super Fine, Fine, Normal BATTERY TYPE Rechargeable Lithium-ion Battery, 3.7V, 960mAh BATTERY LIFE FOR ONE FULLY CHARGED Approximate 50 minutes SCREEN VIDEO PHOTO BATTERY AND CHARGING RECHARGING TIME SUPPORT DATA TRANSFERRING OPERATING SYSTEM Approximate 2 hours via Car Charger while unit is on Approximate 9 hours via Car Charger while unit is off Approximate 4 hours MEMORY TYPE SD Card Class 6 or higher required Up to 32 GB capacity supported RECORDING TIME WITHOUT LOOPING FUNCTION Approximate 80 minutes for 8GB memory SD Card with best video quality OUTPUT PORT mini HDMI, mini USB INPUT PORT DC IN wired with Car Power Adapter MEMORY SLOT SD Card Slot Microsoft Windows® XP, Vista, 7 and later, MAC OS® Windows Media Player may require Product Dimension (inch) 3.18” × 2.36” × 2.29” Carton Dimension (inch) 5.12” × 3.66” × 6.02” Product Weight (lb) 0.30 lb (±0.02 lb) Gross Weight (lb) 1.2 lb Certification FCC, CE STORAGE PORTS via USB the installation of 3rd Party codec packs DIMENSION WEIGHT REGULATIONS 16 | P a g e Video Resolution 1080/30fps 720/60fps 720/30fps 480/30fps Quality Minutes of Video Record 8GB SD Card 16GB SD Card 32GB SD Card Super Fine 80 172 346 Fine 99 207 415 Normal 124 259 519 Super Fine 99 207 415 Fine 110 230 461 Normal 167 345 692 Super Fine 125 259 519 Fine 168 345 692 Normal 253 518 1038 Super Fine 252 518 1038 Fine 339 691 1384 Normal 511 1036 2076 *The numbers in the table are an approximate number of minutes. Your results may vary slightly. Picture Resolution 8M (3200 x 2400) 5M (2592 x 1944) 3M (2048 x 1536) Number of Picure Quality 8GB 16GB 32GB Super Fine 2761 5546 11119 Fine 4070 8173 16386 Normal 6444 12941 25945 Super Fine 3775 7582 15202 Fine 6317 12687 25436 Normal 10310 20705 41512 Super Fine 6444 12941 25945 Fine 9666 19411 38917 Normal 11897 23891 47898 *The numbers in the table are an approximate number of pictures. Your results may vary slightly 17 | P a g e FCC Information This device complies with part 15 of the FCC Rules. Operation is subject to the following two conditions: 1. This device may not cause harmful interference; 2. This device must accept any interference received, including interference that may cause undesired operation. Changes or medications not expressly approved by the party responsible for compliance could void the user’s authority to operate the equipment. 18 | P a g e Disclaimer “HDMI, the HDMI logo and High-Definition Multimedia Interface are trademarks or registered trademarks of HDMI Licensing LLC.” Sceptre is a trademark or registered trademark of Sceptre Group. Sceptre, Inc. shall not be liable for technical or editorial errors or omissions contained herein; nor for incidental or consequential damages resulting from furnishing this material, or the performance or use of this product. In the interest of continuing product improvement, Sceptre, Inc. reserves the right to change product specifications without notice. Information in this document may change without notice. 19 | P a g e SCEPTRE CCR2000 WARRANTY CARD Please read this warranty card carefully, it is a “ONE-YEAR LIMITED WARRANTY” on parts and labor and is only valid when purchased from an Authorized Reseller, only on new and non-refurbished product, and available to customers in the Continental US, Alaska, Hawaii and Puerto Rico. SCEPTRE’s Responsibility SCEPTRE products purchased in the United States are warranted to be free from defects in materials or workmanship for a period of one (1) year from the date of their original retail purchase. If the unit fails to conform to this warranty, we will service the monitor using new or refurbished parts. Service Labor During a period of one (1) year from the effective warranty date, SCEPTRE will provide, when needed, service labor to repair a manufacturing defect at its designated Service Center. To obtain warranty service in the United States, you must first call our Customer Support at (800) 788-2878. The determination of service will be made by SCEPTRE. DO NOT RETURN YOUR UNIT WITHOUT PRIOR AUTHORIZATION. Parts New or remanufactured replacements for defective parts will be used for repairs by SCEPTRE at its designated Service Center for one (1) year from the effective warranty date. Such replacement parts are warranted for the remaining portion of the original warranty period. Service During the one (1) year warranty period, SCEPTRE will, at its option and sole discretion, repair or replace defective parts. The Customer will be required to ship the unit to the Service Center indicated at the time Customer Support is contacted to make the necessary repairs, you are responsible for all transportation charges to the service facility. SCEPTRE is not responsible for the de-installation or re-installation of the unit. Packaging and Shipping Instruction When you send the product to an authorized SCEPTRE service facility you must use the original carton box and packing material or an equivalent as designated by SCEPTRE. Not Covered This warranty does not cover defects, malfunctions or failures resulting from shipping or transit accidents, abuse, misuse, operation contrary to furnished instructions, operation on incorrect power supplies, operation with faulty associated equipment, modification, alteration, improper servicing, tampering or normal wear and tear or units on which the serial number has been removed or defaced. Batteries and SD memory cards are considered wear and tear items. Batteries are not covered under the warranty. SD memory cards are not covered under the warranty. ANY IMPLIED WARRANTIES, INCLUDING ANY IMPLIED WARRANTY OF MERCHANTABILITY AND FITNESS FOR A PARTICULAR PURPOSE SHALL BE LIMITED IN DURATION TO THE PERIOD OF TIME SET FORTH ABOVE. OUR LIABILITY FOR ANY AND ALL LOSSES AND DAMAGES RESULTING FROM ANY CAUSE WHATSOEVER, INCLUDING OUR NEGLIGENCE, ALLEGED DAMAGE OR DEFECTIVE GOODS, WHETHER SUCH DEFECTS ARE DISCOVERABLE OR LATENT, SHALL IN NO EVENT EXCEED THE PURCHASE PRICE OF THE UNIT. WE SHALL NOT BE RESPONSIBLE FOR LOSS OF USE, COMMERCIAL LOSS OR OTHER INCIDENTAL OR CONSEQUENTIAL DAMAGES. SOME STATES DO NOT ALLOW LIMITATIONS ON HOW LONG AN IMPLIED WARRANTY LASTS OR THE EXCLUSION OR LIMITATION OF INCIDENTAL OR CONSEQUENTIAL DAMAGES, SO THE ABOVE LIMITATIONS OR EXCLUSIONS MAY NOT APPLY TO YOU. This warranty gives you specific legal rights, and you may also have other rights which vary from state to state. This is the only warranty applicable; no one is authorized to extend or modify it or to grant any other warranty. SCEPTRE retains the right to assess all warranty claims and to determine if damages are covered by the warranty. In case of a claim that is not covered by the warranty, you will be contacted to determine whether SCEPTRE should repair the damage for a fee or whether the product should be returned to you as received by the repair center. 20 | P a g e