1
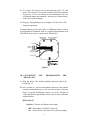
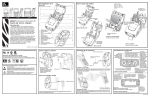
G.A.L. HANDS FREE EMERGENCY
TELEPHONE
MODEL GAL-6400
I. GENERAL
The GAL-6400 Hands Free Emergency Telephone permits a
pre-programmed number to be dialed when the "push to call"
button is depressed on the station. The emergency personnel
upon receiving the call can hear a 10 second recorded message.
By pressing the star "*" key on their telephone keypad, the
emergency phone will respond by stopping the recorded message
and/or issuing a pre-programmed tone location I.D. number and
illuminate the "CALL RECEIVED" indication. The “CALL
RECEIVED” indicator will also light automatically after playing
the recorded message a programmed number of times. During the
call the unit will act as a standard speaker-phone. At any time
after the star key is pressed, the pound ”#” key can be used to
hang up the emergency phone.
The unit also has the capability of dialing up to four additional
pre-programmed numbers if the first number called is
unanswered and/or busy.
II. QUICK PROGRAMMING INSTRUCTIONS
To program a single emergency number to be dialed and voice
location announcement to be recorded without changes to the
security code or tone location ID.
A. Connect the phone line to the modular connector supplied on
the GAL-6400.
B. From another phone, dial the phone number for the line that
the GAL-6400 is attached to. The GAL-6400 will answer
immediately.
C. Dial the factory set security code 1,2,3,4,5,6 on the telephone
keypad. Two beeps should be heard.
D. Using the telephone keypad, enter the emergency number the
GAL-6400 should dial followed by #,0,0. Two beeps should
be heard.
1
E. To record a 10 second voice location message, dial “* 4” and
speak after the tone. To stop the recording, press any telephone
keypad key, or wait 10 seconds for the recording to stop. We
recommend adding the statement, “hit star key to end message”
at the end of your recording.
F. Hang up. Programming is now complete. Test the GAL-6400
for proper operation.
If programming was not successful, or additional features need to
be programmed or modified, such as a second or third number to be
dialed if the first is busy or unanswered, READ ON!
Speaker Volume
Potentiometer
Microphone Sensitivity
Potentiometer
To Speaker
Modular
Connector
Red & Black
To LED for Call
Received Light
Green Wires
To Push to Call
Button Contacts
Figure 1
III. CONNECTING
PHONE UNIT
AND
PROGRAMMING
THE
A. Plug the phone line into the modular connector wired to the
board (Fig. 1).
B. DIP switches S1 and the microphone sensitivity and speaker
volume potentiometers (Fig. 1) are set at the factory to meet the
needs of typical installations. Please review the function of
each setting below and modify if necessary for your conditions
and preferences.
DIP switch S1:
Position 1 - Push to call button switch mode
OFF - Push button CANNOT cancel call
ON - Push button CAN cancel call (factory setting)
2
This switch determines whether or not the push button
can cancel (hang up) a call after it has been initiated.
It is recommended that the call CAN be cancelled (switch
ON). This allows for "resetting" the phone line should the
line become "stuck". If you wish to change, do so after
programming.
Position 2 - Incoming call select
OFF - Incoming calls are NOT answered
ON - Incoming calls are answered (factory setting)
Since programming requires remotely dialing into
the phone unit, this switch MUST be set to ON when
programming. After programming, this switch may
be set to your preference.
Position 3 - Operation mode
OFF - Program only mode
ON - Normal operation mode (factory setting)
This switch must be ON (normal operation mode)
for the unit to operate. To program the unit
with the switch in
this position, a six
character security code must be entered after
calling the unit from a remote telephone. This is
how initial programming will be done.
In program only mode, a security code is not required
to program the unit.
An
incoming
call
automatically puts the unit into programming
operation. Use program only mode (switch OFF) to
program a new security code if the current one is
forgotten.
Microphone sensitivity adjustment (Potentiometer)
The microphone sensitivity (volume that the distant
party hears)
can be adjusted
with
this
potentiometer.
Caution: Setting the gain (volume) too high may
cause distorted audio, and also prevent the distant
party from being heard.
Speaker volume adjustment (Potentiometer)
The speaker volume can be adjusted with this
potentiometer. Set for distortion free sound.
3
C. Initially test the unit by pushing the "PUSH TO CALL" button. A dial
tone followed by touch tones should be heard. Push the button a
second time to cancel the call. If a dial tone was not heard, check
the connection of the phone line to the unit.
Since all programming will be done by dialing this unit from another
telephone, you may now mount the phone unit, and/or close and secure
the station.
D. Programming consists of entering a primary and any additional numbers
(if the second number redial feature is to be used) emergency telephone
number. You may also change the factory set tone identification number
and security code to your own private codes if you wish. After each valid
entry, the unit will respond with two beeps. Programming of a voice
message will be covered in section E.
1. Dial into the unit from any telephone.
2. Enter the factory set security code 1,2,3,4,5,6 on the
telephone keypad.
3. Enter the emergency telephone number (up to
twenty digits) on the touch tone keypad followed by "#,0,0".
If the redial feature will be used (second number will be dialed if
first number does not answer), enter the second emergency
telephone number on the touch tone keypad
followed by "#,0,1", third in “#,0,2”, up to the fifth in “#,0,5”.
IMPORTANT: Redial ring count and/or redial
on busy will be set in section F of the instructions if you are using
these features.
The following functions can be programmed as part of the emergency
telephone number:
Keypad entry
*,6
*,7
Function
Pulse/touch tone toggle
4 second pause
Examples:
- Store the emergency number: "423-5263"
enter: 4,2,3,5,2,6,3,#,0,0
- Store the dialing sequence: "9,(pause),563-2141"'
enter: 9,*,7,5,6,3,2,1,4,1,#,0,0
4
Note: This example would be used on
telephone systems that require pressing "9"
to get an outside line. The "*,7" provides
a four second pause to allow for the outside
line dial tone.
- Store the pulse dialed emergency number:
"562-1275"
enter: *,6,5,6,2,1,2,7,5,#,0,0
Note: This example would be used on
telephone systems that require pulse dialing
(tone dialing does not work).
- Store the second emergency number: "263-9384"
enter: 2,6,3,9,3,8,4,#,0,1
IMPORTANT: Refer to Redial Ring Counter
and Redial on Busy in section F if a second
number will be used.
4. Enter a tone I.D. number (up to twenty digits) for the unit
followed by “#,2,0”.
Note: If using the voice message for
location I.D., you may wish to clear the
tone I.D.
Examples:
- Store the I.D. number: "1234"
enter: 1,2,3,4,#,2,0
-
Clear the I.D. number (when using the voice
location I.D.)
enter: #,2,0
5. Enter your private six digit security code followed by
"#,1,9" to replace the factory code. Make sure to
remember your private security code so that you may
remotely program this unit in the future.
Example:
- Store the new security code: "168263"
enter: 1,6,8,2,6,3,#,1,9
5
E. The GAL-6400 has a built in digital recorder/announcer that
can be used to give location identification. Both the
emergency personnel and the elevator car occupants will hear
the message, however the car occupants will hear it at a
reduced volume. It provides 10 seconds of record time and
has two options for operation.
Forced Play Time
By factory default, the 10 seconds message is played
automatically when the unit detects that the call has been
answered (forced play time value set to “00”). Alternatively,
it may be programmed to play after a programmed amount
of time from 1 to 99 seconds after dialing (forced play time
value set from “01” to “99”).
Repeat Announcement
By factory default, the message will repeat continuously
every 8 seconds until the emergency personnel presses
the “*” key on their key pad. This will stop the message
and turn on the call received LED (repeat announcement
value set to “0”). Alternatively, the announcement may be
programmed to play from 1 to 9 times and then
automatically turn ON the call received LED (repeat
announcement value set from “1” to “9”).
The two options are set by entering a string of six digits
followed by #17. The first two digits of the string set the
Forced Play Time option, the next (third) digit sets the Repeat
Announcement option, followed by “000” for a total of six
digits.
Example:
- Set message announcement options:
Forced Play Time set to play announcement
automatically when call is answered.
Repeat announcement until star “*” is pressed.
enter: 00,0,000 #17
- Set message announcement options:
Forced Play Time set to play announcement 10
seconds after dialing.
Repeat announcement 3 times.
enter: 10,3,000 #17
To record your message:
1. While in programming mode, enter *4. Wait for the
tone and begin recording. Ten seconds of record time
is available. Hit any key to stop recording, or at 10
seconds, the recording will stop.
6
2. At the end of recording, play back of the message is
automatic. To repeat play back for your review enter *5.
To re-record, enter *4.
3. To erase and disable the voice message feature, enter *3.
Example announcement:
- “Emergency call from elevator 3 at 125 Broadway.
Press the star key to stop this announcement.”
Note: If using the factory default for the
repeat announcement option (repeating
message until a “*” is pressed), we
recommend including the instruction to press
the star “*” key at the end of your recorded
message as in the sample above.
F. There are three timing functions and two redial features that
are used by the GAL-6400 for call processing. These functions
are listed below. IMPORTANT: If a second number is to be
dialed if the first is busy or unanswered, the Redial Ring
Counter and/or the Redial on Busy MUST be set.
Talk/Listen Delay - This delay is the switching time
between talk and listen in increments of 0.1 seconds. The
factory default is 0.2 seconds.
Maximum Call Time - This is the maximum time in
minutes that the GAL-6400 will stay on the line. The
factory default is 3 minutes. A value of 0 disables the
maximum call time. CAUTION: Some phone systems do
not issue hang
up signals. Do not disable the
maximum call time if the GAL-6400 does not hang up
reliably.
Silent Time - This is the maximum amount of time in
increments of 10 seconds that the GAL-6400 will stay
on the line with no voice activity. The factory default is
40 seconds. A value of 0 disables the silent time.
Redial ring counter - This is the number of rings the
GAL-6400 will look for before the second or more
programmed emergency number is dialed. If the second
number is unanswered after the same number of rings,
the first number will be attempted again. This will
continue until the line is answered or the unit is hung up.
To allow redialing, values of 2 - 9 can be used (the value
set equals the number of rings). A value of 1 disables the
7
feature (second number will not be dialed). The factory
default is 1 (feature disabled).
Redial on busy - This will enable or disable the feature
to dial the second emergency number on a busy signal. A
value of 1 disables this feature, a value of 2 enables it.
The factory default is 1 (feature disabled).
Pulse dialing rate - This is the rate at which the phone
will dial in pulse mode. A value of 1 sets phone to 10
pulses per second (PPS), a value of 2 sets it to 20 PPS.
The factory default is 1.
The factory defaults for the talk/listen delay, maximum call
time and the silent time are set to provide good operation and
performance in most cases. The redial features should be set to
your preference. If you wish to change any of these values or
enable the redial feature, do so as follows.
The numbers 1 through 9 on the telephone keypad are
used to enter the incremental values of each of the time
functions. As an example, the number 3 represents 0.3
seconds for the talk/listen delay, and the number 6
represents 6 minutes for the maximum call time, etc.
The keypad numbers are also used to enable and set the
number of rings for the redial features. As an example, the
number 3 represents a redial ring count of 3 rings. For
redial on busy, the number 2 represents enabling the
second emergency number to be dialed when the first is
busy.
The new values are entered as a string of digits followed
by "#,1,8". The string is made up of six digits, in the
following order Talk/Listen Delay, Maximum Call Time,
Silent Time, Redial Ring Count , Redial on Busy, and
Pulse Dialing Rate.
Examples:
- Store time functions
& set redial feature: 0.3 seconds Talk/Listen
5 minutes Max. Call Time
70 seconds Silence Time
4 ring Redial Ring Count
Do not Redial on Busy
10 PPS pulse dialing rate
enter: 3,5,7,4,1,1,#,1,8
8
- Store time functions
& set redial feature: 0.4 seconds Talk/Listen
6 minutes Max. Call Time
50 seconds Silence Time
6 ring Redial Ring Count
Redial on Busy
10 pps pulse dialing rate
enter: 4,6,5,6,2,1,#,1,8
IV. TESTING THE PHONE UNIT
Test the unit in the elevator by depressing the "push to call"
button on the cover of the station. A dial tone should be heard
followed by the dialing of the emergency number.
When the call is answered, the answering party should listen for
the voice announcement (if one exists) and push the "*" key on
their touch tone keypad. This will transmit the tone I.D. (if one
exists) of the emergency telephone and light the LED on the
station indicating that the call has been received.
V. PROBLEMS
Most problems encountered with the GAL-6400 hands free
emergency telephone fall into one of the three categories listed
below.
A. Phone line problems
1.
Dial tone not heard when the "PUSH TO CALL" button
is pressed.
Use a standard desk phone to check the phone line. If a
dial tone is not heard, correct the phone line. If a dial tone
is heard, check the connection to the GAL-6400.
2.
GAL-6400 hangs up within seconds of button being
pressed.
This is usually a noisy phone line. Use a standard desk
phone to determine if noise is heard on the line. Make
sure to route all telephone line wiring away from
possible sources of electrical noise such as motors,
controllers, etc. Use shielded twisted pair wiring for
telephone line. Ground the shielding at one end only.
9
B. Programming problems
1. GAL-6400 does not accept programming. Two beep
response from unit is not heard when programming.
The GAL-6400 is looking for standard touch tones for
programming. If you are not successful with the phone you
are using, try calling from outside the building such as
from your office or home phone.
2. Cannot program multiple phones sharing a single phone
line.
Since only one GAL-6400 phone can pick up at a time,
you must program each of the units one at a time.
Disconnect the phone line from all the other units on the
same line not being programmed, or set the incoming call
select switch to off on all the units except for the one being
programmed.
C. Dialing problems
1. Phone dials properly but call does not go through.
Use a standard desk phone (not an office system phone) and
dial the same number as programmed in the GAL-6400 to
determine if the problem is the number, the phone system,
or the unit. Keep in mind some phone systems require a "9"
to be dialed to get an outside line.
The phone line may be a pulse line. Try entering a *6
before the phone number when programming to dial in
pulse mode.
If other problems are encountered with the hands free emergency
telephone, please call G.A.L. at (718) 292-9000.
G.A.L. Manufacturing Corp.
50 E. 153rd Street
Bronx, NY 10451
10
PUB-0002N 0505