1
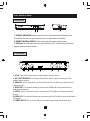
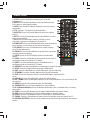
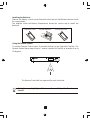
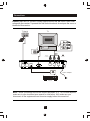
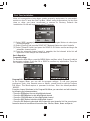
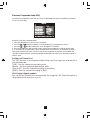
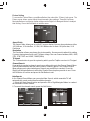
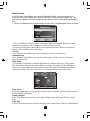
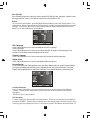
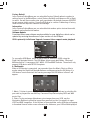
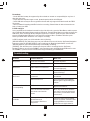
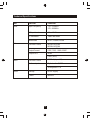
Size: 90x128mm
Size: 90x128mm
Important Safety Instructions
Please note there are no user serviceable parts in this unit.
Do not remove the cover or back for any reason. Refer all servicing to qualified
Guundig Service agent.
Do not expose the unit to rain or moisture, to prevent fire or electric shock hazards.
Do not expose the unit to any liquid or water (dripping or splashing) and no objects
filled with water, such as vases, should be placed on the unit.
Keep the product away from direct sunlight and any heat sources such as radiators
or stoves.
Do not block any of the ventilation openings. The openings on the unit are provided
for ventilation. The openings should never be blocked by placing your product on a
cushion, sofa or other similar surface.
Do not place the product on unstable cart, stand, tripod, bracket or table. The unit
may fall, resulting in possible damage or injury.
Only use the AC adapter included with product. Using any other adapter will void
your warranty.
Unplug the power from the outlet when the unit is not in use.
Only use attachments/accessories specified provided by the manufacturer.
The symbol indicates that dangerous voltages constituting a risk of electric
shock are present within this unit.
The symbol indicates that there are important operating and maintenance
instructions in the literature accompanying this unit.
This symbol indicates that this product incorporates double insulation
between hazardous mains voltage and user accessible parts .when
servicing use only identical replacement parts .
This marking indicates that this product should not be disposed with other
household wastes. To prevent possible harm to the environment or human
health from uncontrolled waste disposal, recycle it responsibly to promote
the sustainable reuse of material resources. Contact your retailer where the
product was purchased.
1
Introduction
Thank you for buying this Bush product, which is designed to give you many
years of trouble-free service.
You may already be familiar with using a similar unit, but please take time to
read these instructions. They are designed to familiarise you with the unit s
m any features and to ensure you get the very best from your purchase.
Safety is important
Your safety and the safety of others is impor tant. Please therefore, ensure you
read the Safety Instructions before you operate this unit.
Warranty
In the unlikely event that your product fails to work normally, please call the
below Bush warranty number for suppor t.
Bush Warranty: 1300 055 518
2
About the Set Top Box
This Set Top Box Receiver allows you to access Digital TV Channels and Radio
Broadcasts, you can also record your favourite TV programs via an external USB
or Hard Disk drive device whilst watching TV.
Main Features
Receives All High Definition Channels
Play, Pause and Record Live TV via USB Memory (USB Not Included)
USB Multi File Suppor t Including(MP3, MP4, JPEG) Photos, Music and Video
Formats
HDMI Suppor ts 1080P Video Output
7 Day Electronic Program Guide
Connect to TV via Composite & HDMI Video Output
Digital Audio via SPDIF Coaxial Output
Easy Menu System
Simple To Use Automatic Set Up System
Teletext (where applicable) with Subtitle Suppor t for the Hard of Hearing
Parental Control
Remote Control
Package Contents
Before installation, please check the items of the package.
The package should contain the following items:
~ Set Top Box
x1 pc
~ Remote Control
x1 pc
~ AAA Battery for the Remote Control
x1 p air
~ Instruction Manual
x1 pc
~ Composite RCA Cable
x1 p c
3
Table of Contents
Front and Rear Panel ...................................................................................... 5
Remote Control...............................................................................................6
Connections..................................................................................................8
First Time Installation......................................................................................9
Troubleshooting.............................................................................................17
Technical Specifications.................................................................................18
Warranty......................................................................................................19
4
Front and Rear Panel
1. Front panel
1
3
2
1. STANDBY INDICATOR: Displays when the unit is in Power mode and Standby mode.
The indicator will show as green when the unit is on and red when in standby.
2. REMOTE CONTROL SENSOR: Receives the signal from your remote control.
3. USB Input: The USB Input allows the unit to Record Live TV, Play multi-media files and
Upgrade software when available.
2. Rear panel
1
2
3
5
4
6
7
1. RF IN: This socket allows you to connect your external aerial.
2. RF LOOP THROUGH: This socket will by pass the RF signal to either your TV or
another video system.
3. COAXIAL: This socket allows you to connect the Set Top Box to on your surround
sound system.
4. HDMI OUT: This socket allows you to use your HDMI cable for a premium high
definition connection.
5. VIDEO: This socket allows you to connect your Set Top Box via Composite Video
Signal.
6.AUDIO L/R: This socket allows you to connect your Set Top Box to receive the Audio
L/R signal.
7.POWER INPUT: This socket is where you connect your main power to the unit.
5
Remote Control
1. LIST: Press the List Button to display your recorded
programs list.
2. MUTE: Press the Mute Button to switch off the Sound only.
Press again to restore audio output.
3. INFO: Press the INFO Button to display the current channel
information.
4. TTX: Press the TTX to enter the Teletext Menu.
5. SUBTITLE: Press the Subtitle Button to select the subtitle
setting.
6. EXIT: Press the Exit button to exit the current Menu or return
to the previous Menu.
7. OK: Press the OK Button to confirm settings or menu
selections. Also press to display the channel list.
8. RIGHT/LEFT: Press the Navigate Buttons to move through the
Menu options or to increases or decreases the volume.
9. TV/RADIO: Press the TV/Radio Button to switch between
from TV and Radio mode.
10. RECALL: Press the Recall Button to go back to the previous
channel you were watching.
11. GOTO: Press the GOTO Button to select the multimedia
option.
12. PREV: Press the Prev Button to skip to the previous track in
multimedia mode or timeshift in DTV mode.
13. NEXT: Press the Next Button to skip to the Next track in
multimedia mode or timeshift in DTV mode.
14. REPEAT: Press the Repeat Button to repeat play in multimedia mode.
15. STOP: Press the Stop Button to stop play in Multimedia.
16. REC: Press the Rec Button to record the program you are watching.
17. STANDBY: Press the Standby Button to turn the unit to standby.
18. EPG: (Electronic Program Guide) Press the EPG Button to enter the EPG
menu.
19. AUDIO: Press the Audio Button to change the audio settings.
20. UP / DOWN: Press the Navigate Buttons to scroll through the Menu or to scroll through the
channel list.
21. MENU: Press the Menu Button to enter the Main Menu.
22. FAVOURITE: Press the Favourite Button to enter the Menu.
23. 0-9 (Numeric Buttons): Press the Numeric Buttons to enter a channel directly or setting
information.
24. FWD: Press the FWD Button to Fast Forward in Multimedia or timeshift mode.
25. REV: Press the Rev Button to Rewind in Multimedia or timeshift mode.
26. PLAY: Press the Play Button to begin or resume play in multimedia mode.
27. PAUSE: Press the Pause Button to pause play in multimedia mode or to pause live TV.
28. COLOUR BUTTONS: Press the Colour Buttons to operate different functions in the Teletext
modes.
6
Installing the Batteries
Remove the battery cover from the Remote Control and put 2xAAA size batteries inside
the compartment.
The diagram inside the Battery Compartment shows the correct way to install the
batteries.
1.Open the cover
2.Install batteries
3.Close the cover
Using the Remote Control
To use the Remote Control, point it towards the front of the Digital Set Top Box. The
Remote Control has a range of up to 7 metres from the Set Top Box at an angle of up to
60 degrees.
The Remote Control will not operate if its path is blocked.
Sunlight or very bright light will decrease the sensitivity of the Remote
Control.
7
Connections
Caution: Make sure to check the voltage specification of the wall outlet is the same
rating with the receiver. To prevent the risk of electric shock, do not open the cover or
the back of the receiver.
TV Aerial
TV
VIDEO IN
YELLOW
(Audio)
(Video)
Coaxial Cable
Coaxial
Power Adaptor
Amplifier
Note: 1.When connecting the receiver to other equipment, e.g., TV, VCR and amplifier,
make sure to refer to relevant user manual for instruction. Also, make sure you
disconnect all the equipments from the mains supply before the connection.
8
First Time Installation
After all connections have been made properly and power is connected,
switch on the TV and the Set Top Box. When using the receiver for the first
time or after you have conducted a restore to Factory Default the
Installation Guide will appear on your TV screen.
(1) Select [OSD Language] and press the RIGHT/LEFT Navigate Buttons to select your
desired language
(2) Select [Country] and press the RIGHT/LEFT Navigate Buttons to select Australia
(3) Select [Channel Search] and press the RIGHT or OK Button confirm and begin the
automatic channel search
(4) Once the automatic channel search is complete, the first channel in the list will
appear on screen and you can now watch TV.
Basic Operation
Program Settings
To access the Main Menu, press the MENU Button and then select [Program] to adjust
the program settings. Press the OK or RIGHT to confirm any adjustments. Press the
EXIT button to exit the Menu.
Program Edit
In the Program Menu, you can edit the program settings. To edit your program
preferences (lock, skip, favourite, move or delete), you will need to enter the Program
Edit Menu. This Menu requires a password to access. Enter the default password
'000000'.
From the channel list shown in the Program Edit Menu you can select and edit channels
by following the below operations;
- Press the RED Button to move a highlighted channel
- Press the GREEN Button to skip a highlighted channel
- Press the YELLOW Button to lock a highlighted channel
- Press the BLUE Button to delete a highlighted channel
- Press the FAV Button to select and add a channel to your favourite list. You can set your
favourite shows to four different favourites lists - Movies, Music, News and Sports.
9
Setting Favourite Programs
The Favourite function in the Program Edit Menu allows you to create four shortlists of
favourite programs that you can easily access.
To set a TV program or radio station to your favourites list, please follow the below:
1. Press the Menu Button and use the Navigation Button to highlight the 'Program Edit'
option and press [OK].
2.Press the Navigation Buttons to select and highlight the channel you want to add
and then press the Fav Button to add to favourites. Use the Navigation Buttons to
select the favourite list (Movie, Music, News & Sports) you wish the program to be
saved to and press the OK Button to confirm.
Viewing Favourite Program
1. Press the Favourite Button and the Favourite Menu will appear.
2. Press the Up/Down Navigate Buttons to scroll through your Favourite Programs.
3. Press the OK Button to select and play your favourite program.
Deleting a TV or Radio Program
1. Press the Favourite Button and the Favourite Menu will appear.
2. Press the Up/Down Navigate Buttons to scroll through your Favourite Programs.
3. When you have found the program you wish to delete, press the Blue Button on your
remote control and the program and heart-shaped symbol will be removed.
4. Press the OK Button to confirm.
Setting a TV or Radio Program to Skip
1. Tune your TV to the program you wish to skip and then press the Green Button on
your remote control. A skip symbol will be displayed next to the program in the
program list.
2. Repeat step one to select and set more programs.
3. To confirm and exit the Menu, press the Exit Button
If you have incorrectly set a program to skip, press the Green Button again and the
selection will be disabled and the skip symbol will disappear.
Moving a TV or Radio Program
1. In your channel list select the program you wish to move and then press the Red
Button on your remote control. A move symbol will appear next to the program.
2. Press the Up/Down Navigate Buttons to move the selected program.
3. Press OK to confirm.
4. Repeat the above steps to move more channels.
Locking a TV or Radio Program
As apart of the parental lock function, you can lock a selected program to restrict it
from being viewed by children. To lock a particular program follow the below steps:
1. Tune your TV to the program you wish to lock and then press the Yellow Button on
your remote control. A lock-shaped symbol will be displayed next to the program in
the program list and it is now locked.
2. Repeat step one to select and lock more programs.
3. To confirm and exit the menu, press the EXIT Button.
4. Press the Yellow Button again to disable the locked program.
5. To view a locked program, you will be require to enter either the default password
'000000' or your last set password.
10
Electronic Programme Guide (EPG)
The Electronic Programme guide, is an on-screen TV guide which shows the scheduled programmes
for the next seven days.
Using the Electronic Programme Guide
1. Press the [EPG] button to enter the on-screen guide.
2. Press the
&
Navigation Buttons to scroll through the TV programmes on screen.
3. Press the
&
Navigation Buttons to scroll through the TV channels.
4. Press the Red Button to skip forward one day or press the Green Button to view the previous day.
5. To set a reminder in the EPG Menu, press the INFO Button and then press the RED Button to begin
setting the reminder. Follow the on-screen instructions to complete the reminder setting. When the
reminder has been set and is activated a reminder window will pop on the screen when the program is
about to start.
Sorting your Channel List
The Sort function in the program settings allows you to arrange the program list in
your desired order.
[LCN] - Sort the channels in ascending order
[Name] - Sort the channels in alphabetical order
[Service ID] - Sort the channels according to the station
[ONID] - Sort the channels according to ONID
LCN (Logical channel number)
You can set that Channel list to automatically be arrange by LCN. Select this option in
the program menu to set it to on or off.
11
Picture Setting
To access the Picture Menu, press Menu Button then select the [Picture] sub-menu. The
Picture menu allows you to adjust the picture and video settings. Press the Up/Down
Navigate Buttons to select an option and press the Right/Left Navigate Buttons to adjust
that setting. Press the Exit Button to exit the menu.
Aspect Ratio
The Aspect Ratio allows you to set the TV screen display. You can choose between either
4:3 PanScan, 4:3 Letter Box, 4:3 Full, 16:9 Widescreen or Auto. 16:9 pillar box, 16:9
Pan&scan
Resolution
The Resolution allows you change the picture quality. You may want to adjust this setting
if you are having issues with your TV picture image. You can choose between; 480i, 480P,
576i, 576P, 720P and 1080I , 1080P(50Hz)
TV format
The TV format refers to your the system by which your Set TopBox receives its TV signal.
Channel Search
If you wish to conduct a channel search your will need to go to the Channel Search Menu.
Press the Menu Button and then select [Search Channel] option. The Channel Search
Menu allows you to select what type of search you would like to conduct. Press the
Right/Left Navigate Buttons to select the Channel Search option you wish to use. Press
the OK Button to confirm and press the Exit Button to exit.
Auto Search
In the Channel Search Menu you can select Auto Search, which means the TV will
automatically search and store all available channels.
1. Select the [Auto Search] option and press the OK or Right Navigate Button to conduct
an Automatic Channel Search.
2. To cancel the channel search, press the Exit Button.
12
Manual Search
In the Channel Search Menu you can select Manual Search, which means you can
manually select the channels you wish to search for and store in the channel list. You
can use this option to add new channels to the channel list with out replacing the whole
list.
1. Select the [Manual Search] option and press the OK or Right Navigate Button to begin.
2. Once in the Manual Search option, press the Right/Left Navigate Buttons to select
the channel frequency of the channel you wish to find and store.
3. Press the OK Button to then scan for the frequency selected. When the channel is
found it will be added to the channel list.
Country
In the Channel Search Menu you can change your country of residence.
Antenna Power
In the Channel Search Menu you can turn setting on or off if you have an external
antenna connected.
Time Menu
To access the Time Menu, press the Menu Button and then select the [Time] option.
The Time Menu allows you to adjust the time settings. Press the Up/Down Navigate
Buttons to select a desired option and then press the Right/Left Navigate Buttons to
adjust the setting. Press the OK Button to confirm and the Exit to exit the menu.
Time offset
In the Time Menu you can set the Time offset to auto or manual. Manual will allow you to
adjust the GMT offset time.
Country Region
In the Time Menu you must set your Country Region when the [Time Offset] is set to
Auto.
Time Zone
In the Time Menu you must set the Time Zone Offset when [Time Offset] is set to Manual.
13
Auto Standby
Auto Standby (inactivity setting) is used to put the Set Top Box into standby if a button hasn't
been pressed for 3 hours. The default setting of the Set Top Box is Off.
Option
To access the Option Menu, press the MENU Button and then select the [Option] Menu. The
Option Menu allows you to adjust the OSD Language, Subtitle Language and Audio Language
settings. To select an option in the Option Menu press the Right/Left Navigate Buttons to
adjust. Press the Exit Button to exit the Menu.
OSD Language
In the Option Menu you can select and adjust the OSD Language.
Audio Language
In the Option Menu you can select your preferred audio language. If the language is not
available, the default program language will be used.
Subtitle Language
In the Option Menu you can select your select the preferred subtitle language.
Digital Audio
In the Option Menu you can select your digital audio connection.
System Setting
To access the System Setting Menu, press the Menu Button and then select [System] Menu.
The System Settings Menu allows you to adjust and view the System Settings. Press the
Right/Left Navigate Button to adjust the settings. Press the Exit Button to exit at any time.
Parental Guidance
In the System Setting Menu you can restrict access to channels that are unsuitable for
children. To restrict/lock undesirable channels you will need to enter either the default
password
'000000' or your own password.
Set Password
To set or change the password for locked programs. Enter your old password or the default
password '000000'. You will then be asked to enter the new password and then confirm by reentererig your new password. Once it is confirmed, press the Exit Button to exit the Menu.13
14
Factory Default
In the System Setting Menu you can select the Factory Default option to conduct a
settings reset. In the Main Menu, select [Factory Default] and then press OK or Right
to select. You will then need to enter your password or the default password '000000'
to gain access to this section. Press the OK Button to confirm. Conducting a Factory
Reset will delete all preset channels and settings.
Information
In the System Setting Menu you can select the Information option to view the model,
hardware and software information.
Software Update
From time to time new software may by available for your digital box, which can be
updated by receiving the software via your aerial or via the USB port.
USB is primarily for Software Upgrade, however it does support movie playback.
To access the USB Menu, press the MENU Button and select [USB] using the
Right/Left Navigate Buttons. The USB Menu allows you to play Music, Photo and
Multimedia files. It can support AVI, WMA, JPEG and BMP formats. The unit will only
support USB device with FAT32 file system.
A. Multimedia
When a USB device is connected, you can select from the Music, Photo or Movie
modes using the Right/Left Navigate Buttons and then pressing the OK Button. If a
USB device is not connected, the warning message "No USB device is Found" will
appear.
1.Music: To listen to music via your USB, use the Navigation Buttons to select the file
you wish to play and the use the Play, Pause and Stop Button to play MP3 and WAV
music files.
2.Photo: To play an image slideshow or view images from your USB, use the
Navigation Buttons to select the image files you wish to view. You are able to open
JPEG and BMP image files. If the files are in the main folder on the USB they will appear
in thumbnail format on the screen otherwise the folders on your USB will be displayed.
15
3.Movie:To watch movies via your USB, use the Navigation Buttons to select the file
you wish to play and then use the Play, Pause and Stop Button to play MPEG2, XVID,
AVI, MKV and VOB video files.
Please Note: Not all profile's are supported.
4. PVR: You can record live TV straight to your USB storage device (pendrive / hard
disk) by inserting the USB into the side of the unit and pressing the Record Button to
start the recording. To stop recording, press the Stop Button.
To play a recorded file, press the List Button to enter the recorded file list. Then use
the Navigation Buttons to select the file you wish to play. You can use the Play/Pause
Button to play or pause recorded files and the Stop Button to stop playback.
B. Photo configure
-Slide Time: when displaying pictures, you can adjust the picture slide show internal
from 1 to 8 seconds.
-Slide Mode: when displaying pictures, there are 60 different slide show modes
(mode 0 to 59) plus a random mode.
-Aspect Ratio: Keep displays the picture as its original aspect,
Discard displays the picture in full screen mode.
C. Movie Configure
- Aspect Ratio:
[Keep]: Play movie as its original aspect.
[Discard]: Play movie in full screen mode.
- Subtitle Specific:
[Small]: Displays the subtitle as small mode.
[Normal]: Displays the subtitle as normal mode.
[Big]: Displays the subtitle as big mode.
- Subtitle BG:
[White]: Displays the subtitle in white background.
[Transparent]: Displays the subtitle in transparent background.
[Grey]: Displays the subtitle in grey background.
[Yellowgreen]: Displays the subtitle in yellowgreen background.
[White]: Displays the subtitle in White background.
- Subtitle Font Color:
[Red]: Displays Subtitle in red font.
[Blue]: Displays Subtitle in blue font.
[Green]: Displays Subtitle in green font.
[White]: Displays Subtitle in white font.
[Black]: Displays Subtitle in black font.
16
Please Note:
- Not all USB devices may be supported by this unit and we assume no responsibility for any loss of
data that may occur.
- Large data files may take longer to read, please be patient while the USB loads.
- Some USB devices may not be recognised as the unit will only support USB devices with the FAT32
file system.
- We recommend formatting the USB first before recording. Please follow the below instructions on
how to format your USB.
D. PVR configure
Once your USB Device has been inserted into the side of the unit, press the Menu Button and then press
the (Left/Right) Navigation Buttons to select USB mode. Press the Enter Button to confirm and enter the
USB mode. Then use the (Up/Down) Navigation Buttons to select the "PVR configure" Menu and then
press the Right Navigation Button to enter the "PVR configure" Menu. This Menu will allow you to
format your USB device and ensure it is ready for recording.
In PVR Configure mode, you will be asked to do the following;
[RECORD DEVICE]:This will allow you to set your USB device to record. Use the (Up/Down) Navigation
Buttons to select the "RECORD DEVICE" option and press the Right Navigation Button to enter the
"RECORD DEVICE" option and automatically set the USB for recording.
[FORMAT]:This will allow you to format and clear your USB for recording. Use the (Up/Down)
Navigation Buttons to select the "FORMAT" option and then press the Right Navigation Button to enter
the "FORMAT" option. Press the Enter Button to begin formatting your USB Device.
Troubleshooting
Problem
Potential Reasons
What to do
No picture
Power isn't connected
Connect the power
Power is not on
Switch on the power
No Picture
No Sound
The Remote Control is
not responding
Record function is not
available
Video Cables not connected
Ensure Video Cables are
connected properly
Picture Settings are incorrect
Conduct a Factory Reset to
clear all Settings
Audio Cables are not
connected
Connect the Audio Cables
as outlined
Mute function is on
Turn off mute by pressing Mute
Button again or by increasing the
volume
The Batteries are dead
Replace the batteries
There are obstructions between
the remote control and the
sensor
Move any obstructions between
the remote control and the sensor
and ensure you follow the remote
instructions
Disk space is full already.
No disk detected.
The format of Disk is not
supported.
Check the Disk before recording.
ensure the format of disk is FTA32.
If using USB device,ensure the
USB version is higher than 2.0.
17
Technical Specifications
Item
Sub Item
Parameter
Tuner
Input Frequency
170~230MHz
470~860MHz
RF Input level
-25~-78dBm
IF Bandwidth
7MHz and 8MHz
Modulation
QPSK,16QAM,64QAM
Decoder Format
MPEG2 MP@ML
MPEG4 MP@ML
Output Format
576P, 720P, 1080i,1080P
Output Port
HDMI
Video
CVBS (RCA)
Audio
Decoder Format
MPEG-1 (layer1&2)
Audio output
Digital audio: S/PDIF
Analog audio: L/R
Power
Voltage
DC 5V Supply
Power
Max 8W
18
Warranty
Please keep your receipt as proof of purchase. This product is warranted for any
defect in materials or workmanship for one year after the original date of purchase.
This product is for normal domestic and office use only.
This warranty does not cover damage from misuse or neglect, accidental damage,
vermin infestation, excessive voltages such as lightning or power surges or any
alteration that affects the performance or reliability of the product.
Our goods come with guarantees that cannot be excluded under the Australian
Consumer Law. You are entitled to a replacement or refund for a major failure and for
compensation for any other reasonably foreseeable loss or damage. You are also
entitled to have the goods repaired or replaced if the goods fail to be of acceptable
quality and the failure does not amount to a major failure.
In the unlikely event that your product fails to work normally, please contact the Bush
Warranty on 1300 055 518 and have your receipt of purchase on hand.
This guarantee is subject to the following provisions:
It is only valid within boundaries of the country of purchase
The product must be correctly assembled & operated in accordance with the
instructions contained in the manual
This product must be used solely for domestic purposes
The guarantee does not cover accidental damage
The guarantee will be rendered invalid if the product is resold or has been damaged
by inexpert repair
The manufacturer disclaims any liability for incidental or consequential damaged
This guarantee is in addition to, & does not diminish, your statutory or legal rights.
PO BOX 6287,
SILVERWATER NSW 1811
www.bushaustralia.com.au
Bush Warranty : 1300 055 518
19