1
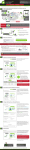
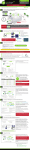
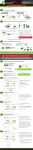
? Need Help? Give us a call.
Phone: 888-573-8820
Email: [email protected]
Web: www.ampedwireless.com/support
SETUP GUIDE
—
R E A D
F I R S T
—
SR300
High Power Wireless-N Range Extender / Smart Repeater
1
Find an optimal setup location between your wireless router and
your wireless dead zone
RECOMMENDED
SIGNAL STRENGTH
>70%
Wireless
Router
Range Extender /
Smart Repeater
Internet
Home/Office Network
Dead Zone
IMPORTANT:
RECOMMENDED
SIGNAL STRENGTH
PLACE THE RANGE EXTENDER / SMART REPEATER IN A LOCATION
WHERE IT CAN RECEIVE A STRONG SIGNAL FROM YOUR WIRELESS ROUTER
>70%
This can be done before or after setup is complete. The Range Extender / Smart Repeater will save your settings.
2
Connect your Computer to the Range Extender
Attach the two included antennas.
Connect the included network cable to an
available network port on your computer.
Attach the Power Adapter to the Range
PWR
Extender’s
port and an
available power outlet.
3
Open your web browser
Enter the setup web address into your browser:
http://setup.ampedwireless.com
If the URL fails to open try: http://192.168.1.240
Recommended browsers: Google Chrome, Safari or Internet Explorer (8.0 and up). Do not use Firefox.
IF YOU HAVE PROBLEMS ACCESSING THE WEB MENU...
Disconnect your PC from all wireless networks, open your browser and try again.
Windows 7 & Vista
(example)
1) Click on the Wireless icon to see available wireless networks
Wireless Network
(For Vista, click Start > Connect To).
Wireless Network
2) Select your current wireless network and click Disconnect.
3) Power the Range Extender off and back on
and try http://setup.ampedwireless.com again.
If you are still having trouble accessing the web menu, disconnect the cable from your computer to the Range
Extender. Connect wirelessly using the SSID: Amped_Wireless and Password: wireless and try again.
Accessing the Smart Setup Wizard does not require Internet access. The menu is served from the Range Extender.
4
Welcome to the Smart Setup Wizard
The wizard will guide you through the
setup of your Range Extender.
Click Next to begin.
5
Scan for a Wireless Network to Repeat
Click Scan to begin scanning for nearby
wireless networks.
Highlight and select the wireless network that
you wish to repeat.
Recommended Signal
>70%
Select the wireless network with
a signal strength greater than 70%
for the most reliable connection.
Poor signal connections may cause slow speeds
or dropped connections.
Click Next to continue.
If you do not see your desired wireless network,
move the Range Extender closer to the router and
scan again as it may be out of range.
6
Home Network Security Settings (If necessary)
If your wireless home network has security
enabled, you will need to enter the security
key here.
If your wireless home network does not have
security enabled, leave the security field
blank.
Click Next to continue.
7
Configure Settings for your Extended Network
The ID of your Extended Network is:
Amped_Wireless
To change it, enter a new name in the SSID field.
Users connecting wirelessly to the Range Extender
will use this ID to identify your Extended Network.
The default Security Key (WPA) of your Extended
Network is: wireless
To change it, enter a new key in the Security Key
field. The key must be at least 8 characters long.
Click Next to apply your settings. The Range
Extender will reboot. This process may take up
to 2 minutes. Do not refresh the web page.
The page will automatically reload with the
connection status.
8
Setup Summary
Congratulations, the Range Extender is now
successfully configured. Your settings are now
saved. You may now detach the Ethernet cable
from your computer and connect wirelessly to
the Range Extender.
If you haven’t already positioned your Range
Extender in an optimal location, you may do so
now. All Range Extender settings are saved and
can be safely powered off for relocation.
You may also attach any wired network
devices to the wired ports on the back of
the Range Extender.
If there was a problem with your configuration,
the Smart Setup Wizard will inform you to restart
the Wizard and select another network to repeat.
If you continue to experience problems, please
contact Amped Wireless Elite Support:
Phone: 888-573-8820
Email: [email protected]
Web: www.ampedwireless.com/support
This is the second page of the Setup Guide. Start on the opposite side first.
SR300
High Power Wireless-N Range Extender / Smart Repeater
How to Connect your Wireless Computer to the Range Extender
Windows 7 and Vista
A. Click on the Wireless icon to see available
wireless networks (For Vista, click Start >
Connect To). Select the "Amped_Wireless"
network and click Connect.
B. When prompted, enter the wireless
security key "wireless" and click OK.
Mac OS X
A. Click on the Wireless icon to see available
wireless networks. Select the "Amped_Wireless"
network and click Connect.
B. When prompted, enter the wireless
security key "wireless" and click OK.
Amped_Wireless
Amped_Wireless
Wi-Fi Protected Setup (One-Touch Setup or Push Button Configuration)
If your wireless adapter has WPS one-touch setup you can use it when connecting to the Range
Extender. Hold down the WPS button on the Range Extender (back panel) for 3 seconds. The WPS
LED will begin to blink. As it blinks, push the WPS button on your wireless adapter or enable WPS
with the provided software for your wireless adapter.
Using the Smart Features on your Range Extender
The Range Extender is equipped with many powerful security features which can be accessed
through the web menu under Smart Features on the left side of the web menu:
12:26
Wireless Access Scheduling
Control when your Wi-Fi is on/off
Menu Location: Smart Features > Access Schedule
User Access Control
Restrict network access to specific users
Menu Location: Smart Features > User Access
Wireless Coverage Control
Adjust the distance of your wireless network
Web Menu (Left Side)
Menu Location: Smart Features > Wireless Coverage
If you are unfamiliar or want more information on how to set up Smart Features, please refer
to the User’s Guide on the included CD.
Setting the Range Extender’s System Clock
In order for your Access Schedules and logs to perform using the correct time stamps and
schedules you will need to set your System Clock. To do so, go under Management and
access the System Clock tab to sync the System Clock with your computer’s time.
Tips: Trouble Accessing the Smart Setup Wizard
PROBLEM: The Setup Wizard does not appear when you enter the setup web address.
Enter the setup web address into your browser:
http://setup.ampedwireless.com
If the URL fails to open, then try: http://192.168.1.240
SOLUTION: Disconnect your computer from all Wi-Fi networks and try again.
Your computer should be connected to the Range Extender with the included Ethernet cable.
a
Disconnect your computer from
all wireless networks.
b
Enter http://setup.ampedwireless.com
into your web browser again.
NOTE: Your computer does not need Internet to access the Smart Setup Wizard.
Windows XP:
Windows 7:
Wireless Network
Wireless Network
Click the Wireless Signal icon from bottom right corner.
Select your network and click Disconnect.
Right click the Wireless Signal icon from bottom right corner.
Click View Available Wireless Networks, select your network and click Disconnect.
If you continue to have problems accessing the Smart Setup Wizard:
a Reboot the Range Extender, disconnect your computer from all wireless networks and try again with the Ethernet cable. If this fails, try...
b Disconnect the cable from your computer to the Range Extender. Connect via wireless adapter to the Range Extender's
wireless network: Amped_Wireless. When prompted, enter the security key: wireless. Once connected, open your web browser and try:
http://setup.ampedwireless.com. If this fails, please contact our support department for assistance.
Tips: Power Outages, Rebooting Routers and Channel Changes
Wireless routers operate on specific wireless channels to avoid interference with neighboring networks. Some
wireless routers are set to automatically scan for the best wireless channel. A power outage, or a simple reboot,
may cause your home wireless router to change its wireless channel and cause the Range Extender to disconnect
from your home network.
To fix this issue, simply log onto the Range Extender’s web menu by opening your web browser and accessing
http://setup.ampedwireless.com. If the page does not load, try resetting the Range Extender by holding down
the reset button on the back panel for five to ten seconds. After the Range Extender has rebooted, open your
web browser and try again.
When the Web Menu appears, run through the Smart Setup Wizard again to reconfigure the connection to your
Home Network.
To prevent the channel changing issue from occurring in the future, you may log onto your router’s web menu
and set the wireless channel from automatic to a static channel number. You will need to reconfigure the Range
Extender with the new channel. If you are not sure how to access your router’s setup menu, please contact the
router’s manufacturer for further support.
Tips: Autoloading Web Menu
When the Range Extender loses its connection with your Home Network, the Web Menu will automatically load on
your web browser. All web address entries will be redirected to the Smart Setup Wizard of the Range Extender. This
redirect feature is meant to notify and help you to easily re-configure your Range Extender in the event of a
disconnection. You may disable this feature through the web menu (left side): IP Settings > Auto-DNS.
Troubleshooting Tips
PROBLEM:
SOLUTIONS:
PROBLEM:
SOLUTIONS:
PROBLEM:
SOLUTIONS:
I cannot connect to my Home Network. I received an error when running the Smart Setup Wizard.
a. Your Home Network may be secured. Double check that you have the correct security key to connect to
the Home Network.
b. Try adjusting the channel number of your Home Network’s router to channel 5 thru 11. Then attempt the
Smart Setup Wizard again.
c. Reboot your Home Network router and try to connect again using the Smart Setup Wizard.
d. Check to see that your Home Network router’s DHCP server is enabled. The Range Extender needs to obtain
an IP from your Home Network router.
My Range Extender was working fine previously, but now I can no longer access the Internet through the Range Extender.
a. The connection to your Home Network may have been dropped or the router settings may have changed. Changes
to the router could be a result of several events, such as a power outage. When this occurs, connect to the Range
Extender and access the setup menu using the web address: http://setup.ampedwireless.com
Run the Smart Setup Wizard to reconnect the Range Extender to your network.
b. The Range Extender may be too far from your home router and not maintaining a signal strength of above 70%.
Check the signal strength between the router and the Range Extender through the web menu (left side):
More Settings > Management > Repeater Status. The Signal Strength readout will be under the Home Wireless
Network Settings section. This Signal Strength must be above 70%. If it is below, move the Range Extender closer
to your router, or reposition the Range Extender.
I cannot find my Home Network when scanning for wireless networks in the Smart Setup Wizard.
a. The Range Extender may be out of range. Move the Range Extender closer towards the wireless router and try
the Setup Wizard again from the web menu.
b. Make sure that your Home Network’s wireless SSID is broadcasting and not hidden. Hidden SSIDs will require
that you manually enter the SSID into the Wireless Settings > Home Network menu.
If you continue to have issues setting up the Range Extender, give us a call — we’re here to help: 888-573-8820
Visit our website for more support information and answers to frequently asked questions: www.ampedwireless.com/support
Amped Wireless
A Division of Newo Corporation
Copyright © 2011 Amped Wireless / Newo Corporation. All rights reserved.
Amped Wireless, Newo Corporation, the Amped Wireless logo are registered trademarks or trademarks of Newo Corporation.
v070312