1
Cinema Rhapsody
Dolby Digital® & DTS®
Audio•Video Preamplifier
with THX® Enhancements
1200/19200 Baud
Operations &
Installation Manual
For the Cinema Rhapsody with Version 2.00 Software
© Copyright 2000, Audio Design Associates, Inc., All Rights Reserved.
Audio Design Associates, Inc., 602-610 Mamaroneck Ave., White Plains, NY, 10605, (914) 946-9595, FAX (914) 946-9620
Contents
Safety Instructions & Electrical Warning ..................................................... 1
AC Connections ............................................................................................. 2
Power Amplifier (& Powered Subwoofer) Connections ......................... 3
Introduction - Front Panel Controls & Displays .......................................... 4
Power On, Mute, Off, & Master Volume Control ..................................... 5
Input Selection - Dialing in the desired component. .............................. 6
Mode Indicators & How They Function ................................................... 7
Mode Selection & Dolby Digital Mode Descriptions .............................. 8
Dolby Digital Modes (AC-3) ...................................................................... 8
Dolby Digital Modes (AC-3) - cont............................................................ 9
DTS Modes ............................................................................................... 10
Pro Logic & Auto Modes ......................................................................... 11
Stereo, Phantom, & Music Modes .......................................................... 12
3 Channel, Quad, Stereo Enhance, and Mono Enhance ...................... 13
Record Selector ....................................................................................... 14
Rear Panel Inputs & Outputs .................................................................. 15
Out Of The Box Setup .................................................................................. 16
Laser Disc or Combination Laser Disc/DVD Player ............................. 18
Laser Disc Player without a Digital Output (or 2nd Laser) .................. 20
DVD Player ............................................................................................... 22
VCR ........................................................................................................... 24
DSS or Satellite Receiver ........................................................................ 25
Cable or TV Tuner .................................................................................... 26
CD Player.................................................................................................. 27
Tuner ......................................................................................................... 28
Cassette .................................................................................................... 29
Auxiliary Input.......................................................................................... 30
Record Output Connections................................................................... 31
Connection To Your TV, Projector, or Line-Doubler ............................. 32
Audio Setup ................................................................................................. 33
Custom Setup
A/V Linking ............................................................................................... 36
Auto Mode ................................................................................................ 37
Labeling Inputs ........................................................................................ 39
Turn-On Input ........................................................................................... 40
Default Mode ............................................................................................ 41
Turn On Volume ....................................................................................... 42
Display Illumination Level ...................................................................... 43
Pro Setup ...................................................................................................... 44
Delay Setup .............................................................................................. 45
Network Bus ............................................................................................. 48
Final Input ................................................................................................ 49
Speaker System Setup - Bass Management ......................................... 50
IR Receiver On & Off Control ................................................................. 51
Bass Peak Limit Manager ....................................................................... 52
HDR & LDR Scale Factors ...................................................................... 53
THX - Re-EQ, Timbre Match, & Decorrelate ......................................... 54
Auto-Balance ........................................................................................... 55
Repeat Count ........................................................................................... 56
Analog Gain Control................................................................................ 57
PCM Scale Factors .................................................................................. 58
Input Format ............................................................................................. 59
Network Baud .......................................................................................... 60
Auxiliary DC Triggers .............................................................................. 61
Effect Delay .............................................................................................. 62
Effect Level .............................................................................................. 63
Appendix A - Solo Channel Test ................................................................. 64
Appendix B - Resetting Factory Defaults .................................................. 65
Appendix C - Master Reset Power Button (Vacation Switch) .................. 66
"Dolby, "AC-3", "Pro Logic", and the double-D symbol are trademarks of Dolby Laboratories Licensing Corporation.
Confidential Unpublished Works. © Copyright 1992-1997, Dolby Laboratories, Inc. All Rights Reserved. Manufactured
under license from Lucasfilm Ltd. Lucasfilm, THX, Re-EQ, Timbre Matching, Adaptive Decorrelation, Bass Peak Level
Manager and Loudspeaker Position Time Synchronization are trademark of Lucasfilm Ltd. Manufactured under license
from DTS Technology, LLC. DTS Digital Surround is a trademark of DTS Technology LLC. ©1998, Audio Design Associates,
Inc. All rights reserved. Technical data and information contained in this manual is subject to change without notice.
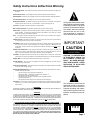
Safety Instructions & Electrical Warning
READ INSTRUCTIONS - All the safety and operating instructions should be read before the appliance is
operated.
RETAIN INSTRUCTIONS - The operating instructions should be retained for future reference.
HEED WARNING - All warnings on the appliance and in the operating instructions should be adhered to.
FOLLOW INSTRUCTIONS - All operating and use instructions should be followed.
WATER AND MOISTURE - The appliance should not be used near water - for example, near a bathtub,
washbowl, kitchen sink, laundry tub, in a wet basement, or near a swimming pool, etc.
LOCATION - The appliance should be installed in a stable location.
WALL OR CEILING MOUNT - The appliance should not be mounted to a wall or ceiling.
VENTILATION - The appliance should be situated so that its location or position does not interfere with its
proper ventilation. For example, the appliance should not be situated on a bed, sofa, rug or similar
surface that may block the ventilation openings.
HEAT - The appliance should be situated away from heat sources such as radiators, heat registers,
stoves, or other appliances that produce heat.
The lightning flash with the arrowhead, within an equilateral triangle,
is intended to alert the user of the
presence of uninsulated "dangerous voltage" within the product's
enclosure that may be of sufficient magnitude to constitute a
risk of electrical shock to persons.
POWER SOURCES - The appliance should be connected to a power supply only of the type described in
the operating instructions or as marked on the appliance.
GROUNDING - Make sure that this unit is always connected to a standard three-prong grounded outlet
(the circular pin is ground). When operating this unit at a higher voltage with a different power cord
configuration, consult your dealer for the proper power cord/outlet combination to use before operating this unit.
POWER CORD PROTECTION - Power supply cords should be routed so that they are not likely to be
walked on or pinched by items placed upon or against them, paying particular attention to cords at
plugs, convenience receptacles, and the point where they exit from the appliance.
CLEANING - The appliance should be cleaned only with a polishing cloth or a soft dry cloth. Never clean
with furniture wax, benzine, insecticides or other volatile liquids since they may corrode the face plate.
POWER LINES - An outdoor antenna should be located away from power lines.
NONUSE PERIODS - The power cord of the appliance should be unplugged from the outlet when left
unused for a long period of time.
OBJECT AND LIQUID ENTRY - Care should be taken so that objects do not fall and liquids are not spilled
into the enclosure through openings.
IMPORTANT
CAUTION
RISK OF ELECTRIC SHOCK
DO NOT OPEN
CAUTION: TO PREVENT RISK
OF ELECTRICAL SHOCK, DO
NOT REMOVE COVER (OR
BACK). NO USER-SERVICEABLE PARTS INSIDE. REFER
SERVICING TO QUALIFIED
SERVICE PERSONNEL.
DAMAGE REQUIRING SERVICE - The appliance should be serviced by an authorized service center or
qualified service personnel when:
•
•
•
•
•
The power supply cord or plug has been damaged; or
Objects have fallen, or liquid has been spilled into the appliance; or
The appliance has been exposed to rain; or
The appliance does not appear to operate normally or exhibits a marked
change in performance; or
The appliance has been dropped; or the enclosure has been damaged.
SERVICING - The user should not attempt to service the appliance beyond that described in the operating
instructions. For all other service requirements, the user should contact an Authorized Dealer or
Service Center.
WARNING:
TO REDUCE THE RISK OF FIRE OR ELECTRICAL SHOCK, DO NOT EXPOSE THIS APPLIANCE TO
RAIN OR MOISTURE. REPLACE FUSE ONLY AS MARKED.
CAUTION:
TO PREVENT ELECTRIC SHOCK, DO NOT PLUG THIS UNIT INTO ANY OUTLET OR EXTENSION
CORD WITHOUT THE STANDARD THREE-PRONG CONFIGURATION, WHERE THE CIRCULAR HOLE
IS USED FOR THE GROUND PLUG. ANY UNITS NOT SOLD IN THE UNITED STATES OR CANADA
ARE NOT SUPPLIED WITH A POWER CORD. THEREFORE, AN AUDIO DESIGN ASSOCIATES DEALER
SHOULD BE CONSULTED BEFORE CONNECTING THIS UNIT TO ANY POWER SOURCE.
The exclamation point within the
equilateral triangle is intended to
alert the user of the presence of
important operating and maintenance (servicing) instruction in the
literature accompanying the appliance.
LINE VOLTAGE SELECTOR SWITCH AND REMOVABLE POWER CORD:
THIS UNIT IS EQUIPPED WITH A VOLTAGE SELECTOR SWITCH. IN MOST CASES, THIS SWITCH
WILL REMAIN IN THE 115V POSITION (SEE PICTURE BELOW), WHICH IS HOW THE UNIT LEAVES
THE FACTORY. HOWEVER, IF YOU WANT TO OPERATE THE UNIT IN AN AREA THAT USES THE
230V SETTING, CONSULT YOUR DEALER BEFORE PLUGGING THE UNIT IN. IN A CASE WHERE
THE 230V SETTING WOULD BE NEEDED, AUDIO DESIGN ASSOCIATES WILL NOT PROVIDE A POWER
CORD FOR THE UNIT. THEREFORE, THE USER MUST CONSULT AN AUTHORIZED DEALER OR
ADA TO OBTAIN THE PROPER POWER CORD, AS WELL. MAKE SURE THAT THE VOLTAGE SELECTOR SWITCH IS IN THE PROPER POSITION AND THAT YOU HAVE THE CORRECT POWER CORD
BEFORE THIS UNIT IS PLUGGED IN AND OPERATED!
115 V
Page 1
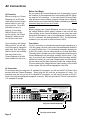
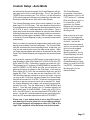
AC Connections
Before You Begin
As you remove the Cinema Rhapsody from its packaging, inspect
the condition of the component prior to proceeding with the following steps for AC connection. In the event that the Cinema Rhapsody appears to have suffered cosmetic damage due to shipping,
please contact your Authorized ADA Dealer immediately and do not
proceed to plug the unit into an AC outlet.
AC Connection
Before you plug your Cinema
Rhapsody into an AC outlet,
make certain that the voltage
selector switch is set to the
proper position. Since ADA
tests each unit prior to
shipping, if the Voltage
Selector Switch is in the
correct position, the Cinema
Rhapsody’s safety fuse will
also be the correct value.
Caution
Before plugging your Cinema Rhapsody into an AC outlet, check
the Voltage Selector Switch setting, located on the units left side
(when looking at the Cinema Rhapsody from the front) and make
certain that the selector is set to your appropriate voltage position.
For U.S. customers, this setting should be 115V. For international
customers, you may need to set this switch to 230V.
If you are altering the Voltage
Selector Switch, you will also
most likely need to change the
safety fuse. Both the Voltage
Selector Switch and the Safety
Fuse are located on the
Cinema Rhapsody’s left side
(when viewed from the front.)
Fuse Values
For U.S. customers or international customers also operating on a
115V AC system, the fuse value of the Cinema Rhapsody should be
a 1 Amp Slow Blow fuse. For international customers operating on
a 230V AC system, the fuse value should be 1/2 Amp Slow Blow.
The safety fuse is located next to the Voltage selector switch on the
Cinema Rhapsody’s left side (when viewing it from the front.) Typically, if you receive the Cinema Rhapsody with the voltage selector
already set correctly for your local voltage system, the corresponding fuse value has also been inserted to match the voltage setting.
If you are altering the Voltage Selector Switch setting, you will need
to also replace the fuse with the appropriate value fuse.
AC Connection
For customers who are using the U.S. standard AC receptacle, you will use the EIC AC Power Cord
provided with the Cinema Rhapsody. Simply plug this AC cord into an operative AC outlet. For
customers who are using a non-U.S. standard AC receptacle, you will need to acquire an EIC AC
Power Cord with the appropriate receptacle connector. ADA only provides AC Power Cords with the
U.S. standard AC prongs.
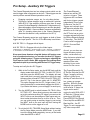
VIDEO INPUTS
3
5
1
7
VIDEO OUT
1
REC
S-VIDEO OUT
MAIN
REC
"Dolby", "AC-3", "Pro Logic", & the double-D Symbol are trademarks of Dolby Laboratories. Confidential Unpublished Works.
©1992-1997 Dolby Laboratories, Inc. All rights reserved. Manufactured under license from Digital Theater Systems, Inc. US Pat. No.
5,451,942 and other worldwide patents issues and pending. "DTS" and "DTS Digital Surround" are trademarks of Digital Theater
Systems, Inc. © 1996 Digital Theater Systems, Inc. All rights reserved. Manufactured under license from Lucasfilm Ltd. US Pat. Nos.
5,043,970; 5,189,703; and 5,222,059. Foreign patents pending. "Lucasfilm" and "THX" are registered trademarks of Lucasfilm Ltd.
S-VIDEO INPUTS
1
2
CAUTION
4
3
RISK OF ELECTRIC SHOCK
DO NOT OPEN
ATTENTION!
Cinema Rhapsody
4
2
2
1
6
8
2
AUDIO INPUTS
4
5
3
RISQUE DE CHOC ELECTRIQUE.
NE PAS OUVRIR
MADE IN U.S.A.
OSD
6
7
8
L
L
L
L
R
R
R
R
REC
AUDIO OUTPUTS
LS
L
SUB
DIGITAL AUDIO INPUTS
1
3
RS
C
Voltage
Selector &
Safety Fuse
On This Side
DATA PORT 12VDC OUT
100mA Max Per
ADA Bus™ DC 1 DC 2
1 2 3 4 1- 2+ 1- 2+
OPTICAL INPUTS
1
2
3
R
CAUTION: Disconnect Supply Cord Before Servicing.
ATTENTION: Debrancher Avant Le Depannage.
LOW VOLTAGE
Serial Data
OUT
WARNING! Risk Of Hazardous Energy!
Make Proper Connections.
AVERTISSEMENT! Energie Electrique Dangereuse!
Faire Des Connexions Propres Pour L'Hautparleur.
Voir La Notice De Fonctionnement.
2
4
115 V
115V
AC OUTPUT
Plug into Cinema Rhapsody
Plug into an AC Outlet
Page 2
AC INPUT
10A~ Max Switched 115V~60Hz/230V~50Hz
230V
Use Same
Value Fuse
115V~1AS.B.
230V~.5AS.B.
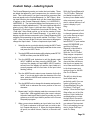
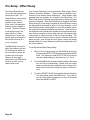
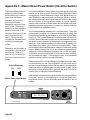
Power Amplifier (& Powered Subwoofer) Connections
Audio Connections
The Cinema Rhapsody’s Audio Outputs are clearly marked in a white field on the back of the Cinema
Rhapsody. ADA strongly suggests not using directional interconnects that lift the grounds. If you are
connecting the audio outputs to a six channel power amplifier (which will also power the subwoofer),
use the diagram below. This diagram includes ADA’s critically acclaimed PTM-6150 Six Channel THX
Power Amplifier. While you may decide to vary the input arrangement if you are using a PTM-6150,
the following input arrangement will cause the amplifier’s front panel LED display to spread outward
from Channel 3, the center channel speaker. If you are using a self-powered subwoofer, you will
connect the Cinema Rhapsody’s SUB Output directly to the subwoofer. If you are using a self powered subwoofer with the PTM-6150, you may opt to “Y” split the SUB output so as to illuminate channel six of the PTM-6150.
Amplifier AC Connections
The Cinema Rhapsody incorporates a switched AC outlet which is rated at 10 Amps. This is powerful
enough for ADA’s PTM-6150 Six Channel THX Power Amplifier. Several other power amplifiers could
also be plugged directly into this switched AC outlet. However, if the power amplifier is going to draw
more than 10 Amps (such as ADA’s MPA-500 Five Channel THX High-Power Amplifier), you will want
to avoid using this switched AC outlet. To connect the power amplifier to the Cinema Rhapsody, you
will need to use an EIC Male to EIC Female AC Cord. These AC cords are also used for computers
and computer monitors and are available in stores that support computer and AC products.
VIDEO INPUTS
3
5
1
VIDEO OUT
1
REC
7
MAIN
4
2
1
6
2
8
2
AUDIO INPUTS
4
5
3
1
REC
2
RISK OF ELECTRIC SHOCK
DO NOT OPEN
1
7
8
L
L
L
L
R
R
R
R
REC
AVERTISSEMENT! Energie Electrique Dangereuse!
Faire Des Connexions Propres Pour L'Hautparleur.
Voir La Notice De Fonctionnement.
ATTENTION!
Cinema Rhapsody
RISQUE DE CHOC ELECTRIQUE.
NE PAS OUVRIR
CAUTION: Disconnect Supply Cord Before Servicing.
ATTENTION: Debrancher Avant Le Depannage.
MADE IN U.S.A.
AUDIO OUTPUTS
LS
L
3
DATA PORT 12VDC OUT
Serial Data
6
RS
C
4
5
3
100mA Max Per
ADA Bus™ DC 1 DC 2
1 2 3 4 1- 2+ 1- 2+
OPTICAL INPUTS
1
2
3
R
Voltage
Selector &
Safety Fuse
On This Side
LOW VOLTAGE
DIGITAL AUDIO INPUTS
1
SUB
2
OUT
WARNING! Risk Of Hazardous Energy!
Make Proper Connections.
CAUTION
4
3
OSD
6
"Dolby", "AC-3", "Pro Logic", & the double-D Symbol are trademarks of Dolby Laboratories. Confidential Unpublished Works.
©1992-1997 Dolby Laboratories, Inc. All rights reserved. Manufactured under license from Digital Theater Systems, Inc. US Pat. No.
5,451,942 and other worldwide patents issues and pending. "DTS" and "DTS Digital Surround" are trademarks of Digital Theater
Systems, Inc. © 1996 Digital Theater Systems, Inc. All rights reserved. Manufactured under license from Lucasfilm Ltd. US Pat. Nos.
5,043,970; 5,189,703; and 5,222,059. Foreign patents pending. "Lucasfilm" and "THX" are registered trademarks of Lucasfilm Ltd.
S-VIDEO INPUTS
S-VIDEO OUT
AC OUTPUT
4
2
115 V
115V
AC INPUT
10A~ Max Switched 115V~60Hz/230V~50Hz
Sub Output To
Power Amplifier
For Passive Subs
Plug into
Cinema Rhapsody
Or Sub Output To
Powered Subwoofer
Manufactured under license
from Lucasfilm Ltd.
LS
OUTPUT 4-16Ω
-
+
CH 1
OUTPUT 4-16Ω
INPUT
47KΩ
-
+
R
INPUT
47KΩ
CH 2
Lucasfilm and THX are registered
trademarks of Lucasfilm Ltd.
L
C
OUTPUT 4-16Ω
INPUT
47KΩ
-
RS
OUTPUT 4-16Ω
CH 4
+
-
INPUT
47KΩ
WARNING!
RISK OF HAZARDOUS
ENERGY!
MAKE PROPER SPEAKER
CONNECTIONS.
+
CH 3
INPUT
47KΩ
PTM-6150 POWER AMP
CAUTION
SUB
OUTPUT 4-16Ω
CH 5
+
EIC Male to
EIC Female
Power Cord
-
AVERTISSEMENT! ENERGIE
ELECTRIQUE DANGEREUSE! FAIRE
DES CONNEXIONS PROPRES POUR
L'HAUTPARLEUR. VOIR LA NOTICE
DE FONCTIONNEMENT.
INPUT
47KΩ
RISK OF ELECTRIC SHOCK
DO NOT OPEN
ATTENTION!
OUTPUT 4-16Ω
CH 6
CAUTION:
+
DISCONNECT SUPPLY CORD
BEFORE SERVICING.
ATTENTION: DEBRANCHER AVANT
LE DEPANNAGE.
RISQUE DE CHOC ELECTRIQUE.
NE PAS OUVRIR
-
MADE IN U.S.A.
VOLTAGE
SWITCH
115 V - 230 V
REPLACE
WITH SAME
VALUE FUSE
10A S.B.
POWER
115 V - 230 V
50 Hz - 60 Hz
115 V
CAUTION! DO NOT SHORT OUTPUTS!
230V
Use Same
Value Fuse
115V~1AS.B.
230V~.5AS.B.
Plug into PTM-6150 or
another power amplifier.
Page 3
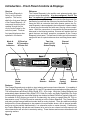
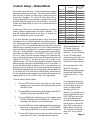
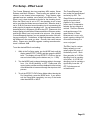
Introduction - Front Panel Controls & Displays
Overview
The Cinema Rhapsody is
factory set for optimum
operation. This section
details the front panel features
of the Cinema Rhapsody. All
component functions can be
operated through the five
control knobs located on the
units front panel. The three
front panel displays are also
explained in this section.
Mode &
Status
Indicators
Welcome
The Cinema Rhapsody is the world’s most advanced audio video
surround sound preamplifier. It is also configured “Out Of The
Box” for optimum operation. While it is designed to be easy to
setup and operate, ADA strongly recommends spending some time
familiarizing yourself with the units many functions and features. For
those who wish to customize their home theater system, the Cinema Rhapsody is also equipped to be configured to operate ideally
in almost any environment and with many varying source components. While the connection of components and accessories are
discussed in the following sections, this area will explain the front
panel features and basic operation commands of the Cinema
Rhapsody’s front panel. The text found in italic type in this manual’s
margins will act as a quick reference when reviewing these materials.
Channel
Two-Line
IR Receiver
Selector
Back-Lit LCD
IR Transmitter
Status Display
& Photo-Cell
DVD DISC 1
ALL -02.5 DB
DIGITAL
Cinema Rhapsody
Features
Master
Reset
Switch
LFE
MODE
ENGAGE
VOLUME
INPUT
CHANNEL
RECORD
SELECTOR
CONTROL
MADE IN U.S.A.
Mode
Selector
Input
Selector
Volume
Control
& On/Off
Record
Selector
The Cinema Rhapsody acts as both an input selector and surround sound decoder. It is capable of
decoding Dolby Pro Logic, Dolby Digital (AC-3), and DTS encoded formats and also providing Lucasfilm
THX enhancements and filters to Dolby Digital, DTS, & Pro Logic. While the Cinema Rhapsody can
automatically detect between Dolby Digital, DTS, Dolby Pro Logic, and Dolby Digital/Dolby Pro Logic
(both decoding formats are used when playing two-channel encoded DVD discs {typically older movies available on DVD that are not mixed in six channels}), the option to engage either full THX enhancements or only THX Re-EQ must be manually set on the Cinema Rhapsody. The Cinema Rhapsody also provides several additional modes ideal for music playback. There are additional settings
that permit the Cinema Rhapsody to also operate in home theaters where a full six channel speaker
array may only be partially implemented (i.e. no subwoofer and/or no center channel). Furthermore,
the Cinema Rhapsody also permits each channel to be set to its own volume level with respect to all
other channels as well as have its own delay setting. These features and more are discussed in the
upcoming sections.
Page 4
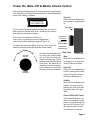
Power On, Mute, Off, & Master Volume Control
When the Cinema Rhapsody is off, turning any knob or pushing any
knob other than the Volume knob will cause the Cinema Rhapsody’s
center LCD display to indicate:
Power On
Press the Cinema Rhapsody’s
Volume knob to engage power
on.
PUSH VOLUME
FOR POWER ON
Front Plate
To turn on the Cinema Rhapsody, providing the unit is not in
Mute, press the Volume knob once. Pressing of the Volume
knob performs only three functions.
If the unit is off, pressing it will turn it on.
If the unit is on, pressing it once will engage Mute.
If the unit is in Mute, pressing it again will turn it off.
&
er
w
o
Raise Vo
lum
VOLUME
CONTROL
e
L
(To regain the audio (exit Mute), turn any of one of the five
knobs or press any knob other than the Volume knob).
Press Knob
To Turn On
Press Knob
Once To Mute
Press Knob
Twice For Off
Once the Cinema Rhapsody is
on, turning the Volume knob
will only raise or lower the
system’s volume level. This is
considered the Master Volume
Control as it will adjust all six
channels of volume, maintaining the balance of levels that
are preset between channels.
Side View
Chassis Side
Mute
While the Cinema Rhapsody is
on, pressing it’s Volume knob
once will mute all channels.
Power Off
While the Cinema Rhapsody is
in Mute, pressing the Volume
knob a second time will turn
the Cinema Rhapsody off.
Un-Mute
While the Cinema Rhapsody is
in Mute, turning any knob or
pressing any knob other than
the Volume knob, will regain
audio.
Power On/Off Via AC Control
If the Cinema Rhapsody is on
when it is unplugged or when
power is removed through the
use of an AC Controller, it will
also automatically turn back
on when power is restored.
Page 5
The Cinema Rhapsody permits you to scroll to the next input without having all of the components you are passing actively process
through the Cinema Rhapsody. This prevents the clicking that is
commonly associated with changing TV channels up and down. To
best access another component from the front of the Cinema Rhapsody, turn the Input Selector knob. As you turn this knob, you will
notice that the top row of the LCD display will not change, still indicating the current component in use (in this example, DVD DISC).
The second line of the LCD display will advance through the input
names until the desired component is displayed.
elect
To S pon Anoth
n
ent
m
e
ur Co
r
T
Input Selection - Dialing in the desired component.
INPUT
SELECTOR
Front View
LASER/DVD 1
ALL -02.5 DB
1.
Dial In New Input
Turn the Input Selector knob
until the second line of the
LCD display reads the
component you wish to
select. As you turn the knob,
you will notice that the top
line of the display still
indicates the current source in
play. Also, this component is
still being routed and
processed by the Cinema
Rhapsody.
LASER/DVD 1
LASERDISC 2
LASER/DVD 1
DVD PLAYER 3
LASER/DVD 1
VCR
4
2.
Engage New Input
Once the second line of the
display indicates the next
component you wish to
access, press the Input
Selector knob to engage this Front Plate
input. This method permits
you to select an input without
switching all of the inputs you
are scrolling through.
LASER/DVD 1
DSS/SAT
5
Once the desired component is displayed on the LCD’s second row,
press the Input Selector knob to
engage that component. The display will then return to read the new
selection (i.e. DSS TV) along with
the Volume Level.
Press Knob
To Activate
The New
Component
Selection
DSS/SAT
5
ALL -02.5 DB
Side View
Page 6
Chassis Side
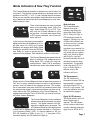
Mode Indicators & How They Function
The Cinema Rhapsody features six indicators on the left side of its
front panel. They provide a visual indication of decoding mode, the
presence of an LFE (“.1” of “5.1”), and if a digital input is accessed.
While you can manually select modes, these indicators are an ideal
way to determine status when the Cinema Rhapsody is in the “AutoMode Detection” state.
Three of the indicators are used to provide
status of the decoding mode, Dolby Pro
Logic, Dolby Digital (AC-3), or DTS. Typically, only one of these indicators is on at
any one time. If a mode other than a Dolby
or DTS mode is selected, none of the indicators will be lit.
In the event you are playing a two-channel
digital source that was encoded in AC-3 (i.e.
an older movie on a DVD), the Cinema
Rhapsody will engage both Dolby Digital
decoding to extract the from the DVD and
then Dolby Pro Logic to decode the two
channel mix for playback. Both indicators will be on in this case.
The Cinema Rhapsody also permits the addition of full-blown THX enhancements to
Dolby Digital, DTS, or Dolby Pro Logic decoding formats. When THX is selected to
enhance these modes, the indicator will be lit.
Please note, the Cinema Rhapsody does not detect the presence of
THX as it is not an encoded process but rather an enhancement
process. Use THX mode for any cinematic sources. THX certification to video tapes, laser discs, and DVDs is intended to ensure that
the material was properly mixed and transferred and does not directly relate to the THX certification of the Cinema Rhapsody. To
engage either full-blown THX or THX Re-EQ, you must do so manually on the Cinema Rhapsody.
The Cinema Rhapsody has two additional
indicators that detail information for digital
sources. The Digital indicator will illuminate when a digital input is accessed. The
DIGITAL
LFE
LFE indicator will light up if the digital source
material has an independent six channel encoded in it for bass or
“Low Frequency Effects” (LFE). If a source material (i.e. AC-3 or
DTS CD, Laserdisc or DVD), is truly “5.1” ( “.1” being the LFE or
subwoofer signal), the LFE indicator will light up.
DIGITAL
LFE
Mode Indicators
The Cinema Rhapsody
features three mode
indicators that illuminate
when either Dolby Digital
(AC-3), Dolby Pro Logic, or
DTS decoding formats are
engaged. Typically, only one
of these three indicators are
on at any one time. However,
when playing a digitally
formatted source material (i.e.
DVD) of an older movie that is
only mixed with two-channel
audio, both the Dolby Digital
and Dolby Pro Logic will
illuminate indicating that both
decoding formats are being
implemented. If a decoding
mode other than DTS, Pro
Logic, or Dolby Digital is
selected, none of the
indicators will be on.
THX Enhancements
The THX indicator will
illuminate only when THX has
been selected in conjunction
with Dolby Digital, DTS, or
Dolby Pro Logic modes. THX
is not auto-detected but must
be intentionally engaged.
Digital & LFE Indicators
The Digital indicator will be lit
when a digital input is
selected. The LFE indicator
will be lit when a digital input
contains a distinct subwoofer
signal (only in DTS & AC-3).
Page 7
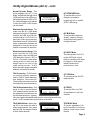
Mode Selection & Dolby Digital Mode Descriptions
o Select Mo
nT
de
r
Tu
MODE
ENGAGE
Front View
1.
Dial In New Mode
Turn the Mode Selector knob
until the second line of the
LCD display reads the mode
you wish to select. As you
turn the knob, you will notice
that the top line of the display
indicates the current source in
play and the second line
indicates the modes available.
The Cinema Rhapsody will not
engage the new mode until
Step 2 is accessed.
2.
Engage New Mode
Once the second line of the
display indicates the next
mode you wish to access,
press the Mode Selector knob
to engage this mode.
AC3 ULTRA Mode
This is the most dynamic of
all Dolby Digital AC-3 modes.
In the AC-3 Ultra mode, the
dialogue normalization takes
place in the Cinema
Rhapsody’s analog domain
and not in the digital domain.
Other AC-3 modes provide
dialogue normalization in the
digital domain by discarding
bits of data.
Page 8
The Cinema Rhapsody provides 22 modes for film, television, and
music playback. This section will detail these modes and their functions. Because the Cinema Rhapsody
Front Plate
can also automatically detect the encoding method of the selected source,
it will automatically engage the best
possible decoding mode for the se- Press Knob
lected components output. While the To Activate
Cinema Rhapsody can automatically
The New
Mode
switch between Dolby Digital, DTS, and Selection
Dolby Pro Logic, enhancement features such as THX, Re-EQ, and other
Dolby Digital options will need to be enSide View
Chassis Side
gaged using the Mode Selector.
Dolby Digital Modes (AC-3)
Dialogue Normalization - As you change Dolby Digital (AC-3) inputs, the display will flash a Dialogue Normalization value on the top
line (DIALOG +4 DB) and the bottom line will display DIALOG NORM.
This information is directly read off of the bit stream from the Dolby
Digital software. The Cinema Rhapsody uses this information to
automatically adjust various levels internal to the Cinema Rhapsody
for consistent sound levels. This display will appear when you either change inputs on the Cinema Rhapsody or the software you
are listening to. This display only appears if the software’s level
require manual adjustment. If you wish to use this number as a
volume reference level, you can use the Master Volume Control to
raise or lower the systems volume level accordingly.
As an example, if one DVD plays
and no Dialogue Normalization level
DIALOG + 4DB
appears and then a second DVD is
DIALOG NORM
played with a Dialogue Normalization level of +4 dB, reducing the
Master Volume Level by 4 dB, will make the second DVD play as
loud as the first.
Ultra Maximum Dynamic Range
- This is the most dynamic of all
LASER/DVD 1
the AC-3 modes in that dialogue
AC3
ULTRA
normalization takes place in the
Cinema Rhapsody’s analog domain rather than the digital domain. AC-3 Ultra mode reads information flags contained in the DVD or laser disc and uses these software specific parameters to set the dialogue normalization after digital
processing takes place. The HDR and LDR scales are preset at “0”
(Full Off) but can be scaled individually.
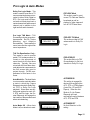
Dolby Digital Modes (AC-3) - cont.
Normal Dynamic Range - This
mode engages the AC-3 “Line
Mode” coupled with the High Level
(HDR) and Low Level (LDR) resolution factors preset to “255” or Full
On. While the option of Line Mode
is fixed, the HDR & LDR factors
can be scaled.
Maximum Dynamic Range - This
mode uses the AC-3 Line Mode
setting as found in AC3 Standard,
however the HDR and LDR factors are fixed at “0” or Full Off. For
play back of films, this mode may
be preferred over AC3 Ultra in that
some compression schemes are
designed to recreate the movie
theater environment in the home.
Minimum Dynamic Range - This
mode uses the AC-3 RF Mod
Mode setting. Also, the HDR and
LDR factors are fixed at “255” or
Full On. This mode is ideal when
viewing a film at a time were the
bangs may be too loud or the
softer sounds too low. In AC3
Night, the audio range is narrowed
between loud and soft sounds.
THX Processing - THX Processing includes several enhancements: Re-EQ, Timbre Matching,
and Adaptive Decorrelation.
These make the sound more like
the original film sound experience.
LASER/DVD 1
AC3 STANDARD
AC3 STANDARD Mode
This mode offers normal
dialogue normalization
coupled with full on/variable
HDR & LDR scaling.
LASER/DVD 1
AC3
MAX
AC3 MAX Mode
This mode offers maximum
dynamic range for dialogue
normalization taking place in
the digital domain.
LASER/DVD 1
AC3
NIGHT
LASER/DVD 1
AC3
THX
AC3 NIGHT Mode
The least dynamic of all AC-3
modes, AC3 Night mode is
ideal for viewing movies when
loud bangs or other impact
related sounds would
normally be too loud.
AC3 THX Mode
This mode provides full THX
enhancements.
THX Re-Equalization Only - This
mode is used to provide partial
LASER/DVD 1
THX enhancements focused on
AC3
RE-EQ
the adjustment of sound levels for
the front three channels. Typically,
films are mixed to standards which result in over bright sound in the
home. Re-EQ compensates for this factor in the home.
AC3 RE-EQ
This mode offers only THX
Re-equalization for the front
channels.
TRUE MONO Mode - When playing AC-3, this mode will make a
mono center channel. Also, when
playing PCM, this mode will make
a mono center channel.
TRUE MONO Mode
This mode, regardless of the
type of encoding of the source
material, mixes a mono center
channel.
LASER/DVD 1
TRUE MONO
Page 9
DTS Modes
DTS DIRECT Mode
This mode is the standard
DTS decoding mode without
any delay and bass
management level settings.
DTS CINEMA Mode
This is the enhanced DTS
decoding mode coupled with
the Delay and Bass
Management Settings found
under the Cinema
Rhapsodys’s Pro Setup.
DTS THX Mode
This mode offers full THX
Enhancements to DTS, in
addition to the features
available with the DTS Cinema
mode.
DTS RE-EQ Mode
This setting is offers only THX
RE-EQ to the DTS Mode in
addition to the features
available with the DTS Cinema
Mode.
Page 10
LASER/DVD 1
DTS DIRECT
LASER/DVD 1
DTS CINEMA
DTS Direct Mode - Much like
Dolby Digital AC-3, DTS is a 5.1
digitally encoded matrix. This
mode provides DTS decoding.
Please note, that most DTS software, in the form of CDs and Laser Discs, do not contain any standard two channel audio tracks. If
you are playing DTS software and
are getting nothing but noise, you
are most likely not in a DTS decoding mode. Please note, in the
Pro Setup Menu, the delays, bass
limiter, and THX enhancements
are disabled and are controlled by
the main processor. This mode is
the purist of all DTS modes as it
was designed to deliver 5.1 playback as DTS has intended.
DTS Cinema Mode - This mode
provides DTS decoding with the
enhancements from the Cinema
Rhapsody’s delay and bass management settings. Please note,
most DTS software that is encoded onto PCM audio channels
(DTS CD’s and Laser Discs) do not
contain any standard two channel
audio tracks. If you are playing
DTS software and are getting
nothing by noise, you are most
likely not in a DTS decoding mode.
LASER/DVD 1
DTS
THX
DTS THX Mode - This mode is the
same as the DTS Cinema mode
with THX Enhancements added to
the surround processing.
LASER/DVD 1
DTS
RE-EQ
DTS RE-EQ Mode - This mode is
the same at the DTS Cinema
mode with only RE-EQ added to
the surround mix. RE-EQ is one
of the aspects of the full THX Enhancements.
Pro Logic & Auto Modes
Dolby Pro Logic Mode - This
mode is used for most film or TV
source materials that are not encoded in either Dolby Digital or
DTS. Pro Logic uses a 2-channel audio mix and plays back a
center channel mix and surround
channel mix in addition to the
right and left audio channels.
Pro Logic THX Mode - THX
Processing includes several enhancements: Re-EQ, TImbre
Matching, and Adaptive
Decorrelation. These make the
sound more like the original film
sound experience..
THX Re-Equalization Only This mode is used to provide
partial THX enhancements focused on the adjustment of
sound levels for the front three
channels. Typically, films are
mixed with the front three channels adjusted to compensate for
the film screen they need to
project through. Re-EQ compensates for this factor in the
home.
LASER/DVD 1
PROLOGIC
LASER/DVD 1
PROLOGIC THX
LASER/DVD 1
PROLOG RE-EQ
Auto Mode On - The Auto Mode
is not so much a mode but rather
a state in which the Cinema
Rhapsody checks for Dolby Digital, DTS, or Dolby Pro Logic
playback. Since there are several mode options for each, AC3, DTS, and Pro Logic, the Cinema Rhapsody will engage the
last version of these modes used
when auto-detecting.
LASER/DVD 1
AUTOMODE ON
Auto Mode Off - When Auto
Mode is off, no detection is used.
LASER/DVD 1
AUTOMODE OFF
PRO LOGIC Mode
This mode is used for most
current TV, Cable and Satellite
broadcasts as well as
playback of video tapes and
non-AC-3/DTS laser discs.
PROLOGIC THX Mode
This mode provides full THX
enhancements to Dolby Pro
Logic.
PROLOG RE-EQ
This mode offers only THX
Re-equalization for the front
channels to Dolby Pro Logic.
AUTOMODE ON
This setting is engaged for
devices that can play either
AC-3, DTS, or PCM software
(Laser Disc, CD, and DVD
Players). When the Auto
Mode is On, the Cinema
Rhapsody will seek
automatically switch between
AC-3, DTS, and PCM.
AUTOMODE OFF
No Auto Detection in this
setting.
Page 11
Stereo, Phantom, & Music Modes
STEREO Mode
This mode offers two-channel
stereo playback with the subwoofer active. The Subwoofer
can also be deactivated.
STEREO RE-EQ Mode
This mode provides twochannel stereo playback with
THX Re-Equalization.
PHANTOM Mode
This mode redirects the center
channel information to the
front right and left speakers
and is used when no center
channel speaker is used.
PHANTOM ENH Mode
This Phantom mode engages
THX Enhancements.
PHANTOM RE-EQ Mode
This Phantom mode only
engages THX RE-EQ.
PHANTOM PLUS Mode
This Phantom mode provides
full range audio to the
surround channels..
MUSIC Mode
This mode can be used for
music playback as it provides
some level of steering
encoded sound tracks.
MUSIC PLUS Mode
This mode adds decorrelation
to the surround channels of
the standard MUSIC Mode.
Page 12
LASER/DVD 1
STEREO
Stereo Mode- The Stereo mode
engages only the front right and
left speakers. The audio path provides for stereo separation. The
subwoofer is also active providing
that the subwoofer is active in the
Bass Management setting found
in the Pro Setup menu.
LASER/DVD 1
STEREO RE-EQ
Stereo RE-EQ -This mode will add
THX RE-EQ to the stereo channels. This is not a full THX mode.
This mode should be used when
watching older stereo movies.
LASER/DVD 1
PHANTOM
The Phantom Mode - This mode
takes the center channels information and combines it with the signal front right and left channels.
This mode is ideal for systems not
incorporating a center channel.
LASER/DVD 1
PHANTOM ENH
Phantom ENH Mode - Phantom
Enhance Mode provides the same
surround sound decoding as the
Phantom mode but with full THX
Enhancements.
LASER/DVD 1
PHANTOM REEQ
Phantom RE-EQ - This mode provides the same redirection of the
center channel information as the
Phantom mode. This mode also
adds THX RE-EQ to the surround
sound mix.
LASER/DVD 1
PHANTOM PLUS
Phantom Plus Mode - Phantom
Plus Mode will divert the center
channel information while providing decorrelation to the surround
channels.
LASER/DVD 1
MUSIC
Music Mode - This mode enables
some level of decoding, thus passing audio to all speaker channels.
Sounding like Dolby Pro Logic, this
mode does not engage any noise
reduction, resulting in a sound that
delivers additional highs.
LASER/DVD 1
MUSIC PLUS
Music Plus Mode - The Music
Plus mode in addition to Music
Mode also provides decorrelation
to the surround channels.
3 Channel, Quad, Stereo Enhance, and Mono Enhance
3 Channel Mode- This mode only
engages the front three speaker,
providing Pro Logic steering
across these channels with the
surrounds completely muted. The
subwoofer is active in this mode
assuming it is set to be active for
this input in the Bass Management
section under Pro Setup.
3 Channel Re-EQ Mode- This
mode is like the 3 Channels mode
with the addition of THX Re-EQ.
Quad Bypass Mode- Ideal for stereo-music playback and older stereo movies, the right channel information is sent to the right surround channel and the left channel information is sent to the left
surround channel. The center
channel (if active, see System
Setup in Pro Setup) is sent a mix
of the right and left channels, with
the mix lowered by 3db.
QUAD BYP EHN Mode - The
Quad Bypass Enhanced mode operates just like the Quad Bypass
mode but adds full THX Enhancements to the surround sound mix.
LASER/DVD 1
3 CHANNELS
LASER/DVD 1
3 CHAN RE-EQ
LASER/DVD 1
QUAD BYPASS
LASER/DVD 1
QUAD BYP EHN
STEREO EHN Mode - The Stereo Enhanced Mode is ideal for
two channel mixes with limited steLASER/DVD 1
reo separation. TV broadcasts
STEREO EHN
and poorly mixed video tapes will
playback with a fuller use of the
speaker array in this mode. Stereo Enhance couples increased stereo separation without destroying the mono mix. This proprietary
mode uses delay settings to enhance the surround sound effect.
The effect level and delay can be adjusted in the Pro Setup menu.
MONO EHN Mode - The Mono
Enhance Mode is similar in design
to the Stereo Enhance mode but
LASER/DVD 1
is ideal for non-stereo mixes. Thus
MONO EHN
old movies and mono TV broadcasts emanate not just from the
center speaker, but rather, utilize the entire speaker array. Even the
worst audio mixes are spatially enhanced. This mode is also adjustable by setting the effect level and delay in the Pro Setup Menu.
3 CHANNELS Mode
This mode provides Pro Logic
decoding with only the three
front channels and the
subwoofer active.
3 CHANN RE-EQ Mode
This 3 channel mode adds reequalization to the three front
channels.
QUAD BYPASS Mode
This mode is designed to
utilize the entire speaker array
for two channel music
playback. All four right and
left speakers receive R/L
information and the center
gets a mix of the two.
QUAD BYP EHN Mode
This mode adds THX
Enhancements to the Quad
Bypass mode when watching
movies.
STEREO EHN Mode
This is a proprietary mode
ideal for playback of signals
with limited stereo separation
such as TV broadcasts and
poorly mixed video tapes.
MONO EHN Mode
This mode is ideal for
playback of mono only mixes
as it will utilize the entire
speaker array.
Page 13
Record Selector
The Record Selector operates
independently from the main
output providing the ability to
record, view, or play (in
another room) a component
other than the one selected in
the home theater.
To determine which device is
currently selected, press the
Record Selector knob. To
change components:
1.
Dial In New Device
Turn the Record Selector knob
until the second line of the
LCD display reads the
component you wish to
select.
2.
Engage New Device
Once the second line of the
display indicates the next
component you wish to
access, press the Input
Record knob to engage this
input.
The Cinema Rhapsody incorporates a record selector that operates
independently from the actual source component selected for the
home theater room. This record selector can be used in several
ways.
1
Use the Record Selector to send audio and video signals
from a particular component to a recording device (i.e. VCR)
2
Use the Record Selector to send a video signals to a second
monitor or TV set. Ideal for the sports fanatic, this option would
permit a second TV to display a broadcast from on tuning mechanism (i.e. DSS receiver, TV tuner, or VCR TV tuner). While the
primary viewing surface would be set to display a particular channel
from one device (i.e. DSS receiver), the additional TV or monitor
could be set to display the image of the TV Tuner in the VCR.
3
Use the Record Selector to determine the image inserted
into a TV’s PIP (Picture In Picture). This would provide the same
effect as described in option 2 (above) using the PIP function in
place of a second TV or monitor.
4
Use the Record Selector to send the audio and video signal
of a particular device to a whole-house multi-room audio video system. This setup would cause the Record Selector to act as a separate zone from the actual home theater.
Record Selector Functions
To determine what component the Record Selector is currently set
to, press the Record Selector knob. The display will read as follows
where the second line of the display indicates the component selected.
elect
To SCom Anoth
n
pon e
ur cord
e
e
RECORD
nt
R
r
T
RECORD TAKEN
LASER/DVD 1
To Select another source component for recording, display to a second monitor (TV or PIP), or for distribution through the house, turn
the Record Selector knob until the
new component appears in the display.
RECORD INPUT
DSS/SAT
5
Front View
Page 14
Then press the Record Selector
knob to engage this device.
Front Plate
Press Knob
To Activate
The New
Component
Selection
Side View
Chassis Side
All rear panel connections are
clearly marked such that all
inputs are situated in a black
field which is bordered and
labeled in white and all
outputs are on a white field
labeled in black. Once the
source connections have
been made, please do the
following setup basics:
Rear Panel Inputs & Outputs
The Cinema Rhapsody’s rear panel connections provide ample component connectors (inputs) for a wide variety of equipment. The following pages show the factory default “Out Of The Box” input settings for the Cinema Rhapsody. When proceeding to connect your
components to the Cinema Rhapsody, ADA suggests using these
settings, however, you may also select to customize your Cinema
Rhapsody to provide any type of input combination. As a reminder,
the Cinema Rhapsody is preprogrammed for optimum operation right
“Out Of The Box”.
Individual Channel Level Settings
See Audio Setup pg. 33
Before you proceed, it will be useful to determine what type of components you intend to connect to the Cinema Rhapsody. Once you
have selected the components, you will want to determine what connectors these devices feature and how to best connect them to the
Cinema Rhapsody. If you are uncertain as to what jacks to use, ADA
suggests contacting your local Authorized ADA Retailer or Custom
Installation Professional for technical support. Should you have any
questions on the Cinema Rhapsody, you can receive factory support
by calling Audio Design Associates, Inc. at 1-800-43-AUDIO (1-800432-8346), between the hours of 9am-5pm, eastern time, MondayFriday.
Bass Configuration Settings
(To tell the Cinema Rhapsody the
types of speakers you have.)
See Pro Setup pg. 51
Bass Peak Limit Manager Settings
(To protect your subwoofer from
overloading on potentially large bass
information. If your subwoofer has
its own built-in limiter, you can set
this feature to off.)
See Bass Peak Limit Manager pg. 53
Delay Settings
Setup Basics
As a starting point, ADA suggests using the “Out Of The Box” configuration to begin making your source connections.
Composite Composite Super
Video
Video
Video
Outputs Outputs
Inputs
VIDEO INPUTS
3
5
1
7
Component
Video (RGB)
Outputs
VIDEO OUT
1
REC
MAIN
REC
"Dolby", "AC-3", "Pro Logic", & the double-D Symbol are trademarks of Dolby Laboratories. Confidential Unpublished Works.
©1992-1997 Dolby Laboratories, Inc. All rights reserved. Manufactured under license from Digital Theater Systems, Inc. US Pat. No.
5,451,942 and other worldwide patents issues and pending. "DTS" and "DTS Digital Surround" are trademarks of Digital Theater
Systems, Inc. © 1996 Digital Theater Systems, Inc. All rights reserved. Manufactured under license from Lucasfilm Ltd. US Pat. Nos.
5,043,970; 5,189,703; and 5,222,059. Foreign patents pending. "Lucasfilm" and "THX" are registered trademarks of Lucasfilm Ltd.
S-VIDEO INPUTS
1
2
1
2
6
8
2
AUDIO INPUTS
4
5
RISK OF ELECTRIC SHOCK
DO NOT OPEN
ATTENTION!
3
6
7
8
L
L
L
L
R
R
R
R
REC
SUB
DIGITAL AUDIO INPUTS
1
3
RS
C
CAUTION: Disconnect Supply Cord Before Servicing.
ATTENTION: Debrancher Avant Le Depannage.
Voltage
Selector &
Safety Fuse
On This Side
DATA PORT 12VDC OUT
Serial Data
R
AVERTISSEMENT! Energie Electrique Dangereuse!
Faire Des Connexions Propres Pour L'Hautparleur.
Voir La Notice De Fonctionnement.
LOW VOLTAGE
100mA Max Per
ADA Bus™ DC 1 DC 2
1 2 3 4 1- 2+ 1- 2+
OPTICAL INPUTS
1
2
3
OUT
Analog
Record
Audio (R/L) Audio
Inputs
Output
RISQUE DE CHOC ELECTRIQUE.
NE PAS OUVRIR
MADE IN U.S.A.
OSD
AUDIO OUTPUTS
LS
L
WARNING! Risk Of Hazardous Energy!
Make Proper Connections.
CAUTION
4
3
Cinema Rhapsody
4
2
Once you have made these basic
settings, if you wish, you can enter
the Custom Setup and Pro Setup
which permits hundreds of other
potential setup options.
Super
Video
Inputs
S-VIDEO OUT
See pg. 46
2
4
115 V
115V
AC OUTPUT
AC INPUT
10A~ Max Switched 115V~60Hz/230V~50Hz
ADA Bus“
Six Channel Digital Optical Digital
Data
Coax Audio
Audio
Home Theater
Port
Inputs
Inputs
Audio Output
230V
Use Same
Value Fuse
115V~1AS.B.
230V~.5AS.B.
Switched
Low
AC
Voltage
Outlet
Triggers
Page 15
Out Of The Box Setup
The “Out Of The Box” Setup
uses the Cinema Rhapsody’s
default setup program. Since
not all source components
have the same audio outputs,
this section offers different
connection possibilities to
take into consideration the
many component
connections.
To best proceed with the
connection of your
components, simply examine
the units that you have and
compare the component’s
output jack to the illustration.
Please note, that the Cinema
Rhapsody’s “Out Of The Box”
setup is designed for quick
and easy connection of the
most common source
components used in today’s
home theater systems. Thus,
this setup does not optimize
all of the audio inputs since a
CD player, second laser disc
player, or DSS receiver may
feature a digital output. If all
three devices offered a digital
output, you would be able to
bypass these components
analog connections noted in
the “Out Of The Box” setup
and have three additional
analog inputs available for
other devices. If the video
game or computer were to
also offer a digital output, you
could then connect as many
as fifteen devices to the
Cinema Rhapsody.
The chart on the following
page details the “Out Of The
Box” Setup.
Page 16
The Cinema Rhapsody is preprogrammed to permit quick and easy
connection of your audio and video components. This section details the options available taking into consideration that not all source
components have each and every output jack present. Since the
Cinema Rhapsody is fully equipped with an abundance of audio
inputs of varying types: 8 Analog R&L Stereo (RCA) Inputs, 4 Digital
Coax (RCA), and 3 TOS-Link Digital Optical Inputs, the “Out Of The
Box” configuration should cover most any home theater system.
Please note, the Cinema Rhapsody is also fully programmable.
Should you care to customize your system, you can do so by following the items in the section titled “Custom Setup”.
The Cinema Rhapsody offers fifteen “Input Labels”. An Input Label
is the name of the component followed by a sequence number (i.e.
LASER/DVD 1, LASERDISC 2, DVD PLAYER 3). Each input
label is capable of being customized including the way the components name appears in the display. Again, you can customize the
way the Input Labels read in the “Custom Setup” section of this
manual. During a typical “Out of the Box” setup, you will most likely
use only a portion of the Input Labels that are preprogrammed in the
factory. The input labels appear as follows:
LASER/DVD
LASERDISC
DVD PLAYER
VCR
DSS/SAT
CABLE/TV
CD PLAYER
TUNER
CASSETTE
AUXILIARY
CAMCORDER
VIDEOGAME
COMPUTER
PREAMP
MULTIROOM
1
2
3
4
5
6
7
8
9
10
11
12
13
14
15
Used for combination LD/DVD Player.
Used for a second laser disc player or
a laser disc without a digital out.
Used for a DVD Player.
Used for VCR.
Used for a DSS or Satellite Receiver.
Used for cable box or TV’s audio output.
Used for a CD player.
Used for a radio tuner.
Used for a cassette deck.
Used for any A/V component.
Used for a Camcorder.
Used for video games.
Used for a computers output.
Used for connection of an existing preamp.
Used for connection of the audio output
from a multi-room audio system.
The Cinema Rhapsody in its “Out Of The Box” setup, will only permit the connection of ten (10) components. Inputs 10-15 are
preprogrammed to the same audio and video input and as such,
only one such device can be connected without going into the “Custom Setup”.
In the “Out Of The Box” setup, the Input Labels show a nine character component name followed by a number. The first 8 inputs correspond to buttons 1-8 on a One-For-All Six IR remote control that
may be shipped with some units.
Page 17
4
5
6
MULTIROOM 15
PREAMP 14
COMPUTER 13
VIDEOGAME 12
CAMCORDER 11
AUXILIARY 10
CASSETTE 9
TUNER 8
CD PLAYER 7
CABLE/TV
DSS/SAT
VCR
DVD PLAYER 3
LASERDISC 2
LASER/DVD 1
INPUT LABEL
6
7
8
1
3
3
3
3
CABLE BOX OR TV TUNER
CD PLAYER
RADIO TUNER
CASSETTE DECK
ANY DEVICE YOU WANT
CAMCORDER
VIDEO GAME
COMPUTER INPUT
3
3
5
DSS OR SATELLITE
RECEIVER
AUDIO OR AUDIO/VIDEO
PREAMPLIFIER
MULTI-ROOM AUDIO OR
AUDIO/VIDEO SYSTEM
4
VCR
-
-
-
-
-
-
-
-
-
-
-
-
-
-
-
-
2
1
-
-
-
8
8
8
8
8
8
-
-
7
6
5
4
3
2
1
-
-
-
-
-
-
-
-
-
-
2
4
3
-
1
-
-
-
-
-
-
-
-
-
-
-
-
1
-
-
DIGITAL
RF
COMPONENT
AUDIO INPUT DEMODULATO VIDEO INPUT
S-VIDEO
VIDEO INPUT
(OPTICAL R INPUT
(COMPOSITE - INPUT (SUPER
(3 X RCA
TOS-LINK
(LASER DISC - RCA TYPE)
VIDEO)
TYPE)
TYPE)
RCA TYPE)
Please
Labels numbers
- note, that Input
10-15 share the same "Out Of The Box"
audio- and video inputs.
Thus you
- can
connect only one of these devices to the
- Rhapsody
Cinema
Reference. - In the event - that you
are not using other inputs or have
connected
a CD player
or DSS receiver
to a digital input, you can add more
devices
to your system.
-
-
-
-
-
-
3
-
2
-
1
DIGITAL
AUDIO INPUT
(COAX - RCA
TYPE)
-
DVD PLAYER
AC-3 LASER DISC OR
COMBINATION PLAYER
OLDER LASER DISC OR
SECOND LASER DISC
COMPONENT
AUDIO INPUT
(R&L STEREO
- RCA TYPE)
Cinema Rhapsody “Out Of The Box” Setup Chart
Laser Disc or Combination Laser Disc/DVD Player
The “Out Of The Box” setup
presumes that your
combination laser disc/DVD
player has the following
outputs:
Digital Audio PCM/AC-3 For
Both DVD and Laser Disc
Playback
Coax (RCA) Type Output
Video Output
(Composite RCA Type)
Your combi-player may also
include a super video output.
Please note, the Cinema
Rhapsody does not cross mix
video signals. As such, if you
wish to use a component’s SVideo output, you will need to
connect an S-Video cable
from the Cinema Rhapsody to
the TV or Projector.
Use the diagram on the
following page to make your
combi-player connections.
ADA suggests using a quality
75Ω Coaxial cable. In the
event that none are available,
you can use standard RCA
interconnects.
If your combi-player does not
have an RCA Type Digital
Audio PCM/AC-3 Coax output
but rather has only an Optical
Digital PCM/AC-3 output, you
will need to change the
programming for this input.
These steps are discussed at
the bottom of the following
page.
Page 18
The Cinema Rhapsody is preprogrammed to permit you to easily
connect a combination laser disc & DVD player. You will need to
make two audio connections in for this unit to play the following:
Dolby Digital Laser Discs, Pro Logic Laser Discs, DTS Laser Discs,
Dolby Digital DVDs, 2 Channel Dolby Digital DVDs, Stereo CDs,
and DTS CDs.
All connections should use a 75 Ohm coaxial cable. If none are
available, standard RCA video interconnects will work.
Connection 1 - Laser Disc Player’s PCM/AC-3 Digital Output - You
will need to connect the combi-players digital output that is marked
by both PCM and AC-3 to the Cinema Rhapsody’s #1 Digital Audio
Input (Orange RCA Connector). This input will pass audio for all
AC-3 playback from a laser disc.
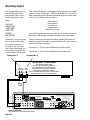
Connection 2 - Laser Disc Player’s Video Output - You will need to
connect the laser disc player’s video output (Composite Video) to
the Cinema Rhapsody’s #1 Video Input.
Connection 3 (Optional) - Laser Disc Player’s S-Video Output - You
may also choose to connect the S-Video (Super Video) output of
the laser disc player to the Cinema Rhapsody S-Video #1 input.
This will require a special super video cable. Please note, if your
projector or TV does not have a super video input, you will not need
to make this connection as the Cinema Rhapsody does not cross
convert S-Video to Composite Video.
The diagram to the right details all of these connections. If your
combi-player does not have an RCA style digital audio output for
PCM/AC-3, it may have an optical digital audio output for PCM/AC3 playback. In this case you will need to alter the LASER/DVD 1
input. The steps to change the input from a digital to an optical input
is discussed at the bottom of the following page.
If your laser disc player does not have a built-in AC-3 RF demodulator, then you will need to add one to the system in order to playback
laser discs in AC-3. ADA provides the RFD-1 AC-3 RF Demodulator
for this purpose. Please contact your Authorized ADA Dealer for
more information regarding the RFD-1.
Please note, that if you are using an external RF demodulator for
playpack of AC-3 laserdiscs, the Cinema Rhapsody’s Auto Mode
function will not automatically select the input connected to the RF
Demodulator. You will need to create an input for the RF
demodulator’s output and manually select this input when viewing
AC-3 encoded laser discs.
Connection 2
Connection 3
Laser Disc or Combination Laser/DVD Player
PCM/AC-3
Digital Out
Video
Out
S-Video
Output
Optional S-Video Cable
(Only functional if you connect your TV or Projector
to the Cinema Rhapsody’s "Main" S-Video Output.)
Video
Cable
1
VIDEO INPUTS
3
5
1
7
VIDEO OUT
1
REC
S-VIDEO OUT
MAIN
REC
1
1
"Dolby", "AC-3", "Pro Logic", & the double-D Symbol are trademarks of Dolby Laboratories. Confidential Unpublished Works.
©1992-1997 Dolby Laboratories, Inc. All rights reserved. Manufactured under license from Digital Theater Systems, Inc. US Pat. No.
5,451,942 and other worldwide patents issues and pending. "DTS" and "DTS Digital Surround" are trademarks of Digital Theater
Systems, Inc. © 1996 Digital Theater Systems, Inc. All rights reserved. Manufactured under license from Lucasfilm Ltd. US Pat. Nos.
5,043,970; 5,189,703; and 5,222,059. Foreign patents pending. "Lucasfilm" and "THX" are registered trademarks of Lucasfilm Ltd.
S-VIDEO INPUTS
2
CAUTION
4
3
RISK OF ELECTRIC SHOCK
DO NOT OPEN
ATTENTION!
Cinema Rhapsody
4
2
1
2
L
R
6
8
2
AUDIO INPUTS
4
5
3
L
R
RISQUE DE CHOC ELECTRIQUE.
NE PAS OUVRIR
MADE IN U.S.A.
OSD
6
L
R
7
8
REC
AUDIO OUTPUTS
LS
L
SUB
DIGITAL AUDIO INPUTS
1
CAUTION: Disconnect Supply Cord Before Servicing.
ATTENTION: Debrancher Avant Le Depannage.
Voltage
Selector &
Safety Fuse
On This Side
LOW VOLTAGE
3
DATA PORT 12VDC OUT
Serial Data
L
WARNING! Risk Of Hazardous Energy!
Make Proper Connections.
AVERTISSEMENT! Energie Electrique Dangereuse!
Faire Des Connexions Propres Pour L'Hautparleur.
Voir La Notice De Fonctionnement.
100mA Max Per
ADA Bus™ DC 1 DC 2
1 2 3 4 1- 2+ 1- 2+
OPTICAL INPUTS
1
2
3
115 V
115V
R
OUT
R
RS
C
2
1
4
AC OUTPUT
AC INPUT
10A~ Max Switched 115V~60Hz/230V~50Hz
230V
Use Same
Value Fuse
115V~1AS.B.
230V~.5AS.B.
Digital Output
(This cable carries Dolby Digital (AC-3) 6 channel audio from Laser Discs
& DVDs, standard 2 channel digital audio from CDs & Laser Discs,
as well as DTS digital 6 channel audio.)
Connection 1
Changing the Cinema Rhapsody’s Audio Input
If you are using a combi-player which only has an optical digital PCM/AC-3 output, you will need to use
an optical TOS-Link type cable to connect the combi-player to Optical #1 on the Cinema Rhapsody.
Then follow these steps.
1
Turn the Input knob to LASER/DVD 1 and press the knob.
2
Turn the Mode knob clockwise to SETUP MODE and press the knob.
3
Turn the Mode knob to AUDIO INPUT and press the knob. Once the knob is pressed the will
read “DIGITAL IN 1”.
4
Turn the mode knob until the display reads OPTICAL IN 1 and press the knob.
You have now altered the LASER/DVD input to access Optical Input 1.
Page 19
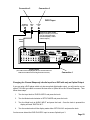
Laser Disc Player without a Digital Output (or 2nd Laser)
The “Out Of The Box” setup
presumes that for the
LASERDISC input, you wish
to connect a laser disc player
that does not have either a
digital coax or digital optical
audio output. You can also
use this input for a second
laser disc player that has a
digital audio output however
you will need to custom
program this input using the
steps discussed on the
bottom of the following page.
For laser disc players that do
not have a digital audio
output, you will use the
following laser disc outputs
Stereo Audio (R&L) Output
AC-3•RF Output (LD)
(May or May Not Exist)
Video Output
(Composite RCA Type)
Your laser disc player may
also include an S-Video
output. Please note, the
Cinema Rhapsody does not
cross mix video signals. As
such, if you wish to use a
component’s S-Video output,
you will need to connect an SVideo cable from the Cinema
Rhapsody to the TV or
Projector.
Use the diagram on the
following page to make your
laser disc player connections.
ADA suggests using a quality
75Ω Coaxial cable. In the
event that none are available,
you can use standard RCA
interconnects.
Page 20
The Cinema Rhapsody is preprogrammed to permit you to easily
connect a laser disc player that does not have a digital audio output.
This laser disc may or may not have an AC-3 RF output. If it does
have an AC-3 RF output, you will need to make two audio connections in for this unit to play the following:
Dolby Digital Laser Discs, Pro Logic Laser Discs, and Stereo CDs.
If you are using this input for a second laser disc that has a digital
audio output (to also play DTS laser discs and CDs), you will need
to custom configure this input. This is discussed at the bottom of
the following page.
All connections should use a 75 Ohm coaxial cable. If none are
available, standard RCA video interconnects will work.
Connection 1 - Laser Disc Player’s Stereo Audio Output - You will
need to connect the laser disc player’s stereo (analog) audio output
(R&L RCA type) to the Cinema Rhapsody’s Audio Input #2.
Connection 2 - Laser Disc Player’s Video Output - You will need to
connect the laser disc player’s video output (Composite Video) to
the Cinema Rhapsody’s #2 Video Input.
Please note, that if you are using an external RF demodulator for
playpack of AC-3 laserdiscs, the Cinema Rhapsody’s Auto Mode
function will not automatically select the input connected to the RF
Demodulator. You will need to create an input for the RF
demodulator’s output and manually select this input when viewing
AC-3 encoded laser discs.
Connection 3 (Optional & Requires RF Demodulator [RFD-1]) - Laser Disc Player’s AC-3 RF Output - You will need to connect the
Laser disc players “AC-3•RF Output” (LD for Laser Disc) to an AC-3
RF Demodulator.
Connection 4 (Must Accompany Step 3) - RF Demodulator’s Output
- You will need to connect the RF Demodulators output to the Cinema Rhapsody’s #4 Digital Audio Input (Orange RCA Connector).
If this is a second laser disc player, chances are it may have a digital
audio input, either Coax (RCA) or optical (TOS-Link). You will most
likely wish to connect this laser disc player to either Digital Input #2
or Optical Input #2 on the Cinema Rhapsody. This would free up
one analog audio input for an eleventh component as the “Out Of
The Box” setup permits for connection of only ten devices (without
going into the “Custom Setup”.)
Follow the steps on the bottom of the next page to alter the audio
input from Analog 2 to either Digital 2 or Optical 2.
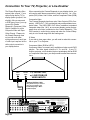
Connection 2
Connection 3
Laser Disc without Digital Audio Output
(May have AC-3 RF Output)
Stereo
Video
Audio Out Out
R
RF ¥ AC-3
Out (LD)
L
AC-3 RF Cable
(Connect this cable if
laser disc has an AC-3
RF output.)
2
DIGITAL
AC-3 OUT
OUTPUT
RFD-1
DIGITAL AC-3 RF DEMODULATOR
VIDEO INPUTS
3
5
1
7
RF
AC-3 IN
INPUT
"DOLBY", "AC-3", AND THE DOUBLE-D
SYMBOL ARE TRADEMARKS OF DOLBY
LABORATORIES LICENSING CORP.
CAUTION
RISK OF ELECTRIC SHOCK
DO NOT OPEN
ON
WARNING! RISK OF HAZARDOUS ENERGY! MAKE PROPER CONNECTIONS.
AVERTISSEMENT! ENERGIE ELECTRIQUE DANGEREUSE! FAIRE DES CONNEXIONS
PROPRES POUR L'HAUTPARLEUR. VOIR LA NOTICE DE FONCTIONNEMENT.
CAUTION: DISCONNECT SUPPLY CORD BEFORE SERVICING.
ATTENTION: DEBRANCHER AVANT LE DEPANNAGE.
2
(The Cinema Rhapsody does not have a
built-in AC-3 RF Demodulator, Use RFD-1)
115 V
Video
Cable
AC-3 RF Demodulator Output
(220V)
1/10A S.B.
DC INPUT MUTE
VOLTAGE SELECTOR
OFF
VIDEO OUT
1
REC
S-VIDEO OUT
MAIN
REC
2
RISK OF ELECTRIC SHOCK
DO NOT OPEN
ATTENTION!
Cinema Rhapsody
4
2
2
1
2L
2R
6
8
2
AUDIO INPUTS
4
5
3
RISQUE DE CHOC ELECTRIQUE.
NE PAS OUVRIR
MADE IN U.S.A.
OSD
6
MADE IN U.S.A.
110/220 VAC SWITCHED
50-60 Hz, 15 WATT
CAUTION
4
3
RISQUE DE CHOC ELECTRIQUE.
NE PAS OUVRIR
7
8
L
L
L
L
R
R
R
R
REC
AUDIO OUTPUTS
LS
L
DIGITAL AUDIO INPUTS
1
SUB
4
3
RS
C
CAUTION: Disconnect Supply Cord Before Servicing.
ATTENTION: Debrancher Avant Le Depannage.
Voltage
Selector &
Safety Fuse
On This Side
DATA PORT 12VDC OUT
100mA Max Per
ADA Bus™ DC 1 DC 2
1 2 3 4 1- 2+ 1- 2+
OPTICAL INPUTS
1
2
3
R
WARNING! Risk Of Hazardous Energy!
Make Proper Connections.
AVERTISSEMENT! Energie Electrique Dangereuse!
Faire Des Connexions Propres Pour L'Hautparleur.
Voir La Notice De Fonctionnement.
LOW VOLTAGE
Serial Data
OUT
FUSE WARNING:
Risk of Fire! Replace Fuse
With Same Type & Rating.
"Dolby", "AC-3", "Pro Logic", & the double-D Symbol are trademarks of Dolby Laboratories. Confidential Unpublished Works.
©1992-1997 Dolby Laboratories, Inc. All rights reserved. Manufactured under license from Digital Theater Systems, Inc. US Pat. No.
5,451,942 and other worldwide patents issues and pending. "DTS" and "DTS Digital Surround" are trademarks of Digital Theater
Systems, Inc. © 1996 Digital Theater Systems, Inc. All rights reserved. Manufactured under license from Lucasfilm Ltd. US Pat. Nos.
5,043,970; 5,189,703; and 5,222,059. Foreign patents pending. "Lucasfilm" and "THX" are registered trademarks of Lucasfilm Ltd.
S-VIDEO INPUTS
1
ATTENTION!
(110V)
2/10A S.B.
2
4
115 V
115V
AC OUTPUT
AC INPUT
10A~ Max Switched 115V~60Hz/230V~50Hz
230V
Use Same
Value Fuse
115V~1AS.B.
230V~.5AS.B.
Stereo AudioCable
(This cable carries standard 2 channel
analog audio from CDs & Laser Discs.)
Connection 4
Connection 1
Changing the Cinema Rhapsody’s Audio Input to Accommodate A Second Laser Disc
If you are using a laser disc player which only has either a digital coax audio output or an optical digital
audio output, you will need to use either a 75Ω coax to connect it to Digital Input #3 or an optical TOSLink type cable to connect the laser disc to Optical #3 on the Cinema Rhapsody. Then follow these
steps.
1
Turn the Input knob to LASERDISC 2 and press the knob.
2
Turn the Mode knob clockwise to SETUP MODE and press the knob.
3
Turn the Mode knob to AUDIO INPUT and press the knob. Once the knob is pressed the will
read “ANALOG IN 1”.
4
Turn the mode knob until the display reads either DIGITAL IN 2 or OPTICAL IN 2 (based on
your configuration) and press the knob.
You have now altered the LASERDISC 2 input to access either Digital Input 2 or Optical Input 2.
Page 21
DVD Player
The “Out Of The Box” setup
presumes that your DVD
player has the following
outputs:
Digital Audio PCM/AC-3
Coax (RCA) Type Output
Video Output
(Composite RCA Type)
Your DVD Player may also
include a super video output.
Please note, the Cinema
Rhapsody does not cross mix
video signals. As such, if you
wish to use a component’s SVideo output, you will need to
connect an S-Video cable
from the Cinema Rhapsody to
the TV or Projector.
Use the diagram on the
following page to make your
DVD player connections. ADA
suggests using a quality 75Ω
Coaxial cable. In the event
that none are available, you
can use standard RCA
interconnects.
Page 22
The Cinema Rhapsody is preprogrammed to permit you to easily
connect a DVD player. You will need to make only one audio connection to play:
Dolby Digital AC-3 DVDs and Stereo CDs.
All connections should use a 75 Ohm coaxial cable. If none are
available, standard RCA video interconnects will work. In the event
that your DVD player does not have a digital PCM/AC-3 coax (RCA
Type) output, but rather only has an optical TOS-Link output for PCM/
AC-3 playback, you will need to customize the setup using the steps
found at the bottom of the following page.
Connection 1 - DVD Player’s Digital PCM/AC-3 Audio Output - You
will need to connect the DVD player’s digital PCM/AC-3 audio output (coax RCA type) to the Cinema Rhapsody’s Digital Audio Input
#3.
Connection 2 - DVD Player’s Video Output - You will need to connect the DVD player’s video output (Composite Video) to the Cinema Rhapsody’s #3 Video Input.
Connection 3 (Optional) - DVD Player’s S-Video Output - You may
also choose to connect the S-Video (Super Video) output of the DVD
player to the Cinema Rhapsody’s #3 S-Video Input. This will require a special super video cable. Please note, if your projector or
TV does not have a super video input, you will not need to make this
connection as the Cinema Rhapsody does not cross convert S-Video
to Composite Video.
If your DVD player does not have an RCA Type Digital Audio PCM/
AC-3 Coax output but rather has only an Optical Digital PCM/AC-3
output, you will need to change the programming for this input. These
steps are discussed at the bottom of the following page. If you are
going to connect the DVD player using an optical input , you should
proceed to connect the DVD’s optical output to the Cinema
Rhapsody’s #3 Optical Input. Then proceed with the instructions on
the following page.
Connection 2
Connection 3
DVD Player
PCM/AC-3
Digital Out
Video
Out
S-Video
Out
Optional S-Video Cable
(Only functional if you connect
your TV or Projector to the
Cinema Rhapsody’s "Main"
S-Video Output.)
Video
Cable
3
VIDEO INPUTS
3
5
1
7
VIDEO OUT
1
REC
REC
(You must connect these
three cables to a TV, linedoubler, or projector that
is capable of processing
component video)
"Dolby", "AC-3", "Pro Logic", & the double-D Symbol are trademarks of Dolby Laboratories. Confidential Unpublished Works.
©1992-1997 Dolby Laboratories, Inc. All rights reserved. Manufactured under license from Digital Theater Systems, Inc. US Pat. No.
5,451,942 and other worldwide patents issues and pending. "DTS" and "DTS Digital Surround" are trademarks of Digital Theater
Systems, Inc. © 1996 Digital Theater Systems, Inc. All rights reserved. Manufactured under license from Lucasfilm Ltd. US Pat. Nos.
5,043,970; 5,189,703; and 5,222,059. Foreign patents pending. "Lucasfilm" and "THX" are registered trademarks of Lucasfilm Ltd.
S-VIDEO INPUTS
S-VIDEO OUT
MAIN
3
Component Video
1
2
RISK OF ELECTRIC SHOCK
DO NOT OPEN
ATTENTION!
Cinema Rhapsody
4
2
1
2
6
8
2
AUDIO INPUTS
4
5
3
RISQUE DE CHOC ELECTRIQUE.
NE PAS OUVRIR
MADE IN U.S.A.
OSD
6
7
8
L
L
L
L
R
R
R
R
REC
AUDIO OUTPUTS
LS
L
SUB
DIGITAL AUDIO INPUTS
1
3
RS
C
CAUTION: Disconnect Supply Cord Before Servicing.
ATTENTION: Debrancher Avant Le Depannage.
Voltage
Selector &
Safety Fuse
On This Side
DATA PORT 12VDC OUT
100mA Max Per
ADA Bus™ DC 1 DC 2
1 2 3 4 1- 2+ 1- 2+
OPTICAL INPUTS
1
2
3
R
AVERTISSEMENT! Energie Electrique Dangereuse!
Faire Des Connexions Propres Pour L'Hautparleur.
Voir La Notice De Fonctionnement.
LOW VOLTAGE
Serial Data
OUT
WARNING! Risk Of Hazardous Energy!
Make Proper Connections.
CAUTION
4
3
2
115 V
115V
AC OUTPUT
4
AC INPUT
10A~ Max Switched 115V~60Hz/230V~50Hz
230V
Use Same
Value Fuse
115V~1AS.B.
230V~.5AS.B.
3
Digital Output
(This cable carries Dolby Digital (AC-3) 6 channel audio from
DVDs and standard 2 channel digital audio from CDs.)
Connection 1
Changing the Cinema Rhapsody’s Audio Input for a DVD with only an Optical Output
If you are using a DVD player which only has an optical digital audio output, you will need to use an
optical TOS-Link type cable to connect the laser disc to Optical #2 on the Cinema Rhapsody. Then
follow these steps.
1
Turn the Input knob to DVD PLAYER 3 and press the knob.
2
Turn the Mode knob clockwise to SETUP MODE and press the knob.
3
Turn the Mode knob to AUDIO INPUT and press the knob. Once the knob is pressed the
display will read “DIGITAL IN 3”.
4
Turn the mode knob until the display reads either OPTICAL IN 3 and press the knob.
You have now altered the DVD PLAYER 3 input to access Optical Input 3.
Page 23
VCR
The “Out Of The Box” setup
for your VCR permits you
connect R&L Stereo Audio as
well as both composite video
and super video.
The Cinema Rhapsody is preprogrammed to permit you to easily
connect a VCR. You will need to make only one audio connection to
play video tapes.
Standard RCA interconnects are used for the audio connection while
a 75Ω coax cable is used for the video connection.
Your VCR may also include a
super video output. Please
note, the Cinema Rhapsody
does not cross mix video
signals. As such, if you wish
to use a component’s S-Video
output, you will need to
connect an S-Video cable
from the Cinema Rhapsody to
the TV or Projector.
Connection 1
Connection 1 - VCR Audio Output - You will need to connect the
VCR’s audio output (stereo RCA type) to the Cinema Rhapsody’s
Audio Input #4.
Connection 2 - VCR Player’s Video Output - You will need to connect the VCR’s video output (Composite Video) to the Cinema
Rhapsody’s #4 Video Input.
Connection 3 (Optional) - VCR’s S-Video Output - You may also
choose to connect the S-Video (Super Video) output of the VCR to
the Cinema Rhapsody’s #4 S-Video Input. This will require a special super video cable. Please note, if your projector or TV does not
have a super video input, you will not need to make this connection
as the Cinema Rhapsody does not cross convert S-Video to Composite Video.
Connection 3
Connection 2
VCR
Stereo
Video
Audio Out Out
R
S-Video
Output
L
Optional S-Video Cable
(Only functional if you connect your TV or Projector
to the Cinema Rhapsody’s "Main" S-Video Output.)
Video
Cable
VIDEO INPUTS
3
5
4
1
7
4
VIDEO OUT
1
REC
MAIN
"Dolby", "AC-3", "Pro Logic", & the double-D Symbol are trademarks of Dolby Laboratories. Confidential Unpublished Works.
©1992-1997 Dolby Laboratories, Inc. All rights reserved. Manufactured under license from Digital Theater Systems, Inc. US Pat. No.
5,451,942 and other worldwide patents issues and pending. "DTS" and "DTS Digital Surround" are trademarks of Digital Theater
Systems, Inc. © 1996 Digital Theater Systems, Inc. All rights reserved. Manufactured under license from Lucasfilm Ltd. US Pat. Nos.
5,043,970; 5,189,703; and 5,222,059. Foreign patents pending. "Lucasfilm" and "THX" are registered trademarks of Lucasfilm Ltd.
S-VIDEO INPUTS
S-VIDEO OUT
1
REC
2
CAUTION
4
3
RISK OF ELECTRIC SHOCK
DO NOT OPEN
ATTENTION!
Cinema Rhapsody
4
2
1
6
2
L
R
8
2
AUDIO INPUTS
4
5
3
4L
4R
6
7
8
L
L
L
R
R
R
REC
AUDIO OUTPUTS
LS
L
SUB
DIGITAL AUDIO INPUTS
1
3
Stereo AudioCable
(This cable carries standard 2 channel audio)
RS
C
Voltage
Selector &
Safety Fuse
On This Side
DATA PORT 12VDC OUT
100mA Max Per
ADA Bus™ DC 1 DC 2
1 2 3 4 1- 2+ 1- 2+
OPTICAL INPUTS
1
2
3
R
CAUTION: Disconnect Supply Cord Before Servicing.
ATTENTION: Debrancher Avant Le Depannage.
LOW VOLTAGE
Serial Data
OUT
Page 24
RISQUE DE CHOC ELECTRIQUE.
NE PAS OUVRIR
MADE IN U.S.A.
OSD
WARNING! Risk Of Hazardous Energy!
Make Proper Connections.
AVERTISSEMENT! Energie Electrique Dangereuse!
Faire Des Connexions Propres Pour L'Hautparleur.
Voir La Notice De Fonctionnement.
2
4
115 V
115V
AC OUTPUT
AC INPUT
10A~ Max Switched 115V~60Hz/230V~50Hz
230V
Use Same
Value Fuse
115V~1AS.B.
230V~.5AS.B.
Standard RCA interconnects are used for the audio connection while
a 75Ω coax cable is used for the video connection.
For DSS or SAT Receivers that
sport a Digital output, you
may select to alter the Cinema
Rhapsody’s “Out Of The Box”
setup to switch the audio for
the DSS/SAT Receiver to a
digital input that is not used.
Connection 1 - DSS Audio Output - You will need to connect the
DSS’s audio output (stereo RCA type) to the Cinema Rhapsody’s
Audio Input #5.
1
Turn the Input knob to
DSS/SAT 6 and press the
knob.
Connection 2 - DSS Receiver’s Video Output - You will need to connect the DSS’s video output (Composite Video) to the Cinema
Rhapsody’s #5 Video Input.
2
Turn the Mode knob
clockwise to SETUP MODE
and press the knob.
Connection 3 (Optional) - DSS’s S-Video Output - You may also
choose to connect the S-Video (Super Video) output of the DSS to
the Cinema Rhapsody’s #2 S-Video Input. This will require a special super video cable. Please note, if your projector or TV does not
have a super video input, you will not need to make this connection
as the Cinema Rhapsody does not cross convert S-Video to Composite Video.
3
Turn the Mode knob to
AUDIO INPUT and press the
knob. Once the knob is
pressed the display will read
“ANALOG IN 5”.
DSS or Satellite Receiver
The Cinema Rhapsody is preprogrammed to permit you to easily
connect a DSS or Satellite Receiver.
Connection 1
4
Turn the mode knob
until the display reads the corresponding digital input that
you have connected your DSS
to and press the knob.
Connection 3
Connection 2
DSS/SATELLITE
Stereo
Video
Audio Out Out
R
S-Video
Output
L
Optional S-Video Cable
(Only functional if you connect your TV or Projector
to the Cinema Rhapsody’s "Main" S-Video Output.)
Video
Cable
5
VIDEO INPUTS
3
5
1
7
2
VIDEO OUT
1
REC
MAIN
"Dolby", "AC-3", "Pro Logic", & the double-D Symbol are trademarks of Dolby Laboratories. Confidential Unpublished Works.
©1992-1997 Dolby Laboratories, Inc. All rights reserved. Manufactured under license from Digital Theater Systems, Inc. US Pat. No.
5,451,942 and other worldwide patents issues and pending. "DTS" and "DTS Digital Surround" are trademarks of Digital Theater
Systems, Inc. © 1996 Digital Theater Systems, Inc. All rights reserved. Manufactured under license from Lucasfilm Ltd. US Pat. Nos.
5,043,970; 5,189,703; and 5,222,059. Foreign patents pending. "Lucasfilm" and "THX" are registered trademarks of Lucasfilm Ltd.
S-VIDEO INPUTS
S-VIDEO OUT
1
REC
2
CAUTION
4
3
RISK OF ELECTRIC SHOCK
DO NOT OPEN
ATTENTION!
Cinema Rhapsody
4
2
1
2
L
R
6
8
2
AUDIO INPUTS
4
5
3
5L
5R
RISQUE DE CHOC ELECTRIQUE.
NE PAS OUVRIR
MADE IN U.S.A.
OSD
6
7
8
L
L
L
R
R
R
REC
AUDIO OUTPUTS
LS
L
SUB
DIGITAL AUDIO INPUTS
1
3
RS
C
Voltage
Selector &
Safety Fuse
On This Side
DATA PORT 12VDC OUT
100mA Max Per
ADA Bus™ DC 1 DC 2
1 2 3 4 1- 2+ 1- 2+
OPTICAL INPUTS
1
2
3
R
CAUTION: Disconnect Supply Cord Before Servicing.
ATTENTION: Debrancher Avant Le Depannage.
LOW VOLTAGE
Serial Data
OUT
WARNING! Risk Of Hazardous Energy!
Make Proper Connections.
AVERTISSEMENT! Energie Electrique Dangereuse!
Faire Des Connexions Propres Pour L'Hautparleur.
Voir La Notice De Fonctionnement.
2
4
115 V
115V
AC OUTPUT
AC INPUT
10A~ Max Switched 115V~60Hz/230V~50Hz
230V
Use Same
Value Fuse
115V~1AS.B.
230V~.5AS.B.
Stereo AudioCable
(This cable carries standard 2 channel audio)
Page 25
Cable or TV Tuner
Your Cable Box or TV Tuner
can be directly connected to
the Cinema Rhapsody. In
order for your cable box to be
connected as a component to
the Cinema Rhapsody, it will
need to be a cable box which
supports a stereo (R&L)
analog audio output (RCA
Type) as well as a composite
video output. If your cable
box or cable convertor does
not support these outputs (it
only has an RF output), you
will need to modulate it
through a tuner on either
channel 3 or channel 4.
Connection 1
The Cinema Rhapsody is preprogrammed to permit you to easily
connect a VCR.
Standard RCA interconnects are used for the audio connection while
a 75Ω coax cable is used for the video connection.
Connection 1 - Cable Box or TV Tuner Audio Output - You will need
to connect the tuner’s audio output (stereo RCA type) to the Cinema
Rhapsody’s Audio Input #6.
Connection 2 - Cable Box or TV Tuner’s Video Output - You will
need to connect the tuner’s video output (Composite Video) to the
Cinema Rhapsody’s #6 Video Input.
Connection 2
CABLE BOX OR TV TUNER
Stereo
Video
Audio Out Out
R
L
Video
Cable
VIDEO INPUTS
3
5
6
1
7
VIDEO OUT
1
REC
MAIN
"Dolby", "AC-3", "Pro Logic", & the double-D Symbol are trademarks of Dolby Laboratories. Confidential Unpublished Works.
©1992-1997 Dolby Laboratories, Inc. All rights reserved. Manufactured under license from Digital Theater Systems, Inc. US Pat. No.
5,451,942 and other worldwide patents issues and pending. "DTS" and "DTS Digital Surround" are trademarks of Digital Theater
Systems, Inc. © 1996 Digital Theater Systems, Inc. All rights reserved. Manufactured under license from Lucasfilm Ltd. US Pat. Nos.
5,043,970; 5,189,703; and 5,222,059. Foreign patents pending. "Lucasfilm" and "THX" are registered trademarks of Lucasfilm Ltd.
S-VIDEO INPUTS
S-VIDEO OUT
1
REC
2
CAUTION
4
3
RISK OF ELECTRIC SHOCK
DO NOT OPEN
ATTENTION!
Cinema Rhapsody
4
2
1
2
6
8
2
AUDIO INPUTS
4
5
3
L
L
R
R
6L
6R
6
7
8
L
L
R
R
REC
AUDIO OUTPUTS
LS
L
SUB
DIGITAL AUDIO INPUTS
1
3
Stereo AudioCable
(This cable carries standard 2 channel audio)
RS
C
Voltage
Selector &
Safety Fuse
On This Side
DATA PORT 12VDC OUT
100mA Max Per
ADA Bus™ DC 1 DC 2
1 2 3 4 1- 2+ 1- 2+
OPTICAL INPUTS
1
2
3
R
CAUTION: Disconnect Supply Cord Before Servicing.
ATTENTION: Debrancher Avant Le Depannage.
LOW VOLTAGE
Serial Data
OUT
Page 26
RISQUE DE CHOC ELECTRIQUE.
NE PAS OUVRIR
MADE IN U.S.A.
OSD
WARNING! Risk Of Hazardous Energy!
Make Proper Connections.
AVERTISSEMENT! Energie Electrique Dangereuse!
Faire Des Connexions Propres Pour L'Hautparleur.
Voir La Notice De Fonctionnement.
2
4
115 V
115V
AC OUTPUT
AC INPUT
10A~ Max Switched 115V~60Hz/230V~50Hz
230V
Use Same
Value Fuse
115V~1AS.B.
230V~.5AS.B.
Standard RCA interconnects are used for the audio connection while
a 75Ω coax cable is used for the video connection.
For CD Players that sport a
Digital output, you may select
to alter the Cinema
Rhapsody’s “Out Of The Box”
setup to switch the audio for
the CD Player to a digital input
that is not used.
Connection 1 - CD Audio Output - You will need to connect the CD’s
audio output (stereo RCA type) to the Cinema Rhapsody’s Audio
Input #7.
1
Turn the Input knob to
CD PLAYER 7 and press the
knob.
Connection 2 (Optional) - CD Player’s Video Output - You will need
to connect the CD’s video output (Composite Video) to the Cinema
Rhapsody’s #7 Video Input.
2
Turn the Mode knob
clockwise to SETUP MODE
and press the knob.
Please note, not all CD players offer a video output and as such, the
Cinema Rhapsody’s #7 Video Output can be used with an audio
input that is not used. To custom configure your Cinema Rhapsody,
see the section titled “Custom Setup”.
3
Turn the Mode knob to
AUDIO INPUT and press the
knob. Once the knob is
pressed the display will read
“ANALOG IN 7”.
CD Player
The Cinema Rhapsody is preprogrammed to permit you to easily
connect a CD.
Connection 1
4
Turn the mode knob
until the display reads the corresponding digital input that
you have connected your CD
Player to and press the knob.
Connection 2
CD Player
Stereo
Video
Audio Out Out
R
L
The CD Player Input
allows for a video signal
in the event the CD Player
offers an on-screen display
or is used with a CD Library
system that offers an
on-screen readout.
Video
Cable
7
VIDEO INPUTS
3
5
1
7
VIDEO OUT
1
REC
MAIN
"Dolby", "AC-3", "Pro Logic", & the double-D Symbol are trademarks of Dolby Laboratories. Confidential Unpublished Works.
©1992-1997 Dolby Laboratories, Inc. All rights reserved. Manufactured under license from Digital Theater Systems, Inc. US Pat. No.
5,451,942 and other worldwide patents issues and pending. "DTS" and "DTS Digital Surround" are trademarks of Digital Theater
Systems, Inc. © 1996 Digital Theater Systems, Inc. All rights reserved. Manufactured under license from Lucasfilm Ltd. US Pat. Nos.
5,043,970; 5,189,703; and 5,222,059. Foreign patents pending. "Lucasfilm" and "THX" are registered trademarks of Lucasfilm Ltd.
S-VIDEO INPUTS
S-VIDEO OUT
1
REC
2
CAUTION
4
3
RISK OF ELECTRIC SHOCK
DO NOT OPEN
ATTENTION!
Cinema Rhapsody
4
2
1
2
6
8
2
AUDIO INPUTS
4
5
3
L
L
R
R
RISQUE DE CHOC ELECTRIQUE.
NE PAS OUVRIR
MADE IN U.S.A.
OSD
6
7L
7R
7
8
L
L
R
R
REC
AUDIO OUTPUTS
LS
L
SUB
DIGITAL AUDIO INPUTS
1
3
RS
C
Voltage
Selector &
Safety Fuse
On This Side
DATA PORT 12VDC OUT
100mA Max Per
ADA Bus™ DC 1 DC 2
1 2 3 4 1- 2+ 1- 2+
OPTICAL INPUTS
1
2
3
R
CAUTION: Disconnect Supply Cord Before Servicing.
ATTENTION: Debrancher Avant Le Depannage.
LOW VOLTAGE
Serial Data
OUT
WARNING! Risk Of Hazardous Energy!
Make Proper Connections.
AVERTISSEMENT! Energie Electrique Dangereuse!
Faire Des Connexions Propres Pour L'Hautparleur.
Voir La Notice De Fonctionnement.
2
4
115 V
115V
AC OUTPUT
AC INPUT
10A~ Max Switched 115V~60Hz/230V~50Hz
230V
Use Same
Value Fuse
115V~1AS.B.
230V~.5AS.B.
Stereo AudioCable
(This cable carries standard 2 channel audio)
Page 27
Tuner
A Tuner can be directly
connected to the Cinema
Rhapsody’s #8 Analog Audio
Input.
The Cinema Rhapsody is preprogrammed to permit you to easily
connect a Tuner.
Standard RCA interconnects are used for the audio connection.
Connection 1 - Tuner Audio Output - You will need to connect the
tuner’s audio output (stereo RCA type) to the Cinema Rhapsody’s
Audio Input #8.
Connection 1
Radio Tuner
Stereo
Audio Out
R
L
VIDEO INPUTS
3
5
1
7
VIDEO OUT
1
REC
MAIN
REC
"Dolby", "AC-3", "Pro Logic", & the double-D Symbol are trademarks of Dolby Laboratories. Confidential Unpublished Works.
©1992-1997 Dolby Laboratories, Inc. All rights reserved. Manufactured under license from Digital Theater Systems, Inc. US Pat. No.
5,451,942 and other worldwide patents issues and pending. "DTS" and "DTS Digital Surround" are trademarks of Digital Theater
Systems, Inc. © 1996 Digital Theater Systems, Inc. All rights reserved. Manufactured under license from Lucasfilm Ltd. US Pat. Nos.
5,043,970; 5,189,703; and 5,222,059. Foreign patents pending. "Lucasfilm" and "THX" are registered trademarks of Lucasfilm Ltd.
S-VIDEO INPUTS
S-VIDEO OUT
1
2
CAUTION
4
3
RISK OF ELECTRIC SHOCK
DO NOT OPEN
ATTENTION!
Cinema Rhapsody
4
2
1
2
6
8
2
AUDIO INPUTS
4
5
3
MADE IN U.S.A.
OSD
6
L
L
L
R
R
R
8L
8R
7
8
REC
AUDIO OUTPUTS
LS
L
SUB
DIGITAL AUDIO INPUTS
1
L
WARNING! Risk Of Hazardous Energy!
Make Proper Connections.
AVERTISSEMENT! Energie Electrique Dangereuse!
Faire Des Connexions Propres Pour L'Hautparleur.
Voir La Notice De Fonctionnement.
CAUTION: Disconnect Supply Cord Before Servicing.
ATTENTION: Debrancher Avant Le Depannage.
Voltage
Selector &
Safety Fuse
On This Side
LOW VOLTAGE
3
DATA PORT 12VDC OUT
Serial Data
100mA Max Per
ADA Bus™ DC 1 DC 2
1 2 3 4 1- 2+ 1- 2+
OPTICAL INPUTS
1
2
3
115 V
115V
R
OUT
Stereo AudioCable
(This cable carries standard 2 channel audio)
Page 28
RISQUE DE CHOC ELECTRIQUE.
NE PAS OUVRIR
R
RS
C
2
4
AC OUTPUT
AC INPUT
10A~ Max Switched 115V~60Hz/230V~50Hz
230V
Use Same
Value Fuse
115V~1AS.B.
230V~.5AS.B.
Cassette
A Cassette Player can be
directly connected to the
Cinema Rhapsody’s #1 Analog
Audio Input.
The Cinema Rhapsody is preprogrammed to permit you to easily
connect a Cassette.
Standard RCA interconnects are used for the audio connection.
Connection 1 - Cassette Audio Output - You will need to connect the
cassette’s audio output (stereo RCA type) to the Cinema Rhapsody’s
Audio Input #1.
Connection 1
Cassette Deck
Stereo
Audio Out
R
L
VIDEO INPUTS
3
5
1
7
VIDEO OUT
1
REC
MAIN
REC
"Dolby", "AC-3", "Pro Logic", & the double-D Symbol are trademarks of Dolby Laboratories. Confidential Unpublished Works.
©1992-1997 Dolby Laboratories, Inc. All rights reserved. Manufactured under license from Digital Theater Systems, Inc. US Pat. No.
5,451,942 and other worldwide patents issues and pending. "DTS" and "DTS Digital Surround" are trademarks of Digital Theater
Systems, Inc. © 1996 Digital Theater Systems, Inc. All rights reserved. Manufactured under license from Lucasfilm Ltd. US Pat. Nos.
5,043,970; 5,189,703; and 5,222,059. Foreign patents pending. "Lucasfilm" and "THX" are registered trademarks of Lucasfilm Ltd.
S-VIDEO INPUTS
S-VIDEO OUT
1
2
CAUTION
4
3
RISK OF ELECTRIC SHOCK
DO NOT OPEN
ATTENTION!
Cinema Rhapsody
4
2
1
1L
1R
2
6
8
2
AUDIO INPUTS
4
5
3
L
R
L
R
RISQUE DE CHOC ELECTRIQUE.
NE PAS OUVRIR
MADE IN U.S.A.
OSD
6
L
R
7
8
REC
AUDIO OUTPUTS
LS
L
SUB
DIGITAL AUDIO INPUTS
1
CAUTION: Disconnect Supply Cord Before Servicing.
ATTENTION: Debrancher Avant Le Depannage.
Voltage
Selector &
Safety Fuse
On This Side
LOW VOLTAGE
3
DATA PORT 12VDC OUT
Serial Data
L
WARNING! Risk Of Hazardous Energy!
Make Proper Connections.
AVERTISSEMENT! Energie Electrique Dangereuse!
Faire Des Connexions Propres Pour L'Hautparleur.
Voir La Notice De Fonctionnement.
100mA Max Per
ADA Bus™ DC 1 DC 2
1 2 3 4 1- 2+ 1- 2+
OPTICAL INPUTS
1
2
3
115 V
115V
R
OUT
R
RS
C
2
4
AC OUTPUT
AC INPUT
10A~ Max Switched 115V~60Hz/230V~50Hz
230V
Use Same
Value Fuse
115V~1AS.B.
230V~.5AS.B.
Stereo AudioCable
(This cable carries standard 2 channel audio)
Page 29
Auxiliary Input
Your last available input on a
Cinema Rhapsody can be
automatically tied to one of
the following device input
labels:
The Cinema Rhapsody is preprogrammed to permit you to easily
connect a tenth component. ADA has provided the “Out Of The
Box” setup with six input label that access Analog Input 3 and Video
Input 8. If you wish to connect either a:
Camcorder or
Video Game or
Computer or
Preamplifier or
Multi-Room System
AUXILIARY
CAMCORDER
VIDEOGAME
COMPUTER
PREAMP
MULTIROOM
If your tenth component does not match any of the above Input Label names, ADA suggests using the Auxiliary Input Label name.
Simply connect one of these items using standard RCA interconnects are used for the audio connection while a 75Ω coax cable is
used for the video connection.
Please note, that you can only
use one of the Input Labels
for a single component. If
you wish to use more than
one of these input labels, you
will need to proceed with the
“Custom Setup” instructions.
Connection 1
Connection 1 - To the Cinema Rhapsody’s Audio Input #3.
Connection 2 - To the Cinema Rhapsody’s #6 Video Input.
Connection 2
AUXILIARY COMPONENT
The "Out Of The Box" Setup
permits one of the following devices to
be connected to the Cinema Rhapsody:
Stereo
Video
Aux, Camcorder, Video Game, Computer,
Audio Out Out
Preamplifier, or Multi-Room System.
Using the Custom Setup wll permit you to maximize
R
L
all available inputs for up to 15 components.
Video
Cable
VIDEO INPUTS
3
5
1
8
7
VIDEO OUT
1
REC
MAIN
"Dolby", "AC-3", "Pro Logic", & the double-D Symbol are trademarks of Dolby Laboratories. Confidential Unpublished Works.
©1992-1997 Dolby Laboratories, Inc. All rights reserved. Manufactured under license from Digital Theater Systems, Inc. US Pat. No.
5,451,942 and other worldwide patents issues and pending. "DTS" and "DTS Digital Surround" are trademarks of Digital Theater
Systems, Inc. © 1996 Digital Theater Systems, Inc. All rights reserved. Manufactured under license from Lucasfilm Ltd. US Pat. Nos.
5,043,970; 5,189,703; and 5,222,059. Foreign patents pending. "Lucasfilm" and "THX" are registered trademarks of Lucasfilm Ltd.
S-VIDEO INPUTS
S-VIDEO OUT
1
REC
2
CAUTION
4
3
RISK OF ELECTRIC SHOCK
DO NOT OPEN
ATTENTION!
Cinema Rhapsody
4
2
1
2
6
8
2
AUDIO INPUTS
4
5
3
3L
3R
6
7
8
L
L
L
L
R
R
R
R
REC
AUDIO OUTPUTS
LS
L
SUB
DIGITAL AUDIO INPUTS
1
3
Stereo AudioCable
(This cable carries standard 2 channel audio)
RS
C
Voltage
Selector &
Safety Fuse
On This Side
DATA PORT 12VDC OUT
100mA Max Per
ADA Bus™ DC 1 DC 2
1 2 3 4 1- 2+ 1- 2+
OPTICAL INPUTS
1
2
3
R
CAUTION: Disconnect Supply Cord Before Servicing.
ATTENTION: Debrancher Avant Le Depannage.
LOW VOLTAGE
Serial Data
OUT
Page 30
RISQUE DE CHOC ELECTRIQUE.
NE PAS OUVRIR
MADE IN U.S.A.
OSD
WARNING! Risk Of Hazardous Energy!
Make Proper Connections.
AVERTISSEMENT! Energie Electrique Dangereuse!
Faire Des Connexions Propres Pour L'Hautparleur.
Voir La Notice De Fonctionnement.
2
4
115 V
115V
AC OUTPUT
AC INPUT
10A~ Max Switched 115V~60Hz/230V~50Hz
230V
Use Same
Value Fuse
115V~1AS.B.
230V~.5AS.B.
Record Output Connections
The Cinema Rhapsody
features a “Record Output”
that can select a component
independently from the main
theater’s component
selection. Thus it is possible
to record from one
component to another (i.e.
DSS to VCR) while you are
viewing a third component
(i.e. DVD).
Typically, you will use the diagram below to connect the Cinema
Rhapsody’s Record Output to either a VCR or Cassette (or other
type of) Recorder. If you wish to pass audio and video to the VCR
and audio only to the Cassette, you will need to provide RCA “Y”
Splitters which will then enable both connection of the VCR and
Cassette. Some components may not be properly grounded. When
these devices are connected to other devices using “Y” splitters,
you may begin to hear some background hum or noise. If this is the
case, you may wish to proceed with the connection of only one of
the recording devices. Otherwise, please consult with your Authorized ADA Dealer.
VCR RECORD CONNECTION
S-Video
Output
Stereo
Video
Audio Out Out
R
Stereo
Audio In
L
R
Video
In
S-Video
Input
L
Optional S-Video Cable
Stereo AudioCable (Standard 2 channel audio)
Video
Cable
R
VIDEO INPUTS
3
5
1
R
VIDEO OUT
1
REC
7
S-VIDEO OUT
MAIN
REC
"Dolby", "AC-3", "Pro Logic", & the double-D Symbol are trademarks of Dolby Laboratories. Confidential Unpublished Works.
©1992-1997 Dolby Laboratories, Inc. All rights reserved. Manufactured under license from Digital Theater Systems, Inc. US Pat. No.
5,451,942 and other worldwide patents issues and pending. "DTS" and "DTS Digital Surround" are trademarks of Digital Theater
Systems, Inc. © 1996 Digital Theater Systems, Inc. All rights reserved. Manufactured under license from Lucasfilm Ltd. US Pat. Nos.
5,043,970; 5,189,703; and 5,222,059. Foreign patents pending. "Lucasfilm" and "THX" are registered trademarks of Lucasfilm Ltd.
S-VIDEO INPUTS
1
2
CAUTION
4
3
RISK OF ELECTRIC SHOCK
DO NOT OPEN
ATTENTION!
Cinema Rhapsody
4
2
6
2
1
8
2
AUDIO INPUTS
4
5
3
L
L
6
L
R
R
RISQUE DE CHOC ELECTRIQUE.
NE PAS OUVRIR
MADE IN U.S.A.
OSD
R
7
8
REC
AUDIO OUTPUTS
LS
L
DIGITAL AUDIO INPUTS
1
SUB
RL
RR
CAUTION: Disconnect Supply Cord Before Servicing.
ATTENTION: Debrancher Avant Le Depannage.
Voltage
Selector &
Safety Fuse
On This Side
LOW VOLTAGE
3
DATA PORT 12VDC OUT
Serial Data
L
WARNING! Risk Of Hazardous Energy!
Make Proper Connections.
AVERTISSEMENT! Energie Electrique Dangereuse!
Faire Des Connexions Propres Pour L'Hautparleur.
Voir La Notice De Fonctionnement.
100mA Max Per
ADA Bus™ DC 1 DC 2
1 2 3 4 1- 2+ 1- 2+
OPTICAL INPUTS
1
2
3
115 V
115V
R
OUT
R
RS
C
2
4
AC OUTPUT
AC INPUT
10A~ Max Switched 115V~60Hz/230V~50Hz
230V
Use Same
Value Fuse
115V~1AS.B.
230V~.5AS.B.
Stereo AudioCable - If you wish to feed audio to both a VCR and a cassette recorder,
you will need to obtain RCA "Y" splitters to provide you with two audio outputs, one
for the VCR and one for the cassette.
CASSETTE RECORD CONNECTION
Stereo
Audio Out
R
L
Stereo
Audio In
R
L
Stereo AudioCable (Standard 2 channel audio)
Page 31
Connection To Your TV, Projector, or Line-Doubler
The Cinema Rhapsody offers
several video outputs. If your
video display device (TV) or
display system (projector, line
doubler) offers a component
or RGB type of input, you may
connect the Cinema
Rhapsody’s Component Video
Output in addition to at the
Composite Video and Super
Video Outputs. Please note,
the Cinema Rhapsody does
not provide cross video
mixing and as such, each type
of video input requires its own
video output connection to
your display device.
Video
Input
When connecting the Cinema Rhapsody to your display device, you
will need to make these connections in order of priority: 1st - Composite (RCA) Video, 2nd S-Video, and 3rd Component Video (RGB)
Composite Video
The Cinema Rhapsody has three main Video Outputs (RCA Composite). VIDEO OUT 1 & 2 are identical and provide standard composite video. The OSD VIDEO OUT offers, in addition to standard
composite video (like 1 & 2), an on-screen-display overlay that appears when a function is selected on the Cinema Rhapsody. This
OSD readout is useful during setup and when the Cinema Rhapsody is out of visual range from the seating area.
S-Video
If you wish to view super video, you will need to make this connection to your TV or Projector.
Component Video (RGB or HDTV)
Component Video is currently only available on better model DVD
players. The video signal consists of Y, Cr, and Cb. If your TV,
monitor, projector, or line doubler (tripler or quadrupler) offer an RGB
or Component Video input, you can proceed to make these connections.
S-Video
Input
TV, PROJECTOR,
or LINE DOUBLER
VIDEO INPUTS
Optional S-Video Cable
Video
Cable
VIDEO INPUTS
3
5
1
7
Component Video
(Only functional if you connect
your TV or Projector to the
Cinema Rhapsody’s "Main"
S-Video Output.)
VIDEO OUT
1
REC
V
V
REC
"Dolby", "AC-3", "Pro Logic", & the double-D Symbol are trademarks of Dolby Laboratories. Confidential Unpublished Works.
©1992-1997 Dolby Laboratories, Inc. All rights reserved. Manufactured under license from Digital Theater Systems, Inc. US Pat. No.
5,451,942 and other worldwide patents issues and pending. "DTS" and "DTS Digital Surround" are trademarks of Digital Theater
Systems, Inc. © 1996 Digital Theater Systems, Inc. All rights reserved. Manufactured under license from Lucasfilm Ltd. US Pat. Nos.
5,043,970; 5,189,703; and 5,222,059. Foreign patents pending. "Lucasfilm" and "THX" are registered trademarks of Lucasfilm Ltd.
S-VIDEO INPUTS
S-VIDEO OUT
MAIN
(You must connect these
three cables to a TV, linedoubler, or projector that
is capable of processing
component video)
1
2
CAUTION
4
3
RISK OF ELECTRIC SHOCK
DO NOT OPEN
ATTENTION!
Cinema Rhapsody
4
2
1
2
6
8
2
AUDIO INPUTS
4
5
3
MADE IN U.S.A.
OSD
6
7
8
L
L
L
L
R
R
R
R
REC
AUDIO OUTPUTS
LS
L
SUB
DIGITAL AUDIO INPUTS
1
3
RS
C
CAUTION: Disconnect Supply Cord Before Servicing.
ATTENTION: Debrancher Avant Le Depannage.
Voltage
Selector &
Safety Fuse
On This Side
DATA PORT 12VDC OUT
100mA Max Per
ADA Bus™ DC 1 DC 2
1 2 3 4 1- 2+ 1- 2+
OPTICAL INPUTS
1
2
3
R
WARNING! Risk Of Hazardous Energy!
Make Proper Connections.
AVERTISSEMENT! Energie Electrique Dangereuse!
Faire Des Connexions Propres Pour L'Hautparleur.
Voir La Notice De Fonctionnement.
LOW VOLTAGE
Serial Data
OUT
Page 32
RISQUE DE CHOC ELECTRIQUE.
NE PAS OUVRIR
2
4
115 V
115V
AC OUTPUT
AC INPUT
10A~ Max Switched 115V~60Hz/230V~50Hz
230V
Use Same
Value Fuse
115V~1AS.B.
230V~.5AS.B.
Audio Setup
The Cinema Rhapsody has been calibrated in the factory for optimum operation. Thus you can at this time decide to run your system with just minor adjustments to the Master Volume Control (center knob).
However, since not all speaker configurations and rooms are the
same and for correct setup you should adjust the channel balance
and delay settings (see page 46 for setting delays) to better suit
your home theater system. If you are unfamiliar with the process of
home theater level calibration and the use of an SPL meter (Sound
Pressure Level meter), ADA strongly suggests contacting an Authorized ADA Dealer for assistance prior to proceeding.
The Cinema Rhapsody features an internal Pink Noise generator
which is used to determine signal level to each speaker. In order to
best proceed with the remainder of this page’s setup instructions, it
is recommended that you use an SPL meter.
The Cinema Rhapsody comes
preprogrammed “Out Of The
Box’ ready to play. Unless
you are going to use an SPL
meter to calibrate your
system, proceed with the
setup as described on page
33.
If you are using an SPL meter,
you will first want to set the
pink noise level for all of the
channels to 75 dB.
The Cinema Rhapsody also has a noise feature called “Noise All”.
This feature sends full bandwidth pink noise to all of your speakers.
This enables you to make a quick check to make sure that your
speakers are connected and that all the drivers are working.
Turn the CHANNEL knob until the display reads NOISE TEST and
then press the CHANNEL knob. The top line should now read NOISE
ALL and the second line should read ALL -0.0 dB. You should hear
pink noise from all of your speakers.
You can now do one of two things, either:
a. Raise and lower the level of the noise coming from all speakers.
Press the CHANNEL knob and then by turning the CHANNEL
knob, you raise and lower the volume. You can now check
the operation of your speakers.
b. Enter into the individual channel adjustment procedure.
1
Turn the CHANNEL knob one click clockwise and you will
read NOISE LEFT, press it. You will now hear pink noise
coming from just the Left channel. Turn on your SPL meter
to the 70dB range, Slow, C Weighted setting. Sit in your
listening position and hold the meter at comfortable arms
length, pointed upwards and adjust the CHANNEL knob
up or down so that the meter reads 75dB. Press the
CHANNEL knob again.
2
Turn the CHANNEL knob clockwise one click until the display reads NOISE CENTER and then press the CHANNEL knob. Raise (clockwise) or lower (counter clockwise)
the center channel’s pink noise level to approximately 75
dB and then press the CHANNEL knob.
Page 33
Audio Setup - Continued
As you proceed to go through
pink noise sweeps, the only
knob you will need to work is
the Cinema Rhapsody’s
Channel knob. This knob not
only selects noise modes but
also noise channels and then
the adjustment of the
channels. Jumping to the
master Volume control will
take you out of the noise
mode.
3
Turn the CHANNEL knob clockwise one click until the display reads NOISE RIGHT and then press the CHANNEL
knob. Raise (clockwise) or lower (counter clockwise) the
right channel’s pink noise level to approximately 75 dB
and then press the CHANNEL knob.
4
Turn the CHANNEL knob clockwise one click until the display reads NOISE R SURR and then press the CHANNEL knob. Raise (clockwise) or lower (counter clockwise)
the right surround channel’s pink noise level to approximately 75 dB and then press the CHANNEL knob.
5
Turn the CHANNEL knob clockwise one click until the display reads NOISE L SURR and then press the CHANNEL
knob. Raise (clockwise) or lower (counter clockwise) the
left surround channel’s pink noise level to approximately
75 dB and then press the CHANNEL knob.
6
Turn the CHANNEL knob clockwise one click until the display reads NOISE L/R SR and then press the CHANNEL
knob. Raise (clockwise) or lower (counter clockwise) both
surround channel’s pink noise level to approximately 75
dB and then press the CHANNEL knob.
7
Turn the CHANNEL knob clockwise one click until the display reads NOISE SUB and then press the CHANNEL
knob. Raise (clockwise) or lower (counter clockwise) the
subwoofer channel’s pink noise level to approximately 75
dB and then press the CHANNEL knob.
At this time you have calibrated the pink noise to THX specifications.
8
Without adjusting either an individual channel’s level turn the
Master Volume control one click to exit the Noise Test.
The Cinema Rhapsody will now return the Master Volume to the approximate level, prior to entering the Noise
Test mode. Please note, that the relative balance between the channels, set during Noise Test, are preserved.
9
Engage a source into play and turn the Master Volume knob
to a comfortable listening level.
10 To save the calibrated levels, turn the CHANNEL knob to
VOL RECALL 1. Press and Hold the CHANNEL knob
until the display flashes VOL STORED 1.
Page 34
Audio Setup - Continued
At this time you have programmed the Cinema Rhapsody’s Volume
Preset #1 to levels that are consistent with the pink noise and this
preset corresponds to a listening level comfortable with respect to
your listening environment.
Bass Volume Presets - While the five main channels should be set
to the same level as you select from one source to another, ADA has
experienced that the subwoofer level for different components and
decoding modes can be significantly different. As such, a bass level
for one input might need to be lower for another input. The Cinema
Rhapsody is equipped to handle this issue as each input can have
its own bass level setting stored into VOL PRESET 1. To set the
bass level for all other inputs, you will need to select each input one
at a time, adjust the bass level to taste and load it into the preset.
11 Turn the INPUT knob to the next device and engage the component into play.
12 Turn the CHANNEL knob until the second line of the display
reads SUB and a number. Press the CHANNEL knob.
13 Raise and lower the CHANNEL knob and the subwoofer will
go up and down in volume. When you have a desired
subwoofer level, press the CHANNEL knob.
14 Turn the CHANNEL knob until the display reads VOL RECALL 1. Press and hold the CHANNEL knob until the
display reads VOL STORED 1.
15 Proceed with steps 16-19 until all active inputs have been
calibrated.
The Cinema Rhapsody is
capable of setting different
bass levels for each one your
components. While the main
five channels levels remain
the same, each input would
engage a different bass level.
This permits you to contour
the bass sound based on the
source component, the
decoding mode, and the
software. As different
decoding modes and their
software have varying levels
of bass, you will find this
feature very useful.
Note:
In order to load in a bass level
for each one of your
components, you will need to
select that component and
then adjust its bass level while
the unit is in play. After you
have set a bass level you like,
you will need to load the
current volume setting into
the Volume Preset #1, using
the same steps that were
required to load the preset on
the previous pages.
Page 35
Custom Setup - A/V Linking
The Cinema Rhapsody can be
custom configured, permitting
you to link any Analog, Video,
S-Video, Component Video,
and LASER AC-3 RF (RF
Inputs are discussed on the
next page) input jack to a
particular Input Label. You
can also modify or completely
change the name of an Input
Label. And finally, under Pro
Setup, you can even limit the
number of Input Labels that
appear as you turn the INPUT
knob. While this is discussed
further under Pro Setup, if
you wish to fully customize
your Cinema Rhapsody, such
that you only see the number
of devices you are using, you
will first need to:
A
Determine the number
of components you are
connecting to your Cinema
Rhapsody and set the Final
Input limit to correspond to
this number (see Pro Setup).
B
Now that you have the
exact number of Input Labels
you need, you will most likely
need to alter the Input Labels
as some of the names may
not be displayed exactly as
you wish them to. (See next
page - Altering Input Labels)
C
Once you have the
Input Labels sequencing in
order as you wish them to,
you may also need to alter the
audio and video connections
linked to this input label.
These steps are discussed in
the paragraph to the left
(Custom Setup - AV Linking).
Page 36
At this time you have already connected all or most of your audio
video components to the Cinema Rhapsody. If you are satisfied
with the component connections to the Cinema Rhapsody, you need
not continue with this section. As the Cinema Rhapsody is
preprogrammed in the factory for optimum performance, you will
not necessarily need to custom program your unit.
In the event that you want to custom program your Cinema Rhapsody, this section will discuss altering audio and video inputs linked
to a particular Input Label.
Each Input Label is nothing but a name. Assigned to each name is
an audio input, a video input, a super video input, a component
video input, and an AC-3 RF input (RF see page 38). Even a radio
tuner, that does not have a video output, will have a video output
possibly connected to another device, linked to it. As such each
Input Label has several Cinema Rhapsody rear panel jacks tied to
it. The beauty behind the Cinema Rhapsody, is that these jacks are
linked in software and can be easily switched using the steps below.
Please note, you can also alter the way the Input Label reads. This
is discussed on the next page, Custom Setup - Labeling Inputs.
To alter a components audio and video inputs:
1
Select the device you wish to alter by turning the INPUT knob
until the second line of the display reads the device name
and press the INPUT knob.
2
Turn the MODE knob clockwise until the display reads SETUP
MODE and then press the MODE knob.
3
Turn the MODE knob clockwise to until the display reads the
type of input you wish to alter for this component.
If you want to alter an analog input, turn to ANALOG INPUT
If you want to alter a video input, turn to VIDEO INPUT.
If you want to alter an S-Video input, turn to S-VIDEO INPUT.
When you have selected the type of input you wish to alter,
press the MODE knob.
4
Turn the MODE knob until the display reads the new input
you are connected to and then press the MODE knob to
engage that input.
5
Proceed with step three to alter other inputs for this component.
6
If you wish to exit this mode, simply turn the INPUT knob.
Custom Setup - Auto Mode
As discussed on the previous page, the Cinema Rhapsody will typically apply an A/V Link to each Input Label. Thus, if you select the
TUNER 8 input and leave your TV & VCR on, you will still see the
VCR’s video image even though you are listening to the radio tuner.
Each Input Label will have a video and S-video follower.
The Cinema Rhapsody uses a unique circuit whereby it can autodetect an AC-3 or DTS signal. This auto detection will permit the
Cinema Rhapsody to change its active decoding mode between an
AC-3, DTS, or non-5.1 mode depending on the software. Since a
single input could auto-mode between as many as three different
decoding formats, and since each decoding format has several enhancement and filter options available, ADA has made it very easy
to setup the Cinema Rhapsody to play your desired format option
automatically.
When you select an input that is programmed to auto-mode, begin
playing some software from that component. The Cinema Rhapsody will auto detect the correct decoding format. At that time, you
may turn the mode knob to one of the other mode options. When
you begin playing software that needs to be decoded in this same
format, the Cinema Rhapsody will engage the last selected format
option.
As an example, suppose your DVD player is connected to the Cinema Rhapsody to play Dolby Digital (AC-3) DVDs, PCM CDs, DTS
DVDs, and DTS CDs. Furthermore, suppose you prefer AC-3 ULTRA decoding for AC-3 software, QUAD BYBASS for standard CDs,
and DTS DIRECT for DTS DVDs and CDs, all you would do is to
place the first piece of software in the DVD player. If this were an
Dolby Digital (AC-3) DVD, the auto detection might very well first
engage AC-3 THX. You can then turn the mode knob to AC-3 ULTRA and then press the mode knob to secure this mode. Any time
you play an AC-3 DVD from this point forward, the Cinema Rhapsody will auto-mode to AC-3 ULTRA. To further insure proper setup,
continue to test the auto-mode circuit with a standard CD. Again,
the Cinema Rhapsody will engage a two channel surround mode,
typically Pro Logic. Turn the mode knob to QUAD BYPASS and
press it. From this point forward, non-5.1 formatted material will
automatically play in QUAD BYPASS. Finally, play a DTS CD or
DVD. Once DTS locks in, turn the mode knob to DTS DIRECT and
press it. As with AC-3 and two-channel formats, from this point forward, the DTS automode default format will be DTS DIRECT.
The Cinema Rhapsody
incorporates a unique Auto
Mode detection circuit for AC3, DTS, and non-5.1 software.
When Auto Mode is set to on
for a Laser Disc or DVD
component, the Cinema
Rhapsody will automatically
switch to an appropriate
decoding mode.
When an input is set to automode on, it will engage the
best possible decoding mode.
As each 5.1 and the two
channel format have several
options, you can select which
option you want engaged
during an auto-mode
detection sequence. As the
Cinema Rhapsody will recall
the last mode format option
used, you can setup your
Cinema Rhapsody by simply
dialing in a mode for both AC3 and DTS 5.1 software and a
decoding option for two
channel software.
Please note, if your default mode is set to any DTS mode, if
auto detection occurs for either AC-3 or two-channel software,
the Cinema Rhapsody will engage to either AC-3 THX or Pro
Logic THX, regardless of the last mode used for that format.
Page 37
Auto Mode On/Off
For components that are not
set to auto-mode on, the
Cinema Rhapsody’s default
mode for this input will return
after re-selecting the input or
during a restart, even if you
alter the mode.
For example, if your CD player
is set for Quad Bypass as its
Default Mode but for this one
CD, you wish to listen to it in
Stereo, turn the mode knob to
Stereo. If you change inputs
or turn the system off, the
next time you access your CD
player, it will default to the
Quad Bypass mode.
Page 38
The AUTOMODE function is a setting rather than a decoding mode.
This setting is intended to permit the Cinema Rhapsody to automatically switch between 5.1 (AC-3 or DTS) decoding modes or a two
channel mode depending on the software in play. The AUTOMODE
function will allow you to flip between AC-3 laser discs (via the laser
disc player’s internal RF Demodulator), DTS and 2 channel PCM
lasers & CDs, and DTS or AC-3 DVDs.
To turn the AUTOMODE ON or OFF:
1
Turn the INPUT knob to the device (capable of playing AC-3
software) you wish to alter and press the INPUT knob.
2
Turn the MODE knob clockwise until the display reads
AUTOMODE ON or AUTOMODE OFF.
3
Press the MODE knob to switch ON to OFF or OFF to ON.
The Cinema Rhapsody’s “Out Of The Box” Setup has the LASER/
DVD 1 and LASERDISC 2 Input Labels set to AUTOMODE ON. All
other Input Labels are set to OFF. If you are using a DVD player on
the DVD PLAYER 3 Input Label and you plan to also play standard
CDs, you may wish to set the DVD PLAYER Input Label to
AUTOMODE ON.
Custom Setup - Labeling Inputs
The Cinema Rhapsody permits you to alter the Input Labels. These
are labels that appear for each component as you rotate the Input
knob. This is quite useful if you have connected a component that
does not appear on the Cinema Rhapsody (i.e. DAT Player). Altering Input Labels is also available when you don’t want the numbers
to appear on the Cinema Rhapsody’s display (i.e. LASER/DVD 1,
LASERDISC 2). The front panel display can read a name up to 12
characters in length (alphanumeric). The most significant benefit of
altering Input Label names is derived when using the Cinema
Rhapsody’s “Final Input” Setup Mode (found under Pro Setup). The
“Final Input” Setup Mode permits you to limit the number of Input
Labels that appear on the Cinema Rhapsody. If you wish to only
display only the devices connected to your Cinema Rhapsody, ADA
suggests first proceeding to the section entitled “Pro Setup - Final
Input”. Once you have set the Final Input, then return to this page to
change the Input Labels. To alter a components Input Label:
1
Select the device you wish to alter by turning the INPUT knob
until the second line of the display reads the device name
and press the INPUT knob.
2
Turn the MODE knob clockwise until the display reads SETUP
MODE and then press the MODE knob.
3
Turn the MODE knob clockwise to until the display reads
INPUT LABELS and then press the MODE knob. The
top line of the display will read LABEL INPUTS and the
second line of the display will read the Input Label as it
currently appears with the first letter of the Input Label
flashing (cursor).
4
Turn the MODE knob to select a new character for the first
letter. If you do not wish to alter the character of the first
letter, press the MODE knob to advance to the cursor to
the second letter.
5
Turn the MODE knob to change this character and press the
MODE knob to advance the cursor position to the next
character.
6
Repeat step 5 until the display reads the new name for this
Input Label. ADA suggests leaving the numeric value at
the end of each Input Label in place to provide you with a
reference as to this Input Label’s position to the Cinema
Rhapsody’s program.
7
When you are done relabeling an Input Label, turn the INPUT knob to advance to the next input you wish to relabel. Repeat with steps 4 - 6. When you are done labeling
all inputs, turn either Volume, Channel, or Record to exit
the
While the Cinema Rhapsody’s
“Out Of The Box” Setup has
pre-labeled connections for
most any home theater audio/
video component, you may
wish to custom label any or all
inputs to display to your
liking.
The Cinema Rhapsody’s builtin character generator allows
you to alter the way an Input
Label reads when it is
displayed. If you prefer to
have DSS/SAT 5 input read as
simply DSS RECEIVER, you
can enter the Cinema
Rhapsody’s Label Mode to
edit and alter this input.
While the “Out Of The Box”
Setup assigns a sequenced
Input Label number to each
Input Label (1 -15), you can
overwrite these numbers so
that they do not appear, but
note, these numbers do refer
to the direct access input
numbers found on the ADA
One-For-All Remote.
The ability to alter the way
Input Labels read is
particularly useful if you are
custom configuring your
Cinema Rhapsody using the
Pro Setup’s “Final Input”
settings. Since the Final Input
Setup allows you to limit the
number of Input Labels that
are displayed as you rotate
the Input Knob, the need to
relabel the lower inputs to suit
your setup will be important.
Prior to proceeding you may
wish to review Final Input
under Pro Setup.
Page 39
Custom Setup - Turn-On Input
The Cinema Rhapsody
provides you with the ability
to select which device you
want the Cinema Rhapsody to
always turn on to. If you
primarily use the Cinema
Rhapsody for viewing DSS
broadcasts, you will want to
alter the Turn On Input.
The Cinema Rhapsody is factory set to always turn on to the VCR 4
input. Thus, even if you were watching a movie on DVD last night,
when the kids come to turn it on in the morning, the Cinema Rhapsody will always switch to the VCR.
The Cinema Rhapsody’s “Out
Of The Box” Turn On Input is
set to VCR as most any home
theater system includes a
VCR. The steps in the
paragraph to the right detail
how to alter the Cinema
Rhapsody’s Turn On Input.
To alter the Cinema Rhapsody’s Turn-On Input:
While you may opt to have the
Cinema Rhapsody turn on to a
specific component, you may
also opt to have the Cinema
Rhapsody always engage to
the input last used.
Page 40
While this ideal for some, you may prefer to have your Cinema Rhapsody to turn on to another device, for example the DSS receiver.
You may even prefer to have the Cinema Rhapsody always engage
to the component that was last used. Any of these options is easy to
access by following these steps.
1
Turn the MODE knob clockwise until the display reads SETUP
MODE and then press the MODE knob.
2
Turn the MODE knob clockwise to until the display reads
TURNON INPUT press the MODE knob.
3
Turn the MODE knob until the display reads the device you
wish to have the Cinema Rhapsody come on to or to the
words LAST USED and press the MODE knob to engage
that setting.
4
If you wish to exit the setup mode, simply turn the INPUT
knob.
Custom Setup - Default Mode
COMPONENT
"OUT OF THE BOX"
DEFAULT MODE
SETTING
INPUT LABEL
Each Input Label can have a mode automatically engaged
whenever that input is accessed. This eliminates the confusion of having to figure out what mode to select every time
that device is engaged. The “Out Of The Box Setup” has already programmed the Input Labels to engage the most appropriate decoding mode for the various devices. If you wish
to alter the Default Mode for one or all of the devices follow
these steps.
AC-3 LASER DISC OR
COMBINATION PLAYER
OLDER LASER DISC OR
SECOND LASER DISC
LASER/DVD 1
LASERDISC 2
DVD PLAYER 3
VCR
4
DSS/SAT 5
CABLE/TV 6
Please note, that for non-5.1 channel components, the default
mode is always engaged when that input is selected. You
may still change modes while on this input. If desired, you
may also engage the option of “Last Used”.
CASSETTE 9
AUXILIARY 10
AC-3 THX
VCR
PRO LOGIC THX
PRO LOGIC THX
CABLE BOX OR TV TUNER
PRO LOGIC THX
CD PLAYER
MUSIC
RADIO TUNER
MUSIC
CASSETTE DECK
MUSIC
ANY DEVICE YOU WANT
PRO LOGIC THX
CAMCORDER
PRO LOGIC THX
CAMCORDER 11
VIDEO GAME
PRO LOGIC THX
COMPUTER INPUT
PRO LOGIC THX
VIDEOGAME 12
COMPUTER 13
DVD PLAYER
DSS OR SATELLITE
RECEIVER
CD PLAYER 7
TUNER 8
AC-3 THX
PRO LOGIC THX
AUDIO OR AUDIO/VIDEO
If you have selected a component that is set to auto-mode PREAMP 14
MUSIC
PREAMPLIFIER
AUDIO OR
(Auto-Mode On), the default mode will have different proper- MULTIROOM 15 MULTI-ROOM
MUSIC
AUDIO/VIDEO SYSTEM
ties. Since auto-mode will engage one of three decoding formats (AC-3, DTS, or 2-channel) based on the input signal, one single
The Cinema Rhapsody’s “Out
default mode (or prefered) is required. As such, these “defaults” are
Of
The Box” Setup has
simply set during the playback of a software segment encoded in
assigned Default Modes to
that mode. During playback, turn the mode knob to select the deeach
input. If you are altering
sired option for that mode (i.e. DTS DIRECT, DTS THX, DTS REthe Out Of The Box Setup,
EQ, etc.). Every time from this point forward a DTS software segchances are you will also wish
ment is played on this input, the last used DTS decoding option will
engage (i.e. DTS THX). The same is true for AC-3 modes or twoto alter the default modes for
channel modes. This “last mode type played” default-to feature will
the inputs you have changed.
always operate if the input’s Default Mode is set to “Last Used”. If
you set the Default Mode to either an AC-3 or two-channel mode,
For components set to Auto
when that mode is detected, the Cinema Rhapsody will engage the
Mode Off, the Cinema
Default Mode rather than the mode format option that was last used.
Rhapsody will always engage
If you select any DTS mode as the Default Mode, when either an
the specified Default Mode
AC-3 or two-channel mix is detected, the Cinema Rhapsody will only
including
the option of “Last
engage either AC-3 THX or PRO LOGIC THX, respectively.
Used”.
To set or alter the Default Mode:
1
Turn the INPUT knob until the input that you wish to alter
appears on the second line of the display and then press
the INPUT knob.
2
Turn the MODE knob clockwise until the display reads SETUP
MODE and then press the MODE knob.
3
Turn the MODE knob clockwise to until the display reads
DEFAULT MODE press the MODE knob. The top line of
the display will read the current default mode.
4
Turn the MODE knob until the display reads the desired default mode or the words LAST USED, or AUTO MODE.
Then press the MODE knob to lock in that default mode.
5
Turn the INPUT knob to the next input you wish to alter and
press the INPUT knob. Then proceed with steps 2-4.
For components that are set
to Auto Mode On, the default
mode will apply as the go to
mode, providing a better
decoding option is not
detected. You may also opt to
leave the Default Mode set to
LAST USED as in auto mode,
the Cinema Rhapsody will
automatically engage the last
format option for that mode.
When DTS is selected as a
Default Mode in automode,
THX will always be applied to
either AC-3 or two channel
mixes.
Page 41
Custom Setup - Turn On Volume
The Cinema Rhapsody’s “Out
Of The Box” Setup has the
Cinema Rhapsody always
turning on to VOLUME
PRESET #1. Unless you have
already locked in a new
volume preset under Audio
Setup, this level will be -25.0
dB.
You can opt to alter the Turn
On Volume to either VOLUME
PRESET #2 or the LAST USED
volume level. The steps
described in the paragraph to
the right detail how to change
the Cinema Rhapsody’s Turn
On Volume.
Note
ADA strongly recommends
using a Turn On Volume
Preset whose level is not too
high. Since the last volume
used might be ear shattering,
having the Cinema Rhapsody
turn on to a preset volume
level removes the chance of
engaging a system that is
ready to sand-blast a room.
This is providing that the
Volume Preset you select is
also of moderate level.
Page 42
The Cinema Rhapsody has the ability to recall one of three volume
levels when it is turned on. The Out Of The Box Setup has the
Cinema Rhapsody always turning onto VOL PRESET 1 which is
factory set for all channels and all inputs at -25.0 dB. This level is
typically a low or moderate volume level. If you have already completed the section on “Audio Setup”, then you may have already
locked in a new audio preset on VOL PRESET 1.
Factory Default Note: The Cinema Rhapsody has been
preprogrammed in the factory such that both VOL PRESET 1 and
VOL PRESET 2 have the same preset level of all channels on all
inputs set to -25.0 dB. If you wish to instantly recall the factory
settings, simply proceed to recall VOL PRESET 2 by turning the
CHANNEL knob until the display reads VOL RECALL 2 and then
press the CHANNEL knob. If you wish to reset VOL PRESET 1 to
the factory default as to begin again, once you have recalled VOL
PRESET 2, simply turn the CHANNEL knob until the display reads
VOL RECALL 1 and then press and hold the CHANNEL knob until
the display reads VOL STORED 1.
If you want the Cinema Rhapsody to come on to a volume level
other than VOL PRESET 1, you can alter it to come on to either VOL
PRESET 2 or LAST USED.
To alter the Cinema Rhapsody’s Turn On Volume:
1
Turn the MODE knob clockwise until the display reads SETUP
MODE and then press the MODE knob.
2
Turn the MODE knob clockwise to until the display reads
TURNON VOL press the MODE knob. The top line of the
display will read the current turn on volume setting.
3
Turn the MODE knob until the display reads the desired turn
on volume. Then press the MODE knob to lock in that
turn on volume.
Custom Setup - Display Illumination Level
The Cinema Rhapsody permits you to alter the intensity of the front
panel LCD display as well as the six indicators located to the left
side of the front panel. If you wish, you can lower the intensity from
100% to 0% (All Off). The Cinema Rhapsody’s Out Of The Box
Setup is set to full intensity (100% On). There is also an Auto setting
where the Cinema Rhapsody will automatically dim its display as
the ambient light in the room is lowered. The unit’s front panel features a photo cell and when set to Auto, will cause the display to
increase with room light and darken as the room gets darker.
DVD DISC 1
ALL -02.5 DB
DIGITAL
LFE
MODE
ENGAGE
INPUT
SELECTOR
d
To alter the level:
1
Turn the MODE knob clockwise until the display reads SETUP
MODE and then press the MODE knob.
2
Turn the MODE knob clockwise to until the display reads
ILLUMINATION press the MODE knob. The top line of
the display will read ILLUMINATION and the second row
will read the current %.
3
Turn the MODE knob until the display reads the desired level
or the word AUTO (displayed with the current % level
based on the photo cell). Then press the MODE knob to
lock in that setting. Note, that as you change the level the
display increases or decreases in intensity. In Auto, the
display will darken as you place your hand over the front
panel’s photo cell.
While you can turn the Six
Quadrant Vector Scope of the
Cinema Rhapsody On and Off,
you can actually dim the rest
of the Cinema Rhapsody’s
front panel display to a %
level that you prefer or set it
to Auto where a photo-cell
determines the display’s
intensity. With the Auto
function, as a room gets
darker, the display dims.
The Cinema Rhapsody’s “Out
Of The Box” Setup has the
Cinema Rhapsody’s front
panel intensity level set to
100%. You can dim this
display, including the six
indicators to the left of the
front panel all the way down
to 0% (full off).
Page 43
Pro Setup
The Cinema Rhapsody has
additional parameters that can
be set under the Pro Setup
Mode. These parameters are
set in the factory for optimum
performance.
To protect these factory
settings, the ability to access
the Pro Setup mode requires
the turning of the MODE knob
until SETUP MODE appears
followed by pressing and
holding of the MODE knob for
a countdown of ten seconds.
When in the Pro Setup Mode,
you can still access functions
typically limited to the
standard Setup Mode.
There is no time-out function
while in Pro Setup.
To exit the Pro Setup Mode,
simply turn the INPUT knob.
The Cinema Rhapsody permits access to the “One Time” Setup functions through its “Pro Setup”. The Pro Setup is well protected from
accidental access in order to best preserve the Cinema Rhapsody’s
“Out Of The Box” factory default parameters. Since the Cinema
Rhapsody is designed for optimum operation, these parameters may
not need to be adjusted, and as such, under most circumstances,
should be left alone.
The features that are available in Pro Setup are:
Delay Settings - Each channels delay (including Sub) can be set in
0.5 dB steps.
Network Bus - The setting of the ADA Bus™ address.
Final Input - Setting the maximum number of Input Labels that appear on
the Cinema Rhapsody.
Speaker System Setup Individual - Set speakers for specific inputs.
Speaker System Setup All - One step speaker setup for all inputs.
Bass Limiter - Bass Peak Limit Manager is set by listening to software.
Bass Limiter Set - Bass Peak Limit Manager is set using pink noise.
HDR Up Scale - Setting the High Dynamic Range scale factor for AC-3.
LDR Dn Scale - Setting the Low Dynamic Range scale factor for AC-3.
Re-Equalize - Turning the THX Re-Equalizer on and off for each input.
Timbre Match - Turning the THX Timbre Match on and off for each input.
Decorrelate - Turning the THX Adaptive Decorrelation on and off for each
input.
Auto-Balance - Turning the Auto-Balance on and off for each input.
Repeat Count - Setting the maximum number of consecutive blocks repeated before muting for Dolby Digital modes.
Analog Gain - Adjusting the gain control from 0 d B to +9 dB, in 3 dB steps
per input.
PCM Scale - Adjusts the PCM scale per AC-3 or non-AC-3 modes.
IRR On/Off - Turning the Cinema Rhapsody’s front panel IR receiver on
and off.
Input Format - Sets the Dolby Digital decoding input format per input.
Aux DC Trig 1 - Sets the Auxiliary Trigger #1 to engage with specific inputs.
Aux DC Trig 2 - Sets the Auxiliary Trigger #1 to engage with specific inputs.
Effect Delay - Sets the effect delay for Stereo & Mono Enhance modes.
Effect Level - Sets the level of effect for Stereo & Mono Enhance modes.
To enter the Pro Setup Mode:
Page 44
1
Turn the MODE knob clockwise until the display reads SETUP
MODE and then press the MODE knob.
2
Turn the MODE knob clockwise to until the display reads
PRO SETUP and press and hold the MODE knob. The
top line of the display will read PRO SETUP and the second line of the display will read T-MINUS 10, T-MINUS
9,.....T-MINUS 1. At this time the display will flash and the
top line will return to read PRO SETUP and the second
line will now read the first Pro Setup function, NETWORK
BUS.
3
To exit the Pro Setup Mode, turn any knob other than the
mode and input knobs. Turn the mode knob to access
the above mentioned parameters.
Pro Setup - Delay Setup
The adjustment of the Delay setting can be configured independently
for each of the Cinema Rhapsody’s six channels (including the
subwoofer channel). The goal of setting channel delays is to have
the sound from each speaker reach the primary seating position at
the same time or perhaps better put, the correct time. Since the
Cinema Rhapsody can delay the signal of a channel from reaching
that channel’s output (and as such, the amplifier, then the speaker,
and then your ears), the delay is applied to all speakers that are
closer to the listener than the furthest speaker. This speaker, the
one at greatest distance from the primary listening/viewing position,
for the sake of this section, will be called the “Reference Speaker”,
because all of the other speakers closer to the listening position, will
use this speaker’s distance as a reference point.
The process of setting the delays will require the use of a tape measure or some other distance measuring instrument. ADA suggests
using the U.S./British standard to measure these distances in feet
as sound travels at approximately 1 foot per millisecond (1/100th of
a second). If you are using the metric st andard to measure your
distances, ADA suggests converting all measurements to feet as it
will be easier to calibrate the delay time settings (1 foot is approximately equal to 30.5 cm).
The example below details a sample speaker placement where each
speaker is located at a different distance from the primary seating
position. The chart to the right is filled in with the sample distances
from diagram below.
CENTER
FRONT (LEFT)
FRONT (RIGHT)
The Cinema Rhapsody
provides the flexibility to set
the delay for each of the six
speaker channels including
the subwoofer. Unlike
conventional delay settings,
where the front right and left
speakers act as the reference
distance, the six channel delay
configuration requires that
one of the six channels be
selected as the reference.
Since delay is applied to
speakers that are closer than
the furthest most speaker, the
“Reference Speaker” is the
speaker that has the greatest
distance to the primary
listening position. Delay is
then applied to all of the other
channels.
The Cinema Rhapsody is
capable of delay settings in
0.5 millisecond increments.
Since 1 foot is equal to 1
millisecond, you can adjust
the delay for each channel to
the nearest 1/2 foot (six
inches). As such, your
measurements need be
rounded to the nearest six
inches.
12 Ft
SUBWOOFER
17 Ft
15 Ft
10 Ft
7 Ft
8 Ft
SUR. (RIGHT)
SUR. (LEFT)
Page 45
Most home theaters have the
front right and left speakers
equal distance from the main
seating area. The same is
usually true of the surround
left and right speakers as it is
common that they are also of
equal distance from the
primary seating position.
To proceed, you will first determine where your primary listening
viewing seating position will be. Next you will want to measure the
distance from the primary listening/viewing position each speaker
using a tape measure. Your measurements need to be accurate to
within 6 Inches (1/2 Foot). Follow these steps:
1
Determine the primary seating position and use it as the
measuring center point.
2
Measure the distance to each speaker and write them on a
piece of paper. You can use the blank chart found on
page 36 which is identical to the sample chart on the next
page.
FRONT LEFT
CENTER
FRONT
RIGHT
SUBWOOFER
LEFT
SURROUND
RIGHT
SURROUND
DISTANCE IN FEET
17
12
15
10
8
7
ENTER DISTANCE
OF FURTHEST
FRONT SPEAKER
(REFERENCE
SPEAKER)
17
17
17
17
17
17
ENTER DISTANCE
OF SPEAKER
17
12
15
10
8
7
SUBTRACT
SPEAKER'S
DISTANCE FROM
REFERENCE
SPEAKER
0
5
2
7
9
1 0
THESE ARE THE
SPEAKER'S
DELAY SETTINGS
Please note, as the delay range for 5.1 modes is 0-15 ms, the above delay settings
directly apply only to 5.1 decoding modes. For Dolby Pro Logic modes, the delay
range is 15-30 ms. Dolby Pro Logic modes automatically add 15 ms to these numbers
If the front set of right and left
speakers are furthest from the
seating area, they would
together act as the Reference
Speaker and not require any
delay. The distance to one of
these speakers will be used as
a reference and the
appropriate delay would then
be set for the surround,
center, and subwoofer
speakers. In this example, all
speakers are at different
distances.
Page 46
3
Determine which of the speakers is furthest away and use
this speaker as the “Reference Speaker”. In most home
theater systems, the front right and left speakers are typically of equal distance from the seating area as are the
left and right surround speakers. If more than one speaker’s position is equal to the greatest distance from the
primary seating position, these speakers will also have
no delay.
4
Subtract the distance of all of the speakers from the distance of the furthest speaker (Reference Speaker). These
numbers will be used as the Delay Settings. The chart
above shows the measurements taken from the example
diagram on the bottom of the previous page. Since the
Front Left speaker is placed the greatest distance from
the seating area, it is used as the Reference Speaker
and requires no delay (Delay = 0 ms). The difference in
the distance of the other speakers from the Reference
Speaker are the actual delay settings. The chart above
details the math involved.
Delay Setup - Continued
You can use the diagram below to insert the distances you measured for your theater.
FRONT LEFT
CENTER
FRONT
RIGHT
SUBWOOFER
LEFT
SURROUND
RIGHT
SURROUND
MEASURED
DISTANCE IN FEET
ENTER DISTANCE
OF FURTHEST
FRONT SPEAKER
(REFERENCE
SPEAKER)
ENTER DISTANCE
OF SPEAKER
SUBTRACT
SPEAKER'S
DISTANCE FROM
REFERENCE
SPEAKER'S
DISTANCE
5
Turn the MODE knob clockwise until the display reads SETUP
MODE and then press the MODE knob. Turn the MODE
knob until the display reads PRO SETUP. Press and hold
the MODE knob. Continue holding the MODE knob until
the Cinema Rhapsody’s display counts down (T -10, 9,
8,...,0) and reads PRO SETUP.
6
Turn the MODE knob clockwise to until the display reads the
word DELAY followed by the first channel you wish to
adjust, and then press the MODE knob to engage that
channel. The top row of the display will read the channel
name and the bottom row will read its current delay setting in MS (milliseconds).
7
Turn the MODE knob until the display reads the desired delay level and then press the MODE knob to engage that
delay. The difference (measured in feet) of the farthest
speaker from the selected speaker is also the same value
in milliseconds.
8
Turn the MODE knob to the next channel who’s delay you
wish to adjust and press the MODE knob.
9
Repeat step 8 for all channels that require delay adjustment.
10 When you have completed adjusting the delay for all channels, turn the INPUT knob to exit the Pro Setup Mode.
THESE ARE THE
SPEAKER'S DELAY
SETTINGS
The actual delay value for
each channel is equal to the
distance that is calculated by
subtracting that channel’s
distance from the primary
listening position from the
distance of the furthest
speaker to the primary
listening position.
In the example from the
previous page, the Reference
Speaker is the Left Front
speaker and this speaker will
not be delayed (0.0 ms). The
Center speaker’s delay will be
set to 5 ms, the Front Right
speaker will be set to 2 ms,
the Subwoofer will be set to 7
ms, the Left Surround speaker
will be set to 9 ms, and the
Right Surround Speaker will
be set to 10 ms. Note that
these delay settings are equal
to the distances in feet.
Page 47
Pro Setup - Network Bus
The Cinema Rhapsody can be
set to one of 255 ADA Bus™
Address settings. The
standard factory default
address is “0”. This address
permits the Cinema Rhapsody
to be controlled by its infrared
remote control.
The Cinema Rhapsody has the ability to be controlled in a network
with other ADA Bus™ components, including multiple Cinema
Rhapsodys. As such, the Cinema Rhapsody has the ability to be
set to as many as 256 addresses. Typically, the factory default address for the Cinema Rhapsody is Bus Address 0. At this address
setting, the Cinema Rhapsody operates with its infrared remote control.
When using the Cinema Rhapsody in an ADA Bus™ multi-zone audio/video system, you may need to alter the address setting to have
the Cinema Rhapsody also operate in conjunction with that zone’s
ADA Bus™ keypad.
The Cinema Rhapsody also has a setting whereby the bi-drectional
control option via the ADA Bus™ jack is completely off. To select
this feature, set the Network Bus Address to “255”.
To change the Bus Address:
Page 48
1
While in the Pro Setup mode, turn the MODE knob until the
display reads NETWORK BUS and then press the MODE
knob.
2
Turn the MODE knob until you have set the Network Bus to
the desired address setting (from 0 {default standard} to
254 - 255 turns the bidirectional control/feedback option
off).
3
When you have the desired address setting on the Cinema
Rhapsody’s display, press the MODE knob to engage the
address.
4
To exit the Network Bus Setup Mode without leaving the Pro
Setup Mode, press the MODE knob. If you wish to exit
the Setup Mode completely, turn any of the knobs other
than MODE or INPUT.
Pro Setup - Final Input
The Cinema Rhapsody provides you with the ability to custom configure the way its display appears. Through the use of the Label
Inputs option, you can rename an Input Label to appear as you wish
it read. Through the Audio/Video Setup, you can alter the links to
the Cinema Rhapsody’s input jacks for any Input Label. But if you
wish to have the Cinema Rhapsody scroll through Input Labels for
only the devices you have connected to it, you will first need to limit
the number of Input Labels the Cinema Rhapsody will display using
the Final Input Setup Mode.
As the Cinema Rhapsody has a total of fifteen Input Labels in its
factory default “Out Of The Box” setup, you may not necessarily be
connecting a total of fifteen devices to the Cinema Rhapsody. If for
example, you are connecting only six devices to the Cinema Rhapsody, you can limit the number of Input Labels that appear on the
Cinema Rhapsody to only six.
Please note, that when the Cinema Rhapsody sets a limit to the
higher Input Label names, it does so by, in this example, not displaying Input Labels 7-15. You cannot selectively omit Input Label names
from displaying (i.e. Input Labels 3, 4, 8, 9-15). Thus, when you set
a limit to the number of Input Label names that are accessible, you
will also most likely need to alter the names of certain labels as well
as the audio/video links to those labels.
To set the Final Input limit:
1
While in the Pro Setup Mode, turn the MODE knob clockwise until the display reads FINAL INPUT and then press
the MODE knob.
2
Turn the MODE knob until the display reads the last input
you wish to access. If you have not altered any Input
Labels up to this point, the Input Label name should also
appear with a number after it and you can use these as a
guide.
3
When you have the last Input Label you wish to display on
the screen, press the MODE knob to engage this final
input.
4
To exit the Final Input Setup Mode without leaving the Pro
Setup Mode, press the MODE knob. If you wish to exit
the Setup Mode completely, turn any of the knobs other
than MODE or INPUT.
The Cinema Rhapsody
provides a total of fifteen
Input Labels, all of which are
accessible in the “Out Of The
Box” configuration. However,
while this setup permits easy
connection of almost any
number of components
without complex
programming, it also means
that the Cinema Rhapsody will
display device names which
may not necessarily be on
your system.
ADA has provided a means by
where you can limit the
number of Input Labels that
appear on the Cinema
Rhapsody’s display by locking
in the Final Input. This has
been discussed briefly under
Labeling Inputs. When you
set the Final Input, the Cinema
Rhapsody will no longer scroll
through all Input Labels
beyond the Final Input. While
this does permit you to limit
the number of devices
displayed, you will most likely
need to re-configure the audio
and video inputs as well as
their Input Labels for some of
your components.
Page 49
Pro Setup - Speaker System Setup - Bass Management
The Cinema Rhapsody’s “Out
Of The Box” Setup is
defaulted to the THX standard
where the High Pass Filter is
active on all speakers with
their subwoofer information
summed to with the LFE
channel (Setting 0). If you are
using full range speakers in
your home theater system,
you can alter the speaker
system configuration aspect
of the Cinema Rhapsody.
Please note, that you have two
options when setting up the
Cinema Rhapsody for your
speaker system. The first
option permits you to setup
the Bass Configuration setting
for all inputs in one easy step.
The other option permits you
to set the speaker system
configuration, individually for
each input.
BASS
CONFIGURATION
CODE #
The Cinema Rhapsody supports two options for Speaker System
Configuration. The easiest option (SPKR SYS ALL) permits you to
setup the speaker configuration for all inputs in one easy step. The
second option (SPKR SYS IND), permits you setup a different
speaker configuration for each input. It is worth noting at this time, if
are planning to set individual inputs to their own speaker configuration and then choose to access the SPKR SYS ALL configuration
option, you will immediately reset all previous individual speaker
settings to what ever configuration first comes up when entering the
more automatic option. As such, do not enter the SPKR SYS ALL
option if you have already adjusted the settings for particular inputs,
unless of course, you wish to reset the previously selected individual
settings.
The chart below details the various options available. Please note,
that the “0” option is the THX standard. It is also the Cinema
Rhapsody’s default speaker setup for all inputs.
LEFT & RIGHT
LEFT & RIGHT
CENTER CHANNEL
SUBWOOFER
FRONT CHANNELS
SURROUND CHANNELS
(C)
(LFE)
(LR)
(S)
BASS MIX
0
HIGH PASS FILTER
HIGH PASS FILTER
HIGH PASS FILTER
YES
1
FULL RANGE
FULL RANGE
FULL RANGE
YES
LFE TO SUB
2
FULL RANGE
FULL RANGE
FULL RANGE
NO
LFE TO LR,S
3
FULL RANGE
FULL RANGE
HIGH PASS FILTER
YES
LFE + S TO SUB
4
FULL RANGE
FULL RANGE
HIGH PASS FILTER
NO
LFE + S TO LR
5
FULL RANGE
HIGH PASS FILTER
FULL RANGE
YES
LFE + C TO SUB
LFE + LR,C,S TO SUB
6
FULL RANGE
HIGH PASS FILTER
FULL RANGE
YES
LFE TO SUB/C TO LR
7
FULL RANGE
HIGH PASS FILTER
FULL RANGE
NO
LFE TO LR,S/C TO LR
8
FULL RANGE
HIGH PASS FILTER
HIGH PASS FILTER
YES
LFE + C + S TO SUB
9
FULL RANGE
HIGH PASS FILTER
HIGH PASS FILTER
NO
LFE + C + S TO LR
1 0
HIGH PASS FILTER
HIGH PASS FILTER
FULL RANGE
YES
LFE + LR, C TO LFE
1 1
HIGH PASS FILTER
FULL RANGE
HIGH PASS FILTER
YES
LFE + LR, S TO SUB
1 2
HIGH PASS FILTER
FULL RANGE
FULL RANGE
YES
LFE + LR TO SUB
If you are using full range
speakers (speakers capable of
handling bass information)
either for all five main
speakers or just some of the
five main speakers, you will
need to use the chart to
determine which Bass
Configuration # best applies
to your speaker array.
Page 50
When setting the Speaker System Configuration, you are in effect,
determining how the bass is managed through your speaker system. The Cinema Rhapsody is very flexible when it comes to this
setup. For those systems that utilize a THX certified speaker system, there will be no need to go through the elaborate Speaker System Configuration setup. However, if you are using speakers that
are capable of full range operation or wish to have different bass
options for different inputs, the Cinema Rhapsody is very flexible.
To change the Speaker System Configuration for all inputs:
1 While in the PRO SETUP mode, turn the MODE knob until
the display reads SPKR SYS ALL, then press the MODE
knob. The display will read BASS CONFIG on the top
line and the second line will read the ALL CONFIG #, where
the number indicates the current setting for all inputs.
2
Turn the MODE knob until the desired Speaker System Configuration is displayed. To exit this setting, press the MODE
knob (to return to the PRO SETUP mode) or turn the
VOLUME knob (to exit the SETUP mode entirely).
To change the Speaker System Configuration for individual inputs:
1 While in the PRO SETUP mode, turn the MODE knob until the display reads SPKR SYS IND
and then press the MODE knob. The display will read BASS CONFIG on the top line and
the second line will read the IND CONFIG #.
2
Turn the INPUT knob (In the BASS CONFIG Setup Mode, turning the INPUT knob does not
eject you from the Pro Setup) to select the input you wish to adjust. The top line of the
display will momentarily display the input you have selected (turned to) and the display will
then indicate this input’s BASS CONFIG/IND CONFIG #.
3
Turn the MODE knob until you have set the IND CONFIG # to the desired setting (from 0
{default & THX setting} to 12). You do not need to press the MODE knob to engage the
bass configuration and if you wish, you can listen to the different configurations as you dial
through them.
4
If you wish to alter the Speaker System Configuration for any or all other inputs, repeat steps 2
& 3. To exit the Bass Configuration Setup Mode without leaving the Pro Setup Mode, press
the MODE knob. To exit this setting, press the MODE knob (to return to the PRO SETUP
mode) or turn the VOLUME knob (to exit the SETUP mode entirely).
Please note, if you were to now enter the SPKR SYS ALL setting, you will reset every individual setting
completed in the steps above.
Pro Setup - IR Receiver On & Off Control
The Cinema Rhapsody provides you with the ability to turn its front
panel infrared receiver on and off via software. If you are using the
Cinema Rhapsody in an environment which is flooded by other infrared signals (from high intensity light bulbs, high frequency lamps,
IR motion detectors, sunlight, etc.), you may opt to turn the Cinema
Rhapsody’s front panel infrared receiver off. You may also want to
turn this IR receiver off if you are controlling the Cinema Rhapsody
from a computer controlled touch screen or ADA keypad as, in some
instances, this IR receiver will prevent component control due to
data reflection.
The Cinema Rhapsody
permits you to turn off the
front panel IR receiver via
software. This is useful if the
Cinema Rhapsody is being
touch screen controlled as
some installations will cause
the front panel IR to reflect
data transfers and prevent
control.
The Cinema Rhapsody’s “Out Of The Box” setup has the IR receiver
in the On position. To turn the IR receiver off or on:
1
While in the Pro Setup Mode, turn the MODE knob clockwise until the display reads IRR CONTROL and then press
the MODE knob. The Cinema Rhapsody’s display will
read IRR CONTROL on the top line and the second line
will read “IS NOW ON” or “IS NOW OFF”.
2
Turn the MODE knob until the display reads the correct setting for the IR Receiver, ON or OFF.
3
To exit the IRR Control Setup Mode without leaving the Pro
Setup Mode, press the MODE knob. If you wish to exit
the Setup Mode completely, turn any of the knobs other
than MODE or INPUT.
Page 51
Pro Setup - Bass Peak Limit Manager
The Cinema Rhapsody
permits you to engage a Bass
Peak Level Manager which
will prevent the subwoofer
from distorting when playing
the system at high volume
levels that the subwoofer
cannot properly process.
The Cinema Rhapsody provides you with the ability to engage a
Bass Peak Limit Manager that operates in a range from 0 dB (decibels) to -24 dB. The function of the Bass Peak Limit Manager is to
reduce the possibility of overloading the subwoofer in cases of extreme volume and/or software that provides extremely dynamic bass
information. If your subwoofer is capable of providing a large level
of bass without bottoming out, you may not need to engage the
Bass Peak Limit Manager. If however, you play your system at
volume levels that, on occasion, will cause your subwoofer to play
distorted audio segments, you will wish to engage the Bass Peak
Limit Manager.
The Cinema Rhapsody’s “Out Of The Box” setup has the Bass Peak Limit Manager set to OFF. There
are two different ways in which to set the Bass Peak Limit Manager. The BASS LIMITER is manual
and does not provide any subwoofer noise (as in Noise Test). To set the Bass Peak Limit Manager in
this manner requires that you listen to your subwoofer for distortion. The second option, BASS LIMITER SET, engages subwoofer noise used to adjust the Bass Peak Limit Manager. You can use either
BASS LIMITER or BASS LIMITER SET to dial in the desired Bass Peak Limit Manager level. You do
not need to use both methods, thus select just one.
The Bass Peak Limit Manager has a range with the options of OFF or -24 dB up to 0 dB. The range
operates as such: As an example, assume that the Bass Peak Limit Manager is set to -12dB. During
operation, as the Master Volume Level is raised and goes above -12 dB, the volume of the subwoofer
channel will stop rising. As such, regardless of how loud the sound system gets (-11 dB all the way to
+10 dB), the bass level will never exceed -12 dB bass limit.
To turn on and adjust the Bass Peak Limit Manager using no test tones:
1
While in the Pro Setup Mode, turn the MODE knob clockwise until the display reads BASS
LIMITER and then press the MODE knob. The Cinema Rhapsody’s display will read BASS
LIMITER on the top line and the second line will read INITIALIZING and/or OFF or a number (-24 to 0 dB).
2
Turn the MODE knob until the display reads the desired setting for the Bass Peak Limit Manager (OFF or -24 to 0 DB).
3
To exit the BASS LIMITER Setup Mode without leaving the Pro Setup Mode, press the MODE
knob. If you wish to exit the Setup Mode completely, turn any of the knobs other than
MODE or INPUT.
To turn on and adjust the Bass Peak Limit Manager using test tones:
1
While in the Pro Setup Mode, turn the MODE knob clockwise until the display reads BASS LIM
SET and then press the MODE knob. The Cinema Rhapsody’s display will read BASS LIM
SET on the top line and the second line will read INITIALIZING and/or OFF or a number
(-24 to 0 dB). Also, the test tone will automatically begin to emanate from the subwoofer.
2
Turn the MODE knob gradually and stop just prior to the subwoofer distorting.
3
Push the MODE knob once to both lock in the Bass Peak Limit Manager setting and to exit this
setup mode.
Page 52
Note: Most active subwoofers have their built-in limiters set to “off”.
Pro Setup - HDR & LDR Scale Factors
The Cinema Rhapsody offers several mode settings when decoding
a Dolby Digital (AC-3) signal. One of these modes is AC-3 NIGHT
mode which provides compression of the low level and high level
signals, such that, the bangs and booms are reduced and the whispers are accentuated. This, in effect narrows the volume range to
permit comfortable listening without the worry of disturbing others
during an explosion or other loud dramatic sound effect. To accomplish this compression, the Cinema Rhapsody, when in AC-3 NIGHT
Mode, engages both the HDR (High Dynamic Range) Scale and the
LDR (Low Dynamic Range) Scale to “255” or Full On. These scale
factors are also set to “255” or Full On during the AC-3 STANDARD
mode. While the Cinema Rhapsody’s “Out Of The Box” Setup has
the HDR and LDR scale factors set to “0” or Full Off (no compression), you can selectively set these scales to a point between (and
including) 0 and 255. These scale factors are specific to the AC-3
modes and as such, can be set differently for either AC-3 ULTRA
mode and AC-3 STANDARD MODE (Please note that AC-3 THX
and AC-3 RE-EQ will also be affected with any change to the AC-3
ULTRA mode in that these modes are tied together).
Prior to proceeding with the HDR and LDR scale factor, you will first
need to select an AC-3 Input Label. Turn the mode knob to
AUTOMODE OFF (or ON) is displayed. If the display is reading
AUTOMODE ON, press the MODE button to turn it to AUTOMODE
OFF. If Automode is already set to off, turn the mode knob to either
AC-3 ULTRA or AC-3 STANDARD (which ever one you wish to adjust the HDR and/or LDR scale) and press the MODE button to engage that mode. You will then need to enter the Pro Setup mode.
1
While in the Pro Setup mode, turn the MODE knob until the
display reads either HDR UP SCALE or LDR DN SCALE
and then press the MODE knob. The display will read
HDR UP SCALE (or LDR DN SCALE) on the top line and
the second line will read the current scale factor and the
mode name (ULTRA, STANDARD, THX, or RE-EQ). If
this input is set to AC-3 NIGHT, AC-3 MAX, or a non-AC3 mode, the display will read FIXED SCALE. While in
either the HDR or LDR Setup mode, you can turn the INPUT knob to see the settings on other inputs.
2
Turn the MODE knob until you have set the HDR (or LDR)
scale set to the desired setting (from 0 {default standard Full Off} to 255 {Full On}). You do not need to press the
MODE knob to engage this setting. While in either the
HDR or LDR Setup mode, you can turn the INPUT knob
to see the settings on other inputs with other modes.
3
If you wish to alter the HDR or LDR scales for any or all other
modes, repeat steps 2 & 3. To exit the HDR (or LDR)
Setup Mode without leaving the Pro Setup Mode, press
the MODE knob. If you wish to exit the Setup Mode completely, turn any of the knobs other than MODE or INPUT.
The HDR (High Dynamic
Range) and LDR (Low
Dynamic Range) Scale
Factors permit the playback of
AC-3 formatted source
material with compression of
both the low and high levels.
As such, the bangs and
booms are never too loud and
whispers never to soft. This
narrowing of the Dynamic
Range takes place when
listening to the AC-3 Night
mode. However, the Cinema
Rhapsody can also adjust
these factors for the AC-3
Ultra and AC-3 Standard
modes. If you make
adjustments to the AC-3 Ultra
mode, these changes will then
also apply to AC-3 THX and
AC-3 Re-EQ as they are linked
together. Conversely, if you
modify either AC-3 THX or
AC-3 Re-EQ, the other linked
modes are also affected.
The Cinema Rhapsody’s “Out
Of The Box” Setup has the
HDR and LDR Scale Factors
set to “0” or Full Off. These
scale factors are engaged in
the AC-3 Night mode
automatically and need not be
adjusted to access AC-3
Night.
Page 53
Pro Setup - THX - Re-EQ, Timbre Match, & Decorrelate
The Cinema Rhapsody
permits you to selectively
engage the Re-Equalization,
Timbre Match, and
Decorrelation filters
individually. These
enhancements, when all three
are on, are equal to full THX.
Thus, you can more simply
turn all three enhancements to
on by simply selecting either
the AC-3 THX, DTS THX, or
PROLOGIC THX modes using
the MODE knob.
You can also directly select
the AC-3 RE-EQ, DTS RE-EQ
or PROLOG RE-EQ modes
using the MODE knob. Please
note, that these
enhancements are only
available on a Dolby Digital
(AC-3) mode, DTS Mode, or
Dolby Pro Logic mode.
THX is an exclusive set of standards and technologies established
to make your experience of the film soundtrack as faithful as possible to what the director intended. Movie soundtracks are mixed in
special movie theaters called dubbing stages and are designed to
be played back in movie theaters with similar equipment and conditions. The soundtrack created for the movie theater is then transferred directly onto Laserdisc, VHS tape, DVD, etc., and is not
changed for playback in a small home theater environment. THX
engineers developed patented technologies to accurately translate
the sound from the movie theater environment into the home, correcting the tonal and spatial errors that occur. When the THX mode
is on, the following three THX technologies are automatically added
after the decoded signal:
Re-Equalization™ - The tonal balance of a film soundtrack will be
excessively bright and harsh when played back over audio equipment in the home because the film soundtracks were designed to
be played back in large movie theatres using very different professional equipment. Re-Equalization restores the correct tonal balance for watching a movie soundtrack in a small home environment.
Timbre Matching™ - The human ear changes our perception of a
sound depending on the direction from which the sound is coming.
In a movie theater, there is an array of surround speakers so that the
surround information is all around you. In a home theater, you use
only two speakers located to the side of your head. The Timbre
Matching feature filters the information going to the surround speakers so that they more closely match the tonal characteristics of the
sound coming from the front and surround speakers.
Adaptive Decorrelation™ - In a movie theater, a large number of
surround speakers help create an enveloping surround sound experience, but in a home theater there are usually, only two speakers. This can make the surround speakers sound like headphones
that lack spaciousness and envelopment. The surround sounds
collapse into the closest speaker as you move away from the middle
seating position. Adaptive Decorrelation slightly changes on surround channel’s time and phase relationship with respect to the other
surround channel. This expands the listening position and creates-with only two speakers--the same spacious surround experience
as in a movie theater.
When you select the AC-3 THX, DTS THX, or PROLOGIC THX
modes, all three enhancements are active (On). When you select
the AC-3 RE-EQ, DTS RE-EQ, or PROLOG RE-EQ modes, the reequalizer is active (On) and the Timbre Match and Decorrelation
filters are off.
Page 54
While these fixed modes permit instant access to certain THX enhancements, the Cinema Rhapsody
also permits you to customize inputs set to either an AC-3, DTS, or Pro Logic mode. Thus, you can
selectively turn the Re-EQ, Timbre Match, and Decorrelation enhancements to on or off, individually,
when in the Pro Setup mode.
If you are interested in adjusting the effects of Re-EQ, Timbre Match, and Decorrelation, you can do so
following the steps below.
1
While in the Pro Setup Mode, turn the MODE knob until the display reads either RE-EQUALIZE, TIMBRE MATCH, or Adaptive DECORRELATE and then press the MODE knob. The
Cinema Rhapsody’s display will read RE-EQUALIZE (TIMBRE MATCH or DECORRELATE)
on the top line and the second line will read “IS NOW ON” or “IS NOW OFF”.
2
Turn the MODE knob until the display reads the correct setting for the particular THX enhancement, ON or OFF. Since each Input has its own default mode, you can set the THX enhancement to on or off for other Input Labels by turning the INPUT knob and scrolling
through all inputs. Please note, some modes will not allow you to turn on and off certain
THX enhancements.
3
To exit the RE-EQUALIZE, TIMBRE MATCH, or Adaptive DECORRELATE Setup Modes without leaving the Pro Setup Mode, press the MODE knob. If you wish to exit the Setup Mode
completely, turn any of the knobs other than MODE or INPUT.
Pro Setup - Auto-Balance
The Cinema Rhapsody also permits you to turn off the Auto Balance
circuit. When the Auto Balance is on, the Cinema Rhapsody will
compensate for discrepancies in the left and right channels, when in
an analog domain. The Cinema Rhapsody’s “Out Of The Box” Setup
has the Auto Balance in the On position.
1
While in the Pro Setup mode, turn the MODE knob until the
display reads AUTO BALANCE and then press the MODE
knob. The display will read AUTO BALANCE on the top
line and the second line will read the current scale factor
and the mode name IS NOW ON or IS NOW OFF.
2
Turn the MODE knob to turn the Auto Balance On or Off.
You can turn the INPUT knob to see the settings on other
inputs with other modes.
3
To exit the AUTO BALANCE Setup Mode without leaving the
Pro Setup Mode, press the MODE knob. If you wish to
exit the Setup Mode completely, turn any of the knobs
other than MODE or INPUT.
The Cinema Rhapsody’s “Out
Of The Box” Setup has the
Auto Balance in the On
position. You can selectively
set the Auto Balance to On or
Off for Inputs set to a Dolby
mode.
Page 55
Pro Setup - Repeat Count
The REPEAT COUNT is a
function that is directly related
to the Dolby Digital (AC-3)
Surround Mode. The Repeat
Count setting indicates the
maximum number of
consecutive block repeats
before muting the output. The
Out Of The Box setup for
repeat count is set to 1. The
maximum setting is 8.
Page 56
The Repeat count is used on Dolby Digital (AC-3) modes and can
be set independently per input, which is set to an AC-3 mode. The
Cinema Rhapsody’s “Out Of The Box” Setup has the Repeat Count
set to “1”. If you wish to alter this setting, you can increase the
Repeat Count as high as 8.
1
While in the Pro Setup Mode, turn the MODE knob until the
display reads REPEAT COUNT and then press the MODE
knob. The Cinema Rhapsody’s display will read REPEAT
COUNT on the top line and the second line will read a
number (1) followed by the word COUNT.
2
Turn the MODE knob until the display reads the desired setting for the Repeat Count (1-8). Since each Input that is
on an AC-3 mode has its own Repeat Count, you can set
the Repeat Count for other Input Labels by turning the
INPUT knob, thus scrolling through all inputs.
3
To exit the REPEAT COUNT Setup Modes without leaving
the Pro Setup Mode, press the MODE knob. If you wish
to exit the Setup Mode completely, turn any of the knobs
other than MODE or INPUT.
Pro Setup - Analog Gain Control
The Cinema Rhapsody also permits you to adjust the gain individually for all analog inputs. The Cinema Rhapsody’s “Out Of The Box”
Setup has all analog inputs set to 0 dB or no Analog Gain. You can
raise the gain for the analog inputs from 0 dB to 3 dB, 6 dB, or as
high as 9 dB of gain. This is quite useful for components that have
lower gain drive such as radio tuners, VCRs, and phonographs
(phono preamplified output). Digital devices such as CDs, DVDs,
Laser Disc players, DSS receivers, etc., typically have a higher drive.
Therefore, you can adjust each analog audio input to an appropriate
level such that, as you switch inputs, the output levels are steady.
1
While in the Pro Setup mode, turn the MODE knob until the
display reads ANALOG GAIN and then press the MODE
knob. The display will read level arrows (<<<>>>) on the
top line and the second line will read IN = 00.0 dB (or
some other number if you have already altered the factory defaults).
2
Turn the MODE knob to raise or lower the Analog Gain Control from 0 dB through 9 dB (in 3 dB steps). Note that the
level arrows will raise as you raise the Analog Gain. If the
level arrows reach the edges of the display and the letter
“C” appears (C<<<<<<<>>>>>>>C), you have raised the
analog gain too far as clipping is occurring (C=Clipping).
ADA suggests raising the Analog Gain level cautiously.
Since other inputs may also require Analog Gain adjustment, you can turn the INPUT knob to see the settings on
other analog inputs and continue to adjust their gain.
3
To exit the ANALOG GAIN Setup Mode without leaving the
Pro Setup Mode, press the MODE knob. If you wish to
exit the Setup Mode completely, turn any of the knobs
other than MODE or INPUT.
The Cinema Rhapsody is
designed to provide an ideal
listening environment for all
of your source components.
Digital audio components,
such as CD players, DVDs,
laser disc players, and DSS
receivers typically have very
good gain drive, there is no
need to compensate their
output levels. However, for
analog audio components,
you may wish to raise their
analog gain so that, as you
change from one input to the
next, the output levels (the
sound level in the room)
remains somewhat constant.
The Cinema Rhapsody is fully
equipped to lower the gain
levels for all analog inputs
independently.
The Cinema Rhapsody’s “Out
Of The Box” Setup has the
Analog Gain levels set to 0 dB
for all Analog Inputs. You can
selectively raise the Analog
Gain for each analog audio
input in 3 dB steps up to 9 dB.
The Cinema Rhapsody will
display the input gain level,
providing the component is
putting out audio, and will
indicate when clipping begins
to occur.
Page 57
Pro Setup - PCM Scale Factors
The Cinema Rhapsody
provides you with the ability
to alter the PCM Scales for
each input set to either an AC3 or Pro Logic mode. The
effect of altering the PCM
scale is the lowering of a
devices audio level. This
adjustment to the audio level
does come with a drawback
as the audio level is reduced
by discarding bits of data. As
such it is not ideal.
The Cinema Rhapsody also permits you to adjust the PCM Scale
for audio inputs. This scale has two settings, one for AC-3 Modes
and another for Pro Logic Modes.
ADA strongly suggests not
altering the factory default
(Out Of The Box) settings for
the PCM scales.
PCM Scaling is mode specific. AC-3 modes, Pro Logic modes, and
Stereo modes permit PCM scaling. DTS modes do not have an
option to adjust the PCM scale factor as they are fixed. In order to
alter the PCM scales individually for each input, you will need to
engage the appropriate mode for an input prior adjusting the PCM
scales.
The PCM scale ranges from 0 to 255, with the factory default (Out
Of The Box Setup) set to 100.
PCM Scales acts much like a digital attenuator, the higher the level
(up to 127), the louder the sound. However, unlike other low to high
scales, this range is based on low points of 0 and 255, whereby 127
is the actual high end of the scale, right in the middle. As such,
when you start to increase the scale beyond 127, the sound will
become lower. Setting the PCM scale to either 0 or 255, nets the
same effect (no audio level).
While 127 is the loudest PCM Scale setting, the PCM Scale setting
of 100 is the Cinema Rhapsody’s “out of the box” configuration.
ADA strongly suggests that you do not change these scales.
Adjusting the PCM Scales will raise or lower the level of each input.
If you wish to adjust the PCM Scale the following steps detail how
this is accomplished.
Page 58
1
While in the Pro Setup Mode, turn the MODE knob until the
display reads either PCM SCALE and then press the
MODE knob. The Cinema Rhapsody’s display will read
PCM SCALE on the top line and the second line will read
a number followed by the words FOR AC-3 (for all AC-3
modes), FOR PROL (for all Pro Logic modes), FOR PCM
(for Stereo modes), and FIXED (for DTS Modes, you can
not alter DTS PCM scales).
2
Turn the MODE knob until the display reads the desired setting for the PCM Scale that you have selected. Since
each Input that is on an either an AC-3 mode, Pro Logic
mode, or Stereo mode (not DTS) has its own PCM scale
setting, you can set the PCM Scales for other Input Labels by turning the INPUT knob, thus scrolling through all
inputs.
3
To exit the PCM Scale Setup Modes without leaving the Pro
Setup Mode, press the MODE knob. If you wish to exit
the Setup Mode completely, turn any of the knobs other
than MODE or INPUT.
Pro Setup - Input Format
The Cinema Rhapsody is also prepared to decode other AC-3 formats, most of which are intended for AC-3 broadcast with HDTV by
way of off-air or satellite reception. As these are future decoding
formats, ADA strongly suggests not altering these settings.
However, should you need to alter these settings, the following describes the procedure to do so.
1
While in the Pro Setup mode, turn the MODE knob until the
display reads INPUT FORMAT and then press the MODE
knob. The display will read INPUT FORMAT on the top
line and the second line will read SIF S/PDIF (or some
other number if you have already altered the factory defaults).
2
Turn the MODE knob to alter between the SIF S/PDIF and
SIF NONFORM (non-formatted) settings. Since other inputs can also have their own Input Format setting, provided they are set to AC-3 modes, you can turn the INPUT knob to see the settings on other inputs and continue to alter their Input Format.
3
To exit the INPUT FORMAT Setup Mode without leaving the
Pro Setup Mode, press the MODE knob. If you wish to
exit the Setup Mode completely, turn any of the knobs
other than MODE or INPUT.
The Cinema Rhapsody has the
ability to alter its Input Format
which only applies to AC-3
decoding. The standard Input
Format for Dolby AC-3
decoding from a laser disc or
DVD is “SIF S/PDIF”. The
current alternate setting is
“SIF NONFORM” and is for
future AC-3 decoding options
that may come with HDTV offair or satellite broadcasts.
At this time, ADA strongly
suggests not altering the
Input Format.
Page 59
Pro Setup - Network Baud
The Cinema Rhapsody has the
ability to increase its baud
rate from 1200 to 19200.
When the unit is controlled
from an infrared remote
control, you must use the
factory default of 1200 baud.
However, when controlling
this unit via either an RS-232
based control system or
wireless RF ADA remote
control, you will want to
increase the baud rate to
19200.
The Cinema Rhapsody allows you to set the baud rate between
either 1200 Baud or 19,200 Baud. At 1200, the standard setting, the
unit will be able to be controlled by an infrared remote control. At
19,200, the IR remote control will no longer function. Also, the OSD
(On Screen Display) will also no longer function (see section below
on how to engage OSD at 19200). This is an important aspect when
determining which baud rate to use. While the 1200 Baud rate is
ideal when controlling via IR, if you are only controlling the Cinema
Rhapsody via an RS-232 control system or RF ADA remote control,
you will want to change the unit’s baud rate to 19200. This will
provide you with greater speed on both control signals and feedback strings.
1
While in the Pro Setup mode, turn the MODE knob until the
display reads NETWORK BAUD and then press the
MODE knob. The display will read INPUT NAME on the
top line and the second line will read 1200 8,N,1 (where
1200 is the Baud rate, 8 is the number of data bits, N
refers to No Parity, and 1 is the number of stop bits).
2
Turn the MODE knob to alter between the 1200 and 19200
baud settings. Even though the top line of the display
reads an Input Name, note that setting the baud rate once,
will affect all inputs.
3
To exit the NETWORK BAUD Setup Mode without leaving
the Pro Setup Mode, press the MODE knob. If you wish
to exit the Setup Mode completely, turn any of the knobs
other than MODE or INPUT.
OSD at 19200
After you have set the baud rate to 19200, you have yet one more
option that can be engaged regarding the unit’s On Screen Display.
If you are not using the composite video output with OSD, then you
can skip this step. However, if you are using the unit’s OSD and
have engaged the 19200 baud rate, then you will need to:
Page 60
1
Unplug the AC power of the Cinema Rhapsody and remove
the cover screws. Once all the screws are removed, lift
the cover off of the unit and place it to the side.
2
When looking at the open Cinema Rhapsody from the front,
located the front circuit board labeled attached to the bottom of the chassis. Slightly to the right of the first socket
micro and below the second, is a small switch that determines which baud rate mode the OSD is set to.
3
To set the OSD to operate at the 19200 baud rate, set this
switch to the back of the unit (DIP switch ON position). To
set it to 1200 baud, move it forward.
Pro Setup - Auxiliary DC Triggers
The Cinema Rhapsody has two low voltage outputs which can be
used to trigger other components or devices. These triggers can be
used to perform several different operations such as:
a
b
Engaging a projector, screen, etc., for only video devices.
Turning on a power amplifier using an external AC switcher
(ADA ACC-3) if the amplifier will draw more than 10 amps
current (Cinema Rhapsody’s Switched AC Outlet maximum).
Alternate speaker drivers between music and film playback.
Engage the ADA 6.1 Surround-Back Processor automatically
when 5.1 decoding takes place in the Cinema Rhapsody.
(Note that this feature is only available on Aux DC 2).
c
d
The Cinema Rhapsody sports two such triggers an both of these
triggers are input specific. The Out Of The Box setup is as follows:
AUX DC TRIG 1 = Engages with all inputs.
AUX DC TRIG 2 = Engages with only the Video Inputs:
LASER/DVD 1, LASERDISC 2, DVD PLAYER 3, VCR 4, DSS/SAT 5, CABLE/TV
6, AUXILIARY 10, CAMCORDER 11, VIDEO GAME 12, and COMPUTER 13.
Since most home theaters using this feature will involve some
level of professional setup, you can alter the Aux DC Triggers
using the following steps. If you are planning on adjusting the
Final Input or Input Labels, ADA suggests first making these
adjustments prior to proceeding with the Aux DC Trigger setup.
To setup and verify the Aux DC Triggers:
1
While in the Pro Setup mode, turn the MODE knob until the
display reads either AUX DC TRIG 1 or AUX DC TRIG 2
and then press the MODE knob. The display will read
Input Label that is currently selected on the top line and
the second line will read DC TRIG1 ON or DC TRIG1 OFF
(Aux DC Trig 2 also has an option call 6.1 ADAPTER.
This option engages the Aux DC 2 trigger when 5.1 decoding is detected, to automatically engage the ADA 6.1.
If you desire this feature, you must apply it to each input.)
2
Turn the MODE knob to switch between DC TRIG1 ON or
DC TRIG1 OFF. Since other inputs may also need to be
set to this particular auxiliary DC trigger, you can turn the
INPUT knob to see the settings on other inputs and continue to alter their status from on to off or off to on. Thus,
you can quickly setup an auxiliary trigger by just turning
the INPUT knob to the next input and then turning the
MODE knob to set the trigger on or off.
3
To exit the AUX DC TRIGGER Setup Mode without leaving
the Pro Setup Mode, press the MODE knob. If you wish
to exit the Setup Mode completely, turn any of the knobs
other than MODE or INPUT.
The Cinema Rhapsody
features two auxiliary DC
outputs or triggers. These
triggers are set in software
and the two triggers operate
independently of each other.
Furthermore, the Aux DC
Triggers can track each input
and determine whether they
should be on for that input.
Aux DC 2 also has an option
to engage automatically when
the Cinema Rhapsody detects
5.1 decoding. Thus, AUX DC
2 can be used to engage the
ADA 6.1 Surround Back
Processor.
As such, you can have one
trigger activate a projector,
screen, curtain when only
video devices are selected and
another trigger activate
speaker drivers when
switching from a music
source to a film source.
The Cinema Rhapsody’s Out
Of The Box Setup has Aux DC
Trigger 1 engaging with any
input as to power up an
auxiliary AC switcher which in
turn, powers up a power
amplifier. While the Cinema
Rhapsody has a switched
outlet rated at 10 Amps, this
trigger can be used in
conjunction with ADA’s ACC-3
AC Switcher (15 Amps) when
powering up ADA’s High
Power MPA-500 Five Channel
Power Amplifier and BPA-500
Bass Amplifier. Aux DC
Trigger 2 is set to engage with
only video components.
Page 61
Pro Setup - Effect Delay
The Cinema Rhapsody has
two modes that are developed
exclusively by ADA. The
Stereo Enhance mode permits
quality surround sound
playback of two-channel
mixes, even if the separation
between the two channels is
minimal. The Mono Enhance
mode applies some of the
same theories of Stereo
Enhancement to mono-only
signals, again providing a full
surround sound array to a
mono only signal.
The Effect Delay sets up the
delay level between right and
left channels that makes the
surround effect of these two
modes more pronounced.
Please note, even slight
adjustment of the Effect Delay
will have an effect on how
these modes sound.
Page 62
The Cinema Rhapsody has two proprietary ADA modes, Stereo
Enhance and Mono Enhance. These modes are applied to twochannel or one channel mixes respectively. These modes, when
selected have two variables, one of which is the Effect Delay. The
Effect Delay works in different ways depending on which of the two
modes are selected. When Stereo Enhance is engaged, the Effect
Delay setting (0-20 ms range) is applied to the left channel, leaving
the right channel untouched, all prior to Pro Logic decoding. In the
Mono Enhance mode, used typically, for mono-only software, where
the right and left channel information are identical. In this mode, the
two channels are first mixed mono together, then the stereo enhancement feature is applied, with the delay set to the left channel (after
mixing down to mono) and prior to the Pro Logic decoding. This
permits the Mono Enhance mode to deliver surround sound with
depth and feel, even though the input signal is mono and during
standard Dolby Pro Logic playback, would only provide audio out of
the center channel.
To set the desired Effect Delay setting:
1
While in the Pro Setup mode, turn the MODE knob until the
display reads EFFECT DELAY and then press the MODE
knob. The display will read EFFECT DELAY on the top
row and a delay setting on the bottom row (i.e. 0 ms).
2
Turn the MODE knob to change the delay setting in the range
from 0 to 20 ms (milliseconds). Please note, this control
option provides real-time feedback but the turning of the
Mode knob to increment through the steps is a slow process.
3
To exit the EFFECT DELAY Setup Mode without leaving the
Pro Setup Mode, press the MODE knob. If you wish to
exit the Setup Mode completely, turn any of the knobs
other than MODE or INPUT.
Pro Setup - Effect Level
The Cinema Rhapsody has two proprietary ADA modes, Stereo
Enhance and Mono Enhance. These modes are applied to twochannel or one channel mixes respectively. These modes, when
selected have two variables, one of which is the Effect Level. The
Effect Level is best described as throttle for the decoding circuit.
When the Effect Level is set to OFF, the decoding circuit is least
active, providing the flattest surround sound field. When the level is
set to -0 dB, the surround sound decoding circuit is processing the
audio signal at its maximum decoding level. You can decrease this
decoding level in 1 dB steps to -20 dB or also OFF. Please note, this
feature applies to both Stereo Enhance and Mono Enhance modes,
and like the Effect Level, only needs to be set once. Like all major
Cinema Rhapsody features, you may sample the results of this setting as you adjust it. Furthermore, a slight adjustment may make a
big difference in the sound you hear.. As such, this control moves
slowly. Please note, that ADA suggests a setting somewhere between -4 dB and -8 dB.
To set the desired Effect Level setting:
1
While in the Pro Setup mode, turn the MODE knob until the
display reads EFFECT LEVEL and then press the MODE
knob. The display will read EFFECT LEVEL on the top
row and a level setting on the bottom row (i.e. - 0 DB).
2
Turn the MODE knob to change the delay setting in the range
from -0 to -20 dB (decibels), or OFF. Please note, this
control option provides real-time feedback but the turning
of the Mode knob to increment through the steps is a slow
process.
3
To exit the EFFECT LEVEL Setup Mode without leaving the
Pro Setup Mode, press the MODE knob. If you wish to
exit the Setup Mode completely, turn any of the knobs
other than MODE or INPUT.
The Cinema Rhapsody has
two modes that are developed
exclusively by ADA. The
Stereo Enhance mode permits
quality surround sound
playback of two-channel
mixes, even if the separation
between the two channels is
minimal. The Mono Enhance
mode applies some of the
same theories of Stereo
Enhancement to mono-only
signals, again providing a full
surround sound array to a
mono only signal.
The Effect Level is a unique
feature whereby you can
actually adjust the power of
the decoding circuit. Much
like a gas pedal, at -0 dB the
decoding circuit is operating
at its fullest. At -20 dB, the
decoding circuit is operating a
significantly lower rate. At
OFF, it’s features are not
noticeable at all.
Page 63
Appendix A - Solo Channel Test
The Cinema Rhapsody is also
capable of playing only one
channel at a time when in the
Solo Test mode. This is ideal
for testing a particular
channel’s output or an
individual speaker.
The Solo Test mode is also
ideal if you wish to determine
the information coming out of
a particular channel.
The Cinema Rhapsody has a unique channel test feature called Solo
Test. When in the Solo Test mode, you can switch between channels while playing an audio track. Thus, you can actually listen to
either all channels, or selectively to one channel. Typically, on other
processors, this would involve lowering all channels until they could
not be heard, then raising the volume of one channel. The Cinema
Rhapsody permits you to engage one channel at a time by just turning a knob. Furthermore, you can also raise and lower each channel or all channels while directly in the Solo Test Mode.
This feature is ideal when you are trying to test a particular channel
output or speaker. It is also unique when toying around with six
channel encoded material. As such, you can instantly see for yourself, the effect one particular channel has with respect to the overall
sound field.
Software Note:
The DTS CD of the Eagles “Hell Freezes Over” album, contains a
bonus cut of “Seven Bridges Road”. While this cut does feature
some instruments, the unique aspect of the recording is that each
vocalist is assigned to one of the five speaker channels. When playing this recording, the harmonies are actually mixing in the open
space of your home theater system, not in the recording studio. Use
the Solo Test mode to select one channel at a time and try to figure
out which voice is coming from which speaker. You need not be an
Eagles fan to enjoy this test.
To access the Cinema Rhapsody’s Solo Test Mode:
Page 64
1
Turn the CHANNEL knob until the second line of the display
reads SOLO TEST and press the CHANNEL knob.
2
At this time, the Cinema Rhapsody is in the Solo Test mode.
You can now turn the CHANNEL knob to selectively access individual channels. There is even a SOLO SEQ
option which will cause the Cinema Rhapsody to automatically sequence through all channels while in the Solo
Test mode.
3
While in the Solo Test mode, if you wish to raise or lower a
particular channel’s volume level, pressing of the CHANNEL knob while locked into a channel, engages the volume controller. Use the CHANNEL knob to raise and lower
volume levels.
4
To exit the Solo Test mode, simply turn any knob other than
the CHANNEL knob.
Appendix B - Resetting Factory Defaults
The Cinema Rhapsody has two Factory Default recall options which
will reset certain Cinema Rhapsody features to configurations programmed at the factory. Please note, neither of the two Default
options will alter the audio and video links.
Input Label Factory Default Recall
To recall the Input Labels that are programmed by ADA:
1
Turn the MODE knob until the display reads SETUP MODE
and press the MODE knob.
2
Turn the MODE knob until the display reads ILLUMINATION
and press the MODE knob.
3
Turn the MODE knob until the ILLUMINATION % reads 88%.
Press the MODE knob and release. Do not turn any knob.
The top line of the display should now read SETUP MODE
and the second line of the display should read ILLUMINATION.
4
Press and hold the MODE knob for approximately ten seconds. This will reset all the Input Labels to the factory
default settings. You can release the MODE knob when
the display reads INPUT LABEL on the top line and DEFAULT on the second line. At this time, the Cinema Rhapsody will restart itself automatically. Note that the Illumination level resets to 100%.
Channel Balance and Pro Setup Feature Recall
To reset all channels to an equal level and also reset the Bass Limiter to Off, the PCM Scales for AC-3, Stereo, & Prologic based modes
to 100, all channel delays set to 0 dB, all Analog Gains to 0 dB, and
all Speaker System Configurations to 0:
1
Turn the MODE knob until the display reads SETUP MODE
and press the MODE knob.
2
Turn the MODE knob until the display reads ILLUMINATION
and press the MODE knob.
3
Turn the MODE knob until the ILLUMINATION % reads 89%.
Press the MODE knob and release. Do not turn any knob.
The top line of the display now reads SETUP MODE and
the second line of the display should read ILLUMINATION.
4
Press and hold the MODE knob for approximately ten seconds. This will reset all the Input Labels to the factory
default settings. You can release the MODE knob when
the display reads FACTORY on the top line and DEFAULT
on the second line. At this time, the Cinema Rhapsody
will restart itself automatically. Note that the Illumination
level resets to 100%.
The Cinema Rhapsody has a
hidden option that permits
you to reset the ADA Factory
Defaults. These “out of the
box” settings can be recalled
in the event you wish to
reconfigure the Cinema
Rhapsody. Please note, that
the Factory Default options do
not reset all functions, such
as audio and video links,
default modes, volume
presets, time delays, etc.
There are two options
available when you wish to
return the Cinema Rhapsody
to ADA’s “out of the box”
configuration. One option
resets only the Input Label
names. Thus, if you
reprogrammed the Input
Labels to read something
other than the labels assigned
by ADA prior to delivery, you
can reset these labels without
affecting other Cinema
Rhapsody parameters.
Illumination is also reset to
100% during this procedure.
The second reset option will
balance all channels to an
equal level (at 0 dB Volume
Level). This reset procedure
will also set the Bass Limiter
to OFF, PCM Scale for AC-3,
Stereo, & Prologic to 100, all
delays to 0, Analog Gains to 0,
and Speaker System
Configurations to 0. Also,
Illumination is reset to 100%.
Page 65
Appendix C - Master Reset Power Button (Vacation Switch)
The Cinema Rhapsody has a
hidden front panel feature
which permits you to remove
power from the Cinema
Rhapsody, as if you were
removing the Cinema
Rhapsody’s power cord from
the AC outlet. The button is
located in the black plexiglass
display window area, to the
left side of the window (to the
left of the mode indicator
lamps). During operation,
this button is depressed and it
sits flush to the plexiglass
surface.
Please note, that this switch is
not intended to be used as an
on/off switch. When this
switch is off, you cannot turn
it on from a remote control or
keypad.
The Cinema Rhapsody has a hidden front panel power button that
permits you to remove power from the Cinema Rhapsody without
unplugging the Cinema Rhapsody’s power cord. Because the Cinema Rhapsody’s rear panel power cord may be difficult to access,
this front panel power button is ideal when you wish to make certain
the unit remains off during lengthy periods of nonuse (vacation
switch), when you want to make certain the unit remains off (while
performing sensitive connections), or when you need to reset the
Cinema Rhapsody (explained below).
The Cinema Rhapsody operates on a microprocessor. Upon first
getting power (plugging in the Cinema Rhapsody’s AC cord), this
microprocessor powers up and remains on, even if the Cinema Rhapsody is off. The Cinema Rhapsody’s microprocessor will remain on
until the Cinema Rhapsody’s power cord is disconnected or the hidden power button is pressed. While having the microprocessor constantly on, does not pose a problem for the Cinema Rhapsody, outside events may require you to reset the microprocessor. These
events might include electrical power outages or brownouts, power
surges, lightning storms, etc. If you are experiencing problems operating your Cinema Rhapsody, problems that you did not experience before, try turning this button off, wait a few minutes, and then
turn the switch on again. If this does not solve your operational
problems, please contact your local ADA Dealer.
Cinema Rhapsody
OFF
ON
Please note, that if the Cinema Rhapsody’s hidden front panel Master Power Button is in the (Out) off position, you will not be able to
turn the Cinema Rhapsody on from the front panel Volume Knob, an
IR remote control, an ADA keypad, or a touch screen system. When
this button is set to the off position, you must first push it in to the on
position, prior to using the Cinema Rhapsody.
Master Reset Power Button
ADA strongly recommends leaving this button on during normal dayto-day use. Unless, you are planning to not use the system for a
long period of time, you will most likely leave this button in the on
position.
DVD DISC 1
ALL -02.5 DB
DIGITAL
Cinema Rhapsody
Page 66
LFE
MADE IN U.S.A.
MODE
ENGAGE
INPUT
VOLUME
CHANNEL
RECORD
SELECTOR
CONTROL