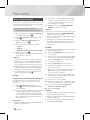
1
HT-E3500
HT-E3530
HT-E3550
5.1CH Blu-ray™
Home Entertainment System
user manual
imagine the possibilities
Thank you for purchasing this Samsung product.
To receive more complete service,
please register your product at
www.samsung.com/register
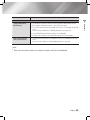
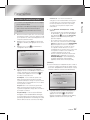
Safety Information
Warning
TO REDUCE THE RISK OF ELECTRIC SHOCK, DO NOT REMOVE THE COVER (OR BACK).
NO USER-SERVICEABLE PARTS ARE INSIDE. REFER SERVICING TO QUALIFIED SERVICE PERSONNEL.
CAUTION
RISK OF ELECTRIC SHOCK
DO NOT OPEN
The lighting flash and Arrowhead
within the triangle is a warning sign
alerting you of dangerous voltage
inside the product.
WARNING
CAUTION: TO REDUCE THE RISK OF ELECTRIC
SHOCK, DO NOT REMOVE COVER (OR BACK)
NO USER SERVICEABLE PARTS INSIDE. REFER
SERVICING TO QUALIFIED SERVICE PERSONNEL.
• To reduce the risk of fire or electric shock, do
not expose this appliance to rain or moisture.
CLASS 1 LASER PRODUCT
This Compact Disc player is classified as a CLASS
1 LASER product. Use of controls, adjustments
or performance of procedures other than those
specified herein may result in hazardous radiation
exposure.
Complies with 21CFR 1040.10 except for
deviations pursuant to Laser Notice No. 50, dated
June 24, 2007.
DANGER :
• VISIBLE AND INVISIBLE LASER RADIATION
WHEN OPEN. AVOID DIRECT EXPOSURE TO
BEAM. (FDA 21 CFR)
CAUTION :
• CLASS 3B VISIBLE AND INVISIBLE LASER
RADIATION WHEN OPEN. AVOID EXPOSURE
TO THE BEAM (IEC 60825-1)
• THIS PRODUCT UTILIZES A LASER.
USE OF CONTROLS OR ADJUSTMENTS
OR PERFORMANCE OF PROCEDURES
OTHER THAN THOSE SPECIFIED HEREIN
MAY RESULT IN HAZARDOUS RADIATION
EXPOSURE. DO NOT OPEN COVER AND DO
NOT REPAIR YOURSELF. REFER SERVICING
TO QUALIFIED PERSONNEL.
CLASS 1
KLASSE 1
LUOKAN 1
KLASS 1
PRODUCTO
| 2 English
The explanation point within the triangle
is a warning sign alerting you of important
instructions accompanying the product.
LASER PRODUCT
LASER PRODUKT
LASER LAITE
LASER APPARAT
LÁSER CLASE 1
Disc Storage & Management
Keep in a cool ventilated area.
Keep in a clean protection jacket and store
vertically.
English
3|
Safety Information
Do not keep in direct sunlight.
• Do not expose this apparatus to dripping or
splashing. Do not put objects filled with liquids,
such as vases, on the apparatus.
• To turn this apparatus off completely, you must
pull the power plug out of the wall socket.
Consequently, the power plug must be easily
and readily accessible at all times.
• Do not touch the power plug with a wet hand.
It can cause an electric shock.
• Do not plug multiple electric devices into the
same wall socket. Ovedrloading a socket can
cause it to overheat, resulting in a fire.
• Maintenance of the Cabinet
- Before connecting other components to this
product, be sure to turn them off.
- If you move your product suddenly from a
cold place to a warm place, condensation
may occur on the operating parts and lens
and cause abnormal disc playback. If this
occurs, unplug the product, wait for two
hours, and then connect the plug to the
power outlet. Then, insert the disc, and try to
play back again.
• If the product makes an abnormal noise or
produces a burning smell or smoke, turn off
the power switch immediately and disconnect
the power plug from the wall outlet. Then,
contact the nearest customer service center for
technical assistance. Do not use the product.
Using the product as it is may cause a fire or an
electric shock.
• To turn this apparatus off completely, you must
pull the power plug out of the wall socket.
Consequently, the power plug must be easily
and readily accessible at all times.
01
• Holding Discs
- Fingerprints or scratches on
a disc may reduce sound and
picture quality or cause skipping.
- Avoid touching the surface of a disc where
data has been recorded.
- Hold the disc by the edges so that fingerprints
will not get on the surface.
- Do not stick paper or tape on the disc.
• Cleaning Discs
- If you get fingerprints or dirt on a
disc, clean it with a mild detergent
diluted in water and wipe with a
soft cloth.
- When cleaning, wipe gently from
the inside to the outside of the disc.
- Disc Storage
Handling Cautions
Safety Information
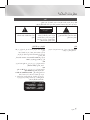
Using the 3D Function
IMPORTANT HEALTH AND SAFETY
INFORMATION FOR 3D PICTURES.
Read and understand the following safety
information before using the 3D function.
• Some viewers may experience discomfort while
viewing 3D TV such as dizziness, nausea, and
headaches.
If you experience any such symptom, stop
viewing 3D TV, remove the 3D Active Glasses,
and rest.
• Watching 3D images for an extended period of
time may cause eye strain. If you feel eye strain,
stop viewing 3D TV, remove your 3D Active
Glasses, and rest.
• A responsible adult should frequently check on
children who are using the 3D function.
If there are any reports of tired eyes, headaches,
dizziness, or nausea, have the child stop viewing
3D TV and rest.
• Do not use the 3D Active Glasses for other
purposes (such as general eyeglasses,
sunglasses, protective goggles, etc.)
• Do not use the 3D function or 3D Active Glasses
while walking or moving around. Using the 3D
function or 3D Active Glasses while moving
around may cause you to bump into objects,
trip, and/or fall, and cause serious injury.
• If you want to enjoy 3D content, connect a 3D
device (3D compliant AV receiver or TV) to the
product’s HDMI OUT port using a high-speed
HDMI cable. Put on 3D glasses before playing
the 3D content.
• The product outputs 3D signals only through
HDMI cable connected to the HDMI OUT port.
• As the video resolution in 3D play mode is fixed
according to the resolution of the original 3D
video, you can not change the resolution to your
preference.
• Some functions such as BD Wise, screen size
adjustment, and resolution adjustment may not
operate properly in 3D play mode.
• You must use a high-speed HDMI cable for
proper output of the 3D signal.
• Stay at least three times the width of the screen
from the TV when watching 3D images. For
example, if you have a 46 inch screen, stay 3.5
meters from the screen.
| 4 English
- Place the 3D video screen at eye level for the
best 3D picture.
• When the product is connected to some 3D
devices, the 3D effect may not function properly.
• This product does not convert 2D content into
3D.
• “Blu-ray 3D” and “Blu-ray 3D” logo are
trademarks of the Blu-ray Disc Association.
Copyright
© 2012 Samsung Electronics Co.,Ltd.
All rights reserved; No part or whole of this user’s
manual may be reproduced or copied without the
prior written permission of Samsung Electronics
Co.,Ltd.
License
• ABOUT DIVX VIDEO: DivX® is a digital video
format created by DivX, LLC, a subsidiary
of Rovi Corporation. This is an official DivX
Certified® device that plays DivX video. Visit
divx.com for more information and software
tools to convert your files into DivX videos.
ABOUT DIVX VIDEO-ON-DEMAND: This DivX
Certified® device must be registered in order to
play purchased DivX Video-on-Demand (VOD)
movies. To obtain your registration code, locate
the DivX VOD section in your device setup
menu. Go to vod.divx.com for more information
on how to complete your registration.
DivX Certified® to play DivX® video up to HD
1080p, including premium content.
DivX®, DivX Certified® and associated logos
are trademarks of Rovi Corporation or its
subsidiaries and are used under license.
Covered by one or more of the following U.S.
patents : 7,295,673; 7,460,668; 7,515,710;
7,519,274
• Oracle and Java are registered trademarks of
Oracle and/or its affiliates. Other names may be
trademarks of their respective owners.
• This item incorporates copy protection
technology that is protected by U.S. patents
and other intellectual property rights of
Rovi Corporation. Reverse engineering and
disassembly are prohibited.
• Blu-ray Disc™, Blu-ray™, and the logos are
trademarks of Blu-ray Disc Association.
• This product uses Cinavia technology to
limit the use of unauthorized copies of some
commercially-produced film and videos and
their soundtracks. When a prohibited use of an
unauthorized copy is detected, a message will
be displayed and playback or copying will be
interrupted.
More information about Cinavia technology
is provided at the Cinavia Online Consumer
Information Center at http://www.cinavia.com.
To request additional information about Cinavia
by mail, send a postcard with your mailing
address to: Cinavia Consumer Information
Center, P.O. Box 86851, San Diego, CA, 92138,
USA.”
This product incorporates proprietary technology
under license from Verance Corporation and is
protected by U.S. Patent 7,369,677 and other
U.S. and worldwide patents issued and pending
as well as copyright and trade secret protection
for certain aspects of such technology. Cinavia
is a trademark of Verance Corporation.
Copyright 2004-2010 Verance Corporation. All
rights reserved by Verance. Reverse engineering
or disassembly is prohibited.
English
5|
Contents
• Manufactured under license under U.S. Patent
Nos: 5,956,674; 5,974,380; 6,226,616;
6,487,535; 7,392,195; 7,272,567; 7,333,929;
7,212,872 & other U.S. and worldwide patents
issued & pending. DTS-HD, the Symbol, & DTSHD and the Symbol together are registered
trademarks & DTS-HD Master Audio | Essential
is a trademark of DTS, Inc. Product includes
software. © DTS, Inc. All Rights Reserved.
01
• Dolby and the double-D symbol are registered
trademarks of Dolby Laboratories.
~ The terms HDMI and HDMI High-Definition
Multimedia Interface, and the HDMI Logo are
trademarks or registered trademarks of HDMI
Licensing LLC in the United States and other
countries.
Contents
2
3
3
4
4
5
7
8
11
12
12
13
14
15
16
16
18
18
18
19
19
19
20
20
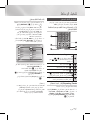
SAFETY INFORMATION
Warning
Disc Storage & Management
Handling Cautions
Using the 3D Function
Copyright
License
GETTING STARTED
Disk and Format Compatibility
Logos of Discs the product can play
Accessories
Front Panel
Rear Panel
Remote Control
CONNECTIONS
Connecting the Speakers
Speaker Components
Installing the Speakers on the Tallboy
Stand
Connecting The Speakers
Connecting to a TV
Method 1 Connecting to a TV
with an HDMI Cable - Best Quality
(Recommended)
Method 2 Connecting to a TV with an
Video Cable - Good Quality
Connecting to External Devices
Method 1 AUX IN : Connecting an
External Analog Component
Method 2 OPTICAL : Connecting an
External Digital Audio Component
Connecting the FM Antenna
Connecting to a Network Router
| 6 English
21
22
22
23
26
28
29
30
30
31
31
31
32
34
35
35
36
36
37
38
43
46
SETTINGS
The Initial Settings Procedure
The Home Screen
Accessing the Settings Screen
Settings Menu Functions
Networks and the Internet
Upgrading Software
Setting Up AllShare
MEDIA PLAY
Using the Streaming Media Services
Playing Files on a USB Device
Playing a Disc with User Recorded
Content
Playing a Commercial Video Disc
Playing a Pre-Recorded Commercial
Audio Disc
Controlling Video Playback
Controlling Music Playback
Controlling Photo Playback
Listening to Radio
Using the Special Effects Remote Control
Buttons
Using BD-LIVE™
Using AllShare
APPENDIX
Additional Information
Troubleshooting
Specifications
Getting Started
Disk and Format Compatibility
VIDEO
Disc Type
Blu-ray Disc
3D Blu-ray Disc
DVD-VIDEO, DVD-RW,
DVD-R, DVD+RW,
DVD+R
Details
Getting Started
Media
02
Disc types and contents your product can play
BD-ROM or BD-RE/-R disc recorded in the BD-RE format.
DVD-VIDEO, recorded DVD+RW/DVD-RW(V)/DVDR/+R discs that have
been recorded and finalized, or a USB storage media containing MKV, MP4
contents.
MUSIC
CD-RW/-R, DVD-RW/-R, Music recorded on CD-RW/-R, DVD-RW/-R, BD-RE/-R discs or a USB storage
BD-RE/-R
media containing MP3 or WMA contents.
PHOTO
CD-RW/-R, DVD-RW/-R, Photos recorded on CD-RW/-R, DVD-RW/-R, BD-RE/-R discs or a USB storage
BD-RE/-R
media containing JPEG contents.
| NOTE |
\ The product may not play certain CD-RW/-R and DVD-R because of the disc type or recording conditions.
\ If a DVD-RW/-R disc has not been recorded properly in DVD video format, it will not be playable.
\ Your product will not play content that has been recorded on a DVD-R at a bitrate that exceeds 10 Mbps.
\ Your product will not play content that has been recorded on a BD-R or USB device at a bitrate that exceeds 30 Mbps.
\ Playback may not work for some types of discs, or when you use specific operations, such as angle change and aspect ratio
adjustment. Information about the discs is written in detail on the disc box. Please refer to this if necessary.
\ When you play a BD-J title, loading may take longer than a normal title or some functions may perform slowly.
Disc types your product cannot play
• HD DVD
• DVD-ROM/PD/MVDisc, etc
| NOTE |
• DVD-RAM
• Super Audio CD
(except CD layer)
• DVD-RW(VR mode)
• CVD/CD-ROM/CDV/
CD-G/CD-I/LD
(CD-Gs play audio
only, not graphics.)
• 3.9 GB DVD-R Disc
for Authoring.
\ This product may not respond to all operating commands because some Blu-ray Disc, DVD, and CD discs allow specific or
limited operation and provide only certain features during playback.
Please note that this is not a defect in the product.
\ Samsung cannot guarantee that this product will play every disc bearing the Blu-ray Disc, DVD or CD logo because disc
formats evolve, and problems and errors may occur during the creation of Blu-ray Disc, DVD, and CD software and/or the
manufacture of discs.
\ Please contact the SAMSUNG Customer Care Center if you have questions or encounter difficulty when playing Blu-ray Disc,
DVD, or CD discs in this product. Also, refer to rest of this user manual for additional information on playback restrictions.
\ Some commercial discs and DVD discs purchased outside your region may not play on this product.
English
7|
Getting Started
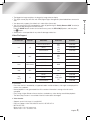
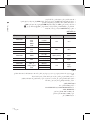
Region Code
Blu-ray players and discs are coded by region.
These regional codes must match for a disc to
play. If the codes do not match, the disc will not
play.
The Region Number for this product is displayed
on the rear panel of the product.
Disc Type
Blu-ray Disc
DVD-VIDEO
| NOTE |
Region
Code
Area
A
North America, Central America,
South America, Korea, Japan,
Taiwan, Hong Kong and South
East Asia.
B
Europe, Greenland, French
territories, Middle East, Africa,
Australia and New Zealand.
C
India, China, Russia, Central and
South Asia.
1
The U.S., U.S. territories and
Canada
2
Europe, Japan, the Middle East,
Egypt, South Africa, Greenland
3
Taiwan, Korea, the Philippines,
Indonesia, Hong Kong
4
Mexico, South America,
Central America, Australia,
New Zealand, Pacific Islands,
Caribbean
5
Russia, Eastern Europe, India,
most of Africa, North Korea,
Mongolia
6
China
\ If the Region number of a Blu-ray Disc/DVDs does not
correspond to the Region number of this product, the
product cannot play the disc.
| 8 English
Logos of Discs the product can play
Blu-ray Disc
3D Blu-ray Disc
BD-LIVE
Dolby
DTS
PAL broadcast system in
U.K, France, Germany, etc.
Java
Supported File Formats
Notes on the USB connection
• Your player supports USB storage media, MP3
players, digital cameras, and USB card readers.
• The player does not support folder or file names
longer than 128 characters.
• Some USB/External HDD/digital camera devices
may not be compatible with the player.
• Your player supports the FAT16, FAT32, and
NTFS files systems.
• Connect USB devices directly to the player’s
USB port. Connecting through a USB cable
may cause compatibility problems.
• Inserting more than one memory device into
a multi-card reader may cause the reader to
operate improperly.
• The player does not support the PTP protocol.
• Do not disconnect a USB device during a
“loading” process.
File Extension
*.avi
Container
AVI
Video Codec
Audio Codec
Resolution
DivX 3.11/4.x/5.1/6.0
MP3
AC3
DTS
WMA
PCM
1920x1080
MP4v3
H.264 BP/MP/HP
VC-1 AP
*.mkv
MKV
DivX 5.1/6.0
H.264 BP/MP/HP
*.wmv
WMV (wmv9)
*.mp4
MP4
VC-1 AP
VC-1 SM
MP4 (mp4v)
H.264 BP/MP/HP
MPEG1
*.mpg
*.mpeg
PS
MPEG2
H.264 BP/MP/HP
MP3
AC3
DTS
WMA
AAC
MP1, 2
Dolby Digital
DTS
1920x1080
1920x1080
1920x1080
1920x1080
1920x1080
1920x1080
1920x1080
1920x1080
1920x1080
1920x1080
1920x1080
1920x1080
Limitations
- Even when the file is encoded by a supported codec mentioned above, a file might not be played if its
content has a problem.
- Normal playback is not guaranteed if the file’s container information is wrong or the file itself is
corrupted.
- Files having a higher Bitrate or frame rate than standard may stutter during sound/video playback.
- The Seek (skip) function is not available if the file’s index table is damaged.
Video decoder
- Supports up to H.264 Level 4.1 and AVCHD
- Does not support H.264 FMO/ASO/RS and VC1 SP/MP/AP L4
- MPEG4 SP, ASP :
Below 1280 x 720 : 60 frames max
Above 1280 x 720 : 30 frames max
English
9|
Getting Started
Video File Support
02
• The bigger the image resolution, the longer the image takes to display.
• This player cannot play MP3 files with DRM (Digital Rights Management) downloaded from commercial
sites.
• Your player only supports the video that is under 30fps (frame rate).
• You must remove the USB storage device safely (by performing the “Safely Remove USB” function) to
prevent possible damage to the USB memory.
Press the HOME button to move to the home menu, press the YELLOW (C) button, and then press
the E button.
• SAMSUNG is not responsible for any data file damage or data loss.
Getting Started
- Does not support GMC 2 or higher
Audio decoder
- Supports WMA 7, 8, 9 and STD
- Does not support WMA sampling rate of 22050Hz mono.
Music File Support
File Extension
Container
Audio Codec
Support Range
*.mp3
MP3
MP3
-
*.wma
WMA
WMA
Sampling rates (in kHz) - 8, 11, 16, 22, 32, 44.1, 48
Bitrates - All bit-rates from 5kbps to 384kbps
AVCHD (Advanced Video Codec High Definition)
• This product can play back AVCHD format discs. These discs are normally recorded and used in
camcorders.
• The AVCHD format is a high definition digital video camera format.
• The MPEG-4 AVC/H.264 format compresses images with greater efficiency than the conventional
image compressing format.
• Some AVCHD discs use the “x.v.Color” format. This product can play back AVCHD discs that use
“x.v.Color” format.
• “x.v.Color” is a trademark of Sony Corporation.
• “AVCHD” and the AVCHD logo are trademarks of Matsushita Electronic Industrial Co., Ltd. and Sony
Corporation.
| NOTE |
\ Some AVCHD format discs may not play, depending on the recording conditions.
\ AVCHD format discs need to be finalized.
\ “x.v.Color” offers a wider color range than normal DVD camcorder discs.
\ Some MKV and MP4 format discs may not play, depending on their video resolution and frame rate.
| 10 English
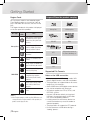
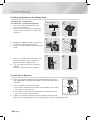
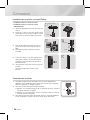
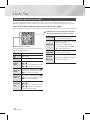
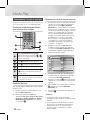
Accessories
02
Check for the supplied accessories below.
Getting Started
FUNCTION
VOLUME
-
+
1
2
4
5
7
8
DISC MENU
Video Cable
FM Antenna
SUBTITLE
MUTE
3
6
9
TITLE MENU
0
POPUP
HOME
REPEAT
TOOLS
INFO
EXIT
RETURN
TUNER
MEMORY MO/ST
A
B
SOUND
EFFECT
HDMI Cable
User Manual
C
D
TUNING
DOWN
UP
Remote Control / Batteries (AAA size)
Figures and illustrations in this User Manual are provided for reference only and may differ from actual
product appearance.
English
11 |
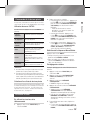
Getting Started
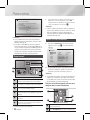
Front Panel
PLAY/PAUSE
FUNCTION
STOP
ENTER
OPEN/CLOSE
VOLUME CONTROL
DISPLAY
DISC TRAY
USB HOST
REMOTE CONTROL
SENSOR
POWER
| NOTE |
\ To upgrade the product's software through the USB Host jack, you must use a USB memory stick.
\ When the product displays the Blu-ray Disc menu, you cannot start the movie by pressing the 6 button on the product or
the remote. To play the movie, you must select Play Movie or Start in the disc menu, and then press the E button.
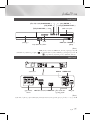
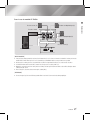
Rear Panel
AUX
IN
FRONT L
SURROUND L
SUBWOOFER
FRONT R
SURROUND R
IMPEDANCE : 3Ω
SPEAKERS OUT
CENTER
VIDEO
OUT
LAN
FM ANT
L
R
HDMI OUT
COOLING FAN
OPTICAL
DIGITAL
AUDIO IN
AUX IN
VIDEO OUT
AUX
IN
CENTER
FRONT L
SURROUND L
SUBWOOFER
FRONT R
SURROUND R
IMPEDANCE : 3Ω
SPEAKERS OUT
VIDEO
OUT
LAN
FM ANT
L
R
OPTICAL
HDMI OUT
SPEAKER OUTPUT
CONNECTORS
| NOTE |
LAN TERMINAL
HDMI OUT
EXTERNAL DIGITAL
AUDIO IN (OPTICAL)
DIGITAL
AUDIO IN
FM ANTENNA
\ Ensure a minimum of 4 inches of clear space on all sides of the home theater to ensure adequate ventilation.
Do not obstruct the cooling fan or ventilation holes.
| 12 English
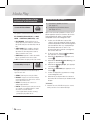
Remote Control
02
Tour of the Remote Control
Press to select Blu-ray's mode.
FUNCTION
VOLUME
Adjust the volume.
Press numeric buttons to operate
options.
MUTE
-
+
1
2
3
4
5
6
7
8
DISC MENU
POPUP
Press to skip backwards or
forwards.
Press to play a disc.
SUBTITLE
HOME
REPEAT
Allows you to repeat a title,
chapter, track or disc.
Selects the disc subtitle language.
TOOLS
INFO
RETURN
EXIT
Press to use the Tools menu.
Select on-screen menu items
and change menu value.
Return to the previous menu.
TUNER
MEMORY MO/ST
These buttons are used both for
menus on the product and also
several Blu-ray Disc functions.
Use to enter the Popup menu/
Title menu.
Press to search backwards or
forwards.
Press to pause a disc.
Press to stop a disc.
Press to move to the Home screen.
Cut off the sound temporarily.
9
TITLE MENU
0
Press to view the disc menu.
To open and close the disc tray.
A
B
SOUND
EFFECT
C
D
TUNING
DOWN
Select the desired Dolby Pro
Logic II audio mode.
UP
Use to display the playback
information when playing
a Blu-ray/DVD disc.
Press to Exit the menu.
Use to set a preset radio frequency.
Select MONO or STEREO for
radio broadcasts.
Search for active FM stations and
to change channels.
Press to apply sound effects.
Installing batteries in the Remote Control
Battery size: AAA
| NOTE |
\ Make sure to match the “+” and “–” ends of the batteries
with the diagram inside the compartment.
\ Assuming typical TV usage, the batteries last for about
one year.
\ The remote control can be used up to approximately 23
feet (7 meters) from the product in a straight line.
English
13 |
Getting Started
Turn the product on and off.
Connections
This section describes various methods of connecting the product to other external components.
Before moving or installing the product, be sure to turn off the power and disconnect the power cord.
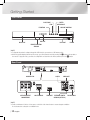
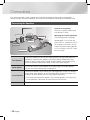
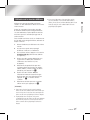
Connecting the Speakers
Position of the product
Place it on a stand or cabinet shelf,
or under the TV stand.
Center
Subwoofer
Front (R)
Product
Front (L)
Surround (L)
Surround (R)
Selecting the Listening Position
The listening position should be
located about 2.5 to 3 times the
size of the TV's screen from the TV.
For example, if you have a 46 inch
screen, locate the listening position
115 to 138 inches (9.6 to11.5 feet)
from the screen.
Front Speakers
Place these speakers in front of your listening position, facing inwards (about 45°)
toward you. Place the front speakers so that their tweeters will be at the same
height as your ear. Align the front face of the front speakers with the front face of
the center speaker or place them slightly in front of the center speakers.
Center Speaker
It is best to install the Center Speaker at the same height as the front speakers.
You can also install it directly over or under the TV.
Surround Speakers
Place these speakers to the side of your listening position. If there isn't enough
room, place these speakers so they face each other. Position them about 2 to
3 feet (60 to 90cm) above your ear, facing slightly downward.
the front and center speakers, the surround speakers are used mainly
* Unlike
for sound effects. Sound will not come from them all the time.
Subwoofer
| 14 English
The position of the subwoofer is not so critical. Place it anywhere you like.
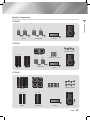
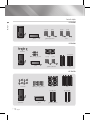
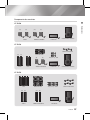
Speaker Components
03
HT-E3500
(R)
FRONT
(L)
Connections
(L)
(R)
SURROUND
CENTER
SUBWOOFER
HT-E3530
SPEAKER CABLE
(L)
(R)
STAND BASE
(L)
FRONT
(R)
SURROUND
STAND
SCREW (5X15): 8EA
CENTER
SUBWOOFER
HT-E3550
STAND
(L)
(R)
FRONT
STAND BASE
(L)
SCREW (5X15): 16EA
SPEAKER CABLE
(R)
SURROUND
CENTER
SUBWOOFER
English
15 |
Connections
Installing the Speakers on the Tallboy Stand
* HT-E3530 only - Front Speakers
* HT-E3550 only - Front/Surround Speakers
1. Turn the Stand Base upside-dowon and
connect it to the Stand.
2. Insert screws clockwise into the three holes
marked using a screwdriver as shown in the
illustration.
3. Straighten a supplied speaker wire and put in
the hole on the Center of Stand Base.
4. Connect the upper Speaker to the assembled
Stand.
5. Insert a screw clockwise into the hole on the
rear of the speaker using a screwdriver.
And then connect a speaker cable.
6. This is the appearance after the speaker is
installed.
Follow this steps to install other speaker.
1
Stand Base
2
Stand
3
4
Speaker
Stand
5
6
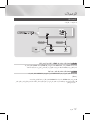
Connecting The Speakers
1. Match the subwoofer cable bundle to the subwoofer by matching the
color coded plug on bundle to the colored sticker on the bottom of the
subwoofer.
2. To attach speaker wire to the subwoofer:
a. Press down the red tab on the back of the subwoofer, insert the red
wire, and then release the tab.
b. Press down the black tab on the back of the subwoofer, insert the
black wire, and then release the tab.
Black
3. Connect the speaker wire plugs from each speaker to the back of the
product by matching the colors of the speaker plugs to the colors of the speaker jacks.
| 16 English
Red
In case of HT-E3500
03
Center Speaker
Connections
Surround Speaker (L)
Front Speaker (L)
SURROUND
IMPEDANCE : 3
SPEAKERS OUT
Surround Speaker (R)
SURROUND
Front Speaker (R)
CENTER
FRONT L
SURROUND L
SUBWOOFER
FRONT R
SURROUND R
IMPEDANCE : 3Ω
SPEAKERS OUT
Subwoofer
LAN
| CAUTION |
\ To mount your speakers on a wall, fix screws or nails on the desired wall securely and install the speaker using the stud hole on the rear
side. Note that screws or nails for wall-mounted installation is not provided with the product.
\ Do not let children play with or near the speakers. They could get hurt if a speaker falls.
\ When connecting the speaker wires to the speakers, make sure that the polarity (+/–) is correct.
\ Keep the subwoofer speaker out of reach of children to prevent children from inserting their hands or alien substances into the duct (hole)
of the subwoofer speaker.
\ Do not hang the subwoofer on the wall through the duct (hole).
| NOTE |
\ If you place a speaker near your TV set, the screen color may be distorted because of the magnetic field.
English
17 |
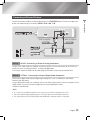
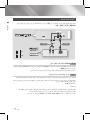
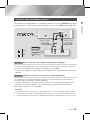
Connections
Connecting to a TV
Select either Method 1 or Method 2.
AUX
IN
AUX
IN
FRONT L
SURROUND L
FRONT R
SURROUND R
IMPEDANCE : 3Ω
SPEAKERS OUT
CENTER
SUBWOOFER
FM ANT
FM ANT
L
R
HDMI OUT
L
VIDEO
OUT
LAN
VIDEO
OUT
OPTICAL
DIGITAL
AUDIO IN
R
HDMI OUT
Method 1
OPTICAL
DIGITAL
T
TAL
AUDIO IN
Method 2
HDMI IN
VIDEO IN
Method 1 Connecting to a TV with an HDMI Cable - Best Quality (Recommended)
Connect an HDMI cable from the HDMI OUT jack on the back of the product to the HDMI IN jack on your
TV.
If the TV supports ARC, you can hear TV sound from home theater with only connect this cable.
Method 2 Connecting to a TV with an Video Cable - Good Quality
Connect the supplied Video cable from the VIDEO OUT jack on the back of the product to the VIDEO IN
jack on your TV.
| NOTE |
\ The VIDEO Out jack always outputs in the 576i/480i resolution regardless of the resolution set in the Setup menu.
\ Do not connect the unit through a VCR. Video signals fed through VCRs may be affected by copyright protection systems and
the picture will be distorted on the television.
| 18 English
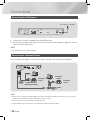
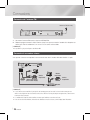
Connecting to External Devices
AUX
IN
FRONT L
SURROUND L
FRONT R
SURROUND R
IMPEDANCE : 3Ω
SPEAKERS OUT
CENTER
SUBWOOFER
FM ANT
FM ANT
L
R
HDMI OUT
L
VIDEO
OUT
LAN
VIDEO
OUT
OPTICAL
DIGITAL
AUDIO IN
R
HDMI OUT
OPTICAL
DIGITAL
DIGI
TAL
TAL
AUDIO IN
(Cable not supplied.)
(Cable not supplied.)
Method 1
R
Red
W
White
External Devices
Method 2
OPTICAL OUT
Method 1 AUX IN : Connecting an External Analog Component
Using an RCA audio cable (not supplied), connect the AUDIO In jack on the product to the AUDIO Out
jack on the external analog component. Select the AUX mode.
~ Be sure to match the colors on the cable plugs to the colors on the input and output jacks.
Method 2 OPTICAL : Connecting an External Digital Audio Component
To connect the digital audio output of digital signal components such as Cable Boxes and Satellite
Receivers (Set-Top-Boxes).
Using a digital optical cable (not supplied), connect the Optical Digital Audio In jack on the product to the
Digital Optical Out jack of the external digital device using a digital optical cable.
Select the D. IN mode.
| NOTE |
\ To see video from your Cable Box/Satellite receiver, you must connect its video output directly to your TV.
\ This system supports Digital sampling frequencies of 32 kHz or higher from external digital components.
\ This system supports only DTS and Dolby Digital audio. MPEG audio, a bitstream format, is not supported.
English
19 |
Connections
AUX
IN
03
To select the correct mode for an external device, press the FUNCTION button. Each time you press the
button, the mode changes in this order : BD/DVD D. IN AUX FM
Connections
Connecting the FM Antenna
FM Antenna (supplied)
AUX
IN
FRONT L
SURROUND L
SUBWOOFER
FRONT R
SURROUND R
IMPEDANCE : 3Ω
SPEAKERS OUT
CENTER
VIDEO
OUT
LAN
FM ANT
L
R
HDMI OUT
OPTICAL
DIGITAL
T
TAL
AUDIO IN
1 . Connect the FM antenna supplied to the FM ANTENNA Jack.
2 . Slowly move the antenna wire around until you find a location where reception is good, then fasten it
to a wall or other rigid surface.
| NOTE |
\ This product does not receive AM broadcasts.
Connecting to a Network Router
You can connect your product to your network router using one of the methods illustrated below.
AUX
IN
FRONT L
SURROUND L
FRONT R
SURROUND R
IMPEDANCE : 3Ω
SPEAKERS OUT
CENTER
SUBWOOFER
FM ANT
L
R
HDMI OUT
Or
VIDEO
OUT
LAN
OPTICAL
DIGITAL
AUDIO IN
Broadband modem
(with integrated router)
Broadband
service
Broadband
modem
Broadband
service
Router
| NOTE |
\ Internet access to Samsung’s software update server may not be allowed, depending on the router you use or your ISP’s
policy. For more information, contact your ISP (Internet Service Provider).
\ DSL users, please use a router to make a network connection.
\ For the AllShare function, a PC must be connected in the network as shown in the figure.
| 20 English
Settings
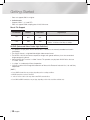
The Initial Settings Procedure
2 . Press the ▲▼ buttons to select the desired
language, and then press the E button.
3 . Press the E button to start function setup.
Initial Settings
TV Aspect and Network will be set.
Each setting may be changed later under "Settings".
Start
a Previous
" Select
4 . The TV Aspect screen appears. Press the ▲▼
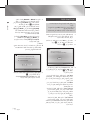
buttons to select desired a TV Aspect ratio,
and then press the E button.
You have four choices:
16:9 Original - For widescreen TVs. Displays
widescreen pictures in their orignal 16:9
format and 4:3 pictures (the old, standard
format) in 4:3 pillar box format with black bars
on the left and right.
16:9 Full - For widescreen TVs. Displays
widescreen pictures in their orignal 16:9
format and expands 4:3 pictures to fill the
16:9 screen.
4:3 Letter Box - For older, standard screen
analog TVs. Displays 4:3 pictures in full
screen and 16:9 pictures in letter box format
that retains the 16:9 aspect ratio but puts
black bars above and below the picture.
| NOTE |
\ If you skip network setup here or the setup does not
work correctly, you can go to "Configuring Your Network
Connection" on page 26 to set up the product's network
connection later.
Initial Settings I Network - Wired
Choose the method to configure Internet Protocol (IP).
Please make sure that the Ethernet cable is connected.
Auto : Configure IP automatically.
Auto
Manual
a Previous d Skip
< Move " Select
6 . The product verifies the network connection
and then connects to the network. When
it is done, press the E button. The Initial
Settings Complete screen appears, and then
the Home screen appears.
English
21 |
Settings
1 . Turn on your TV after connecting the product,
and then turn on the product. When you turn
on the product for the first time, the product
automatically displays the Initial Settings
Language screen.
5 . The Network - Wired screen appears.
- If you have a network with dynamic IP
addresses - and most people do - select
Auto, press the E button, and then go to
Step 6.
- If you have a network with static IP addresses,
we suggest you select Skip by pressing the
BLUE (D) button, and then go to "Configuring
Your Network Connection" on page 26
after you have completed the initial setup.
"Configuring Your Network Connection"
provides a full explanation of how to configure
your network connection manually.
- If you have no network, select Skip by
pressing the BLUE (D) button. The Initial
Settings Complete screen appears, and
then the Home screen appears.
04
• The Home menu will not appear if you do not configure
the initial settings.
• The OSD (On Screen Display) may change in this
product after you upgrade the software version.
• The access steps may differ depending on the menu
you selected.
4:3 Pan-Scan - For older, standard screen
analog TVs. Displays 4:3 pictures in full
screen and 16:9 pictures in Pan-Scan format
that fills the screen, but cuts off the left and
right sides of the picture and enlarges the
middle vertically.
Settings
1 . To select an option on the Home screen,
move the cursor using the ◄► buttons until it
highlights the option of your choice, and then
press the E button.
Initial Settings I Network - Wired
MAC Address (d0:66:7b:dc:28:fc)
IP Address, Subnet Mask, Gateway, DNS Server
Gateway Ping
Internet Service Test
| NOTE |
Your network is operating properly.
If you still have a problem, contact your network service provider.
\ To play or view video, music, or photo files located on your
PC, you must connect your home theater and PC to a home
network and you must download, install, and configure the
AllShare software on your PC. (See page 29)
OK
" Select
| NOTE |
\ If you want to display the Initial Setting screen again and
make changes, select the Reset option. (See page 26)
\ If you use an HDMI cable to connect the product to an
Anynet+(HDMI-CEC)-compliant Samsung TV and 1.) You
have set the Anynet+(HDMI-CEC) feature to ON in both
the TV and the product and 2.) You have set the TV to a
language supported by the product, the product will select
that language as the preferred language automatically.
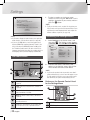
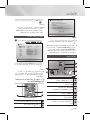
Accessing the Settings Screen
1 . Select Settings on the Home screen, and
then press E. The Settings screen appears.
Settings
Display
The Home Screen
3
®
Settings
2
4
5
1
a Change Device
d View Devices
" Enter
1
Videos. Play videos located on discs, USB devices,
or your PC.
2
Photos. View photos located on discs, USB devices,
or your PC.
3
Network Services. Select a network service:
Vudu, CinemaNow or YouTube.
4
Music. Play music located on discs, USB devices,
or your PC.
5
Settings. Set various functions to suit your
personal preferences.
6
Displays the colored buttons on your remote that
you can press to access or perform functions.
Selecting an Option on the Home Screen
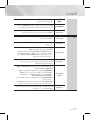
| 22 English
TV Aspect Ratio
: 16:9 Original
BD Wise
: On
Network
Resolution
: Auto
System
Movie Frame (24 Fs)
: Auto
Language
HDMI Color Format
: Auto
Security
HDMI Deep Color
: Auto
General
Progressive Mode
: Auto
Support
™
No Disc
►
Audio
6
2 . To access the menus, sub-menus, and
options on the Settings screen, please refer
to the remote control
below.
VOLUME illustration
MUTE
FUNCTION
| NOTE |
-
+
2 stop 3mode for more than 5
1 in the
\ If you leave the product
minutes without using4 it, a screen
saver
5
6 will appear on your
TV. If the product is left in the screen saver mode for more
9
7power8will automatically
than 20 minutes, the
turn off.
DISC MENU
TITLE MENU
0 POPUP
Buttons on the Remote Control Used
for the Settings Menu
SUBTITLE
HOME
REPEAT
1
TOOLS
INFO
RETURN
EXIT
3
2
1
2
TUNER
MEMORY MO/ST
A
B
C
4
D
TUNING
SOUND
HOME Button : Press
to move
to the Home screen.
UP
EFFECT DOWN
RETURN (') Button : Return to the previous menu.
EXIT Button : Press to exit the current menu.
Settings
4
04
3
E (Enter) / DIRECTION Button :
~ Press ▲▼◄► to move the cursor or select an item.
~ Press the E button to activate the currently selected item
or confirm a setting.
| NOTE |
\ The E button on the product's front panel can be used for same purpose as the E button on the remote control.
Detailed Function Information
Each Settings function, menu item, and individual option is explained in detail on-screen. To view an
explanation, use the ▲▼◄► buttons to select the function, menu item, or option.
The explanation will usually appear the bottom of the screen. A short description of each Settings function
starts on this page. Additional informaton on some of the functions is also in the Appendix of this manual.
Settings Menu Functions
Display
3D Settings
Set up the 3D related functions.
3D Blu-ray Playback Mode: Select whether to play a Blu-ray
Disc with 3D contents in 3D Mode. If you move to the Home
or Smart Hub Home menu while in 3D mode, the product will
switch to 2D automatically.
Screen Size: Enter the size of the TV attached to the product.
The product will automatically adjust the 3D output to the screen
size of the TV.
TV Aspect
Ratio
Lets you adjust the output of the product to the screen size of your
TV. See page 21, Step 4 for a description of the screen size options.
BD Wise
BD Wise is Samsung’s latest inter-connectivity feature.
When you connect a Samsung product and a Samsung TV with
BD Wise to each other via HDMI, and BD Wise is on in both the
product and TV, the product outputs video at the video resolution
and frame rate of the Blu-ray/DVD Disc.
Resolution
Lets you set the output resolution of the HDMI video signal
to Auto, 1080p, 1080i, 720p, 576p/480p. If Composite is
connected, the resolution supports only 576i/480i. The number
indicates the number of lines of video per frame. The i and p
indicate interlaced and progressive scan, respectively. The more
lines, the higher quality.
Movie Frame
(24 Fs)
Setting the Movie Frame (24 Fs) feature to Auto lets the product
adjust its HDMI output to 24 frames per second automatically for
improved picture quality if attached to a 24Fs compatible TV.
• You can enjoy the Movie Frame (24 Fs) feature only on a TV
supporting this frame rate.
• Movie Frame is only available when the product is in the HDMI
1080i or 1080p output resolution modes.
English
23 |
Settings
Audio
HDMI Color
Format
Lets you set the color space format for the HDMI output to
match the capabilities of the connected device (TV, monitor,
etc).
HDMI Deep
Color
Lets you set the product to output video from the HDMI OUT
jack with Deep Color. Deep Color provides more accurate
color reproduction with greater color depth.
Progressive
Mode
Lets you improve picture quality when viewing DVDs.
Speaker
Setting
Speaker
Selection
Lets you select which speakers you want active, either the
TV's speakers or the Home theatre's speakers.
Audio Return
Channel
Lets you direct the sound from the TV to the Home Theater
speakers. Requires an HDMI connection and an Audio Return
Channel (ARC) compatible TV.
• When Audio Return Channel is set to Auto, the home
theater automatically selects either ARC or optical input as
the audio source, depending on your connections. If Audio
Return Channel is active, optical input does not work.
Digital Output
Lets you set the Digital Output to match the capabilities of the
AV receiver you’ve connected to the product. For more details,
please refer to the digital output selection table. (See page 42)
Dynamic
Range Control
Lets you apply dynamic range control to Dolby Digital, Dolby
Digital Plus, and Dolby True HD audio.
Auto: Automatically controls the dynamic range of Dolby
TrueHD audio, based on information in the Dolby TrueHD
soundtrack. Also turns dynamic range control on for Dolby
Digital and Dolby Digital Plus.
Off: Leaves the dynamic range uncompressed, letting you
hear the original sound.
On: Turns dynamic range control on for all three Dolby
formats. Quieter sounds are made louder and the volume of
loud sounds is reduced.
Audio Sync
| 24 English
You can set the speaker options.
When the product is attached to a digital TV, lets you adjust
the audio delay so that the audio syncs with the video. You
can set the delay between 0 and 300 milliseconds.
Network
System
Language
Security
General
Lets you test the Internet Protocol setup to see if it is working
correctly.
Network
Status
Lets you check whether a connection to the network and the
Internet have been established.
BD-Live
Internet
Connection
Lets you allow or prohibit an Internet connection for the BDLive service.
Initial Settings
Lets you re-run the Initial Settings procedure. See page 20 for
details.
Anynet+
(HDMI-CEC)
Anynet+ is a convenient function that offers linked operations
with other Samsung products that have the Anynet+ feature
and lets you control those products with one Samsung TV
remote. To operate this function, you must connect this
product to an Anynet+ Samsung TV using an HDMI cable.
BD Data
Management
Lets you manage the contents you downloaded through a Bluray disc that supports the BD-Live service. You can view the
information about the USB device you are using for BD Live
data storage including the storage space. You can also delete
BD Live data and change the device.
You can select the language you prefer for the On-Screen Menu, disc menu, etc.
• The selected language will only appear if it is supported on the disc.
The default PIN is 0000. Enter the default PIN to access the security function if
you haven't created your own PIN.
BD Parental
Rating
Prevents playback of Blu-ray Discs with a rating equal to or
above a specific age ratings unless the PIN is entered.
DVD Parental
Rating
Prevents playback of DVDs with a rating above a specific
numerical ratings unless the PIN is entered.
YouTube Lock
If the lock set to On, you must enter the PIN to use the service.
Change PIN
Change the 4-digit PIN used to access security functions.
Time Zone
You can specify the time zone that is applicable to your area.
English
25 |
Settings
Network Test
For more information about Network Settings and network
functions, see "Networks and the Internet" starting on page 26.
04
Wired
Network
Settings
Settings
Support
Software
Upgrade
Contact
Samsung
Terms of
Service
Agreement
Reset
For more information about the Software Update function, see
"Upgrading Software" on page 28.
Provides contact information for assistance with your product.
View the general disclaimer regarding third party contents and
services.
All settings will revert to the default except for the network
settings. The default security password is 0000.
Networks and the Internet
When you connect this product to a network, you
can use network based applications and functions
such as BD-LIVE and upgrade the product's
software through the network connection.
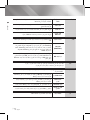
Configuring Your Network Connection
Before you begin, contact your ISP to find out
if your IP address is static or dynamic. If it is
dynamic, we recommend you use the Automatic
procedure below. If it is static, you must use the
Manual procedure that follows.
• Before you begin, confirm that the product is
connected to your router with a network cable.
❑
Automatic
To start the configuration process, follow these
steps:
1 . In the Home menu, select Settings, and then
press the E button.
2 . Select Network, and then press the E
button.
3 . Select Wired Network Settings, and then
press the E button.
The Wired Network Settings screen appears.
4 . Press the ► button on the Internet Protocol
Setup menu.
Use ▲▼ button to select Auto and then
press the E button.
| 26 English
Settings
Display
Audio
Network
Wired Network Settings
Internet Protocol Setup : Auto
IP Address
\
: 0
0
0
0
: 0
0
0
0
Language Gateway
: 0
0
0
0
Security DNS
: Auto
0
0
0
System
General
Subnet Mask
: 0
DNS Server
Support
> Move
" Select
' Return
5 . The Network function acquires and fills in the
values for IP Address, Subnet Mask, etc.,
automatically.
6 . After the Network function has acquired the
network values, press the RETURN (')
button.
7 . Select Network Test, and then press E.
The home theater validates the network
connection. When it is done, press the
RETURN (') button.
❑
Manual
Display
Audio
Wired Network Settings
Internet Protocol Setup : Manual
\
IP Address
: 0
Subnet Mask
: 255 255 255
0
Language Gateway
: 0
Security DNS
: Manual
Network
System
General
: 0
DNS Server
0
0
0
0
0
0
0
0
Support
> Move
0
" Select
' Return
1 . Follow the first four steps in the Automatic
procedure, but select Manual instead of Auto
in Step 4.
2 . Press the ▼ arrow button to go to the first
entry field (IP Address).
3 . Use the number buttons on your remote to
enter numbers.
4 . When done with each field, use the ► button
to move successively to the next field.
You can also use the other arrow buttons to
move up, down, and back.
5 . Enter the IP Address, Subnet Mask, and
Gateway values.
1 · Right click the Network icon on the bottom
right of the Windows desktop.
2 · In the pop-up menu, click Status.
3 · On the dialog that appears, click the Support
tab.
4 · On the Support tab, click the Details button.
The Network settings are displayed.
• Windows 7
1 · Click the Network icon on the bottom right of
the Windows desktop.
2 · In the pop-up menu, click Network and
Sharing Center.
3 · On the dialog that appears, click the Local
Area Connection.
4 · On the Support tab, click the Details button.
The Network settings are displayed.
| NOTE |
\ Depending on your Windows version, the information may
differ.
6 . Press the ▼ button to go to DNS.
7 . Press the ▼ button to go to the first DNS
entry field. Enter the numbers as above.
8 . Press the RETURN (') button on your
remote.
9 . Select Network Status, and then press E.
10 . The Network Status screen appears.
The product verifies the network connection
and then connects to the network. When it is
done, highlight OK, and then press E.
| NOTE |
\ You can get the Network values from your Internet
provider. You can also view these values on most Windows
computers. For instructions, see "Getting the Network
Setting Values" on this page.
English
27 |
Settings
Settings
You can view your Network Settings values on
most Windows computers. To view the Network
Settings values, follow these steps:
• Windows XP
04
If you have a static IP address or the Automatic
procedure does not work, you’ll need to set the
Network Settings values manually.
< Getting the Network Settings Values >
Settings
Upgrading Software
The Software Upgrade menu allows you to
upgrade the product’s software for performance
improvements or additional services.
• Never turn the product off or back on manually during
the update process.
1 · In the Home menu, select Settings, and then
press the E button.
2 · Select Support, and then press the E
button.
3 · Select Software Upgrade, and then press
the E button.
4 · Select one of the following methods:
• By Online
• By USB
• Auto Upgrade Notification
5 · Press the E button.
Directions for each method begin below.
| NOTE |
\ The update is complete when the product turns off
after restarting. Press the POWER button to turn on the
updated product for your use. Never turn the product on
or off manually during the update process.
\ Samsung Electronics takes no legal responsibility for product
malfunction caused by an unstable Internet connection or
consumer negligence during a Software Update.
\ If you want to cancel the upgrade while the upgrade
software is downloading, press the E button.
By Online
Your product must be connected to the Internet
to use the By Online function. Remove all discs
before you begin.
1 · Select By Online, and then press the E
button. The Connecting to Server message
appears.
2 · If an update is available, a popup message
appears asking if you want to upgrade.
If you select Yes, the product turns off
automatically, turns on, and then begins the
upgrade.
| IMPORTANT |
\ Never turn the home theater on or off manually during a
software upgrade.
| 28 English
3 · The update progress popup appears. When
the update is completed, the product turns
off automatically again.
4 · Press the POWER button to turn on the
product.
| NOTE |
\ The update is complete when the product turns off
after restarting. Press the POWER button to turn on the
updated product for your use.
\ Never turn the product off or on manually during the
update process.
\ Samsung Electronics takes no legal responsibility for
a product malfunction caused by an unstable internet
connection or consumer negligence during software upgrade.
By USB
1 · Visit www.samsung.com.
2 · Click SUPPORT on the top right of the page.
3 · Enter the product's model number into the
search field, and then click Find Product.
4 · Click Get downloads in the center of the
page below the Downloads header.
5 · Click Firmware in the center of the page.
6 · Click the ZIP icon in the File column on the
right side of the page.
7 · Click OK in the pop-up that appears to
download and save the firmware file to your PC.
8 · Unzip the zip archive to your computer. You
should have a single folder with the same
name as the zip file.
9 · Copy the folder to a USB flash drive.
10 · Make sure no disc is inserted in the product,
and then insert the USB flash drive into the
USB port of the product.
11 · In the product’s menu, go to Settings >
Support > Software Upgrade.
12 · Select By USB.
| NOTE |
\ There should be no disc in the product when you upgrade
the software using the USB Host jack.
\ Never turn the product off or on manually during the
update process.
\ When the Software Update is done, check the software
details in the Software Upgrade menu.
Auto Upgrade Notification
Setting Up AllShare
2 · In the Software Update menu, set Auto
Upgrade Notification to On.
If there is a new software version available,
the product will notify you with a pop-up
message.
To Download the AllShare Software
1 · Turn on the product.
3 · To upgrade the firmware, select Yes. The
product turns off automatically, turns on, and
then begins the upgrade.
4 · The update progress popup will appear. When
the update is complete, the product will turn
off automatically again.
5 · Press the POWER button to turn on the
product.
| NOTE |
\ The update is complete when the product turns off
after restarting. Press the POWER button to turn on the
updated product for your use. Never turn the product on
or off manually during the update process.
\ Samsung Electronics shall take no legal responsibility
for product malfunction caused by unstable of internet
connection or consumer negligence during Software
Update.
To use AllShare with your PC, you must install
AllShare software on your PC. You can download
the PC software and get detailed instructions for
using AllShare from the Samsung.com website.
1 · Go to www.samsung.com.
2 · Click SUPPORT at the top of the page.
3 · On the Support page, enter the model
number of your player into the Model
Number field, and then press the E button.
4 · On the page that appears, click Get
downloads on the left side under
Downloads. The Download Center appears.
5 · On the Download Center page, click the
Software tab.
6 · On the software tab, click the File icon on the
right side of the AllShare line.
7 · In the pop-up that appears, click Save File.
8 · Find the AllShare install file on your disk, and
then double click the file.
9 · In the pop-up that appears, click Run, and
then follow the directions that appear on your
screen.
Download the AllShare Installation/Instruction
manual from the same Software Tab by clicking
the corresponding PDF file symbol in the File
column on the right. The file, in PDF format, will
download and open. Follow the directions to
install and setup AllShare. You can view and/or
save the file.
| NOTE |
\ To use allshare with your smartphone, you need to
connect your set & smartphone to the same router.
English
29 |
Settings
AllShare enables you to play music, video and
photo files in your PC using the product. To use
AllShare, you must connect the product to your
PC via the network (See page 20) and install the
SAMSUNG PC Share Manager on the PC.
04
If your product is connected to the network and
you set Auto Upgrade Notification on, the product
will notify you if a new software version is available
with a pop-up message.
Media Play
Using the Streaming Media Services
• To use the Streaming Media Services, your home
theater must be connected to the Internet. You also
may need a vendor account for some services.
OR
view, and then press the E button.
4-1. Press the BLUE (D) button.
Use the ▲▼◄► buttons in the Home menu to
move to the desired service, and then press the
E button.
®
PANDORA
internet radio
™
HD Movies
™
USB DISK
YouTube. You can view video streamed by
YouTube.
USB DISK
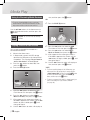
Playing Files on a USB Device
You can play multimedia files located on a
connected USB device.
1 · Move to the Home menu.
2 · In Stop mode, connect the USB storage
device to the USB port on the front panel of
the product. The message “Do you want to
access the device?” will be displayed.
3 · Press the ◄► button to select Yes, then
press the E button.
4 · Press the RED (A) button.
™
USB DISK
Safely Remove USB d View Devices " Enter
5 · Press the ▲▼ buttons to select the USB
Flash Mem or Disk then press the E button.
6 · Press the ◄► buttons to select Videos,
Music or Photos, then press the E button.
7 · If files appear on the screen go to Step 8. If
file folders appear on the screen, use the ▲▼
buttons to select a folder, press E, and
then go to Step 8.
8 · Use the ▲▼ buttons to select a file to play or
| 30 English
5-1. Press the ▲▼ buttons to select the USB
Flash Mem or Disk then press the E button.
6-1. Press the ▲▼ buttons to select Videos,
Music or Photos, then press the E button.
7-1. If files appear on the screen go to Step 8-1.
If file folders appear on the screen, use the
▲▼ buttons to select a folder, press E, and
then go to Step 8-1.
8-1. Use the ▲▼ buttons to select a file to play or
view, and then press the E button.
| NOTE |
\ To prevent possible damage to the USB memory, you
must remove the USB storage device safely using the
“Safely Remove USB” function. Press the HOME button
to move to the Home menu, select the YELLOW (C)
button, and then press the E button.
\ To listen to your music files with 5.1 channel sound, you
must set the Dolby Pro Logic II mode to MATRIX.
(See page 36)
CD
USB DISK a Change Device
d HOME " Enter
Playing a Commercial Video Disc
1 · Turn on the home theater.
2 · Open the disc tray, place a user recorded disc
into the disc tray with the disc’s label facing
up, and then close the tray.
3 · After the disc loads, press the RED (A)
button.
4 · Press the ▲▼ buttons to select CD or DVD,
and then press the E button.
5 · Press the ◄► buttons to select Videos,
Music, or Photos, then press the E button.
6 · If files appear on the screen, go to Step 7.
If file folders appear on the screen, use the
◄► buttons to select a folder, press E,
and then go to Step 7.
7 · Use the ◄► buttons to select a file to play or
view, and then press the E button.
OR
3-1. After the disc loads, press the BLUE (D)
button.
4-1. Press the ◄► buttons to select CD or DVD,
and then press the E button.
Place a disc into the disc tray with the disc’s label
facing up and then close the disc tray. Playback
starts automatically. If it does not playback
automatically, move to Videos in the Home menu
and press the E button.
In most cases, commercial videos will display a
disc menu. To play the movie on the disc, select
Play on the disc menu, and then press E.
| NOTE |
\ For more information about playing videos, go to "Controlling
Video Playback" on page 32.
Playing a Pre-Recorded
Commercial Audio Disc
1 · Insert an Audio CD (CD-DA) or an MP3 Disc into
the disc tray.
• For an Audio CD (CD-DA), the first track will
be played automatically. Tracks on a disc
are played in the order in which they were
recorded on the disc.
• For an MP3 disc, press the ◄► buttons to
select Music, then press the E button.
Playlist
5 . Press the ▲▼ buttons to select Videos,
Music or Photos, and then press the E
button.
TRACK 001
-1
6 . If files appear on the screen go to Step 7 .
If file folders appear on the screen, use the
▲▼ buttons to select a folder, press E, and
then go to Step 7-1.
-1
-1
7-1. Use the ▲▼ buttons to select a file to play or
view, and then press the E button.
+
00:08 / 05:57
1/12
TRACK 001
05:57
TRACK 002
04:27
TRACK 003
04:07
TRACK 004
03:41
TRACK 005
03:17
TRACK 006
03:35
s Pause
Tools
' Return
2 · To play a particular track, use the ▲▼ buttons
on the remote to select the track, and then
press the E button.
| NOTE |
\ For more information about playing music, go to "Controlling
Music Playback" on page 34.
English
31 |
Media Play
You can play mulitmedia files you have recorded
on DVD or CD discs.
05
Playing a Disc with User
Recorded Content
Media Play
Controlling Video Playback
FUNCTION
VOLUME
MUTE
- playback
+
You can control the
of video files located on Blu-ray, DVD, and CD discs, and on USB storage
devices. Depending
some of the functions described in this manual may not be available.
1 on 2the media,
3
Buttons on the4 Remote
5
6 Control used for Video Playback
8
7
DISC MENU
SUBTITLE
9
TITLE MENU
0
POPUP
HOME
REPEAT
TOOLS
INFO
Playback related buttons
The product does
not play sound
in Search, Slow,
RETURN
EXIT
or Step mode.
TUNER
MEMORY MO/ST
6
A
B
C
D
EFFECT
DOWN
UP
StartsSOUND
playback.
TUNING
5
Stops playback.
7
Pauses playback.
Fast
Motion
Play
During playback, press the 3 or button.
Each time you press the 3 or button, the playback speed will change.
Slow
Motion
Play
In pause mode, press the button.
Each time you press the button,
the playback speed will change.
Step
Motion
Play
In pause mode, press the 7 button.
Each time you press the 7 button, a
new frame appears.
Skip
Motion
Play
During playback, press the 1 or 2
button.
Each time you press 1 or 2 button,
the disc moves to the previous or next
chapter or file.
| 32 English
Using the disc menu, title menu, popup
menu and title list
DISC
MENU
During playback, press this button to
display the Disc menu.
TITLE
MENU
During playback, press this button to
display the Title menu.
• If your disc has a playlist, press
the GREEN (B) button to go to the
playlist.
POPUP
MENU
During playback, press this button to
display the Pop-up menu.
DISC
MENU
or TITLE
MENU
During playback, press this button to
display the title list.
Using the TOOLS Menu
Playing Time
Select to move to the specific playback
point. Use the numeric buttons to input
the playback point.
Full Screen
Select to set the desired full screen
size. You can select Original, Mode1
(larger), and Mode2 (largest).
Select to set the picture mode.
- Picture Mode
▪ Normal : Choose this setting for
most viewing applications.
▪ Movie : This is the best setting
Picture Setting
for watching movies.
▪ User : Lets you adjust the
sharpness and noise reduction
function respectively.
▪ Dynamic : Choose this setting to
increase Sharpness.
Chapter
Select to move to a chapter that you
desire to watch.
Repeat
Select to repeat a specific title, chapter
(BD/DVD discs only) or marked section.
Audio
Select to set the desired audio
language.
- You can also operate this function
by pressing the AUDIO button on the
remote control.
Subtitle
Select to set the desired subtitle
language.
- You can also operate this function
by pressing the SUBTITLE button on
the remote control.
Angle
To view a scene from another angle.
The Angle option displays the number
of angles available to view (1/1, 1/2,
1/3, etc.).
BONUSVIEW
Video /
Select to set the desired bonusview
BONUSVIEW
option.
Audio
(BD discs only)
| NOTE |
\ Depending on the disc or storage device, the Tools menu
may differ. All options may not be displayed.
Creating a Video Playlist
You can create a playlist of video files in a way that
is nearly identical to the way you create a playlist
of music files. For instructions, see "Creating a
Music Playlist" on page 34.
English
33 |
Media Play
Title
If the movie or video have more than
one title, move to or select a desired
title.
05
During playback, press the TOOLS button.
Menu that appears only when a BD/DVD
disc plays
Media Play
Controlling Music Playback
Creating a Music Playlist
You can control the playback of music content
located on DVDs, CDs, and USB storage devices.
Buttons on the Remote Control used
for Music Playback
- +
FUNCTION
VOLUME
6
MUTE
1
2
3
4
5
6
7
8
DISC MENU
9
TITLE MENU
0
POPUP
1
5
SUBTITLE
HOME
REPEAT
4
TOOLS
1
1 · If playing music from a commercial CD or
DVD, press the 5 or RETURN (') button.
The Music List Screen appears. If you are
creating a playlist from music on a user
created disk or USB device, access the
Music list as described in "Playing Files on a
USB Device" on page 29 or "Playing a Disc
with User Recorded Content" on page 30.
2 · Press the ▲▼◄► buttons to move to the
desired file, and then press the YELLOW (C)
button to select it. Repeat this procedure to
select additional files.
2
3
Music
00:05:57
INFO
EFFECT
DOWN
UP
3 6 button : Plays the currently selected track.
4 5 button : Stops a track.
Skip : During playback, press the 1 or 2 button
5 to move to the previous or next music of listed.
6
NUMBER buttons : During Playlist playback, press
the desired track number. The selected track is
played.
Repeating Tracks
You can set the product to repeat tracks.
1 · During the music playback, press the TOOLS
button.
2 · Use ◄► button to select Off, Track or One,
All or Shuffle in Repeat Mode, and then
press the E button.
| 34 English
TRACK 004
TRACK 006
TRACK 007
TRACK 008
TRACK 009
TRACK 010
00:03:47
00:03:53
CD
00:04:27
TRACK 005
00:03:17
MEMORY MO/ST
2 files selected 1/2 Page
TRACK 002
TRACK 003
00:04:07
Fast Play (Audio CD (CD-DA) only)
During playback, press the 3 or button.
Each time youRETURN
press the 3EXIT
or button, the
playback speed will change.
TUNER
A
C
D
aB track.
2 7 button : Pause
TUNING
SOUND
TRACK 002
TRACK 001
00:03:41
00:03:35
00:03:49
00:03:45
Select Jump page
' Return
3 · To remove a file from the Playlist, move to the
file, and then press the YELLOW(C) Button.
4 · Press the E button to play the selected files.
The Playlist screen appears.
5 · To go to the Music List, press the 5 or
RETURN (') button.
6 · To go back to the Playlist, press the E
button.
| NOTE |
\ You can create a playlist with up to 99 tracks
on Audio CDs (CD-DA).
\ If you go to the Music List from the Playlist, and
then return to the Playlist, the Playlist will start
playing again from the beginning.
Controlling Photo Playback
During playback, press the TOOLS button.
Start Slide
Show
Select to start a slide show.
Slide Show
Speed
Select to adjust the slide show speed.
Zoom
Select to enlarge the current picture.
(Enlarge up to 4 times)
Rotate
Select to rotate a picture.
(This will rotate the picture either
clockwise or counter clockwise.)
Information
Shows the picture information including
the name and size, etc.
Background
Music
Select to listen to music while viewing
a slide show.
| NOTE |
\ Depending on the disc or storage device, the Tools menu
may differ. All options may not be displayed.
\ To enable the background music function, the photo file
must be in the same storage media as the music file.
However, the sound quality can be affected by the bitrate
of the MP3 file, the size of the photo, and the encoding
method.
Creating a Photo Playlist
You can create a playlist of photos in a way that is
nearly identical to the way you create a playlist of
music files. For instructions, see "Creating a Music
Playlist" on page 34.
1 · Press the FUNCTION button to select FM.
2 · Tune in to the desired station.
• Preset Tuning 1 : Press the 5 button
to select PRESET and then press the
TUNING/CH (UP, DOWN) button to select
the preset station.
- Before you can tune to preset stations,
you must add preset stations to the
product's memory.
• Manual Tuning : Press the 5 button
to select MANUAL and then press the
TUNING/CH (UP, DOWN) button to tune in
to a lower or higher frequency.
• Automatic Tuning : Press the 5 button to
select MANUAL and then press and hold
the TUNING/CH (UP, DOWN) button to
automatically search the band.
Setting Mono/Stereo
Press the MO/ST button.
• Each time the button is pressed, the sound
switches between STEREO and MONO.
• In a poor reception area, select MONO for a
clear, interference-free broadcast.
Presetting Stations
Example : Presetting FM 89.10 into memory.
1 · Press the FUNCTION button to select FM.
2 · Press the TUNING/CH (UP, DOWN) button to
select <89.10>.
3 · Press the TUNER MEMORY button.
• NUMBER flashes on the display.
4 · Press the TUNER MEMORY button again.
• Press the TUNER MEMORY button before
NUMBER disappears from the display on its
own.
• After you press the TUNER MEMORY
button, NUMBER disappears from the
display and the station is stored in memory.
5 · To preset another station, repeat steps 2 to 4.
• To tune in to a preset station, press the
TUNING/CH (UP, DOWN) button.
English
35 |
Media Play
Using the Tools Menu
Using Buttons on the Remote Control
05
You can control the playback of photos located on
DVDs, CDs, and USB storage devices.
Listening to Radio
Media Play
Using the Special Effects Remote
Control Buttons
SOUND EFFECT Function
SOUND
EFFECT
Lets you select a mode that optimizes the sound.
MP3 ENHANCER SMART VOLUME POWER
BASS OFF
• MP3 ENHANCER : Helps enhance your sound
experience (ex. mp3 music). You can upscale your
MP3 level sound (24 kHz, 8bit) to CD level sound
(44.1 kHz, 16bit).
• SMART VOLUME : Regulates and stabilizes the
volume level, preventing drastic volume changes
when you change channels or during scene
transitions.
• POWER BASS : Increases the volume level of bass
tones and provides thudding sound effects.
• OFF : Select this for normal listening.
Dolby Pro Logic II Function
You can select the desired Dolby Pro Logic II audio
mode.
• MOVIE : Adds realism to a movie soundtrack.
• MUSIC : When listening to music, you can experience
sound effects as if you are listening to the actual
performance.
• MATRIX : Select to hear multi channel surround
sound.
• PROLOG : Select to listen to a 2CH sound source in
5.1CH surround sound with all speakers active.
- A specific speaker(s) may not output depending on
the input signal.
| 36 English
Using BD-LIVE™
1 · Connect the product to the network.
(See page 19)
2 · Configure the network settings.
(See pages 26~27)
Once the product is connected to your network,
you can enjoy various movie-related service
contents available on BD-LIVE compliant discs.
1 · Attach a USB memory stick to the USB jack
on the front of the product, and then use BD
Data Management to check its remaining
memory. The memory device must have at
least 1GB of free space to accommodate the
BD-LIVE services.
2 · Select Settings on the Home screen, and
then press the E button.
3 · Select System, and then press the E
button.
4 · Select BD Data management, and then
press the E button.
5 · Select Change Device, and then press the
E button.
6 · Select USB DISK, and then press the E
button.
7 · Insert a Blu-ray Disc that supports BD-LIVE.
8 · Select an item from the list of BD-LIVE service
contents provided by the disc manufacturer.
| NOTE |
\ The way you use BD-LIVE and the provided contents may
differ, depending on the disc manufacturer.
Using AllShare
05
AllShare lets you access and play files located on
your PC through your home theater.
Follow the directions in the AllShare user's guide
to setup AllShare on your PC and to tag folders
and files you want to share with the home theater.
Media Play
To access and play files located on your PC after
you have setup AllShare, follow these steps:
1 · Turn on your PC, your TV, and the home
theater.
2 · Make sure the AllShare Shared server is
running on your PC.
3 · On your home theater, press the BLUE (D)
button (View Devices).
4 · Use the left or right arrow button to select
your PC in the Device List.
5 · Select the kind of file you want to view or play,
Videos, Photos, or Music, and then press E.
6 · Use the ◄► button to select the folder with
the kind of files you selected, and then press
E. The File List is displayed.
7 · Select the file you want to view or play, and
then press E.
| NOTE |
\ You can create Playlists from files on your PC in the same
way you create playlists from files on USB devices and
discs.
\ With a few exceptions, you can control the playback
of files on your PC in the same fashion you control the
playback of files on USB devices and discs.
\ You can also access files on you PC by first selecting
Videos, Photos, or Music on the Home screen, and then
selecting your PC from the device list that appears.
English
37 |
Appendix
Additional Information
Note
HDMI OUT
Connections
• Certain HDMI output resolutions may not work, depending on your TV.
• You must have an HDMI connection to enjoy videos with 3D technology.
• A long HDMI cable may cause screen noise. If this occurs, set HDMI Deep Color to Off in the
menu.
3D Settings
• For some 3D discs, to stop a movie during 3D playback, press the 5 button once. The movie
stops and the 3D mode option is de-activated.
To change a 3D option selection when you are playing a 3D movie, press the 5 button once.
The Blu-ray menu appears. Press the 5 button again, then select 3D Settings in the Blu-ray
menu.
• Depending on the content and the position of the picture on your TV screen, you may see vertical
black bars on the left side, right side, or both sides.
TV Aspect
• Depending on the disc type, some aspect ratios may not be available.
• If you select an aspect ratio and option which is different than the aspect ratio of your TV screen,
then the picture might appear to be distorted.
• If you select the 16:9 Original, your TV may display 4:3 Pillarbox (black bars on sides of
picture).
BD Wise (Samsung Products only)
Settings
• When BD Wise is on, the Resolution setting automatically defaults to BD Wise and BD Wise
appears in the Resolution menu.
• If the product is connected to a device that does not support BD Wise, you can not use the BD
Wise function.
• For proper operation of BD Wise, set the BD Wise option in both the product and the TV to On.
Digital Output
• Be sure to select the correct Digital Output or you will hear no sound or just loud noise.
• If the HDMI device (AV receiver, TV) is not compatible with compressed formats (Dolby digital,
DTS), the audio signal outputs as PCM.
• Regular DVDs do not have BONUSVIEW audio and Navigation Sound Effects.
• Some Blu-ray Discs do not have BONUSVIEW audio and Navigation Sound Effects.
• This Digital Output setup does not affect the analog (L/R) audio or HDMI audio output to your TV.
It affects the optical and HDMI audio output when your product is connected to an AV receiver.
• If you play MPEG audio soundtracks, the audio signal outputs as PCM regardless of your Digital
Output selections (PCM or Bitstream).
BD-LIVE Internet Connection
• The Internet connection may be restricted while you are using BD-LIVE contents.
| 38 English
Anynet+(HDMI-CEC)
• In the external memory mode, disc playback may be stopped if you disconnect the USB device in
the middle of playback.
• Only those USB devices formatted in the FAT file system (DOS 8.3 volume label) are supported.
We recommend you use USB devices that support USB 2.0 protocol with 4 MB/sec or faster
read/write speed.
• The Resume Play function may not work after you format the storage device.
• The total memory available to BD Data Management may differ, depending on the conditions.
Settings
DivX® Video On Demand
• For more information about DivX(R) VOD, visit “http://vod.divx.com”.
Speaker Settings
• When Speaker Selection is set to TV Speaker, audio is produced through the TV speakers.
HDMI audio
• When HDMI audio is outputted to the TV speaker, it is automatically down-mixed to 2 channels.
Audio Return Channel
• When Anynet+ (HDMI-CEC) is Off, the Audio Return Channel function is not available.
• Using an HDMI cable not certified for ARC (Audio Return Channel) may cause a compatibility
problem.
• The ARC function is only available if an ARC-compliant TV is connected.
Digital Output
• Digital Output can be activated when Speaker Selection is selected to TV Speaker.
Playing a Video files
• Video files with high bitrates of 20Mbps or more strain the product’s capabilities and may stop
playing during playback.
Playback
Selecting the Audio Language
• The ◄► indicator will not appear on the screen if the BONUSVIEW section does not contain any
BONUSVIEW audio settings.
• The languages available through the Audio Language function depend on the languages that are
encoded on the disc. This function or certain languages may not be available.
• Some Blu-ray Discs may allow you to select either the PCM or Dolby digital audio soundtrack in
English.
English
39 |
Appendix
BD Data Management
07
• Depending on your TV, certain HDMI output resolutions may not work. Please refer to the user
manual of your TV.
• This function is not available if the HDMI cable does not support CEC.
• If your Samsung TV has an Anynet+ logo, then it supports the Anynet+ function.
Appendix
Selecting the Subtitle Language
Playback
• Depending on the Blu-ray Disc / DVD, you may be able to change the subtitle language in the
Disc Menu. Press the DISC MENU button.
• This function depends on the selection of subtitles that are encoded on the disc and may not be
available on all Blu-ray Discs/DVDs.
• Information about the main feature BONUSVIEW mode will also appear if the Blu-ray Disc has a
BONUSVIEW section.
• This function changes both the primary and secondary subtitles at the same time.
• The total number of primary and secondary subtitles are displayed respectively.
Playing a JPEG files
• You can’t enlarge the subtitle and PG graphic in the full screen mode.
Dolby Pro Logic II Mode
• Before selecting Dolby Pro Logic II mode, connect your external device to the AUDIO INPUT jacks
(L and R) on the product. If you connect to only one of the inputs (L or R), you cannot listen to
surround sound.
Using the TOOLS button while playing pictures
Allshare Play
• If the system is connected to a BD Wise compliant TV that has set BD Wise to On, the Picture
Settings menu will not appear.
• The Background Music function will not work unless the music file and the photo file are located
on the same storage media. Also, sound quality can be impacted by the bitrate of the MP3 music
file, the size of the photos, and the encoding method.
Playing back a USB Storage Device
• You must remove the USB storage device safely (by performing the “Safely Remove USB”
function) to prevent possible damage to the USB memory. Press the HOME button to move to the
Home menu, select the YELLOW (C) button, and then press the E button.
• If you insert a disc when playing a USB storage device, the Function mode is changed to
“BD/DVD” automatically.
| 40 English
Resolution according to the output mode
Blu-ray Disc/E-contents/Digital Contents playback
❑
HDMI Mode
Blu-ray Disc
E-contents/
Digital contents
VIDEO
Mode
VIDEO Mode
BD Wise
Resolution of Blu-ray Disc
1080p@60F
576i/480i
-
Auto
Max. Resolution of TV input
Max. Resolution of TV input
576i/480i
-
1080p@60F
1080p@60F
1080p@60F
576i/480i
-
Movie Frame : Auto
(24Fs)
1080p@24F
1080p@24F
576i/480i
-
1080i
1080i
1080i
576i/480i
576i/480i
720p
720p
720p
576i/480i
576i/480i
576p/480p
576p/480p
576p/480p
576i/480i
576i/480i
576i/480i
-
-
-
576i/480i
DVD playback
Setup
Output
BD Wise
HDMI/connected
HDMI Mode
VIDEO Mode
480i
576i/480i
HDMI/not connected
VIDEO Mode
-
Auto
Max. Resolution of TV input
576i/480i
-
1080p@60F
1080p@60F
576i/480i
-
1080i
1080i
576i/480i
576i/480i
720p
720p
576i/480i
576i/480i
576p/480p
576p/480p
576i/480i
576i/480i
576i/480i
-
-
576i/480i
English
41 |
Appendix
Output
Setup
HDMI/not
connected
HDMI/connected
07
❑
Appendix
Digital Output Selection
Bitstream
(Re-encoded
DTS)
Setup
PCM
Bitstream
(Unprocessed)
Connection
HDMI supported AV
receiver
HDMI supported AV
receiver
PCM
Up to PCM 7.1ch
PCM
DTS re-encoded
Dolby Digital
Up to PCM 7.1ch
Dolby Digital
DTS re-encoded
Dolby Digital
Plus
Up to PCM 7.1ch
Dolby Digital Plus
DTS re-encoded
Up to PCM 7.1ch
Dolby TrueHD
DTS re-encoded
Up to PCM 6.1ch
DTS
DTS re-encoded
Up to PCM 7.1ch
DTS-HD High Resolution
Audio
DTS re-encoded
Up to PCM 7.1ch
DTS-HD Master Audio
DTS re-encoded
PCM 2ch
Up to PCM 5.1ch
Up to PCM 6.1ch
PCM 2ch
Dolby Digital
DTS
PCM 2ch
Dolby Digital
DTS
Decodes the main feature
audio and BONUSVIEW
audio stream together
into PCM audio and adds
Navigation Sound Effects.
Outputs only the main
feature audio stream so that
your AV receiver can decode
the audio bitstream.
You will not hear
BONUSVIEW audio or
Navigation Sound Effects.
Decodes the main
feature audio and
BONUSVIEW audio
stream together
into PCM audio and
adds Navigation
Sound Effects, then
re-encodes the
PCM audio into DTS
bitstream.
Audio Stream
Dolby TrueHD
on Blu-ray
Disc
DTS
DTS-HD High
Resolution
Audio
DTS-HD
Master Audio
PCM
Audio Stream
Dolby Digital
on DVD
DTS
Definition for
Blu-ray Disc
Any
Bitstream
(Re-encoded
Dolby D)
HDMI
HDMI supported
supported AV
AV receiver
receiver
Re-encoded
Dolby Digital *
Re-encoded
Dolby Digital *
Re-encoded
Dolby Digital *
Re-encoded
Dolby Digital *
Re-encoded
Dolby Digital *
Re-encoded
Dolby Digital *
Re-encoded
Dolby Digital *
PCM 2ch
Dolby Digital
DTS
Decodes the main
feature audio and
BONUSVIEW audio
stream together
into PCM audio and
adds Navigation
Sound Effects, then
re-encodes the PCM
audio into Dolby
digital bitstream or
PCM.
* If the Source Stream is 2ch or mono, “Re-encoded Dolby D” Setting are not applied. Output will be
PCM 2ch.
Blu-ray Discs may include three audio streams :
- Main Feature Audio : The audio soundtrack of the main feature.
- BONUSVIEW audio : An additional soundtrack such as the director or actor’s commentary.
- Navigation Sound Effects: Sound effects that occur when you navigate the disc’s or movie’s menu.
Navigation Sound Effects are different on each Blu-ray disc.
| 42 English
Troubleshooting
Check/Remedy
I cannot eject the disc.
• Is the power cord plugged securely into the outlet?
• Turn off the power and then turn it back on.
Playback does not start.
• Check the region number of the Blu-ray/DVD disc.
A Blu-ray/DVD disc purchased from abroad may not be playable.
• CD-ROMs and DVD-ROMs cannot be played on this product.
• Make sure that the rating level is correct.
Playback does not start
immediately when the
Play/Pause button is
pressed.
• Are you using a deformed disc or a disc with scratches on the surface?
• Wipe the disc clean.
Sound is not produced.
• The home theater does not play sound during fast playback, slow playback,�and step motion
playback.
• Are the speakers connected properly? Is the speaker setup correctly customized?
• Is the disc severely damaged?
Sound can be heard only
from a few speakers and not
all 6.
•
•
•
•
Dolby Digital 5.1 CH
Surround Sound is not
produced.
• Is there "Dolby Digital 5.1 CH" mark on the disc? Dolby Digital 5.1 CH Surround Sound is
produced only if the disc is recorded with 5.1 channel sound.
• Is the audio language correctly set to Dolby Digital 5.1-CH in the information display?
The remote control does not
work.
• Are you operating the remote within its operational range and within the proper angle relative to
the sensor?
• Are the batteries drained?
• The disc is rotating but no
picture is produced.
•
•
•
•
• Picture quality is poor and
picture is shaking.
On certain Blu-ray/DVD discs, sound is output from the front speakers only.
Check if the speakers are connected properly.
Adjust the volume.
When listening to a CD, radio or TV, sound is output to the front speakers only.
Is the TV power on?
Are the video cables connected properly?
Is the disc dirty or damaged?
A poorly manufactured disc may not be playable.
Audio language and subtitles
do not work.
• Audio language and subtitles will not work if the disc does not contain them.
The menu screen does not
appear even when the menu
function is selected.
• Are you using a disc that does not contain menus?
The aspect ratio cannot be
changed.
• You can play 16:9 Blu-ray/DVD discs in 16:9 Full mode, 4:3 Letter Box mode, or
4:3 Pan-Scan mode, but 4:3 Blu-ray/DVD discs are played in 4:3 ratio only. Refer to the
Blu-ray Disc jacket and then select the appropriate function.
English
43 |
Appendix
Symptom
07
Refer to the table below when this product does not function properly. If the problem you are
experiencing is not listed below or if the instructions below do not help, turn off the product, disconnect
the power cord and contact the nearest authorized dealer or Samsung Electronics Service Centre.
Appendix
Symptom
Check/Remedy
• The product is not
working.
• Press and hold the remote control's 5 button for 5 seconds in NO DISC mode.
- Using the RESET function will erase all stored settings.
Do not use this unless necessary.
You have forgotten the
rating level password.
• With no disc in the product, press and hold the product's 5 button for longer than 5
seconds. INIT appears on the display and all settings will return to the default values.
Then, press the POWER button.
- Using the RESET function will erase all stored settings.
Do not use this unless necessary.
Can't receive radio
broadcasts.
• Is the antenna connected properly?
• If the antenna's input signal is weak, install an external FM antenna in an area with
good reception.
While listening to TV audio
through the Product, no
sound is heard.
• If the OPEN/CLOSE ^ button is pressed while listening to TV audio using the D. IN or
AUX functions, the Blu-ray/DVD disc functions are turned on and the TV audio is muted.
"Not Available" appears on
screen.
• The features or action cannot be completed at this time because:
1. The Blu-ray/DVD disc's software restricts it.
2. The Blu-ray/DVD disc's software doesn’t support the feature (e.g., angles)
3. The feature is not available at the moment.
4. You’ve requested a title or chapter number or search time that is out of range.
If the HDMI output is set to a
resolution your TV cannot
support (for example, 1080p),
you may not see a picture on
your TV.
• Press and hold the 5 button on front panel for more than 5 seconds with no disc in
the product. All settings will revert to the factory settings.
No HDMI output.
• Check the connection between the TV and the HDMI jack of the product.
• Check if your TV supports 576p/480p/720p/1080i/1080p HDMI input resolution.
Abnormal HDMI output
screen.
• If random noise appears on the screen, it means that TV does not support HDCP (Highbandwidth Digital Content Protection).
AllShare Play function
I can see folders shared
through AllShare Play,
but I cannot see the files.
• AllShare Play shows only files corresponding to the Photo, Music, and Movie categories.
Files that do not correspond to these categories may not be displayed.
Video is played
intermittently.
• Check if the network is stable.
• Check if the network cable is properly connected and if the network is not overloaded.
The AllShare Play
connection between the TV
and PC is unstable.
• IP addresses under the same subnetwork should be unique, otherwise IP collision can
results in such a phenomenon.
• Check if you have a firewall enabled.
If so, disable the firewall function.
| 44 English
Check/Remedy
• Test whether the network connection is active by using the Network Status function.
• Check whether a USB memory device is connected to the product.
• The memory device must have at least 1GB of free space to accommodate the BD-LIVE
service.
You can check the available size in BD Data Management. (See page 39)
• See if the BD-LIVE Internet Connection option is set to Allow(All).
• If all above fails, contact the contents provider or update to the latest firmware.
When using the BD-LIVE
service, an error occurs.
• The memory device must have at least 1GB of free space to accommodate the BD-LIVE
service.
You can check the available size in BD Data Management. (See page 39)
| NOTE |
\ When the factory default settings are restored, all stored user BD data will be deleted.
English
45 |
Appendix
I cannot connect to the
BD-LIVE server.
07
BD-LIVE
Symptom
Appendix
Specifications
General
FM Tuner
Weight
2.5 kg
Dimensions
430 (W) x 50 (H) x 250 (D) mm
Operating Temperature Range
+5°C to +35°C
Operating Humidity Range
10 % to 75 %
Signal/noise ratio
55 dB
Usable sensitivity
12 dB
Total harmonic distortion
0.5 %
BD (Blu-ray Disc)
Reading Speed : 9.834 m/sec
DVD (Digital Versatile Disc)
Disc
CD : 5 inches (COMPACT DISC)
CD : 3 1/2 inches (COMPACT DISC)
Video Output
Video/Audio
Amplifier
| 46 English
Composite Video
HDMI
Reading Speed : 6.98 ~ 7.68 m/sec.
Approx. Play Time (Single Sided, Single Layer Disc) : 135 min.
Reading Speed : 4.8 ~ 5.6 m/sec.
Maximum Play Time : 74 min.
Reading Speed : 4.8 ~ 5.6 m/sec.
Maximum Play Time : 20 min.
1 channel : 1.0 Vp-p (75 Ω load)
Blu-ray Disc : 576i/480i
PCM multichannel audio, Bitstream audio, PCM audio
Front speaker output
80W x 2(3Ω)
Center speaker output
80W(3Ω)
Surround speaker output
80W x 2(3Ω)
Subwoofer speaker output
100W(3Ω)
Frequency response
DVD : 480i
1080p, 1080i, 720p, 576p/480p
Analog input
20Hz~20kHz (±3dB)
Digital input
20Hz~40kHz (±4dB)
S/N Ratio
70dB
Channel separation
60dB
Input sensitivity
(AUX)500mV
Speaker system
5.1ch speaker system
Surround
Center
Subwoofer
Impedance
3Ω
3Ω
3Ω
3Ω
Frequency range
140Hz~20kHz
140Hz~20kHz
140Hz~20kHz
40Hz ~ 160Hz
Output sound
pressure level
87dB/W/M
87dB/W/M
87dB/W/M
88dB/W/M
Rated input
80W
80W
80W
100W
Maximum input
160W
160W
160W
200W
07
Front
HT-E3500
Front
Surround
Centre
Subwoofer
77 x 107 x 68
77 x 107 x 68
228 x 77 x 70
155 x 300 x 285
HT-E3530
Dimensions
(W x H x D)
Speaker
Front
Surround
Centre
Subwoofer
89 x 1053 x 71
* Stand base:
230 x 25 x 230
77 x 107 x 68
228 x 77 x 70
155 x 300 x 285
Front
Surround
Centre
Subwoofer
89 x 1053 x 71
* Stand base:
230 x 25 x 230
89 x 1053 x 71
* Stand base:
230 x 25 x 230
228 x 77 x 70
155 x 300 x 285
HT-E3550
(Unit : kg)
HT-E3500
Weights
Front
Surround
Centre
Subwoofer
0.4 kg
0.4 kg
0.5 kg
2.9 kg
HT-E3530
Front
Surround
Centre
Subwoofer
2.9 kg
0.4 kg
0.5 kg
2.9 kg
Front
Surround
Centre
Subwoofer
2.9 kg
2.9 kg
0.5 kg
2.9 kg
HT-E3550
•
•
•
•
•
Samsung Electronics Co., Ltd reserves the right to change the specifications without notice.
Weight and dimensions are approximate.
Design and specifications are subject to change without prior notice.
For the power supply and Power Consumption, refer to the label attached to the product.
Network speeds equal to or below 10Mbps are not supported.
English
47 |
Appendix
(Unit : mm)
Contact SAMSUNG WORLD WIDE
If you have any questions or comments relating to Samsung products, please contact the SAMSUNG customer
care center.
` Asia Pacific
Area
Contact Center
AUSTRALIA
NEW ZEALAND
CHINA
1300 362 603
0800 SAMSUNG (0800 726 786)
400-810-5858
HONG KONG
(852) 3698 4698
Web Site
www.samsung.com
www.samsung.com
www.samsung.com
www.samsung.com/hk
www.samsung.com/hk_en/
VIETNAM
1800 1100 11
3030 8282
1800 3000 8282
1800 266 8282
0800-112-8888
021-5699-7777
1800-88-9999
1-800-10-SAMSUNG(726-7864) for PLDT
1-800-3-SAMSUNG(726-7864) for Digitel
1-800-8-SAMSUNG(726-7864) for Globe
02-5805777
1800-SAMSUNG(726-7864)
1800-29-3232
02-689-3232
0800-329-999
0266-026-066
1 800 588 889
U.A.E
OMAN
KUWAIT
BAHRAIN
Egypt
JORDAN
IRAN
Morocco
Saudi Arabia
800-SAMSUNG (726-7864)
800-SAMSUNG(726-7864)
183-2255
8000-4726
08000-726786
800-22273
021-8255
080 100 2255
9200-21230
www.samsung.com
www.samsung.com
www.samsung.com
www.samsung.com
www.samsung.com
www.samsung.com
www.samsung.com
www.samsung.com
www.samsung.com
NIGERIA
0800-726-7864
0800-10077
0302-200077
8000 0077
800-00-0077
7095- 0077
0800 724 000
0800 300 300
0685 88 99 00
0860-SAMSUNG(726-7864 )
www.samsung.com
INDIA
INDONESIA
MALAYSIA
PHILIPPINES
SINGAPORE
THAILAND
TAIWAN
` Middle East
` Africa
Ghana
Cote D’ Ivoire
Senegal
Cameroon
KENYA
UGANDA
TANZANIA
SOUTH AFRICA
www.samsung.com
www.samsung.com
www.samsung.com
www.samsung.com
www.samsung.com
www.samsung.com
www.samsung.com
www.samsung.com
www.samsung.com
www.samsung.com
www.samsung.com
www.samsung.com
www.samsung.com
www.samsung.com
www.samsung.com
www.samsung.com
AH68-02442M-00
HT-E3500
HT-E3530
HT-E3550
نظام الترفيه المنزلي
™5.1CH Blu-ray
دليل المستخدم
تخيل اإلمكانيات
نشكركم على شراء هذا المنتج من .Samsung
ً
تكامال،
للحصول على خدمة أكثر
الرجاء تسجيل المنتج على الموقع
www.samsung.com/register
معلومات السالمة
تحﺬير
للتقليل من خطر التعرض للصدمة الكهرباﺋية ،ال تقم بﺈزالة الغطاء (أو الجزء الخلفي).
ال توجد أجزاء يمكن أن يقوم المستخدم بخدمتها في الداخل .اترك أعمال الصيانة للفنيين المﺆهلين.
تنﺒﻴﻪ
ﺧطر التعرﺽ لصﺪمة كﻬرباﺋﻴة
ال تﻔتﺢ ﻫﺬا المﻜاﻥ
يمثل الفالﺵ المضيء ورأﺱ السهم داخل
المثلﺚ عالمة تحذير تنبهك بالجهد الكهربي
الخطير بداخل المنتج.
تنبيه :لتقليل مخاﻃر التعرض لصدمة
كهربية ،ال تقم بﺈزالة الغطاء (أو الغطاء
الخلفي) .فال توجد أجزاء يمكن للمستخدم
صيانتها بالداخل .وإنما يُرجى ترك عملية
الصيانة لموﻇفي الصيانة المﺆهلين.
تحﺬير
•لتقليل خطر نشوﺏ حريق أو حدوﺙ صدمة كهرباﺋية ،ال تعرض
هذا الجهاز للمطر أو الرﻃوبة.
منتﺞ لﻴزر مﻦ الﻔﺌة اﻷﻭلﻰ
تم تصنيﻒ مشغل األقراﺹ المدمجة هذا على أنه منتج ليزر من الفﺌة
األولى.
وقد يﺆدي استخدام عناصر تحكم أو إجراءات التعديل أو تنفيذ
إجراءات األداء بخالف تلك المحددة في هذا الدليل إلى التعرض
لخطر اإلشعاع.
متوافق مع 21CFR 1040.10باستثناء االختالفات ً
ﻃبقا إلخطار
الليزر رقم ،50بتاريﺦ 24يونيو.2007 ،
ﺧطر:
•ينبعﺚ إشعاع ليزر مرﺋي وﻏير مرﺋي عند الفتﺢ .تجنﺐ التعرض
المباشر للشعاع(FDA 21 CFR( .
تنﺒﻴﻪ:
•ينبعﺚ إشعاع ليزر مرﺋي وﻏير مرﺋي من الفﺌة 3Bعند الفتﺢ.
تجنﺐ التعرض للشعاع ((IEC 60825-1
•هذا المنتج يستخدم الليزر USE OF CONTROLS OR .قد
يترتﺐ على استخدام أدوات تحكم أو أدوات ضبط أو تنفيذ
إجراءات ﻏير المحددة في هذا المستند التعرض إلشعاع خطير .ال
تقم بفتﺢ الغطاء أو إجراء اإلصالﺡ بنفسك .وإنما يُرجى ترك
عملية الصيانة للموﻇفين المﺆهلين.
الﻔﺌة اﻷﻭلﻰ
KLASSE 1
LUOKAN 1
KLASS 1
PRODUCTO
|٢
العربية
تعبر عالمة التعجﺐ بداخل المثلﺚ عن عالمة
تحذير تنبهك بالتعليمات الهامة المصاحبة
للمنتج.
منتﺞ لﻴزر
LASER PRODUKT
LASER LAITE
LASER APPARAT
LÁSER CLASE 1
ال تتركه في أشعة الشمﺲ المباشرة.
اتركه في منطقة باردة وجيدة التهوية.
احتفظ باألقراﺹ في حقيبة حماية نظيفة وقم بتخزينها بشكل
رأسي.
العربية | ٣
0١
•اإلمساك باألقراﺹ
قد تﺆدي بصمات األصابع أو الخدوﺵ فيالقرﺹ إلى خفﺾ جودة الصوت والصورة
أو قد تﺆدي إلى تخطي المسارات.
تجنﺐ مالمسة سطﺢ القرﺹ الذي تم تسجيل البيانات عليه. امسك القرﺹ من الحواف بحيﺚ ال تترك بصمات أصابع علىسطحه.
ال تقم بلصق الورق أو األشرﻃة على القرﺹ.•تنظيﻒ األقراﺹ
إذا تركت بصمات أصابع أو إذا ﻇهرتقاذورات على القرﺹ ،فقم بتنظيفه بساﺋل
مخفﻒ من منظﻒ خفيﻒ في المياﻩ ،وامسحه
باستخدام قطعة قماﺵ ناعمة.
عند التنظيﻒ ،امسﺢ القرﺹ برفق من الداخلإلى الخارج.
-التخزين على القرﺹ
•ال تعرض هذا الجهاز لقطرات أو رذاذ المياﻩ .ال تضع األشياء
المملوءة بالسواﺋل ،مثل المزهريات ،على الجهاز.
•إليقاف تشغيل هذا المنتج بشكل تام ،يجﺐ أن تسحﺐ قابﺲ الطاقة
من المقبﺲ الجداري .ولذلك ،يجﺐ أن يكون من السهل الوصول
إلى قابﺲ الطاقة في أي وقت.
•ال تلمﺲ قابﺲ الطاقة بﺄي ٍد مبللة.
فقد يﺆدي ذلك إلى حدوﺙ صدمة كهرباﺋية.
•ال تقوم بتوصيل أجهزة كهربية متعددة في نفﺲ المقبﺲ الجداري.
فقد يﺆدي الحمل الزاﺋد على أحد المقابﺲ إلى ارتفاع درجة
حرارته ،مما قد يﺆدي إلى نشوﺏ حريق.
•صيانة الخزانة
قبل توصيل مكونات أخرى بهذا المنتج ،تﺄكد من إيقاف تشغيلجميع األجهزة.
إذا قمت بنقل المنتج بشكل مفاجﺊ من مكان بارد إلى مكاندافﺊ ،فقد يحدﺙ تكاﺛﻒ على أجزاء التشغيل والعدسات مما
يﺆدي إلى تشغيل القرﺹ بشكل ﻏير عادي .إذا حدﺙ ذلك،
فافصل المنتج عن الكهرباء ،وانتظر لمدة ساعتين ،ﺛم قم
بتوصيل القابﺲ بمنفذ التيار الكهرباﺋي .ﺛم أدخل القرﺹ وحاول
التشغيل مرة أخرى.
•إذا أصدر المنتج ضوضا ًء ﻏير ﻃبيعية أو إذا صدرت منه راﺋحة
احتراق أو دخان ،فﺄوقﻒ تشغيل المنتج من مفتاﺡ الطاقة على
الفور وقم بفصل قابﺲ الطاقة من المنفذ الجداري .ﺛم اتصل بﺄقرﺏ
مركز خدمة عمالء للحصول على المساعدة الفنية .وال تستخدم
المنتج .يمكن أن يﺆدي استخدام المنتج بالحالة التي هو عليها إلى
نشوﺏ حريق أو حدوﺙ صدمة كهربية.
•إليقاف تشغيل هذا المنتج بشكل تام ،يجﺐ أن تسحﺐ قابﺲ الطاقة
من المقبﺲ الجداري .ولذلك ،يجﺐ أن يكون من السهل الوصول
إلى قابﺲ الطاقة في أي وقت.
معلوماﺕ الﺴﻼمة
تخزيﻦ اﻷقراﺹ ﻭﺇﺩارتﻬا
اﺣتﻴاﻃاﺕ التعامﻞ مع المنتﺞ
معلومات السالمة
اﺳتخﺪاﻡ ﻭﻇﻴﻔة ﺛﻼﺛي اﻷبعاﺩ
معلومات هامة حول الصحة والسالمة للصور ﺛالﺛية األبعاد.
اقرأ وافهم معلومات السالمة التالية قبل استخدام وﻇيفة األبعاد الثالﺛية.
•بعﺾ المشاهدين قد يتعرضون لعدم االرتياﺡ أﺛناء مشاهدة التلفاز
ﺛالﺛي األبعاد مثل الدوار والغثيان والصداع.
إذا شعرت بﺄي من هذﻩ األعراض ،فتوقﻒ عن مشاهدة التلفاز ﺛالﺛي
األبعاد ،وانزع النظارات ﺛالﺛية األبعاد النشطة ،وخذ ً
قسطا من الراحة.
•قد تتسبﺐ مشاهدة الصور ﺛالﺛية األبعاد لفترة ﻃويلة في إجهاد العين.
إذا شعرت بﺄي إجهاد للعين ،فتوقﻒ عن مشاهدة التلفاز ﺛالﺛي األبعاد،
وانزع النظارات ﺛالﺛية األبعاد ،وخذ ً
قسطا من الراحة.
•البد أن يراقﺐ أحد البالغين المسﺌولين األﻃفال الذين يستخدمون وﻇيفة
األبعاد الثالﺛية بشكل مستمر.
إذا كانت هناك أية مالحظات حول إجهاد العيون ،أو الصداع ،أو
الدوار ،أو الغثيان ،فاﻃلﺐ من الطفل أن يتوقﻒ عن مشاهدة التلفاز
ﺛالﺛي األبعاد واجعله يﺄخذ ً
قسطا من الراحة.
•ال تستخدم النظارات النشطة ﺛالﺛية األبعاد ألﻏراض أخرى (مثل
النظارات العامة ،أو نظارات الشمﺲ ،أو النظارات الواقية ،إلﺦ)
•ال تستخدم الوﻇيفة "ﺛالﺛي األبعاد" أو "النظارات النشطة ﺛالﺛية
األبعاد" أﺛناء السير أو التحرك .قد يﺆدي استخدام الوﻇيفة "ﺛالﺛي
األبعاد" أو "النظارات النشطة ﺛالﺛية األبعاد" أﺛناء التحرك إلى
االصطدام باألشياء و/أو التعثر و/أو السقوط ،مما قد يﺆدي إلى
إصابات خطيرةC.
•إذا كنت ترﻏﺐ في االستمتاع بالمحتوى ﺛالﺛي األبعاد ،فقم بتوصيل
جهاز ﺛالﺛي األبعاد (جهاز استقبال صوت وصورة أو جهاز تلفاز
متوافق مع العرض ﺛالﺛي األبعاد) بمنفذ HDMI OUTبالمنتج
باستخدام كبل HDMIعالي السرعة .ضع نظارات الرﺅية ﺛالﺛية
األبعاد قبل تشغيل المحتوى ﺛالﺛي األبعاد.
•يقوم المنتج بﺈخراج اإلشارات ﺛالﺛية األبعاد فقط عبر كبل HDMI
المتصل بمنفذ .HDMI OUT
•حيﺚ إن دقة الفيديو في وضع التشغيل ﺛالﺛي األبعاد ﺛابتة ً
وفقا لدرجة
دقة الفيديو ﺛالﺛي األبعاد األصلي ،ال يمكنك تغيير الدقة حسﺐ
تفضيلك.
•قد ال تعمل بعﺾ الوﻇاﺋﻒ مثل ،BD Wiseوضبط حجم الشاشة،
وضبط درجة الدقة بشكل جيد في وضع التشغيل ﺛالﺛي األبعاد.
•يجﺐ أن تستخدم كبل HDMIفاﺋق السرعة إلخراج اإلشارة ﺛالﺛية
األبعاد بشكل صحيﺢ.
•ابق بعي ًدا عن الشاشة على مسافة تساوي ﺛالﺙ أضعاف عرضها على
األقل عند مشاهدة الصور ﺛالﺛية األبعاد .على سبيل المثال ،إذا كانت
لديك شاشة مقاﺱ 46بوصة ،فابق بعي ًدا على مسافة 3.5متر عن
الشاشة.
|4
العربية
ضع شاشة الفيديو ﺛالﺛية األبعاد في مستوى العين للحصول علىأفضل صورة ﺛالﺛية األبعاد.
•عندما يتم توصيل المنتج ببعﺾ األجهزة ﺛالﺛية األبعاد ،قد ال يعمل
التﺄﺛير ﺛالﺛي األبعاد بشكل جيد.
•هذا المنتج ال يحول المحتوى ﺛناﺋي األبعاد إلى ﺛالﺛي األبعاد.
•يعد " "Blu-ray 3Dوشعار " "Blu-ray 3Dعالمتان تجاريتان
لشركة .Blu-ray Disc Association
ﺣقوﻕ الطﺒع
حقوق الطبع والنشر © لعام 2012محفوﻇة لشركة Samsung
.Electronics Co.,Ltd
جميع الحقوق محفوﻇة ،ال يجوز إعادة إنتاج أي جزء من دليل
المستخدم هذا أو كله أو نسخه بدون إذن تحريري مسبق من شركة
.Samsung Electronics Co., Ltd
الترﺧﻴﺺ
•تم تصنيع هذا الجهاز بموجﺐ ترخيﺺ حسﺐ أرقام براءات
االختراع األمريكية التالية،5,974,380 ،5,956,674 :
،7,272,567 ،7,392,195 ،6,487,535 ،6,226,616
7,212,872 ،7,333,929وبراءات االختراع األمريكية
والعالمية األخرى التي تم إصدارها أو التي تنتظر الحصول على
براءة االختراع .تعد DTS-HDورمزها و DTS-HDورمزها
معًا عبارة عن عالمات تجارية مسجلة وDTS-HD Master
Audio | Essentialعبارة عن عالمة تجارية لشركة DTS,
.Incويشتمل المنتج على برامج .حقوق الطبع والنشر © محفوﻇة
لشركة ،DTS, Incجميع الحقوق محفوﻇة.
•نبذة عن :DIVX VIDEOيعتبر ®DivXتنسيق فيديو رقمي
أنشﺄته شركة ،DivX, LLCوهي شركة تابعة لشركة Rovi
.Corporationهذا الجهاز هو جهاز معتمد من DivX
،®Certifiedويقوم بتشغيل فيديو بتنسيق .DivXتفضل بزيارة
الموقع divx.comللحصول على مزيد من المعلومات وأدوات
البرامج المطلوبة لتحويل ملفاتك إلى فيديو .DivX
نبذة عن :DIVX VIDEO-ON-DEMANDهذا الجهاز
المرخﺺ به من قبل ®DivX Certifiedيجﺐ تسجيله لتشغيل
محتويات أفالم عرض DivXعند الطلﺐ ( )VODالتي يتم
شراﺅها .للحصول على رمز التسجيل ،حدد قسم DivX VOD
في قاﺋمة إعداد الجهاز .اذهﺐ إلى vod.divx.comلمزيد من
المعلومات حول ﻃريقة استكمال تسجيلك.
هذا الجهاز معتمد من ®DivX Certifiedلتشغيل فيديو
®DivXبدقة عالية تصل حتى 1080بكسل ،بما في ذلك
المحتويات المميزة.
تعتبر ®DivXو ®DivX Certifiedوالشعارات المرتبطة
عالمات تجارية لشركة Rovi Corporationأو الشركات
التابعة لها ويتم استخدامها بموجﺐ الترخيﺺ.
وهذا المنتج يخضع لواحد أو أكثر من براءات االختراع األمريكية
التالية;7,515,710 ;7,460,668 ;7,295,673 :
7,519,274
•تعتبر Oracleو Javaعالمتان تجاريتان مسجلتان لشركة
Oracleو/أو الشركات التابعة لها .وﺛمة أسماء أخرى قد تكون
عالمات تجارية لمالكيها.
•هذا المنتج يحتوي على تقنية حماية حقوق الطبع والمحمية من قبل
براءات االختراع األمريكية وحقوق الملكية الفكرية األخرى
الخاصة بشركة .Rovi Corporationيحظر إجراء الهندسة
العكسية وتفكيك هذا المنتج.
•تعتبر ™Blu-ray Discو ™Blu-rayوالشعارات عالمات
تجارية لشركة .Blu-ray Disc Association
•يستخدم هذا المنتج تقنية Cinaviaللحد من استخدام النسﺦ ﻏير
المرخﺺ بها من بعﺾ األفالم ومقاﻃع الفيديو التي يتم إنتاجها
لﻸﻏراض التجارية ومسارات الصوت المتاحة بها .وعند اكتشاف
استخدام محظور لنسخة ﻏير معتمدة ،يتم عرض رسالة وستتم
مقاﻃعة التشغيل أو النسﺦ.
يتم توفير المزيد من المعلومات حول تقنية Cinaviaفي مركز
معلومات عمالء Cinaviaعلى اإلنترنت على الموقع http://
.www.cinavia.comلطلﺐ المزيد من المعلومات حول
Cinaviaعبر البريد ،قم بﺈرسال بطاقة بريدية مع عنوانك
البريدي إلىCinavia Consumer Information :
Centre, P.O. Box 86851, San Diego, CA,
“.92138, USA
يشتمل هذا المنتج على تقنية مملوكة للشركة بموجﺐ ترخيﺺ من
شركة Verance Corporationوهي خاضعة لحماية براءة
االختراع األمريكية رقم 7,369,677وﻏيرها من براءات
االختراع األمريكية والعالمية األخرى التي تم إصدارها والمعلقة
باإلضافة إلى حماية حقوق الطبع والنشر واألسرار التجارية ألوجه
معينة لهذﻩ التقنية .تعد Cinaviaعالمة تجارية خاصة لشركة
.Verance Corporationحقوق الطبع والنشر لﻸعوام من
2004إلى 2010محفوﻇة لشركة Verance
.Corporationيتم حفظ كل الحقوق لصالﺢ .Veranceيحظر
إجراء الهندسة العكسية أو تفكيك هذا المنتج.
العربية | ٥
0١
•تعد Dolbyورمز Dالمزدوج عالمتان تجاريتان مسجلتان
مملوكتان لشركة .Dolby Laboratories
معلوماﺕ الﺴﻼمة
~ تعتبر HDMIوشعار HDMIوHigh-Definition
Multimedia Interfaceعالمات تجارية أو عالمات تجارية
مسجلة لشركة HDMI Licencing LLCفي الواليات المتحدة
وبلدان أخرى.
المحتويات
معلوماﺕ الﺴﻼمة
٢
٣
٣
٤
٤
٥
تحﺬير
تخزيﻦ اﻷقراﺹ ﻭﺇﺩارتﻬا
اﺣتﻴاﻃاﺕ التعامﻞ مع المنتﺞ
اﺳتخﺪاﻡ ﻭﻇﻴﻔة ﺛﻼﺛي اﻷبعاﺩ
ﺣقوﻕ الطﺒع
الترﺧﻴﺺ
اﻹﻋﺪاﺩاﺕ
٢١
٢٢
٢٢
٢٣
٢٦
٢٨
٢٩
تشﻐﻴﻞ الوﺳاﺋﻂ
بﺪء االﺳتخﺪاﻡ
٧
٨
١١
١٢
١٢
١٣
توافق اﻷقراﺹ ﻭالتنﺴﻴق
ﺷعاراﺕ اﻷقراﺹ التي يمﻜﻦ للمنتﺞ تشﻎيلﻬا
الملحقاﺕ
اللوﺣة اﻷمامﻴة
اللوﺣة الخلﻔﻴة
ﻭﺣﺪﺓ التحﻜم ﻋﻦ بعﺪ
التوﺻﻴﻼﺕ
١٤
١٥
١٦
١٦
١٨
١٨
١٨
١٩
١٩
١٩
٢٠
٢٠
|٦
توﺻﻴﻞ الﺴماﻋاﺕ
مكونات السماعة
تثبيت السماعات على حامل رأسي
توصيل السماعات
التوﺻﻴﻞ بتلﻔاﺯ
الطريقة ١التوصيل بتلفاز باستخدام كبل HDMI
– أفضل جودة (يوصى بذلك)
الطريقة ٢التوصيل بتلفاز باستخدام كبل فيديو – جودة
جيدة
التوﺻﻴﻞ بﺄجﻬزﺓ ﺧارجﻴة
الطريقة :AUX IN ١توصيل مكون تناﻇري خارجي
الطريقة ٢بصري :توصيل مكون صوت رقمي خارجي
توﺻﻴﻞ ﻫواﺋي FM
التوﺻﻴﻞ بموجﻪ ﺷﺒﻜة
العربية
ﺇجراء اﻹﻋﺪاﺩاﺕ اﻷﻭلﻴة
الشاﺷة الرﺋﻴﺴﻴة
الوﺻول ﺇلﻰ ﺷاﺷة اﻹﻋﺪاﺩاﺕ
ﻭﻇاﺋف قاﺋمة اﻹﻋﺪاﺩاﺕ
الشﺒﻜاﺕ ﻭاﻹﻧترﻧﺖ
تحﺪيﺚ الﺒرﻧامﺞ
ﺇﻋﺪاﺩ AllShare
٣٠
٣٠
٣١
٣١
٣١
٣٢
٣٤
٣٥
٣٥
٣٦
٣٦
٣٧
اﺳتخﺪاﻡ ﺧﺪماﺕ ﻭﺳاﺋﻂ الﺒﺚ
تشﻐﻴﻞ ملﻔاﺕ ﻋلﻰ جﻬاﺯ USB
تشﻐﻴﻞ قرﺹ يحتوﻱ ﻋلﻰ محتوياﺕ مﺴﺠلة مﻦ قﺒﻞ
المﺴتخﺪﻡ
تشﻐﻴﻞ أقراﺹ الﻔﻴﺪيو التﺠارية
ً
مﺴﺒقا
تشﻐﻴﻞ قرﺹ ﺻوﺕ تﺠارﻱ مﺴﺠﻞ
التحﻜم في تشﻐﻴﻞ الﻔﻴﺪيو
التحﻜم في تشﻐﻴﻞ الموﺳﻴقﻰ
التحﻜم في تشﻐﻴﻞ الصور
االﺳتماﻉ ﺇلﻰ الراﺩيو
اﺳتخﺪاﻡ أﺯرار التﺄﺛﻴراﺕ الخاﺻة بوﺣﺪﺓ التحﻜم ﻋﻦ بعﺪ
اﺳتخﺪاﻡ ™BD-LIVE
اﺳتخﺪاﻡ AllShare
الملحق
٣٨
٤٣
٤٦
المعلوماﺕ اﻹﺿافﻴة
اﺳتﻜشاﻑ اﻷﺧطاء ﻭﺇﺻﻼﺣﻬا
المواﺻﻔاﺕ
بدء االستخدام
توافق اﻷقراﺹ ﻭالتنﺴﻴق
الفيديو
بﺪء االﺳتخﺪاﻡ
الوﺳاﺋﻂ
ﻧوﻉ القرﺹ
0٢
أﻧواﻉ اﻷقراﺹ ﻭالمحتوياﺕ التي يمﻜﻦ للمنتﺞ تشﻐﻴلﻬا
التﻔاﺻﻴﻞ
قرﺹ Blu-ray
قرﺹ 3D Blu-ray Discقرﺹ BD-ROMأو BD-RE/-Rالمسجل بتنسيق .BD-RE
ﺛالﺛي األبعاد
DVD-VIDEO، DVDأقراﺹ DVD-VIDEOأو DVD+RW/DVD-RW)V(/DVDR/+Rالمسجلةالتي تم تسجيلها وإنهاﺅها أو وساﺋط تخزين USBالتي تحتوي على محتويات بتنسيق
RW، DVD-R،
MKV DVD+RW، DVD+Rأو .MP4
موسيقى
CD-RW/-R، DVDRW/-R، BD-RE/-R
الموسيقى المسجلة على أقراﺹ CD-RW/-Rأو ،DVD-RW/-Rأو BD-RE/-R
أو وساﺋط تخزين USB
التي تحتوي على محتويات MP3أو .WMA
الصور
CD-RW/-R، DVDRW/-R، BD-RE/-R
الصور المسجلة على أقراﺹ CD-RW/-Rأو DVD-RW/-Rأو BD-RE/-Rأو
وساﺋط تخزين USB
التي تحتوي على محتويات .JPEG
| مﻼﺣﻈة |
◄ قد ال يتمكن المنتج من تشغيل أقراﺹ CD-RW/-Rو DVD-Rمعينة بسبﺐ نوع القرﺹ أو ﻇروف التسجيل.
◄ إذا لم يتم تسجيل قرﺹ DVD-RW/-Rبطريقة سليمة بتنسيق DVDالفيديو ،فلن يمكن تشغيله.
◄ لن يقوم المنتج بتشغيل المحتوى الذي تم تسجيله على قرﺹ DVD-Rبمعدل بت يتعدى 10ميجا بت في الثانية.
◄ لن يقوم المنتج الخاﺹ بك بتشغيل المحتوى الذي تم تسجيله على جهاز BD-Rأو USBبمعدل بت يتعدى 30ميجا بت في الثانية.
◄ قد ال يتم تشغيل بعﺾ أنواع األقراﺹ ،أو عندما تستخدم عمليات محددة ،مثل تغيير الزاوية أو تعديل نسبة العرض إلى االرتفاع .يتم توفير
معلومات حول األقراﺹ تكون مكتوبة بالتفصيل على علبة القرﺹ .يرجى الرجوع إلى تلك المعلومات إذا لزم األمر.
◄ عندما تقوم بتشغيل عنوان ،BD-Jفقد يستغرق التحميل ً
وقتا أﻃول من العنوان العادي ،أو قد تعمل بعﺾ الوﻇاﺋﻒ ببطء.
أﻧواﻉ اﻷقراﺹ التي ال يمﻜﻦ للمنتﺞ تشﻐﻴلﻬا
• HD DVD
DVD-ROM/PD/ﺹرق •
كلذ ىلإ امو MV،
• DVD-RAM
ةجمدملا ﺹارقألا •
ةقﺉافلا ةيتوﺹلا
( CDةقﺏط ءانﺙتﺱاﺏ)
( VRعضو) • DVD-RW
• CVD/CD-ROM/CDV/
CD-G/CD-I/LD
لﻍﺵت CD-Gﺹارقأ)
ﺱيلو ،طقف توﺹلا
(.تاموﺱرلا
ةﺡاﺱمﺏ DVD-Rﺹرق •
.ﺥﺱنلل تياﺏ اجيج 3.9
| مﻼﺣﻈة |
◄ قد ال يستجيﺐ هذا المنتج لجميع أوامر التشغيل ألن بعﺾ أقراﺹ Blu-rayوأقراﺹ الفيديو الرقمية واألقراﺹ المضغوﻃة تسمﺢ بتشغيل
معين أو محدود وتوفر بعﺾ السمات المعينة فقط أﺛناء التشغيل.
الرجاء مالحظة أن هذا األمر ال يمثل عيبًا في المنتج.
◄ ال تضمن شركة Samsungقيام هذا المنتج بتشغيل كل قرﺹ يحمل شعار أقراﺹ Blu-ray Discأو DVDأو ،CDألن تنسيقات
األقراﺹ تتطور ،وقد تحدﺙ مشكالت وأخطاء أﺛناء إنشاء برامج أقراﺹ Blu-rayأو DVDأو CDو/أو أﺛناء تصنيع األقراﺹ.
◄ الرجاء االتصال بمركز عاية عمالء شركة SAMSUNGإذا كانت لديك استفسارات أو إذا واجهتك صعوبة في تشغيل أقراﺹ Blu-ray
أو DVDأو CDفي هذا المنتجً .
أيضا ،ارجع إلى باقي هذا الدليل للحصول على المزيد من المعلومات حول قيود التشغيل.
◄ بعﺾ األقراﺹ التجارية وأقراﺹ DVDالتي يتم شراﺅها من خارج المنطقة التي تقيم بها قد ال يمكن تشغيلها على هذا المنتج.
العربية | 7
بدء االستخدام
رمز المنطقة
يتم ترميز مشغالت Blu-rayواألقراﺹ حسﺐ المنطقة .ويجﺐ أن
تتفق هذﻩ الرموز اإلقليمية حتى يمكن تشغيل القرﺹ .إذا لم تتطابق
الرموز ،فلن يتم تشغيل هذا القرﺹ.
يتم عرض رقم المنطقة لهذا المنتج على اللوحة الخلفية للمنتج.
ﻧوﻉ القرﺹ
قرﺹ
Blu-ray
DVDVIDEO
| مﻼﺣﻈة |
رمز
المنطقة
المنطقة
A
أمريكا الشمالية ،وأمريكا الوسطى،
وأمريكا الجنوبية ،وكوريا ،واليابان،
وتايوان ،وهونج كونج ،وجنوﺏ
شرق ﺁسيا
B
أوروبا ،وجرينالند ،واألقاليم التابعة
لفرنسا ،والشرق األوسط ،وإفريقيا،
وأستراليا ،ونيوزيالندا.
C
الهند ،والصين ،وروسيا ،ووسط
وجنوﺏ ﺁسيا.
1
الواليات المتحدة ،واألقاليم التابعة
للواليات المتحدة ،وكندا
2
أوروبا ،واليابان ،والشرق األوسط،
ومصر ،وجنوﺏ إفريقيا ،وجرينالند
3
تايوان ،وكوريا ،والفلبين،
وإندونيسيا ،وهونج كونج
4
المكسيك ،وأمريكا الجنوبية ،وأمريكا
الوسطى ،وأستراليا ،ونيوزيالندا،
وجزر المحيط الهادي ،والكاريبي
5
روسيا ،وأوروبا الشرقية ،والهند،
ومعظم دول إفريقيا ،وكوريا
الشمالية ،ومنغوليا
6
الصين
◄ إذا كان رقم المنطقة الخاﺹ بﺄقراﺹ Blu-ray Disc/
DVDال يطابق رقم المنطقة الخاﺹ بهذا المنتج ،فلن يتمكن
المنتج من تشغيل القرﺹ.
|٨
العربية
ﺷعاراﺕ اﻷقراﺹ التي يمﻜﻦ للمنتﺞ تشﻎيلﻬا
قرﺹ Blu-ray
BD-LIVE
DTS
قرﺹ 3D Blu-ray Disc
ﺛالﺛي األبعاد
Dolby
نظام بﺚ PALفي
المملكة المتحدة وفرنسا وألمانيا،
إلﺦ.
Java
التنﺴﻴقاﺕ المﺪﻋومة
مﻼﺣﻈاﺕ ﺣول اتصال USB
•يدعم منتجك وساﺋط تخزين USBومشغالت MP3والكاميرات
الرقمية وأجهزة قراءة بطاقات .USB
•ال يدعم المنتج أسماء المجلدات أو الملفات األﻃول من ً 128
حرفا.
•قد ال تتوافق بعﺾ أجهزة الكاميرات الرقمية USB/مع المنتج.
•يدعم المنتج نظم ملفات FAT16و FAT32و.NTFS
•قم بتوصيل أجهزة USBمباشرة بمنفذ USBبالمنتج .يمكن أن
يتسبﺐ التوصيل عبر كبل USBفي حدوﺙ مشكالت توافق.
•في حالة إدخال أكثر من وحدة ذاكرة واحدة في قارﺉ بطاقات
متعددة فقد ال يعمل القارﺉ بالشكل الصحيﺢ.
•ال يدعم المنتج برتوكول .PTP
•ال تفصل جهاز USBأﺛناء عملية "التحميل".
0٢
•كلما كانت دقة الصورة أكبر ،استغرقت الصور ً
وقتا أﻃول للعرض.
•ال يمكن لهذا المنتج تشغيل ملفات MP3المزودة بميزة إدارة الحقوق الرقمية ( )DRMالتي يتم تنزيلها من المواقع التجارية.
إﻃارا في الثانية (معدل اإلﻃارات).
•ال يدعم منتجك إال الفيديو األقل من ً 30
•يجﺐ عليك إزالة جهاز تخزين USBبﺄمان (بتنفيذ وﻇيفة ﺇﺯالة USBبﺄماﻥ) لمنع أي تلﻒ ممكن لذاكرة .USB
اضغط على الزر الرﺋﻴﺴﻴة لالنتقال إلى الشاشة الرﺋيسية ،ﺛم اضغط على الزر أﺻﻔر )ﺝ( ،ﺛم اضغط على الزر .E
•ال تكون شركة SAMSUNGمسﺌولة عن أي تلﻒ أو فقد للبيانات.
بﺪء االﺳتخﺪاﻡ
ﺩﻋم ملﻔاﺕ الﻔﻴﺪيو
امتﺪاﺩ الملف
الحاﻭية
*avi.
AVI
*mkv.
MKV
*wmv.
(WMV (wmv9
*mp4.
MP4
*mpg.
*mpeg.
PS
ترمﻴز الﻔﻴﺪيو
ترمﻴز الصوﺕ
DivX 3.11/4.x
5.1/6.0/
MP3
AC3
DTS
WMA
PCM
MP4v3
H.264 BP/MP/HP
VC-1 AP
DivX 5.1/6.0
H.264 BP/MP/HP
VC-1 AP
VC-1 SM
(MP4 (mp4v
H.264 BP/MP/HP
MPEG1
MPEG2
H.264 BP/MP/HP
) Resolutionالﺪقة(
1920x1080
1920x1080
1920x1080
1920x1080
MP3
AC3
DTS
1920x1080
WMA
1920x1080
AAC
MP1, 2
Dolby Digital
DTS
1920x1080
1920x1080
1920x1080
1920x1080
1920x1080
1920x1080
القﻴوﺩ
-
حتى إذا تم ترميز ملﻒ باستخدام برنامج ترميز مدعوم من برامج الترميز المذكورة أعالﻩ ،فقد ال يتم تشغيل الملﻒ إذا كانت هناك مشكلة في
محتواﻩ.
وال نضمن التشغيل العادي في حالة كون معلومات حاوية الملﻒ خاﻃﺌة أو إذا كان الملﻒ ذاته ً
تالفا.
قد يتعثر تشغيل الملفات التي تحتوي على معدل بت أو معدل إﻃارات أعلى من المعدل القياسي أﺛناء تشغيل الصوت/الفيديو.
ال تتوافر وﻇيفة البحﺚ (التخطي) إذا كان جدول فهرﺱ الملﻒ ً
تالفا.
جﻬاﺯ فﻚ تشﻔﻴر الﻔﻴﺪﻱو
-
-
يدعم حتى H.264المستوى 4.1
ال يدعم H.264 FMO/ASO/RSوVC1 SP/MP/AP L4
MPEG4 SPو:ASP
إﻃارا بحد أقصى
أقل من ً 60 :720 × 1280
إﻃارا بحد أقصى
أعلى من ً 30 :720 × 1280
ال يدعم GMC 2أو أعلى
العربية | ٩
بدء االستخدام
جﻬاﺯ فﻚ تشﻔﻴر الصوﺕ
يدعم ،WMA 7و ,8و ،9وSTD -ال يدعم معدل عينات WMAالتي تبلﻎ 22050هرتز أحادي
ﺩﻋم ملﻔاﺕ الصوﺕ
امتﺪاﺩ الملف
الحاﻭية
ترمﻴز الصوﺕ
ﻧطاﻕ الﺪﻋم
*mp3.
MP3
MP3
-
*wma.
WMA
WMA
* معدالت العينة (بالكيلو هرتز) – 48 ،44.1 ،32 ،22 ،16 ،11 ،8
* معدالت البت – كل معدالت البت في نطاق يتراوﺡ بين 5كيلو بت في
الثانية إلى 384كيلو بت في الثانية
ترمﻴز الﻔﻴﺪيو المتقﺪﻡ ﻋالي الوﺿوﺡ )(AVCHD
•يمكن أن يقوم هذا المنتج بتشغيل األقراﺹ ذات تنسيق .AVCHDويتم تسجيل هذﻩ األقراﺹ واستخدامها بشكل ﻃبيعي في كاميرات الفيديو
الرقمية.
•تنسيق AVCHDهو تنسيق عالي التعريﻒ لكاميرات الفيديو الرقمية.
•تنسيق MPEG-4 AVC/H.264يضغط الصور بكفاءة أعلى من تنسيق ضغط الصور التقليدي.
•تستخدم بعﺾ أقراﺹ AVCHDتنسيق " ."x.v.Colourيمكن أن يقوم هذا المنتج بتشغيل األقراﺹ ذات تنسيق AVCHDالتي تستخدم
تنسيق "."x.v.Colour
•" "x.v.Colourهي عالمة تجارية لشركة .Sony Corporation
•تعد " "AVCHDوشعار AVCHDعالمتان تجاريتان لشركة .Matsushita Electronic Industrial Co., Ltdوشركة Sony
.Corporation
| مﻼﺣﻈة |
◄ قد ال يتم تشغيل بعﺾ األقراﺹ بتنسيق ،AVCHDبنا ًء على ﻇروف التسجيل.
◄ يتطلﺐ األمر إنهاء األقراﺹ بتنسيق .AVCHD
◄ توفر " "x.v.Colourنطاق ألوان أوسع من أقراﺹ DVDلكاميرات الفيديو الرقمية العادية.
◄ قد ال يتم تشغيل بعﺾ األقراﺹ بتنسيقات و ،MKVو ،MP4بنا ًء على دقة الفيديو ومعدل اإلﻃارات.
| ١٠
العربية
الملحقاﺕ
0٢
ابحﺚ عن الملحقات المرفقة المذكورة أدناﻩ.
MUTE
3
6
9
TITLE MENU
كبل الفيديو
كابل HDMI
دليل المستخدم
2
1
5
4
8
7
DISC MENU
0
POPUP
هواﺋي FM
+
REPEAT
SUBTITLE
HOME
TOOLS
INFO
EXIT
RETURN
TUNER
MEMORY MO/ST
D
C
TUNING
UP
DOWN
A
B
SOUND
EFFECT
وحدة التحكم عن بعد/
بطاريات (مقاﺱ (AAA
اﻷﺷﻜال ﻭالرﺳوماﺕ التوﺿﻴحﻴة المﺴتخﺪمة في ﺩلﻴﻞ المﺴتخﺪﻡ ﻫﺬا ﻫي للرجوﻉ فقﻂ ﻭقﺪ تختلف ﻋﻦ مﻈﻬر المنتﺞ الحقﻴقي.
العربية | ١١
بﺪء االﺳتخﺪاﻡ
FUNCTION
VOLUME
-
بدء االستخدام
اللوﺣة اﻷمامﻴة
ﺯر ) PLAY/PAUSEتشﻐﻴﻞ /ﺇيقاﻑ مﺆقﺖ(
ﺯر ) ENTERﺇﺩﺧال(
ﺯر ) OPEN/CLOSEفتﺢ/ﺇﻏﻼﻕ(
ﺯر ) STOPﺇيقاﻑ(
مﺴتوﻯ ﺻوﺕ التحﻜم
ﺯر ) FUNCTIONﻭﻇﻴﻔة(
الشاﺷة
ﺯر POWERمﻀﻴف USB
)تشﻐﻴﻞ(
ﺩرﺝ اﻷقراﺹ
مﺴتشعر ﻭﺣﺪﺓ التحﻜم ﻋﻦ بعﺪ
| مﻼﺣﻈة |
◄ لترقية برنامج المنتج من خالل مقبﺲ مضيﻒ ،USBيجﺐ استخدام شريحة ذاكرة .USB
◄ عندما يعرض المنتج قاﺋمة قرﺹ ،Blu-rayال يمكنك أن تبدأ الفيلم بالضغط على الزر
يجﺐ اختيار "تشغيل الفيلم" أو "بدء" في قاﺋمة القرﺹ ،ﺛم اضغط على الزر . E
في المنتج أو في وحدة التحكم عن بعد .لتشغيل الفيلم،
اللوﺣة الخلﻔﻴة
LAN
FM ANT
L
OPTICAL
DIGITAL
AUDIO IN
VIDEO OUT
HDMI OUT
مرﻭﺣة التﺒريﺪ
AUX IN
AUX
IN
SPEAKERS OUT
L
OPTICAL
DIGITAL
AUDIO IN
| مﻼﺣﻈة |
SURROUND R
FRONT R
SUBWOOFER
LAN
FM ANT
ﻫواﺋي FM
SURROUND L
FRONT L
R
IMPEDANCE : 3Ω
VIDEO
OUT
R
IMPEDANCE : 3Ω
VIDEO
OUT
AUX
IN
SPEAKERS OUT
CENTER
SURROUND L
FRONT L
CENTER
SURROUND R
FRONT R
SUBWOOFER
HDMI OUT
مﺪﺧﻞ الصوﺕ الرقمي HDMI OUTﻃرﻑ توﺻﻴﻞ ﺷﺒﻜة LAN
الخارجي )بصرﻱ(
موﺻﻼﺕ ﺇﺧراﺝ
الﺴماﻋة
◄ تﺄكد من وجود 10سم كحد أدنى من صافي المساحة في كل جوانﺐ السينما المنزلية لضمان التهوية الكافية .ال تعيق مروحة التبريد أو فتحات التهوية.
| ١٢
العربية
ﻭﺣﺪﺓ التحﻜم ﻋﻦ بعﺪ
0٢
جولة في ﻭﺣﺪﺓ التحﻜم ﻋﻦ بعﺪ
بﺪء االﺳتخﺪاﻡ
تشغيل المنتج وإيقاف تشغيله.
اضغط لتحديد وضع .Blu-ray
( ,AUX, BD/DVDإلﺦ).
FUNCTION
إلخراج القرﺹ.
MUTE
قطع الصوت بشكل مﺆقت.
+
3
2
1
6
5
4
8
7
9
TITLE MENU
استخدم هذا الزر للدخول إلى القاﺋمة المنبثقة
/قاﺋمة العنوان.
اضغط على هذين الزرين للبحﺚ إلى الخلﻒ
أو األمام.
VOLUME
-
اضغط على أزرار األرقام للحصول على خيارات
التشغيل.
DISC MENU
0
POPUP
قم بضبط مستوى الصوت.
اضغط لعرض قاﺋمة القرﺹ.
اضغط على هذين الزرين لالنتقال إلى الخلﻒ أو األمام.
اضغط لتشغيل القرﺹ.
اضغط على هذا الزر إليقاف تشغيل القرﺹ
بشكل مﺆقت.
REPEAT
SUBTITLE
HOME
للسماﺡ لك بتكرار عنوان أو فصل أو مسار أو
قرﺹ.
اضغط إليقاف القرﺹ.
لتحديد لغة الترجمة الخاصة بالقرﺹ.
استخدم هذا الزر لعرض معلومات التشغيل
أﺛناء تشغيل قرﺹ .Blu-ray/DVD
INFO
TOOLS
EXIT
RETURN
اضغط عليه لالنتقال إلى الشاشة الرﺋيسية.
اضغط على هذا الزر الستخدام قاﺋمة ( Toolsاألدوات).
اضغط على هذا الزر للخروج من القاﺋمة.
يستخدم لضبط تردد راديو محدد ً
مسبقا.
TUNER
MEMORY MO/ST
D
حدد "أحادي" أو "استريو" لبﺚ الراديو.
C
TUNING
UP
DOWN
A
B
SOUND
EFFECT
للبحﺚ عن محطات FMالنشطة وتغيير
القنوات.
حدد عناصر القاﺋمة المعروضة على الشاشة
وقم بتغيير قيمة القاﺋمة.
العودة للقاﺋمة السابقة.
تُستخدم هذﻩ األزرار للقواﺋم الخاصة بهذا المنتج
باإلضافة إلى إجراء وﻇاﺋﻒ متعددة على
أقراﺹ .Blu-ray
لتحديد وضع صوت Dolby Pro Logic II
المطلوﺏ.
اضغط لتطبيق التﺄﺛيرات الصوتية.
تركﻴب الﺒطارياﺕ في ﻭﺣﺪﺓ التحﻜم ﻋﻦ بعﺪ.
ﺣﺠم الﺒطاريةAAA:
| مﻼﺣﻈة |
◄ تﺄكد من مطابقة النهايتان " "+و" "-للبطاريتين مع المخطط
البياني بداخل التجويﻒ.
◄ بافتراض استخدام التلفاز المعتاد ،تستمر البطاريات في العمل لمدة
عام واحد.
◄ يمكن استخدام وحدة التحكم عن بعد من على بعد يصل إلى
7أمتار تقريبًا عن المنتج بخط مستقيم.
العربية | ١٣
التوصيالت
يصﻒ هذا القسم ً
ﻃرقا متعددة لتوصيل المنتج بالمكونات الخارجية األخرى.
قبل نقل المنتج أو تركيبه ،تﺄكد من إيقاف تشغيل الطاقة وفصل سلك الطاقة.
توﺻﻴﻞ الﺴماﻋاﺕ
ﻭﺿع المنتﺞ
الوﺳطﻰ
مﻀخمالصوﺕ
المنتﺞ )يمنﻰ(
ﺳماﻋةمحﻴطﻴة)يمنﻰ(
المنتﺞ
المنتﺞ )يﺴرﻯ(
ضع المنتج على حامل أو رف الخزانة أو أسفل حامل
التلفاز.
تحﺪيﺪ ﻭﺿع االﺳتماﻉ
يجﺐ أن يكون موضع االستماع على مسافة 2.5
إلى 3أضعاف من حجم شاشة التلفاز بعي ًدا عن
التلفاز .فعلى سبيل المثال ،إذا كانت لديك شاشة
46بوصة ،فاجعل موضع االستماع على مسافة
115إلى 138بوصة عن الشاشة.
ﺳماﻋةمحﻴطﻴة)يﺴرﻯ(
الﺴماﻋة اﻷمامﻴة
ضع هذﻩ السماعات أمام موضع االستماع الخاﺹ بك ،بحيﺚ تكون موجهة للداخل ( 45درجة تقريبًا) باتجاهك.
ضع السماعات األمامية بحيﺚ تكون مكبرات الصوت الموجودة فيها بنفﺲ ارتفاع أذنك .قم بمحاذاة الواجهة األمامية
للسماعات األمامية مع الواجهة األمامية للسماعة المركزية أو ضعها برفق أمام السماعات المركزية.
الﺴماﻋة الوﺳطﻰ
من األفضل تركيﺐ السماعة الوسطى بنفﺲ ارتفاع السماعات األمامية .يمكنك ً
أيضا تركيبها مباشر ًة فوق التلفاز أو
تحته.
ﺳماﻋاﺕ الصوﺕ
المحﻴطي
مﻀخم الصوﺕ
| ١4
العربية
ضع هاتين السماعتين على جانﺐ موضع االستماع .في حالة عدم وجود مساحة كافية ،فضعهما بحيﺚ تكونان
موجهتين لبعضهما البعﺾ .ضعهما فوق أذنك بحوالي 60إلى 90سم ،بحيﺚ تكونان موجهتين ً
قليال إلى
األسفل.
* على عكﺲ السماعات األمامية والسماعات المركزية ،تستخدم السماعات المحيطية بشكل أساسي لتﺄﺛيرات
الصوت .لن يصدر صوت منهما أب ًدا.
أمرا هامًا .فيمكنك وضعه في أي مكان تريد.
ال يعد موضع مضخم الصوت ً
مﻜوﻧاﺕ الﺴماﻋة
0٣
HT-E3500
ﺃﻣﺎﻣﻴﺔ
)ﻳﻤﻨﻰ(
التوﺻﻴﻼﺕ
)ﻳﻤﻨﻰ(
)ﻳﺴﺮﻯ(
)ﻳﺴﺮﻯ(
ﺍﻟﻮﺳﻄﻰ
ﺳﻤﺎﻋﺔ ﺍﻟﺼﻮﺕ ﺍﻟﻤﺤﻴﻄﻲ
ﻣﻀﺨﻢ ﺍﻟﺼﻮﺕ
HT-E3530
ﻛﺒﻞ ﺍﻟﺴﻤﺎﻋﺔ
)ﻳﻤﻨﻰ()ﻳﺴﺮﻯ(
ﻗﺎﻋﺪﺓ ﺍﻟﺤﺎﻣﻞ
)ﻳﻤﻨﻰ(
ﺃﻣﺎﻣﻴﺔ
ﺣﺎﻣﻞ
)ﻳﺴﺮﻯ(
ﻣﺴﻤﺎﺭ ﻟﻮﻟﺒﻲ )8EA :(٥X١٥
ﺍﻟﻮﺳﻄﻰ
ﺳﻤﺎﻋﺔ ﺍﻟﺼﻮﺕ ﺍﻟﻤﺤﻴﻄﻲ
ﻣﻀﺨﻢ ﺍﻟﺼﻮﺕ
HT-E3550
ﺣﺎﻣﻞ
ﻗﺎﻋﺪﺓ ﺍﻟﺤﺎﻣﻞ
)ﻳﻤﻨﻰ( )ﻳﺴﺮﻯ(
)ﻳﻤﻨﻰ()ﻳﺴﺮﻯ(
ﺃﻣﺎﻣﻴﺔ
ﺳﻤﺎﻋﺔ ﺍﻟﺼﻮﺕ ﺍﻟﻤﺤﻴﻄﻲ
ﻣﺴﻤﺎﺭ ﻟﻮﻟﺒﻲ )16EA :(٥X١٥
ﺍﻟﻮﺳﻄﻰ
ﻛﺒﻞ ﺍﻟﺴﻤﺎﻋﺔ
ﻣﻀﺨﻢ ﺍﻟﺼﻮﺕ
العربية | ١٥
التوصيالت
تﺜﺒﻴﺖ الﺴماﻋاﺕ ﻋلﻰ ﺣامﻞ رأﺳي
* HT-E3530فقﻂ -الﺴماﻋاﺕ اﻷمامﻴة
* HT-E3550فقﻂ -الﺴماﻋاﺕ اﻷمامﻴة/المﺠﺴمة
2
. ١قم بمد كبل السماعة وضعه في الفتحة الموجودة في قاعدة
الحمل.
1
قاعدة الحامل
. ٢أدخل البراﻏي في الفتحات الثالﺙ المميزة باستخدام مفك على
النحو الموضﺢ بالشكل التوضيحي.
حامل
.٣
.٤
قم بفرد سلك السماعة وأدخله في الفتحة بمنتصﻒ قاعدة الحامل.
قم بتوصيل السماعة العلوية بالحامل المركﺐ.
4
3
السماعة
حامل
.٥
أدخل برﻏيًا في اتجاﻩ عقارﺏ الساعة داخل الفتحة الموجودة
بالجزء
الخلفي من السماعة باستخدام المفك .ﺛم قم بتوصيل كابل
السماعة.
هذا هو الشكل بعد تركيﺐ السماعة.
اتبع هذﻩ الخطوات لتركيﺐ السماعة األخرى.
.٦
5
6
توﺻﻴﻞ الﺴماﻋاﺕ
.١
.٢
.٣
| ١٦
قم بمطابقة حزمة كابالت مضخم الصوت بمضخم الصوت من خالل مطابقة القابﺲ المميز بﺄلوان
في الحزمة بالملصق الملون أسفل مضخم الصوت.
لتركيﺐ سلك السماعة بكل سماعة:
أ .اضغط على اللسان األحمر الموجود في ﻇهر السماعة ،ﺛم أدخل السلك األحمر ،وحرر اللسان.
ﺏ .اضغط على اللسان األسود الموجود في ﻇهر السماعة ،ﺛم أدخل السلك األسود ،وحرر اللسان.
قم بتوصيل قوابﺲ سلك السماعة بظهر المنتج بمطابقة ألوان قوابﺲ السماعة بﺄلوان مقابﺲ السماعة.
العربية
أحمر
أسود
في ﺣالة HT-E3500
السماعةالوسطى
SPEAKERS OUT
IMPEDANCE : 3
السماعة المحيطية (يمنى)
0٣
السماعة المحيطية (يسرى)
التوﺻﻴﻼﺕ
السماعة األمامية (يسار)
SURROUND
SURROUND
السماعة األمامية (يمين)
SPEAKERS OUT
IMPEDANCE : 3Ω
LAN
SURROUND L
FRONT L
CENTER
SURROUND R
FRONT R
SUBWOOFER
مضخمالصوت
| تحﺬير |
◄ لتركيﺐ السماعات على جدار ،قم بتثبيت البراﻏي أو المسامير على الجدار المطلوﺏ بﺈحكام وقم بتركيﺐ السماعة باستخدام فتحة المسمار الكبير بالجانﺐ
الخلفي .الحظ أن البراﻏي أو المسامير المخصصة للتركيﺐ على الجدار ﻏير متوفرة مع المنتج.
◄ ال تسمﺢ لﻸﻃفال باللعﺐ بالسماعات أو بالقرﺏ منها .فقد يصيبهم أذى إذا ما سقطت إحدى السماعات.
◄ عند توصيل أسالك السماعة بالسماعات ،تﺄكد من صحة القطبية (.)–/+
◄ حافظ على سماعة مضخم الصوت بعي ًدا عن األﻃفال لتفادي إدخال األﻃفال أيديهم فيها أو إدخال أجسام ﻏريبة داخل أنبوﺏ (فتحة) سماعة مضخم الصوت.
◄ ال تقم بتعليق مضخم الصوت على الحاﺋط من خالل األنبوﺏ (الفتحة).
| مﻼﺣﻈة |
◄ إذا وضعت سماعة بالقرﺏ من جهاز التلفاز ،فقد يحدﺙ تشويﺶ للون الشاشة نتيجة للمجال المغناﻃيسي.
العربية | ١7
التوصيالت
التوﺻﻴﻞ بتلﻔاﺯ
حدد الطريقة 1أو الطريقة .2
AUX
IN
VIDEO
OUT
FM ANT
LAN
FM ANT
L
OPTICAL
DIGITAL
AUDIO IN
OPTICAL
DIGITAL
T
TAL
AUDIO IN
SURROUND L
FRONT L
SURROUND R
FRONT R
HDMI OUT
R
HDMI OUT
الطريقة ٢
VIDEO IN
R
IMPEDANCE : 3Ω
L
VIDEO
OUT
AUX
IN
SPEAKERS OUT
CENTER
SUBWOOFER
الطريقة ١
HDMI IN
الطريقة ١التوﺻﻴﻞ بتلﻔاﺯ باﺳتخﺪاﻡ كﺒﻞ – HDMIأفﻀﻞ جوﺩﺓ )يوﺻﻰ بﺬلﻚ(
قم بتوصيل كبل HDMIمن قابﺲ HDMI OUTخلﻒ المنتج بقابﺲ ( HDMI INمدخالت )HDMIبالتلفاز الخاﺹ بك.
إذا كان التلفزيون يدعم ،ARCفال يمكنك سماع صوت التليفزيون من نظام المسرﺡ المنزلي إال بعد توصيل هذا الكابل.
الطريقة ٢التوﺻﻴﻞ بتلﻔاﺯ باﺳتخﺪاﻡ كﺒﻞ فﻴﺪيو – جوﺩﺓ جﻴﺪﺓ
قم بتوصيل كبل الفيديو المرفق من قابﺲ VIDEO OUTبمﺆخرة المنتج بقابﺲ VIDEO INبالتلفاز الخاﺹ بك.
| مﻼﺣﻈة |
خرجا بدقة 576i/480iبغﺾ النظر عن ضبط الدقة في قاﺋمة اإلعداد.
◄ يخرج قابﺲ VIDEO Outداﺋمًا ً
◄ ال تقم بتوصيل الوحدة عبر .VCRإشارات الفيديو التي تﺄتي عبر أجهزة الفيديو قد تتﺄﺛر بﺄنظمة حماية حقوق الطبع والنشر وتظهر الصور
مشوهة على التلفاز.
| ١٨
العربية
التوﺻﻴﻞ بﺄجﻬزﺓ ﺧارجﻴة
FM ANT
LAN
FM ANT
L
OPTICAL
DIGITAL
AUDIO IN
OPTICAL
DIGITAL
DIGI
TAL
TAL
AUDIO IN
R
IMPEDANCE : 3Ω
L
VIDEO
OUT
AUX
IN
SPEAKERS OUT
SURROUND L
FRONT L
CENTER
SURROUND R
FRONT R
SUBWOOFER
HDMI OUT
R
الطريقة ٢
HDMI OUT
الطريقة ١
أجﻬزﺓ ﺧارجﻴة
OPTICAL OUT
أﺣمر
R
أبﻴﺾ
W
الطريقة :AUX IN ١توﺻﻴﻞ مﻜوﻥ تناﻇرﻱ ﺧارجي
باستخدام كبل صوت ،RCAقم بتوصيل قابﺲ دخل الصوت AUDIO Inفي المنتج بقابﺲ مخرج الصوت AUDIO Outفي المكون التناﻇري
الخارجي .حدد الوضع .AUX
~ تﺄكد من مطابقة األلوان الموجودة في مقابﺲ الكبل مع األلوان الموجودة في قوابﺲ الدخل والخرج.
الطريقﺓ ٢بصرﻱ :توﺻﻴﻞ مﻜوﻥ ﺻوﺕ رقمي ﺧارجي
لتوصيل مخرج الصوت الرقمي الخاﺹ بمكونات اإلشارة الرقمية ،مثل صناديق الكبل وأجهزة استقبال األقمار الصناعية (أجهزة فك التشفير).
باستخدام كبل بصري رقمي (ﻏير مرفق) ،قم بتوصيل قابﺲ دخل الصوت الرقمي البصري في المنتج بقابﺲ المخرج الرقمي البصري في الجهاز
الرقمي الخارجي باستخدام كبل بصري رقمي.
حدد الوضع .D. IN
| مﻼﺣﻈة |
◄ لمشاهدة فيديو من صندوق كبل/جهاز استقبال أقمار صناعية ،يجﺐ عليك توصيل مخرج الفيديو الموجود به مباشرة بالتلفاز لديك.
◄ يدعم هذا النظام ترددات العينات الرقمية البالغة 32كيلو ﻩرتز أو أعلى من المكونات الرقمية الخارجية.
◄ ال يدعم هذا النظام سوى صوت Dolby Digitalو .DTSصوت ،MPEGتنسيق تدفق بت ،ﻏير مدعوم.
العربية | ١٩
0٣
VIDEO
OUT
AUX
IN
التوﺻﻴﻼﺕ
لتحديد الوضع الصحيﺢ لجهاز خارجي ،اضغط على الزر ﻭﻇﻴﻔة .في كل مرة يتم فيها الضغط على الزر ،يتغير الوضع بالترتيﺐ التالي:
FM AUX D. IN BD/DVD
التوصيالت
توﺻﻴﻞ ﻫواﺋي FM
هواﺋي ( FMمرفق)
IMPEDANCE : 3Ω
VIDEO
OUT
AUX
IN
SPEAKERS OUT
LAN
FM ANT
L
OPTICAL
DIGITAL
T
TAL
AUDIO IN
R
SURROUND L
FRONT L
CENTER
SURROUND R
FRONT R
SUBWOOFER
HDMI OUT
. ١قم بتوصيل هواﺋي FMالمرفق مع قابﺲ هواﺋي .FM
. ٢قم بتحريك سلك الهواﺋي ببطء حتى تجد مكا ًنا يتم فيه االستقبال بشكل جيد ،ﺛم ﺛبته بحاﺋط أو سطﺢ صلﺐ ﺁخر.
| مﻼﺣﻈة |
◄ ال يستقبل هذا المنتج بﺚ .AM
التوﺻﻴﻞ بموجﻪ ﺷﺒﻜة
يمكنك توصيل المنتج الخاﺹ بك بموجه شبكة باستخدام إحدى الطرق الموضحة أدناﻩ.
LAN
FM ANT
L
OPTICAL
DIGITAL
AUDIO IN
موﺩﻡ النطاﻕ
الترﺩﺩﻱ العريﺾ
ﺧﺪمة النطاﻕ
العريﺾ
ﺧﺪمة النطاﻕ
العريﺾ
R
IMPEDANCE : 3Ω
VIDEO
OUT
AUX
IN
SPEAKERS OUT
SURROUND L
FRONT L
CENTER
SURROUND R
FRONT R
SUBWOOFER
HDMI OUT
موﺩﻡ النطاﻕ العريﺾ
)مع جﻬاﺯ توجﻴﻪ مﺪمﺞ(
أﻭ
جﻬاﺯ توجﻴﻪ
| مﻼﺣﻈة |
ً
◄ قد يُسمﺢ بالوصول عبر اإلنترنت إلى خادم تحديﺚ البرامج الخاﺹ بشركة ،Samsungوفقا للموجه الذي تستخدمه أو سياسة موفر
خدمة اإلنترنت .للمزيد من المعلومات ،اتصل بموفر خدمة اإلنترنت (.(ISP
◄ فيما يتعلق بمستخدمي ،DSLالرجاء استخدام جهاز توجيه إلنشاء اتصال شبكة.
◄ الستخدام وﻇيفة ،AllShareيجﺐ توصيل جهاز كمبيوتر بالشبكة كما هو موضﺢ بالشكل.
| ٢٠
العربية
. ٥تظهر شاشة ( Network – Wiredالشبكة -سلكية).
ﺇجراء اﻹﻋﺪاﺩاﺕ اﻷﻭلﻴة
. ٢استخدم األزرار ▲▼ الموجودة بوحدة التحكم عن بعد لتحديد
اللغة المطلوبة ،ﺛم اضغط على الزر Eمرتين.
. ٣اضغط على الزر Eلبدء اإلعداد.
Initial Settings
إذا لم تكن لديك شبكة ،فحدد ) Skipتخطي( بالضغط علىالزر ) BLUEأﺯرﻕ( ) .(Dتظهر شاشة Initial
( Settings Completeاكتملت اإلعدادات األولية) ،ﺛم
تظهر الشاشة الرﺋيسية.
| مﻼﺣﻈة |
◄ إذا تم تخطي إعداد الشبكة هنا أو لم يعمل اإلعداد بشكل صحيﺢ،
فيمكنك االنتقال إلى "تهيﺌة اتصال الشبكة" صفحة 26إلعداد
اتصال الشبكة بالمنتج في وقت الحق.
TV Aspect and Network will be set.
Each setting may be changed later under "Settings".
Initial Settings I Network - Wired
Start
Choose the method to configure Internet Protocol (IP).
Please make sure that the Ethernet cable is connected.
Auto : Configure IP automatically.
" Select
a Previous
. ٤تظهر شاشة ( TV Aspectنسﺐ التلفزيون) .اضغط على
الزرين ▲▼ لتحديد نسبة العرض إلى االرتفاع للتلفزيون ﺛم
اضغط على الزر .E
لديك أربعة خيارات:
16:9أﺻلي -ألجهزة التلفاز عريضة الشاشة .لعرض صور
شاشة عريضة بتنسيقها األصلي 16:9وصور ( 4:3التنسيق
القياسي ،القديم) في تنسيق مربع قاﺋم 4:3بﺄشرﻃة سوداء على
اليسار واليمين.
Manual
< Move " Select
Auto
a Previous d Skip
. ٦يتحقق المنتج من اتصال الشبكة ﺛم يتصل بالشبكة .عند االنتهاء
من ذلك ،اضغط على الزر .E
تظهر شاشة ( Initial Settings Completeاكتملت
اإلعدادات األولية) ،ﺛم تظهر الشاشة الرﺋيسية.
16:9كامﻞ -ألجهزة التلفاز عريضة الشاشة .لعرض صور
شاشة عريضة بتنسيقها األصلي 16:9وتكبير صور 4:3
لملء الشاشة .16:9
4:3ﺷاﺷة ﻋرﺿﻴة -ألجهزة التلفاز التناﻇرية ذات الشاشة
القياسية القديمة .لعرض صور 4:3في شاشة كاملة وصور
16:9في تنسيق شاشة عرضية يحتفظ بنسبة العرض إلى
االرتفاع 16:9ولكن يضع أشرﻃة سوداء فوق الصورة
وأسفلها.
4:3ﺷاﺷة ﻋاﺩية -ألجهزة التلفاز التناﻇرية ذات الشاشة
القياسية القديمة .لعرض صور 4:3في شاشة كاملة وصور
16:9بتنسيق الشاشة العادية Pan-Scanالذي يمﻸ الشاشة،
ولكنه يقتﺺ الجوانﺐ اليمنى واليسرى من الشاشة ويقوم بتكبير
الوسط عموديًا.
العربية | ٢١
0٤
. ١قم بتشغيل التلفاز الخاﺹ بك بعد توصيل المنتج ،ﺛم قم بتشغيل
المنتج .عند تشغيل المنتج ألول مرة ،فسيقوم المنتج تلقاﺋيًا
بعرض شاشة لغة اإلعدادات األولية.
إذا كانت لديك شبكة بها عناوين IPﺛابتة ،فنقترﺡ أن تحدد) Skipتخطي( بالضغط على الزر ) BLUEأﺯرﻕ( )،(D
ﺛم انتقل إلى "تهيﺌة اتصال الشبكة" صفحة 26بعد إتمام
ً
كامال
شرحا
اإلعداد األولي .توفر "تهيﺌة اتصال الشبكة" ً
لكيفية تهيﺌة اتصال الشبكة يدويًا.
اﻹﻋﺪاﺩاﺕ
•لن تظهر القاﺋمة الرﺋيسية في حالة عدم تهيﺌة اإلعدادات
األولية.
•قد يتغير العرض على الشاشة ( )OSDفي هذا المنتج بعد
تحديﺚ إصدار البرامج.
•قد تختلﻒ خطوات الوصول ً
وفقا للقاﺋمة التي قمت بتحديدها.
إذا كانت لديك شبكة بها عنوان IPديناميكي – ومعظماألشخاﺹ كذلك – فحدد ) Autoتلقاﺋي( واضغط على الزر
( Enterإدخال) ،Eﺛم انتقل إلى الخطوة .6
اإلعدادات
. ١لتحديد خيار في الشاشة الرﺋيسية ،قم بتحريك المﺆشر باستخدام
الزرين ►◄ إﻟﻰ أن ﻳﺘﻢ ﺗﻤﻴﻴﺰ اﻟﺨﻴﺎر اﻟﺬي ﺗﺮﻳﺪه ،ﺛﻢ اﺿﻐﻂ ﻋﻠﻰ اﻟﺰر
.E
Initial Settings I Network - Wired
) MAC Address (d0:66:7b:dc:28:fc
IP Address, Subnet Mask, Gateway, DNS Server
| مﻼﺣﻈة |
Gateway Ping
Internet Service Test
◄ لتشغيل ملفات الفيديو أو الموسيقى أو الصور الموجودة على
الكمبيوتر أو عرضها ،يجﺐ توصيل نظام المسرﺡ المنزلي
والكمبيوتر بالشبكة المنزلية ويجﺐ تنزيل برنامج AllShare
وتثبيته وتهيﺌته على الكمبيوتر( .انظر الصفحة (.29
Your network is operating properly.
If you still have a problem, contact your network service provider.
OK
" Select
الوﺻول ﺇلﻰ ﺷاﺷة اﻹﻋﺪاﺩاﺕ
| مﻼﺣﻈة |
. ١حدد اﻹﻋﺪاﺩاﺕ في الشاشة الرﺋيسية ،ﺛم اضغط على الزر .E
تظهر شاشة ( Settingsاإلعدادات).
◄ إذا كنت ترﻏﺐ في عرض شاشة اإلعداد األولي مرة أخرى
وإجراء التغييرات ،فحدد الخيار "إعادة الضبط"( .انظر الصفحة
(26
Settings
◄ إذا كنت تستخدم كبل HDMIلتوصيل المنتج بتلفاز Samsung
متوافق مع ( Anynet+(HDMI-CECو ).1قمت بﺈعداد ميزة
( Anynet+(HDMI-CECعلى تشغيل في التلفاز والمنتج
و ).2قمت بﺈعداد التلفاز على لغة مدعومة من قبل المنتج ،فسيقوم
المنتج بتحديد هذﻩ اللغة بحيﺚ تكون هي اللغة المفضلة تلقاﺋيًا.
►
: 16:9 Original
TV Aspect Ratio
: On
BD Wise
Audio
: Auto
Resolution
Network
: Auto
)Movie Frame (24 Fs
System
: Auto
HDMI Color Format
Language
: Auto
HDMI Deep Color
Security
: Auto
Progressive Mode
General
الشاﺷة الرﺋﻴﺴﻴة
3
Display
Support
®
™
. ٢للوصول إلى قاﺋمة ( Settingsاإلعدادات) وقواﺋمها الفرعية
وخياراتها ،يرجى الرجوع إلى الشكل الخاﺹ بالتحكم عن بعد
VOLUME
MUTE
أدناﻩ.
FUNCTION
4
Settings
2
5
1
6
" Enter
1
2
3
4
5
d View Devices
a Change Device
No Disc
ملﻔاﺕ الﻔﻴﺪيو .لتشغيل ملفات الفيديو الموجودة على
األقراﺹ أو أجهزة USBأو الكمبيوتر.
الصور .لعرض الصور الموجودة على األقراﺹ أو أجهزة
USBأو الكمبيوتر.
لعرض األزرار الملونة الموجودة بوحدة التحكم عن بُعد
6التي يمكنك الضغط عليها للوصول إلى الوﻇاﺋﻒ أو
إجراﺋها.
تحديد خيار في الشاشة الرﺋيسية.
| ٢٢
+
| مﻼﺣﻈة |
2
1
3
◄ إذا تركت المنتج في وضع اإليقاف ألكثر من 5دقاﺋق بدون
شاشة توقﻒ 5على 4
استخدام ،فستظهر 6
التلفاز الخاﺹ بك .إذا تُرك
المﺆقتة ألكثر 7من 20دقيقة ،فسيتم إيقاف
الشاشة
المنتج في وضع
8
9
DISC MENU
TITLE MENU
التشغيل تلقاﺋيًا.
0 POPUP
اﻷﺯرار الموجوﺩﺓ في ﻭﺣﺪﺓ التحﻜم ﻋﻦ بعﺪ ﻭالمﺴتخﺪمة
لقاﺋمة ) Settingsاﻹﻋﺪاﺩاﺕ(
REPEAT
العربية
SUBTITLE
HOME
1
ﺧﺪماﺕ الشﺒﻜة .تحديد خدمة شبكة:
Vuduأو CinemaNowأو .YouTube
الموﺳﻴقﻰ .لتشغيل الموسيقى الموجودة على األقراﺹ أو
أجهزة USBأو الكمبيوتر.
اﻹﻋﺪاﺩاﺕ .لتعيين وﻇاﺋﻒ متنوعة لمالءمة التفضيالت
الشخصية الخاصة بك.
-
INFO
TOOLS
EXIT
RETURN
3
4
TUNER
MEMORY MO/ST
D
C
TUNING
UP
DOWN
B
2
A
SOUND
EFFECT
1
الزر رﺋﻴﺴي :اضغط عليه لالنتقال إلى الشاشة الرﺋيسية.
2
الزر ﻋوﺩﺓ)'( :العودة للقاﺋمة السابقة.
0٤
4
الزر ﺧرﻭﺝ :اضغط للخروج من القاﺋمة الحالية.
اﻹﻋﺪاﺩاﺕ
3
الزر ( Eﺇﺩﺧال( /االتﺠاﻩ:
~ اضغط على ▲▼◄► لتحريك المﺆشر أو الختيار
عنصر.
~ اضغط على الزر Eلتنشيط العنصر المحدد حاليًا
أو لتﺄكيد إعداد.
| مﻼﺣﻈة |
◄ يمكن استخدام الزر Eالموجود في لوحة المنتج األمامية لنفﺲ ﻏرض الزر Eالموجود في وحدة التحكم عن بعد.
المعلوماﺕ التﻔصﻴلﻴة للوﻇﻴﻔة
سيظهر التوضيﺢ عاد ًة أسفل الشاشة .لعرض الشرﺡ ،استخدم األزرار ▲▼►◄ لتحديد الوﻇيفة أو عنصر القاﺋمة أو الخيار.
سيظهر الشرﺡ ﻏالبًا على يمين الشاشة .يظهر ً
قصيرا لكل وﻇيفة من وﻇاﺋﻒ اإلعدادات في الصفحة التالية .كما تظهر معلومات إضافية حول
وصفا
ً
بعﺾ الوﻇاﺋﻒ في الملحق الخاﺹ بهذا الدليل.
ﻭﻇاﺋف قاﺋمة اﻹﻋﺪاﺩاﺕ
اﻹﻋﺪاﺩاﺕ ﺛﻼﺛﻴة
اﻷبعاﺩ
إعداد الوﻇاﺋﻒ المتعلقة باألبعاد الثالﺛية.
ﻭﺿع تشﻐﻴﻞ Blu-rayﺛﻼﺛي اﻷبعاﺩ :حدد ما إذا كنت تريد تشغيل قرﺹ
Blu-rayالمحتوي على محتويات ﺛالﺛية األبعاد في الوضع ﺛالﺛي األبعاد أم ال .إذا
انتقلت إلى الشاشة الرﺋيسية أو قاﺋمة Smart Hubالرﺋيسية أﺛناء التواجد في
الوضع ﺛالﺛي األبعاد ،فسينتقل المنتج إلى الوضع ﺛناﺋي األبعاد بشكل تلقاﺋي.
ﺣﺠم الشاﺷة :أدخل حجم التلفاز المرفق بالمنتج .سيقوم المنتج تلقاﺋيًا بضبط الخرج
ﺛالﺛي األبعاد على حجم شاشة التلفاز.
ﻧﺴﺒة ﻋرﺽ ﺇلﻰ
ارتﻔاﻉ التلﻔاﺯ
يسمﺢ لك بضبط مخرج المنتج حسﺐ حجم شاشة التلفاز الخاﺹ بك .انظر الصفحة
، 21الخطوة 4لالﻃالع على وصﻒ خيارات حجم الشاشة.
ﻋرﺽ
BD Wise
الﺪقة
ﺇﻃار اﻷفﻼﻡ
) 24ﺇﻃارًا في
الﺜاﻧﻴة(
ميزة BD Wiseهي أحدﺙ ميزة اتصال متبادل من شركة .Samsung
عندما تقوم بتوصيل منتج وتلفاز من Samsungمزودين بميزة BD Wise
كل من المنتج
ببعضهما عبر ،HDMIوتكون ميزة BD Wiseقيد التشغيل في ٍ
والتلفاز ،يقوم المنتج بﺈخراج الفيديو بدقة الفيديو ومعدل اإلﻃارات الخاصين بﺄقراﺹ
.Blu-ray Disc/DVD
تتيﺢ لك ضبط دقة المخرجات الخاصة بﺈشارة فيديو HDMIعلى تلقاﺋي أﻭ 1080p
أﻭ 1080iأﻭ 720pأﻭ .576p/480pفي حالة توصيل مركﺐ ،ال تدعم الدقة
سوى .576i/480iيشير الرقم إلى عدد خطوط الفيديو لكل إﻃار .أما حرفا iوp
فهما اختصاران لكلمتي متشابك وتقدمي باللغة اإلنجليزية ،على التوالي .كلما زادت
الخطوط ،زادت الجودة.
إﻃارا في الثانية) على "تلقاﺋي" يسمﺢ للمنتج
إن ضبط ميزة "إﻃارات الفيلم" (ً 24
إﻃارا في الثانية بشكل تلقاﺋي لتحسين
بتعديل مخرجات HDMIالخاصة به على ً 24
إﻃارا في الثانية.
جودة الصورة في حالة التركيﺐ بتلفاز متوافق مع ً 24
إﻃارا في الثانية) على تلفاز يدعم
•بﺈمكانك أن تستمتع بميزة إﻃارات األفالم (ً 24
معدل اإلﻃارات هذا فحسﺐ.
•تتاﺡ إﻃارات األفالم فقط عندما يكون المنتج في أوضاع دقة مخرجات HDMI
1080iأو .1080p
العربية | ٢٣
اإلعدادات
ﺻوﺕ
تنﺴﻴق ألواﻥ
HDMI
يتيﺢ لك إعداد تنسيق مساحة اللون لمخرجات HDMIبما يتوافق مع إمكانيات الجهاز
الموصل (تلفاز ،شاشة ،وما إلى ذلك).
لوﻥ HDMIالﻐامق
يتيﺢ لك ضبط المنتج على إخراج الفيديو من مقبﺲ HDMI OUTبﺄلوان ﻏامقة.
يسمﺢ لك اللون العميق بﺈعادة إنتاج األلوان بشكل أكثر دقة وبعمق أكبر لﻸلوان.
الوﺿع المتﺪرﺝ
DVD.ﺹارقأ ةدﻩاﺵم دنع ةروﺹلا ةدوج نيﺱﺡت كل ﺡيتي
ﺇﻋﺪاﺩاﺕ الﺴماﻋة
يمكنك ضبط خيارات السماعة.
تحﺪيﺪ الﺴماﻋة
يتيﺢ لك تحديد السماعات التي تريد تنشيطها ،سواء كانت سماعات التلفاز أم سماعات
المسرﺡ المنزلي.
قناﺓ ﺇرجاﻉ الصوﺕ
تتيﺢ لك توجيه الصوت من التلفاز إلى سماعات السينما المنزلية .تتطلﺐ اتصال
HDMIوتلفاز متوافق مع قناة إرجاع صوت (.(ARC
•عند ضبط ( Audio Return Channelقناة إرجاع الصوت) على Auto
(تلقاﺋي) ،يحدد نظام المسرﺡ المنزلي ARCأو اإلدخال الضوﺋي تلقاﺋيًا كمصدر
صوتً ،
وفقا التصاالتك .إذا كانت ( Audio Return Channelقناة إرجاع
الصوت) نشطة ،فلن يعمل اإلدخال الضوﺋي.
الخرﺝ الرقمي
يتيﺢ لك ضبط اإلخراج الرقمي لمطابقة إمكانيات جهاز استقبال الصوت والفيديو الذي
قمت بتوصيله بالمنتج .لمزيد من التفاصيل ،يرجى الرجوع إلى جدول تحديد
المخرجات الرقمية( .انظر الصفحة (42
يسمﺢ لك بتطبيق التحكم في المدى الديناميكي لصوت ،Dolby DigitalوDolby
،Digital Plusو.Dolby True HD
التحﻜم في المﺪﻯ
الﺪينامﻴﻜي
مزامنة ﺻوتﻴة
| ٢4
العربية
) Auto تلقاﺋي( :للتحكم في المدى الديناميكي بشكل تلقاﺋي لصوت Dolby
،TrueHDاعتما ًدا على المعلومات الموجودة في مسار صوت Dolby
.TrueHDكما أنه يقوم كذلك بتشغيل التحكم في المدى الديناميكي لصوت
Dolby Digitalو.Dolby Digital Plus
) Off ﺇيقاﻑ تشﻐﻴﻞ( :يترك المدى الديناميكي بدون ضغط ،مما يتيﺢ لك االستماع
إلى الصوت األصلي.
) On تشﻐﻴﻞ( :لتشغيل التحكم في المدى الديناميكي لكل تنسيقات Dolbyالثالﺛة.
يتم زيادة قوة األصوات الهادﺋة ويتم تقليل مستوى صوت األصوات المرتفعة.
عند تركيﺐ المنتج بتلفاز رقمي ،يتيﺢ لك ضبط تﺄخير الصوت ليزامن الصوت الفيديو.
يمكنك ضبط التﺄخير بين 0و 300مللي ﺛانية.
الشﺒﻜة
اﻷماﻥ
ﺣالة الشﺒﻜة
يتيﺢ لك التحقق مما إذا كان هناك اتصال بالشبكة وأنه تم إجراء االتصال باإلنترنت.
اتصال اﻹﻧترﻧﺖ
BD-Live
يتيﺢ لك السماﺡ بﺈجراء اتصال إنترنت لخدمة BDLiveأو حظرﻩ.
اﻹﻋﺪاﺩاﺕ اﻷﻭلﻴة
يسمﺢ لك بتشغيل إجراءات اإلعدادات األولية .للحصول على التفاصيل ،انظر الصفحة
.20
+Anynet
)(HDMI-CEC
خاصية +Anynetهي وﻇيفة مالﺋمة تعرض عمليات تشغيل مرتبطة بمنتجات
Samsungاألخرى التي تحتوي على ميزة +Anynetوتتيﺢ لك التحكم في هذﻩ
المنتجات من خالل وحدة تحكم عن بعد واحدة خاصة بتلفاز .Samsungولتشغيل
هذﻩ الوﻇيفة ،يجﺐ توصيل هذا المنتج بجهاز تلفاز Anynet+ Samsung
باستخدام كبل .HDMI
ﺇﺩارﺓ بﻴاﻧاﺕ BD
يتيﺢ لك إدارة المحتويات التي قمت بتنزيلها من خالل قرﺹ Blurayالذي يدعم
خدمة .BD-Liveيمكنك عرض معلومات حول جهاز USBالذي تستخدمه لتخزين
بيانات BD Liveبما في ذلك مساحة التخزين .يمكنك ً
أيضا حذف بيانات BD Live
وتغيير الجهاز.
يمكنك تحديد اللغة التي تفضلها للقاﺋمة التي تظهر على الشاشة ،وقاﺋمة األقراﺹ ،وﻏيرها.
•لن تظهر اللغة التي تم تحديدها ما لم تكن مدعومة على القرﺹ.
أدخل رقم PINاالفتراضي للوصول إلى وﻇيفة األمان إذا لم تقم بﺈنشاء رقم
رقم PINاالفتراضي هو ِ .0000
PINالخاﺹ بك.
تصنﻴف BDاﻷبوﻱ
ﻋاﻡ
مساو أو أعلى من التصنيفات
لمنع تشغيل أقراﺹ Blu-rayالتي تشتمل على تصنيﻒ ٍ
العمرية المحددة ما لم يتم إدخال رقم .PIN
تصنﻴف DVD
اﻷبوﻱ
لمنع تشغيل أقراﺹ DVDالتي تشتمل على تصنيﻒ أعلى من التصنيفات الرقمية
المحددة ما لم يتم إدخال رقم .PIN
تﺄمﻴﻦ YouTube
في حالة ضبط التﺄمين على ( Onتشغيل) ،يجﺐ إدخال رقم PINالستخدام الخدمة.
تﻐﻴﻴر رمز التعريف
الشخصي
قم بتغيير رقم PINالمكون من 4أرقام الستخدام وﻇاﺋﻒ األمان الخاصة بالوصول.
المنطقة الزمنﻴة
يمكنك تحديد المنطقة الزمنية المطابقة لمنطقتك.
العربية | ٢٥
0٤
اللﻐة
اﺧتﺒار الشﺒﻜة
يتيﺢ لك اختبار إعداد ( Internet Protocolبروتوكول اإلنترنت) لمعرفة ما إذا
كان يعمل بشكل صحيﺢ.
اﻹﻋﺪاﺩاﺕ
النﻈاﻡ
ﺇﻋﺪاﺩاﺕ الشﺒﻜة
الﺴلﻜﻴة
للحصول على مزيد من المعلومات حول إعدادات الشبكة ووﻇاﺋﻒ الشبكة ،انظر بدء
"الشبكات واإلنترنت" في الصفحة .26
اإلعدادات
الﺪﻋم
ترقﻴة الﺒرامﺞ
للحصول على مزيد من المعلومات حول وﻇيفة تحديﺚ البرامج ،انظر "ترقية البرامج"
في الصفحة .28
االتصال بشركة
Samsung
يوفر معلومات االتصال للحصول على المساعدة فيما يتعلق بالمنتج.
بنوﺩ اتﻔاقﻴة الخﺪمة
ﺇﻉ .ﺽ
لعرض إخالء المسﺌولية العام فيما يتعلق بمحتويات وخدمات الجهات الخارجية.
ستتم استعادة جميع اإلعدادات االفتراضية باستثناء إعدادات الشبكة .كلمة مرور األمان
االفتراضية هي .0000
الشﺒﻜاﺕ ﻭاﻹﻧترﻧﺖ
عند توصيل هذا المنتج بشبكة ،يمكنك استخدام التطبيقات والوﻇاﺋﻒ
المعتمدة على الشبكة مثل BD-LIVEوترقية برنامج المنتج من
خالل اتصال الشبكة.
تﻬﻴﺌة اتصال الشﺒﻜة الخاﺹ بﻚ
قبل البدء ،اتصل بموفر خدمة اإلنترنت لمعرفة ما إذا كان عنوان IP
ً
ﺛابتا أو ديناميكيًا .إذا كان ديناميكيًا ،فنوصيك باستخدام اإلجراء
( Automaticتلقاﺋي) الوارد أدناﻩ .إذا كان ً
ﺛابتا ،فيجﺐ استخدام
اإلجراء ( Manualيدوي) الذي يليه.
•قبل أن تبدأ ،تﺄكد أن المنتج متصل بالموجه باستخدام كابل
شبكة.
❏
) Automaticتلقاﺋي(
بدء عملية التهيﺌة ،اتبع هذﻩ الخطوات.
. ١في الشاشة الرﺋيسية ،حدد ) Settingsاﻹﻋﺪاﺩاﺕ( ,ﺛم اضغط
على الزر .E
. ٢حدد ) Networkالشﺒﻜة( ،ﺛم اضغط على الزر .E
. ٣حدد ) Wired Network Settingsﺇﻋﺪاﺩاﺕ الشﺒﻜة
الﺴلﻜﻴة( ،ﺛم اضغط على الزر .E
تظهر شاشة ( Wired Network Settingsإعدادات
الشبكة السلكية).
. ٤اضغط على الزر ► في قاﺋمة Internet Protocol
( Setupإعداد بروتوكول اإلنترنت).
استخدم الزر ▲▼ لتحديد ) Autoتلقاﺋي( ﺛم اضغط على
الزر .E
| ٢٦
العربية
Settings
Wired Network Settings
:
0
0
0
0
0
0
Display
Audio Internet Protocol Setup
\ Auto
Network
0
IP Address
: 0
System
0
Subnet Mask
: 0
Language
0
Gateway
: 0
Security
: Auto
GeneralDNS
0
0
0
: 0
Support DNS Server
> Move " Select ' Return
. ٥تحصل وﻇيفة ( Networkالشبكة) على قيم عنوان IPوقناع
الشبكة الفرعية وﻏيرها تلقاﺋيًا.
. ٦بعد أن تحصل وﻇيفة ( Networkالشبكة) على قيم الشبكة،
اضغط على الزر ) RETURNرجوﻉ( ('(.
. ٧حدد ،Network Statusﺛم اضغط على .E
يتحقق نظام المسرﺡ المنزلي من اتصال الشبكة .عند االنتهاء
من ذلك ،اضغط على الزر ) RETURNرجوﻉ( ('(.
❏
يﺪﻭﻱ
> الحصول ﻋلﻰ قﻴم ﺇﻋﺪاﺩاﺕ الشﺒﻜة <
Wired Network Settings
:
0
0
0
Display
Audio Internet Protocol Setup
Manual
\
Network
0
0
IP Address
:
System
Subnet Mask
: 255 255 255
Language
0
0
Gateway
: 0
Security
: Manual
GeneralDNS
0
0
0
: 0
Support DNS Server
> Move " Select ' Return
. ١اتبع الخطوات األربع األولى في اإلجراء Automatic
(تلقاﺋي) ،وحدد ) Manualيﺪﻭﻱ( ً
بدال من ( Autoتلقاﺋي)
في الخطوة .4
. ٢اضغط على زر السهم ▼ لالنتقال إلى حقل اإلدخال األول (IP
( Addressعنوان .(IP
. ٣استخدم أزرار األرقام بوحدة التحكم عن بُعد إلدخال األرقام.
. ٤عند االنتهاء من كل حقل ،استخدم الزر ► لالنتقال إلى الحقل
التالي على التوالي .يمكنك ً
أيضا استخدام أزرار األسهم
األخرى لالنتقال ألعلى وألسفل وللخلﻒ.
. ٥أدخل قيم عنوان ) IP Addressﻋنواﻥ (IPوSubnet
) Maskقناﻉ الشﺒﻜة الﻔرﻋﻴة( و) Gatewayالﺒوابة(.
. ٦اضغط على الزر ▼ لالنتقال إلى .DNS
. ١انقر بزر الماوﺱ األيمن على أيقونة الشبكة في أسفل يمين
سطﺢ المكتﺐ في نظام تشغيل .Windows
. ٢في القاﺋمة المنبثقة ،انقر فوق "الحالة".
. ٣في مربع الحوار الذي يظهر ،انقر فوق عالمة التبويﺐ "الدعم".
. ٤في عالمة تبويﺐ ( Supportالدعم) ،انقر على الزر
( Detailsتفاصيل) .يتم عرض إعدادات الشبكة.
•Windows 7
. ١انقر على أيقونة الشبكة في أسفل يمين سطﺢ المكتﺐ في نظام
تشغيل .Windows
. ٢في القاﺋمة المنبثقة ،انقر على Network and Sharing
( Centreمركز الشبكة والمشاركة).
. ٣في مربع الحوار المعروض ،انقر فوق Local Area
( Connectionاالتصال المحلي).
. ٤في عالمة تبويﺐ ( Supportالدعم) ،انقر على الزر
( Detailsتفاصيل) .يتم عرض إعدادات الشبكة.
| مﻼﺣﻈة |
◄ ً
وفقا إلصدار نظام تشغيل ،Windowsقد تختلﻒ المعلومات.
. ٧اضغط على الزر ▼ لالنتقال إلى حقل إدخال DNSاألول.
أدخل األرقام كما هو موضﺢ أعالﻩ.
. ٨اضغط على الزر ) RETURNرجوﻉ( (') بوحدة التحكم
عن بُعد.
. ٩حدد ) Network Statusﺣالة الشﺒﻜة( ﺛم اضغط على
.E
. ١٠تظهر شاشة ( Network Statusحالة الشبكة).
يتحقق المنتج من اتصال الشبكة ﺛم يتصل بالشبكة .عند االنتهاء
من ذلك ،حدد ) OKموافق( ﺛم اضغط على .E
| مﻼﺣﻈة |
◄ يمكنك الحصول على قيم ( Networkالشبكة) من موفر
اإلنترنت .كما يمكنك كذلك عرض هذﻩ القيم على معظم أجهزة
الكمبيوتر التي تعمل بنظام تشغيل .Windowsللحصول على
التعليمات ،يرجى االﻃالع على "الحصول على قيم إعدادات
الشبكة" في صفحة.
العربية | ٢7
اﻹﻋﺪاﺩاﺕ
Settings
•Windows XP
0٤
إذا كان لديك عنوان ً IP
ﺛابتا أو إذا لم تعمل اإلجراءات التلقاﺋية ،فﺄنت
تحتاج إلى إدخال قيم إعدادات الشبكة يدويًا.
يمكنك عرض قيم إعدادات الشبكة على معظم أجهزة الكمبيوتر التي
تعمل بنظام تشغيل .Windowsلعرض قيم إعدادات الشبكة ،اتبع
هذﻩ الخطوات:
اإلعدادات
تحﺪيﺚ الﺒرﻧامﺞ
تتيﺢ لك قاﺋمة تحديﺚ البرنامج ترقية برامج المنتج للحصول على
تحسينات األداء أو الخدمات اإلضافية.
•ال تقم أب ًدا بﺈيقاف تشغيل المنتج أو إعادة تشغيله يدويًا أﺛناء
عملية التحديﺚ.
. ١في القاﺋمة الرﺋيسية ،حدد اﻹﻋﺪاﺩاﺕ ،ﺛم اضغط على الزر
.E
. ٢حدد ) Supportالﺪﻋم( ،ﺛم اضغط على الزر .E
. ٣حدد ترقﻴة الﺒرامﺞ ،ﺛم اضغط على الزر .E
. ٤حدد أحد األساليﺐ التالية:
•ﻋﺒر االﻧترﻧﺖ
•) By USBباﺳتخﺪاﻡ (USB
•) By Discﻋﺒر القرﺹ(
•) Auto Upgrade Notificationﺇﺧطار الترقﻴة
التلقاﺋﻴة(
. ٣يظهر إﻃار تقدم التحديﺚ المنبثق .وعند اكتمال التحديﺚ ،يتم
إيقاف تشغيل المنتج مرة أخرى تلقاﺋيًا.
. ٤اضغط على الزر ) POWERتشﻐﻴﻞ( لتشغيل المنتج.
| مﻼﺣﻈة |
◄ يكتمل التحديﺚ عندما يتم إيقاف تشغيل المنتج بعد إعادة تشغيله.
اضغط على الزر ) POWERتشﻐﻴﻞ( لتشغيل المنتج الذي تم
تحديثه الستخدامك.
◄ ال تقم أب ًدا بﺈيقاف تشغيل المنتج أو تشغيله يدويًا أﺛناء عملية
التحديﺚ.
◄ ال تتحمل شركة Samsung Electronicsأي مسﺌولية
قانونية عن وجود عطل بالمنتج بسبﺐ عدم استقرار اتصال
اإلنترنت أو إهمال المستخدم أﺛناء ترقية البرنامج.
) By USBباﺳتخﺪاﻡ (USB
. ١تفضل بزيارة .www.samsung.com
. ٢انقر على ) SUPPORTالﺪﻋم( في الجزء العلوي األيسر من
الصفحة.
. ٥اضغط علي الزر .E
توجيهات لكل ﻃريقة من الطرق تبدأ أدناﻩ.
. ٣أدخل رقم ﻃراز المنتج في حقل البحﺚ ،ﺛم انقر على Find
) Productالﺒحﺚ ﻋﻦ المنتﺞ(.
◄ يكتمل التحديﺚ عندما يتم إيقاف تشغيل المنتج بعد إعادة تشغيله.
اضغط على الزر ( POWERتشغيل) لتشغيل المنتج الذي تم
تحديثه الستخدامك .ال تقم أب ًدا بتشغيل المنتج أو إيقاف تشغيله
يدويًا أﺛناء عملية التحديﺚ.
. ٥انقر على ) Firmwareالﺒرﻧامﺞ الﺜابﺖ( في الجزء األوسط
من الصفحة.
| مﻼﺣﻈة |
◄ ال تتحمل شركة Samsung Electronicsأية مسﺌولية قانونية
عن أي قصور في المنتج نتيجة عدم استقرار االتصال باإلنترنت أو
إهمال المستهلك أﺛناء ترقية البرنامج.
◄ إذا كنت ترﻏﺐ في إلغاء الترقية أﺛناء تنزيل برامج الترقية،
فاضغط على الزر .E
ﻋﺒر االﻧترﻧﺖ
. ٤انقر على ) Get downloadsالحصول ﻋلﻰ التنزيﻼﺕ( في
الجزء األوسط من الصفحة تحت العنوان Downloads
(التنزيالت).
. ٦انقر على أيقونة ) ZIPملف مﻀﻐوﻁ( في عمود ( Fileالملﻒ)
في الجزء األيمن من الصفحة.
. ٧انقر على ) OKموافق( في الشاشة المنبثقة التي تظهر لتنزيل
وحفظ ملﻒ البرنامج الثابت إلى جهاز الكمبيوتر الخاﺹ بك.
. ٨قم بفك ضغط الملﻒ المضغوط على الكمبيوتر .يجﺐ أن يكون
لديك مجل ًدا واح ًدا بنفﺲ اسم الملﻒ المضغوط.
. ٩قم بنسﺦ المجلد إلى جهاز فالﺵ .USB
يجﺐ توصيل المنتج باإلنترنت الستخدام وﻇيفة ( By Onlineعبر
اإلنترنت) .قم بﺈزالة جميع األقراﺹ قبل أن تبدأ.
. ١٠تﺄكد من عدم وجود أقراﺹ في المنتج ،ﺛم أدخل محرك أقراﺹ
USBمحمول في منفذ USBفي المنتج.
. ٢في حالة توفر التحديﺚ ،تظهر رسالة منبثقة تسﺄلك عما إذا كنت
تريد الترقية.
في حالة تحديد ( Yesنعم) ،يتم إيقاف تشغيل المنتج تلقاﺋيًا
وتشغيله ،ﺛم تبدأ الترقية.
. ١٢حدد .By USB
. ١حدد اﻹﻧترﻧﺖ ،ﺛم اضغط على الزر .Eتظهر رسالة
.Connecting to Server
| ﻫاﻡ |
ً
◄ ال تقم أبدا بتشغيل المسرﺡ المنزلي أو إيقاف تشغيله يدويًا أﺛناء
ترقية البرنامج.
| ٢٨
العربية
. ١١في قاﺋمة المنتج ،انتقل إلى اﻹﻋﺪاﺩاﺕ < الﺪﻋم < ترقﻴة
الﺒرامﺞ.
| مﻼﺣﻈة |
◄ يجﺐ أال تكون هناك أية أقراﺹ في المنتج عندما تقوم بترقية
البرنامج باستخدام قابﺲ مضيﻒ .USB
◄ ال تقم أب ًدا بﺈيقاف تشغيل المنتج أو تشغيله يدويًا أﺛناء عملية
التحديﺚ.
◄ عند االنتهاء من ترقية البرنامج ،تحقق من تفاصيل البرنامج في
القاﺋمة ترقﻴة الﺒرامﺞ.
) Auto Upgrade Notificationﺇﺧطار الترقﻴة
التلقاﺋﻴة(
. ٣لترقية البرنامج الثابت ،حدد ) Yesﻧعم( .يتم إيقاف تشغيل
المنتج تلقاﺋيًا وتشغيله ،ﺛم تبدأ الترقية.
. ٤سيظهر إﻃار تقدم التحديﺚ المنبثق .عند اكتمال التحديﺚ ،يتم
إيقاف التشغيل تلقاﺋيًا مرة أخرى.
. ٥اضغط على الزر ) POWERتشﻐﻴﻞ( لتشغيل المنتج.
| مﻼﺣﻈة |
◄ يكتمل التحديﺚ عندما يتم إيقاف تشغيل المنتج بعد إعادة تشغيله.
اضغط على الزر ) POWERتشﻐﻴﻞ( لتشغيل المنتج الذي تم
تحديثه الستخدامك .ال تقم أب ًدا بتشغيل المنتج أو إيقاف تشغيله
يدويًا أﺛناء عملية التحديﺚ.
◄ ال تتحمل شركة Samsung Electronicsأي مسﺌولية
قانونية عن وجود عطل بالمنتج بسبﺐ عدم استقرار اتصال
اإلنترنت أو إهمال المستخدم أﺛناء ترقية البرنامج.
لتنزيﻞ برﻧامﺞ AllShare
الستخدام برنامج AllShareمع الكمبيوتر ،يجﺐ تثبيت برنامج
AllShareعلى الكمبيوتر .يمكنك تنزيل برنامج الكمبيوتر
والحصول على اإلرشادات التفصيلية الستخدام برنامج AllShare
من موقع الويﺐ .Samsung.com
. ١انتقل إلى الموقع .www.samsung.com
. ٢انقر على ) Supportالﺪﻋم( في الجزء العلوي من الصفحة.
. ٣على صفحة ( Supportالدعم) ،أدخل رقم ﻃراز المشغل في
حقل ) Model Numberرقم الطراﺯ( ﺛم اضغط على الزر
.E
. ٤في الشاشة التي تظهر ،انقر فوق "الحصول ﻋلﻰ التنزيﻼﺕ" في
الجانﺐ األيمن تحت "التنزيﻼﺕ".
يظهر "مركز التنزيﻞ".
. ٥في صفحة ) Download Centreمركز التنزيﻞ( ،انقر
على عالمة التبويﺐ ) Softwareالﺒرامﺞ(.
. ٦في عالمة التبويﺐ "البرامج" ،انقر فوق الرمز "ملف" الموجود
على الجانﺐ األيمن من سطر .AllShare
. ٧في القاﺋمة المنبثقة التي تظهر ،انقر على ) Save Fileﺣﻔﻆ
ملف(.
. ٨ابحﺚ عن ملﻒ تثبيت AllShareعلى سطﺢ المكتﺐ ،ﺛم انقر
مزدوجا على الملﻒ.
نقرا
ً
ً
. ٩في القاﺋمة المنبثقة التي تظهر ،انقر على ( Runتشغيل) ﺛم اتبع
اإلرشادات التي تظهر على الشاشة.
قم بتنزيل دليل تعليمات/تثبيت AllShareمن عالمة التبويﺐ
"البرامج" ذاتها بالنقر فوق رمز ملﻒ PDFالمناﻇر في العمود
"ملﻒ" في الجانﺐ األيسر .اتبع التوجيهات لتثبيت برنامج
AllShareوإعدادﻩ .يمكنك عرض الملﻒ و/أو حفظه.
| مﻼﺣﻈة |
◄ الستخدام AllShareمع هاتفك الذكي ،يجﺐ توصيل جهازك
الموجه.
والهاتﻒ الذكي بنفﺲ
ّ
العربية | ٢٩
0٤
. ١قم بتشغيل المنتج.
. ٢في قاﺋمة ( Software Updateتحديﺚ البرنامج) ،اضبط
) Auto Upgrade Notificationﺇﺧطار الترقﻴة
التلقاﺋﻴة( على ) Onتشﻐﻴﻞ(.
في حالة توفر إصدار جديد للبرنامج ،سيخطرك المنتج برسالة
منبثقة.
يتيﺢ لك برنامج AllShareإمكانية تشغيل ملفات الموسيقى والفيديو
والصور في الكمبيوتر باستخدام المنتج .الستخدام ،AllShareيجﺐ
توصيل المنتج بالكمبيوتر عبر الشبكة (انظر صفحة )20وقم بتثبيت
PC Share Managerمن .SAMSUNG
اﻹﻋﺪاﺩاﺕ
ً
متصال بالشبكة وقمت بضبط Auto Upgrade
إذا كان المنتج
( Notificationإخطار الترقية التلقاﺋية) على تشغيل ،فسيخطرك
متوفرا مع رسالة
المنتج بما إذا كان هناك إصدار جديد للبرنامج
ً
منبثقة.
ﺇﻋﺪاﺩ AllShare
تشغيل الوساﺋط
اﺳتخﺪاﻡ ﺧﺪماﺕ ﻭﺳاﺋﻂ الﺒﺚ
أﻭ
. ٤اضغط على الزر ) BLUEأﺯرﻕ( ).(D
١-
•الستخدام خدمات وساﺋط البﺚ ،يجﺐ توصيل المسرﺡ المنزلي
باإلنترنت .قد تحتاج ً
مورد لبعﺾ الخدمات.
أيضا إلى حساﺏ ّ
™
استخدم األزرار ▲▼►◄ في القاﺋمة ( Homeالرﺋيسية) لالنتقال
إلى الخدمة المطلوبة ،ﺛم اضغط على الزر .E
USB DISK
.YouTubeيمكنك عرض الفيديو الذي تم بثه
HD Movies
بواسطة CinemaNow .YouTube
®
PANDORA
™
internet radio
d HOME " Enter
تشﻐﻴﻞ ملﻔاﺕ ﻋلﻰ جﻬاﺯ USB
يمكنك تشغيل ملفات الوساﺋط المتعددة الموجودة على جهاز USB
متصل.
. ١انتقل إلى القاﺋمة ( Homeالرﺋيسية).
. ٢في وضع ( Stopاإليقاف) ،قم بتوصيل جهاز تخزين USB
بمنفذ USBالموجود باللوحة األمامية للمنتج .سيتم عرض
الرسالة "Do you want to access the
( "?deviceهل تريد الوصول إلى الجهاز؟).
. ٣اضغط على الزر ◄► لتحديد ) Yesﻧعم( ،ﺛم اضغط على
الزر .E
).(A
. ٤اضغط على الزر ) REDأﺣمر( ) (
USB DISK
.١-٥اضغط على الزرين ▲▼ لتحديد USB Flash Mem
(ذاكرة )USB Flashأو ( Diskالقرﺹ) ﺛم اضغط على
الزر .E
.١-٦اضغط على الزرين ▲▼ لتحديد ) Videosملﻔاﺕ الﻔﻴﺪيو(
أو ) Musicالموﺳﻴقﻰ( أو ) Photosالصور( ،ﺛم اضغط
على الزر .E
.١-7إذا ﻇهرت الملفات على الشاشة فانتقل إلى الخطوة .١-٨وإذا
ﻇهرت المجلدات على الشاشة ،فاستخدم الزرين ▲▼ لتحديد
مجلد ،واضغط على Eﺛم انتقل إلى الخطوة .١-٨
.١-٨استخدم الزرين ▲▼ لتحديد ملﻒ لتشغيله أو عرضه ،ﺛم
اضغط على الزر .E
| مﻼﺣﻈة |
™
◄ لمنع أي تلﻒ محتمل لذاكرة ،USBيجﺐ إزالة جهاز تخزين
USBبﺄمان باستخدام وﻇيفة "ﺇﺯالة USBبﺄماﻥ" .اضغط على
الزر منزل لالنتقال إلى القاﺋمة الرﺋيسية ،ﺛم اضغط على الزر
أﺻﻔر )ﺝ( ،ﺛم اضغط على الزر .E
CD
USB DISK
Safely Remove USB d View Devices " Enter
USB DISK a Change Device
. ٥اضغط على الزرين ▲▼ لتحديد USB Flash Mem
(ذاكرة )USB Flashأو ( Diskالقرﺹ) ﺛم اضغط على
الزر .E
. ٦اضغط على الزرين ►◄ لتحديد ) Videosملﻔاﺕ الﻔﻴﺪيو(
أو ) Musicالموﺳﻴقﻰ( أو ) Photosالصور( ،ﺛم اضغط
على الزر .E
. ٧إذا ﻇهرت الملفات على الشاشة ،فانتقل إلى الخطوة .8وإذا
ﻇهرت مجلدات الملفات على الشاشة ،فاستخدم الزرين ▲▼
لتحديد مجلد ،واضغط على ،Eﺛم انتقل إلى الخطوة .8
. ٨استخدم الزرين ▲▼ لتحديد ملﻒ لتشغيله أو عرضه ،ﺛم
اضغط على الزر .E
| ٣٠
العربية
◄ لالستماع إلى الملفات الموسيقية بصوت القناة 5.1يجﺐ ضبط
وضع Dolby Pro Logic IIعلى ( MATRIXمصفوفة).
(انظر الصفحة (36
تشﻐﻴﻞ قرﺹ يحتوﻱ ﻋلﻰ محتوياﺕ مﺴﺠلة مﻦ قﺒﻞ
المﺴتخﺪﻡ
. ٣بعد تحميل القرﺹ ،اضغط على الزر ) REDأﺣمر( ).(A
. ٤اضغط على الزرين ▲▼ لتحديد ( CDقرﺹ مضغوط) أو
،DVDﺛم اضغط على الزر .E
. ٥اضغط على الزرين ►◄ لتحديد ) Videosملﻔاﺕ الﻔﻴﺪيو(
أو ) Musicالموﺳﻴقﻰ( أو ) Photosالصور( ،ﺛم اضغط
على الزر .E
. ٦إذا ﻇهرت الملفات على الشاشة ،فانتقل إلى الخطوة .7
إذا ﻇهرت المجلدات على الشاشة ،فاستخدم الزرين ►◄
لتحديد مجلد واضغط على ،Eﺛم انتقل إلى الخطوة .7
. ٧استخدم الزرين ►◄ لتحديد ملﻒ لتشغيله أو عرضه ،ﺛم
اضغط على الزر .E
أﻭ
.١-٣بعد تحميل القرﺹ ،اضغط على الزر ) BLUEأﺯرﻕ( ).(D
.١-٤اضغط على الزر ►◄ لتحديد ) CDقرﺹ مﻀﻐوﻁ( أو
،DVDﺛم اضغط على الزر .E
.١-٥اضغط على الزرين ▲▼ لتحديد ) Videosملﻔاﺕ الﻔﻴﺪيو(
أو ) Musicالموﺳﻴقﻰ( أو ) Photosالصور( ،ﺛم اضغط
على الزر .E
.١-٦إذا ﻇهرت الملفات على الشاشة ،فانتقل إلى الخطوة .١-7
إذا ﻇهرت مجلدات الملفات على الشاشة ،فاستخدم الزرين
▲▼ لتحديد مجلد واضغط على ،Eﺛم انتقل إلى الخطوة
.١-7
.١-7استخدم الزرين ▲▼ لتحديد ملﻒ لتشغيله أو عرضه ،ﺛم
اضغط على الزر .E
| مﻼﺣﻈة |
◄ لمزيد من المعلومات حول تشغيل ملفات الفيديو ،انتقل إلى "التحكم
في تشغيل الفيديو" صفحة .32
ً
مﺴﺒقا
تشﻐﻴﻞ قرﺹ ﺻوﺕ تﺠارﻱ مﺴﺠﻞ
ً
مضغوﻃا ( )CD-DAأو قرﺹ MP3في
. ١أدخل قرﺹ صوت
درج األقراﺹ.
•بالنسبة لقرﺹ الصوت المضغوط ( ،)CD-DAسيتم تشغيل
المادة المسجلة األولى تلقاﺋيًا .يتم تشغيل المواد المسجلة على
القرﺹ بترتيﺐ تسجيلها عليه.
•بالنسبة لقرﺹ ،MP3اضغط على الزرين ◄► لتحديد
) Musicموﺳﻴقﻰ( ،ﺛم اضغط على الزر .E
1/12
Playlist
05:57
TRACK 001
04:27
TRACK 002
04:07
TRACK 003
03:41
TRACK 004
03:17
TRACK 005
00:08 / 05:57
+
TRACK 006
03:35
' Return
TRACK 001
Tools
s Pause
. ٢لتشغيل مسار معين ،استخدم الزرين ▲▼ في وحدة التحكم عن
بعد لتحديد المسار ،ﺛم اضغط على .E
| مﻼﺣﻈة |
◄ للحصول على مزيد من المعلومات حول تشغيل الموسيقى ،انتقل إلى
"التحكم في تشغيل الموسيقى" في الصفحة .34
العربية | ٣١
0٥
. ١قم بتشغيل المسرﺡ المنزلي.
قرصا سجله المستخدم في درج
. ٢افتﺢ درج األقراﺹ وضع ً
األقراﺹ مع توجيه ملصق القرﺹ ألعلى ﺛم أﻏلق الدرج.
قرصا في درج األقراﺹ بحيﺚ يكون الملصق الموجود على
ضع ً
القرﺹ مواجهًا ألعلى ،ﺛم قم بﺈﻏالق الدرج .يبدأ التشغيل بشكل
تلقاﺋي .يبدأ التشغيل تلقاﺋيًا .إذا لم يتم التشغيل تلقاﺋيًا ،فانتقل إلى
) Videosملﻔاﺕ الﻔﻴﺪيو( في القاﺋمة ( Homeالرﺋيسية) واضغط
على الزر .E
في أﻏلﺐ الحاالت ،تعرض ملفات الفيديو التجارية قاﺋمة القرﺹ.
لتشغيل الفيلم على القرﺹ ،حدد ) Playتشﻐﻴﻞ( على قاﺋمة القرﺹ
ﺛم اضغط على .E
تشﻐﻴﻞ الوﺳاﺋﻂ
يمكنك تشغيل ملفات الوساﺋط المتعددة التي قمت بتسجيلها على
أقراﺹ DVDأو .CD
تشﻐﻴﻞ أقراﺹ الﻔﻴﺪيو التﺠارية
تشغيل الوساﺋط
FUNCTION
التحﻜم في تشﻐﻴﻞ الﻔﻴﺪيو
MUTE
+
VOLUME
-
يمكنك التحكم في تشغيل ملفات الفيديو الموجودة على أقراﺹ Blu-rayو DVDو CDوأجهزة تخزين ً .USB
وفقا للقرﺹ ،قد ال تتاﺡ بعﺾ
الدليل2 .
1
الوﻇاﺋﻒ الموضحة في هذا 3
التحﻜم 4
ﻭﺣﺪﺓ 5
اﻷﺯرار الموجوﺩﺓ في 6
ﻋﻦ بعﺪ ﻭالمﺴتخﺪمة لتشﻐﻴﻞ الﻔﻴﺪيو
8
9
TITLE MENU
7
DISC MENU
0
POPUP
HOME
REPEAT
اﻷﺯرار ﺫاﺕ الصلة بالتشﻐﻴﻞ
RETURN
EXIT
ً
التشغيل البطيء أو
وضع البحﺚ أو
صوتا أﺛناء
ال يُصدر المنتج
TUNER
الحركة المرحلية.
MEMORY MO/ST
D
C
B
6
لبدء التشغيل.
5
إليقاف التشغيل.
7
إليقاف التشغيل ً
مﺆقتا.
TUNING
UP
DOWN
قاﺋمة اﻷقراﺹ أﻭ أﺛناء التشغيل ،اضغط على هذا الزر لعرض
قاﺋمة العناﻭيﻦ قاﺋمة العناوين.
SOUND
EFFECT
.
أو
في وضع اإليقاف المﺆقت ،اضغط على الزر
.
التشﻐﻴﻞ بالحركة
في كل مرة يتم فيها الضغط على الزر
الﺒطﻴﺌة
تتغير سرعة التشغيل.
في وضع اإليقاف المﺆقت ،اضغط على الزر
.
التشﻐﻴﻞ بالحركة
المرﺣلﻴة
في كل مرة يتم فيها الضغط على الزر
يظهر إﻃار جديد.
أو .
أﺛناء التشغيل ،اضغط على الزر
أو
تخطي التشﻐﻴﻞ في كل مرة يتم فيها الضغط على الزر
بالحركة الﺒطﻴﺌة
ينتقل القرﺹ إلى الفصل أو الملﻒ السابق
أو التالي.
| ٣٢
قاﺋمة العناﻭيﻦ
أﺛناء التشغيل ،اضغط على هذا الزر لعرض
قاﺋمة العناوين.
•إذا كان القرﺹ الخاﺹ بك يحتوي على
قاﺋمة تشغيل ،فاضغط على الزر أﺧﻀر )ﺏ(
لالنتقال إلى قاﺋمة التشغيل.
أﺛناء التشغيل ،اضغط على هذا الزر لعرض
القاﺋمة المنﺒﺜقة
القاﺋمة المنبثقة.
A
أو
التشﻐﻴﻞ بالحركة أﺛناء التشغيل ،اضغط على الزر
في كل مرة يتم فيها الضغط على الزر
الﺴريعة
تتغير سرعة التشغيل.
العربية
قاﺋمة اﻷقراﺹ
أﺛناء التشغيل ،اضغط على هذا الزر لعرض
قاﺋمة األقراﺹ.
SUBTITLE
TOOLS
INFO
اﺳتخﺪاﻡ قاﺋمة اﻷقراﺹ ،ﻭقاﺋمة العناﻭيﻦ ،ﻭالقاﺋمة المنﺒﺜقة،
ﻭالﺋحة العناﻭيﻦ
اﺳتخﺪاﻡ قاﺋمة اﻷﺩﻭاﺕ
ﻭقﺖ التشﻐﻴﻞ
حدد هذا الخيار لالنتقال إلى نقطة التشغيل
المحددة .استخدم األزرار الرقمية إلدخال
نقطة التشغيل.
مﻞء الشاﺷة
حدد هذا الخيار لضبط حجم ملء الشاشة
المطلوﺏ .يمكنك تحديد أصلي ،وضع1
(كبير) ،ووضع ( 2أكبر).
ﻭﺿع الصورﺓ
حدد هذا الخيار لتعيين وضع الصورة.
ﻭﺿع الصورﺓ▪ ) Normalﻋاﺩﻱ( :اختر هذا اإلعداد
ألكثر التطبيقات مشاهدة.
▪ أفﻼﻡ :يعد هذا اإلعداد أفضل إعداد
لمشاهدة األفالم.
▪ المﺴتخﺪﻡ :يمكنك ضبط وﻇاﺋﻒ الحدة
وتقليل الضوضاء بالتتابع.
▪ ﺩينامﻴﻜي :اختر هذا اإلعداد لزيادة
الحدة.
0٥
العنواﻥ
إذا كان للفيلم أو للفيديو أكثر من عنوان،
فانتقل إلى العنوان المطلوﺏ أو حددﻩ.
الﻔصﻞ
حدد هذا الخيار لالنتقال إلي الفصل الذي
ترﻏﺐ في مشاهدته.
تﻜرار
حدد هذا اإلعداد لتكرار عنوان أو فصل
محدد (أقراﺹ BD/DVDفقط) أو قسم
محدد.
ﺻوﺕ
حدد هذا الخيار لتعيين لغة الصوت
المطلوبة.
يمكنك ًأيضا تشغيل هذﻩ الوﻇيفة
بالضغط على الزر ﺻوﺕ في وحدة
التحكم عن بعد.
تشﻐﻴﻞ الوﺳاﺋﻂ
أﺛناء التشغيل ،اضغط على الزر أﺩﻭاﺕ.
القاﺋمة التي تﻈﻬر فقﻂ ﻋنﺪ تشﻐﻴﻞ قرﺹ BD/DVD
الترجمة
حدد هذا الخيار لتعيين لغة الترجمة
المطلوبة.
يمكنك ًأيضا تشغيل هذﻩ الوﻇيفة
بالضغط على الزر ترجمة مصاحبة في
وحدة التحكم عن بعد.
الزاﻭية
لعرض مشهد من زاوية أخرى .يعرض
خيار "الزاوية" عدد الزوايا المتاحة للعرض
( ،3/1 ،2/1 ،1/1إلﺦ.).
فﻴﺪيو
حدد لتعيين خيار bonusviewالمرﻏوﺏ
/ BONUSVIEW
ﺻوﺕ BONUSVIEWفيه.
)أقراﺹ BDفقﻂ(
| مﻼﺣﻈة |
◄ ً
وفقا لنوع القرﺹ أو جهاز التخزين ،قد تختلﻒ قاﺋمة "أدوات" .قد
ال يتم عرض كل الخيارات.
ﺇﻧشاء قاﺋمة تشﻐﻴﻞ فﻴﺪيو
يمكنك إنشاء قاﺋمة تشغيل ملفات الفيديو بطريقة مطابقة تقريبًا لطريقة
إنشاء قاﺋمة تشغيل ملفات الموسيقى .لمعرفة اإلرشادات ،راجع "إنشاء
قاﺋمة تشغيل الموسيقى" صفحة .34
العربية | ٣٣
تشغيل الوساﺋط
التحﻜم في تشﻐﻴﻞ الموﺳﻴقﻰ
ﺇﻧشاء قاﺋمة تشﻐﻴﻞ موﺳﻴقﻰ
يمكنك التحكم في تشغيل محتوى الموسيقى الموجود على أقراﺹ
DVDواألقراﺹ المضغوﻃة وأجهزة تخزين .USB
اﻷﺯرار الموجوﺩﺓ في ﻭﺣﺪﺓ التحﻜم ﻋﻦ بعﺪ ﻭالمﺴتخﺪمة
لتشﻐﻴﻞ الموﺳﻴقﻰ
- +
FUNCTION
VOLUME
MUTE
3
2
1
6
5
4
8
9
TITLE MENU
0
POPUP
1
6
. ١في حالة تشغيل الموسيقى من قرﺹ مضغوط أو قرﺹ DVD
تجاري ،اضغط على الزر
أو ) RETURNرجوﻉ(
('(.
تظهر شاشة ( Music Listقاﺋمة الموسيقى) .في حالة إنشاء
قاﺋمة تشغيل من الموسيقى على قرﺹ قام بﺈنشاﺋه المستخدم أو
جهاز ،USBفقم بالوصول إلى ( Music listقاﺋمة
الموسيقى) كما هو موضﺢ في "تشغيل الملفات على جهاز
"USBصفحة 29أو "تشغيل قرﺹ يشتمل على محتوى
سجله المستخدم" صفحة .30
. ٢اضغط على األزرار ▲▼◄► لالنتقال إلى الملﻒ المطلوﺏ
ﺛم اضغط على الزر ) YELLOWأﺻﻔر( ) (Cلتحديدﻩ .كرر
هذا اإلجراء لتحديد الملفات اإلضافية.
7
DISC MENU
5
2
REPEAT
HOME
2 files selected 1/2 Page
SUBTITLE
4
3
INFO
TRACK 002
TRACK 001
TRACK 004
TRACK 003
00:04:27
00:03:41
TOOLS
1
UP
DOWN
EFFECT
2
الزر
:إيقاف المسار ً
مﺆقتا.
3
الزر
:لتشغيل المسار المحدد حاليًا.
4
الزر
:إليقاف مسار.
5
أو
) Skipتخطي( :أﺛناء التشغيل ،اضغط على الزر
لالنتقال إلى ملﻒ الموسيقي السابق أو التالي المدرج.
6
أزرار اﻷرقاﻡ :أﺛناء تشغيل قاﺋمة التشغيل ،اضغط على
رقم المسار المطلوﺏ .يتم تشغيل المسار المحدد.
00:04:07
TRACK 006
TRACK 008
TRACK 007
TRACK 010
TRACK 009
00:03:49
00:03:45
' Return
00:05:57
TRACK 005
00:03:35
التشﻐﻴﻞ الﺴريع )اﻷقراﺹ المﺪمﺠة الصوتﻴة )(CD-DA
فقﻂ(
RETURN
EXIT
أو .
أﺛناء التشغيل ،اضغط على الزر
TUNER
MEMORY MO/ST
أو ،تتغير
على الزر
الضغط
يتم فيها
في كل مرة
A
B
C
D
TUNING
SOUND
سرعة التشغيل.
TRACK 002
Music
00:03:17
00:03:47
00:03:53
Select Jump page
CD
. ٣إلزالة فيلم من قاﺋمة التشغيل ،انتقل إلى الملﻒ ﺛم اضغط على
الزر ) YELLOWأﺻﻔر( ).(C
. ٤اضغط على الزر Eلتشغيل الملفات المحددة.
تظهر شاشة ( Playlistقاﺋمة التشغيل).
. ٥لالنتقال إلى ( Music Listقاﺋمة الموسيقى) ،اضغط على
أو ) RETURNرجوﻉ( ('(.
. ٦للرجوع إلى ( Playlistقاﺋمة التشغيل) ،اضغط على الزر
.E
) Repeating Tracksتﻜرار المواﺩ المﺴﺠلة(
| مﻼﺣﻈة |
. ١أﺛناء تشغيل الموسيقى ،اضغط على الزر ) TOOLSأﺩﻭاﺕ(.
◄ في حالة االنتقال إلى ( Music Listقاﺋمة الموسيقى) من
( Playlistقاﺋمة التشغيل) ﺛم ارجع إلى قاﺋمة التشغيل ،سيتم
تشغيل قاﺋمة التشغيل مرة أخرى من البداية.
يمكنك ضبط المنتج لتكرار المواد المسجلة.
. ٢استخدم الزر ►◄ لتحديد ) Offﺇيقاﻑ( أو ) Trackماﺩﺓ
مﺴﺠلة( أو ) Oneﻭاﺣﺪﺓ( أو ) Allالﻜﻞ( أو Shuffle
)تﺒﺪيﻞ ﻋشواﺋي( في ) Repeat Modeﻭﺿع التﻜرار( ﺛم
اضغط على الزر .E
| ٣4
العربية
◄ يمكنك إنشاء قاﺋمة تشغيل تحتوي على ما يصل إلى 99مادة
مسجلة على أقراﺹ الصوت المضغوﻃة (.(CD-DA
التحﻜم في تشﻐﻴﻞ الصور
أﺛناء التشغيل ،اضغط على الزر أﺩﻭاﺕ.
بﺪء ﻋرﺽ
الشراﺋﺢ
حدد هذا الخيار لبدء عرض الشراﺋﺢ.
ﺳرﻋة ﻋرﺽ
الشراﺋﺢ
حدد هذا الخيار لضبط سرعة عرض
الشراﺋﺢ.
موﺳﻴقﻰ الخلﻔﻴة
حدد هذا الخيار لالستماع إلى الموسيقى أﺛناء
تشغيل عرض الشراﺋﺢ.
التصﻐﻴر/التﻜﺒﻴر
حدد هذا الخيار لتكبير الصورة الحالية( .يتم
التكبير ﺡتى 4أضعاف)
تﺪﻭير
حدد هذا الخيار لتدوير الصورة( .سيعمل هذا
الخيار على تدوير الصورة إما في نفﺲ اتجاﻩ
عقارﺏ الساعة أو عكﺲ اتجاﻩ عقارﺏ
الساعة).
معلوماﺕ
لعرض معلومات الصورة بما في ذلك االسم
والحجم وﻏيرها.
| مﻼﺣﻈة |
◄ ً
وفقا لنوع القرﺹ أو جهاز التخزين ،قد تختلﻒ قاﺋمة "أدوات" .قد
ال يتم عرض كل الخيارات.
◄ لتمكين وﻇيفة موسيقى الخلفية ،يجﺐ أن يكون ملﻒ الصورة في
نفﺲ وسيطة التخزين التي بها ملﻒ الموسيقى.
ومع ذلك ،قد تتﺄﺛر جودة الصوت بمعدل البت الخاﺹ بملﻒ
MP3وحجم الصورة وﻃريقة الترميز.
ﺇﻧشاء قاﺋمة تشﻐﻴﻞ ﺻور
يمكنك إنشاء قاﺋمة تشغيل الصور بطريقة مطابقة تقريبًا لطريقة إنشاء
قاﺋمة تشغيل ملفات الموسيقى .لمعرفة اإلرشادات ،راجع "إنشاء قاﺋمة
تشغيل الموسيقى" صفحة .34
. ١اضغط على زر الوﻇﻴﻔة لتحديد .FM
. ٢ضبط المحطة المطلوبة.
لتحديد ﺇﻋﺪاﺩ
•الضبط المسﺐق :1اضغط علي الزر
مﺴﺒق ،ﺛم اضغط علي الزر ﺿﺒﻂ/قناﺓ ((UP, DOWN
لتحديد المحطة المعدة ً
مسبقا.
قبل أن تتمكن من الضبط على محطة معدة ًمسبقا ،يجﺐ
إضافة محطات معدة ً
مسبقا إلى ذاكرة المنتج.
لتحديد يﺪﻭﻱ ،ﺛم
•الضبط اليدوي :اضغط علي الزر
اضغط علي الزر ﺿﺒﻂ/قناﺓ ( )UP, DOWNللضبط
حسﺐ التردد األكبر أو األقل.
الختيار يﺪﻭﻱ ،ﺛم
•الضبط التلقاﺋي :اضغط علي الزر
اضغط مع االستمرار علي الزر ﺿﺒﻂ/قناﺓ
( )UP, DOWNللبحﺚ تلقاﺋيًا في النطاق.
ﺇﻋﺪاﺩ أﺣاﺩﻱ/اﺳتريو
اضغط على الزر .MO/ST
•في كل مرة يتم فيها الضغط على الزر ،يتم تبديل الصوت بين
اﺳتريو و أﺣاﺩﻱ.
•في المناﻃق ضعيفة االستقبال ،حدد أﺣاﺩﻱ للحصول علي بﺚ
واضﺢ وخال من التشويﺶ.
ً
مﺴﺒقا
المحطاﺕ المﻀﺒوﻃة
مثال :ضبط التردد ً FM 89.10
مسبقا في الذاكرة.
. ١اضغط على زر الوﻇﻴﻔة لتحديد .FM
. ٢اضغط علي الزر ﺿﺒﻂ/قناﺓ ( )UP, DOWNلتحديد
>.<89.10
. ٣اضغط علي الزر ﺫاكرﺓ الموالف.
•تومﺾ رسالة "الرقم" علي الشاشة.
. ٤اضغط علي الزر ﺫاكرﺓ الموالف مرة أخرى.
•اضغط علي الزر ﺫاكرﺓ الموالف قبل اختفاء رسالة "الرقم"
من الشاشة تلقاﺋيًا.
•بعد الضغط على الزر ﺫاكرﺓ الموالف ،ستختفي رسالة
"الرقم" من الشاشة ويتم تخزين المحطة في الذاكرة.
. ٥لضبط محطة أخرى ً
مسبقا ،كرر الخطوات من 2إلى .4
•للضبط على محطة مضبوﻃة ً
مسبقا ،اضغط علي الزر
ﺿﺒﻂ/قناﺓ (.(UP, DOWN
العربية | ٣٥
تشﻐﻴﻞ الوﺳاﺋﻂ
اﺳتخﺪاﻡ قاﺋمة اﻷﺩﻭاﺕ
اﺳتخﺪاﻡ اﻷﺯرار الموجوﺩﺓ في ﻭﺣﺪﺓ التحﻜم ﻋﻦ بعﺪ
0٥
يمكنك التحكم في تشغيل الصور الموجودة على أقراﺹ DVD
واألقراﺹ المضغوﻃة وأجهزة تخزين .USB
االﺳتماﻉ ﺇلﻰ الراﺩيو
تشغيل الوساﺋط
اﺳتخﺪاﻡ أﺯرار التﺄﺛﻴراﺕ الخاﺻة بوﺣﺪﺓ التحﻜم ﻋﻦ
بعﺪ
ﻭﻇﻴﻔة تﺄﺛﻴر الصوﺕ
تﺄﺛﻴر
الصوﺕ
ي ّ
ُمكنك من تحديد أي وضع من أجل تحسين الصوت.
) MP3 ENHANCERﻭﺣﺪﺓ تحﺴﻴﻦ (MP3
) SMART SOUNDالصوﺕ الﺬكي( POWER
) BASSتحﺴﻴﻦ الصوﺕ( ) OFF ﺇيقاﻑ(
• محﺴﻦ :MP3يساعد على تعزيز تجربتك الصوتية (على
سبيل المثال ،موسيقى .)mp3كما يمكنك ترقية مستوى صوت
( MP3يبلﻎ 24كيلوهرتز 8 ،بت) إلى مستوى صوت قرﺹ
مضغوط (يبلﻎ 44,1كيلو هرتز 16 ،بت).
• ) SMART SOUNDالصوﺕ الﺬكي( :لتنظيم وموازنة
مستوى الصوت ،مما يحول دون حدوﺙ تغيرات شديدة في
مستوى الصوت عند تغيير القنوات أو أﺛناء االنتقال من مشهد
ﻵخر.
• :Power Bassيعمل على زيادة مستوى صوت النغمات
كما يدعم مﺆﺛرات صوت ّ
دوي مكتوم.
• ﺇيقاﻑ :حدد لالستماع إلى الصوت العادي.
ﻭﻇﻴﻔة Dolby Pro Logic II
يمكنك تحديد وضع صوت Dolby Pro Logic IIالمطلوﺏ.
• أفﻼﻡ :إلضافة الواقعية إلى مسار صوت الفيلم.
• موﺳﻴقﻰ :عند االستماع إلى الموسيقى ،يمكنك تجربة تﺄﺛيرات
الصوت وكﺄنك تستمع إلى األداء الفعلي.
• :MATRIXحدد لسماع صوت محيطي متعدد القنوات.
• :PROLOGحدد لسماع مصدر صوت 2CHبصوت
محيطي 5.1CHبتفعيل جميع السماعات.
قد ال تُصدر سماعة (سماعات) معينة ًصوتا اعتما ًدا على إشارة
اإلدخال.
| ٣٦
العربية
اﺳتخﺪاﻡ ™BD-LIVE
. ١قم بتوصيل المنتج بالشبكة( .انظر الصفحة (19
. ٢قم بتهيﺌة إعدادات الشبكة( .انظر صفحتي (27~26
بمجرد توصيل المنتج بالشبكة ،يمكنك االستمتاع بمحتويات خدمات
متنوعة ذات صلة باألفالم المتاحة على األقراﺹ المتوافقة مع
.BD-LIVE
. ١قم بتوصيل وحدة ذاكرة USBبمقبﺲ USBفي الجهة
األمامية للمنتج ،ﺛم استخدم BD Data Management
(إدارة بيانات )BDللتحقق من الذاكرة المتبقية .يجﺐ أن
يحتوي جهاز الذاكرة على 1جيجا بايت على األقل من
المساحة الخالية الستيعاﺏ خدمات .BD-LIVE
. ٢حدد ) Settingsاﻹﻋﺪاﺩاﺕ( في الشاشة الرﺋيسية ،ﺛم اضغط
على الزر .E
. ٣حدد ) Systemالنﻈاﻡ( ،ﺛم اضغط على الزر .E
. ٤حدد ) BD Data Managementﺇﺩارﺓ بﻴاﻧاﺕ ،(BDﺛم
اضغط على الزر .E
. ٥حدد ) Change Deviceتﻐﻴﻴر الﺠﻬاﺯ( ،ﺛم اضغط على
الزر .E
. ٦حدد ،USBﺛم اضغط على الزر .E
. ٧أدخل قرﺹ Blu-rayيدعم .BD-LIVE
عنصرا من قاﺋمة خدمة BD-LIVEالمتنوعة المتوفرة من
. ٨حدد
ً
قبل مصنع القرﺹ.
| مﻼﺣﻈة |
◄ قد تختلﻒ الطريقة التي تستخدم بها BD-LIVEوالمحتويات
المتوفرةً ،
وفقا لمصنع القرﺹ.
اﺳتخﺪاﻡ AllShare
0٥
يتيﺢ لك برنامج AllShareالوصول إلى الملفات الموجودة على
الكمبيوتر وتشغيلها من خالل نظام المسرﺡ المنزلي.
اتبع التوجيهات الواردة في دليل مستخدم AllShareإلعداد برنامج
AllShareعلى الكمبيوتر ووضع عالمات على المجلدات والملفات
التي تريد مشاركتها مع نظام المسرﺡ المنزلي.
تشﻐﻴﻞ الوﺳاﺋﻂ
للوصول إلى الملفات الموجودة على الكمبيوتر وتشغيلها بعد إعداد
برنامج ،AllShareاتبع هذﻩ الخطوات:
. ١قم بتشغيل الكمبيوتر والتليفزيون ونظام المسرﺡ المنزلي.
. ٢تﺄكد من تشغيل خادم AllShareالمشترك على الكمبيوتر.
. ٣اضغط على الزر ) BLUEأﺯرﻕ( )( (Dعرض األجهزة)
بالمسرﺡ المنزلي.
. ٤استخدم زر السهم األيسر أو األيمن لتحديد الكمبيوتر في
( Device Listقاﺋمة الجهاز).
. ٥حدد نوع الملﻒ الذي تريد عرضه أو تشغيله ،من بين
( Videosملفات الفيديو) أو ( Photosالصور) أو Music
(الموسيقى) ،ﺛم اضغط على .E
. ٦استخدم الزر ►◄ لتحديد المجلد الذي يحتوي على نوع
الملفات التي حددتها ﺛم اضغط على .Eيتم عرض File
( Listقاﺋمة الملفات).
. ٧حدد الملﻒ الذي تريد عرضه أو تشغيله ،ﺛم اضغط على .E
| مﻼﺣﻈة |
◄ يمكنك إنشاء قواﺋم تشغيل من الملفات الموجودة على الكمبيوتر
بنفﺲ الطريقة التي تتبعها إلنشاء قواﺋم تشغيل من الملفات
الموجودة على أجهزة USBأو األقراﺹ.
◄ مع استثناءات قليلة ،يمكنك التحكم في تشغيل الملفات على
الكمبيوتر بنفﺲ األسلوﺏ المتبع للتحكم في تشغيل الملفات على
أجهزة USBواألقراﺹ.
◄ يمكنك ً
أيضا الوصول إلى الملفات الموجودة على الكمبيوتر من
خالل تحديد ( Videosملفات الفيديو) أو ( Photosالصور) أو
( Musicالموسيقى) على الشاشة ( Homeالرﺋيسية) ً
أوال ﺛم
تحديد الكمبيوتر من قاﺋمة األجهزة التي يتم عرضها.
العربية | ٣7
الملحق
المعلوماﺕ اﻹﺿافﻴة
الﺣﻆ
HDMI OUT
التوﺻﻴﻼﺕ
• ً
وفقا لنوع التلفاز الخاﺹ بك ،قد ال تعمل بعﺾ درجات الدقة الخاصة بﺈخراجات .HDMI
•يجﺐ أن يتوافر لديك اتصال HDMIلالستمتاع بالفيديو مع تقنية األبعاد الثالﺛية.
•يمكن أن يتسبﺐ كابل HDMIالطويل في حدوﺙ ضوضاء على الشاشة .إذا حدﺙ ذلك ،فقم بتعيين الخيار لوﻥ
HDMIالﻐامق على ﺇيقاﻑ في القاﺋمة.
( 3D Settingsاإلعدادات ﺛالﺛية األبعاد)
مرة
•بالنسبة لبعﺾ األقراﺹ ﺛالﺛية األبعاد ،إليقاف الفيلم أﺛناء التشغيل ﺛالﺛي األبعاد ،اضغط على الزر
واحدة .يتوقﻒ الفيلم ويتم تعطيل الوضع ﺛالﺛي األبعاد.
مرة واحدة .تظهر قاﺋمة
لتغيير خيار ﺛالﺛي األبعاد عند تشغيل فيلم ﺛالﺛي األبعاد ،اضغط على الزر
.Blu-rayاضغط على الزر
مرة أخرى ،ﺛم حدد اإلعدادات ﺛالﺛية األبعاد في قاﺋمة .Blu-ray
• ً
وفقا لمحتوى ووضع الصورة في شاشة التلفاز ،يمكنك رﺅية أعمدة سوداء رأسية على الجانﺐ األيسر ،أو
األيمن ،أو على كال الجانبين.
( TV Aspectنسبة عرض إلى ارتفاع التلفاز)
•اعتما ًدا على نوع القرﺹ ،قد ال تكون بعﺾ نسﺐ العرض إلى االرتفاع متاحة.
•إذا قمت باختيار نسبة عرض إلى ارتفاع وخيار مختلﻒ عن نسبة العرض إلى االرتفاع الخاصة بشاشتك ،فﺈن
الصور قد تظهر مشوهة.
•إذا قمت بتحديد 16:9أﺻلي ،فقد يعرض التلفاز 4:3مربع ﻋموﺩﻱ (أعمدة سوداء على جانبي الصورة).
( BD Wiseمنتجات شركة Samsungفقط)
اﻹﻋﺪاﺩاﺕ
•عند تشغيل ميزة ،BD Wiseيتم ضبط إعداد الدقة بشكل افتراضي على ،BD Wiseوتظهر BD Wise
في قاﺋمة .Resolution
ً
متصال بجهاز ال يدعم ،BD Wiseفلن تستطيع استخدام وﻇيفة .BD Wise
•إذا كان المنتج
•لتشغيل وﻇيفة BD Wiseبشكل مناسﺐ ،قم بتعيين خيار BD Wiseلكل من المنتج والتلفاز على وضع
التشغيل.
Digital Output
ضجيجا مرتفعًا فقط.
•تﺄكد من اختيار المخرجات الرقمية الصحيحة وإال فلن تسمع أي صوت أو ستسمع
ً
•إذا كان جهاز ( HDMIجهاز استقبال الصوت والفيديو ،التلفاز) ﻏير متوافق مع التنسيقات المضغوﻃة
( ،)Dolby digital، DTSيتم إخراج اإلشارة الصوتية بتنسيق .PCM
•ال تحتوي أقراﺹ DVDالمنتظمة على صوت BONUSVIEWوتﺄﺛيرات صوت التنقل.
•بعﺾ أقراﺹ Blu-rayليﺲ بها صوت BONUSVIEWوال مﺆﺛرات صوت التنقل.
•ال يﺆﺛر إعداد اإلخراج الرقمي هذا على الصوت التناﻇري (يسار/يمين) أو إخراج صوت HDMIلتلفازك.
فهو يﺆﺛر على اإلخراج البصري وصوت HDMIعند توصيل المنتج بجهاز استقبال الصوت والفيديو.
•إذا كنت تقوم بتشغيل مسارات صوتية بتنسيق ،MPEGفسيتم إخراج إشارة الصوت بتنسيق PCMبغﺾ
النظر عن اختيارات المخرجات الرقمية ( PCMأو تدفق البت).
BD-LIVE Internet Connection
محظورا أﺛناء استخدام محتويات .BD-LIVE
•ويمكن أن يكون االتصال باإلنترنت
ً
| ٣٨
العربية
(Anynet+(HDMI-CEC
اﻹﻋﺪاﺩاﺕ
( DivX® Video On Demandفيديو ®DivXعند الطلﺐ)
•للحصول على مزيد من المعلومات حول ،DivX)R( VODتفضل بزيارة الموقع "http://vod.divx.
."com
إعدادات السماعة
•عند تحديد الخيار تحﺪيﺪ الﺴماﻋة على تشﻐﻴﻞ ،سيتم إصدار الصوت من خالل سماعات التلفاز.
HDMI audio
•عند إخراج صوت HDMIمن سماعة التلفاز ،يتم خلطه تلقاﺋيًا ليخرج من قناتين.
قناة إرجاع الصوت
ُ
•عند إيقاف تشغيل ( ،Anynet+ (HDMI-CECلن تتاﺡ وﻇيفة قناة إرجاع الصوت.
•قد يﺆدي استخدام كبل HDMIال يدعم قناة إرجاع الصوت ( )ARCمشكلة توافق.
•تتاﺡ فقط وﻇيفة قناة إرجاع الصوت عندما يتم توصيل جهاز تلفاز متوافق مع وﻇيفة قناة إرجاع الصوت.
Digital Output
•يمكن تنشيط الخرج الرقمي عند اختيار تحﺪيﺪ الﺴماﻋة إلى ﺳماﻋة التلﻔاﺯ.
تشغيل ملفات فيديو
•ملفات الفيديو ذات معدالت البت العالية التي تصل إلى 20ميجا بت في الثانية أو أكثر تﺆﺛر على إمكانيات
المنتج وقد تﺆدي إلى إيقاف التشغيل أﺛناء التشغيل.
التشﻐﻴﻞ
تحديد لغة الصوت
•لن يتم عرض المﺆشر ►◄ على الشاشة إذا كان القسم BONUSVIEWال يحتوي على أية إعدادات
صوت .BONUSVIEW
•تتاﺡ اللغات من خالل وﻇيفة لغة الصوت ً
وفقا للغات التي تم تشفيرها على القرﺹ .قد ال تتاﺡ هذﻩ الوﻇيفة أو
بعﺾ اللغات المحددة.
•وتسمﺢ لك بعﺾ أقراﺹ Blu-rayبتحديد إما PCMأو مسار صوت Dolbyالرقمي باللغة اإلنجليزية.
العربية | ٣٩
07
( BD Data Managementإدارة بيانات (BD
•في وضع الذاكرة الخارجية ،يمكن أن يتم إيقاف تشغيل القرﺹ إذا قمت بفصل جهاز USBفي منتصﻒ
التشغيل.
•أجهزة USBالتي تم تنسيقها في نظام ملﻒ ( FATتسمية المجلد )DOS 8.3هي فقط المدعومة.
ونوصي باستخدام أجهزة USBالتي تدعم بروتوكول ،USB 2.0وسرعة قراءة /كتابة 4ميجا بايت /
ﺛانية أو أسرع.
•قد ال تعمل وﻇيفة استﺌناف التشغيل بعد تنسيق جهاز التخزين.
•قد تختلﻒ الذاكرة الكلية المتاحة إلدارة بيانات BDباختالف الظروف.
الملحق
• ً
وفقا لنوع التلفاز الخاﺹ بك ،قد ال تعمل بعﺾ درجات الدقة الخاصة بمخرجات .HDMIيرجى الرجوع إلى
دليل المستخدم الخاﺹ بالتلفاز.
•هذﻩ الوﻇيفة ﻏير متاحة إذا كان كابل HDMIال يدعم .CEC
•إذا كان تلفاز Samsungالخاﺹ بك يحتوي على شعار ،+Anynetفهذا يعني أنه يدعم وﻇيفة
.+Anynet
الملحق
تحديد لغة الترجمة
التشﻐﻴﻞ
• ً
وفقا ألقراﺹ ،Blu-ray Disc / DVDقد يمكنك تغيير لغة الترجمة في ( Disc Menuقاﺋمة األقراﺹ).
اضغط على الزر .DISC MENU
•تعتمد هذﻩ الوﻇيفة على تحديد لغات الترجمة المشفرة على القرﺹ ،وقد ال تتوفر على كل أقراﺹ Blu-ray
.Disc/DVD
•يتم ً
أيضا عرض معلومات حول وضع الميزة األساسية BONUSVIEW/إذا كان قرﺹ Blu-rayيحتوي
على قسم .BONUSVIEW
•تغير هذﻩ الوﻇيفة لغات الترجمة األولية والثانوية في نفﺲ الوقت.
•يتم عرض إجمالي رقم التراجم األولية والثانوية بالتتابع.
عرض ملفات JPEG
•ال يمكنك تكبير الترجمة ورسوم العروض التقديمية في وضع الشاشة الكاملة.
وضع Dolby Pro Logic II
•قبل تحديد وضع ،Dolby Pro Logic IIقم بتوصيل جهازك الخارجي بمقابﺲ إدخال الصوت (يمين
ويسار) بالمنتج .إذا قمت بالتوصيل بمدخل واحد فقط (يمين أو يسار) ،فال يمكنك االستماع إلى صوت
محيطي.
AllShare Play
استخدم الزر "أدوات" أﺛناء عرض الصور
ً
متصال بتلفاز متوافق مع ميزة BD Wiseتم ضبطه على الوضع "تشغيل" ،فلن تظهر قاﺋمة
•إذا كان النظام
إعدادات الصورة.
•لن تعمل وﻇيفة "تشغيل موسيقى الخلفية" إال إذا كان ملﻒ الموسيقى وملﻒ الصور موجودين على وساﺋط
التخزين ذاتها .باإلضافة إلى ذلك ،قد تتﺄﺛر جودة الصوت بمعدل البت الخاﺹ بملﻒ موسيقى MP3وحجم
الصور وﻃريقة الترميز.
تشغيل جهاز تخزين USB
•يجﺐ عليك إزالة جهاز تخزين USBبﺄمان (بتنفيذ وﻇيفة ﺇﺯالة USBبﺄماﻥ) لمنع أي تلﻒ ممكن لذاكرة
.USBاضغط على الزر منزل لالنتقال إلى القاﺋمة الرﺋيسية ،ﺛم اضغط على الزر أﺻﻔر )ﺝ( ،ﺛم اضغط على
الزر .E
•إذا قمت بﺈدخال قرﺹ أﺛناء تشغيل جهاز تخزين ،USBيتغير وضع الوﻇيفة إلى الوضع
" "BD/DVDتلقاﺋيًا.
| 4٠
العربية
الﺪقة ً
ﻃﺒقا لوﺿع المخرجاﺕ
BD Wise
/ HDMIمتصﻞ
ﻭﺿع HDMI
المحتوياﺕ اﻹلﻜترﻭﻧﻴة/
قرﺹ Blu-ray
المحتوياﺕ الرقمﻴة
إﻃارا
دقة أقراﺹ Blu-ray
1080pعند ً 60
أقصى دقة لمدخالت
التلفاز
تلقاﺋي
ﻭﺿع VIDEO
ﻭﺿع VIDEO
576i/480i
-
أقصى دقة لمدخالت التلفاز
576i/480i
-
إﻃارا
1080pعند ً 60
576i/480i
-
إﻃارا
1080pعند ً 24
576i/480i
-
1080i
576i/480i
576i/480i
720p
720p
720p
576i/480i
576i/480i
576p/480p
576p/480p
576p/480p
576i/480i
576i/480i
576i/480i
-
-
-
576i/480i
إﻃارا
1080pعند ً 60
إﻃار الفيلم :تلقاﺋي (24
إﻃارا)
ً
1080i
❏
/ HDMIﻏﻴر متصﻞ
1080pعند 60
إﻃارا
ً
1080pعند 24
إﻃارا
ً
1080i
تشﻐﻴﻞ أقراﺹ DVD
ﻭﺿع VIDEO
576i/480i
/ HDMIﻏﻴر متصﻞ
ﻭﺿع VIDEO
-
تلقاﺋي
أقصى دقة لمدخالت التلفاز
576i/480i
-
إﻃارا
1080pعند ً 60
إﻃارا
1080pعند ً 60
576i/480i
-
1080i
1080i
576i/480i
576i/480i
720p
720p
576i/480i
576i/480i
576p/480p
576p/480p
576i/480i
576i/480i
576i/480i
-
-
576i/480i
المخرجاﺕ
اﻹﻋﺪاﺩ
BD Wise
/ HDMIمتصﻞ
ﻭﺿع HDMI
480i
العربية | 4١
الملحق
اﻹﻋﺪاﺩ
المخرجاﺕ
07
❏
تشﻐﻴﻞ أقراﺹ / Blu-rayالمحتوياﺕ اﻹلﻜترﻭﻧﻴة /المحتوياﺕ الرقمﻴة
الملحق
اﺧتﻴار المخرجاﺕ الرقمﻴة
Bitstream
Bitstream
Bitstream
) Dolby Dمعاﺩ
PCM
اﻹﻋﺪاﺩ
) DTSمعاﺩ التشﻔﻴر(
)ﻏﻴر معالﺞ(
التشﻔﻴر(
جﻬاﺯ اﺳتقﺒال ﺻوﺕ
جﻬاﺯ اﺳتقﺒال ﺻوﺕ
جﻬاﺯ اﺳتقﺒال ﺻوﺕ
جﻬاﺯ اﺳتقﺒال ﺻوﺕ
ﻭفﻴﺪيو يﺪﻋم HDMIأﻭ ﻭفﻴﺪيو يﺪﻋم HDMIأﻭ
االتصال
ﻭفﻴﺪيو يﺪﻋم HDMIﻭفﻴﺪيو يﺪﻋم HDMI
بصرﻱ
بصرﻱ
Dolby Digital
DTSمعاد ترميزها
PCM
حتى PCM 7.1قناة
PCM
معاد ترميزﻩ*
Dolby
Dolby Digital
DTSمعاد ترميزها
Dolby Digital
حتى PCM 7.1قناة
معاد ترميزﻩ*
Digital
Dolby Digital
Dolby
حتى PCM 7.1قناة DTS Dolby Digital Plusمعاد ترميزها
معاد ترميزﻩ*
Digital Plus
Dolby Digital
Dolby
DTSمعاد ترميزها
Dolby TrueHD
حتى PCM 7.1قناة
معاد ترميزﻩ*
التدفق الصوتي TrueHD
في قرﺹ
Dolby Digital
DTSمعاد ترميزها
DTS
حتى PCM 6.1قناة
DTS
Blu-ray
معاد ترميزﻩ*
صوت
Dolby Digital
صوت DTS-HDعالي
DTSمعاد ترميزها
حتى PCM 7.1قناة
DTS-HD
معاد ترميزﻩ*
الدقة
عالي الدقة
قرﺹ
Dolby Digital
قرﺹ DTS-HD
DTS-HD
DTSمعاد ترميزها
حتى PCM 7.1قناة
معاد ترميزﻩ*
للصوت الرﺋيسي
للصوت
الرﺋيسي
PCMقناتان
PCMقناتان
PCMقناتان
PCMقناتان
PCM
Dolby
التدفق الصوتي
Dolby Digital
Dolby Digital
Dolby Digital
حتى PCM 5.1قناة
Digital
في DVD
DTS
DTS
DTS
حتى PCM 6.1قناة
DTS
لفك تشفير صوت الميزة
إلخراج تدفق صوت
األساسية وتدفق صوت
لفك تشفير صوت الميزة
الميزة األساسية فقط
لفك تشفير صوت الميزة
BONUSVIEWمعًا
األساسية وتدفق صوت
بحيﺚ يمكن لجهاز
األساسية وتدفق صوت استقبال الصوت والفيديو BONUSVIEWمعًا داخل داخل صوت PCM
الوضوﺡ لقرﺹ
BONUSVIEWم
وإضافة تﺄﺛيرات صوت
صوت PCMوإضافة
PCMعًا الخاﺹ بك فك تشفير
أي منها
داخل صوت
Blu-ray
تﺄﺛيرات صوت التنقل ،ﺛم إعادة التنقل ،ﺛم إعادة تشفير
تدفق البت.
وإضافة تﺄﺛيرات صوت
تشفير صوت PCMداخل صوت PCMداخل تدفق
لن تسمع صوت
التنقل.
بت Dolby digitalأو
تدفق بت .DTS
BONUSVIEWأو
.PCM
تﺄﺛيرات صوت التنقل.
* إذا كان تدفق المصدر أحاديًا أو قناتين ،فال يتم تطبيق إعداد " Dolby Dمعاد ترميزﻩ" .وتكون اإلخراج PCMقناتان.
يمكن أن تتضمن أقراﺹ Blu-rayﺛالﺛة تدفقات صوتية:
صوت الميزة األساسية :مسار الصوت للميزة األساسية. صوت :BONUSVIEWمسار الصوت اإلضافي ،مثل تعليقات المخرج أو الممثل. ( Navigation Sound Effectsالتﺄﺛيرات الصوتية للتنقل) :التﺄﺛيرات الصوتية التي تظهر عند تصفﺢ قاﺋمة القرﺹ أو الفيلم.تختلﻒ التﺄﺛيرات الصوتية للتنقل في كل قرﺹ من أقراﺹ .Blu-ray
| 4٢
العربية
اﺳتﻜشاﻑ اﻷﺧطاء ﻭﺇﺻﻼﺣﻬا
اﻷﻋراﺽ
ال أﺳتطﻴع ﺇﺧراﺝ القرﺹ.
•هل سلك الطاقة متصل بمنفذ الطاقة بﺄمان؟
•قم بﺈيقاف تشغيل المنتج ،ﺛم أعد تشغيله مرة أخرى.
ال يﺒﺪأ التشﻐﻴﻞ.
•تحقق من رقم المنطقة الخاﺹ بقرﺹ .Blu-ray/DVD
قد ال يمكن تشغيل قرﺹ Blu-ray/DVDالذي تم شراﺅﻩ من الخارج.
•ال يمكن تشغيل األقراﺹ المضغوﻃة وأقراﺹ الفيديو الرقمية في هذا المنتج.
•تﺄكد من صحة مستوى التصنيﻒ.
ال يﺒﺪأ التشﻐﻴﻞ
ﻋلﻰ الﻔور ﻋنﺪ
الﻀﻐﻂ ﻋلﻰ الزر تشﻐﻴﻞ/ﺇيقاﻑ
مﺆقﺖ.
ً
قرصا به خدوﺵ على السطﺢ؟
قرصا
مشوها أو ً
•هل تستخدم ً
•امسﺢ القرﺹ لتنظيفه.
ال يتم ﺇﺻﺪار ﺻوﺕ.
•ال تصدر شاشة عرض السينما المنزلية ً
صوتا أﺛناء التشغيل السريع والتشغيل البطيء وتشغيل الحركة
المرحلية.
•هل تم توصيل السماعات بطريقة صحيحة؟ هل تم تخصيﺺ إعداد السماعة بطريقة صحيحة؟
•هل القرﺹ تالﻒ بشدة؟
يمﻜﻦ ﺳماﻉ الصوﺕ فقﻂ مﻦ ﺧﻼل
ﺳماﻋاﺕ قلﻴلة فقﻂ ﻭلﻴﺲ مﻦ ﺧﻼل
الﺴماﻋاﺕ الﺜماﻧي.
•يخرج الصوت من السماعات األمامية فقط في أقراﺹ Blu-ray/DVDمعينة.
•تﺄكد من توصيل السماعات بطريقة صحيحة.
•قم بضبط مستوى الصوت.
•عند االستماع إلى قرﺹ مضغوط أو راديو أو تلفاز ،يصدر الصوت من السماعات األمامية فقط.
ال يصﺪر الصوﺕ المحﻴطي
.Dolby Digital 5.1 CH
•هل توجد عالمة " "Dolby Digital 5.1 CHعلى القرﺹ؟ يصدر الصوت المحيطي Dolby Digital
5.1 CHفقط إذا تم تسجيل القرﺹ بصوت قناة .5.1
•هل تم تعيين لغة الصوت بشكل صحيﺢ على Dolby Digital 5.1-CHفي شاشة عرض
المعلومات؟
ال تعمﻞ ﻭﺣﺪﺓ التحﻜم ﻋﻦ بعﺪ.
•هل تقوم بتشغيل وحدة التحكم عن بعد في نطاق تشغيلها وبزاوية مناسبة قريبة من المستشعر؟
•هل البطاريات مستنفدة؟
• يﺪﻭر القرﺹ ﻭلﻜﻦ
ال يتم ﻋرﺽ الصورﺓ.
•هل تم تشغيل التلفاز؟
•هل تم توصيل كبالت الفيديو بطريقة صحيحة؟
•هل القرﺹ متسﺦ أو تالﻒ؟
•قد ال تعمل األقراﺹ رديﺌة الصنع.
• جوﺩﺓ الصورﺓ رﺩيﺌة ﻭ
ﻭالصورﺓ مﻬزﻭﺯﺓ.
ال تعمﻞ لﻐة الصوﺕ ﻭال لﻐاﺕ
الترجمة.
•لن تعمل لغة الصوت ولغات الترجمة إذا لم يحتو القرﺹ عليهما.
ال تﻈﻬر ﺷاﺷة القاﺋمة ﺣتﻰ ﻋنﺪ
تحﺪيﺪ ﻭﻇﻴﻔة القاﺋمة.
قرصا ال يحتوي على قواﺋم؟
•هل تستخدم ً
العربية | 4٣
07
الﻔحﺺ/العﻼﺝ
الملحق
راجع الجدول الوارد أدناﻩ إذا كان المنتج ال يعمل بشكل جيد .إذا كانت المشكلة التي تواجهك ﻏير مبينة أدناﻩ أو إذا لم تساعدك التعليمات المذكورة
أدناﻩ في حل مشكلتك ،فقم بﺈيقاف تشغيل المنتج وفصل سلك الطاقة واتصل بﺄقرﺏ موزع معتمد أو مركز خدمة عمالء Samsung
.Electronics
الملحق
اﻷﻋراﺽ
ال يمﻜﻦ تﻐﻴﻴر ﻧﺴﺒة العرﺽ ﺇلﻰ
االرتﻔاﻉ.
الﻔحﺺ/العﻼﺝ
•يمكنك تشغيل أقراﺹ Blu-ray/DVDبنسبة عرض إلى ارتفاع 16:9في وضع 16:9كامل أو
في وضع 4:3شاشة عرضية أو
وضع 4:3شاشة عادية ،ويتم تشغيل أقراﺹ Blu-ray/DVDبنسبة عرض إلى ارتفاع 4:3
بنسبة عرض إلى ارتفاع 4:3فقط .راجع حقيبة أقراﺹ ،Blu-rayﺛم حدد الوﻇيفة المناسبة.
• المنتﺞ ال يعمﻞ.
ﺛوان في وضع ال يوجد قرﺹ.
•اضغط مع االستمرار على زر وحدة التحكم
لمدة ٍ 5
يﺆدي استخدام وﻇيفة "إعادة تعيين" إلى مسﺢ جميع اإلعدادات المخزنة.ال تستخدم هذﻩ الوﻇيفة إال عند الحاجة.
ﻧﺴﻴاﻥ كلمة مرﻭر مﺴتوﻯ
التصنﻴف.
•في حالة عدم وجود قرﺹ بالمنتج ،اضغط مع االستمرار على زر المنتج
تظهر INITعلى الشاشة وتعود جميع اإلعدادات إلى القيم االفتراضية.
ﺛم ،اضغط على زر التشﻐﻴﻞ.
يﺆدي استخدام وﻇيفة "إعادة تعيين" إلى مسﺢ جميع اإلعدادات المخزنة.ال تستخدم هذﻩ الوﻇيفة إال عند الحاجة.
ال يمﻜﻦ اﺳتقﺒال ﻋملﻴاﺕ بﺚ
الراﺩيو.
•هل تم توصيل الهواﺋي بطريقة صحيحة؟
•إذا كانت إشارة دخل الهواﺋي ضعيفة ،فقم بتثبيت هواﺋي FMخارجي في مكان جيد االستقبال.
ال يصﺪر ﺻوﺕ ﻋنﺪ االﺳتماﻉ ﺇلﻰ
ﺻوﺕ التلﻔاﺯ ﻋﺒر المنتﺞ.
•إذا تم الضغط على الزر فتﺢ/ﺇﻏﻼﻕ ^ أﺛناء االستماع إلى صوت التلفاز باستخدام وﻇاﺋﻒ D. INأو
،AUXيتم تشغيل وﻇاﺋﻒ أقراﺹ Blu-ray/DVDويتم كتم صوت التلفاز.
ﻇﻬور ﻋﺒارﺓ "ﻏﻴر متوفر" ﻋلﻰ
الشاﺷة.
•ال يمكن إكمال الميزات أو اإلجراء في هذا الوقت بسبﺐ:
.1حظر برنامج أقراﺹ Blu-ray/DVDذلك.
.2ال يدعم برنامج أقراﺹ Blu-ray/DVDالميزة (على سبيل المثال ،الزوايا).
.3الميزة ليست متوفرة في هذا الوقت.
.4قد قمت بطلﺐ عنوان أو رقم فصل أو وقت بحﺚ خارج النطاق.
ﺇﺫا كاﻧﺖ مخرجاﺕ HDMIمﻀﺒوﻃة
ﻋلﻰ ﺩرجة ﺩقة ال يﺪﻋمﻬا جﻬاﺯ التلﻔاﺯ
الخاﺹ بﻚ )ﻋلﻰ ﺳﺒﻴﻞ المﺜال،
،(1080pفقﺪ ال يمﻜنﻚ رﺅية الصورﺓ
ﻋلﻰ التلﻔاﺯ.
ﺛوان مع عدم وجود قرﺹ
•اضغط مع االستمرار على الزر
باللوحة األمامية لمدة تزيد عن ٍ 5
في المنتج .ستتم استعادة جميع إعدادات المصنع.
ال توجﺪ مخرجاﺕ .HDMI
•تحقق من االتصال بين التلفاز ومقبﺲ HDMIفي المنتج.
•تحقق من دعم التلفاز لدقة إدخال .HDMI 576p /480p /720p /1080i /1080p
ﺷاﺷة مخرجاﺕ HDMIﻏﻴر
ﻃﺒﻴعﻴة.
•إذا ﻇهرت ضوضاء عشواﺋية على الشاشة ،فهذا يعني أن التلفاز ال يدعم حماية ( HDCPحماية
المحتويات الرقمية ذات النطاق العريﺾ العالي)
| 44
العربية
ﺛوان.
ألكثر من ٍ 5
اﻷﻋراﺽ
الﻔحﺺ/العﻼﺝ
يتم ﻋرﺽ الﻔﻴﺪيو بشﻜﻞ متقطع.
•تحقق من استقرار الشبكة.
•تحقق من توصيل كبل الشبكة جي ًدا وأن حمل الشبكة ليﺲ زاﺋ ًدا.
اتصال AllShare Playبﻴﻦ
التلﻔاﺯ ﻭجﻬاﺯ الﻜمﺒﻴوتر ﻏﻴر
مﺴتقر.
•يجﺐ أن يكون عنوان IPفي نفﺲ الشبكة الفرعية فري ًدا ،وإال فقد ينجم عن ذلك تعارض في عناوين
IPمما يﺆدي إلى ﻇهور هذﻩ الظاهرة.
•تحقق من تمكين جدار حماية.
وإذا كان األمر كذلك ،فقم بتعطيل وﻇيفة جدار الحماية.
ال يمﻜنني االتصال بخاﺩﻡ
.BD-LIVE
•قم باختبار لتحديد هل نجﺢ اتصال الشبكة أم ال باستخدام وﻇيفة حالة الشبكة.
•تحقق من توصيل جهاز ذاكرة USBبالمنتج أم ال.
•يجﺐ أن يحتوي جهاز الذاكرة على 1جيجا بايت على األقل من المساحة الخالية الستيعاﺏ خدمات
.BD-LIVE
يمكنك التحقق من الحجم المتوفر في إدارة بيانات ( .BDانظر الصفحة (39
•يرجى التحقق من إعداد خيار ( BD-LIVE Internet Connectionاتصال إنترنت
)BD-LIVEعلى (( Allow (Allالسماﺡ (الكل)).
•إذ فشلت جميع اإلجراءات السابقة ،فاتصل بموفر المحتويات أو قم بالتحديﺚ إلى أحدﺙ البرامج
الثابتة.
ﻋنﺪ اﺳتخﺪاﻡ ﺧﺪمة ،BD-LIVE
يحﺪﺙ ﺧطﺄ.
•يجﺐ أن يحتوي جهاز الذاكرة على 1جيجا بايت على األقل من المساحة الخالية الستيعاﺏ خدمات
.BD-LIVE
يمكنك التحقق من الحجم المتوفر في إدارة بيانات ( .BDانظر الصفحة (39
BD-LIVE
| مﻼﺣﻈة |
◄ عند استعادة إعدادات المصنع االفتراضية ،يتم حذف جميع بيانات BDالمخزنة الخاصة بالمستخدم.
العربية | 4٥
الملحق
يمﻜنني رﺅية المﺠلﺪاﺕ المشتركة
ﻋﺒر ،AllShare Play
ﻭلﻜﻦ ال يمﻜنني رﺅية الملﻔاﺕ.
•يعرض AllShare Playالملفات المطابقة لفﺌات الصور والموسيقى واألفالم فقط .وقد ال يتم
عرض الملفات التي ال تتطابق مع هذﻩ الفﺌات.
07
ﻭﻇﻴﻔة AllShare Play
الملحق
المواﺻﻔاﺕ
الوزن
عام
مولﻒ FM
األبعاد
( 430العرض) × ( 50االرتفاع) ×( 250العمق) مم
مدى درجة حرارة التشغيل
C°+5إلى +35°C
مدى درجة الرﻃوبة للتشغيل
% 10إلى % 75
نسبة اإلشارة/التشويﺶ
55ديسيبل
حساسية االستخدام
12ديسيبل
إجمالي التشويه التوافقي
% 0.5
(BD (Blu-ray Disc
سرعة القراءة 9.834 :م/ﺛانية
( DVDالقرﺹ المتنوع الرقمي)
األقراﺹ
القرﺹ المدمج 5 :بوصات
(القرﺹ المدمج)
القرﺹ المدمج 1/2 3 :بوصة
(القرﺹ المدمج)
مخرجات الفيديو
الفيديو المركﺐ
الفيديو /الصوت
HDMI
مضخم الصوت
| 4٦
سرعة القراءة 6.98 :إلى 7.68م/ﺛانية
وقت التشغيل التقريبي (قرﺹ بجانﺐ واحد ،قرﺹ بطبقة واحدة) 135 :دقيقة
سرعة القراءة 4.8 :إلى 5.6م/ﺛانية
أقصى وقت للتشغيل 74 :دقيقة
سرعة القراءة 4.8 :إلى 5.6م/ﺛانية
أقصى وقت للتشغيل 20 :دقيقة
1قناة 1.0 :فولت من الذروة إلى الذروة (حمل 75أوم)
قرﺹ DVD : 480i
صوت PCMمتعدد القنوات ،صوت تدفق البت ،صوت PCM
خرج السماعة األمامية
خرج السماعة الوسطى
80واط (3Ωأوم)
خرج سماعة الصوت المحيطي
80واط 3( 2أوم)
خرج سماعة مضخم الصوت
100واط (3Ωأوم)
استجابة التردد
Blu-ray: 576i/480i
1080p، 1080i، 720p، 576p/480p
80واط 3( 2أوم)
نسبة S/N
العربية
2.5كجم
اإلدخال التناﻇري
20هرتز إلى 20كيلو هرتز ( ±3ديسيبل)
الدخل الرقمي
20هرتز إلى 40كيلو هرتز ( ±4ديسيبل)
70ديسيبل
فصل القناة
60ديسيبل
حساسية اإلدخال
(المساعد) 500مللي فولت
نظام السماعة
3.0
40هرتز إلى 160
هرتز
مستوى ضغط الصوت 87ديسيبل/واط/مللي 87ديسيبل/واط/مللي 87ديسيبل/واط/مللي 88ديسيبل/واط/مللي
الخارج
مقدار الدخل
80واط
80واط
80واط
100واط
أقصى حد لإلدخال
160واط
160واط
160واط
200واط
)(Unit : mm
األمامية
السماعة
األبعاد
(العرض × االرتفاع
× العمق)
سماعة الصوت
المحيطي
68 x 107 x 77
68 x 107 x 77
األمامية
سماعة الصوت
المحيطي
71 x 1053 x 89
* قاعدة الحامل:
230 x 25 x 230
68 x 107 x 77
HT-E3500
الوسطى
مضخم الصوت
70 x 77 x 228
285 x 300 x 155
الوسطى
مضخم الصوت
HT-E3530
70 x 77 x 228
285 x 300 x 155
HT-E3550
األمامية
سماعة الصوت
المحيطي
الوسطى
71 x 1053 x 89
* قاعدة الحامل:
230 x 25 x 230
71 x 1053 x 89
* قاعدة الحامل:
230 x 25 x 230
70 x 77 x 228
مضخم الصوت
285 x 300 x 155
)(Unit : kg
األمامية
0.4كجم
الوزن
سماعة الصوت
المحيطي
0.4كجم
2.9كجم
سماعة الصوت
المحيطي
0.4كجم
2.9كجم
سماعة الصوت
المحيطي
2.9كجم
األمامية
األمامية
HT-E3500
الوسطى
مضخم الصوت
0.5كجم
2.9كجم
HT-E3530
الوسطى
مضخم الصوت
0.5كجم
2.9كجم
HT-E3550
الوسطى
مضخم الصوت
0.5كجم
2.9كجم
•تحتفظ شركة Samsung Electronics Co., Ltdبالحق في تغيير المواصفات دون إشعار.
•الوزن واألبعاد قيم تقريبية.
•التصميم والمواصفات عرضة للتغيير دون سابق إشعار.
•بالنسبة إلى مصدر الطاقة واستهالك الطاقة ،راجع الملصق الموجود على المنتج.
•ال تكون سرعات الشبكة التي تساوي أو تقل عن 10ميجا بت في الثانية مدعومة.
العربية | 47
الملحق
النطاق الترددي
3.0
140هرتز إلى 20
كيلو هرتز
مضخم الصوت
07
المقاومة الظاهرية
األمامية
نظام سماعة قناة 5.1
سماعة الصوت
الوسطى
المحيطي
3.0
3.0
140هرتز إلى 140 20هرتز إلى 20
كيلو هرتز
كيلو هرتز
في مختلف أرجاء العالمSamsung االتصال بشركة
.SAMSUNG فيرجى االتصال بمركز رعاية عمالء شركة،Samsung إذا كانت لديك أية استفسارات أو تعليقات فيما يتعلق بمنتجات شركة
موقع الويب
www.samsung.com
www.samsung.com
www.samsung.com
www.samsung.com/hk
/www.samsung.com/hk_en
مركز االتصال
603 362 1300
)SAMSUNG (0800 726 786 0800
400-810-5858
4698 3698 )852(
www.samsung.com
11 1100 1800
8282 3030
8282 3000 1800
8282 266 1800
0800-112-8888
021-5699-7777
1800-88-9999
1-800-10-SAMSUNG(726-7864) for PLDT
1-800-3-SAMSUNG(726-7864) for Digitel
1-800-8-SAMSUNG(726-7864) for Globe
02-5805777
)1800-SAMSUNG(726-7864
1800-29-3232
02-689-3232
0800-329-999
0266-026-066
889 588 800 1
www.samsung.com
www.samsung.com
www.samsung.com
www.samsung.com
www.samsung.com
www.samsung.com
www.samsung.com
www.samsung.com
www.samsung.com
)800-SAMSUNG (726-7864
)800-SAMSUNG(726-7864
183-2255
8000-4726
08000-726786
800-22273
021-8255
2255 100 080
9200-21230
www.samsung.com
0800-726-7864
0800-10077
0302-200077
0077 8000
800-00-0077
0077 7095000 724 0800
300 300 0800
00 99 88 0685
) 0860-SAMSUNG(726-7864
www.samsung.com
www.samsung.com
www.samsung.com
www.samsung.com
www.samsung.com
www.samsung.com
www.samsung.com
www.samsung.com
www.samsung.com
www.samsung.com
www.samsung.com
www.samsung.com
www.samsung.com
www.samsung.com
www.samsung.com
AH68-02442M-00
المنطقة
Asia Pacific `
AUSTRALIA
NEW ZEALAND
CHINA
HONG KONG
INDIA
INDONESIA
MALAYSIA
PHILIPPINES
SINGAPORE
THAILAND
TAIWAN
VIETNAM
Middle East `
U.A.E
OMAN
KUWAIT
BAHRAIN
Egypt
JORDAN
IRAN
Morocco
Saudi Arabia
Africa `
NIGERIA
Ghana
Cote D’ Ivoire
Senegal
Cameroon
KENYA
UGANDA
TANZANIA
SOUTH AFRICA
HT-E3500
HT-E3530
HT-E3550
Cinéma maison
5.1CH Blu-ray™
guide d’utilisation
imaginez les possibilités
Merci d'avoir acheté ce produit Samsung.
Pour obtenir notre service complet,
veuillez enregistrer votre produit sur
www.samsung.com/register
Consignes de sécurité
Avertissement
POUR LIMITER LES RISQUES D'ÉLECTROCUTION, NE RETIREZ PAS LE CACHE (OU LE CACHE ARRIÈRE).
AUCUNE PIÈCE INTERNE N'EST RÉPARABLE PAR L'UTILISATEUR. CONFIEZ L’ENTRETIEN DE CET
APPAREIL À UNE PERSONNE QUALIFIÉE.
ATTENTION
RISK OF ELECTRIC SHOCK
DO NOT OPEN
La flèche représentant la foudre à
l'intérieur du triangle vous avertit que
la tension du produit est dangereuse.
AVERTISSEMENT
ATTENTION : AFIN DE RÉDUIRE LES RISQUES DE
CHOC ÉLECTRIQUE, NE RETIREZ PAS LE COUVERCLE
(NI LE PANNEAU ARRIÈRE). AUCUNE PIÈCE INTERNE
NE PEUT ÊTRE RÉPARÉE PAR L'UTILISATEUR. TOUTE
RÉPARATION DOIT ÊTRE CONFIÉE À DU PERSONNEL
QUALIFIÉ.
• Pour diminuer les risques d’incendie ou
d’électrocution, n’exposez pas cet appareil à la
pluie ou à l’humidité.
| 2 French
Le point d'exclamation à l'intérieur du
triangle vous avertit que des instructions
importantes accompagnent le produit.
Produit laser de CLASSE 1
Ce lecteur de disques compacts est un produit
LASER DE CLASSE 1. L’utilisation des commandes,
des réglages ou l’observation de procédures autres
que ceux spécifiés dans ce manuel peut entraîner
une exposition à des rayonnements dangereux.
Cet appareil est conforme à la norme américaine
21CFR 1040.10, sauf en ce qui concerne les
exceptions citées dans le document « Laser Notice
No. 50 » du 24 juin 2007.
DANGER :
• DES RAYONNEMENTS LASER VISIBLES ET
INVISIBLES SONT ÉMIS LORSQUE LE PRODUIT
EST OUVERT. ÉVITEZ TOUTE EXPOSITION
DIRECTE AU FAISCEAU. (FDA 21 CFR)
ATTENTION :
• DES RAYONNEMENTS LASER VISIBLES
ET INVISIBLES DE CLASSE 3B SONT ÉMIS
LORSQUE LE PRODUIT EST OUVERT. ÉVITEZ
TOUTE EXPOSITION AU FAISCEAU (IEC 60825-1).
• CE PRODUIT UTILISE UN LASER. L'UTILISATION
DES COMMANDES, LES RÉGLAGES OU
L'EXÉCUTION DE PROCÉDURES AUTRES QUE
CELLES SPÉCIFIÉES DANS CE DOCUMENT
PEUVENT ENTRAÎNER UNE EXPOSITION AUX
RADIATIONS DANGEREUSES. N'OUVREZ PAS LE
COUVERCLE ET NE RÉPAREZ PAS LE PRODUIT
VOUS-MÊME. TOUTE RÉPARATION DOIT ÊTRE
CONFIÉE À DU PERSONNEL QUALIFIÉ.
CLASS 1
KLASSE 1
LUOKAN 1
KLASS 1
PRODUCTO
LASER PRODUCT
LASER PRODUKT
LASER LAITE
LASER APPARAT
LÁSER CLASE 1
Disc Storage & Management
Entreposez-les dans un endroit frais et aéré.
Rangez-les dans une jaquette propre,
verticalement.
French
3|
Consignes de sécurité
N’exposez pas les disques à la lumière
directe du soleil.
• N’exposez pas cet appareil aux égouttements
ou aux éclaboussures. Ne placez pas d'objet
contenant des liquides, comme des vases, sur
l’appareil.
• Pour éteindre complètement cet appareil, vous
devez retirer la fiche d'alimentation électrique
de la prise murale. Par conséquent, la fiche doit
être aisément accessible en tout temps.
• Ne touchez pas la fiche d’alimentation électrique
avec les mains mouillées,
car cela pourrait entraîner un choc électrique.
• Ne branchez pas plusieurs appareils électriques
dans la même prise murale. La surcharge d’une
prise peut causer une surchauffe qui pourrait
entraîner un feu.
• Entretien du meuble
- Avant de brancher un composant sur ce
produit, assurez-vous que celui-ci est hors
tension.
- Si vous déplacez soudainement le produit
d'un endroit froid à un endroit chaud, de la
condensation pourrait se former sur les pièces
et la lentille et occasionner des problèmes
de lecture. Dans pareil cas, débranchez le
produit et patientez deux heures avant de le
rebrancher dans la prise de courant. Ensuite,
insérez le disque et essayez de relancer la
lecture.
• Si vous percevez un bruit anormal ou une
odeur de brûlé ou si vous apercevez de la
fumée, éteignez immédiatement le produit et
débranchez la fiche d’alimentation électrique de
la prise murale. Ensuite, communiquez avec le
service après-vente le plus proche pour obtenir
de l’aide. N'utilisez pas l'appareil. Continuer
d'utiliser l'appareil risque de provoquer un
incendie ou une décharge électrique.
• Pour éteindre complètement cet appareil, vous
devez retirer la fiche d'alimentation électrique
de la prise murale. Par conséquent, la fiche doit
être aisément accessible en tout temps.
01
• Comment tenir les disques
- Des traces de doigts ou des
rayures sur la surface du disque
peuvent altérer la qualité du son
et de l’image ou provoquer des sauts.
- Évitez de toucher la surface du disque sur
laquelle les données ont été enregistrées.
- Tenez le disque par les bords afin de ne pas
laisser d’empreintes sur sa surface.
- Ne collez pas de papier ou d’adhésif sur le
disque.
• Nettoyage des disques
- Enlevez les traces de doigts ou
la saleté qui s’est déposée sur
le disque avec un chiffon doux
humecté de détergent doux dilué dans de
l’eau.
- Lors du nettoyage, essuyez le disque du
centre vers le bord.
- Rangement des disques
Précautions de manipulation
Consignes de sécurité
Utilisation de la fonction 3D
CONSIGNES IMPORTANTES RELATIVES À LA
SANTÉ ET À LA SÉCURITÉ CONCERNANT LES
IMAGES 3D.
Lisez attentivement les consignes de sécurité avant
d'utiliser la fonction 3D.
• Lorsqu'ils regardent la télévision 3D, certains
téléspectateurs pourraient ressentir certains
troubles, tels que des vertiges, des nausées ou
des maux de tête.
Si de tels symptômes se manifestent, arrêtez de
regarder la télévision 3D, enlevez les lunettes 3D
actives et reposez-vous.
• Le visionnement d'images 3D pendant une période
prolongée pourrait vous fatiguer les yeux. En cas
de fatigue oculaire, arrêtez de regarder la télévision
3D, enlevez les lunettes 3D actives et reposezvous.
• Les enfants utilisant la fonction 3D doivent être
constamment surveillés par un adulte responsable.
En cas de fatigue des yeux, de maux de tête, de
vertiges ou de nausées, l'enfant doit arrêter de
regarder la télévision en 3D et se reposer.
• N'utilisez pas les lunettes actives 3D à d'autres fins
(comme lunettes de vue, de soleil ou de protection,
par exemple).
• N'utilisez pas la fonction 3D ou les lunettes actives
3D tout en marchant ou en bougeant. L’utilisation
de la fonction 3D ou le port des lunettes actives
lorsque vous vous déplacez peut entraîner des
blessures car vous pouvez vous heurter à des
objets, trébucher et/ou tomber et vous blesser
sérieusement.C
• Si vous souhaitez visionner du contenu 3D,
connectez un appareil 3D (récepteur A/V ou
téléviseur compatible 3D) au port de sortie HDMI
OUT du produit à l'aide d'un câble HDMI haute
vitesse. Veillez à mettre les lunettes 3D avant de
visionner le contenu 3D.
• Le produit émet des signaux 3D uniquement par le
câble HDMI connecté au port de sortie HDMI OUT.
• La résolution de la vidéo en mode de lecture 3D
étant définie en fonction de la résolution de la
vidéo 3D originale, vous ne pouvez pas choisir la
résolution de l'image selon vos préférences.
• Des fonctions telles que BD Wise, l'adaptation de
la taille de l'écran ou le réglage de la résolution
peuvent ne pas fonctionner correctement en mode
de lecture 3D.
| 4 French
• Vous devez utiliser un câble HDMI haute vitesse
pour assurer une émission correcte du signal 3D.
• Lorsque vous visionnez des images en 3D,
assurez-vous de vous tenir éloigné du téléviseur
à une distance équivalente à au moins trois fois la
taille de l'écran. Par exemple, si votre écran est de
46 po, tenez-vous à 3,5 m de l'écran.
- Positionnez l'écran à hauteur des yeux pour
mieux apprécier l'image en 3D.
• Lorsque le produit est connecté à plusieurs
appareils 3D, l'effet 3D pourrait ne pas fonctionner
correctement.
• Ce produit ne convertit pas le contenu 2D en 3D.
• « Blu-ray 3D » et le logo « Blu-ray 3D » sont
des marques de commerce de Blu-ray Disc
Association.
Tous droits réservés
© 2012 Samsung Electronics Co., Ltd.
Tous droits réservés; ce manuel d'utilisation
ne peut être reproduit ou copié, partiellement
ou totalement, sans l'accord préalable écrit de
Samsung Electronics Co., Ltd.
Licence
• À PROPOS DE VIDÉO DIVX : DivX® est un format
de vidéo numérique créé par DivX, LLC, une filiale
de Rovi Corporation. Cet appareil est officiellement
certifié DivX Certified® pour la lecture des vidéos
DivX. Pour obtenir de plus amples renseignements
et prendre connaissance des outils logiciels requis
pour convertir vos fichiers en format vidéo DivX,
consultez www.divx.com.
À PROPOS DE LA VIDÉO SUR DEMANDE DIVX
: Cet appareil DivX Certified® doit être enregistré
pour lire les films vidéo sur demande (VOD) de
format DivX achetés dans le commerce. Pour
obtenir votre code d’enregistrement, repérez la
section DivX VOD dans le menu de configuration
de votre appareil. Pour obtenir de plus amples
renseignements sur la procédure d’enregistrement,
consultez vod.divx.com.
DivX Certified® pour lire la vidéo DivX® jusqu'à
1080p HD, y compris le contenu de haute qualité.
DivX®, DivX Certified® et les logos associés sont
des marques de commerce de Rovi Corporation
ou de ses filiales et sont utilisés sous licence.
Couvert par l'un ou plusieurs des brevets
américains suivants : 7,295,673; 7,460,668;
7,515,710; 7,519,274
• Oracle et Java sont des marques déposées
d'Oracle et/ou de ses filiales. D'autres noms
pourraient être des marques de commerce
appartenant à leurs propriétaires respectifs.
• Ce produit intègre la technologie de protection
contre la copie; cette technologie est protégée
par les brevets américains ainsi que par
d’autres droits de propriété intellectuelle
de Rovi Corporation. Le désossement et le
désassemblage sont interdits.
• Blu-ray Disc™, Blu-ray™ et les logos sont
des marques de commerce de Blu-ray Disc
Association.
• Ce produit utilise la technologie Cinavia pour
limiter l’utilisation de copies illégales de certains
films et vidéos disponibles dans le commerce
et de leur piste sonore. Lorsque l'utilisation
interdite d'une copie illégale est détectée, un
message s'affiche et la lecture ou la copie
est interrompue. D'autres renseignements
sur la technologie Cinavia sont fournis au
Centre Cinavia d'information en ligne pour
les consommateurs à l'adresse http://www.
cinavia.com. Pour demander de l'information
additionnelle sur Cinavia par courrier, envoyez
une carte à l'adresse postale suivante : Cinavia
Consumer Information Center, P.O. Box 86851,
San Diego, CA, 92138, USA.
Ce produit intègre une technologie sous licence
de Verance Corporation qui est protégée par
le brevet américain 7 369 677 et par d'autres
brevets américains et internationaux déposés
ou en attente, ainsi que par le droit d'auteur;
certains aspects de cette technologie sont
également protégés par le secret industriel.
Cinavia est une marque de commerce de
Verance Corporation. Tous droits réservés
2004-2010 Verance Corporation. Tous droits
réservés par Verance. Le désossement et le
désassemblage sont interdits.
|
French
5
Table des matières
• Fabriqué sous licence, sous les numéros de brevets
américains suivants : 5 956 674; 5 974 380;
6 226 616; 6 487 535; 7 392 195; 7 272 567;
7 333 929; 7 212 872; d’autres brevets ont été
émis ou sont en attente aux É.-U et ailleurs dans
le monde. DTS-HD, le Symbole, DTS-HD et le
Symbole ensemble sont des marques déposées et
DTS-HD Master Audio | Essential est une marque
de commerce de DTS, Inc. Le produit comprend le
logiciel. © DTS, Inc.Tous droits réservés.
01
• Dolby et le symbole du double D sont des
marques déposées de Dolby Laboratories.
~ HDMI, High-Definition Multimedia Interface et le
logo HDMI sont des marques de commerce ou
des marques déposées de HDMI Licensing LLC
aux États-Unis et dans d'autres pays.
Table des matières
2
3
3
4
4
5
7
8
11
12
12
13
14
15
16
16
18
18
18
19
19
19
20
20
CONSIGNES DE SÉCURITÉ
Avertissement
Rangement et gestion des disques
Précautions de manipulation
Utilisation de la fonction 3D
Tous droits réservés
Licence
MISE EN ROUTE
Compatibilité du disque et du format
Logos des disques que le produit peut
lire
Accessoires
Face avant
Face arrière
Télécommande
CONNEXIONS
Connexion des enceintes
Connexion des enceintes
Composants des enceintes Installation des
enceintes sur le pied Tallboy
Connexion des encetintes
Connexion du lecteur à un téléviseur
Méthode 1 Connexion à un téléviseur au
moyen d'un câble HDMI - type de connexion
de la meilleure qualité (recommandé)
Méthode 2 Connexion à un téléviseur au
moyen d’un câble vidéo - type de connexion
de bonne qualité
Connexion à des périphériques externes
Méthode 1 ENTRÉE AUX : Connexion d’un
composant périphérique analogique
Méthode 2 OPTIQUE : Connexion à un
composant audio de périphérique
Connexion de l’antenne FM
Connexion à un routeur réseau
| 6 French
21
22
22
23
26
28
29
30
30
31
31
31
32
34
35
35
36
36
37
38
43
46
PARAMÈTRES
Procédure de paramétrage initiale
Écran Accueil
Accès à l'écran Paramètres
Fonctions du menu Paramètres
Réseaux et Internet
Mise à niveau logicielle
Configuration d'AllShare
MEDIA PLAY
Utilisation de l'option Streaming Media
Services
Lecture des fichiers stockés sur un
périphérique USB
Lecture d'un disque à contenu enregistré
par l'utilisateur
Lecture de disques vidéo offerts dans le commerce
Lecture d'un disque audio préenregistré de
type commercial
Commande de la lecture de vidéo
Commande de l'écoute de musique
Commande de la lecture de vidéo
Écoute de la radio
Utilisation des touches d’effets spéciaux de la
télécommande
Utilisation de BD-LIVE™
Utilisation de la fonction AllShare
ANNEXES
Information complémentaire
Dépannage
Caractéristiques techniques
Mise en route
Compatibilité du disque et du format
VIDÉO
MUSIQUE
PHOTO
Type de disque
Disque Blu-ray
Disque Blu-ray 3D
Détails
Le disque BD-ROM ou BD-RE/-R est enregistré dans le format BD-RE.
DVD-VIDÉO, DVD-RW, DVD-VIDÉO, disques DVD+RW/DVD-RW(V)/DVDR/+R qui ont été enregistrés
DVD-R, DVD+RW, DVD+R et finalisés ou périphérique USB comprenant du contenu DivX, MKV ou MP4.
CD-RW/-R, DVD-RW/-R, Photos enregistrées sur un disque CD-RW/-R, DVD-RW/-R ou BD-RE/-R ou
BD-RE/-R
sur un périphérique USB comprenant Zdu contenu MP3 ou WMA.
CD-RW/-R, DVD-RW/-R, Photos enregistrées sur des disques CD-RW/-R, DVD-RW/-R ou BD-RE/-R ou
sur un périphérique USB comprenant du contenu JPEG.
BD-RE/-R
| REMARQUE |
\ Selon le type de disque ou les conditions d'enregistrement, il se peut que certains disques CD-RW/-R et DVD-R ne puissent pas être lus sur cet
appareil.
\ Si un disque DVD-RW/-R n'a pas été enregistré correctement dans le format vidéo DVD, il ne pourra pas être lu.
\ Le produit ne lit pas les contenus qui ont été enregistrés sur un disque DVD-R selon un débit binaire de plus de 10 Mbps.
\ Le produit ne lit pas les contenus qui ont été enregistrés sur un disque BD-R ou un périphérique USB selon un débit binaire de plus de 30 Mbps.
\ La lecture et/ou l’enregistrement peuvent être impossibles avec certains types de disque ou lorsque vous exécutez des commandes spécifiques,
comme les changements d'angle et le réglage du format d'image. Des renseignements détaillés concernant le disque sont inscrites sur le boîtier.
Consultez-les au besoin.
\ Lors de la lecture d'un titre BD-J, il se peut que le chargement prenne plus de temps que pour un titre normal et que certaines fonctions
s'exécutent plus lentement que d'habitude.
Types de disques que votre produit ne peut pas lire
• DVD HD
• Disque DVD-ROM/
PD/MV, etc.
| REMARQUE |
• DVD-RAM
• Super Audio CD
(à l'exception de la
couche CD)
• DVD-RW (mode VR) • Disque DVD-R 3,9 Go
pour la création.
• CVD/CD-ROM/CDV/
CD-G/CD-I/LD
(Les CD-G lisent des
données audio uniquement
et non les données
graphiques.)
\ Ce produit peut ne pas répondre à toutes les commandes car certains disques Blu-ray, DVD et CD ne permettent qu'un fonctionnement spécifique
ou limité et autorisent uniquement l'utilisation de certaines fonctionnalités en cours de lecture.
Veuillez noter que ceci n'est pas une défaillance du produit.
\ Samsung ne peut pas garantir que ce produit pourra lire tous les disques comportant le logo Blu-ray Disc, DVD ou CD parce que les formats de
disque évoluent et des problèmes ou des erreurs peuvent se produire pendant la création des logiciels pour disques Blu-ray, DVD et CD ou pendant
la fabrication des disques.
\ Veuillez communiquer avec le Centre de service à la clientèle SAMSUNG pour toute question ou tout problème concernant la lecture des disques
Blu-ray, DVD ou CD sur ce produit. Vous pouvez également vous reporter au manuel d'utilisation pour obtenir plus de renseignements sur les
restrictions en matière de lecture.
\ Il se peut que certains disques et DVD commerciaux achetés en dehors de votre zone ne puissent pas être lus sur ce produit.
French
7|
Mise en route
Assistance
02
Types de disque et contenus que votre produit peut lire
Mise en route
Code régional
Les lecteurs et les disques Blu-ray sont codés par
région. Ces codes régionaux doivent correspondre
pour que le disque puisse être lu. Si les codes ne
correspondent pas, le disque ne pourra pas être
lu. Le code régional est affiché sur la face arrière
du produit.
Type de
disque
Disque Bluray
Code
régional
Pays
A
Amérique du Nord, Amérique
centrale, Amérique du Sud, Corée,
Japon, Taïwan, Hong Kong et SudEst asiatique.
B
Europe, Groenland, Territoires
d'outre-mer, Moyen-Orient,
Afrique, Australie et NouvelleZélande.
C
DVD VIDÉO
| REMARQUE |
Inde, Chine, Russie, Asie centrale
et Asie du Sud.
1
États-Unis, Territoires des É.-U. et
Canada
2
Europe, Japon, Moyen-Orient,
Égypte, Afrique du Sud, Groenland
3
Taïwan, Corée, Philippines,
Indonésie, Hong Kong
4
Mexique, Amérique du Sud,
Amérique centrale, Australie,
Nouvelle-Zélande, Îles du
Pacifique, Caraïbes
5
Russie, Europe de l’Est, Inde,
majorité des pays d’Afrique, Corée
du Nord, Mongolie
6
Chine
\ Si le numéro de région d’un disque Blu-ray/DVD ne
correspond pas au numéro de région de ce produit, celuici ne peut pas lire le disque.
| 8 French
Logos des disques que le produit peut lire
Disque Blu-ray
Disque Blu-ray 3D
BD-LIVE
Dolby
DTS
Norme de télédiffusion PAL au
R.-U., en France, en
Allemagne, etc.
Java
Formats pris en charge
Prise en charge des fichiers musicaux
• Votre produit prend en charge les périphériques USB,
les lecteurs MP3, les appareils photo numériques et
les lecteurs de cartes USB.
• Ce produit ne prend pas en charge les noms de
dossiers ou de fichiers qui comportent plus de 128
caractères.
• Certains périphériques USB, disques durs ou
appareils photo numériques pourraient ne pas être
compatibles avec ce lecteur.
• Votre produit prend en charge les systèmes de
fichiers FAT 16, FAT 32 et NTFS.
• Connectez les périphériques USB directement au port
USB du produit. La connexion par câble USB peut
causer des problèmes d'incompatibilité.
• L’insertion de plusieurs unités de stockage dans un
lecteur multicarte peut entraîner le dysfonctionnement
de celui-ci.
• Ce produit ne prend pas en charge le protocole PTP.
Extension de fichier
*.avi
Conteneur
AVI
Codec vidéo
Codec audio
Résolution
DivX 3.11/4.x/5.1/6.0
MP3
AC3
DTS
WMA
PCM
1920x1080
MP4v3
H.264 BP/MP/HP
VC-1 AP
*.mkv
MKV
DivX 5.1/6.0
H.264 BP/MP/HP
*.wmv
WMV (wmv9)
*.mp4
MP4
VC-1 AP
VC-1 SM
MP4 (mp4v)
H.264 BP/MP/HP
MPEG1
*.mpg
*.mpeg
PS
MPEG2
H.264 BP/MP/HP
MP3
AC3
DTS
WMA
AAC
MP1, 2
Dolby Digital
DTS
1920x1080
1920x1080
1920x1080
1920x1080
1920x1080
1920x1080
1920x1080
1920x1080
1920x1080
1920x1080
1920x1080
1920x1080
Restrictions
- Même un fichier encodé au moyen d’un codec pris en charge mentionné ci-dessus pourrait ne pas être lu en cas de
problème de contenu.
- La lecture normale ne sera pas garantie si les renseignements sur le conteneur du fichier sont erronées ou si le fichier luimême est corrompu.
- La lecture audio/vidéo des fichiers dont le débit binaire ou la fréquence d'image sont supérieurs à la
normale pourrait être saccadée.
- La fonction de recherche (sauter) n’est pas disponible si la table d’index du fichier est endommagée.
Décodeur vidéo
- Prend en charge le niveau 4.1 de la norme H.264 ainsi que le format AVCHD
- Ne prend pas en charge les normes H.264 FMO/ASO/RS et VC1 SP/MP/AP L4
- MPEG4 SP, ASP :
Résolution inférieure à 1280 x 720 : 60 images max
Résolution supérieure à 1280 x 720 : 30 images max
- Ne prend pas en charge le format GMC 2 ou supérieur
French
9|
Mise en route
Prise en charge des fichiers vidéo
02
• Ne déconnectez pas le périphérique USB durant le processus de « chargement ».
• Plus la résolution de l’image est élevée, plus l'affichage de l'image prend du temps.
• Ce produit ne peut pas lire les fichiers MP3 lorsque la technologie DRM (gestion des droits numériques) a été téléchargée
depuis des sites commerciaux.
• Votre produit ne prend en charge que la vidéo inférieure à 30 images/seconde (fréquence d'images).
• Vous devez retirer le périphérique USB avec précaution (en utilisant la fonction « Retirer périph. USB ») pour éviter
d'endommager la mémoire USB.
Appuyez sur la touche ACCUEIL pour aller au menu d'accueil, appuyez sur le bouton JAUNE (C), puis sur a touche E.
• SAMSUNG décline toutes responsabilités relatives à la corruption de fichiers de données ou à la perte de données.
Mise en route
Décodeur audio
- Prend en charge les formats WMA 7, 8, 9 et STD
- Ne prend pas en charge le taux d’échantillonnage WMA de 22 050 Hz mono.
Prise en charge des fichiers musicaux
Extension de
fichier
Conteneur
Codec audio
Plage de prise en charge
*.mp3
MP3
MP3
-
*.wma
WMA
WMA
Taux d'échantillonnage (en kHz) - 8, 11, 16, 22, 32, 44,1, 48
Débits binaires - Tous les débits binaires compris entre 5 kbps
et 384 kbps
AVCHD (Codec vidéo avancé haute définition)
• Ce produit peut lire les disques en format AVCHD. Ces disques sont normalement enregistrés et lus
sur des caméscopes.
• Le format AVCHD est un format vidéo numérique haute définition.
• Le format MPEG-4 AVC/H.264 compresse les images de façon plus efficace que le format de
compression d'image traditionnel.
• Certains disques AVCHD utilisent le format « x.v.Colour ». Ce produit peut lire les disques AVCHD de
format « x.v.Colour ».
• « x.v.Colour » est une marque de commerce de Sony Corporation.
• « AVCHD » et le logo AVCHD sont des marques de commerce de Matsushita Electronic Industrial Co.,
Ltd. et de Sony Corporation.
| REMARQUE |
\ Dépendamment des conditions d’enregistrement, il est possible que certains disques de format AVCHD ne puissent pas être
lus.
\ Les disques de format AVCHD doivent être finalisés.
\ Le format « x.v.Colour » offre une plus vaste gamme de couleurs qu’un DVD de caméscope normal.
\ Il est possible que certains disques de format MKV ou MP4 ne puissent pas être lus, en raison de la résolution et de la
fréquence de l’image vidéo.
| 10 French
Accessoires
02
Vérifiez que les accessoires ci-dessous sont fournis.
Mise en route
FUNCTION
VOLUME
-
+
1
2
4
5
7
8
DISC MENU
Câble vidéo
Antenne FM
SUBTITLE
MUTE
3
6
9
TITLE MENU
0
POPUP
HOME
REPEAT
TOOLS
INFO
EXIT
RETURN
TUNER
MEMORY MO/ST
A
B
SOUND
EFFECT
Câble HDMI
Manuel d'utilisation
C
D
TUNING
DOWN
UP
Télécommande/
Piles (AAA size)
Les chiffres et les illustrations contenus dans ce Manuel d'utilisation sont fournis à titre de référence
uniquement et pourraient ne pas représenter exactement le produit.
French
11 |
Mise en route
Face avant
LECTURE/PAUSE
FONCTION
ARRÊT
ENTRÉE
OUVRIR/FERMER
COMMANDES DU VOLUME
AFFICHAGE
TIROIR DISQUE
HÔTE USB
CAPTEUR DE LA TÉLÉCOMMANDE
| REMARQUE |
MARCHE/
ARRÊT
\ Pour effectuer des mises à niveau du logiciel du produit en utilisant la prise Hôte USB, vous devez utiliser une clé USB.
\ Lorsque le produit affiche le menu du disque Blu-ray, vous ne pouvez pas commencer à visionner le film en appuyant sur le
bouton 6 du produit ou sur la touche de la télécommande. Pour lire la vidéo , sélectionnez Lire le film ou Démarrer dans le
menu du disque puis appuyez sur la touche E.
Face arrière
AUX
IN
FRONT L
SURROUND L
SUBWOOFER
FRONT R
SURROUND R
IMPEDANCE : 3Ω
SPEAKERS OUT
CENTER
VIDEO
OUT
LAN
FM ANT
L
R
HDMI OUT
VENTILATEUR
OPTICAL
DIGITAL
AUDIO IN
ENTRÉE AUX SORTIE VIDÉO
AUX
IN
CENTER
FRONT L
SURROUND L
SUBWOOFER
FRONT R
SURROUND R
IMPEDANCE : 3Ω
SPEAKERS OUT
LAN
| REMARQUE |
FM ANT
L
R
HDMI OUT
CONNECTEURS DE SORTIE
DES ENCEINTES
VIDEO
OUT
BORNE RL
OPTICAL
DIGITAL
AUDIO IN
SORTIE HDMI CONNEXION DE CARTE ANTENNE FM
TX (SANS FIL)
\ Veillez à laisser un espace minimum de 10 cm (4 po) de chaque côté du cinéma maison pour assurer une ventilation
adéquate. N'obstruez pas le ventilateur ou les orifices d’aération.
| 12 French
Télécommande
02
Présentation de la télécommande
Pour sélectionner le mode de Blu-ray.
FUNCTION
VOLUME
Pour régler le volume.
Appuyez sur les touches numériques pour commander les options.
Pour afficher le menu Disque.
MUTE
-
+
1
2
3
4
5
6
7
8
DISC MENU
POPUP
SUBTITLE
HOME
REPEAT
TOOLS
INFO
RETURN
EXIT
Pour utiliser le menu Outils.
Pour sélectionner les éléments
du menu à l’écran et en changer
les valeurs.
Pour revenir au menu précédent.
Ces touches permettent d'utiliser
les menus du produit ainsi que
plusieurs fonctions liées au disque
Blu-ray.
Pour accéder au menu contextuel/menu Titres.
Pour effectuer une recherche
vers l'arrière ou l'avant.
Pour interrompre la lecture d’un disque.
Appuyez pour arrêter un disque.
Pour sélectionner la langue des
sous-titres du disque.
Pour accéder au menu Accueil.
Pour couper le son provisoirement.
9
TITLE MENU
0
Appuyez sur ces touches pour effectuer
un saut vers l'arrière ou l'avant.
Appuyez pour lire un disque.
Pour ouvrir et fermer le tiroir disque.
TUNER
MEMORY MO/ST
A
B
SOUND
EFFECT
C
D
TUNING
DOWN
UP
Permet de répéter la lecture d’un
titre, d’un chapitre, d’une piste
ou d’un disque.
Pour afficher les données de
lecture pendant la lecture d’un
disque Blu-ray/DVD.
Pour quitter le menu.
Sélectionnez la fréquence de diffusion radio MONO ou STÉRÉO.
Pour rechercher les stations FM
actives et changer les chaînes.
Sélectionnez le mode audio
Dolby Pro Logic II souhaité.
Pour appliquer les effets sonores.
Insertion des piles dans la télécommande
Type de piles : AAA
| REMARQUE |
\ Veillez à faire correspondre les extrémités « + » et « - » des
piles au diagramme situé à l’intérieur du compartiment.
\ Sur la base d’un usage normal du téléviseur, la durée de
vie des piles est d’environ un an.
\ La télécommande peut être utilisée à une distance du produit
pouvant aller jusqu’à 7 mètres (23 pi), en ligne droite.
French
13 |
Mise en route
Pour allumer et éteindre le produit.
Connexions
Cette section couvre différentes méthodes pour connecter le produit à d’autres périphériques.
Avant de déplacer ou d'installer le produit, assurez-vous de le mettre hors tension et débranchez le
cordon d’alimentation.
Connexion des enceintes
Mise en place du produit
Placez-le sur un pied, une étagère ou
sous le pied du téléviseur.
Centrale
Caisson des basses
Avant (D)
Produit
Avant (G)
Ambiophonique (G)
Ambiophonique (D)
Sélection de la position d’écoute
La position d’écoute devrait être
de 2,5 à 3 fois la taille de l’écran
du téléviseur. Par exemple, si vous
avez un écran de 46 po, placez la
position d’écoute à une distance de
2,92 à 3,50 mètresde l’écran.
Enceintes avant
Placez ces enceintes devant votre position d’écoute, tournées vers vous (à environ
45°). Placez les enceintes avant de façon à ce que leurs haut-parleurs d’aigus se
trouvent à la hauteur de votre oreille. Alignez la face avant des enceintes avant avec la
face avant de l’enceinte centrale ou placez-les légèrement devant l’enceinte centrale.
Enceinte centrale
Il est préférable d’installer l’enceinte centrale à la même hauteur que les enceintes
avant. Vous pouvez aussi l’installer directement sur ou sous le téléviseur.
Enceintes
ambiophoniques
Caisson des
basses
| 14 French
Placez ces enceintes de chaque côté de votre position d’écoute. S’il n’y a pas assez
d’espace, placez-les de sorte qu’elles soient face à face. Placez-les à environ 60 à
90 cm (2 à 3 pi) au-dessus de votre oreille, légèrement dirigées vers le bas.
Contrairement aux enceintes avant et centrale, les enceintes ambiophoniques sont
* essentiellement utilisées pour les effets sonores. Elles ne produisent pas de son en
permanence.
La position du caisson des basses n’est pas aussi importante. Placez-le à l’endroit de
votre choix.
Composants des enceintes
03
HT-E3500
(D)
AVANT
(G)
Connexions
(G)
(D)
AMBIOPHONIQUES
CENTRALE
CAISSON DES BASSES
HT-E3530
CÂBLE D’ENCEINTE
(G)
(D)
BASE DU PIED
(G)
AVANT
PIED
(D)
AMBIOPHONIQUES
VIS (5 X 15) : 8EA
CENTRALE
CAISSON DES BASSES
HT-E3550
PIED
(G)
(D)
AVANT
BASE DU PIED
(G)
VIS (5 X 15) : 16EA
CÂBLE D’ENCEINTE
(D)
AMBIOPHONIQUES
CENTRALE
SUBWOOFER
French
15 |
Connexions
Installation des enceintes sur le pied Tallboy
* HT-E3530 seulement – Enceintes avant
* HT-E3550 seulement – Enceintes avant/
ambiophoniques
1. Retournez le pied de la base et connectez-le à
la base.
2. Insérez les vis dans le sens des aiguilles d’une
montre dans les trois orifices marqués à l’aide
d’un tournevis, comme l’indique l’illustration.
1
Base du pied
Pied
3
3. Étirez le câble d’enceinte fourni et faites-le
passer par le trou au centre de la base du
pied.
4. Connectez l’enceinte supérieure au pied
assemblé.
5. Insérez la vis dans le sens des aiguilles d’une
montre dans l’orifice à l’arrière de l’enceinte
à l’aide d’un tournevis.Branchez ensuite un
câble d’enceinte.
6. Voici comment se présente l'enceinte une fois
installée.
Suivez ces étapes pour installer l’autre
enceinte.
2
4
Enceinte
Pied
5
6
Connexion des enceintes
1. Accouplez chaque faisceau de câbles avec l’enceinte appropriée en
appariant la fiche codée par couleur de chaque faisceau avec l’étiquette
de couleur apposée sur chaque enceinte.
2. Pour fixer le câble d’enceinte à chaque enceinte :
a. Appuyez sur la languette rouge située à l’arrière de l’enceinte, insérez le
fil rouge et relâchez la languette.
b. Appuyez sur la languette noire située à l’arrière de l’enceinte, insérez le
fil noir et relâchez la languette.
3. Branchez les fiches de contact d'enceinte situées à l’arrière du produit en
faisant concorder les couleurs des fiches et des prises d’enceinte.
| 16 French
Noir
Rouge
Dans le cas du modèle HT-E3500
SURROUND
IMPEDANCE : 3
SPEAKERS OUT
Enceinte ambiophonique (D)
SURROUND
Enceinte avant (D)
CENTER
FRONT L
SURROUND L
SUBWOOFER
FRONT R
SURROUND R
IMPEDANCE : 3Ω
SPEAKERS OUT
Caisson des basses
LAN
| MISE EN GARDE |
\ Pour procéder au montage mural des enceintes, fixez fermement les vis ou les clous sur le mur choisi et installez l'enceinte par le trou du
montant situé à l'arrière. Notez que les vis ou les clous utilisés pour l'installation murale ne sont pas fournis avec le produit.
\ Ne laissez pas les enfants jouer avec ou à proximité des enceintes. Ils risqueraient d’être blessés en cas de chute des enceintes.
\ Lors du branchement des fils aux enceintes, assurez-vous de respecter le sens de la polarité (+/-).
\ Maintenez le caisson des basses hors de la portée des enfants pour éviter qu’ils insèrent leurs mains ou des matières étrangères dans le
conduit (orifice) du caisson.
\ N’accrochez pas le caisson des basses au mur par le conduit (orifice).
| REMARQUE |
\ Une enceinte placée près de votre téléviseur pourrait altérer la couleur de l’écran en raison du champ magnétique.
French
17 |
Connexions
Enceinte centrale
03
Enceinte ambiophonique (G)
Enceinte avant (G)
Connexions
Connexion du lecteur à un téléviseur
Sélectionnez la méthode 1 ou 2.
AUX
IN
AUX
IN
FRONT L
SURROUND L
FRONT R
SURROUND R
IMPEDANCE : 3Ω
SPEAKERS OUT
CENTER
SUBWOOFER
FM ANT
FM ANT
L
R
HDMI OUT
L
VIDEO
OUT
LAN
VIDEO
OUT
OPTICAL
DIGITAL
AUDIO IN
R
HDMI OUT
Méthode 1
OPTICAL
DIGITAL
T
TAL
AUDIO IN
Méthode 2
HDMI IN
VIDEO IN
Méthode 1 Connexion à un téléviseur au moyen d'un câble HDMI - type de connexion de la
meilleure qualité (recommandé)
À l’aide du câble HDMI, raccordez la prise HDMI OUT (SORTIE HDMI) située à l'arrière de l'appareil à la
prise HDMI IN (ENTRÉE HDMI) de votre téléviseur.
Si le téléviseur prend en charge la fonctionnalité ARC, vous pourrez écouter le son à partir du cinéma
maison en reliant uniquement ce câble.
Méthode 2 Connexion à un téléviseur au moyen d’un câble vidéo - type de connexion de
bonne qualité
Connectez le câble vidéo fourni de la prise VIDEO OUT (SORTIE VIDÉO) située à l’arrière du produit à la
prise d’entrée VIDEO IN (ENTRÉE VIDÉO) de votre téléviseur.
| REMARQUE |
\ La prise VIDEO Out émet toujours dans la résolution 576i/480i, indépendamment de la résolution définie dans le menu de
configuration.
\ Ne connectez pas le produit au moyen d’un magnétoscope à cassettes. Les signaux vidéo alimentés par les magnétoscopes
à cassettes peuvent être soumis à des systèmes de protection du droit d'auteur et de ce fait, l'image pourrait être déformée
sur le téléviseur.
| 18 French
Connexion à des périphériques externes
AUX
IN
FRONT L
SURROUND L
FRONT R
SURROUND R
IMPEDANCE : 3Ω
SPEAKERS OUT
CENTER
SUBWOOFER
OPTICAL
DIGITAL
AUDIO IN
R
HDMI OUT
(Câble non fourni.)
Méthode 1
R
Rouge
W
Blanc
FM ANT
FM ANT
L
R
HDMI OUT
L
VIDEO
OUT
LAN
VIDEO
OUT
External Devices
OPTICAL
DIGITAL
DIGI
TAL
TAL
AUDIO IN
(Câble non fourni.)
Méthode 2
OPTICAL OUT
Méthode 3 AUX IN : Connexion d’un composant périphérique analogique
À l’aide d’un câble audio RCA (non fourni), connectez la prise d’entrée AUDIO In du produit à la prise de
sortie AUDIO Out du périphérique analogique. Sélectionnez le mode AUX.
~ Assurez-vous d’apparier les couleurs des fiches du câble avec les couleurs des prises d’entrée et
de sortie.
Méthode 2 OPTIQUE : Connexion à un composant audio de périphérique
Pour connecter la sortie audio numérique des composants à signal numérique tels que les boîtes de
jonction de câbles et les récepteurs satellites (Décodeurs).
À l’aide d’un câble optique numérique (non fourni), connectez la prise Optical Digital Audio In (Entrée
audio optique numérique) du produit à la prise Digital Optical Out (Sortie optique numérique) du
périphérique. Sélectionnez le mode D. IN.
| REMARQUE |
\ Pour regarder la vidéo depuis votre récepteur à boîte de jonction/satellite, vous devez connecter sa sortie vidéo directement à votre téléviseur.
\ Ce système prend en charge les fréquences d’échantillonnage numériques de 32 kHz et plus des composants de périphériques numériques.
\ Ce système prend uniquement en charge l’audio DTS et Dolby Digital. L’audio MPEG, qui a un format de flux binaire, n’est pas prise en charge.
French
19 |
Connexions
AUX
IN
03
Pour sélectionner le mode approprié à un périphérique, appuyez sur la touche FONCTION. Chaque fois
que vous appuyez sur cette touche, le mode change dans l’ordre suivant : BD/DVD D. IN AUX FM
Connexions
Connexion de l’antenne FM
Antenne FM (fournie)
AUX
IN
FRONT L
SURROUND L
SUBWOOFER
FRONT R
SURROUND R
IMPEDANCE : 3Ω
SPEAKERS OUT
CENTER
VIDEO
OUT
LAN
FM ANT
L
R
HDMI OUT
OPTICAL
DIGITAL
T
TAL
AUDIO IN
1 · Connectez l’antenne FM fournie à la prise ANTENNE FM.
2 · Déplacez progressivement le fil de l’antenne jusqu’à ce que vous trouviez l'endroit où la réception est
bonne, puis fixez-le solidement à un mur ou sur une autre surface solide.
| REMARQUE |
\ Ce produit ne reçoit pas la fréquence de diffusion AM.
Connexion à un routeur réseau
Vous pouvez connecter votre produit à votre routeur réseau selon l'une des méthodes illustrées ci-après.
AUX
IN
FRONT L
SURROUND L
FRONT R
SURROUND R
IMPEDANCE : 3Ω
SPEAKERS OUT
CENTER
SUBWOOFER
FM ANT
L
R
HDMI OUT
Ou
VIDEO
OUT
LAN
Modem large bande
(avec routeur intégré)
OPTICAL
DIGITAL
AUDIO IN
Service
large bande
Modem
large bande
Service
large bande
Routeur
| REMARQUE |
\ L'accès Internet au serveur Mise à jour logicielle de Samsung peut vous être refusé en fonction du routeur que vous
utilisez ou des règlements de votre fournisseur de services Internet. Pour de plus amples renseignements, contactez votre
fournisseur d'accès Internet.
\ Les utilisateurs de ligne DSL doivent utiliser un routeur pour établir une connexion au réseau.
\ Pour exécuter la fonction AllShare, il faut avoir un ordinateur connecté au réseau, comme indiqué dans l'illustration.
| 20 French
Paramètres
Procédure de paramétrage initiale
puis allumez le produit. Lorsque vous allumez le produit
pour la première fois, il affiche automatiquement l’écran
Langue des paramètres initiaux.
2 . Appuyez sur les touches ▲▼pour sélectionner
la langue souhaitée, puis appuyez sur la touche
E.
3 . Appuyez sur la touche E pour démarrer la
configuration de la fonction.
Paramètre initial
Les paramètres d'aspect TV et de réseau vont être définis.
Chaque paramètre peut être ensuite modifié sous le menu
"Paramètres".
Démarrer
apparaît.
- Si vous disposez d'un réseau doté d'adresses
IP dynamiques, ce qui est le cas de la plupart
des utilisateurs, E sélectionnez Auto (Auto),
appuyez sur la touche Enter (Entrer), puis
passez à l'étape 6.
- Si vous disposez d'un réseau doté d'adresses IP
fixes, nous vous conseillons de sélectionner Skip
(Passer) en appuyant sur la touche BLUE (BLEUE)
(D), puis de passer à la section « Configuration
de la connexion réseau », en page 26, une fois
la configuration initiale effectuée. La section «
Configuration de la connexion réseau » vous fournit
une explication complète sur les modalités de
configurer manuellement votre réseau.
- Si vous n'avez pas de réseau, sélectionnez
Skip (Passer) en appuyant sur la touche
BLUE (BLEUE) (D). L'écran Initial Settings
Complete (Paramètres initiaux définis)
apparaît, suivi de l'écran Home (Accueil).
| REMARQUE |
a Vorheriges
" Choisir
4 . L'écran TV Aspect (Format écran) apparaît.
Appuyez sur les touches ▲▼ pour sélectionner
l'option TV Aspect ratio (Format d'image télé)
souhaitée, puis appuyez sur la touche E.
Vous disposez de quatre choix :
16:9 Original – Pour les téléviseurs grand écran.
Affiche les images grand écran dans leur format
original 16:9 ainsi que les images 4:3 (l’ancien format
standard), dans le format Pillarbox 4:3 avec les barres
noires à gauche et à droite.
16:9 plein écr. – Pour les téléviseurs grand écran.
Affiche les images grand écran dans leur format
original 16:9 et agrandit les images dans le format 4:3
pour remplir l’écran 16:9.
4:3 panoramique – Pour les anciens téléviseurs
analogiques à écran standard. Affiche les images
4:3 en format plein écran et les images 16:9 en format
panoramique qui maintient le format d’image 16:9, mais
remet les barres au-dessus et au-dessous de l’image.
\ Si vous n'effectuez pas la configuration réseau à ce stade ou
si celle-ci ne se fait pas correctement, vous pourrez accéder
à la section « Configuration de la connexion réseau » en page
26 afin de configurer la connexion réseau ultérieurement.
Paramètre initial | Réseau - Câblé
Choisissez la méthode pour configurer le protocole Internet (IP).
Vérif. câble est connecté.
Auto : Configurer IP automatiquement.
Auto
Manuel
a Vorheriges d Ignorer < Déplacer
" Choisir
6 . Le produit vérifie la connexion réseau puis se
connecte au réseau. À la fin de l'opération,
appuyez sur la touche E. L'écran Initial
Settings Complete (Paramètres initiaux définis)
apparaît, suivi de l'écran Home (Accueil).
French
21 |
Paramètres
1 . Allumez votre téléviseur après avoir connecté le produit,
5 . L'écran Network - Wired (Réseau - Câblé)
04
• Le menu Accueil n'apparaîtra pas si vous ne configurez
pas les paramètres initiaux.
• L'affichage à l'écran (OSD) peut changer sur ce produit
après la mise à niveau de la version du logiciel.
• Les étapes d'accès peuvent varier selon le menu
sélectionné.
4:3 Pan-Scan – Pour les anciens téléviseurs
analogiques à écran standard. Affiche les images 4:3
en format plein écran et les images 16:9 en format
Pan-Scan qui remplit l’écran, mais coupe l’image
sur la droite et sur la gauche et élargit le centre
verticalement.
Paramètres
1 . Pour sélectionner une option sur l'écran Accueil,
déplacez le curseur à l'aide des touches ◄►
jusqu'à la mise en surbrillance de l'option de votre
choix, puis appuyez sur le bouton E.
Paramètre initial | Réseau - Câblé
MAC adresse (d0:66:7b:dc:28:fc)
Adresse IP,Masque sous-réseau,Passerelle, Serveur DNS
Ping passerelle
Test service internet
| REMARQUE |
Votre réseau fonctionne correctement.
Si vous rencontrez encore des problèmes réseau, contactez votre
fournisseur de services réseau.
OK
" Choisir
| REMARQUE |
\ Si vous souhaitez afficher de nouveau l'écran Paramètres
initiaux pour apporter des changements, sélectionnez l'option
Réinitialiser. (Voir page 26)
\ Si vous utilisez le câble HDMI pour connecter le produit à un
téléviseur Samsung conforme à la norme Anynet+(HDMI-CEC) et
si 1.) Vous avez défini la fonction Anynet+(HDMI-CEC) à Activ. sur
le téléviseur et sur le produit 2.) Vous avez réglé le téléviseur à
une langue prise en charge par le produit, le produit sélectionne
automatiquement cette langue comme langue préférée.
\ Pour lire ou afficher des fichiers de vidéos, de musique ou
de photos sur l'ordinateur, vous devez connecter le cinéma
maison et l'ordinateur à un réseau domestique, puis
télécharger, installer et configurer le logiciel AllShare sur
l'ordinateur. (Voir page 29.)
Accès à l'écran Paramètres
1 . Sélectionnez Paramètres à l'écran Accueil, puis
appuyez sur la touche E. L'écran Paramètres
apparaît.
Paramètres
Affichage
Écran Accueil
►
Format TV
: 16:9 Original
Audio
BD Wise
: Activé
Réseau
Résolution
: Auto
Système
Trame vidéo (24Fs)
: Auto
Langue
Format couleur HDMI
: Auto
Sécurité
Couleur intense HDMI
: Auto
Général
Mode progressif
: Auto
Assistance
3
®
™
Paramètres
2
4
2 . Pour accéder aux menus, sous-menus et options
de l'écran Paramètres, veuillez vous reporter à
VOLUME
l'illustration de la télécommande
MUTE ci-dessous.
FUNCTION
5
1
No Disc
a Changer périph.
d Afficher périph.
" Entrer
6
1
Videos (Vidéos). Permet de lire des vidéos stockées sur
des disques, des périphériques USB ou votre ordinateur.
2
Photos (Photos). Permet de visionner des photos stockées
sur des disques, des périphériques USB ou votre ordinateur.
3
Network Services (Services réseau). Permet de sélectionner un
service réseau : Vudu, CinemaNow, ou YouTube.
4
Music (Musique). Permet de lire des fichiers de musique
stockés sur des disques, des périphériques USB ou votre
ordinateur.
5
Paramètres. Définissez diverses fonctions selon vos
préférences.
6
Affiche les touches de couleur de la télécommande
sur lesquelles vous pouvez appuyer pour accéder aux
fonctions ou exécuter celles-ci.
Sélection d'une option sur l'écran Accueil
| 22 French
| REMARQUE |
-
+
2en mode
1
3 d'arrêt pendant plus de
\ Si le produit demeure inutilisé
5 minutes, un économiseur
sur le téléviseur.
4 d’écran
5 s’affiche
6
Si le produit demeure en mode d’économiseur d’écran pendant
8
9
7
plus de 20 minutes,DISC
il s'éteint
automatiquement.
MENU
TITLE MENU
0 POPUP
Touches de la télécommande utilisées pour
naviguer dans le menu Paramètres
SUBTITLE
HOME
REPEAT
1
TOOLS
INFO
RETURN
EXIT
3
2
TUNER
MEMORY MO/ST
A
1
2
B
C
4
D
TUNING
SOUND
Touche HOME (ACCUEIL)
: Appuyez
sur cette touche pour
UP
EFFECT DOWN
passer à l'écran Accueil.
Touche RETURN(RETOUR) : Pour revenir au menu précédent.
Touche EXIT (QUITTER) : Pour quitter le menu actuellement sélectionné.
| REMARQUE |
Paramètres
4
04
3
Touche E (Entrée) / DIRECTION :
~ Appuyez sur ▲▼◄► pour déplacer le curseur ou sélectionner un
élément.
~ Appuyez sur la touche E pour activer l'élément actuellement
sélectionné ou confirmer un paramètre.
\ Le bouton E qui se trouve sur la face avant du produit peut être utilisé aux mêmes fins que la touche E de la télécommande.
Information détaillée sur les fonctions
Chaque fonction de paramètre, élément de menu et option individuelle est expliqué(e) en détail à l’écran. Pour voir une
explication, utilisez les touches ▲▼◄► pour sélectionner la fonction, l'élément ou l'option.
The explanation will usually appear the bottom of the screen. Une brève description de chaque fonction du menu
Paramètres commence à la page suivante. De l’information complémentaire sur certaines fonctions est également fournie dans
l’annexe de ce guide.
Fonctions du menu Paramètres
Affichage
Paramètres 3D
Pour configurer les fonctions liées à l’option 3D.
Mode Lecture Blu-ray 3D : Sélectionnez pour visionner un disque Bluray avec du contenu 3D en mode 3D . Si vous passez au menu Accueil
ou Accueil Smart Hub en mode 3D, le produit passe automatiquement
en mode 2D.
Taille écran : Entrez la taille du téléviseur connecté au produit. Le produit
adaptera automatiquement la sortie 3D à la taille de l’écran du téléviseur.
Format d'image
télé
Vous permet de régler la sortie du produit en fonction de la taille de l’écran
de votre téléviseur. Voir une description des options de taille d’écran page
21, étape 4.
BD Wise
BD Wise est la plus récente fonction d'interconnectivité de Samsung.
Lorsque vous interconnectez un produit Samsung et un téléviseur Samsung avec BD
Wise au moyen d'un câble HDMI, si la fonction BD Wise est activée sur le produit et
sur le téléviseur, le produit diffuse la vidéo à la résolution et à la fréquence d'images
vidéo du disque Blu-ray/DVD.
Résolution
Vous permet de définir la résolution de sortie du signal vidéo HDMI à Auto, 1080p,
1080i, 720p, 576p/480p. Si Composite est connecté, le système ne prend en
charge que la résolution 576i/480i. Ces valeurs indiquent le nombre de lignes
vidéo par image. Les lettres i et p signifient respectivement balayage entrelacé (i) et
balayage progressif (p). Plus il y a de lignes, plus la qualité de l'image est supérieure.
Fréquence
cinéma
(24 ips)
Le réglage de la fonction Fréquence cinéma (24 ips) à Auto autorise le
produit à régler automatiquement sa sortie HDMI à 24 images par seconde
pour améliorer la qualité de l’image si le produit est connecté à un téléviseur
compatible avec la fréquence 24 ips.
• La fonction Fréquence cinéma (24 ips) n'est disponible que sur un
téléviseur compatible avec cette fréquence d'image.
• La fonction Fréquence cinéma est seulement disponible lorsque le
produit est en mode résolution HDMI 1080i ou 1080p.
Format couleurs
HDMI
Vous permet de régler le format de l'espace couleur pour la sortie HDMI en
fonction des fonctionnalités de l'appareil connecté (téléviseur, moniteur, etc.).
French
23 |
Paramètres
Affichage
Audio
Couleurs
profondes
HDMI
Vous permet de définir le produit de façon à diffuser la vidéo
avec des couleurs profondes depuis la prise de sortie HDMI
OUT. L'option Couleurs profondes permet une reproduction
plus fidèle des couleurs, notamment en termes d'intensité.
Mode progressif
Cette option permet d'améliorer la qualité de l'image lors de la
lecture d'un DVD.
Paramètres
des enceintes
Vous permet de définir les options des enceintes.
Sélect. hautparleur
Vous permet de sélectionner les enceintes que vous souhaitez
activer, soit les enceintes du téléviseur ou celles du cinéma maison.
Canal retour
audio
Vous permet de diriger le son du téléviseur vers les enceintes du
cinéma maison. Requiert une connexion HDMI et un canal retour
audio (ARC) compatible avec le téléviseur.
• Lorsque l'option Audio Return Channel (Canal retour audio)
est réglée sur Auto (Auto), le cinéma maison sélectionne
automatiquement ARC ou l'entrée optique comme source
audio, selon vos connexions. Si l'option Audio Return
Channel (Canal retour audio) est activée, l'entrée optique
sera inopérante.
Sortie
numérique
Vous permet de définir la sortie numérique selon les fonctionnalités
du récepteur A/V que vous avez connecté au produit. Pour plus
de détails, veuillez vous reporter au tableau de sélection des
sorties numériques. (Voir page 42)
Vous permet d'appliquer la commande de portée dynamique à
l'audio Dolby Digital, Dolby Digital Plus et Dolby True HD.
Commande
de portée
dynamique
Sync. audio
| 24 French
Auto : Commande automatiquement la portée dynamique de
l'audio Dolby TrueHD en fonction de l'information fournie par la
piste sonore Dolby TrueHD. Active aussi la commande de portée
dynamique pour les formats Dolby Digital et Dolby Digital Plus.
Désact. : Laisse la portée dynamique non compressée, vous
laisse entendre le son original.
Activ. : Active la commande de portée dynamique pour les trois
formats Dolby. Le volume des sons feutrés est augmenté et le
volume des sons bruyants est diminué.
Vous permet, lorsque le produit est connecté à un téléviseur
numérique, de régler le décalage du son de façon à ce que l’audio
soit synchronisée avec la vidéo. Vous pouvez régler le décalage
entre 0 et 300 millisecondes.
Réseau
Sécurité
Test réseau
Permet de tester la configuration du protocole Internet pour vérifier si
ce dernier fonctionne correctement.
État du réseau
Permet de vérifier si la connexion au réseau et à Internet a été établie.
Connexion
Internet BDLive
Permet d'autoriser ou d'interdire une connexion Internet lors de
l'utilisation du service BD-Live.
Paramètres
initiaux
Pour recommencer l'exécution de la procédure Paramètres
initiaux. Voir les détails page 20.
Anynet+
(HDMI-CEC)
Anynet+ est une fonction pratique qui autorise l’interfonctionnement
avec d’autres produits Samsung dotés de la fonction Anynet+ et vous
permet de commander ces produits avec une télécommande de
téléviseur Samsung. Pour utiliser cette fonction, vous devez connecter
ce produit à un téléviseur Samsung Anynet+ à l’aide d’un câble HDMI.
Gestion des
données BD
Permet de gérer les contenus téléchargés auxquels vous avez
accédé au moyen d'un disque Blu-ray prenant en charge le
service BD-Live. Vous pouvez afficher les informations relatives au
périphérique USB que vous utilisez pour le stockage des données
BD-Live, y compris l'espace de stockage disponible. Vous avez
également la possibilité de supprimer les données BD-Live et de
changer de périphérique.
Vous pouvez sélectionner votre langue préférée pour les options On-Screen menu
(Menu à l'écran), etc.
• La langue sélectionnée ne s'affiche que lorsqu'elle est prise en charge par le disque.
Le NIP par défaut est 0000. Si vous n'avez pas créé votre propre NIP, saisissez le NIP
par défaut pour accéder à la fonction de sécurité.
BD Parental
Rating
Empêche la lecture de DVD comportant un classement numérique
spécifique à moins de saisir le NIP.
DVD Parental
Rating
Prevents playback of DVDs with a rating above a specific
numerical ratings unless the PIN is entered.
Verrouillage de
YouTube
Si le verrouillage est spécifié sur On (On), vous devrez saisir le NIP
pour utiliser le service.
Change PIN
Général
Fuseau horaire
Permet de modifier le NIP à 4 chiffres autorisant l'accès aux
fonctions de sécurité.
Vous pouvez spécifier le fuseau horaire qui s'applique à votre région.
French
25 |
Paramètres
Langue
Pour de plus amples renseignements sur les paramètres réseau
et les fonctions réseau, voir le chapitre « Réseaux et Internet » qui
commence à la page 26.
04
Système
Paramètres du
réseau câblé
Paramètres
Assistance
Mise à jour
logicielle
Communiquer
avec Samsung
Conditions
d'entente de
service
Réinit.
Pour de plus amples renseignements sur la fonction Mise à jour
logicielle, voir la section « Mise à jour logicielle » de la page 28.
Fournit les coordonnées afin d'obtenir de l'aide avec le produit.
Permet d'afficher la dénégation générale de responsabilité
concernant les contenus et services de tiers.
Tous les paramètres sont rétablis sur leur valeur par défaut,
sauf les paramètres réseau. Le mot de passe de sécurité par
défaut est 0000.
Réseaux et Internet
Lorsque vous connectez ce produit à un réseau, vous
pouvez utiliser les applications et les fonctions basées
sur le réseau, telles que BD-LIVE, pour mettre à jour
les logiciels du produit via la connexion réseau.
Configuration de votre connexion réseau
Avant de commencer, contactez votre fournisseur de
services Internet pour savoir si votre adresse IP est
fixe ou dynamique. Si l'adresse est dynamique, nous
vous conseillons d'utiliser la procédure automatique
décrite ci-dessous. Si l'adresse est fixe, vous devrez
recourir à la procédure manuelle détaillée ci-après.
• Avant de commencer, vérifiez que le produit est
connecté au routeur à l'aide d'un câble réseau.
❑
Automatique
Pour démarrer le processus de configuration,
exécutez les étapes suivantes :
1 . À l'écran Accueil, sélectionnez Paramètres,
puis appuyez sur la touche E.
2 . Sélectionnez Réseau, puis appuyez sur la
touche E.
3 . Sélectionnez Wired Network Settings
(Paramètres du réseau câblé), puis
appuyez sur la touche E. L'écran Network
- Wired (Réseau - Câblé) apparaît.
4 . Appuyez sur la touche ► dans le menu
Internet Protocol Setup (Configuration du
protocole Internet). Servez-vous de la touche
▲▼ pour sélectionner Auto (Auto) puis
appuyez sur la touche E.
| 26 French
Paramètres
Paramètres réseau câblé
Affichage
Audio Config. prot. Internet
Réseau
Système
Langue
\
0
0
0
Masque sous-réseau : 0
0
0
0
: 0
0
0
0
0
0
0
Passerelle
Sécurité DNS
Général
: Auto
: 0
Adresse IP
: Auto
Serveur DNS
: 0
Assistance
> Déplacer " Choisir
' Retour
5 . La fonction Network (Réseau) acquiert et
renseigne automatiquement les valeurs des
options IP Address (Adresse IP), Subnet
Mask (Masque s.-réseau), etc.
6 . Une fois que la fonction Network (Réseau)
a acquis les valeurs réseau, appuyez sur la
touche RETURN (RETOUR) (').
7 . Sélectionnez Network Test (Test réseau), puis
appuyez sur E. Le cinéma maison valide
la connexion réseau. À la fin de l'opération,
appuyez sur la touche RETURN (RETOUR)
(').
❑
Manuel
Paramètres réseau câblé
Affichage
Audio Config. prot. Internet
Réseau
Système
Langue
Adresse IP
: Manuel
: 0
\
0
0
Masque sous-réseau : 255 255 255
Passerelle
: 0
Sécurité DNS
: Manuel
Général
: 0
Serveur DNS
0
0
0
0
0
0
0
0
Assistance
> Déplacer " Choisir
' Retour
1 . Exécutez les quatre premières étapes de la
procédure automatique, mais sélectionnez
Manual (Manuel) à la place d'Auto à l'étape
4.
2 . Appuyez sur la touche de direction ▼ pour
accéder au premier champ de saisie (IP
Address (Adresse IP)).
3 . Utilisez les touches numériques de votre
télécommande pour saisir les chiffres.
4 . Lorsque vous avez effectué l'opération dans
un champ donné, servez-vous de la touche
►pour passer au champ suivant.
Vous pouvez également utiliser les autres
touches de direction pour vous déplacer vers
le haut et le bas ou retourner en arrière.
5 . Saisissez les valeurs des options IP Address
(Adresse IP), Subnet Mask (Masque s.réseau) et Gateway (Passerelle).
< Obtention des valeurs des paramètres réseau >
Vous pouvez aussi afficher les valeurs des
paramètres réseau sur la plupart des ordinateurs
équipés de Windows. Pour afficher les valeurs des
paramètres réseau, veuillez exécuter les étapes
suivantes :
• Windows XP
1 · Cliquez avec le bouton droit sur l'icône
Réseau, située en bas à droite du bureau de
Windows.
2 · Dans le menu contextuel, cliquez sur État.
3 · Cliquez sur l'onglet Assistance dans la boîte
de dialogue qui s'affiche.
4 · Dans la fenêtre Assistance, cliquez sur le
bouton Détails. Les paramètres Réseau
s’affichent.
• Windows 7
1 · Cliquez sur l'icône Réseau, située en bas à
droite du bureau de Windows.
2 · Dans le menu contextuel, cliquez sur Centre
Réseau et partage.
6 . Appuyez sur la touche ▼ pour accéder à
DNS.
3 · Dans la boîte de dialogue qui s’ouvre, cliquez
sur Connexion au réseau local ou Connexion
au réseau sans fil, selon votre type de
connexion réseau.
8 . Appuyez sur la touche RETURN (RETOUR)
(') de la télécommande.
| REMARQUE |
7 . Appuyez sur la touche ▼ pour accéder au
premier champ d'entrée DNS. Saisissez les
chiffres, tel qu'indiqué ci-dessus.
9 . Sélectionnez Network Status (État du réseau
), puis appuyez sur E.
10 . L'écran Network Status (État du réseau)
apparaît. Le produit vérifie la connexion
réseau puis se connecte au réseau. Une fois
l'opération effectuée, mettez en surbrillance
OK, puis appuyez sur E.
4 · Dans la fenêtre Assistance, cliquez sur le
bouton Détails. Les paramètres Réseau
s’affichent.
\ Ces indications peuvent varier selon la version de
Windows utilisée.
French
27 |
Paramètres
Paramètres
\ Vous pouvez obtenir les valeurs des paramètres de
réseau auprès de votre fournisseur Internet. Vous pouvez
aussi afficher ces valeurs sur la plupart des ordinateurs
utilisant Windows. Pour consulter les instructions, voir la
section « Obtention des valeurs des paramètres réseau »
de cette page.
04
Si vous avez une adresse IP fixe ou si la procédure
automatique est inopérante, vous devrez définir les
valeurs Paramètres réseau manuellement.
| REMARQUE |
Paramètres
Mise à niveau logicielle
Le menu Mise à jour logicielle vous permet de mettre à
niveau le logiciel du produit pour améliorer la performance
ou obtenir des services additionnels.
• Évitez d’éteindre et de rallumer le produit
manuellement durant le processus de mise à jour.
1 · Dans le menu Accueil, sélectionnez Paramètres,
puis appuyez sur la touche E.
2 · Sélectionnez Assistance, puis appuyez sur la
touche E.
3 · Sélectionnez Mise à niveau logicielle, puis
appuyez sur la touche E.
4 · Sélectionnez l’une des méthodes suivantes :
• En ligne
• Par USB
• Notification de mise à niveau automatique
5 · Appuyez sur la touche E.
Les procédures à suivre pour chaque méthode
sont indiquées ci-dessous.
| REMARQUE |
\ La mise à jour est terminée lorsque le produit s'éteint après avoir
redémarré. Appuyez sur la touche POWER (MARCHE/ARRÊT) pour
allumer le produit en vue de l'utiliser. N'éteignez ou ne rallumez
jamais le produit manuellement durant le processus de mise à jour.
\ Samsung Electronics n'assume aucune responsabilité légale en cas de
défaillance du produit provoquée par une connexion Internet instable ou
une négligence du consommateur pendant la mise à niveau logicielle.
\ Si vous souhaitez annuler la mise à niveau en cours de téléchargement du
logiciel de mise à niveau, appuyez sur la touche E.
En ligne
Pour utiliser la fonction By Online (En ligne), vous devez
préalablement connecter le produit à Internet. Avant
de commencer, retirez tous les disques insérés dans
l'appareil.
1 · Sélectionnez En ligne, puis appuyez sur la
touche E. Le message Connexion au serveur
en cours apparaît.
2 · Si une mise à jour est indisponible, un message
contextuel apparaîtra pour vous demander si
vous souhaitez effectuer une mise à niveau. Si
vous sélectionnez Yes (Oui), le produit s'éteindra
puis se rallumera automatiquement et la mise à
niveau sera lancée.
| IMPORTANT |
\ N'éteignez ou ne rallumez jamais le cinéma maison manuellement
durant la mise à niveau du logiciel.
| 28 French
3 · Une fenêtre contextuelle apparaît pour indiquer
l'état d'avancement de la mise à jour. Lorsque
la mise à jour est terminée, le produit s'éteint
automatiquement à nouveau.
4 · Appuyez sur la touche POWER (MARCHE/
ARRÊT) pour allumer le produit.
| REMARQUE |
\ La mise à jour est terminée lorsque le produit s'éteint après avoir
redémarré. Appuyez sur la touche POWER (MARCHE/ARRÊT)
pour allumer le produit en vue de l'utiliser.
\ N'éteignez ou ne rallumez jamais le produit manuellement durant
le processus de mise à jour.
\ Samsung Electronics n'assume aucune responsabilité légale en
cas de défaillance du produit provoquée par une connexion Internet
instable ou une négligence du consommateur pendant la mise à
niveau du logiciel.
Par USB
1 · Visitez www.samsung.com.
2 · Cliquez sur ASSISTANCE dans la partie supérieure
droite de la page.
3 · Entrez le numéro de modèle du produit dans le champ
de recherche, puis cliquez sur Rechercher produit.
4 · Cliquez sur Télécharger dans le centre de la page
sous le titre Téléchargements.
5 · Cliquez sur Micrologiciel au centre de la page.
6 · Cliquez sur l'icône ZIP dans la colonne Fichier sur la
partie droite de la page.
7 · Dans la fenêtre contextuelle qui apparaît, cliquez sur
OK pour télécharger et sauvegarder le fichier du
micrologiciel sur votre ordinateur.
8 · Dézippez le dossier compressé sur l'ordinateur. Vous
devriez avoir un seul dossier dézippé portant le même
nom que le fichier compressé.
9 · Copiez le dossier sur une clé USB.
10 · Assurez-vous que le produit ne contient pas de disque,
puis insérez la clé USB dans le port USB du produit.
11 · Dans le menu du produit, allez à Paramètres >
Assistance > Mise à jour logicielle.
12 · Sélectionnez Par USB.
| REMARQUE |
\ Aucun disque ne devrait se trouver dans le produit lorsque vous mettez le
logiciel à niveau au moyen de la prise USB Hôte.
\ N'éteignez ou ne rallumez jamais le produit manuellement durant
le processus de mise à jour.
\ Une fois la mise à niveau terminée, consultez les détails sur le logiciel
dans le menu Mise à niveau logicielle.
1 · Allumez le produit.
2 · Dans le menu Software Update (Mise à jour
du logiciel), réglez l'option Auto Upgrade
Notification (Notification de mise à niveau
automatique) sur On.
Si une nouvelle version du logiciel est
disponible, le produit vous le notifiera par un
message contextuel..
3 · Pour mettre à niveau le micrologiciel,
sélectionnez Yes (Oui). Le produit s'éteint
puis se rallume automatiquement et la mise à
niveau est lancée.
4 · Une fenêtre contextuelle apparaît pour
indiquer l'état d'avancement de la mise à jour.
Lorsque la mise à jour est terminée, le produit
s'éteint automatiquement.
5 · Appuyez sur la touche POWER (MARCHE/
ARRÊT) pour allumer le produit.
| REMARQUE |
\ La mise à jour est terminée lorsque le produit s'éteint
après avoir redémarré. Appuyez sur la touche POWER
(MARCHE/ARRÊT) pour allumer le produit en vue de
l'utiliser. N'éteignez ou ne rallumez jamais le produit
manuellement durant le processus de mise à jour.
\ Samsung Electronics n'assume aucune responsabilité légale
en cas de défaillance du produit provoquée par une connexion
Internet instable ou une négligence du consommateur pendant
la mise à niveau logicielle.
Configuration d'AllShare
AllShare vous permet d'utiliser le produit pour lire
des fichiers de musique, de vidéos ou de photos
stockés sur votre ordinateur. Pour utiliser AllShare,
vous devez préalablement connecter le produit
à votre ordinateur via le réseau (voir page 20)
et installer le gestionnaire SAMSUNG PC Share
Manager sur l'ordinateur.
Pour utiliser la fonction AllShare sur votre
ordinateur, vous devez préalablement y installer
le logiciel AllShare. Vous pouvez télécharger
le logiciel sur votre ordinateur et obtenir les
instructions détaillées sur l'utilisation d'AllShare
depuis le site Web Samsung.com.
1 · Allez à www.samsung.com.
2 · Cliquez sur Assistance dans le haut de la
page.
3 · Sur la page Support, saisissez le numéro
de modèle de votre produit dans le champ
Model Number (Numéro du modèle), puis
appuyez sur la touche E.
4 · Sur la page qui apparaît, cliquez
sur Télécharger, à gauche, sous
Téléchargements.
Le Centre de téléchargement apparaît.
5 · À la page Centre de téléchargement, cliquez
sur l'onglet Logiciels.
6 · À l’onglet Logiciels, cliquez sur l’icône Fichier
situé à droite de la ligne AllShare.
7 · Dans la fenêtre contextuelle qui apparaît,
cliquez sur Enregistrer le fichier.
8 · Rechercher le fichier d’installation AllShare
sur votre disque, puis double-cliquez sur le
fichier.
9 · Dans la fenêtre contextuelle qui apparaît,
cliquez sur Exécuter, puis suivez les
instructions qui s'affichent à l'écran.
Téléchargez le guide d'installation et d'utilisation
AllShare depuis le même onglet Logiciel en
cliquant sur l'icône de fichier PDF dans la colonne
Fichier à droite. Le fichier au format PDF sera
téléchargé et ouvert. Suivez les instructions
fournies pour installer et configurer AllShare. Vous
pouvez afficher et/ou sauvegarder le fichier.
| REMARQUE |
\ Pour utiliser AllShare sur votre smartphone, vous devez
connecter votre installation et votre smartphone sur le
même routeur.
French
29 |
Paramètres
Si votre produit est connecté au réseau et que
vous activez la fonction Auto Upgrade Notification
(Notification de mise à niveau automatique), le
produit vous notifiera de la disponibilité d'une
nouvelle version de logiciel par un message
contextuel.
Téléchargement du logiciel AllShare
04
Notification de mise à niveau
automatique
nemaNow
Media Play
Utilisation de l'option Streaming Media
Services
• Pour utiliser l'option Streaming Media Services
(Diffusion en continu des services de médias), votre
cinéma maison doit être connecté à Internet. La
fourniture de certains services peut nécessiter que
vous ayez un compte fournisseur.
Servez-vous des touches ▲▼◄► du menu
Home (Accueil) pour accéder au service souhaité,
puis appuyez sur la touche E.
®
PANDORA
internet radio
™
HD Movies
7 · Si des fichiers apparaissent à l'écran, passez
à l'étape 8. Par contre, si des dossiers de
fichiers s'affichent, servez-vous des touches
▲▼ pour sélectionner un dossier, appuyez
sur E, puis allez à l'étape 8.
8 · Servez-vous des touches ▲▼ pour
sélectionner un fichier à lire ou à afficher, puis
appuyez sur la touche E.
OR
4-1. Appuyez sur la touche BLUE (BLEUE) (D).
YouTube. Vous pouvez afficher la vidéo
diffusée en continu par YouTube.
™
USB DISK
Lecture des fichiers stockés sur un
périphérique USB
Il est possible de lire les fichiers multimédias stockés
sur un périphérique USB connecté.
1 · Accédez au menu Home (Accueil).
2 · En mode Stop (Arrêt), connectez le périphérique
de stockage USB au port USB situé sur le
panneau avant du produit. Le message « Do
you want to access the device? » (Souhaitezvous changer d'appareil?) s'affiche.
3 · Appuyez sur la touche ◄► pour sélectionner
Yes (Oui), puis appuyez sur la touche E.
4 · Appuyez sur la touche RED (ROUGE) (A).
™
USB DISK
d Accueil " Entrer
5-1. Appuyez sur les touches ▲▼ pour
sélectionner USB Flash Mem (Mém Flash
USB), puis appuyez sur la touche E.
6-1. Appuyez sur les touches ▲▼ pour
sélectionner Videos (Vidéos), Music
(Musique) ou Photos (Photos), puis
appuyez sur la touche E.
-1
7 . Si des fichiers apparaissent à l'écran, passez
à l'étape 8-1. Par contre, si des dossiers de
fichiers s'affichent, servez-vous des touches
▲▼ pour sélectionner un dossier, appuyez
sur E, puis allez à l'étape 8-1.
8-1. Servez-vous des touches ▲▼ pour
sélectionner un fichier à lire ou à afficher, puis
appuyez sur la touche E.
| REMARQUE |
CD
USB DISK
USB DISK a Changer périph.
Retirer péri. USB d Afficher périph. " Entrer
5 · Appuyez sur les touches ▲▼ pour sélectionner
USB Flash Mem (Mém Flash USB), puis appuyez
sur la touche E.
6 · Appuyez sur les touches ◄► pour sélectionner
Videos (Vidéos), Music (Musique) ou Photos
(Photos), puis appuyez sur la touche E.
| 30 French
\ Vous devez retirer le périphérique USB en utilisant la
fonction « Retirer péri. USB » pour éviter d'endommager le
périphérique USB. Appuyez sur la touche HOME (ACCUEIL)
pour aller au menu Accueil, sélectionnez le bouton JAUNE (C),
puis appuyez sur la touche E.
\ Pour écouter vos fichiers de musique avec un son à 5.1
canaux, vous devez définir le mode Dolby Pro Logic II sur
MATRIX. (Voir page 36.)
1 · Allumez le cinéma maison.
Place a disc into the disc tray with the disc’s label
facing up and then close the disc tray. La lecture
commence automatiquement.Si tel n'est pas le
cas, accédez à l'élément Videos (Vidéos) dans le
menu Home (Accueil), puis appuyez sur la touche
E.
3 · Une fois le disque chargé, appuyez sur la
touche RED (ROUGE) (A).
La plupart des vidéos disponibles dans le commerce
affichent un menu de disque. Pour lire le film stocké
sur le disque, sélectionnez Play (Lecture) dans le
menu du disque, puis appuyez sur E.
| REMARQUE |
2 · Ouvrez le tiroir disque, placez un disque
enregistré par l'utilisateur dans le tiroir, face
imprimée dirigée vers le haut, puis fermez le
tiroir.
4 · Appuyez sur les touches ▲▼ pour
sélectionner CD (CD) ou DVD (DVD), puis
appuyez sur la touche E.
5 · Appuyez sur les touches ◄► pour
sélectionner Videos (Vidéos), Music
(Musique) ou Photos (Photos), puis
appuyez sur la touche E.
6 · Si des fichiers apparaissent à l'écran, passez
à l'étape 7. Par contre, si des dossiers de
fichiers s'affichent, servez-vous des touches
◄►pour sélectionner un dossier, appuyez
sur E, puis allez à l'étape 7.
7 · Servez-vous des touches ◄► pour
sélectionner un fichier à lire ou à afficher, puis
appuyez sur la touche E.
OU
3-1. Une fois le disque chargé, appuyez sur la
touche BLUE (BLEUE) (D).
\ Pour obtenir de plus amples informations sur la lecture vidéo,
consultez la section relative au contrôle de la lecture vidéo,
en page 32.
Lecture d'un disque audio
préenregistré de type commercial
1 · Insérez un CD audio (CD-DA) ou un disque MP3
dans le tiroir disque.
• • Dans le cas d'un CD Audio (CD-DA), la
première piste est lue automatiquement.
Les pistes d'un disque sont lues par ordre
d'enregistrement.
• Dans le cas d'un disque MP3, appuyez sur
les touches ◄►pour sélectionner Music
(Musique), puis appuyez sur la touche E.
E
Liste de lecture
4 . Appuyez sur les touches ◄► pour
sélectionner CD ou DVD, puis appuyez sur la
touche E.
-1
5 . Appuyez sur les touches ▲▼ pour
sélectionner Videos (Vidéos), Music
(Musique) ou Photos (Photos), puis
appuyez sur la touche E.
Piste 001
-1
6-1. Si des fichiers apparaissent à l'écran, passez
à l'étape 7-1. Par contre, si des dossiers de
fichiers s'affichent, servez-vous des touches
▲▼ pour sélectionner un dossier, appuyez
sur E, puis allez à l'étape 7-1.
7-1. Servez-vous des touches ▲▼ pour
sélectionner un fichier à lire ou à afficher, puis
appuyez sur la touche E.
+
00:08 / 05:57
1/12
Piste 001
05:57
Piste 002
04:27
Piste 003
04:07
Piste 004
03:41
Piste 005
03:17
Piste 006
03:35
s Pause
Outils
' Retour
2 · Pour lire une piste en particulier, utilisez les
touches ▲▼ de la télécommande pour
sélectionner la piste, puis appuyez sur la touche
E.
| REMARQUE |
\ Pour de plus amples renseignements sur la lecture de la
musique, voir « Commande de la lecture de musique », page
34.
French
31 |
Media Play
Vous pouvez lire les fichiers multimédia que vous
avez enregistrés sur des DVD ou des CD.
Lecture de disques vidéo offerts
dans le commerce
05
Lecture d'un disque à contenu
enregistré par l'utilisateur
Media Play
Commande de la lecture de vidéo
FUNCTION
VOLUME
MUTE
Vous pouvez commander
- +la lecture des fichiers de vidéo stockés sur un disque Blu-ray, DVD et CD et sur un
périphérique USB. Selon le disque, certaines des fonctions décrites dans ce manuel pourraient ne pas être offertes.
2
1
3
Touches de la télécommande utilisées pour la lecture des vidéos
4
5
7
8
DISC MENU
SUBTITLE
0
HOME
TOOLS
6
9
TITLE MENU
POPUP
REPEAT
INFO
Touches liées à la lecture
Le produit n'émet aucun son en mode Recherche,
RETURN
EXIT
Ralenti ou Image par image.
TUNER
MEMORY MO/ST
6
Lance
laB lecture.
A
C
D
5
DOWN
Arrête EFFECT
la lecture.
UP
7
Interrompt la lecture.
Lecture
rapide
Pendant la lecture, appuyez sur les touches
3 ou .
Chaque fois que vous appuyez sur la touche
3 ou , la vitesse de lecture change.
Lecture au
ralenti
En mode Pause, appuyez sur la touche .
Chaque fois que vous appuyez sur la touche
, la vitesse de la lecture change.
Lecture par
image
En mode Pause, appuyez sur la touche 7.
Chaque fois que vous appuyez sur la touche
7, une nouvelle image apparaît.
Lecture par
saut
Pendant la lecture, appuyez sur la touche
1 ou 2.
Chaque fois que vous appuyez sur la touche
1 ou 2, le disque passe au chapitre ou
au fichier précédent ou suivant.
| 32 French
SOUND
TUNING
Utilisation des menus du disque et des titres,
du menu contextuel et de la liste des titres.
MENU DISQUE
Pendant la lecture, appuyez sur cette
touche pour afficher le menu Disque.
Pendant la lecture, appuyez sur cette touche
pour afficher le menu Titres.
MENU TITRES • Si votre disque comprend une liste
d'écoute, appuyez sur la touche VERTE
(B) pour aller à la liste d'écoute.
MENU
Pendant la lecture, appuyez sur cette touche
CONTEXTUEL pour afficher le menu Contextuel.
MENU DISQUE
ou
MENU TITRES
Pendant la lecture, appuyez sur cette touche
pour afficher la liste des titres.
Utilisation du menu OUTILS
Si le film ou la vidéo propose plusieurs
titres, sélectionnez le titre souhaité.
Playing Time
(Durée de
lecture)
Sélectionnez cette option pour accéder
à un point de lecture spécifique.
Servez-vous des touches numériques
pour saisir le point de lecture.
Plein écran
Sélectionnez pour définir la taille de plein
écran souhaitée. Vous pouvez sélectionner
Original, Mode1 (plus grand) et Mode2 (le
plus grand).
Réglage de
l'image
Sélectionnez pour régler le mode image.
- Picture Mode (Mode image)
▪ Normal (Normal) : Choisissez
ce réglage pour la plupart des
visionneuses.
▪ Cinéma : Ce réglage est le mieux
adapté au visionnement de films.
▪ Utilisateur : Vous permet de
régler respectivement la netteté et
l'atténuation du bruit.
▪ Dynamique : Choisissez ce réglage
pour accentuer la netteté de l'image.
Sélectionnez pour effectuer la lecture du
film depuis le début.
Repeat
(Répéter)
Sélectionnez cette option pour répéter
un titre, un chapitre (pour les disques
BD/DVD uniquement) ou une section
spécifique.
Audio
Sélectionnez pour régler la langue audio
souhaitée.
- Vous pouvez également activer
cette fonction en appuyant sur la
touche AUDIO de la télécommande.
Sous-titres
Sélectionnez pour régler la langue
souhaitée pour les sous-titres.
- Vous pouvez également activer
cette fonction en appuyant sur
la touche SOUS-TITRES de la
télécommande.
Angle
Pour visionner une scène sous un autre
angle. L’option Angle affiche le nombre
d’angles sous lesquels il est possible de
visionner (1/1, 1/2, 1/3, etc.).
Vidéo
BONUSVIEW/
Audio
BONUSVIEW
(Disques BD
uniquement)
Sélectionnez pour régler l'option
Bonusview de votre choix.
| REMARQUE |
\ En fonction du disque ou du support d'enregistrement, le
menu Outils peut varier. Toutes les options pourraient ne pas
s’afficher.
Création d'une liste de lecture vidéo
Vous pouvez créer une liste de lecture de fichiers
vidéo de la même manière que vous le feriez pour
une liste de lecture de fichiers musicaux. Pour les
instructions, reportez-vous à la section « Création
d'une liste de lecture musicale », en page 34.
French
33 |
Media Play
Title (Titre)
Chapter
(Chapitre)
05
Pendant la lecture, appuyez sur la touche TOOLS
(OUTILS).
Menu qui apparaît uniquement pendant la
lecture d’un disque BD/DVD.
Media Play
Commande de l'écoute de musique
Vous pouvez commander la lecture du contenu musical
stocké sur un DVD, un CD ou un périphérique USB.
Touches de la télécommande utilisées
pour la lecture de la musique
- +
FUNCTION
VOLUME
6
MUTE
1
2
3
4
5
6
7
8
DISC MENU
9
TITLE MENU
0
POPUP
1
5
SUBTITLE
HOME
REPEAT
4
TOOLS
1
2
3
INFO
Lecture rapide (CD (CD-DA) audio seulement)
Pendant la lecture, appuyez sur les touches 3 ou .
Chaque fois queRETURN
vous appuyezEXIT
sur la touche 3 ou ,
la vitesse de lecture change.
TUNER
Création d'une liste de lecture musicale
1 · Si la lecture musicale est effectuée à partir du
contenu d'un CD ou d'un DVD commercial,
appuyez sur la touche 5 ou RETURN
(RETOUR) (') . L'écran Music List (Liste des
fichiers musicaux) apparaît. Si vous créez une
liste de lecture à partir de contenus musicaux
stockés sur un disque créé par l'utilisateur
ou sur un périphérique de stockage USB,
accédez à la Liste des fichiers musicaux tel
qu'indiqué dans la section « Lecture des
fichiers stockés sur un périphérique USB
», en page 29 ou « Lecture d'un disque
comportant des contenus enregistrés par
l'utilisateur », en page 30.
2 · Appuyez sur les touches ▲▼◄► pour
accéder au fichier souhaité, puis appuyez
sur la touche YELLOW (JAUNE) (C) afin de
le sélectionner. Répétez la procédure pour
sélectionner d'autres fichiers.
Musique Piste 002
EFFECT
DOWN
6
Répétition de piste
Vous pouvez régler le produit de manière à répéter
certaines pistes.
1 · Pendant la lecture musicale, appuyez sur la
touche TOOLS (OUTILS).
2 · Servez-vous de la touche ◄► pour
sélectionner Off, Track (Piste) ou One (Une),
All (Tout) ou Shuffle (Aléatoire) en Repeat
Mode (Mode de répétition), puis appuyez
sur la touche E.
| 34 French
Piste 006
Piste 007
Piste 008
Piste 009
Piste 010
00:03:47
4 Touche 5 : Arrête la lecture d'une piste.
Touches NUMÉRIQUES : Pendant la lecture de la liste
d'écoute, appuyez sur le numéro de piste souhaité. La
piste sélectionnée est alors lue.
Piste 004
Piste 005
00:03:17
3 Touche 6 : Lit la piste actuellement sélectionnée.
5
Piste 003
00:04:07
UP
Saut : Pendant la lecture, appuyez sur la touche 1
ou 2 pour passer au fichier musical précédent ou
suivant dans la liste.
Piste 002
00:05:57
MEMORY MO/ST
A
B
C
D
laTUNING
lecture
d'une piste.
2 Touche 7 : Interrompre
SOUND
2 Fich. sél. 1/2 Page
Piste 001
00:03:53
CD
00:04:27
00:03:41
00:03:35
00:03:49
00:03:45
Choisir Accès à la page ' Retour
3 · Pour retirer un fichier de la liste de lecture,
accédez au fichier concerné, puis appuyez
sur la touche YELLOW (JAUNE) (C).
4 · Appuyez sur la touche E pour lire les fichiers
sélectionnés. L'écran Playlist (Liste d'écoute)
apparaît.
5 · Pour accéder à la Liste des fichiers musicaux,
5 appuyez sur la touche RETURN
(RETOUR) (').
6 · Pour revenir à la liste de lecture, appuyez sur
la touche E.
| REMARQUE |
\ Vous pouvez créer une Liste d'écoute
comportant jusqu'à 99 pistes sur des CD audio
(CD-DA).
\ Si vous quittez la Liste des fichiers musicaux
pour passer à la liste de lecture et que vous
retournez ensuite sur la Liste des fichiers
musicaux, celle-ci s'exécutera à nouveau
depuis le début.
Commande de la lecture photo
Pendant la lecture, appuyez sur la touche TOOLS
(OUTILS).
Lancer le
diaporama
Sélectionnez pour lancer le diaporama.
Vit. diaporama
Sélectionnez cette option pour régler la
vitesse du diaporama.
Background
Music (Fond
musical)
Sélectionnez pour écouter de la musique
tout en visionnant un diaporama.
Zoom
Sélectionnez cette option pour agrandir
l'image actuellement sélectionnée.
(Agrandit jusqu'à 4 fois)
Pivoter
Sélectionnez cette option pour faire
tourner l'image.
(Fera pivoter l'image dans le sens des
aiguilles d'une montre ou dans le sens
inverse.)
Information
Affiche les informations relatives aux
images, y compris le nom, la taille, etc.
| REMARQUE |
\ En fonction du disque ou du support d'enregistrement, le menu Outils
peut varier. Toutes les options pourraient ne pas s’afficher.
\ Pour activer la fonction de fond musical, le fichier de photos doit se
trouver dans même support d'enregistrement que le fichier de musique.
Toutefois, la qualité du son pourrait être affectée par le débit binaire du
fichier MP3, par la taille de la photo et par la méthode d'encodage.
Création d'une liste de lecture photo
Vous pouvez créer une liste de lecture de photos de
la même manière que vous le feriez pour une liste de
lecture de fichiers musicaux. Pour les instructions,
reportez-vous à la section « Création d'une liste de
lecture musicale », en page 34.
Écoute de la radio
En utilisant les touches de la
télécommande
1 · Appuyez sur la touche FONCTION pour
sélectionner FM.
Définition de la fréquence Mono/Stéréo
Appuyez sur la touche MO/ST.
• Chaque fois que la touche est pressée, le son
permute entre STÉRÉO et MONO.
• Dans un endroit où la réception est mauvaise,
sélectionnez MONO pour obtenir une diffusion
claire, sans interférences.
Préréglage des stations
Exemple : préréglage de la station FM 89.10 dans la
mémoire.
1 · Appuyez sur la touche FONCTION pour
sélectionner FM.
2 · Appuyez sur la touche SYNTONISATION/
CANAL (UP, DOWN) pour sélectionner
<89.10>.
3 · Appuyez sur la touche MÉMOIRE
SYNTONISEUR.
• NUMÉRO clignote sur l’affichage.
4 · Appuyez de nouveau sur la touche MÉMOIRE
SYNTONISEUR.
• Appuyez sur la touche MÉMOIRE
SYNTONISEUR avant que NUMÉRO
disparaisse automatiquement de l’affichage.
• Dès que vous avez appuyé sur la touche
MÉMOIRE SYNTONISEUR, NUMÉRO
disparaît de l’affichage et la station est mise
en mémoire.
5 · Pour prérégler une autre station, répétez les
étapes 2 à 4.
• Pour écouter une station préréglée, appuyez
sur la touche SYNTONISATION CANAL (UP,
DOWN).
French
35 |
Media Play
Utilisation du menu OUTILS
05
Vous pouvez commander la lecture de photos stockées
sur des DVD, des CD ou des périphériques de stockage.
2 · Réglez sur la station souhaitée.
• Pour prérégler la syntonisation 1 : Appuyez sur
la touche 5 pour sélectionner PRÉRÉGLER,
puis sur la touche SYNTONISATION/CANAL
(UP, DOWN) pour sélectionner la station
préréglée.
- Avant de sélectionner les stations
préréglées, vous devez les ajouter à la
mémoire du produit.
• Syntonisation manuelle : Appuyez sur la
touche 5 pour sélectionner MANUEL, puis
sur la touche SYNTONISATION/CANAL (UP,
DOWN) pour sélectionner une fréquence
inférieure ou supérieure.
• Syntonisation automatique : Appuyez sur la
touche 5 pour sélectionner MANUEL, puis
appuyez sur la touche SYNTONISATION/
CANAL (UP, DOWN) et maintenez-la
enfoncée pour rechercher la bande.
Media Play
Utilisation des touches d’effets
spéciaux de la télécommande
Fonction EFFETS SPÉCIAUX
SOUND
EFFECT
Vous permet de sélectionner un mode qui optimise le son.
MP3 ENHANCER (REHAUSSEUR MP3) SMART
SOUND POWER BASS (POWER BASS) OFF
• MP3 ENHANCER : Permet d’améliorer le son (ex.
musique mp3). Vous pouvez rehausser le son de niveau
MP3 (24 kHz, 8 bits) au son de niveau CD (44,1 kHz, 16
bits).
• SMART SOUND : Règle et stabilise le niveau de
volume, en empêchant les variations de volume
importantes lors d'un changement de canal ou
durant les transitions entre scènes.
• POWER BASS : Augmente le volume des tonalités
basses et produit des effets sonores sourds.
• OFF : Sélectionnez cette option pour une écoute normale.
Fonction Dolby Pro Logic II
Vous pouvez sélectionner le mode audio Dolby Pro
Logic II de votre choix.
• CINÉMA : Rend une piste sonore plus réaliste.
• MUSIQUE : Lorsque vous écoutez de la musique,
vous pouvez apprécier les effets sonores comme si
vous écoutiez un vrai concert.
• MATRIX : Sélectionnez pour écouter le son
ambiophonique multicanal.
• PROLOG : Sélectionnez pour écouter une source de
son 2 canaux en son ambiophonique 5.1 canaux
avec toutes les enceintes activées.
- Selon le signal d'entrée, une/des enceinte(s)
pourrai(en)t ne pas produire de son.
| 36 French
Utilisation de BD-LIVE™
1 · Connectez le produit au réseau.
(Voir page 19.)
2 · Configurez les paramètres réseau.
(Voir pages 26~27.)
Après avoir connecté le produit au réseau, vous
pouvez apprécier plusieurs contenus de services
cinématographiques offerts sur des disques
compatibles avec la technologie BD-LIVE.
1 · Insérez une clé USB dans la prise USB
située à l'avant du produit et vérifiez l'espace
mémoire disponible via BD Data Management
(Gestion données Blu-ray). Le périphérique
de mémoire doit avoir au moins 1 Go
d'espace libre pour satisfaire aux exigences
des services BD-LIVE.
2 · À l'écran Accueil, sélectionnez Paramètres,
puis appuyez sur la touche E.
3 · Sélectionnez Système, puis appuyez sur la
touche E.
4 · Sélectionnez Gestion données Blu-ray, puis
appuyez sur la touche E.
5 · Sélectionnez Changer périph., puis appuyez
sur la touche E.
6 · Sélectionnez USB DISK, puis appuyez sur la
touche E.
7 · Insérez un disque Blu-ray prenant en charge
la technologie BD-LIVE.
8 · Sélectionnez un élément dans les contenus
de service BD-LIVE fournis par le fabricant de
disque.
| REMARQUE |
\ L’utilisation du service BD-LIVE ainsi que des contenus
fournis peut varier selon le fabricant du disque.
Utilisation de la fonction AllShare
Pour accéder aux fichiers situés sur l'ordinateur et
les lire après avoir configuré AllShare, exécutez les
étapes suivantes :
1 · Allumez l'ordinateur, le téléviseur et le cinéma
maison.
2 · Assurez-vous que le serveur partagé
d'AllShare s'exécute sur l'ordinateur.
3 · Sur le cinéma maison, appuyez sur la touche
BLUE (BLEUE) (D) (View Devices (Afficher
les appareils)).
4 · Servez-vous de la touche de direction vers
la gauche ou la droite pour sélectionner
l'ordinateur sous Device List (Liste
d'appareils).
5 · Sélectionnez le type de fichier que vous
souhaitez afficher ou lire parmi les options
Videos (Vidéos), Photos (Photos) ou Music
(Musique), puis appuyez sur E.
6 · Servez-vous de la touche ◄► pour
sélectionner le dossier contenant le type
de fichier que vous avez sélectionné, puis
appuyez sur E. La liste des fichiers
s'affiche.
7 · Sélectionnez le fichier que vous souhaitez
afficher ou lire, puis appuyez sur E.
| REMARQUE |
\ Vous pouvez créer des listes de lecture à partir des
fichiers stockés sur l'ordinateur de la même manière que
vous le feriez pour créer des listes de lecture depuis des
fichiers stockés sur les périphériques USB et les disques.
\ À part quelques rares exceptions, vous pouvez
commander la lecture des fichiers stockés sur l'ordinateur
de la même façon que vous le feriez pour la lecture de
fichiers contenus sur des périphériques USB ou des
disques.
French
37 |
Media Play
Suivez les instructions figurant dans le guide
d'utilisation d'AllShare pour configurer AllShare
sur votre ordinateur, et pour repérer les dossiers
et fichiers que vous souhaitez partager avec le
cinéma maison.
05
AllShare vous permet d'accéder aux fichiers
stockés sur votre ordinateur et de les lire via votre
cinéma maison.
\ Vous pouvez également accéder aux fichiers stockés
sur votre ordinateur en sélectionnant d'abord Videos
(Vidéos), Photos (Photos) ou Music (Musique) dans l'écran
Home (Accueil), puis votre ordinateur dans la liste de
périphériques qui apparaît.
Annexes
Information complémentaire
Remarque
SORTIE HDMI
Connexions
• Selon votre téléviseur, certaines résolutions de sortie HDMI pourraient être incompatibles.
• Vous devez disposer d'une connexion HDMI pour visionner les vidéos en 3D.
• Un câble HDMI qui est trop long pourrait entraîner du bruit à l’écran. Si c’est le cas, réglez la fonction
Couleurs profondes HDMI à Désac. dans le menu.
Paramètres 3D
• Sur certains disques 3D, pour arrêter un film en cours de lecture 3D, appuyez une seule fois sur la
touche 5. La lecture du film est alors interrompue et l'option du mode 3D est désactivée.
Pour changer la sélection de l'option 3D lorsque vous lisez un film en 3D, appuyez une seule fois sur
la touche 5. Le menu Blu-ray apparaît. Appuyez de nouveau sur la touche 5, puis sélectionnez
Paramètres 3D dans le menu Blu-ray.
• Selon le contenu et la position de l'image sur l'écran de votre téléviseur, vous pouvez voir apparaître
des barres verticales noires sur la droite ou la gauche de l'écran ou sur les deux côtés.
Format d'image télé
• Selon le type de disque utilisé, certains formats d'image pourraient ne pas être disponibles.
• Si vous sélectionnez un format d’image différent de celui de votre téléviseur, il est possible que l’image
affichée soit déformée.
• Si vous sélectionnez 16:9 Original, le téléviseur pourra afficher dans le format 4:3 Pillarbox (bandes
noires de chaque côté de l’image).
BD Wise (produits Samsung uniquement)
Paramètres
• Lorsque la fonction BD Wise est activée, le paramètre Résolution est automatiquement défini à BD
Wise et BD Wise apparaît dans le menu Résolution.
• Si le produit est connecté à un appareil ne prenant pas en charge BD Wise, vous ne pouvez pas
utiliser la fonction BD Wise.
• Pour assurer un bon fonctionnement de BD Wise, veillez à définir la résolution BD Wise à Activ. dans le
menu du produit et dans celui du téléviseur.
Sortie numérique
• Assurez-vous de sélectionner la sortie numérique appropriée, sinon vous n'entendrez aucun son ou juste un son très fort.
• Si l'appareil HDMI (récepteur A/V, téléviseur) n'est pas compatible avec les formats compressés (Dolby digital, DTS), le
signal audio est produit au format PCM.
• Les DVD courants ne sont pas dotés des fonctionnalités audio BONUSVIEW et Effet sonores de navigation.
• Certains disques Blu-ray ne sont pas dotés des fonctionnalités audio BONUSVIEW et Effets sonores de navigation.
• La configuration du paramètre Sortie numérique n’a aucune incidence sur la sortie audio analogique (G/D) ou HDMI de votre
téléviseur.Elle a une incidence sur la sortie audio optique et HDMI lorsque votre produit est connecté à un récepteur A/V.
• Si vous lisez des pistes sonores MPEG, le signal audio sera produit au format PCM indépendamment de vos sélections
de sortie numérique (PCM ou flux binaire).
Connexion Internet BD-Live
• Il est possible que la connexion Internet soit limitée lorsque vous utilisez des contenus BD-LIVE.
| 38 French
Anynet+ (HDMI CEC)
• En mode mémoire externe, la lecture du disque pourrait s’arrêter si vous déconnectez le
périphérique USB en cours de lecture.
• Seuls les périphériques USB de format de système de fichier FAT (étiquette de volume DOS 8.3) sont
pris en charge.
Nous vous recommandons d'utiliser des périphériques USB prenant en charge le protocole USB 2.0
avec une vitesse de lecture/d'écriture supérieure ou égale à 4 Mo/s.
• La fonction Reprise de la lecture pourrait ne pas fonctionner après le formatage du périphérique de stockage.
• La capacité totale de mémoire disponible pour l'option Gestion données Blu-ray peut varier selon les conditions.
Paramètres
DivX® Vidéo à la demande
• Pour de plus amples renseignements sur DivX(R) VOD, visitez "http://vod.divx.com".
Paramètres des enceintes
• Lorsque Sélection enceinte est réglé à Enceinte télé, l’audio est produite par les enceintes du téléviseur.
Audio HDMI
• Lorsque la sortie audio HDMI est produite par l’enceinte du téléviseur, elle est automatiquement souséchantillonnée à 2 canaux.
Canal retour audio
• Lorsque la fonction Anynet+(HDMI-CEC) est désactivée, la fonction Canal de retour audio n'est pas
disponible.
• L’utilisation d’un câble HDMI non certifié pour utiliser la fonction ARC (Canal retour audio) pourrait
entraîner un problème de compatibilité.
• La fonction ARC est disponible à condition que le téléviseur connecté prenne en charge la fonction ARC.
Sortie numérique
• La sortie numérique peut être activée lorsque Sélection enceinte est réglé à Enceinte télé.
Lecture de fichiers vidéo
• Les fichiers vidéo qui ont un débit binaire élevé de 20 Mbit/s ou plus altèrent la capacité des
fonctionnalités du produit et pourraient s'arrêter en cours de lecture.
Lecture
Sélection de la langue de la bande son
• L’indicateur ◄► ne s’affichera pas à l’écran si la section BONUSVIEW ne contient aucun
paramètre BONUSVIEW audio.
• Les langues proposées par la fonction Langue audio dépendent des langues encodées sur le
disque. Par conséquent, cette fonction ou certaines langues pourraient ne pas être proposées.
• Certains disques Blu-ray vous autorisent à sélectionner la piste sonore anglaise PCM ou Dolby
Digital.
French
39 |
Annexes
Gestion données BD
07
• Selon votre téléviseur, il est possible que certaines résolutions de sortie HDMI ne fonctionnent pas.
Veuillez vous reporter au guide d'utilisation de votre téléviseur.
• Cette fonction ne sera pas disponible si le câble HDMI ne prend pas en charge le format CEC.
• Si votre téléviseur Samsung dispose d'un logo Anynet+, cela signifie qu'il est compatible Anynet+.
Annexes
Sélection de la langue des sous-titres
Lecture
• Selon le disque Blu-ray ou le DVD utilisé, il se peut que vous puissiez changer la langue des
sous-titres dans le Menu du disque. Appuyez sur la touche DISC MENU.
• Cette fonction dépend de la sélection des sous-titres encodés sur le disque et peut ne pas être
disponible sur tous les disques Blu-ray/DVD.
• L'information concernant la fonction principale ou le mode BONUSVIEW s’affichera également si
le disque Blu-ray comprend une section BONUSVIEW.
• Cette fonction modifie à la fois les sous-titres principaux et secondaires.
• Le nombre total de sous-titres principaux et secondaires s’affiche.
Lecture des fichiers JPEG
• Vous ne pouvez pas agrandir les sous-titres ou les graphiques PG pour les afficher en mode
plein écran.
Mode Dolby Pro Logic II
• Avant de sélectionner le mode Dolby Pro Logic II, connectez votre périphérique aux prises
d’ENTRÉE AUDIO (G et D) du produit. Si vous le connectez à une seule entrée (G ou D), vous ne
pouvez pas entendre le son ambiophonique.
Utilisation de la touche TOOLS (OUTILS) pendant la lecture des fichiers d'images
Allshare Play
• Si le système est connecté à un téléviseur compatible avec BD Wise sur lequel BD Wise est réglé
à Activ., le menu Paramètres image n’apparaît pas.
• La fonction Fond musical ne fonctionnera pas si le fichier de musique et le fichier de photos ne
se trouvent pas sur le support d'enregistrement. De plus, la qualité sonore pourrait être atténuée
par le débit binaire du fichier MP3, la taille des photos et la méthode d'encodage.
Lecture de contenu à partir d'un périphérique de stockage USB
• Vous devez retirer le périphérique USB avec précaution (en utilisant la fonction « Retirer périph.
USB ») pour éviter d'endommager la mémoire USB. Appuyez sur la touche HOME (ACCUEIL)
pour aller au menu Accueil, sélectionnez le bouton JAUNE (C), puis appuyez sur la touche E.
• Si vous insérez un disque lors de la lecture un périphérique de stockage USB, le mode de
fonctionnement est modifié pour "BD / DVD" automatiquement.
| 40 French
Résolution selon le mode de sortie
Lecture des contenus Blu-ray/dTes e-contenus/numériques
❏
HDMI/connecté
HDMI/non connecté
Mode HDMI
Disque Blu-ray
E-contenus/
contenus numériques
Mode VIDÉO
Mode VIDÉO
1080p à 60F
576i/480i
-
BD Wise
Résolution du
disque Blu-ray
Auto
Résolution max.
de l'entrée du
téléviseur
Résolution max. de
l'entrée du téléviseur
576i/480i
-
1080p à 60F
1080p à 60F
1080p à 60F
576i/480i
-
Fréquence cinéma : Auto
(24 ips)
1080p à 24F
1080p à 24F
576i/480i
-
1080i
1080i
1080i
576i/480i
576i/480i
720p
720p
720p
576i/480i
576i/480i
576p/480p
576p/480p
576p/480p
576i/480i
576i/480i
576i/480i
-
-
-
576i/480i
Lecture de DVD
Configuration
Sortie
HDMI/connecté
HDMI/non connecté
Mode HDMI
Mode VIDÉO
Auto
Résolution max. de l'entrée du
téléviseur
576i/480i
-
1080p à 60F
1080p à 60F
576i/480i
-
1080i
1080i
576i/480i
576i/480i
720p
720p
576i/480i
576i/480i
576p/480p
576p/480p
576i/480i
576i/480i
576i/480i
-
-
576i/480i
BD Wise
480i
576i/480i
Mode VIDÉO
-
French
41 |
Annexes
Configuration
Sortie
07
❏
Annexes
Sélection des sorties numériques
Flux binaire
(non traité)
Flux binaire
Flux binaire
(réencodé en Dolby
(réencodé en DTS)
D)
Configuration
PCM
Connexion
Récepteur A/V
compatible HDMI
Récepteur A/V
compatible HDMI
PCM
Jusqu'à PCM 7.1 ca
PCM
Réencodé en DTS
Dolby Digital
Jusqu'à PCM 7.1 ca
Dolby Digital
Réencodé en DTS
Dolby Digital
Plus
Jusqu'à PCM 7.1 ca
Dolby Digital Plus
Réencodé en DTS
Jusqu'à PCM 7.1 ca
Dolby TrueHD
Réencodé en DTS
Jusqu’à 6.1 canaux
PCM
DTS
Réencodé en DTS
Jusqu'à PCM 7.1 ca
Audio haute résolution
DTS-HD
Réencodé en DTS
Jusqu'à PCM 7.1 ca DTS-HD Master Audio
Réencodé en DTS
Flux de
données audio Dolby TrueHD
sur disque
Blu-ray
DTS
Audio haute
résolution
DTS-HD
DTS-HD
Master Audio
PCM
Flux de
Dolby Digital
données audio
sur DVD
DTS
Résolution
pour disque
Blu-ray
Aucune
PCM 2 ca
Jusqu’à 5.1 canaux
PCM
Jusqu’à 6.1 canaux
PCM
Décode la principale
fonction audio et
le flux de données
audio BONUSVIEW en
données PCM et ajoute
des effets sonores de
navigation.
Récepteur A/V
compatible HDMI
Récepteur A/V
compatible HDMI
Réencodé en
Dolby Digital *
Réencodé en
Dolby Digital *
Réencodé en
Dolby Digital *
Réencodé en
Dolby Digital *
Réencodé en
Dolby Digital *
Réencodé en
Dolby Digital *
PCM 2 ca
PCM 2 ca
Réencodé en
Dolby Digital *
PCM 2 ca
Dolby Digital
Dolby Digital
Dolby Digital
DTS
DTS
DTS
Produit uniquement
le flux de données
audio de la fonction
principale, de sorte
que le récepteur A/
V puisse décoder le
flux binaire audio.
Vous n’entendrez ni
l'audio BONUSVIEW ni
les effets sonores de
navigation.
Décode la principale
fonction audio et le flux
binaire audio BONUSVIEW
en données PCM et ajoute
des effets sonores de
navigation, puis réencode
les données audio PCM en
flux binaire DTS.
Décode la principale
fonction audio et le flux
audio BONUSVIEW en
données PCM et ajoute
des effets sonores
de navigation, puis
réencode les données
audio PCM en flux
binaire Dolby Digital ou
PCM.
* Si le flux source est 2 ca, le réglage « Dolby D. réencodé » ne sera pas appliqué. La sortie sera PCM 2 ca.
Les disques Blu-ray peuvent contenir trois types de flux audio :
- Principale fonctionnalité audio : Piste sonore de la fonction principale.
- Fonctionnalité audio BONUSVIEW : Piste sonore supplémentaire, par exemple, le commentaire du
réalisateur ou de l’acteur.
- Effets sonores de navigation : Lorsque vous choisissez une quelconque navigation de menu, les effets
sonores de navigation peuvent être audibles. Les effets sonores de navigation sont différents sur
chaque disque Blu-ray.
| 42 French
Dépannage
Vérification/Solution
Le disque ne peut pas être
éjecté.
• Le cordon d’alimentation est-il solidement branché dans la prise?
• Coupez l’alimentation électrique, puis rétablissez-la.
La lecture ne démarre pas.
• Vérifiez le numéro de région du disque Blu-ray/DVD. Il arrive que les disques Blu-ray/DVD
achetés à l'étranger ne puissent pas être lus.
• Les CD-ROM et les DVD-ROM ne peuvent pas être lus sur ce produit.
• Assurez-vous que le niveau de classement est approprié.
La lecture ne démarre pas
immédiatement lorsque la
touche Lecture/Pause est
pressée.
Aucun son n’est produit.
Le son est uniquement
produit par quelques
enceintes, pas par les 6.
Le son ambiophonique
Dolby Digital 5.1 canaux
n’est pas produit.
La télécommande ne
fonctionne pas.
• Le disque tourne mais
aucune image n’est
produite.
• La qualité est mauvaise et
l’image tremble.
La langue de l'audio et les
sous-titres ne fonctionnent pas.
L’écran des menus
n’apparaît pas, même
lorsque la fonction du menu
est sélectionnée.
• Le disque est-il déformé ou sa surface est-elle rayée?
• Nettoyez le disque.
• Le cinéma maison n'émet pas de son pendant la lecture accélérée, au ralenti ou image par image.
• Les enceintes sont-elles correctement connectées? La configuration des enceintes est-elle
correctement définie?
• Le disque est-il très endommagé?
•
•
•
•
Avec certains disques Blu-ray/DVD, le son est produit uniquement par les enceintes avant.
Vérifiez si les enceintes sont correctement connectées.
Réglez le volume.
Lors de l’écoute d’un CD, de la radio ou du téléviseur, le son est produit uniquement par
les enceintes avant.
• La marque « Dolby Digital 5.1 CH » est-elle apposée sur le disque? Le son ambiophonique Dolby
Digital 5.1 canaux est produit uniquement si le disque a été enregistré avec un son 5.1 canaux.
• La langue audio est-elle correctement définie à Dolby Digital 5.1-CH dans l’affichage de
l’information?
• Utilisez-vous la télécommande dans la limite opérationnelle et dans l’angle approprié
par rapport au détecteur?
• Les piles sont-elles épuisées?
•
•
•
•
Le téléviseur est-il sous tension?
Les câbles vidéo sont-ils correctement connectés?
Le disque est-il sale ou endommagé?
La lecture d’un disque de fabrication médiocre pourrait être impossible.
• La langue de l'audio et les sous-titres ne fonctionnent pas si le disque n’est pas doté de
ces fonctions.
• Le disque que vous utilisez contient-il des menus?
French
43 |
Annexes
Problème
07
Reportez-vous au tableau ci-dessous lorsque ce produit ne fonctionne pas correctement. Si le problème
que vous rencontrez n’est pas répertorié ci-dessous ou si les consignes ne vous sont d’aucune aide,
éteignez l’appareil, débranchez le cordon d’alimentation et communiquez avec le revendeur agréé le plus
proche ou avec un Centre de services Samsung Electronics.
Annexes
Problème
Le format d’image ne peut
pas être modifié.
• Le produit ne fonctionne
pas.
• Le produit ne fonctionne pas
normalement.
Vous avez oublié le mot de
passe pour le niveau de
classement.
Impossible de recevoir les
émissions de radio.
Aucun son n’est émis lors
de l’écoute de l’audio du
téléviseur par le produit.
« Non disponible » apparaît
à l’écran.
Il est possible que l'écran du
téléviseur n'affiche pas
d'image lorsque la résolution
de la sortie HDMI n'est pas
prise en charge par le
téléviseur (par exemple 1080p).
Aucune sortie HDMI.
Écran de sortie HDMI
anormal.
Fonction AllShare Play
Les dossiers partagés sont
visibles au moyen de
AllShare Play,
mais pas les fichiers.
| 44 French
Vérification/Solution
• Le produit peut lire les disques 16:9 Blu-ray/DVD en mode 16:9 Plein écran, 4:3 Letter Box
ou 4:3 Pan-Scan, mais les disques 4:3 Blu-ray/DVD ne sont lus qu’en format d’image 4:3.
Reportez-vous à la pochette du disque Blu-ray, puis sélectionnez la fonction appropriée.
• En mode VEILLE, appuyez et maintenez enfoncée pendant 5 secondes la touche 5 de
la télécommande.
- L'utilisation de la fonction RÉINITIALISER effacera tous les paramètres enregistrés.
N’utilisez cette fonction que si cela est vraiment nécessaire.
• Alors que le produit ne contient pas de disque, appuyez sur le bouton 5 du produit
pendant plus de 5 secondes. INIT apparaît sur l'affichage et tous les paramètres
reviennent à leurs valeurs par défaut.
Appuyez sur la touche MARCHE/ARRÊT.
- L'utilisation de la fonction RÉINITIALISER effacera tous les paramètres enregistrés.
N’utilisez cette fonction que si cela est vraiment nécessaire.
• L’antenne est-elle correctement branchée?
• Si le signal d’entrée de l’antenne est faible, installez une antenne FM extérieure dans
une zone où la réception est bonne.
• Si le bouton OUVRIR/FERMER ^ est pressé pendant l’écoute de l’audio du téléviseur à
l’aide des fonctions D. IN ou AUX, les fonctions du disque Blu-ray/DVD discsont activées
et le son du téléviseur est coupé.
• Aucune fonction ou action ne peut être exécutée pour le moment car :
1. Le logiciel du disque Blu-ray/DVD empêche l'exécution.
2. Le logiciel du disque Blu-ray/DVD ne prend pas en charge la fonction (p. ex., angles)
La fonction n'est pas disponible pour le moment.
4. Vous avez demandez un numéro de titre ou de chapitre ou un moment de recherche
qui n'est pas compris.
• Appuyez sur la touche 5 du panneau avant et maintenez-la enfoncée pendant plus
de 5 secondes lorsqu'il n'y a pas de disque inséré dans le produit. Tous les paramètres
sont rétablis sur leur valeur par défaut définie en usine.
• Vérifiez la connexion entre le téléviseur et la prise HDMI du produit.
• Vérifiez si votre téléviseur prend en charge les résolutions d'entrée HDMI
576 p/480 p/720 p/1080 i/1080 p.
• Si du bruit aléatoire est produit à l'écran, cela signifie que le téléviseur ne prend pas en
charge le système HDCP (Système de protection des contenus numériques en haute
définition).
• AllShare Play montre uniquement les fichiers correspondant aux catégories Photos,
Musique et Films. Les fichiers qui n'entrent dans aucune de ces catégories pourraient
ne pas s'afficher.
Problème
Annexes
La connexion AllShare Play
entre le téléviseur et
l’ordinateur est instable.
• Vérifiez si le réseau est instable.
• Vérifiez si le câble réseau est correctement connecté et si le réseau n'est pas
surchargé.
07
La vidéo est lue par
intermittence.
Vérification/Solution
• L’adresse IP sous le même sous-réseau doit être unique sinon, la collision IP peut
entraîner ce problème.
• Vérifiez si votre pare-feu est activé.
Si c'est le cas, désactivez-le.
BD-LIVE
Je ne parviens pas à me
connecter au serveur
BD-LIVE.
Une erreur s'est produite en
cours d'utilisation du service
BD-LIVE.
• Vérifiez si la connexion réseau est établie en utilisant la fonction État du réseau.
• Vérifiez si le périphérique USB est connecté au produit.
• Le périphérique de mémoire doit avoir au moins 1 Go d'espace libre pour satisfaire aux
exigences des services BD-LIVE.
Vous pouvez vérifier la capacité disponible sous Gestion données Blu-ray. (Voir page 39)
• Vérifiez si l’option Connexion Internet BD-LIVE est réglée à Permettre (Tout).
• Si toutes ces tentatives échouent, communiquez avec le fournisseur du contenu ou
mettez à niveau au micrologiciel de la version la plus récente.
• Le périphérique de mémoire doit avoir au moins 1 Go d'espace libre pour satisfaire aux
exigences des services BD-LIVE.
Vous pouvez vérifier la capacité disponible sous Gestion données Blu-ray. (Voir page 39)
| REMARQUE |
\ Lorsque les paramètres par défaut sont rétablis, toutes les données utilisateur Blu-ray enregistrées sont effacées.
French
45 |
Annexes
Caractéristiques techniques
Général
Syntoniseur FM
Poids
2.5 kg
Dimensions
Plage de températures de
fonctionnement
Plage de taux d'humidité
430 (L) x 50 (H) x 250 (P) mm
Rapport signal/bruit
55 dB
Sensibilité utilisable
12 dB
0.5 %
BD (Blu-ray Disc)
Vitesse de lecture : 9,834 m/s
Disque
CD : 5 inches (DISQUE COMPACT)
CD : 3 1/2 inches (DISQUE COMPACT)
Sortie vidéo
Vidéo composite
Vidéo/Audio
HDMI
| 46 French
10 % à 75 %
Distorsion harmonique totale
DVD (Digital Versatile Disc)
Amplifier
+5 °C à +35 °C
Vitesse de lecture : 6,98 à 7,68 m/s
Temps de lecture approx. (disque monoface et monocouche) :
135 min
Vitesse de lecture : 4,8 à 5,6 m/s
Durée de lecture maximum : 74 min
Vitesse de lecture : 4,8 à 5,6 m/s
Durée de lecture maximum : 20 min
1 canal : 1,0 V crête à crête (charge 75 Ω)
Disques Blu-ray : 576i/480i
1080p, 1080i, 720p, 576p/480p
Audio PCM multicanal, flux binaire audio, audio PCM
Sortie de l’enceinte avant
80W x 2(3Ω)
Sortie enceinte centrale
80W(3Ω)
Sortie enceinte ambiophonique
80W x 2(3Ω)
Sortie du caisson des basses
100W(3Ω)
Courbe de résonnance
DVD : 480i
Entrée analogique
20Hz~20kHz (±3dB)
Entrée numérique
20Hz~40kHz (±4dB)
Rapport signal/bruit
70dB
Séparation des canaux
60dB
Sensibilité d’entrée
(AUX)500mV
Système
d'enceintes
Système d'enceintes 5.1 canaux
Avant
Centrale
Caisson des basses
3Ω
3Ω
3Ω
140Hz~20kHz
140Hz~20kHz
40Hz ~ 160Hz
87dB/W/M
87dB/W/M
88dB/W/M
07
Entrée nominale
80W
80W
80W
100W
Entrée maximale
160W
160W
160W
200W
(Unit : mm)
HT-E3500
Avant
Ambiophonique
Centrale
Caisson des basses
77 x 107 x 68
77 x 107 x 68
228 x 77 x 70
155 x 300 x 285
Avant
Ambiophonique
HT-E3530
Dimensions
(L x H x P)
Enceinte
89 x 1053 x 71
* Caisson des basses : 77 x 107 x 68
230 x 25 x 230
Centrale
Caisson des basses
228 x 77 x 70
155 x 300 x 285
HT-E3550
Avant
Ambiophonique
Centrale
89 x 1053 x 71
89 x 1053 x 71
* Caisson des basses : * Caisson des basses : 228 x 77 x 70
230 x 25 x 230
230 x 25 x 230
Caisson des basses
155 x 300 x 285
(Unit : kg)
HT-E3500
Poids
Avant
Ambiophonique
Centrale
Caisson des basses
0.4 kg
0.4 kg
0.5 kg
2.9 kg
Avant
Ambiophonique
Centrale
Caisson des basses
2.9 kg
0.4 kg
0.5 kg
2.9 kg
HT-E3530
HT-E3550
Avant
Ambiophonique
Centrale
Caisson des basses
2.9 kg
2.9 kg
0.5 kg
2.9 kg
• Samsung Electronics Co., Ltd se réserve le droit de modifier les caractéristiques techniques sans
préavis.
• Le poids et les dimensions sont approximatifs.
• La conception et les caractéristiques techniques sont susceptibles d’être modifiées sans préavis.
• Pour l’alimentation électrique et la consommation d'électricité, veuillez vous reporter à l’étiquette
apposée sur le produit.
• Les débits réseau égaux ou inférieurs à 10 Mbps ne sont pas pris en charge.
French
47 |
Annexes
Impédance
3Ω
Bande de
140Hz~20kHz
fréquences
Niveau de pression
87dB/W/M
sonore de la sortie
Ambiophonique
Communiquez avec SAMSUNG DANS LE MONDE ENTIER
Pour toutes questions ou observations concernant les produits Samsung, veuillez communiquer avec le Centre
de service à la clientèle SAMSUNG.
` Asia Pacific
Pays
Centre de contact
AUSTRALIA
NEW ZEALAND
CHINA
1300 362 603
0800 SAMSUNG (0800 726 786)
400-810-5858
HONG KONG
(852) 3698 4698
Site Web
www.samsung.com
www.samsung.com
www.samsung.com
www.samsung.com/hk
www.samsung.com/hk_en/
VIETNAM
1800 1100 11
3030 8282
1800 3000 8282
1800 266 8282
0800-112-8888
021-5699-7777
1800-88-9999
1-800-10-SAMSUNG(726-7864) for PLDT
1-800-3-SAMSUNG(726-7864) for Digitel
1-800-8-SAMSUNG(726-7864) for Globe
02-5805777
1800-SAMSUNG(726-7864)
1800-29-3232
02-689-3232
0800-329-999
0266-026-066
1 800 588 889
U.A.E
OMAN
KUWAIT
BAHRAIN
Egypt
JORDAN
IRAN
Morocco
Saudi Arabia
800-SAMSUNG (726-7864)
800-SAMSUNG(726-7864)
183-2255
8000-4726
08000-726786
800-22273
021-8255
080 100 2255
9200-21230
www.samsung.com
www.samsung.com
www.samsung.com
www.samsung.com
www.samsung.com
www.samsung.com
www.samsung.com
www.samsung.com
www.samsung.com
NIGERIA
0800-726-7864
0800-10077
0302-200077
8000 0077
800-00-0077
7095- 0077
0800 724 000
0800 300 300
0685 88 99 00
0860-SAMSUNG(726-7864 )
www.samsung.com
INDIA
INDONESIA
MALAYSIA
PHILIPPINES
SINGAPORE
THAILAND
TAIWAN
` Middle East
` Africa
Ghana
Cote D’ Ivoire
Senegal
Cameroon
KENYA
UGANDA
TANZANIA
SOUTH AFRICA
www.samsung.com
www.samsung.com
www.samsung.com
www.samsung.com
www.samsung.com
www.samsung.com
www.samsung.com
www.samsung.com
www.samsung.com
www.samsung.com
www.samsung.com
www.samsung.com
www.samsung.com
www.samsung.com
www.samsung.com
www.samsung.com
AH68-02442M-00