1
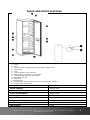
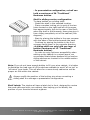
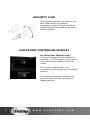
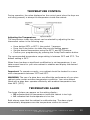
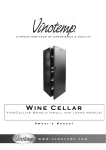
A PROUD HERITAGE OF EXPERIENCE & QUALITY
Vinocave Wine Cellar
VT-CAVE Models
O w n e r ’ s
M a n u a l
W W W . V I N O T E M P . C O M
Your Wine Cellar
This unit can be used for Storage and/or Service. Vinocave wine cabinets are
available in both glass door and solid door models.
Serving Wines
Storing wines at the proper temperature is important. To preserve them as
long as possible wine should be stored at approximately 55° Fahrenheit.
However, the chart below suggests the optimal drinking temperature for the
different styles of wine.
°C
19
18
17
15
14
13
12
11
10
9
8
7
1
°F
66
64
62
59
57
55
54
52
50
48
46
45
Wine Style
Armagnac, Brandy, Cognac
Full Bodied Red wines, Shiraz
Tawny Port
Medium Bodied Red Wines
Amontillado Sherry
Light Bodied Red Wines
Full Bodied White Wines
Medium Bodied White Wines
Rosé, Light Bodied White Wines
Vintage Sparkling
Fino Sherry
Non Vintage Sparkling
W W W . V I N O T E M P . C O M
General Operating Instructions
Remove all packaging and labels from your wine cellar. Be sure that all parts
have been included before discarding any packaging materials. You may
want to keep the box and packing materials for use at a later date.
Upon receipt of unit and inspection, the supply cord must be replaced if it is
damaged. Contact our customer service at 1-800-777-8466.
•
•
Let the unit rest, UNPLUGGED for 48 hours once you have it placed in
your home.
Please fully read the instruction manual.
Please read and follow all safety rules
and operating instructions before using.
17631 South Susana Road, Rancho Dominguez, California 90221
[email protected]
2
TABLE OF CONTENTS
PARTS AND SPECIFICATIONS ......................................................... 4
IMPORTANT SAFETY INSTRUCTIONS ................................................ 5
CORD INSTRUCTIONS.................................................................... 6
INSTALLATION INSTRUCTIONS ....................................................... 6
LAYOUT AND LOADING RECOMMENDATIONS .................................... 7
SECURITY LOCK............................................................................ 9
ELECTRONIC CONTROLLER/DISPLAY ................................................ 9
TEMPERATURE CONTROL.............................................................. 10
TEMPERATURE ALARM.................................................................. 10
CLEANING AND CARE .................................................................. 11
EVERYDAY CABINET CARE TIPS..................................................... 11
TROUBLESHOOTING .................................................................... 12
FREQUENTLY ASKED QUESTIONS .................................................. 13
3
W W W . V I N O T E M P . C O M
PARTS AND SPECIFICATIONS
1.
2.
3.
4.
5.
6.
7.
8.
9.
10.
11.
12.
13.
14.
Cabinet Body
Hinge
Door
Universal shelf (storage and/or presentation configuration)
Hygrometer
Lock
Thermodynamic pump opening
Rigidity Bar (not present on all models)
Universal shelf (sliding configuration)
Adjustable foot (4)
Wire shelf
Storage tray
Temperature display (position may vary for glass door models)
Temperature adjustments
Item(s)
VT-CAVE SD and VT-CAVE G
Bottle Capacity
Approx. 267
Dimension (HxWxD)
71.25"×26.8"×26.8"
Power Consumption
1.2kw.h/24h
Cooling System
R134a
Ambient Temp
32~95°F Solid Door / Max 86°F Glass Door
Temperature Range
48~59°F
Rated Voltage / Rated Frequency
115V / 60Hz
Input Power
140W
17631 South Susana Road, Rancho Dominguez, California 90221
[email protected]
4
IMPORTANT SAFETY INSTRUCTIONS
When using an electrical appliance, basic precautions should be followed to
reduce the risk of fire, electric shock, and personal injury.
1. Use this appliance only as described in this manual. Other users are
not recommended, as it may cause fire, electric shock or personal
injury.
2. This product is intended for indoor, household use.
3. To protect against electric shock, do not immerse unit, plug or cord in
water or other liquids.
4. Keep away from children.
5. Unplug from the outlet when not in use, when moving from one
location to another or before cleaning.
6. To disconnect the appliance, grip the plug and pull it from the wall
outlet. Never pull by the cord.
7. Do not operate the appliance in the presence of explosive and/or
flammable fumes.
8. Do not place the appliance or any of its parts near an open flame,
cooking or other heating appliance.
9. Do not operate the appliance with a damaged cord or plug. If the
product malfunctions, or if it is dropped or damaged in any manner,
do not use.
10. The use of attachments is not recommended and may be hazardous.
11. A loose fit between the AC outlet (receptacle) and plug may cause
overheating and a distortion of the plug. Contact a qualified
electrician to replace loose or worn outlet.
12. This appliance is designed to be free standing (not built-in).
13. The wine cellar is intended for use in a controlled ambient location
such that the ambient temperature does not exceed 95°F. For best
performance, locate away from large temperature fluctuations and
where ambient temperature range will remain inside accepted range
(32-95°F).
14. Locate the unit away from direct sunlight and sources of heat (stove,
heater, dishwasher, refrigerator, radiator, etc.).
IMPORTANT: Any work carried out on the cooling unit must be done by a
professional refrigerationist, who must check the circuit for leaks before
switching the appliance back on. Likewise, any work carried out on the
electrical circuit must be done by a qualified electrician.
WARNING: To reduce the risk of fire, electric shock or personal
injury, unplug or disconnect the appliance from the power supply
before servicing.
5
W W W . V I N O T E M P . C O M
CORD INSTRUCTIONS
For your protection, this unit is equipped with a
3-conductor cord set that has a molded 3-prong
grounding-type plug, and should be used in
combination with a properly connected
grounding-type outlet as shown in figure A. Not
for use with an extension cord.
INSTALLATION INSTRUCTIONS
1.
2.
3.
4.
5.
Carefully remove all of the packaging around your wine cabinet.
Place your wine cellar on a solid, flat surface that is strong enough to
support the unit when fully loaded.
Allow a minimum 4-inch space between the wall and the back of the
cabinet.
Open the door and make sure all components are intact.
Release the cord and plug the power cord into a standard electrical
outlet.
Aligning Your Wine Cellar
In order for you to level off your cabinet as easily as possible, it is equipped
with 4 adjustable feet. However, we recommend that you tighten the back
feet to the maximum and use the front feet to create a level.
Important Placement Notes
♦
Select an unencumbered, well-ventilated area for best performance.
♦
This wine cellar is designed to be free standing only and operated
indoors.
♦
Do not place the unit in a moist location or near a heat source
including other major appliances or direct sunlight.
♦
Do not plug unit into the same outlet as a refrigerator or microwave.
♦
Do not place heavy objects on top of the unit.
Important: WAIT 48 HOURS BEFORE PLUGGING IN THE CABINET
Should you need to move your cabinet, never tilt it more than 45° and
always sideways, on the side that the electrical cable comes out (right hand
side when looking at the cabinet.)
17631 South Susana Road, Rancho Dominguez, California 90221
[email protected]
6
LAYOUT AND LOADING RECOMMENDATIONS
Each shelf can be used as a storage, presentation or sliding shelf. Each of
your wine cabinet’s shelves has 13 recesses for bottles thus enabling you to
place your bottles in total safety. Also, your shelves all have a label slot,
designed to receive the pre-cut cards delivered with your cabinet, thus
helping you to identify the position of your favorite wines at a glance.
Shelf in storage version configuration:
To place bottles on a storage shelf:
- Install the shelf in the selected location.
- Place a wooden locking pin in each of the two
holes located on the right and left of the upper
face approximately 15 cm in front of the shelf:
these pins butt up against the heat shaped wall
and avoid all accidental shelf movement (See
diagram).
- Start by placing the bottles in the rear recesses
with the base of the bottle towards the back.
- Continue by placing the bottles in the front
recesses, facing them in the opposite direction.
- Continue stacking the bottles in this way
making sure that no bottle touches the rear wall.
- A storage shelf can hold a maximum of 6
layers, each of 13 bottles, this representing
78 "Standard" Bordeaux bottles (100kg).
Shelf in presentation version configuration:
To place bottles on a presentation shelf:
- Install the shelf in the selected location.
- Place a wooden locking pin in each of the two
holes located on the right and left of the upper
face approximately 15cm in front of the shelf:
these pins butt up against the heat shaped wall
and avoid all accidental shelf movement (See
diagram).
- Start by placing the bottles in the rear recesses
with the base of the bottles towards the back (6
"Standard" Bordeaux bottles).
- Continue stacking the bottles on the rear
recesses (7+6+7+6 = 26 "Standard" Bordeaux
bottles) making sure that no bottle touches the
rear wall.
- To present the bottles, place them in an upright
position on the front of the shelf (Maximum
capacity: 6 "Traditional" Bordeaux bottles).
7
W W W . V I N O T E M P . C O M
- In presentation configuration, a shelf can
hold a maximum of 38 "Traditional"
Bordeaux bottles.
Shelf in sliding version configuration:
To place bottles on a sliding shelf:
- Install the shelf in the selected location.
- Place a wooden locking pin in each of the two
holes located on the right and left of the upper
face approximately 4cm to the rear of the shelf:
when the shelf is slid forwards, these pins stop it
from sliding completely out of the cabinet (See
diagram).
- Start by placing the bottles in the rear recesses
with the base of the bottles towards the back.
- Continue by placing the bottles in the front
recesses facing them in the opposite direction.
-A sliding shelf can only hold one layer of
bottles (maximum of 13 "Traditional"
Bordeaux bottles).
- In order to enjoy optimum accessibility when
setting up the cabinet in a mixed layout, we
recommend that shelves destined to be used as
sliding shelves are located in the middle section
of the cabinet.
Note: If you do not have enough bottles to fill your wine cabinet, it is better
to distribute the load over all of the shelves available to avoid "all on top" or
"all below" type loads. This will allow for a more sturdy cabinet as well as
proper air flow within the cabinet.
Always modify the position of the locking pins when converting a
sliding shelf to a storage or presentation configuration.
Shelf Labels: The shelves all have a label slot in front, designed to receive
the cards delivered with your cabinet, thus helping you to identify the
position of your favorite wines at a glance.
17631 South Susana Road, Rancho Dominguez, California 90221
[email protected]
8
SECURITY LOCK
As a security measure, the lock on your
wine cellar works on a double
movement system. The key should be
pushed inward and turned at the same
time to operate.
ELECTRONIC CONTROLLER/DISPLAY
For Glass Door Cabinets Only:
If you push upwards on the electronic
controller, it will be hidden in the ceiling
of the cabinet and display will not be
visible.
If you push upwards again, the
controller will come back into its original
position.
For transport purposes, cabinets may
ship with the electronic controller in
hidden position.
9
W W W . V I N O T E M P . C O M
TEMPERATURE CONTROL
During operation, the value displayed on the control panel when the keys are
not being pressed, is always the temperature inside the cabinet.
Adjusting the Temperature:
The temperature inside the cabinet can be selected by adjusting the two
thermostat values in the following way:
•
•
•
•
Press button SET1 or SET 2, the symbol °| appears.
Press the Probe button to make the previous setting appear.
Set the desired temperature using the SET 1 and SET2 buttons.
Confirm your programming by pressing the Probe/Confirmation button.
The recommended temperature range setting is between 50°F and 57°F. The
default setting is 54°F.
When there has been a significant modification in set temperatures, it can
take several hours for your wine cabinet to stabilize and display the desired
temperature.
Important: To operate correctly, your cabinet should be located in a room
with a temperature between 32°F and 95°F.
WARNING: The use of a glass door can affect the performance of your wine
cabinet under certain extreme temperature conditions. Your wine cabinet
fitted with a glass door operates efficiently with ambient temperature less
then 86°F (30°C).
TEMPERATURE ALARM
Two types of alarm can appear on the setting display:
• HI indicates that the temperature inside the cabinet is too high
• LO indicates that the temperature is too low
Both alarms mean that the cabinet is malfunctioning. The alarm signal
automatically disappears once the temperature returns to normal.
17631 South Susana Road, Rancho Dominguez, California 90221
[email protected]
10
CLEANING AND CARE
•
•
•
•
•
Always unplug the wine cellar before cleaning.
Do not use benzene, scrubbing brushes or chemical cleaners as these
will damage the unit. Use only a mild, nonabrasive cleanser to clean
the exterior of the cabinet.
Clean the stainless steel door and handle by wiping with a warm water
and baking soda solution. The solution should be about 2 tablespoons
of baking soda to a quart of water.
Wash the racks with a mild detergent solution.
Always dry all the parts with a clean dry cloth before plugging the wine
cellar back into the receptacle.
EVERYDAY CABINET CARE TIPS
The following few operations enable you to obtain optimum operation and an
extended life cycle.
1 - Regularly remove dust (twice a year) from the condenser (black metal
grill fastened to the back of your wine cabinet).
2 - Completely clean the inside of your wine cabinet once a year, taking care
to ensure that you have unplugged and unloaded it (use water and a noncaustic cleaning product, and make sure to rinse well).
Hygrometry
You cabinet is equipped with an exclusive system enabling the creation,
inside your wine cabinet, of the correct humidity level required to perfectly
seal the corks in your bottles. On installation, it is important to pour the
equivalent of a small glass of water on the floor of the cabinet to start up the
heat dynamic pump process. Thereafter, it is important to add water from
time to time.
The long life of your wine cabinet depends on regular monitoring,
especially of anything that may appear abnormal, and informing us
of any anomalies found.
Energy-Saving Tips:
• Install your cabinet in an appropriate place and within the
recommended temperature range.
• Keep the door open for as short a time as possible.
• Ensure that the door seal is in good condition and not damaged. If it is
damaged, contact your Vinotemp dealer.
11
W W W . V I N O T E M P . C O M
TROUBLESHOOTING
SYMPTOM
Vibrations
•
Check to make sure the wine cellar is on a level surface.
The door will
not close
properly.
•
•
•
The wine cellar is not on a level surface.
The racks are out of position.
A bottle is too long.
•
•
Make sure unit is plugged into wall socket.
Check the wall outlet for power. Make sure the outlet is not controlled by
a wall switch.
Make sure the wall socket is functional by testing another electrical
appliance in the power socket.
Unit has no
power/does
not operate.
The inside
temperature
does not seem
correct.
POSSIBLE CAUSE
•
•
•
•
•
•
•
Power is ON
but the unit
will not cool.
•
•
Compressor
will not turn
off
•
•
Make sure the cooling vents are not obstructed.
The room may be too hot. If the ambient temperature is 90°F or higher,
the unit can have difficulty chilling adequately.
When using the unit for the first time, it can take up to 24-48 hours to
reach the desired temperature.
Allow at least 24-48 hours for the internal temperature to initially adjust.
If the room temperature is above 90°F, the unit can have difficulty
cooling. Humidity does not affect the cooling ability of the unit.
To achieve accurate temperature control, the unit should not be used of
operated in any of the following locations:
o In a sunny place
o In a room with poor air circulation such as a garage, closet, near
another heat-producing appliance such as a dishwasher, oven or
refrigerator.
o With an outlet shared with a refrigerator, as the refrigerator will drain
power from the wine cellar.
o In a cabinet or closet.
Make sure the grill area at the back of the cabinet is clean and
unobstructed.
Ensure that the temperature SET values comply with the given
temperature range
Place your hand on the condenser (metal grill located along the exterior
wall behind your cabinet). If the condenser is cold, contact for service.
If the condenser is hot, turn the cold adjuster to its highest level. If
compressor still does not stop (after waiting a short period of time for
cabinet to adjust), contact for service.
Warning: Technical service being done on your Vinocave without being preapproved by Vinotemp may lead to your warranty being considered null and
void.
17631 South Susana Road, Rancho Dominguez, California 90221
[email protected]
12
FREQUENTLY ASKED QUESTIONS
Q: I have noticed differences in temperature between the upper and
lower section of my cabinet.
• Check that none of the bottles is touching the back of the appliance.
• Check to make sure your temperature was set correctly (following
provided instructions)
• Please note, however, that only the air temperature varies, as these
liquids have a high degree of thermal inertia, which prevents the wine
from changing temperature.
• As in a natural cellar, a deviation in temperature of 1 to 2° F is
considered normal owing to convection phenomena. The more
important factor for wine is that at any given time the temperature is
constant.
Q: I have noticed frost on the back of my cabinet.
Frost may appear on the upper left section of the back wall of your wine
cabinet. It is coldest when the compressor starts up. This is therefore the
time when the frost will be most noticeable. This is completely normal. When
the compressor stops, this frost will turn into water droplets. If frost
accumulates to the point of producing ice (because the bottles are touching
the back wall), unplug the appliance, wait for it to defrost, then arrange the
bottles correctly before plugging it back in. If, despite these precautions, ice
(and not frost) reappears, it is essential that you contact you obtain
authorized service for your unit.
Q: What are the risks for my wine in case of extended power outage?
You wine cabinet’s insulation protects against extreme changes in
temperature; thermal inertia linked to the volume of bottles considerably
slows down changes in temperature. Should a power outage occur, the
temperature will be restored very slowly in order to protect the wine from
thermal shock. It is recommended that you avoid opening the cabinet during
this time to preserve the temperature inside the cabinet. Wine kept at an
alternate ambient temperature for a short period will not deteriorate.
Q: My cabinet isn’t making any noise. Is there a problem?
The compressor fitted in your Vinocave cabinet is very quiet (36dB).
Depending on the ambient temperature of the room and the temperature of
the cabinet, the compressor may have stopped according to the setting.
13
W W W . V I N O T E M P . C O M
Q: The level of humidity in my cabinet is too low.
Only a level of humidity which is very low over a long period of time is
harmful (< than 50%). When the compressor is operating, a drop in
humidity may occur owing to the transformation of humidity into frost.
This drying of the air is only temporary and has no effect on the corks.
In case of persistent low humidity:
• Check that the hygrometer used to measure moisture is still correctly
calibrated.
• Check that none of the bottles is touching the back wall of the cabinet.
• Check that the air inlet (shaft) is not obstructed.
• Pour the equivalent of a glass of water into the compartment which
collects condensation water, if it is accessible, or into the bottom of the
rear of the cabinet on the left hand side (condensation water
evacuation pipe).
Q: My cabinet does not have enough shelf storage space for my
needs.
Your cabinet comes standard with 5 adjustable shelves. Additional shelves
may be purchased through your retailer or directly through Vinotemp. The
maximum number of shelves for use with these wine cabinets is 13.
17631 South Susana Road, Rancho Dominguez, California 90221
[email protected]
14
TERMS OF SALE AND WARRANTY
Vinotemp International (“Seller”) and the person or entity that acquires these goods from Seller (“Purchaser”)
hereby fully agree to the following terms and conditions of the sale: Shipping fees are the responsibility of the
Purchaser whether freight prepaid or freight collect. Seller assumes no responsibility for the goods sold to the
Purchaser once the goods have left the Seller’s premises, including, but not limited to, late delivery by the moving
carrier, or for events caused by any difficulty carrier incurs in attempting to fit the goods into the Purchaser’s place
of business or residence due to the size of the goods or otherwise. Purchaser assumes all responsibility for delivery,
payment of freight, access, measurement, installation, hook-up, wiring, moving and storage of the goods. The
transportation of all goods is subject to the terms and conditions which the moving carrier imposes on Purchaser
including, but not limited to, additional charges imposed per flight of stairs, and/or additional charges resulting
from the carrier’s inability to safely and/or adequately use the building elevator to lift the goods to an upper floor.
Any claim for damages incurred during shipment by the carrier of the goods are insured and handled directly with
the carrier. Any damages due to manufacture defects will be handled directly with Vinotemp International, subject
to the limited warranty.
All sales are final, and unless authorized in writing by the Seller, Purchaser may not return the goods, under any
circumstance. If Purchaser refuses to accept the goods, under any circumstance, the Purchaser is liable for the
return and cost of freight both ways, and if Seller does take back the goods, there will be a restocking charge that
is 35% of the purchase price of the goods. Custom Cabinet and Racking are non returnable. Purchaser must notify
Seller of non-conforming goods within four days of delivery, after which time all goods are deemed accepted. If an
order has been placed and production has started, cancellation of your order will be a 15% charge.
If Purchaser tenders payment with a check that has insufficient funds (NSF), or stops payment on a check or credit
card for any reason, Purchaser agrees to pay for all costs associated with the Seller’s connection or litigation of
such a claim, including without limitation extra damages, court costs and attorneys’ fees. Finance charges begin the
date of invoice. Collection fees plus NSF fee of $50 will be added to your invoice, which you agree to promptly pay.
Title to the goods does not pass until payment is received in full by Seller and Seller retains a security interest in
the goods until they are paid for in full.
LIMITED WARRANTY: Seller warrants that the goods will be free of defects in materials and workmanship as
follows: VINO-CAVE wine cabinet units: parts and labor (uninstalled) for a period of 12 (twelve) months from date
of sale, removal and re-installation of unit is not included in warranted labor. For a scratch and dent or refurbished
unit, warranty is 3 months from your dated invoice (parts for function only, not cosmetic). Installed products are
parts only for 1 year, no labor. There is no warranty on parts purchased separately. Purchaser’s exclusive remedy is
limited, at Seller’s option; to repair or replace defective part[s] with either new or factory reconditioned part[s].
Purchaser is responsible for shipping the unit pre-paid to designated facility and Seller will pay return shipping
charges in the continental United States for items repaired under warranty within 12 (twelve) months from date of
sale. Since the natural variation in texture, density, grain, color, tone and shade of wood is unavoidable; Seller
does not guarantee the texture, color, tone or shade of the wood: nor does seller guarantee the colorfastness of
wood or against peeling, chipping, cracking or scratching. Note: Unfinished wood is subject to warping; all wood
surfaces must be sealed before placing cellar into service. Improper placement of the unit will void the warranty.
This limited warranty does not cover damage due to such things as accident, misuse, abuse, mishandling, neglect,
acts of God, fires, earthquakes, floods, high winds, government, war, riot or labor trouble, strikes, lockouts, delay
of carrier, unauthorized repair, or any other cause beyond the control of the Seller, whether similar or dissimilar to
the foregoing. Seller is not responsible for any damages caused to Seller’s property resulting from the good. This
limited warranty applies only inside the Continental US. (Alaska, Puerto Rico and Hawaii are not warranted).
Purchaser understands and acknowledges that the goods sold here are wine cellars, cigar humidors, and/or other
similar units which house wine or cigars. Purchaser assumes all risk of using these units, including risk of spoilage,
humidity variations, temperature variations, leaks, fire, water damage, mold, mildew, dryness and similar and any
other perils that might occur.
Seller is not responsible for incidental or consequential damages, and there are no warranties, expressed or
implied, which extend beyond the Limited Warranty described above. The implied warranties of merchantability
and of fitness for a particular purpose are hereby expressly disclaimed. Some states do not allow the exclusion of
incidental or consequential damages, or a waiver of the implied warranties of fitness and/or merchantability, so the
above limitations may not apply to you. This warranty gives you specific legal rights and you may also have other
rights which vary from state to state.
In the event of any dispute between Seller and Purchaser arising out of or relating to these terms and conditions or
to the goods sold generally, Purchaser must first file a written claim with Seller within ten days of the occurrence
giving rise to the claim and wait an additional thirty days for a response before initiating any legal action. The sale
and all terms are subject to California law. Any legal proceeding arising out of or relating to these terms and
conditions or to the goods sold generally shall be brought solely and exclusively in the County of Los Angeles. In no
event may Purchaser initiate any legal proceeding more than six months after the occurrence of the event giving
rise to the dispute.
The above terms and conditions are the only ones governing this transaction and Seller makes no oral
representations of any kind. These Terms and Conditions can only be modified in writing, signed by both Purchaser
and Seller. 04/08
15
W W W . V I N O T E M P . C O M
SERVICE & IMPORTANT NOTICE
Upon receipt of unit and inspection, the supply cord must be replaced if it is
damaged. Contact our customer service at 1-800-777-8466.
The Manufacturer has a policy of continuous improvement on its products
and reserves the right to change materials and specifications without notice.
WARNING:
Please do not place the unit within reach of children.
For adult use only.
Contact [email protected] with any questions or visit:
www.vinotemp.com
17631 South Susana Road, Rancho Dominguez, California 90221
[email protected]
16
17631 S. Susana Road
Rancho Dominguez, CA 90221
www.vinotemp.com
Vinotemp is a registered trademark of Vinotemp International. All products, features, services, and
information in this document are subject to change without notice. We cannot guarantee the accuracy
of the contents of this document. We disclaim liability for errors, omissions, or future changes.
© 2009 Vinotemp International. All rights reserved.
17
W W W . V I N O T E M P . C O M