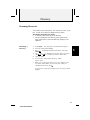
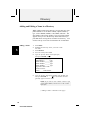
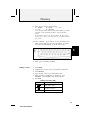
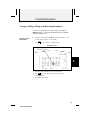
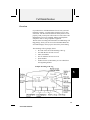
1
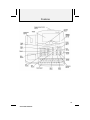
Table of Contents 2-Line Speakerphone 882 Personal Information Center User's Manual Part 2 AT&T 882 Manual Table of Contents Introduction........................................................ii Features..............................................................iii Section 1 - Installation ....................................1 Parts Checklist ..................................................2 Install Batteries ................................................3 Connect Line Cords and AC Power...............4 Telephone Jacks and Lines.............................4 Modular Jack Test ............................................5 Setting Up the Phone.......................................6 Setting the Clock ............................................6 Entering Your Home Phone Numbers ........6 Determining Line 1 and Line 2 ....................6 One Phone Number Operation .....................6 Getting To Where You Want To Go ...............7 Soft Key Labels ...............................................8 Menus ................................................................9 Add /Edit Displays ...........................................10 Menu Items .....................................................11 Main Menu .....................................................11 Set-Up Menu ...................................................12 Dialing Another Number for an Individual ........................................................................31 Making a Call from Another Directory ....31 Special Dialing Features...............................32 Dialing Long Phone Numbers ....................32 Entering a Dialing Delay ............................32 Storing a Temporary Tone ..........................32 Storing a Switchhook Flash........................32 Storing Custom Calling Codes ...................32 Section 4 - Calendar /Reminder .................33 Overview ..........................................................34 Creating Reminders .......................................34 Viewing, Adding, Editing, an d Removin g Reminders.........................................35 Viewing a Day’s Reminders ........................35 Calendar View ..............................................35 Entering Reminders.....................................36 Viewing Reminders ......................................37 Removing a Reminder .................................37 Editing a Reminder ......................................37 Section 2 - Operation ....................................13 Section 5 - Incoming Call Log ...................38 Light Indicators ..............................................15 Telephone Displays ........................................15 Making a Call .................................................16 Answering a Call ............................................17 Speakerphone for Hands-free Conversation ..........................................................................18 Mute .................................................................18 Hold ..................................................................19 Switching Between Lines .............................19 Flash ................................................................20 Temporary Tone Dialing ...............................20 Monitoring the Length of a Call ..................20 Redial ...............................................................21 ADial ................................................................22 Conference Call .............................................22 Conference Call Options ...............................23 Adjusting the Display Contrast.....................23 Ringer Volume ...............................................24 Handset Volume .............................................24 Overview ..........................................................39 Incoming Call Messages ...................E RROR ! BOOKMARK NOT DEFINED . Incoming Call Log .........................................40 Reviewing InLog ............................................40 Reviewing InLog ..........................................40 Making a Call from InLog .............................40 Making a Call ...............................................41 Using ADial when Making an InLog Call ........................................................................41 Removing a Call from InLog ........................41 Removing a Call ...........................................41 Removing Entire InLog ...............................41 Section 3 - Directory .....................................25 Overview ..........................................................26 Renaming Directories ....................................27 Renaming a Directory .................................27 Adding and Editing a Name in a Directory 28 Adding a Name .............................................28 Editing a Name .............................................29 Removing a Name from a Directory ..........30 Making a Call from a Directory ...................30 Making a Call from the Current Directory ........................................................................30 Using ADial when Making a Directory Call ...............................................30 Section 6 - Appendices .................................42 Customizing the Phone .................................43 Opening the Set-Up Menu ........................43 Set Clock .......................................................43 Memory Lock ................................................43 Change Password .........................................44 Rename Directory ........................................44 Enter Home Phone Numbers .....................44 Caller ID ........................................................44 Button Tone ..................................................45 Removal Confirm .........................................45 Preferred Line...............................................45 Line Choice...................................................46 In Case of Difficulty.......................................47 Maintenance ...................................................48 Index ................................................................52 i AT&T 882 Manual Introduction 2-Line Speakerphone 882, Personal Information Center The 2-Line Speakerphone 882, Personal Information Center has been designed to meet standards for convenient, reliable service. To get the most from this telephone, please read this manual carefully. It explains in simple steps how to install, use and care for this 882 phone. You can use the phone as a personal directory, storing names with phone numbers and other important information. The 882 also provides a calendar to assist in time management. The 882 has unique keys that make setting up your directory or using other functions very easy. It is important to understand how to use these keys - especially the Cursor Control and the Soft Keys - so you can perform these functions successfully. The Cursor Control moves to a location where you will type in your information. (See page 7 for further explanations of the 882 keys.) If you subscribe to Caller ID service from your local telephone company, your 882 makes using this service more convenient. The 882 displays the name and number of the calling party after the second ring and keeps a log of the calls. Caller Identification Service is provided by your local telephone company. There is a fee for this service and it may not be available in all areas. This product cannot identify calls from areas not served by your local telephone company. It can display information only if both you and the caller are in areas offering Caller Identification Service and if both telephone companies use compatible equipment. The 882 provides you with the following telephone features: Speakerphone for hands-free talking Speakerphone Volume Control Enhanced Handset Volume Control Ringer Volume Controls Redial Log (DiLog) of last five numbers dialed AutoDial, Hold, Mute Keyboard for easy entry of names and information Personal Directory for storing names, numbers and information Calendar/Reminder for storing 50 timed reminders Alerts you when reminders occur Call Identification stores records of 64 incoming calls Dial any number from Incoming Call Log ii AT&T 882 Manual Features iii AT&T 882 Manual Installation Page SECTION 2 Parts Checklist 3 Installing Batteries 4 Connecting the Phone 6 One Phone Number Operation 7 Getting to Where You Want to Go 9 Using the Menus 1 1 This Personal Information Center phone may operate differently from other telephones you have used. Read this section carefully to become familiar with the many unique features of the 882. Getting Started at a Glance • • • • Installing batteries and connecting the phone. Getting around the system. Setting the clock. Entering your area code and phone numbers. 1 AT&T 882 Manual Installation 1 Every 882 telephone should include the following components: 1 2 3 4 5 6 Telephone Handset Coiled handset cord (2) 7’ line cords AC power transformer 4 AA heavy duty batteries NOTE: Remove the labels on the handset and the display before using the phone. Check the list to make sure you have all DIAL MODE This telephone has a push-button dial which will work with tone or dial pulse (rotary) telephone service. Even when set to dial pulse service, the phone can be switched temporarily to tone for access to services that require tone signaling, including some tone-activated computer systems. This telephone is hearing-aid compatible. 2 AT&T 882 Manual the correct parts included with the telephone. You should save your protective packaging materials to reuse if you move or need to ship the telephone. We have provided all necessary parts. However, if you need additional parts to modernize or expand your telephone wiring, we offer a complete line of accessory products - including jacks, cords and adapters - to make any job quick, safe and inexpensive. Ask for them where you purchased your 882, or call 1-800-7229125. Installation 1 Install Batteries 1 Install Batteries DO NOT UNPLUG AC POWER WHILE CHANGING BATTERIES. The phone may lose information stored in memory if there is no AC power while installing batteries. When replacing the batteries insert four heavy duty AA batteries. Always use four new batteries NOTE: The phone WILL NOT WORK without AC power. 3 AT&T 882 Manual Installation 1 2 Connect Line Cords and AC Power Telephone Jacks and Lines This phone is designed to work with two telephone lines. In some homes, both lines are wired into the same jack. If you are not sure if your jack is wired for two lines (two different phone numbers from one jack), perform the modular jack test on the opposite page. If you have two different phone numbers coming from one jack, youÕre all set to proceed with installing the line cords and AC power. Connect Line Cords and AC Power You should install the phone within 7 feet of both jacks. If either jack is more than 7 feet away you’ll need a longer line cord. 4 AT&T 882 Manual Installation Modular Jack Test 1 If you know the type of modular jacks you will be using, this test is not necessary. 1 1 2 Plug the line cord, with the clear modular plugs, into the jack labeled L1 or L1/L2 on the back of the phone. Plug the other end into the modular jack you intend to use. Connect coiled cord to phone and handset and hang up. Pick up the handset. You are on Line 1. Listen for a dial tone, then press LINE 2 and listen again. • If you hear a dial tone on both lines, the jack you’ve chosen is wired for two lines (two different phone numbers coming from one jack). You should follow directions for two-line jack. • If you hear a dial tone on only one line, the jack has only one line. Locate the jack for your other line. You should follow directions for two separate jacks. Connect Line Cord for a Two-line Jack Connect Line Cords for Two Separate Jacks 1 You will use both line cords. 1 Connect cord with clear plugs to L1or L1/L2 on back of phone. 2 Connect cord with blue plugs to L2 on back of phone. 3 Connect line cord with clear plug to jack for Line 1. 4 Connect line cord with blue plug to jack for Line 2. 2 3 Use the line cord with the clear modular plugs. Connect one end of the line cord to the L1 or L1/L2 on the back of the phone. Connect the other end to the wall jack. If you have only one phone number, you can have another line installed. If you prefer to have both lines in the same jack, you can have a two-line RJ-14 installed. 5 AT&T 882 Manual Installation 1 3 Setting Up the Phone When the phone is first plugged into the power plug, the ÒSet-UpÓ menu will appear. You may have to adjust the Display Contrast. (see page 23) Setting the Clock 1 2 3 4 5 6 SELECT “Set Clock ” from the Set-Up menu. Enter the time then A for AM or P for PM. Press . Enter the current date. Press . When you are done press the soft key below Done. Entering Your Home Phone Numbers 1 2 3 4 5 6 Highlight “Enter Home Phone Numbers”. Press SELECT. Enter your 3 digit area code , then press . Enter the phone number for Line 1, then press Enter the phone number for Line 2, then press Press the soft key below Done . . . Determining Line 1 and Line 2 If you have a two-line jack follow the procedure below to determine which line is Line 1 and Line 2. • Press LINE 1 and call one of your phone numbers. If you hear a busy signal, Line 1 is the number you called. If Line 2 rings, it is the number you called. One Phone Number Operation If you have only one telephone number make line choice MANUAL . 1 2 3 6 AT&T 882 Manual Highlight “Line choice is”. Press SELECT to alternate between AUTOMATIC and MANUAL. Press the soft key below Done when you are done changing settings. Getting to Where You Want to Go 1 Cursor A blinking character or light character on dark background showing what choice an action would act on. Cursor Control Moves the cursor to the next or previous item on a display. While viewing a menu, moves to the next or previous display. While adding or editing information, moves one character left or right MENU Opens and closes the 882’s Main Menu . SELECT Chooses highlighted information or alternates between two choices. Soft Key Labels These commands (functions) change depending on what action you are performing, or what the phone is doing. Press these soft keys to activate the commands. Soft Keys 7 AT&T 882 Manual Getting to Where You Want to Go 1 Soft Key Labels Below is the chart listing the soft key labels and what each one does. These labels appear on a display depending on what activity you are performing or what the phone is doing. Label What it does Add lets you add an entry to the highlighted choice. ADial repeatedly redials a phone number that is busy or not answered and requires pressing SPEAKER or lifting the handset when the far-end answers. (see page 22) Back shows the previous display. Cancel cancels changes you have made. Dial dials number highlighted on the display. DiLog displays the Re Di al Log on the display. (see page 21) Done saves information and returns to previous display. Edit lets you edit information on the display. Exit leaves an operation and returns to telephone display. InLog displays the In coming Call Log on the display. (see page 39) More displays the next menu display, for those menus with more than one menu. (see page 11) Refer lets you view information for numbers in your ReDial Log (DiLog). (see page 21) Remind displays the month, beginning with the current month. Use and to move back or forward to other months. (see page 35) Add reminders from Calendar View display. Remove erases the highlighted item on the display. Review lets you view items in a highlighted category. RmAll allows erasing of entire InLog, or Directory. SetUp lets you customize the phone. Timer turns the timer ON and OFF. (see page 20) 8 AT&T 882 Manual Using the Menus Menus 1 A menu is a list of choices. Parts of a Menu • The top line of a menu is its title. • The next six lines are its choices. • The bottom line contains up to four labels for the “Soft Keys” that are directly below the display. These labels are for different actions, which vary by menu. Cursor A blinking or reverse video character indicating your location on a menu. When the cursor is on a choice it is “highlighted”. The highlighted choice can be acted on in different ways, depending on the menu. Reverse Video Information displayed with a shaded or dark background and light letters. • • Press SELECT to view the menu for the highlighted choice. Press one of the “Soft Keys” to produce its label’s action. For example, press the soft key below Dial to dial the highlighted phone number, or Add to open the display that lets you add a new directory entry. 9 AT&T 882 Manual Using the Menus 1 Add/Edit Displays Some displays are for adding or changing information. On these displays, you: • • 10 AT&T 882 Manual Type information for directory entries and reminders using the alpha keypad or the dial pad. OR Press SELECT to alternate between two choices. Choices that let you alternate are in ÒReverse VideoÓ or all capital letters. Using the Menus Menu Items When a menu has more than 6 selections, or if there is a second display, More appears at the bottom of the display. This indicates the display continues to a second display. Press the soft key below More to view the second display. On the second display Back replaces More. Press Back to return to the first display. Choosing a Menu Item 1 2 Use the or buttons to move the cursor to highlight an option. Press SELECT or one of the soft keys. Main Menu The Main Menu lets you view different directories. • Press MENU to view the Main Menu. • Press SELECT to select the choice you have highlighted. The screen for that directory will appear. You will then be able to add or select individual entires. • Press MENU again to exit from the Main Menu to the regular phone display. The soft keys available on the Main Menu are: SetUp customize phone features Remind display the Calendar for the current month and add and review reminders. InLog view Incoming Call Log. (see page 40) DiLog view the ReDial Log. (see page 21) Main Menu Main Menu -Directory SetUp Remind InLog DiLog 11 AT&T 882 Manual 1 Using the Menus 1 Set-Up Menu After you install the batteries and connect all the cords, use Set-Up to customize some of the phoneÕs features. You can customize the 882 at any time. Viewing the Set-Up Menu 1 2 Press Menu. Main Menu appears. Press the soft key below SetUp. The Set-Up menu appears. Moving Around Menus • Press • Press More , or to view second menu. • Press Back , or to view first menu. or to move among choices. Set-Up Menu 1 Set-Up Set Clock Memory is UNLOCKED Change Password Rename Directories Enter Home Phone Numbers Caller ID is ON More Exit 12 AT&T 882 Manual Set-Up Menu 2 Set-Up Button Tone is ON Removal Confirm is ON Prefered Line is LINE 1 Line Choice is AUTO Back Exit Operation Page SECTION 15 Light Indicators 2 16 Making a Call 17 Answering a Call 2 18 Using the Speakerphone 18 Using Mute 19 Using Hold 19 Switching Between Lines 20 Using Flash 20 Monitoring the Length of a Call 21 Using Redial This Personal Information Center phone may operate differently from other telephones you have used. Read this section carefully to become familiar with the many unique features of the 882. Operation at a Glance 22 Using ADial • • 22 Using Conference Call • 23 Adjusting the Display Contrast • • • 24 Adjusting the Ringer and Handset Volume Making and answering a call. Using speakerphone, conference calling, hold and redial. Using the Personal Directory, see page 25. Making a conference call. Switching between lines. Adjusting ringer and handset volume. 13 AT&T 882 Manual Operation 2 14 AT&T 882 Manual Operation Light Indicators Light Activity Meaning LINE 1 Yellow-green and flashing The line is ringing. Red and flashing The line is on Hold. LINE 2 Red and on steady The line is in use at this phone or another phone. Message ON There is Caller ID or Reminder information on the display. or 2 or There can be information on the display about one of the events in the “Telephone Displays” table below. Telephone Displays When the display is not being used for the Directory, Reminders, Calendar, Redial Log or Incoming Call Log, one of the ÒnormalÓ phone displays appears. These displays have the time and date on the top line and soft key labels on the bottom line. There are also indications about the following things that appear on the display: Message Low Battery What it means The batteries need to be changed. Replace the batteries promptly to prevent memory loss. See page 3. Ring 1 OFF Ring 2 OFF You can make or answer calls when the ringer is OFF. The yellow-green LINE IN USE light for the ringing line still flashes. Other phones on this line will still ring. When ringer is OFF, the message light does not come on. See page 24 . No Line 1 No Line 2 The phone lines may be disconnected or not working properly. Check the connections and look at the “In Case Of Difficulty Section” on page 47. Message If you subscribe to Message Waiting service “Message” appears when you have a message. In some areas Message Waiting is known as Voice Messaging or Voice Mail. 15 AT&T 882 Manual Operation Making a Call You can make a call from the dial pad or by pressing Dial on the directory, DiLog or InLog displays. Pages 21 and 22 explain in detail how to make a Redial or ADial call. Sections 3 and 5 explain how to dial numbers from the directories or InLog. When you make a call, the ÒPreferred LineÓ is always selected when both lines are free. If you did not change this setting in Set-Up, the preferred line will be the line connected to Line 1 on the back of the phone. 2 Making a Call from 1 the Dial Pad 2 Lift handset or press SPEAKER. Override Automatic Line Selection: Press LINE 1 or LINE 2. Pressing the line button turns on the speakerphone. You can then lift the handset if you wish. Dial the number from the dial pad. You can insert a hyphen, pause or wait by pressing the space bar on the alpha pad once for a hyphen, twice for a 3-second pause, and 3 times for a 30 second wait. Using Dial Making a Call From a Directory, 1 Locate the display where the number you want to dial appears. DiLog or InLog 2 3 16 AT&T 882 Manual Use the or buttons to highlight the number. Press the soft key below Dial. The label changes to ADial. The speakerphone indicator comes ON and the phone begins to dial the number after a few seconds. Operation Using ADial This feature repeatedly dials a highlighted phone number, if busy. See page 21 for further information on ADial. 1 Do not lift the handset or press SPEAKER. 2 Locate the display where the number you want to dial appears. 3 Use the or buttons to highlight the number. 4 Once the number is highlighted, press the soft key below Dial. The label changes to ADial. 5 Immediately press the soft key below Adial . 2 Answering a Call When you answer a call, the phone automatically selects the ringing line if line choice is Automatic (see page 46). Each line has a different ringer tone to signal an incoming call. The yellow-green LINE IN USE indicator flashes when that line receives a call. The red LINE IN USE indicator is ON if the line is in use at this phone or another phone. • Lift handset or press SPEAKER. If Line choice is AUTO the ringing line will be answered. If Line choice is MANUAL, you must press the line button to answer the non-preferred line. NOTE: If you subscribe to Caller Identification Service, Call ID information is sent to the phone between the first and second ring. See pp 38-41 for Caller ID information. 17 AT&T 882 Manual Operation Speakerphone for Hands-free Conversation You can use the speakerphone to make or answer a call. The SPEAKER light is ON when the speakerphone is in use. During a call you can switch back and forth from handset to speakerphone as often as you like. 2 Using SPEAKER 1 2 Press SPEAKER to turn on the speakerphone. Pressing LINE 1 or LINE 2 when the phone is not in use turns on the speakerphone. Press SPEAKER again to hang up. NOTE: Whenever the speakerphone light is ON, you can hang up the handset without disconnecting your call. Adjusting Speaker Volume • Use the volume buttons to adjust the speaker volume when you are using the speakerphone. Mute The Mute feature turns off the microphone so the person at the other phone cannot hear you. When Mute is ON, the MUTE light is ON. Mute is automatically cancelled when you hang up, put a call on Hold, change lines, or switch from handset to speakerphone or speakerphone to handset during a call. Using Mute 1 2 18 AT&T 882 Manual Press MUTE for privacy so the other person cannot hear you. The Mute light is ON. Press MUTE again to resume your telephone conversation. Operation Hold When a call is on hold, the red LINE IN USE light for the line flashes. Putting a Call on Hold Taking a Call Off Hold • • • Press HOLD to keep a call on the line when you place the handset back in the cradle. Nothing you or the other person says can be heard. 2 Press line button. OR Lift handset of another phone on the same line. NOTE: If the other party hangs up Hold may be cancelled. Switching Between Lines Whether you are using the handset or the speakerphone, use the HOLD feature to switch back and forth between the lines. Below is an example. Switching Between Lines Example: You are using Line 1, Line 2 rings. 1 Press HOLD to hold Line 1. 2 Press LINE 2 to answer the other call. 3 Press LINE 1 to hang up Line 2 and return to your first call. OR Press HOLD to hold Line 2, and press LINE 1 to return to your first call. 19 AT&T 882 Manual Operation Flash The Flash feature is useful if you have subscribed to custom calling services from your local telephone company. You press FLASH instead of pressing the switchhook to activate services such as call waiting or 3-way calling. You still have to dial the codes provided by your local phone company. 22 Using Flash • Press FLASH , instead of the switchhook, when using custom calling services. Temporary Tone Dialing If you have rotary service, you can change from pulse to tone dialing during a call by pressing . This is useful if you need to send tone signals for access to telephone banking or longdistance services. Example Using Temporary Tone Dialing 1 2 Dial a number. Press and release . All keys pressed after this will send tone signals. 3 After you hang up, the phone automatically returns to rotary service. Digits pressed after will not be stored in Redial . Monitoring the Length of a Call The built-in timer allows you to measure elapsed time. The phone displays time in minutes and seconds and automatically stops when you hang up. Using the Timer 20 AT&T 882 Manual • Press the soft key below Timer to start the Timer. • Press the soft key below Timer to stop the Timer. Operation Redial You can dial the last number you called by pressing Dial after lifting the handset or pressing SPEAKER. The last five numbers dialed are stored in the ReDial Log (DiLog). At the top of the display appears the most recent number you dialed. Numbers you dial from directories or from the dial pad appear in the DiLog. The phone displays the numbers dialed from a directory by the name and phone number type you entered for that entry. Dialing the Last Number Dialed 1 2 Dialing a Number 1 from DiLog 2 (redial list) 3 4 Using ADial when Making a Redial Call Referring to the Directory Entry for a Number in DiLog You may lift the handset or press SPEAKER. Press the soft key below Dial. Press the soft key below DiLog. Use to highlight the number you want to dial. You may lift the handset or press SPEAKER. Press the soft key below Dial. Last Number Dialed 1 Do not lift the handset or press SPEAKER. 2 Press the soft key below Dial. The label changes to ADial. 3 Press the soft key below ADial. Erasing a Number 1 in DiLog 2 From Redial List 1 Do not lift the handset or press SPEAKER. 2 Once the number is highlighted, press the soft key below Dial. The label changes to ADial. 3 Press the soft key below ADial. 3 Press the soft key below DiLog. Use to highlight the number you want to erase. Press the soft key below Remove. 1 2 3 Press the soft key below DiLog. Use to highlight the number you want view. Press the soft key below Refer . 21 AT&T 882 Manual 2 Operation ADial ADial repeatedly redials a phone number. This feature is only available when the handset is hung up and the speakerphone light is OFF. If the preferred line is busy, the phone will use the second line. This phone will dial the highlighted number up to 10 times, or until the phone is answered. If the called line is busy, the phone will redial about every minute. You will hear the number being dialed. When the call is answered, you MUST lift the handset or press SPEAKER to talk. 2 Dialing a Number 1 2 • Press the soft key below Dial. The label changes to ADial. Press the soft key below ADial. To cancel automatic redial, press ADial again or lift the handset or press SPEAKER. Conference Call You can use both lines at the same time to set up a three-way conference call. Making a Conference Call 1 2 3 4 Make or answer a call. Press HOLD. Call someone on the other line. Press CONF. Ending a Conference Call • Hang up. All parties will be disconnected. NOTE: Under certain circumstances, the far-end parties on a conference call might not hear one another clearly. 22 AT&T 882 Manual Operation Conference Call Options Putting a Conference Call on Hold • Press HOLD. Both lines are on hold. When you put a conference call on hold, no one can hear the other people on the call. • Press CONF to release hold. 2 Talking Privately with One Caller 1 2 3 Dropping One Line • Press HOLD to place both lines on hold. Press the line button of the person with whom you want to speak privately. Press CONF to continue your conference call. Press the line button of the party with whom you wish to remain talking. The other line will hang up. Adjusting the Display Contrast You can adjust the display contrast. The Display Contrast switch is on the top of the phone. Slide the tab sideways to desired level of contrast. 23 AT&T 882 Manual Operation Ringer Volume The two volume control buttons allow you to adjust the ringer volume up to very loud and down to OFF. You can dial or answer calls normally with either one or both ringers off. When the phone is not in use, pressing these buttons produces a display that allows you to choose the ringer to be adjusted. After you choose which ringer you want to adjust and press one of the volume control buttons, you will hear a sample of the current ring level. 2 Adjusting the Ringer Volume 1 2 3 4 Press one of the volume buttons. If the ringer you want to adjust is not highlighted, press the soft key for it. Use the volume buttons to adjust the ringer. Three beeps indicate the maximum value or OFF. Press Exit when you are done. Handset Volume When you are using the handset, you can use the volume control buttons to adjust the handset volume. The four highest settings are louder than most other phones. Adjust the volume accordingly. 24 AT&T 882 Manual Directory Page SECTION 3 26 Overview 27 Renaming Directories 28 Adding and Editing a Name in a Directory 30 Making a Call from a Directory 3 32 Special Dialing Features This section describes how to change directory names, store names in a directory and make calls from your Personal Directory. Personal Directory at a Glance • • • • • Using your personal directory. Changing a directory name. Adding, editing and removing a name in a directory. Making a directory call. Using special dialing features. 25 AT&T 882 Manual Directory Overview This 882 telephone is a personal information management system. You can store up to 200 names with phone numbers and other information. You can then dial numbers from these directories with the press of a button. You can divide the names among six personal directories. Each name can have up to four phone numbers and additional comments stored with it. If you have not been using the phone, when you start typing a person's name, matching names from the directory that was most recently used will appear. Sample Directory 3 26 AT&T 882 Manual Directory Renaming Directories You can have up to 6 directories. Use as many or as few as you like. Use the Set-Up menu to change directory names. Information about directory names • A directory name can be up to 24 characters. • The first 4 characters in a directory name appear in the upper right corner of the individual entry displays as an identifier. Renaming a Directory 1 2 3 4 5 6 7 Press MENU . The first page of the Main Menu appears. Press the soft key below SetUp. Press to highlight “Rename Directories”, then press SELECT. Use and to highlight the directory name you want to change, or the dash (-) where you want to add a name. Type the name. If you want to name another directory, follow steps 4 and 5. When you are done and want to save your changes, press the soft key below Exit. If you do not press EXIT , the information will not be saved OR If you want to cancel your changes, press the soft key below Cancel . 3 27 AT&T 882 Manual Directory Adding and Editing a Name in a Directory While putting a name into a directory you can enter up to four phone numbers. You can further identify a phone number by type, such as HOME, WORK, CAR, BEEP, and FAX. The first number is the primary number. The type for this number appears when you view the directory and is dialed when you press Dial while viewing the list of names in a directory. You can also enter up to six lines of information for an individual. Adding a Name 3 1 2 3 4 5 Press MENU . Highlight the directory where you want to add the name. Press SELECT. Press the soft key below Add. Type the person's name on the alpha pad, then press ENTER or . name________________-dir main phone # _______type phone number _______type phone number _______type phone number _______type Type notes here. Use arrows to move More Cancel Done 5 Type the person's main phone number from the dial pad, then press ENTER or . This is the number that will generally appear with the name. NOTE: If you want to enter a Pause or Wait as part of the phone number, use the “P” or “W” on the alpha pad. (“Adding a Name” continued to next page) 28 AT&T 882 Manual Directory 6 Enter the type for the phone number. H = HOME W = WORK F = Fax C = CAR B = BEEPER You can type another label for the phone number, if you do not want to use the labels provided. Just type all four letters. If you want to enter more phone numbers for this person repeat steps 5 and 6. You can enter up to 4 phone numbers per person. Enter any comments. If you want to use any punctuation press ALT and the alpha key above the punctuation. If needed, the phone will automatically go to the next display. 3 Editing a Name 7 When you are finished press Done . 1 2 3 2 3 Press MENU . Highlight the directory with the individual’s information. Press SELECT. Type the first letter(s) of the individual’s name. When the name is highlighted on the display, press SELECT. The individual’s entry display appears. Press Edit. Buttons You Use to Edit 4 Buttons ç What they do Moves the blinking cursor from item to item. Moves the blinking cursor left or right on a line. Delete a character. 29 AT&T 882 Manual Directory Removing a Name 1 from a Directory 2 3 4 5 6 Press MENU . Highlight the directory with the individual’s information. Press SELECT. Start typing the person's name. When the name is highlighted on the display, press SELECT. The individual's information is on the display. Press the soft key below Remove. Making a Call from a Directory 3 There are several convenient ways to make a call from a directory. First you highlight the phone number. From the current directory you can begin to type the name of the person you want to call. The phone will search the current directory and display the first six matches. The first entry is highlighted. If you are making a call from the current directory, dialing another number for an individual or making a call from another directory, you can use Dial or ADial. ADial repeatedly redials the highlighted phone number, if busy. Making a Call from the Current Directory 1 2 Using ADial when 1 Making a Directory 2 Call 3 30 AT&T 882 Manual Start typing the person's name. When the name of the person you want to call is highlighted and the right type is next to the name, press the soft key below Dial. Dialing will occur in a few seconds. Do not lift the handset or press SPEAKER. Once the name of the person is highlighted, press the soft key below Dial. The label changes to ADial. Immediately press the soft key below ADial. Directory Dialing Another Number for an Individual Making a Call from Another Directory 1 2 3 1 2 3 4 Once the name of the person is highlighted, press SELECT to see the entry for the person. Use to highlight the number you want to dial. Press soft key below Dial. Press Menu. Highlight the appropriate directory and press SELECT. Start typing the person's name. As soon as you enter a letter, the list of names appears. Keep typing letters until you highlight the name you want. When the name of the individual you want to call appears on the display, press the soft key below Dial. 3 If you want to dial another number saved for the individual refer to “ Dialing Another Number for an Individual”, above. 31 AT&T 882 Manual Directory Special Dialing Features Dialing Long Phone Numbers You can store numbers longer than 16 digits in different lines of an entry. Press Dial when the first part of the number is highlighted. Wait for dialing to stop. Highlight the other line and press Dial. Entering a Dialing Delay You can program a pause/delay into a directory number for use with certain banking and long-distance services, or to obtain an outside line when using a business telephone system. To insert a dialing delay in a phone number you are storing, press ÒPÓ or a ÒWÓ on the alpha key pad. Each time you press ÒPÓ, a delay of a few seconds occurs in the dialing sequence. ÒWÓ inserts a pause of 30 seconds. While the number is dialing, pressing Dial during the Wait will cause the Wait to end. Storing a Temporary Tone If you have selected the pulse dialing mode, you may store the TONE signal as part of the number. For example, you may store a dialing sequence that includes the phone number you will dial in pulse mode followed by the TONE signal and any additional number you will dial in tone mode. As you store the dialing sequence in the phone, press TONE, on the dial pad, at the appropriate point in the sequence. Storing a Switchhook Flash You can use the switchhhook flash to activate customcalling services, such as call waiting or 3-way calling. You may store a switchhook flash as part of a customcalling dialing sequence. Press FLASH , on the dial pad, at the appropriate point in the sequence. If you program a FLASH into a directory number and the phone doesnÕt wait long enough for dial tone before dialing, enter a pause after the FLASH . To enter a pause, press ÒPÓ on the alpha key pad. Storing Custom Calling Codes You can use a directory entry for the codes that activate a custom calling service. Follow the steps to ÒAdding a NameÓ on page 28. Instead of typing a phone number, enter the Custom Calling code. 3 32 AT&T 882 Manual Calendar/Reminder Page SECTION 34 Overview 4 34 Creating Reminders 35 Viewing, Adding Editing, and Removing Reminders This section describes how to create, view, and remove reminders. Calendar/Reminder at a Glance • • • 4 Creating reminders. Using calendar month to check a dayÕs schedule. Viewing all reminders. 33 AT&T 882 Manual Calendar/Reminder Overview This 882 helps with time management by providing calendar and reminder functions. You can display the calendar a month at a time. The days of the month for which you have reminders will be marked. You can create reminders, view individual reminders, and remove reminders. You can view/edit/remove a reminder from the same display. When the time and date of the reminder occur, the phone will beep. If you are not using the directory or other features, the reminder will appear in the display and beep. You can remove or save reminders from this display. If you remove a weekly, or monthly, or yearly reminder from this display, you are only removing the current instance of it. 4 Creating Reminders You can create four types of reminders, One-time, Weekly, Monthly, and Yearly. One-time reminders are for individual appointments. Weekly reminders are for regularly-scheduled events, and more than one day in the week can be marked with these reminders. Monthly reminders might be for paying bills. Yearly reminders could be for birthdays and anniversaries. Information about reminders: • The phone can store up to 50 reminders. • A reminder can have up to 3 lines of information. • Each line of information can have up to 24 characters. • At the time of the reminder the phone alerts you with a beep. • The phone can alert you with an early alarm about a reminder, up to 60 minutes prior to the reminder. 34 AT&T 882 Manual Calendar/Reminder Viewing, Adding, Editing, and Removing Reminders You can view reminders for a specific day by pressing the Remind soft key. You can then Add and Review reminders from the Calendar View. Viewing a Day’s Reminders 1 Press the soft key below Remind on the Main Menu. The current month appears on the display. Use to view earlier and later months. Calendar View 4 2 2 3 4 The days with reminders are in reverse video. Use to move the cursor to the day you want. Press SELECT. Press Exit when done. 35 AT&T 882 Manual Calendar/Reminder Entering Reminders 1 2 3 4 Type the time, then press ENTER or 6 Type the date, then press ENTER or Weekly Reminders: Use to highlight the day, then press SELECT. Select as many days as you want the reminder to occur. 7 Use the alpha keypad to enter any notes. To enter punctuation marks hold down the ALT key and type the punctuation mark you want. Press ENTER . Type the number of minutes, up to 60, if you want an additional early reminder. To change any information you entered, use to get to the correct line and use and to get around on the line. Edit your information. Choose one of the actions at the bottom of the display. 9 10 36 AT&T 882 Manual . . 5 8 4 Press MENU . Press the soft key below Remind . The Calendar View appears. Press the soft key below Add. The “New Reminder” display appears. Highlight the type of reminder you want to create, then press the soft key below Add. Done You are finished. Return to Calendar View. Cancel You do not want to save the information. Back You want to enter another reminder and repeat steps 4-8. Exit You want to save the reminder and quit. Calendar/Reminder Viewing Reminders 1 2 3 4 5 6 Press MENU . Press the soft key below Remind . Press the soft key below Review . Use to highlight the type. Press SELECT. Use to view the next or previous reminder. NOTE: When you view a reminder type you can go back to the Calendar View, edit or remove the current reminder by pressing the soft key below that option. Removing a Reminder • Press the soft key below Remove. Editing a Reminder • Press the soft key below Edit. 4 Buttons You Use to Edit Buttons ç What they do Moves the blinking cursor from item to item. Moves the blinking cursor left or right on a line. Delete a character. 37 AT&T 882 Manual Call Identification Page SECTION 5 39 Overview 40 Incoming Call Messages 40 Incoming Call Log (InLog) 40 Reviewing InLog 41 Making a Call from InLog 41 Removing a Call from InLog This section describes how to use the Call Identification features. These features operate in combination with CLASS Call Identification Service offered by your local telephone company. The 882 stores the information it receives from your local telephone company in the Incoming Call Log. (InLog) Call Identification Features at a Glance 5 • • • • Reviewing Incoming Call Messages. Making a call from InLog. Removing a call from InLog. Visual Message Waiting. NOTE: In some areas Call Identification is known as Caller ID. 38 AT&T 882 Manual Call Identification Overview If you subscribe to Call Identification Service from your local telephone company, your 882 makes using this service more convenient. For the Caller ID functions of this phone to work properly, both you and your caller must be in areas where Call Identification services are available, and the local telephone companies must be using compatible equipment. The 882 stores incoming call information in an Incoming Call Log (InLog), which you can access from the Main Menu and from other displays when you press the soft key below InLog. The Incoming Call Log display shows: • the order of the call in the Incoming Call Log. • time and date the call was received. • name (if available). • line on which the call was received. • phone number. • number of times (9 maximum) you were called from the originating number. Sample Incoming Call Log 5 39 AT&T 882 Manual Call Identification Incoming Call Messages Message OUT OF AREA Meaning This message may appear for some long distance calls or calls originating from an area not covered by Call Identification Service. This message may also appear if the caller’s local telephone company uses equipment incompatible with that of your local telephone company. PRIVATE The phone number or name not available at the caller’s request. CALL ID ERROR Incoming Call Identification was not complete. Rep =3 When someone calls several times from the same phone number, the phone only keeps a record of the most recent call. The phone displays how many times the call was repeated (up to nine times). Call 5 Position of the call in the Incoming Call Log. Incoming Call Log (InLog) The Incoming Call Log stores information for up to 64 phone calls. You must subscribe to this service for both lines to receive Incoming Call information about both lines. The most recent call is call #1. For example, if there are 5 calls in memory, call #1 is the most recent call and call #5 is the oldest. If the memory is full, the oldest call is deleted to make room for the new incoming call. 5 Reviewing InLog When you begin to review the Incoming Call Log, the most recent calls appear on the display. The and buttons are used to move back or forward, one display at a time, to scan the call log. Reviewing InLog 40 AT&T 882 Manual 1 2 3 Press the soft key below InLog. Use to review InLog. Press the soft key below Exit when you are done. Call Identification Making a Call from InLog When you review the Incoming Call Log, you can dial any number that appears on the display. If the phone number is out of your area code, the phone will automatically dial a Ò1Ó before dialing the phone number. You can also use the dial pad to dial while you look at the InLog number. Making a Call 1 2 3 Press the soft key below InLog. Use until the number you want to dial is highlighted. Press the soft key below Dial. Using ADial when Making an InLog Call 1 2 3 Do not lift the handset or press SPEAKER. Press the soft key below InLog. Once the number is highlighted, press the soft key below Dial. The label changes to ADial. Press the soft key below ADial. 4 Removing a Call from InLog 5 There are two ways you can remove calls from the Incoming Call Log. You can remove a specific call while reviewing the log, or you can erase the entire InLog. Removing a Call 1 2 3 Press the soft key below InLog. Use until the number you want is highlighted. Press the soft key below Remove when you are done. If confirmation is ON you will see “Press YES to remove”. Press the soft key below YES to confirm removal. Removing Entire InLog 1 2 Press the soft key below InLog. Press the soft key below RmAll. You will be asked to press “Yes” to confirm removal. 41 AT&T 882 Manual Appendices SECTION Page 43 Customizing This Phone Opening the Set-Up Menu Set Clock Memory Lock 44 Change Password Rename Directory Enter Home Phone Numbers Caller ID 45 Button Tone Removal Confirm Preferred Line 46 Line Choice 47 In Case of Difficulty 48 Maintenance 53 Index 6 42 AT&T 882 Manual 6 Appendices Customizing This Phone You can customize the features of the 882 phone at any time, or you can leave the settings already entered. You reach the display to customize this phone from the Set-Up menu. Opening the Set-Up Menu 1 2 Press Menu. Main Menu appears. Press the soft key below SetUp. Set Clock The reminder features will not work unless the clock is set. 1 2 3 4 5 6 SELECT “Set Clock ”. Enter the time, then A for AM or P for PM. Press . Enter the current date. Press . When you are done, press Done. Memory Lock When memory is Locked, access to information is restricted so that no one can change, delete, or add to your 882 memory without first entering a password. 1 2 3 Highlight “Memory is UNLOCKED”. Press SELECT, enter your password, then press Done to alternate between UNLOCKED and LOCKED. Press to move to next item or press the soft key below Exit when you are done changing all settings. 6 43 AT&T 882 Manual Appendices Change Password Choose a password you can remember easily, but not something that can be guessed by others. The default password is 1234. The password can be up to 24 characters, letters or numbers. 1 2 3 4 Press MENU . Highlight “Change Password” Press SELECT. You may be asked to type your old password. Type your new password and press ENTER or . Rename Directory See page 27 for steps to rename a directory. Enter Home Phone Numbers When you enter your home phone numbers, they appear on the display after you press SPEAKER, or lift the handset. If you subscribe to Call Identification service, your area code must be entered. 1 2 3 4 5 6 6 Highlight “Enter Home Phone Numbers”. Press SELECT. Enter your 3 digit area code , then press . Enter the phone number for Line 1, then press Enter the phone number for Line 2, then press Press Done . . . Caller ID If ON and you subscribe to Call Identification Services, the information will appear on the display. If you do not subscribe to Caller ID, you may want to turn this OFF. 1 2 3 44 AT&T 882 Manual Highlight “Caller ID”. Press SELECT to alternate between ON and OFF. Press to move to next item or press the soft key below Exit when you are done changing all settings. Appendices Button Tone If ON, a tone sounds every time a button is pressed. 1 2 3 Highlight “Button Tone”. Press SELECT to alternate between ON and OFF. Press to move to next item or press the soft key below Exit when you are done changing all settings. Removal Confirm If ON, prevents accidental erasure of information. When you remove information an extra display appears requiring you to press a YES or NO soft key. When removal confirmation is OFF, removal confirmation is only required to confirm a removal of a directory or to remove all of the Incoming Call Log. 1 2 3 Highlight “Removal confirm”. Press SELECT to alternate between ON and OFF. Press to move to next item or press the soft key below Exit when you are done changing all settings. Preferred Line The preferred line is the line selected when both lines are free. If you do not change this setting, the preferred line will be the line connected to Line 1 on the back of the phone. 1 2 3 Highlight “Preferred Line”. Press SELECT to alternate between Line 1 and Line 2. Press to move to next item or press the soft key below Exit when you are done changing all settings. 6 45 AT&T 882 Manual Appendices Line Choice You can control line selection by choosing Automatic or Manual. If you select Manual, the line button of the nonpreferred line has to be pressed to use that line. The installed setting is Automatic. If you have only one phone number, make the line choice Manual. 1 2 3 6 46 AT&T 882 Manual Highlight “Line Choice is”. Press SELECT to alternate between AUTOMATIC and MANUAL. Press to move to next item or press the soft key below Exit when you are done changing all settings. In Case of Difficulty Problem Solution Display Screen Remains Blank > > Check the contrast control switch to make sure the contrast is not set too low for the room lighting. See page 23. Check AC power connection. No AC Power The phone will not work if there is no AC power. No Dial Tone > > > > Check that both lines are not on HOLD. Check that the line cord and the coiled handset cord are connected properly at both ends. Check for AC power. Is the display on? If not, try another AC plug. Unplug the phone and connect it to another working modular jack. Plug in AC power. If it still does not work, and other phones in your home are working the problem may be with this phone. Call 1-800-722-9125. Call Cannot Be Dialed, Or Is Dialed Slowly See page 4 to reset the DIAL MODE switch. If you have rotary dialing service, you cannot dial phone numbers with the switch set to TT (tone). Set the switch to DP (rotary), then hang up and dial again. Difficulty Entering Phone Numbers In Memory Review pages 25-32 to make sure you are storing the number correctly. Phone Does Not Work Check the AC connections between the phone and the electrical outlet. Call ID - Local Long Distance The telephone will not add Ò1Ó and the local area code to local long distance numbers. You may not be able to dial these numbers from InLog. “No Line” Appears in Display > > > Numbers in a Directory that Contain a FLASH Cannot be Dialed Check that the line cord is connected properly at both ends. Unplug the phone and connect it to another working modular jack. Plug in AC power. If it still does not work, and other phones in your home are working the problem may be with this phone. Call 1-800-722-9125. Try another phone in this phone jack. If it doesnÕt work, there may be a problem with the phone line. Enter a ÒPÓ after the FLASH in the phone number. 47 AT&T 882 Manual 6 In Case of Difficulty Problem Solution No Call Information Received Check all line cord connections at both the wall and phone. Call Identification is a subscription service. Non-subscribers to this service cannot receive call information. You must subscribe to the service on both lines to get the service on both lines. The phone receives call information between the first and second ring. If the caller hangs up or you answer before the second ring, the phone may not receive Call Identification information. If you have Call Forward Service and you forward your calls, the phone does not receive call information. Those calls are forwarded before completing the second ring. Telephone Does Not Ring Make sure the RINGER volume is ON. If there are several other phones on the same line, try disconnecting some of the other phones. Having too many phones connected can create problems, such as low ringer volume or impaired sound quality during calls. You are connected to a caller but cannot hear or speak to them. Check that MUTE and HOLD are not ON. Automatic Line Choice is not working properly. You may need to initialize the phone lines. Follow steps below. Line 1 1. Press Line 1, then SPEAKER. 2. Press Line 1, then SPEAKER. 3. Press Line 1, then SPEAKER. Line 2 1. Press Line 2, then SPEAKER. 2. Press Line 2, then SPEAKER. 3. Press Line 2, then SPEAKER. OR Line In Use lights not working properly. 6 Maintenance Information Although this telephone is designed to be maintenance-free, it contains sensitive electronic parts. Treat it with care to ensure best performance. Avoid Rough Treatment Avoid dropping the handset, and replace it gently on the telephone after use. The original packaging should be used for protection if you must ship the telephone. Cleaning The hard plastic case of this telephone has a durable finish that should retain its original luster for many years. Clean exposed parts with a soft, slightly damp cloth. To remove stains, use a mild soap. Never use detergents, excess water, treated cloths, harsh cleaning agents or sprays. 48 AT&T 882 Manual Index AC power, 2, 3, 4, 47, 48 Add, 1, 8, 9, 10, 28, 35 ADial, 17, 21, 22, 30, 41 Area code, 1, 6, 41, 43, 47 Back, 8, 11, 12, 35 Batteries, 1, 3 Button tone, 1, 42, 44 Calendar, 1, 11, 16, 33, 36 Call Identification, 1, 8, 11, 16, 38, 39, 40, 41, 45 Cancel, 8, 27, 28, 35 CONF, 22, 23 Conference call, 1, 14, 22, 23 Contrast Control, 1, 14, 23 Cursor, 7, 9 Cursor Control, 7, 9 Dial, 8, 9, 17, 20, 21, 28, 30, 31, 32, 41, 47 DiLog, 8, 11, 21 Display Contrast, 1, 14, 23 Line choice, 1, 42, 46 Line In Use, 16, 17, 19 Main Menu, 1, 7, 11, 12, 13, 27, 36, 37, 39, 43 Maintenance, 1, 42 Messages, i, 15, 38, 40 More, 8, 11, 12, 13, 27, 35, 43 MUTE, 18, 48 One-phone line operation, 1, 6 Pause (Dialing Delay), 28 Redial, 1, 14, 16, 20, 21 Redial Log, 1, 14, 16, 20, 21 Refer, 8, 21 Remind, 8, 11, 36 Removal confirm, 1, 42, 45 Remove, 2, 8, 21, 27, 30, 36, 37, 41 Repeat Call, 40 Review, 8, 13, 36, 37, 47 Ringer volume, 1, 24 RmAll, 8, 41 Done, 6, 8, 29, 43, 44, 45, 46 DP (rotary), 4 Edit, 1, 8, 10, 29, 35, 36, 37 Electric power, 1, 2, 3, 4, 47 Erasing stored numbers, 2, 8, 21, 27, 30, 36, 37, 41 Exit, 8, 13, 24, 27, 35, 36, 40 Flash, 1, 14, 20, 32 Handset volume, 1, 14, 24 Hold, 1, 14, 16, 18, 19, 23 Incoming Call Log, 1, 8, 11, 38, 39, 40, 41, 47 InLog, 1, 8, 11, 38, 39, 40, 41, 47 Set-Up, 6, 7, 9, 10, 11, 12, 17, 42, 43 Soft Key Labels, 1, 7, 8 Soft Keys, 7, 9 SPEAKER, 8, 17, 18, 21, 22, 30, 41, 43 Temporary Tone Dialing, 1, 20 Time, setting, 1, 6, 42, 43 Timer, 8, 20 TONE, 32, 47 6 TT, 4 Using menus, 1, 9, 12 49 AT&T 882 Manual Index Copyright 1998 Philips Consumer Communications, L.P. All rights reserved. Printed in Mexico. 848234712 Issue 1AT&T