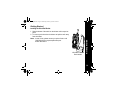
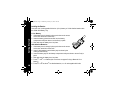
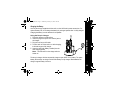
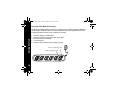
1
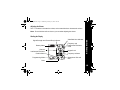
MOTOROLA, the Stylized M Logo, and Radius are
registered in the Use Patent & Trademark Office.
All other product or service names are the proper of
their respecitive owners.
© Motorola, Inc. 2004. All rights reserved. Printed in the U.S.A.
*6881096C37*
VL50
6881096C37-O
Two-Way Radio User Guide
CP50fcc.fm Page 6 Wednesday, February 11, 2004 10:09 AM
VL50TOC.fm Page 1 Tuesday, February 24, 2004 4:43 PM
Contents
Introduction . . . . . . . . . . . . . . . . . . . . . . . 2
Package Contents . . . . . . . . . . . . . . . . . 2
FCC Licensing Information . . . . . . . . . . 4
Product Safety and RF Exposure
Compliance. . . . . . . . . . . . . . . . . . . . . . 6
Battery Charger Safety Instructions . . . . 7
Radio Controls . . . . . . . . . . . . . . . . . . . . 8
Getting Started . . . . . . . . . . . . . . . . . . . . 9
Installing the Swivel Belt Holster . . . . . . 9
Installing the Batteries . . . . . . . . . . . . . 10
Charging the Battery . . . . . . . . . . . . . . 10
Charging Status LEDs . . . . . . . . . . . . . 13
Turning Your Radio On and Off . . . . . . 14
Adjusting the Volume . . . . . . . . . . . . . . 15
Reading the Display. . . . . . . . . . . . . . . 15
Talking and Receiving . . . . . . . . . . . . . 16
Basic Radio Operation . . . . . . . . . . . . . 16
Signal Strength and Channel Busy
Indicators. . . . . . . . . . . . . . . . . . . . . . 16
Talk Range. . . . . . . . . . . . . . . . . . . . . . 17
Handsfree Use (VOX) . . . . . . . . . . . . . 17
Locking the Keypad . . . . . . . . . . . . . . . 19
Monitoring a Channel. . . . . . . . . . . . . . 19
Scanning . . . . . . . . . . . . . . . . . . . . . . . 20
Programming Mode . . . . . . . . . . . . . . . 21
Factory Default Settings . . . . . . . . . . . 22
Entering Programming Mode. . . . . . . . 23
Cloning Radio Settings . . . . . . . . . . . . 27
Advanced Features. . . . . . . . . . . . . . . . 28
Troubleshooting . . . . . . . . . . . . . . . . . . 30
Use and Care. . . . . . . . . . . . . . . . . . . . . 33
Frequencies and Bandwidths . . . . . . . 34
Spirit GT Series Programming . . . . . . 40
Limited Warranty for Motorola . . . . . . 41
Accessories. . . . . . . . . . . . . . . . . . . . . . 48
1
VL50intro.fm Page 2 Thursday, February 26, 2004 3:28 PM
Introduction
Introduction
2
Thank you for purchasing a Motorola VL50 Radio. Your radio is a product of
Motorola’s 75 plus years of experience as a world leader in designing and
manufacturing communications equipment. The VL50 radio provides cost-effective
communications for businesses such as retail stores, restaurants, hotels, and
schools. Motorola professional two-way radios are the perfect communications
solution for all of today’s fast-paced industries.
Please read this guide carefully so you know how to properly operate the radio
before use.
Package Contents
•
•
•
•
•
•
•
•
VL50 Radio
Swivel Belt Holster
Lithium-Ion Battery
AAA Battery Tray
Drop-In Charger with Transformer
User's Guide
Accessory Brochure
Warranty Card
VL50intro.fm Page 3 Tuesday, February 24, 2004 4:44 PM
Introduction
For product-related questions, please call:
1-800-927-2744 in the USA
1-888-390-6456 TTY (Text Telephone)
3
VL50fcc.fm Page 4 Wednesday, February 25, 2004 11:45 AM
FCC Licensing Information
FCC Licensing Information
4
The Motorola VL50 two-way radio operates on radio frequencies that are regulated by the Federal
Communications Commission (FCC). In order to transmit on these frequencies, you are required to have a
license issued by the FCC.
Application is made available on FCC Forms 601, schedules D and H, and remittance form 159. If ordering the
forms by mail, phone, or from the FCC website, please request document number 000601, which includes all
forms and instructions. If using the FCC Fax-on-Demand system, use the 7-digit order numbers listed below.
To obtain the required forms, please use the following contact information:
By Phone or Web
Faxed
Mailed
or for questions
contact the Fax-On-Demand call the FCC forms hotline
regarding FCC license
system at:
at:
contact the FCC at:
1-888-CALL-FCC
1-800-418-FORM
1-202-418-0177
1-888-225-5322
1-800-418-3676
or: http://www.fcc.gov
Request forms 3060001,
Request document 000601
Request document 000601
3060003, and 3060006
Before filling out your application, you must decide which frequency(ies) you can operate on. See Frequencies
and Bandwidths on page 34. For questions on determining your radio frequency, please call Motorola Product
Services at 1-800-927-2744.
Changes or modifications not expressly approved by Motorola may void the user’s authority granted by the FCC
to operate this radio and should not be made. To comply with FCC requirements, transmitter adjustments should
be made only by or under the supervision of a person certified as technically qualified to perform transmitter
VL50fcc.fm Page 5 Tuesday, February 24, 2004 4:44 PM
FCC Licensing Information
maintenance and repairs in the private land mobile and fixed services as certified by an organization
representative of the user of those services. Replacement of any transmitter component (crystal, semiconductor,
etc.) not authorized by the FCC equipment authorization for this radio could violate FCC rules.
Note: Use of this radio outside the country where it was intended to be distributed is subject to government
regulations and may be prohibited.
5
VL50safety.fm Page 6 Tuesday, February 24, 2004 4:44 PM
Product Safety and RF Exposure Compliance
Product Safety and RF Exposure Compliance
6
!
Before using this product, read the operating instructions for safe usage contained in the
Product Safety and RF Exposure booklet enclosed with your radio.
Caution
ATTENTION!
This radio is restricted to occupational use only to satisfy FCC RF energy exposure requirements. Before
using this product, read the RF energy awareness information and operating instructions in the Product Safety
and RF Exposure booklet enclosed with your radio (Motorola Publication part number 6881095C98) to ensure
compliance with RF energy exposure limits.
For a list of Motorola-approved antennas, batteries, and other accessories, visit the following web site which lists
approved accessories: http://www.motorola.com/cgiss/index.shtml.
Battery Charger Safety Instructions
Save these Instructions
1. Do not expose the charger to rain or snow.
2. Do not operate or disassemble the charger if it has received a sharp blow, or has been dropped or damaged
in any way.
3. Never alter the AC cord or plug provided with the unit. If the plug will not fit the outlet, have the proper outlet
installed by a qualified electrician. An improper condition can result in a risk of electric shock.
4. To reduce the risk of damage to the cord or plug, pull the plug rather than the cord when disconnecting the
charger from the AC receptacle.
5. To reduce the risk of electric shock, unplug the charger from the outlet before attempting any maintenance
or cleaning.
6. Use of an attachment not recommended or sold by Motorola may result in a risk of fire, electric shock, or
personal injury.
7. Make sure the cord is located so it will not be stepped on, tripped over, or subjected to damage or stress.
8. An extension cord should not be used unless absolutely necessary. Use of an improper extension cord
could result in a risk of fire and/or electric shock. If an extension cord must be used, make sure that:
• The pins on the plug of the extension cord are the same number, size, and shape as those on the plug of
the charger.
• The extension cord is properly wired and in good electrical condition.
• The cord size is 18 AWG for lengths up to 100 feet, and 16 AWG for lengths up to 150 feet.
9. The supply cord of this charger cannot be replaced. If the cord is damaged, call the Motorola Accessories
and Aftermarket Division at 1-800-422-4210 in the USA or 1-888-390-6456 TTY (Text Telephone).
Product Safety and RF Exposure Compliance
VL50safety.fm Page 7 Tuesday, February 24, 2004 4:44 PM
7
VL50getstart.fm Page 8 Wednesday, February 25, 2004 1:44 PM
Radio Controls
Microphone
Radio Controls
Use P to:
Turn radio on/off
Adjust radio volume
Use B to:
Transmit call tone
Accessory Jack
Use Push to Talk to:
Talk
Exit a menu
Use [ and ] to:
Change channels
Change menu settings
Use T to:
Monitor the frequency
Scan channels
Speaker
Use S to:
Lock the keypad
Scroll through menus
8
020976o
VL50getstart.fm Page 9 Wednesday, February 25, 2004 1:44 PM
Getting Started
1. Slide the bottom of the radio into the holster until it snaps into
place.
2. To remove, push the tab on the holster and pull the radio away
from the holster.
Note: In case of loss, please contact your point-of-sale or call
1-800-422-4210 to request replacement part
number HCLN4013.
HCLN4013 Swivel
Belt Holster 0310
Getting Started
Installing the Swivel Belt Holster
9
VL50getstart.fm Page 10 Wednesday, February 25, 2004 1:44 PM
Installing the Batteries
Getting Started
Your radio uses a rechargeable Lithium-Ion (Li-Ion) battery or 3 AAA alkaline batteries with
the 56564 AAA Battery Tray.
10
Li-Ion Battery
1. If the battery door is already in place, push down on the recess
on the door and slide it off the radio.
2. Insert the battery, printed arrows first, into the battery
compartment and press down to secure firmly in place.
3. Slide and snap the battery door into place.
AAA Alkaline Batteries
1. If the battery door is already in place, push down on the recess
on the door and slide it off the radio.
2. Insert 3 AAA batteries into the battery tray as shown by the
markings inside the tray.
3. Insert the battery tray into the battery compartment and press down to secure firmly in
place.
4. Slide and snap the battery door into place.
5. Press S until A or n flashes (this menu does not appear if using a Motorola Li-Ion
battery).
6. Press [ or ] to select A for alkaline batteries, or n for rechargeable AAA cells.
VL50getstart.fm Page 11 Wednesday, February 25, 2004 1:44 PM
Charging the Battery
Using the Drop-in Charger
1. Place the charger on a flat surface.
2. Insert the plug of the power cord into the jack on
the charger.
3. Plug the cord into an AC outlet.
4. Turn the radio off. If the radio is on while charging,
it will take longer to fully charge.
5. Insert the radio (with battery installed) into the
front charging pocket.
Note: The radio will fit in the charger with the
holster on.
Getting Started
Use only the charger supplied with the radio, or other VL50 radio power accessories. For
optimum battery life, do not charge the battery for prolonged periods after it is fully charged.
Charging the battery over the weekend is acceptable.
The drop-in charger will also sequentially charge a spare 56557 Li-Ion battery. The spare
battery will not begin to charge until the radio battery is fully charged. Both batteries will
charge in approximately 2–6 hours.
11
VL50getstart.fm Page 12 Thursday, February 26, 2004 2:53 PM
Using the 56531 Multi-Unit Charger
Getting Started
The Multi-Unit Charger (MUC) allows drop-in charging of up to 6 radios or batteries. Batteries
can be charged inside the radios or removed and placed in the MUC separately. Each of the
6 charging pockets can hold a radio or battery, but not both.
12
1.
2.
3.
4.
5.
Place the charger on a flat surface.
Insert the power cord plug into the jack on the MUC.
Plug the cord into an AC outlet.
Turn the radio off.
Insert the radio or battery into the charging pocket.
Battery charging pocket
Radio charging pocket
VL50getstart.fm Page 13 Wednesday, February 25, 2004 1:44 PM
Charging Status LEDs
On the drop-in charger, the radio and battery charging pockets have their own LEDs.
On the MUC, each of the 6 charging pockets has an LED. The LEDs are grouped into pairs to
show which charging pockets are paired (for cloning, see page 27).
Battery Meter
The battery meter in the upper left corner of the display (see page 15) shows how much
battery power is remaining.
Battery Type
3 Bars
2 Bars
1 Bar
Flashing
d
b
c
m
100%–85%
85%–25%
25%–10%
Final 10%
AAA Alkaline 100%–75%
75%–40%
40%–10%
Final 10%
Li-Ion
Getting Started
The LED is solid red when the battery is charging, and solid green when charging is complete.
Battery Life
Based on 5% transmit, 5% receive, 90% standby (standard duty cycle):
Li-Ion – 12 Hours
AAA Alkaline – 10 Hours
Note: For optimal battery life, high-capacity alkaline batteries are recommended.
13
VL50getstart.fm Page 14 Wednesday, February 25, 2004 1:44 PM
Turning Your Radio On and Off
See page 8 for a basic radio diagram.
Turn P clockwise to turn the radio on, and counterclockwise to turn the radio off. When the
radio is on, the transmit light on the top of the radio flashes every 3 seconds.
Getting Started
When you turn the radio on, the radio chirps and the display briefly shows all
features and display segments.
14
The radio then displays the current channel (larger number in
the center) and the frequency assigned to that channel (on the right indicated
by l).
The Interference Eliminator Code displays briefly (indicated by y, then
the current channel remains displayed.
VL50getstart.fm Page 15 Wednesday, February 25, 2004 1:44 PM
Adjusting the Volume
Turn P clockwise to increase the volume, and counterclockwise to decrease the volume.
Note: Do not hold the radio too close to your ear when adjusting the volume.
Signal Strength and Channel Busy Indicator
Battery Meter
Channel
Interference Eliminator
Code Indicator
Programming Mode
VibraCall® Alert Indicator
Frequency and
Interference Eliminator
Code
Keypad Lock
Frequency Indicator
Getting Started
Reading the Display
Microphone Gain and
VOX
Scan
15
VL50operation.fm Page 16 Tuesday, February 24, 2004 4:46 PM
Talking and Receiving
Basic Radio Operation
Talking and Receiving
1. Press and hold T to check for channel activity. If you hear static, the channel is clear to
use. Do not transmit if someone is speaking on the channel. Press T again to stop
monitoring.
2. To talk, press and hold Push to Talk and speak into the microphone. Hold the radio
2 to 3 inches away from your mouth.
3. To listen, release Push to Talk.
The transmit LED on the top of the radio is red when transmitting.
Signal Strength and Channel Busy Indicators
When there is activity on a frequency, the radio displays w and the
transmit light flashes at a faster rate of once per second.
When there is activity on the same frequency and code as your radio
(your radio is receiving), the radio displays w and a signal strength
from 1 (weakest) to 6 (strongest). This can help determine when a
radio is moving out of range.
Note: Obstacles that block the signal path may affect the strength of the incoming signal.
16
VL50operation.fm Page 17 Tuesday, February 24, 2004 4:46 PM
Industrial
Multi-Level
Outdoor
Inside steel/concrete
industrial buildings
Inside multi-level
buildings
Flat ground with no
obstructions
Up to 200,000 sq. ft.
Up to 15 floors
Up to 5 miles
Handsfree Use (VOX)
The VL50 radio can operate handsfree when used with compatible voice activation (VOX)
accessories. A short delay occurs between the time when you start talking and when the radio
transmits.
Talking and Receiving
Talk Range
17
Talking and Receiving
VL50operation.fm Page 18 Tuesday, February 24, 2004 4:46 PM
18
With Compatible VOX Accessories
1. Turn the radio off.
2. Open the accessory cover.
3. Plug the audio accessory firmly into the accessory jack.
4. Turn the radio on. The radio displays g. If g is flashing and
you are setting up the VOX accessory for the first
time, set the VOX sensitivity level (see page 19).
5. Lower the radio volume BEFORE placing the accessory in or
near your ear.
6. To transmit, speak into the accessory microphone. To receive,
stop talking.
To disable VOX operation, press Push to Talk or remove the audio accessory.
Note: To order accessories, call 1-800-422-4210, or contact your point of purchase.
Setting the VOX Sensitivity
You can adjust the sensitivity of your radio’s accessory or microphone during VOX operation
to suit different operating environments. These menus appear only when the VOX feature is in
use, which is indicated by g.
1. Press S until g displays. The radio displays H when you are setting
the external VOX (with audio accessory).
2. Press [ or ] to select the sensitivity level:
0 = Off
1 = Low
2 = Medium
3 = High
Locking the Keypad
You can lock the keypad to avoid accidentally changing your radio settings.
1. Press and hold S for 3 seconds.
2. To unlock, press and hold S for 3 seconds.
Monitoring a Channel
Monitoring allows you to check for activity on a channel.
1. Press and hold T. If the channel is clear to use, you will hear static
and w and 0 will display.
2. Press T again to stop monitoring.
External VOX
020995o
Talking and Receiving
VL50operation.fm Page 19 Tuesday, February 24, 2004 4:46 PM
19
VL50operation.fm Page 20 Tuesday, February 24, 2004 4:46 PM
Talking and Receiving
Scanning
20
You can scan up to 4 channels and frequencies. When the radio detects activity, it stops
scanning and locks in on the active channel. This allows you to talk and listen to the person
transmitting without changing channels.
1. To start scanning, briefly press T.
The scan icon h displays and the radio begins to scan the channels. When the radio
detects activity, it stops on that channel and displays w and the channel number.
2. To talk to the person transmitting without switching channels, press Push to Talk within
5 seconds. If no transmission occurs within 5 seconds, scanning resumes.
3. To stop scanning, briefly press T.
If you press Push to Talk while the radio is scanning, the radio transmits on the channel you
were on before you started scanning.
Skipping and Removing Channels While Scanning
Scan has two temporary features to make it easier to use.
• Scan advance
If the radio stops scanning on a channel you do not want to listen to, press ] to resume
scanning for the next active channel.
• Nuisance delete
Press and hold [ to temporarily remove a channel from the scan list. The channel return
the next time you use the scan feature.
VL50operation.fm Page 21 Tuesday, February 24, 2004 4:46 PM
Programming mode allows you to change the following settings on your radio:
• Channel
• Frequency
• Interference eliminator code
• Call tones
• Microphone gain
• Scan list
• Available channels
Notes:
• To talk with someone on your two-way radio, the channel, frequency, and interference
eliminator code must be the same on both radios.
• You cannot enter programming mode while a VOX accessory is plugged into the radio.
Programming Mode
Programming Mode
21
VL50operation.fm Page 22 Wednesday, February 25, 2004 11:54 AM
Factory Default Settings
Programming Mode
Your radio is programmed at the factory to the following settings:
Channel
1
2
3
4
5
6
7
8
Code
Call Tone/
VibraCall®
VOX
Microphone
Gain
Frequency
1
2
3
4
5
6
7
8
1
Off (0)
Off (0)
2 (medium sensitivity)
To restore the factory settings, turn the radio on while holding Push to Talk and S for
22 3 seconds.
VL50operation.fm Page 23 Tuesday, February 24, 2004 4:46 PM
Press and hold Push to Talk and T for 3 seconds while turning the radio on. The radio beeps
and displays k, the channel number flashes, and the frequency (indicated by l)
and code (indicated by y) display alternately.
Note: If you press and release the Push to Talk button when programming, you will return
to the front of the Programming Mode.
Selecting a Channel
1. In programming mode, press S until the channel number flashes and the
frequency and code display alternately (this is the first setting after you
enter programming mode).
2. Press [ or ] to select the channel.
3. Press and hold Push to Talk to exit programming mode, or press S to
continue programming.
Programming the Frequency
1. In programming mode, press S until l displays and the frequency
number flashes.
2. Press [ or ] to select the frequency.
3. Press and hold Push to Talk to exit programming mode, or press S to
continue programming.
Note: See page 34 for information on frequencies for communicating with other business
radios. If you are matching your VL50 radio to an existing Spirit GT radio, see page 40.
Programming Mode
Entering Programming Mode
23
Programming Mode
VL50operation.fm Page 24 Tuesday, February 24, 2004 4:46 PM
Programming the Interference Eliminator Code
The interference eliminator code helps minimize interference by providing code combinations
that filter out static, noise, and unwanted messages.
1. In programming mode, press S until y displays and the code
number flashes.
2. Press [ or ] to select the code (see page 37).
3. Press and hold Push to Talk to exit programming mode, or press S to
continue programming.
Programming the Available Channels
If you need fewer channels, you can reduce the number of available channels.
1. In programming mode, press S until = displays and the channel number
flashes.
2. Press [ or ] to select the number of channels you want available.
3. Press and hold Push to Talk to exit programming mode, or press S to
continue programming.
Note: The radio retains settings for channels made unavailable.
Programming Call Tones and VibraCall®
Your radio can transmit call tones to other radios in your group so you can alert them that you
are about to talk. Your radio is programmed at the factory with call tones turned off (set to 0),
but you can change this setting to choose a distinctive call tone.
24
The VibraCall® feature is an additional call tone option that makes the VL50 radio vibrate
briefly when it receives if you have not transmitted or received in the last 30 seconds. Select
call tone 8 to turn VibraCall® on. i displays on the radio when VibraCall® is on.
1. In programming mode, press S until E displays.
2. Press [ or ] to hear and select the call tone. Select call tone 8 for
VibraCall®.
3. Press and hold Push to Talk to exit programming mode, or press S to
continue programming.
To transmit your call tone, press B on the side of the radio.
Programming Mode
VL50operation.fm Page 25 Thursday, February 26, 2004 3:29 PM
25
Programming Mode
VL50operation.fm Page 26 Tuesday, February 24, 2004 4:46 PM
26
Programming Microphone Gain
You can adjust the microphone sensitivity to suit different users or operating environments.
1. In programming mode, press S until g and ? display.
2. Press [ or ] to select the sensitivity level:
3 = High sensitivity, for quiet environments
2 = Medium sensitivity (default)
1 = Low sensitivity, for loud environments
3. Press and hold Push to Talk to exit programming mode, or press S to continue
programming.
Editing the Scan List
For faster scanning and to avoid hearing unwanted transmissions, you can edit the scan list to
skip channels.
1. In programming mode, press S until h displays and the channel number
and Y or n flash.
2. Press [ or ] to select the channel you want to remove from the scan list.
3. Press T to display either Y to include the channel or n to exclude the
channel.
4. Press and hold Push to Talk to exit programming mode, or press S to continue
programming.
VL50operation.fm Page 27 Thursday, February 26, 2004 2:51 PM
Cloning Radio Settings
Cloning Radio Settings
You can copy VL50 radio settings from one radio (the source) to a second radio using the
56531 Multi-Unit Charger (MUC) optional accessory. See the MUC User's Guide for more
information.
You can clone only one radio at a time. A multi-channel radio can clone to a single-channel
radio, but only the first channel is cloned. The MUC does not have to be plugged in for cloning,
but both radios require charged batteries.
1. On the source radio, press and hold Push to Talk and T for 3 seconds while turning the
radio on. The radio beeps and displays k.
2. Place the source radio in one of the charging pockets.
3. Turn the target radio on and place it in the charging pocket that is
paired with the pocket containing the source radio. There are
Paired
3 paired charging pockets as indicated by the 3 pairs of charging
pockets
status LEDs.
4. Press and hold T on the source radio. The source radio transmits its
settings to the target radio. If cloning was successful, P or Pass
displays on the source radio and the target radio displays all feature
icons. If cloning was not successful, F or Fail displays on the source
radio.
5. Turn the target radio off and back on again to use.
LEDs 031102o
6. To clone another radio, repeat steps 3 and 4.
7. To exit programming mode on the source radio, press and hold Push to Talk until k
no longer appears.
27
VL50operation.fm Page 28 Tuesday, February 24, 2004 4:46 PM
Advanced Features
You can set the following features by pressing and holding additional buttons while turning
the radio on.
Press This Button
While Turning
the Radio On
Default
Setting
Turn Keypad Tones On/Off
Turns keypad beeps off for silent keypad operation.
[
On
Turn End-of-Transmission Tone On/Off
If enabled, your two-way radio transmits a tone when you
finish transmitting (like saying Roger or Over).
If keypad tones are off and end-of-transmission tone is on,
you will not hear the end-of-transmission tone, but it is
transmitted.
]
Off
Push to Talk T [
On
Advanced Features
To Do This
28
Turn Battery Save Mode On/Off
Decreases attack time, which is the brief period of time
between when the radio receives a transmission on its
frequency and broadcasts audio. Turning battery save
mode off decreases battery life by approximately 20%.
To Do This
Restore Factory Defaults
Returns radio to its original factory settings.
Press This Button
While Turning
the Radio On
Default
Setting
Push to Talk S
---
Advanced Features
VL50operation.fm Page 29 Tuesday, February 24, 2004 4:46 PM
29
VL50operation.fm Page 30 Tuesday, February 24, 2004 4:46 PM
Troubleshooting
Troubleshooting
Symptom
Try This:
No Power
Recharge or replace Li-Ion battery.
Reposition or replace Alkaline batteries.
Message not
transmitted
Make sure Push to Talk is completely pressed while
transmitting.
Recharge, replace, and/or reposition batteries.
Verify the transmit light is illuminated while speaking.
Verify Channel, Frequency, and Code settings are correct.
Hearing other
Frequency may be in use. Change on all radios if possible (see
noises or
conversation on page 23 and 24).
a channel
Poor audio
quality
30
Bandwidth does not match. For optimal audio quality when
communicating with VL50 radios, the bandwidth of other radios
should be set to 12.5 kHz, if possible.
Symptom
Try This:
Limited talk
range
Steel and/or concrete structures, heavy foliage, buildings, or
vehicles decrease range (see page 17). Check for clear line of
sight to improve range.
Wearing radio close to body such as in a pocket or on a belt
decreases range. Change location of radio.
Message not
received
Confirm radios have the same channel, frequency, and
interference eliminator code settings (see page 21).
Recharge, replace, and/or reposition batteries.
Move to another location. Obstructions and operating indoors or
in vehicles may decrease range.
Verify radio is not in scan mode.
Heavy static or
interference
Radios are too close. They must be at least 5 feet apart.
Radios are too far apart or obstacles are interfering with
transmission.
Keypad locked
Unlock by holding S for 3 seconds.
Low batteries
Recharge or replace batteries. Extreme operating temperatures
affect battery life.
Troubleshooting
VL50operation.fm Page 31 Tuesday, February 24, 2004 4:46 PM
31
Troubleshooting
VL50operation.fm Page 32 Tuesday, February 24, 2004 4:46 PM
32
Symptom
Try This:
Charger light
does not come
on
Reinsert radio and/or battery.
Clean battery and/or charger contacts.
Verify that the charging pin on the transformer is inserted
correctly into the drop-in charger.
AAA cells installed in radio. Remove and replace with Li-Ion
battery.
Low battery
meter reading
although new
batteries are
installed
Verify radio is set to the correct battery type (see page 10).
Verify high-capacity alkaline batteries are used for optimal
battery life.
Cannot activate
VOX
Feature not set and on (see page 18).
Sensitivity set to 0 (see page 19).
Verify that accessory allows VOX operation.
Cannot enter
k mode
Unplug audio accessories and retry.
VL50operation.fm Page 33 Tuesday, February 24, 2004 4:46 PM
Use and Care
Use a soft damp cloth
to clean the exterior.
Do not immerse
in water.
Do not use alcohol or
cleaning solutions.
If the radio is submerged in water...
Turn radio off and
remove batteries.
Dry with soft cloth.
Use and Care
XXX
Do not use radio until
completely dry.
33
VL50operation.fm Page 34 Tuesday, February 24, 2004 4:46 PM
Frequencies and Bandwidths
Frequencies and Bandwidths
34
These charts provide frequency information and are useful when using Motorola VL50 radios
with other business radios. Frequency Display Number is identical to Spirit M, GT, and SSeries frequency position (where applicable), but bandwidth may be different.
UHF Frequencies
Display
Number
Frequency
(MHz)
Bandwidth
Display
Number
Frequency
(MHz)
Bandwidth
1
464.5000
12.5/25.0
11
462.6750
12.5/25.0
2
464.5500
12.5/25.0
12
464.3250
12.5/25.0
3
467.7625
12.5/25.0
13
464.8250
12.5/25.0
4
467.8125
12.5/25.0
14
469.2625
12.5/25.0
5
467.8500
12.5/25.0
15
469.5000
12.5/25.0
6
467.8750
12.5/25.0
16
469.5500
12.5/25.0
7
467.9000
12.5/25.0
17
462.7625
12.5
8
467.9250
12.5/25.0
18
462.7875
12.5
9
462.5750
12.5/25.0
19
462.8125
12.5
10
462.6250
12.5/25.0
20
462.8375
12.5
VL50operation.fm Page 35 Tuesday, February 24, 2004 4:46 PM
UHF Frequencies (Continued)
Frequency
(MHz)
Bandwidth
Display
Number
Frequency
(MHz)
Bandwidth
21
462.8625
12.5
35
461.2875
12.5
22
462.8875
12.5
36
461.3125
12.5
23
462.9125
12.5
37
461.3375
12.5
24
464.4875
12.5
38
461.3625
12.5
25
461.0375
12.5
39
462.7625
12.5
26
461.0625
12.5
40
462.7875
12.5
27
461.0875
12.5
41
462.8125
12.5
28
461.1125
12.5
42
462.8375
12.5
29
461.1375
12.5
43
462.8625
12.5
30
461.1625
12.5
44
462.8875
12.5
31
461.1875
12.5
45
462.9125
12.5
32
461.2125
12.5
46
464.4875
12.5
33
461.2375
12.5
47
464.5125
12.5
34
461.2625
12.5
48
464.5375
12.5
Frequencies and Bandwidths
Display
Number
35
VL50operation.fm Page 36 Tuesday, February 24, 2004 4:46 PM
UHF Frequencies (Continued)
Frequencies and Bandwidths
Display
Number
36
Frequency
(MHz)
Bandwidth
Display
Number
Frequency
(MHz)
Bandwidth
49
464.5625
12.5
53
466.1125
12.5
50
466.0375
12.5
54
466.1375
12.5
51
466.0625
12.5
55
466.1625
12.5
52
466.0875
12.5
56
466.1875
12.5
VL50operation.fm Page 37 Tuesday, February 24, 2004 4:46 PM
Display
Number
Code
(Hz)
Display
Number
Code
(Hz)
Display
Number
Code
(Hz)
1
67.0
14
107.2
27
167.9
2
71.9
15
110.9
28
173.8
3
74.4
16
114.8
29
179.9
4
77.0
17
118.8
30
186.2
5
79.7
18
123.0
31
192.8
6
82.5
19
127.3
32
203.5
7
85.4
20
131.8
33
210.7
8
88.5
21
136.5
34
218.1
9
91.5
22
141.3
35
225.7
10
94.8
23
146.2
36
233.6
11
97.4
24
151.4
37
241.8
12
100.0
25
156.7
38
250.3
13
103.5
26
162.2
Frequencies and Bandwidths
Interference Eliminator Codes
Carrier Squelch (0) disables interference eliminator codes.
37
VL50operation.fm Page 38 Tuesday, February 24, 2004 4:46 PM
Frequencies and Bandwidths
Digital Interference Eliminator Codes
38
Display
Number
Digital
Code
Display
Number
Digital
Code
Display
Number
Digital
Code
39
023
54
115
69
223
40
025
55
116
70
226
41
026
56
125
71
243
42
031
57
131
72
244
43
032
58
132
73
245
44
043
59
134
74
251
45
047
60
143
75
261
46
051
61
152
76
263
47
054
62
155
77
265
48
065
63
156
78
271
49
071
64
162
79
306
50
072
65
165
80
311
51
073
66
172
81
315
52
074
67
174
82
331
53
114
68
205
83
343
VL50operation.fm Page 39 Tuesday, February 24, 2004 4:46 PM
Display
Number
Digital
Code
Display
Number
Digital
Code
Display
Number
Digital
Code
84
346
97
465
110
632
85
351
98
466
111
654
86
364
99
503
112
662
87
365
100
506
113
664
88
371
101
516
114
703
89
411
102
532
115
712
90
412
103
546
116
723
91
413
104
565
117
731
92
423
105
606
118
732
93
431
106
612
119
734
94
432
107
624
120
743
95
445
108
627
121
754
96
464
109
631
Frequencies and Bandwidths
Digital Interference Eliminator Codes (Continued)
39
VL50operation.fm Page 40 Tuesday, February 24, 2004 4:46 PM
Spirit GT Series Programming
Spirit GT Series Programming
40
The VL50 radio platform is designed to replace the Spirit GT Series radio. The first eight
frequencies and 38 interference eliminator codes of VL50 radio are compatible with Spirit GT
Series. To program your VL50 radio to talk with a Spirit GT Series, verify or change your Spirit
GT settings as follows.
To verify the frequency and code:
1. Press the Menu button 3 times. The channel number and frequency display.
2. Press Menu again. The interference eliminator code displays.
To change the frequency:
1. Enter programming mode by pressing and holding Push to Talk for approximately
5 seconds while turning the radio on, then release Push to Talk.
2. Use the Scroll button to select one the eight frequencies.
To change the interference eliminator code:
1. Enter programming mode by pressing and holding Push to Talk for approximately
5 seconds while turning the radio on, then release Push to Talk.
2. Press the Menu button. The code number flashes.
3. Use the Scroll button to select the code.
To exit programming mode on a Spirit GT Series radio, press Push to Talk or the radio will
exit programming mode after five seconds.
VL50warranty.fm Page 41 Wednesday, February 25, 2004 1:48 PM
Limited Warranty
for Motorola Personal Communications
Products Purchased in the United States and Canada
Warranty
What This Warranty Covers
• Products. Defects in materials and workmanship in wireless cellular telephones, pagers,
and/or two-way radios, and certain accessories that are sold with them, such as the battery,
battery charger, and holster manufactured and/or sold by Motorola (Products).
• Batteries. Defects in materials and workmanship in batteries that are manufactured by
Motorola and/or sold with Products are covered by this warranty only if the fully-charged
capacity falls below 80% of rated capacity or they leak.
• Software. Physical defects in the media that tangibly embodies each copy of any software
supplied with the Products.
II.
What the Period of Coverage Is
From the date the Products are purchased by the first end-user:
• Products. The warranty is for one year. Exception: The warranty for Spirit GT Series and
Talkabout Series two-way radio accessories (including the Spirit GT Series batteries) is for
90 days.
• Software. The warranty is for 90 days.
• Repairs/Replacements. The warranty is for the balance of the original warranty or for 90
days from the date you receive it, whichever is longer.
Limited Warranty
I.
41
VL50warranty.fm Page 42 Wednesday, February 25, 2004 1:48 PM
III.
Who is Covered
This warranty extends to the first end-user purchaser only.
Limited Warranty
IV.
42
What We Will Do to Correct Warranty Problems
At no charge to you, we have the option to repair or replace the Products or software that do not
conform to the warranty, or to refund the Products’ purchase price. We may use functionally
equivalent reconditioned/refurbished/pre-owned or new Products or parts. No software updates are
provided.
V.
How to Obtain Warranty Service or Other Information
USA/
Two-Way Radios 1-800-927-2744
Canada
TTY
TTY 1-888-390-6456
For Accessories, please call 1-800-422-4210.
You will receive instructions on how to ship the Products to Motorola. You must ship the Products to
us with freight, duties and insurance prepaid. Along with the Products you must include: (a) a copy
of your receipt, bill of sale or other comparable proof of purchase; (b) a written description of the
problem; (c) the name of your service provider (if this Product requires subscription service); (d) the
name and location of the installation facility (if applicable) and, most importantly; (e) your address
and telephone number. If requested, you must also return all detachable parts such as antennas,
batteries and chargers. RETAIN YOUR ORIGINAL PROOF OF PURCHASE.
We will ship repaired or replacement Products at our expense for the freight and insurance, but at
your expense for any duties. If additional information is needed, please contact us at the telephone
number listed above.
VI.
What This Warranty Does Not Cover
• Products that are operated in combination with ancillary or peripheral equipment or software
not furnished by Motorola for use with the Products (“ancillary equipment”), or any damage
to the Products or ancillary equipment as a result of such use. Among other things,
“ancillary equipment” includes batteries, chargers, adaptors, and power supplies not
manufactured or supplied by Motorola. Any of these voids the warranty.
• Someone other than Motorola (or its authorized service centers) tests, adjusts, installs,
maintains, alters, modifies, or services the Products in any way. Any of these voids the
warranty.
Limited Warranty
VL50warranty.fm Page 43 Wednesday, February 25, 2004 1:48 PM
43
Limited Warranty
VL50warranty.fm Page 44 Wednesday, February 25, 2004 1:48 PM
44
• Rechargeable batteries that: (a) are charged by other than the Motorola-approved battery
charger specified for charging such batteries; (b) have any broken seals or show evidence
of tampering; (c) are used in equipment other than the Product for which they are specified;
or (d) are charged and stored at temperatures greater than 60 degrees centigrade. Any of
these voids the warranty.
• Products that have: (a) serial numbers or date tags that have been removed, altered, or
obliterated; (b) board serial numbers that do not match each other, or board serial numbers
that do not match the housing; or (c) nonconforming or non-Motorola housings or parts. Any
of these voids the warranty.
• Defects or damage that result from: (a) use of the Products in a manner that is not normal or
customary; (b) improper operation or misuse; (c) accident or neglect such as dropping the
Products onto hard surfaces; (d) contact with water, rain, extreme humidity, or heavy
perspiration; (e) contact with sand, dirt or the like; or (f) contact with extreme heat, or spills
of food or liquid.
• Physical damage to the surface of the Products, including scratches, cracks, or other
damage to a display screen, lens, or other externally exposed parts.
• Failure of Products that is due primarily to any communication service or signal you may
subscribe to or use with the Products.
• Coil cords that are stretched or that have any broken modular tabs.
• Products that are leased.
VL50warranty.fm Page 45 Wednesday, February 25, 2004 1:48 PM
Flat-rate repair rates may apply to Products not covered by this warranty. To obtain information
about Products needing repairs that are not covered by this warranty, please call the telephone
number previously listed. We will provide information on repair availability, rates, methods of
payment, where to send the Products, etc.
This is Motorola’s complete warranty for the Products, and states your exclusive remedies. This
warranty is given in lieu of all other express warranties. Implied warranties, including without
limitation, the implied warranties of merchantability and fitness for a particular purpose, are given
only if specifically required by applicable law. Otherwise, they are specifically excluded.
No warranty is made as to coverage, availability, or grade of service provided by the Products,
whether through a service provider or otherwise.
No warranty is made that the software will meet your requirements or will work in combination with
any hardware or applications software products provided by third parties, that the operation of the
software products will be uninterrupted or error free, or that all defects in the software products will
be corrected.
In no event shall Motorola be liable, whether in contract or tort (including negligence) for damages
in excess of the purchase price of the Product, or for any indirect, incidental, special or
consequential damages of any kind, or loss of revenue or profits, loss of business, loss of
information or data, or other financial loss arising out of or in connection with the ability or inability
to use the Products, to the full extent these damages may be disclaimed by law.
Limited Warranty
VII. Some Other Limitations
45
VL50warranty.fm Page 46 Wednesday, February 25, 2004 1:48 PM
Limited Warranty
VIII. Patent and Software Provisions
46
At Motorola’s expense, we will defend you, and pay costs and damages that may be finally awarded
against you, to the extent that a lawsuit is based on a claim that the Products directly infringe a
United States patent. Our obligation is conditioned on: (a) you notifying us promptly in writing when
you receive notice of the claim; (b) you giving us sole control of the defense of the suit and all
negotiations for its settlement or compromise; and (c) should the Products become, or in Motorola's
opinion be likely to become, the subject of a claim of infringement of a United States patent, you
permit us, at our option and expense, either to: procure for you the right to continue using the
Products; replace or modify them so that they become non-infringing; or grant you a credit for such
Products, as depreciated, and accept their return. The depreciation will be an equal amount per
year over the lifetime of the Products, as established by Motorola.
Motorola will have no liability to you with respect to any claim of patent infringement that is based
upon the combination of the Products or parts furnished under this limited warranty with ancillary
equipment, as defined in VI., above.
This is Motorola’s entire liability with respect to infringement of patents by the Products.
Laws in the United States and other countries preserve for Motorola and other third party software
providers certain exclusive rights for copyrighted software, such as the exclusive rights to
reproduce in copies and distribute copies of such software. The software may be copied into, used
in and redistributed with only those Products that are associated with such software. No other use,
including without limitation, disassembly or reverse engineering of such software or exercise of
exclusive rights in such software is permitted.
Some states and other jurisdictions do not allow the exclusion or limitation of incidental or
consequential damages, or limitation on the length of an implied warranty, so the above limitations
or exclusions may not apply to you. This warranty gives you specific legal rights, and you may also
have other rights, which vary from jurisdiction to jurisdiction.
Limited Warranty
VL50warranty.fm Page 47 Wednesday, February 25, 2004 1:48 PM
47
VL50warranty.fm Page 48 Thursday, February 26, 2004 2:53 PM
Accessories
Audio Accessories
Accessories
56517
56518
BDN6774
BDN6773
HMN8435
HMN9051
Earpiece with In-line PTT Microphone
Earpiece with Boom Microphone
Earpiece with Microphone
Headset with Swivel Boom Microphone
Earbud with PTT Microphone
Remote Speaker Microphone
Carry Accessories
HCLN4013
56519
Swivel Belt Holster
Leather Carry Case
Chargers
56553
56531
Charger
Multi-Unit Charger
Batteries
56557
56564
Packaged Battery
AAA Battery Tray Kit
Replacement Parts
1585883F01
48
Battery Cover
This product is not intended for field repair. There are no user servicable parts.
VL50qr.fm Page 49 Tuesday, February 24, 2004 4:47 PM
VL50 Radio Programming Quick Reference
To enter programming mode, press and hold Push to Talk
and Qfor 3 seconds while turning the radio on. The radio
beeps and displays k, the channel number flashes, and the
frequency (indicated by l) and code (indicated by y)
display alternately.
Set the
Channel
Set the
Frequency
Set the
Interference
Eliminator
Code
Set
Available
Channels
Press [ or
].
Press S until l displays.
Press [ or
frequency.
] to change the
Press S until y
displays.Press [or ] to change
the code.
Press S until = displays.
Press [ or ] to select
number of available channels.
VL50qr.fm Page 50 Tuesday, February 24, 2004 4:47 PM
VL50 Radio Programming Quick Reference
Press S until E display.s
Set a Call
Tone
Press [ or ] to select1, 2, or
3 for audible call tones, 4 for
VibraCall, or 0 for off (default).
Press S until g and ? display.
Set the
Microphone
Gain
Press [ or ] to select:
1 Low sensitivity
2 Medium sensitivity
3 High sensitivity
Press S until h displays and the
channel number and Y or n flash.
Edit the
Scan List
Press [ or
] to select the
channel, then press T to select Y
(include channel) or n (exclude
channel).
CP50fcc.fm Page 6 Wednesday, February 11, 2004 10:09 AM
MOTOROLA, the Stylized M Logo, and Radius are
registered in the Use Patent & Trademark Office.
All other product or service names are the proper of
their respecitive owners.
© Motorola, Inc. 2004. All rights reserved. Printed in the U.S.A.
*6881096C37*
6881096C37-O
VL50
Commercial Series
Two-Way Radio User Guide