1
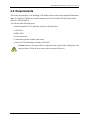
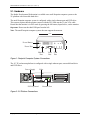
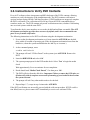
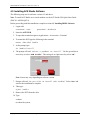
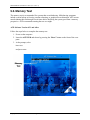
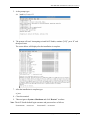
500 A Huntmar Park Drive
ASTi
Telestra 4 ACE Studio
Cold Start Procedure
Document: DOC-02-TEL4-ASCS-1
Advanced Simulation Technology inc. 500 A Huntmar Drive, Herndon, Virginia, 20170 USA
Revision J1 (July, 2011)
Product Name: Telestra 4 ACE Studio
ASTi Telestra 4 ACE Studio Cold Start Procedure
© Copyright ASTi 2010-11.
Restricted Rights: Use, duplication, or disclosure by the Government is subject to restrictions as set forth in subparagraph (c)(1)(ii) of the Rights in Technical Data and Computer Software clause at DFARS 252.227-7013.
This material may be reproduced by or for the U.S. Government pursuant to the copyright license under the
clause at DFARS 252.227-7013 (1994).
ASTi
500 A Huntmar Park Drive
Herndon, VA 20170
Red Hat® Enterprise Linux®
Red Hat® Subscription
ASTi’s ACE Studio software is designed to run on an installation of Red Hat® Enterprise Linux® client. This
ensures optimal interoperability with ASTi’s ACE Studio software, host routing software and external communications servers. As such included in the Cold Start DVDs is the complete installation of Red Hat® Enterprise
Linux® client. This software is not activated to a current Red Hat subscription. It is the end users responsibility
to activate their subscription and connect to the Red Hat Network. The Red Hat subscription will provide the end
user with support, maintenance, software and security updates. For details on Red Hat activation see the Red Hat
web site:
https://www.redhat.com/apps/activate
Export Restriction
Countries other than the United States may restrict the import, use, or export of software that contains encryption
technology. By installing this software, you agree that you shall be solely responsible for compliance with any
such import, use or export restrictions. For full details on Red Hat export restrictions please visit:
http://www.redhat.com/licenses/export
Table of Contents
1.0. Overview . . . . . . . . . . . . . . . . . . . . . . . . . . . . . . . . . . . . . . . . . . . . . . 1
2.0. Requirements . . . . . . . . . . . . . . . . . . . . . . . . . . . . . . . . . . . . . . . . . . 2
2.1. Hardware ........................................................................................................... 3
Figure 1: Footprint Computer System Connections ...........................................................3
Figure 2: 2U Platform Connections ...................................................................................3
3.0. Instructions to Verify DVD Contents . . . . . . . . . . . . . . . . . . . . . . . . 4
4.0. ACE Studio Cold Start Procedure . . . . . . . . . . . . . . . . . . . . . . . . . . 5
4.1. Installing RHEL Software ................................................................................. 5
4.2. Installing ACE Studio Software ....................................................................... 7
5.0. Memory Test . . . . . . . . . . . . . . . . . . . . . . . . . . . . . . . . . . . . . . . . . . . 9
Appendix A: Installation Instructions for Older Software Versions . 11
Installing RHEL Software ................................................................................... 11
Installing ACE Studio Software .......................................................................... 11
i
ii
ASTi ACE Studio Cold Start Procedure (Ver. 2, Rev. J)
1.0. Overview
The cold start procedure described in this document allows users to build ACE Studio systems
from scratch. There are three main reasons for using the cold start procedure:
1. Installing the latest software version
2. Rebuilding a damaged hard disk
3. Creating spare hard disks
Warning: Performing a system cold start to upgrade the software will cause complete
erasure of the system hard drive.
Copyright © 2011 Advanced Simulation Technology inc.
1
ASTi ACE Studio Cold Start Procedure (Ver. 2, Rev. J)
2.0. Requirements
This cold start procedure is for installing ACE Studio software on the Development Workstation.
Note: To install ACE Studio on a virtual machine see the ACE Studio VM Quick Start Guide
(DOC-01-ASVM-QSG-4).
You will need the following items:
• Small footprint PC or 2U platform with removable hard drive
• ASTi DVD
• RHEL DVD
• Power connection
• Connected keyboard, monitor, and mouse
• Optional ASTi Information Assurance (IA) DVD
Caution: Remove all external drives connected to the system before starting the cold
start procedure. Failure to do so may result in erasure of the drive.
2
Copyright © 2011 Advanced Simulation Technology inc.
ASTi ACE Studio Cold Start Procedure (Ver. 2, Rev. J)
2.1. Hardware
The Studio Development Workstation is available on a small footprint computer system or the
2U platform with removable hard drive.
The small footprint computer system is configured with a single ethernet port and DVD drive.
This system requires that the monitor connect with the DVI cable not the 15-pin VGA cable.
Ensure that the monitor is in DVI mode by pressing the left button, Input Source, on the monitor.
Important: Do not use the third USB port from the left.
Note: The small footprint computer system does not support the memtest.
6.5”
Power Button
2”
Power Port
Ethernet
Port
Video USB
Port Port
Figure 1: Footprint Computer System Connections
The 19” 2U rackmount platform is configured with a single ethernet port, removable hard drive
and DVD Drive.
Power Supply
Video
0000
ASTI
PROPERTY OF
PS/2 Keyboard
Network Port
Figure 2: 2U Platform Connections
Copyright © 2011 Advanced Simulation Technology inc.
3
ASTi ACE Studio Cold Start Procedure (Ver. 2, Rev. J)
3.0. Instructions to Verify DVD Contents
Every ACE software release incorporates an MD5 checksum of the DVD's contents, allowing
customers to verify the integrity of the installation media. The DVD contents verification is
optional and not required for the Cold Start Procedure. If DVD problems are suspected, complete
the DVD verification. The verification will fail if any file on the DVD is unreadable due to
scratches, marks, etc. The DVD contents only needs verification one time, whether Cold Starting
one or several systems with the same DVD.
To perform the check, users must have access to the sh shell and md5sum executable. The ASTi
development workstation provides these resources by default, and is the recommended computer to use for media verification.
The following instructions are for DVD verification using the development workstation.
1. Power on the development workstation, as it boots insert the ASTi DVD into the disk
drive within 10 seconds of powering on. (If the development workstation boots from the
hard drive, reboot the system and hold down the ‘alt’ key as it restarts.)
2. At the command prompt, enter:
studio mediacheck
3. The prompt will read “CD Not Found” as the system ejects ASTi DVD. Remove the
DVD.
4. Insert the RHEL DVD and select ‘Ok’.
5. The system prompt opens for the DVD media check. Select ‘Test’ to begin the media
check.
Wait approximately five to ten minutes for test completion.
6. Result should read “Media Check Passed,” if so then press ‘Ok’.
7. The DVD will eject from the disk drive. Important: Failure to remove the DVD after verification will result in complete erasure and reformatting of your hard disk the next time
the system is booted.
8. The prompt will ask if any other media needs to be checked.
9. Repeat Steps 1-7, except in step 4 reinsert the ASTi DVD.
If the DVD verification was successful, proceed with the cold start procedure. If DVD verification failed, however, please contact ASTi immediately to receive new software DVDs.
4
Copyright © 2011 Advanced Simulation Technology inc.
ASTi ACE Studio Cold Start Procedure (Ver. 2, Rev. J)
4.0. ACE Studio Cold Start Procedure
Warning: ASTi highly recommends that there are no KVM switches connected to the
system during the cold start process. Or at a minimum if you run into an issue with a
KVM, disconnect it and then try the cold start process again.
4.1. Installing RHEL Software
The following steps are for software versions 4.10 and above.
1. Power on the system via the power switch.
1a. If you are cold starting the 2U platform, insert the ASTi DVD immediately, and
ensure that the system boots off the ASTi DVD.
1b. If you are cold starting the small footprint computer system, hold down the ‘ALT’ key
while inserting the ASTi DVD and ensure that the system boots off the DVD.
2. At the prompt, select
RHEL Studio [Default]
and press enter.
Note: For ACE software versions 4.30 and previous, the prompt screen is different. At the
prompt type “studio” and press enter.
Copyright © 2011 Advanced Simulation Technology inc.
5
ASTi ACE Studio Cold Start Procedure (Ver. 2, Rev. J)
Optional: Alternate RHEL versions are available. Select the installation that corresponds
with your system (i.e. Studio).
3. The prompt will read “CD Not Found” and the system will eject the ASTi DVD. Remove
the DVD.
4. Insert the RHEL DVD and select ‘Ok’.
5. Wait for the installation to complete.
6. The DVD will automatically eject, remove the DVD and select “Reboot.”
6
Copyright © 2011 Advanced Simulation Technology inc.
ASTi ACE Studio Cold Start Procedure (Ver. 2, Rev. J)
4.2. Installing ACE Studio Software
The following steps are for software versions 4.5 and above.
Note: To install ACE Studio on a virtual machine see the ACE Studio VM Quick Start Guide
(DOC-01-ASVM-QSG-4).
Before proceeding with this installation, complete section 4.1. Installing RHEL Software.
1. Login with:
username: root
password: abcd1234
2. Insert the ASTi DVD.
3. To open the terminal navigate to Applications > Accessories > Terminal.
4. To mount the DVD type the following in the terminal:
mount /dev/dvd /media
5. At the prompt type:
sh /media/install
6. The prompt will read, ‘Select a product to install.’ Use the up and down
arrow keys to select ‘ACE Studio’. Then using tab or right arrow key select ‘OK’.
Note: Screen may vary depending on software version.
7. Prompt will read, ‘Do you wish to install ACE Studio?’ Select ‘Yes’ and
wait for the installation to complete.
8. Then type:
eject /media
9. Remove the DVD from the drive.
10. Type:
reboot
to reboot the system.
Copyright © 2011 Advanced Simulation Technology inc.
7
ASTi ACE Studio Cold Start Procedure (Ver. 2, Rev. J)
For step-by-step instructions on setting up the IP address, see the Telestra 4 Quick Start Guide
(DOC-01-TEL4-QSG-1) section 2.0. Setting up the ACE Studio Development Workstation.
For step-by-step instructions on installing the ASTi ACE Information Assurance (IA) software,
see the Telestra 4 Information Assurance Installation Guide (DOC-01-TEL4-IA-IG-1).
8
Copyright © 2011 Advanced Simulation Technology inc.
ASTi ACE Studio Cold Start Procedure (Ver. 2, Rev. J)
5.0. Memory Test
The memory test is recommended for systems that are misbehaving. Misbehaving symptoms
include system lockup or freezing, random rebooting, or graphics/screen distortion. ASTi recommends running this test through several times before declaring the system good from a memory
perspective. ASTi recommends running the test over night.
ACE Software Version 4.31 and After
Follow the steps below to complete the memory test.
1. Power on the computer.
2. Insert the ASTi DVD and reboot by pressing the “Reset” button on the front of the computer.
3. At the prompt, select
Memtest
and press enter.
Copyright © 2011 Advanced Simulation Technology inc.
9
ASTi ACE Studio Cold Start Procedure (Ver. 2, Rev. J)
ACE Software versions 4.10 to 4.30
Boot the system with the ASTi DVD (the one that is used for the Cold Start procedure) and then
start the utility by typing "memtest" at the prompt (instead of "studio" or "target"). It is recommended that this runs through several times before declaring the system good from a memory perspective. ASTi recommends running the test over night.
Execute the Memory Test
1. Power on the computer.
2. Insert the ASTi DVD and reboot.
3. At the prompt, type: memtest
4. Let test run for an extended period of time or overnight.
10
Copyright © 2011 Advanced Simulation Technology inc.
ASTi ACE Studio Cold Start Procedure (Ver. 2, Rev. J)
Appendix A: Installation Instructions for Older
Software Versions
Installing RHEL Software
These steps are for ASTi software versions 4.1 – 4.9.
1. Power on the system via the power switch.
2. Hold down the ‘ALT’ key while inserting the RHEL DVD (previously titled ASTi DVD
1). Skip this step if you are cold starting the 2U platform.
3. Select the DVD Windows icon to boot from the DVD.
4. At the prompt type
studio
5. Wait for the installation to complete.
6. The DVD will automatically eject, remove the DVD and select “Reboot.”
Installing ACE Studio Software
These steps are for ASTi software versions 4.1 – 4.4.
Note: If you are installing ACE software versions 4.5 or above please see section “4.2. Installing
ACE Software.”
Before proceeding with this installation, complete section “Installing RHEL Software” located
in this Appendix.
1. Login with:
username: root
password: abcd1234
2. Insert the ASTi DVD (previously titled ASTi DVD 2).
3. Open a terminal by navigating to Applications > Accessories > Terminal.
4. To mount the DVD type:
mount /dev/dvd /media
Copyright © 2011 Advanced Simulation Technology inc.
11
ASTi ACE Studio Cold Start Procedure (Ver. 2, Rev. J)
5. At the prompt type:
sh /media/install
6. The prompt will read “Attempting to install ACE Studio, continue [Y/N]” press ‘Y’ and
then press enter.
The screen below will display after the installation is complete.
7. After the installation is complete type:
eject
8. Close the terminal.
9. Then navigate to System > Shutdown and click “Restart” to reboot.
Note: The ACE Studio default login username and password are as follows:
Username: aceuser
12
Password: aceuser
Copyright © 2011 Advanced Simulation Technology inc.