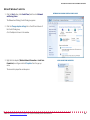
1
User Manual Motorola 2247-N8 DSL Wi-Fi Gateway SAVE THESE INSTRUCTIONS Motorola 2247-N8 DSL Wi-Fi Gateway User Guide Contents COPYRIGHTS . . . . . . . . . . . . . . . . . . . . . . . . . . . . . . . . . . . . . 3 SAFETY INFORMATION. . . . . . . . . . . . . . . . . . . . . . . . . . . . . . . 3 SETUP AND INSTALLATION . . . . . . . . . . . . . . . . . . . . . . . . . . . . 4 Before you Begin . . . . . . . . . . . . . . . . . . . . . . . . . . . . . . . . . . . . 5 Connecting the Gateway . . . . . . . . . . . . . . . . . . . . . . . . . . . . . . 6 Wireless (Wi-Fi) Network Setup . . . . . . . . . . . . . . . . . . . . . . . . 8 Connecting to the Web Management Interface . . . . . . . . . .9 Secure Your Wireless Network . . . . . . . . . . . . . . . . . . . . . . . . . 10 Wired (Ethernet) Network Setup . . . . . . . . . . . . . . . . . . . . . . . 13 Connecting to the Web Management Interface . . . . . . . . . .13 ADVANCED CONFIGURATIONS . . . . . . . . . . . . . . . . . . . . . . . . . 15 Links Bar . . . . . . . . . . . . . . . . . . . . . . . . . . . . . . . . . . . . . . . . . . . 15 Status . . . . . . . . . . . . . . . . . . . . . . . . . . . . . . . . . . . . . . . . . . . . . 29 DSL . . . . . . . . . . . . . . . . . . . . . . . . . . . . . . . . . . . . . . . . . . . . . . . 30 WAN. . . . . . . . . . . . . . . . . . . . . . . . . . . . . . . . . . . . . . . . . . . . . . 31 Ethernet. . . . . . . . . . . . . . . . . . . . . . . . . . . . . . . . . . . . . . . . . . . 32 Wireless . . . . . . . . . . . . . . . . . . . . . . . . . . . . . . . . . . . . . . . . . . . 33 IP. . . . . . . . . . . . . . . . . . . . . . . . . . . . . . . . . . . . . . . . . . . . . . . . . 34 LAN. . . . . . . . . . . . . . . . . . . . . . . . . . . . . . . . . . . . . . . . . . . . . . . 36 System Log . . . . . . . . . . . . . . . . . . . . . . . . . . . . . . . . . . . . . . . . 37 Firewall Log . . . . . . . . . . . . . . . . . . . . . . . . . . . . . . . . . . . . . . . . 38 Utilities . . . . . . . . . . . . . . . . . . . . . . . . . . . . . . . . . . . . . . . . . . . . 39 Diagnostics . . . . . . . . . . . . . . . . . . . . . . . . . . . . . . . . . . . . . . . . 39 Restart Router. . . . . . . . . . . . . . . . . . . . . . . . . . . . . . . . . . . . . . 40 Reset Router . . . . . . . . . . . . . . . . . . . . . . . . . . . . . . . . . . . . . . . 41 Update Router. . . . . . . . . . . . . . . . . . . . . . . . . . . . . . . . . . . . . . 42 Help. . . . . . . . . . . . . . . . . . . . . . . . . . . . . . . . . . . . . . . . . . . . . . . 43 FREQUENTLY ASKED QUESTIONS - AND ANSWERS (FAQS) . . . . . .44 BASIC TROUBLESHOOTING . . . . . . . . . . . . . . . . . . . . . . . . . . . . .46 Home. . . . . . . . . . . . . . . . . . . . . . . . . . . . . . . . . . . . . . . . . . . . . . 16 Condition Indicators (LEDs). . . . . . . . . . . . . . . . . . . . . . . . . . . . 46 Configure . . . . . . . . . . . . . . . . . . . . . . . . . . . . . . . . . . . . . . . . . . 16 Troubleshooting LED Conditions . . . . . . . . . . . . . . . . . . . . . . . 48 Connection. . . . . . . . . . . . . . . . . . . . . . . . . . . . . . . . . . . . . . . . .17 DHCP Server. . . . . . . . . . . . . . . . . . . . . . . . . . . . . . . . . . . . . . . .19 More IP Subnets . . . . . . . . . . . . . . . . . . . . . . . . . . . . . . . . . . . .20 Wireless . . . . . . . . . . . . . . . . . . . . . . . . . . . . . . . . . . . . . . . . . . .21 NAT . . . . . . . . . . . . . . . . . . . . . . . . . . . . . . . . . . . . . . . . . . . . . . .27 Router Password . . . . . . . . . . . . . . . . . . . . . . . . . . . . . . . . . . . .28 Time Zone . . . . . . . . . . . . . . . . . . . . . . . . . . . . . . . . . . . . . . . . .29 Adding Devices to the Wireless Network . . . . . . . . . . . . . . . . 49 Microsoft Windows 8 . . . . . . . . . . . . . . . . . . . . . . . . . . . . . . . . 49 Microsoft Windows 7 . . . . . . . . . . . . . . . . . . . . . . . . . . . . . . . . 50 Microsoft Windows XP . . . . . . . . . . . . . . . . . . . . . . . . . . . . . . . 52 Mac OS X Releases . . . . . . . . . . . . . . . . . . . . . . . . . . . . . . . . . . 54 Please visit www.motorola.com/us/support for FAQs and additional product documentation. 1 Motorola 2247-N8 DSL Wi-Fi Gateway User Guide Configuring Client Devices. . . . . . . . . . . . . . . . . . . . . . . . . . . . . 55 Microsoft Windows 8 . . . . . . . . . . . . . . . . . . . . . . . . . . . . . . . .56 Microsoft Windows 7 and Vista. . . . . . . . . . . . . . . . . . . . . . . .58 Microsoft Windows XP . . . . . . . . . . . . . . . . . . . . . . . . . . . . . . .60 Mac OS X . . . . . . . . . . . . . . . . . . . . . . . . . . . . . . . . . . . . . . . . . .61 Access Information . . . . . . . . . . . . . . . . . . . . . . . . . . . . . . . . . . 63 SUPPORT . . . . . . . . . . . . . . . . . . . . . . . . . . . . . . . . . . . . . . . . 64 CARING FOR THE ENVIRONMENT BY RECYCLING . . . . . . . . . . . . . 65 Recycling your Motorola Equipment. . . . . . . . . . . . . . . . . . . .65 Genbrug af dit Motorola-udstyr . . . . . . . . . . . . . . . . . . . . . . .65 Recycling bei Geräten von Motorola. . . . . . . . . . . . . . . . . . . .65 Reciclaje de su equipo Motorola . . . . . . . . . . . . . . . . . . . . . . .65 Recyclage de votre équipement Motorola . . . . . . . . . . . . . . .66 Uw Motorola-materiaal recycleren. . . . . . . . . . . . . . . . . . . . .66 Recykling posiadanego sprz´tu Motorola . . . . . . . . . . . . . . . .66 Reciclagem do seu equipamento Motorola . . . . . . . . . . . . . .66 Återvinning av din Motorola-utrustning . . . . . . . . . . . . . . . . .67 Please visit www.motorola.com/us/support for FAQs and additional product documentation. 2 Motorola 2247-N8 DSL Wi-Fi Gateway User Guide Copyrights Safety Information ©2013 Motorola Mobility LLC All rights reserved. MOTOROLA, and the Stylized M Logo are trademarks or registered trademarks of Motorola Trademark Holdings, LLC. All other trademarks are the property of their respective owners. No part of this publication may be reproduced in any form or by any means or used to make any derivative work (such as translation, transformation, or adaptation) without written permission from Motorola Mobility LLC. Motorola Mobility reserves the right to revise this publication and to make changes in content from time to time without obligation on the part of Motorola Mobility to provide notification of such revision or change. Motorola Mobility provides this guide without warranty of any kind, implied or expressed, including, but not limited to, the implied warranties of merchantability and fitness for a particular purpose. Motorola Mobility may make improvements or changes in the product(s) described in this manual at any time. CAUTION: Depending on the power supply provided with this product, EXCEPT AS INDICATED IN THE APPLICABLE SYSTEM PURCHASE AGREEMENT, THE SYSTEM, DOCUMENTATION AND SERVICES ARE PROVIDED “AS IS”, AS AVAILABLE, WITHOUT WARRANTY OF ANY KIND. MOTOROLA MOBILITY LLC DOES NOT WARRANT THAT THE SYSTEM WILL MEET CUSTOMER'S REQUIREMENTS, OR THAT THEIR OPERATION WILL BE UNINTERRUPTED OR ERRORFREE, OR THAT ANY ERRORS CAN OR WILL BE FIXED. MOTOROLA MOBILITY LLC HEREBY DISCLAIMS ALL OTHER WARRANTIES, EXPRESS OR IMPLIED, ORAL OR WRITTEN, WITH RESPECT TO THE SYSTEM AND SERVICES INCLUDING, WITHOUT LIMITATION, ALL IMPLIED WARRANTIES OF TITLE, NON-INFRINGEMENT, INTEGRATION, MERCHANTABILITY OR FITNESS FOR ANY PARTICULAR PURPOSE AND ALL WARRANTIES ARISING FROM ANY COURSE OF DEALING OR PERFORMANCE OR USAGE OF TRADE. EXCEPT AS INDICATED IN THE APPLICABLE SYSTEM PURCHASE AGREEMENT, MOTOROLA MOBILITY LLC SHALL NOT BE LIABLE CONCERNING THE SYSTEM OR SUBJECT MATTER OF THIS DOCUMENTATION, REGARDLESS OF THE FORM OF ANY CLAIM OR ACTION (WHETHER IN CONTRACT, NEGLIGENCE, STRICT LIABILITY OR OTHERWISE), FOR ANY (A) MATTER BEYOND ITS REASONABLE CONTROL, (B) LOSS OR INACCURACY OF DATA, LOSS OR INTERRUPTION OF USE, OR COST OF PROCURING SUBSTITUTE TECHNOLOGY, GOODS OR SERVICES, (C) INDIRECT, PUNITIVE, INCIDENTAL, RELIANCE, SPECIAL, EXEMPLARY OR CONSEQUENTIAL DAMAGES INCLUDING, BUT NOT LIMITED TO, LOSS OF BUSINESS, REVENUES, PROFITS OR GOODWILL, OR (D) DIRECT DAMAGES, IN THE AGGREGATE, IN EXCESS OF THE FEES PAID TO IT HEREUNDER FOR THE SYSTEM OR SERVICE GIVING RISE TO SUCH DAMAGES DURING THE 12-MONTH PERIOD PRIOR TO THE DATE THE CAUSE OF ACTION AROSE, EVEN IF COMPANY HAS BEEN ADVISED OF THE POSSIBILITY OF SUCH DAMAGES. THESE LIMITATIONS ARE INDEPENDENT FROM ALL OTHER PROVISIONS OF THIS AGREEMENT AND SHALL APPLY NOTWITHSTANDING THE FAILURE OF ANY REMEDY PROVIDED HEREIN. one of the following serves as the mains power disconnect: power supply cord plug, or appliance coupler. It is important that the direct plug-in power supply, the power socket-outlet, or the appliance coupler be readily accessible. TELECOMMUNICATION Safety: When using your telephone equipment, follow these basic safety precautions to reduce the risk of fire, electric shock, and injury: Do not use this product near water, for example, near a bath- tub, or sink, in a wet basement, or near a swimming pool. Avoid using a telephone (other than a cordless type) during an electrical storm. There may be a remote risk of electrical shock from lightning. Do not use the telephone to report a gas leak in the vicinity of the leak. PRODUCT VENTILATION: The Motorola 2247-N8 DSL Wi-Fi Gateway is intended for use in a consumer's home. Ambient temperatures should not exceed 104°F (40°C). Do not use in locations exposed to outside heat radiation or trapping of its own heat. At least one inch of clearance should be maintained on all sides except the bottom when properly installed. The 2247-N8 Gateway should not be placed inside tightly enclosed spaces unless proper ventilation is provided. All Motorola Mobility LLC products are furnished under a license agreement included with the product. If you are unable to locate a copy of the license agreement, please contact Motorola Mobility LLC. Motorola Mobility Part Number: 579442-002-00 Please visit www.motorola.com/us/support for FAQs and additional product documentation. 3 Motorola 2247-N8 DSL Wi-Fi Gateway User Guide Setup and Installation Thank you for selecting the Motorola 2247-N8 DSL Wi-Fi Gateway. This guide will help you install the 2247-N8, connect computers and other devices to it using the 2247-N8’s wired (Ethernet) or wireless networking capabilities, and connect to your existing DSL provider for Internet access. Quick Start Guide TIP: For rapid installation, configuration, and set up of wireless networking, use the instructions on the included Quick Start Guide. Advanced configuration instructions and basic troubleshooting are also provided in this User Guide. If you need additional information about the 2247-N8, or have configuration and use questions, go to www.motorola.com/us/support. Before you Begin Package Contents IMPORTANT: You must have an existing DSL connection installed before starting installation of the 2247-N8! You will also need the information below from your DSL service provider: PPP or PPPoE user name and password - This may be the e-mail user name and password from your DSL provider’s service, or it may be a customer identification name and password. If you are unsure, contact your DSL provider. VPI/VCI numbers used with your DSL service - In most cases the 2247-N8 will automatically detect this information. If you need to enter it, refer to “Advanced Configurations” on page 15 of this User Guide. Note: Check the contents of the box to make sure you have all the items shown to the right: BEFORE RETURNING THIS PRODUCT TO THE STORE for any reason, call Motorola Broadband Technical Support at 1-877-466-8646. Please visit www.motorola.com/us/support for FAQs and additional product documentation. 4 Motorola 2247-N8 DSL Wi-Fi Gateway User Guide Connecting the Gateway 1. Decide on a location for the 2247-N8. Put the 2247-N8 near an AC wall outlet (the power source) and a phone jack activated for DSL, in a cool location where none of the 2247-N8’s vents will be blocked. Location Guidelines NG BLOCKING VENTS .OTHI !# /UTLET $3, *ACK Caution: If the location is too hot or the vents are blocked, the high temperature could cause the 2247-N8 to malfunction. #LEA R AREA MORE THAN INCH 2. Connect the 2247-N8 to the DSL service: Plug the telephone cable (included gray cord) into the gray DSL port on the back of the 2247-N8. Plug the other end of the telephone cable into a phone jack activated for DSL. Connecting to DSL Service $3, 0ORT $3, *ACK .O $3, &ILTER Note: If your DSL service uses line filters, do not plug the telephone cable from the 2247-N8 into a line filter. Please visit www.motorola.com/us/support for FAQs and additional product documentation. 5 Motorola 2247-N8 DSL Wi-Fi Gateway User Guide Connecting the Gateway (Continued) 3. Power the 2247-N8. Connect the power supply to the power jack on the back panel of the 2247-N8. Plug the power supply into an electrical outlet. Turn on the Power switch. Connecting Power 0OWER JACK 0OWER SWITCH The Power light (on the front of the 2247-N8) should light solid green. !# POWER CORD 4. Wait for the DSL light on the front of the 2247-N8 to turn solid green (steady and not blinking). This may take up to five minutes. To connect a wireless device, continue with “Wireless (Wi-Fi) Network Setup” on page 8. To connect a wired device, continue with “Wired (Ethernet) Network Setup” on page 13. Please visit www.motorola.com/us/support for FAQs and additional product documentation. 6 Motorola 2247-N8 DSL Wi-Fi Gateway User Guide Please visit www.motorola.com/us/support for FAQs and additional product documentation. 7 Motorola 2247-N8 DSL Wi-Fi Gateway User Guide Wireless (Wi-Fi) Network Setup The 2247-N8 Wi-Fi Gateway has a default network "name," or SSID (service set identifier) that uses a unique 8-digit number in the format “xxxx xxxx”. The 2247-N8 broadcasts this unique network name so that wireless computers and other devices can detect it. With the 2247-N8 installed and on, use the following steps to add devices to the wireless network. TIP: Because your computer detects the strongest wireless networks first, position it close (within 10 feet) to the 2247-N8, if you can, to ensure that you are connecting to your 2247-N8. 1. Connect your primary computer to the 2247-N8 wireless network. Click the wireless tray icon, open the wireless settings panel, or click the AirPort menu (depending on your operating system). Windows 7/XP/Vista Windows 8 2247-N8 Wireless Installation Mac OS X 2. Find the network ID for your 2247-N8 in the wireless networks list and connect your computer to the network. If you have difficulty connecting to the network, refer to the detailed instructions in “Adding Devices to the Wireless Network” on page 49. Please visit www.motorola.com/us/support for FAQs and additional product documentation. 8 Motorola 2247-N8 DSL Wi-Fi Gateway User Guide Wireless (Wi-Fi) Network Setup (Continued) Connecting to the Web Management Interface 3. Once you are connected to the 2247-N8, open a Web browser and type http://192.168.1.254 into the address bar. Press ENTER. 2247-N8 Web Management Interface Address A Welcome to your Motorola Router window appears. 4. At the Welcome to your Motorola Router screen follow the onscreen instructions to decide if you want unrestricted LAN access or password-protected access. Selecting Access Restriction Note: if you use password protection, your user name is “admin”. After you log in to the 2247-N8, the Quickstart page will appear. 5. Enter your PPP user name and password, provided to you by your DSL service provider. Remember, you may need to call your DSL provider for this information. 6. Enter your password a second time (in the Confirm Password field) and click the Connect button. You will see the Connection Information screen when the connection to your service provider is successful. QuickStart Page TIP: If you are having trouble connecting, enter your information again and make sure the Caps Lock key on your computer is not on. If you are still having trouble go to the “Frequently Asked Questions - and Answers (FAQs)” section of this guide or to the “Basic Troubleshooting” section. 7. Proceed to “Secure Your Wireless Network” on page 10. Please visit www.motorola.com/us/support for FAQs and additional product documentation. 9 Motorola 2247-N8 DSL Wi-Fi Gateway User Guide Secure Your Wireless Network Once you are connected to the Internet you will want to secure your wireless network to keep it private. Follow these steps to add security to your wireless network and enable the fastest wireless speeds on your 2247-N8. Home (Start) Page 1. Log in to the management interface. Click the Configure link located on the left side of the screen. 2. Click Wireless to view the Wireless Base Settings page. Wireless Base Settings Page A number of wireless networking categories are displayed below the Wireless link in the side menu bar. You will use these links later in the procedure. 3. Change the Standard setting to B/G/N and click Apply Changes. Please visit www.motorola.com/us/support for FAQs and additional product documentation. 10 Motorola 2247-N8 DSL Wi-Fi Gateway User Guide Secure Your Wireless Network (Continued) 4. Click the Security link located below Wireless on the left side of the screen. Wireless Security Settings Page 5. Choose the security method to use for your network: To use WEP-Manual, follow the left arrow to step 10 on page 12. To use WPA-PSK continue with step 6 (below). Note: WPA-PSK is the preferred privacy method. Only use WEP – Manual if your computer or device does not support WPA-PSK. Configuring WPA-PSK Security: WPA-PSK Security Settings 6. Click the Privacy pull-down menu and select WPA-PSK. The screen will update and you will see two new options displayed. 7. Delete the default Passphrase and change it to a password that is easy for you to remember but difficult for someone else to guess. This password will be needed each time you add a new device to your wireless network. The WPA-PSK passphrase can be between 8 and 63 characters. For best security it should be at least 20 characters. 8. Click the WPA Version pull-down menu and select WPA-2. Click Apply Changes. Security is now activated, and you will be temporarily disconnected from the 2247-N8. 9. Use the wireless tray or wireless settings (Windows) or the wireless menu option (Mac OS) to find and connect to the 2247-N8 one more time. This time you will need to enter your wireless network password to complete your connection. Open a Web browser and enjoy your Internet access through the Motorola 2247-N8 DSL Wi-Fi Gateway! Please visit www.motorola.com/us/support for FAQs and additional product documentation. 11 Motorola 2247-N8 DSL Wi-Fi Gateway User Guide Secure Your Wireless Network (Continued) WEP-Manual Security Settings Configuring WEP-Manual Security: 10. Click the Privacy pull-down menu and select WEP-Manual. The screen will update and you will see two new options displayed. 11. Change the Key Length value to 26 characters (128 bits), or to 10 characters (40/64 bits) if your device does not support 128 bit WEP. 12. Enter a WEP key that matches the character length you chose using a combination of numbers from 0-9 and letters from a-f. For example, “c8335fde7742a467bc85df2fc8” is a valid 26 character key. Tip: Write down the key you will use before proceeding to the next step! This key will be needed each time you add a new device to your wireless network. 13. Click Apply Changes. Security is now activated, and you will be temporarily disconnected from the 2247-N8. 14. Use the wireless tray or wireless settings (Windows) or the wireless menu option (Mac OS) to find and connect to the 2247-N8 one more time. This time you will need to enter your wireless network key to complete your connection. 15. Open a Web browser and enjoy your Internet access through the Motorola 2247-N8 DSL Wi-Fi Gateway! TIP: If you forget your wireless password or key you can connect to the 2247-N8 using a wired (Ethernet) connection to retrieve the information. Use the included Ethernet cable and follow steps 1 and 2 of “Wired (Ethernet) Network Setup” on page 13. Log in to the Web interface, click Configure and then Wireless in the Links bar. To reset the 2247-N8 to factory defaults and start over, see “Frequently Asked Questions - and Answers (FAQs)” on page 44. Please visit www.motorola.com/us/support for FAQs and additional product documentation. 12 Motorola 2247-N8 DSL Wi-Fi Gateway User Guide Wired (Ethernet) Network Setup With the 2247-N8 powered on, use the following steps to make a wired connection from a computer to the Ethernet ports on the 2247-N8: 1. Locate the yellow Ethernet cable included in the package. Insert the plug on one end of the cable into any of the four yellow ports on the back of the 2247-N8. The connector will only fit into the port one way. Insert the connector until the locking tab clicks into place. 2. Insert the other end of the Ethernet cable into an Ethernet networking port on your computer. Press the connector into the port until the tab clicks into place. Once the Ethernet devices are connected to the 2247-N8, your network may resemble the figure shown to the right. 2247-N8 Ethernet Installation Note: Almost every device is configured to get its network information automatically using “DHCP,” and you should not need to configure your computer. If you have trouble getting to the 2247-N8 Web page in the next step, you can check your computer’s network settings in “Basic Troubleshooting” on page 46. Connecting to the Web Management Interface 3. Once you are connected to the 2247-N8, open a Web browser and type http://192.168.1.254 into the address bar. Press Enter. 2247-N8 Web Management Interface Address A Welcome to your Motorola Router window appears. Please visit www.motorola.com/us/support for FAQs and additional product documentation. 13 Motorola 2247-N8 DSL Wi-Fi Gateway User Guide Wired (Ethernet) Network Setup (Continued) 4. At the Welcome to your Motorola Router screen, follow the onscreen instructions to decide if you want unrestricted LAN access or password-protected access. Selecting Access Restriction TIP: if you use password protection, your user name is “admin”. After you log in to the 2247-N8, the Quickstart page will appear. 5. Enter the PPP user name and password provided to you by your DSL service provider. Remember, you may need to call your DSL provider for this information. QuickStart Page 6. Enter your password a second time (in the Confirm Password field) and click the Connect button. TIP: If you are having trouble connecting, enter your information again You will see the Connection Information screen when the connection to your service provider is successful. and make sure the Caps Lock key on your computer is not on. If you are still having trouble, go to “Frequently Asked Questions - and Answers (FAQs)” on page 44 or “Basic Troubleshooting” on page 46. 7. Open a Web browser and enjoy your Internet access through the Motorola 2247-N8 DSL Wi-Fi Gateway! Please visit www.motorola.com/us/support for FAQs and additional product documentation. 14 Motorola 2247-N8 DSL Wi-Fi Gateway User Guide Advanced Configurations Most of the time, the basic setup is all you will need to be able to enjoy your Internet connection using the 2247-N8. Use this section if you need to configure advanced options. If you need help logging in to the 2247-N8, refer to “Wireless (Wi-Fi) Network Setup” on page 8 or “Wired (Ethernet) Network Setup” on page 13. Links Bar The links located on the left side of the Web user interface allow you to monitor, diagnose, and update your 2247-N8. Clicking an option will expand or collapse the pages available to you. Links Bar Default Content The following sections and subsections describe the contents of the pages available from the links bar: “Home” on page 16. “Configure” on page 16. “Status” on page 29. “Utilities” on page 39. “Help” on page 43. Please visit www.motorola.com/us/support for FAQs and additional product documentation. 15 Motorola 2247-N8 DSL Wi-Fi Gateway User Guide Home You may click the Home menu item to return to the 2247-N8 home screen. This page provides information and statistics about the DSL connection, the configuration and identification of the 2247-N8, and the local address configuration. Gateway Home Screen Configure Use the Configure menu options to change and update the settings on your 2247-N8 Gateway. The Configure category contains the following pages (which will show under the Configure selection in the links bar); “Connection” on page 17 “DHCP Server” on page 19 “More IP Subnets” on page 20 “Wireless” on page 33 “NAT” on page 27 “Router Password” on page 28 “Time Zone” on page 29 Please visit www.motorola.com/us/support for FAQs and additional product documentation. 16 Motorola 2247-N8 DSL Wi-Fi Gateway User Guide Connection Use the Connection page to change the way you connect to your Internet Service Provider (ISP). You should only change these settings when your ISP requires it. Important: always remember to click Apply Changes to make sure your updates are saved. Configure Connection Page DSL Auto Modulation: If this check box is selected (default setting), your 2247-N8 will use automatic rate adaptation, which tries to sync at the fastest possible modulation. Auto Detection VPI/VCI: If this check box is selected (default setting), your 2247-N8 will attempt to detect the virtual circuit pairs in use by trying the most common settings until one is found. Thereafter, the 2247-N8 will always attempt to use that pair. If the 2247-N8 cannot detect the VPI/VCI set in use, you can clear the check box, and enter the values manually. VPI 0 and VPI 35 and VPI 8 and VCI 35 are the most common virtual circuit pairs used. Always try auto-detection first and then contact your service provider if another value is required. Encapsulation: ether-llc (this is the only option) PPPoE: Point to Point Protocol over Ethernet (PPPoE) is the most commonly used configuration by DSL service providers. To use PPPoE, select the check box, enter the information below, and click Apply Changes. PPP Username PPP Password Confirm Password Connection Type - Select always-on (default) to make sure your 2247-N8 is always connected to the Internet. If you choose on-demand, your 2247-N8 will establish a connection to the Internet only when a request is made from your home network. You can use the User Please visit www.motorola.com/us/support for FAQs and additional product documentation. 17 Motorola 2247-N8 DSL Wi-Fi Gateway User Guide Inactivity Timeout setting to specify how long the Internet connection will remain active after it becomes idle. Enter a time in seconds. If you choose manual, you will need to manually connect and disconnect to your service provider from the Home page of the 2247-N8. MRU - Leave this setting at the default of 1492 unless your ISP instructs you to change the setting. Bridging - Use this setting if you require a device on the local area network (LAN) side of the 2247-N8 to establish a connection to your service provider. In this mode, all traffic is passed through the 2247-N8, and it does not provide routing or security features. Use Static IP Addressing - use this option if your service provider has hard-coded your network information and provided you with the values needed below. Please note that using DHCP to obtain a WAN IP address is not currently supported in the Web user interface. Remember to click Apply Changes when you have finished entering the information. Static IP Address Netmask IP Gateway Primary DNS Server Secondary DNS Server UPnP - Universal Plug-n-Play is used by applications (typically games) that require a two-way path to be set up while the application is in use. The default setting is enabled. Please visit www.motorola.com/us/support for FAQs and additional product documentation. 18 Motorola 2247-N8 DSL Wi-Fi Gateway User Guide DHCP Server Use the DHCP Server Configuration page to change the Dynamic Host Configuration Protocol (DHCP) settings on your 2247-N8. The 2247-N8 will serve DHCP addresses starting with the primary subnet and then serve addresses from additional subnets in the order they were added. Remember to click Apply Changes to make sure your updates are saved. Important: The DHCP server for the primary subnet must be enabled and serving at least one IP address in order for the DHCP server feature to serve addresses for additional subnets. DHCP Server Configuration Page Router IP Address - The 2247-N8 LAN IP address. The default setting is 192.168.1.254 Subnet Mask - The 2247-N8 LAN subnet mask. The default setting is 255.255.255.0 DHCP Server Enable - Enables or disables the 2247-N8 DHCP server. Clear the check box if you have another DHCP server that provides addresses to your network. The default setting is enabled (box selected). DHCP Start Address - This address must be in the same subnet as the Router IP Address you entered above. For example, with the Router IP Address listed above, you could use a DHCP start address of 192.168.1.64. DHCP End Address - This address must be in the same subnet as the Router IP Address you entered above. For example, with the Router IP Address listed above, you could use a DHCP end address of 192.168.1.253. DHCP Lease - Enter a lease time in dd:hh:mm:ss (days/hours/minutes/seconds) format. The default setting is one day. Please visit www.motorola.com/us/support for FAQs and additional product documentation. 19 Motorola 2247-N8 DSL Wi-Fi Gateway User Guide More IP Subnets You can enable and configure up to seven secondary LAN IP subnets on your 2247-N8. Each subnet requires an IP address/subnet mask pair. If the DHCP Server is enabled, you can enable DHCP service on each subnet by entering DHCP start and end addresses. The 2247-N8 will serve DHCP addresses starting with the primary subnet and then serve addresses from additional subnets in the order they were added. Important: the DHCP server for the primary subnet must be enabled and serving at least one IP address in order for the DHCP server feature to serve addresses for additional subnets More IP Subnets Page Use the options below to configure additional subnets. IP Address - Enter the IP address for the 2247-N8 Gateway. Netmask - Enter the subnet mask. Enable DHCP Server - Use this option to enable or disable a DHCP server for the subnet DHCP Start Address - This address must be in the same subnet as the IP Address you entered above. DHCP End - This address must be in the same subnet as the IP Address you entered above. Add this IP Subnet - Click this button to add each additional subnet to the 2247-N8. Follow the instructions on the web page to edit or remove a subnet. Please visit www.motorola.com/us/support for FAQs and additional product documentation. 20 Motorola 2247-N8 DSL Wi-Fi Gateway User Guide Wireless Use the Web pages listed below to configure basic and advanced wireless networking features on your 2247-N8. The Wireless page has a number of associated sub-pages that configure specific wireless operations and settings: “Base Settings” on page 21 “Security” on page 23 “Multiple SSID” on page 24 “Wi-Fi Multimedia” on page 25 “MAC Filtering” on page 26 Base Settings Use the Wireless Base Settings page to configure the basic wireless features on your Motorola 2247-N8 DSL Wi-Fi Gateway using the options below. Wireless Base Settings Page Enabled - When this check box is selected (default setting) the wireless radio is enabled. Clear this box to disable the wireless radio. No wire- less devices will be able to access the 2247-N8 when the radio is disabled. Connect to the 2247-N8 using Ethernet to turn the radio back on. Standard - The following options are available. Use caution when changing this setting because clients not compatible with a mode will be disconnected. If you are unsure, choose B/G/N. B/G - Default setting B-only G-only B/G/N - Preferred setting A/N A-only N-only Standard - Note that if all of your clients support the 802.11n standard, you can choose N-only, which will present the additional options below: Please visit www.motorola.com/us/support for FAQs and additional product documentation. 21 Motorola 2247-N8 DSL Wi-Fi Gateway User Guide Band - Use the pull-down menu to choose the 2.4 GHz and 5 GHz bands. Bandwidth - Use the pull-down menu to choose Narrow-20MHz or Wide-40MHz. Channel - This option changes the wireless channel that allows a client to access the 2247-N8. Changing the wireless channel can improve performance if you suspect interference from other devices near your location. Wireless Protected Setup - This option provides a convenient way to add advanced secure Wi-Fi connections. Wi-Fi certified WPS clients can connect and learn the security setting of the 2247-N8 using their hardware push button (if supported) or by entering their special PIN number at the 2247-N8 WPS support page. Non-WPS clients can be added by following the steps in “Adding Devices to the Wireless Network” on page 49. Follow the steps below to use WPS: Make sure your wireless clients are running. Press the WPS push-button on the back of the 2247-N8 to begin the exchange, which may last up to two minutes. Do not power off your 2247-N8 during the exchange. The 2247-N8 will display a success message when the exchange has completed. Note: not all wireless client devices support WPS. Refer to your client documentation if you are unsure. Please visit www.motorola.com/us/support for FAQs and additional product documentation. 22 Motorola 2247-N8 DSL Wi-Fi Gateway User Guide Security The 2247-N8 supports up to four wireless networks, and each network can have a separate security setting. Wireless Security Page Use the options below to configure security for each wireless network that is enabled. Configure Settings for - Use the pull-down menu to select the wireless network (SSID) that you wish to configure. Please note that wireless networks are enabled in the Multiple SSID page (see page 24). Privacy - Choose one of the privacy settings listed below. The options available on the page will change depending on your choice. OFF -No Privacy (default) - The wireless network is open (no security) allowing any device to connect and access the network. WEP-Manual - Use the options below to configure a wireless network to use Wired Equivalent Privacy. Key Length - Use the pull-down menu to choose 10 characters (40/64 bits) or 26 characters (128 bits). Use 128 bits if all of your wireless devices support it. Key - Enter a WEP key that matches the character length you chose using a combination of numbers from 0-9 and letters from a-f. For example, "c8335fde7742a467bc85df2fc8" is a valid 26 character key. You must enter the assigned key for each new device that is added to the network. WPA-PSK - This is the preferred security method. Use the options below to configure your wireless network to use Wi-Fi Protected Access-Pre-Shared Key. - Passphrase - The passphrase can be between 8 and 63 characters. For best security it should be at least 20 characters. You must enter the assigned passphrase for each new device that is added to the network. WPA Version - Enter WPA-1, WPA-2, or Both. Use WPA-2 if all of your devices support it or Both if you have older devices that only support WPA-1. Hide SSID - Choose this option to turn off SSID broadcasting for a wireless network. You will no longer see the network broadcasted but you will still be able to connect to it. Block Wireless Bridging - Select the check box to block wireless clients on this SSID from communicating with other wireless clients on the LAN side of the 2247-N8 regardless of SSID. Wireless clients will still be able to communicate with the 2247-N8 and to wired (Ethernet-connected) interfaces connected to the 2247-N8. Please visit www.motorola.com/us/support for FAQs and additional product documentation. 23 Motorola 2247-N8 DSL Wi-Fi Gateway User Guide Multiple SSID The 2247-N8 supports up to four simultaneous wireless networks (SSIDs). Adding additional SSIDs can be useful if you need to use different security settings between wireless networks. Use the options below to create additional wireless networks on the 2247-N8. Please note that by default, all SSIDs have access to the 2247-N8 LAN and the other SSIDs that are enabled. Wireless Multiple SSID Page Use the options below to create additional wireless networks on the 2247-N8. Configure settings for - Use the pull-down menu to select the wireless network (SSID) that you wish to configure. SSID Enable - Select the check box to enable the SSID. Clear the box to disable the SSID. SSID Name - Enter an SSID name of up to 32 characters. Numbers, letters, and spaces are allowed. Please visit www.motorola.com/us/support for FAQs and additional product documentation. 24 Motorola 2247-N8 DSL Wi-Fi Gateway User Guide Wi-Fi Multimedia Wi-Fi Multimedia, or WMM is a feature that allows a wireless network to establish a Quality of Service (QoS) for transferring different types of data. For transferring data such as voice and video, it is important that data is delivered in a timely manner to avoid video or audio skipping, even under busy network conditions. With WMM enabled, voice and video are given the higher priority service that they need. Wireless WiFi Multimedia Page Select the Enabled check box to enable WMM. Clear the box to disable WMM. When WMM is disabled, voice and video are treated the same as any other data. If WMM is enabled, the 2247-N8 examines each packet to determine the type of data in order to assign it to a queue. The predefined queues are: VOICE (VO): Highest priority, minimum delay. Example: VoIP VIDEO (VI): High priority, minimum delay. Example: IPTV BEST EFFORT: (BE): Medium priority, medium throughput and delay. Example: Most traditional IP data. BACKGROUND: (BK): Lowest priority, high throughput. Example: FTP Please visit www.motorola.com/us/support for FAQs and additional product documentation. 25 Motorola 2247-N8 DSL Wi-Fi Gateway User Guide MAC Filtering Use wireless MAC filtering to add additional security to a wireless network. Using a whitelist or a blacklist you can limit access to the wireless network using a client's hardware ID. MAC filtering can limit access to a wireless network even if a client has the proper network access password or key. Wireless MAC Filtering Page Use the options below to configure MAC filtering. Configure settings for - Use the pull down menu to select the wireless network (SSID) that you wish to configure. MAC Filtering Type - Use the pull-down menu to select one of the following options: Disabled - No MAC filtering will be used (default) Whitelist - Only MAC addresses on this list will be able to access the wireless network. All other wireless access will be denied. Blacklist - Only MAC addresses on this list will be denied access to the wireless network. All other wireless clients will be allowed. MAC Address - Enter a device MAC address to add to the whitelist or blacklist, whichever is active, and click Add this MAC. Click Apply Changes to save the MAC filtering list. Please visit www.motorola.com/us/support for FAQs and additional product documentation. 26 Motorola 2247-N8 DSL Wi-Fi Gateway User Guide NAT Network Address Translation (NAT) lets your 2247-N8 use a single public IP address assigned by your Internet service provider to support multiple computers on your home network. Your home network uses private IP addresses, and the 2247-N8 keeps track of each device's request and translates it to the single public address as it goes out to the Internet. NAT also allows you to open specific ports to your home network using a “pinhole” to support applications that need to be accessed from the Internet. NAT Page The following functions are provided on the NAT page: NAT Enable - If the check box is selected, NAT is enabled (default). Clear the box to disable NAT only if so instructed by your ISP. Please visit www.motorola.com/us/support for FAQs and additional product documentation. 27 Motorola 2247-N8 DSL Wi-Fi Gateway User Guide Pinhole Entry Protocol - Choose UDP or TCP External Port Range - Enter a single port where traffic will be received by the 2247-N8 from the Internet. Internal Address - Enter the private IP address of a device on the 2247-N8 local area network where traffic for this pinhole will be directed. Internal Start Port - Enter a single port where traffic will be destined from the 2247-N8's LAN to the Internet. Add this pinhole - Click this button to add the pinhole entry. You can edit or remove an entry from the Pinhole List located directly above the Pinhole Entry section of the Web page. Note: a separate pinhole entry is needed for each port that you wish to open. Pinhole entries are also specific to the protocol chosen. Click the Help link while visiting the NAT Configuration Web page for additional information. Click Apply Changes to save your updates. Router Password The 2247-N8 allows two methods of access: restricted and unrestricted. Select the access method from the Router Password page. Router Password Page Unrestricted LAN Access - When the check box is selected, any device on the local area network can access and make changes to the 2247-N8 configuration without providing a password. Please visit www.motorola.com/us/support for FAQs and additional product documentation. 28 Motorola 2247-N8 DSL Wi-Fi Gateway User Guide Note: when the Unrestricted LAN Access box is not selected you will see the New Password and Confirm Password fields displayed. Enter and confirm a case-sensitive password that is between 1 and 32 characters in length. Choose a password that is easy for you to remember but difficult for someone else to guess. If you use password protection, your user name is “admin”. Time Zone This option is used to apply time stamps for the system and firewall logs. The default setting is UTC. Choose an option from the pull-down menu, and click Apply Changes to save your update. Status This section displays statistics for the 2247-N8 ports and LAN, and it provides log entries that can be helpful for troubleshooting. The following sub-categories of pages are available from the Status link in the links bar. “DSL” on page 30 “WAN” on page 31 “Ethernet” on page 32 “Wireless” on page 33 “IP” on page 34 “LAN” on page 36 “System Log” on page 37 “Firewall Log” on page 38 Please visit www.motorola.com/us/support for FAQs and additional product documentation. 29 Motorola 2247-N8 DSL Wi-Fi Gateway User Guide DSL The DSL Statistics page shows DSL configuration information. Status - DSL Statistics Page Use the information below to determine the state of the DSL line and to help with troubleshooting. Line State - Up (connected), Down (disconnected), Idle (not attempting to train) Modulation - Method of regulating the DSL signal Data Path - Path used by the device's processor Current VPI - The VPI currently in use. This may have been auto-detected by the 2247-N8. Current VCI - The VCI currently in use. This may have been auto-detected by the 2247-N8. Speed (kbps) - Downstream (traffic from the Internet) and Upstream (traffic to the Internet) speeds in kilobits per second. SN Margin (dB) - Signal to noise margin, in decibels. These values display the amount of unwanted “noise” on the DSL line. Line Attenuation (dB) - These values display the reduction in signal strength on the DSL line, in decibels. CRC Errors - These values display the number of times data packets have been resent due to errors in transmission or reception. Please visit www.motorola.com/us/support for FAQs and additional product documentation. 30 Motorola 2247-N8 DSL Wi-Fi Gateway User Guide WAN The WAN Statistics page displays information about your wide area network connection which is established through the DSL port on the 2247-N8. Status - WAN Statistics Page MAC Address - The Media Access Control or hardware address for the WAN port. When PPPoE is used, the server MAC address will be dis- played. Tx Good Frames - The number of good frames transmitted since the WAN connection was established. Tx Packets - The number of packets transmitted since the WAN connection was established. Tx Discard Frames - The number of frames discarded since the WAN connection was established. Rx Good Frames - The number of good frames received since the WAN connection was established. Rx Packets - The number of packets received since the WAN connection was established. Rx Multicast Frames - The number of multicast frames received since the WAN connection was established. Rx Discard Frames - The number of received frames discarded since the WAN connection was established. Please visit www.motorola.com/us/support for FAQs and additional product documentation. 31 Motorola 2247-N8 DSL Wi-Fi Gateway User Guide Ethernet The Ethernet Statistics page displays information about your local area network connection. Status - Ethernet Statistics Page MAC Address - The Media Access Control or hardware address for the LAN ports. Tx Good Frames - The number of good frames transmitted on the LAN. Tx Packets - The number of packets transmitted on the LAN. Tx Discard Frames - The number of transmitted frames that have been discarded on the LAN. Rx Good Frames - The number of good frames received on the LAN. Rx Packets - The number of packets received on the LAN. Rx Multicast Frames - The number multicast frames received on the LAN. Rx Discard Frames - The number of received frames that have been discarded on the LAN. Please visit www.motorola.com/us/support for FAQs and additional product documentation. 32 Motorola 2247-N8 DSL Wi-Fi Gateway User Guide Wireless The Wireless Statistics page shows information about the configuration and operation of the wireless networks. Status - Wireless Statistics Page Use the pull-down menu near the top of the page to choose the wireless network that you want to monitor. Security - Displays the current security in place for the wireless network. Bytes Transmitted - The number of bytes transmitted since the network was last restarted. Bytes Received - The number of bytes received since the network was last restarted. Packets Transmitted - The number of packets transmitted since the network was last restarted. Packets Received - The number of packets received since the network was last restarted. Please visit www.motorola.com/us/support for FAQs and additional product documentation. 33 Motorola 2247-N8 DSL Wi-Fi Gateway User Guide IP This page displays information and statistics for the IP configuration of the 2247-N8. Status - IP Statistics Page The following information is displayed: General IP WAN Address - The wide area network IP address IP Gateway - The gateway address of the service provider network Primary DNS - The primary domain name server IP address Primary DNS Name - The primary domain name server name Secondary DNS - The secondary domain name server IP address Secondary DNS Name - The secondary domain name server name Please visit www.motorola.com/us/support for FAQs and additional product documentation. 34 Motorola 2247-N8 DSL Wi-Fi Gateway User Guide IP Interfaces This section displays the IP address, subnet mask, and interface information assigned to the 2247-N8. When additional IP subnets are configured, information is displayed for each subnet. Network Routing Table This section displays the destination network, subnet mask, gateway and interface name for each route assigned to the 2247-N8. When additional IP subnets are configured, routing information is displayed for each subnet. Host Routing Table This section displays the network, subnet mask, gateway and interface name for each host address assigned to the 2247-N8. When additional IP subnets are configured, routing information is displayed for each subnet. Please visit www.motorola.com/us/support for FAQs and additional product documentation. 35 Motorola 2247-N8 DSL Wi-Fi Gateway User Guide LAN This page displays information and statistics for the local area network (LAN) configuration of the 2247-N8. Status - LAN Statistics Page The following information is displayed: Router IP Address - The IP address assigned to the 2247-N8 LAN. Subnet Mask - The subnet mask assigned to the 2247-N8 LAN. DHCP Start Address - The first IP address in the DHCP pool. DHCP End Address - The last IP address in the DHCP pool. DHCP Server Status - Displays ON (enabled) or OFF (disabled). DNS Server - The IP address of the default domain name server. Devices on LAN - Displays the IP address, MAC (hardware) address, and network name for each device on the LAN. Please visit www.motorola.com/us/support for FAQs and additional product documentation. 36 Motorola 2247-N8 DSL Wi-Fi Gateway User Guide System Log The system log displays a chronological list of events that have occurred in the 2247-N8. Status - System Log The system log options are: Clear Log - Removes all entries from the log and logging resumes. Save to File - Saves the current log entries to a file on your computer. You will be prompted to open the file or specify a location on your com- puter to save it. Please visit www.motorola.com/us/support for FAQs and additional product documentation. 37 Motorola 2247-N8 DSL Wi-Fi Gateway User Guide Firewall Log The firewall log displays a chronological list of firewall events that have occurred in the 2247-N8 and how they were handled. Status - Firewall Log The firewall log options are: Clear Log - Removes all entries from the log and logging resumes. Save to File - Saves the current log entries to a file on your computer. You will be prompted to open the file or specify a location on your com- puter to save it. Please visit www.motorola.com/us/support for FAQs and additional product documentation. 38 Motorola 2247-N8 DSL Wi-Fi Gateway User Guide Utilities This section allows you to run diagnostics on your Motorola 2247-N8 DSL Wi-Fi Gateway, restart or reset the 2247-N8, or perform a firmware upgrade. The Utilities category contains the following sub-categories, which will appear when the Utilities link is clicked in the links bar. “Diagnostics” on page 39 “Restart Router” on page 40 “Reset Router” on page 41 “Update Router” on page 42 Diagnostics This automated, multi-layer test checks the functionality of the 2247-N8 from the physical connections to the data traffic being sent through the 2247-N8. Diagnostics Page Run Full Diagnostics - When you click this button, diagnostic results will be displayed in the Progress Window. Test Web Access - Enter a Web address and click Test. Results will be displayed in the Progress Window. Please visit www.motorola.com/us/support for FAQs and additional product documentation. 39 Motorola 2247-N8 DSL Wi-Fi Gateway User Guide Restart Router Use this page to restart the Motorola 2247-N8 DSL Wi-Fi Gateway. When the 2247-N8 restarts, it loads the last saved configuration. Restart Router Page Click Yes, restart Router to restart the 2247-N8. All services will be disconnected while the 2247-N8 restarts. Click No to cancel the request and return to the 2247-N8 Home page. Please visit www.motorola.com/us/support for FAQs and additional product documentation. 40 Motorola 2247-N8 DSL Wi-Fi Gateway User Guide Reset Router This option will erase the configuration on the Motorola 2247-N8 DSL Wi-Fi Gateway and reset it to the factory default settings. Reset Router Page IMPORTANT: Make sure you have written down any configuration information you need before resetting the 2247-N8! Click Yes, reset to factory settings to proceed. Click No to cancel the request and return to the 2247-N8 Home page. Please visit www.motorola.com/us/support for FAQs and additional product documentation. 41 Motorola 2247-N8 DSL Wi-Fi Gateway User Guide Update Router The Software Upgrade page allows you to update the firmware on your Motorola 2247-N8 DSL Wi-Fi Gateway. Update Router Page The current firmware version is displayed at the top of the page. You can periodically check for new firmware by clicking the “Click here to download” link and comparing the firmware version to the one you are currently running. Firmware can also be downloaded from the Motorola support website by visiting www.motorola.com/us/support . Save the new firmware to a location like your computer's desktop and follow the steps below to complete the upgrade. 1. Click the Browse button and navigate to the location on your computer where you saved the new firmware. 2. Double-click the .bin firmware file you downloaded. 3. Click the Update Software from PC button on the Software Upgrade page. 4. When the update completes you will see “Firmware image is valid - Please restart to complete update” in red at the top of the page. 5. Click the Restart Router link to go to the Restart Router page. 6. Click Yes, restart Router to complete the upgrade. 7. Follow the on-screen instructions to log back into the 2247-N8. You can confirm that the new firmware is installed by clicking the Home page and looking for the Software Version. Please visit www.motorola.com/us/support for FAQs and additional product documentation. 42 Motorola 2247-N8 DSL Wi-Fi Gateway User Guide Help Help displays helpful information about the current 2247-N8 Web page you are visiting. Click the Help link any time you are unsure about a configuration option or if you need additional information before making a change to the 2247-N8. Please visit www.motorola.com/us/support for FAQs and additional product documentation. 43 Motorola 2247-N8 DSL Wi-Fi Gateway User Guide Frequently Asked Questions - and Answers (FAQs) Q: What is the default user name and password of the 2247-N8? A: By default, the 2247-N8 does not require a user name or password. If you choose password protection in the initial setup or by visiting the Router Password page your user name will be “admin”. Q: How do I access the configuration screens of my 2247-N8? A: By default, your 2247-N8 has an IP Address of 192.168.1.254. You access your 2247-N8 by typing http://192.168.1.254 into your browser’s address bar and pressing Enter on your keyboard. Q: What troubleshooting steps can I do on my own before calling for support? A: If your connection to the Internet stops working, check to make sure that all of the cables are plugged in correctly (refer to “Connecting the Gateway” on page 5 if needed). If this does not fix the problem, shut down your computer and turn off the 2247-N8. Wait about 30 seconds and then turn on the 2247-N8. Wait for the Internet light on the 2247-N8 to become solid green and then turn on your computer and launch a Web browser. Q: Why is my DSL light flashing green? A: A flashing green light indicates that no cable is attached to the DSL port or that the 2247-N8 is negotiating a connection. A solid green DSL light along with a solid green Internet light indicates that an Internet connection is established. If your DSL light does not become solid green, verify that the connection from the 2247-N8 DSL port to the telephone/DSL jack is secure. If the connection is secure, contact your ISP (Internet service provider) to verify that your DSL line is functioning properly. Q: What is the default IP address of my 2247-N8? A: The default IP address of the 2247-N8 is 192.168.1.254. You can access the Web configuration pages by typing http://192.168.1.254 into your browser and pressing Enter on your keyboard. Q: I made some configuration changes in my 2247-N8. Why didn’t the changes take effect? A: Any configuration changes made to the 2247-N8 require that you click Apply Changes before they take effect. You will see “Changes Saved” at the top of the page when the configuration changes are applied. Q: I see “The router configuration has been changed but not saved. The next time you hit Apply Changes on any page, these changes will be saved. Hit Cancel Changes now to revert these changes.” at the top of the Web page. What should I do? A: This message indicates that you made changes on another page and did not save them. Click Cancel Changes to discard the changes or Apply Changes on the current page to accept the changes. Please visit www.motorola.com/us/support for FAQs and additional product documentation. 44 Motorola 2247-N8 DSL Wi-Fi Gateway User Guide Q: I forgot my password, how can I access my 2247-N8? A: Remember to use “admin” as your username. If you don't remember the password, the only way to access the 2247-N8 is to reset it following the steps below: 1. Refer to the diagram at right, and find the round Reset button opening. Factory Default (“Reset”) Button 2. Carefully insert the point of a pen or an unwound paperclip into the opening. Press and hold the recessed button: If you press the button for less than half a second, the unit will continue to run as normal. If you press the button for more than 15 seconds, when you release it, the 2247-N8 will perform a factory reset, clear all settings and configurations, and reboot. Note: To make sure the 2247-N8 Gateway returns to the factory defaults you must hold the reset button for more than 15 seconds. When you release it, the 2247-N8 will perform a factory reset, clear all settings and configurations, and reboot. Keep in mind that all of your settings will need to be reconfigured. Follow the steps in “Wireless (Wi-Fi) Network Setup” on page 8 or “Wired (Ethernet) Network Setup” on page 13 to reconfigure your 2247-N8. Q: Can I change the wireless network (SSID) name on my 2247-N8? A: Yes, log in to the 2247-N8 and follow the steps below to change the SSID name. 1. Click on the Configure link located on the left side of the screen. 2. Click on the Wireless link 3. Click on the Multiple SSID link. 4. Use the Configure settings for: pull-down menu to choose the SSID that you want to rename (the default SSID is “SSID1”). 5. In the SSID Name field, enter an SSID name of up to 32 characters. Numbers, letters, and spaces are allowed. 6. Click the Apply Changes button to save the update to the 2247-N8. You will need to reconnect all wireless devices to the network after changing the network name (SSID). Please visit www.motorola.com/us/support for FAQs and additional product documentation. 45 Motorola 2247-N8 DSL Wi-Fi Gateway User Guide Basic Troubleshooting This section gives some simple suggestions for troubleshooting problems with your Motorola 2247-N8 DSL Wi-Fi Gateway's initial configuration. Before troubleshooting, make sure you have completed the installation of the 2247-N8 correctly. If necessary, re-perform the procedures in “Connecting the Gateway” on page 5, “Wireless (Wi-Fi) Network Setup” on page 8, and “Wired (Ethernet) Network Setup” on page 13. Condition Indicators (LEDs) When all of your connections are made, the status LEDs on the front of your 2247-N8 will light, according to the following diagram: LEDs Showing Normal Operation The system status lights can indicate normal operation or abnormal conditions, and can be useful for troubleshooting. Please visit www.motorola.com/us/support for FAQs and additional product documentation. 46 Motorola 2247-N8 DSL Wi-Fi Gateway User Guide The following table lists the LEDs from left to right, and provides a description of the conditions indicated by types of LED activity. LED Power Activity Description Steady green Power on and system functioning. Steady red Device malfunction detected. Flashing red Embedded system software being updated. Off Device not powered on. Steady green Link to Ethernet device detected on the specified port. Flashing green Activity detected on the specified port. Wireless Flashing green Activity detected on the Wireless network. WPS (Wireless Protected Setup) Steady green WPS operation successful. USB (Universal Serial Bus) N/A Not currently used. DSL (Digital Subscriber Line) Steady green Connected to provider DSL network and ready. Blinking green Negotiating connection to provider DSL network. Internet Steady green Connected to the provider network. Flashing green Activity on the provider network detected by 2247-N8. Flashing green Activity detected on the provider network broadband connection. Off No broadband connection detected. Ethernet (1, 2, 3, 4) Activity Please visit www.motorola.com/us/support for FAQs and additional product documentation. 47 Motorola 2247-N8 DSL Wi-Fi Gateway User Guide Troubleshooting LED Conditions If the Power or DSL lights are off, use the following action tables to attempt to identify or resolve the problem: LED Condition Recommended Actions Power (off) Power (solid red) Contact support (1-877-466-8646). DSL (off) Check that all phones have a DSL microfilter. Verify that the 2247-N8 DSL line does not have a DSL microfilter installed. Verify that the connection from the 2247-N8 to the phone jack is made with the telephone (gray) cable Verify that the provided 2247-N8 power adapter is being used. Check the power supply connection to the 12V DC “POWER” adapter port on the 2247-N8. Check that power switch is on. Check and verify the operation of the AC power outlet. Try another, known good, outlet. Contact support (1-877-466-8646). included with the 2247-N8. Reconnect the DSL cable at the 2247-N8 DSL port and DSL wall jack. Ensure that the connector clicks into each port. Verify that the DSL cable is plugged into a wall jack that is activated for DSL service. Verify DSL line activation with your service provider. DSL (blinking) Take no action - the 2247-N8 is negotiating a connection with the provider network. Internet (off) Check the DSL light - If the DSL light is solid green, re-enter your PPP or PPPoE user name and password into the 2247-N8. Please visit www.motorola.com/us/support for FAQs and additional product documentation. 48 Motorola 2247-N8 DSL Wi-Fi Gateway User Guide Adding Devices to the Wireless Network If you have difficulty adding devices to the 2247-N8 wireless network with the wireless tray or wireless settings (Windows) or the wireless menu option (Mac OS), you may need these more detailed instructions. The method used to connect to the network depends on the operating system. The following sections detail some common operating systems: “Microsoft Windows 8” on page 49 “Microsoft Windows 7” on page 50 “Microsoft Windows XP” on page 52 “Mac OS X Releases” on page 54 Microsoft Windows 8 1. Open the Windows 8 charms bar: Touch screens: Touch the top right corner of the Windows 8 desktop, and drag diagonally toward the center of the display. Trackpads and mice: Hover the mouse pointer at the top right corner of the Windows 8 desktop. Keyboards: Press and hold the Windows key and C key. Charms Bar with Settings Icon The Windows charms bar opens on the right edge of the screen. 2. Click the Settings icon (circled in the image) in the charms bar. Settings Common Functions Group The Settings panel opens. 3. Click the Wi-Fi icon in the common functions collection at the bottom of the Settings panel. The Wi-Fi icon may be labeled as “Available” if the computer has not connected to a wireless network. It may also be labeled with the name of a currently active or previously used wireless network. Please visit www.motorola.com/us/support for FAQs and additional product documentation. 49 Motorola 2247-N8 DSL Wi-Fi Gateway User Guide Microsoft Windows 8 (Continued) 4. Locate the 2247-N8 network in the list. Select the network by touching or clicking the network name. The selected entry expands to show additional functions. TIP: The default network name is an eight-digit number in the format “xxxx xxxx”. 5. Click the Connect button. 6. Respond to any security prompt from the computer. You may need to enter a wireless access password or key (WEP-Manual or WPA-PSK networks) to join the network: Windows 8 will connect you to the 2247-N8 Wi-Fi network. Microsoft Windows 7 Windows 7 Network Information Popup 1. Click the network icon ( or ) in the notification area of the desktop (the lower right corner of the screen, near the system clock). The network connection information window pops up. Please visit www.motorola.com/us/support for FAQs and additional product documentation. 50 Motorola 2247-N8 DSL Wi-Fi Gateway User Guide Microsoft Windows 7 (Continued) 2. Click on the 2247-N8 network entry in the Wireless Network Connections list of the information window. Network Connection Button TIP: The default network name is an eight digit number in the format “xxxx xxxx”. A “Connect” button appears below the network ID. 3. Click the Connect button. 4. Respond to any security prompt from the computer. You may need to enter a wireless access password or key (WEP-Manual or WPA-PSK networks) to join the network: 5. Wait while the computer connects to the network. Please visit www.motorola.com/us/support for FAQs and additional product documentation. 51 Motorola 2247-N8 DSL Wi-Fi Gateway User Guide Microsoft Windows XP 1. Click the Start menu, and then click on the Control Panel shortcut. The Windows XP Control Panels window opens. Note: The Windows device’s wireless network adapter must be active to detect the 2247-N8’s network. 2. Set the Control Panel window to the “Classic” (Windows 95) view. Look for the text under the control panel title in the left of the window: If the text under the control panel title reads “Switch to Category view,” the panel window is already in classic view, continue with the procedure. If the text reads “Switch to Classic view,” click it to change from Category view to classic view. 3. Double-click the Network Connections icon. Classic View Switch Viewing Available Networks The Network Connections control panel opens. 4. Locate the wireless network adapter icon in the control panel. Note: If the adapter is listed as Disabled, right-click the adapter icon and click Enable to activate it. 5. Right-click the wireless adapter icon and select View Available Wireless Networks from the pop-up menu. A list of detected wireless networks appears. Please visit www.motorola.com/us/support for FAQs and additional product documentation. 52 Motorola 2247-N8 DSL Wi-Fi Gateway User Guide Microsoft Windows XP (Continued) 6. Click the 2247-N8 network entry in the Wireless Network Connections list of the information window. A Connect button appears below the network ID. TIP: The default network name is an eight-digit number in the format “xxxx xxxx”. 7. Click the Connect button. 8. Respond to any security prompt from the computer. You may need to enter a wireless access password or key (WEP-Manual or WPA-PSK networks) to join the network: If your network is unsecured, a Wireless Network Connection warning window may appear. Click the Connect Anyway button to close the window and proceed. 9. Wait while the computer connects to the network. Please visit www.motorola.com/us/support for FAQs and additional product documentation. 53 Motorola 2247-N8 DSL Wi-Fi Gateway User Guide Mac OS X Releases 1. Click the AirPort (Wi-Fi) icon ( or ) in the top menu bar. The AirPort icon is located in the upper right hand corner near the system clock. Mac OS AirPort Menu The AirPort pull-down menu appears. 2. Click the 2247-N8 network entry in the Wireless Network Connections list of the information window. TIP: The default network name is an eight-digit number in the format “xxxx xxxx”. Note: If the AirPort adapter is not on, click Turn AirPort On in the pulldown menu. 3. Respond to any security prompt from the computer. You may need to enter a wireless access password or key (WEP-Manual or WPA-PSK networks) to join the network: 4. Select the Remember this Network check box to set the computer to connect to the 2247-N8 automatically. 5. Wait while the computer connects to the network. Please visit www.motorola.com/us/support for FAQs and additional product documentation. 54 Motorola 2247-N8 DSL Wi-Fi Gateway User Guide Configuring Client Devices The Motorola 2247-N8 DSL Wi-Fi Gateway serves dynamically-assigned network addresses by default for wireless and Ethernet connected devices. Be sure to configure each device connected to your 2247-N8 to accept a dynamically-assigned IP address, commonly referred to as Dynamic Host Configuration Protocol, or DHCP. If your devices are not configured for DHCP operation, use the instructions in this section to set them to DHCP operation. The procedure to configure DHCP operation is different for each set of computer operating systems. The instructions that follow provide procedures for the most common home computer operating systems: “Microsoft Windows 8” on page 56 “Microsoft Windows 7 and Vista” on page 58 “Microsoft Windows XP” on page 60 “Mac OS X” on page 61 Please visit www.motorola.com/us/support for FAQs and additional product documentation. 55 Motorola 2247-N8 DSL Wi-Fi Gateway User Guide Microsoft Windows 8 1. From the Metro UI, open the All Apps list: With a touch device: swipe up to bring up the apps dock. With a mouse or trackpad: right-click the Start screen’s background. The apps dock opens. Windows 8 System Apps Group (detail) 2. Click the All Apps button. The applications list opens. 3. Locate the Windows System apps group, and find and open Control Panel under that heading. 4. Click the Network and Sharing Center control panel. The Network and Sharing Control Panel group opens. 5. Click the Change Adapter Settings link in the left column of the Control Panel group. Local Connection Properties A list of adapters is shown in the window. 6. Right-click the adapter to configure and click Properties from the pop-up menu. The Connection Properties Window opens. Please visit www.motorola.com/us/support for FAQs and additional product documentation. 56 Motorola 2247-N8 DSL Wi-Fi Gateway User Guide Microsoft Windows 8 (Continued) 7. Click Internet Protocol Version 4 (TCP/IPv4) in the list shown under “This connection uses the following items:”. Click the Properties button. Local Area Connection Properties Window An Internet Protocol Version 4 Properties window opens. 8. Click the following option buttons in the Internet Protocol Properties window to select them: Internet Protocol Properties Window Obtain an IP address automatically Obtain DNS server address automatically 9. Click the OK button to close the Internet Protocol Properties window. Click the OK button in the network adapter’s Properties window to complete the process. Please visit www.motorola.com/us/support for FAQs and additional product documentation. 57 Motorola 2247-N8 DSL Wi-Fi Gateway User Guide Microsoft Windows 7 and Vista 1. Click the Start button, click Control Panel, and then click Network and Sharing Center. Network and Sharing Control Panel Group The Network and Sharing Control Panel group opens. 2. Click the Change adapter settings link in the left hand column of the Control Panel group. A list of adapters is shown in the window. 3. Right-click the adapter (Wireless Network Connection or Local Area Connection) to configure and click Properties from the pop-up menu. Local Connection Properties The connection properties window opens. Please visit www.motorola.com/us/support for FAQs and additional product documentation. 58 Motorola 2247-N8 DSL Wi-Fi Gateway User Guide Microsoft Windows 7 and Vista (Continued) 4. Click Internet Protocol Version 4 (TCP/IPv4) in the list shown under “This connection uses the following items:”. Click the Properties button. Local Area Connection Properties Window An Internet Protocol Version 4 Properties window opens. 5. Click the following option buttons in the Internet Protocol Properties window to select them: Internet Protocol Properties Window Obtain an IP address automatically Obtain DNS server address automatically 6. Click the OK button to close the Internet Protocol Properties window. Click the OK button in the adapter’s Properties window to complete the process. Please visit www.motorola.com/us/support for FAQs and additional product documentation. 59 Motorola 2247-N8 DSL Wi-Fi Gateway User Guide Microsoft Windows XP 1. Click the Start menu, and then click Control Panel. Double-click Network Connections. Network Connections A Network Connections window opens, showing available network adapters. 2. Right-click the network adapter (may be labeled Local Area Connection or Wireless Network Connection). Click Properties in the pop-up window. The adapter’s Properties window opens. 3. Click Internet Protocol (TCP/IP) to select it. Click the Properties button. The Internet Protocol Properties window opens. Please visit www.motorola.com/us/support for FAQs and additional product documentation. Local Area Connection Properties 60 Motorola 2247-N8 DSL Wi-Fi Gateway User Guide Microsoft Windows XP (Continued) 4. Click the following option buttons in the Internet Protocol Properties window to select them: Internet Protocol Properties Obtain an IP address automatically Obtain DNS server address automatically 5. Click the OK button to close the Internet Protocol Properties window. Click the OK button in the adapter’s Properties window to complete the process. Mac OS X 1. Click the Apple menu and click System Preferences from the pulldown menu. 2. Double-click the Network control panel launcher. System Preferences Entry Network Control Panel Icon The network preferences panel opens. Please visit www.motorola.com/us/support for FAQs and additional product documentation. 61 Motorola 2247-N8 DSL Wi-Fi Gateway User Guide Mac OS X (Continued) 3. Click the adapter you are configuring (AirPort or Built-in Ethernet in most cases) in the adapter list. Network Preferences Panel 4. For Built-in Ethernet adapters, perform the following steps: a. Click the Configure pull-down menu and select Using DHCP. Do not enter DNS Server or Search Domain entries in this window. b. Click the Apply button to close the network preferences panel. 5. For Wi-Fi only, perform the following steps; a. Click the Advanced button. b. Click TCP/IP. c. Click the Configure IPv4 pull-down menu and select Using DHCP. d. Click the OK button to close the Advanced window. e. Click the Apply button to close the Network preferences panel. 6. Close the System Preferences window. Please visit www.motorola.com/us/support for FAQs and additional product documentation. 62 Motorola 2247-N8 DSL Wi-Fi Gateway User Guide Access Information Record your subscriber information here for future reference: Required Information Your entries: Your telephone number: Your ISP user name (PPP or PPPoE user name): (example: [email protected]) Your ISP password: Service provider support contact information: Support desk number: VPI and VCI numbers (if used): Please visit www.motorola.com/us/support for FAQs and additional product documentation. 63 Motorola 2247-N8 DSL Wi-Fi Gateway User Guide Support Answers to many frequently asked product-related questions, as well as full product documentation with advanced configuration instructions, are also available on-line at: http://www.motorola.com/us/support/ Have a smartphone? Use this QR Code and a QR code reader to go directly to the Motorola 2247-N8 DSL Wi-Fi Gateway Support web site: You can contact Motorola Broadband Technical Support at 1-877-466-8646. Before you call, please note the serial number (SN) of your Motorola 2247-N8 DSL Wi-Fi Gateway. It is located on the label on the bottom of the 2247-N8 below the model number. You will need the 2247-N8 serial number if you need to request technical support. Please visit www.motorola.com/us/support for FAQs and additional product documentation. 64 Motorola 2247-N8 DSL Wi-Fi Gateway User Guide Caring for the Environment by Recycling When you see this symbol on a Motorola product, do not dispose of the product with residential or commercial waste. Recycling your Motorola Equipment Please do not dispose of this product with your residential or commercial waste. Some countries or regions, such as the European Union, have set up systems to collect and recycle electrical and electronic waste items. Contact your local authorities for information about practices established for your region. If collection systems are not available, call Motorola Customer Service for assistance. Please visit www.motorola.com/recycle for instructions on recycling. Beskyttelse af miljøet med genbrug Når du ser dette symbol på et Motorola-produkt, må produktet ikke bortskaffes sammen med husholdningsaffald eller erhvervsaffald. Umweltschutz durch Recycling Wenn Sie dieses Zeichen auf einem Produkt von Motorola sehen, entsorgen Sie das Produkt bitte nicht als gewöhnlichen Hausoder Büromüll. Cuidar el medio ambiente mediante el reciclaje Cuando vea este símbolo en un producto Motorola, no lo deseche junto con residuos residenciales o comerciales. Genbrug af dit Motorola-udstyr Dette produkt må ikke bortskaffes sammen med husholdningsaffald eller erhvervsaffald. Nogle lande eller områder, f.eks. EU, har oprettet systemer til indsamling og genbrug af elektriske og elektroniske affaldsprodukter. Kontakt de lokale myndigheder for oplysninger om gældende fremgangsmåder i dit område. Hvis der ikke findes tilgængelige indsamlingssystemer, kan du kontakte Motorola Kundeservice. Recycling bei Geräten von Motorola Bitte entsorgen Sie dieses Produkt nicht als gewöhnlichen Haus- oder Büromüll. In einigen Ländern und Gebieten, z. B. in der Europäischen Union, wurden Systeme für die Rücknahme und Wiederverwertung von Elektroschrott eingeführt. Erkundigen Sie sich bitte bei Ihrer Stadtoder Kreisverwaltung nach der geltenden Entsorgungspraxis. Falls bei Ihnen noch kein Abfuhroder Rücknahmesystem besteht, wenden Sie sich bitte an den Kundendienst von Motorola. Reciclaje de su equipo Motorola No deseche este producto junto con sus residuos residenciales o comerciales. Algunos países o regiones, tales como la Unión Europea, han organizado sistemas para recoger y reciclar desechos eléctricos y electrónicos. Comuníquese con las autoridades locales para obtener información acerca de las prácticas vigentes en su región. Si no existen sistemas de recolección disponibles, solicite asistencia llamando el Servicio al Cliente de Motorola. Please visit www.motorola.com/us/support for FAQs and additional product documentation. 65 Motorola 2247-N8 DSL Wi-Fi Gateway User Guide Recyclage pour le respect de l'environnement Lorsque vous voyez ce symbole sur un produit Motorola, ne le jetez pas avec vos ordures ménagères ou vos rebuts d'entreprise. Milieubewust recycleren Als u dit symbool op een Motorolaproduct ziet, gooi het dan niet bij het huishoudelijk afval of het bedrijfsafval. Recyclage de votre équipement Motorola Veuillez ne pas jeter ce produit avec vos ordures ménagères ou vos rebuts d'entreprise. Certains pays ou certaines régions comme l'Union Européenne ont mis en place des systèmes de collecte et de recyclage des produits électriques et électroniques mis au rebut. Veuillez contacter vos autorités locales pour vous informer des pratiques instaurées dans votre region. Si aucun système de collecte n'est disponible, veuillez appeler le Service clientèle de Motorola qui vous apportera son assistance. Uw Motorola-materiaal recycleren. Gooi dit product niet bij het huishoudelijk afval het of bedrijfsafval. In sommige landen of regio's zoals de Europese Unie, zijn er bepaalde systemen om elektrische of elektronische afvalproducten in te zamelen en te recycleren. Neem contact op met de plaatselijke overheid voor informatie over de geldende regels in uw regio. Indien er geen systemen bestaan, neemt u contact op met de klantendienst van Motorola. Dba³oÊç o Êrodowisko - Recykling posiadanego sprz´tu Motorola Produktu nie nale″y wyrzucaç do komunalnych pojemników na Êmieci. W niektórych krajach i regionach, np. w Unii Europejskiej, istniejà systemy zbierania i recykling Produktów Motorola oznaczonych tym symbolem nie nale″y wyrzucaç do komunalnych pojemników na Êmieci. recyklingu sprz´tu elektrycznego i elektronicznego. Informacje o utylizacji tego rodzaju odpadów nale″y uzyskaç od w³adz lokalnych. JeÊli w danym regionie nie istniejà systemy zbierania odpadów elektrycznych i elektronicznych, informacje o utylizacji nale″y uzyskaç od biura obs³ugi klienta firmy Motorola (Motorola Customer Service). Cuidando do meio ambiente através da reciclagem Reciclagem do seu equipamento Motorola Quando você ver este símbolo em um produto Motorola, não descarte o produto junto com lixo residencial ou comercial. Não descarte este produto junto com o lixo residencial ou comercial. Alguns países ou regiões, tais como a União Européia, criaram sistemas para colecionar e reciclar produtos eletroeletrônicos. Para obter informações sobre as práticas estabelecidas para sua região, entre em contato com as autoridades locais. Se não houver sistemas de coleta disponíveis, entre em contato com o Serviço ao Cliente da Motorola para obter assistência. Please visit www.motorola.com/us/support for FAQs and additional product documentation. 66 Motorola 2247-N8 DSL Wi-Fi Gateway User Guide Var rädd om miljön genom återvinning När du ser den här symbolen på en av Motorolas produkter ska du inte kasta produkten tillsammans med det vanliga avfallet. Återvinning av din Motorola-utrustning Kasta inte denna produkt tillsammans med det vanliga avfallet. Vissa länder eller regioner, som t.ex. EU, har satt upp ett system för insamling och återvinning av el- och elektronikavfall. Kontakta dina lokala myndigheter för information om vilka regler som gäller i din region. Om det inte finns något insamlingssystem ska du kontakta Motorolas kundtjänst för hjälp. Please visit www.motorola.com/us/support for FAQs and additional product documentation. 67