1
INSTRUCTION
BOOKLET
pe
Recipe
et
Booklet
Reverse Side
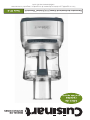
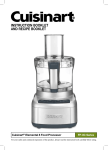
Cuisinart® Elemental 8 Food Processor
FP-8 Series
For your safety and continued enjoyment of this product, always read the instruction book carefully before using.
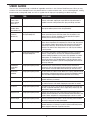
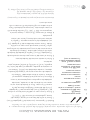
RECOMMENDED MAXIMUM WORK BOWL CAPACITY
FOOD
CAPACITY
Sliced or shredded fruit, vegetables or cheese
8 cups
Chopped fruit, vegetables or cheese
2 cups
Puréed fruit, vegetables or cheese
3 cups cooked; 1½ cups puréed
Chopped or puréed meat, fish or seafood
¾ pound
Thin liquid (e.g., dressings, soups, etc.)
4 cups
Cake batter
8-inch cheesecake batter; 1 box (15.25 ounce) cake mix
Cookie dough
2½ dozen (based on average chocolate chip cookie recipe)
White bread/pizza dough
2.5 cups (all-purpose or bread flour)
Nuts for nut butter
2 cups
2
IMPORTANT UNPACKING
INSTRUCTIONS
This package contains a Cuisinart Elemental 8
Food Processor and the accessories for it:
8-cup work bowl, work bowl cover with pusher,
metal chopping/mixing/dough blade, thin reversible
metal slicing & shredding disc, medium reversible
metal slicing & shredding disc, base with stem
adapter and instruction/recipe book.
CAUTION:
THE CUTTING TOOLS HAVE VERY SHARP
EDGES. To avoid injury when unpacking the parts,
please follow these instructions.
1. Place the box on a low table or on the floor next
to the kitchen counter where you intend to keep
the food processor. Be sure the box is right side
up.
2. Open top flaps—there will be a rectangular
block of packing material that holds the
processor parts, each fitted into a cavity.
3. Remove the instruction/recipe book and the
metal slicing & shredding disc accessories from
one side.
4. Lift out the packing material.
5. Remove the base and bowl together and place
it on the counter or table. Read the instructions
thoroughly before using the machine.
6. Save the shipping cartons and packing material.
You will find them very useful if you need to
repack the processor for moving or other
shipment.
We recommend that you visit our website,
www.cuisinart.com for a fast, efficient way to
complete your product registration.
3
IMPORTANT
SAFEGUARDS
Cleaning
To protect against risk of electrical shock, do
not put base in water or other liquids.
General
Always follow these safety precautions when using
this appliance.
1. This appliance should not be used by or near
children or individuals with certain disabilities.
Getting Ready
2. Do not operate this, or any other motor-driven
appliance, while under the influence of alcohol or
other substances that affect your reaction time or
perception.
1. Read all instructions.
2. Blades and discs are sharp. Handle them
carefully.
3. This food processor is UL listed for household
use. Use it only for food preparation as described
in the accompanying recipe and instruction book.
Do not use this appliance for anything but its
intended use.
3. Always unplug from outlet when not in use,
before putting on or taking off parts, before
removing food and before cleaning. To
unplug, grasp plug and pull from electrical
outlet. Never pull cord.
4. The use of attachments not recommended or
sold by Cuisinart may cause fire, electrical
shock or personal injury, or damage to your
food processor.
4. Do not use outdoors.
5. Do not let cord hang over edge of table or
counter, or touch hot surfaces.
6. Do not operate any appliance with a
damaged cord or plug, or after appliance has
been dropped or damaged in any way. Return
appliance to the nearest authorized service
facility for examination, repair or electrical or
mechanical adjustment.
5. To avoid possible malfunction of work bowl
switch, never store processor with cover
assembly in locked position.
6. Maximum rating of 350 watts is based on attachment that draws greatest current. Other recommended attachments may draw significantly less
current.
Operation
1. Keep hands as well as spatulas and other utensils away from moving blades or discs while processing food, to prevent the possibility of severe
personal injury or damage to food processor. A
plastic scraper may be used, but only when the
food processor motor is stopped.
7. Do not operate your appliance in an appliance
garage or under a wall cabinet. When storing
in an appliance garage always unplug the
unit from the electrical outlet. Not doing so
could create a risk of fire, especially if the appliance touches the walls of the garage or the door
touches the unit as it closes.
2. Avoid coming into contact with moving parts.
Never push food down by hand when slicing or
shredding. Always use pusher.
NOTICE: If your food processor has a plastic
case, it has a polarized plug (one blade is wider
than the other). As a safety feature, this plug will
fit in a polarized outlet only one way. If the plug
does not fit fully in the outlet, reverse the plug. If
it still does not fit, contact a qualified electrician.
Do not attempt to defeat this safety feature.
3. Make sure motor has completely stopped before
removing cover. (If machine does not stop within
4 seconds after you remove the bowl cover
assembly, call 1-800-762-0190 for assistance. Do
not use the machine.)
4. Never store any blade or disc on motor shaft. To
reduce the risk of injury, no blade or disc should
be placed on the shaft except when the bowl is
properly locked in place and the processor is in
use. Store blades and discs, as you would sharp
knives, out of reach of children.
SAVE THESE
INSTRUCTIONS
FOR HOUSEHOLD USE
ONLY
5. Be sure cover and feed tube are securely locked
in place before operating food processor.
6. Never try to override or tamper with cover
interlock mechanism.
4
WARNING: RISK OF FIRE
OR ELECTRIC SHOCK
CONTENTS
Important Unpacking Instructions................ 3
Important Safeguards................................... 4
Parts ............................................................. 6
Assembly Instructions ...................................7
Machine Controls ......................................... 7
Machine Functions ....................................... 7
User Guide ................................................... 9
Cleaning, Storage and Maintenance .......... 10
For Your Safety........................................... 10
Technical Data .............................................10
Troubleshooting .......................................... 11
Warranty Information ............................ 12-13
The lightning flash with arrowhead
symbol within an equilateral triangle
is intended to alert the user to the
presence of uninsulated, dangerous
voltage within the product’s enclosure
that may be of sufficient magnitude to
constitute a risk of fire or electric
shock to persons.
The exclamation point within an
equilateral triangle is intended to alert
the user to the presence of important
operating and maintenance (servicing)
instructions in the literature accompanying appliance.
WARNING
RISK OF FIRE OR ELECTRIC SHOCK
DO NOT OPEN
WARNING: TO REDUCE THE RISK OF FIRE OR ELECTRIC SHOCK,
DO NOT REMOVE COVER (OR BACK)
NO USER-SERVICEABLE PARTS INSIDE
REPAIR SHOULD BE DONE BY AUTHORIZED SERVICE PERSONNEL ONLY
5
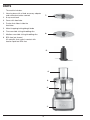
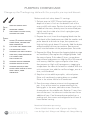
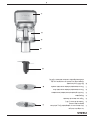
PARTS
The machine includes:
1. Housing base with a fixed accessory adapter
and convenient button controls
7.
2. 8-cup work bowl
3. Cover with feed tube
4. Pusher that slides inside the
feed tube
5. Metal chopping/mixing/dough blade
6. Fine reversible slicing/shredding disc
6.
7. Medium reversible slicing/shredding disc
8. BPA free (not shown)
All materials that come in contact with
food or liquid are BPA free
5.
4.
3.
2.
1.
6
ASSEMBLY
INSTRUCTIONS
MACHINE CONTROLS
High and Low Control Buttons
The High and Low controls are buttons that allow
the machine to run until Off is selected.
Before First Use
1. Properly assemble and engage the machine.
Before using your Cuisinart Elemental 8 Food
Processor for the first time, wash the work bowl,
work bowl cover, pusher, blade, and discs (see
Cleaning Instructions on page 10).
2. Add ingredients to the work bowl, either through
the feed tube or directly into the bowl.
3. Press the High or Low button. The blue LED light
will illuminate and the motor will start.
1. Place the food processor base on a dry, level
countertop with the controls facing you. Do not
plug the unit in until it is fully assembled.
4. Press the Off button when finished.
Pulse Button
2. With the bowl on the base, use the handle to
turn the work bowl clockwise to lock it onto the
housing base.
The Pulse control is a button that allows the
machine to run only while it is being pressed. This
capability provides more accurate control of the
duration and frequency of processing. Unless otherwise specified, a pulse should be about one second.
CHOPPING/MIXING/DOUGH BLADE
1. Place the work bowl on top, with the work
bowl handle just to the right of center. Turn the
work bowl clockwise to lock it onto the
housing base.
1. With the machine properly assembled and
engaged, and ingredients in the work bowl, press
the Pulse button repeatedly as needed. The blue
LED High light will illuminate upon activation.
2. Carefully lift and place the blade over the work
bowl accessory adapter. Blade should fit snugly
and rest on the bottom of the work bowl.
MACHINE FUNCTIONS
3. Plug in the housing base.
Using the Chopping/Mixing/Dough
Blade
Chopping
4. Add desired ingredients to work bowl.
5. Place work bowl cover on work bowl, with the
feed tube just to the right of center. Turn
clockwise to lock onto work bowl.
• For raw ingredients: peel, core and/or remove
seeds and pits. Food should be cut into even, ½
to 1-inch pieces. Foods cut into same size
pieces produce the most even results.
6. Align pusher with the feed tube opening on the
work bowl cover and slide down to the bottom.
7. You are now ready to operate the machine.
• Pulse food in 1-second increments to chop. For
the finest chop, either hold the pulse down or
press High or Low to run the machine
continuously. Watch ingredients closely to
achieve desired consistency and scrape the work
bowl as necessary. Low speed is recommended
for making doughs and batters. High speed is
recommended for most other chopping,
processing and slicing/shredding tasks.
REVERSIBLE
SLICING/SHREDDING DISCS
1. Place the work bowl on top of the base, with
the work bowl handle just to the right of center.
Turn the work bowl clockwise to lock it onto
the housing base.
2. Choose desired disc.
3. Carefully place disc over accessory adapter,
with the side being used facing up.
Puréeing
• To purée fresh fruits or cooked fruits/vegetables:
Ingredients should be cut into 1-inch pieces; a
smooth purée is best achieved when all the
pieces are equal in size. Pulse to initially chop and
then process High or Low until food is puréed;
scrape the work bowl as necessary. Do not use
this method to purée cooked white potatoes.
4. Place work bowl cover onto work bowl, with
the feed tube just to the right of center. Turn
clockwise to lock onto work bowl.
5. Align pusher with the feed tube opening on the
work bowl cover and slide down to the bottom.
6. Plug in the housing base.
• To purée solids for a soup or sauce: Strain the
solids from the liquid and process the solids
alone. Add cooking liquid and process as needed.
7. You are now ready to operate the machine.
7
Using the Reversible Slicing/
Shredding Discs
• The slicing discs make whole slices. They slice
fruits and vegetables, cooked meat and semifrozen raw meat. The shredding discs shred
most firm and hard cheeses. They also shred
vegetables like potatoes, carrots and zucchini.
• Always pack food in the feed tube evenly
for slicing and shredding. The food will dictate
the amount of pressure: Use light pressure for
soft foods, medium pressure for medium foods,
and firm pressure for harder foods. Always
process with even pressure.
• For round fruits or vegetables: Remove a thick
slice on the bottom of the food so that it sits
upright in the feed tube. If food does not fit in the
feed tube, cut in half or quarter to fit. Process
with even pressure.
• For small ingredients like mushrooms, radishes
or strawberries: Trim the ends so the food sits
upright in the feed tube.
• When slicing or shredding cheese, be sure that
the cheese is well chilled.
• To shred leafy vegetables like lettuce or spinach:
Roll leaves together and stand them up in feed
tube. Process with even pressure.
NOTE: Always use pusher when slicing
or shredding. Never put your hands in
the feed tube when unit is running.
8
USER GUIDE
You can slice, shred and chop a multitude of vegetables and fruits in the Cuisinart Food Processor. What you may
not know is that the food processor is the perfect tool for a number of other tasks, such as softening butter, making
bread crumbs, making baby food, etc. Here is a guide that will help you in preparing just about anything!
FOOD
TOOL
DIRECTIONS
Soft Cheeses
(ricotta, cream
cheese, cottage
cheese, etc.)
Chopping/Mixing/Dough Blade
Have cheese at room temperature. When applicable, cut into 1-inch pieces.
Process until smooth, stopping to scrape down the sides of the bowl as
needed. Perfect for making cheesecakes, dips, pasta fillings, and more.
Firm Cheeses
(Cheddar, Swiss,
Edam, Gouda, etc.)
Slicing/Shredding Disc
Cheese should be well chilled before slicing/shredding. Cut to fit feed tube.
Use light to medium pressure when slicing/shredding.
Hard Cheeses
(Parmesan,
Romano, etc.)
Chopping/Mixing/Dough Blade
Slicing/Shredding Disc
Chill cheese. If using the chopping blade, cut into ½-inch pieces. Pulse to
break up and then process until finely grated. This will produce a nice
grated cheese. If slicing or shredding, cut to fit feed tube. Use light to
medium pressure when slicing/shredding.
Baby Food
Chopping/Mixing/Dough Blade
As for all fruit and vegetable purées, cut ingredients into ½ to 1-inch
pieces. Steam ingredients until completely soft. Pulse to chop, then process
until completely smooth (add steaming liquid through the feed tube when
processing if necessary). To ensure there are no lumps, press mixture
through a fine mesh strainer. Keeps frozen in ice cube trays for individual
1-ounce portions.
Butter
Chopping/Mixing/Dough Blade
Slicing/Shredding Disc
For creaming : Have butter at room temperature. Cut into 1-inch pieces.
Process, scraping bowl as necessary. For compound (flavored) butters,
process flavoring ingredients, such as herbs, zest, vegetables, etc., before
adding butter. For shredding/slicing: Freeze briefly. Use light to medium
pressure to shred or slice. Shredded butter is great for preparing certain
pastry doughs. Sliced butter is great for serving alongside corn on the cob
or freshly made rolls.
Bread/Cookie/
Cracker/Chip
Crumbs
Chopping/Mixing/Dough Blade
Break into pieces. Pulse to break up, and then process until desired
consistency. This will make perfect bread/cracker/chip crumbs for coating
meats and fish. Processed cookies make delicious pie and cake crusts!
Milk Shakes/
Smoothies
Chopping/Mixing/Dough Blade
For milk shakes, first add ice cream. While unit is running, add milk through
the feed tube until desired consistency is achieved. For smoothies, add fruit
first, then add the liquid through the feed tube while unit is running.
Fresh Herbs
Chopping/Mixing/Dough Blade
Wash and dry herbs VERY well. Pulse to roughly chop. Continue pulsing until
desired consistency is achieved.
Nuts
Chopping/Mixing/Dough Blade
Pulse to chop to desired consistency. To make a nut butter, pulse to break
up, and then process until smooth, stopping to scrape down as needed.
"Ice Cream"
Chopping/Mixing/Dough Blade
Put frozen fruit cut into 1-inch pieces into the work bowl, with liquid (juice
or milk), any desired sweeteners, such as sugar, honey, simple syrup, and
other flavors. Process until smooth.
Whipped Cream
Chopping/Mixing/Dough Blade
Process well-chilled cream until cream begins to thicken. Add sugar as
desired; process continuously until cream reaches desired consistency. This
cream is dense and perfect as a whipped topping for cake or ice cream.
Superfine Sugar
Chopping/Mixing/Dough Blade
Process granulated sugar for about 1 minute until finely ground. Excellent
for using in meringues and other baked goods.
Ground Meat
Chopping/Mixing/Dough Blade
Cut meat into ½-inch pieces. Pulse to chop, about 14 long pulses, or until
desired consistency is achieved. If a purée is desired, continue to process.
Never chop/purée more than ¾ pound at one time.
9
FOR YOUR SAFETY
CLEANING, STORAGE AND
MAINTENANCE
• Like all powerful electrical appliances, a food
processor should be handled with care. Follow
these guidelines to protect yourself and your
family from misuse that could cause injury.
• Keep your Cuisinart Elemental 8 Food
Processor ready to use on the kitchen counter.
When not in use, leave it unplugged.
• Keep the blade and discs out of the reach
of children.
• All parts except the housing base are dishwasher
safe, and we recommend washing them in the
dishwasher on the top rack only. Due to intense
water heat, washing the work bowl, cover and
accessories on the bottom rack may cause
damage over time. Insert the cover with the feed
tube facing up to ensure proper cleaning. Insert
the work bowl and pusher upside down for
drainage. Remember to unload the dishwasher
carefully wherever you have placed sharp blades
and discs.
• To simplify cleaning, rinse the work bowl, cover,
pusher and blade or disc immediately after use
so food won’t dry on them. Be sure to position
the pusher upside down for drainage. If food
lodges in the pusher, remove it by running water
through it, or use a bottle brush.
• If you wash the blade and discs by hand, do it
carefully. When handling, use the plastic hubs.
Avoid leaving them in soapy water where they
may disappear from sight. To clean the metal
blade, fill the work bowl with soapy water, hold
the blade by its plastic center and move it rapidly
up and down on the center shaft of the bowl.
Use of a spray attachment is also effective. If
necessary, use a brush.
• The work bowl is made of SAN plastic. It should
not be placed in a microwave oven.
• The housing base may be wiped clean with a
soapy, non-abrasive material. Be sure to dry it
thoroughly.
• If the feet leave spots on the counter, spray them
with a spot remover and wipe with a damp
sponge.
• If any trace of the spot remains, repeat the
procedure and wipe the area with a damp
sponge and nonabrasive cleaning powder.
IMPORTANT: Never store any blade or disc on the
motor shaft. No blade or disc should be placed on
the shaft except when the processor is about to
be used.
MAINTENANCE: Any other servicing should be
performed by an authorized service representative.
• Handle and store metal blade and discs carefully.
Their cutting edges are very sharp.
• Never put blade or discs on the motor shaft until
the work bowl is locked in place.
• Always be sure that the blade or disc is down on
motor shaft as far as it will go.
• Always insert the metal blade in the work bowl
before putting ingredients in bowl.
• When slicing or shredding food, always use the
pusher. Never put your fingers or spatula into
feed tube.
• Always wait for the blade or disc to stop
spinning before you remove the pusher assembly
or cover from the work bowl.
• Always unplug the unit before removing food,
cleaning, or putting on or taking off parts.
• Always remove work bowl from base of machine
before you remove the chopping/mixing/dough
blade.
• Be careful to prevent the chopping blade from
falling out of the work bowl when emptying the
bowl. Remove it before tilting the work bowl.
TECHNICAL DATA
The motor in your food processor operates on a
standard line operating current. The appropriate
voltage and frequency for your machine are shown
on a label on the bottom of the base.
An automatic, temperature-controlled circuit
breaker in the motor ensures complete protection
against motor burnout. If the processor runs for an
exceptionally long time when chopping, mixing or
kneading a thick or heavy mixture in successive
batches, the motor may overheat. If this happens,
the processor will stop. Turn it off and wait for the
motor to cool before proceeding. It will usually
cool within 10 minutes. In extreme cases, it could
take an hour.
Safety switches prevent the machine from operating
when the work bowl or the cover is not locked into
position. The motor stops within seconds when the
motor is turned off; and when the pusher assembly is
removed, a fast-stop circuit also enables the motor to
stop within seconds.
Cuisinart offers a Limited Two-Year Warranty on
the entire machine.
10
4. Problem: Dough doesn’t clean inside of the
work bowl.
Solution:
• Amount of dough may exceed maximum
capacity of your food processor. Remove half
and process in two batches.
• Dough may be too dry (see number 7).
• Dough may be too wet (see number 8).
5. Problem: Nub of dough forms on top of blade
and does not become uniformly kneaded.
Solution:
• Stop machine, carefully remove dough, divide it
into 3 pieces and redistribute them evenly in the
work bowl.
6. Problem: Dough feels tough after kneading.
Solution:
• Divide dough into 2 or 3 pieces and redistribute evenly in bowl. Process 10 seconds or
until uniformly soft and pliable.
7. Problem: Dough is too dry.
Solution:
• While machine is running, add water, 1 tablespoon at a time, until dough cleans the inside of
the bowl.
8. Problem: Dough is too wet.
Solution:
• While machine is running, add flour, 1 tablespoon at a time, until dough cleans the inside of
the bowl.
TROUBLESHOOTING
Food Processing
1. Problem: The food is unevenly processed.
Solution:
• The ingredients should be cut evenly into
½ to 1-inch pieces before processing.
• Process in batches to avoid overloading.
2. Problem: Slices are uneven or slanted.
Solution:
• Place evenly cut food, cut side down, into the
feed tube.
• Apply even pressure on the pusher.
3. Problem: Food falls over in feed tube.
Solution:
• Feed tube should be packed full for best results.
4. Problem: Some food remains on top of the disc.
Solution:
• It is normal for small pieces to remain; cut
remaining bits by hand and add to processed
ingredients.
Dough Kneading
1. Problem: Motor slows down.
Solution:
• Amount of dough may exceed maximum
capacity of your food processor. Remove half
and process in two batches.
• Dough may be too wet (see number 8).
If motor speeds up, continue processing. If
not, add more flour, 1 tablespoon at a time,
until the motor speeds up. Process until dough
cleans the sides of the work bowl.
2. Problem: Blade doesn’t incorporate ingredients.
Solution:
• Always start the food processor before adding
liquid. Add liquid in a slow, steady stream, or
through the drizzle hole in the pusher, allowing the dry ingredients to absorb it. If too much
liquid is added, wait until ingredients in the work
bowl have mixed, then add remaining liquid
slowly (do not turn off the machine). Pour liquid
onto dough as it passes under feed tube opening; do not pour liquid directly onto bottom of
the work bowl.
3. Problem: Blade rises in work bowl.
Solution:
• Excessively sticky dough can cause blade to
rise. Carefully reinsert blade and immediately
add 2 tablespoons of flour through the feed tube
while the machine is running.
Technical
1. Problem: The motor does not start.
Solution:
• There is a safety interlock to prevent the motor
from starting if it is not properly assembled.
Make sure the work bowl and work bowl cover
are securely locked into position.
• If the motor still will not start, check the power
cord and outlet.
2. Problem: The food processor shuts off during
operation.
Solution:
• The cover may have become unlocked; check to
make sure it is securely in position.
• A safety protector in the motor prevents the
motor from overheating, which is caused by
excessive strain. Press the Off control button
and wait 20 to 30 minutes to allow the food
processor to cool off before resuming.
11
To facilitate the speed and accuracy of your
return, please enclose $10.00 for shipping and
handling of the product.
3. Problem: The motor slowed down during
operation.
Solution:
• This is normal as some heavier loads (e.g., slicing/shredding cheese) may require the motor to
work harder. Simply reposition the food in the
feed tube and try again.
• The maximum load capacity may have been
exceeded. Remove some of the ingredients and
continue processing.
4. Problem: The food processor vibrated/moved
around the countertop during processing.
Solution:
• Make sure the rubber feet at the bottom of the
unit are clean and dry. Also make sure that the
maximum load capacity is not being exceeded.
• This is normal as some heavier loads (e.g., slicing/shredding cheese) may require the motor to
work harder.
Please pay by check or money order (California
residents need only supply proof of purchase
and should call 1-800-726-0190 for shipping
instructions).
NOTE: For added protection and secure handling
of any Cuisinart product that is being returned,
we recommend you use a traceable, insured
delivery service. Cuisinart cannot be held
responsible for in-transit damage or for packages
that are not delivered to us. Lost and/or damaged
products are not covered under warranty. Please
be sure to include your return address, daytime
phone number, description of the product defect,
product model number (located on bottom of
product), original date of purchase, and any other
information pertinent to the product’s return.
Your Cuisinart Elemental 8 Food Processor has
been manufactured to the strictest specifications
and has been designed for use only in 120 volt
outlets and only with authorized accessories
and replacement parts. This warranty expressly
excludes any defects or damages caused by
attempted use of this unit with a converter, as
well as use with accessories, replacement parts
or repair service other than those authorized
by Cuisinart. This warranty does not cover any
damage caused by accident, misuse, shipment or
other than ordinary household use. This warranty
excludes all incidental or consequential damages.
Some states do not allow the exclusion or
limitation of these damages, so these exclusions
may not apply to you. You may also have other
rights, which vary from state to state.
LIMITED TWO-YEAR
WARRANTY
This warranty is available to consumers only. You
are a consumer if you own a Cuisinart Elemental
8 Food Processor that was purchased at retail
for personal, family or household use. Except
as otherwise required under applicable law, this
warranty is not available to retailers or other
commercial purchasers or owners.
We warrant that your Cuisinart Elemental 8 Food
Processor will be free of defects in materials and
workmanship under normal home use for two
years from the date of original purchase.
CALIFORNIA RESIDENTS ONLY:
We recommend that you visit our website,
www.cuisinart.com for a fast, efficient way to
complete your product registration. However,
product registration does not eliminate the need
for the consumer to maintain the original proof of
purchase in order to obtain the warranty benefits.
In the event that you do not have proof of
purchase date, the purchase date for purposes of
this warranty will be the date of manufacture.
California law provides that for In-Warranty
Service, California residents have the option of
returning a nonconforming product (A) to the
store where it was purchased or (B) to another
retail store that sells Cuisinart products of the
same type.
The retail store shall then, at its discretion, either
repair the product, refer the consumer to an
independent repair facility, replace the product,
or refund the purchase price less the amount
directly attributable to the consumer’s prior
usage of the product. If the above options do not
result in the appropriate relief to the consumer,
the consumer may then take the product to an
independent repair facility if service or repair
can be economically accomplished. Cuisinart
and not the consumer will be responsible for
the reasonable cost of such service, repair,
If your Cuisinart Elemental 8 Food Processor
should prove to be defective within the warranty
period, we will repair it, or if we think necessary,
replace it. To obtain warranty service, simply
call our toll-free number 1-800-726-0190 for
additional information from our Customer Service
Representatives, or send the defective product to
Customer Service at Cuisinart, 7475 North Glen
Harbor Blvd., Glendale, AZ 85307.
12
replacement, or refund for nonconforming
products under warranty.
California residents may also, according
to their preference, return nonconforming
products directly to Cuisinart for repair, or
if necessary, replacement, by calling our
Consumer Service Center toll-free at 1-800726-0190.
Cuisinart will be responsible for the cost of the
repair, replacement, and shipping and handling
for such products under warranty.
BEFORE RETURNING
YOUR CUISINART PRODUCT
If you are experiencing problems with your
Cuisinart product, we suggest that you call our
Consumer Service Center at 1-800-726-0190
before returning the product to be serviced.
If servicing is needed, a Representative can
confirm whether the product is under warranty
and direct you to the nearest service location.
Important: If the nonconforming product is to
be serviced by someone other than Cuisinart’s
Authorized Service Center, please remind the
servicer to call our Consumer Service Center
at 1-800-726-0190 to ensure that the problem
is properly diagnosed, the product is serviced
with the correct parts, and the product is still
under warranty.
©2014 Cuisinart
150 Milford Road
East Windsor, NJ 08520
Printed in China
14CE002354
G IB-12704-ESP
13
NOTES:
Recipe Booklet
8-CUP FOOD PROCESSOR
BASICS
Basic Fresh Breadcrumbs .............................................................................................18
Dill Butter ......................................................................................................................19
Vegetable Cream Cheese ............................................................................................20
Salmon Cream Cheese.................................................................................................20
Peanut Butter ................................................................................................................21
Basic Vinaigrette ...........................................................................................................21
Tahini Dressing ..............................................................................................................22
Caesar Dressing ............................................................................................................23
Mayonnaise ...................................................................................................................24
Basil Pesto .....................................................................................................................25
Simple Tomato Sauce...................................................................................................26
Rémoulade ....................................................................................................................27
Tomato Salsa .................................................................................................................27
Chunky Guacamole ......................................................................................................28
BREAKFAST & BRUNCH
Morning Glory Muffins .................................................................................................29
Zucchini Spice Bread ....................................................................................................30
Onion, Pepper and Potato Frittata .............................................................................31
APPETIZERS
Ten-Layer Nachos .........................................................................................................32
Refried Beans ................................................................................................................33
Hummus ........................................................................................................................34
Tea Sandwiches – 2 varieties (Radish-Dill; Cucumber-Salmon).................................35
Stuffed Breads – 2 varieties (Sausage; Broccoli Rabe)...............................................37
16
BASICS
SOUPS/SALADS/SIDES
Gazpacho ......................................................................................................................40
Creamy Sweet Potato Soup .........................................................................................41
Spring Vegetable Minestrone ......................................................................................42
Coleslaw ........................................................................................................................43
Chopped Salad .............................................................................................................44
Shredded Brussels Sprouts ..........................................................................................45
Potato-Zucchini-Carrot Cakes .....................................................................................46
ENTRÉES
Falafel ............................................................................................................................47
Pizza Margherita ...........................................................................................................48
Mushroom, Leek and Gruyère Quiche........................................................................49
Chicken Pot Pie .............................................................................................................50
Vegetable Stir-Fry .........................................................................................................51
Tacos Americanos .........................................................................................................52
Fish Sticks ......................................................................................................................53
DOUGHS/BREADS
Pizza Dough ..................................................................................................................54
Pâte Brisée ...................................................................................................................55
Buttery Dinner Rolls ......................................................................................................56
Buttermilk Biscuits ........................................................................................................57
DESSERTS
Classic Apple Pie ..........................................................................................................58
Carrot Cake with Cream Cheese Frosting ..................................................................59
Pumpkin Cheesecake ...................................................................................................60
BASICS
17
BASIC FRESH BREADCRUMBS
There is no need to buy breadcrumbs when you can make them with your
Cuisinart® Food Processor in no time at all.
Makes 2⁄3 cup
4
SLICES WHITE BREAD
1. Preheat oven to 325°F. Bake slices of bread in a
single layer for about 20 minutes or until bread is
completely dried out. (Since you are only baking four
slices of bread, this is the perfect task for your toaster
oven, saving energy and money.)
2. Insert the chopping blade into the work bowl of the
food processor. Directly into the work bowl, break the
bread into pieces and pulse 6 to 8 times, then
process on High until desired texture is achieved,
about 30 to 60 seconds.
Note: Breadcrumbs can also be processed from day-old
bread. Simply break into uniform pieces and follow
above instruction until finely chopped.
Tip: For seasoned breadcrumbs, add ¼ teaspoon each
dried oregano, dried basil, garlic powder and ground
onion flakes to toasted bread and process as above.
Nutritional information per serving (2 tablespoons):
Calories 96 (11% from fat) • carb. 18g • pro. 3g • fat 1g
• sat. fat 0g • chol. 0mg • sod. 144mg • calc. 16mg • fiber 2g
18
BASICS
DILL BUTTER
Using a high-quality European-style butter makes a difference, so splurge
on a good brand for this recipe. We feature it in our Radish - Dill Tea
Sandwiches, but a pat on top of grilled or roasted salmon is another
great use for it.
¼
½
CUP FRESH DILL
2
PINCHES KOSHER SALT
CUP (1 STICK) GOOD QUALITY
BUTTER, ROOM TEMPERATURE
AND CUT INTO 4 PIECES
PINCH FRESHLY GROUND BLACK
PEPPER
Makes ½ cup
1. Insert the chopping blade into the work bowl of the
food processor.
2. Put the dill into the work bowl and process on High
to chop, about 10 seconds.
3. Add the butter, salt and pepper. Process on High,
scraping down as needed, for about 10 seconds until
thoroughly combined.
4. Taste and adjust seasoning accordingly.
Nutritional information per serving (2 teaspoons):
Calories 67 (100% from fat) • carb. 0g • pro. 0g • fat 7g
• sat. fat 5g • chol. 20mg • sod. 24mg • calc. 0mg • fiber 0g
BASICS
19
VEGETABLE CREAM CHEESE
Vibrant with color and texture, this spread isn’t just for schmearing on
your morning bagel – serve with crackers, in sandwiches, or even as
a topping to a baked potato.
Makes 1 cup
½
MEDIUM CARROT, PEELED AND CUT
INTO ½-INCH PIECES (HEAPING ¼
CUP)
½
SMALL RED BELL PEPPER, CUT INTO
½-INCH PIECES (HEAPING ¼ CUP)
1
SCALLION, CHOPPED INTO
PIECES (ABOUT ¼ CUP)
1
TABLESPOON FRESH ITALIAN
PARSLEY, STEMS DISCARDED
8
OUNCES PLAIN CREAM CHEESE
(1 STANDARD PACKAGE), ROOM
TEMPERATURE AND CUT INTO 8
PIECES
½ TO 1
½
½-INCH
1. Insert the chopping blade into the work bowl of the
food processor. Add the carrot, red pepper, scallion
and parsley and pulse about 5 times to chop. Add
the cream cheese, lemon juice and salt to the bowl
and pulse about 10 to 12 times, until the all the
ingredients have been fully incorporated and cream
cheese is smooth. Scrape down the sides of the bowl
between every few pulses if needed.
Nutritional information per serving (1 tablespoon):
Calories 35 (85% from fat) • carb. 1g • pro. 1g • fat 3g
• sat. fat 2g • chol. 10mg • sod. 79mg • calc. 1mg • fiber 0g
TEASPOON FRESH LEMON JUICE
TEASPOON KOSHER SALT
SALMON CREAM CHEESE
Whether on a toasted poppy seed bagel or in an elegant tea sandwich,
salmon cream cheese is a treat for all!
Makes about 1 cup
8
OUNCES PLAIN CREAM CHEESE
(1 STANDARD PACKAGE), ROOM
TEMPERATURE AND CUT INTO
8 PIECES
PINCH KOSHER SALT
PINCH FRESHLY GROUND BLACK
PEPPER
3
OUNCES SMOKED SALMON, CUT
INTO 1-INCH PIECES
2
2
2
TEASPOONS FRESH LEMON JUICE
TEASPOONS DRAINED CAPERS
SPRIGS FRESH DILL
20
BASICS
1. Insert the chopping blade into the work bowl of the
food processor. Add the cream cheese, salt and
pepper. Pulse a few times to break up, and then
process until smooth. Add the smoked salmon,
lemon juice, capers and dill and pulse to combine.
Then run on High to fully combine all of the ingredients.
2. Taste and add another pinch of salt if desired.
Nutritional information per serving (1 tablespoon):
Calories 56 (83% from fat) • carb. 1g • pro. 2g • fat 5g
• sat. fat 3g • chol. 16mg • sod. 160mg • calc. 1mg • fiber 0g
PEANUT BUTTER
You’ll be pleasantly surprised how easy it is to make your own nut butter; be
sure to use unsalted nuts so you can control the amount of seasoning
in the final product.
Makes about 1 cup
2
CUPS UNSALTED, DRY ROASTED
PEANUTS
KOSHER SALT TO TASTE
1. Insert the chopping blade into the work bowl of the
food processor. Pulse peanuts about 10 times and then
process on Low until drops of oil are visible and the
mixture is very smooth, about 4 to 5 minutes, depending on desired consistency. (You may need to stop to
scrape down the sides of the bowl periodically.)
2. Add salt and pulse 2 to 3 times to incorporate. Adjust
seasoning as desired.
TIP: This method can be done with any of your favorite
nuts; try adding sweet or savory spices to the spread for
more complex flavor.
Nutritional information per serving (1 tablespoon):
Calories 116 (71% from fat) • carb. 4g • pro. 5g • fat 10g
• sat. fat 1g • chol. 0mg • sod. 105mg • calc. 11mg • fiber 2g
BASIC VINAIGRETTE
This classic vinaigrette can be tossed with mixed greens or drizzled over
grilled chicken – and it works great as a marinade, too.
Makes 1 cup
1½
½
TEASPOONS CHAMPAGNE VINEGAR
1
½
¼
¾
TEASPOON DIJON MUSTARD
SMALL SHALLOT (ABOUT ¾
OUNCE), PEELED AND HALVED
TEASPOON KOSHER SALT
TEASPOON GROUND WHITE PEPPER
CUP EXTRA VIRGIN OLIVE OIL
1. Insert the chopping blade into the work bowl of the
food processor. Add the vinegar, shallot, mustard, salt
and pepper to the bowl and process on Low to
combine and finely chop.
2. With machine running on Low, pour the olive oil
through the drizzle hole in the pusher until all
ingredients are homogenous, about 1½ to 2 minutes.
Nutritional information per serving (1 tablespoon):
Calories 106 (82% from fat) • carb. 1g • pro. 0g • fat 11g
• sat. fat 2g • chol. 0mg • sod. 91mg • calc. 1mg • fiber 0g
BASICS
21
TAHINI DRESSING
Tahini (a paste of ground sesame seeds) can now be found in most grocery
stores. Be sure to stir well before measuring out, as it naturally separates in
its jar. This dressing is a perfect match for our Falafel on page 47, but is also
just as delicious over mixed greens.
Makes about 1 cup
1
GARLIC CLOVE
1
CUP TAHINI
¼
CUP WATER, PLUS MORE AS
NEEDED
2
1
¾
¼
TABLESPOONS FRESH LEMON JUICE
½
CUP EXTRA VIRGIN OLIVE OIL
⁄3
TEASPOON HONEY
TEASPOON KOSHER SALT
TEASPOON FRESHLY GROUND
BLACK PEPPER
1. Insert the chopping blade into the work bowl of the
food processor. With the machine running on High,
drop the garlic through the feed tube. Allow to
process until finely chopped. Stop machine to scrape
down sides. Add the tahini, ¼ cup of water, lemon
juice, honey, salt and pepper.
2. Turn machine on Low to process while adding the oil
through the drizzle hole in the pusher. Continue to
process until desired consistency. If dressing seems
too thick, process in up to an additional ¼ cup of
water. Adjust seasoning to taste.
Nutritional information per serving (1 tablespoon):
Calories 91 (88% from fat) • carb. 2g • pro. 1g • fat 9g
• sat. fat 1g • chol. 0mg • sod. 111mg • calc. 22mg • fiber 0g
22
BASICS
CAESAR DRESSING
There are many versions of this recipe, but our take is pretty close to the
classic. If you’d prefer not to use raw egg yolks, egg substitute can be used.
Makes 1 cup
1 TO 2
5
2
2
4
4
2
GARLIC CLOVES
½
TEASPOON FRESHLY GROUND
BLACK PEPPER
⁄3
CUP EXTRA VIRGIN OLIVE OIL
2
ANCHOVY FILLETS
LARGE EGG YOLKS*
TEASPOONS DIJON MUSTARD
TEASPOONS FRESH LEMON JUICE
TEASPOONS RED WINE VINEGAR
TEASPOONS WORCESTERSHIRE
SAUCE
1. Insert the chopping blade into the work bowl of the
food processor. With the machine running on High,
drop the garlic through the feed tube and process
until finely chopped. Add the anchovies, egg yolks,
mustard, lemon juice, vinegar, Worcestershire sauce
and pepper to the work bowl. Process on High until
well blended.
2. With the machine running on Low, pour the olive oil
through the drizzle hole in the pusher in a steady
stream until the dressing is emulsified, about 30
seconds.
Nutritional information per serving (1 tablespoon):
Calories 91 (95% from fat) • carb. 1g • pro. 1g • fat 10g
• sat. fat 2g • chol. 24mg • sod. 60mg • calc. 4mg • fiber 0g
*Raw egg warning: Caution is suggested in consuming raw and lightly
cooked eggs due to the slight risk of salmonella or other food-borne
illness. To reduce this risk, we recommend you use only fresh, properly
refrigerated, clean, grade A or AA eggs with intact shells, and avoid
contact between the yolks or whites and the shell.
BASICS
23
MAYONNAISE
Taste the difference in homemade mayonnaise.
Makes 1 cup
4
¾
½
1
1
¾
LARGE EGG YOLKS*
TEASPOON KOSHER SALT
TEASPOON DIJON MUSTARD
TEASPOON FRESH LEMON JUICE
TABLESPOON WATER
CUP VEGETABLE OIL
1. Insert the chopping blade into the work bowl of the
food processor. Process the egg yolks, salt, mustard,
lemon juice and water on Low until smooth, about 30
seconds. With the machine running, add the oil
through the drizzle hole in the pusher until all oil is
incorporated and the mayonnaise is emulsified and
homogenous.
2. Scrape down sides; taste and adjust seasoning
accordingly.
Note: For fresh herb mayonnaise: process 1⁄3 cup firmly
packed fresh herbs (e.g., parsley, dill, tarragon, basil,
etc.), stems removed, with the yolks before adding
the oil.
For a bolder-flavored mayonnaise, increase the salt by
¼ teaspoon, the Dijon by ½ teaspoon and lemon juice
to 1 tablespoon.
Nutritional information per serving
(1 tablespoon, using egg yolks):
Calories 93 (96% from fat) • carb. 0g • pro. 1g • fat 10g
• sat. fat 1g • chol. 41mg • sod. 104mg • calc. 5mg • fiber 0g
*Raw egg warning: Caution is suggested in consuming raw and lightly
cooked eggs due to the slight risk of salmonella or other food-borne
illness. To reduce this risk, we recommend you use only fresh, properly
refrigerated, clean, grade A or AA eggs with intact shells, and avoid
contact between the yolks or whites and the shell.
For lower-cholesterol mayonnaise, and to avoid using raw eggs,
cholesterol free egg substitute may be substituted for the egg yolks.
24
BASICS
BASIL PESTO
This is a slightly cheesier version of the standard pesto, but you can
adjust the amount of cheese as desired. Try any combination of
herbs or nuts in this recipe.
Makes 1¼ cups
2
OUNCES PARMESAN OR PECORINO
CHEESE CUT INTO ½-INCH CUBES
1
¼
3
GARLIC CLOVE
½
½ TO 2⁄3
TEASPOON KOSHER SALT
CUP PINE NUTS, LIGHTLY TOASTED
CUPS TIGHTLY PACKED FRESH BASIL
LEAVES (ABOUT 3 OUNCES)
CUP EXTRA VIRGIN OLIVE OIL
1. Insert the chopping blade into the work bowl of the
food processor. Add the cheese, garlic and nuts to
the work bowl and pulse to roughly chop, about 10
pulses. Add the basil leaves and salt and pulse about
10 to 15 times; scrape the bowl. With the machine
running on Low, add the olive oil in a slow, steady
stream through the feed tube, processing until
combined and an emulsion is formed, about 1
minute. Scrape down the sides of the work bowl.
2. To store the pesto, transfer to a glass jar or airtight
container. Tap to remove all air bubbles and even out
the surface. Cover the surface directly with plastic
wrap and refrigerate. The pesto will keep for 5 days in
the refrigerator, or it may be frozen.
Nutritional information per serving (1 tablespoon):
Calories 72 (80% from fat) • carb. 0g • pro. 1g • fat 8g
• sat. fat 1g • chol. 2mg • sod. 74mg • calc. 40mg • fiber 0g
BASICS
25
SIMPLE TOMATO SAUCE
This sauce comes together quickly, but tastes as if it has been simmering
all day. When cooked down, it makes a tasty topping for
homemade pizzas.
Makes about 3 cups
1. Put the olive oil into a medium size saucepan over
medium heat.
1½
4
1
TEASPOONS OLIVE OIL
¾
¼
1
TEASPOON DRIED OREGANO
½
1
TEASPOON KOSHER SALT
¼
TEASPOON FRESHLY GROUND
BLACK PEPPER
¼
TEASPOON RED PEPPER FLAKES
(OPTIONAL)
GARLIC CLOVES
SMALL ONION, CUT INTO
PIECES
1-INCH
CUP DRY WHITE WINE
CAN (28 OUNCES) WHOLE PEELED
PLUM TOMATOES, WITH JUICE
LARGE SPRIG FRESH BASIL
12 LEAVES)
(10 TO
2. While the oil is heating, insert the chopping blade
into the work bowl of the food processor. With the
machine running on High, drop the garlic through the
feed tube to chop. Turn unit off, scrape down the
sides of the bowl and add the onion. Pulse to finely
chop, about 5 times.
3. When the oil is hot add the garlic, onion and oregano
to the pan. Sauté until the onion is softened and the
garlic is fragrant. Add the wine to the pan and cook
until completely reduced.
4. While the wine is cooking, add the tomatoes to the
work bowl and pulse to finely chop, about 8 times.
Add the tomatoes, salt and basil to the pan.
5. Bring the sauce to a boil, then reduce to low. Partly
cover the pan and simmer for 30 minutes. Turn off the
heat and stir in the black pepper and red pepper
flakes, if using. Taste and adjust seasoning
accordingly.
If you would like to use this sauce for pizza, continue to
simmer uncovered for an additional 30 to 40 minutes
until thick and reduced, stirring often. Let the sauce cool
completely before using on pizza dough.
Nutritional information per serving (¼ cup):
Calories 27 (20% from fat) • carb. 4g • pro. 1g • fat 1g
• sat. fat 0g • chol. 0mg • sod. 239mg • calc. 16mg • fiber 1g
26
BASICS
RÉMOULADE
This sauce not only complements seafood, but also pairs well with freshly
steamed vegetables. For a richer, thicker consistency, use Greek yogurt
in place of regular.
Makes 21⁄3 cups
½
MEDIUM TO LARGE SHALLOT,
PEELED AND CUT INTO 1-INCH
PIECES
¼
CUP FRESH ITALIAN PARSLEY,
STEMS DISCARDED
1
1
3
1¼
½
¼
TABLESPOON FRESH DILL
1
TEASPOON FRESHLY GROUND
BLACK PEPPER
⁄8
1. Insert the chopping blade into the work bowl of the
food processor. Add the shallot, parsley and dill;
pulse to chop, about 10 pulses. Scrape down the
sides of the bowl and add the mustard and capers
and pulse 5 to 10 times to chop.
TABLESPOON DIJON MUSTARD
TABLESPOONS DRAINED CAPERS
2. Add the mayonnaise, yogurt, relish and black pepper;
use 5 long pulses to combine. Do not over-process.
Refrigerate until ready to use.
CUPS MAYONNAISE
Nutritional information per serving (1 tablespoon):
CUP NONFAT PLAIN YOGURT
Calories 64 (89% from fat) • carb. 1g • pro. 1g • fat 6g
• sat. fat 1g • chol. 26mg • sod. 105mg • calc. 8mg • fiber 0g
CUP SWEET RELISH
TOMATO SALSA
Serve warm tortilla chips alongside this fresh and tangy salsa.
Makes about 2 cups
¼
CUP FRESH CILANTRO, STEMS
DISCARDED
2
SMALL SCALLIONS, CUT
INTO 1-INCH PIECES
1
1
SMALL GARLIC CLOVE
¾
2
1
TEASPOON KOSHER SALT
JALAPEÑO, SEEDED AND
CUT INTO ½-INCH PIECES
1. Insert the chopping blade into the work bowl of the
food processor. Add the cilantro, scallions, garlic and
jalapeño and pulse to chop, about 10 pulses. Add the
salt, tomatoes and lime juice and pulse to chop until
desired consistency is reached, about 8 to 10 pulses.
2. Taste and adjust seasoning accordingly. Depending
on desired consistency, strain salsa to remove excess
liquid.
CUPS GRAPE TOMATOES
Nutritional information per serving (¼ cup):
TEASPOON FRESH LIME JUICE
Calories 11 (7% from fat) • carb. 2g • pro. 0g • fat 0g
• sat. fat 0g • chol. 0mg • sod. 287mg • calc. 7mg • fiber 1g
BASICS
27
CHUNKY GUACAMOLE
Our fresh guacamole is perfect for the Sunday game or served alongside
quesadillas for a festive dinner. It is also a component in our
Ten-Layer Nachos (page 32)!
Makes about 1 cup
1
½
SMALL GARLIC CLOVE
1
SCALLION, CUT INTO
PIECES
1
TABLESPOON FRESH CILANTRO,
STEMS DISCARDED
2
RIPE AVOCADOS, HALVED, PITS
REMOVED
2
¾
TABLESPOONS FRESH LIME JUICE
28
JALAPEÑO, SEEDED, CUT INTO
1-INCH PIECES
1-INCH
TEASPOON KOSHER SALT
BASICS
1. Insert the chopping blade into the work bowl of the
food processor. Add the garlic, jalapeño, scallion and
cilantro and pulse to roughly, but evenly chop.
2. Scrape down the sides of the bowl. Scoop out the
insides of the avocados in pieces directly into the
work bowl and add the lime juice and salt. Alternate
between pulsing and running on High until desired
consistency is achieved, about 10 to 15 pulses.
Nutritional information per serving (¼ cup):
Calories 71 (73% from fat) • carb. 4g • pro. 1g • fat 6g
• sat. fat 1g • chol. 0mg • sod. 118mg • calc. 7mg • fiber 3g
MORNING GLORY MUFFINS
Start your day with this muffin, packed with energy and fiber.
Makes 6 muffins
NONSTICK COOKING SPRAY
¼
⁄3
CUP UNBLEACHED, ALL-PURPOSE
FLOUR
1
CUP WHOLE WHEAT FLOUR
½
½
½
¼
½
TEASPOON KOSHER SALT
1
CUP WALNUTS, LIGHTLY TOASTED
2
LARGE PEELED CARROTS
1
⁄3
CUP PACKED, LIGHT BROWN SUGAR
2
⁄3
LARGE EGGS, ROOM TEMPERATURE
1
CUP VEGETABLE OIL
½
TEASPOON PURE VANILLA EXTRACT
1
CUP SHREDDED, UNSWEETENED
COCONUT
2
TABLESPOONS SUNFLOWER SEEDS
⁄3
⁄3
TEASPOON BAKING SODA
TEASPOON GROUND CINNAMON
CUP ROLLED OATS (NOT INSTANT)
TEASPOON GRATED ORANGE ZEST
1. Preheat oven to 350°F. Lightly coat a six-cup muffin
pan with nonstick cooking spray and set aside.
2. Insert the chopping blade into the work bowl of the
food processor. Add the flours, salt, baking soda,
cinnamon, oats and zest to the work bowl; process on
Low for 10 seconds to sift. Transfer ingredients to a
medium mixing bowl; reserve. Add the walnuts and
pulse to chop, about 5 times. Leaving the nuts in the
bowl, remove the chopping blade and insert the
medium shredding disc. Cut the carrots to fit the feed
tube snugly and shred on High. Add to the bowl with
the dry ingredients and stir to combine; reserve.
3. Reinsert the chopping blade and add the brown
sugar, eggs, oil and vanilla to the work bowl and
process on Low for 5 seconds, until combined. Add
the flour/carrot mixture, and pulse three times to
combine. Scrape down the sides of the bowl and add
the coconut and sunflower seeds. Pulse 3 to 4 more
times to incorporate.
4. Divide the batter among the prepared muffin cups
and bake for 18 to 20 minutes, until a toothpick or
cake tester comes out clean.
Nutritional information per muffin:
Calories 316 (60% from fat) • carb. 27g • pro. 6g • fat 22g
• sat. fat 4g • chol. 62mg • sod. 232mg • calc. 30mg • fiber 3g
BREAKFAST & BRUNCH
29
ZUCCHINI SPICE BREAD
This moist, quick bread is perfect for breakfast or for an afternoon snack.
Makes one 2-pound loaf (16 servings)
NONSTICK COOKING SPRAY
2¼
CUPS UNBLEACHED, ALL-PURPOSE
FLOUR
1½
¾
¼
1
1
½
1
TEASPOONS GROUND CINNAMON
½
1
2
½
CUP VEGETABLE OIL
TEASPOON GROUND ALLSPICE
TEASPOON GROUND NUTMEG
TEASPOON KOSHER SALT
TEASPOON BAKING POWDER
CUP WALNUTS, LIGHTLY TOASTED
LARGE ZUCCHINI, APPROXIMATELY
8 TO 10 OUNCES
CUP GRANULATED SUGAR
LARGE EGGS
CUP DRIED CHERRIES OR
CRANBERRIES
1. Preheat oven to 325°F. Coat a 9 x 5 x 3-inch loaf pan
with cooking spray.
2. Insert the chopping blade into the work bowl of the
food processor. Add the flour, spices, salt and baking
powder and process on Low for 10 seconds to sift.
Transfer ingredients to a large bowl; reserve. Add the
walnuts to the work bowl and chop, 2 to 3 pulses.
Leaving the nuts in the work bowl, remove the
chopping blade and insert the medium shredding
disc. Trim the zucchini to fit the feed tube and shred.
Transfer the walnuts and zucchini to the bowl with the
dry ingredients. Stir to mix.
3. Reinsert the chopping blade and add the vegetable
oil, sugar and eggs. Process on Low for 5 to 10
seconds until combined. Add to the mixing bowl with
the dry ingredients, along with the dried fruit, and stir
until just combined.
4. Pour the batter into the prepared pan and bake in the
middle of the oven for 1 hour and 15 minutes, or until
a toothpick or cake tester comes out clean.
5. Cool on a wire rack for 5 minutes, and then turn the
loaf out onto a wire rack to cool completely.
Nutritional information per serving:
Calories 194 (37% from fat) • carb. 28g • pro. 3g • fat 8g
• sat. fat 1g • chol. 23mg • sod. 183mg • calc. 14mg • fiber 1g
30
BREAKFAST & BRUNCH
ONION, PEPPER AND POTATO FRITTATA
Frittatas are simple and delicious. This is also tasty with some crumbled
cooked Italian sausage mixed into it.
Makes 10 servings
1. Preheat oven to 350°F.
2
1
1
GARLIC CLOVES
1
SMALL TO MEDIUM RUSSET POTATO
(4 TO 6 OUNCES), PEELED AND
HALVED, RESERVED IN COLD WATER
1
3
½
¼
OUNCE PARMESAN CHEESE
12
LARGE EGGS, BEATEN
SMALL ONION, HALVED
MEDIUM RED BELL PEPPER,
QUARTERED, CORED AND SEEDED
TEASPOONS OLIVE OIL, DIVIDED
TEASPOON KOSHER SALT, DIVIDED
TEASPOON FRESHLY GROUND
BLACK PEPPER, DIVIDED
2. Insert the chopping blade into the work bowl of the
food processor. With the unit running on High, drop
the garlic through the feed tube and process to finely
chop.
3. Keeping the garlic in the bowl, remove the chopping
blade and insert the medium slicing disc. Slice the
onion and pepper on High. Remove vegetables and
reserve. Slice the potato on High; remove and reserve
in cold water.
4. Remove the slicing disc, and insert the fine shredding
disc. Shred the Parmesan on High; reserve.
5. Place a 10-inch oven-safe nonstick skillet* over medium
heat. Add 2 teaspoons of the olive oil and swirl the pan
to coat the surface evenly. Once oil is hot, add the
garlic, onion and pepper, with a pinch each of the salt
and pepper; sauté until softened, about 6 to 8 minutes.
Remove and reserve.
6. Add the remaining teaspoon of oil to the pan. Remove
the potatoes from the water and dry well on a towel.
Add to the pan with 2 pinches each of the salt and
pepper. Sauté until tender and edges are browned,
about 6 minutes.
*If not using a nonstick pan, coat the 7. Once potatoes have browned, add the onion/pepper
mixture back to the pan, stir to combine, then top with
pan with a nonstick cooking spray
the eggs, remaining salt and pepper and shredded
before adding the eggs. Once the
Parmesan. Leave skillet on the heat so that the bottom
vegetables are sautéed, stir them
and sides of the frittata begin to set, about 6 minutes.
into beaten eggs and add to the
Place skillet into oven and bake until the top of the
coated pan.
frittata is golden and puffed, about 20 to 25 minutes.
Nutritional information per serving:
(based on 10 servings)
Calories 127 (56% from fat) • carb. 5g
• pro. 9g • fat 8g • sat. fat 3g • chol.
225mg • sod. 248mg • calc. 73mg
• fiber 1g
8. Carefully remove skillet from oven and invert onto a
cutting board. Cut the frittata and serve immediately.
BREAKFAST & BRUNCH
31
TEN-LAYER NACHOS
These nachos are loaded with all the best ingredients. You can tweak
this recipe however you wish, using different cheeses or substituting
your favorite ingredients.
Makes 10 to 12 servings
1
STANDARD BAG TORTILLA CHIPS
(THIS IS AN ESTIMATE – YOU NEED
ENOUGH TO COVER THE BOTTOM
OF A RIMMED BAKING SHEET)
¾
CUP REFRIED BEANS, HOMEMADE
(RECIPE FOLLOWS) OR CANNED
2 TO 4
SCALLIONS, TRIMMED AND CUT
INTO 1-INCH PIECES
(2 SCALLIONS IF THEY ARE LARGE;
USE 4 IF THEY ARE SMALL)
1
JALAPEÑO, HALVED, SEEDED AND
CUT INTO 1-INCH PIECES
½
¾
6 TO 8
CUP GRAPE TOMATOES
2
2
⁄3
⁄3
½
CUP WHOLE, PITTED BLACK OLIVES
OUNCES MONTEREY JACK OR
CHEDDAR CHEESE, OR A MIX OF
THE TWO, CHILLED
CUP SALSA (PAGE
27)
CUP GUACAMOLE (PAGE
28)
CUP SOUR CREAM OR PLAIN
YOGURT
1. Preheat oven to 375°F. Line a rimmed baking sheet
with foil. Evenly distribute the chips on the prepared
baking pan.
2. Evenly distribute dollops of the refried beans on top
of the chips. Set aside.
3. Insert the chopping blade into the work bowl of the
food processor. Put the scallions, jalapeño and
tomatoes in the bowl and pulse to roughly chop,
about 5 times. Remove and evenly distribute on the
chips and beans.
4. Remove the chopping blade and insert the medium
slicing disc. Slice the olives on High. Remove and
distribute on top of the nachos. Remove the slicing
disc and flip to insert the shredding disc side. Shred
the cheese(s) on High. Remove and evenly distribute
over the assembled nacho ingredients.
5. Bake for about 15 minutes, or until the cheese is fully
melted and lightly browned. Serve immediately with
salsa, guacamole and sour cream.
Nutritional information per serving (based on 12 servings):
Calories 249 (48% from fat) • carb. 25g • pro. 7g • fat 13g
• sat. fat 3g • chol. 13mg • sod. 421mg • calc. 174mg • fiber 4g
32
APPETIZERS
REFRIED BEANS
Easy enough to buy canned, but making your own is simple
and much more delicious!
Makes about 1 cup
2
½
GARLIC CLOVES
½
JALAPEÑO, SEEDED AND CUT INTO
1-INCH PIECES
2
TABLESPOONS VEGETABLE OIL,
DIVIDED
1
½
1 TO 2
TABLESPOON TOMATO PASTE
MEDIUM ONION, CUT INTO
PIECES
1-INCH
TEASPOON KOSHER SALT, DIVIDED
PINCHES GROUND CUMIN
PINCH CAYENNE
1
CAN (15 OUNCES) PINTO BEANS,
DRAINED
1 TO 1½ CUPS WATER
1. Insert the chopping blade into the work bowl of the
food processor. Put the garlic, onion and jalapeño in
the bowl and process on High to finely chop.
2. Put 1 tablespoon of oil in a medium-size nonstick
skillet set over medium heat. Once oil is hot, add the
chopped vegetables, tomato paste, pinch of salt,
cumin and cayenne. Sauté until softened, about 4
minutes. Add the drained beans and cook until hot
and softened a bit more, about 6 to 8 minutes.
3. Transfer all ingredients to the food processor, still
fitted with the metal chopping blade. Pulse until
desired consistency, adding water through the feed
tube as you go to achieve a nice creamy texture.
Add additional salt to taste.
4. Add the remaining tablespoon of oil to the same
skillet set over medium-high heat. Once hot, add the
puréed bean mixture to the pan and cook, stirring
frequently, until slightly darkened in color, no more
than 4 minutes. Serve warm.
Nutritional information per serving (¼ cup):
Calories 83 (41% from fat) • carb. 10g • pro. 3g • fat 4g
• sat. fat 0g • chol. 0mg • sod. 311mg • calc. 28mg • fiber 3g
APPETIZERS
33
HUMMUS
Serve this brightly flavored dip with warm pita for a satisfying snack.
Makes about 3 cups
1
1
2
GARLIC CLOVE
¼
2
¼
CUP TAHINI
½
¼
TEASPOON GROUND CUMIN
TEASPOON KOSHER SALT
CANS (15.5 OUNCES EACH)
CHICKPEAS, RINSED AND DRAINED
⁄8
1
34
TABLESPOONS FRESH LEMON JUICE
CUP PLUS TWO TABLESPOONS
WATER
CUP EXTRA VIRGIN OLIVE OIL, PLUS
1 TABLESPOON FOR SERVING
TEASPOON PAPRIKA (OPTIONAL)
PINCH ZA’ATAR (OPTIONAL)
APPETIZERS
1. Insert the chopping blade into the work bowl of the
food processor. With the unit running on High, drop
the garlic through the feed tube and process to finely
chop, about 10 seconds. Add remaining ingredients
and process on Low until smooth, about 3 minutes,
stopping to scrape down the sides of the bowl as
needed.
2. For serving, transfer hummus to a shallow bowl. Make
a slight indentation in the center of the dip and fill
with the remaining tablespoon of oil. Sprinkle the
paprika and za’atar, if using, over the oil.
Nutritional information per serving (2 tablespoons):
Calories 79 (44% from fat) • carb. 2g • pro. 2g • fat 4g
• sat. fat 1g • chol. 0mg • sod. 207mg • calc. 23mg • fiber 2g
RADISH-DILL TEA SANDWICHES
An elegant sandwich to serve for a ladies’ tea or lunch.
Makes about 22 sandwiches
6 TO 8
SMALL RADISHES (ABOUT
BUNCH), TRIMMED
1
½
LOAF RYE COCKTAIL BREAD*
CUP DILL BUTTER (PAGE
SOFTENED
1 SMALL
19),
KOSHER SALT
1. Fit the medium slicing disc into the work bowl of the
food processor. Fill the feed tube with the radishes
and slice on High.
2. Lay the slices of bread on a clean work surface.
Spread 1 teaspoon of butter on one side of each
piece of bread. Top half of the buttered pieces with 3
radish slices and a pinch of salt. Top with another
piece of bread, buttered side down. Continue with all
of the bread.
3. Halve the sandwiches on the diagonal and serve
immediately.
*If you cannot find cocktail bread,
extra-thin sliced bread is a good
substitute. Just cut each slice in
quarters to make cocktail-size.
Nutritional information per sandwich:
Calories 72 (56% from fat) • carb. 7g • pro. 1g • fat 4g
• sat. fat 3g • chol. 11mg • sod. 198mg • calc. 10mg • fiber 1g
APPETIZERS
35
CUCUMBER-SALMON TEA SANDWICHES
Be sure to include these tasty sandwiches for your next luncheon – they will
add color and flavor to the table.
Makes about 22 sandwiches
1
SMALL TO MEDIUM CUCUMBER,
HALVED LENGTHWISE AND
WIDTHWISE
1
LOAF PUMPERNICKEL COCKTAIL
BREAD*
½
CUP SALMON CREAM CHEESE
(PAGE 20), SOFTENED
3½
OUNCES SMOKED SALMON, TORN
OR CUT INTO 22 PIECES
1. Insert the medium slicing disc into the work bowl of
the food processor. Slice the cucumber on High (you
will have half-moon shapes).
2. Lay the slice of bread on a clean work surface. Spread
1 teaspoon of salmon cream cheese on one side of
each piece of bread. Top half of the bread with 3
cucumber slices and a piece of smoked salmon. Top
with another piece of bread, cream cheese side
down. Continue with all of the bread.
3. Halve the sandwiches on the diagonal and serve
immediately.
Nutritional information per sandwich:
*If you cannot find cocktail bread,
extra-thin sliced bread, such as
Calories 85 (48% from fat) • carb. 7g • pro. 4g • fat 5g
Pepperidge Farm brand, is a good
• sat. fat 2g • chol. 13mg • sod. 360mg • calc. 12mg • fiber 1g
substitute. Cut each slice in quarters
to make cocktail-size.
36
APPETIZERS
SAUSAGE BREAD (STROMBOLI STYLE)
This recipe is great for a hungry crowd and can easily be doubled. We use a combination of
sweet and hot sausage in this bread, but feel free to use whatever suits your taste.
Makes one 14-inch roll
2
TABLESPOONS VEGETABLE OIL,
DIVIDED
1
SMALL FENNEL BULB, FRONDS
REMOVED (RESERVED FOR
ANOTHER USE), QUARTERED AND
CORED
2
¼ TO ½
4
GARLIC CLOVES, SMASHED
½
POUND SWEET ITALIAN SAUSAGE,
CASINGS REMOVED
¼
POUND HOT ITALIAN SAUSAGE,
CASINGS REMOVED
2
TABLESPOONS WHITE WINE
TEASPOON KOSHER SALT
OUNCES REGULAR MOZZARELLA,
DIVIDED
UNBLEACHED, ALL-PURPOSE
FLOUR, FOR ROLLING DOUGH
1
RECIPE PIZZA DOUGH (PAGE
54)
EGG WASH (1 LARGE EGG LIGHTLY
BEATEN WITH 1 TEASPOON WATER)
1. Preheat oven to 400°F with rack in the middle of the oven.
Lightly coat a baking sheet with 1 tablespoon of the oil and
set aside.
2. Heat remaining oil in a 12-inch skillet over medium heat.
3. While the oil is heating, insert the medium slicing disc into
the work bowl of the food processor and slice the fennel on
High. Remove and add to the hot skillet with the garlic and
¼ teaspoon of the salt. Sauté for about 8 to 10 minutes until
the fennel is softened and lightly browned. While fennel and
garlic are cooking, remove the slicing disc and flip over to
insert the shredding disc side. Fit the mozzarella into the
feed tube and shred on High; reserve in bowl.
4. Once the fennel has cooked, remove and reserve in a
separate bowl. Return pan to the heat and break sausage up
into medium-size chunks directly into the pan. Cook until
sausage is browned with no pink, about 5 to 7 minutes.
Return fennel to the pan and stir to combine. Add the wine
and scrape any bits on the bottom of the pan with a wooden
spoon. Cook until wine has evaporated, about 1 minute, and
remove pan from heat. Remove and discard garlic and stir
in ½ cup of the mozzarella. Set aside to cool slightly.
5. Punch down pizza dough on a lightly floured surface. With the tips of your fingers, gently press out
into a 14 x 8-inch rectangle, turning and stretching as needed. Gently lift dough onto prepared baking
sheet and reshape if necessary. If any tears appear, pinch the dough back together.
6. Evenly spread sausage mixture all over the dough in a single layer, leaving a 1-inch border around the
outside. Sprinkle remaining cheese evenly over the sausage mixture.
7. Brush the border of the dough with the egg wash. Starting with the long end closest to you, roll the
dough like a jelly roll to the center of the rectangle. Take the long end farthest from you and tightly
pull it back over the dough in the center to cover and complete the roll. Pinch to seal all along the
seam. Fold the ends of the dough in on each side and pinch to seal. Roll the dough over so it is
seam-side down and arrange in the center of the baking sheet. Brush all over with egg wash, and with
a paring knife cut 3 evenly spaced slits in the top.
8. Bake for 30 minutes, rotating the pan halfway through cooking, or until golden brown and cooked
through. Remove and allow bread to rest 5 minutes before slicing. Serve warm.
TIP: For an ultimate version, combine the flavors of both stuffed breads (see next recipe) into one.
Nutritional information per serving (based on 14 servings):
Calories 204 (54% from fat) • carb. 16g • pro. 8g • fat 13g • sat. fat 4g
• chol. 36mg • sod. 406mg • calc. 73mg • fiber 2g
APPETIZERS
37
BROCCOLI RABE BREAD
Sweet ricotta complements the slight bitterness of
broccoli rabe in this version.
Makes one 14-inch roll
2
TABLESPOONS VEGETABLE OIL,
DIVIDED
2
1
GARLIC CLOVES
BUNCH BROCCOLI RABE (NO MORE
THAN 1 POUND), TRIMMED AND
CUT INTO 2-INCH PIECES
¾
TEASPOON KOSHER SALT, DIVIDED
1
TEASPOON RED PEPPER FLAKES
¼
½
OUNCE PECORINO ROMANO
⁄8
CUP WHOLE MILK RICOTTA
PINCH GROUND NUTMEG
¼
TEASPOON FRESHLY GROUND
BLACK PEPPER
UNBLEACHED, ALL-PURPOSE
FLOUR, FOR ROLLING DOUGH
1
RECIPE PIZZA DOUGH (PAGE
54)
EGG WASH (1 EGG BEATEN
LIGHTLY WITH 1 TEASPOON WATER)
1. Preheat oven to 400°F with rack in the middle of the
oven. Lightly coat a baking sheet with 1 tablespoon
of the oil and set aside.
2. Heat the remaining oil in a 12-inch sauté pan over
medium heat until shimmering.
3. While the oil is heating, insert the chopping blade
into the work bowl of the food processor. With the
unit running on High, drop the garlic through feed
tube to chop.
4. Add broccoli rabe to the skillet – it will look like a lot,
but will shrink as it cooks. Season with ¼ teaspoon of
the salt and sauté for about 7 to 8 minutes, or until
just tender. Halfway through cooking, stir in the garlic
and red pepper flakes. Remove from the heat and set
aside to cool slightly.
5. While the broccoli rabe is cooking, put the pecorino
cheese into the work bowl, still fitted with the
chopping blade, and process on High to finely grate.
Put into a medium-size mixing bowl with the ricotta,
nutmeg, remaining salt and pepper. Once the broccoli
rabe has cooked, add it to the other ingredients and
stir to completely combine.
6. Punch down pizza dough on a lightly floured surface.
With the tips of your fingers, gently press out dough
into a 14 x 8-inch rectangle, turning and stretching as
needed. Gently lift dough onto prepared baking
sheet and reshape if necessary. If any tears appear,
pinch the dough back together.
7. Evenly spread the broccoli-cheese mixture all over the
dough in a single layer, leaving a 1-inch border
around the outside.
8. Brush the border of the dough with the egg wash.
Starting with the long end closest to you, roll the
dough like a jelly roll to the center of the rectangle.
38
APPETIZERS
Take the long end farthest from you and tightly pull it back over the
dough in the center to cover and complete the roll. Pinch to seal all
along the seam. Fold the ends of the dough in on each side and
pinch to seal. Roll the dough over so it is seam-side down and
arrange in the center of the baking sheet. Brush all over with egg
wash, and with a paring knife cut 3 evenly spaced slits in the top.
9. Bake for 30 to 35 minutes, rotating the pan halfway through
cooking, or until golden brown and cooked through. Remove and
allow bread to rest 5 minutes before slicing. Serve warm.
TIP: For an ultimate version, combine the flavors of both stuffed
breads (see previous recipe) into one.
Nutritional information per serving: (based on 14 servings)
Calories 204 (54% from fat) • carb. 16g • pro. 8g • fat 13g
• sat. fat 4g • chol. 36mg • sod. 406mg • calc. 73mg • fiber 2g
APPETIZERS
39
GAZPACHO
This bright and vibrant soup is perfect all summer long.
Makes 3½ cups
1
1
GARLIC CLOVE
¼
CUP FRESH ITALIAN PARSLEY,
STEMS DISCARDED
2
SCALLIONS, TRIMMED AND CUT
INTO 1-INCH PIECES
½
MEDIUM TO LARGE CUCUMBER
(ABOUT 3 OUNCES), CUT INTO
1-INCH PIECES
¼
YELLOW BELL PEPPER, CUT INTO
1-INCH PIECES
¼
RED BELL PEPPER, CUT INTO
1-INCH PIECES
2
MEDIUM VINE-RIPE TOMATOES,
CORED AND CUT INTO 1-INCH
PIECES
1
¼
TEASPOON KOSHER SALT
1
1
3
1½
TEASPOON RED WINE VINEGAR
JALAPEÑO, SEEDED AND CUT INTO
1-INCH PIECES
40
1. Insert the chopping blade into the work bowl of the
food processor. With the machine running on High,
drop the garlic and jalapeño down the feed tube to
chop. Stop to scrape down the sides and add the
parsley, scallions, cucumber, bell peppers and
tomatoes. Pulse 5 to 6 times to roughly chop.
2. Add the remaining ingredients and pulse another 6 to
7 times to incorporate. Taste and adjust seasoning as
desired. Serve.
Nutritional information per serving (½ cup):
Calories 24 (5% from fat) • carb. 5g • pro. 1g • fat 0g
• sat. fat 0g • chol. 0mg • sod. 362mg • calc. 18mg • fiber 1g
TEASPOON FRESHLY GROUND
BLACK PEPPER
TEASPOON FRESH LIME JUICE
DASHES HOT SAUCE
CUPS VEGETABLE JUICE, LOW
SODIUM
SOUPS/SALADS/SIDES
CREAMY SWEET POTATO SOUP
This velvety soup is perfect for a brisk fall day.
Makes about 3 cups
2
1
1
TABLESPOONS UNSALTED BUTTER
1
LEEK, TRIMMED AND CUT INTO
2-INCH PIECES
½
TEASPOON KOSHER SALT, DIVIDED
GARLIC CLOVE
½-INCH PIECE GINGERROOT,
PEELED
PINCH FRESHLY GROUND BLACK
PEPPER
2
¼
MEDIUM SWEET POTATOES (ABOUT
1 POUND), PEELED AND CUT TO
FIT THE FEED TUBE (RESERVE IN
COLD WATER IF NOT USING
IMMEDIATELY)
TEASPOON GROUND CINNAMON
PINCH CAYENNE
2
CUPS CHICKEN OR VEGETABLE
BROTH, LOW SODIUM
½ TO ¾
CUP HEAVY CREAM (OPTIONAL)
1. Put the butter in a medium to large pot over low
heat.
2. While butter is heating, prepare the vegetables.
Insert the chopping blade into the work bowl of the
food processor. Add the garlic, ginger and leek, and
pulse until finely chopped, about 8 to 10 times. Put
into the pot with a pinch each of the salt and pepper.
Sauté until softened, about 8 minutes (you want the
heat to be low so the vegetables do not pick up any
color).
3. While vegetables are cooking, remove the chopping
blade and insert the medium slicing disc. Slice the
potatoes on High. Add to the softened vegetables
and stir to fully combine. Add the cinnamon, cayenne
and broth, and increase heat to bring mixture to a
boil. Once boiling, reduce heat to maintain a simmer.
Allow to simmer until potatoes are tender, about 15
minutes.
4. Using a slotted spoon, transfer the soup solids to the
food processor and transfer liquid to a measuring cup
(this will make it easier to add to the food processer
while puréeing). Process on High to purée and while
processing, slowly add the hot cooking liquid to the
food processor. Process on High for about 2 minutes
for a smooth consistency.
5. Return the soup to the saucepan to re-warm. Stir in
the cream if using. Taste and adjust seasoning
accordingly.
6. Serve immediately.
Nutritional information per serving (1 cup):
Calories 221 (66% from fat) • carb. 17g • pro. 1g • fat 16g
• sat. fat 11g • chol. 55mg • sod. 598mg • calc. 29mg • fiber 2g
SOUPS/SALADS/SIDES
41
SPRING VEGETABLE MINESTRONE
Pesto stars in this brightly flavored springtime soup.
Makes about 12 cups
1. Put the olive oil in a large pot over medium heat.
1½
1
1
TEASPOONS OLIVE OIL
¾
½
TEASPOON KOSHER SALT, DIVIDED
3
MEDIUM CARROTS, PEELED,
TRIMMED AND HALVED
1
CELERY STALK, TRIMMED AND
HALVED
½
SMALL FENNEL BULB, TRIMMED
AND HALVED
1
SMALL ZUCCHINI, TRIMMED AND
HALVED LENGTHWISE AND
WIDTHWISE
1
SMALL YELLOW SQUASH, TRIMMED
AND HALVED LENGTHWISE AND
WIDTHWISE
6
OUNCES RED POTATOES, CUT INTO
½-INCH PIECES
6
CUPS CHICKEN OR VEGETABLE
STOCK, LOW SODIUM
1
CAN (15 OUNCES) CHICKPEAS,
DRAINED FIRST THEN RINSE
1
CAN (15 OUNCES) RED KIDNEY
BEANS, DRAINED FIRST THEN
RINSED
GARLIC CLOVE
SMALL LEEK, TRIMMED AND CUT
INTO 1-INCH PIECES
TEASPOON FRESHLY GROUND
BLACK PEPPER, DIVIDED
2
CUPS COOKED DITALINI PASTA OR
OTHER SMALL VARIETY (OPTIONAL)
2 TO 4
TABLESPOONS BASIL PESTO
(PAGE 25), FOR SERVING
2. While oil is heating, prepare the vegetables. Insert
the chopping blade into the work bowl of the food
processor. Add the garlic and leek; pulse until finely
chopped, about 6 to 8 pulses. Transfer to the pot
with ¼ teaspoon of the salt and pinch of pepper and
begin to sauté.
3. While the garlic and leek are cooking, remove the
chopping blade and insert the medium slicing disc.
Fit the carrots and celery into the feed tube so they
are snug and slice on High. Slice the fennel on High.
Add to the pot, with the remaining salt and pepper,
and sauté until slightly soft, about 10 minutes.
4. Slice the zucchini and squash on High; reserve in
bowl. Once the vegetables have cooked, stir in the
potatoes and stock. Increase temperature to bring
mixture to a boil. Reduce to maintain a simmer and
add the zucchini, squash, chickpeas and beans.
Continue to simmer until all vegetables are tender,
about 20 to 30 minutes. Stir in the cooked ditalini, if
using, and simmer for an additional 5 to 10 minutes
or until heated through. Taste and adjust seasoning
accordingly.
5. Serve in individual bowls topped with a dollop of
pesto. The pesto is best stirred into soup before
eating.
Nutritional information per serving (1 cup):
Calories 127 (19% from fat) • carb. 20g • pro. 7g • fat 3g
• sat. fat 0g • chol. 0mg • sod. 659mg • calc. 57mg • fiber 5g
42
SOUPS/SALADS/SIDES
COLESLAW
A mayonnaise-free version of this classic barbecue dish,
this is nice and light with the same tang.
Makes about 5 cups
1. Insert the chopping blade into the work bowl of the
food processor. Add the scallions and parsley and
pulse to finely chop, about 6 to 8 pulses. Add the
ketchup, cider vinegar, oil, salt, celery salt and black
pepper and pulse to combine. Reserve.
3
SMALL SCALLIONS, CUT INTO
1-INCH PIECES
1
CUP FRESH ITALIAN PARSLEY,
STEMS DISCARDED
2
2
2
½
TABLESPOONS KETCHUP
1
TEASPOON CELERY SALT
¼
TEASPOON FRESHLY GROUND
BLACK PEPPER
1
¼
LARGE CARROT, PEELED
MEDIUM HEAD RED CABBAGE,
CORED, ABOUT 8 OUNCES
Nutritional information per serving (½ cup):
¼
MEDIUM HEAD SAVOY CABBAGE,
CORED, ABOUT 8 OUNCES
Calories 55 (68% from fat) • carb. 4g • pro. 1g • fat 4g
• sat. fat 1g • chol. 0mg • sod. 89mg • calc. 25mg • fiber 1g
⁄8
TABLESPOONS CIDER VINEGAR
TABLESPOONS VEGETABLE OIL
TEASPOON KOSHER SALT
2. Remove the chopping blade and insert the medium
shredding disc. Shred the carrot on High. Remove the
shredding disc and flip to insert the slicing disc. Slice
the cabbages on High. Transfer to a large mixing or
serving bowl and toss all ingredients together.
3. Taste and adjust seasoning as desired.
SOUPS/SALADS/SIDES
43
CHOPPED SALAD
This delicious, garden-fresh salad is always a big hit –
even among non-salad eaters!
Makes about 4 cups
1
SMALL SHALLOT, CUT INTO
PIECES
2
SCALLIONS, TRIMMED AND CUT
INTO 1-INCH PIECES
¼
CUP FRESH ITALIAN PARSLEY,
STEMS DISCARDED
1
CELERY STALK, TRIMMED AND
HALVED LENGTHWISE
1
MEDIUM CARROT, TRIMMED,
PEELED AND HALVED LENGTHWISE
½
MEDIUM CUCUMBER, SEEDED AND
QUARTERED LENGTHWISE
2
PLUM TOMATOES, QUARTERED
LENGTHWISE
½
CUP CORN, FRESH OR FROZEN,
THAWED
1
CUP CANNED CHICKPEAS, DRAINED
AND RINSED
½
¼
TEASPOON KOSHER SALT
2½
TABLESPOONS BASIC VINAIGRETTE
(PAGE 21)
44
1-INCH
1. Insert the chopping blade into the work bowl of the
food processor. Add the shallot, scallions and parsley;
pulse to chop, about 10 pulses.
2. Remove the chopping blade and insert the medium
slicing disc. Slice the celery, carrot, cucumber and
tomatoes on High.
3. Transfer ingredients from work bowl to a large mixing
bowl and toss with the corn, chickpeas, salt, pepper
and vinaigrette.
4. Taste and adjust seasoning accordingly. Serve
immediately.
Nutritional information per serving (½ cup):
Calories 87 (38% from fat) • carb. 12g • pro. 2g • fat 4g
• sat. fat 1g • chol. 0mg • sod. 271mg • calc. 25mg • fiber 2g
TEASPOON FRESHLY GROUND
BLACK PEPPER
SOUPS/SALADS/SIDES
SHREDDED BRUSSELS SPROUTS
The sweetness of the Brussels sprouts is highlighted in this simple side
dish. For an upscale twist, drizzle a small amount of white truffle oil over the
sprouts just before serving.
Makes about 3 cups
3
1
TABLESPOONS OLIVE OIL
½
2
TEASPOON KOSHER SALT
1
2
TEASPOON FRESH LEMON JUICE
POUND BRUSSELS SPROUTS,
TRIMMED
PINCHES FRESHLY GROUND BLACK
PEPPER
PINCHES RED PEPPER FLAKES
(OPTIONAL)
1. Put the oil in a large skillet over medium/medium-low
heat.
2. Insert the medium slicing disc into the work bowl of
the food processor. Slice the Brussels sprouts on
High. Add to the pan, with the salt and pepper, and
sauté until very tender, about 20 to 25 minutes.
3. Add the remaining ingredients and toss to combine.
Serve immediately.
Nutritional information per serving (½ cup):
Calories 93 (63% from fat) • carb. 7g • pro. 3g• fat 7g
• sat. fat 1g • chol. 0mg • sod. 209mg • calc. 32mg • fiber 3g
SOUPS/SALADS/SIDES
45
POTATO-ZUCCHINI-CARROT CAKES
A twist on the traditional potato latke.
Makes ten to twelve 2½-inch cakes
1
TABLESPOON FRESH ITALIAN
PARSLEY, STEMS DISCARDED
1
MEDIUM RUSSET POTATO, PEELED
AND CUT TO FIT THE FEED TUBE
1
1
SMALL ZUCCHINI, TRIMMED
1
¾
¼
SMALL ONION
2
TABLESPOONS UNBLEACHED,
ALL-PURPOSE FLOUR OR MATZO
MEAL
1
2
LARGE EGG, LIGHTLY BEATEN
SMALL TO MEDIUM CARROT,
TRIMMED AND PEELED
TEASPOON KOSHER SALT
TEASPOON FRESHLY GROUND
BLACK PEPPER
TABLESPOONS VEGETABLE OIL,
PLUS MORE AS NEEDED
APPLESAUCE AND SOUR CREAM
FOR SERVING
1. Insert the chopping blade into the work bowl of the
food processor. Add the parsley and finely chop,
using 5 to 6 long pulses. Leaving the parsley in the
bowl, remove the chopping blade and replace with
the medium shredding disc. Laying the vegetables
horizontally in the feed tube (trim to fit as needed),
shred the potato, zucchini, carrot and onion on High.
Wrap the vegetables in a clean kitchen towel and
wring it over a bowl or the sink to squeeze out all the
excess liquid.
2. Transfer the vegetables to a medium-size bowl. Add
the salt, pepper and flour and gently mix to fully combine. Gradually add the beaten egg (you may not
need all of it) until the mixture just holds together.
You do not want the mixture to be too wet or the final
cakes will be dense.
3. Put the oil in large non-stick skillet over medium-high
heat. Using a heaping tablespoon per pancake, drop
the batter into the pan. Use the back of the spoon to
flatten out the pancakes into 2½-inch rounds. Cook
the pancakes in batches, no more than 4 at a time,
about 1½ to 2 minutes per side or until crisp and
browned. Repeat, adding oil as needed until all
pancakes are cooked. Keep finished pancakes warm
on rack set over a baking sheet in a 200°F oven.
4. Serve pancakes warm with applesauce and sour
cream.
Nutritional information per pancake (based on 12):
Calories 48 (48% from fat) • carb. 5g • pro. 1g • fat 3g
• sat. fat 0g • chol. 12mg • sod. 105mg • calc. 9mg • fiber 1g
46
SOUPS/SALADS/SIDES
FALAFEL
The food processor makes it possible to whip up this Middle Eastern
street food staple in your own home!
Remember to soak the chickpeas the night before.
Makes 15 falafel
1
1
GARLIC CLOVE
½
CUP DRIED CHICKPEAS, SOAKED
OVERNIGHT, RINSED AND DRAINED
¾
TEASPOON KOSHER SALT
1
TEASPOON FRESHLY GROUND
BLACK PEPPER
¾
¼
TEASPOON GROUND CUMIN
1
TEASPOON CHILI POWDER
SMALL SHALLOT, CUT INTO
PIECES
⁄8
⁄8
1
⁄3
1-INCH
TEASPOON GROUND CORIANDER
CUP PACKED FRESH ITALIAN
PARSLEY, STEMS AND LEAVES
½
CUP PLUS 1 TABLESPOON
UNBLEACHED, ALL-PURPOSE FLOUR
¼
1
TEASPOON BAKING SODA
TABLESPOON WATER
VEGETABLE OIL, FOR COOKING
PITA FOR SERVING
CHOPPED TOMATOES, CUCUMBERS
AND LETTUCE FOR SERVING
TAHINI DRESSING (PAGE
SERVING
22) FOR
1. Insert the chopping blade into the work bowl of the
food processor. Add the garlic and shallot and pulse
to chop, about 5 times. Scrape down the sides of the
bowl and pulse another 2 to 3 times. Add the
chickpeas, salt, pepper, spices, parsley and 1
tablespoon of flour. Pulse 10 to 12 times to coarsely
grind the chickpeas. Scrape down the sides of the
bowl and then process on Low for 10 to 15 seconds
until finely ground.
2. Dissolve the baking soda in the tablespoon of water
and with the unit running on Low, pour through the
feed tube. Process for 15 to 20 seconds to blend well.
3. Using a tablespoon measure, scoop chickpea mixture
and shape into 15 balls. Place the balls on a tray or
plate lined with wax paper and chill in the refrigerator
for 30 minutes. Put the remaining ½ cup of flour in a
shallow bowl and set aside.
4. Fill a 3-quart saucepan with enough oil to reach ¼-inch
depth and place over medium-high heat until an
inserted thermometer registers 375°F.* Roll the falafel
in the flour, shaking off any excess and drop into the
oil. Cook the falafel in batches, no more than 5 at a
time, for about 2½ to 3 minutes, turning halfway
through until browned and crisp.
5. Remove to a paper towel-lined sheet tray and repeat
with remaining falafel.
Nutritional information per falafel:
Calories 62 (44% from fat) • carb. 7g
• pro. 2g • fat 3g • sat. fat 0g
• chol. 0mg • sod. 138mg • calc. 9mg
• fiber 1g
6. Serve falafel with sliced pita, veggies and a drizzle of
tahini.
*If choosing to bake instead: Preheat oven to 400°F.
Line a baking sheet with parchment and drizzle with
olive oil. Skip the step of coating the falafel in flour and
arrange on the parchment. Drizzle with more oil, turning
to coat the balls all over. Bake for 20 to 25 minutes,
turning halfway through until browned and crisp.
ENTRÉES
47
PIZZA MARGHERITA
This Neapolitan pizza is perfect in summer, when fresh tomatoes
and basil are abundant.
Makes one 12-inch pizza (8 servings)
1
1
RECIPE PIZZA DOUGH (PAGE
54)
4 TO 6
OUNCES FRESH MOZZARELLA,
WELL CHILLED
2 TO 3
PLUM TOMATOES (RIPE, BUT STILL
FIRM)
OUNCE PARMIGIANO REGGIANO,
CUT INTO ½-INCH CUBES
8 TO 10 MEDIUM TO LARGE FRESH BASIL
LEAVES, THINLY SLICED
UNBLEACHED, ALL-PURPOSE
FLOUR, FOR STRETCHING DOUGH
CORNMEAL, FOR SPRINKLING
2
TABLESPOONS EXTRA VIRGIN
OLIVE OIL
PINCH KOSHER SALT
1. Prepare the pizza dough and allow to rise. Preheat
oven to 500°F with rack in the middle of the oven. If
using a baking stone, place it on the rack and allow to
heat for an additional 30 minutes after the oven has
preheated.
2. While the oven is heating, insert the chopping blade
into the work bowl of the food processor. With the
unit running on High, drop the Parmigiano cubes
through the feed tube and process until finely grated.
Remove and reserve.
3. Remove the chopping blade and insert the medium
shredding disc. Shred the mozzarella on High.
Remove and reserve. Flip the shredding disc to the
slicing disc side. Slice the tomatoes on High.
4. On a lightly floured work surface, stretch the dough
into a 12 to 14-inch round. Place on a baker’s peel or
the underside of a baking sheet that has been
sprinkled with cornmeal (or you can stretch the dough
onto a greased pizza mesh/screen, or alternately
bake on a parchment-lined baking sheet). Brush the
dough with the olive oil and then sprinkle with both
of the cheeses. Arrange the sliced tomatoes over the
cheese.
5. Carefully slide the pizza into the oven (whether onto
the stone, or onto a baking sheet or directly onto the
rack if using a pizza screen). Bake the pizza for 10 to
15 minutes, or until the cheese is bubbly and the
dough is nicely browned at the edges.
6. Remove pizza and sprinkle with the fresh basil and
pinch of salt.
Nutritional information per serving:
Calories 184 (40% from fat) • carb. 20g • pro. 7g • fat 8g
• sat. fat 3g • chol. 14mg • sod. 390mg • calc. 96mg • fiber 1g
48
ENTRÉES
MUSHROOM, LEEK AND GRUYÈRE QUICHE
From an elegant weekend brunch to a light lunch or dinner
when paired with salad, quiche works for any meal.
Makes 12 servings
1. Preheat oven to 350°F.
½
RECIPE PÂTE BRISÉE DOUGH
(PAGE 55)
1
1
GARLIC CLOVE
4
1
¼
1
OUNCES MUSHROOMS
2
¾
½
3
1
¼
OUNCES GRUYÈRE
SMALL TO MEDIUM LEEK, TRIMMED
AND CUT INTO ½-INCH PIECES
TEASPOON OLIVE OIL
TEASPOON KOSHER SALT, DIVIDED
TEASPOON FRESH THYME (OR
TO ½ TEASPOON DRIED)
¼
CUP WHOLE MILK
CUP HEAVY CREAM
LARGE EGGS
LARGE EGG YOLK
TEASPOON FRESHLY GROUND
BLACK PEPPER
2. Roll out dough to 1⁄8-inch thick circle and fit into a
9-inch tart pan. Chill in refrigerator for 30 to 40
minutes. Using a fork, prick the chilled dough evenly
all over, but make sure not to go entirely through the
dough. Line the shell with parchment and weigh it
down with dried beans or rice. Bake for 15 to 20
minutes, or until the dough under the parchment is
no longer wet. Remove the beans/rice and parchment
and continue baking until the shell is golden brown,
an additional 10 to 15 minutes. Remove and set
aside. Reduce the oven temperature to 325°F.
3. While shell is baking, prepare the filling. Insert the
chopping blade into the work bowl of the food
processor. With the unit running on High, add the
garlic and leek through the feed tube and process to
finely chop. Remove and reserve. Remove the
chopping blade and insert the medium slicing disc
and slice the mushrooms on Low.
4. Put oil in a medium skillet over medium-low heat.
Once oil is hot, add the chopped garlic and leek with a pinch of the salt. Sauté until
softened, about 4 minutes. Add the mushrooms and thyme. Sauté until mushrooms are
softened and have picked up some color, about 6 to 10 minutes.
5. While the mushrooms are cooking, remove the slicing disc and insert the fine shredding
disc. Shred the Gruyère on High. Remove and reserve.
6. Replace the shredding disc with the chopping blade. Put the milk, cream, eggs, yolk,
remaining salt and the pepper in the work bowl. Process on Low to fully combine.
7. To assemble the quiche, scatter the garlic, leek and mushrooms evenly along the bottom of
the baked tart shell. Pour the egg mixture over the vegetables and scatter the Gruyère on top.
8. Place the quiche on a baking sheet and bake for 25 to 30 minutes or until just set.
9. Remove from oven and let sit for 5 to 10 minutes before serving.
Nutritional information per serving:
Calories 193 (70% from fat) • carb. 9g • pro. 5g • fat 15g • sat. fat 9g
• chol. 102mg • sod. 185mg • calc. 79mg • fiber 0g
ENTRÉES
49
CHICKEN POT PIE
The ultimate comfort food.
Makes 8 to 10 servings
6
1
1
1
TABLESPOONS UNSALTED BUTTER
1
ROASTED CHICKEN,
APPROXIMATELY 2 TO 3 POUNDS,
ROOM TEMPERATURE AND CUT
INTO 1-INCH PIECES (SKIN AND
CARCASS DISCARDED)
2
MEDIUM CARROT, PEELED
CELERY STALK
SMALL ONION (4 OUNCES), CUT
INTO 1-INCH PIECES
⁄3
CUP UNBLEACHED, ALL-PURPOSE
FLOUR, DIVIDED
4 TO 5
CUPS CHICKEN BROTH, LOW
SODIUM
1
MEDIUM WAXY POTATO, PEELED
AND CUT INTO ½-INCH CUBES,
RESERVED IN COLD WATER UNTIL
READY TO USE
1
MEDIUM SWEET POTATO, PEELED
AND CUT INTO ½-INCH CUBES,
RESERVED IN COLD WATER UNTIL
READY TO USE
¾
¼
TEASPOON KOSHER SALT
TEASPOON FRESHLY GROUND
BLACK PEPPER
⁄3
⁄3
1
CUP FROZEN PEARL ONIONS
1
CUP FROZEN PEAS
1
RECIPE BUTTERMILK BISCUIT
DOUGH (PAGE 57)
Nutritional information per serving
(based on 10 servings):
Calories 494 (52% from fat) • carb. 32g
• pro. 27g • fat 28g • sat. fat 13g
• chol. 112mg • sod. 777mg
• calc. 43mg • fiber 3g
1. Preheat oven to 400°F with the rack in the lower third
of the oven.
2. Put the butter in a medium-size stockpot over
medium-low heat.
3. While pan is heating, prepare the vegetables. Insert
the medium slicing disc into the work bowl of the
food processor, slice the carrot and celery together
and reserve.
4. Remove the slicing disc and insert the chopping blade.
Add the onion and pulse about 5 to 6 times to chop. Add
the onion, carrot and celery to the pot to sauté, until
vegetables are softened, about 8 to 10 minutes.
5. In two batches, roughly chop the chicken by pulsing 2
to 3 times. Remove and reserve in a separate bowl.
6. Stir the flour into the vegetable mixture and cook for
about 3 minutes to eliminate any raw flour taste.
Slowly whisk in 4 cups of the chicken broth, increase
heat to medium high to bring to a boil, then reduce
heat slightly to maintain a healthy simmer. Stir in the
potatoes, salt and pepper and let simmer for about
15 minutes, until vegetables are tender. Add more
broth if necessary so vegetables stay submerged. Stir
in the reserved chicken and frozen onions. Simmer for
an additional 30 to 35 minutes to thicken. Once
stew-like, stir in the peas.
7. While filling is cooking prepare the biscuit dough. Cut
biscuit dough into 9 pieces. Reserve, covered loosely
with plastic.
8. Pour filling into a 9-inch square pan. Evenly distribute
the biscuits over the top of the filling so there is
about ¼ inch of space between biscuits.
9. Bake until biscuits are fully cooked and golden
brown, about 15 minutes. Allow pot pie to rest at
least 15 minutes before serving.
50
ENTRÉES
VEGETABLE STIR-FRY
This dish is a quick way to incorporate any veggies you have on hand; add
chicken, beef or cubed tofu for a heartier meal.
Makes 6 cups
2
1
GARLIC CLOVES
1
MEDIUM RED BELL PEPPER,
HALVED, CORED
1
STALK BROCCOLI, FLORETS AND
STEM SEPARATED, STEM TRIMMED
AND PEELED
4
BABY BOK CHOY, LEAVES TRIMMED
AND RESERVED
6
WHITE BUTTON MUSHROOMS,
CLEANED
1
MEDIUM RED ONION, TRIMMED TO
FIT FEED TUBE
1½
1
TABLESPOONS VEGETABLE OIL
3
TABLESPOONS SOY SAUCE,
REDUCED SODIUM
¼
2
½
TEASPOON FISH SAUCE
1
1
TEASPOON HOT SESAME OIL
1-INCH PIECE GINGER, PEELED
AND QUARTERED
CUP VEGETABLE OR CHICKEN
BROTH, LOW SODIUM
TEASPOONS CORNSTARCH
CUP SNAP OR SNOW PEAS,
TRIMMED
TABLESPOON SESAME SEEDS
1. Insert the chopping blade into the work bowl of the
food processor. With the unit running on High, add
the garlic and ginger through the feed tube and
process to finely chop, about 10 to 15 seconds.
Remove and reserve.
2. Remove the chopping blade and replace with the
medium slicing disc. On High, slice the red pepper,
broccoli stalk, bok choy, mushrooms and onion.
Remove and reserve.
3. Put the vegetable oil into a large skillet over mediumhigh heat. Once the oil is hot, add the garlic and
ginger. Sauté until fragrant, about 30 seconds. Add
the sliced vegetables and sauté for about 7 to 8
minutes, until they begin to soften.
4. While the vegetables are cooking, stir together the
broth, soy sauce, fish sauce and cornstarch. Add the
broth mixture to the pan and bring to a boil. Stir in
the bok choy leaves, broccoli florets and snap peas.
Cook until broccoli and peas are just tender and
sauce coats the vegetables, about 3 to 5 minutes.
5. Stir in the sesame oil and the seeds. Adjust seasoning
as desired and serve immediately over rice.
COOKED RICE, FOR SERVING
Nutritional information per serving (1 cup):
Calories 79 (51% from fat) • carb. 8g • pro. 2g • fat 5g
• sat. fat 1g • chol. 0mg • sod. 288mg • calc. 33mg • fiber 2g
ENTRÉES
51
TACOS AMERICANOS
A bit spicy and full of flavor, this is a great recipe to have in your arsenal –
kids especially will love assembling their own tacos.
Makes about 12 tacos
GARNISH:
4
OUNCES MONTEREY JACK
¼
HEAD ROMAINE OR ICEBERG
LETTUCE
2
PLUM TOMATOES, QUARTERED
TACO FILLING:
GARLIC CLOVE
1
1
JALAPEÑO, SEEDED, HALVED AND
CUT INTO 1-INCH PIECES
½
MEDIUM ONION, CUT INTO 1-INCH
PIECES
⁄4
3
POUND BEEF STEW MEAT, CUT
INTO ½-INCH PIECES
1
1½
½
¼
TEASPOON VEGETABLE OIL
TEASPOONS CHILI POWDER
TEASPOON GROUND CUMIN
TEASPOON DRIED OREGANO
PINCH CAYENNE
¾
2
½
16
TEASPOON KOSHER SALT
TEASPOONS TOMATO PASTE
CUP CHICKEN BROTH, LOW SODIUM
SMALL (3- TO 5-INCH) SOFT CORN
TORTILLAS, KEPT WARM
SOUR CREAM OR PLAIN YOGURT,
FOR SERVING
TOMATO SALSA, FOR SERVING
(PAGE 27)
CHUNKY GUACAMOLE,
FOR SERVING (PAGE 28)
1. Insert the medium shredding disc into the work bowl
of the food processor. On High, shred the Monterey
Jack. Remove and reserve, keeping it loosely covered
with plastic wrap. Flip the disc to the slicing disc side.
On High, slice the lettuce; remove and reserve. Slice
the tomatoes and reserve.
2. Remove the slicing disc and insert the chopping
blade. With the machine running on High, drop the
garlic and jalapeño through the feed tube until finely
chopped. Stop the machine, scrape down the sides
of the bowl and add the onion. Pulse to finely chop,
about 3 times. Scrape down the sides of the bowl
and add the stew meat. Using 10 to 12 long pulses,
finely chop the meat, pausing between pulses to
allow it to drop back into the bowl. Scrape down the
sides of the bowl halfway through chopping.
3. Put the oil into a large skillet over medium-high heat.
Add the chopped meat-vegetable mixture, spices
and salt. Cook until the meat is no longer pink. Add
the tomato paste and cook for about 1 minute. Add
the broth and cook until it has evaporated. Remove
the pan from the heat.
4. To assemble the tacos, put about 2 to 3 tablespoons
of taco meat in the center of each tortilla. Top with
some of the lettuce, tomato and cheese. Garnish with
sour cream, salsa and guacamole.
Nutritional information per taco:
Calories 128 (56% from fat) • carb. 6g • pro. 8g • fat 8g
• sat. fat 3g • chol. 27mg • sod. 290mg • calc. 88mg • fiber 1g
52
ENTRÉES
FISH STICKS
Crushed tortilla chips make crisp fish sticks that are perfect in fish tacos, but
for a more traditional coating, use the breadcrumbs recipe on page 18.
Makes about 10 to 20 fish sticks (depending on type of
fish used; see ingredients)
3
½
CUPS TORTILLA CHIPS
POUND WHITE FISH, LIKE LEMON
SOLE OR COD (BECAUSE COD
TENDS TO BE THICKER, YOU
MAY ONLY GET 10 “STICKS” OUT
OF A ½-POUND PIECE, BUT WITH
THINNER FISH, LIKE LEMON SOLE,
YOU WILL BE ABLE TO GET CLOSER
TO 20)
JUICE OF
1 LEMON OR LIME
KOSHER SALT
FRESHLY GROUND BLACK PEPPER
½
CUP UNBLEACHED, ALL-PURPOSE
FLOUR, MIXED WITH A PINCH EACH
OF KOSHER SALT AND BLACK
PEPPER
1
¼
LARGE EGG, LIGHTLY BEATEN
CUP VEGETABLE OIL
RÉMOULADE, FOR SERVING
(PAGE 27)
1. Insert the chopping blade into the work bowl of the
food processor. Add the tortilla chips and pulse about
5 times to break up, then process on High to finely
chop, about 20 to 30 seconds. Remove and reserve
in a shallow baking dish.
2. Cut the fish into 1-inch wide “sticks.” Liberally season
on all sides with the citrus juice, salt and pepper.
3. Put the flour and egg into separate shallow bowls or
baking dishes.
4. First lightly coat the fish in the flour, then in the egg
and then in the ground chips. Set on a clean platter.
Repeat with remaining fish.
5. Put the oil in a large skillet over medium heat. Once
hot, cook fish, putting no more than 5 pieces into the
skillet at one time, until golden brown and crisp.
Remove and reserve on a cooling rack set over a
paper towel-lined tray.
6. Serve immediately with the rémoulade.
Note: To enjoy as fish tacos, prepare as directed, and
serve in warmed soft tortillas, topped with cabbage slaw
and a squeeze of lime juice. To prepare slaw: mix
together 2 tablespoons of chopped cilantro with 1 cup
of shredded green cabbage, 1⁄8 teaspoon each of kosher
salt and black pepper and 1 teaspoon of olive oil.
Nutritional information per fish stick:
Calories 67 (53% from fat) • carb. 5g • pro. 3g • fat 4g
• sat. fat 0g • chol. 14mg • sod. 39mg • calc. 10mg • fiber 0g
ENTRÉES
53
PIZZA DOUGH
This dough can be used for more than just the obvious – check out our
recipes for Sausage Bread or Broccoli Rabe Bread on pages 37 and 38.
Makes ¾ pound dough (two 9-inch crusts, or one
14-inch crust)
2¼
TEASPOONS (1 STANDARD PACKET,
¼ OUNCE) ACTIVE DRY YEAST
1
TEASPOON GRANULATED SUGAR
2
CUP WARM WATER
⁄3
12⁄3
1
(105°–115°F)
CUPS BREAD FLOUR (YOU MAY
SUBSTITUTE UNBLEACHED,
ALL-PURPOSE FLOUR)
TEASPOON OLIVE OIL, PLUS MORE
¾
TEASPOON KOSHER SALT
FOR COATING DOUGH
1. In a liquid measuring cup dissolve yeast and sugar in
warm water. Let stand until foamy, about 5 minutes.
2. Insert the chopping blade into the work bowl of the
food processor. Add the flour, olive oil and salt. With
the machine running on Low, pour the liquid mixture
through the feed tube as fast as the flour absorbs it.
Process until the dough cleans the sides of the work
bowl and forms a ball. Continue to process for 30
seconds to knead the dough. Dough may be slightly
sticky.
3. Lightly coat the inside of a large bowl with olive oil.
Add dough and turn to coat in oil and cover bowl
tightly with plastic wrap. Let rise in a warm place until
doubled in size, about 1 hour.
4. Place dough on a lightly floured surface and punch
down. Form into desired crust size(s) as directed by
appropriate recipe.
Nutritional information per serving (based on 12 servings):
Calories 62 (6% from fat) • carb. 13g • pro. 2g • fat 0g
• sat. fat 0g • chol. 0g • sod. 143mg • calc. 0mg • fiber 0g
54
DOUGHS/BREADS
PÂTE BRISÉE
This versatile dough can be used for sweet or savory treats.
Makes two, single-crust 9-inch pies or one, 9-inch
double-crust pie
2
CUPS UNBLEACHED, ALL-PURPOSE
FLOUR
1
16
TEASPOON KOSHER SALT
¼
TABLESPOONS (2 STICKS)
UNSALTED BUTTER, COLD AND CUT
INTO ½-INCH CUBES
CUP ICE WATER
1. Insert the chopping blade into the work bowl of the
food processor. Add the flour and salt and process on
Low for 10 seconds to sift. Add the butter and pulse
until the mixture resembles coarse crumbs.
2. Pour in water 1 tablespoon at a time and pulse until
mixture just forms a dough – you may not need all of
the water. Divide dough equally into two pieces and
form each into a flat disc; wrap in plastic and
refrigerate until ready to use.
NOTE: As long as it is well wrapped, this pastry freezes
well for up to 6 months.
Nutritional information per double-crust serving
(based on 12 servings):
Calories 200 (66% from fat) • carb. 15g • pro. 2g • fat 15g
• sat. fat 9g • chol. 40mg • sod. 190mg • calc. 0mg • fiber 0g
Nutritional information per single-crust serving
(based on 12 servings):
Calories 100 (66% from fat) • carb. 7g • pro. 1g • fat 7g
• sat. fat 5g • chol. 20mg • sod. 95mg • calc. 0mg • fiber 0g
DOUGHS/BREADS
55
BUTTERY DINNER ROLLS
Fresh from the oven, warm rolls make any dinner extra special.
Makes 10 rolls
⁄3
1
CUP WHOLE MILK, PLUS
1 TABLESPOON FOR BRUSHING
4
TABLESPOONS UNSALTED BUTTER,
PLUS 1 TABLESPOON FOR
BRUSHING AND FOR PAN
2
1¾
3
TABLESPOONS GRANULATED SUGAR
2½
¾
1
CUPS BREAD FLOUR
TEASPOONS ACTIVE DRY YEAST
TABLESPOONS WARM WATER
(105°–110°F)
TEASPOON KOSHER SALT
LARGE EGG, LIGHTLY BEATEN
1. In a small saucepan combine the 1⁄2 cup of milk, 6
tablespoons of butter and the sugar. Warm over low
heat until the butter is melted. Remove from heat and
set aside to cool to room temperature
2. Dissolve the yeast in the warm water. Let stand 5
minutes, or until mixture is foamy. Insert the chopping
blade into the work bowl of the food processor. Add
the flour and salt; process for 10 seconds on Low.
Combine the beaten egg with the milk and yeast
mixture and with the machine running on Low, slowly
add the liquids through the feed tube and process
until a dough ball forms. Continue processing 45
seconds to knead the dough. Shape the dough into a
smooth ball and place in a 1-gallon sealable plastic
bag. Squeeze the air out and seal the bag. Let rise in
a warm place until the dough has doubled in size,
about 45 to 60 minutes.
3. Preheat oven to 450°F. Lightly butter a 9-inch round
baking pan. Divide the dough into 10 equal pieces,
about 2 ounces each. Roll into smooth rounds and
arrange in the prepared pan. Cover with plastic wrap
and let rise until the rolls have doubled in size, about
30 to 40 minutes. Combine remaining tablespoon of
milk and butter and heat until the butter has melted.
Just before baking, gently brush the rolls with the
melted butter/milk mixture. Bake until golden brown
or an internal temperature of 180°F is reached, about
12 to 15 minutes. Remove from pan and let cool on a
rack for about 10 minutes for serving.
4. For a softer roll, brush each with melted butter just
after removing from oven.
Nutritional information per roll:
Calories 144 (28% from fat) • carb. 7g • pro. 4g • fat 2g
• sat. fat 1g • chol. 22mg • sod. 157mg • calc. 17mg • fiber 1g
56
DOUGHS/BREADS
BUTTERMILK BISCUITS
These biscuits are so light and tender, you will
want to make them every night.
Makes 8 biscuits
1¼
CUPS UNBLEACHED, ALL-PURPOSE
FLOUR, PLUS MORE FOR SHAPING
¼
2
1½
¼
½
CUP CAKE FLOUR
TEASPOONS CREAM OF TARTAR
TEASPOONS BAKING SODA
TEASPOON GRANULATED SUGAR
TEASPOON KOSHER SALT
PINCH FRESHLY GROUND BLACK
PEPPER
6
2
⁄3
2
TABLESPOONS UNSALTED BUTTER,
COLD AND CUBED
CUP BUTTERMILK
TABLESPOONS UNSALTED BUTTER,
MELTED
1. Preheat oven to 500°F. Line a baking sheet with
parchment paper.
2. Insert the chopping blade into the work bowl of the
food processor. Add both flours, cream of tartar and
baking soda and process on Low for 10 seconds. Add
the sugar, salt and pepper and process on Low again
for 5 seconds. Add the cold butter and pulse to
incorporate until the size of the butter resembles
peas.
3. While pulsing, pour the buttermilk (you may not need
all of it) through the feed tube until just incorporated
– the dough will be sticky but not overly wet. Remove
dough from work bowl and place on a well-floured
surface. Knead dough by hand about two to three
times, form into a log and cut into 8 equal pieces.
Form each piece into a round and place evenly
spaced on the prepared baking sheet.
4. Bake 10 minutes, or until golden brown. Remove
from oven and brush with melted butter. Serve
immediately.
TIP: For more rustic-style biscuits, bake the pieces of
dough without shaping once you’ve portioned them
out.
Nutritional information per biscuit:
Calories 191 (54% from fat) • carb. 19g • pro. 3g • fat 11g
• sat. fat 7g • chol. 31mg • sod. 389mg • calc. 26mg • fiber 0g
DOUGHS/BREADS
57
CLASSIC APPLE PIE
Everyone needs a fail-proof apple pie recipe – here is our favorite to share
with you and your family.
Makes one 10-inch pie, 8 to 12 servings
1
RECIPE PÂTE BRISÉE DOUGH
(PAGE 55)
1½
POUNDS APPLES (GOLDEN
DELICIOUS, GINGER GOLD, OR
PINK LADY TEND TO BE THE
TASTIEST), ABOUT 4 MEDIUM,
PEELED, CORED, AND HALVED
JUICE OF
½
½ MEDIUM LEMON
TEASPOON GROUND CINNAMON
PINCH GROUND NUTMEG
¼
1
½
TEASPOON KOSHER SALT
TEASPOON PURE VANILLA EXTRACT
CUP GRANULATED SUGAR PLUS
MORE FOR SPRINKLING
EGG WASH (1 LARGE EGG, LIGHTLY
BEATEN WITH 1 TEASPOON OF
WATER)
1. Preheat oven to 450°F with the rack in the lower third
of the oven.
2. Roll out one of the discs of dough to 1⁄8-inch-thick
circle and fit into a 10-inch pie plate. Chill in refrigerator for a minimum of 20 minutes. Using a fork, prick
the chilled dough evenly all over, but make sure not
to go entirely through the dough.
3. While dough is chilling, prepare the filling. Insert the
slicing disc into the work bowl of the food processor.
Stand the apple halves upright in the feed tube and
slice on High. Transfer to a large bowl and gently toss
with the lemon juice, spices, salt, vanilla and sugar.
4. Transfer the apple mixture to the pie shell.
5. Roll out the remaining dough into a 10-inch disc.
Brush the outer rim of the pie shell with the egg
wash. Press the dough disc on top of the filled pie
plate, pressing down the sides to seal. Using a paring
knife, trim any excess dough and discard (or save for
another use). Cut four ½-inch vents in the center of
the top of the pie crust in a circular pattern, similar to
a clock’s 12, 3, 6 and 9 o’clock positions. Brush the
top with more of the egg wash and sprinkle with
granulated sugar.
6. Bake the pie for 15 minutes, then reduce the temperature to 350°F and continue to bake until golden
brown, approximately another 40 minutes. Let the pie
rest on a cooling rack at least 40 minutes before
serving.
Nutritional information per serving (based on 12 servings):
Calories 263 (51% from fat) • carb. 30g • pro. 2g • fat 15g
• sat. fat 9g • chol. 48mg • sod. 241mg • calc. 5mg • fiber 1g
58
DESSERTS
CARROT CAKE WITH CREAM CHEESE FROSTING
A cake that is moist, sweet and a bit tangy. Garnish the top with sliced
toasted almonds or finely chopped walnuts for a perfect presentation.
Makes one 9-inch round cake, about 10 servings
NONSTICK COOKING SPRAY
¾
CUP PLUS 2 TABLESPOONS
UNBLEACHED, ALL-PURPOSE FLOUR
1
1
½
½
1
½
TEASPOON GROUND CINNAMON
½
½
CUP GRANULATED SUGAR
½
CUP PLUS 2 TABLESPOONS
VEGETABLE OIL
2
1
LARGE EGGS
TEASPOON BAKING POWDER
TEASPOON BAKING SODA
TEASPOON KOSHER SALT
CUP WALNUTS, TOASTED
POUND CARROTS
MEDIUM) PEELED
(3 TO 4
CUP PACKED LIGHT OR DARK
BROWN SUGAR
TEASPOON PURE VANILLA EXTRACT
FROSTING:
8
OUNCES CREAM CHEESE, ROOM
TEMPERATURE AND CUT INTO 8
PIECES
1
2
2
⁄3
¼
½
STICK UNSALTED BUTTER, ROOM
TEMPERATURE AND CUT INTO 4
PIECES
OUNCES GOAT CHEESE, ROOM
TEMPERATURE (SOUR CREAM OR
PLAIN YOGURT CAN BE
SUBSTITUTED)
CUP CONFECTIONERS’ SUGAR
TEASPOON KOSHER SALT
TEASPOON PURE VANILLA EXTRACT
Nutritional information per serving:
Calories 495 (62% from fat) • carb. 41g
• pro. 7g • fat 35g • sat. fat 11g
• chol. 74mg • sod. 405mg • calc. 58mg
• fiber 2g
1. Preheat oven to 350°F. Coat a 9-inch round baking
pan with cooking spray; set aside.
2. Insert the chopping blade into the work bowl of the
food processor. Add the flour, cinnamon, baking
powder, baking soda and salt. Process on Low 10
seconds. Transfer to a large mixing bowl.
3. Put the walnuts into the work bowl and pulse 2 to 3
times to coarsely chop. Leaving the nuts in the bowl,
remove the chopping blade and replace with the
medium shredding disc. Shred the carrots on High.
Add the nuts and carrots to the bowl with the dry
ingredients.
4. Remove the shredding disc and replace with the
chopping blade. Add the sugars to the work bowl. In
a large measuring cup combine the oil, eggs and
vanilla. While the unit is running on Low, gradually
add the wet ingredients through the feed tube.
Process until well mixed, about 30 to 45 seconds,
stopping to scrape down the sides of the bowl as
needed. Add the wet ingredients to the dry and stir
until just combined.
5. Pour the batter into the prepared pan and bake for 35
minutes or until a cake tester inserted in the center
comes out clean. Cool completely in the pan.
6. Prepare the frosting. Clean the chopping blade and
insert into the work bowl. Add the cream cheese and
butter and process on High until smooth, about 60
seconds, stopping to scrape down the sides of the
bowl. Add the goat cheese; process another 10 to 15
seconds. Add the sugar, salt and vanilla and process
until completely smooth, another 15 to 20 seconds.
7. Once the cake has cooled, remove from the pan and
turn out onto a serving plate or cake stand. Frost the
entire cake, spreading evenly on the top and sides with
an offset spatula. Chill cake slightly before serving.
DESSERTS
59
PUMPKIN CHEESECAKE
Change up the Thanksgiving table with this pumpkin pie-inspired dessert.
Makes one 8-inch cake, about 12 servings
CRUST:
24
3
FILLING:
16
½
¼
1
4
1
NONSTICK COOKING SPRAY
GINGERSNAP COOKIES
TABLESPOONS UNSALTED BUTTER,
SOFTENED AND CUBED
OUNCES (2 STANDARD PACKAGES)
CREAM CHEESE, SOFTENED AND
ROOM TEMPERATURE
CUP PACKED LIGHT BROWN SUGAR
CUP GRANULATED SUGAR
TEASPOON PURE VANILLA EXTRACT
LARGE EGGS, ROOM TEMPERATURE
CUP PUMPKIN PURÉE
PINCH KOSHER SALT
½
TEASPOON GROUND CINNAMON
1
TEASPOON GROUND ALLSPICE
⁄8
1
⁄8
TEASPOON GROUND NUTMEG
8
OUNCES CRÈME FRAÎCHE OR PLAIN
GREEK YOGURT, ROOM
TEMPERATURE
1. Preheat oven to 325°F. Place a baking pan with a
depth of at least 1⁄4 inch on the bottom rack of the
oven and fill with water. Position the other rack in the
middle of the oven, directly over the water-filled pan.
Lightly coat the inside of an 8-inch springform pan
with nonstick spray.
2. Prepare the crust. Insert the chopping blade into the
work bowl of the food processor. Add the cookies and
pulse about 6 to 8 times to chop, then process on
High to finely grind, about 20 seconds. Add the butter
and pulse about 6 times to combine. Remove and
press into the bottom of the prepared pan. Set aside.
3. Prepare the filling. Remove the chopping blade to wipe
out work bowl, then replace the chopping blade. Add
the cream cheese. Pulse about 5 times, scrape down
sides of bowl and process on High for 30 to 35 seconds
until creamy. Add the sugars and pulse a few times,
then process on High until homogenous, stopping to
scrape down the sides of the bowl as needed. With the
unit running on Low, add the vanilla and eggs, one at a
time, until combined.
4. Stop the unit to add the pumpkin, salt and spices.
Pulse until combined, scraping down as needed.
Pulse in the crème fraîche until combined.
5. Pour the cream cheese mixture into the prepared
pan. If any of the water has evaporated from the
baking pan in the oven, add some more. Place the
cheesecake on the middle rack. Bake for 1 hour, then
turn off the oven. Let cake rest inside the oven for an
additional hour. Cool cheesecake completely on a
cooling rack, then cover and refrigerate for at least 8
hours before serving.
Nutritional information per serving:
60
DESSERTS
Calories 334 (60% from fat) • carb. 27g • pro. 6g • fat 22g
• sat. fat 12g • chol. 122mg • sod. 258mg • calc. 36mg • fiber 1g
TARTA DE QUESO DE CALABAZA
Cambie la mesa del Día de Acción de Gracia con este sabroso
postre de calabaza.
Rinde 12 porciones (un pastel de 8 pulgadas/20 cm)
SPRAY VEGETAL
CORTEZA:
24
GALLETAS DE JENGIBRE
3
RELLENO:
16
½
¼
CUCHARADAS (45 G) DE
MANTEQUILLA SIN SAL, EN
PEDACITOS, A TEMPERATURA
AMBIENTE
ONZAS (465 G) DE QUESO
CREMA, SUAVIZADO Y A
TEMPERATURA AMBIENTE
TAZA
(100 G) DE AZÚCAR RUBIO
TAZA (50 G) DE AZÚCAR
GRANULADO
PIZCA DE SAL KOSHER
1
½
TAZA (200 G) DE PURÉ DE
CALABAZA
1
HUEVOS GRANDES, A
TEMPERATURA AMBIENTE
4
CUCHARADITA DE EXTRACTO
NATURAL DE VAINILLA
1
⁄8
1
⁄8
1
8
CUCHARADITA DE CANELA EN
POLVO
CUCHARADITA DE PIMIENTA DE
JAMAICA EN POLVO
CUCHARADITA DE NUEZ MOSCADA
RALLADA
CUCHARADAS DE "CRÈME
FRAÎCHE" O YOGUR NATURAL, A
TEMPERATURA AMBIENTE
Información nutricional por porción:
Calorías 334 (60% de grasa)
• Carbohidratos 27 g • Proteínas 6 g
• Grasa 22 g • Grasa saturada 12 g
• Colesterol 122 mg • Sodio 258 mg
• Calcio 36 mg • Fibra 1 g
60
1. Precalentar el horno a 325 °F (160 °C). Colocar una
bandeja sobre la rejilla inferior y llenar con agua.
Colocar la otra rejilla en el centro del horno,
directamente encima de la bandeja. Engrasar un
molde desmontable de 8 pulgadas (20 cm) con
spray vegetal.
2. Preparar la corteza. Instalar la cuchilla picadora en el
tazón. Agregar las galletas, pulsar 6–8 veces para
picar, y luego procesar a velocidad alta (HIGH)
durante aproximadamente 20 segundos para moler.
Agregar la mantequilla y pulsar aproximadamente 6
veces para combinar. Apisonar la mezcla en el fondo
del molde preparado. Reservar.
3. Preparar el relleno. Retirar la cuchilla picadora, limpiar
el tazón y vuelva a instalar la cuchilla picadora.
Agregar el queso crema. Pulsar 5 veces, raspar el
tazón, y procesar a velocidad alta (HIGH) durante
30–35 segundos, hasta obtener una mezcla cremosa.
Agregar el azúcar y procesar a velocidad alta (HIGH)
hasta obtener una mezcla suave y homogénea (raspar
el tazón si es necesario). Encender la máquina en
LOW y agregar la vainilla y los huevos, uno a la vez;
procesar hasta que estén combinados.
4. Parar la máquina y agregar la calabaza, la sal y las
especias. Pulsar para combinar, raspando el tazón si
es necesario. Agregar la "crème fraîche" y pulsar
para combinar.
5. Echar la mezcla cuidadosamente en el molde.
Agregar más agua a la bandeja si es necesario.
Colocar la tarta de queso en el centro del horno.
Hornear durante 1 hora, y luego apagar el horno.
Dejar la tarta en el horno apagado durante una hora
más. Retirar del horno, dejar enfriar sobre una rejilla,
y luego cubrir y refrigerar durante 8 horas o más
antes de servir.
POSTRES
PASTEL DE ZANAHORIA CON COBERTURA DE
QUESO CREMA
Un pastel húmedo, dulce y algo agrio. Decorar con láminas de
almendras tostadas o nueces finamente picadas para una presentación perfecta.
Rinde 10 porciones (un pastel de 9 pulgadas/20 cm)
SPRAY VEGETAL
CUCHARADITA DE SAL KOSHER
½
1
CUCHARADITA DE BICARBONATO
DE SODIO
½
CUCHARADITA DE POLVO DE
HORNEAR
1
CUCHARADITA DE CANELA EN
POLVO
1
TAZA + 2 CUCHARADAS
DE HARINA COMÚN
¾
(100 G)
TAZA (120 G) DE NUECES
TOSTADAS
HUEVOS GRANDES
2
1
TAZA + 2 CUCHARADAS
DE ACEITE VEGETAL
½
TAZA (100 G) DE AZÚCAR RUBIO
O MORENO
½
TAZA (100 G) DE AZÚCAR
GRANULADO
½
LIBRA (410 G) DE ZANAHORIAS,
PELADAS
½
(125 ML)
CUCHARADITA DE EXTRACTO
NATURAL DE VAINILLA
GLASEADO:
8
1
2
ONZAS (230 G) DE QUESO
CREMA, A TEMPERATURA
AMBIENTE, EN PEDAZOS
BARRA (115 G) DE MANTEQUILLA
SIN SAL, A TEMPERATURA
AMBIENTE, EN PEDACITOS
2
⁄3
¼
½
ONZAS (60 G) DE QUESO DE
CABRA, A TEMPERATURA AMBIENTE
(TAMBIÉN PUEDE USAR CREMA
AGRIA O YOGUR)
TAZA
(80 G) DE AZÚCAR GLASÉ
CUCHARADITA DE SAL KOSHER
CUCHARADITA DE EXTRACTO
NATURAL DE VAINILLA
Información nutricional por porción:
Calorías 495 (62% de grasa)
• Carbohidratos 41 g • Proteínas 7 g
• Grasa 35 g • Grasa saturada 11 g
• Colesterol 74 mg • Sodio 405 mg
• Calcio 58 mg • Fibra 2 g
1. Precalentar el horno a 350 °F (180 °C). Engrasar un
molde redondo de 9 pulgadas (20 cm) de diámetro con
spray vegetal.
2. Instalar la cuchilla picadora en el tazón. Agregar la
harina, la canela, el polvo de hornear, el bicarbonato y
la sal. Procesar a velocidad baja (LOW) durante 10
segundos. Reservar, en un recipiente grande.
3. Poner las nueces en el tazón y pulsar 2–3 veces para
picar. Sin vaciar el tazón, retirar la cuchilla picadora e
instalar el disco rallador medio. Rallar las zanahorias,
usando la velocidad alta (HIGH).
Reservar, junto con los ingredientes secos.
4. Retirar el disco rallador e instalar la cuchilla picadora.
Colocar el azúcar en el tazón. Combinar el aceite, los
huevos y la vainilla en una taza de medir grande.
Encender la máquina en LOW y echar lentamente los
ingredientes líquidos por la boca de llenado. Procesar
durante 30–45 segundos, raspando el tazón de vez en
cuando. Agregar los ingredientes húmedos a la mezcla
a los ingredientes secos y revolver justo hasta combinar.
5. Echar la mezcla en el molde y meter al horno durante 35
minutos, hasta que un probador salga limpio. Dejar
enfriar en el molde.
6. Preparar el glaseado: Instalar la cuchilla picadora en el
tazón de la procesadora. Agregar el queso crema y la
mantequilla y procesar a velocidad alta (HIGH) durante
aproximadamente 60 segundos, hasta obtener una
mezcla suave (raspar el tazón si es necesario). Agregar el
queso de cabra y procesar durante 10–15 segundos
adicionales. Agregar el azúcar, la sal y la vainilla y
procesar durante 15–20 segundos.
7. Después de que haya enfriado el pastel, desmoldar
sobre un plato para servir. Cubrir todo el pastel con el
glaseado, usando una espátula larga. Refrigerar antes
de servir.
POSTRES
59
PASTEL DE MANZANA CLÁSICO
Todo el mundo necesita una receta infalible de pastel de manzana – a
continuación viene nuestra favorita para compartir con su familia.
Rinde 8–12 porciones (una tarta de 10 pulgadas/22 cm)
LIBRA (680 G) DE MANZANAS,
PELADAS Y CORTADAS A LA MITAD
1½
RECETA DE MASA QUEBRADA
(PÁGINA 55)
1
JUGO DE
½ LIMÓN
CUCHARADITA DE SAL KOSHER
¼
1
PIZCA DE NUEZ MOSCADA
RALLADA
1
CUCHARADITA DE CANELA EN
POLVO
½
½
CUCHARADITA DE EXTRACTO
NATURAL DE VAINILLA
TAZA (100 G) DE AZÚCAR
GRANULADO + UN POCO MÁS
PARA ESPOLVOREAR
BARNIZ DE HUEVO (1 HUEVO
GRANDE LIGERAMENTE BATIDO
1 CUCHARADA DE AGUA)
+
1. Poner la rejilla del horno en el tercio inferior del
horno y precalentar el horno a 450 °F (200 °C).
2. Estirar la masa con un rodillo hasta formar un disco
de ¹∕8 pulgada (3 mm) de espesor por 10 pulgadas
(22 cm) de diámetro. Refrigerar durante por lo
menos 20 minutos. Picar el fondo de tarta varias
veces con los dientes de un tenedor, teniendo
cuidado de no perforar completamente la masa.
3. Mientras la masa está enfriándose, preparar el
relleno. Instalar el disco rebanador. Colocar las
mitades de manzana rectas en la boca de llenado y
rebanar, usando velocidad alta (HIGH). Colocar en
un recipiente grande y agregar el jugo de limón, las
especias, la sal, la vainilla y el azúcar; revolver para
combinar.
4. Echar la mezcla encima del fondo de tarta.
5. Estirar el resto de la masa para formar otro disco de
10 pulgadas (22 cm). Cepillar el borde del fondo de
tarta con el barniz de huevo. Colocar el disco de
masa encima de la tarta, presionando las orillas para
sellar. Cortar el exceso de masa con un cuchillo
filudo. Cortar cuatro hendiduras de ½ pulgada (0.5
cm) alrededor de la corteza superior. Cepillar la
corteza con barniz de huevo y rociar con azúcar
granulado.
6. Meter al horno por 15 minutos, y luego ajustar la
temperatura a 350 °F (180 °C) y hornear durante 40
minutos adicionales, hasta que esté dorada. Dejar
enfriar sobre una rejilla durante 40 minutos o más
antes de servir.
Información nutricional por porción (basada en 12 porciones):
Calorías 263 (51% de grasa) • Carbohidratos 30 g
• Proteínas 2 g • Grasa 15 g • Grasa saturada 9 g
• Colesterol 48 mg • Sodio 241 mg • Calcio 5 mg • Fibra 1 g
58
POSTRES
PANECILLOS CON SUERO DE MANTEQUILLA
Estos panecillos son tan ligeros y suaves que
querrá prepararlos cada noche.
Rinde 8 panecillos
CUCHARADITA DE SAL KOSHER
½
1
CUCHARADITA DE AZÚCAR
GRANULADO
¼
CUCHARADITA DE BICARBONATO
DE SODIO
1½
CUCHARADITAS DE CRÉMOR
TÁRTARO
2
TAZA (30 G) DE HARINA DE
REPOSTERÍA
¼
TAZA (155 G) DE HARINA COMÚN
(MÁS SI ES NECESARIO)
1¼
6
2
⁄3
2
PIZCA DE PIMIENTA NEGRA
RECIÉN MOLIDA
CUCHARADAS (85 G) DE
MANTEQUILLA SIN SAL FRÍA, EN
PEDACITOS
TAZA (160 G) DE SUERO DE
MANTEQUILLA ("BUTTERMILK")*
CUCHARADAS (30 G) DE
MANTEQUILLA SIN SAL, DERRETIDA
1. Precalentar el horno a 500 °F (260 °C). Forrar una
placa para horno con papel sulfurizado.
2. Instalar la cuchilla picadora en el tazón. Agregar la
harina, el crémor tártaro y el bicarbonato de sodio y
procesar a velocidad baja (LOW) durante 10
segundos. Agregar el azúcar, la sal y la pimienta y
procesar a velocidad baja (LOW) durante 5
segundos. Agregar la mantequilla fría y pulsar 15
veces para incorporar.
3. Echar el suero de mantequilla lentamente por la
boca de llenado mientras pulsa (puede que no
necesite todo). La masa debe estar pegajosa, pero
no muy húmeda. Poner la masa sobre una superficie
generosamente enharinada. Amasar a mano 2–3
veces, formar una barra y cortar en 8 porciones
iguales. Formar una bola con cada porción y poner
las bolas sobre la placa para horno.
4. Meter al horno por 10 minutos, hasta dorarse.
Retirar del horno y cepillar con mantequilla
derretida. Servir inmediatamente.
CONSEJO: para obtener panecillos de aspecto más
tradicional, meter las porciones de masa al horno sin
formar bolas.
Información nutricional por panecillo:
Calorías 191 (54% de grasa) • Carbohidratos 19 g
• Proteínas 3 g • Grasa 11 g • Grasa saturada 7 g
• Colesterol 31 mg • Sodio 389 mg • Calcio 26 mg • Fibra 0 g
MASAS/PANES
57
1
⁄3
4
PANCITOS CON SABOR A MANTEQUILLA
Perfectos para dar algo especial a la cena, recién salidos del horno.
Rinde 10 pancitos
TAZA (120 ML) DE LECHE ENTERA
+ 1 CUCHARADA PARA CEPILLAR
CUCHARADAS (85 G) DE
MANTEQUILLA SIN SAL +
1 CUCHARADA (15 G) PARA
CEPILLAR Y ENGRASAR LA PLACA
CUCHARADAS DE AGUA TIBIA
3
21⁄2
CUCHARADITAS DE LEVADURA SECA
ACTIVA
1¾
CUCHARADAS DE AZÚCAR
GRANULADO
2
¾
1
TAZAS (375 G) DE HARINA PARA
HACER PAN
CUCHARADITA DE SAL KOSHER
HUEVO GRANDE, LIGERAMENTE
BATIDO
Información nutricional por pancito:
Calorías 144 (28% de grasa)
• Carbohidratos 7 g • Proteínas 4 g
• Grasa 2 g • Grasa saturada 1 g
• Colesterol 22 mg • Sodio 157 mg
• Calcio 17 mg • Fibra 1 g
56
1. En una cacerola pequeña, combinar 1⁄2 taza (120 ml)
de la leche con 6 cucharadas (85 g) de la
mantequilla y el azúcar. Calentar a fuego lento hasta
que la mantequilla esté derretida. Retirar del fuego
y reservar, enfriar a temperatura ambiente.
2. Disolver la levadura en agua tibia. Dejar fermentar
durante 5 minutos. Instalar la cuchilla picadora en el
tazón. Agregar la harina y la sal y procesar a
velocidad baja (LOW) durante 10 segundos.
Combinar el huevo batido, levadura y la mezcla de
leche. Encender la máquina en LOW, echar los
ingredientes líquidos en la boca de llenado y
procesar justo hasta formarse una bola de masa.
Procesar durante 45 segundos adicionales. Formar
una bola de masa suave y poner en una bolsa de
plástico hermética. Expulsar el aire y cerrar la bolsa.
Dejar leudar al doble de su volumen, durante 45–60
minutos.
3. Precalentar el horno a 450 °F (230 °). Engrasar un
molde redondo de 9 pulgadas (25 cm) de diámetro
con mantequilla. Dividir la masa en 10 porciones
iguales. Formar bolitas suaves y disponer en el
molde. Cubrir sin apretar con una película de
plástico y dejar leudar durante 30–40 minutos, hasta
doblar de volumen. Combinar el resto de la leche y
de la mantequilla y calentar la mezcla hasta que la
mantequilla esté derretida. Justo antes de meter al
horno, cepillar los pancitos con la mezcla de leche
con mantequilla. Meter al horno por 12–15 minutos,
hasta dorarse. Retirar del molde y dejar enfriar sobre
una rejilla durante 10 minutos antes de servir.
4. Nota: para que los pancitos estén aún más suaves,
cepillarlos con mantequilla derretida al retirarlos del
horno.
MASAS/PANES
"PÂTE BRISÉE" (MASA QUEBRADA)
Esta masa versátil es perfecta para preparar recetas saladas o dulces.
Rinde 2 fondos de tarta de 9 pulgadas (23 cm)
CUCHARADITA DE SAL KOSHER
1
16
TAZAS (250 G) DE HARINA
COMÚN
2
¼
CUCHARADAS (225 G) DE
MANTEQUILLA SIN SAL FRÍA, EN
PEDACITOS
TAZA
(60 ML) DE AGUA HELADA
1. Instalar la cuchilla picadora en el tazón. Agregar la
harina y la sal y procesar a velocidad baja (LOW)
durante 10 segundos. Agregar la mantequilla y
pulsar hasta obtener una mezcla homogénea.
2. Agregar agua, una cucharada a la vez, y seguir
pulsando justo hasta formarse una bola de masa
(puede que no sea necesario utilizar toda el agua).
Dividir la masa en dos porciones iguales. Formar un
disco plano con cada porción. Envolver los discos
en una película de plástico y refrigerar hasta el
momento de usar.
NOTA: la masa podrá guardarse durante 6 meses en el
congelador.
Información nutricional por porción (basada en 12 porciones):
Calorías 200 (66% de grasa) • Carbohidratos 15 g
• Proteínas 2 g • Grasa 15 g • Grasa saturada 9 g
• Colesterol 40 mg • Sodio 190 mg • Calcio 0 mg • Fibra 0 g
Información nutricional por porción (basada en 12 porciones):
Calorías 100 (66% de grasa) • Carbohidratos 7 g
• Proteínas 1 g • Grasa 7 g • Grasa saturada 5 g
• Colesterol 20 mg • Sodio 95 mg • Calcio 0 mg • Fibra 0 g
MASAS/PANES
55
MASA DE PIZZA
Esta masa puede usarse para más de lo obvio – mire nuestras
recetas de pan de salchicha o de pan de grelo en las páginas 37–38.
Rinde ¾ libra (340 g), lo suficiente como para preparar
dos pizzas de 9 pulgadas (22 cm) o una pizza de 14
pulgadas (35 cm)
CUCHARADITA DE AZÚCAR
GRANULADO
1
CUCHARADITAS DE LEVADURA SECA
ACTIVA
2¼
2
⁄3
TAZA
(80 ML) DE AGUA TIBIA
CUCHARADITA DE SAL KOSHER
¾
CUCHARADITA DE ACEITE DE OLIVA
+ UN POCO MÁS PARA CUBRIR LA
BOLA DE MASA
1
TAZA (210 G) DE HARINA PARA
HACER PAN O HARINA COMÚN
12⁄3
1. Disolver la levadura y el azúcar en el agua tibia.
Dejar fermentar durante aproximadamente 5
minutos.
2. Instalar la cuchilla picadora en el tazón. Agregar la
harina, el aceite de oliva y la sal. Encender la
máquina en LOW y agregar lentamente la mezcla
líquida por la boca de llenado, asegurándose de
que la harina absorba el líquido antes de echar más.
Cuando la masa llegue a formar una bola, procesar
durante 30 segundos adicionales para amasar.
Puede que la masa esté ligeramente pegajosa.
3. Cepillar levemente el interior de un tazón grande
con aceite de oliva. Colocar la masa en el tazón,
volteándola para cubrirla con aceite. Luego, cubrir
con una película de plástico. Dejar leudar al doble
de su volumen, durante aproximadamente 1 hora.
4. Poner la masa sobre una superficie ligeramente
enharinada y aplastar para desinflar. Estirar la masa
y seguir la receta.
Información nutricional por porción (basada en 12 porciones):
Calorías 62 (6% de grasa) • Carbohidratos 13 g • Proteínas 2 g
• Grasa 0 g • Grasa saturada 0 g • Colesterol 0 g
• Sodio 143 mg • Calcio 0 mg • Fibra 0 g
54
MASAS/PANES
3
½
PALITOS DE PESCADO
Los chips de maíz picados rinden palitos de pescado crujientes que
son perfectos para preparar tacos de pescado, pero si desea algo más
tradicional, utilice nuestra receta de pan rallado en la página 18.
Rinde 10–20 palitos de pescado (dependiendo del
tipo de pescado usado; ver los ingredientes)
TAZAS
(150 G) DE CHIPS DE MAÍZ
LIBRA (410 G) DE FILETE DE
PESCADO BLANCO COMO
LENGUADO O BACALAO
(OBTENDRÁ MENOS PALITOS CON
BACALAO YA QUE ES MÁS GRUESO)
JUGO DE
1 LIMÓN O LIMA
SAL KOSHER, A GUSTO
PIMIENTA NEGRA RECIÉN MOLIDA
TAZA (60 ML) DE ACEITE VEGETAL
"RÉMOULADE", PARA SERVIR
(PÁGINA 27)
¼
HUEVO GRANDE, LIGERAMENTE
BATIDO
1
TAZA (60 G) DE HARINA COMÚN
CON UNA PIZCA DE SAL KOSHER Y
DE PIMIENTA NEGRA
½
1. Instalar la cuchilla picadora en el tazón. Agregar los
chips de maíz, pulsar 5 veces para romper, y luego
procesar a velocidad alta (HIGH) durante 20–30
segundos hasta que estén finamente picados.
Reservar, en una bandeja baja.
2. Cortar el pescado en tiras de 1 pulgada (2.5 cm) de
ancho. Sazonar con jugo de limón, sal y pimienta.
3. Colocar la harina y el huevo en cuencos bajos
separados.
4. Rebozar ligeramente el pescado en la harina, luego
en el huevo, y finalmente en los chips molidos.
Reservar, sobre un plato limpio. Repetir con el resto
del pescado.
5. Poner el aceite a calentar a fuego medio, en un
sartén grande. Cuando esté caliente, freír los palitos
de pescado (no más de 5 a la vez) hasta que estén
dorados y crujientes. Retirar y reservar sobre una
rejilla forrada con papel absorbente.
6. Servir inmediatamente, con la "rémoulade".
Nota: Para preparar tacos de pescado, servir los
palitos de pescado en una tortilla caliente con
ensalada de col y un salpicón de jugo de lima. Para
preparar la ensalada de col: combinar 2 cucharadas de
cilantro picado, 1 taza (150 g) de col rallada, 1⁄8
cucharadita de sal kosher y pimienta negra y 1
cucharadita de aceite de oliva.
Información nutricional por palito de pescado:
Calorías 67 (53% de grasa) • Carbohidratos 5 g • Proteínas 3 g
• Grasa 4 g • Grasa saturada 0 g • Colesterol 14 mg
• Sodio 39 mg • Calcio 10 mg • Fibra 0 g
PLATOS PRINCIPALES
53
TACOS AMERICANOS
Ligeramente picante y llena de sabor, esta receta debería formar parte de
su lista de recetas favoritas – a los niños especialmente les encantará armar
sus propios tacos.
Rinde aproximadamente 12 tacos
ADEREZO:
4
ONZAS (115 G) DE QUESO
MONTEREY JACK
¼
2
LECHUGA ROMANA O ICEBERG
TOMATES ITALIANOS, EN CUARTOS
RELLENO:
1
DIENTE DE AJO
1
JALAPEÑO, SIN SEMILLAS,
CORTADO A LA MITAD Y
EN TROCITOS
½
3
⁄4
1
1½
½
¼
1
¾
2
CEBOLLA MEDIANA, EN PEDAZOS
LIBRA (340 G) DE CARNE PARA
GUISO, EN CUBOS
CUCHARADITA DE ACEITE VEGETAL
CUCHARADITA DE CHILE EN POLVO
CUCHARADITA DE COMINO EN
POLVO
CUCHARADITA DE ORÉGANO SECO
PIZCA DE PIMIENTA DE CAYENA
CUCHARADITA DE SAL KOSHER
CUCHARADITAS DE
CONCENTRADO/PASTA DE TOMATE
TORTILLAS PEQUEÑAS TIBIAS
16
TAZA (120 ML) DE CALDO DE
POLLO BAJO EN SODIO
½
CREMA AGRIA O YOGUR PARA
SERVIR
1. Instalar el disco rebanador medio. Rallar el queso
Monterey Jack, usando la velocidad alta (HIGH).
Retirar y reservar el queso, cubierto con plástico.
Voltear el disco. Rebanar la lechuga, usando
velocidad alta (HIGH); retirar y reservar. Cortar los
tomates en rodajas; reservar.
2. Retirar el disco rallador e instalar la cuchilla
picadora. Encender la máquina en HIGH y echar el
ajo y el jalapeño en la boca de llenado; procesar
hasta que estén finamente picados. Raspar el tazón
y agregar la cebolla. Pulsar aproximadamente 3
veces para picar finamente. Raspar el tazón y
agregar la carne. Pulsar 10–12 veces, usando
pulsaciones largas y marcando una pausa entre cada
pulsación, para picar finamente la carne. Raspar el
tazón a la mitad del tiempo.
3. Poner el aceite a calentar a fuego medio-alto, en un
sartén grande. Agregar la mezcla de carne picada,
las especias y la sal. Cocer hasta que la carne esté
bien cocida. Agregar el concentrado de tomate y
cocer durante 1 minuto. Agregar el caldo y reducir
hasta que se haya evaporado. Retirar del fuego.
4. Para armar los tacos: colocar 2–3 cucharadas de la
carne en el centro de cada tortilla. Añadir lechuga,
tomate y queso. Aderezar con crema agria, "salsa" y
guacamole.
SALSA DE TOMATE PARA SERVIR
(PÁGINA 27)
GUACAMOLE CON PEDAZOS PARA
SERVIR (PÁGINA 28)
52
Información nutricional por taco:
Calorías 128 (56% de grasa) • Carbohidratos 6 g
• Proteínas 8 g • Grasa 8 g • Grasa saturada 3 g
• Colesterol 27 mg • Sodio 290 mg • Calcio 88 mg • Fibra 1 g
PLATOS PRINCIPALES
SALTEADO DE VEGETALES
Esta receta es un método rápido de incorporar cualquier vegetal que tenga
disponible; agregue pollo, res o cubitos de tofu para una comida más
saludable.
Rinde 6 tazas
2
1
DIENTES DE AJO
TROZO DE 1 PULGADA (2.5 CM)
DE JENGIBRE FRESCO, PELADO Y
CORTADO EN CUARTOS
CHAMPIÑONES BLANCOS, LIMPIOS
6
1
MINI COL CHINA "BOK CHOY
BABY", LAS HOJAS CORTADAS Y
RESERVADAS
4
TALLO DE BRÉCOL, LOS
COGOLLITOS SEPARADOS
1
PIMIENTO DULCE ROJO MEDIANO,
CORTADO A LA MITAD
1
1½
1
CEBOLLA ROJA MEDIANA,
CORTADA PARA CABER EN LA
BOCA DE LLENADO
CUCHARADA DE ACEITE VEGETAL
TAZA (235 ML) DE CALDO DE
VEGETALES O DE POLLO BAJO EN
SODIO
CUCHARADITAS DE MAICENA
2
½
CUCHARADITA DE SALSA DE
PESCADO
¼
CUCHARADAS DE SALSA DE SOYA
BAJA EN SODIO
3
TAZA (100 G) DE ARVEJAS DE
VAINA O TIRABEQUES/ARVEJAS
CHINAS ("SNOW PEAS")
CUCHARADA DE SEMILLAS DE
SÉSAMO
1
CUCHARADITA DE ACEITE DE
SÉSAMO PICANTE
1
ARROZ COCIDO PARA SERVIR
1. Instalar la cuchilla picadora en el tazón. Encender la
máquina en HIGH y echar el ajo y el jengibre en la
boca de llenado; procesar durante 10–15 segundos,
hasta que estén finamente picados. Reservar.
2. Retirar la cuchilla picadora e instalar el disco
rebanador medio. Rebanar el pimiento rojo, los
tallos de brécol, la col China, las setas y la cebolla,
usando la velocidad alta (HIGH). Reservar.
3. Poner el aceite vegetal a calentar a fuego medioalto, en un sartén grande. Cuando el aceite esté
caliente, agregar el ajo y el jengibre. Saltear durante
aproximadamente 30 minutos, hasta que estén
fragantes. Agregar los vegetales en rodajas y saltear
durante 7–8 minutos, hasta que empiecen a
suavizarse.
4. Mientras los vegetales están cociendo, combinar el
caldo, la salsa de soya, la salsa de pescado y la
maicena. Agregar la mezcla al sartén y seguir
cociendo hasta que empiece a hervir. Agregar las
hojas de col china, los cogollitos de brécol y las
arvejas de vaina. Cocer durante 3–5 minutos, hasta
que el brécol y las arvejas estén tiernas-firmes y que
la salsa esté espesa.
5. Agregar el aceite de sésamo y las semillas. Ajustar la
sazón al gusto y servir inmediatamente, con arroz.
Información nutricional por porción (1 taza/235 ml):
Calorías 79 (51% de grasa) • Carbohidratos 8 g • Proteínas 2 g
• Grasa 5 g • Grasa saturada 1 g • Colesterol 0 mg
• Sodio 288 mg • Calcio 33 mg • Fibra 2 g
PLATOS PRINCIPALES
51
“CHICKEN POT PIE”
Comida reconfortante por excelencia.
Cantidad: 8–10 porciones
1. Poner la rejilla del horno en el tercio inferior del horno y
precalentar el horno a 400 °F (200 °C).
ZANAHORIA MEDIANA, PELADA
1
1
1
1
CUCHARADAS (85 G) DE
MANTEQUILLA SIN SAL
6
2
⁄3
RAMA DE APIO
CEBOLLA PEQUEÑA, EN PEDAZOS
POLLO DE 2–3 LIBRAS (910 G –
1.3 KG), ASADO Y CORTADO EN
CUBITOS, A TEMPERATURA
AMBIENTE
TAZA
(85 G) DE HARINA COMÚN
CUCHARADITA DE SAL KOSHER
¾
¼
CAMOTE/BATATA MEDIANO, EN
CUBITOS (DEJAR EN AGUA FRÍA
HASTA EL MOMENTO DE USAR)
1
PATATA PARA HERVIR MEDIANA,
EN CUBITOS (DEJAR EN AGUA FRÍA
HASTA EL MOMENTO DE USAR)
1
TAZAS (945 ML – 1.2 L) DE
CALDO DE POLLO BAJO EN SODIO
4–5
CUCHARADITA DE PIMIENTA NEGRA
RECIÉN MOLIDA
TAZA (50 G) DE ARVEJAS
CONGELADAS
⁄3
1
TAZA (50 G) DE CEBOLLAS
CAMBRAY ("PEARL ONIONS")
CONGELADAS
⁄3
1
1
RECETA DE MASA DE PANECILLOS
DE SUERO DE MANTEQUILLA
(PÁGINA 57)
Información nutricional por porción
(basada en 10 porciones):
Calorías 494 (52% de grasa)
• Carbohidratos 32 g • Proteínas 27 g
• Grasa 28 g • Grasa saturada 13 g
• Colesterol 112 mg • Sodio 777 mg
• Calcio 43 mg • Fibra 3 g
50
2. Derretir la mantequilla a fuego medio-lento, en una
cacerola mediana.
3. Mientras la cacerola está calentando, preparar los
vegetales. Instalar el disco rebanador medio y cortar la
zanahoria y el apio en rodajas.
4. Retirar el disco rallador e instalar la cuchilla amasadora.
Agregar la cebolla y pulsar 5–6 veces para picar. Colocar
la cebolla, la zanahoria y el apio en la cacerola y saltear
durante 8–10 minutos, hasta que estén suaves.
5. Colocar la mitad del pollo en el tazón y pulsar 2–3 veces
para picar; repetir. Reservar, en un tazón.
6. Agregar la harina a la mezcla de vegetales y cocer durante
aproximadamente 3 minutos. Agregar lentamente 4 tazas
(945 ml) del caldo de pollo, revolviendo con un batidor.
Cuando el caldo empiece a hervir, reducir el fuego para
que siga hirviendo a fuego lento. Agregar la patata, el
camote, sal y pimienta. Seguir cociendo a fuego lento
durante aproximadamente minutos, hasta que los
vegetales estén tiernos. Agregar más caldo si es necesario
para que los vegetales permanezcan sumergidos. Agregar
el pollo reservado y las cebollas congeladas. Cocer a
fuego lento durante 30–35 minutos adicionales para
espesar. Una vez más espeso, agregar las arvejas.
7. Mientras el relleno está cociendo, preparar la masa de
galletas. Cortar la masa de galletas en 9 pedazos. Cubrir
con plástico y reservar.
8. Echar el relleno en un molde cuadrado de 9 pulgadas
(22.5 cm). Esparcir uniformemente la masa encima del
relleno, dejando un espacio de ¼ (0.5 cm) entre los
pedazos de masa.
9. Meter al horno durante aproximadamente 15 minutos,
hasta dorarse. Dejar enfriar durante 15 minutos o más
antes de servir.
PLATOS PRINCIPALES
"QUICHE" DE SETAS, PUERRO Y QUESO GRUYÈRE
La "quiche" es perfecta con cualquier comida, desde un elegante
desayuno-almuerzo de fin de semana hasta un almuerzo o una cena rápida.
Rinde 12 porciones
1. Precalentar el horno a 350 °F (180 °C).
DIENTE DE AJO
1
1
RECETA DE MASA QUEBRADA
(PÁGINA 55)
½
4
1
¼
1
PUERRO PEQUEÑO A MEDIANO, EN
RODAJAS
ONZAS
(115 G) DE SETAS
CUCHARADITA DE ACEITE DE OLIVA
CUCHARADITA DE SAL KOSHER
CUCHARADITA DE TOMILLO FRESCO
(ó ¼–½ CUCHARADITA DE
TOMILLO SECO)
TAZA
¾
½
ONZAS (60 G) DE QUESO
GRUYÈRE O QUESO SUIZO
2
3
1
¼
(175 ML) DE LECHE ENTERA
TAZA (120 ML) DE CREMA
LÍQUIDA PARA BATIR ("HEAVY
CREAM")
HUEVOS GRANDES
YEMA DE HUEVO GRANDE
CUCHARADITA DE PIMIENTA NEGRA
RECIÉN MOLIDA
2. Estirar la masa con un rodillo hasta formar un disco de ¹∕8
pulgada (3 mm) de espesor por 9 pulgadas (22 cm) de
diámetro. Refrigerar durante 30–40 minutos. Picar el
fondo de tarta varias veces con los dientes de un tenedor,
teniendo cuidado de no perforar completamente la masa.
Poner una hoja de papel sulfurizado encima de la masa y
llenar parcialmente el molde con arroz crudo o frijoles
secos. Meter al horno durante 15–20 minutos, o hasta que
la masa esté seca. Retirar el arroz crudo/los frijoles secos y
el papel sulfurizado y hornear el fondo de tarta durante
10–15 minutos adicionales, hasta dorarse. Reservar.
Ajustar la temperatura a 325 °F (160 °C).
3. Mientras la corteza está en el horno, preparar el relleno.
Instalar la cuchilla picadora en el tazón. Encender la
máquina en HIGH y echar el ajo en la boca de llenado;
procesar hasta que esté finamente picado. Reservar.
Retirar la cuchilla picadora e instalar el disco rebanador
medio. Cortar las setas en rodajas, usando la velocidad
baja (LOW).
4. Calentar el aceite a fuego medio-lento, en un sartén
mediano. Cuando el aceite esté caliente, agregar el ajo
picado y una pizca de la sal. Saltear durante aproximadamente 4 minutos, hasta que estén suaves.
Agregar entonces las setas y el tomillo. Saltear durante 6–10 minutos, hasta que los vegetales
estén suaves y que hayan adquirido un color vivo leve.
5. Mientras las setas están cociendo, instalar el disco rallador fino y rallar el queso, usando la
velocidad alta (HIGH). Reservar.
6. Retirar el disco rallador e instalar la cuchilla picadora. Poner la leche, la crema, los huevos, la yema,
la sal remanente y la pimienta en el tazón. Procesar a velocidad baja (LOW) para combinar.
7. Para armar la "quiche": esparcir las setas y el puerro sobre el fondo de tarta. Echar la mezcla de
huevo sobre los vegetales y espolvorear el resto del queso rallado encima.
8. Meter al horno por 25–30 minutos, hasta que el relleno esté justo cuajado.
9. Retirar del horno y dejar enfriar durante 5–10 minutos antes de servir.
Información nutricional por porción:
Calorías 193 (70% de grasa) • Carbohidratos 9 g • Proteínas 5 g
• Grasa 15 g • Grasa saturada 9 g • Colesterol 102 mg • Sodio 185 mg
• Calcio 79 mg • Fibra 0 g
PLATOS PRINCIPALES
49
PIZZA MARGARITA
Esta pizza napolitana es perfecta durante el verano, cuando los tomates y la
albahaca están de temporada.
Rinde 8 porciones (una tarta de 12 pulgadas/22.5 cm
de diámetro)
HOJAS MEDIANAS A GRANDES DE
ALBAHACA FRESCA, FINAMENTE
REBANADAS
8–10
TOMATES ITALIANOS MADUROS
PERO FIRMES
2–3
ONZAS (115–175 G) DE QUESO
MOZZARELLA FRESCO, BIEN FRÍO
4–6
ONZA (30 G) DE QUESO
PARMESANO, EN CUBITOS
1
RECETA DE MASA DE PIZZA
(PÁGINA 54)
1
HARINA COMÚN PARA ESTIRAR LA
MASA
HARINA DE MAÍZ PARA ROCIAR
PIZCA DE SAL KOSHER
1
CUCHARADAS DE ACEITE DE OLIVA
VIRGEN EXTRA
2
1. Preparar la masa de pizza y dejar leudar. Poner la
rejilla del horno en el centro del horno y precalentar
el horno a 500 °F (260 °C). Si usa una piedra de
hornear, colocarla sobre la rejilla y permitir que se
caliente durante 30 minutos adicionales.
2. Instalar la cuchilla picadora en el tazón. Encender la
máquina en HIGH y echar los cubos de queso
Parmigiano en la boca de llenado; procesar hasta
que esté finamente picado. Reservar.
3. Retirar la cuchilla picadora e instalar el disco rallador
medio. Rallar la Mozzarella, usando la velocidad alta
(HIGH). Reservar. Voltear el disco rallador. Cortar los
tomates en rodajas, usando la velocidad alta (HIGH).
4. Estirar la masa sobre una superficie ligeramente
enharinada hasta formar un disco de 12–14
pulgadas (30–35 cm). Colocar la masa sobre una
pala de pizza o la parte de abajo de una placa para
horno espolvoreada con harina de maíz (también
puede estirar la masa sobre una placa perforada
para pizza engrasada o hornearla sobre una placa
para hornear forrada con papel sulfurizado). Cepillar
la masa con aceite de oliva y rociar con los dos
quesos. Disponer las rodajas de tomates encima del
queso.
5. Meter cuidadosamente la pizza al horno. Hornear
durante 10–15 minutos, o hasta que el queso esté
derretido y que la masa esté ligeramente dorada.
6. Retirar del horno y esparcir la albahaca fresca y una
pizca de sal encima.
Información nutricional por porción:
Calorías 184 (40% de grasa) • Carbohidratos 20 g
• Proteínas 7 g • Grasa 8 g • Grasa saturada 3 g
• Colesterol 14 mg • Sodio 390 mg • Calcio 96 mg • Fibra 1 g
48
PLATOS PRINCIPALES
"FALAFEL" (CROQUETAS DE GARBANZO)
¡Gracias a su procesadora, preparar esta popular especialidad oriental en
casa es muy fácil! Recuerda remojar los garbanzos en agua
la noche anterior.
Rinde 15 croquetas
1
1
½
¾
1
∕8
DIENTE DE AJO
CHALOTE PEQUEÑO, EN PEDAZOS
TAZA (60 G) DE GARBANZOS
SECOS, REMOJADOS
DURANTE LA NOCHE,
ENJUAGADOS Y ESCURRIDOS
CUCHARADITA DE SAL KOSHER
CUCHARADITA DE PIMIENTA NEGRA
RECIÉN MOLIDA
CUCHARADITA DE SEMILLAS DE
CILANTRO EN POLVO
¼
CUCHARADITA DE COMINO EN
POLVO
¾
1
∕8
⁄3
1
CUCHARADITA DE CHILE EN POLVO
TAZA (30 G) DE PEREJIL ITALIANO
FRESCO (TALLOS Y HOJAS)
(70 G) DE
CUCHARADA DE AGUA
1
CUCHARADITA DE BICARBONATO
DE SODIO
¼
TAZA + 1 CUCHARADA
HARINA COMÚN
½
ACEITE VEGETAL PARA FREÍR
PAN PITA PARA SERVIR
TOMATES, PEPINOS Y LECHUGA
PICADOS PARA SERVIR
ADEREZO TAHINI (RECETA EN LA
PÁGINA 22) PARA SERVIR
1. Instalar la cuchilla picadora en el tazón. Agregar el ajo y el
chalote y pulsar aproximadamente 5 veces para picar.
Raspar el tazón y pulsar 2–3 veces más. Agregar los
garbanzos, la sal, la pimienta, las especias, el perejil y 1
cucharada de harina. Pulsar 10–12 veces para moler grueso.
Raspar el tazón y procesar a velocidad baja (LOW) durante
10–15 segundos, hasta que estén finamente molidos.
2. Disolver el bicarbonato en una cucharada de agua.
Encender la máquina a velocidad baja (LOW) y echar la
mezcla por la boca de llenado. Procesar durante 15–20
segundos.
3. Usando una cuchara para medir la mezcla, formar 15
croquetas. Colocar las croquetas sobre un plato forrado
con papel encerado y refrigerar durante 30 minutos.
Colocar la media taza de harina remanente en un cuenco
bajo y reservar.
4. Echar ¼ pulgada (0.5 cm) de aceite en una cacerola
mediana y poner a calentar a fuego medio-alto hasta que
el aceite alcance 375°F (190 °C).* Rebozar las croquetas
en harina, sacudiendo el exceso, y meter cuidadosamente
en el aceite. Cocer las croquetas (no más de 5 a la vez)
durante 2½–3 minutos, dándole la vuelta a la mitad del
tiempo, hasta que estén crujientes y doradas.
5. Colocar las croquetas sobre un plato forrado con papel
absorbente y repetir con el resto de la mezcla.
6. Servir con pedazos de pan pita, vegetales y aderezo Tahini.
Información nutricional por "falafel":
Calorías 62 (44% de grasa)
• Carbohidratos 7 g • Proteínas 2 g
• Grasa 3 g • Grasa saturada 0 g
• Colesterol 0 mg • Sodio 138 mg
• Calcio 9 mg • Fibra 1 g
*También puede hornear los "falafel". Para esto:
precalentar el horno a 400 °F (200 °C). Forrar una placa
para horno con papel sulfurizado y rociar con aceite.
Disponer las croquetas sobre el papel sulfurizado, sin
rebozarlas en harina. Rociar con más aceite, dando la
vuelta a las croquetas para cubrirlas con aceite. Hornear
durante 20–25 minutos, dándole la vuelta a la mitad del
tiempo, hasta dorarse.
PLATOS PRINCIPALES
47
CROQUETAS DE PATATA-CALABACÍN-ZANAHORIA
Croquetas/panqueques de patata mejoradas.
Rinde 10–12 porciones
CEBOLLA PEQUEÑA
1
¾
¼
ZANAHORIA PEQUEÑA A MEDIA,
PELADA Y CORTADA
1
CALABACÍN ("ZUCCHINI")
PEQUEÑO, CORTADO
1
PATATA "RUSSET" MEDIANA,
CORTADA PARA CABER EN LA
BOCA DE LLENADO
1
CUCHARADA DE HOJAS PEREJIL
ITALIANO FRESCO
1
CUCHARADITA DE SAL KOSHER
CUCHARADITA DE PIMIENTA NEGRA
RECIÉN MOLIDA
CUCHARADAS DE ACEITE VEGETAL
(MÁS SI ES NECESARIO)
2
HUEVO GRANDE, LIGERAMENTE
BATIDO
1
CUCHARADAS DE HARINA COMÚN
O HARINA DE PAN ÁCIMO
2
COMPOTA DE MANZANA Y CREMA
AGRIA PARA SERVIR
1. Instalar la cuchilla picadora en el tazón. Agregar el
perejil y pulsar 5–6 veces, usando pulsaciones
largas, para picar finamente, Dejando el perejil en el
tazón, retirar la cuchilla e instalar el disco rallador
medio. Colocar los vegetales horizontalmente en la
boca de llenado y rallar la patata, el calabacín, la
zanahoria y la cebolla a velocidad alta (HIGH).
Envolver los vegetales rallados en una toalla de
cocina limpia y exprimir el exceso de líquido.
2. Reservar los vegetales rallados en un cuenco
mediano. Agregar la sal, la pimienta y la harina y
revolver suavemente para combinar. Agregar
progresivamente el huevo batido (puede que no
necesite todo), hasta que la mezcla forme una masa.
La mezcla no debería estar muy húmeda, o las
croquetas resultarán muy densas.
3. Calentar el aceite a fuego medio-alto, en un sartén
antiadherente grande. Echar cucharadas de la
mezcla en el sartén. Aplanar las croquetas con la
cuchara, formando círculos de 2½ pulgadas (6 cm).
Cocer las croquetas (no más de 4 a la vez) durante
1½–2 minutos por lado, hasta que estén crujientes y
doradas. Repetir, agregando más aceite si es
necesario. Mantener las coquetas calientes en el
horno (200 °F/100 °C).
4. Servir inmediatamente con compota de manzana y
crema agria.
Información nutricional por porción (basada en 12 porciones):
Calorías 48 (48% de grasa) • Carbohidratos 5 g • Proteínas 1 g
• Grasa 3 g • Grasa saturada 0 g • Colesterol 12 mg
• Sodio 105 mg • Calcio 9 mg • Fibra 1 g
46 SOPAS/ENSALADAS/PLATOS DE ACOMPAÑAMIENTO
3
1
COLES DE BRUSELAS RALLADAS
Esta receta simple realza la dulzura de las coles de Bruselas. Para darle un
toque de lujo, rociélo una pequeña cantidad de aceite de trufa blanca.
Rinde aproximadamente 3 tazas (710 ml)
CUCHARADAS DE ACEITE DE OLIVA
LIBRA (455 G) DE COLES DE
BRUSELAS, LIMPIAS
½
2
CUCHARADITA DE SAL KOSHER
PIZCAS DE PIMIENTA NEGRA
RECIÉN MOLIDA
PIZCAS DE HOJUELAS DE PIMIENTO
ROJO (OPCIONAL)
2
CUCHARADITA DE JUGO DE LIMÓN
FRESCO
1
1. Poner el aceite a calentar a fuego medio/mediolento, en un sartén grande.
2. Instalar el disco rebanador medio. Rebanar las coles
de Bruselas, usando la velocidad alta (HIGH).
Colocar los vegetales en el sartén, junto con la sal/
pimienta remanentes y saltear durante
aproximadamente 20–25 minutos, hasta que estén
suaves.
3. Agregar el resto de los ingredientes remanentes y
revolver para combinar. Servir inmediatamente.
Información nutricional por porción (½ taza/120 ml):
Calorías 93 (63% de grasa) • Carbohidratos 7 g • Proteínas 3 g
• Grasa 7 g • Grasa saturada 1 g • Colesterol 0 mg
• Sodio 209 mg • Calcio 32 mg • Fibra 3 g
SOPAS/ENSALADAS/PLATOS DE ACOMPAÑAMIENTO 45
1
2
ENSALADA DE VERDURAS PICADAS
Esta sabrosa ensalada de verduras frescas siempre es un éxito –
¡Incluso con las personas que no comen ensalada!
Rinde aproximadamente 4 tazas (945 ml)
CHALOTE PEQUEÑO, EN PEDAZOS
CEBOLLETAS
TROCITOS
("SCALLIONS"), EN
CUCHARADITA DE SAL KOSHER
½
¼
TAZA (250 G) DE GARBANZOS
ENLATADOS, ENJUAGADOS Y
ESCURRIDOS
1
TAZA (50 G) DE MAÍZ FRESCO O
DESCONGELADO
½
TOMATES ITALIANOS, CORTADOS
EN CUARTOS
2
PEPINO, SIN SEMILLAS Y PARTIDO
LONGITUDINALMENTE EN CUARTOS
½
ZANAHORIA MEDIANA, PELADA Y
PARTIDA LONGITUDINALMENTE A
LA MITAD
1
RAMA DE APIO, LIMPIA Y PARTIDA
A LA MITAD
1
TAZA (15 G) DE PEREJIL ITALIANO
FRESCO (SIN TALLOS)
¼
2½
1. Instalar la cuchilla picadora en el tazón. Agregar el
chalote, las cebolletas y el perejil y pulsar
aproximadamente 10 veces para picar.
2. Retirar la cuchilla picadora e instalar el disco
rebanador medio. Cortar el apio, la zanahoria, el
pepino y los tomates en rodajas, usando la
velocidad alta (HIGH).
3. Colocar los ingredientes en un tazón grande y
agregar el maíz, los garbanzos, la sal, la pimienta y
la vinagreta.
4. Probar y ajustar la sazón al gusto. Servir
inmediatamente.
Información nutricional por porción (½ taza/120 ml):
Calorías 87 (38% de grasa) • Carbohidratos 12 g
• Proteínas 2 g • Grasa 4 g • Grasa saturada 1 g
• Colesterol 0 mg • Sodio 271 mg • Calcio 25 mg • Fibra 2 g
CUCHARADITA DE PIMIENTA NEGRA
RECIÉN MOLIDA
CUCHARADAS DE VINAGRETA
BÁSICA (RECETA EN LA PÁGINA
21)
44 SOPAS/ENSALADAS/PLATOS DE ACOMPAÑAMIENTO
ENSALADA DE COL
Esta versión sin mayonesa es más ligera, pero tiene el mismo sabor fuerte.
Rinde aproximadamente 5 tazas (1.2 L)
CUCHARADAS DE KETCHUP
2
2
TAZA (60 G) DE PEREJIL ITALIANO
FRESCO (SIN TALLOS)
1
CEBOLLETAS ("SCALLIONS")
PEQUEÑAS, EN TROZOS
3
2
½
1
⁄8
CUCHARADAS DE VINAGRE DE
SIDRA DE MANZANA
CUCHARADAS DE ACEITE VEGETAL
CUCHARADITA DE SAL KOSHER
CUCHARADITA DE SAL DE APIO
ZANAHORIA GRANDE, PELADA
1
¼
CUCHARADITA DE PIMIENTA NEGRA
RECIÉN MOLIDA
¼
¼
COL ROJA MEDIANA, EL CORAZÓN
SACADO
COL DE SABOYA/MILÁN
MEDIANA, EL CORAZÓN SACADO
1. Instalar la cuchilla picadora en el tazón. Agregar las
cebolletas y el perejil y pulsar 6–8 veces, hasta que
estén finamente picados. Agregar la salsa de
tomate, el vinagre de sidra, el aceite, la sal, la sal de
apio y la pimienta negra; pulsar para combinar.
Reservar.
2. Retirar la cuchilla picadora e instalar el disco rallador
medio. Rallar la zanahoria, usando la velocidad alta
(HIGH). Voltear el disco y rebanar la col, usando la
velocidad alta (HIGH). Colocar la mezcla en un
recipiente grande y revolver.
3. Probar y ajustar la sazón al gusto.
Información nutricional por porción (½ taza/120 ml):
Calorías 55 (68% de grasa) • Carbohidratos 4 g
• Proteínas 1 g • Grasa 4 g • Grasa saturada 1 g
• Colesterol 0 mg • Sodio 89 mg • Calcio 25 mg • Fibra 1 g
SOPAS/ENSALADAS/PLATOS DE ACOMPAÑAMIENTO 43
1½
1
1
¾
½
"MINESTRONE" DE VEGETALES DE PRIMAVERA
El pesto es la estrella de esta sabrosa sopa primaveral.
Rinde aproximadamente 12 tazas (2.8 L)
CUCHARADITA DE ACEITE DE OLIVA
DIENTE DE AJO
PUERRO PEQUEÑO, EN TROZOS
CUCHARADITA DE SAL KOSHER
CUCHARADITA DE PIMIENTA NEGRA
RECIÉN MOLIDA
CUCHARADAS DE PESTO DE
ALBAHACA (RECETA EN LA PÁGINA
2–4
TAZAS (400 G) DE PASTA
DITALINI COCIDA (U OTRA
VARIEDAD DE PASTA PEQUEÑA)
2
LATA DE 15 ONZAS (435 G) DE
FRIJOLES ROJOS, ESCURRIDOS Y
ENJUAGADOS
1
LATA DE 15 ONZAS (435 G) DE
GARBANZOS, ESCURRIDOS Y
ENJUAGADOS
1
TAZAS (1.4 L) DE CALDO DE
POLLO O DE VEGETALES BAJO EN
SODIO
6
ONZAS (175 G) DE PATATAS
ROJAS, CORTADAS EN CUBOS
6
CALABACÍN AMARILLO PEQUEÑO,
CORTADO LONGITUDINALMENTE Y
A LO ANCHO A LA MITAD
1
CALABACÍN ("ZUCCHINI")
PEQUEÑO, CORTADO
LONGITUDINALMENTE Y A LO
ANCHO A LA MITAD
1
BULBO PEQUEÑO DE HINOJO,
PARTIDO A LA MITAD
½
RAMA DE APIO, LIMPIA Y PARTIDA
A LA MITAD
1
ZANAHORIAS MEDIANAS, PELADAS
Y PARTIDAS A LA MITAD
3
1. Poner el aceite de oliva a calentar a fuego medio,
en una olla.
2. Mientras el aceite está calentando, preparar los
vegetales. Instalar la cuchilla picadora en el tazón.
Agregar el ajo y el puerro; pulsar 6–8 veces, hasta
que estén finamente picados. Colocar la mezcla en
la olla, junto con ¼ cucharadita de sal y una pizca de
pimienta; empezar a saltear.
3. Retirar la cuchilla picadora e instalar el disco
rebanador medio. Cortar las zanahorias y el apio en
rodajas, usando la velocidad alta (HIGH). Cortar el
hinojo en rodajas, usando la velocidad alta (HIGH).
Colocar los vegetales en la olla, junto con la sal/
pimienta remanentes y saltear durante
aproximadamente 10 minutos, hasta que estén
suaves.
4. Cortar el calabacín, usando la velocidad alta (HIGH);
reservar. Cuando los vegetales están suaves,
agregar las patatas y el caldo. Subir el fuego para
que la mezcla hierva. Reducir el fuego para que siga
hirviendo a fuego lento y agregar el calabacín, los
garbanzos y los frijoles. Seguir cociendo a fuego
lento durante 20–30 minutos, hasta que todos los
vegetales estén suaves. Agregar la pasta cocida
(opcional) y seguir cociendo a fuego lento durante
5–10 minutos, hasta que esté caliente. Probar y
ajustar la sazón al gusto.
5. Servir en boles individuales con una cucharada de
pesto. The pesto is best stirred into soup before
eating.
25)
Información nutricional por porción (1 taza/235 ml):
Calorías 127 (19 % de grasa) • Carbohidratos 20 g
• Proteínas 7 g • Grasa 3 g • Grasa saturada 0 g
• Colesterol 0 mg • Sodio 659 mg • Calcio 57 mg • Fibra 5 g
42 SOPAS/ENSALADAS/PLATOS DE ACOMPAÑAMIENTO
CREMA DE CAMOTE
Crema suave, ideal para un día fresco de otoño.
Rinde aproximadamente 3 tazas (710 ml)
1. Derretir la mantequilla a fuego medio, en una olla.
DIENTE DE AJO
1
1
CUCHARADAS (30 G) DE
MANTEQUILLA SIN SAL
2
1
½
1
TROZO DE ½ PULGADA
DE JENGIBRE, PELADO
(1.5 CM)
PUERRO, EN TROZOS
CUCHARADITA DE SAL KOSHER
PIZCA DE PIMIENTA NEGRA
RECIÉN MOLIDA
PIZCA DE PIMIENTA DE CAYENA
1
2
CUCHARADITA DE CANELA EN
POLVO
¼
CAMOTES/BATATAS MEDIANOS,
PELADOS Y CORTADOS
PARA CABER EN LA BOCA DE
LLENADO (RESERVAR EN AGUA
FRÍA SI NO LOS USA
INMEDIATAMENTE)
2
½–¾
TAZAS (475 ML) DE CALDO DE
POLLO O DE VEGETALES BAJO EN
SODIO
TAZA (120–175 ML) DE CREMA
LÍQUIDA PARA BATIR ("HEAVY
CREAM") SI DESEA
2. Mientras la mantequilla se derrite, preparar los
vegetales. Instalar la cuchilla picadora en el tazón.
Agregar el ajo, el jengibre y el puerro; pulsar 8–10
veces, hasta que estén finamente picados. Colocar
en la olla, con una pizca de sal y pimienta. Saltear a
fuego lento durante aproximadamente 8 minutos,
hasta suavizarse, sin permitir que los vegetales
adquieran un color vivo.
3. Retirar la cuchilla picadora e instalar el disco
rebanador medio. Cortar el camote en rodajas,
usando la velocidad alta (HIGH). Colocar en la olla y
revolver para combinar. Agregar la canela, la
pimienta de canela y el caldo y subir el fuego hasta
que la mezcla hierva. Una vez que la mezcla
empiece a hervir, reducir el fuego para que siga
hirviendo a fuego lento. Dejar hervir a fuego lento
durante aproximadamente 15 minutos, hasta que el
camote esté suave.
4. Colocar los sólidos en la procesadora y el líquido en
una taza medidora grande. Procesar a velocidad alta
(HIGH) hasta conseguir un puré, agregando
lentamente el líquido caliente. Procesar a velocidad
alta durante aproximadamente 2 minutos, hasta
obtener una consistencia suave.
5. Regresar la sopa en la olla y recalentarla. Agregar
crema si desea. Probar y ajustar la sazón al gusto.
6. Servir inmediatamente.
Información nutricional por porción (1 taza/235 ml):
Calorías 221 (66% de grasa) • Carbohidratos 17 g
• Proteínas 1 g • Grasa 16 g • Grasa saturada 11 g
• Colesterol 55 mg • Sodio 598 mg • Calcio 29 mg • Fibra 2 g
SOPAS/ENSALADAS/PLATOS DE ACOMPAÑAMIENTO 41
1
1
GAZPACHO
Sabrosa sopa fría de origen andaluz, perfecta para el verano.
Rinde aproximadamente 3½ tazas (830 ml)
DIENTE DE AJO
JALAPEÑO, SIN SEMILLAS, EN
TROCITOS
CUCHARADITA DE SAL KOSHER
1
¼
TOMATES MEDIANOS MADUROS,
SIN SEMILLAS, EN PEDAZOS
2
PIMIENTO DULCE ROJO, EN
PEDAZOS
¼
PIMIENTO DULCE AMARILLO, EN
PEDAZOS
¼
PEPINO MEDIANO A GRANDE, EN
PEDAZOS
½
CEBOLLETAS
TROCITOS
2
TAZA (15 G) DE PEREJIL ITALIANO
FRESCO (SIN TALLOS)
¼
("SCALLIONS"), EN
1. Instalar la cuchilla picadora en el tazón. Encender la
máquina en HIGH y echar el ajo y el jalapeño en la
boca de llenado. Raspar el tazón y agregar el perejil,
las cebolletas, el pepino, los pimientos y los
tomates. Pulsar 5–6 veces para picar grueso.
2. Agregar el resto de los ingredientes y pulsar 6–7
veces para combinar. Probar y ajustar la sazón al
gusto. Servir.
Información nutricional por porción (½ taza/120 ml):
Calorías 24 (5% de grasa) • Carbohidratos 5 g • Proteínas 1 g
• Grasa 0 g • Grasa saturada 0 g • Colesterol 0 mg
• Sodio 362 mg • Calcio 18 mg • Fibra 1 g
CUCHARADITA DE PIMIENTA NEGRA
RECIÉN MOLIDA
GOTAS DE SALSA PICANTE
3
1½
CUCHARADITA DE JUGO DE LIMA
FRESCO
1
CUCHARADITA DE VINAGRE DE
VINO TINTO
1
TAZA (355 ML) DE CALDO DE
VEGETALES BAJO EN SODIO
40 SOPAS/ENSALADAS/PLATOS DE ACOMPAÑAMIENTO
lado la masa hacia el centro del rectángulo. Doblar el resto de la
masa encima del rollo. Pellizcar la masa a lo largo de la juntura
para sellar. Doblar las extremidades del rollo y pellizcar para sellar.
Voltear el rollo y disponerlo en el centro de la placa. Cepillar con
el barniz de huevo y cortar 3 hendeduras en la parte superior.
9. Meter al horno por 30–35 minutos, hasta dorarse, girando la placa
a la mitad del tiempo. Retirar del horno y dejar enfriar durante 5
minutos antes de cortar. Servir tibio.
CONSEJO: combinar los dos recetas de pan relleno para el último
sabor (ver la receta anterior).
Información nutricional por porción: (basada en 14 porciones)
Calorías 204 (54% de grasa) • Carbohidratos 16 g • Proteínas 8 g • Grasa 13 g
• Grasa saturada 4 g • Colesterol 36 mg • Sodio 406 mg • Calcio 73 mg
• Fibra 2 g
APERITIVOS
39
2
2
1
¾
1
⁄8
PAN DE GRELO
El queso Ricotta complementa deliciosamente la amargura del
grelo en esta receta.
Rinde una barra de 14 pulgadas (35 cm)
CUCHARADAS DE ACEITE VEGETAL
DIENTES DE AJO
MANOJO DE GRELO (NO MÁS DE
LIBRA/455 G), EN TROZOS
1
CUCHARADITA DE SAL KOSHER
CUCHARADITA DE HOJUELAS DE
PIMIENTO ROJO
1. Poner la rejilla del horno en el centro del horno y
precalentar el horno a 400 °F (200 °C). Engrasar
levemente una placa de hornear con una cucharada
del aceite y reservar.
2. Calentar el resto de aceite a fuego medio, en un
sartén grande.
4. Colocar el grelo en el sartén. Sazonar con ¼
cucharadita de sal y saltear durante 7–8 minutos, o
justo hasta que esté tierno. A la mitad del tiempo,
agregar el ajo y las hojuelas de pimiento rojo. Retirar
del fuego y dejar enfriar ligeramente.
CUCHARADITA DE PIMIENTA NEGRA
RECIÉN MOLIDA
¼
PIZCA DE NUEZ MOSCADA
RALLADA
1
TAZA (120 ML) DE QUESO
RICOTTA DE LECHE ENTERA
½
3. Instalar la cuchilla picadora en el tazón. Encender la
máquina en HIGH y echar el ajo en la boca de
llenado.
ONZA (5–10 G) DE QUESO
PARMESANO RALLADO
¼
HARINA COMÚN PARA ESTIRAR LA
MASA
1
RECETA DE MASA DE PIZZA
(PÁGINA 54)
BARNIZ DE HUEVO (1 HUEVO
GRANDE LIGERAMENTE BATIDO
1 CUCHARADA DE AGUA)
+
5. Mientras el grelo está cociendo, coloque el queso
Pecorino en el tazón de la procesadora y procesar a
velocidad alta (HIGH) hasta que esté finamente
picado. Colocar el queso en un tazón mediano y
agregar el queso Ricotta, la nuez moscada y el resto
de la sal/pimienta. Cuando el grelo esté cocido,
agregarlo al resto de los ingredientes y revolver para
combinar.
6. Colocar la masa de pizza sobre una superficie
ligeramente enharinada y aplastar para desinflar.
Formar un rectángulo de 14 x 8 pulgadas (35 x 20
cm), presionando con los dedos y estirando y
volteando la masa. Colocar suavemente la masa
sobre la placa preparada, volviendo a formar el
rectángulo si es necesario. Si la masa se rompe,
volver a pegarla.
7. Esparcir la mezcla de grelo/queso sobre la masa,
dejando un borde de 1 pulgada (2.5 cm) todo
alrededor.
8. Cepillar el borde con el barniz de huevo. Enrollar un
38
APERITIVOS
2
1
PAN DE SALCHICHA (ESTILO STROMBOLI)
Esta receta para calmar el apetito puede duplicarse fácilmente. Usamos una combinación
de salchicha dulce y picante en este pan, pero puede usar cualquier tipo de salchicha.
Rinde una barra de 14 pulgadas (35 cm)
CUCHARADAS DE ACEITE VEGETAL
BULBO DE HINOJO PEQUEÑO,
CORTADO EN CUARTOS
2
¼–½
4
DIENTES DE AJO, MACHACADOS
CUCHARADITA DE SAL KOSHER
ONZAS (115 G) DE QUESO
MOZZARELLA FRESCO
CUCHARADAS DE VINO BLANCO
2
LIBRA (110 G) DE SALCHICHA
ITALIANA PICANTE, SIN TRIPA
¼
LIBRA (225 G) DE SALCHICHA
ITALIANA DULCE, SIN TRIPA
½
HARINA COMÚN PARA ESTIRAR LA
MASA
1
RECETA DE MASA DE PIZZA
(PÁGINA 54)
BARNIZ DE HUEVO (1 HUEVO
GRANDE LIGERAMENTE BATIDO
1 CUCHARADA DE AGUA)
+
1. Poner la rejilla del horno en el centro del horno y precalentar
el horno a 400 °F (200 °C). Engrasar levemente una placa de
hornear con una cucharada del aceite y reservar.
2. Calentar el resto del aceite a fuego medio, en un sartén
grande.
3. Instalar el disco rebanador medio en el tazón y cortar el hinojo
en rodajas, usando la velocidad alta (HIGH). Agregar al sartén,
junto con el ajo y ¼ cucharadita de la sal. Saltear durante
8–10 minutos, hasta que el hinojo esté suave y ligeramente
dorado. Voltear el disco. Rallar la Mozzarella, usando la
velocidad alta (HIGH); dejar el queso rallado en el tazón.
4. Cuando el hinojo esté cocido, retirarlo del sartén y reservarlo
en un tazón. Regresar el sartén sobre el fuego y romper la
salchicha en pedazos medianos directamente en el sartén.
Cocer durante 5–7 minutos, hasta que la salchicha esté
dorada. Agregar el hinojo y revolver para combinar. Agregar
el vino y raspar el fondo del sartén con un cucharón de
madera para despegar los residuos. Cocer durante
aproximadamente 1 minuto, hasta que el vino se haya
evaporado y retirar del fuego. Retirar y tirar el ajo y agregar
½ taza de Mozzarella. Dejar enfriar ligeramente.
5. Colocar la masa de pizza sobre una superficie ligeramente enharinada y aplastar para desinflar. Formar un
rectángulo de 14 x 8 pulgadas (35 x 20 cm), presionando con los dedos y estirando y volteando la masa.
Colocar suavemente la masa sobre la placa preparada, volviendo a formar el rectángulo si es necesario.
Si la masa se rompe, volver a pegarla.
6. Esparcir la mezcla de salchicha sobre la masa, dejando un borde de 1 pulgada (2.5 cm) todo alrededor.
Esparcir el resto del queso encima de la mezcla de salchicha.
7. Cepillar el borde con el barniz de huevo. Enrollar un lado la masa hacia el centro del rectángulo. Doblar
el resto de la masa encima del rollo. Pellizcar la masa a lo largo de la juntura para sellar. Doblar las
extremidades del rollo y pellizcar para sellar. Voltear el rollo y disponerlo en el centro de la placa. Cepillar
con el barniz de huevo y cortar 3 hendeduras en la parte superior.
8. Meter al horno por 30 minutos, hasta dorarse, girando la placa a la mitad del tiempo. Retirar del horno y
dejar enfriar durante 5 minutos antes de cortar. Servir tibio.
CONSEJO: combinar las dos recetas de pan relleno para el último sabor (ver la receta siguiente).
Información nutricional por porción (basada en 14 porciones):
Calorías 204 (54% de grasa) • Carbohidratos 16 g • Proteínas 8 g • Grasa 13 g • Grasa saturada 4 g
• Colesterol 36 mg • Sodio 406 mg • Calcio 73 mg • Fibra 2 g
APERITIVOS
37
EMPAREDADOS DE PEPINO-SALMÓN
Incluya estos sabrosos sándwiches en su próxima merienda – añadirán color
y sabor a la mesa.
Rinde aproximadamente 22 sándwiches
ONZAS (100 G) DE SALMÓN
AHUMADO, EN TAJADITAS
3½
TAZA (115 G) DE QUESO CREMA
CON SALMÓN AHUMADO (RECETA
EN LA PÁGINA 20) SUAVIZADO
½
BARRA DE PAN DE CENTENO PARA
CÓCTEL*
1
PEPINO PEQUEÑO A MEDIANO,
CORTADO LONGITUDINALMENTE A
LA MITAD
1
1. Instalar el disco rebanador medio. Cortar los
pepinos en rodajas, usando la velocidad alta (HIGH);
obtendrá media lunas.
2. Colocar las rebanadas de pan sobre una superficie
limpia. Untar cada rebanada con una cucharadita de
queso crema con salmón ahumado. Añadir 3 rodajas
de pepino y una tajada de salón ahumado sobre
cada rebanada. Cerrar los sándwiches, el lado con
queso crema apuntando hacia abajo. Repetir con el
resto del pan.
3. Cortar los sándwiches diagonalmente por la mitad y
servir inmediatamente.
*si pan para cóctel no está
disponible, usar pan regular, en
rebanadas finas; cortar cada
rebanada en cuartos.
36
Información nutricional por sándwich:
Calorías 85 (48% de grasa) • Carbohidratos 7 g • Proteínas 4 g
• Grasa 5 g • Grasa saturada 2 g • Colesterol 13 mg
• Sodio 360 mg • Calcio 12 mg • Fibra 1 g
APERITIVOS
EMPAREDADOS DE RÁBANO-ENELDO
Elegantes sándwiches, perfectos para servir con té o para el almuerzo.
Rinde aproximadamente 22 sándwiches
6–8
1
½
RÁBANOS PEQUEÑOS
BARRA DE PAN DE CENTENO PARA
CÓCTEL*
TAZA (115 G) DE MANTEQUILLA
DE ENELDO (RECETA EN LA PÁGINA
19)
SAL KOSHER, A GUSTO
1. Instalar el disco rebanador medio. Cortar los
rábanos en rodajas, usando la velocidad alta (HIGH).
2. Colocar las rebanadas de pan sobre una superficie
limpia. Untar cada rebanada con una cucharadita de
mantequilla. Cubrir la mitad de las rebanadas con 3
rodajas de rábano y una pizca de sal. Cerrar los
sándwiches, el lado con mantequilla apuntando
hacia abajo. Repetir con el resto del pan.
3. Cortar los sándwiches diagonalmente por la mitad y
servir inmediatamente.
Información nutricional por sándwich:
*si pan para cóctel no está
disponible, usar pan regular, en
rebanadas finas; cortar cada
rebanada en cuartos.
Calorías 72 (56% de grasa) • Carbohidratos 7 g • Proteínas 1 g
• Grasa 4 g • Grasa saturada 3 g • Colesterol 11 mg
• Sodio 198 mg • Calcio 10 mg • Fibra 1 g
APERITIVOS
35
1
1
2
¼
2
HUMUS
Esta sabrosa salsa para mojar es perfecta para servir con pan pita.
Rinde aproximadamente 3 tazas (475 ml)
DIENTE DE AJO
CUCHARADITA DE SAL KOSHER
LATAS DE 15.5 ONZAS (450 G)
DE GARBANZOS, ESCURRIDOS Y
ENJUAGADOS
TAZA
(60 ML) DE SALSA TAHINI
CUCHARADAS DE JUGO DE LIMÓN
FRESCO
TAZA (60 ML) DE ACEITE DE OLIVA
VIRGEN EXTRA + 1 CUCHARADA
PARA SERVIR
¼
CUCHARADITA DE COMINO EN
POLVO
½
TAZA + 2 CUCHARADAS
DE AGUA
¼
(65 ML)
PIZCA DE
1
CUCHARADITA DE PÁPRIKA
1
⁄8
34
(OPCIONAL)
"ZA’ATAR" (OPCIONAL)
1. Instalar la cuchilla picadora en el tazón. Encender la
máquina en HIGH y echar el ajo en la boca de
llenado; procesar hasta que esté finamente picado.
Agregar el resto de los ingredientes y procesar a
velocidad baja (LOW) durante aproximadamente 3
minutos, hasta obtener una mezcla suave (raspar el
tazón si es necesario).
2. Para servir: colocar el humus en un cuenco poco
profundo. Hacer una abolladura en el centro con
una cuchara y llenar con el aceite remanente.
Salpicar páprika y "za’atar" (opcional) encima del
aceite.
Información nutricional por porción (2 cucharadas):
Calorías 79 (44% de grasa) • Carbohidratos 2 g • Proteínas 2 g
• Grasa 4 g • Grasa saturada 1 g • Colesterol 0 mg
• Sodio 207 mg • Calcio 23 mg • Fibra 2 g
APERITIVOS
2
½
½
2
1
½
1–2
1
1
1–1½
FRIJOLES REFRITOS
¡Esta versión casera es fácil de preparar
y mucho mejor que las versiones enlatadas!
Rinde aproximadamente 1 taza (235 ml)
DIENTES DE AJO
CEBOLLA MEDIANA, EN PEDAZOS
JALAPEÑO, SIN SEMILLAS, EN
TROCITOS
CUCHARADAS DE ACEITE VEGETAL
CUCHARADITA DE CONCENTRADO
DE TOMATE
CUCHARADITA DE SAL KOSHER
PIZCAS DE COMINO EN POLVO
PIZCA DE PIMIENTA DE CAYENA
LATA DE 15 ONZAS (435 G) DE
FRIJOLES PINTOS, ESCURRIDOS
TAZA
(235–355 ML) DE AGUA
1. Instalar la cuchilla picadora en el tazón. Agregar el
ajo, la cebolla y el jalapeño y procesar a velocidad
alta (HIGH) hasta que estén finamente picados.
2. Poner 1 cucharada de aceite a calentar a fuego
medio, en un sartén medio. Cuando el aceite esté
caliente, agregar los vegetales picados, el
concentrado de tomate una pizca de sal, el comino
y la pimienta de Cayena. Saltear durante
aproximadamente 4 minutos, hasta que estén
suaves. Agregar los frijoles escurridos y cocer
durante 6–8 minutos, hasta que estén suaves.
3. Poner la mezcla en el tazón de la procesadora,
equipada con la cuchilla picadora. Pulsar hasta
obtener la consistencia deseada, agregando agua
por la boca de llenado para obtener una
consistencia cremosa.
Agregar sal, a su gusto
4. Colocar el aceite remanente en el sartén y calentar a
fuego medio-alto. Cuando el aceite esté caliente,
agregar el puré de frijoles y cocer, revolviendo
frecuentemente, hasta que la mezcla oscurezca
ligeramente (no más de 4 minutos). Servir tibio.
Información nutricional por porción (¼ taza/60 ml):
Calorías 83 (41% de grasa) • Carbohidratos 10 g
• Proteínas 3 g • Grasa 4 g • Grasa saturada 0 g
• Colesterol 0 mg • Sodio 311 mg • Calcio 28 mg • Fibra 3 g
APERITIVOS
33
NACHOS DE DIEZ CAPAS
Estos nachos están repletos con los mejores ingredientes. Puede variar
la receta, usando diferentes quesos o sustituyendo
sus ingredientes favoritos.
Rinde 10–12 porciones
ONZAS (175–230 G) DE QUESO
MONTEREY JACK O CHEDDAR (O
UNA MEZCLA DE LOS DOS)
TAZA (160 ML) DE SALSA (RECETA
EN LA PÁGINA 27)
TAZA (160 ML) DE GUACAMOLE
(RECETA EN LA PÁGINA 28)
6–8
TAZA (75 G) DE ACEITUNAS
NEGRAS DESHUESADAS
¾
TAZA
PERA
½
JALAPEÑO, SIN SEMILLAS Y
CORTADO EN TROCITOS
1
CEBOLLETAS
TROZOS
2–4
TAZA (150 G) DE FRIJOLES
REFRITOS (RECETA A
CONTINUACIÓN)
¾
PAQUETE DE CHIPS DE MAÍZ
(SUFICIENTES COMO PARA CUBRIR
EL FONDO DE UNA BANDEJA)
1
⁄3
2
⁄3
2
½
("SCALIONS"), EN
(75 G) DE TOMATES DE
TAZA (120 ML) DE CREMA AGRIA
O DE YOGUR NATURAL
1. Precalentar el horno a 375 °F (190 °C). Forrar una
bandeja baja con papel de aluminio. Disponer los
chips en el fondo de la bandeja.
2. Esparcir frijoles refritos encima de los chips.
Reservar.
3. Instalar la cuchilla picadora en el tazón. Agregar las
cebolletas, el jalapeño y los tomates y pulsar 5
veces para picar grueso. Esparcir encima de los
chips y de los frijoles.
4. Retirar la cuchilla picadora e instalar el disco
rebanador medio. Cortar las aceitunas en rodajas,
usando la velocidad alta (HIGH). Esparcir encima de
los nachos. Voltear el disco. Rallar el queso, usando
la velocidad alta (HIGH). Esparcir uniformemente
encima de los nachos.
5. Meter al horno por 15 minutos, hasta que el queso
esté completamente derretido y ligeramente
dorado. Servir inmediatamente con salsa picante,
guacamole y crema agria.
Información nutricional por porción (basada en 12 porciones):
Calorías 249 (48% de grasa) • Carbohidratos 25 g
• Proteínas 7 g • Grasa 13 g • Grasa saturada 3 g
• Colesterol 13 mg • Sodio 421 mg • Calcio 174 mg
• Fibra 4 g
32
APERITIVOS
"FRITTATA" DE CEBOLLA, PIMIENTO DULCE
Y PATATA
Las "frittatas" son simples y deliciosas. Esta receta también es muy sabrosa
preparada con salchicha italiana desmenuzada.
Rinde 10 porciones
1. Precalentar el horno a 350 °F (160 °C).
2
1
1
DIENTES DE AJO
CEBOLLA PEQUEÑA, PICADA
PIMIENTO ROJO, SIN SEMILLAS, EN
CUARTOS
2. Instalar la cuchilla picadora en el tazón. Encender la
máquina en HIGH y echar el ajo en la boca de
llenado; procesar hasta que esté finamente picado.
4. Retirar el disco rebanador e instalar el disco rallador
fino. Rallar el queso Parmesano, usando velocidad
alta (HIGH); reservar.
CUCHARADITA DE PIMIENTA NEGRA
RECIÉN MOLIDA
CUCHARADAS DE ACEITE DE OLIVA
3. Sin vaciar el tazón, retirar la cuchilla picadora e
instalar el disco rebanador medio. Cortar la cebolla y
el pimiento en rodajas, usando la velocidad alta
(HIGH). Reservar. Slice the potato on High; remove
and reserve in cold water.
3
½
¼
ONZA (30 G) DE QUESO
PARMESANO
1
PATATA "RUSSET" PEQUEÑA A
MEDIANA, PELADA Y PARTIDA
(RESERVADA EN AGUA FRÍA)
1
12
CUCHARADITA DE SAL KOSHER
HUEVOS GRANDES, LIGERAMENTE
BATIDOS
*Si no usa un sartén antiadherente,
deberá engrasarlo con spray
vegetal antes de agregar los
huevos. Después de saltear los
vegetales, revuélvalos con los
huevos batidos y poner la mezcla
en el sartén.
Información nutricional por porción:
(basada en 10 porciones)
Calorías 127 (56% de grasa)
• Carbohidratos 5 g • Proteínas 9 g
• Grasa 8 g • Grasa saturada 3 g
• Colesterol 225 mg • Sodio 248 mg
• Calcio 73 mg • Fibra 1 g
5. Poner un sartén antiadherente* grande a calentar a
fuego medio. Agregar 2 cucharaditas de aceite de
oliva y cubrir el fondo del sartén. Cuando el aceite
esté caliente, agregar el ajo, la cebolla, el pimiento y
una pizca de sal y de pimienta; saltear durante 6–8
minutos, hasta que esté suave. Reservar.
6. Agregar la cucharadita de aceite remanente al sartén.
Secar las patatas con papel absorbente. Colocar en el
sartén y sazonar con sal y pimienta. Saltear durante
aproximadamente 6 minutos, hasta que estén suaves
y que las orillas estén doradas.
7. Cuando las patatas estén doradas, agregar la mezcla
de cebolla/pimiento, revolver para combinar, y echar
encima la mezcla de huevos, la sal/pimienta
remanente y el queso Parmesano rallado. Cocer sin
revolver durante aproximadamente 6 minutos, hasta
que el fondo y los lados de la "frittata" empiecen a
cuajarse. Poner el sartén al horno y hornear durante
20–25 minutos, hasta dorarse.
8. Retirar el sartén del horno y voltearlo sobre una tabla
de picar. Cortar y servir inmediatamente.
DESAYUNOS Y DESAYUNOS-ALMUERZOS
31
PAN DE CALABACÍN CON ESPECIAS
Este pan rápido y jugoso es perfecto para el desayuno o como refrigerio.
Rinde 16 porciones (una barra de 2 libras/910 g)
SPRAY VEGETAL
CUCHARADITA DE SAL KOSHER
1
1
CUCHARADITA DE NUEZ MOSCADA
RALLADA
¼
CUCHARADITA DE PIMIENTA DE
JAMAICA EN POLVO
¾
CUCHARADITA DE CANELA EN
POLVO
1½
TAZAS (280 G) DE HARINA
COMÚN
2¼
CUCHARADITA DE POLVO DE
HORNEAR
CALABACÍN
1
½
TAZA (70 G) DE NUECES,
LIGERAMENTE TOSTADAS
½
("ZUCCHINI") GRANDE
TAZA (120 ML) DE ACEITE
VEGETAL
HUEVOS GRANDES
2
½
TAZA (200 G) DE AZÚCAR
GRANULADO
1
TAZA (60 G) DE ARÁNDANOS
AGRIOS SECOS O CEREZAS PASAS
1. Precalentar el horno a 325 °F (160 °C). Engrasar un
molde de barra de 9 x 5 x 3 pulgadas (22.5 x 12.5 x
7.5 cm) con spray vegetal.
2. Instalar la cuchilla picadora en el tazón. Agregar la
harina, las especias, la sal y el polvo de hornear y
procesar a velocidad baja (LOW) durante 10
segundos. Poner la mezcla en un tazón grande;
reservar. Colocar las nueces en el tazón de la
procesadora y pulsar 2–3 veces. Sin vaciar el tazón,
retirar la cuchilla picadora e instalar el disco rallador
medio. Rallar los calabacines. Reservar, junto con los
ingredientes secos. Revolver.
3. Volver a instalar la cuchilla picadora y agregar el
aceite vegetal, el azúcar y los huevos. Procesar a
velocidad baja (LOW) durante 5–10 segundos para
combinar. Agregar a la mezcla de ingredientes
secos, junto con las frutas secas, y revolver para
combinar.
4. Verter la mezcla en el molde y meter al horno por 1
hora y 15 minutos, hasta que un probador salga
limpio.
5. Dejar enfriar en el molde durante 5 minutos, y luego
desmoldar y dejar enfriar completamente sobre una
rejilla.
Información nutricional por porción:
Calorías 194 (37% de grasa) • Carbohidratos 28 g
• Proteínas 3 g • Grasa 8 g • Grasa saturada 1 g
• Colesterol 23 mg • Sodio 183 mg • Calcio 14 mg • Fibra 1 g
30
DESAYUNOS Y DESAYUNOS-ALMUERZOS
¼
1
⁄3
½
½
"MUFFINS" PARA EL DESAYUNO
Empiece bien su día, con estos "muffíns" repletos con energía y fibras.
Rinde 6 "muffins"
SPRAY VEGETAL
TAZA
(30 G) DE HARINA COMÚN
TAZA (40 G) DE HARINA DE TRIGO
INTEGRAL
CUCHARADITA DE SAL KOSHER
CUCHARADITA DE BICARBONATO
DE SODIO
CUCHARADITA DE RALLADURA DE
NARANJA
½
TAZA (30 G) DE COPOS DE AVENA
(NO UTILICE AVENA INSTANTÁNEA)
¼
CUCHARADITA DE CANELA EN
POLVO
½
⁄3
1
⁄3
1
2
TAZA (50 G) DE NUECES,
LIGERAMENTE TOSTADAS
ZANAHORIAS GRANDES, PELADAS
TAZA
(65 G) DE AZÚCAR RUBIO
CUCHARADITA DE EXTRACTO
NATURAL DE VAINILLA
½
TAZAS (80 ML) DE ACEITE
VEGETAL
1
⁄3
HUEVOS GRANDES, A
TEMPERATURA AMBIENTE
2
1
⁄3
2
TAZA (35 G) DE COCO RALLADO
SIN AZÚCAR
CUCHARADAS DE SEMILLAS DE
GIRASOL
1. Precalentar el horno a 350 °F (180 °C). Engrasar un
molde para muffins con spray vegetal.
2. Instalar la cuchilla picadora en el tazón. Agregar la
harina, la sal, el bicarbonato de sodio, la canela, la
avena y la ralladura y procesar a velocidad baja
(LOW) durante 10 segundos. Poner la mezcla en un
tazón mediano; reservar. Colocar las nueces en el
tazón de la procesadora y pulsar aproximadamente
5 veces para picar. Sin vaciar el tazón, retirar la
cuchilla picadora e instalar el disco rallador medio.
Rallar las zanahorias, usando la velocidad alta
(HIGH). Combinar la mezcla con los ingredientes
secos; reservar.
3. Volver a instalar la cuchilla picadora y agregar el
azúcar rubio, los huevos, el aceite y la vainilla;
procesar a velocidad baja (LOW) durante 5
segundos para combinar. Agregar la mezcla de
harina/zanahoria y pulsar 3 veces para combinar.
Raspar el tazón y agregar el coco y las semillas de
girasol. Pulse 3 to 4 more times to incorporate.
4. Verter la mezcla en el molde y hornear durante
18–20 minutos, hasta que un probador salga limpio.
Información nutricional por "muffin":
Calorías 316 (60% de grasa) • Carbohidratos 27 g
• Proteínas 6 g • Grasa 22 g • Grasa saturada 4 g
• Colesterol 62 mg • Sodio 232 mg • Calcio 30 mg • Fibra 3 g
DESAYUNOS Y DESAYUNOS-ALMUERZOS
29
GUACAMOLE CON TROZOS
Nuestro guacamole fresco es perfecto para comer con chips delante del
televisor o servir con quesadillas. ¡También es un componente de nuestros
nachos de diez capas (página 32)!
Rinde aproximadamente 1 taza (235 ml)
1
½
DIENTE DE AJO PEQUEÑO
JALAPEÑO, SIN SEMILLAS, EN
TROCITOS
CUCHARADA DE CILANTRO FRESCO
1
CEBOLLETA
TROZOS
1
2
2
¾
28
("SCALLIONS"), EN
(SIN TALLOS)
1. Instalar la cuchilla picadora en el tazón. Agregar el
ajo, el jalapeño, la cebolleta y el cilantro y pulsar
para picar grueso.
2. Raspar el tazón. Agregar el aguacate, el jugo de
lima y la sal. Pulsar 10–15 veces, y luego procesar a
velocidad alata (HIGH) hasta obtener la consistencia
deseada.
Calorías 71 (73% de grasa) • Carbohidratos 4 g • Proteínas 1 g
• Grasa 6 g • Grasa saturada 1 g • Colesterol 0 mg
• Sodio 118 mg • Calcio 7 mg • Fibra 3 g
CUCHARADAS DE JUGO DE LIMA
FRESCO
Información nutricional por porción (¼ taza/60 ml):
AGUACATES MADUROS
CUCHARADITA DE SAL KOSHER
RECETAS BÁSICAS
SALSA "RÉMOULADE"
Esta salsa acompaña deliciosamente tanto los mariscos como los vegetales
al vapor. Para conseguir una consistencia más espesa, sustituya el yogur
por yogur griego.
Cantidad: 21⁄3 tazas (555 ml)
CUCHARADA DE ENELDO FRESCO
1
1
TAZA (15 G) DE PEREJIL ITALIANO
FRESCO (SIN TALLOS)
¼
CHALOTE MEDIANO A GRANDE,
PELADO Y CORTADA EN PEDAZOS
½
CUCHARADA DE MOSTAZA DE
DIJON
TAZA
1¼
½
CUCHARADAS DE ALCAPARRAS,
ESCURRIDAS
3
¼
1
∕8
(295 ML) DE MAYONESA
TAZA (120 ML) DE YOGUR
NATURAL SIN GRASA
TAZA
(50 G) DE PICADILLO DULCE
CUCHARADITA DE PIMIENTA NEGRA
RECIÉN MOLIDA
1. Instalar la cuchilla picadora en el tazón. Colocar el
chalote, el perejil y el eneldo en el tazón y pulsar
aproximadamente 10 veces para picar. Raspar el
tazón, agregar la mostaza y las alcaparras y pulsar
5–10 veces para picar.
2. Agregar la mayonesa, el yogur, el picadillo y la
pimienta negra; pulsar 5 veces, usando pulsaciones
largas, para combinar. No procesar demasiado.
Refrigerar hasta el momento de usar.
Información nutricional por porción (1 cucharada):
Calorías 64 (89% de grasa) • Carbohidratos 1 g • Proteínas 1 g
• Grasa 6 g • Grasa saturada 1 g • Colesterol 26 mg • Sodio
105 mg • Calcio 8 mg • Fibra 0 g
SALSA DE TOMATES
Esta salsa fresca y agridulce es perfecta para servir con chips de maíz
calientes.
Rinde aproximadamente 2 tazas (475 ml)
CEBOLLAS PEQUEÑAS, EN PEDAZOS
2
1
1
TAZA (15 G) DE CILANTRO
ITALIANO FRESCO (SIN TALLOS)
¼
DIENTE DE AJO PEQUEÑO
JALAPEÑO, SIN SEMILLAS, EN
TROCITOS
¾
2
1
CUCHARADITA DE SAL KOSHER
TAZAS
PERA
(300 G) DE TOMATES DE
CUCHARADA DE JUGO DE LIMA
FRESCO
1. Instalar la cuchilla picadora en el tazón. Agregar el
cilantro, las cebolletas, el ajo y el jalapeño; pulsar
aproximadamente 10 veces para picar. Agregar la
sal, los tomates y el jugo de lima; pulsar 8–10 veces,
hasta obtener la consistencia deseada.
2. Probar y ajustar la sazón al gusto. Colar la salsa para
eliminar el exceso de líquido si desea.
Información nutricional por porción (¼ taza/60 ml):
Calorías 11 (7% de grasa) • Carbohidratos 2 g • Proteínas 0 g
• Grasa 0 g • Grasa saturada 0 g • Colesterol 0 mg
• Sodio 287 mg • Calcio 7 mg • Fibra 1 g
RECETAS BÁSICAS
27
SALSA DE TOMATE CLÁSICA
Esta salsa rápida tiene el mismo sabor que si hubiera cocido a fuego lento
durante todo el día. Reducida, es perfecta para preparar pizza.
Rinde aproximadamente 3 tazas (710 ml)
1½
4
1
¾
¼
CUCHARADITA DE ACEITE DE OLIVA
DIENTES DE AJO
CEBOLLA PEQUEÑA, EN PEDAZOS
CUCHARADITA DE ORÉGANO SECO
TAZA
SECO
(60 ML) DE VINO BLANCO
CUCHARADITA DE SAL KOSHER
½
1
LATA DE 28 ONZAS (810 G) DE
TOMATES COCIDOS, CON JUGO
1
RAMITA DE ALBAHACA FRESCA
(10–12 HOJAS)
CUCHARADITA DE HOJUELAS DE
PIMIENTO ROJO
¼
CUCHARADITA DE PIMIENTA NEGRA
RECIÉN MOLIDA
¼
1. Poner el aceite de oliva a calentar a fuego medio,
en una cacerola mediana.
2. Instalar la cuchilla picadora en el tazón. Encender la
máquina en HIGH y echar el ajo en la boca de
llenado. Raspar el tazón y agregar la cebolla. Pulsar
aproximadamente 5 veces para picar finamente.
3. Una vez caliente, agregar el ajo picado, la cebolla y
el orégano. Saltear hasta que la cebolla esté suave y
el ajo fragante. Agregar el vino y seguir cociendo
hasta que la mayoría del líquido se haya evaporado.
4. Poner los tomates en el tazón y pulsar
aproximadamente 8 veces para picar. Colocar los
tomates, la sal y la albahaca en la cacerola.
5. Cuando la salsa empiece a hervir, reducir el fuego.
Cubrir parcialmente la cacerola y cocer a fuego
lento durante 30 minutos. Apagar y agregar la
pimienta negra y las hojuelas de pimienta roja
(opcional). Probar y ajustar la sazón al gusto.
Para preparar salsa para pizza, cocer la salsa (sin tapar)
durante 30–40 minutos adicionales, revolviendo
ocasionalmente. Dejar enfriar completamente antes de
cubrir la pizza.
Información nutricional por porción (¼ taza/60 ml):
Calorías 27 (20% de grasa) • Carbohidratos 4 g • Proteínas 1 g
• Grasa 1 g • Grasa saturada 0 g • Colesterol 0 mg
• Sodio 239 mg • Calcio 16 mg • Fibra 1 g
26
RECETAS BÁSICAS
PESTO DE ALBAHACA
Esta versión tiene más queso que el pesto tradicional, pero puede
ajustar la cantidad de queso al gusto. Pruebe cualquier combinación de
hierbas o nueces en esta receta.
Rinde 1¼ taza
DIENTE DE AJO
1
¼
ONZAS (60 G) DE QUESO
REGGIANO PARMIGIANO, EN
CUBITOS
2
TAZA (35 G) DE PIÑONES,
LIGERAMENTE TOSTADOS
CUCHARADITA DE SAL KOSHER
½
½–2⁄3
ONZAS (90 G) DE HOJAS DE
ALBAHACA FRESCA
3
TAZA (120–160 ML) DE ACEITE
DE OLIVA VIRGEN EXTRA
1. Instalar la cuchilla picadora en el tazón. Agregar el
queso, el ajo y las nueces y pulsar aproximadamente
10 veces para picar. Agregar la albahaca y pulsar
10–15 veces; raspar el tazón. Encender la máquina
en LOW y agregar el aceite lentamente por el
orificio en el empujador; procesar durante
aproximadamente 1 minuto para emulsionar. Raspar
el tazón.
2. Para guardar el pesto: ponerlo en un tarro de vidrio
o en un recipiente hermético. Darle golpecitos para
eliminar las burbujas de aire de la superficie. Cubrir
con una película de plástico y refrigerar. El pesto
podrá conservarse en el refrigerador durante 5 días,
o bien congelarse.
Información nutricional por porción (1 cucharada):
Calorías 72 (80% de grasa) • Carbohidratos 0 g • Proteínas 1 g
• Grasa 8 g • Grasa saturada 1 g • Colesterol 2 mg
• Sodio 74 mg • Calcio 40 mg • Fibra 0 g
RECETAS BÁSICAS
25
4
¾
½
MAYONESA
La mayonesa casera es mucho más sabrosa que la comprada.
Rinde 1 taza (235 ml)
YEMAS DE HUEVO GRANDE*
CUCHARADITA DE SAL KOSHER
CUCHARADITA DE MOSTAZA DE
DIJON
CUCHARADA DE AGUA
1
¾
CUCHARADITA DE JUGO DE LIMÓN
FRESCO
1
TAZA (175 ML) DE ACEITE
VEGETAL
1. Instalar la cuchilla picadora en el tazón. Agregar las
yemas, la sal, la mostaza, el jugo de limón y el agua;
procesar a velocidad baja (LOW) durante 30
segundos. Sin apagar la máquina, agregar el aceite
de oliva lentamente por el orificio en el empujador
y seguir procesando hasta que la mezcla esté
emulsionada.
2. Raspar el tazón; probar y ajustar la sazón al gusto.
Nota: para preparar mayonesa con hierbas, añadir 1⁄3
taza llena (10 g) de hierbas frescas como perejil,
eneldo, estragón, albahaca, etc. (hojas solamente) a las
yemas antes de agregar el aceite.
Si desea una mayonesa más fuerte, agregar ¼
cucharadita de sal, ½ cucharadita de mostaza y 1
cucharada de jugo de limón.
Información nutricional por porción
(1 cucharada, usando yemas):
Calorías 93 (96% de grasa) • Carbohidratos 0 g • Proteínas 1 g
• Grasa 10 g • Grasa saturada 1 g • Colesterol 41 mg
• Sodio 104 mg • Calcio 5 mg • Fibra 0 g
*Advertencia: los huevos crudos y parcialmente cocidos pueden estar
contaminados con bacterias nocivas, como la salmonella. Para reducir
el riesgo de infección, le aconsejamos que utilice huevos frescos,
limpios y debidamente refrigerados de calidad A o AA, con cáscara
intacta, y que evite el contacto entre las yemas o las claras y la cáscara.
Para preparar mayonesa baja en colesterol, sustituir las yemas con el
sustituto de huevo sin colesterol.
24
RECETAS BÁSICAS
ADEREZO CÉSAR
Existen muchas variaciones de esta receta, pero esta es muy parecida a la
versión clásica. Si no desea usar huevos frescos, puede usar sustituto de
huevo pasteurizado.
Rinde 1 taza (235 ml)
1–2
5
2
2
DIENTES DE AJO
FILETES DE ANCHOA
YEMAS DE HUEVO GRANDE*
CUCHARADITAS DE MOSTAZA DE
DIJON
CUCHARADITA DE PIMIENTA NEGRA
RECIÉN MOLIDA
½
CUCHARADITAS DE SALSA
WORCESTERSHIRE
2
CUCHARADITAS DE VINAGRE DE
VINO TINTO
4
CUCHARADITAS DE JUGO DE LIMÓN
FRESCO
4
⁄3
2
TAZA (160 ML) DE ACEITE DE
OLIVA VIRGEN EXTRA
1. Instalar la cuchilla picadora en el tazón. Encender la
máquina en HIGH y echar el ajo en la boca de
llenado. procesar hasta que esté finamente picado.
Agregar las anchoas, las yemas, la mostaza, el jugo
de limón, el vinagre, la salsa Worcestershire y la
pimienta. Procesar a velocidad alta (HIGH) para
combinar.
2. Encender la máquina en LOW y agregar el aceite
lentamente por el orificio en el empujador; procesar
durante aproximadamente 30 segundos para
emulsionar.
Información nutricional por porción (1 cucharada):
Calorías 91 (95% de grasa) • Carbohidratos 1 g
• Proteínas 1 g • Grasa 10 g • Grasa saturada 2 g
• Colesterol 24 mg • Sodio 60 mg • Calcio 4 mg • Fibra 0 g
*Advertencia: los huevos crudos y parcialmente cocidos pueden estar
contaminados con bacterias nocivas, como la salmonella. Para reducir el
riesgo de infección, le aconsejamos que utilice huevos frescos, limpios y
debidamente refrigerados de calidad A o AA, con cáscara intacta, y que
evite el contacto entre las yemas o las claras y la cáscara.
RECETAS BÁSICAS
23
1
1
⁄3
ADEREZO DE TAHINI
La salsa Tahini (pasta de semillas de sésamo) ahora está disponible en
la mayoría de los supermercados. Cerciórese de mezclar la salsa antes
de medirla, ya que se separa naturalmente en su tarro. Este aderezo
es perfecto para servir con nuestros "falafel" (receta en la página 47) o
aderezar una ensalada de verduras de hoja.
Rinde aproximadamente 1 taza (235 ml)
DIENTE DE AJO
TAZA
(80 ML) DE SALSA TAHINI
CUCHARADITA DE MIEL
1
¾
¼
CUCHARADAS DE JUGO DE LIMÓN
FRESCO
2
TAZA (60 ML) DE AGUA (USAR
MÁS SI ES NECESARIO)
¼
½
CUCHARADITA DE SAL KOSHER
CUCHARADITA DE PIMIENTA NEGRA
RECIÉN MOLIDA
TAZA (120 ML) DE ACEITE DE
OLIVA VIRGEN EXTRA
1. Instalar la cuchilla picadora en el tazón. Encender la
máquina en HIGH y echar el ajo en la boca de
llenado. Procesar hasta que esté finamente picado.
Apagar y raspar el tazón. Agregar la salsa Tahini, ¼
taza (60 ml) de agua, el jugo de limón, la miel, la sal
y la pimienta.
2. Encender la máquina en LOW y agregar el aceite
lentamente por el orificio en el empujador. Seguir
procesando hasta obtener la consistencia deseada.
Si el aderezo parece muy espeso, agregar ¼ taza
(60 ml) más de agua. Ajustar la sazón al gusto.
Información nutricional por porción (1 cucharada):
Calorías 91 (88% de grasa) • Carbohidratos 2 g • Proteínas 1 g
• Grasa 9 g • Grasa saturada 1 g • Colesterol 0 mg
• Sodio 111 mg • Calcio 22 mg • Fibra 0 g
22
RECETAS BÁSICAS
MANTEQUILLA DE MANÍ
Le sorprenderá lo fácil que es preparar su propia mantequilla de nuez.
Cerciórese de usar nueces sin sal para poder controlar la cantidad de sal en
el producto final.
Rinde aproximadamente 1 taza (235 ml)
2
TAZAS
(290 G) DE MANÍ TOSTADO
SAL KOSHER, A SU GUSTO
1. Instalar la cuchilla picadora en el tazón. Agregar el
maní, pulsar 10 veces, y luego procesar a velocidad
baja (LOW) durante aproximadamente 4–5 minutos,
hasta obtener una mezcla muy suave y aceitosa.
Raspar el tazón de vez en cuando.
2. Agregar la sal; pulsar 2 ó 3 veces para combinar.
Ajustar la sazón al gusto.
CONSEJO: puede usar este método para preparar
cualquier mantequilla de nuez; añada especias dulces o
saladas para obtener un sabor más interesante.
Información nutricional por porción (1 cucharada):
Calorías 116 (71% de grasa) • Carbohidratos 4 g • Proteínas 5 g
• Grasa 10 g • Grasa saturada 1 g • Colesterol 0 mg
• Sodio 105 mg • Calcio 11 mg • Fibra 2 g
VINAGRETA BÁSICA
Esta vinagreta clásica es ideal para aderezar vegetales crudos o pollo
asado; también puede usarse como marinada.
Rinde 1 taza (235 ml)
CUCHARADITA DE SAL KOSHER
½
¼
CUCHARADITA DE MOSTAZA DE
DIJON
1
CHALOTE PEQUEÑO, PELADO Y
PARTIDO
1
CUCHARADITA DE VINAGRE DE
CHAMPAÑA
1½
¾
CUCHARADITA DE PIMIENTA
BLANCA RECIÉN MOLIDA
1. Instalar la cuchilla picadora en el tazón. Agregar el
vinagre, el chalote, la mostaza, la sal y la pimienta;
procesar a velocidad baja (LOW) para picar
finamente.
2. Sin apagar el aparato, agregar el aceite de oliva
lentamente por el orificio en el empujador y
procesar durante aproximadamente 1½–2 minutos,
hasta obtener una mezcla homogénea.
Información nutricional por porción (1 cucharada):
TAZA (175 ML) DE ACEITE DE
OLIVA VIRGEN EXTRA
Calorías 106 (82% de grasa) • Carbohidratos 1 g
• Proteínas 0 g • Grasa 11 g • Grasa saturada 2 g
• Colesterol 0 mg • Sodio 91 mg • Calcio 1 mg • Fibra 0 g
RECETAS BÁSICAS
21
QUESO CREMA CON VEGETALES
Llena de color y textura, esta crema para untar no sólo puede usarse sobre
panecillos; también puede acompañar galletas saladas, sándwiches, e
incluso patatas al horno.
Rinde 1 taza (235 ml)
CUCHARADITA DE SAL KOSHER
½
CUCHARADITA DE JUGO DE LIMÓN
FRESCO
½–1
ONZAS (230 G) DE QUESO
CREMA, A TEMPERATURA
AMBIENTE, EN PEDAZOS
8
CUCHARADA DE HOJAS PEREJIL
ITALIANO FRESCO
1
CEBOLLETA
TROZOS
1
PIMIENTO DULCE ROJO GRANDE,
EN PEDAZOS
½
ZANAHORIA MEDIANA, PELADA Y
CORTADA EN TROCITOS
½
("SCALLION"), EN
1. Instalar la cuchilla picadora en el tazón. Agregar la
zanahoria, el pimiento rojo, las cebolletas y el
perejil; pulsar 5 veces para picar. Agregar el queso
crema, el jugo de limón y la sal; pulsar 10–12 veces,
hasta que esté suave. Raspar el tazón si es
necesario.
Información nutricional por porción (1 cucharada):
Calorías 35 (85% de grasa) • Carbohidratos 1 g • Proteínas 1 g
• Grasa 3 g • Grasa saturada 2 g • Colesterol 10 mg
• Sodio 79 mg • Calcio 1 mg • Fibra 0 g
QUESO CREMA CON SALMÓN AHUMADO
¡El queso crema con salmón ahumado siempre es un éxito, ya sea sobre
panecillos con semillas de amapola o en elegantes emparedados.
Rinde aproximadamente 1 taza (235 ml)
PIZCA DE SAL KOSHER
1
1
ONZAS (230 G) DE QUESO
CREMA, A TEMPERATURA
AMBIENTE, EN PEDAZOS
8
PIZCA DE PIMIENTA NEGRA RECIÉN
MOLIDA
RAMITAS DE ENELDO FRESCO
2
CUCHARADAS DE ALCAPARRAS,
ESCURRIDAS
2
CUCHARADITAS DE JUGO DE LIMÓN
FRESCO
2
ONZAS (90 G) DE SALMÓN
AHUMADO, EN PEDAZOS
3
20
1. Instalar la cuchilla picadora en el tazón. Agregar el
queso crema, la sal y la pimienta. Pulsar varias veces
para romper, y luego procesar continuamente hasta
que esté suave. Agregar el salmón ahumado, el
jugo de limón, las alcaparras y el eneldo; pulsar para
combinar. Luego, procesar a velocidad alta (HIGH)
hasta obtener una mezcla homogénea.
2. Probar y ajustar la sal al gusto.
Información nutricional por porción (1 cucharada):
Calorías 56 (83% de grasa) • Carbohidratos 1 g • Proteínas 2 g
• Grasa 5 g • Grasa saturada 3 g • Colesterol 16 mg
• Sodio 160 mg • Calcio 1 mg • Fibra 0 g
RECETAS BÁSICAS
MANTEQUILLA DE ENELDO
Usar mantequilla europea de alta calidad marca la diferencia. Por lo tanto,
no dude en comprar mantequilla de calidad para preparar esta receta. La
usamos en nuestra receta de emparedados de rábano-eneldo,
pero también es perfecta para servir con salmón asado.
.
¼
½
2
1
TAZA
(15 G) DE ENELDO FRESCO
TAZA (115 G) DE
MANTEQUILLA DE ALTA
CALIDAD, A TEMPERATURA
AMBIENTE, CORTADO EN 4
PEDAZOS
PIZCAS DE SAL KOSHER
PIZCA DE PIMIENTA NEGRA
RECIÉN MOLIDA
Rinde ½ taza
1. Instalar la cuchilla picadora en el tazón.
2. Poner el eneldo en el tazón y procesar a velocidad
alta (HIGH) durante 10 segundos.
3. Agregar la mantequilla, la sal y la pimienta. Procesar
a velocidad alta (HIGH) durante aproximadamente
10 segundos para combinar, raspando el tazón si es
necesario.
4. Probar y ajustar la sazón al gusto.
Información nutricional por porción (2 cucharaditas):
Calorías 67 (100% de grasa) • Carbohidratos 0 g
• Proteínas 0 g • Grasa 7 g • Grasa saturada 5 g
• Colesterol 20 mg • Sodio 24 mg • Calcio 0 mg • Fibra 0 g
RECETAS BÁSICAS
19
PAN RALLADO FRESCO BÁSICO
¿Por qué comprar pan rallado cuando lo puede preparar tan fácilmente con
su procesadora de alimentos Cuisinart®?
Rinde 2∕3 taza
4
REBANADAS DE PAN BLANCO
1. Precalentar el horno a 325 °F (160 °C). Meter el pan
al horno por aproximadamente 20 minutos, hasta
que esté completamente seco. Nota: puede hacer
esto en su horno tostador para ahorrar energía y
dinero, puesto que hornea solamente cuatro
rebanadas de pan.
2. Instalar la cuchilla picadora en el tazón. Romper el
pan en pedazos, directamente en el tazón. Pulsar 10
veces, y luego procesar continuamente a velocidad
alta (HIGH) hasta conseguir la textura deseada
(30–90 segundos para resultados gruesos y 3–4
minutos para resultados finos).
Nota: también puede preparar pan rallado con pan
del día anterior. simplemente rompa el pan en
pedazos uniformes y siga las instrucciones para picarlo
finamente.
Consejo: Para preparar pan rallado sazonado, agregar
¼ cucharadita de cada uno de los ingredientes
siguientes: orégano, albahaca seca, ajo en polvo y
cebolla en polvo.
Información nutricional por porción (2 cucharadas):
Calorías 96 (11% de grasa) • Carbohidratos 18 g
• Proteínas 3 g • Grasa 1 g • Grasa saturada 0 g
• Colesterol 0 mg • Sodio 144 mg • Calcio 16 mg • Fibra 2 g
18
RECETAS BÁSICAS
SOPAS/ENSALADAS/PLATOS DE
ACOMPAÑAMIENTO
Gazpacho ......................................................................................................................40
Crema de camote .........................................................................................................41
"Minestrone" de vegetales de primavera ..................................................................42
Ensalada de col .............................................................................................................43
Ensalada de verduras picadas .....................................................................................44
Coles de Bruselas ralladas ...........................................................................................45
Croquetas de patata-calabacín-zanahoria .................................................................46
PLATOS PRINCIPALES
"Falafel" (croquetas de garbanzo) .............................................................................47
Pizza Margarita..............................................................................................................48
Quiche de setas, puerro y queso Gruyère .................................................................49
“Chicken pot pie” ........................................................................................................50
Salteado de vegetales..................................................................................................51
Tacos Americanos ........................................................................................................52
Palitos de pescado .......................................................................................................53
MASAS/PANES
Masa de pizza ...............................................................................................................54
"Pâte brisée" (masa quebrada) ...................................................................................55
Pancitos con sabor a mantequilla ...............................................................................56
Panecillos de suero de mantequilla ............................................................................57
POSTRES
Pastel de manzana clásico ...........................................................................................58
Pastel de zanahoria con cobertura de queso crema .................................................59
Tarta de queso de calabaza.........................................................................................60
RECETAS BÁSICAS
17
RECETAS BÁSICAS
Pan rallado fresco básico .............................................................................................18
Mantequilla de eneldo .................................................................................................19
Queso crema con vegetales ........................................................................................20
Queso crema con salmón ahumado ...........................................................................20
Mantequilla de maní ....................................................................................................21
Vinagreta básica ...........................................................................................................21
Aderezo de Tahini ........................................................................................................22
Aderezo César ..............................................................................................................23
Mayonesa ......................................................................................................................24
Pesto de albahaca ........................................................................................................25
Salsa de tomate clásica ................................................................................................26
Salsa "Rémoulade" ......................................................................................................27
Salsa de tomates ..........................................................................................................27
Guacamole con trozos .................................................................................................28
DESAYUNOS Y DESAYUNOS/ALMUERZOS
"Muffins" para el desayuno .........................................................................................29
Pan de calabacín con especias ....................................................................................30
"Frittata" de cebolla, pimiento dulce y patata ..........................................................31
APERITIVOS
Nachos de diez capas ..................................................................................................32
Frijoles refritos ..............................................................................................................33
Humus............................................................................................................................34
Emparedados – 2 variedades (rábano/eneldo; pepino/salmón) ..............................35
Panes rellenos – 2 variedades (salchicha; grelo) ........................................................37
16
RECETAS BÁSICAS
Libro de recetas
PROCESADORA DE ALIMENTOS DE 8 TAZAS (1.9 L)
©2014 Cuisinart
150 Milford Road
East Windsor, NJ 08520
Impreso en la China
14CE002354
G IB-12704-ESP
14
independiente, cambiará el producto o
reembolsará el consumidor por el precio
original del producto, menos la cantidad
imputable al uso del producto por el
consumidor hasta que éste se dañe. Si estas
dos opciones no satisfacen al consumidor,
podrá llevar el aparato a un centro de servicio
independiente, siempre que se pueda ajustar
o reparar el aparato de manera económica.
Cuisinart será responsable por los gastos de
servicio, reparación, reemplazo o reembolso
de los productos defectuosos durante el
período de garantía.
Los residentes de California también pueden,
si lo desean, mandar el aparato defectuoso
directamente a Cuisinart para que lo reparen
o lo cambien. Para esto, se debe llamar a
nuestro servicio posventa al 1-800-726-0190.
Cuisinart será responsable por los gastos de
reparación, reemplazo, manejo y envío de los
productos defectuosos durante el período de
garantía.
ANTES DE HACER REPARAR SU APARATO
Si su aparato tiene algún problema, le
recomendamos que llame a nuestro servicio
posventa al 1-800-726-0190 antes de regresar
el aparato a Cuisinart. Un representante le
confirmará si su aparato sigue bajo garantía y
le indicará la dirección del centro de servicio
más cercano.
Importante: si debe llevar el aparato
defectuoso a un centro de servicio no
autorizado, por favor informe al personal
del centro de servicio que deberían llamar
al servicio posventa de Cuisinart al 1-800726-0190 a fin de diagnosticar el problema
correctamente, usar las piezas correctas para
repararlo y asegurarse de que el producto esté
bajo garantía.
13
2. Problema: El aparato se apaga durante el uso.
Solución:
• Asegurarse de que la tapa esté bien cerrada.
• Un cortocircuito de seguridad apaga
automáticamente en motor en caso de
sobrecalentamiento, lo cual puede ocurrir al
procesar mezclas espesas durante un tiempo
prolongado. Si esto ocurriera, desconectar el
aparato y dejar enfriar durante 20–30 minutos.
3. Problema: El motor pierde velocidad durante el
uso.
Solución:
• Esto puede ocurrir cuando el motor hace
mucha fuerza (por ejemplo para rebanar/rallar
queso). Vuelva a colocar los alimentos en la
boca de llenado y seguir procesando.
• Puede que la cantidad de alimentos exceda
la capacidad máxima de la procesadora.
Retirar una parte de los ingredientes y seguir
procesando.
4. Problema: El aparato se mueve durante el uso.
Solución:
• Averiguar que los pies de caucho debajo de la
base están limpios y secos. También averiguar
que la cantidad de alimentos no excede la
capacidad máxima.
• Esto puede ocurrir cuando el motor hace
mucha fuerza (por ejemplo para rebanar/rallar
queso).
GARANTÍA LIMITADA DE
DOS AÑOS
Esta garantía es para los consumidores
solamente. Usted es un consumidor si ha
comprado su aparato Cuisinart® en una tienda,
para uso personal o casero. A excepción de los
estados donde la ley lo permita, esta garantía no
es para los detallistas u otros comerciantes.
Cuisinart garantiza este aparato contra todo
defecto de materiales o fabricación durante dos
años después de la fecha de compra original,
siempre que el aparato haya sido utilizado para
uso doméstico y según las instrucciones.
Le aconsejamos que llene el formulario de
registro disponible en www.cuisinart.com a fin
de facilitar la verificación de la fecha de compra
original. Sin embargo, registrar el producto no es
necesario para recibir servicio bajo esta garantía.
En ausencia del recibo de compra, el período de
garantía será calculado a partir de la fecha de
fabricación.
Si este aparato presentara algún defecto de
materiales o fabricación durante el período de
garantía, la reparemos o reemplazaremos (a
nuestra opción). Para obtener servicio bajo esta
garantía, llame a nuestra línea directa gratuita al
1-800-726-0190 o regrese el aparato defectuoso
a: Cuisinart, Service Department, 7475 North
Glen Harbor Blvd., Glendale, AZ 85307.
Regrese el aparato defectuoso, junto con su
recibo de compra y un cheque o giro postal de
US$10.00 por gastos de manejo y envío.
Los residentes de California sólo necesitan dar
una prueba de compra y deben llamar al 1-800726-0190 para recibir instrucciones de envío.
NOTA: para más seguridad, le aconsejamos que
mande su paquete por un método de entrega
con seguro y seguimiento. Cuisinart no será
responsable por los daños ocurridos durante
el transporte o por los paquetes mandados
a una dirección equivocada. Los productos
perdidos y/o lastimados durante el envío no serán
cubiertos bajo esta garantía. Recuerde incluir
su nombre, dirección y teléfono, la descripción
del problema, así como cualquier información
pertinente.
Este aparato satisface las más altas exigencias
de fabricación y ha sido diseñado para uso sobre
corriente de 120V, usando accesorios y piezas
de repuesto autorizados solamente. Esta garantía
excluye expresamente los daños causados por
accesorios, piezas o reparaciones no autorizados
por Cuisinart, así como los daños causados
por el uso de un convertidor de voltaje. Esta
garantía no cubre el uso institucional o comercial
del producto, y no es válida en caso de daños
causados por mal uso, negligencia o accidente.
Esta garantía excluye expresamente todos los
daños incidentales o consecuentes. Algunos
Estados no permiten la exclusión o limitación de
daños incidentales o consecuentes, de modo que
las limitaciones mencionadas pueden no regir
para usted. Usted puede tener otros derechos
que varían de un Estado a otro.
RESIDENTES DE CALIFORNIA SOLAMENTE
La ley del estado de California ofrece dos
opciones bajo el período de garantía. Los
residentes del estado de California pueden (A)
regresar el producto defectuoso a la tienda
donde lo compraron o (B) a otra tienda que venda
productos Cuisinart® de este tipo.
La tienda, a su opción, reparará el producto,
referirá el consumidor a un centro de servicio
12
al sacar el juego de empujadores.
Cuisinart ofrece una garantía limitada de dos años
sobre este aparato.
RESOLUCIÓN DE
PROBLEMAS
3.
Problemas al picar/rebanar/rallar
1. Problema: Los alimentos picados no son
uniformes.
Solución:
• Cortar los alimentos en pedazos uniformes de
½–1 pulgada (1.5–2.5 cm) antes de procesarlos.
• No sobrellenar el tazón.
2. Problema: Las rebanadas/tajadas/rodajas no son
uniformes.
Solución:
• Colocar los alimentos en la boca de llenado con
el lado cortado apuntando hacia abajo.
• Procesar, ejerciendo presión uniforme.
3. Problema: Los alimentos no se mantienen rectos
en la boca de llenado.
Solución:
• Apretujar los alimentos en la boca de llenado.
4. Problema: Alimentos permanecen encima del
disco.
Solución:
• Esto es normal.; cortar los pedazos a mano.
Problemas al amasar
1. Problema: El motor pierde velocidad.
Solución:
• Puede que la cantidad de masa exceda la
capacidad máxima. Dividir la masa en dos
porciones y amasar por separado.
• Puede que la masa sea demasiada húmeda
(ver “La masa está demasiado húmeda” a
continuación).
Si el motor acelera, seguir procesando. En el
caso contrario, agregar 1 cucharada de harina
a la vez, hasta que el motor acelere. Seguir
procesando, hasta que la masa se despegue
de las paredes del tazón.
2. Problema: La cuchilla no combina los
ingredientes.
Solución:
• Siempre poner la procesadora en marcha antes
de agregar líquido. Echar el líquido lentamente
por el orificio en el empujador, para permitir que
los ingredientes secos lo absorban. Si el líquido
salpica o chapotea al añadirlo, dejar que los
ingredientes secos lo absorban antes de agregar
4.
5.
6.
7.
8.
más. Echar el líquido por la boca de llenado, en
el momento preciso en que la masa pasa debajo
de ésta. No agregar el líquido directamente al
tazón.
Problema: La cuchilla no permanece en el fondo
del recipiente.
Solución:
• Esto puede pasar si la masa está demasiada
pegajosa. Volver a instalar la cuchilla y agregar
2 cucharadas de harina por la boca de llenado
mientras la procesadora está encendida.
Problema: La masa no deja el tazón limpio.
Solución:
• Puede que la cantidad de masa exceda la
capacidad máxima. Dividir la masa en dos
porciones y amasar por separado.
• Puede que la masa sea demasiada seca (ver “La
masa está demasiado seca” a continuación).
• Puede que la masa sea demasiada húmeda
(ver “La masa está demasiado húmeda” a
continuación).
Problema: La masa se enreda en la cuchilla y no
está homogénea.
Solución:
• Dividir la masa en tres porciones y disponer
uniformemente en el fondo del tazón.
Problema: La masa parece dura.
Solución:
• Dividir la masa en 2 ó 3 porciones y disponer
uniformemente en el fondo del tazón. Amasar
durante 10 segundos, hasta obtener una masa
suave y homogénea.
Problema: La masa está demasiado seca.
Solución:
• Encender la máquina y agregar agua, 1
cucharada a la vez. Procesar hasta que la masa
deje el tazón limpio.
Problema: La masa está demasiado húmeda.
Solución:
• Encender la máquina y agregar harina, 1
cucharada a la vez. Procesar hasta que la masa
deje el tazón limpio.
PROBLEMAS TÉCNICOS
1. Problema: El motor no se enciende.
Solución:
• Un sistema de seguridad impide que el motor
se encienda a menos que la unidad esté
debidamente ensamblada. Cerciorarse que el
tazón y la tapa están debidamente instalados.
• Si esto no soluciona el problema, inspeccionar
el cable y la toma de corriente.
11
LIMPIEZA, MANTENIMIENTO
Y ALMACENAJE
• Mantenga su procesadora de alimentos en la
encimera, para siempre tenerla lista.
Desenchufe el aparato cuando no esté en uso.
• Mantenga la cuchilla y los discos fuera del
alcance de los niños.
• Todas las piezas removibles son aptas para
lavavajillas. Recomendamos que las lave en el
lavavajillas, en el nivel superior únicamente. El
intenso calor del agua en el nivel inferior del
lavavajillas puede dañar los tazones, la tapa y
los accesorios Ponga la tapa recta, con la boca
de llenado apuntando hacia arriba, para que se
limpie debidamente. Ponga el tazón y el
empujador al revés. Tenga cuidado al retirar las
cuchillas y los discos del lavavajillas.
• Le recomendamos que enjuague todas las
piezas inmediatamente después del uso, ya
que alimentos secos podrían dificultar la
limpieza. Cerciórese de poner el empujador al
revés para que le agua escurra. Si alimentos
quedaron atrapados adentro del empujador,
enjuague éste en agua o límpielo con un cepillo
para botella.
• Si desea lavar la cuchilla y los discos a mano,
haga esto con mucho cuidado. Sosténgalos por
el eje de plástico. No los deje en agua
jabonosa, donde los pueda perder de vista.
Para limpiar la cuchilla, llene el tazón con agua
jabonosa. Instale la cuchilla en el tazón y,
sosteniéndola por el eje de plástico, muévala
rápidamente y repetidamente desde arriba
hasta abajo. También puede lavarla con spray.
Utilice un cepillo si fuera necesario.
• El tazón es hecho de plásticos de tipo SAN
(resinas de estireno acrilonitrilo). No es apto
para microondas.
• Limpie la base después de cada uso con un
paño no abrasivo ligeramente humedecido con
agua jabonosa. Séquela bien.
• Si los pies dejan marcas en la encimera,
vaporice producto quitamanchas y restriegue
con una esponja humedecida.
• Si esto no soluciona el problema, vuelva a
limpiar la encimera con un limpiador en polvo
no abrasivo.
IMPORTANTE: No guarde las cuchillas o los
discos sobre el eje del motor. Instale la cuchilla o
el disco en el tazón en el momento de usarlo
únicamente.
MANTENIMIENTO: Cualquier otro servicio debe
ser realizado por un técnico autorizado.
PARA SU SEGURIDAD
• Su aparato, como todos los electrodomésticos,
debe usarse con cuidado. Para prevenir los
riesgos de herida resultantes de un mal uso,
siga estas reglas de seguridad.
• Manipule la cuchilla y los discos con sumo
cuidado. Sus filos son muy afilados.
• Asegúrese de que el tazón esté debidamente
instalado antes de instalar la cuchilla o el disco.
• Inserte la cuchilla o el disco completamente, lo
más bajo que encaje.
• Siempre instale la cuchilla antes de agregar los
ingredientes al tazón.
• Siempre use el empujador para empujar los
alimentos. Nunca introduzca sus dedos o algún
utensilio en la boca de llenado.
• Siempre espere hasta que la cuchilla o el disco
esté totalmente inmóvil antes de abrir la tapa o
remover el empujador.
• Siempre desenchufe el aparato antes vaciar el
tazón, limpiar el aparato, instalar o remover
piezas.
• Siempre retire el tazón de la base antes de
retirar la cuchilla.
• Tenga cuidado de no dejar caer la cuchilla al
vaciar el tazón. Retírela antes de vaciar el
tazón.
ESPECIFICACIONES
TÉCNICAS
El motor de su procesadora de alimento funciona
con corriente estándar. Las especificaciones
eléctricas del aparato están indicadas en la
etiqueta debajo de la base.
Un disyuntor de seguridad apagará
automáticamente en motor en caso de
sobrecalentamiento. Esto puede ocurrir al
procesar mezclas espesas durante un tiempo
prolongado o al usar el aparato sin interrupción
durante un tiempo excesivo. Si esto ocurriera,
desconecte el aparato y permita que se enfríe
durante 10 minutos o más (hasta una hora en
casos extremos).
Un mecanismo de seguridad impide que el aparato
se ponga en marcha a menos que el tazón y la tapa
estén debidamente cerrados. El motor de la
procesadora se apaga muy rápidamente después
de apagar el aparato y se detiene automáticamente
10
INSTRUCCIONES DE USO
Su nueva procesadora de alimentos Cuisinart no sólo le permitirá picar, rallar y cortar en rodajas una gran variedad
de frutas y vegetales. También es la herramienta perfecta para muchas otras tareas de preparación alimenticia,
tales como suavizar la mantequilla, rallar pan, preparar papillas y mucho más. ¡A continuación incluimos una guía
que le permitirá preparar cualquier receta!
Cortar la carne en pedazos de ½ pulgada (1.5 cm). Pulsar para picar (aproximadamente 14
pulsaciones largas), y luego procesar continuamente para moler. No procesar más de ¾ libra
(340 g) a la vez.
Cuchilla picadora/mezcladora/
amasadora
Carne molida
Procesar azúcar granulado durante aproximadamente 1 minuto, hasta pulverizarlo. El azúcar
de sémola es ideal para preparar merengues y otros productos de panadería y confitería.
Cuchilla picadora/mezcladora/
amasadora
Azúcar de sémola
Procesar la crema fría hasta que espese. Agregar azúcar si desea y seguir procesando hasta
obtener la consistencia deseada. La crema batida será densa, perfecta para acompañar pastel
o helado.
Cuchilla picadora/mezcladora/
amasadora
Crema batida
Colocar pedazos de 1 pulgada (2.5 cm) de fruta congelada en el tazón. Agregar líquido (jugo o
leche), el edulcorante deseado (azúcar, miel, jarabe simple) y otros sabores. Procesar hasta
obtener una mezcla suave.
Cuchilla picadora/mezcladora/
amasadora
"Helado"
Pulsar hasta obtener la consistencia deseada. Para preparar mantequilla de nuez (como por ej.
mantequilla de maní), pulsar para picar y luego procesar hasta que esté suave, raspando el
tazón de vez en cuando.
Cuchilla picadora/mezcladora/
amasadora
Nueces
Lavar y secar bien las hierbas. Pulsar para picar grueso. Seguir pulsando hasta obtener la
consistencia deseada.
Cuchilla picadora/mezcladora/
amasadora
Hierbas frescas
Cuchilla picadora/mezcladora/
amasadora
Batidos y licuados
(smoothies)
Romper en pedazos. Pulsar para romper, y luego procesar hasta obtener la textura deseada.
Esto producirá la mezcla rallada de pan/galletas saladas/chips perfecta para empanar carne o
pescado. ¡Las galletas ralladas son perfectas para preparar corteza de tarta y pasteles!
Cuchilla picadora/mezcladora/
amasadora
Pan rallado o
galletas molidas
Para suavizar: Utilizar mantequilla a temperatura ambiente. Cortar en pedazos de 1 pulgada
(2.5 cm). Procesar, raspando el tazón si fuera necesario. Para preparar mantequillas
aromatizadas, procesar los ingredientes aromatizantes (hierbas, ralladura, vegetales. etc.)
primero, antes de agregar la mantequilla. Para rallar/rebanar: Congelar brevemente. Usar
presión ligera a moderada. Rallar la mantequilla puede resultar útil para preparar ciertos tipos
de hojaldres. Rebanar la mantequilla es perfecto para servir con mazorcas de maíz o pancitos
frescos.
Cuchilla picadora/mezcladora/
amasadora
Disco rebanador/rallador
Mantequilla
Cortar las frutas/verduras cocidas en pedazos de ½–1 pulgada (1.5–2.5 cm). Cocer al vapor
hasta que estén muy suaves. Pulsar para picar, y luego procesar hasta obtener la consistencia
deseada (agregar líquido por la boca de llenado si es necesario). Colar el puré con colador de
malla fina. Congelar el puré en bandejas de cubitos de hielo para conseguir porciones
individuales de 1 onza (30 ml).
Cuchilla picadora/mezcladora/
amasadora
Papillas
Cuchilla picadora/mezcladora/
amasadora
Disco rebanador/rallador
Quesos duros
(Parmesano,
Romano, etc.)
Disco rebanador/rallador
Quesos firmes
(Cheddar, suizo,
Edam, Gouda, etc.)
Cuchilla picadora/mezcladora/
amasadora
Quesos suaves
(Ricotta, queso
crema, requesón,
etc.)
ACCESORIO
ALIMENTO
INSTRUCCIONES
Utilizar queso a temperatura ambiente. Cortar el queso en pedazos de 1 pulgada (2.5 cm) si es
necesario. Procesar hasta que esté finamente picado, raspando el tazón de vez en cuando.
Perfecto para preparar tarta de queso, salsas para mojar, relleno de pasta, y más.
Refrigerar o congelar brevemente antes de procesar. Cortar en pedazos suficientemente
pequeños como para caber en la boca de llenado. Usar presión ligera a moderada.
Refrigerar o congelar brevemente antes de procesar. Cortar en pedazos de ½ pulgada (1.5 cm)
para picar. Pulsar varias veces para romper, y luego procesar continuamente hasta que esté
finamente picado. Esta producirá resultados finos. Cortar en pedazos suficientemente
pequeños como para caber en la boca de llenado para rallar o cortar en rodajas. Usar presión
ligera a moderada.
Para preparar batidos, agregar el helado primero. Sin apagar la máquina, echar la leche por la
boca de llenado y procesar hasta obtener la consistencia deseada. Para licuados de frutas,
procesar las frutas primero, y luego agregar el líquido por la boca de llenado, sin apagar la
máquina.
9
si los pedazos son del mismo tamaño. Oprimir
el botón PULSE repetidamente para picar
grueso, luego procesar con la función HIGH
(alto) o LOW (bajo) hasta obtener puré. Raspar
el tazón si es necesario. Nota: no utilice este
método para preparar puré de papas.
• Para preparar crema de verdura: Colar la sopa,
reservando el líquido, y licuar solamente las
verduras. Después, agregar un poco del caldo y
seguir procesando.
Discos rebanadores/ralladores
reversibles
• Los discos rebanador corta rodajas/tajadas/
rebanadas enteras. Es ideal para cortar en
rodajas frutas, vegetales, carnes cocidas y
carnes crudas semi-congeladas. Los discos
rallador es capaz de rallar la mayoría de los
quesos firmes y duros. También puede usarse
para rallar los vegetales como las patatas, las
zanahorias y los calabacines.
• Para lograr resultados homogéneos, apretujar
los alimentos en la boca de llenado. La presión
necesaria dependerá de la consistencia de los
ingredientes. Ejercer presión ligera para rebanar
alimentos suaves, presión moderada para
rebanar alimentos firmes y presión firme para
rebanar ingredientes duros. Ejercer siempre
presión uniforme.
• Para cortar frutas/vegetales en rodajas: Cortar
la extremidad inferior de la fruta/vegetal e
introducirla en la boca de llenado, el lado
cortado primero. Si no cabe, cortar a la mitad o
en cuartos. Procesar, ejerciendo presión
uniforme.
• Para rebanar pequeños alimentos como
champiñones, rábanos o fresas: cortar ambas
extremidades de la fruta/hortaliza e introducirla
verticalmente en la boca de llenado.
• Refrigerar o congelar brevemente el queso
antes de rebanar o rallarlo.
• Para rallar col, lechuga y otras hortalizas de
hoja: Formar un rollo de hojas e introducirlo
verticalmente en la boca de llenado. Procesar,
ejerciendo presión uniforme.
NOTA: siempre use el empujador para
empujar los alimentos; nunca introduzca
los dedos en la boca de llenado durante el
funcionamiento.
8
INSTRUCCIONES DE
ENSAMBLAJE
Antes del primer uso:
Antes de usar el aparato por primera vez, lave
todas las piezas removibles según se describe en
las instrucciones de limpieza.
1. Ponga la procesadora sobre una superficie
llana y seca. No enchufe el aparato hasta que
esté completamente ensamblado.
2. Instale el tazón sobre la base y gírelo en
sentido antihorario para sujetarlo.
CUCHILLA PICADORA/
MEZCLADORA/AMASADORA
1. Coloque el tazón sobre la base, con la
agarradera ligeramente a la derecha del
centro. Gire el tazón en sentido horario para
sujetarlo.
2. Agarre cuidadosamente e instale la cuchilla
deseada sobre el adaptador. La cuchilla
debería quedar ajustada, en el fondo del
tazón.
3. Enchufe el cable en una toma de corriente.
4. Colocar los ingredientes deseados en el
tazón.
5. Coloque la tapa sobre el tazón, con la boca
de llenado ligeramente a la derecha del
centro. Gire en sentido horario para sujetar.
6. Inserte el empujador en la boca de llenado.
7. El aparato está listo.
DISCOS REBANADORES/
RALLADORES REVERSIBLES
1. Coloque el tazón sobre la base, con la
agarradera ligeramente a la derecha del
centro. Gire el tazón en sentido horario para
sujetarlo.
CONTROLES
Botones HIGH y LOW
Hacen funcionar la máquina a velocidad alta (HIGH)
o baja (LOW), hasta presionar el botón OFF para
apagar.
1. Ensamble el aparato según se describió en las
instrucciones de ensamblaje.
2. Ponga los ingredientes en el tazón o
introdúzcalos en la boca de llenado.
3. Presione el botón HIGH (alto) o LOW (bajo). El
indicador luminoso azul se encenderá y el aparato
se pondrá en marcha.
4. Para apagar el aparato, oprima el botón OFF.
Botón PULSE
(encendido intermitente) La función de pulso le
permitirá obtener resultados más homogéneos y
evitará que procese excesivamente los ingredientes.
Salvo indicación contraria en la receta, utilice
pulsaciones cortas de un segundo.
1. Ensamble el aparato según se describió en
las instrucciones de ensamblaje. Ponga los
ingredientes en el tazón. Oprima repetidamente
el botón PULSE, hasta obtener la consistencia
deseada. El indicador luminoso azul se encenderá
cada vez que oprima el botón PULSE.
FUNCIONES
Cuchilla picadora/mezcladora/
amasadora
Picar
• Pelar las frutas/verduras y retirar las partes
duras (corazón, pepas, semillas, huesos, etc.).
Cortar los alimentos en pedazos de ½–1
pulgada (1.5–2.5 cm). Obtendrá resultados más
homogéneos si los pedazos son del mismo
tamaño.
• Puré de frutas/verduras crudas o cocinadas:
Cortar los ingredientes en pedacitos 1 pulgada
(2.5 cm). Obtendrá resultados más homogéneos
7. El aparato está listo.
Hacer puré
6. Conecte el cable a una toma de corriente.
• Pulsar repetidamente hasta obtener la
consistencia deseada. Para obtener una textura
más fina, mantener el botón de pulso oprimido
o utilizar la función HIGH (alto) o LOW (bajo).
Averiguar la consistencia a menudo y raspar el
recipiente con una espátula si es necesario. Se
recomienda usar la velocidad baja para
procesar masas y mezclas. Se recomienda usar
la velocidad alta para picar, procesar, rebanar,
rallar, etc.
5. Inserte el empujador en la boca de llenado.
2. Elija el disco deseado.
3. Coloque cuidadosamente el disco sobre el
adaptador, con el lado que desea usar
apuntado hacia arriba.
4. Coloque la tapa sobre el tazón, con la boca
de llenado ligeramente a la derecha del
centro. Gire en sentido horario para sujetar.
7
PIEZAS
La máquina incluye:
1. Una base con un adaptador fijo y prácticos
botones de control
7.
2. Tazón de 8 tazas (1.9 L)
3. Tapa con boca de llenado
4. Empujador
5. Cuchilla picadora/mezcladora/amasadora
6. Disco rebanador/rallador reversible fino
7. Disco rebanador/rallador reversible medio
6.
8. Sin BPA (no ilustrado)
Ninguna de las piezas en contacto con los
alimentos/líquidos contiene bisfenol A (BPA).
5.
4.
3.
2.
1.
6
ADVERTENCIA: RIESGO
DE INCENDIO O
ELECTROCUCIÓN
El símbolo representado por un
relámpago con punta de flecha
dentro de un triángulo equilátero
tiene como fin alertar al usuario de la
presencia de voltajes peligrosos no
aislados en el interior del aparato, los
cuales pueden ser de suficiente
magnitud para constituir un riesgo de
incendio o electrocución.
El signo de exclamación dentro de
un triángulo equilátero tiene como fin
alertar al usuario de la presencia de
instrucciones importantes de
operación y mantenimiento (servicio)
en la documentación que acompaña
al equipo.
ÍNDICE
Instrucciones de desembalaje ....................... 3
Medidas de seguridad importantes ................ 4
Piezas .............................................................. 6
Instrucciones de ensamblaje .......................... 7
Controles ........................................................ 7
Funciones ....................................................... 7
Instrucciones de uso ....................................... 9
Limpieza, mantenimiento y almacenaje ....... 10
Para su seguridad ........................................ 10
Especificaciones técnicas ............................. 10
Resolución de problemas ............................ 11
Garantía .................................................. 12–13
ADVERTENCIA
RIESGO DE INCENDIO O ELECTROCUCIÓN
NO LO ABRA
ADVERTENCIA: PARA REDUCIR EL RIESGO DE INCENDIO O ELECTROCUCIÓN,
NO DESARME EL CUERPO DEL APARATO.
ESTE APARATO NO CONTIENE PIEZAS QUE PUEDAN SER REPARADAS POR
EL USUARIO. LAS REPARACIONES DEBEN SER EFECTUADAS
POR TÉCNICOS AUTORIZADOS SOLAMENTE.
5
IMPORTANTES
MEDIDAS DE SEGURIDAD
Limpieza
Para reducir el riesgo de electrocución, no
coloque el bloque-motor en agua u otro
líquido.
General
2. No utilice este aparato bajo el efecto del alcohol
u otra sustancia que afecte su tiempo de
reacción o su percepción.
1. Lea todas las instrucciones.
1. Este aparato no debería ser usado por o cerca
de niños o personas con alguna discapacidad.
Siempre que use aparatos eléctricos, debe tomar
precauciones básicas de seguridad, incluso las
siguientes:
Preparación:
2. Las cuchillas y los discos son muy filosos;
manipúlelos con sumo cuidado.
3. Desconecte el aparato cuando no esté en
uso, antes de instalar o de remover piezas,
antes de vaciar el tazón y antes de limpiarlo.
Para desconectar el aparato de la toma de
corriente, agarre el cable por la clavija; nunca
jale el cable.
4. No lo utilice en exteriores.
5. No permita que el cable cuelgue del borde de la
encimera o de la mesa, ni que haga contacto con
superficies calientes.
6. No utilice este aparato si el cable o la
clavija estuviesen dañados, si no funcionase
debidamente, si estuviese dañado, o después de
que se hubiese caído al piso o al agua. Regrese
el aparato a un centro de servicio autorizado
para su revisión, reparación o ajuste.
Funcionamiento
1. Para reducir el riesgo de herida seria o de daño
al aparato, mantenga las manos y los utensilios
alejados de la cuchilla o del disco durante el
funcionamiento. Se podrá usar una espátula de
goma, siempre que el aparato esté apagado.
2. Evite el contacto con las piezas móviles. Nunca
introduzca la mano en la boca de llenado.
Siempre use el empujador.
3. Espere hasta que el motor se haya detenido
completamente antes de remover la tapa. Si
el motor no se detiene dentro de 4 segundos
después de abrir la tapa, desconecte el aparato
y llame al 1-800-726-0190 para asistencia. No
utilice el aparato.
4. No guarde las cuchillas o los discos en el tazón.
Para prevenir el riesgo de heridas, nunca instale la
cuchilla o el disco antes de haberse asegurado de
que el tazón esté debidamente instalado. Guarde
los accesorios fuera del alcance de los niños.
5. Asegúrese de que la tapa esté debidamente
puesta y que el empujador esté completamente
engranado antes de poner el aparato en marcha.
6. No intente forzar el mecanismo de seguridad de
la tapa.
3. Este aparato está homologado por UL para uso
doméstico. Utilícelo únicamente con el propósito
para el cual fue diseñado, según se describe
en este manual de instrucciones. No utilice
el aparato para ningún otro fin que no sea el
indicado.
4. El uso de accesorios no recomendados por
Cuisinart para uso con este modelo podría
provocar un incendio, un choque eléctrico o una
herida.
5. Nunca guarde el aparato con el juego de
empujadores en la posición de bloqueo.
6. La potencia nominal máxima (350 watts) está
basada en el accesorio que consume más
electricidad. Otros accesorios pueden utilizar
menos electricidad.
7. No haga funcionar el aparato bajo o adentro de
un armario. Siempre desconecte el aparato
antes de guardarlo en un armario. Dejar
el aparato conectado presenta un riesgo de
incendio, especialmente si éste toca las paredes
o la puerta del armario cuando cierra.
AVISO: Modelos con base de plástico: el cable
de este aparato está dotado de una clavija
polarizada (una pata es más ancha que otra).
Como medida de seguridad, se podrá enchufar
de una sola manera en la toma de corriente
polarizada. Si no entrara en la toma de corriente,
inviértala. Si aún no entrara completamente,
comuníquese con un electricista. No intente ir en
contra de esta función de seguridad.
GUARDE ESTAS
INSTRUCCIONES
PARA USO
DOMÉSTICO
SOLAMENTE
4
IMPORTANTES
INSTRUCCIONES DE
DESEMBALAJE
Esta caja incluye la procesadora de alimentos de
8 tazas (1.9 L) Cuisinart Elemental y sus
accesorios:
un tazón de 8 tazas (1.9 L), una tapa con
empujador, una cuchilla picadora/mezcladora/
amasadora, un disco triturador/rallador reversible
fino, un disco triturador/rallador reversible medio,
una base con adaptador y un manual de
instrucciones/libro de recetas.
PRECAUCIÓN:
LAS HERRAMIENTAS DE CORTE SON MUY
AFILADAS. Para prevenir las heridas, desembale
el aparato cuidadosamente, siguiendo las
instrucciones siguientes:
1. Ponga la caja sobre una superficie llana y
amplia, como una mesa o una encimera.
Asegúrese de que la caja esté recta.
2. En la caja, encontrará un bloque de espuma de
poliestireno con cavidades que contienen las
piezas de la procesadora.
3. Retire el manual de instrucciones/libro de
recetas y el disco triturador/rallador reversible
ubicados en un lado.
4. Retire el material de embalaje.
5. Retire la base y el tazón juntos y colóquelos
sobre la encimera o una mesa. Lea todas las
instrucciones cuidadosamente antes de usar el
aparato.
6. Le aconsejamos que guarde el material de
embalaje; puede ser útil.
Le aconsejamos que llene el formulario de registro
disponible en www.cuisinart.com a fin de facilitar
la verificación de la fecha de compra original.
3
CAPACIDADES MÁXIMAS
2.5 tazas (375 g) de harina común o harina para hacer pan
Pan blanco/Pizza
2½ docenas (receta de galletas de chispas de chocolate)
Galletas
Mezcla para una tarta de queso de 8 pulgadas (20 cm); 15.25 onzas (450 ml) de
mezcla preparada.
Mezcla para pastel
4 tazas (945 ml)
Líquidos fluidos*
(por ej. aderezo, sopa, etc.)
¾ libra (340 g)
Carne, pescado o marisco picado o molido
3 tazas/468 g (volumen procesado: 1½ taza/390 g)
Puré de fruta/verdura/queso
2 tazas (320 g)
Fruta/verdura/queso picado
8 tazas (896 g)
Fruta/verdura/queso rebanado o rallado
CAPACIDAD
ALIMENTO
2 tazas (292 g)
Mantequilla de frutas secas (por ejemplo maní)
2
MANUAL DE
INSTRUCCIONES
Libro de
recetas
en el lado opuesto
Procesadora de alimentos de 8 tazas (1.9 L) Cuisinart® Elemental 8
Serie FP-8
Para su seguridad y para disfrutar plenamente de este producto, siempre lea las instrucciones
cuidadosamente antes de usarlo.
Version no : IB-12704-ESP
Fold Size: 210X148mm
white wrie-o 120PP
Material (Cover): 105gsm art paper for whole book
(Inside):
Coating: gloss varnishing in cover
Color (Cover): 4C(CMYK)+1C(BK)
(Inside): 1C(BK)+1C(BK) Lncluding 2 color pages
Date: APR-17-2014
Co-ordinator:
Hugo Description
PDF version : IB-12704-ESP (1.0) Book
Hugo Code : CEM0509IB-1-1
Color Series:
Remark: Quality request (1)
Operator : wyx
IRP : AAJ