1
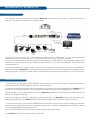
Smart Vu - Ref. SVU300
QUICK START GUIDE
Thank you for choosing Analog Way and the Smart Vu. By following these simple steps, you should
be able to setup and use your powerfull scaler/switcher within minutes. Discover the Smart Vu
extensive capabilities and intuitive interface while configuring your first show, and unleash your
creativity for a new experience in show and event management by Analog Way.
What’s in the box
1 x Smart Vu seamless scaler/switcher
1 x Power supply cord
1 x HD15 to 5 BNC cable
1 x Ethernet crossover cable
1 x Set of 3 audio 5-pin screw terminals
4 x M4x12mm screws
1 x RCS (PC only)*
1 x User manual (PDF version)*
1 x Quick Start Guide (PDF version)*
WARNING!
If required, front handles of the device can be dismantled,
but with caution.
The original screws removed must not be reintroduced to
their location without handles in place.
Substantial damages can occur, including risk of electric
shock from the mains voltage.
Only M4x12mm screws can be used.
(They are supplied with the unit)
* Download on our website: www.analogway.com
Smart Vu Overview
The Smart Vu front panel is comprised of several sections, each carefully labeled and self explanatory,
corresponding to all of the machine’s versatile functions.
The STANDBY button (1) will allow users to turn the device on and off once the main outlet switch (11) is
turned on. The menu screen (2), menu scroll knob (4), and Control section (3) will give users access to the
Smart Vu menu. The Layer Selection section (6) will allow users to select which layer the Smart Vu will work
on, while the Input Selection section (5), determines which of the 7 available input sources will be used in
that layer. The FREEZE button (7) allows users to take a snapshot of the displayed image. The TAKE button
(10) of the Smart Vu will display your Preview screen to the Main output (17). The EFFECT button (8) and
the PRESET button (9) are both shortcuts to Smart Vu menu functions (Layer Effects and Presets).
The rear panel of the Smart Vu will let you connect all of your input sources and outputs to the device. Plug
universal analog sources (14), DVI-I sources (15) and SD/HD-SDI sources (16) to your Smart Vu. Connect a
DVI or universal analog projection device to your Smart Vu video outputs (17), audio inputs and outputs (18
and 19), and a remote controller to the IP/LAN connector (13).
* NOTE * : the Preview Output of the Smart Vu does not come standard, it is available as an option (OPTMMS-Preview) to be ordered with the unit.
4
2
3
5
7
6
8 9 10
1
2
1
3
4
5
6
7
8
9
WORKING WITH THE SMART VU
Setting up the Smart Vu
The following setup is an example of a typical Smart Vu configuration for an event or roadshow, but can of
course be modified according to your specific needs:
Connect all of your sources (PC, video camera, streaming server, DVD player...) to the appropriate input
connectors at the rear of the unit (see “The SmartVu rear panel” p.22 of the User Manual).
Connect your main output to the video projector for audience viewing, and your preview output (Optional) to
a monitor for preview purposes (see “Connecting the SmartVu”, p.21 of the User Manual). Turn all input and
output devices on.
Connect the supplied AC power cord to the unit, then connect the other end of the cord to a grounded AC
outlet. Power up the Smart Vu by pressing the I/0 button at the rear of the unit, and wait for the menu to run its
startup sequence. The unit is on and ready to function when the System Menu appears on your VFD screen.
Input & Output configuration
1/ In the menu section, press the EXIT/MENU button and select Input in the menu by rotating the selection
knob and press the ENTER button to enter the Input sub-menu.
2/ Select Auto Setting and press enter to automatically configure the inputs plugged into the Smart Vu. The
device will set all input resolutions and frequencies to match the input sources plugged to the device.
3/ Alternatively, you can configure all inputs of the Smart Vu individually, by navigating to the Input menu and
setting each input accordingly.
Once your inputs have all been configured, the output settings of the Smart Vu must be set according to the
machines plugged on your Smart Vu Main and Preview outputs (video projector, preview monitor...).
1/ In the menu section, press the EXIT/MENU button and select Output in the menu by rotating the selection
knob. Enter the Output sub-menu and select the output type, resolution and frequency, so that they match
the viewing hardware plugged into the unit.
2/ Press the ENTER button to enter each of the desired output parameters.
Your Smart Vu is now set up and ready to work with.
Smart Vu layers
The Smart Vu offers several different layer types to work with (Background
Frames, Background Live, PIP and Logos).
* NOTE *: Background Frames and Logos are available only with the OPTMMS-Logo option installed on the Smart Vu.
- FRAMES: It is possible to store up to 4 frames in the Smart Vu non
volatile memory. Frames are mainly used as backgrounds in a typical
setup, and can be recorded from any of the Smart Vu 7 inputs and called
back at the press of a single button.
1/ In the Input Selection section, press the input button (1-7) of the source
you wish to record as a frame. Press the TAKE button to view it on the
main display.
2/ Select Logos/Frames in the menu by rotating the selection knob, then
by pressing the ENTER button.
3/ Select Record Frames in the Logo/Frames menu by rotating the scroll
knob, then by pressing the ENTER button. A white rectangle will appear
on your main display, indicating the frame which will be captured. Select
an empty frame memory (they are indicated in the sub-menu) to store the
frame into, and press the ENTER button.
4/ Press the BACKGROUND FRAME button, select the frame number by
pressing button 1-4 in the Input Selection section, then press the TAKE
button.
- PIP: a PIP allow you to resize, position and add borders and transition
effects to a layer.
1/ In the Layer Selection section, press the PIP button. On the preview
screen, the layer will appear as a color rectangle, and “00” will be indicated
in the layer rectangle.
2/ In the Input Selection section, press the source button (1-7) of the source
you wish to affect to the selected PIP. On your optional preview screen,
the source will appear in the PIP rectangle, and PIP1 will be indicated in
the layer rectangle.
3/ Press the PIP button, then rotate the scroll knob to access desired
layer attributes (size, position, zoom, border, transparency...) and press
the corresponding ENTER button in the Layer sub-menu to enter and
parameter layer attributes.
4/ By pressing the source button again, the Image sub-menu appears
on your menu VFD screen. Rotate the scroll knob to access the desired
source attributes (aspect in/out, color, centering, blanking adjust...) and
press the ENTER button in the Image sub-menu to enter and adjust
source attributes.
5/ Press TAKE to view the results on your main screen.
(Output preview is an option. To be ordered with the unit.)
- LOGOS: It is possible to store up to 4 logos in the Smart Vu non volatile
memory. Logos work in much the same way as frames, and
can be recorded from any of the Smart Vu 7 sources.
1/ In the Input Selection section, press the source button (1-7) of the
source you wish to record as a logo. The source button will start blinking.
2/ Select the Logos/Frames menu by scrolling through the menu with the
scroll knob, then by pressing the ENTER button.
+
Frame
Memories
3/ Select Record Logos in the Logos/Frames menu by rotating the scroll
knob, then pressing ENTER. A small white rectangle will appear on your
main display, indicating the logo which will be captured.
4/ Adjust logo size, position, and fine tune key attributes by rotating the
scroll knob and pressing ENTER to memorize logo settings.
5/ Select an empty logo memory (empty logos are indicated in the submenu) to store the logo into. Press the ENTER button. The Smart Vu will
display a progress status bar on the VFD screen.
6/ In the Layer Selection section, press the LOGO button, and select
logo number (1-4) you wish to use. Your logo will appear on the preview*
screen above any existing layer on screen.
7/ Press the TAKE button. Your logo will appear on the main display.
Logo
Memories
+
- LIVE BACKGROUND: To work with a live background, press the
BACKGROUND LIVE button, then select a live input source from the
Input Selection section of the Smart Vu. The background will appear on
your Preview*. Simply press the TAKE button to view the results on your
Main output.
Making a transition
Whether catering to complex event setups, or putting together intricate
shows, your Smart Vu will deliver exciting transitions and like you could
expect from a dedicated mixer.
1/ In the Layer Selection section, press the PIP button. The button will start
blinking. On your Preview* screen, PIP will appear as a color rectangle.
The parameters of the layer will automatically appear on your Smart Vu
VFD menu screen.
2/ Pressing the EFFECT button will give you direct access to the Layer
menu, where you can parameter layer effects. Alternatively, in the Layer
menu, select Opening Effect, press the ENTER button and select Type.
Select an opening effect and press the ENTER button. Navigate to Duration
in the Opening Effect sub-menu, and set the duration of your effect by
rotating the selection knob and pressing ENTER.
3/ Set a closing effect for your PIP by navigating to the Closing Effect
menu, then press TAKE to view the transition effect on your Main output.
or
Warranty
This Analog Way product has a 3 year warranty on parts and labor,
back to factory. This warranty does not include faults resulting from user
negligence, special modifications, electrical surges, mishandling (drop/
crush), and/or any other damage caused by misuse.
Going further with the Smart Vu
For complete details and operation procedures, please refer to the
Smart Vu User Manual and our website for further information:
www.analogway.com
Version: 4.0 - 19/03/2012
Code: 140109