1
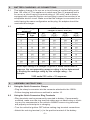
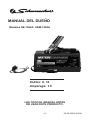
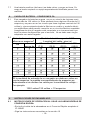
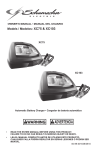
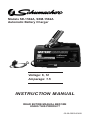
Models SE-1562A, SEM-1562A
Automatic Battery Charger
Voltage: 6, 12
Amperage: 1.5
INSTRUCTION MANUAL
READ ENTIRE MANUAL BEFORE
USING THIS PRODUCT
00-99-000254/0408
IMPORTANT: read and save this safety and instruction manual.
1.
IMPORTANT SAFETY INSTRUCTIONS
1.1
SAVE THESE INSTRUCTIONS – This manual contains important safety
and operating instructions for battery charger Models SE-1562A and SEM1562A.
1.2
Do not expose charger to rain or snow.
1.3
Use of an attachment not recommended or sold by the battery charger
manufacturer may result in a risk of fire, electric shock, or injury to persons.
1.4
To reduce risk of damage to electric plug and cord, pull by plug rather than
cord when disconnecting charger.
1.5
An extension cord should not be used unless absolutely necessary. Use of
improper extension cord could result in a risk of fire and electric shock. If
an extension cord must be used, make sure:
• That pins on plug of extension cord are the same number, size, and
shape as those of plug on charger;
• That extension cord is properly wired and in good electrical condition and;
• That wire size is large enough for AC ampere rating of charger as specified in Table 8.2.
1.6
Do not operate charger with damaged cord or plug; take to a qualified
service person. (Call customer service at: 800-621-5485.)
1.7
Do not operate charger if it has received a sharp blow, been dropped, or
otherwise damaged in any way; take it to a qualified serviceman. (Call
customer service at: 800-621-5485.)
1.8
Do not disassemble charger; take it to a qualified serviceman when
service or repair is required. Incorrect reassembly may result in a risk of
electric shock or fire. (Call customer service at: 800-621-5485.)
1.9
To reduce risk of electric shock, unplug charger from outlet before attempting any maintenance or cleaning. Turning off controls will not reduce this
risk.
WARNING – RISK OF EXPLOSIVE GASES.
WORKING IN VICINITY OF A LEAD-ACID BATTERY IS DANGEROUS.
BATTERIES GENERATE EXPLOSIVE GASES DURING NORMAL
BATTERY OPERATION. FOR THIS REASON, IT IS OF UTMOST
IMPORTANCE THAT YOU FOLLOW THE INSTRUCTIONS EACH TIME
YOU USE THE CHARGER.
To reduce risk of battery explosion, follow these
instructions and those published by battery manufacturer and manufacturer of any equipment you intend to
use in vicinity of battery. Review cautionary marking on
these products and on engine.
•1•
2.
PERSONAL PRECAUTIONS
2.1
Consider having someone close enough by to come to your aid when you
work near a lead-acid battery.
2.2
Have plenty of fresh water and soap nearby in case battery acid contacts
skin, clothing, or eyes.
2.3
Wear complete eye protection and clothing protection. Avoid touching
eyes while working near battery.
2.4
If battery acid contacts skin or clothing, wash immediately with soap and
water. If acid enters eye, immediately flood eye with running cold water for
at least 10 minutes and get medical attention immediately.
2.5
NEVER smoke or allow a spark or flame in vicinity of battery or engine.
2.6
Be extra cautious to reduce risk of dropping a metal tool onto battery. It
might spark or short-circuit battery or other electrical part that may cause
explosion.
2.7
Remove personal metal items such as rings, bracelets, necklaces, and
watches when working with a lead-acid battery. A lead-acid battery can
produce a short-circuit current high enough to weld a ring or the like to
metal, causing a severe burn.
2.8
Use charger for charging a LEAD-ACID battery only. It is not intended to
supply power to a low voltage electrical system other than in a starter-motor application. Do not use battery charger for charging dry-cell batteries
that are commonly used with home appliances. These batteries may burst
and cause injury to persons and damage to property.
2.9
NEVER charge a frozen battery.
3.
PREPARING TO CHARGE
3.1
If necessary to remove battery from vehicle to charge, always remove
grounded terminal from battery first. Make sure all accessories in the
vehicle are off, so as not to cause an arc.
3.2
Be sure area around battery is well ventilated while battery is being
charged.
3.3
Clean battery terminals. Be careful to keep corrosion from coming in contact with eyes.
3.4
Add distilled water in each cell until battery acid reaches level specified by
battery manufacturer. Do not overfill. For a battery without removable cell
caps, such as valve regulated lead acid batteries, carefully follow manufacturer’s recharging instructions.
3.5
Study all battery manufacturer’s specific precautions while charging and
recommended rates of charge.
3.6
Determine voltage of battery by referring to vehicle owner’s manual and
make sure that output voltage selector switch is set at correct voltage. If
charger has adjustable charge rate, charge battery initially at lowest rate.
•2•
4.
CHARGER LOCATION
4.1
Locate charger as far away from battery as DC cables permit.
4.2
Never place charger directly above battery being charged; gases from battery will corrode and damage charger.
4.3
Never allow battery acid to drip on charger when reading electrolyte specific gravity or filling battery.
4.4
Do not operate charger in a closed-in area or restrict ventilation in any
way.
4.5
Do not set a battery on top of charger.
5.
DC CONNECTION PRECAUTIONS
5.1
Connect and disconnect DC output clips only after setting any charger
switches to “off” position and removing AC cord from electric outlet. Never
allow clips to touch each other.
5.2
Attach clips to battery and chassis, as indicated in 6.5, 6.6, and 7.2
through 7.4.
6.
FOLLOW THESE STEPS WHEN BATTERY IS INSTALLED IN
VEHICLE.
A SPARK NEAR BATTERY MAY CAUSE BATTERY EXPLOSION. TO
REDUCE RISK OF A SPARK NEAR BATTERY:
6.1
Position AC and DC cords to reduce risk of damage by hood, door, or
moving engine part.
6.2
Stay clear of fan blades, belts, pulleys, and other parts that can cause
injury to persons.
6.3
Check polarity of battery posts. POSITIVE (POS, P, +) battery post usually
has larger diameter than NEGATIVE (NEG, N,–) post.
6.4
Determine which post of battery is grounded (connected) to the chassis.
If negative post is grounded to chassis (as in most vehicles), see (6.5). If
positive post is grounded to the chassis, see (6.6).
6.5
For negative-grounded vehicle, connect POSITIVE (RED) clip from battery
charger to POSITIVE (POS, P, +) ungrounded post of battery. Connect
NEGATIVE (BLACK) clip to vehicle chassis or engine block away from
battery. Do not connect clip to carburetor, fuel lines, or sheet-metal body
parts. Connect to a heavy gauge metal part of the frame or engine block.
6.6
For positive-grounded vehicle, connect NEGATIVE (BLACK) clip from battery charger to NEGATIVE (NEG, N, –) ungrounded post of battery. Connect POSITIVE (RED) clip to vehicle chassis or engine block away from
battery. Do not connect clip to carburetor, fuel lines, or sheet-metal body
parts. Connect to a heavy gauge metal part of the frame or engine block.
•3•
6.7
When disconnecting charger, turn switches to off, disconnect AC cord,
remove clip from vehicle chassis, and then remove clip from battery terminal.
6.8
See OPERATING INSTRUCTIONS for length of charge information.
7.
FOLLOW THESE STEPS WHEN BATTERY IS OUTSIDE VEHICLE.
A SPARK NEAR THE BATTERY MAY CAUSE BATTERY EXPLOSION.
TO REDUCE RISK OF A SPARK NEAR BATTERY:
7.1
Check polarity of battery posts. POSITIVE (POS, P, +) battery post usually
has a larger diameter than NEGATIVE (NEG, N, –) post.
7.2
Attach at least a 24-inch-long 6-gauge (AWG) insulated battery cable to
NEGATIVE (NEG, N, –) battery post.
7.3
Connect POSITIVE (RED) charger clip to POSITIVE (POS, P, +) post of
battery.
7.4
Position yourself and free end of cable as far away from battery as possible – then connect NEGATIVE (BLACK) charger clip to free end of cable.
7.5
Do not face battery when making final connection.
7.6
When disconnecting charger, always do so in reverse sequence of connecting procedure and break first connection while as far away from battery as practical.
7.7
A marine (boat) battery must be removed and charged on shore. To
charge it onboard requires equipment specially designed for marine use.
•4•
8.
8.1
battery charging - ac connections
This battery charger is for use on a circuit having a nominal rating more
than 120 volts (or ″This appliance is rated more than 15 amperes and is
for use on a circuit having a nominal rating of 120 volts″) and is factoryequipped with a specific electric cord and plug to permit connection to an
acceptable electric circuit. Make sure that the charger is connected to an
outlet having the same configuration as the plug. No adapter should be
used with this charger.
8.2
AC input rating,
a
amperes
But less
At least
than
0
2
2
3
3
4
4
5
5
6
6
8
8
10
10
12
12
14
14
16
16
18
18
20
25
(7.6)
18
18
18
18
18
18
18
16
16
16
14
14
AWG size of cord
Length of cord, feet (m)
50
100
150
(15.2)
(30.5)
(45.6)
18
18
16
18
16
14
18
16
14
18
14
12
16
14
12
16
12
10
14
12
10
14
10
8
12
10
8
12
10
8
12
8
8
12
8
6
a
If the input rating of a charger is given in watts rather than in
amperes, the corresponding ampere rating is to be determined
by dividing the wattage rating by the voltage rating ± for
example:
1250 watts/125 volts = 10 amperes
9.
9.1
assembly instructions
Using the Quick Connector Clamps
• Plug the clamp’s connector into the connector attached to the 1562A.
• Follow charging instructions as outlined in section 10.
9.2
Using the Quick Connector Ring Terminals
• Ring terminals can be permanently mounted to battery. If permanently
mounted, make sure the ring terminal cables are not obstructing or touching any live components in the vehicle. ALWAYS ensure ring terminals
are properly mounted prior to charging.
• Turn the vehicle’s ignition OFF before making ring terminal connections.
• Attach the red ring terminal (+) to the positive terminal of the battery.
•5•
• Attach the black ring terminal (-) to the negative terminal of the battery.
• Plug the ring terminal’s connector into the connector attached to the
1562A
• Follow charging instructions as outlined in section 10.
10. operating instructions
10.1 Set the 6 and 12 volt selector switch to match the voltage of the battery
being charged.
10.2 Connect charger to a battery as outlined in section 6 or 7.
10.3 Plug AC power cord into 120 AC volt receptacle.
10.4 The YELLOW LED indicates CHARGING, the GREEN LED indicates
battery is fully CHARGED and the RED LED indicates CHECK BATTERY.
See more detailed explanation below.
10.5 When the charger is plugged into an AC outlet, but not connected to a
battery, the GREEN LED will illuminate. For proper operation, the battery
charger must be plugged into an AC outlet and connected to a battery.
10.6 When properly connected, the YELLOW LED indicator will illuminate. This
indicator will stay illuminated until the battery is fully charged. (The battery
is fully charged when battery voltage reaches approximately 14.4V.) At
that point, the YELLOW LED turns off and the GREEN LED illuminates.
10.7 When the battery is fully charged, the battery charger is in Maintain Mode
which allows the battery charger to keep the battery charged at approximately 13.2V.
10.8 Never leave the battery connected to the charger while the charger is
unplugged from the AC outlet.
10.9 The RED LED indicates an overload condition. Disconnect clamps for at
least five seconds. Re-connect clamps, and the charger will automatically
reset to the normal charge state.
10.10 Common causes for overload:
• shorting of the battery clamps
• reverse-polarity connection to a battery (battery clamps should be in a:
+/+ and -/- connection, instead of +/- connection).
• problem battery
• charging two or more batteries in parallel
• charging batteries larger than the size commonly used in a car or small
truck.
10.11 Battery types: Most Regular, Deep Cycle and Gel Type batteries can be
maintained.
•6•
11.
maintenance instructions
11.1 Before performing maintenance, unplug and disconnect battery charger
(see sections 6.7 or 7.6).
11.2 After use, use a dry cloth to wipe all battery corrosion and other dirt or oil
from terminals, cords, and the charger case.
11.3 Servicing does not require opening unit, as there are no user-serviceable
parts.
12. storage instructions
12.1 Store charger unplugged, in an upright condition. Cord will still conduct
electricity until it is unplugged from outlet.
12.2 Store inside, in a dry, cool place (unless you’re using an on-board, UL
listed Marine Charger ).
12.3 Do not store clips on handle, clipped together, on or around metal, or
clipped to cables.
13. troubleshooting
Problem
Possible Cause
Solution
Both Green and Yellow
LEDs are on.
Battery is close to fully
charge.
Just allow more time for
charging.
Green LED is on when
connected to a discharged battery.
Battery is sulfated or
deeply discharged.
Keep the charger on the
battery for a few hours.
The Yellow LED will
aluminate. If not, call
customer service.
Green LED is on when
connected to a discharged battery.
Wrong setting.
Select the proper voltage setting.
14. accessories and replacement parts
• 3899001235 - Alligator Clip
• 94030008 Quick Disconnect
Call: 800-621-5485
•7•
15. limited warranty
Schumacher Electric Corporation makes this limited
warranty to the original purchaser at retail of this
product. This limited warranty is not transferable.
Schumacher Electric Corporation warrants this battery charger for two
years from date of purchase at retail against defective material or workmanship. If such should occur, the unit will be repaired or replaced at the
option of the manufacturer (call customer service: 800-621-5485). It is the
obligation of the purchaser to forward the unit together with proof of purchase, transportation and / or mailing charges prepaid to the manufacturer
or its authorized representative. This limited warranty is void if the product
is misused, subjected to careless handling, or repaired by anyone other
than the factory or other authorized factory representative.
This is the only express limited warranty and the manufacturer neither
assumes nor authorizes anyone to assume or make any other warranty
towards the product other than this express limited warranty. The manufacturer makes no warranty of merchantability or fitness for purpose of this
product and expressly excludes such from this limited warranty. Further,
the manufacturer specific excludes warranty of this product.
Call Customer Service at: 800-621-5485 Monday - Friday, 7 a.m. to 5 p.m.
•8•
MANUAL DEL DUEÑO
Modelos SE-1562A, SEM-1562A
Voltios: 6, 12
Amperage: 1.5
LEA TODO EL MANUAL ANTES
DE USAR ESTE PRODUCTO.
•9•
00-99-000254/0408
• 10 •
IMPORTANTE: LEA Y CONSERVE ESTE MANUAL DE INSTRUCCIONES Y
SEGURIDAD.
1.
INSTRUCCIONES DE SEGURIDAD IMPORTANTES
1.1
CONSERVE ESTAS INSTRUCCIONES – Este manual contiene instrucciones operativas y de seguridad importantes para el cargador de baterías
Modelo SC-10030A.
1.2
No exponga el cargador a lluvia ni a nieve.
1.3
El uso de un accesorio no recomendado o vendido por el fabricante del
cargador de baterías podría ocasionar riesgo de incendio, descarga eléctrica o lesión a las personas.
1.4
Para reducir el riesgo de peligro del enchufe y cable eléctricos, cuando
desconecte el cargador, tire del enchufe y no del cable.
1.5
No se debería utilizar un alargue a menos que sea absolutamente necesario. El uso indebido del alargue podría ocasionar riesgo de incendio y
descarga eléctrica. Si debe utilizar un alargue, asegúrese de que:
• La cantidad, tamaño y la forma de los bornes del enchufe del alargue
coincidan con los del enchufe del cargador;
• El alargue esté adecuadamente conectado y en buena condición eléctrica; y
• El tamaño del cable sea lo suficientemente largo para el amperaje de CA
del cargador, según lo especificado en la Tabla 9.1.
1.6
No manipule el cargador si tiene el cable o el enchufe dañados – reemplácelos de inmediato. (Llame al servicio de atención al cliente: 800-6215485.)
1.7
No manipule el cargador si ha recibido un golpe fuerte, se ha caído o dañado de cualquier modo; llévelo a un técnico calificado. (Llame al servicio
de atención al cliente: 800-621-5485.)
1.8
No desarme el cargador, llévelo a un reparador calificado cuando sea
necesario algún tipo de servicio técnico o reparación. El reensamblado incorrecto podría ocasionar riesgo de descarga eléctrica o incendio. (Llame
al servicio de atención al cliente: 800-621-5485.)
1.9
Para reducir el riesgo de descarga eléctrica, desenchufe el cargador del
tomacorriente antes de intentar realizar alguna actividad de mantenimiento o limpieza. Los controles de apagado no reducirán este riesgo.
ADVERTENCIA – RIESGO DE GASES EXPLOSIVOS.
ES PELIGROSO TRABAJAR CERCA DE UNA BATERÍA DE PLOMO Y
ÁCIDO. LAS BATERÍAS GENERAN GASES EXPLOSIVOS DURANTE
SU FUNCIONAMIENTO NORMAL. POR ESO, ES DE SUMA IMPORTANCIA QUE SIGA LAS INSTRUCCIONES CADA VEZ QUE UTILICE
EL CARGADOR.
• 11 •
PARA REDUCIR EL RIESGO DE EXPLOSIÓN DE LA BATERÍA, SIGA
ESTAS INSTRUCCIONES ADEMÁS DE LAS PUBLICADAS POR EL
FABRICANTE DE CUALQUIER EQUIPO QUE QUIERA USAR CERCA
DE LA BATERÍA. ReviSe LAS MARCAS DE PRECAUCIÓN DE ESTOS
PRODUCTOS Y DEL MOTOR.
2.
PRECAUCIONES PERSONALES
2.1
Considere tener a alguien que lo acompañe para asistirlo cuando trabaje
cerca de una batería de plomo y ácido.
2.2
Tenga a mano mucha agua fresca y jabón en caso de que la piel, la ropa
o los ojos entren en contacto con el ácido de la batería.
2.3
Use protección total para ojos y ropa. Evite tocarse los ojos mientras
trabaja cerca de la batería.
2.4
Si el ácido de la batería entra en contacto con la piel o la ropa, lave de
inmediato con agua y jabón. Si el ácido entra en los ojos, deje que éstos
se llenen de agua fría corriente al menos 10 minutos y consiga atención
médica inmediata.
2.5
NUNCA fume ni permita que haya chispas o llamas cerca de la batería o
del motor.
2.6
Sea extremadamente cauteloso para reducir el riesgo de dejar caer una
herramienta metálica en la batería, ya que podría echar chispas o causar
un cortocircuito en la batería o en otra parte eléctrica que pudiera ocasionar una explosión.
2.7
Retire los artículos metálicos personales como anillos, pulseras, collares
y relojes cuando trabaje con una batería de plomo y ácido, dado que ésta
puede ocasionar una corriente de cortocircuito lo suficientemente alta
como para soldar al metal algún anillo u otro artículo, y provocar así una
quemadura grave.
2.8
Use el cargador para cargar una batería de PLOMO Y ÁCIDO, exclusivamente, ya que no está diseñado para suministrar energía a un sistema
eléctrico de bajo voltaje distinto de una aplicación de motor de arranque.
No utilice el cargador de batería para cargar baterías secas, comúnmente
utilizadas en artefactos domésticos. Estas baterías podrían explotar y
ocasionar una lesión en personas y un daño en los bienes.
2.9
NUNCA cargue una batería congelada.
3.
PREPARación de la carga
3.1
Si es necesario quitar la batería del vehículo para cargarla, siempre retire
el terminal a tierra de la batería primero. Asegúrese de que todos los accesorios dentro del vehículo estén apagados para evitar causar un arco.
3.2
Asegúrese de que el área que rodea la batería esté bien ventilada durante
la carga.
3.3
Limpie los terminales de la batería. Sea cuidadoso para así evitar que la
corrosión entre en contacto con los ojos.
• 12 •
3.4
Agregue agua destilada en cada celda hasta que el ácido de la batería
alcance el nivel especificado por el fabricante. Evite que se rebase. En el
caso de una batería sin capas de celda desmontables, como las baterías
de plomo y ácido reguladas por una válvula, siga atentamente las instrucciones de recarga del fabricante.
3.5
Lea las precauciones específicas del fabricante de baterías mientras
realiza la carga además de los índices de carga sugeridos.
3.6
Determine el voltaje de la batería teniendo en cuenta el manual del
propietario del automóvil y asegúrese de que el interruptor del selector de
voltaje de salida está puesto en el voltaje correcto. Si el cargador tiene un
índice de carga ajustable, primero cargue la batería en el índice más bajo.
4.
UBICACIÓN DEL CARGADOR
4.1
Ubique el cargador lo más alejado posible de la batería en la medida que
los cables de CC se lo permitan.
4.2
Nunca deposite el cargador directamente sobre la batería que se está cargando; los gases de la batería corroerán y dañarán el cargador.
4.3
Nunca permita que el ácido de la batería gotee sobre el cargador cuando
esté leyendo el peso específico electrolítico o llenando de la batería.
4.4
No maneje el cargador en un área cerrada o con poca ventilación.
4.5
No coloque una batería sobre el cargador.
5.
PRECAUCIONES DE LA CONEXIÓN CC
5.1
Conecte y desconecte los sujetadores de salida de corriente CC sólo
luego de apagar los interruptores del cargador (posición “off”) y retirar el
cable CA del enchufe eléctrico. Nunca deje que los sujetadores se toquen
entre ellos.
5.2
Coloque los sujetadores a la batería y chasis, según lo indicado en 6.5,
6.6, y 7.2 hasta 7.4.
6.
SIGA ESTOS PASOS AL INSTALAR UNA BATERÍA EN EL VEHÍCULO.
UNA CHISPA CERCA DE LA BATERÍA PODRÍA PROVOCAR UNA EXPLOSIÓN. PARA EVITAR ESTO:
6.1
Coloque los cables CA y CC para reducir el riesgo de daño provocado por
el capó, la puerta o una parte móvil del motor.
6.2
Manténgase alejado de paletas de ventiladores, cinturones, poleas y
demás partes que puedan causar una lesión a las personas.
6.3
Revise la polaridad de los terminales de la batería. El terminal de la batería de polaridad POSITIVA (POS, P, +) por lo general tiene un diámetro
mayor que el terminal de polaridad NEGATIVA (NEG, N,–).
6.4
Determine qué terminal tiene conexión a tierra (conectado) con el chasis.
• 13 •
Si el terminal negativo está conectado al chasis (como en la mayoría de
los vehículos), véase (6.5). Si el terminal positivo es el que está conectado al chasis, véase (6.6).
6.5
Para un vehículo de conexión a tierra negativa, conecte el sujetador
POSITIVO (ROJO) desde el cargador de la batería hacia el terminal sin
conexión a tierra POSITIVO (POS, P, +). Conecte el sujetador NEGATIVO
(NEGRO) al chasis del vehículo o bloque del motor, lejos de la batería.
No conecte el sujetador al carburador, a las mangueras de combustible
o planchas de metal de la carrocería. Conecte a una parte metálica del
calibre pesado de la estructura o bloque del motor.
6.6
Para un vehículo de conexión a tierra positiva, conecte el sujetador
NEGATIVO (NEGRO) desde el cargador de la batería hacia el terminal sin
conexión a tierra NEGATIVO (NEG, N, –). Conecte el sujetador POSITIVO (ROJO) al chasis de vehículo o bloque del motor, lejos de la batería.
No conecte el sujetador al carburador, a las mangueras de combustible
o planchas de metal de la carrocería. Conecte a una parte metálica del
calibre pesado de la estructura o bloque del motor.
6.7
Al desconectar el cargador, desenchufe los interruptores, desconecte el
cable de corriente alterna, retire los sujetadores del chasis del vehículo y
luego el del terminal de la batería.
6.8
Vea las INSTRUCCIONES OPERATIVAS para mayor información sobre
la carga.
7.
SIGA ESTOS PASOS cuando la batería esté afuera del
vehículo.
UNA CHISPA CERCA DE LA BATERÍA PODRÍA PROVOCAR SU EXPLOSIÓN. PARA EVITAR ESTO:
7.1
Revise la polaridad de los terminales de la batería. El terminal de la batería de polaridad POSITIVA (POS, P, +) por lo general tiene un diámetro
mayor que el terminal de polaridad NEGATIVA (NEG, N,–).
7.2
Añada por lo menos un cable de batería aislado calibre (AWG – calibre
estadounidense de cable) 6 de 24 pulgadas al terminal de la batería con
polaridad NEGATIVA (NEG, N, -).
7.3
Conecte el sujetador del cargador POSITIVO (ROJO) al terminal POSITIVO (POS, P, +).
7.4
Ubíquese y libere el extremo del cable lo más lejos posible de la batería –
luego conecte el sujetador del cargador NEGATIVO (NEGRO) para liberar
el extremo del cable.
7.5
No se acerque a la batería cuando realice la conexión final.
7.6
Cuando desconecte el cargador, hágalo siempre en la secuencia inversa
al procedimiento de conexión y primero interrumpa la conexión mientras
esté tan lejos de la batería como sea posible.
• 14 •
7.7
Una batería marítimo (de barco) se debe retirar y cargar en tierra. Su
carga a bordo requiere un equipo especialmente diseñado para el uso
marítimo.
8.
CARGA DE BATERÍA – CONEXIONES CA
8.1
Este cargador de baterías es para uso en un circuito de régimen nominal de más de 120 voltios (o “Este artefacto tiene régimen de más de 15
amperios y es para uso en un circuito que tiene régimen nominal de 120
voltios).y viene equipado desde la fábrica con cordón y enchufe eléctricos específicos para permitir conexión en un circuito eléctrico aceptable.
Asegúrese de que el cargador esté conectado a un tomacorriente que
tiene la misma configuración que el enchufe, No se debe usar ningún
adaptador con este cargador.
8.2 Entrada de corriente
a
alterna en amperios
A no
De
menos de
0
2
2
3
3
4
4
5
5
6
6
8
8
10
10
12
12
14
14
16
16
18
18
20
Medida del cable segun la AWG
Longitud del cable, pies (m)
25
50
100
150
(7.6)
(15.2)
(30.5)
(45.6)
18
18
18
16
18
18
16
14
18
18
16
14
18
18
14
12
18
16
14
12
18
16
12
10
18
14
12
10
16
14
10
8
16
12
10
8
16
12
10
8
14
12
8
8
14
12
8
6
a
Si la cantidad de entrada de un cargador es dada en vatios en
vez de amperios, la medida correspondiente de amperios es
determinada si se dividen los vatios por la cantidad de voltaje ±
Por ejemplo:
1250 vatios/125 voltios = 10 amperios
9.
9.1
INSTRUCCIONES DE ENSAMBLADO
INSTRUCCIONES DE OPERACIÓN AL USAR LAS ABRAZADERAS DE
CONEXIÓN RÁPIDA:
• Enchufe el cable de la abrazadera en el Conector Rápido acoplado al
IP-180KE
• Siga las instrucciones resumidas en la sección 10
• 15 •
9.2
INSTRUCCIONES DE OPERACIÓN AL USAR LOS TERMINALES DE
ARO DE CONEXIÓN RÁPIDA.
• Las terminales con argolla pueden permanecer montadas en la batería permanentemente. Si se dejan conectadas permanentemente,
asegúrese de que no obstruccionen o rosen partes delicadas del vehículo. Asegúrese SIEMPRE que las argollas de las terminales queden
bien sujetas antes de iniciar la carga.
• El vehículo debe permanecer APAGADO antes de conectar las terminales.
• Sujete la argolla de la Terminal roja (+) al poste positivo de la batería.
• Sujete la argolla de la Terminal negra (-) al poste negativo de la batería.
• Enchufe el conector de la Terminal de las argollas en el conector que
sale del Cargador 1562 A
• Siga las instrucciones resumidas en la sección 10
10. operating instructions
10.1 Fije el conmutador selector de 6 y 12 voltios en el mismo voltaje que el de
la batería a cargarse
10.2 Conecte el cargador a una batería según se describe en la Sección 6 o 7.
10.3 Enchufe el cordón de potencia CA en un tomacorriente de 120 voltios CA
10.4 El DEL AMARILLO indica CARGANDO, el DEL VERDE indica que la
batería está totalmente CARGADA y el DEL ROJO indica Revise la
batería. Vea le explicación más detallada abajo.
10.5 Cuando el cargador está enchufado en un tomacorriente CA, pero no
conectado a una batería, el LED VERDE se ilumina. Para operación
correcta, el cargador tiene que estar enchufado en un tomacorriente CA y
conectado a una batería.
10.6 Con la debida conexión, el DEL AMARILLO se ilumina y este indicador
sigue iluminado hasta que la batería esté a plena carga. (La batería está
a plena carga cuando su voltaje alcanza aproximadamente 14,4 Voltios).
En ese punto el DEL AMARILLO se apaga y el DEL VERDE se ilumina.
10.7 Cuando la batería está a plena carga, el cargador de baterías está en
Modo de Mantenimiento lo que permite que el cargador de baterías mantenga a la batería cargada en aproximadamente 13,2 Voltios.
10.8 Nunca deje a la batería conectada al cargador mientras que el cargador
está desenchufado del tomacorriente CA.
10.9 El DEL ROJO indica una condición de sobrecarga. Desconecte las
abrazaderas y espere por lo menos cinco segundos. Luego reconecte las
abrazaderas y el cargador se repondrá automáticamente en el estado de
carga normal.
• 16 •
11.
INSTRUCCIONES DE MANTENIMIENTO
11.1 Antes de efectuar mantenimiento, desenchufe y desconecte el cargador
de baterías (vea las secciones 6.7 o 7.6).
11.2 Después del uso, limpie toda corrosión de la batería y otra suciedad o
aceite de los terminales, cordones, y la caja del cargador usando un trapo
seco.
11.3 No se necesita abrir la unidad para darle servicio, .puesto que no hay
piezas a las que el usuario puede atender.
12. INSTRUCCIONES DE ALMACENAMIENTO
12.1 Guarde el cargador desenchufado, en posición vertical. El cordón aún
conduce electricidad hasta que esté desenchufado del tomacorriente.
12.2 Guárdelo adentro, en un sitio seco y fresco (a no ser que se está usando
un Cargador Marino, a bordo, listado con UL).
12.3 No guarde las pinzas sobre el asa, conectadas entre sí, sobre o alrededor
de metal o conectadas a los cables.
13.
Problema
Causa posible
solución
La luz verde LED se
enciende cuando se
conecta a una batería
descargada.
La batería está corrosiva o excesivamente
descargada
Mantenga el cargador
conectado a la batería
por pocas horas. La luz
amarilla LED se encenderá. Si no, es así,
contacte Servicios al
Cliente.
Las luces LED verde y
amarilla están encendidas.
La batería casi está car- Sólo permita un poco
gada completamente
más de carga.
La luz verde LED se
enciende cuando se
conecta a una batería
descargada.
Conexión equivocada
14. ACCESORIOS Y PIEZAS DE REPUESTO
• 3833001235 - Alligator Clip
• 94030008 Quick Disconnect
Call: 800-621-5485
• 17 •
Ajuste el selector apropiado de voltaje.
15. GARANTÍA LIMITADA
Schumacher Electric Corporation hace esta garantia limitada al comprador original al por menor de este producto. Esta garantia limitada no es
transferible.
Schumacher Electric Corporation garantiza este cargador de batería por
dos años, contados a partir de la fecha de compra al por menor, contra
defectos de material o fabricación (800-621-5485). Si tal cosa ocurre,
la unidad será reparada o reemplazada, según opción del fabricante. El
comprador tiene la obligación de enviar la unidad, acompañada de la
prueba de compra, al fabricante o a su representante autorizado, con el
costo del transporte o de envío por correo ya pagado. Esta garantía limitada no es válida si el producto ha sido usado incorrectamente, o sometido a manejo negligente, o reparado por cualquier persona o entidad que
no sea el fabricante o su representante autorizado.
La presente es la única garantía expresa y limitada y el fabricante ni
asume ni autoriza a nadie a asumir ni hacer ningún otro compromiso con
relación a este producto que no sea esta garantía limitada y expresa. El
fabricante no hace ninguna garantia de capacidad de comercialización
ni de adecuación a su finalidad de este producto y expresamente las excluye de esta garantia limitada. Algunos estados no permiten la exclusión
o limitación de daños incidentales o consecuentes o del período de la
garantía implícita, de modo que las limitaciones o exclusiones citadas
arriba pueden no ser aplicables a Ud. Esta garantía le concede a Ud.
derechos legales específicos, y Ud. quizás tenga también otros derechos
que varían de estado en estado.
• 18 •