1
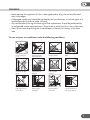
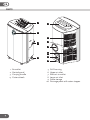
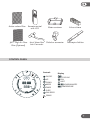
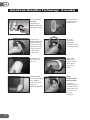
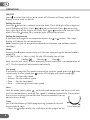
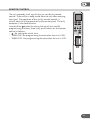
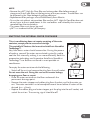
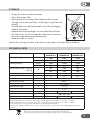
INSTRUCTION MANUAL
PLMB
9KEHPW-410 /12KEHPW-410 /15KEHPW-410
P L M B mono bloc s
ENGLISH
GB
SAFETY instructions
IMPORTANT!
• The unit is designed for indoor operation.
• Rating: This unit must be connected to a 220-240 V~ / 50 Hz earthed outlet.
• The installation must be in accordance with regulations of the country where the
unit is used.
If you are in any doubt about the electrical installation, have it checked and if
necessary modified by a qualified electrician.
• The air conditioner is safe. However, as with other electrical appliances, use it
with care.
• This appliance is not intended for use by young children or infirm persons unless
they have been adequately supervised by a responsible person to ensure that they
can use the appliance properly
• Young children should be supervised to ensure that they do not play with the
appliance.
• Do not clean the air conditioner by spraying it or immersing it in water.
• Do not insert any object into openings of the air conditioner.
• Disconnect it from the mains before cleaning the unit or any of its components.
• Never connect the unit to an electrical outlet using an extension cord. If an outlet
is not available, one should be installed by a licensed electrician.
GB
WARNING
• Never operate this appliance if it has a damaged cord or plug. Do not lead the cord
over sharp edges.
• A damaged supply cord should be replaced by the manufacturer, its service agent or a
qualified person in order to avoid a hazard.
• Any service other than regular cleaning or filter replacement should be performed by
an authorized service representative. Failure to do so could result in a loss of warranty.
• Don’t lift or move by pushing the air conditioner at the rear, but always at the front
side.
Do not use your air conditioner under the following conditions:
If the power cable
wires are frayed
or cut
When small
children may be
left unattended
On a slope or
uneven surface
Close to a naked
flame
This products is
not made for DIY
repair
If there is a risk of
liquid falling on
the unit
Inside unit exposed
to the weather
outdoors
Near water
If an extension
lead may become
overloaded
Where the power
cable may be
damaged
Where it may
be damaged by
chemicals
Where there is a
risk of interference
by foreign objects
GB
PARTS
1
5
2
6
3
3
7
4
8
9
10
1. Air outlet
2. Control panel
3. Carrying handle
4. Caster wheels
5. Grill housing
6. Upper air inlet
7. Exhaust air outlet
8. Lower air inlet
9. Cable storage
10. Drainage point with water stopper
Controls
ON/OFF
UP
DOWN
MODE
TIMER
Display
COOLING
FAN
HEAT
HOURS:MINUTES
TEMPERATURE
GB
Active carbon filter
3M™ High Air Flow
filter (Optional)
Remote control
with LCD
Spiral Water Pipe
with Connector
Water container
Exhaust hose
Slide bar connector
Telescopic slide bar
CONTROL PANEL
Controls
ON/OFF
UP
DOWN
MODE
TIMER
Display
COOLING
FAN
HEAT
HOURS:MINUTES
TEMPERATURE
SLEEP
FAN SPEED
SWING
GB
AutoDrain NanoMist Technology™ Assembly
1
3
5
7
Attach Window
Slide Bar
Connector to
Exhaust Hose by
twisting as shown.
Connect the
female half of the
quick connector
at the end of the
spiral water pipe
to the male part
in the hot air
outlet pipe.
Assemble the
hot air hose on
the unit.
Unfold flexible
hose with attached
hose adapter
connector, and
snap into
Window Slide Bar.
2
4
6
8
Put spiral water
pipe into hot air
flexible hose.
Turn the
connector
90 degrees
clockwise until it
is locked in place.
Clip on the
water atomizer at the end
of the spiral
pipe to the
holder.
Only
Required For
Disassembly.
In order to
unlock the quick
connector, push
the tab and turn
the connector
counterclockwise.
GB
Installation
WARNING!
Before using the air conditioner it should be left in an upright position for at least
2 hours. This unit can easily be moved from one room to another.
In doing so keep this in mind:
– Ensure that the unit is positioned upright, on a level surface and 50 cm away
from any obstacles.
– To place the loose filters in the filter holder.
•Take the filter holder out of the air conditioner.
•Open the filter holder and place the active carbon filter (black) in the filter
holder.
•Place the filter fixing component back in the holder.
•Place the filter holder back in the air conditioner.
– Do not operate the unit inside the bathroom, shower, or in any other very humid
environment.
– Connect the hose to the unit by turning it clockwise (at least 5 turns).
– Similarly, connect the hose to the slide bar connector as far as possible.
– Place the telescopic slide bar in the open window or door and adjust the length
to fill as much open space as possible.
– Put the slide bar connector in the opening in the telescopic slide bar.
– Close the window or door as much as possible to prevent outside air entering the
room.
– Ensure that the slide bar connector has a free flow outside.
IMPORTANT!
The flexible exhaust hose can be extended from 500 to 1500 mm for mounting.
This length has been designed especially according to the specifications of the air
conditioner. Do not use an extension or exchange for a different hose as that may
lead to malfunctioning. The exhaust air must flow freely, any blockage can lead to
overheating of the air conditioner. Take care to prevent any sharp bow or bend in the
exhaust.
GB
Operation
ON/OFF
Press to switch the unit on, or to switch off. A buzzer will beep, and the LCD will
display 12:00 o’clock as default.
Setting the clock
Press the -button for 3 seconds to set the clock. The 2 left digits of the 4 digits on
the LCD-display will flash. Press or to adjust the hour. Press momentarily,
the 2 right digits of the 4 digits will flash. Press or to adjust the minutes of the
clock. Press the -button for 3 seconds again to activate the clock.
Setting the temperature
If you want to change the set temperature press the or -button. The 2 digit
display will indicate the set temperature.
Note: Reaching the set temperature depends on the room and outdoor climatic
conditions.
Mode
Pressing the -button successively until the icon representing the desired mode is
appearing
(=> Cool => Fan => Heat => etc). On the LCD-display you will see:
Cooling
Fan only Heat
Each time the unit starts, it starts operating in cool mode with a set temperature of
22°C. The fan speed will be selected automatically.
Fan speed
If you prefer a constant fan speed instead of the auto fan speed, press the -button
successively; the fan speed icon
on the LCD-display will rotate accordingly.
• Fast - for the turbo speed
• Normal- for the medium speed
• Slow - for the slow speed
• Auto - alternating fast and slow speed
Heat
With the mode switch select
, set the desired temperature and the unit will heat
until this temperature is reached. Fan speed is selected automatically. Do not place
the unit near anything that could catch fire or be scorched. Do not
obstruct the air outlet.
Timer
For all of the following TIMER programming, proceed firstly with
these standard steps:
• Press the -button briefly; the 2 left digits of the 4 digits on the
Timer example
GB
LCD display are flashing.
• Press or to adjust the hour.
• Press the -button briefly again, the 2 right digits of the 4 digits are flashing.
• Press or to adjust the minutes of the clock in intervals of 5 minutes. The
timer is set. After 10 seconds the time display returns.
Programming the timer for ON - when the unit is OFF.
• Perform the standard steps as described above.
The linear time scale will be on between the ON programmed times until 24:00.
The flashing bar on the time scale indicates the real time and moves a segment
ahead every 30 minutes until it reaches the ON timer time, then the black segments
in the linear time scale will disappear.
Programming the timer for OFF - when the unit is RUNNING.
• Perform the standard steps as described above.
The linear time scale will be on between the present time to the OFF programmed
time. The flashing bar on the time scale indicates the real time and moves a
segment ahead every 30 minutes until it reaches the OFF timer time, then the black
segments in the linear time scale will disappear.
Repeated OFF and ON
Programming the timer for repeat OFF and ON - when the unit is RUNNING.
• Perform the standard steps as described above.
• Repeat the above procedure while the digits are still flashing for setting the ON.
The linear time scale will be ON between 00:00 to the time set with the timer to
OFF and from the ON time until 24:00. The flashing bar on the time scale indicates
the real time and moves a segment ahead every 30 minutes. The unit will operate
daily according to the timer setting.
Repeated ON and OFF
Programming the timer for repeat ON and OFF - when the unit is NOT RUNNING.
• Perform the standard steps as described above.
• Repeat the above procedure while the digits are still flashing for setting the OFF.
The linear time scale will be OFF between 00:00 to the time set with the timer to
ON and from the OFF time until 24:00. The flashing bar on the time scale indicates
the real time and moves a segment ahead every 30 minutes. The unit will operate
daily according to the timer setting.
After a power failure, or after the unit has been unplugged, you will have to program
the timer settings again.
Cancelling the timer function
In order to cancel the timer programming press the -button momentarily, then it
will return to the time display. The daily mode will be cancelled as well. The black
segments in the linear time scale will disappear.
GB
LCD blue back light
In order to switch off the blue back light, press the - and -buttons at the same
time. The blue back light will blink twice and goes off after three seconds.
By pushing any of the buttons the blue back light will come on again.
Air flow
On the moment the air conditioner is connected to the mains, the louvres open and
close and stay closed.
• When the ON-button is pressed, the louvres open to maximum and return to an
angle of 75° above the upper plane of the louvres housing.
• Press the -button, the louvres will swing continuously up and down between
30° and 80° above the upper plane of the louvres housing.
• By pressing the -button again the movement will stop and the louvres remain
in that position. The direction of the air flow is then constant.
• When the OFF-button is pressed, the louvres close.
This way of directing the air flow is particularly convenient when using the remote
control: a user friendly approach to your comfort.
In order to direct the air flow to a lower angle, raise the louvres�����������������������
������������������������������
housing by pulling it
up only by the centre of its back rim.
Sleep mode
The sleep mode function adjusts the set temperature of the unit to the thermal
Air outlet down,
louvres closed
Air outlet up,
louvres opened
Raising the
louvres housing.
needs of the body falling asleep as follow:
• Default fan speed: LOW
• Press the -button to operate the sleep mode. Press the -button again in order
to cancel the sleep mode.
The set temperature will increase 1°C after 1 hour and a further 1°C after 2 hours.
• No FAN mode under SLEEP mode operation.
10
GB
Remote control
The unit responds to all signals that are sent by the remote
control. There will be a beep sound from the unit after receiving
the signal. The operation of the unit by remote control, is
almost identical to the operation by the control panel. The only
exception is the clock function.
Instead of the -button for setting the actual time and for
programming the timer, there are 3 push buttons on the remote
control as follows:
• - for setting the actual time.
• TIMER ON - for programming the time when the unit is ON.
• TIMER OFF - for programming the time when the unit is OFF.
11
GB
Air Filters
This air conditioner is equipped with two filter sets:
1. A multi layer filter in the upper air inlet, to clean the circulated room air, which
includes:
a. A screen filter, to remove dust particles.
b. An active carbon filter, to remove odours.
c. 3M™ High Air Flow filter; to remove unhealthy particles from the air such as
pollen, bacteria, animaldander and dust. Selected models have the 3M™ High
Air Flow fillter as standard. However, if you require to add this to your model,
or wish to purchase a replacement, call Atlantic for details.
2. A screen filter in the lower air inlet, to remove dust particles.
NOTE! The active carbon filter and the 3M™ High Air Flow filter are delivered in a
plastic packaging. Don’t forget to install these filters.
Cleaning the air filters
a. The screen filters in the upper and lower air inlet should be cleaned regularly by rinsing
them under running water.
b. The positive/negative electrostatically charged 3M™ High Air Flow filter is
recommended to be changed every 3 months. Unusual dirt, construction work, pets,
the presence of smoke and running the air conditioning unit continuously can shorten
the life time of the 3M™ High Air Flow filter.
c. The active carbon filter can be cleaned with a vacuum cleaner when dusty but has to be
changed at the same time as the 3M™ High Air Flow filter.
Filter installation
1
2
3
4
• Slide out the filter holder from the unit.
• Separate the filter fixer from the filter holder (see fig. 1).
• Remove the active carbon filter (black) and the 3M™ High Air Flow filter (white)
from its plastic bag.
• Insert the active carbon filter into the filter holder (see fig. 2).
• Insert the 3M™ High Air Flow filter into the filter holder (see fig. 3).
• Fix the filter by reassembling the fixer into the filter holder (see fig. 4).
12
GB
NOTE!
• Remove the 3M™ High Air Flow filter and active carbon filter before seasonal
storage and install new filters at the beginning of the new season. The old filters can
be disposed in the ‘Non-biological garbage container’.
• Replacement filter packages are available directly from Atlantic.
• To run the unit without active carbon filter and/or 3M™ High Air Flow filter does not
do any harm to the air conditioner. In this case odours and unhealthy dust are not
removed from the circulated air.
• The screen filter must always be used.
• 3M™ is a trademark of the 3M Company.
Emptying the internal water container
This air conditioning does not require emptying of the water
container, except prior to season end storage.
This portable AC features the Innovative AutoDrain NanoMist
Technology™.
Very little excess water should accumulate. During the process
of cooling, some of the water accumulated is actually used to
cool the unit internally, making it run more efficiently. Both this
evaporative technology and Innovative AutoDrain NanoMist
Technology™ are features not found in most portable air
conditioners.
To empty the water container do the following:
• Switch off the unit and remove the plug from the wall socket.
Do not move the unit. Doing this can result in water leakage,
damaging your floor or carpet.
• Place the water container on the floor underneath the
permanent drainage point.
• Remove the water stopper and rubber plug from the drain and let the water run
out. The water container has to be emptied several times before all water will be
drained (ca. 1.5 litres).
• Replace the rubber plug and water stopper, put the plug into the wall socket, and
switch the unit on. The warning signal should be off.
13
GB
cleaning
WARNING! First of all switch off the unit and remove the plug from the wall socket.
Clean the housing with a soft, damp cloth. Never use aggressive chemicals, petrol,
detergents or other cleansing solutions.
Clean the screen filter regularly with a vacuum cleaner. See also “AIR FILTERS”
section.
NOTE! Never use the air conditioner without the screen filter.
trouble shooting
Never try to repair or dismantle the air condition yourself. Incompetent repairs result in loss of warranty
and can endanger the user and the property.
Problem
The air
conditioner does
not function.
The air
conditioner does
not seem to
perform.
Cause
No power supply.
Is the LCD light flashing.
Timer function is active.
In direct sunlight.
Windows or doors open, many
people or a heat source in the room.
Dirty filter.
Air inlet or air outlet blocked.
Room temperature lower than the
selected value.
The unit is noisy. Unit stands uneven.
The compressor
does not work.
The remote
control does not
function.
Solution
Connect to a functioning outlet and switch on.
Empty the internal water container.
Deactivate TIMER function.
Close curtains.
Close doors and windows, place an extra air
conditioner.
Clean or replace the filter(s).
Remove the blockage.
Change temperature selection.
Place on an even, solid surface (less
vibrations).
Wait 3 minutes until the temperature has
decreased, then turn on the unit again.
Make sure the remote control is correctly
aimed at the control panel.
The overheat protection is probably
activated.
Distance too great.
Remote control signal not detected
by the control panel.
The batteries are drained.
Replace the batteries.
To correct problems that have not been described in the table and/or if the recommended solutions fail
to solve the problem, contact an authorized service centre.
14
GB
Storage
• Empty the internal water container.
• Clean the screen filter.
• Remove the active carbon filter before end of season
storage and install new filters at the beginning of the new
season.
• The old filters can be disposed of in the ‘Non-biological
rubbish container’.
Replacement filter packages are available from Atlantic.
• Put the unit in Fan Only mode for a few hours to ensure
that the inside becomes completely dry.
• Store the cable as shown.
Protect the unit against dust and store in a dry place, not accessible to children.
technical data
Model
Cooling capacity
Heating capacity
PLMB
9KEHPW-410
PLMB
12KEHPW-410
PLMB
15KEHPW-410
BTU/h
9000
12000
15000
KW
2.6
3.5
4.4
BTU/h
9500
12500
15500
KW
Power consumption -Cooling
-Heating
W
2.8
3.7
4.5
850
1100
1500
900
1200
1400
Current -Cooling
A
3.7
4.8
6.5
Current -Heating
A
3.9
5.2
6.0
Mains
V / Hz / PH
220 - 240 V~/ 50 / 1
Compressor model
Rotary
Fan speeds
3 (2+1 turbo)
Thermostat range
ºC
18 - 32
Operating temperature range
ºC
5 - 35
Refrigerant / R410A
g
Dimensiones (w x h x d)
Net weight
340
mm
kg
560
660
500 x 815 x 415
31.2
35
35.8
PLMB 9KEHPW-410 series can be connected only to a supply with system impedance no more than 0.210 Ohm.
PLMB 12KEHPW-410 series can be connected only to a supply with system impedance no more than 0.130 Ohm.
PLMB 15KEHPW-410 series can be connected only to a supply with system impedance no more than 0.110 Ohm.
If necessary, please consult your supply authority for system impedance information.
Subject to modifications without prior notice. For greater precision, please refer to the rating label placed on the
product.
Reminder:
Waste electrical products must not be disposed of with household waste.
This product should be taken to your local recycling centre for safe treatment.
15
YOUR GUARANTEE
DOMESTIC AIR CONDITIONERS
If this product is found to be defective as a result of faulty materials or workmanship
within two years from date of purchase, it will be repaired or replaced free of charge.
The purchaser is responsible for sending/returning the unit to/from an approved repairer.
Products are non-refundable 14 days from date of purchase.
This guarantee is subject to the following terms:
Atlantic Australasia, must be notified of the fault
Proof of purchase must be presented to Atlantic Australasia’s nominated
representative
The warranty will be void if the product is modified, misused or repaired by an
unauthorised person
The guarantee does not cover accidental damage, misuse, or consumable items
such as filters
The guarantee after repair or replacement will not be extended beyond the original
two-year period
All replacement parts or units will be new or reconditioned
Parts or units, which are replaced, become the property of Atlantic Australasia
Atlantic Australasia disclaims any liability for incidental or consequential damages
The warranty applies for the use of the product in Australia and New Zealand.
This GUARANTEE is in addition to your Statutory Rights.
Atlantic Australasia Pty Ltd
Suite 4, 13-25 Church Street, Hawthorn, Victoria, Australia 3122
Ph. (03) 9852 9599
Fx. (03) 9852 9844
Email: [email protected]
www.atlantics.com.au
PLMB monoblocs-410 913129140
Atlantic Australasia
Ph: 0800 422 000 Fx: 04 3800 509 Email: [email protected] Web: www.atlantics.co.nz