1
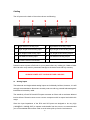
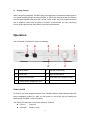
 TAURUS Headphone Amplifier / Pre Amplifier USER’S GUIDE
Revision 1.0
AURALIC LIMITED
RM 19C, LOCKHART CENTRE, 301-307 LOCKHART ROAD, HK
Phone: +852 6852 3312. Fax: +852 8199 9198
Email: [email protected]. Website: www.auralic.com
Copyright © 2008-2012 AURALIC LIMITED (AURALiC) and licensors.
All rights reserved. No part of this publication including but not limited to, graphics, text,
code or interactive features, may be reproduced without the express written permission
from AURALiC or its licensors. The content of this manual is provided for information use
only, is subject to change without notice, and should not be construed as a commitment by
AURALiC. AURALiC assumes no responsibility or liability for any errors or inaccuracies
that may appear in this manual. AURALiC, inspire the music, ActiveUSB, AFN402, Alire,
Purer-Power and their graphic logos are trademarks or registered trademarks of AURALiC
in the Hong Kong and/or other countries. AURALiC's trademarks may not be used in
connection with any product or service that is not AURALiC's, in any manner that is likely
to cause confusion among customers or in any manner that disparages or discredits
AURALiC. All other trademarks not owned by AURALiC that appear on this site are the
property of their respective owners, who may or may not be affiliated with, connected to,
or sponsored by AURALiC.
2 Welcome
Begins from the pursuit of an extraordinary amplifier that can well match with modern top
quality headphones, inspired by the soul of Rupert Neve's legendary design philosophy,
bearing with modern simplism style appearance, TAURUS is born with a perfect coalescence of classic and pop elements. Joint using with ARK MX+ and a great headphone, it
lets you sailing through the ocean of music, experiencing the wonders of artistic enjoyment.
z
AURALiC ORFEO Class-A Output Module
Inspired by Neve 8078 analog console’s circuit design, AURALiC developed ORFEO
Class-A output module. The principle of this module is to use a mass of small signal
components with best linear characteristic. By packing them though a thermal balance procedure and bias the transistors into Class-A, ORFEO achieves impressive
performance with open loop distortion less than 0.001%. With such sophisticated
module, TAURUS shares the same warm and natural sound with Neve 8078.
z
Low Noise Input Buffer
The input buffer of TAURUS is specifically designed by AURALiC to meet the requirement of headphone amplifier usage. This buffer own an exclamatory low noise
of less than 2uV while maintains high input impedance (100K of RCA and 200K of
XLR). The low noise input buffer endues TAURUS with a dynamic range over 130dB
and possible to fit into any kind of source, even with high output impedance devices
such as valve buffered CD, it can still easily capture every details and ensure the reality of music impression.
z
Real-time Switchable Working Mode
With a unique 4-way individual output structure, you can configure TAURUS into
standard or balanced working mode by simply pressing the button on the front panel
without power off the unit or unplug the headphone. In the standard mode, TAURUS
can output 4500mW continuous and undistorted power into 32ohm, satisfy the
toughest headphone’s driving requirement; when facing high impedance loads,
TAURUS can also deliver 1000mW continuous and undistorted power into 600ohm in
balanced mode. Such flexible design allows TAURUS to match most modern top
quality headphones in a perfect way.
Smoothed music expression, sophisticated circuit design and brilliant appearance;
TAURUS is another exemplary works designed by AURALiC.
3 Table of Contents
Warranty ......................................................................................................... 6
Unpacking ...................................................................................................... 6
Placement and Cabling ................................................................................. 7
Placement .................................................................................................. 7
Check Your AC Mains Voltage ................................................................... 7
Cabling ...................................................................................................... 8
Operation ........................................................................................................ 9
Power On/Off ............................................................................................. 9
Volume Control ........................................................................................ 10
Input/Output Control ................................................................................ 10
Headphone Connection ........................................................................... 11
Burn-in period and Warm-up.................................................................... 11
Maintenance & Service ................................................................................ 12
Maintenance ............................................................................................ 12
Service..................................................................................................... 12
Contact .................................................................................................... 12
Troubleshooting ........................................................................................... 13
No Power ................................................................................................. 13
No Sound or Low Output ......................................................................... 13
Distorted or Partial Sound........................................................................ 13
Noise/Hum ............................................................................................... 13
Specifications............................................................................................... 14
EC Declaration of Conformity ..................................................................... 15
AURALiC Product Registration Form ........................................................ 17
4 IMPORTANT SAFETY INSTRUCTIONS
z
All safety and operating instructions should be read before the product is operated,
and retained for future reference.
z
This product should be operated only from the type of power source indicated on the
back of the unit. If you are not sure of the type of your mains power supply, consult
your dealer or local power company.
z
To completely disconnect this product from the AC mains, disconnect the power
supply cord plug from the AC receptacle.
z
Do not use the product near water, i.e. near a bathtub, kitchen sink, laundry tub, in a
wet basement, near a swimming pool etc.
z
Do not install the product near heat sources such as radiators, heat registers, stoves,
or other apparatus that produce heat. See “Placement and Cabling” on page 7.
z
Do not let objects or liquids fall into the product. Do not expose the product to dripping
or splashing. Do not place a vessel containing liquid on top of the product.
z
Clean only with a soft, dry cloth.
z
Do not attempt to service this product yourself. Opening or removing covers may
expose you to dangerous voltage. Refer all servicing to authorized service personnel.
See “Service” on page 12. 5 Warranty
AURALiC offers a 90-day factory warranty from the date of purchase that can be extended
to a 3-Year limited warranty. This non-transferable warranty is available to the original
owner by completing the product registration form including the original sales information
from your authorized AURALiC dealer within 30 days of purchase. You could either use
the online registration form on our website (www.auralic.com) or fill ‘AURALiC Product
Registration Form’ on page 17 and send it back to your dealer to finish the registration.
Warranty coverage includes all parts and labors. Warranty is void if damage is due to
abuse, neglect or unauthorized modification. Cost associated with the return of this
product is the sole responsibility of the owner. All repair work must be done by AURALiC
or by an authorized AURALiC repair agency. Work done by unauthorized persons will void
any and all warranty coverage.
AURALiC products are uniquely identified with a serial number (S/N) on the back of the
unit. This number is required to validate your warranty. Please reference your serial
number if service is required.
Before the product can be returned for service, an RMA (Return Material Authorization)
number must be issued by AURALiC. Contact your dealer or AURALiC for further information. Units without an RMA number will not be accepted for service.
Unpacking
Please confirm that the following items are in the box:
z TAURUS
z AC Power Cord
z User’s Guide
Carefully unpack each piece, if there is any damage, or if anything is missing, please
contact your dealer or AURALiC.
ONLY SHIP THIS PRODUCT IN ITS ORIGINAL PACKING!
Please be sure to retain the original shipping carton and all packing materials as they are
specially designed to protect the unit during transportation or shipping.
6 Placement and Cabling
Placement
TAURUS should be placed on a solid and stable surface with good ventilation. Do not
install this product near any heat sources such as radiators or other product (such as
amplifiers) that produce heat. Site the product so that its location or position does not interfere with its proper ventilation. For example, it should not be situated on a bed, sofa,
rug, or similar surface that may block the ventilation openings, or placed in a built in installation such as a bookcase or cabinet that may impede the flow of air through the ventilation openings.
Ventilation Requirement
TAURUS dissipates up to 50 Watts of power during normal operation. It
should be installed in a space with at least five inches of clearance above;
one inch behind and on both sides of its enclosure to provide adequate
ventilation. Avoid placing it directly above other equipment that produces
heat.
Check Your AC Mains Voltage
TAURUS is shipped with its mains voltage preset for operation in the destination country.
The mains voltage setting is written on the back of the unit, left besides power cord socket.
Mains voltage setting is not intended to be changed by the user. If it needs to be changed,
contact your dealer or AURALiC.
The power cord has a three-wire grounding type plug (a plug having a third pin for grounding). It will only fit into a grounding type power outlet. If you are unable to insert the plug
fully into the outlet, contact your dealer or AURALiC. Do not defeat the safety purpose of
the grounded type plug.
TAURUS MUST BE USED WITH CORRECT
MAINS VOLTAGE AND PROPERLY EARTHED!
7 Cabling
The I/O ports on the back of the unit are shown as following:
1
Right Balanced Analog Input
5
Right Balanced Analog Output
2
Right Single-Ended Analog Input
6
Right Single-Ended Analog Output
3
Left Single-Ended Analog Input
7
Left Single-Ended Analog Output
4
Left Balanced Analog Input
8
Left Balanced Analog Output
9
AC Mains Power Cord Socket
Please be sure to power off all units in your system before any cabling job, failed to follow
this instruction may result in permanent damage to the device and void any warranty.
ALWAYS POWER OFF TAURUS BEFORE CABLING!
z
Analog Inputs
The balanced and single-ended analog inputs are individually buffered, however, it is still
strongly recommended to disconnect unused ports to avoid any potential electromagnetic
interference induced by cable.
The sensitivity of both RCA and XLR inputs are same as 2Vrms with a maximum allowed
level at 6Vrms. Please be sure to use a source component with its output level within this
range.
Since the input impedance of the RCA and XLR ports are designed to be very high
(100K@RCA / 200K@ XLR) to capture music details from the source, we recommended
you to use shielded interconnect cable to avoid noise pick-up from the environment.
8 z
Analog Outputs
When using as pre-amplifier, TAURUS will provide high level, low distortion audio signal to
your power amplifier though its analog outputs. In STD mode, both RCA and XLR outputs
are connected together with XLR’s pin 2 as hot; in BAL mode, only XLR outputs are active
with a maximum output level at 36Vrms. AURALiC recommended you only connecting
RCA or XLR outputs at the same time for best sonic performance.
Operation
The front panel of TAURUS is shown as following:
1
Power Switch
2
Volume Control Knob
3
Power LED
4
Input Control Switch
5
Output Control Switch
6
4PIN Balanced Headphone Jack
7
6.35mm Stereo Headphone Jack
Power On/Off
As soon as you have plugged the power cord, TAURUS will be in deep standby mode with
power dissipation at about 0.1 Watt, you can power on and off the unit by pressing the
tactile switch ‘POWER’ on the from panel.
The Power LED indicates current work status of TAURUS:
z LED off:
Power off
z LED light:
Ready to work
9 Volume Control
The volume control allows you to increase or decrease the output level of analog outputs
and headphone jack from -80dB to +16dB.
LISTENING WITH HEADPHONE AT LARGE SOUND PRESURE
LEVEL WILL PERMANENTLY DAMAGE YOUR HEARING!
TAURUS is very powerful in driving ability; this also means it can produce sound at level
which may permanently damage your hearing. Always take care of your hearing when
enjoy the music and try to reduce the volume all the time as far as possible.
Please always reduce the volume before plug/unplug as well as put on the headphones.
This not only protects your headphones from loud click and pop noise during the
plug/unplug but also avoid reproduce a much higher sound level when a new headphone
with lower impedance is plugged.
Input/Output Control
The input control switch allows you to choose the music source between RCA and XLR
inputs. Though both inputs are individually buffered, we recommended you only connecting one pair of inputs to avoid any potential electromagnetic interference induced by cable.
The output control switch set the working mode of TAURUS on the fly. In the standard
mode, TAURUS can output 4500mW continuous and undistorted power into 32ohm and
1000mW continuous and undistorted power into 600ohm in balanced mode.
All outputs and jack are active under STD mode; RCA outputs at the back panel and
6.35mm stereo headphone jack will be muted under BAL mode for proper operation. For
best sonic performance, please connect only one kind of outputs/jack at a same time.
Using TAURUS as Pre Amplifier
Since analog outputs on the back panel and headphone jack on front
panel are in parallel connection, please unplug your headphones when
using TAURUS as pre amplifier. Failed to do those will result in high power
output on the headphone jack and damage your headphone.
10 Headphone Connection
TAURUS is designed to well match all modern dynamic headphones with either 6.35mm
stereo headphone jack (TRS jack) or 4PIN balanced XLR jack. Please make sure the plug
is seated for a solid connection.
The pin wiring for 6.35mm jack is: tip=left channel, ring=right channel, sleeve=ground. Pin
wiring for 4PIN XLR jack is: pin1=left positive, pin2=left ground/negative, pin3=right positive, pin4=right ground/negative.
Don’t use mono 6.35mm plug (TS plug)!
A mono 6.35mm plug (TS plug) will create a short connection; this will
destroy the ORFEO output module in TAURUS! Double check that you
use 6.35mm stereo plugs when you connect headphones.
Burn-in period and Warm-up
As the same with the other audio components, TAURUS requests at least 100 hours music signal burn-in to achieve its designed performance; the sonic will be in best after 500
hours music signal burn-in.
Since TAURUS is working in Class-A, it need regular warm-up before it can sound best for
enjoyment. The warm-up time depend on room temperature which should between 30 to
60 minutes.
11 Maintenance & Service
Maintenance
TAURUS does not require regular maintenance in normal use. However, there are a few
things that will help to keep it in good operating and cosmetic condition:
Cleaning
Only clean the enclosure with a soft, dry cloth.
Extended Nonuse
Disconnect TAURUS from mains power when it will be left unattended or unused for an
extended period of time.
Service
If your TAURUS encounters a problem, contact your dealer or AURALiC. Do not void the
warranty by allowing unauthorized personnel to attempt repairs. Do not attempt to service
the product yourself. Opening the cover may expose you to dangerous voltage, as well as
void the warranty.
Before TAURUS can be returned for service, an RMA (Return Material Authorization)
number must be issued by AURALiC. Contact your dealer or AURALiC for further information.
Contact
If you have any question, please feel free to contact our technical support department:
AURALIC LIMITED
B406, No.11 East Shixing Street
Shijingshan District, Beijing, 100041
China
[email protected]
www.auralic.com
12 Troubleshooting
No Power
z
z
z
Examine the power cord to be sure that it is connected to both the AC mains connector and an AC wall outlet.
Try substituting another power cord.
Check the AC mains voltage setting on the back of the unit and see if it is according to
your local power voltage.
No Sound or Low Output z
z
z
z
Examine all cables to ensure a solid connection between the TAURUS and associated components.
Make sure you have selected the right input and output ports.
Make sure all associated components are powered on and not muted.
Make sure all associated components connected to the selected input are producing
an audible input signal.
Distorted or Partial Sound
z
z
Check the cables between the TAURUS and associated components, making sure all
connections are good and sound.
Check out the output level of your source component and make sure it will not overdrive TAURUS’s input by delivering signal level above 6Vrms.
Noise/Hum
z
z
z
z
Check the input cables between TAURUS and associated components, making sure
all connections are good and sound.
Make sure the input cables between the TAURUS and sources component are not
routed near AC cables, power transformers, or other EMI inducing devices.
Try to use high quality interconnect cable with full ground shield.
Try to plug TAURUS and associated components with different AC main socket to
avoid ground loop induced hum noise.
13 Specifications
Frequency Response
z
z
THD+N
<0.002%, 20Hz-20KHz at rated output
Dynamic Range
>130dB, 20Hz-20KHz, A-weighted
Crosstalk
<-80dB at 1KHz
Output Power
Input Port
Output Port
3Hz - 300KHz, +/- 3dB
20Hz - 20KHz, +/- 0.1dB
STD Mode
BAL Mode
32ohm
4500mW
1200mW
120ohm
1200mW
4500mW
300ohm
500mW
2000mW
600ohm
250mW
1000mW
z
z
RCA: Sensitivity: 2Vrms; Maximum: 6Vrms
XLR: Sensitivity: 2Vrms; Maximum: 6Vrms
z
z
z
z
6,35mm Stereo Headphone Jack (STD only)
4PIN XLR Headphone Jack (AKG K1000 wiring)
RCA analog out (STD only)
XLR analog out (PIN2:HOT)
Power Dissipation
50 Watts at max.
Dimension
11''W x 9''D x 2.6''H (33cm x 23cm x 6.5cm)
Weight
12 lbs (5.5kg)
All specifications are subject to change without notice.
14 EC Declaration of Conformity
AURALIC LIMITED declares this product is in conformity with the Low Voltage
Directive 73/23/EEC and Electromagnetic Compatibility 89/336/EEC as
amended by 92/31/EEC and 93/68/EEC.
The conformity of the designated product with the provisions of Directive
number 73/23/EEC (LVD) is proved by full compliance with the following
standards:
EN60065 2002 General requirements
The conformity of the designated product with the provisions of Directive
number 89/336/EEC (EMC) is proved by full compliance with the following
standards:
EN55013 2001 Conducted emissions
EN55013 2001 Absorbed emissions
EN55020 2002 Immunity
15 16 AURALiC Product Registration Form
Owner Information
Your Name
Street Address
City
Zip Code
Country
Email
Telephone
Product Information
Product Type
Serial Number
Dealer Name
Purchase Date
Purchase Price
Currency
17 18