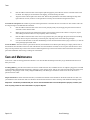
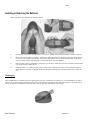
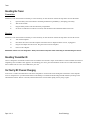
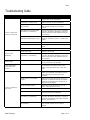
1
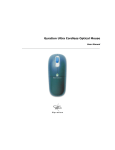
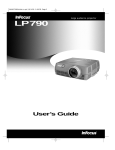
TRACER
User Instructions
Boost Technology, LLC
1712 Ocean Avenue
San Francisco, California 94112
www.boosttechnology.com
76-000025-19 Rev. 1
Tracer
Table of Contents
About Tracer™................................................................................................................................................................................ 3
Using Tracer.................................................................................................................................................................................... 4
The Transmitter .......................................................................................................................................................................... 4
The Visor ................................................................................................................................................................................ 6
For Hands-Free Mousing....................................................................................................................................................... 6
For Desktop Use .................................................................................................................................................................... 7
The Holster............................................................................................................................................................................. 7
Care and Maintenance.................................................................................................................................................................... 8
Installing or Removing the Batteries.......................................................................................................................................... 9
Recharging ............................................................................................................................................................................. 9
Resetting the Tracer.................................................................................................................................................................10
Transmitter ...........................................................................................................................................................................10
Receiver ...............................................................................................................................................................................10
Resetting Transmitter ID ..........................................................................................................................................................10
On-The-Fly RF Channel Changing..........................................................................................................................................10
Troubleshooting Guide..................................................................................................................................................................11
Regulatory Information..................................................................................................................................................................12
Contacting Boost ......................................................................................................................................................................13
The Boost Guarantee ...............................................................................................................................................................13
Page 2 of 13
Boost Technology
Tracer
About Tracer™
Thank you for purchasing Tracer™, a whole new kind of mouse you control by moving your head. Tracer uses GyroPoint
Technology™, based on a solid-state sensor that detects your natural head motions to precisely control the cursor on the screen!
Because its patented micro-gyroscope technology is remarkably precise — down to individual pixel resolution — anything that can be
done with a mouse, you can do with Tracer.
Follow this guide to easily install and use the Tracer. Please refer to the figure below to familiarize yourself with the parts of the
Tracer system:
Boost Technology
Page 3 of 13
Tracer
Installing Tracer
Installing Tracer is quick and simple. Please refer to the illustration on the preceding page:
1.
Make sure you have a Microsoft, Logitech or compatible mouse driver installed on your computer. Refer to your
operating system's documentation for details about driver verification and installation.
2.
Plug the AC adapter into a power outlet and insert power plug into the back of the receiver.
Note - The AC adapter is required to charge the NiMH battery in the transmitter. Once the transmitter is charged, the
AC adapter may be disconnected, if desired. The AC adapter needs to be connected to the receiver when charging of the
battery is required. Disconnecting the AC adapter may also reduce the reception range.
3.
Install NiMH battery into Tracer transmitter (see "Installing or Removing Batteries" below)
4.
Allow Tracer to charge in cradle for 14 hours.
5.
Turn off your computer.
6.
Connect theTracer receiver cable to your computer by one of the following methods:
a. Directly connect the PS2 plug on the receiver to the PS2 port on the rear of your computer.
b. If you use a PC that does not have a PS2 port, connect the receiver to either the RS-232 serial port or a USB port using the
appropriate adapter.
c. If you are using an Apple Macintosh with an ADB jack, use the appropriate adapter and load the driver software as instructed
in the README file on the included diskette.
d. If you are using an Apple Macintosh with a USB jack, connect the receiver to the USB jack using the appropriate adapter
Refer to your computer's instruction manual to locate the correct port. The adapter you specified when ordering the
Tracer will have been included in your shipment.
7.
Power on computer
Note - Receiver must be at least 12 inches from any significant electromagnetic source (e.g., monitor).
Using Tracer
The Transmitter
Note - The transmitter must be placed on the receiver cradle before initial use. If it was not, place the transmitter in
the cradle until the transmitter LED blinks at least once, to allow the system to synchronize properly.
Familiarize yourself with the features of the transmitter:
Page 4 of 13
Boost Technology
Tracer
The LED indicates the activity of the transmitter. If the LED is lit, the transmitter is on. If the LED is blinking and/or dim, the
transmitter battery needs to be recharged soon. If the LED is dark, the transmitter is either in "sleep" mode, or the battery is dead.
Press any button to wake up the transmitter. If the LED remains dark, return the transmitter to the receiver cradle, attach the AC
adapter, and allow to recharge for more than 14 hours before using again.
The Channel Select Button switches between eight different broadcasting channels in series. Click this button if you are
experiencing inconsistant or erratic cursor movements due to possible radio interference.
The "Off" Button, on the underside of the transmitter, allows the transmitter to be put into "sleep" mode. In sleep mode certain
electronics are turned off, allowing battery life to be conserved when the mouse is not in use. To put the transmitter into "sleep" mode,
hold down the Channel Select button and quickly depress the "Off" button. To reactivate the transmitter, press any button.
The Left and Right Mouse Buttons act as the left and right buttons on any standard computer mouse. Pressing either of the buttons
will also wake the transmitter if it has been put into "sleep" mode. The right mouse button, in some applications, may also "park" the
cursor. By right-double-clicking, the cursor can be frozen in one place. A second right-double-click frees the cursor and allows it to
move normally again.
The Connector allows the attachment of two external switches that will then function as Left and Right Mouse Buttons. The
transmitter buttons will continue to work normally. The jack for each switch is directly in front of its corresponding button. Any
switch with a standard 3.5 mm mono connector plug may be used.
The Connector also provides the modular jack for attaching the visor, for hands-free mousing. The jacks are identified in the sketch
below (looking at the front of the transmitter):
Boost Technology
Page 5 of 13
Tracer
The Visor
Refer to the picture above while following the instructions below.
The Brim of the Visor contains a gyroscope, a device that senses the motion of your head and converts that to motion of the cursor on
the screen. To properly sense the motion of your head, the visor must be worn with the brim at the front, and the gyroscope in front of
your forehead.
The Data Cable has a modular plug at one end that is connected to the transmitter during use.
The Adjustible Strap can be used to snug the visor onto your head. The cutout in the strap should be centered around the small bump
at the base of the user's skull. Slide the arms of the strap up the sides of the headband until the visor fits comfortably.
For Hands-Free Mousing
Important - Make sure the battery has been charged for at least 14 hours before initial use.
1.
Plug the data cable from the visor into the center jack on the transmitter connector.
2.
Start the computer with the receiver properly connected and the transmitter in the receiver cradle.
3.
Remove the transmitter from the receiver cradle and place it out of the way. It may be left on the desktop or any
other surface, or it may be secured in the supplied In Use Cradle. (See section below on the installation and use of
the in use cradle.) The LED on the receiver cradle will blink rapidly once communication begins.
4.
When first turned on, and each time the visor is disconnected from or connected to the transmitter, the cursor may
drift across the screen in one direction to a side or corner. This is normal. If this occurs, lay the visor right side up on
a stable surface. The system should stabilize within five seconds.
5.
Wear the visor on the head like an athletic cap. Adjust the strap as necessary to keep visor comfortable and stable.
6.
Control the cursor on the screen by turning your head in a natural motion .
Page 6 of 13
Boost Technology
Tracer
For Desktop Use
1.
Place the transmitter on a flat surface or mouse pad.
2.
Move the transmitter around on the surface as you would a normal computer mouse. The transmitter will
automatically sense the motion of the mouse ball and allow it to control the cursor. It may take a few seconds to
switch control from the visor to the ball. (Even if the visor is not plugged in, it defaults to "hands-free" mode.)
3.
If you stop moving the mouse, the gyroscope in the visor will be reactivated in less than five seconds.
The Holster
The Holster provides a means to attach the transmitter to a chair, keeping it out of the way while allowing comfortable use of the
visor. The holster will secure the transmitter best when installed facing up, but will also hold it facing "sideways". There are several
ways to attach the cradle, user preference dictates the final choice of orientation and location. Refer to the illustration below while
following these instructions.
To mount on a frame member: The most secure attachment for the holster is on the frame of the chair.
1.
Boost Technology
Feed the supplied 3/4 inch wide velcro straps through the two pairs of slits on the back of the holster, as shown on
the left below.
Page 7 of 13
Tracer
2.
Peel the adhesive from the back of the neoprene pad and apply the pad to the boss where it will make contact with
the frame. This helps prevent the holster from slipping, and from marring the frame.
3.
Align the holster with the pad on the chosen strut. Run the strap behind the strut and back through the loop. Pull
tight and close on itself, as shown on the right above.The strap can be trimmed to length with scissors.
To mount on a flat panel: This method is good for attaching the holster to the back side of a seat cushion or other surface with a flat
area large enough to accommodate the transmitter.
1.
Peel the adhesive from the back of the velcro "hook" pad (the prickly one) and apply the pad to the boss where it
will make contact with the frame.
2.
Make sure the area chosen for mounting the holster is clean and free of dust. If the surface is non-porous, wipe it
with rubbing alcohol and allow it to dry completely before continuing.
3.
Peel the adhesive from the back of the velcro "loop" pad (the fuzzy one) and apply the pad to the chosen mounting
location. Be sure to press down firmly on the entire pad, especially at the corners and along the edges..
4.
It is safe to stick the holster to the chair immediately, but wait at least 24 hours before trying to remove it, or else the
velcro pad might peel off the chair.
To use the holster: Once the holster is positioned as desired, the transmitter can be held in place during use. Simply tuck the rear of
the transmitter into the basket at the lower end of the holster. Once the transmitter is seated, secure it in place with the narrow velcro
strap at the top. Run the strap in front of the connector and through the loop on the far side. Fold it back and stick the end to itself to
prevent the transmitter from moving or falling out of the holster.
Care and Maintenance
Your Tracer is built for lasting performance. Below is a list of items that should help ensure that you get maximum life and service
from your Tracer.
To Charge Battery, place the Tracer back in the receiver cradle after each use, and make sure the AC adapter is plugged in. The LED
on the transmitter should initially flash slowly, indicating a "quick charge" mode. After up to 5 hours, the LED will glow steady green,
indicating a "deep charge" mode. A fully-charged NiMH battery will discharge in about three weeks of non-use if not left on a
powered receiver cradle.
Inspect and clean the mouse track ball and rollers, as needed. Dust and dirt will accumulate on the mouse track ball over time. Use
your thumbs to twist off the track ball cover. Remove the mouse ball and clean it with a cotton-tip swab and diluted rubbing alcohol.
Important - The battery included with your Tracer must be handled with care and disposed of properly. Contact your
local recycling center for more information on proper disposal.
Page 8 of 13
Boost Technology
Tracer
Installing or Removing the Batteries
Refer to the figure while following the directions below:
1.
From the top of the mouse, slide the battery cover open by pushing firmly with your thumbs as shown in 1, above.
2.
Remove the existing battery if necessary. Connect the replacement battery to the mouse. The plug is designed to fit
in one way only: carefully align the tabs on the battery plug with the slots on the transmitter socket. Gently push
battery connector until it snaps into place, as shown in 2, above. DO NOT FORCE.
3.
Place the battery pack in compartment, replace the cover as shown. Make sure wires do not interfere with the battery
cover when closing (3 and 4, above)
4.
Charge the battery overnight by placing Tracer on the receiver cradle before its first use. The LED on the mouse
slowly flashes to indicate it is charging. When fully charged, the LED glows a solid green and Tracer is ready for
use.
Recharging
Tracer NiMH batteries can hold a charge for approximately 10 hours of continuous use. However, it is recommended that you place
Tracer in its receiver/recharger cradle whenever you leave your desk for any length of time. If the Tracer battery is extremely low on
charge, the LED on the transmitter will slowly blink. The LED goes dark if the battery is discharged.
Boost Technology
Page 9 of 13
Tracer
Resetting the Tracer
Transmitter
Sometimes, if the Tracer behaves erratically, it will be necessary to reset the mouse. Follow the steps below to reset the handet:
1.
Open the battery door as described in "Installing and Removing the Battery", and unplug your battery.
2.
Wait for 60 seconds.
3.
Plug the battery back in and close the battery compartment.
4.
Set Tracer in its Receiver Cradle for 5 seconds, until the LED on the transmitter blinks at least once.
Receiver
Sometimes, if the Tracer behaves erratically, it will be necessary to reset the mouse. Follow the steps below to reset the receiver:
1.
Turn off the computer.
2.
Disconnect the receiver from the computer. Disconnect the AC adapter from the receiver, if plugged in.
3.
Plug the AC adapter into the receiver. Plug the receiver into the computer.
4.
Power on the computer.
Remember- PS2 is not "hot swappable". Always turn off the computer when connecting or disconnecting the Tracer.
Resetting Transmitter ID
Tracer is designed to work inside a multi-Tracer environment: each unit has a unique 16-bit address to avoid incidental control from a
neighboring unit. If another Tracer appears to be controlling your cursor, place the transmitter on the receiver cradle until the LED
starts to flash. This sets a new 16-bit address for your unit.
On-The-Fly RF Channel Changing
Your Tracer is a radio-controlled device and can be susceptible to various forms of electromagnetic interference. If the computer
cursor is unresponsive to your movements-either on the desktop or in hands-free mode-change the RF channel by clicking on the
Channel Select button. Wait for 3 seconds, until the LED on the receiver blinks rapidly, then try using it again.
Page 10 of 13
Boost Technology
Tracer
Troubleshooting Guide
Problem
Cursor is visible, but
shows no movement
Cursor Moves
Erratically
Cursor drifts
Transmitter fails to
synchronize with
receiver
Cursor not visible on
the screen
Boost Technology
Reason
Solution
Visor is not connected
Plug the cable from the visor into the
modular jack on the transmitter
Transmitter in "sleep" mode
Press any button to wake transmitter.
Transmitter and receiver not
synchronizing
Place transmitter in receiver cradle and make
sure it blinks at least once to indicate
contact.
RF interference (receiver LED is
not flickering consistently)
Change the channel until you find a suitable
one (See "RF Channel Changing"). Move the
receiver away from other electronic sources,
like monitors.
Battery is very low or dead
(transmitter LED blinking or off)
Recharge by placing transmitter in receiver
cradle for at least four hours, or install fresh
battery.
Transmitter needs to be reset
See "Resetting the Tracer"
Cursor is "parked"
Double-right-click on the transmitter to free
cursor.
Receiver needs to be reset
See "Resetting the Tracer"
Mouse ball is dirty
Clean the mouse ball
RF interference (receiver LED is
not flickering consistently)
Change the channel until you find a suitable
one (See "RF Channel Changing"). Move the
receiver away from other electronic sources,
like monitors.
Gyroscope not steady
Place visor right side up on a flat surface for
five seconds until it self steadies.
Contacts are dirty
Clean the metal contacts on the underside of
the transmitter by rubbing with a pencil
eraser. Clean off residue with a clean soft
cloth.
Tracer not installed properly
Turn of the computer and make sure all
cables are connected, and that the receiver
is plugged into the correct port on the
computer.
Mouse driver is not installed
properly
Make sure you have the correct version of
Microsoft or Logitech mouse driver installed.
PS2 driver for the PS2 port, Serial driver if
using the Serial adapter.
Wrong operating system
Usable OS include Windows 3.X, 95, 98,
2000, or NT; Mac OS 8 or later
Receiver needs to be reset
See "Resetting the Tracer"
Cursor drifting
Place visor right side up on a flat surface for
five seconds until it self steadies.
RF interference (receiver LED is
not flickering consistently)
Change the channel until you find a suitable
one (See "RF Channel Changing" on page #).
Move the receiver away from other electronic
sources, like monitors.
Transmitter and receiver not
synchronizing
Place transmitter in receiver cradle and make
sure it blinks at least once to indicate
contact.
Page 11 of 13
Tracer
Regulatory Information
ATTENTION! THIS DEVICE EMITS RADIO FREQUENCIES AND HAS NOT BEEN CERTIFIED BY THE FAA FOR USE ONBOARD AIRCRAFT.
DO NOT USE THIS DEVICE AT ANY TIME ONBOARD CIVIL AIRCRAFT. TO MINIMIZE THE POSSIBILITY OF INTERFERENCE,
DISCONNECT THE BATTERY TO ENSURE THAT TRACER REMAINS OFF DURING FLIGHT.
FCC Statement
This equipment has been tested and found to comply with the limits for a Class B digital device, pursuant to Part 15 of the FCC Rules.
These limits are designed to provide reasonable protection against harmful interference in a residential installation. This equipment
generates, uses and radiates radio frequency energy and, if not installed and used in accordance with the instructions, may cause
harmful interference to radio communications. However, there is no guarantee that interference will not occur in a particular
installation. If this equipment does cause harmful interference to radio or television reception, which can be determined by turning the
equipment off and on, the user is encouraged to try to correct the interference by one or more of the following measures:
1.
Reorient or relocate the receiving antenna (television, radio, etc.).
2.
Increase the separation between the equipment and receiver.
3.
Connect the equipment to an outlet on a circuit different from that to which the receiver is connected.
4.
Consult the dealer or an experienced radio/TV technician for additional help.
Caution: Changes or modifications not expressly approved by the party responsible for compliance could void the user's authority to
operate the equipment. Contact Boost Technology, LLC, 1712 Ocean Avenue, San Francisco, CA 94112; Tech Support 1 (866) 2667843. This device complies with Part 15 of the FCC Rules. Operation is subject to the following two conditions: (1) this device may
not cause harmful interference, and (2) this device must accept any interference received, including interference that may cause
undesired operation. Warning: Using this product in any way other than as described in this manual or altering the antenna in any
way may violate FCC rules.
FCC ID PJQ-TRACER-25 (Transmitter), FCC ID JJ4-GP9450-R (Receiver).
Page 12 of 13
Boost Technology
Tracer
Contacting Boost
If you have any questions on your new Boost Tracer, please use any of the phone/FAX numbers or addresses below:
Main Office: (415) 334-8246
Sales and Service: (toll-free) (866) BOOST-HELP (866-266-7843)
email: [email protected] [email protected]
World Wide Web:www.boosttechnology.com
Address: 1712 Ocean Avenue, San Francisco, CA 94112
The Boost Guarantee
Your Tracer comes with a 30-day money-back guarantee. If for any reason, during the first 30 days after the date of
purchase, you are dissatisfied with the product, you may return it with original proof of purchase for replacement or a full
refund (This does not apply if the product has been damaged by accident, abuse, misuse, or misapplication).
Without original proof-of-purchase or after thirty days, users may ship defective units to Boost for repair at Boost's current
rates for parts and labor, or for replacement as defined under the Tracer Replacement Insurance Program (purchased
separately).
To make a return or inquire regarding a repair, contact the Boost Customer Service Center, toll free, at 1-866-BOOST HELP
(1-866-266-7843).
BOOST TECHNOLOGY IS NOT RESPONSIBLE FOR ANY LOST PROFITS, LOST SAVINGS OR OTHER INCIDENTAL
OR CONSEQUENTIAL DAMAGES ARISING OUT OF THE USE OF, OR INABILITY TO USE, THIS PRODUCT. THIS
INCLUDES DAMAGE TO PROPERTY AND, TO THE EXTENT PERMITTED BY LAW, DAMAGES FOR PERSONAL
INJURY.
Boost Technology
Page 13 of 13