1
MetaFrame Solutions Guide
Citrix MetaFrame Application
Server for Windows 2000 Servers
Version 1.8
Citrix Systems, Inc.
Information in this document is subject to change without notice. Companies, names, and data used in
examples herein are fictitious unless otherwise noted. No part of this document may be reproduced or
transmitted in any form or by any means, electronic or mechanical, for any purpose, without the
express written permission of Citrix Systems, Inc.
© 1990-2000
© 1985-1997
Citrix Systems, Inc. All rights reserved.
Microsoft Corporation. All rights reserved.
Citrix, Independent Computing Architecture (ICA), MultiWin, DirectICA, SecureICA, Program
Neighborhood, MetaFrame, and WINFRAME are registered trademarks or trademarks of Citrix
Systems, Inc. in the U.S.A. and other countries.
Microsoft, MS, MS-DOS, Windows, Windows NT, and BackOffice are either registered trademarks
or trademarks of Microsoft Corporation in the United States and/or other countries.
All other Trade Names referred to are the Servicemark, Trademark, or Registered Trademark of the
respective manufacturers.
Document No. mf.solg.w2k.adm
iii
Contents
Welcome. . . . . . . . . . . . . . . . . . . . . . . . . . . . . . . . . . . . . . . . . . . . . . . . . . . . . . . . . . . ix
Who Should Use this Guide . . . . . . . . . . . . . . . . . . . . . . . . . . . . . . . . . . . . . . . . . . . ix
How to Use this Guide . . . . . . . . . . . . . . . . . . . . . . . . . . . . . . . . . . . . . . . . . . . . . . . ix
Disclaimer . . . . . . . . . . . . . . . . . . . . . . . . . . . . . . . . . . . . . . . . . . . . . . . . . . . . . . . . . . x
Conventions . . . . . . . . . . . . . . . . . . . . . . . . . . . . . . . . . . . . . . . . . . . . . . . . . . . . . . . . . x
Finding More Information About MetaFrame. . . . . . . . . . . . . . . . . . . . . . . . . . . . . xi
Finding Information About Windows 2000. . . . . . . . . . . . . . . . . . . . . . . . . . . . . . xii
Citrix on the World Wide Web. . . . . . . . . . . . . . . . . . . . . . . . . . . . . . . . . . . . . . . . xii
Citrix Technical Support Bulletin Board Service . . . . . . . . . . . . . . . . . . . . . . . . . xiii
Year 2000 Readiness . . . . . . . . . . . . . . . . . . . . . . . . . . . . . . . . . . . . . . . . . . . . . . . . xiii
Citrix Sales Offices . . . . . . . . . . . . . . . . . . . . . . . . . . . . . . . . . . . . . . . . . . . . . . . . . xiii
Chapter 1 What Is MetaFrame? . . . . . . . . . . . . . . . . . . . . . . . . . . . . . . . . . . . . . . . . . . . 1
Enterprise Application Challenges . . . . . . . . . . . . . . . . . . . . . . . . . . . . . . . . . . . . . . . 1
What Is Server-Based Computing? . . . . . . . . . . . . . . . . . . . . . . . . . . . . . . . . . . . . . . 2
Citrix Server-Based Computing . . . . . . . . . . . . . . . . . . . . . . . . . . . . . . . . . . . . . . . . . 3
MetaFrame Application Server for Windows . . . . . . . . . . . . . . . . . . . . . . . . . . . 3
The Citrix ICA Clients. . . . . . . . . . . . . . . . . . . . . . . . . . . . . . . . . . . . . . . . . . . . . . 5
Citrix Services . . . . . . . . . . . . . . . . . . . . . . . . . . . . . . . . . . . . . . . . . . . . . . . . . . . . 6
Load Balancing Services . . . . . . . . . . . . . . . . . . . . . . . . . . . . . . . . . . . . . . . . . 6
SecureICA Services . . . . . . . . . . . . . . . . . . . . . . . . . . . . . . . . . . . . . . . . . . . . . 6
DirectICA Services. . . . . . . . . . . . . . . . . . . . . . . . . . . . . . . . . . . . . . . . . . . . . . 6
Installation Management Services. . . . . . . . . . . . . . . . . . . . . . . . . . . . . . . . . . 7
Resource Management Services . . . . . . . . . . . . . . . . . . . . . . . . . . . . . . . . . . . 7
VideoFrame. . . . . . . . . . . . . . . . . . . . . . . . . . . . . . . . . . . . . . . . . . . . . . . . . . . . 7
License Packs . . . . . . . . . . . . . . . . . . . . . . . . . . . . . . . . . . . . . . . . . . . . . . . . . . 7
MetaFrame’s Features and Benefits . . . . . . . . . . . . . . . . . . . . . . . . . . . . . . . . . . . . . . 8
IS Management Benefits . . . . . . . . . . . . . . . . . . . . . . . . . . . . . . . . . . . . . . . . . . . . 8
End-User Benefits . . . . . . . . . . . . . . . . . . . . . . . . . . . . . . . . . . . . . . . . . . . . . . . . . 9
Features Included in 1.8. . . . . . . . . . . . . . . . . . . . . . . . . . . . . . . . . . . . . . . . . . . . . 9
Partnerships and Compatibility. . . . . . . . . . . . . . . . . . . . . . . . . . . . . . . . . . . . . . . . 11
The Citrix-Compatible Program . . . . . . . . . . . . . . . . . . . . . . . . . . . . . . . . . . . . 11
Citrix Business Alliance Partners . . . . . . . . . . . . . . . . . . . . . . . . . . . . . . . . . . . 11
Planning Considerations for a MetaFrame Solution . . . . . . . . . . . . . . . . . . . . . . . 12
Chapter 2 Deploying the MetaFrame Servers and ICA Clients. . . . . . . . . . . . . . . . . 15
Sample Server Configurations . . . . . . . . . . . . . . . . . . . . . . . . . . . . . . . . . . . . . . . . 16
iv
MetaFrame Solutions Guide
Server Hardware Device Notes. . . . . . . . . . . . . . . . . . . . . . . . . . . . . . . . . . . . . . . .
Compaq Lightning MAC B2 . . . . . . . . . . . . . . . . . . . . . . . . . . . . . . . . . . . . . . .
Dell PowerEdge 4100/200 . . . . . . . . . . . . . . . . . . . . . . . . . . . . . . . . . . . . . . . . .
IBM Netfinity 3500 . . . . . . . . . . . . . . . . . . . . . . . . . . . . . . . . . . . . . . . . . . . . . .
IBM ServeRAID Netfinity 5500 . . . . . . . . . . . . . . . . . . . . . . . . . . . . . . . . . . . .
IBM Netfinity 7000 . . . . . . . . . . . . . . . . . . . . . . . . . . . . . . . . . . . . . . . . . . . . . .
IBM Netfinity 7000 M10 (86802RU). . . . . . . . . . . . . . . . . . . . . . . . . . . . . . . .
IBM PC Server 330 . . . . . . . . . . . . . . . . . . . . . . . . . . . . . . . . . . . . . . . . . . . . . .
MetaFrame Servers and NT Domains . . . . . . . . . . . . . . . . . . . . . . . . . . . . . . . . . .
Installing Windows 2000. . . . . . . . . . . . . . . . . . . . . . . . . . . . . . . . . . . . . . . . . . . . .
Installing MetaFrame. . . . . . . . . . . . . . . . . . . . . . . . . . . . . . . . . . . . . . . . . . . . . . . .
Creating Server Farms . . . . . . . . . . . . . . . . . . . . . . . . . . . . . . . . . . . . . . . . . . . . . . .
Client Modem Support . . . . . . . . . . . . . . . . . . . . . . . . . . . . . . . . . . . . . . . . . . . . . .
17
18
18
20
20
21
22
25
26
26
28
29
30
Chapter 3 Installing Applications. . . . . . . . . . . . . . . . . . . . . . . . . . . . . . . . . . . . . . . . . 33
Application Integration . . . . . . . . . . . . . . . . . . . . . . . . . . . . . . . . . . . . . . . . . . . . . . 33
Application Installation and Configuration . . . . . . . . . . . . . . . . . . . . . . . . . . . 34
User-Specific . . . . . . . . . . . . . . . . . . . . . . . . . . . . . . . . . . . . . . . . . . . . . . . . . 35
User-Global . . . . . . . . . . . . . . . . . . . . . . . . . . . . . . . . . . . . . . . . . . . . . . . . . . 36
Application Compatibility . . . . . . . . . . . . . . . . . . . . . . . . . . . . . . . . . . . . . . . . . 38
Application Video Performance . . . . . . . . . . . . . . . . . . . . . . . . . . . . . . . . . . . . 38
The Thinwire Virtual Channel . . . . . . . . . . . . . . . . . . . . . . . . . . . . . . . . . . . 39
Software Application Notes . . . . . . . . . . . . . . . . . . . . . . . . . . . . . . . . . . . . . . . . . . 40
Accounting Software . . . . . . . . . . . . . . . . . . . . . . . . . . . . . . . . . . . . . . . . . . 40
Great Plains Dynamics C/S+ and Dynamics. . . . . . . . . . . . . . . . . . . . . . . . 40
Client Platforms . . . . . . . . . . . . . . . . . . . . . . . . . . . . . . . . . . . . . . . . . . . . . . . . . 44
IBM OS/2 Warp Version 4.0 . . . . . . . . . . . . . . . . . . . . . . . . . . . . . . . . . . . . 44
E-Mail Software . . . . . . . . . . . . . . . . . . . . . . . . . . . . . . . . . . . . . . . . . . . . . . . . . 50
Microsoft Exchange Server (Enterprise Edition) Version 5.0
and Microsoft Exchange Client Version 5.0. . . . . . . . . . . . . . . . . . . . . . . . 50
Microsoft Exchange Server (Enterprise Edition) Version 5.5
and Microsoft Exchange Client Version 5.0. . . . . . . . . . . . . . . . . . . . . . . . 54
Microsoft Outlook 98 . . . . . . . . . . . . . . . . . . . . . . . . . . . . . . . . . . . . . . . . . . 59
Financial Software . . . . . . . . . . . . . . . . . . . . . . . . . . . . . . . . . . . . . . . . . . . . . . . 61
PeopleSoft 6.x . . . . . . . . . . . . . . . . . . . . . . . . . . . . . . . . . . . . . . . . . . . . . . . . 61
Host Connectivity Software. . . . . . . . . . . . . . . . . . . . . . . . . . . . . . . . . . . . . . . . 66
Hummingbird eXceed 5 for Windows 2000 . . . . . . . . . . . . . . . . . . . . . . . . 66
Internet Service Provider (ISP) Connectivity Software. . . . . . . . . . . . . . . . . . 69
ExtendNet VPN Remote Access Server . . . . . . . . . . . . . . . . . . . . . . . . . . . 69
Modem Connectivity Software . . . . . . . . . . . . . . . . . . . . . . . . . . . . . . . . . . . . . 73
Contents
Comtrol RocketModem . . . . . . . . . . . . . . . . . . . . . . . . . . . . . . . . . . . . . . . .
Networking Software . . . . . . . . . . . . . . . . . . . . . . . . . . . . . . . . . . . . . . . . . . . . .
Microsoft Windows 2000 Multi-Protocol Routing Service. . . . . . . . . . . .
Productivity Software . . . . . . . . . . . . . . . . . . . . . . . . . . . . . . . . . . . . . . . . . . . .
Symantec ACT! Version 3. . . . . . . . . . . . . . . . . . . . . . . . . . . . . . . . . . . . . .
Corel WordPerfect Suite 8 . . . . . . . . . . . . . . . . . . . . . . . . . . . . . . . . . . . . . .
Lotus Notes 4.5 for Windows NT . . . . . . . . . . . . . . . . . . . . . . . . . . . . . . . .
Lotus SmartSuite 97 . . . . . . . . . . . . . . . . . . . . . . . . . . . . . . . . . . . . . . . . . . .
Microsoft Office 97 . . . . . . . . . . . . . . . . . . . . . . . . . . . . . . . . . . . . . . . . . . .
Microsoft Office 2000 . . . . . . . . . . . . . . . . . . . . . . . . . . . . . . . . . . . . . . . . .
Novell GroupWise 5.5 . . . . . . . . . . . . . . . . . . . . . . . . . . . . . . . . . . . . . . . . .
Novell ManageWise Version 2.6 . . . . . . . . . . . . . . . . . . . . . . . . . . . . . . . .
Programming Software . . . . . . . . . . . . . . . . . . . . . . . . . . . . . . . . . . . . . . . . . . .
Microsoft Visual Basic Version 5.0 Enterprise Edition. . . . . . . . . . . . . . .
v
73
76
76
78
78
79
80
83
85
86
88
89
91
91
Chapter 4 Securing the Enterprise . . . . . . . . . . . . . . . . . . . . . . . . . . . . . . . . . . . . . . . 93
Defining User Rights. . . . . . . . . . . . . . . . . . . . . . . . . . . . . . . . . . . . . . . . . . . . . . . . 93
User Profiles . . . . . . . . . . . . . . . . . . . . . . . . . . . . . . . . . . . . . . . . . . . . . . . . . . . . 93
Granting Access to Anonymous Users . . . . . . . . . . . . . . . . . . . . . . . . . . . . . . . 94
Protecting Against Viruses and Trojan Horses . . . . . . . . . . . . . . . . . . . . . . . . . . . 95
How to Prevent Trojan Horse Attacks . . . . . . . . . . . . . . . . . . . . . . . . . . . . . . . 95
How to Prevent Virus Outbreaks . . . . . . . . . . . . . . . . . . . . . . . . . . . . . . . . . . . 95
Auditing System Activity . . . . . . . . . . . . . . . . . . . . . . . . . . . . . . . . . . . . . . . . . . . . 96
The Auditlog Utility. . . . . . . . . . . . . . . . . . . . . . . . . . . . . . . . . . . . . . . . . . . . . . 98
Securing Data and Applications . . . . . . . . . . . . . . . . . . . . . . . . . . . . . . . . . . . . . . . 99
SecureICA Services . . . . . . . . . . . . . . . . . . . . . . . . . . . . . . . . . . . . . . . . . . . . . . 99
SecureICA Features . . . . . . . . . . . . . . . . . . . . . . . . . . . . . . . . . . . . . . . . . . . 99
Understanding Encryption . . . . . . . . . . . . . . . . . . . . . . . . . . . . . . . . . . . . . 100
Understanding Government Export Restrictions . . . . . . . . . . . . . . . . . . . 101
Third-Party Security Products. . . . . . . . . . . . . . . . . . . . . . . . . . . . . . . . . . . . . 102
Security Dynamics ACE/Server . . . . . . . . . . . . . . . . . . . . . . . . . . . . . . . . 103
Solaris Installation . . . . . . . . . . . . . . . . . . . . . . . . . . . . . . . . . . . . . . . . . . . 109
Progress Database Installation. . . . . . . . . . . . . . . . . . . . . . . . . . . . . . . . . . 110
Solaris ACE/Server Installation. . . . . . . . . . . . . . . . . . . . . . . . . . . . . . . . . 111
VTCP/SECURE Software . . . . . . . . . . . . . . . . . . . . . . . . . . . . . . . . . . . . . 112
Chapter 5 Connecting to the Web . . . . . . . . . . . . . . . . . . . . . . . . . . . . . . . . . . . . . . .
An Introduction to Citrix Web Computing . . . . . . . . . . . . . . . . . . . . . . . . . . . . .
Web Browsers for Citrix Web Computing . . . . . . . . . . . . . . . . . . . . . . . . . . . . .
Microsoft Internet Explorer Version 4.0 for Windows NT. . . . . . . . . . . . . .
117
117
118
118
vi
MetaFrame Solutions Guide
Microsoft Internet Explorer Version 5.0 for Windows NT. . . . . . . . . . . . . .
Netscape Navigator Version 3.04, 32-bit Version . . . . . . . . . . . . . . . . . . . . .
Netscape Communicator Version 4.61, 32-bit Version. . . . . . . . . . . . . . . . .
Web Servers for Citrix Web Computing . . . . . . . . . . . . . . . . . . . . . . . . . . . . . . .
Microsoft Internet Information Server Version 5.0 . . . . . . . . . . . . . . . . . . . .
Netscape FastTrack Server Version 3.01 for Windows NT . . . . . . . . . . . . .
Sample Procedure for Setting Up Web Computing. . . . . . . . . . . . . . . . . . . . . . .
119
119
120
121
121
122
122
Chapter 6 Maintaining MetaFrame . . . . . . . . . . . . . . . . . . . . . . . . . . . . . . . . . . . . . . . 131
Monitoring Network Activity and Performance . . . . . . . . . . . . . . . . . . . . . . . . . 131
Event Viewer . . . . . . . . . . . . . . . . . . . . . . . . . . . . . . . . . . . . . . . . . . . . . . . . . . 131
Using Event Logs to Troubleshoot . . . . . . . . . . . . . . . . . . . . . . . . . . . . . . 132
Using Event Logs to Analyze Activity . . . . . . . . . . . . . . . . . . . . . . . . . . . 133
Network Monitor . . . . . . . . . . . . . . . . . . . . . . . . . . . . . . . . . . . . . . . . . . . . . . . 133
Performance Monitor . . . . . . . . . . . . . . . . . . . . . . . . . . . . . . . . . . . . . . . . . . . . 134
Solving Performance Problems . . . . . . . . . . . . . . . . . . . . . . . . . . . . . . . . . . . . 135
Processor(s) . . . . . . . . . . . . . . . . . . . . . . . . . . . . . . . . . . . . . . . . . . . . . . . . . 135
Memory . . . . . . . . . . . . . . . . . . . . . . . . . . . . . . . . . . . . . . . . . . . . . . . . . . . . 136
Hard Disks . . . . . . . . . . . . . . . . . . . . . . . . . . . . . . . . . . . . . . . . . . . . . . . . . . 138
Network . . . . . . . . . . . . . . . . . . . . . . . . . . . . . . . . . . . . . . . . . . . . . . . . . . . . 139
Monitoring Users and ICA Sessions . . . . . . . . . . . . . . . . . . . . . . . . . . . . . . . . 139
Virtual Memory . . . . . . . . . . . . . . . . . . . . . . . . . . . . . . . . . . . . . . . . . . . . . . . . 139
Third-Party Technologies for Prioritizing ICA Traffic . . . . . . . . . . . . . . . . . 140
Cisco Queuing Technologies in a Citrix Environment . . . . . . . . . . . . . . 140
Packeteer (PacketShaper) . . . . . . . . . . . . . . . . . . . . . . . . . . . . . . . . . . . . . . 143
Applying Server Hotfixes and Service Packs . . . . . . . . . . . . . . . . . . . . . . . . . . . 146
What are Hotfixes and Service Packs? . . . . . . . . . . . . . . . . . . . . . . . . . . . . . . 146
Hotfix Naming Convention . . . . . . . . . . . . . . . . . . . . . . . . . . . . . . . . . . . . . . . 146
Extracting, Installing, and Removing Hotfixes . . . . . . . . . . . . . . . . . . . . . . . 147
The Hotfix Utility . . . . . . . . . . . . . . . . . . . . . . . . . . . . . . . . . . . . . . . . . . . . . . . 148
Chapter 7 Troubleshooting the System . . . . . . . . . . . . . . . . . . . . . . . . . . . . . . . . . . 151
Troubleshooting User Accounts . . . . . . . . . . . . . . . . . . . . . . . . . . . . . . . . . . . . . . 151
Finding Memory Leaks . . . . . . . . . . . . . . . . . . . . . . . . . . . . . . . . . . . . . . . . . . . . . 152
Identifying Memory Leaks Using Performance Monitor . . . . . . . . . . . . . . . 152
Identifying Memory Leaks in NT Services. . . . . . . . . . . . . . . . . . . . . . . . . . . 153
Limiting the Impact of Memory Leaks. . . . . . . . . . . . . . . . . . . . . . . . . . . . . . 154
Resolving Driver Conflicts . . . . . . . . . . . . . . . . . . . . . . . . . . . . . . . . . . . . . . . . . . 154
Setting up a MetaFrame Server Kernel Debug Session . . . . . . . . . . . . . . . . . . . 154
The Kernel Debugger (I386kd.exe) . . . . . . . . . . . . . . . . . . . . . . . . . . . . . . . . 155
Contents
Symbols and Symbol Trees . . . . . . . . . . . . . . . . . . . . . . . . . . . . . . . . . . . . . . .
Kernel Debug Configurations . . . . . . . . . . . . . . . . . . . . . . . . . . . . . . . . . . . . .
Requirements for Debugging . . . . . . . . . . . . . . . . . . . . . . . . . . . . . . . . . . . . .
Hardware Requirements. . . . . . . . . . . . . . . . . . . . . . . . . . . . . . . . . . . . . . .
Configuring the Target Computer for Debugging . . . . . . . . . . . . . . . . . . . . .
Installing Hotfixes on the Target Computer . . . . . . . . . . . . . . . . . . . . . . .
Installing Symbols on the Target Computer. . . . . . . . . . . . . . . . . . . . . . .
Preparing the Target Computer Modem and COM Port . . . . . . . . . . . . .
Modifying the Boot.ini File to Enable Kernel Debugging . . . . . . . . . . .
Configuring the Host Computer for Debugging . . . . . . . . . . . . . . . . . . . . . .
Installing Symbols on the Host Computer . . . . . . . . . . . . . . . . . . . . . . . .
Preparing the Host Computer Modem and COM Port. . . . . . . . . . . . . . .
Installing and Configuring the Kernel Debugger Application . . . . . . . .
Running the Kernel Debugger . . . . . . . . . . . . . . . . . . . . . . . . . . . . . . . . . .
Troubleshooting a Debug Session . . . . . . . . . . . . . . . . . . . . . . . . . . . . . . . . .
Inability to Break into the Debugger. . . . . . . . . . . . . . . . . . . . . . . . . . . . .
Failure of the Target Modem to Auto-Answer. . . . . . . . . . . . . . . . . . . . .
[Parity Error] Message . . . . . . . . . . . . . . . . . . . . . . . . . . . . . . . . . . . . . . . .
vii
155
156
156
157
157
157
158
158
158
161
161
161
162
163
165
165
166
167
Index . . . . . . . . . . . . . . . . . . . . . . . . . . . . . . . . . . . . . . . . . . . . . . . . . . . . . . . . . . . . . . . . 169
viii
MetaFrame Solutions Guide
ix
Welcome
The Citrix MetaFrame Solutions Guide is designed to:
K
Show you some of the many ways MetaFrame 1.8 for Windows 2000 Servers
can be used to meet common requirements
K
List some of the products that have been found to be compatible with
MetaFrame
K
Help you select the proper hardware and software components to build a
system running MetaFrame with Windows 2000
Who Should Use this Guide
This guide is designed to help administrators and resellers with the installation,
setup, and operation of MetaFrame.
How to Use this Guide
The chapters of the MetaFrame Solutions Guide roughly reflect the phases you go
through when you deploy a MetaFrame solution:
Chapter
Contents
Chapter 1, “What Is MetaFrame?”
Introduces you to the components of Citrix’ serverbased computing solution and provides ideas for
planning your deployment.
Chapter 2, “Deploying the
MetaFrame Servers and ICA
Clients”
Provides installation tips, system configuration
guidelines, and information about popular thirdparty hardware devices.
Chapter 3, “Installing
Applications”
Describes the special requirements for multiuser
applications and the installation of many popular
third-party software applications.
Chapter 4, “Securing the
Enterprise”
Describes techniques and third-party applications
that you can use to secure your systems.
Chapter 5, “Connecting to the
Web”
Introduces Citrix Web Computing and details
supported Web browser and server software.
Chapter 6, “Maintaining
MetaFrame”
Contains tips about fine tuning MetaFrame systems
and instructions for applying service packs and
hotfixes.
Chapter 7, “Troubleshooting the
System”
Gives step-by-step instructions for diagnosing
problems on MetaFrame servers.
x
MetaFrame Solutions Guide
Note
The products listed in this guide have been tested and found to be compatible with
MetaFrame. Many other products work well with MetaFrame but Citrix cannot
guarantee the compatibility of untested products.
Because MetaFrame runs on Windows 2000, most compatible applications can be
expected to work. Review the application notes in Chapter 3 for detailed
application integration tips and techniques.
Some application notes in this guide were supplied by third parties and are noted
as such.
Disclaimer
This guide is not intended to be a comprehensive listing of all the third-party
components that can be used with Citrix MetaFrame. MetaFrame supports
industry-standard hardware and software; therefore, many options exist far beyond
those contained in this guide.
Citrix makes no claim as to the suitability of products mentioned in this guide to
fit your needs. All third-party products may be available through multiple
suppliers. The products and suppliers listed are for reference purposes only and
are subject to change without notice.
If you encounter a compatibility problem with any product listed in this guide,
contact the product vendor for technical support.
Conventions
The following conventional terms, text formats, and symbols are used throughout
the printed documentation.
Convention
Meaning
Bold
Indicates boxes and buttons, column headings, command-line
commands and options, icons, dialog box titles, lists, menu
names, tabs, user input, and menu commands.
Italic
Indicates a placeholder for information or parameters that you
must provide. For example, if the procedure asks you to type
filename, you must type the actual name of a file. Italic also
indicates new terms and the titles of other books.
ALL UPPERCASE
Represents keyboard keys; for example, CTRL, ENTER, F2.
Monospace
Represents text displayed at the command prompt and text file
contents.
Û
Indicates a procedure.
Welcome
xi
Convention
Meaning
K
Indicates a list of related information, not procedural steps.
WINNT or
%SystemRoot%
Refers to the Windows 2000 system tree. This can be \WTSRV,
\WINNT, \WINDOWS, or whatever other directory name you
specify when you install Windows 2000.
{braces}
Enclose required items in syntax statements. For example,
{ yes | no } indicates that you must specify yes or no when
using the command. Type only the information within the
braces, not the braces themselves.
[brackets]
Enclose optional items in syntax statements. For example,
[password] indicates that you can choose to type a password
with the command. Type only the information within the
brackets, not the brackets themselves.
| (vertical bar)
Stands for “or” and separates items within braces or brackets.
For example, { /hold | /release | /delete } indicates that you
must type /hold or /release or /delete.
… (ellipsis)
Indicates that you can repeat the previous item(s) in syntax
statements. For example, /route:devicename[,…] indicates that
you can specify more than one device, putting commas between
the device names.
Finding More Information About MetaFrame
Your MetaFrame package includes the following printed documentation:
K
The CD liner notes includes an overview of the product, Citrix support
information, and instructions for activating your Citrix software licenses.
K
The MetaFrame Administrator’s Guide tells administrators how to install,
configure, and maintain MetaFrame servers.
K
The Citrix ICA Client Quick Reference Cards give users step-by-step
instructions for using the Citrix ICA Clients to connect to Citrix servers and
run published applications.
Your MetaFrame software includes the following online documentation in
WinHelp format in the MetaFrame Books Online:
K
The MetaFrame Solutions Guide gives administrators detailed information
about planning, deploying, and configuring server-based computing solutions
using MetaFrame, the Citrix ICA Clients, and a wide variety of third-party
hardware and software.
K
The Citrix ICA Client Administrator’s Guides tell administrators how to
install, configure, and deploy the various ICA Clients to end-users.
K
The online version of the MetaFrame Administrator’s Guide.
xii
MetaFrame Solutions Guide
Û To access MetaFrame Books Online
Click Start, point to Programs, then MetaFrame Tools, and click MetaFrame
Books Online.
All of the documentation for MetaFrame is also available in Adobe PDF format in
the documentation directory of your MetaFrame CD-ROM. Using the Adobe
Acrobat Reader, you can view and search the documentation electronically or
print it for easy reference. To download the Adobe Acrobat Reader for free, please
go to Adobe’s Web site at http://www.adobe.com.
Important Please consult the Readme.txt file in the root directory of your
MetaFrame CD-ROM for any last-minute updates, installation instructions, and
corrections to the documentation.
Finding Information About Windows 2000
Most Windows 2000 compatibility guidelines can be applied to Citrix MetaFrame
because MetaFrame is designed to run with Windows 2000. For example,
MetaFrame supports the deployment of Win32, Win16, DOS, OS/2 1.x (text
only), and POSIX applications. The MultiWin and ICA technologies included in
MetaFrame extend the capabilities of Windows 2000 and, in some cases, require
additional set up and configuration for best results with applications.
For Windows 2000 compatibility information, see the following Microsoft
resources:
K
The Microsoft Web site at http://www.microsoft.com
K
Microsoft Technet
Citrix on the World Wide Web
Citrix offers online Technical Support Services at http://www.citrix.com that
include the following:
K
Downloadable Citrix ICA Clients, available at http://download.citrix.com
K
A Frequently Asked Questions page with answers to the most common
technical issues
K
An FTP server containing the latest service packs and hotfixes for download
K
An Online Knowledge Base containing an extensive collection of technical
articles, troubleshooting tips, and white papers
Welcome
xiii
K
Interactive online support forums
K
The Citrix Developer Network (CDN) available at http://www.citrix.com/cdn
This new, open enrollment membership program provides access to developer
tool kits, technical information, and test programs for software and hardware
vendors, system integrators, ICA licensees, and corporate IT developers who
incorporate Citrix server-based computing solutions into their products.
Citrix Technical Support Bulletin Board Service
The Citrix Technical Support Bulletin Board Service is fully integrated with Citrix
Online Technical Support Services. Customers without Web or e-mail access can
dial in to the Citrix BBS at (954) 267-2590. Communication parameters are: no
parity, 8 data bits, 1 stop bit, up to 28,800 baud.
Year 2000 Readiness
For a detailed description of the Year 2000 Readiness of Citrix products, see our
Web site at http://www.citrix.com/misc/y2000.htm.
Citrix Sales Offices
Australia
Citrix Systems Australia Pty Ltd.
State Forest Building, Level 7
423 Pennant Hills Road
Pennant Hills, NSW 2120
Australia
Telephone: +61 2 9980-0800
Fax: +61-2-9980-6763
Internet URL: www.citrix.com.au
France
Citrix Systems SARL
7, Place de la Defense
92974 Paris, La Defense 4 Cedex
France
Telephone: +33-149-00-33-00
Fax: +33-149-00-33-01
Internet URL: www.eu.citrix.com
xiv
MetaFrame Solutions Guide
Germany
Citrix Systems GmbH
Am Soeldnermoos 17
85399 Hallbergmoos
Germany
Telephone: +49-811-8300-00
Fax: +49-811-8300-11
Internet URL: www.eu.citrix.com
Italy
Citrix Systems Italia
Via Giovanni da Udine, 34
20156 Milano
Italy
Telephone: +39-(0)2-38093613
Fax: +39-(0)2-38093305
Internet URL: www.eu.citrix.com
Japan
Citrix Systems Japan KK
Arco tower 16F, 1-8-1, Shimo-Meguro
Meguro, Tokyo, Japan153-0064
Telephone: +81-3-5434-0992
Fax: +81-3-5434-0986
Internet URL: www.citrix.com
UK
Citrix Systems UK Ltd.
Buckingham Court, Kingsmead Business Park
London Road, High Wycombe
Buckinghamshire, HP11 1JU
United Kingdom
Telephone: +44(0) 1494 6849-00
Fax: +44(0) 1494 6849-98
Internet URL: www.eu.citrix.com
United States
Citrix Systems, Inc.
6400 Northwest Sixth Way
Fort Lauderdale, FL 33309
Phone: (954) 267-3000
Fax: (954) 267-9319
BBS: (954) 267-2590
Internet URL: www.citrix.com
1
C H A P T E R
1
What Is MetaFrame?
This chapter gives you an executive summary of MetaFrame and describes:
K
The challenges of deploying applications across the enterprise
K
What server-based computing is
K
The components of Citrix’ server-based computing solution
K
MetaFrame’s features and benefits
K
Citrix partnerships and compatibility
K
Planning considerations for a MetaFrame solution
Enterprise Application Challenges
MIS managers face the daunting task of deploying client/server Windows
applications across enterprise networks that can easily grow to regional, national,
or global proportions. Unfortunately, traditional client/server technologies rarely
rise to the enterprise-wide challenges faced by MIS. In fact, the established
approaches usually hinder strategic application deployments by inflating costs,
complicating management, and performing poorly.
Traditional client/server application architectures and the accompanying
deployment models established by distributed PC-based LANs, remote control,
and remote node technologies all fail to deliver fast, inexpensive, efficient
application deployments. The problem is inherent to traditional client/server
architecture, which emphasizes client-side computational power. In today’s widely
distributed enterprises, the client/server model breaks down as the client moves
farther away from the server, yet is required to perform the same tasks as a local
machine.
2
MetaFrame Solutions Guide
Organizations seeking to broadly deploy line-of-business applications across the
enterprise face a diverse set of challenges associated with cost, management, and
performance:
K
LAN-Locked Applications. Most business applications, such as two-tier
client/server, are designed for the LAN and are not optimized to run over highlatency phone or WAN connections that run 100 to 1000 times slower than a
local segment.
K
New Users. Today’s corporate computing infrastructure is built for employees,
not a company’s prospects, customers, and suppliers.
K
Heterogeneous Clients. Not everyone uses or needs a PC on the desktop.
Some use non-Windows systems such as OS/2, UNIX, or Macintosh. Some
need low-cost, fixed function devices, such as terminals. Others need new
devices such as wireless tablets and personal digital assistants (PDAs).
K
Management. Managing access (security), version control (maintenance),
system configuration (moves, adds, deletes), and support (help desk) are very
costly, particularly for distant users.
MIS rarely has the luxury of deploying mission-critical applications in a
homogeneous environment, let alone from a centralized location. Instead, the
enterprise network usually includes a widely dispersed variety of servers, client
workstations, and operating systems. A variety of wide area connections joins
remote office LANs throughout the nation or the world. The user base can include
from dozens to thousands of local, remote, mobile, and telecommuting users.
MIS rarely has the luxury of deploying mission-critical applications in a
homogeneous environment, let alone from a centralized location. Instead, the
enterprise network usually includes a widely-dispersed variety of servers, client
workstations, and operating systems. A variety of wide area connections joins
remote office LANs throughout the nation or the world. The user base can include
from dozens to thousands of local, remote, mobile, and telecommuting users.
What Is Server-Based Computing?
Server-based computing is a logical, efficient evolution of today’s networking
environments that gives organizations a way to extend resources, simplify
application deployment and administration, and lower the total cost of application
ownership.
With server-based computing, applications are deployed, managed, supported, and
executed completely on a server. Client devices, whether “fat” or “thin,” have
instant access to business-critical applications on the server, without application
rewrites or downloads. Because server-based computing works within the current
computing infrastructure and standards, it is rapidly becoming the most reliable
way to reduce the complexity and total cost of enterprise computing.
Chapter 1 What Is MetaFrame?
3
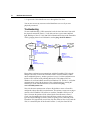
Server-based computing relies on three critical components:
K
A multiuser operating system that allows multiple concurrent users to log on
and run applications in separate, protected sessions on a single server.
K
A remote presentation services architecture capable of separating the
application’s logic from its user interface, so that only keystrokes, mouse
clicks, and screen updates travel the network.
MetaFrame uses Citrix’ ICA, which enables virtually any client device to
access virtually any application over any type of network connection. Unlike
the Network Computing (NC) architecture, server-based computing does not
require applications to be downloaded to client devices. As a result, application
performance is neither bandwidth- nor device-dependent.
K
Centralized application and client management, which enables enterprises
to overcome the critical application deployment challenges of management,
access, performance, and security.
Citrix Server-Based Computing
Citrix’ server-based computing solution consists of:
K
MetaFrame Application Server for Windows
K
The Citrix ICA Clients
K
Citrix Services
MetaFrame Application Server for Windows
MetaFrame Application Server for Windows incorporates Citrix’ Independent
Computing Architecture (ICA) protocol and provides a high-performance, costeffective, and secure way to deploy, manage, and access business-critical
applications throughout an enterprise, regardless of client device or network
connection. With this innovative software, enterprises can:
K
Bring server-based computing to heterogeneous computing environments and
provide access to the most powerful 32-bit Windows-based applications,
regardless of client hardware, operating platform, network connection, or
protocol
K
Offer enterprise-caliber server and client management that allows IS
professionals to scale, deploy, and support applications from a single location
K
Provide a seamless user experience at the desktop, delivering a wide variety of
applications with exceptional performance that is independent of bandwidth
Citrix MetaFrame brings server-based computing to the entire enterprise,
including headquarters, branch offices, and remote users, and extends the
capabilities of Windows 2000 Servers for departmental and workgroup
environments. It offers IS professionals a cost-effective way to deploy, manage,
4
MetaFrame Solutions Guide
and support applications from a single point. It provides universal application
access from virtually any type of client device. It ensures bandwidth-independent
performance with any type of network protocol or connection, and offers unique
features for enhanced application management and security.
MetaFrame provides:
K
Support for heterogeneous computing environments
While Windows 2000 supports Windows-based devices and IP-based
connections, MetaFrame goes further, providing universal access to Windowsbased applications regardless of client hardware, operating platform, network
connection, or LAN protocol. As a result, organizations can keep their existing
infrastructures while still deploying the most advanced 32-bit Windows-based
applications across the enterprise.
K
Enterprise-scale management
Organizations building enterprise computing solutions around Windows 2000
will benefit from the robust enterprise management tools of MetaFrame,
including increased system scalability and simplified support of multiple
applications for thousands of users enterprise-wide. Servers can be added
easily and transparently without touching user desktops. Applications can be
deployed and administered across multiple servers from a single location.
Not only does MetaFrame provide the ability to train users of heterogeneous
clients on the latest Windows-based applications, it also allows administrators
to control user access to client resources, thereby maintaining system integrity
and network performance. To secure corporate information, MetaFrame keeps
all vital data and applications on the server, allowing it to be accessed without
downloading.
K
Seamless desktop integration
MetaFrame goes beyond Windows 2000 by offering increased functionality
and enhanced user experience, including complete access to all local system
resources, such as full 16-bit stereo audio, local drives, COM ports, and local
printers. Applications running remotely from the server look, feel, and perform
as though they are running locally. With MetaFrame, users enjoy a comfort
level that eliminates the need for training and increases user productivity.
Chapter 1 What Is MetaFrame?
5
The Citrix ICA Clients
Citrix is continually expanding its offering of ICA Clients to support the growing
need for access to Citrix servers from almost any type of device. Among the
supported ICA Client platforms are:
32-bit
Windows
The Citrix ICA Client for Win32 supports Windows 95,
Windows 98, Windows NT, and Windows 2000, and offers
features that take advantage of the robust capabilities of the
client machine. The Program Neighborhood provides users
customized views of applications published throughout the
enterprise that they are authorized to access.
16-bit
Windows
The Citrix ICA Client for Win16 supports Windows 3.1 and
Windows for Workgroups 3.11, leveraging older, less
powerful Windows PCs and providing their users access to 32bit applications.
DOS
The Citrix ICA Client for DOS includes versions for both 16and 32-bit extended DOS machines. The 32-bit version
provides more features than the 16-bit version, while requiring
less conventional memory.
Web plug-ins
The Citrix ICA Windows Web Clients are available as
ActiveX and Netscape plug-ins that Web masters can
incorporate into Web pages for Internet or Intranet access to
applications running on Citrix servers.
Java
The Citrix ICA Client for Java can run in both applet and
application mode. As an applet, the Java client can be
embedded in a Web page, like the Web plug-in clients. As an
application the Java client supports client platforms that
include a resident Java virtual machine (JVM).
Macintosh
The Citrix ICA Client for Macintosh supports Macintosh PCs
running System 7.1 or later and extends remote application
access to Macintosh users.
UNIX
The Citrix ICA Client for UNIX includes versions for Linux,
SCO, Digital UNIX, HP-UX, IBM AIX, SGI IRIX, and Sun Solaris.
Windows CE
The Citrix ICA Client for Windows CE is integrated into
products manufactured by our OEM partners, including
manufacturers of windows-based terminals, hand-held devices,
and Windows CE Professional devices.
For more information on the types of products available, see
our Web site at http://www.citrix.com.
6
MetaFrame Solutions Guide
For specific details about the features, installation, and administration of the
clients, see the Citrix ICA Client Administrator’s Guides for the clients you plan
to deploy.
Citrix Services
Citrix offers a variety of server add-ons that enhance the scalability,
manageability, and reach of MetaFrame and the Citrix ICA Clients:
K
Load Balancing Services
K
SecureICA Services
K
DirectICA Services
K
Installation Management Services
K
Resource Management Services
K
VideoFrame
K
License Packs
Load Balancing Services
Citrix Load Balancing Services gives you the ability to scale a single MetaFrame
server into a multi-server farm. With load balancing, you can publish an
application to be run on any subset of servers in a Citrix server farm. When an
ICA Client user starts a remote session on the Citrix server and launches a load
balanced application, that user is automatically connected to the least busy server
in the farm. With Load Balancing Services, you can:
K
Balance application load among both MetaFrame and WINFRAME servers
K
Adjust the criteria used to determine server load
SecureICA Services
SecureICA Services contains features to enhance the security of data
communication across any type of connection supported by MetaFrame.
SecureICA Services uses the RC5 encryption algorithm from RSA Data Security,
Inc. The MetaFrame server and the Citrix ICA Client use the Diffie-Hellman keyagreement algorithm with a 1024-bit key to generate RC5 keys.
DirectICA Services
Citrix DirectICA for MetaFrame adds support for multi-VGA adapters to Citrix
MetaFrame Application Server for Windows. A multi-VGA adapter (also called a
multiconsole adapter) is a hardware device that contains several VGA video
adapters with additional support hardware. Each multi-VGA adapter appears to
the server as several VGA video adapters, each with an accompanying keyboard,
mouse, and optional serial and parallel ports, depending on the manufacturer and
Chapter 1 What Is MetaFrame?
7
model. The only limit to the number of multi-VGA adapters that you can install is
your license count.
The combination of a keyboard, mouse, and monitor attached to a port on the
multi-VGA adapter is referred to as a DirectICA station. MetaFrame treats
connections associated with DirectICA stations much like the system console; the
devices (serial and parallel ports) associated with the DirectICA station are on the
server computer itself. Any serial or parallel ports associated with a DirectICA
station are given unique device names and are treated as ports on the server
computer. Because the ports are on the server, DirectICA stations do not support
drive mapping, COM port mapping, or printer mapping.
For more information about DirectICA, see the MetaFrame Administrator’s
Guide.
Installation Management Services
Citrix Installation Management Services lets you simultaneously install an out-ofthe-box application on all Citrix servers in a farm from a single point without
manual intervention. You can install applications on servers regardless of their
physical locations, network connection type, or individual hardware setup.
Resource Management Services
Citrix Resource Management Services is the only application and systems
management product designed specifically for Citrix servers. RMS provides fullfeature management tools for analyzing and tuning MetaFrame, WINFRAME,
Terminal Server, and Windows 2000 systems.
VideoFrame
VideoFrame provides on-demand streaming video support over a wide range of
bandwidths to ICA Clients running on Windows platforms.
License Packs
When you first purchase MetaFrame, you get one or more base licenses for an
initial user count. MetaFrame uses server-based concurrent licensing, which
determines the number of users that can log onto your server at any given time.
As your user base grows, you can purchase license packs from Citrix to expand
your user count.
Citrix MetaFrame License Packs come in 5-, 10-, 20-, and 50-user versions.
For more information about Citrix licensing, including how to pool user counts
from multiple servers, see the MetaFrame Administrator’s Guide.
8
MetaFrame Solutions Guide
MetaFrame’s Features and Benefits
MetaFrame offers benefits to both IS management and end-users. Version 1.8
provides a range of new features to further simplify application deployment and
access.
IS Management Benefits
MetaFrame provides a number of features that ease the burden on MIS:
K
Economy. MetaFrame supports multiple concurrent users on a single
processor and offers free, unlimited client software licensing, making it a costeffective solution for enterprise-wide application delivery.
K
Enterprise Scalability. Symmetrical multiprocessing (SMP) hardware
compatibility enables MetaFrame to support hundreds of concurrent users.
K
Extensive Connectivity. MetaFrame connects users to the network through
standard telephone lines, WAN links (T1, T3, 56Kb, X.25), broadband
connections (ISDN, Frame Relay, ATM), or the Internet.
K
Single-Point Application Management. With MetaFrame, all application
upgrades and additions are made only once at the server and are instantly
available to all remote users.
K
End-to-End Management. Using MetaFrame, administrators can set up
applications, view active sessions, monitor system performance and events,
troubleshoot problems, and create reports from the server. MetaFrame also
allows administrators to use popular network management tools, such as
Microsoft Systems Management Server and SNMP managers.
K
Remote Administration. System administrators can dial-up to the Citrix
server for remote administration and management.
K
Remote Support and Training. Administrators can connect to a remote
user’s session to visually see what is on the screen and interact with the user,
making MetaFrame a valuable remote support and training tool.
K
Seamless Network Integration. MetaFrame integrates into NetWare,
Windows NT, Novell, and other PC networks, allowing administrators to
quickly set up users from existing domain or bindery information.
K
Security. The MetaFrame security tools enhance the standard Windows 2000
security features by providing additional methods for securing file systems.
Chapter 1 What Is MetaFrame?
9
End-User Benefits
MetaFrame also improves the end-user’s experience through:
K
Fast Application Access. The Citrix ICA Clients give remote users fast access
to any type of application, including DOS and 16- and 32-bit Windows
programs, whether productivity applications, traditional client/server
applications, or in-house mission-critical applications.
K
Local/Remote Transparency. MetaFrame provides all the familiarity of a
local LAN desktop. Remote users have complete access to all local system
resources such as notebook drives, remote printers, and clipboards. Users can
also cut and paste between local and remote applications and drag-and-drop to
copy files in the background while they continue to work.
K
Integrated Desktops. From a single desktop, remote users can run
applications locally from the notebook PC or remotely from the Citrix server
for best performance.
K
Easy Setup. With its Windows 95-like installation and setup wizard, ICA
Clients are easy to install for Windows 3.1, Windows for Workgroups,
Windows 95, Windows 98, Windows NT, and Windows 2000. The wizard
guides users through all the necessary installation steps and automatically
detects the PC’s available modem.
K
32-Bit Windows Application Availability. Remote users gain immediate
access to Windows 95 and Windows NT applications, regardless of their client
hardware. MetaFrame enables even DOS-based 286 systems to run Windows
95 applications at near-LAN speeds over low-bandwidth connections.
Features Included in 1.8
K
Program Neighborhood. Program Neighborhood introduces a new metaphor
for user application access that replaces Remote Application Manager for the
Citrix ICA Win32 Client and delivers access to centrally deployed
applications. With the introduction of Program Neighborhood, server-based
applications can be pushed to the Program Neighborhood client, integrated
into the local 32-bit Windows desktop, or pushed directly to the client’s Start
menu.
Similar in concept to Windows Network Neighborhood, Program
Neighborhood provides total administrative control of applications by
providing users with dynamic access to published applications. Not only do
users have an enhanced server-based application experience, but also no client
configuration is required. Program Neighborhood provides complete
administrative control over application access and local desktop integration.
10
MetaFrame Solutions Guide
K
SpeedScreen. SpeedScreen builds on the intelligent agent technology,
introduced in MetaFrame 1.0, that reduces the transmission of frequently
repainted screens. In comparison with MetaFrame 1.0, bandwidth consumption
is reduced, on average, by 25-30% and total packets transmitted is cut by up to
60%, resulting in significant improvements in measured speed on restricted
bandwidth connections.
SpeedScreen furthers the user experience with consistent performance
regardless of network connection by reducing latency and improving the feel
of the server-based application.
K
Installation Management Services (IMS) Ready. The Installation
Management Services option gives Citrix administrators the ability to centrally
manage software replication across Citrix server farms. You can run an
application’s installation routine just once per platform, then deploy the
application to each server in the farm automatically.
This innovative system services option for MetaFrame offers administrators an
excellent alternative to manually installing and configuring the same
application on multiple Citrix servers. Administrators can now more easily and
cost-effectively deploy applications to thousands of users across the enterprise.
K
Video Ready. VideoFrame in conjunction with MetaFrame 1.8 enables the
production and deployment of custom video applications to 32-bit Windows
ICA Clients using an innovative intelligent compression and a streaming
extension to the ICA protocol.
By integrating VideoFrame into a Citrix server farm, administrators can now
deploy custom video applications to any 32-bit Windows desktop, on demand,
while maintaining consistent performance across any network connection,
regardless of available bandwidth.
K
ICA Browser Management. With ICA Browser management, part of the
enhancements to Citrix Server Administration, administrators now have the
ability to control browser parameters such as backup ICA Browsers, ICA
Gateways, and update and refresh intervals. Administrators can also configure
which servers always attempt to become the master ICA browser.
ICA Browser management simplifies browser administration through an
intuitive user interface for better system scaling and management.
Chapter 1 What Is MetaFrame?
K
11
License Pool Recovery. Citrix has introduced a new backup licensing feature
to better manage pooled licenses across the server farm. With this feature, you
can define the number of backup servers to which user licensing data is
replicated.
This addition to Citrix license pooling provides a greater level of fault
tolerance across multiple Citrix servers.
K
Client Device Licensing. This feature allows a user to establish multiple
sessions to multiple servers while consuming only a single pooled license for
each session.
Client device licensing reduces IT organizations’ total cost of ownership
(TCO) by providing seamless access to multiple applications across multiple
servers, without incurring additional licensing costs.
Partnerships and Compatibility
Citrix has an ongoing program of application compatibility testing; however, we
recommend that you contact the application vendors for information about
MetaFrame compatibility. The Citrix-Compatible program and the Citrix Business
Alliance program supply much of the information found in this guide.
The Citrix-Compatible Program
The Citrix-Compatible program enables software and hardware manufacturers to
showcase their products or services as compatible with Citrix products.
Citrix-compatible products are listed in this guide. This guide is available for
download on the Citrix World Wide Web site (http://www.citrix.com). Some
members of the Citrix-Compatible program also include product brochures and
special offers in the Citrix Solutions Provider handbook distributed in every Citrix
Solutions Network (CSN) training class.
Citrix Business Alliance Partners
Members of the Citrix Business Alliance program provide the technology building
blocks for solutions that include high-performance servers, flexible
communications infrastructures, robust client-server development tools, and
turnkey corporate applications. This program is composed of leading industry
vendors who work with Citrix to develop innovative new products and markets for
server-based computing.
12
MetaFrame Solutions Guide
Planning Considerations for a MetaFrame Solution
Before you begin the rest of the book, here are some sample questions to help you
analyze your system requirements, along with some possible answers:
K
K
K
What business problem are you trying to solve?
K
Remote e-mail access while traveling
K
Branch office access to large client/server applications (for example, human
resources)
K
Streamline order entry process
K
Improve customer service
What computing platform and applications are you using?
K
NetWare
K
Oracle database
K
PowerBuilder application on Windows desktops
How many users need access? How many concurrent users? How long will a
typical connection last?
K
100 users total, 25 concurrent connections, 30 minutes
K
What application server(s) are you planning to use?
K
How will you connect to the application server?
K
K
Async Dial-In
K
Remote node (Microsoft RAS or third-party remote node software)
K
LAN
K
WAN (leased line, Frame Relay, ISDN, ATM)
K
Internet
What client hardware/software will you be using?
K
K
K
486DX/2 Windows notebook, 12MB RAM, Shiva PPP dialer supporting IP
and IPX
What are the functional requirements for a remote user?
K
Interactively access Microsoft Office, client/server applications, 3270
connectivity to mainframe applications
K
Print e-mail, documents, reports to client printer
K
File transfer between clients and servers
K
Security issues like dial-back, firewalls, third-party security hardware, etc.
What are the performance requirements?
K
Ten seconds to look up a record
K
Type ahead limited to 2−3 characters for 50 WPM typist
Chapter 1 What Is MetaFrame?
K
What is the time frame for initial pilot and full deployment?
K
K
K
K
Thirty day pilot, full deployment in the following 60 days
Have the resources been allocated for this project?
K
Budget approved
K
Project manager and internal resources assigned
K
Professional systems integrator/Citrix authorized reseller engaged
Who are the decision makers?
K
Director of MIS: budget approval, overall responsibility
K
Vice President of Finance: signoff on success criteria and final OK
K
Project Manager: “owns” the project
How will we support the system once it is in place?
K
Disaster and recovery plans
K
Maintenance plans
K
Capacity planning and evaluating future needs
13
14
MetaFrame Solutions Guide
15
C H A P T E R
2
Deploying the MetaFrame Servers
and ICA Clients
The first phase of putting a MetaFrame solution into production is to deploy
your servers and clients. To do so, you need to go through these steps:
1. Decide on your server hardware and peripheral devices.
2. Decide how your MetaFrame servers should fit into your NT domains.
3. Install Windows 2000 with Terminal Services.
4. Install MetaFrame.
5. Create a server farm and add your MetaFrame servers to it.
6. Preconfigure modem support for your end-users.
7. Install the clients and any custom configuration files.
This chapter includes information to assist you with these steps.
For help with
See
Step 1
“Sample Server Configurations” and “Server Hardware Device
Notes”
Step 2
MetaFrame Servers and NT Domains
Step 3
Installing Windows 2000 Server with Terminal Services
Step 4
Installing MetaFrame
Step 5
Creating Server Farms
Step 6
Client Modem Support
For step-by-step instructions on installing the ICA Clients, see the Citrix ICA
Client Administrator’s Guides for the clients you plan to deploy.
16
MetaFrame Solutions Guide
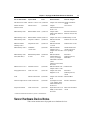
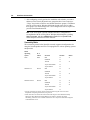
Sample Server Configurations
Hardware compatible with Microsoft Windows 2000 Server and MetaFrame is
listed in the Microsoft Windows 2000 Hardware Compatibility List (HCL). The
following table shows several sample hardware configurations suitable for
deploying MetaFrame servers in an enterprise environment.
Note This is not a comprehensive list of compatible platforms and is presented
solely to provide examples of known good configurations. No endorsement of any
particular manufacturer is implied.
Server Make/Model
System BIOS
CPUs
Disk Controller
Network Adapter
Acer Altos 21000
(4) PIIIAdaptec 7896 U2
500MHz Xeon
Amdahl Envista Series AMI V.1.00.05.CD0
(4) PP200
Mylex DAC960PD Disk Intel 82557-based 10/100
Array Controller, (2)
Ethernet PCI
AIC 7870 v.1.26s
emb_PCI
Compaq Lightning
MAC B2 *
(8) 500MHz
PII Xeon
Compaq Integrated
Smart Array/42xx
Compaq NC3131 Dual
Port UTP Fast Ethernet
(2) PII-450
SimBios SCSI-3
Compaq Netelligent
10/100 TX PCI UTP
Controller 2.3
Compaq Proliant 2500 E24 09/18/96
(1) PP-200
Symbios Logic
875XSID, 2280 PCI
SCSI
Compaq Netelligent
10/100 TX PCI UTP
Controller 2.3
Compaq Proliant 3000 P09 11/25/98
(1) PII-450
Compaq Wide-Ultra
SCSI
Compaq Netelligent
10/100 TX PCI UTP
Controller 2.3
Compaq
Proliant 5000 Server
E16 12/30/96
(4) PP-200
Symbios Logic 875XSID Compaq Netelligent
PCI SCSI
10/100 TX PCI UTP
Controller 2.3
Compaq Proliant 5500 P12 11/20/98
Server
(1) PII-400
Compaq Wide-Ultra
SCSI
Compaq
Proliant 6000 Server
E20 05/16/97
(2) PP-200
(2) Symbios Logic C810 Compaq Netelligent
PCI SCSI
10/100 TX PCI UTP
Controller 2.3
Compaq Proliant 6500 P11 11/13/98
Server
(4) P6-400
Compaq Wide-Ultra
SCSI
Compaq Proliant 800
P14 8/19/98
Intel 82557-based 10/100
Compaq Netelligent
10/100 TX PCI UTP
Controller 2.3
NIC 3122 PCI Dual
10/100
Dell Optiplex Gx1
Phoenix v1.49 2/17/98 (2) PII-400
Adaptec AIC-7890/7880 3COM 3C590 Extended
Dell Power
Edge 4100/200 *
Phoenix 4.05 va05
Adaptec 7880, 7860, PE Intel EtherExpress Pro
RAID 2
100B
(2) PP-200
Chapter 2 Deploying the MetaFrame Servers and ICA Clients
Server Make/Model
System BIOS
CPUs
Disk Controller
Network Adapter
Dell Precision 410 MT Phoenix v1.49 2/17/98 (1) PII-400
Adaptec AIC-7880/7890 3COM 3C905B-TX
10/100
Hewlett Packard
NetServer E/40
Phoenix 4.05.8
Adaptec
3Com 3C595
AHA2910/AIC785x Pci
SCSI v.1.24
IBM Netfinity 3000
IBM PC BIOS 3/8/98 (1) PII-350
Adaptec AHA2940U/AHA-2940UW
Pci SCSI
IBM Netfinity 3500 *
IBM PC BIOS 3/20/98 (2) PII-333
Adaptec AIC-7895 v1.31IBM Etherjet 10/100
IBM Netfinity 5000
Surepath v1.06Rev9
(2) PII-450
IBM ServerRAID
v3.10.08
AMD PC NET 10/100
IBM ServeRAID
Netfinity 5500 *
Surepath 05/12/98
(2) PII-350
IBM ServerRAID
v2.70.04
AMD PCNET 10/100
IBM Netfinity 7000 *
AMI BIOS
1.00.14.CDO
(4) PP-200
IBM ServeRAID
3COM Etherlink XL
Adapter (3.0.01),
10/100 (Not part of
Adaptec AIC-78xx PCI server package)
SCSI
IBM Netfinity 7000
M10 (8680-2RU) *
IBM Netfinity BIOS
9/19/98
(4) PII-400
Xeon
IBM ServeRAID
Intel-82557
Adapter (BIOS ver.
(EtherExpress Pro)
2.23.7), (2) Adaptec
Embedded
AHA2240U/UW Dual
(AHA394XAU/UW/AUWD)
PCI SCSI
IBM PC Server 330 *
SurePath 10/22/97
(2) PP-200
IBM ServeRAID 2.23.7, AMD PCNET
Adaptec 7880 v.1.26s1
Intergraph Interserve
AMI v2.0 1996
(4) PP-100
Adaptec AIC-7860,
Megaraid v1.06
NCR
Phoenix 2.00.00.040
(8) PP-200
Adaptec AIC-7880 PCI SMC9332BDT
SCSI
NetPower Sparta Series AMI 1.00.06.CD0
(2) PP-200
(2)Adaptec PCI 7880
v1.25, Adaptec AHA2940U/2940UW PCI
SCSI 2.23.7
Sequent NTS-2000
(4) P6-200
Mylex DAC 960 v1.29. SMC 9332/9334 BDT
4MB, (2) AIC-7880U 10/100
PCI SCSI
AMI 1.00.07.CD0
(1) PP-200
Intel 8255x-based PCI
Ethernet card (10/100)
Intel-82557
(EtherExpress Pro)
10/100
Intel Pro 100B 82557
* Additional information about these systems is included below.
Server Hardware Device Notes
This section contains notes for popular server hardware devices.
17
18
MetaFrame Solutions Guide
Compaq Lightning MAC B2
This application note describes how to install Citrix MetaFrame and Microsoft
2000 Datacenter Server on a Compaq Lightning MAC B2 server.
Software Requirements
K
Microsoft Windows 2000 Datacenter Server
K
MetaFrame Version 1.8 for Windows 2000
K
Compaq Softpaq for Microsoft Windows 2000
Before Installation
1. Obtain the Compaq Softpaq for Microsoft Windows 2000 from the Compaq
Web site at http://www.compaq.com/support/files/server/softpaqs or by
contacting Compaq Support.
2. Create the four Softpaq support diskettes by following the online instructions.
Installing Windows 2000 and MetaFrame
1. Insert the Windows 2000 Datacenter Server CD-ROM, turn on the machine,
and when prompted, press any key to boot from the CD.
2. Press F6 to install third-party mass storage controllers when prompted from the
Windows 2000 Setup screen.
3. Press S to specify additional SCSI adapters when prompted to do so.
4. When prompted for a manufacturer-supplied hardware support disk, insert
Compaq Softpaq diskette #2 into drive A and press ENTER. Select Compaq
Integrated Smart Array Controllers and press ENTER to continue.
5. See the Microsoft Windows 2000 Server Installation Guide to complete the
installation.
6. Insert the MetaFrame Version 1.8 for Windows 2000 CD-ROM and choose
MetaFrame Setup from the list of on-screen options.
7. See the MetaFrame Installation Guide to complete installation and setup.
Dell PowerEdge 4100/200
This application note describes how to install MetaFrame on a Dell PowerEdge
4100 system.
The Dell PowerEdge series systems are high-speed, upgradeable PC servers
designed around the Intel Pentium Pro family of microprocessors. The PowerEdge
4100 systems provide both Extended Industry-Standard Architecture (EISA) and
high-performance Peripheral Component Interconnect (PCI) expansion slots. The
Chapter 2 Deploying the MetaFrame Servers and ICA Clients
19
PowerEdge 4100 series comes in two models: the 4100/180 equipped with one or
two 180MHz Pentium Pro processors (each with 256KB of Level 1 cache) and the
4100/200 equipped with one or two 200MHz Pentium Pro processors (each with
512KB of Level 1 cache). The 4100 series has an upper limit of 1GB of RAM.
Optionally, the 4100 can be equipped with the Dell PowerEdge RAID II
controller.
Software Requirements
K
MetaFrame Version 1.8 for Windows 2000
K
Microsoft Windows 2000 with Terminal Services
K
Dell Server Assistant CD-ROM Version 1.30 or later
Installing MetaFrame
1. Insert the Dell Server Assistant CD-ROM into the CD-ROM drive of the
PowerEdge 4100 and power on the Dell machine. The Dell Server Assistant
software boots from the CD-ROM. From the Dell Server Assistant CD-ROM
menu, select Create Diskettes. Follow the instructions on-screen to create the
Dell support diskettes.
2. Install Windows 2000 following the directions in the Microsoft documentation.
When Setup displays all recognized SCSI controllers, if the PowerEdge RAID
II Controller is installed in the PowerEdge 4100, press S to install the Dell
PowerEdge RAID II Controller drive
3. Insert the Dell PowerEdge Drivers diskette that was created in Step 1 and click
OK.
4. Complete Windows 2000 installation.
5. After the system reboots, log on to the Windows 2000 console as an
administrator.
6. Insert the MetaFrame compact disk into the CD-ROM drive and begin
installing MetaFrame following the instructions in the Citrix MetaFrame
documentation.
Installing the Dell PowerEdge RAID II Controller Console
1. Install the PowerEdge RAID II Console after Windows 2000 installation is
complete.
2. From the console, log on as an administrator.
3. Insert the Dell PowerEdge RAID II Controller Driver diskette into drive A.
4. Type a:\setup in the text box of the Run menu and press ENTER to begin
installation. Follow the displayed instructions.
5. When installation is complete, the PowerEdge RAID II Console is added to the
Programs folder in the administrator’s Start menu.
20
MetaFrame Solutions Guide
IBM Netfinity 3500
This application note describes how to install MetaFrame on an IBM Netfinity
3500 system. IBM Netfinity 3500 servers are the new generation foundations for
your networked computing and e-business needs today and into the future.
Software Requirements
K
MetaFrame Version 1.8 for Windows 2000
K
Microsoft Windows 2000 with Terminal Services installed
K
SCSI-7800 Device Drivers, Version 2.11 or later
Installing MetaFrame
1. Obtain the SCSI-7800 Device Driver and Utilities Version 2.11 by contacting
IBM Support or visiting the IBM Web site at http://www.pc.ibm.com/servers
2. Install Windows 2000 following the directions in the Microsoft documentation.
3. When prompted to autodetect mass storage controllers, press ENTER to detect
the Atapi Version 1.2 IDE CD-ROM controller.
4. Press S to configure additional SCSI controllers.
5. Expand the list of SCSI controllers, select Other (located at the end of the list),
and press ENTER.
6. Insert the SCSI-7800 Device Driver/Utilities Diskette and click OK. The
device drivers on the diskette are displayed. Select the Adaptec AIC-78xx
driver for Microsoft Windows NT 4.0 and press ENTER to continue.
7. Complete Windows 2000 installation.
8. After the system reboots, log on to the Windows 2000 console as an
administrator.
9. Insert the MetaFrame compact disk in the CD-ROM drive and choose
MetaFrame Setup from the list of on-screen options.
10. Install MetaFrame following the instructions in the Citrix MetaFrame
documentation.
IBM ServeRAID Netfinity 5500
This application note describes how to install MetaFrame on an IBM ServeRAID
Netfinity 5500 system. The IBM Netfinity 5500 server has the power, scalability,
and manageability for today’s complex network systems demands. There is
support for two-way SMP integral tape drives and the ultra-fast 10,000-rpm hard
disk drives. Fully in step with Intel’s processor technology, Netfinity 5500 is the
powerful and reliable foundation upon which you can run your business-critical
applications.
Chapter 2 Deploying the MetaFrame Servers and ICA Clients
21
Software Requirements
K
MetaFrame Version 1.8 for Windows 2000
K
Microsoft Windows 2000 with Terminal Services installed
K
IBM PC ServeRAID Device Driver and Utilities (Version 2.0 or later)
Installing MetaFrame
1. Obtain the IBM PC ServeRAID Device Driver and Utilities Version 2.00 by
contacting IBM Support.
2. Install Windows 2000 following the directions in the Microsoft documentation.
3. When prompted to autodetect mass storage controllers, press S to detect the
Atapi Version 1.2 IDE CD-ROM controller.
4. Press S to configure additional SCSI controllers.
5. Expand the list of additional SCSI controllers, select Other (located at the end
of the list), and press ENTER.
6. When prompted for a driver diskette, insert the IBM PC ServeRAID Adapter
Device Driver/Utilities Diskette and press ENTER. The device drivers on the
diskette are displayed. Select the IBM PC ServeRAID Adapter driver and
press ENTER to continue.
The ServeRAID Adapter must be installed first or the installation process will
hang.
7. Complete Windows 2000 installation.
8. After the system reboots, log on to the Windows 2000 console as an
administrator.
9. Insert the MetaFrame compact disk in the CD-ROM drive and choose
MetaFrame Setup from the list of on-screen options.
10. Install MetaFrame following the instructions in the Citrix MetaFrame
documentation.
IBM Netfinity 7000
This application note describes how to install Windows 2000 and MetaFrame on
an IBM Netfinity 7000 system.
The IBM Netfinity 7000 is a high-performance, symmetric multiprocessing (SMP)
server that is ideally suited for networking environments requiring superior
microprocessor performance, efficient memory management, flexibility, and large
amounts of data storage, utilizing hot-swap drive bays for added reliability. The
IBM Netfinity 7000 provides both Extended Industry-Standard Architecture
(EISA) and high-performance Peripheral Component Interconnect (PCI)
expansion slots.
22
MetaFrame Solutions Guide
Software Requirements
K
MetaFrame Version 1.8 for Windows 2000
K
Microsoft Windows 2000 with Terminal Services installed
K
IBM PC ServeRAID Device Driver and Utilities (Version 2.82 or later)
Installing MetaFrame
1. Obtain the IBM PC ServeRAID Device Driver and Utilities Version 2.82 by
contacting IBM Support or visiting the IBM Web site at
http://www.pc.ibm.com/servers
2. Install Windows 2000 following the directions in the Microsoft documentation.
3. During Setup, press S to manually configure SCSI controllers.
4. Expand the list of SCSI controllers, select Other (located at the end of the list),
and press ENTER.
5. When prompted for a driver diskette, insert the IBM PC ServeRAID Adapter
Device Driver /Utilities Diskette and press ENTER. The device drivers on the
diskette are displayed. Select the IBM PC ServeRAID Adapter driver and
press ENTER to continue.
The ServeRAID Adapter must be installed first or the installation process will
hang.
6. Press S to configure additional SCSI controllers. Select Adaptec
AHA294x/AIC78xx and IDE CD-ROM (ATAPI v1.2 PCI).
7. Complete Windows 2000 installation.
8. After the system reboots, log on to the Windows 2000 console as an
administrator.
9. Insert the MetaFrame compact disk in the CD-ROM drive and choose
MetaFrame Setup from the list of on-screen options.
10. Install MetaFrame following the directions in the Citrix MetaFrame
documentation.
IBM Netfinity 7000 M10 (86802RU)
This application note describes how to install Citrix MetaFrame and Microsoft
Windows 2000 on an IBM Netfinity 7000 M10 system.
The IBM Netfinity 7000 M10 is a high-performance, symmetric multiprocessing
(SMP) server that is ideally suited for networking environments requiring superior
microprocessor performance, efficient memory management, flexibility, and large
amounts of data storage, utilizing hot-swap drive bays for added reliability. The
IBM Netfinity 7000 M10 provides both Extended Industry-Standard Architecture
(EISA) and high-performance Peripheral Component Interconnect (PCI)
Chapter 2 Deploying the MetaFrame Servers and ICA Clients
23
expansion slots. The M10 adds the processing power of up to four Intel Pentium II
Xeons.
Requirements
Software Requirements
K
MetaFrame Version 1.8 for Windows 2000
K
Microsoft Windows 2000 with Terminal Services installed
K
Adaptec 7800 Family Manager Set for Windows NT 4.0, Version 3.01 or
higher
K
IBM ServeRaid Adapter Device Drivers, Version 3.00.18 or higher
K
IBM 100/10 EtherJet PCI Adapter Device Drivers, Version 2.5 or higher
K
S3 Incorporated Video Adapter Device Drivers, Version 3.24.10 or higher
Hardware Requirements
K
External SCSI cable (IBM Part No. 76H3589)
K
External half-high SCSI storage enclosure (IBM Part No. 3510020)
K
Netfinity 4.51G 10K Wide Ultra SCSI hard disk drive (IBM Part No.
01K8009)
Before Installation
1. Obtain the required device drivers by contacting IBM Support or visiting the
IBM Web site at http://www.pc.ibm.com/servers.
2. Create boot diskettes. At a DOS prompt, type winnt32 /ox from the \I386
directory on the Windows 2000 CD-ROM and follow the on-screen
instructions.
3. Install the Netfinity hard disk drive in the external SCSI enclosure and connect
it to the Adaptec SCSI controller card’s external port using the SCSI cable.
Installing Windows 2000 and MetaFrame
1. Insert boot disk #1, turn on the machine, and follow the on-screen instructions.
2. When prompted to autodetect mass storage controllers, press S to skip mass
storage detection.
3. Press S to configure additional SCSI adapters.
4. Expand the list of additional SCSI adapters, select Other (located at the end of
the list), and press ENTER.
5. When prompted for a driver diskette, insert the IBM ServeRaid Device Drivers
diskette and press ENTER. Select the IBM ServeRaid Adapter and press
ENTER to continue.
24
MetaFrame Solutions Guide
6. Press S to configure additional SCSI adapters, select Other, and press
ENTER.
7. When prompted for a driver diskette, insert the Adaptec 7800 Family Manager
Device Drivers diskette and press ENTER. Select the Adaptec AIC-78XX PCI
SCSI controller (NT 4.0) and press ENTER to continue.
8. Press S to configure additional SCSI adapters. Expand the list of additional
SCSI adapters, select the IDE CD-ROM (ATAPI 1.2)/PCI IDE controller, and
press ENTER to continue.
9. When prompted to choose where to install Windows 2000, select the external
(non-RAID) hard disk drive and press C to create a partition.
Note It is recommended that you create a 1000MB partition for the installation
of Windows 2000, leaving the bulk of the hard disk to be used for the page
file.
10. Refer to the Microsoft documentation to continue the installation.
11. From the Network Adapters dialog box, click Select from list… to display
the Select Network Adapter dialog box.
12. Click Have Disk… and insert the IBM 100/10 EtherJet PCI adapter diskette.
Click OK to continue.
13. Select the IBM 100/10 EtherJet PCI adapter and click OK to continue.
14. Refer to the Microsoft documentation to complete the installation.
15. Insert the MetaFrame Version 1.0 CD-ROM and choose MetaFrame Setup
from the list of on-screen options.
16. See the MetaFrame Administrator’s Guide to complete installation and set up.
Video Card Adapter Installation
During system installation, the standard video driver supplied with Windows 2000
is automatically installed. To obtain larger screen sizes and video color depth, you
must install the manufacturer’s supplied video driver. The following procedure
describes how to install the correct video driver.
1. Click Start, select Settings, then click Control Panel.
2. In Control Panel, double click Display.
3. Select the Settings tab and then click the Display Type... button.
4. In the Adapter Type field, click the Change... button. The Change Display
dialog box appears.
5. Click the Have Disk... button.
6. Insert the new display driver diskette into drive A, then click OK.
7. From the list of displayed S3 devices, select your S3 device.
Chapter 2 Deploying the MetaFrame Servers and ICA Clients
25
8. From Third-party Drivers, click Yes to proceed. If you receive the message
“The driver is already installed on the system” and are asked to use the current
or new drivers, click New.
9. If prompted for the driver diskette a second time, click Continue.
10. When you receive the message “The drivers were successfully installed,”
remove the display driver diskette, then click OK.
11. Click Close twice.
12. Click Yes to reboot the server.
IBM PC Server 330
This application note describes how to install MetaFrame on an IBM PC Server
330 system.
The IBM PC Server 330 is a high-speed, upgradeable PC server-class system with
large data storage capacity and improved system expandability. The PC Server
330 provides both Extended Industry-Standard Architecture (EISA) and highperformance Peripheral Component Interconnect (PCI) expansion slots.
Software Requirements
K
MetaFrame Version 1.8 for Windows 2000
K
Microsoft Windows 2000 with Terminal Services installed
K
IBM PC ServeRAID Device Driver and Utilities Version 1.40
Installing MetaFrame
1. Install Windows 2000 following the directions in the Microsoft documentation.
2. When prompted whether to autodetect mass storage controllers , press S to
skip mass storage detection and S again to specify additional SCSI adapters.
3. Insert the IBM ServeRAID Device Driver and utility diskette, press ENTER
until the IBM PC ServeRAID Adaptor is displayed. Press ENTER to accept
the driver and then press ENTER to continue.
4. Complete Windows 2000 installation.
5. After the system reboots, log on to the Windows 2000 console as an
administrator.
6. Insert the MetaFrame compact disk into the CD-ROM drive and begin
installing MetaFrame following the instructions in the Citrix MetaFrame
documentation.
26
MetaFrame Solutions Guide
MetaFrame Servers and NT Domains
MetaFrame can be used in one of two ways: as a stand-alone server or as a server
on a network domain. MetaFrame inherits the properties of the Windows 2000
server on which it is installed. When you install Windows 2000, you can configure
it as a server or as a domain controller.
When installed as a server, MetaFrame can be used as a stand-alone system or it
can join an existing network domain. If your MetaFrame server is not joining an
existing domain and you do not anticipate having more than one MetaFrame
server (for example, if you are adding a single MetaFrame server to an existing
NetWare network for Dial-In user access), you do not need to establish a domain.
If your configuration will eventually expand past a single MetaFrame server,
establishing a domain avoids the need to recreate users on each additional server.
If you set up MetaFrame as a domain controller, it becomes the central point for a
new network domain. Other servers can join this network domain. Usually the
best configuration is to make one MetaFrame server a domain controller and
configure all other MetaFrame servers as servers on that network domain. During
Windows 2000 Setup, you are given the option of joining a network domain. In
this case, you select the name of the domain used on the domain controller to join
the network domain. Setting up a domain allows your MetaFrame and Windows
2000 systems to work together. You can also leave the MetaFrame server in its
own network workgroup, which is the default; the system becomes a stand-alone
system and is unaware of the domain.
Note If you do not add the server to a network domain when you install Windows
2000, you can join a domain later by accessing the properties of My Computer,
Network Identification Tab.
Installing Windows 2000
You must install and configure Windows 2000 before you install MetaFrame.
Before you install Windows 2000, make sure the following information is
available:
K
The types of SCSI adapters and devices on your servers
K
The types of network adapters you plan to use and any disks that were
provided by the vendors
Note Windows 2000 cannot be installed on drives altered with a compression
utility.
Chapter 2 Deploying the MetaFrame Servers and ICA Clients
27
You can install Windows 2000:
K
Using the Windows 2000 boot diskettes
K
Over an existing Windows NT or a Terminal Server/MetaFrame installation
using the Winnt32.exe program
K
From a DOS prompt using the Winnt.exe program
Tip Citrix recommends using the boot diskettes provided with Windows 2000 to
perform the installation because you can then partition and format the target hard
disk drives as necessary. The other two methods do not support reformatting of
the drive containing the installation files.
Use one of the other methods only if you do not have a CD-ROM drive on the
server and want to perform the installation across the network. In that case, boot
the server in DOS, format the system partition, and then install Windows 2000
across the network, converting the drive to NTFS from FAT in the process.
If the installation disks, also called boot diskettes, that are supplied with Windows
2000 are misplaced or lost, you can create them on an existing Windows NT,
Windows 2000, WINFRAME, or MetaFrame server using either the Makeboot.exe
or MakeBT32.exe executable from the Windows 2000 CD, as follows:
1. Have four blank, formatted, high-density 3.5-inch floppy disks ready. Label the
formatted disks “Setup Boot Disk,” “Setup Disk#2,” “Setup Disk#3,” and
“Setup Disk#4.”
2. Insert the Windows 2000 CD in the CD drive.
3. At a command prompt, change to the \Bootdisk directory on the CD-ROM.
4. Once in this directory, type either Makeboot or MakeBT32 and press
ENTER.
5. When prompted, insert the Setup Boot Disk in drive A. After some files are
copied, you are prompted to insert Setup Disk #2, Disk #3, and then Disk #4.
To install a fresh copy of Windows 2000 using the boot diskettes, perform the
following steps:
1. Insert the Windows 2000 Setup Boot Disk into the server’s drive A and start
the server.
An installation screen appears.
2. Setup gives you a choice of autodetecting the mass storage devices or selecting
them manually. In the latter case, Setup allows you to manually select SCSI
adapters, CD-ROM drives, and special disk controllers by pressing F6 for
installation. Citrix recommends that you allow Setup to autodetect the devices.
3. Insert disks #2 through #4 in drive A. Setup loads the drivers for Windows
2000 installation to boot Windows NT.
28
MetaFrame Solutions Guide
4. From the Setup Notification dialog box, press ENTER to continue the
installation.
5. Press ENTER to continue the installation, R to repair an installation, or F3 to
quit the entire process.
6. Press ENTER to continue the installation.
The End User License Agreement (EULA) is displayed. Read the EULA and
press F8 if you accept the terms and conditions in the agreement.
7. Setup performs a search to detect any previous installations of Windows NT,
Windows 2000, or Terminal Server. If you are installing a fresh copy of
Windows 2000, press N for new installation.
8. You are asked for a traget location to install Windows 2000. You can create or
delete partitions at this point.
9. Select the newly created partition or an existing partition as the target and press
ENTER.
10. You can choose to format this partition as either FAT or NTFS. To restrict and
audit user access, Citrix recommends formatting the partition as NTFS.
11. When format is complete, files are copied to the server. Setup has completed
the text-based portion of the installation. Remove any disks and CDs from their
drives and press ENTER to restart the computer.
12. The server restarts with the GUI setup. Follow the on-screen prompts to install
and configure Windows 2000, keeping the following in mind:
K
Install all the protocols for which you will be creating ICA connections. To
minimize resource allocations, install only the protocols required.
K
Install the Terminal Server service.
K
Setting up Windows 2000 as a domain controller causes greater load on the
server because it must authenticate domain logons and maintain the
directory database for a domain.
K
Do not install screen savers because they create unnecessary load.
K
Install only the Windows 2000 services that you need.
K
Create an Emergency Repair Disk for your system. Do not forget to update
this disk after making changes to your system configuration; for example,
after renaming drives when installing MetaFrame.
Installing MetaFrame
If you are deploying only one or two MetaFrame servers, a typical interactive
installation, running Setup.exe on each server, is fine. However, if you have a
large number of servers to deploy, you may prefer to use unattended setup.
Chapter 2 Deploying the MetaFrame Servers and ICA Clients
29
You can run an unattended setup to perform a new installation or an upgrade of a
MetaFrame server without being present. Unattended setup mode uses an optional
answer file to provide answers to the questions asked during Setup. If you do not
use an answer file, or if you use an answer file but do not specify answers to some
questions, default answers are used for those questions.
You can accommodate a variety of server configurations by creating multiple
answer files and tailoring them to the specifics of each type of server you are
deploying. Similar server configurations require only minor changes in the answer
files.
For step-by-step instructions about installing MetaFrame and additional
information about unattended installation, see the MetaFrame Administrator’s
Guide.
Creating Server Farms
Published applications:
K
Give ICA Client users easy access to applications running on Citrix servers
K
Increase your control over application deployment
K
Shield users from the mechanics of the Windows NT server environment
hosting the ICA session
The Citrix utility Published Application Manager, with its support for server farms
and Program Neighborhood, is the main tool for publishing applications.
When you publish applications, user access to those applications is greatly
simplified in three areas:
K
Addressing. Instead of connecting to a Citrix server by its IP address or server
name, ICA Client users can connect to a specific application by whatever name
you give it. Connecting to applications by name eliminates the need for users
to remember which servers contain which applications.
K
Navigation of the server desktop. Instead of requiring client users to have
knowledge of the Windows NT 4.0 and/or 3.51 desktop (Windows NT
Explorer or Program Manager) to find and start applications after connecting
to Citrix servers, published applications present the ICA Client user with only
the desired application in an ICA session.
K
User authentication. Instead of logging on and logging off multiple Citrix
servers to access applications, Program Neighborhood users can authenticate
themselves a single time to all servers and obtain immediate access to all
applications configured for their user group or specific user name. Also,
publishing applications for the special Citrix anonymous user group lets you
30
MetaFrame Solutions Guide
completely eliminate the need for user authentication for those applications
you want to provide to all users on your network.
Citrix server farms provide you with a flexible and robust way of deploying
applications to ICA Client users. Server farms let you centralize your control over
the application deployment process by grouping Citrix servers into a single
administrative unit. Citrix servers in a farm function together to make applications
easily available to your ICA Client users.
A server farm is a group of Citrix servers managed as a single entity and that
share some form of physical connection and a common base of user accounts.
After you place your servers in a server farm, you can publish applications on
servers in the farm for users in the common base of accounts. After starting
Program Neighborhood, a user logs in once, then sees an application set
containing each application configured for his or her specific user account or user
group.
For more information about server farms and how to create them, see the
MetaFrame Administrator’s Guide and the online help for Published Application
Manager.
Client Modem Support
Although Citrix and Microsoft make every effort to provide support for the latest
modems, new modems are released almost daily. This section describes how to
add support for a new modem to the MetaFrame server and client systems.
The first step in adding support for new modem types is to obtain the modem Inf
file from the manufacturer’s Web site, bulletin board system (BBS), or FTP site.
Once you have the Inf file, follow the procedures in this section to install the Inf
file on a client PC for use by the Citrix ICA Client. Follow the procedures in the
Windows 2000 Administrator’s Guide to install the Inf file for use by Windows
2000 Configuration and Microsoft RAS.
Û To install a new modem for use by the Citrix ICA Client (DOS, Win16,
Win32)
1. The modem scripts for the ICA Clients are contained in the Modem.ini file.
This file is located in the following directory (by client type):
K DOS client: \WFClient\Modem.ini
K Win16 client: \ICA16\Modem.ini
K Win32 client: \Program Files\Citrix\ICA Client\Modem.ini
2. Use a text editor to add the name of the new modem to the [Modems] list at the
beginning of the Modem.ini file. Insert the name in the proper position by
alphabetical order.
Chapter 2 Deploying the MetaFrame Servers and ICA Clients
31
3. Add the initialization strings for the modem that you downloaded from the
manufacturer to the file. These strings are located in alphabetical order by
manufacturer and modem type at the end of the Modems list. Save the file and
exit the editor.
4. Verify that the modem added now appears in the ICA Client modem list.
32
MetaFrame Solutions Guide
33
C H A P T E R
3
Installing Applications
The second phase of putting a MetaFrame solution into production is to install the
applications on your servers and make them available to your end-users. To do so,
you must:
1. Understand the special demands a multiuser operating system places on
applications
2. Install the applications you plan to publish on your MetaFrame servers
This chapter includes information to assist you with these steps.
For help with
See
Step 1
Application Integration
Step 2
Software Application Notes
Application Integration
When integrating an application into a MetaFrame environment, the main areas of
consideration are:
K
Application installation and configuration
K
Application compatibility
K
Application video performance
Some applications have characteristics that, although relatively benign in a singleuser environment, can lead to decreased performance or application
incompatibilities in a MetaFrame multiuser distributed presentation environment.
Understanding and avoiding these characteristics (if possible) helps ensure the
smooth integration of an application into a MetaFrame environment.
34
MetaFrame Solutions Guide
As a general rule, follow the application guidelines below when selecting or
developing applications:
K
Win32 (32-bit) applications are preferred over Win16 (16-bit) applications.
Windows 2000 with Terminal Services runs Win16 applications through a
process called Win16 on Win32 (WOW), which causes Win16 applications to
have higher processor requirements than comparable Win32 applications.
K
The Windows Ini files must be accessed using the proper Windows NT APIs.
This is needed so the Ini file synchronization features of Windows 2000 will
work properly.
K
Applications (mostly DOS applications) that poll a hardware device or the
keyboard rather than waiting for an event can have an adverse effect on system
performance. The DOSKBD command can be used to tune DOS applications
that perform excessive keyboard polling.
K
Use the Windows NT APIs instead of custom coding whenever possible. Many
Windows NT APIs have Citrix MultiWin enhancements to seamlessly support
a multiuser environment.
K
Avoid hard coding of paths and network identifiers.
K
NetWare applications must be able to run in bindery mode.
K
DOS graphics are not supported on ICA connections.
K
Avoid using bitmaps in graphics; use vector-based graphics instead. Use the
raster operator to “brush” graphics on the screen for best performance on an
ICA device.
K
VxDs are not supported in a Windows NT environment.
K
When developing Win32 applications, make sure that the Dlls do not have to
be moved in memory; instead, use fixed Dll addresses. The Windows NT SDK
includes tools to help with this.
The following sections discuss some of these guidelines in greater detail.
Application Installation and Configuration
In a multiuser environment such as MetaFrame, it is essential that all users be able
to make use of the same applications concurrently without interfering with each
other’s preference settings or data.
The first and most important step is to assign each user a unique home directory;
for example, C:\Users\%Username%. If no home directory is assigned, the system
assigns the default local home directory to the user account (the root directory) on
the server’s local drive where Windows 2000 is installed as an upgrade or the
\Documents and Settings\%Username% directory where Windows 2000 is
installed as the initial version). Windows 2000 is also equipped with a desktop
folder called My Documents, which offers an alternative to home directories but
Chapter 3 Installing Applications
35
does not replace them. All users have this folder in their user profile. For
applications to work properly, utilize Active Directory Users and Computers for
domain user accounts and Computer Management (local) for local user accounts
to assign a separate home directory to each user.
Û To configure existing users to use separate home directories
1. If you want to change the path to a domain user’s home directory, log on as a
domain administrator. If you want to change the path to a local user’s home
directory, log on as a local administrator.
2. For a domain user account, open Active Directory Users and Computers.
Expand the domain node of the console tree, expand the organizational unit
where the user is located, and click Users.
For a local user account, open Computer Management (local). In the console
tree, click Computer Management, System Tools, Local Users and Groups,
and then Users.
3. Double-click the user whose home directory you want to change.
4. Click the Terminal Services Profile tab.
5. Click the radio button next to Local Path and enter x:\users\%username%,
where x is the drive where MetaFrame is installed (usually drive C).
If the home directory is on a network share, click Connect, select a drive to
connect, and then type the network path.
6. Click Apply and then Close.
DOS and OS/2 text applications can generally be installed and used as-is. DOS
applications that perform keyboard polling may need tuning with the DOSKBD
command to avoid excessive resource consumption.
Windows applications often use Windows features such as the system Registry
and Ini files. Some of the information in these files is common to all users and
some information is user-specific. This may require some application
customization, as discussed in this section.
There are two ways to install 16- or 32-bit Windows applications in a MetaFrame
environment: user-global and user-specific.
User-Specific
User-specific means that the application is installed by a specific user only for his
or her own use. The default installation is user-specific. Any Ini or other files the
application tries to place in the default Windows directory are installed to that
user’s home Windows directory. Even if the application is installed to a network
or shared directory, other users do not have access to all the Dll and Ini files
needed to run the application and must do a user-specific install for themselves. In
36
MetaFrame Solutions Guide
short, a separate install must be done for each user who wants to use the
application.
If an application is installed with the user-specific method, no special
considerations regarding the storage and retrieval of data are needed. However,
because the application must be completely installed once for each user, this
method can consume a large amount of disk space and adds to administrative
overhead in larger environments.
Some applications offer the option of doing a network installation. This process
copies the installation diskettes or CD-ROM files to a common directory on the
network from which individual users can then run a SETUP or INSTALL utility,
which copies the required Ini files to their home Windows directory. While it does
use less space on the MetaFrame server than multiple user-specific installations, it
still requires that a separate process be run for each user.
User-Global
Citrix recommends using the user-global method of installing Windows
applications. With this method, an application is installed once by an administrator
and can be run by anyone who logs on to that MetaFrame server.
To perform a user-global install, use either of the following methods:
K
Use the Add/Remove Programs utility in Control Panel to initiate the
installation
K
Use the change user /install command at the command prompt before
installing the application and change user /execute after installing the
application
The Add/Remove Programs utility and the change user /install command place
the session into install mode. This ensures that Ini files are installed to the
Windows 2000 system directory instead of the user’s home Windows directory.
When the installation is complete, the Add/Remove Programs utility and change
user /execute command place the session back into execute mode. When a user
starts the application for the first time, the required user-specific files are
automatically copied to the user’s home directory.
Most Win32 applications install in a pseudo user-global fashion by default, even
when the session is not in install mode, because they make use of the Windows
2000 registry, where each user can have a unique set of registry settings. Win16
applications use Ini files for configuration settings so they must be installed using
install mode in order for multiple users to get separate copies of these files. It is
recommended that you always install any Windows application, whether 16- or
32-bit, using install mode. For security reasons, it is also recommended that you
install applications on Windows NT file system (NTFS)-formatted drives rather
than on FAT-formatted drives.
Chapter 3 Installing Applications
37
Û To perform a user-global install using Add/Remove Programs
(recommended)
1. Log on to the MetaFrame server as an administrator.
2. Close all applications and ensure no users are connected to the server. Disable
further logons by typing change logon /disable at a command prompt.
3. Open Control Panel.
4. Double-click Add/Remove Programs.
5. In the Add/Remove Programs dialog box, click Add New Programs.
6. Select the method to install the program and follow the instructions in the
wizard.
7. In the Change User Option dialog box, click All users begin with common
application settings and then click Next.
8. Install the application on a local NTFS drive as directed by the installation
program.
9. The After Installation dialog box appears. Click Next when installation is
complete.
10. In the Finish Admin Install dialog box, click Finish.
11. Enable user logons by typing change logon /enable at a command prompt.
Û To perform a user-global install using the change user command
1. Log on to the MetaFrame server as an administrator.
2. Close all applications and ensure no users are connected to the server. Disable
further logons by typing change logon /disable at a command prompt.
3. At a command prompt, type change user /install.
This command places the system in install mode and allows Windows 2000 to
keep track of the user-specific application registry entries, initialization (Ini)
files, and Dynamic Linked Library (Dll) files the application adds to the
Windows 2000 system during installation.
4. Install the application following instructions in the documentation.
If you are asked to enter your name during the installation process, use a
generic name because the name is the default for all users. Configure any
default program settings you want all users to have.
5. When installation is complete, at a command prompt, type change user
/execute.
This command returns the system to execute mode.
38
MetaFrame Solutions Guide
6. Enable user logons by typing change logon /enable at a command prompt.
Make sure that any shared resources (such as network drives or printers) are
set up for each user before running the application. Check the software
documentation for any notes that apply to the installation or use of the
application.
7. It is generally a good idea to write-protect the application’s directory (and
\Winnt if you have not already done so) from all non-administrator users. This
allows users to read the program files but protects the files from inadvertent
changes or deletions.
Note If you installed to an NTFS partition, the security options in Windows
NT Explorer allow you to set the security to a wide array of options and restrict
access only to specific user groups. If the application is installed on a FAT
partition, you can use the ATTRIB command to mark the files and directories
as read-only but cannot use the advanced security features of NTFS. For this
reason, Citrix recommends that Windows 2000, MetaFrame, and applications
be installed on NTFS partitions. While using NTFS is not a must, it does
provide a wider range of security options. If the applications reside on a
NetWare file server, use the FILER program to set the security options.
If you need to determine if the system is in execute or install mode, typechange
user /query at the command prompt.
The exact actions performed when a user-global application is started can be tuned
and optimized by creating and setting compatibility bits in registry variables
associated with the application.
Application Compatibility
Many older applications are not compatible with MetaFrame’s multiuser
environment. Several Application Compatible Scripts (ACS) are available to help
ensure that the applications run in such an environment. The ACS are in the
%SystemRoot%\Application Compatibility Scripts folder on the MetaFrame
server.
Application Video Performance
The Citrix Independent Computing Architecture (ICA) protocol provides highperformance Windows presentation services over low-bandwidth connections.
ICA is a robust and extensible protocol that includes definitions for the following
capabilities:
K
Full-screen text presentation
K
Graphical Windows application screen presentation
Chapter 3 Installing Applications
K
Keyboard and mouse input
K
Session control
K
Framing for asynchronous connections
K
Error detection and recovery
K
Encryption
K
Data compression
K
File system redirection
K
Print redirection
K
COM port redirection
K
Multiple generic virtual channels
K
Cut and paste across clients and servers
K
General purpose Citrix server browsing
39
The Thinwire Virtual Channel
The thinwire protocol is an ICA virtual channel protocol used to transmit
presentation commands from Windows applications running on the application
server to the client. The thinwire protocol is highly tuned for transmission of
Windows object display over low-bandwidth connections. This is accomplished
through:
K
Command- and object-specific intelligent compression with state persistence;
that is, run-length encoding for bitmaps
K
Outboard complex clipping and complex curve drawing
K
Intelligent caching of Windows objects such as bitmaps, brushes, glyphs, and
pointers
K
Remote SaveScreenBitmaps
K
Cross-session persistent caching
To enable thinwire to most efficiently distribute the Windows image to the ICA
client, use the following guidelines:
K
Use vector graphics instead of bit-mapped images for graphics
K
Use the raster operator to “brush” graphics to the screen
Bitmaps require more bandwidth than vector graphics because all of the image
data for each unique bitmap must be transmitted from the server at least once. ICA
compensates for this by caching each unique bitmap on the client system. When a
bitmap is to be displayed, it is compared with the client’s locally cached bitmaps.
If the displayed bitmap matches one that is already cached at the client, ICA sends
40
MetaFrame Solutions Guide
a command telling the client to redisplay the local copy instead of sending the
image over the wire.
Blinking cursors cause unnecessary bandwidth utilization because every blink
requires data packets to be transmitted. Applications that do not use a blinking
cursor or that allow the blinking cursor to be disabled are preferred.
Software Application Notes
The products listed in this section have been tested and found to be compatible
with MetaFrame. Other products work well with MetaFrame but Citrix cannot
guarantee the compatibility of untested products.
Because MetaFrame is an add-on to Microsoft Windows 2000, most Windows
NT-compatible applications can be expected to work. Review the following
application notes for detailed application integration tips and techniques.
Accounting Software
Great Plains Dynamics C/S+ and Dynamics
Overview
Great Plains Software develops, markets, and supports accounting and financial
management software worldwide, offering solutions ranging from midrange
client/server systems to small business integrated accounting software.
Great Plains Dynamics C/S+ is a client/server financial management suite for
Microsoft BackOffice. Dynamics C/S+ offers a complete suite of Internet-ready
financial applications and tools in a flexible three-tier client/server architecture.
Dynamics C/S+ for SQL Server is exclusively optimized for Microsoft SQL
Server. ISAM database options are also available for Dynamics C/S+.
Great Plains Dynamics is an accounting solution for growing companies with $1
to $50 million in revenues seeking financial information access throughout the
deployment of strategic technologies and the Internet. Dynamics is a complete
financial management solution with more than 20 financial modules and tools, and
hundreds of Dynamics companion products.
Citrix MetaFrame extends Dynamics C/S+ and Dynamics into WAN and dial-in
environments without sacrificing performance. By running the client portion of
Great Plains Dynamics or Dynamics C/S+ on a MetaFrame server, you can use
Citrix’s advanced ICA protocol to provide local LAN performance to client PCs
on the local LAN, over a WAN, or even to dial-in users in the field. Using ICA,
only the keyboard, mouse, and video information are transferred between the
Chapter 3 Installing Applications
41
MetaFrame server and the ICA Client; all the interaction between the Great Plains
server and client machines takes place over the high-speed LAN.
The two companies’ combined products provide customers with a state-of-the-art
client/server financial management solution that can be economically deployed
enterprise-wide across a wide area network, while delivering a high level of
performance to all users, no matter where they are.
Requirements
Hardware Requirements
K
Server PC with Pentium processor or greater for Dynamics Server; dualprocessor SMP system recommended for Dynamics C/S+ Server. See the
Great Plains Installation: Procedures manual for detailed system
requirements.
K
MetaFrame server with Pentium processor or greater for Dynamics Client; a
dual-processor SMP system is recommended for Dynamics C/S+ Client. The
system should contain 32MB RAM plus 8-10MB per remote client, and at
least 400MB available disk space.
K
ICA Client PCs. See the Citrix ICA Client Administrator’s Guides.
Software Requirements
K
MetaFrame Version 1.8 for Windows 2000
K
ICA Client (DOS, Win16, or Win32)
K
Great Plains Dynamics or Dynamics C/S+
Supported Databases and Operating Environments
Dynamics C/S+ Client/Server Systems
Note For best performance, implement the MetaFrame server on a physical server
different from the database engine.
Database
software
Dynamics
C/S+ clients
Database
server
Application
server
Networking
software
MS SQL
Server 6.5
Citrix
MetaFrame 1.8
for Windows
2000 or higher
Windows NT
Server 3.51 or
higher (Intel or
Alpha)
Windows NT Server
3.51 or higher (Intel
or Alpha)
Windows NT
Workstation 3.51 or
higher (Intel or
Alpha)
Windows NT
Server 3.51 or
higher (Intel or
Alpha)
42
MetaFrame Solutions Guide
Database
software
Dynamics
C/S+ clients
Database
server
Btrieve
Server for
NT
Citrix
Windows NT
MetaFrame 1.8 Server 3.51 or
for Windows
higher (Intel only)
2000 or higher
Windows NT Server Windows NT
3.51 or higher (Intel Server 3.51 or
only)
higher (Intel only)
Windows NT
Workstation 3.51 or
higher (Intel only)
Faircom
Server
Citrix
MetaFrame 1.8
for Windows
2000 or higher
Windows NT Server
3.51 or higher (Intel
or Alpha)
Windows NT
Workstation 3.51 or
higher (Intel or
Alpha)
Windows NT
Server 3.51 or
higher (Intel or
Alpha)
Application
server
Networking
software
Windows NT
Server 3.51 or
higher (Intel or
Alpha)
Dynamics Client/Server Systems
Note For best performance, implement the MetaFrame server on a physical server
different from the database engine. By keeping the servers separate, performance
on both can be optimized and maintained.
Database
software
Dynamics
clients
Btrieve Server
for NT
Citrix
MetaFrame 1.8
FOR WINDOWS
2000 or higher
Windows NT Server
3.51 or higher (Intel)
Citrix MetaFrame 1.8
for Windows 2000 or
higher
Windows NT Server 3.51
or higher (Intel)
Btrieve Server
for NetWare
Citrix
MetaFrame 1.8
for Windows
2000 or higher
NetWare 3.12, 4.10,
or 4.11
NetWare 3.12, 4.10, or
4.11
c-tree Plus
Citrix
MetaFrame 1.8
for Windows
2000 or higher
Windows NT Server
3.51 or higher (Intel)
NetWare 3.12, 4.10,
or 4.11
Citrix MetaFrame 1.8
for Windows 2000 or
higher
Windows NT Server 3.51
or higher (Intel)
Servers
Networking
software
NetWare 3.12, 4.10, or
4.11
Chapter 3 Installing Applications
43
Dynamics Stand-alone Systems
Database
Operating environments
Btrieve Workstation
Citrix MetaFrame 1.8 for Windows 2000
c-tree Plus
Citrix MetaFrame 1.8 for Windows 2000
Installation
Û To install Great Plains Dynamics C/S+ or Dynamics
1. Verify system requirements. Make sure your system meets the recommended
minimum requirements for a Dynamics or Dynamics C/S+ system and that
your system is prepared for installation. See the instructions in the Dynamics or
Dynamics C/S+ Installation: Procedures Manual and the MetaFrame
documentation.
2. Install MetaFrame. See the MetaFrame documentation for detailed installation
procedures.
3. Review database server information, if necessary. Depending on your database
server choice, review the Dynamics or Dynamics C/S+ Installation:
Procedures Manual to properly configure your database.
4. Install Dynamics or Dynamics C/S+ on one client and on a server. It is
recommended that you install the Dynamics or Dynamics C/S+ database on a
server different from your MetaFrame server. Also, install a client on a
machine other than the MetaFrame server. This allows you to verify the correct
installation of Dynamics or Dynamics C/S+ before you set up your MetaFrame
server. The MetaFrame server can then be set up as another client. Once this is
accomplished, all client machines on your network can be configured to access
your Dynamics or Dynamics C/S+ database.
5. Check the mapped drives or UNC (universal naming convention) pathnames
that each client uses to identify the server. Be sure that each client identifies
the Dynamics or Dynamics C/S+ folder on the server the same way; for
instance, all clients should identify the C:\Dynamics folder on the server using
the same ID, such as F:\Dynamics or F:\.
6. Install Dynamics or Dynamics C/S+ applications on a client computer and
install data on the server computer, following the instructions in the Dynamics
or Dynamics C/S+ Installation: Procedures Manual.
Note When installing Dynamics, do not use your server to install data; it will
prevent your clients from locating the data and you will need to enter a location
translation.
44
MetaFrame Solutions Guide
7. Use Dynamics or Dynamics C/S+ Utilities. See the Dynamics or Dynamics
C/S+ Installation: Procedures Manual for information about how to define
your account framework and synchronize it with your dictionary, and to
register Dynamics or Dynamics C/S+.
8. Perform initial setup procedures. Follow the instructions in the Dynamics or
Dynamics C/S+ Installation: Procedures Manual to start the program for the
first time and perform initial setup procedures such as creating a company,
adding users, and setting user access. You must complete these procedures
before you begin using Dynamics or Dynamics C/S+.
9. Install and set up Dynamics or Dynamics C/S+ on all additional client
computers, including the MetaFrame server and the remote ICA client
sessions.
Client Platforms
IBM OS/2 Warp Version 4.0
Overview
The ICA Win16, DOS, and Win16 Web Clients are supported on OS/2 Warp
Version 4.0.
Note Cut, Copy, and Paste operations only work when cutting or copying data
from the ICA Client and pasting it to the WIN-OS2 or OS/2 session. Data cut or
copied from the OS/2 or separate WIN-OS2 session (not the one running the ICA
Client) cannot be pasted to the ICA Client.
The following connectivity methods are supported for the ICA Win16 and DOS
Clients:
Client
TCP/IP
IPX
SPX
NetBIOS
Async
(direct)
Async
(modem)
DOS
No
Yes
No
Yes
Yes
Yes
Win16
Yes
No
No
Yes
Yes
Yes
In addition to using the Win16 and DOS Clients, you can configure the ICA Web
Client (Win16 version) for use with the IBM OS/2 Web Explorer.
Chapter 3 Installing Applications
45
Software Requirements
K
K
IBM OS/2 Warp 4.0
K
File and Print Client Services
K
TCP/IP Services
K
NetWare Client Services
Citrix MetaFrame Version 1.8 for Windows 2000
K
ICA DOS Client
K
ICA Win16 Client
K
ICA Win16 Web Client (ALE 16-bit Plugin), available on the Citrix Web
site at http://download.citrix.com
Installation
OS/2 Installation
Install OS/2 Warp Version 4.0 following the standard installation procedure. Use
the default settings. Install networking support for File and Print Client Services,
Novell NetWare, TCP/IP Client Services, and the NetWare client. Verify that the
network adapter settings are correct. Select the workstation name, description (if
desired), and domain name. Choose the protocol you want to use. For TCP/IP,
specify the hostname (usually the same as the workstation name), the IP address,
the subnet mask, the router address, and the domain name as required by your
configuration, or use DHCP if a DHCP server is present on the LAN.
IBM OS/2 Warp Version 4.0 includes network and TCP/IP protocols and software
as part of the operating system. Follow the instructions for installing the additional
network and TCP/IP software as part of the installation of the system. Network
and TCP/IP software for WINOS2 and virtual DOS are installed as defaults
during the installation.
WINOS2 Setup
Before installing the ICA Client, you must set the WINOS2 settings to allow the
ICA Client to operate properly with DDE and Clipboard. Establish the settings as
follows:
Note You can elect not to make these settings if you do not intend to use the DDE
or Clipboard functions.
1. Under OS/2 System Folder, click System Setup and then WIN-OS/2 Setup.
2. Under WIN-OS/2 Setup Properties, click the Data Exchange tab.
3. In the Data Exchange Settings dialog box, choose Public for both selections.
This is required for DDE and Clipboard operation.
46
MetaFrame Solutions Guide
4. Close all the previous selections; this portion of the settings is complete.
5. Under OS/2 System Folder, select Command Prompts.
6. Select WIN-OS/2 Window. The right mouse button brings up a menu; click
Properties.
7. Select the Session tab, then select WIN-OS/2 Properties. Make sure the All
DOS and WIN-OS/2 Settings radio button is highlighted and click OK.
8. Set WIN_RUN_MODE to 3.1 Enhanced Compatibility.
9. Set WIN_DDE to On.
10. Set WIN_CLIPBOARD to On.
11. Click Save and close the notebook.
12. Close all the previous selections; this portion of the settings is complete.
13. When using IBM LAN and NetBIOS, add the following line to the
Autoexec.bat:
x:\ibmcom\ltsvcfg n1=1
where x is the OS/2 system drive. This command enables the
NAME_NUMBER_1 support required for NetBIOS connections.
Client Installation on OS/2
Before installing the client, decide what protocols you will use. Client installation
is simple; insert the ICA Client diskette in drive A and run setup in a WINOS2
session.
Client Protocol
TCP/IP
If you choose TCP/IP, make sure you have the server hostname handy and that
OS/2 TCP/IP and DOS TCP/IP are installed.
IBM LAN
All IBM LAN software must be installed prior to installing the client. You
must know the server name, the client name, and the password. The following
line must be in Autoexec.bat to allow NetBIOS to work:
c:\ibmcom\lstvcfg n1=1
Dial-In
When installation starts, you are asked if you want to select the Dial-In option.
Do not select this option at this time. Once installation is complete and you are
setting up the local user, you can use the Dial-In option to allow a modem
connection.
ICA Win16 Client
Before installing the ICA Win16 Client, decide what network protocols and
hardware you will use.
Chapter 3 Installing Applications
IPX and SPX connections are not supported at this time because OS/2 does not
support VxDs. TCP/IP connections are supported without any changes. Serial
Dial-In and direct connect connections are supported without any changes.
NetBIOS connections are supported if you load NAME_NUMBER_1 support.
NetBIOS connections require you to load NAME_NUMBER_1 support before
running the client. This support is not enabled by default. Include the following
line in the Autoexec.bat or in a .Bat file that starts the ICA Client:
x:\ibmcom\ltsvcfg n1=1
where x is the OS/2 system drive.
ICA DOS Client
Change the ICA DOS Client session by following the procedure below:
1. Right click the DOS Full Screen icon.
2. Select Properties.
3. Select the Sessions tab.
4. Select DOS Properties.
5. Select All DOS Settings and click OK.
6. From the DOS Settings-All DOS Settings dialog box, change the
DOS_FILES setting to 40.
The default value of 20 causes the ICA DOS Client to exit with an
“insufficient files” error message.
DOS sessions under OS/2 Warp load NetWare support (TBMI2 and NETX) by
default; IPX connections are supported without any changes. SPX is not
supported.
For the DOS 16-bit Client for 286 processors: TCP/IP support is loaded. When
creating a TCP/IP remote application entry, specify TCP/IP–VSL as the
connection type. Include the following line in the Autoexec.bat or in a .Bat file
that starts the DOS Client:
x:\wfclient\mibmtcp.exe
(c\wfclient- is the default directory for the DOS Client, change
accordingly)
NetBIOS connections require you to load NAME_NUMBER_1 support before
running the client. This support is not enabled by default. Include the following
line in the Autoexec.bat or in a .Bat file that starts the DOS Client:
x:\ibmcom\ltsvcfg n1=1
where x is the OS/2 system drive.
47
48
MetaFrame Solutions Guide
DOS async connections require changes to the default DOS settings for the
session. The following changes support direct connect and modem connections at
up to 57.6Kbps:
COM_DIRECT_ACCESS
On
COM_HOLD
On
COM_RECEIVE_BUFFER_FLUSH
None
COM_SELECT
All
DOS_DEVICE
x:/OS2/MDOS/COMDD.SYS (see note below)
DOS_FILES
40
HW_ROM_TO_RAM
On
HW_TIMER
On
IDLE_SECONDS
60
IDLE_SENSITIVITY
100
Note x is the OS/2 system drive. Add this device driver statement to the list of
device drivers.
ICA Win16 Web Client and Web Explorer
The IBM OS/2 Web Explorer is an OS/2-based Web browser. The procedure
below describes how to configure the IBM OS/2 Web Explorer for use with the
Citrix ICA Web Client.
1. Download the ICA Win16 Web Client (ALE 16-bit Plugin) from the Citrix
Demo Web page at http://download.citrix.com. Follow the directions on the
page to install the 16-bit Web client – Wfplug16.exe.
2. Edit the file C:\Mptn\Etc\Explore.ini. In the [advanced] section, specify a
Mailcap file if one does not exist by adding C:\Mptn\Etc\Mailcap to the end of
the mailcap= statement. In the [advanced] section, specify an Extmap file if
one does not exist by adding C:\Mptn\Etc\Extmap to the end of the Extmap=
statement. Save the file and exit the editor.
3. Edit or create the file C:\Mptn\Etc\Mailcap. Add the line:
application/x-ica; c:\OS2\MDOS\WINOS2\System\WFICA16.EXE %s
Save the file and exit the editor.
4. Edit or create the file C:\Mptn\Etc\Extmap. Add the line:
application/x-ica ica
Save the file and exit the editor.
5. Restart the Web Explorer.
Chapter 3 Installing Applications
49
Printer Setup
Local Printing
1. Verify that the WIN-OS/2 printer drivers are installed on a local machine.
2. To access your local printer, connect to the MetaFrame server. Click Start,
select Settings, and then Printers.
Note You must have administrator privileges on the server to add or remove a
printer.
3. Double-click Add Printer.
The Add Printer Wizard dialog box appears.
4. Select Network Printer Server and click Next.
5. Double-click Client Network and then Client.
6. Select the printer and manufacturer, and follow the on-screen instructions.
When a printer is connected, a printer description appears in the Printers
dialog box.
Printing Using a Network Printer
1. Make sure the printer is physically attached to the network server. The network
server must have the printer driver installed.
2. The printer must be shared and all members must have full access to it and its
settings.
3. Click Start, select Settings, Printers.
4. Double-click Add Printer.
The Add Printer Wizard dialog box appears.
5. Select Network Printer Server and click Next.
6. Locate the network printer and follow the on-screen instructions to continue
with installation.
7. When the printer object is created, the printer is accessible by the clients.
MetaFrame server applications can now print.
8. A print object is created automatically in the Client Print Manager. The client
user has to select the print object as the default to configure the server printer
as the default printer.
50
MetaFrame Solutions Guide
Printing from the MetaFrame Server
The printer object for a MetaFrame printer is created using the MetaFrame Print
Manager.
1. Create the printer object as a shared object.
2. Once the printer object is created, the printer is accessible by the clients.
Applications running on the MetaFrame server can now print on the server
printer. A print object is created automatically in the Client Print Manager. The
client user has the option of selecting the print object as the default if the user
needs the server printer to be the default printer.
DDE and OLE
DDE and OLE are supported within the Citrix ICA Clients. There is no
interoperability between the ICA Clients and WIN-OS2 or OS/2 sessions.
Network and CD-ROM Drives
All non-local drives are supported by executing the following command at a
command prompt:
net use x: \\client\y:
where x: is the drive to be mapped to and y: is the non-local drive supported by
OS/2.
E-Mail Software
Microsoft Exchange Server (Enterprise Edition) Version 5.0 and
Microsoft Exchange Client Version 5.0
Overview
Microsoft Exchange Server is a client/server corporate messaging system that
incorporates e-mail, scheduling, electronic forms, document sharing, and custom
applications in a single product. Microsoft Exchange consists of two parts:
Exchange Server and Exchange Client. This section describes a tested method for
installing and configuring Microsoft Exchange Server 5.0 and Microsoft
Exchange Client 5.0 using a MetaFrame server.
In a standard configuration, Microsoft Exchange Server is installed and run as a
service on the primary domain controller (PDC), which can be a MetaFrame
server or a Microsoft Windows 2000 server. The Exchange Client is installed on
all other MetaFrame servers. Users connect to the MetaFrame servers and run the
Microsoft Exchange Client, which then accesses the Microsoft Exchange Server.
Chapter 3 Installing Applications
51
Software Requirements
K
MetaFrame Version 1.8 for Windows 2000
K
Microsoft Windows 2000 with Terminal Services installed
K
Microsoft Exchange Server Version 5.0 and Microsoft Exchange Client
Version 5.0
Installing and Configuring Microsoft Exchange Server 5.0
Installing Microsoft Exchange Server 5.0
1. Install and configure MetaFrame as a primary domain controller (PDC). Make
sure that the page file size is equal to at least 1.5 times the amount of physical
RAM and that there is at least 250MB of free hard drive space.
2. Log on to the console of the MetaFrame server as an administrator.
3. At the command prompt, type change user /install and press ENTER. This
places the user session in install mode.
4. Insert the Microsoft Exchange Server 5.0 CD-ROM into the CD-ROM drive.
5. Run Server\Setup\i386\Setup.exe from the Exchange Server 5.0 CD-ROM.
6. Click OK in the Microsoft Exchange Server Setup window.
7. Microsoft Exchange Setup offers three choices:
K
Typical Installation
K
Complete/Custom Installation
K
Minimum Installation
If you are installing Exchange 5.0 for the first time, select Typical Installation.
Typical Installation was chosen for this test.
8. Enter the CD Key and click OK.
9. Click OK in the MetaFrame Server Licensing Mode dialog box.
10. Enter the required information in the Choose Licensing Mode dialog box.
11. Check I Agree in the Per Server Licensing dialog box and then click OK.
12. Add the number of licenses purchased or required for this Exchange Server
and click Continue.
13. If Microsoft Exchange 5.0 was previously installed on your system, at this
point you can make changes to an existing site that you have already created.
For new installs, select Create a New Site. Enter your organization name and
a user-defined site name. Record this data for future use.
Setup confirms the creation of a new site.
Setup asks for an account name that will be used to log on to the system to start
Exchange services when the system boots. Although this can be any user
account, it is recommended that the administrator account be used.
52
MetaFrame Solutions Guide
14. Source files are now copied to your system.
15. When installation is completed, you can run the Optimizer immediately or run
it later at your convenience.
16. At the command prompt, type change user /execute and press ENTER.
Installation of Microsoft Exchange Server 5.0 is now complete.
Verifying Installation of Microsoft Exchange Server 5.0
Follow the procedure below to verify that Microsoft Exchange Server 5.0 is
correctly installed and configured.
1. Click Start, select Administrative Tools, then Computer Management.
Expand System Tools and select Services. Scroll down the Services list and
verify that the following services are listed and are automatically started:
K
Microsoft Exchange Directory
K
Microsoft Exchange Information Store
K
Microsoft Exchange Message Transfer Agent
K
Microsoft Exchange System Attendant
2. Click the Server Start button and select Programs, then Microsoft
Exchange. Verify that the following are listed:
K
Microsoft Exchange Administrator
K
Microsoft Exchange Migration Wizard
K
Microsoft Exchange Optimizer
K
Microsoft Exchange Server Health
K
Microsoft Exchange Server History
K
Microsoft Exchange Server IMS Queues
K
Microsoft Exchange Server IMS Statistics
K
Microsoft Exchange Server IMS Traffic
K
Microsoft Exchange Server Load
K
Microsoft Exchange Server Queues
K
Microsoft Exchange Server Users
Configuring Microsoft Exchange Server 5.0
After installing Microsoft Exchange Server 5.0, the server needs to be configured
for users to log on and retrieve mail. Because Microsoft Exchange Server resides
on a MetaFrame server, all users with mailboxes on this Microsoft Exchange
Server are also MetaFrame users. However, MetaFrame users do not automatically
have Exchange mailboxes. Use the following procedure to configure Exchange
users.
Chapter 3 Installing Applications
53
1. Open Microsoft Exchange Administrator.
2. Type the server name to which you want to connect or click Browse. The
server is typically the MetaFrame server on which Microsoft Exchange is
installed.
3. In the left side of the Administrator dialog box, expand the site name icon
and click Recipients.
4. From the File menu, select New Mailbox to create mailboxes. Click Primary
Windows NT Account to associate this new mailbox with an existing account
on the domain. If an account does not exist, the form allows creation of new
accounts.
Installing and Configuring Microsoft Exchange Client 5.0
Special Considerations
If Microsoft Exchange Client 5.0 is being installed on the MetaFrame server
containing the Microsoft Exchange 5.0 Server, perform the following steps to
ensure a successful Exchange Client installation. If Microsoft Exchange Client 5.0
is being installed on any other MetaFrame server, go to “Installing Microsoft
Exchange Client 5.0” later in this chapter.
1. Log on to the MetaFrame server as an administrator.
2. Click Start, select Administrative Tools, then Computer Management.
Expand System Tools and select Services. Stop the following services:
K
Messenger
K
Microsoft Exchange Directory
K
Microsoft Exchange Information Store
K
Microsoft Exchange Message Transfer Agent
K
Microsoft Exchange System Attendant
3. Close the Computer Management dialog box.
4. Install Microsoft Exchange Client 5.0 as described below, skipping Steps 1
and 2.
54
MetaFrame Solutions Guide
Installing Microsoft Exchange Client 5.0
Note Windows Messaging forms do not work for multiple users.
After installing Microsoft Exchange Client, run the script
%SystemRoot%\Application Compatibilty Scripts\Install\Winmsg.Cmd. This
script adds %SystemRoot%\Application Compatibility\Scripts\Logon
\WmsgUsr.Cmd to UsrLogon.Cmd.
When a user logs on, the %SystemRoot%\Forms subdirectory is copied to the
user’s home directory.
Running this script is not required if you run the Office 97 installation script
instead.
1. Install and configure MetaFrame.
2. Log on to the console of the MetaFrame server as an administrator.
3. At a command prompt, type change user /install and press ENTER.
4. From the Microsoft Exchange Client CD, run x:\Eng\Winnt\i386\Setup.exe,
where x is the CD-ROM drive.
5. After accepting the copyright policies, type your name and company
information.
6. Change the default installation path if desired.
7. Microsoft Exchange Setup offers three choices:
K
Typical Installation
K
Complete/Custom Installation
K
Minimum Installation
If you are installing Exchange Client 5.0 for the first time, select Typical
Installation.
8. Click OK when setup is complete.
9. At a command prompt, type change user /execute and press ENTER.
Note If Microsoft Exchange Server 5.0 is installed on the same system where the
Exchange Client is installed, make sure that the Exchange Server services you
stopped during installation are started again before proceeding to the next section.
10. Check that the permissions for Everyone in the %SystemRoot%\Forms folder
are Change.
11. Check that the permissions for Everyone in the %SystemRoot%\System32
\Oleaut32.dll are Read.
Chapter 3 Installing Applications
55
Configuring Microsoft Exchange Client 5.0
Once Microsoft Exchange Server and Client are installed and configured, users
can log on to a MetaFrame server on the network and access their mailboxes on
the Microsoft Exchange Server 5.0 using the Microsoft Exchange Client 5.0.
Before you can access e-mail, you must perform the following steps to configure
Microsoft Exchange 5.0 Client.
1. Log on to a MetaFrame server that has Exchange Client 5.0 installed.
2. Double-click Inbox Desktop or select Start, Programs, and then Microsoft
Exchange.
3. When the Setup wizard appears, verify that Microsoft Exchange Server is
checked and that Microsoft Mail and Internet Mail are not checked; click Next.
4. Enter the name of the Microsoft Exchange Server. This is typically the name of
the server on which Microsoft Exchange Server 5.0 is installed. Also enter the
mailbox name; this is typically the username.
5. Select if you travel with the computer and click Next.
6. In the Personal Address Book dialog box, save Mailbox.pab in the user’s
home directory.
7. After completing the Setup wizard, the Exchange Inbox appears.
Setup of Microsoft Exchange Client 5.0 is now complete.
Microsoft Exchange Server (Enterprise Edition) Version 5.5 and
Microsoft Exchange Client Version 5.0
Overview
Microsoft Exchange Server is a client/server corporate messaging system that
incorporates e-mail, scheduling, electronic forms, document sharing, and custom
applications in a single product. Microsoft Exchange consists of two parts:
Exchange Server and Exchange Client. This section describes a tested method for
configuring Microsoft Exchange Server 5.5 and Microsoft Exchange Client 5.0
using a MetaFrame server.
For this application note, two configurations were tested. In the first configuration,
Microsoft Exchange Server 5.5 and Microsoft Exchange Client 5.0 were both
installed on a MetaFrame server. For the second configuration, Microsoft
Exchange Server 5.5 was installed on a dedicated Windows 2000 server and
Microsoft Exchange Client 5.0 was installed on a MetaFrame server. With both
configurations, multiple users can simultaneously run the client software by
creating ICA sessions on the MetaFrame server. This note does not describe the
installation of Microsoft Exchange Server on Windows 2000. For installation on
Windows 2000, see the Microsoft documentation.
56
MetaFrame Solutions Guide
Software Requirements
K
MetaFrame Version 1.8 for Windows 2000
K
Microsoft Windows 2000 with Terminal Services installed
K
Microsoft Exchange Server 5.5 and Microsoft Exchange Client 5.0
Installing and Configuring Microsoft Exchange Server 5.5
Installing Microsoft Exchange Server 5.5
1. Install and configure the MetaFrame server.
2. Log on to the console of the server as a domain administrator.
3. At a command prompt, type change user /install and press ENTER. This
places the user session in install mode.
4. Run Server\Setup\i386\Setup.exe on the Microsoft Exchange Server 5.5 CDROM.
5. Click Accept in the Microsoft Exchange Server Setup dialog box.
6. Microsoft Exchange Setup offers three choices:
K
Typical Installation
K
Complete/Custom Installation
K
Minimum Installation
Typical Installation was chosen for this test.
7. Enter the CD Key and click OK.
8. Check the I agree box in the Microsoft Licensing window and then click OK.
9. If Microsoft Exchange 5.5 was previously installed on your system, at this
point you can make changes to an existing site that you have already created.
For new installs, select Create a New Site. Enter your organization name and
a user-defined site name.
Setup confirms the creation of a new site.
Setup asks for an account name and password to be used to log on to the
system to start Exchange services when the system boots. Although this can be
any user account, it is recommended that the administrator account be used.
10. Source files are now copied to your system.
11. When installation is completed, you can run the Optimizer immediately or run
it later at your convenience.
12. At a command prompt, type change user /execute and press ENTER.
Installation of Microsoft Exchange Server 5.5 is now complete.
Chapter 3 Installing Applications
57
Verifying Installation of Microsoft Exchange Server 5.5
Follow the procedure below to verify that Microsoft Exchange Server 5.5 is
correctly installed.
1. Click Start, select Administrative Tools, then Computer Management.
Expand System Tools and select Services. Scroll down the Services list and
verify that the following services are listed and are automatically started:
K
Microsoft Exchange Directory
K
Microsoft Exchange Event Service
K
Microsoft Exchange Information Store
K
Microsoft Exchange Message Transfer Agent
K
Microsoft Exchange System Attendant
2. Click the Server Start button and select Programs, then Microsoft
Exchange. Verify that the following are listed:
K
Microsoft Exchange Administrator
K
Microsoft Exchange Migration Wizard
K
Microsoft Exchange Optimizer
K
Microsoft Exchange Server Health
K
Microsoft Exchange Server History
K
Microsoft Exchange Server IMS Queues
K
Microsoft Exchange Server IMS Statistics
K
Microsoft Exchange Server IMS Traffic
K
Microsoft Exchange Server Load
K
Microsoft Exchange Server Queues
K
Microsoft Exchange Server Users
Configuring Microsoft Exchange Server 5.5
After installing Microsoft Exchange Server 5.5, configure the server for users to
log on and retrieve mail. Because Microsoft Exchange Server resides on a
MetaFrame server, all users with mailboxes on this Microsoft Exchange Server are
also MetaFrame users. However, MetaFrame users do not automatically have
Exchange mailboxes.
Û To configure Exchange users
1. Open Microsoft Exchange Administrator.
2. Type the server name to which you want to connect or click Browse. The
server is typically the MetaFrame server on which Microsoft Exchange is
installed.
58
MetaFrame Solutions Guide
3. In the left side of the Administrator dialog box, expand the site name icon
and click Recipients.
4. From the File menu, select New Mailbox to create mailboxes. Click Primary
Windows NT Account to associate this new mailbox with an existing account
on the domain. If an account does not exist, the form allows creation of new
accounts.
Installing and Configuring Microsoft Exchange Client 5.0
Installing Microsoft Exchange Client 5.0
Perform the following steps to ensure a successful Exchange Client installation:
1. Log on to the MetaFrame server as an administrator.
If Microsoft Exchange Client is not being installed on the same server as
Microsoft Exchange Server, skip Steps 2 and 3.
2. Click Start, select Administrative Tools, then Computer Management.
Expand System Tools and select Services. Stop the following services:
K
Messenger
K
Microsoft Exchange Directory
K
Microsoft Exchange Event Service
K
Microsoft Exchange Information Store
K
Microsoft Exchange Message Transfer Agent
K
Microsoft Exchange System Attendant
3. Close the Computer Management dialog box.
4. At a command prompt, type change user /install and press ENTER.
5. From the Microsoft Exchange Client CD, run x:\Eng\Winnt\i386\Setup.exe,
where x is the CD-ROM drive.
6. After accepting the copyright policies, enter your name and company
information.
7. Change the default installation path if desired.
8. Microsoft Exchange Setup offers three choices:
K
Typical Installation
K
Complete Installation
K
Custom Installation
9. Click OK when setup is complete.
10. At a command prompt, type change user /execute and press ENTER.
Chapter 3 Installing Applications
59
Note If Microsoft Exchange Server 5.5 is installed on the same system where
the Exchange Client is installed, make sure that the Exchange Server services
you stopped during installation are started again before proceeding to the next
section.
11. Run %SystemRoot%\Application Compatibility Scripts\Install\Winmsg.cmd.
When application tuning is complete, have all users log off and then log back
on for the changes to take effect.
12. Check that the permissions for Everyone in the %SystemRoot%\Forms folder
are Modify.
13. Check that the permissions for Everyone in the %SystemRoot%\System32
\Oleaut32.dll are Read.
Configuring Microsoft Exchange Client 5.0
Once Microsoft Exchange Server and Client are installed and configured, users
can log on to a MetaFrame server on the network and access their mailboxes on
Microsoft Exchange Server 5.5 using Microsoft Exchange Client 5.0.
Before you can access e-mail, you must perform the following steps to configure
Microsoft Exchange Client 5.0.
1. Log on to a MetaFrame server that has Exchange Client 5.0 installed.
2. Double-click Inbox Desktop or select Start, Programs, and then Microsoft
Exchange.
3. When the Setup wizard appears, verify that Microsoft Exchange Server is
checked and that Microsoft Mail and Internet Mail are not checked; click Next.
4. Type the name of the Microsoft Exchange Server. This is typically the name of
the server on which Microsoft Exchange Server 5.5 is installed. Also enter the
mailbox name; this is typically the username.
5. Select if you travel with the computer and click Next.
6. In the Personal Address Book dialog box, save Mailbox.pab in the user’s
home directory.
7. After completing the Setup wizard, the Exchange Inbox appears.
Setup of Microsoft Exchange 5.0 Client is now complete.
Microsoft Outlook 98
Overview
Outlook is the latest client messaging software from Microsoft. It combines e-mail
and scheduling functions seamlessly into one interface.
60
MetaFrame Solutions Guide
Requirements
Hardware Requirements
K
Server capable of running Microsoft Windows 2000 and MetaFrame
Software Requirements
K
MetaFrame Version 1.8 for Windows 2000
K
Microsoft Windows 2000 with Terminal Services installed
K
Outlook 98
Installation
Û To install Outlook 98 on a Windows 2000 server with MetaFrame installed
Note If Outlook 98 and Exchange Server 5.0 will be installed on the same
MetaFrame/ Windows 2000 server, Outlook 98 must be installed first.
1. Log on as an administrator and insert the Outlook 98 CD-ROM into the CD
drive.
2. When the Microsoft Outlook dialog box appears, exit the dialog box.
3. At a command prompt, type change user /install. Then run Setup.exe on the
root of the Outlook 98 CD.
4. Click Install Outlook 98 when the Setup dialog box appears.
5. Click Standard Installation.
6. Click Corporate email.
7. If prompted, click Upgrade Only Newer Items.
8. Allow installation to complete.
9. At a command prompt, type change user /execute.
10. Click OK to restart the server.
11. When Outlook installation is complete, run Outlk98.cmd from the
%SystemRoot\Application Compatibility Scripts\Install folder.
12. Follow the directions on the screen. When application tuning is complete, log
off and then back on for the settings to take effect.
Configuration
1. From each Citrix ICA Client, log on to the MetaFrame/Windows 2000 server.
2. Select Start, Programs, and then Outlook 98 to launch Outlook.
3. In the Outlook Setup wizard, select MS Exchange Server and click Next.
Chapter 3 Installing Applications
61
4. Specify the location of the Exchange Server and the owner of the mail account,
then click Next.
5. Click No when asked if you travel with this computer, then click Next.
6. Place the Personal Address Book on the user’s home drive or a local client
drive, then click Next.
7. Specify whether or not to add Outlook to the Startup folder and click Next.
8. Click Finish to complete the configuration.
9. Click Yes to make Outlook your default manager for mail, news, and contacts.
Financial Software
PeopleSoft 6.x
Note This application note was provided by PeopleSoft. All trade names referred
to are the Servicemark, Trademark, or Registered Trademark of the respective
manufacturers.
The information contained in this note is subject to change without notice.
This note provides guidelines for configuring and installing Microsoft Windows
2000, with or without Citrix MetaFrame, for use with PeopleSoft applications.
Supported Configurations
Be sure to check with your administrator to get the latest information about
supported configurations, including PeopleSoft versions, Windows 2000 versions,
and Citrix MetaFrame versions.
CPU and Memory Recommendations
The recommended minimum client hardware configuration is a Pentium 133 CPU
with at least 32MB of RAM. Based on these figures, the following table
represents the recommended CPU and memory for a typical Windows 2000 server
running PeopleSoft clients.
Note Sizing is a relative process and, depending on your specific requirements,
these numbers can skew either way; this information is only meant as a starting
point. Your environment (hardware, applications, user activity level, and so on)
dictates your actual needs.
62
MetaFrame Solutions Guide
Concurrent users
Processor required
RAM
10–12
One P6 200 or above
256MB+
20–24
Two P6 200 or above
512MB+
30–36
Three PII 233 or above
768MB+
40–48
Four PII 233 or above
1GB+
48+
Add servers based on above model
Usage Restrictions
Windows 2000 will be servicing many clients, in essence acting as the operating
system for all users connected to it. With this in mind, keep the Windows 2000
server free of PeopleSoft processes that can be handled by other servers. Here are
some recommendations for process distribution:
K
Never run the database server on the Windows 2000 server. Run it on a
separate machine.
K
Never run the PeopleSoft application server on the Windows 2000 server. Run
it on a separate machine.
K
Never run Process Scheduler on the Windows 2000 server. Run it on your
database server or on a separate server.
K
If possible, use a separate file server to act as the repository for non-shared
user files, including PeopleSoft cache files. This puts the burden of read/write
file I/O on a separate server, reducing the overhead for the Windows 2000
server and allowing more of its resources to be devoted to processing user
applications.
K
Use a high-speed network connection between the Windows 2000 server and
any auxiliary servers, including, but not limited to, database servers,
application servers, Process Scheduler servers, and file servers.
User Home Directories
Because multiple clients run on a single server, it is important that each user have
his or her own dedicated file area (commonly referred to as a home directory) for
non-shared files such as temp and cache files.
PeopleSoft Cache Files
In a client/server environment, each PeopleSoft user has a set of cache files stored
on his or her client machine. In the Windows 2000 environment, each user must
also have a unique set of cache files. You can achieve this by assigning each
Windows 2000 user a home directory, preferably on a separate server, and using
Configuration Manager to point the cache files directory to a subdirectory of that
home directory.
Chapter 3 Installing Applications
63
Specifying a User’s Cache Files Directory under a Dedicated Home
Directory
Only one Windows 2000 user should be able to read and write data to each
PeopleSoft cache directory.
It is equally important that only one PeopleTools instance has access to each set of
cache files. If multiple PeopleTools instances access the same set of cache data,
you could experience application exception errors. This can happen if a user ends
a Windows 2000 session improperly, then starts another session. To avoid this,
see “Ending a Windows 2000 Session” later in this chapter.
Anonymous Users
If your Windows 2000 environment uses anonymous log on IDs, make sure that
each anonymous ID has its own home directory area and that only one instance of
each anonymous user can be logged on at the same time.
Installing Applications
When installing applications on the Windows 2000 server, such as Microsoft
Office or PeopleSoft, if you want all users to be able to access these applications,
use the Add/Remove Programs Administrative wizard and make sure all users
begin with common application settings.
Ending a Windows 2000 Session
Û To end a Windows 2000 session
Click Start and then Logoff in the session taskbar.
- Or Click Start and then Disconnect in the session taskbar.
- Or Click the Close Window button at the upper right corner of the title bar.
The recommended way to end a Windows 2000 session is option 1. This ends the
user session and closes down all running programs, including PeopleTools. This
ensures that no PeopleTools programs are left running. The next time a
PeopleTools program is launched, it will not conflict with any other PeopleTools
program run in the previous session. This ensures a clean set of cache files for
each user’s PeopleTools program.
64
MetaFrame Solutions Guide
If you choose options 2 or 3, it is possible for “phantom” programs to be running
when users reconnect. This means that multiple instances of PeopleTools are
running without the user knowing it. These multiple instances of PeopleTools can
corrupt the cache files, causing a system access violation and shutting down
PeopleTools.
To further ensure that users are safely closing programs when they leave a session,
administrators can set an option in each user’s profile. This can be done in two
places.
Option 1
Console Setup for User Manager
You must utilize User Manager in order to change a user’s profile. Setting up the
Management Console allows easier access to more commonly used utilities, such
as User Manager.
1. Click Start, select Run, and type mmc to run User Manager.
2. In the Console dialog box, click Console, then select Add/Remove Snap-in.
3. Click Add. The Add Standalone Snap-in dialog box appears. This dialog box
allows you to customize the console settings and allows quicker access to
commonly used MetaFrame utilities.
User Manager
1. In Local Users and Groups, double-click the Users folder, then double-click
the user whose profile you want to change.
2. In the User Properties dialog box, click the Sessions tab.
3. Under the Sessions tab, change When a session limit is reached or
connection is broken to End session.
4. Click OK and exit User Manager.
Option 2
1. Click Start, select MetaFrame Tools (Common), and click Citrix
Connection Configuration.
2. In the Citrix Connection Configuration dialog box, double-click a
connection.
3. In the Edit Connection dialog box, click Advanced.
4. In the Advanced Connection Settings dialog box, change On a broken or
timed-out connection to reset and click OK.
5. Click OK again and exit Citrix Connection Configuration.
Chapter 3 Installing Applications
65
Performance Tuning Considerations
This section offers suggestions about how to improve the performance of
PeopleSoft applications on a MetaFrame server.
Background Wallpaper
ICA sessions carry display characteristics over the network to the end user. The
fewer graphics that need to travel the network, the better the performance for the
end user. For this reason, the administrator can disable background desktop
wallpaper.
PeopleSoft Splash Screen
If you are concerned about the network traffic generated by the PeopleSoft splash
screen when signing on from an ICA Client, you can disable it.
To disable the splash screen at startup, add the following command line parameter
to the Pstools.exe command used to start PeopleTools:
-ss NO
The entire command line would look like this:
N:\PT750\BIN\CLIENT\WINX86\PSTOOLS.EXE –ss NO
Troubleshooting
If you are experiencing problems running PeopleSoft applications in your
MetaFrame server environment, read this section for tips and answers to known
issues.
Application Errors
Sometimes when certain users access applications such as Crystal Reports, they
get an error message stating dlls or system files are missing. Why does it happen?
Windows 2000 is a multiuser operating system. When an application gets
installed, it can be installed in one of two ways, either as an application for the
specific user installing the application or as an application for all users of the
system.
When installing an application, if all users are to have access to it, make sure it
gets installed for all users. See “Installing Applications” earlier in this chapter.
66
MetaFrame Solutions Guide
File ID Limits
With more concurrent users on Windows 2000, the server frequently gets Event
ID 2009 errors in the Event Log. What is this and why does it happen?
Windows 2000 has a limitation of open file handles (FIDs). For each SMB virtual
circuit, there is a limit of 2048 FIDs. If client sessions are accessing the same file
server, all clients share the SMB virtual circuit; therefore, all clients contribute to
the 2048 FID limitation.
This is also true for mappings to the local Windows 2000 server. Because most
home directory mappings are done by connecting to a shared resource, even if
client sessions access a local Windows 2000 drive, if a drive mapping is used (for
example, virtual drive is mapped with the net use command), all clients have the
2048 FID limitation.
PeopleSoft uses numerous files when running. It is recommended that you use a
separate file server to limit resource contention. When using a separate file server,
all clients are subject to the combined 2048 FID limit. A solution is to spread
users across multiple file servers. The actual limit of users per server is based on
actual usage. For example, users who use third-party applications on top of
PeopleSoft would use more FIDs.
Host Connectivity Software
Hummingbird eXceed 5 for Windows 2000
Overview
Hummingbird eXceed 5 for Windows 2000 is a comprehensive X Window server
application for Windows NT and MetaFrame servers. eXceed works with your
TCP/IP network to access X applications (also known as X clients) on host
computers running X Windows. The eXceed software turns your system into a PC
X server. In the X Windows environment, a PC X server is also referred to as an
X Windows terminal or server. The X Windows desktop runs as an application on
the MetaFrame server. An ICA Client session connected to the MetaFrame server
can use eXceed to run X Windows-based applications on a host computer running
the X Window environment. The benefits of using Hummingbird eXceed for
Windows 2000 on a MetaFrame server include:
K
The ability to deliver an X Windows desktop over a low bandwidth connection
with excellent performance
K
The MetaFrame server and ICA Client sessions can replace expensive X
Terminals
Chapter 3 Installing Applications
67
Software Requirements
K
Hummingbird eXceed 5 for Windows 2000
K
Microsoft Windows 2000 with Terminal Services installed
K
MetaFrame Version 1.8 for Windows 2000
Installation
There are three steps to installation and configuration.
K
Installing the Hummingbird application software on the MetaFrame server
K
Installing the ICA Client software for each user
K
Configuring the ICA Client software for each user
Installing Hummingbird Application Software
The first step in installing eXceed 5 is to install the shared server portion of the
Hummingbird Application Software on the MetaFrame server.
1. Log on to the MetaFrame server as an administrator.
2. At a command prompt, type change user /install and press ENTER.
3. Insert the Hummingbird eXceed 5 CD-ROM into a CD-ROM drive on the
MetaFrame server.
4. At a command prompt, change the working directory to the \Exceed directory
on the eXceed 5 CD-ROM.
5. Type expand msvcrt20.dl_ %systemroot%\system32\msvcrt20.dll and
press ENTER.
6. Type expand ctl3d32.dl_ %systemroot%\system32\ctl3d32.dll and press
ENTER.
7. Type expand mfc30.dl_ %systemroot%\system32\mfc30.dll and press
ENTER.
8. Run Setup from the \Exceed directory on the CD-ROM.
9. When Setup starts, select Shared User Installation and then Express. Specify
a local directory on the MetaFrame server (for example,
C:\Win32app\Exceed).
10. When installation is complete, type change user /execute and press ENTER.
The eXceed 5 shared server is now installed. Each user who will use eXceed must
perform an installation from the C:\Exceed\Userins directory. This process is
detailed below. If the administrator has already installed the client software, go
directly to “Client Configuration” later in this chapter. All other users must
perform a client software installation from the shared directory.
68
MetaFrame Solutions Guide
Installing Hummingbird Client Software
This section describes the client-side installation of the Hummingbird Application
Software. This must be done by each MetaFrame user who will run the
Hummingbird eXceed application.
1. Log on to the MetaFrame server as a user.
2. At a command prompt, type change user /install and press ENTER.
3. Run Setup from the \Exceed\Userins directory created in Step 7 above.
4. The first Setup popup asks you to specify the eXceed home directory. Specify
the directory created in Step 9 above.
5. The next popup asks you to specify the user’s home directory. Specify the
user’s home directory; for example, %SystemRoot%\Profiles\HermS\Exceed.
6. For users without rights to \%SystemRoot%\System32, three errors will appear
during the file copy, each saying “MoveFileEx: Error#{5}. The requested
access was denied.” Click OK each time. This indicates the administrator
copied the files to the proper directory in Steps 5, 6, and 7 above.
7. Each user must select a password to configure the X configuration setup.
8. You are asked if you want to tune the video display. Click Yes if Msvcrt20.dll
was copied into the %SystemRoot%\System32 directory. If it was not, click
No.
9. At a command prompt, type change user /execute and press ENTER.
Client Configuration
This section describes the client-side configuration of the Hummingbird
Application Software. This configuration must be done by each MetaFrame user
who will run eXceed.
1. After the eXceed client software is installed, double-click the Xconfig icon in
the eXceed program group.
2. Double-click the Communication icon. Set the mode to XDMCP-indirect and
select a unique display number for each user.
Note Each user must have a unique display number. If two users have the
same user number, incorrect program operation can occur.
3. Select Configure and enter the IP address of the X server running XDM.
4. Click OK twice.
5. Select the Windows Mode icon and set the Windows mode to Single.
6. Click OK.
7. Select the Transports icon, enter the broadcast address, and click OK.
Chapter 3 Installing Applications
69
8. Close the Xconfig window and run the eXceed icon in the eXceed program
group to run an X Windows session from the selected XDM server.
Note At this time eXceed does not support multiuser 3270 connectivity under
MetaFrame.
Internet Service Provider (ISP) Connectivity Software
ExtendNet VPN Remote Access Server
Overview
Note The information in this application note was provided by Mike Stone,
Systems Engineer, Extended Systems Inc., 5777 North Meeker Ave., Boise, ID
83713.
This application note describes how to install and use the ExtendNet VPN to
manage PC-to-LAN Virtual Private Network connections. By simply dialing a
local Internet Service Provider (ISP) and using the industry-standard Point-toPoint Tunneling Protocol (PPTP), remote users can access their LAN (and,
consequently, Citrix MetaFrame server) as if physically connected. All
authentication from the Internet, encryption of packets, decryption of packets, and
management of users is processed by the ExtendNet VPN server.
The primary benefits of utilizing the ExtendNet VPN for managing PC-to-LAN
(MetaFrame server) connections are:
Security. ExtendNet VPN shields your mission-critical MetaFrame server from
direct Internet access. Anyone desiring access to the MetaFrame server MUST
authenticate to the ExtendNet VPN first. This keeps the Windows/MetaFrame
server safely behind the ExtendNet VPN, further reducing the risk of attack from
the Internet. PPTP provides 40-bit (the maximum allowed internationally) or 128bit (domestic maximum) encryption keys. The ExtendNet VPN is also a dedicated
hardware platform with a proprietary “hardened” operating system with a reduced
code set versus a commercially available operating system, such as Windows
2000.
Performance. The ExtendNet VPN offloads the tasks of encryption and
decryption from the MetaFrame server. The ExtendNet VPN is hardware
optimized to maximize throughput and decrease the utilization levels of the
MetaFrame server.
70
MetaFrame Solutions Guide
Ease of use. By utilizing a standards-based solution dedicated to remote access,
the ExtendNet VPN is easy to set up and configure. Interoperability is achieved
using standard PPTP and Simple Network Management Protocol (SNMP)
communication specifications.
Requirements
Hardware
K
File server
K
An available 10Base-T, 10Base-2, or 100Base-TX network connection for the
VPN server
K
Dedicated Internet connection at the MetaFrame site
K
Management console in the form of a PC running Windows 95 or Windows
NT 4.0 to run the management software (InterprEYES Manager and Monitor)
K
Remote clients with dial out capability (modem, etc.) and access to the Internet
through an account with an ISP
Software
K
MetaFrame Version 1.8 for Windows 2000
K
Microsoft Windows 2000 with Terminal Services installed
K
Remote clients running Windows 95, Windows 98, or Windows NT
K
Remote Windows 95 or Windows 98 must have Dial-Up Networking (DUN)
Version 1.3 with the Microsoft VPN option enabled
K
Remote Windows NT clients must have Service Pack 4 installed
K
Network Operating System (NOS) protocol supporting TCP/IP
System Integration
Note Before you proceed, make sure that Microsoft Windows 2000 and Citrix
MetaFrame are already installed on the server and that the server is configured to
accept TCP ICA connections.
K
ExtendNet VPN serves as a gateway between the Citrix network and the
Internet. Because the ExtendNet VPN functions on the TCP/IP layer (the
network and transport layers of the OSI model), remote users can authenticate
to the ExtendNet VPN, receive an IP address that is valid for the local subnet,
and then authenticate to the Citrix MetaFrame server as if physically connected
to the MetaFrame server’s network.
K
Firewall and/or router configuration. The ExtendNet VPN utilizes Microsoft’s
PPTP for encapsulating and encrypting the packets during transmission over
the Internet. PPTP requires that two packet types are passed to the PPTP server
(in this case, the ExtendNet VPN). Data packets are PPP packets encapsulated
Chapter 3 Installing Applications
71
using an enhanced Internet Generic Routing Encapsulation Protocol Version 2
(GRE V2). GRE is protocol type 47. Control packets (for status inquiry and
signaling information) are transmitted and received over a TCP connection.
The TCP port used is 1723. Both of these packet types must be able to reach
the ExtendNet VPN and may require some configuration of a router and/or
firewall (if present and filtering) at the ExtendNet VPN site.
K
Client configuration. Because the ExtendNet VPN uses PPTP to enable remote
access to a LAN over the Internet, each client must be configured to utilize
PPTP. Installing the Microsoft software varies by operating system (either
Windows 95, Windows 98, or Windows NT) but is detailed in the Extended
Systems VPN User’s Guide-Remote Setup.
Installation
Û To install and configure the ExtendNet VPN server
1. Connect the ExtendNet VPN to the LAN with 10Base-T, 10Base-2, or
100Base-TX.
2. Install the InterprEYES discovery and management software on a Windows
server.
InterprEYES discovers and allows configuration of the ExtendNet VPN. It
automatically discovers an ExtendNet VPN on the same local subnet but
requires multicast support to discover an unconfigured device that is on a
remote network.
3. Configure a remote client to access the ExtendNet VPN.
Note The Citrix ICA Client must already be installed on the remote client
machine in order to log on to the Citrix server.
4. Test the configuration by attempting to connect the remote client to the
ExtendNet VPN.
5. After authenticating to the local network successfully, the remote client can log
on to the Citrix server by a TCP ICA connection. This type of connection is
enabled by default on a MetaFrame 1.8 for Windows 2000 server.
Usage
When utilizing the ExtendNet VPN, a client performs the following steps to
initiate a Citrix MetaFrame session.
1. Connect to the Internet. This is typically achieved through a DUN connection
but can also be through a LAN connection to the Internet.
2. Double-click the DUN icon representing the VPN connection to the ExtendNet
VPN.
72
MetaFrame Solutions Guide
3. Log on to the Citrix MetaFrame server through the ICA client.
You can now access any resources on the MetaFrame server as if you were
physically connected.
Troubleshooting
To start troubleshooting a VPN connection, break the issue into zones. Start with
the physical connection (Zone 1). Verify that you have a green status and link
light. Build up to Zone 2. Verify that local communication exists to the ExtendNet
VPN by pinging from a local workstation, such as ping <local IP address>.
Ensure that a workstation can communicate with the ExtendNet VPN using the
InterprEYES utility to check the ExtendNet VPN’s current IP address, subnet
mask, and default gateway. Another good test is to see if a client workstation can
initiate a VPN session locally utilizing Microsoft’s VPN adapter (DUN on
Windows 95 or 98 and a RAS connection in Windows NT). In Zone 3, verify that
communication exists with the Internet. Ping a domain name by entering the
following (or some other domain name) at a command line: ping
www.extendedsystems.com.
Zone 4 is the most common cause of issues. By default, a router or firewall is
configured to deny all traffic from the Internet. This means a remote user trying to
connect to the ExtendNet VPN will never reach the ExtendNet VPN server (in
Zone 1) because the packets will be refused by the firewall/router at Zone 4.
Check your forwarding rules for the firewall/router to make sure these packet
types are allowed through. If remote clients are getting errors connecting to the
ExtendNet VPN (specifically error 650 or 629) but clients in Zone 2 can reach the
VPN, it is most likely due to the firewall. In Zone 5, verify the client DUN is
Chapter 3 Installing Applications
73
configured to the IP address of the ExtendNet VPN server. Also, try to ping
hp.com and then try to ping the IP address of the ExtendNet VPN.
For more advanced troubleshooting tips, query Extended Systems’ knowledge
base at http://www.extendedsystems.com or contact Extended Systems’
technical support directly.
Modem Connectivity Software
Comtrol RocketModem
Overview
The Comtrol RocketModem is a multiport, PCI bus expansion card with multiple
modem capabilities. This section describes a tested configuration of Comtrol
RocketModem with Citrix MetaFrame.
Requirements
Hardware Requirements
Dell OptiPlex GXi with one Pentium processor
K Comtrol RocketModem card with four modems
K
Software Requirements
K
MetaFrame Version 1.8 for Windows 2000
K
Comtrol RocketModem Device Driver Version 3.14
Installing Comtrol RocketModem Card
1. Turn the computer off, remove the computer cover, and select a slot to install
the controller.
2. Remove the expansion slot cover and insert the RocketModem card.
3. Replace the covers and restart the system.
Installing Comtrol RocketModem Device Driver
1. On the desktop, right click My Computer and click Properties.
2. Click the Hardware tab and then click Hardware Wizard.
Windows 2000 will find your new device if it has been properly installed.
3. Let the Hardware wizard search for a suitable driver for your device.
4. When your driver is found, click Next.
5. Click Finish to complete Comtrol RocketModem installation.
74
MetaFrame Solutions Guide
6. Insert the driver installation diskette that accompanied your new hardware in
drive A (or other appropriate drive). From the \Winnt subdirectory, extract the
self-extracting zipped file (6540v4_19_2.exe) to an empty directory on your
computer.
7. At a command prompt, type change user /install.
8. Run Setup.exe. In RocketPort/RocketModem NT Setup, select an I/O
address range (180-1c3 hex default was chosen for this installation). Running
Setup creates an entry for the Comtrol RocketModem in the Start menu.
Note Make sure that these selections do not conflict with an existing I/O
address range or with COM ports already in use.
9. In the remaining RocketPort/RocketModem Setup dialog boxes, click OK.
10. Reboot the system in order for the changes to take effect.
Setting up Comtrol RocketModem
1. In Control Panel, double-click Phone and Modem Options. Click the
Modems tab.
2. Click Add. Check Don’t detect my modem; I will select it from a list.
3. Choose Comtrol as the manufacturer and select RocketModem VS2000 v.34.
4. Select all ports in the range assigned to the RocketModem board and click
Next.
5. Click Yes for all the subsequent dialog boxes to continue the installation.
6. Click Finish to complete the setup.
7. Click OK.
Terminal Connection Configuration Using Comtrol
RocketModem
1. Click Start, select Programs, then Administrative Tools, and then Terminal
Services Configuration.
2. In the Terminal Services Configuration dialog box, click Action and select
Create New Connection.
3. Under Connection type, select Citrix ICA 3.0, choose Basic encryption level,
and select Use remote control with default user settings.
4. Enter a connection name and select Async for transport. Click Next. Select
one of the RocketModem COM ports for device, click Next, and then click
Finish.
5. Repeat Steps 1–4 for additional terminal connections.
6. Reboot the server.
Chapter 3 Installing Applications
75
Configuring ICA Clients to use Comtrol RocketModem
1. Using a text editor, open \System32\RAS\Modem.inf.
2. Using a text editor, open \Program Files\Citrix\ICA Client\Modem.ini.
3. Maintaining alphabetical order, add the name of the modem connected to the
RocketModem that is listed in the Modem.inf file to the top portion of the
Modem.ini file and add an equal sign at the end of the modem name; for
example, US Robotics=.
4. Copy the initialization strings from the Modem.inf file and paste them at the
end of the Modem.ini file.
5. Close the Modem.inf file and save and close the Modem.ini file.
6. With the text editor, open \Program Files\Citrix\ICA Client\Wfclient.ini.
7. Below the last COM port listed in the Windows COM Port Name section of
the Wfclient.ini file, add the COM port followed by an equal sign for each port
to be used by the RocketModems; for example, COM5=.
8. Save the Wfclient.ini file and close the text editor.
Citrix ICA Clients can now access the RocketModems.
Verifying the Installation of Comtrol RocketModem
Follow the procedure below to verify that the Comtrol RocketModem is correctly
installed and configured:
1. Connect the modem ports to phone ports.
2. Click Start. Select Programs, Accessories, then Hyperterminal, and click
HyperTerminal.
Note If this is the first time you are using HyperTerminal, enter an area code
and click Close. When prompted, type a modem name.
3. Type a name in Connection Description and click OK.
4. In the Connect To field, enter an area code and a phone number that can be
used for testing.
5. In the Connect Using list at the bottom of the Connect To dialog box, select
the first of the RocketModems.
6. In the Connect field, click Dial.
7. Verify the connection is made.
8. Repeat Steps 1–7 for each RocketModem.
76
MetaFrame Solutions Guide
Networking Software
Microsoft Windows 2000 Multi-Protocol Routing Service
Overview
This section describes how to install and integrate the Microsoft Windows 2000
Multi-Protocol Routing Service on a Microsoft Windows 2000 server. MultiProtocol Routing enables small- to medium-sized organizations to deploy a
Windows 2000 server as a low cost LAN-to-LAN routing solution for TCP/IP and
IPX networks, eliminating the need for a dedicated router. The Multi-Protocol
Routing Service can also be used to link LANs that have different network
topologies (such as Ethernet and Token Ring). Each packet sent over a LAN has a
packet header that contains source and destination address fields. Using the packet
header information, the routing service receives network packets from a source
and routes them to their destination using the shortest path available. This reduces
network traffic on other LAN segments, optimizing network performance.
The Multi-Protocol Routing Service allows a Windows 2000 server to act as a
router for the network. Any ICA Client on any attached network loop can
establish a remote session from a MetaFrame server on any other network loop
using the TCP/IP and IPX protocols.
Requirements
Hardware Requirements
K
Microsoft Windows 2000 server with two or more network cards for full
Multi-Protocol Routing functionality
Software Requirements
K
MetaFrame Version 1.8 for Windows 2000
K
Microsoft Windows 2000 with Terminal Services installed
Installation
1. Click Start, select Programs, Administrative Tools, and then click Routing
and Remote Access.
2. In the left window pane, highlight the local server, click the Action menu
option, and select Configure and Enable Routing and Remote Access.
The Network dialog box appears.
3. When the Routing and Remote Access Configuration wizard appears, click
Next.
Chapter 3 Installing Applications
77
4. On the Routing and Remote Access dialog box, uncheck the Enable remote
access control box and check the Enable server as a router control box.
Select a routing type and click Next.
5. When prompted, click Finish to complete the routing service installation and
start the service.
Configuration and Troubleshooting
IP
After the routing service is configured and started, you need to add static IP
addresses for each of the network cards.
1. In the Routing and Remote Access utility, double-click IP Routing.
2. Double-click the General icon. A list of all the network cards installed on your
machine appears.
3. Double-click Local Area Connection and select the Configuration tab.
4. Click Use the following IP address.
5. Specify an IP address and subnet mask for the Local Area Connection.
6. In the Router (Default Gateway) field, enter the IP address of the network to
which you want to route the packets.
7. Repeat IP configuration for all other Local Area Connections.
Note At a command prompt, type route print to see what routes your machine
has. You can also use the ping and tracert commands to troubleshoot or verify
that the Multi-Protocol Routing service is working for TCP/IP.
After configuring IP for each network card on your machine, the Windows 2000
server starts exchanging routing information with other Windows 2000 and RIP
routers. For more information about TCP/IP, see the appropriate Windows 2000
documentation.
IPX
If no network number is defined for the segment to which Windows 2000 server is
connected, you must define a unique network number for that segment. For
example, if you have a Windows 2000 server with two network interface cards
and the first network card is connected to an existing Novell network, you can
leave the network number blank because Windows 2000 auto-detects the network
number for that segment. If the second network card is connected to the Microsoft
network; no IPX network number is defined for this segment. You must type in a
unique network number for this segment. Use Ipxroute.exe to determine the
network number of your network adapter. Ensure that the same frame types are
selected for both network adapters.
78
MetaFrame Solutions Guide
Productivity Software
Symantec ACT! Version 3
Overview
Symantec’s ACT! 3.0 is a business contact management program. MetaFrame
extends ACT!’s capabilities by allowing multiple users to simultaneously use
ACT! with shared or unshared contact databases. This note describes a tested
method of configuring ACT! 3.0 using MetaFrame.
Requirements
Hardware Requirements
K
MetaFrame server
Software Requirements
K
MetaFrame Version 1.8 for Windows 2000
K
ACT! Version 3
Installing ACT!
1. At a command prompt, type change user /install.
2. Run Setup.exe from the ACT! CD-ROM.
3. Fill in the user information.
4. Select the installation location.
5. Select the type of installation (Typical was chosen for this test configuration).
6. Complete registration information.
7. At a command prompt, type change user /execute.
Configuring ACT!
On MetaFrame, ACT! can be set up to allow a shared database to be used
simultaneously by multiple users and for unshared databases to be used by
individuals. In either case, permissions must be set to allow proper access.
All users who share a common database must have access to both the database file
(that is, Contacts.dbf) and the directory that contains the database file (for
example, C:\Act\Database). If a user does not have the correct permissions when
he or she starts ACT! for the first time, the Database Setup wizard does not accept
any database filenames. When this happens, the user must exit the Setup wizard
and choose New from the File pull-down menu to create a database and save it in
a location where he or she has sufficient rights.
Chapter 3 Installing Applications
79
Verifying Installation of ACT!
Follow the procedure below to verify that ACT! is correctly installed and
configured:
1. Click Start, select Programs, ACT! 3.0 for Windows, and then ACT! 3.0.
2. Follow the Setup wizard (default values were used in the test configuration).
3. Enter My Record information.
4. Click Contact and then New Contact from the menu bar to add a new contact.
5. From the menu bar, select Lookup, then Company, and enter the name of a
current contact with the company name you selected.
Note ACT! does not allow any two users of a shared database to make concurrent
changes to the same contact record. Once a user starts to change a record, that user
must save the changes or switch to a different record before others can make
changes to the record. ACT! allows users of a shared database to make concurrent
changes to different contact records.
Additionally, if an alarm is set for a scheduled activity, all users concurrently
running ACT! and using the same database receive the alarm.
Corel WordPerfect Suite 8
Overview
Corel WordPerfect Suite 8 is an office application suite that includes
WordPerfect, Quattro Pro, and Presentations. MetaFrame extends WordPerfect
Suite 8 capabilities by allowing multiple users to concurrently use any of the
suite’s programs. This note describes a tested method for configuring WordPerfect
Suite 8 using MetaFrame.
Requirements
Hardware Requirements
K
MetaFrame server
Software Requirements
K
MetaFrame Version 1.8 for Windows 2000
K
Corel WordPerfect Suite 8
Installing Corel WordPerfect Suite 8
1. Install and configure MetaFrame as a standalone server or a domain controller.
2. Log on to the console of the MetaFrame server as an administrator.
80
MetaFrame Solutions Guide
3. At a command prompt, type change user /install and press ENTER. This
places the user session in install mode.
4. Insert the Corel WordPerfect Suite 8 CD in the CD-ROM drive.
5. When AutoRun displays the Corel WordPerfect Suite 8 Applications Disk
window, click Corel WordPerfect Suite Setup.
6. Click Next in the Welcome dialog box and Yes in the License Agreement
dialog box.
7. Enter the appropriate information in the Registration Information dialog box.
8. Select the type of installation: Typical, Compact, Custom, or Run From CDROM. (For this installation, Typical was chosen.)
9. Enter the installation location.
10. Select the components to be installed. (All components were selected during
this installation.)
11. Click Install in the Ready to Install dialog box.
12. When installation is complete, click OK to exit setup.
13. At a command prompt, type change user /execute and press ENTER.
Verifying Installation of Corel WordPerfect Suite 8
Follow the procedure below to verify that WordPerfect Suite 8 is correctly
installed and configured:
1. Select Corel Desktop Application Director 8 from the Accessories program
group.
2. Double-click the WordPerfect icon and verify that WordPerfect starts
correctly.
3. Repeat Step 2 for Quattro Pro and Presentations.
Lotus Notes 4.5 for Windows NT
Overview
This application note describes how to integrate Lotus Notes 4.5 Server and
Workstation software with MetaFrame. Lotus Notes is a workgroup environment
for developing applications that enables groups of people to share information and
work together. Lotus Notes enables you to communicate with colleagues,
collaborate in teams, and coordinate strategic business processes.
There are two parts to the Notes installation.
K
Installing Lotus Notes Server for Windows NT on a Windows
2000/MetaFrame server
Chapter 3 Installing Applications
K
81
Installing Lotus Notes Workstation for Windows NT that can also run on a
MetaFrame server
If a Lotus Notes Server is already running in your network and you are not
installing Notes on a MetaFrame server, proceed to the Installing Lotus Notes
Workstation Program section later in this chapter. If you plan on running both
Lotus Notes Server and Lotus Notes Workstation on a MetaFrame server, follow
the directions in both the server and workstation installation sections.
Installation Note
Although both the Lotus Notes Server and many copies of Lotus Notes
Workstation for Windows can run on a single MetaFrame server, this is not
always the best solution. If the system running MetaFrame is a high end,
multiprocessor machine with a large amount of RAM and a very fast hard disk
subsystem, this configuration works fine. However, if the MetaFrame servers are
configured to meet only MetaFrame needs, you need to add more computing
resources to those machines or consider running Lotus Notes Server on a separate
machine. It is recommended that you have a standalone Windows NT Server to
run Lotus Notes Server and run the Lotus Notes Workstation client on the
MetaFrame servers. This allows Lotus Notes Server to use all of the system
resources of a separate machine. The MetaFrame server(s) with the Lotus clients
can then support multiple remote or network users who want to access the Lotus
Notes Server.
Lotus Notes Workstation for Windows NT allows you to do a public install. It is
suggested that you do a single public install to the MetaFrame server or to any
available network server. Users who want to set themselves up for Lotus Notes
access can then run the standard Lotus Notes Workstation installation from the
public install by changing into that directory and running Setup.
Requirements
Hardware Requirements (choose one of the following)
K
One MetaFrame server
K
One MetaFrame server and one Windows NT 4.0 or Windows 2000 server
Software Requirements
K
MetaFrame Version 1.8 for Windows 2000
K
Citrix ICA Client
K
Lotus Notes Release 4.5
82
MetaFrame Solutions Guide
Installation
Û To install Lotus Notes Server for Windows NT on a MetaFrame Server
1. It is recommended that you create an administrative user specifically for Lotus
Notes on the MetaFrame server that will run the Lotus Notes Server. Log on to
the MetaFrame server as this administrative user.
2. Before proceeding with the Notes Server installation, you must run change
user /install from the command prompt if you want to run Notes Server as an
automatic service. However, this does not allow you to run the Administrators
Personal Workstation at the same time that the Notes Server is running.
Therefore, it is recommended that you run the Administrators Personal
Workstation from a workstation rather than the Notes Server.
3. Proceed with installing Lotus Notes Server. Run install from the Win32\Install
directory on the Lotus Notes 4.5 CD-ROM or from the floppy diskettes made
from the Win32\Disk_Kit directory. Register the software.
4. In the Install Options dialog box, select directories and the group under which
you want to install. If you want to install Notes as a service, choose Customize
Features-Manual Install. If you do not want to install Notes as a service,
choose Server Install and skip to Step 6.
5. In the Customize dialog box, verify that Notes Service Install is selected.
6. After installation of the Notes Server is complete, Notes places the Lotus
Notes Server and Workstation icons in a Common program group on your
desktop. Move these icons to a Personal Program Group. This situation arises
only if you are using a single MetaFrame server for the Notes server and client
workstation installs (see the Installation Note above).
7. The first time you double-click the Notes Workstation icon, Notes Setup starts
automatically. You must complete server setup before working in Notes. If you
try to start Notes server without first completing Notes setup, the server exits
with the message: “You must first run the workstation server setup program to
set up your system. To restart the setup process, double-click the Notes
workstation icon.”
8. Proceed with Lotus Notes installation. See the Lotus Notes documentation for
specifics about the Lotus Notes Server setup.
9. When server setup is complete, you need to name the port (that is, SPX;
LAN0) under Tools, Server Administration, Servers, Servers View.
Double-click the appropriate server and edit Network Configuration.
10. Running Notes as an automatic service is useful if you need to start the server
from a remote location or to restart automatically after a system failure. If you
choose to install Notes as a service during installation, follow these
instructions to make the service automatic.
A. Click Start, select Programs, then Administrative Tools, and click
Computer Management.
Chapter 3 Installing Applications
83
B. Expand System Tools, then click Services.
C. Double-click Lotus Domino Server.
D. Select Automatic as the startup type.
11. Reboot the MetaFrame server to start the Lotus Notes server, or run change
user /execute from the command prompt and double-click the Notes Server
icon to start the Notes Server manually.
Û To install the Lotus Notes Workstation Program for Windows on a
MetaFrame server
1. Log on to the MetaFrame server on which you are going to install the Notes
client using the desired Citrix ICA Client (DOS, Win16, or Win32.) Log on as
the user for whom you want to set up the Lotus Notes Workstation for
Windows program.
2. If you did a file server or network distribution install of the Lotus Notes
Workstation for Windows program, net use the directory on the network,
change to the Notes public directory, and run the install program. If you did
not do a public install, load the CD-ROM or floppy diskettes and do a normal
install of the workstation program. From a command prompt, run install from
the Win32\Install directory or from the floppy diskettes created from the
Win32\Disk_Kit directory.
3. When the install program is launched, you may receive a message telling you
there are multiple copies of Notes for Windows on the hard disk. This is to be
expected because many clients may be using this particular MetaFrame server
as a Notes workstation.
4. At the Install Options panel, choose Standard Install and point your
Program and Data drive paths to the user’s Windows directory; for example,
\Wtsrv\Profiles\Daniela\Notes and \Wtsrv\Profiles\Daniela\Notes\Data. Select
Program Group and proceed with workstation installation. If the selected user
profile path is not the default, you must provide the profile path name.
5. Repeat Steps 1- 4 for each user who wants to set up the Lotus Notes
Workstation program for Windows.
Lotus SmartSuite 97
Overview
This application note describes how to install Lotus SmartSuite 97 on a
MetaFrame server.
Lotus SmartSuite 97 is a package of 32-bit software applications that operate
together to make work easier and communication more effective. The package
includes Lotus SmartCenter 97 and SuiteStart 97 (command centers that access
desktop applications and application files), Lotus 1-2-3 97 (a spreadsheet
84
MetaFrame Solutions Guide
program), Lotus Word Pro 97 (a word processor), Lotus Approach 97 (a
database), Lotus Freelance Graphics 97 (a presentation graphics package), Lotus
Organizer 97 (a personal information management tool), and Lotus ScreenCam 97
(a show-and-tell communication tool).
Organizer 97 and ScreenCam 97 are not supported under MetaFrame Version 1.8
for Windows 2000. During installation, you are asked if you want to install the
ScreenCam files. Errors in installation will occur if these files are installed.
Software Requirements
K
Microsoft Windows 2000 with Terminal Services installed
K
MetaFrame Version 1.8 for Windows 2000
K
Lotus SmartSuite 97
Installation
There are three ways to install Lotus SmartSuite 97:
K
Standard
K
File Server
K
Network Distribution.
A standard installation places the product on the MetaFrame server’s hard disk.
This allows ICA clients to access the applications from the MetaFrame server
desktop.
A file server installation allows Lotus applications to be shared by multiple “node”
users on networks such as Windows NT or Novell NetWare. The main portion of
the applications resides in one location, or sharepoint, and all node users are
configured to use the applications from that location. All users must have access
to this shared location through a network or on a local machine. This type of
installation is recommended only when using Microsoft Windows 2000 with
Terminal Services.
A distribution installation copies the contents of the Lotus diskettes or CD-ROM
to the MetaFrame server. You can then use the copy on the MetaFrame server to
perform subsequent standard, file server, or network distribution installs. This
installation is useful if you will be running several standard installs to other
machines. You can run Install from the distribution location on the MetaFrame
server or network sharepoint rather than installing from disk or CD-ROM on each
machine.
Û To perform a standard installation of Lotus SmartSuite 97 on a MetaFrame
server
1. Log on to the MetaFrame server as a local administrator.
Chapter 3 Installing Applications
85
2. At a command prompt, type change user /install.
3. Run Install.exe from the SmartSuite 97 CD-ROM.
4. Continue the installation following the directions in the SmartSuite 97 manual,
with the following exception:
Organizer 97 and ScreenCam 97 are not supported under MetaFrame Version
1.8 for Windows 2000. If the files are installed, errors in installation will
occur.
5. After installation, if you are prompted to restart the computer, click Restart.
After the computer reboots, log on to the console as a local administrator.
6. Run Ssuite97.cmd in the %SystemRoot%\Application Compabitility
Scripts\Install folder. Follow the directions on the screen.
7. When application tuning is complete, log off and then log back on for the
settings to take effect.
Û To perform a network distribution installation of Lotus SmartSuite 97 on a
MetaFrame server
1. Log on to the MetaFrame server as a local administrator.
2. Run Install.exe from the SmartSuite 97 CD-ROM.
3. Check the File Server or Multiple User Install check box at the bottom of the
initial Welcome dialog box.
4. Click the Network Distribution Install radio button when prompted for the
type of network installation.
5. Continue the installation following the directions in the SmartSuite 97 Network
Administrator Manual or the SmartSuite 97 Readnet.txt file.
6. The client can now install SmartSuite 97 by accessing Install.exe using the
sharepoint on the network or by logging onto the MetaFrame server where the
installation was executed and running Install.exe from there.
Microsoft Office 97
Overview
This application note describes how to install Microsoft Office 97 on a
MetaFrame server.
Software Requirements
K
MetaFrame Version 1.8 for Windows 2000
K
Microsoft Office 97
86
MetaFrame Solutions Guide
Installation
Û To install Microsoft Office 97 on a MetaFrame server
1. Log on to the console as a local administrator.
2. At a command prompt, type change user /install.
3. Run Setup.exe from the Office 97 CD-ROM.
4. Continue the installation following the directions in the Office 97 manual.
Note If the server drives were remapped during MetaFrame installation, the
following error messages appear when 84% of Microsoft Office 97 is installed:
“Setup tried to create an invalid path using C:\MSoffice\Winword and
Bookshelf.dll.”
“Setup tried to create an invalid path using C:\MSoffice\Winword and
Bshelf94.dot.”
“Setup tried to create an invalid path using C:\MSoffice\Winword and
Bsword.hlp.”
If these error messages appear, click OK. They do not affect installation.
5. After setup, if you are prompted to restart the computer, click Restart
Windows. After the computer reboots, log on to the console as a local
administrator.
6. Run Office97.cmd from the %SystemRoot%\Application Compatibility
Scripts\Install folder.
7. Follow the directions on the screen. When application tuning is complete, log
off and then log back on for the settings to take effect.
Microsoft Office 2000
Overview
This application note describes how to install Microsoft Office 2000 on a
MetaFrame server.
There are three outstanding issues with Office 2000 at the present time:
K
Do not set any features to Run from Network, Run from CD, or Installed on
First Use. These settings do not work in a Windows 2000 server environment
K
Set the Outlook features that you want to install to Run from My Computer.
Set all other features to Not Available
K
Some features of Outlook 2000 do not work properly in the Windows 2000
server environment. See the Microsoft Office Resource Kit Journal on the
Chapter 3 Installing Applications
87
Microsoft Web site at (http://www.microsoft.com/office/ork/2000
/journ/OutlTermSrvr.htm)
Software Requirements
K
Microsoft Windows 2000 with Terminal Services installed
K
MetaFrame Version 1.8 for Windows 2000
K
Microsoft Office 2000
Installation
Û To install Microsoft Office 2000 on a MetaFrame server
1. Log on to the MetaFrame server as an administrator.
2. Copy the Termsrvr.mst transform file from the Office 2000 Resource Kit or
from the Microsoft Web site to a location on the MetaFrame server.
3. Close all applications and ensure no users are connected to the server. Disable
further logons by typing change logon /disable at a command prompt.
4. Open Control Panel.
5. Double-click Add/Remove Programs.
6. In the Add/Remove Programs dialog box, click Add New Programs.
7. Select CD or Floppy to install the program.
The Install Program From Floppy Disk or CD-ROM dialog box appears.
Click Next.
8. Setup automatically detects the location of Setup.exe if installation is from the
CD-ROM. If Setup.exe is located elsewhere; that is, on a network sharepoint,
use the Browse button to point to that location.
9. On the command line, add the following command (separated by spaces) after
Setup.exe:
TRANSFORMS="path\TermSrvr.mst"
This command identifies the Terminal Server transform for Setup to use during
installation. Specify the correct path to the Mst file downloaded in Step 2
above.
Click Next.
10. Proceed with installation until you reach the license agreement. Click Next to
accept the terms of this agreement.
11. If you want to perform a Normal or Default installation, click Install Now.
Allow the Installer to complete the installation and then skip to Step 16.
12. If you want to perform a Custom installation, click Custom Install.
13. Select the location where you want to install Office 2000.
88
MetaFrame Solutions Guide
Note You need at least 259MB on the destination drive to install Office 2000.
14. Select the applications you want to install. The recommended applications are
selected by default. Unselected applications or applications that are marked
unavailable are marked as such because of incompatibility or performance
issues.
15. After you choose which applications to install, click Next and allow the
Microsoft Office 2000 Installer to continue with the installation.
16. When Setup is complete, click Next on the After Installation dialog box.
17. In the Finish Admin Install dialog box, click Finish.
18. Enable user logons by typing change logon /enable at a command prompt.
System Integration
See the Microsoft Office 2000 Resource Kit Journal for additional information
about system integration issues and recommendations. This document is located
on the Microsoft Web site at http://www.microsoft.com.
Novell GroupWise 5.5
Groupwise 5.5 is Novell’s latest version of their groupware software. It is closely
linked with NDS and now supports multiple clients and multiple protocol access,
including SMTP and POP services, and a Web-based GUI client. There are
several installation options for GroupWise, including running a post office on a
Windows NT server. For simplicity, this application note discusses installing
GroupWise Domain and Post Office services on a Novell NetWare server,
although the directions also apply to post offices running on a Windows NT
server. This note is limited to discussing only the Windows 32-bit version of
Novell’s client software.
Test Configuration
K
One NetWare 5.0 server
K
One MetaFrame 1.8 for Windows 2000 server
Software Requirements
K
At least one NetWare 4.1x or higher server with GroupWise 5.5 Domain and
Post Office services installed
K
Windows 2000 Server CD (if Windows Messaging is not installed on the
MetaFrame server)
K
Novell GroupWise 5.5
Chapter 3 Installing Applications
89
Installation
Û To install the GroupWise 5.5 client on a MetaFrame server
1. At a command prompt, type change user /install.
2. Insert the GroupWise 5.5 CD into the appropriate drive and run Setup.exe
from the \Clients\Win32 directory.
3. If the Windows Messaging System files are not installed on your MetaFrame
server, you receive the following message:
“Windows Messaging System is required to run GroupWise 5.5 but is not
found on your computer.”
Click Next to install the Messaging System (requires Windows 2000 Server
CD). The system reboots.
Important After the system reboots, at a command prompt, type change user
/install.
4. Select the Standard installation.
5. Select the location where you want to install GroupWise.
6. Select the components of GroupWise you want to install.
7. Select the group name for the GroupWise application icons.
8. Select the components you want to install into the startup folder. These
components are launched at startup for all users.
9. Select the Language to install.
10. Click Next to begin the file copy process.
11. When the files are copied, exit the installation application without launching it.
12. At a command prompt, type change user /execute to change the mode back to
execute.
Usage
Follow the usage directions in the GroupWise 5.5 User’s Guide.
Troubleshooting
See “Troubleshooting” in the GroupWise 5.5 User’s Guide.
Novell ManageWise Version 2.6
Novell’s ManageWise Version 2.6 was not designed to be a multiuser product. As
a result, there are few options for how to install it on MetaFrame except as it is
installed for Windows NT. It can be made multiuser by manually pointing the
location of the databases that the application uses for storing and retrieving data to
90
MetaFrame Solutions Guide
a virtual location (like a user’s home directory) so that it is different for each user.
If you do decide to do this, you also need to manually copy the database files to
that directory for each user, change each user’s Nms.ini file, and then point the
two database entries to the virtual directory. This means that more disk space is
needed to store each set of databases for each user. Forcing ManageWise to be
multiuser is not recommended.
Test Configuration
K
MetaFrame Version 1.0 server with Novell’s 32-bit client for Windows NT
K
NetWare Version 5 server
K
ManageWise Version 2.6
Software Requirements
K
NetWare Version 4.1x or higher
K
MetaFrame Version 1.0
Installation
Û To install ManageWise Version 2.6 on a MetaFrame server
1. Log on to the MetaFrame server and into the NDS tree as an administrator.
2. On the MetaFrame server, at a command prompt, type change user /install.
3. Run Setup.exe from the ManageWise CD-ROM.
4. After navigating through the introductory screens, select the drive letter that is
mapped to the SYS: volume of your NetWare server.
5. Add a license and choose the type of installation you want (Custom or
Typical).
6. Continue through the summary screen. There is a significant delay in the
installation program after the summary screen. Do not reset the computer;
installation will continue.
7. Have the installation program update the Autoexec.ncf and Net$log.dat files.
8. Complete the installation and exit Setup.exe.
9. At a command prompt, type change user /execute.
Usage
Follow the usage directions in the ManageWise Version 2.6 User's Guide.
Troubleshooting
See the Troubleshooting section in the ManageWise Version 2.6 User's Guide.
Chapter 3 Installing Applications
91
Programming Software
Microsoft Visual Basic Version 5.0 Enterprise Edition
Overview
Microsoft Visual Basic Version 5.0 allows users to create applications for
Microsoft Windows. MetaFrame extends Visual Basic’s capabilities by allowing
multiple users to concurrently create, modify, and run Visual Basic applications.
This application note describes a tested method for installing and using Microsoft
Visual Basic Version 5.0 Enterprise Edition with MetaFrame.
Software Requirements
K
MetaFrame Version 1.8 for Windows 2000
K
Microsoft Visual Basic Version 5.0 Enterprise Edition
Installing Microsoft Visual Basic
1. Log on to the console of the MetaFrame server as an administrator.
2. At a command prompt, type change user /install and press ENTER. This
places the user session in install mode.
3. Run Setup.exe.
4. In Name and Organization Information, enter the appropriate information.
5. Enter the installation location.
6. Select the type of installation: Typical, Compact, or Custom. (For this
installation, Typical was chosen.)
7. When installation is complete, click OK to exit Setup.
8. At a command prompt, type change user /execute and press ENTER.
9. Reboot the computer.
Verifying Installation of Microsoft Visual Basic Version 5.0
To verify that Visual Basic 5.0 is correctly installed and configured:
1. In Windows NT, click Start, select Programs, and click Visual Basic.
2. In New Project, click Existing.
3. In Directories, select x/Vb/Samples/Pguide/Biblio, where x is the directory in
which Visual Basic was installed.
4. In File Name, double-click Biblio.vbp.
5. After the file loads, expand the Forms directory in the upper right side window.
6. Double-click Form1.
92
MetaFrame Solutions Guide
7. When the form loads, verify that the form can be changed and saved.
8. From a MetaFrame session, verify that a user without administrative rights can
repeat Steps 1–7.
Note Visual Basic 5.0 must be installed in a directory where users without
administrative rights have Change or Full Control permissions. Without these
permissions, users cannot create applications that contain databases.
93
C H A P T E R
4
Securing the Enterprise
The third phase of putting a MetaFrame solution into production is to secure your
data, applications, and systems from unauthorized use and attack. This chapter
provides the following sections to assist you:
K
Defining User Rights
K
Protecting Against Viruses and Trojan Horses
K
Auditing System Activity
K
Securing Data and Applications
Defining User Rights
In MetaFrame and Windows 2000, there are several ways to define and enhance
users’ workstation environments. You can define network connections, available
applications, Windows program groups, and Windows desktop appearance. If you
want, you can prevent users from changing the desktop environment you create.
If you need to set up a large number of users who have similar characteristics on a
MetaFrame server, it is convenient to create a user template. This template can be
configured with the desktop configuration, applications, and network drives that
the user needs and can then be used as a pattern to create new users when needed.
User Profiles
The most powerful method you have of managing user environments is through
user profiles. A profile is a file that serves as a snapshot of a user’s desktop
environment. With profiles, you can also restrict users’ ability to change these
settings. You can create profiles for users who have domain accounts and store
these profiles on servers. Each user can have a single profile with one
configuration that is loaded when the user logs on.
94
MetaFrame Solutions Guide
You can control what users can and cannot do on their workstations and on the
rest of the network in several ways. The most important method, and the one most
often utilized, is to use the predefined local groups. Adding a user to one of these
groups gives the user a large set of predefined rights and abilities.
Another way to restrict users’ abilities is by limiting their logon hours and the
network computers they are allowed to use.
Permissions on each file, directory, or printer shared on the network define who
can and cannot access those resources. You can assign permissions to local
groups, global groups, and directly to individual users. It is not recommended that
you assign permissions to individual users, however, because these are hard to
maintain for large numbers of users.
You can monitor what users do by auditing actions and resources. Auditing an
action or resource causes an entry to be written to the Event Log whenever that
action is performed or that resource is accessed.
Although not recommended, you can directly manipulate user rights (also called
rights) that specify what actions local groups, global groups, and users can
perform. Using the predefined local groups and their predetermined sets of rights
serves most needs. If you need to grant rights to other groups or users, or fine-tune
what rights the predetermined groups have, you have the ability to do so.
Finally, you can also control a user’s desktop environment by assigning the user a
profile.
Granting Access to Anonymous Users
If you are going to configure your MetaFrame server for High security and you
want to allow anonymous users access to your system, you must allow Read and
Execute permissions to the following list of files for the Anonymous group. You
also must specifically allow access to any applications you want to be available for
anonymous users. These changes are necessary because anonymous users are not
members of the Users group.
K
%SystemRoot%\System32\Userinit.exe
K
%SystemRoot %\ System32\Winlogon.exe
K
%SystemRoot %\ System32\Winsta.dll
K
%SystemRoot %\ System32\Clib.dll
K
%SystemRoot %\ System32\Regapi.dll
K
%SystemRoot %\ System32\Ulmreg.dll
K
%SystemRoot %\ System32\Ctxsku.dll
K
%SystemRoot %\ System32\Samlib.dll
Chapter 4 Securing the Enterprise
K
%SystemRoot %\ System32\Winspool.drv
K
%SystemRoot %\ System32\Mpr.dll
95
Protecting Against Viruses and Trojan Horses
It is extremely important to prevent intentional intrusions into your computer
network that take the form of viruses and Trojan horses. Viruses are programs that
attempt to spread from computer to computer and either cause damage (by erasing
or corrupting data) or annoy users (by printing messages or altering what is
displayed on the screen) on every computer they infect. Trojan horses are
programs that masquerade as other common programs while they attempt to
capture information.
An example of a Trojan horse is a program that masquerades as a system logon
screen in an attempt to capture user names and password information, which the
writers of the Trojan horse can later use to access the system.
How to Prevent Trojan Horse Attacks
Windows 2000 provides an important safeguard against Trojan horse programs.
Before you can log onto a Windows 2000 computer, you must press the secure
attention sequence, CTRL+ALT+DEL. This series of keystrokes always directly
invokes the Windows 2000 operating system logon screen; Trojan horse programs
are never activated this way. Users provide only their username and password to
the operating system itself. To ensure the effectiveness of this procedure, make
sure your users always press CTRL +ALT+DEL or CTRL +F1 in a MetaFrame
session before logging on at a computer, even if the logon window is already on
the screen.
The secure attention sequence is also required before a user can unlock a locked
workstation or change his or her password.
Another way to guard against Trojan horses is to make your applications Read and
Execute only so that they cannot be replaced with programs that masquerade as
the original program to illegally obtain information.
How to Prevent Virus Outbreaks
Viruses are usually not intentionally introduced to your system. In most cases,
users unknowingly introduce a virus into your network when they obtain what
they believe to be a useful, safe program from another source, such as an online
bulletin board. Many network users are unaware that they can bring viruses into
the network this way. Therefore, one of the best ways to keep your network virusfree is by educating your users.
96
MetaFrame Solutions Guide
Have at least one commercial virus-detection program in use and regularly check
your file servers for viruses. If possible, make virus-detection software available to
your users.
Other ways to protect against computer viruses include the following:
K
Set file permissions to make all applications available on network servers and
workstations Read and Execute only, preventing them from being replaced by
viruses.
K
Before putting a new application or file on the network, put it on a computer
not attached to the network and check it with your virus detection software.
Log on to this computer using a Guest account so that the program being
examined cannot modify any important files.
K
Regularly use a Windows NT-compatible virus scanner. Consider using the at
command to periodically run the virus scanning program; for example, late at
night when no users are logged on.
K
NEVER LEAVE A DISKETTE IN THE DISKETTE DRIVE OF YOUR
SERVER. If the system is rebooted (for example, because of a power failure),
the system will attempt to boot from diskette and become infected.
K
Regularly back up the files on your file servers (and workstations, if possible)
so that damage is minimized if a virus attack does occur.
Auditing System Activity
You can specify that an audit entry be written to the Event Log whenever certain
actions are performed or files are accessed. The audit entry shows the action
performed, the user who performed it, and the date and time of the action. You
can audit both successful and failed attempts at actions, so the audit trail can show
both who actually performed actions on the network and who tried to perform
actions that are not permitted.
Note Event Viewer log entries for logon events now include the computer name
where the logon attempt originated.
The following table lists the categories of events you can choose to audit and what
events are covered by each category. For each of the categories listed below, you
can choose whether to audit only successful actions in that category, failed
attempts to perform actions in that category, both, or neither.
Chapter 4 Securing the Enterprise
Category
Events
Logon and Logoff
Logon attempts, logoff attempts, and the creating and
breaking of network connections to servers.
File and Object Access
Accesses a directory or a file set for auditing in Windows
Explorer; uses of a printer managed by the computer.
Use Of User Rights
Successful uses of user rights and failed attempts to use
rights not assigned to users.
User and Group
Management
Creation, deletion, and modification of user and group
accounts.
Security Policy Changes
Granting or revoking user rights to users and groups, and
establishing and breaking trust relationships with other
domains.
Restart, Shutdown, and
System
Shutting down and restarting the computer, filling up the
audit log, and discarding audit entries if the audit log is
already full.
Process Tracking
Starting and stopping processes on the computer.
97
You specify what types of system events are audited through the Group Policy
Snap-In. The following table shows the types of folder and file accesses you can
audit.
Folder access
File access
Displaying names of files in the folder
Displaying the file’s data
Displaying folder attributes
Displaying file attributes
Changing folder attributes
Displaying the file’s owner and permissions
Creating subfolders and files
Changing the file
Going to the folder’s subfolders
Changing file attributes
Displaying the folder’s owner and
permissions
Running the file
Deleting the folder
Deleting the file
Changing folder permissions
Changing the file’s permissions
Changing folder ownership
Changing the file’s ownership
98
MetaFrame Solutions Guide
The Auditlog Utility
The Auditlog utility is used to generate reports of logon/logoff activity for a
MetaFrame server based on the Windows 2000 security Event Log. To use
Auditlog, logon/logoff accounting must be enabled.
Syntax
Auditlog
[username|session] [/before:mm/dd/yy] [/after:mm/dd/yy]
[/write:filename | [/time | /fail /all | /detail]]
[/eventlog:filename]
Auditlog
[/clear[:backup_log_file_name]]
Auditlog
[/?]
Parameters
username
Generates a report of logon/logoff activity for the specified username.
Session
Generates a report of logon/logoff activity for the specified session.
/before:mm/dd/yy
Reports only on logon/logoff activity before mm/dd/yy.
/after:mm/dd/yy
Reports only on logon/logoff activity after mm/dd/yy.
/write:filename
Specifies the name of an output file. Creates a comma-delimited file that can
be imported into an application such as a spreadsheet to produce custom
reports or statistics.
/time
Generates a report of logon/logoff activity for each user, displaying
logon/logoff times and total time logged on. Useful for gathering usage
statistics by user. (Not used for with /fail or /detail.)
/fail
Generates a report of failed logon/logoff attempts. (Not used with /time or /all.)
/all
Generates a report of all logon/logoff activity. (Not used with /fail.)
/detail
Generates a detailed report of logon/logoff activity. (Not used with /time.)
Chapter 4 Securing the Enterprise
99
/eventlog:filename
Specifies the name of a backup security event log to use as input to Auditlog.
Create a backup security log from the Event Log Viewer or with the
Auditlog/Clear:filename utility, which saves the current event log in filename
and clears the event log.
/clear[:backup_log_file_name]
Closes the current logon/logoff log file, optionally saves it as filename (for
back up purposes), and opens a new log file.
/? (help)
Displays the syntax for the utility and information about the utility’s options.
Remarks
Auditlog gives the administrator a powerful tool to verify and maintain system
security and correct usage. The information can be extracted as reports or as
comma-delimited files that can be used as input to other programs.
You must enable logon/logoff accounting in order to collect the information used
by Auditlog. To enable logon/logoff accounting:
1. Click Start, Programs, and then Administrative Tools to open Local
Security Policy.
2. On the Tree tab (left pane), select Local Policies and then Audit Policy.
3. Right click Audit Logon Events and Audit Account Logon Events, then
select Security.
4. Select Success and Failure under Local Policy. Click OK to save your
changes.
Securing Data and Applications
SecureICA Services
Citrix SecureICA Services enhances the security of ICA connections by allowing
users to access Citrix MetaFrame servers over secure communications channels.
This section provides details about the SecureICA encryption software.
SecureICA Features
Citrix SecureICA contains features to enhance the security of data communication
across any type of connection supported by ICA. SecureICA Services uses the
RC5 encryption algorithm from RSA Data Security, Inc. The Citrix server and
ICA Client use the Diffie-Hellman key agreement algorithm with a 1024-bit key
to generate RC5 keys.
100
MetaFrame Solutions Guide
SecureICA Services offers the following features:
K
128-bit encryption during user authentication
To ensure account security, SecureICA uses 128-bit encryption during the
authentication phase.
K
Strong session encryption and flexible encryption support
The 128-bit encryption level is considered virtually impossible to break with
current technology. The 40-bit and 56-bit encryption levels require a
significant investment in time and money to break with a brute force attack.
The availability of 56-bit encryption for global use provides an international
data encryption solution.
K
Per-connection encryption support
Different encryption levels can be used for each connection. For example, a
dial-up connection with 40-bit encryption and a LAN connection with 128-bit
encryption can be used simultaneously.
K
Cross client compatibility
SecureICA Clients are available for DOS, Win16, Win32, and the ICA Web
Client Netscape Plug-in and Internet Explorer ActiveX control.
K
Enforceable encryption levels
The Citrix server administrator can enforce minimum encryption levels on a
per-connection and per-user (WINFRAME only) basis. ICA Client connections
are allowed only if the ICA Client is using at least the minimum level.
K
Dynamic key generation
The SecureICA server and client generate unique RC5 keys for each
connection. A system service periodically generates new Diffie-Hellman
parameters in the background, providing an enhanced level of security.
Understanding Encryption
Encryption is the process of obscuring the true meaning of a message so that only
the intended recipient can understand it.
The encryption process transforms data into a form that is unreadable to anyone
without a special piece of information. This information allows the recipient to
unscramble or decrypt the message. This piece of information is called a key.
The process used to create the scrambled message is called an encryption
algorithm.
There are two general types of encryption algorithms. A symmetric key algorithm
uses the same key to encrypt and decrypt the scrambled data. This means the
secret key must never be revealed to anyone but the intended recipient of the data.
The advantage of a symmetric key algorithm is its speed.
Chapter 4 Securing the Enterprise
101
The disadvantage of a symmetric key algorithm is that the secret key used to
encrypt the data must be sent to whoever needs to decrypt the data. If there was a
secure channel to transmit the key, the data could be sent the same way and
encryption would be unnecessary.
The second type of algorithm is a public-private key algorithm. It relies on certain
mathematical properties to create a set of keys, such that one key can only encrypt
data and the other key can only decrypt the data. The encrypt-only key is called a
public key. The decrypt-only key is called a private key. A message encrypted
with the public key can only be decrypted by the private key.
The public key can be openly transmitted without compromising the security of
the encrypted data. Knowing the public key does not allow anyone to decrypt the
encrypted data.
Many modern encryption programs combine the two types of algorithms. A
symmetric key algorithm encrypts the data. The secret key is exchanged using a
public-private key algorithm. This provides the speed of a symmetric key
algorithm with the security of a public-private key algorithm.
RC5 is a symmetric key algorithm. The Diffie-Hellman key agreement algorithm
is a public-private key algorithm.
Understanding Government Export Restrictions
The United States government restricts the export of strong cryptography.
Encryption strength is usually defined by the size of the keys used to encrypt and
decrypt data.
Encryption products using keys greater than 56 bits are usually restricted from
export. However, larger keys can be exported for use in authentication products.
SecureICA Services comes in two versions: North American and Global. The
North American version of SecureICA Services uses a 128-bit key during user
logon. A selectable 40-, 56-, or 128-bit key is used to encrypt the remainder of the
session. The Global version uses a 128-bit key during user logon. A 56-bit key is
used to encrypt the remainder of the session.
United States export policy regarding encryption has been known to allow for
export of stronger data keys to subsidiaries of North American based financial
institutions. The export of these stronger keys must be applied for and is
controlled on a per-application basis.
102
MetaFrame Solutions Guide
Third-Party Security Products
This section contains detailed installation and integration information for the
following third-party security devices:
K
Security Dynamics ACE/Server Software
K
VTCP/SECURE Software
These security devices control remote access to the MetaFrame server through
proprietary access control software. The remote user dials in or connects over the
network to obtain access to the MetaFrame server by successfully completing an
authentication dialog with the security device. Once the user is authenticated, the
security device is transparent to the user.
Several general configuration issues are encountered when using third-party
security devices:
K
For the MetaFrame server to properly detect when a connection is made or
broken, the security device must supply modem signals that can be used by the
MetaFrame server to detect when a connection is made or terminated. This
varies depending on the security device.
K
If needed, configure the client PC and the client software to operate properly
with the security device. Some security systems require software or hardware
on the client PC.
K
The MetaFrame server and the security device itself must be secured from
unauthorized tampering. It is recommended that you place all hardware in a
secured room to prevent unauthorized personnel from acquiring access to the
equipment.
K
Most third-party security devices secure remote Dial-In users (or local, directly
connected asynchronous users) only. You need to consider how to secure your
system from improper access by LAN- or WAN-connected users.
The third-party security devices discussed in this section control remote access to
the MetaFrame server through proprietary access control software. Details about
access control hardware are available through the individual hardware
manufacturers. The software access control devices most often used are based on
one of two premisses.
The first method is based on secondary user authentication. In addition to the
Primary Windows Authentication, the access control software adds another layer
of authentication based on separate user databases. This software control method
decreases the likelihood of compromised passwords.
The next method of software access control is based on encrypting data
transmissions. In this case, the access control software provides a layer of
authentication and then encypts all data packets between the client and server.
Chapter 4 Securing the Enterprise
103
This software control method prevents eavesdropping on unsecure phone lines or
networks.
The access control software listed in this chapter implements one of these two
methods to provide security and access control.
Security Dynamics ACE/Server
The Security Dynamics ACE/Server security software provides SecurID
identification and authentication of users on TCP/IP networks. There are two
pieces to the ACE/Server security software program: the ACE/Server Host and the
ACE/Agent for Windows 2000.
Note The term ACE/Agent has replaced ACE/Client in most of Security
Dynamics products and literature.
The ACE/Server host software operates on Windows Terminal Server and on a
wide variety of UNIX-based platforms, while the ACE/Agent for Windows 2000
runs on a MetaFrame server. When used in conjunction with a SecurID token,
ACE/Server centrally authenticates a user’s identity, allowing only authorized
users access to protected network resources.
Note The Security Dynamics ACE/Server uses the Progress database. This
database does not function on multiprocessor machines.
The ACE/Server is a secondary security solution that supplements Terminal
Server’s own base security. This additional security can be configured for remote
control logons (sessions) and remote access logons (RAS). The ACE/Server acts
as a database storing PIN tokens for authenticating users logging onto a
MetaFrame server. The ACE/Agent is installed on the MetaFrame server and is
integrated into the session and RAS logons. Upon logon to the MetaFrame server,
the user is challenged by both MetaFrame security and SecurID passcode security.
Requirements
The ACE/Server host software operates on Terminal Server and a wide variety of
UNIX platforms. This note describes only the configuration tested in the Citrix
labs.
Note ACE/Server Version 3.3 is not supported on Windows 2000. Therefore,
only the ACE/Server host software installation on UNIX Solaris is discussed here.
104
MetaFrame Solutions Guide
Security Dynamics SecurID
ACE/Server UNIX Solaris Version
Hardware Requirements
K Sun SPARCstation with CD-ROM drive and 4mm DAT tape
Software Requirements
K Solaris Version 2.5 (UNIX operating system)
K
Progress Software Database
K
Security Dynamics ACE/Server Version 3.3
K
Security Dynamics ACE/Agent for Windows NT Version 4.1 or higher
Citrix MetaFrame and ACE/Agent for Windows 2000
Hardware Requirements
K MetaFrame 1.8 for Windows 2000 server
Software Requirements
MetaFrame Version 1.8 for Windows 2000 (see “MetaFrame Server
Configuration” later in this section)
K
K
Security Dynamics ACE/Agent for Windows 2000
Integration Overview
Follow the steps below to install ACE/Server on a Solaris UNIX platform.
1. Install the Solaris UNIX operating system.
2. Install the Progress Database.
3. Install and configure the ACE/Server.
4. Configure a Windows 2000/MetaFrame server (detailed below).
5. Install and configure the ACE/Agent for Windows 2000 on the MetaFrame
server (detailed below).
Windows 2000/MetaFrame Server Configuration
For detailed information about MetaFrame server equipment selection and
software installation, see the Citrix MetaFrame documentation.
1. Install MetaFrame following the instructions in the Citrix documentation.
Chapter 4 Securing the Enterprise
105
Notes The TCP/IP protocol must be installed on the MetaFrame server in
order to communicate with the ACE/Server installed on the Sun
SPARCstation.
For asynchronous modem connections, the MetaFrame server must have an
intelligent multiport board, such as a Digi International, installed and
configured.
For remote node connections, RAS must be installed on the server. (Remote
MetaFrame ICA Dial-In connections do not use RAS.)
2. Reboot the server.
Installing ACE/Agent for Windows 2000 on a Windows 2000/MetaFrame
Server
1. Obtain a copy of the Sdconf.rec file and place it in the %SystemRoot%
\System32 directory on the Windows 2000/MetaFrame server. This allows you
to set security options and test the installation without having to reboot
beforehand.
2. Make sure that the MetaFrame server is configured as a client machine in the
ACE/Server database. If this is the first authentication for this MetaFrame
server, verify that the Sent Node Secret checkbox is unchecked.
3. If the ACE/Agent for Windows 2000 was installed on the MetaFrame server
but was reconfigured; that is, the IP address has changed, be sure to delete the
Node Secret file. This file, Secureid, is stored in the %SystemRoot%\System32
directory.
4. Insert the Windows 2000 CD in the CD-ROM drive of the MetaFrame server.
The ACE/Agent for Windows 2000 Setup is located in the Valuadd\3rdparty
\Security\Sdti directory. Proceed with the installation as described in the
ACE/Agent documentation. Run Setup using the Add/Remove Programs
applet in the Control Panel. The ACE/Agent can be configured to support
remote control connections, remote node connections, or both.
5. When prompted to set security options, do so. For remote control users, select
Enable Local Access Security on the Local tab. To verify that a user can
authenticate, select Test Authentication with ACE/Server on the Main tab.
Authentication problems occur here if the MetaFrame server is not configured
as a client in the ACE/Server database, if the Sdconf.rec file is outdated, or if
the Securid (Node Secret) file is outdated.
6. If you intend to use RAS as a connectivity option on the MetaFrame server,
select Enable Remote Access Security. This option is disabled if the RAS
server is not installed.
Note To have the ACE/Server authenticate everyone who connects through
RAS, select Challenge All Users on the Remote tab.
106
MetaFrame Solutions Guide
7. After configuring security options, the installation asks whether you want to
add users to the Security Dynamics user groups that have been created (see
“Usage” later in this section for more details about these groups). Click Yes to
start the ACE/Agent for Windows 2000 Snap-In and create users to add to
these groups or to add existing users. Users configured as such are required to
provide SecurID authentication.
Note If the ACE/Agent is already installed, the above configuration is
accomplished with the ACE/Agent for Windows 2000 Snap-In by clicking
Start, Programs, and then Administrative Tools. Select System Tools,
followed by the SecurID icon on the menu bar.
Connectivity Matrix
The connectivity matrix below identifies currently supported configurations for
using the SecurID product and ICA Client programs for various operating systems
and protocols.
Client
operating
system
ICA
Client
Protocol
Session*
RAS**
DOS
DOS
IPX
X
X
NetBIOS
X
TCP/IP
X
Async null modem
X
Async Dial-In
X
Windows 3.x
Windows 95/NT
Win16
Win32
IPX
X
NetBIOS
X
TCP/IP
X
Async null modem
X
X
X
X
Async Dial-In
X
IPX
X
X
NetBIOS
X
X
TCP/IP
X
X
Async null modem
X
Async Dial-In
X
* Session connections are remote control connections made using the Citrix ICA Client
Independent Computing Architecture (ICA) protocol.
**RAS connections are remote node connections made using the Citrix MetaFrame Dialup
Manager for DOS, MetaFrame Dialup Manager for Windows, Windows 95 Dialup
Networking, or Remote Access Dialout for Windows NT in conjunction with RAS configured
on the MetaFrame server.
Chapter 4 Securing the Enterprise
107
Usage
Remote Control Connections
1. Select a configuration from the connectivity matrix above and set up a
supported client configuration. (For instructions about installing and
configuring a connection with an ICA Client, see the Citrix MetaFrame
documentation.
2. Initiate a connection to the MetaFrame server using one of the supported
protocols. The standard MetaFrame logon screen appears.
3. Log on to the MetaFrame server. If the user specified belongs to the local user
group Sdlocal or domain Sdlocal (see “Domain Controller Installations”
below), you must provide a SecurID authentication passcode.
4. Respond to the SecurID challenge with a passcode from a SecurID token card.
Bypassing Authentication on a Per-Session Basis
Windows 2000 contains a fix that allows you to configure sessions to bypass
SecurID logon authentication (not RAS authentication) on a per-session basis. If
the user is a member of the Sdlocal group or the server is configured to challenge
all users, the user is not challenged. To bypass SecurID authentication for a
session:
1. Start Citrix Connection Configuration.
2. Select a session.
3. Select Advanced Session.
4. Check the Use Default Authentication box and click OK to save the changes.
Remote Node Connections
1. Configure a machine as specified in the above configuration matrix. Dial into a
RAS port. Be sure that the client software is configured to display terminal
mode after dialup. This step is essential or you cannot log on. Each user
configured in the Sdremote or domain Sdremote user groups is prompted for
the domain, username, and password.
2. Upon successful authentication, your username and password are taken from
the RAS client’s configuration and verified by the network as with a normal
RAS logon.
Note Your RAS logon username and your ACE/Server name must be
identical.
Domain Controller Installations
If the ACE/Agent software is installed on a MetaFrame server that is also a
domain controller, two additional groups are created during the installation:
domain Sdremote and domain Sdlocal. These two groups allow users on any
108
MetaFrame Solutions Guide
machine that uses the domain controller to be authenticated using the SecurID
solution.
Note Any machine, whether local or domain, on which you want to use SecurID
authentication must have the ACE/Agent installed.
Two example configurations are shown below:
Example 1
An ICA Client, using RAS, connects to the MetaFrame server Server_1 in the
domain DC_EX and the user specified is a member of DC_EX’s domain
Sdremote user group. The user is challenged with the SecurID authentication.
Note In this example, both Server_1 and DC_EX must have the ACE/Agent
installed.
Example 2
An ICA Client, using ICA remote control, connects to the MetaFrame server
named Server_2 and logs into domain DC_EX2. The user is a member of
DC_EX2’s domain Sdlocal group. The user is challenged with the secondary
authentication.
Note Both Server_2 and DC_EX2 must have the ACE/Agent installed.
Troubleshooting
When I try to connect to the MetaFrame server using RAS, it drops the connection
whenever it tries to verify the username and password on the network.
Do not forget to turn on the terminal mode after dialin option on the RAS client
side. This option is essential or you will not be prompted by the SecurID
authentication.
When I try to log on to the MetaFrame server using a RAS or session connection,
I get a “User access denied” message. The ACE/Server log shows the message
“Node verification failed.”
There are two possible causes. First, check to see if the client configuration on the
ACE/Server has the Sent Node Secret box checked. If it does, uncheck it. Next,
on the MetaFrame server, look in the %SystemRoot%\System32 directory. If the
file Securid exists, delete it. Try to log on again. If you still get the failure, delete
the Sdconf.rec file from the %SystemRoot%\System32 directory and obtain a
current copy from Security Dynamics.
Chapter 4 Securing the Enterprise
109
When I try to start Sdadmin on the ACE/Server, I get a “user root not found”
message even though I have a root user on the server.
This happens only on the first logon after installation, if ever, and it means that the
database is not yet ready to be administered. Run Sdcreadm on the ACE/Server
and then try again.
I am trying to get a user to authenticate but the token is not being accepted. I tried
to resynchronize the card in the database but that gives an Invalid tokencode
error message.
The database is not receiving a value in the range of values that it will accept.
Typically, this means that the time zone or the date and time configured on the
ACE/Server are not correct. Check the date and time that the ACE/Server reports
in the System, Edit System Parameters menu. If the time shown there is not
correct, make the appropriate adjustments to either the Timezone variable
(Start\Control Panel\Date+Time icon) or to the date and time (using the Date
command).
I have dialup or network users who do not have SecurID cards. How can they
connect without being challenged by the ACE/Server?
As an administrator, run Citrix Connection Configuration and edit a session. Click
Advanced Session. Check the Use Default Authentication box and click OK to
save the change.
During installation, I get an “Operating system not supported” error when I run
Sdsetup and Sdnewdb.
The documentation provided with the ACE/Server includes a Readme stating that
certain operating systems (including newer versions of Solaris) are not included in
the installation scripts. It also includes directions for editing those scripts (Sdsetup
and Sdnewdb) to make them support those operating systems. Follow the
instructions in the ACE/Server documentation.
Solaris Installation
Installation of the Solaris operating system is detailed in the documentation
provided by Sun Microsystems; however, some general steps are listed below.
1. Place the Solaris installation CD in the CD-ROM drive and turn on the
computer. If a previous installation of Solaris or SunOS exists on the machine,
interrupt the boot process (with STOP+A), specify N for new command mode,
and type boot cdrom.
2. From this point on, you are in the Solaris installation procedure. The three
parts of the installation procedure are:
K
Machine Identification
K
Software Installation
110
MetaFrame Solutions Guide
K
Post Installation.
The following questions and answers are important to ensure that both
Progress and ACE/Server function correctly:
Machine Identification
Question
Answer
Networked
Yes
Specify Time Zone By
Offset from GMT
Install Software
Question
Answer
Software Group
<-Entire Distribution
Be sure to specify a valid root password.
3. When the installation is complete, make the following modification:
cd /etc
vi system (or use whatever editor you like) and add the following lines to the
end of the file:
Set
Set
Set
Set
Set
Set
Set
SEMSYS:SEMINFO_SEMMNI
SEMSYS:SEMINFO_SEMMNS
SEMSYS:SEMINFO_SEMMNU
SEMSYS:SEMINFO_SEMMSL
SHMSYS:SHMINFO_SHMMAX
SHMSYS:SHMINFO_SHMMNI
SHMSYS:SHMINFO_SHMSEG
=
=
=
=
=
=
=
64
200
100
50
16777216
100
16
4. The Timezone, as set up by the default installation, will not work correctly
with the ACE/Server’s reliance on GMT (UTC) time. Change the
/Etc/Default/Init file to match your particular time zone configuration. In the
Eastern US, change the TZ field in that file to EST5EDT4; this indicates
Eastern Standard Time, with an offset from UTC of five hours, and Eastern
Daylight Time with an offset from UTC of four hours.
5. Modify the /Etc/Services file to include the two lines for the ACE services.
They are as follows:
securid
5500/udp
# ACE/Server
securidprop
5510/tcp
# ACE/Server Slave
Progress Database Installation
Installation of the Progress Database is detailed in the documentation provided by
Security Dynamics; however, some general steps are listed below.
Chapter 4 Securing the Enterprise
111
1. Log on as root user to the Solaris machine. Insert the Progress Database 4mm
DAT tape into the tape reader. From the console, execute these commands:
cd /mnt
cpio -iudcvBm < /dev/rmt/0m
/proinst
2. Enter the product license Serial Numbers, Reference Numbers, and Control
Numbers from the product license addendum sheet that comes with the
database package. When done, press Ctrl+E.
3. Specify the installation directory and let the installation continue. When asked
if you want to copy scripts, answer N or No.
4. Install the patch for the Progress Database. Insert the Progress Patch DAT tape
and execute these commands:
md temp
cd temp
tar -xv
Note The process takes several minutes.
5. Follow directions in the Readme.pro file created by the previous command.
Use this file to create a shell script (batch file) that updates everything in one
command.
Solaris ACE/Server Installation
Installation of the ACE/Server is detailed in the documentation provided by
Security Dynamics; however, some general steps are listed below.
1. Place the ACE/Server tape in the DAT drive. On the drive where you intend to
install the ACE/Server, execute these commands:
mkdir sds
cd sds
tar -xv
2. Edit the Sdsetup and Sdnewdb files to modify the versions of Solaris that are
supported.
3. Execute Sdsetup and follow the installation instructions, answering the
questions as they apply to your system and configuration.
Solaris ACE/Server Configuration
Configuration of the ACE/Server is detailed in the documentation provided by
Security Dynamics; however, some key details are listed below.
1. From the ACE/Server console, start the Sdadmin program.
112
MetaFrame Solutions Guide
2. From the Tokens menu, select Import and import the token file(s) you intend
to use for this integration.
3. Select Site and then Add. This is a container for machines you intend to use
from this location. It is a client machine management tool, not a physical
separation.
4. Add a group. A group is a way to easily associate a selection of client
machines with a selection of users. Any user who is designated as a member of
a group can log on and get authenticated by any machine also contained in that
group.
5. Add one client entry for each machine that will use the SecurID secondary
authentication. Each machine’s IP address must be resolvable by the server,
whether by DNS, NIS, or simply the /Etc/Hosts file. The machine’s type is
dependent on the operating system. For Windows 2000 and MetaFrame
machines, it is NetOS. Be sure to add the clients to the group created above.
6. Add a user entry for each user who will use SecurID authentication. The
default shell variable is not relevant for users who will log on from Windows
2000 and MetaFrame hosts but is required for users who will log on from a
UNIX client. Be sure to add the users to the group configured in Step 4 above;
all can log on from any client configured in that group.
VTCP/SECURE Software
Overview
VTCP/SECURE is a security software package that allows remote users to
connect to a MetaFrame server over untrusted networks for a secure remote
MetaFrame session. This is done by creating a virtual private network that
transparently encrypts and validates all data between the Citrix ICA Client and the
MetaFrame server.
VTCP/SECURE provides encryption, authentication, and authorization to protect
TCP networked computers and incorporates a number of security management
features. The encryption, authentication, and key exchange algorithms include
DES 40, Triple DES, and Diffie-Hellman. Authentication, authorization, and
accounting services are provided through TACACS+ or the internal one-time
password authentication service.
Software Requirements
K
MetaFrame Version 1.8 for Windows 2000
K
VSGATE Server Software Version 2.1a or higher
K
VSCLIENT Client Software Version 2.1a or higher
K
TCP Client WinSock Version 1.1 or higher
Chapter 4 Securing the Enterprise
113
Note Client systems require a minimum of 8MB of RAM for VTCP/SECURE
and the ICA Client software.
Installation Overview
VTCP/SECURE is composed of two parts: the VSCLIENT software that is
installed on the client machine and the VSGATE software that is installed on a
MetaFrame server or a gateway server to the corporate Intranet. VTCP/SECURE
gateways can reside on the UNIX, Windows NT, or Windows 95 operating
systems. These gateways allow network connectivity to a MetaFrame server
residing on the corporate Intranet. The gateways decrypt data from the remote
client for communication on the local Intranet. The VSCLIENT software can
reside on Windows operating systems compliant with WinSock 1.1 or higher.
The procedures below describe how to install the VTCP/SECURE gateway
software on MetaFrame and how to install and use the VSCLIENT software with
Windows 95. In this example, the MetaFrame server itself is directly connected to
the Internet without an intervening gateway server. For ICA Client configurations,
see the connectivity matrix below. For more detailed information about
VTCP/SECURE, see the VTCP/SECURE Administrators Guide, the Vamin2.hlp
file included with the VTCP/SECURE software, or contact Infoexpress, Inc.
Note When connecting any MetaFrame server to an untrusted network, secure
your MetaFrame server using the procedures outlined in the MetaFrame
documentation.
Quick Start Installation
1. Install the VSGATE software on a MetaFrame server with TCP/IP sessions
and Internet networking access.
2. Configure the VSGATE software.
3. Install the VSCLIENT software on a Windows 95 system.
4. Create a VSCLIENT connection entry to the MetaFrame server.
5. Install the ICA Win32 Client.
6. Use Program Neighborhood Custom Connection to create a remote TCP/IP
network connection entry.
Quick Start Usage
1. Use Dial-up networking from the Windows 95 client machine to dial into an
Internet Service Provider (ISP) for TCP connectivity or use your existing
TCP/IP network connection.
2. Run the VTCP/SECURE client software from Windows 95, creating a secure
communications channel to the MetaFrame server.
114
MetaFrame Solutions Guide
3. Run the ICA Win32 Client and connect to the MetaFrame server.
The following matrix lists the possible client operating systems and the
recommended ICA Clients to use. The VSCLIENT software for Windows works
on all of the listed operating systems over TCP/IP remote node dial up or network
TCP/IP client connections only. Direct ICA dialin and other network protocols are
not supported by VTCP/SECURE software.
Client operating system
ICA Client
Windows 3.1 (with WinSock 1.1 or higher)
ICA 16-bit Client for Windows
Windows for Workgroups (with WinSock 1.1
or higher)
ICA 16-bit Client for Windows
Windows 95
ICA 32-bit Client for Windows
Windows NT 3.51 or 4.0
ICA 32-bit Client for Windows
Installation
VSGATE Software
1. Log on to the MetaFrame server as an administrator.
2. At a command prompt, type change user /install.
3. Install the VSGATE software.
4. During the VSGATE software installation, select to install the software as a
service and enter the TCP/IP subnet mask of the MetaFrame server.
5. Following installation, at a command prompt, type change user /execute.
6. Reboot the MetaFrame server and log on to the server as an administrator.
7. Run Vsadmin from the VSGATE program group.
8. From the Vsadmin program, select 5 to manage local passwords.
9. Select 1 to add a user.
10. Enter the new username.
11. Select the default settings except for the Access Filter settings.
12. Select 1 for Netops for Access Filter settings.
13. Save the configuration.
VSCLIENT Software
1. On a Windows 95 client, install the VTCP/SECURE software.
2. During VSCLIENT installation, select System Wide.
3. Reboot the Windows 95 client.
Chapter 4 Securing the Enterprise
115
Usage
1. From the Windows 95 client machine, dial into the ISP for Internet access
using Windows 95 Dial-up Networking or, if available, use an existing TCP/IP
network connection.
2. Select the VSCLIENT application from the VSCLIENT program group.
3. Click Connect.
4. Enter the name or IP address of the MetaFrame server and click OK. (Leave
the port address empty.)
5. Once communication to the VSGATE server is established, you are prompted
for the VTCP/SECURE username and password you created in Vsadmin.
With proper authentication, a “Smart Tunnel” or virtual private network is
created between the remote client and the MetaFrame server.
6. Run the ICA 32bit Client and create an entry to connect over TCP/IP to the
MetaFrame server.
7. Double-click the new entry to establish a secure TCP/IP network connection to
the MetaFrame server.
116
MetaFrame Solutions Guide
117
C H A P T E R
5
Connecting to the Web
If you are publishing applications for end-users who connect to your Citrix servers
over the Internet or your organization’s Intranet, the next phase of deploying your
solution is to set up Citrix Web Computing. This chapter provides the following
information to assist you:
K
An introduction to Citrix Web Computing
K
Requirements for supported Web browsers for Citrix Web Computing
K
Requirements for supported Web servers for Citrix Web Computing
K
A sample procedure for setting up Citrix Web Computing
An Introduction to Citrix Web Computing
Citrix Web Computing consists of four components:
K
Web server. The Web server software can run on the Citrix server or on a
separate computer. The only step needed to enable the Web server for Citrix
Web Computing is to register ICA as an application MIME type. Any Web
server that supports application MIME types can be used.
One important distinction that sets Citrix Web Computing apart from the CGI
and Microsoft Active Server Pages models is that the Web server does not
execute any additional software to support Citrix Web Computing. The Web
server contains ICA files that are downloaded to the Web browser for
processing by the Citrix ICA Web Client.
K
Citrix server. To the Citrix server, an ICA connection from a Web client is no
different than a connection from any other ICA Client. The same security and
user configuration guidelines used for published applications apply to Web
Computing.
By default, the ICA connections created during Setup support an unlimited
number of connections. See your Windows 2000 documentation for
instructions about how to limit the number of concurrent users.
118
MetaFrame Solutions Guide
Fifteen anonymous user accounts are created automatically during installation.
If more than 15 anonymous users are logged in, each additional anonymous
user account is dynamically created. By default, the anonymous user limit is
99. See the MetaFrame release notes for instructions about how to change this
limit.
K
Citrix ICA Web Clients. The ICA Web Clients work with any Web browser
that supports configurable MIME types. The Citrix ActiveX control for
Internet Explorer and Plug-in for Netscape Navigator and Netscape
Communicator allow these Web browsers to display ICA sessions embedded
in Web pages.
When a user clicks a hyperlink to an ICA file or loads an HTML page
containing an embedded ICA session, the Web browser passes the ICA file to
the ICA Web Client, which then initiates a session on the Citrix server using
the information contained in the ICA file and the application definition. Video,
keyboard, and mouse data are passed between the session on the Citrix server
and the ICA Web Client using the Citrix ICA protocol.
K
ICA file. ICA files are text files containing a series of command tags. These
tags define the attributes of the session to be launched on a Citrix server. The
Web browser downloads the ICA file and passes it to the ICA Web Client,
which then initiates the ICA session on the Citrix server.
You can use either Published Application Manager or the ICA File Editor to
create ICA files.
For more information about Citrix Web Computing and the ICA Web Clients, see
the Citrix ICA Client Administrator’s Guide for the Windows Web Clients.
Web Browsers for Citrix Web Computing
Microsoft Internet Explorer Version 4.0 for Windows NT
Microsoft Internet Explorer Version 4.0 is a World Wide Web browser with an
integrated set of tools for every type of user, from basic services like e-mail to
conferencing, broadcasting, and Web-authoring capabilities.
Requirements
Hardware Requirements
K Internet connection (modem, Ethernet card, ISDN, etc.)
Software Requirements
Microsoft Internet Explorer Version 4.0 for Windows NT
K
Chapter 5 Connecting to the Web
119
Note Active Desktop is currently not supported.
Configuration
If the Citrix ICA Web Client is not installed, Internet Explorer automatically
downloads and installs the client from the Web server. Copy the Citrix ICA Web
Client files to the local Web server. By default, the HTML files generated by
Citrix’s Published Application Manager wizard point to www.citrix.com. Change
this link to point to the location where the Citrix ICA Web Client was copied on
the local Web server.
1. The first time Internet Explorer downloads the Citrix ICA Web Client, a
window labeled “Security Warning” appears.
2. You are asked if you want to install and run the Citrix ICA Web Client.
3. Click Yes. The Citrix ICA Web Client is installed and the session launches.
Microsoft Internet Explorer Version 5.0 for Windows NT
Microsoft Internet Explorer Version 5.0 is a World Wide Web browser with an
integrated set of tools for every type of user, from basic services like e-mail to
conferencing, broadcasting, and Web-authoring capabilities. Internet Explorer
Version 5.0 is installed by default when you install a Windows 2000 server.
Requirements
Hardware Requirements
K Internet connection (modem, Ethernet card, ISDN, etc.)
Software Requirements
K Microsoft Internet Explorer Version 5.0 for Windows NT
Internet Explorer 5.0 does not need any configuration for ActiveX support of the
Citrix ICA Web Client. HTML files with embedded or launched ICA connections
can be opened without additional configuration.
Netscape Navigator Version 3.04, 32-bit Version
Netscape Navigator Version 3.04 is a multimedia World Wide Web browser for
HTML documents on the Internet and on Intranets. Navigator integrates Web
exploration, e-mail, news groups, chat, and FTP capabilities. There is platform
support for live on-line applications. Navigator supports Live Objects, frames,
Java applets, and Netscape inline plug-ins.
120
MetaFrame Solutions Guide
Requirements
Hardware Requirements
K
Internet connection (modem, Ethernet card, ISDN)
Software Requirements
K
Netscape Navigator Version 3.04, 32-bit Version
Configuration
If the Citrix ICA Web Client is not installed, Netscape Navigator automatically
downloads and installs the client from the Web server. Copy the Citrix ICA Web
Client files to the local Web server. By default, the HTML files generated by the
Citrix Published Application Manager wizard points to www.citrix.com. Change
this link to point to the local Web server where the ICA Web Client is installed.
1. The first time Netscape Navigator downloads the Citrix ICA Web Client, a
window appears stating that a plug-in is required.
2. You are asked if you want to download the Citrix ICA Web Client plug-in.
3. Click Yes to download the ICA Web Client to the destination directory.
4. Close the browser and run the plug-in (Wfplug32.exe) from the directory
where it is installed.
5. When the ICA Web Client plug-in is successfully installed, the browser can
open and launch ICA connections from the HTML files.
Netscape Communicator Version 4.61, 32-bit Version
Netscape Communicator Version 4.61 is a World Wide Web browser designed for
corporate users with support for calendars, mainframe access, and centralized
management of Communicator. It combines Netscape Navigator with a suite of
Internet tools for mail, news and discussion group access, online conferencing,
Web page creation, and instant messaging.
Requirements
Hardware Requirements
K
Internet connection (modem, Ethernet card, ISDN)
Software Requirements
K
Netscape Communicator Version 4.61, 32-bit Version
Chapter 5 Connecting to the Web
121
Configuration
If the Citrix ICA Web Client is not installed, Netscape Communicator
automatically downloads and installs the client from the Web server. Copy the
ICA Web Client files to the local Web server. By default, the HTML files
generated by the Citrix Published Application Manager wizard points to
www.citrix.com. Change this link to point to the local Web server where the ICA
Web Client is installed.
1. The first time Netscape Communicator downloads the Citrix ICA Web Client,
a window appears stating that a plug-in is required.
2. You are asked if you want to download the Citrix ICA Web Client plug-in.
3. Click Yes to download the ICA Web Client to the destination directory.
4. Close the browser and run the plug-in (Wfplug32.exe) from the directory
where it is installed.
5. When the Web Client plug-in is successfully installed, the browser can open
and launch ICA connections from the HTML files.
Web Servers for Citrix Web Computing
MetaFrame supports any Web server that supports application MIME types.
Procedures for doing this vary by Web server. The Web server software can run
on the same computer as MetaFrame or on a separate server. The following Web
servers are several of those supported by MetaFrame.
Microsoft Internet Information Server Version 5.0
Microsoft Internet Information Server (IIS) Version 5.0 is an integrated Web
server that installs by default with Windows 2000. It is a complete solution for
creating and managing Web sites on the Internet or an Intranet. IIS uses the same
directory, security model, and file permissions as all other Windows NT server
network services.
Software Requirements
K
Microsoft Internet Information Server Version 5.0
K
MetaFrame Version 1.8 for Windows 2000
Registering the ICA MIME Type
The ICA MIME type is automatically registered with IIS 5.0. No configuration is
necessary.
122
MetaFrame Solutions Guide
Netscape FastTrack Server Version 3.01 for Windows NT
Netscape FastTrack Server Version 3.01 is an entry level Web server that lets
users create and manage a Web site. It is a complete solution for creating and
managing Web sites on the Internet or an Intranet. The FastTrack Server includes
the Netscape Communicator client software for creating, editing, and publishing
documents.
Û To install the Netscape FastTrack Server on a MetaFrame server
1. Log on to the MetaFrame server as an administrator.
2. At a command prompt, type change user /install. This places the user session
in install mode.
3. Install Netscape FastTrack Server following the directions in the readme file.
4. When installation is complete, at a command prompt, type change user
/execute. This changes the user session back to execute mode.
Registering the ICA MIME Type
1. Edit the following four files:
K
path\bin\admserve\cfgstuff\MIME.types
K
path\bin\httpd\install\misc\MIME.types
K
path\admserve\httpd-servername\MIME.types
K
path\httpd-servername\MIME.types
where path is the directory containing the Netscape FastTrack Server and
servername is the name of the FastTrack Server.
2. Add the following line to the end of each file:
type=application/x-ica exts=ica
Sample Procedure for Setting Up Web Computing
Here is a sample procedure for setting up a seamless connection to a MetaFrame
server using:
K
MetaFrame Version 1.8 for Windows 2000
K
Microsoft’s Internet Explorer 4.x or 5.x Web Browser
K
Microsoft’s Internet Information Server 5.0
For more detailed instructions about setting up Citrix Web Computing, see the
Citrix ICA Client Administrator’s Guide for the ICA Windows Web Clients.
Chapter 5 Connecting to the Web
123
Û To publish an application
The first step in this procedure is to publish an application. Publishing an
application allows you to start an application without knowing any details of the
application’s location, executable name, or server name.
1. Open Published Application Manager.
2. From the Application menu, click New.
3. Enter the application name and a detailed description; click Next.
4. Select whether the application will be started explicitly or anonymously and
then click Next.
5. Click Browse to locate the executable file for the application and click Next.
6. Specify the Window properties for the application and click Next.
7. Specify the default settings for Program Neighborhood clients when users
connect to this application. Click Next.
8. Select how the application will appear on Citrix clients that have Program
Neighborhood user interface and click Next.
9. Highlight the groups and users that are allowed to run the application and click
Add. When the groups and users are selected, click Next.
10. Highlight the server(s) that will be configured to run the application and click
Add. When finished, click Next.
11. Click Finish.
Û To create ICA and HTML files
The next step in this procedure is to create both an ICA file and an HTML file. An
ICA file is a plain text file that contains the parameters necessary to define an ICA
session.
1. Open Published Application Manager.
2. Highlight the published application you just created and from the Application
menu, click Write HTML File.
3. Select the level of assistance you require and click Next.
4. Select Create a New ICA File. Click Next.
5. Select the size and color attributes you want displayed when connecting to the
application by the ICA file. For the ICA File Name field, click Browse to
specify the Web server’s root path (typically \Inetpub\wwwroot) and a name
for the ICA file. Click Save. The file name and path are automatically entered
into the File Name dialog box. Click Next.
6. Select the type of application session you want to create: Embedded or
Launched.
124
MetaFrame Solutions Guide
7. Select the details associated with the session type. For the HTML file name,
click Browse to specify the Web server’s root path and a name for the HTML
file. Click Save. The file name and path are automatically entered into the File
Name dialog box. Click Next.
8. Click Finish.
The following sample ICA file is created from the process:
[WFClient]
Version=2
TcpBrowserAddress=10.4.10.191
TcpBrowserAddress2=10.4.10.95
IpxBrowserAddress=CC:00C04F98D76F
IpxBrowserAddress2=CC:00C04F98D81C
NetBiosBrowserAddress=MARLINS
NetBiosBrowserAddress2=DOLPHINS
[ApplicationServers]
BLPNC=
[BLPNC]
Address=BLPNC
InitialProgram=#BLPNC
DesiredHRES=640
DesiredVRES=480
DesiredColor=2
TransportDriver=TCP/IP
WinStationDriver=ICA 3.0
The TcpBrowserAddress is the IP address of a server on the network where access
to the application is available. This could also include an IPX address or NetBIOS
address if those protocols are used instead of IP.
The second section is the Application Servers section.
[ApplicationServers]
BLPNC=
The Application Servers section indicates the published application to which you
will be connected.
The section that describes the application appears as follows. The address is the
published application name or the specific address of the server. If a specific
address is used, load balancing is not employed. The initial program name is the
published application to which you will be connecting; if this is left blank, a
desktop is defaulted. The transport driver indicates the transport protocol you will
be using. The desired resolution is indicated; if a screen percent is present, it
overrides the resolution indicated. The desired color refers to the number of
colors; 16 colors=1, 256 colors=2.
Chapter 5 Connecting to the Web
125
[BLPNC]
Address=BLPNC
InitialProgram=#BLPNC
DesiredHRES=640
DesiredVRES=480
DesiredColor=2
TransportDriver=TCP/IP
WinStationDriver=ICA 3.0
The following sample HTML file is created from the process:
<!DOCTYPE HTML PUBLIC "-//IETF//DTD HTML//EN">
<html>
<head>
<meta http-equiv="Content-Type" content="text/html; charset=iso-8859-1">
<meta name="METAMARKER" content="null">
<title>Demo Application Page</title>
<script language="VBScript">
<!-option explicit
dim majorver
dim ua
dim ie3
dim ie4
dim aol
dim minorver4
dim update
dim winplat
dim nav
dim intButton
set nav = navigator
ua = "Mozilla/2.0 (compatible; MSIE 3.02; Windows NT)"
minorver4 = ""
if len(ua) >=1 then 'nav object is supported
winplat = mid(ua,instr(ua,"Windows") + 8, 2)
majorver = mid(ua,instr(ua,"MSIE") + 5, 1)
ie3 = majorver = 3 and (winplat = "NT" or winplat = "95" or winplat
= "32")
ie4 = majorver = 4 and (winplat = "NT" or winplat = "95" or winplat
= "32")
update = instr(ua,"Update a")
aol = instr(ua,"AOL")
if ie4 then minorver4 = mid(ua,instr(ua,"MSIE") + 7, 3)
end if
-->
</script>
126
MetaFrame Solutions Guide
</head>
<body bgcolor=#FFFFFF link=#CC0000 vlink=#660099
topmargin=0 leftmargin=0>
<table border=0 cellpadding=4 cellspacing=0>
<tr>
<td bgcolor="#FF9900" width=110> </td> <!-- Delete this
line to remove the orange band!! -->
<td valign=top bgcolor=#FFFFFF>
You can easily use this template for other
applications. The source for this page is well documented and easily
customizable.
Please take a look at it.<p>
<FONT color=#ffffff>
<!-- DIRECT.EXE EMBED -->
<script language="JavaScript">
<!-// YOU SHOULD ONLY NEED TO CHANGE THE VARIABLES BELOW.
//
// icaFile: location of the .ICA file for both the OBJECT and EMBED.
var icaFile = "bl.ica";
// width and height: pixel-size of the embedded application.
var width = 640;
var height = 480;
// start attribute: if Auto, application fires up upon pageload. If
Manual, application waits to be clicked by user.
var start = "Auto";
// border attribute: On/Off, to specify border around application
window.
var border = "On";
// Want vertical/horizontal space around the app? Set these just like
for the <IMG> tag.
var hspace = 2;
var vspace = 2;
// Where is the ActiveX CAB file located? It's probably best to leave
this set to Citrix:
var cabLoc =
"http://www.citrix.com/bin/cab/wfica.cab#Version=4,2,274,317";
// Where is the Plugins Reference page located? It's probably best to
leave this set to Citrix:
var plugRefLoc = "http://www.citrix.com/demoroom/plugin.htm";
// END OF CHANGES. DO NOT CHANGE THE VARIABLES BELOW.
//
Chapter 5 Connecting to the Web
127
// The following is the ActiveX tag:
var activeXHTML = '<CENTER><OBJECT classid="clsid:238f6f83-b8b4-11cf8771-00a024541ee3" data="' + icaFile + '" CODEBASE="' + cabLoc + '"
width=' + width + ' height=' + height + ' hspace=' + hspace + ' vspace='
+ vspace + '> <param name="Start" value="' + start + '"><param
name="Border" value="' + border + '"></OBJECT></CENTER>';
// And the Plugin tag:
var plugInHTML = '<CENTER><EMBED SRC="' + icaFile + '" pluginspage="'
+ plugRefLoc + '" width=' + width + ' height=' + height + ' start=' +
start + ' border=' + border + ' hspace=' + hspace + ' vspace=' + vspace
+ '></CENTER>';
var userAgent = navigator.userAgent;
if (userAgent.indexOf("Mozilla") != -1) {
if (userAgent.indexOf("MSIE") != -1) {
if (userAgent.indexOf("Windows 3") > 0)
{ document.write(plugInHTML); }
else
{ document.write(activeXHTML); }
}
else
{ if (userAgent.indexOf("Win16") > 0) { document.write(plugInHTML); }
else { document.write(plugInHTML); }
}
}
//-->
</script>
<noscript>
<a href="bl.ica">
Your browser does not support JavaScript! You'll have to click here to
launch the application.
</a>
</noscript>
</FONT>
<br>
<font size=2 face="Arial,Helvetica,sans-serif"><br>
The client works with web sites that
have a link to a Citrix multi-user application
server. Users must have an active TCP/IP
connection to an Internet or Intranet Web server
to use the Citrix ICA Web Client. <br>
<br>
<strong>How do I get the client? </strong><br>
If you're using a browser that supports ActiveX,
such as Internet Explorer 3.0/4.0, the ICA Web ActiveX
Control download will initialize<br>
after loading this page. <br>
<br>
128
MetaFrame Solutions Guide
If you're using Netscape
Navigator®/Communicator®, you'll have
to download the ICA Web Plug-in -- we have a
16-bit (Windows 3.x, Windows for<br>
Workgroups) version, and a 32-bit (Windows 95,
Windows NT®) version. <br>
</font><a
href="http://www.citrix.com/demoroom/plugin.htm"><font
size=2 face="Arial,Helvetica,sans-serif">Click
here to get the Netscape Plug-ins.</font></a> <br>
<font size=2 face="Arial,Helvetica,sansserif">
<br>
<br>
Be sure to check out our ICA Java Applet client. Just
click on
the 'Java Embed' entries in the left-hand
sidebar under Excel, Powerpoint or Taxi. The ICA Java Applet will load
automatically to your system.
</font><a href="/java/default.asp">
<font size="2" face="Arial,Helvetica,sans-serif"><br>Click
here to get the full-featured Java ICA
Client.</font></a>
<br>
<strong>Handling Different
Browsers</strong><br></font>
<font
size=2 face="Arial,Helvetica,sans-serif">
These embedded applications are now presented in
the preferred manner to your Web browser through
the use of JavaScript.<br>
<a
href="http://www.citrix.com/demoroom/switchscript.htm">
Go here to see how it's done.</font></a>
<br><br>
<strong>Problems?</strong><br></font>
<font
size=2 face="Arial,Helvetica,sans-serif">
Contact our Demo Room Support at <a
href="mailto:[email protected]">
[email protected]</a> for assistance with demonstration
problems.
</font>
<hr size=1 noshade>
<p><br>
</p>
</td>
</tr>
</table>
</td>
Chapter 5 Connecting to the Web
129
</tr>
</table>
</body>
</html>
Û To test the connection
To test your connection, open Internet Explorer. In the Location field, enter the
URL and HTML file name; for example, http://dolphins/bl.htm. The Web page
loads with the Citrix ICA session inside the browser window and your published
application starts.
130
MetaFrame Solutions Guide
131
C H A P T E R
6
Maintaining MetaFrame
Once you have deployed and configured your MetaFrame servers and ICA
Clients, you have to maintain your systems. This chapter includes information to
assist you with:
K
Monitoring network activity and performance
K
Applying service packs and hotfixes
Monitoring Network Activity and Performance
This section discusses tools that track network activity and performance. These
tools, Event Viewer, Network Monitor, and Performance Monitor, display three
types of information, respectively:
K
Event logs that record errors, security audits, and other significant events for
problem diagnosis
K
Network traffic statistics that indicate such things as network utilization, total
frames received per second, and broadcast frames received per second
K
Performance statistics that indicate such things as queue activity, processor
utilization, memory usage, and server throughput
Event Viewer
Windows 2000 with Terminal Services installed keeps a record of errors, logon
activities, and other significant events that happen on computers. These records
are stored in event logs that can be examined with the Event Viewer. Typical log
entries include such items as the failure of a device driver, a data error from a
network card, or an unsuccessful logon.
Every Windows 2000 computer has several logs in which events are recorded.
The following table describes the event logs relevant to MetaFrame.
132
MetaFrame Solutions Guide
Event log
Description
Event selection process
System
Errors, warnings, or information
generated by the MetaFrame
server.
Selection of events is preset by the
operating system.
Security
Valid and invalid logon attempts
and events related to resource
use such as creating, opening, or
deleting files or other objects.
Control of security event auditing is
set in the Local Policies folder in the
Local Security Policy MMC.
Errors, warnings, or information
generated by application
software, such as an electronic
mail or database program.
Application developers decide which
events to monitor.
Application
Control of file and directory access
audits is set through Windows NT
Explorer.
System and application logs are available to be viewed by all users, while security
logs are accessible only to system administrators. With appropriate administrative
rights, you can also view logs on other computers.
Using Event Logs to Troubleshoot
Each entry in an event log can include the following information:
K
Date
K
Time
K
Source
K
Type
K
Category
K
Event ID
K
User
K
Computer Name
In addition, most events generate a text description and sometimes binary data,
which are available by double-clicking a single entry. The binary data is generated
by the application that was the source of the event record. Because the data
appears in hexadecimal format, interpreting it may require consulting someone
who is familiar with the source application. Binary data is displayed in words or in
bytes.
Careful monitoring of event logs can help you predict and identify the sources of
system problems. For example, if log warnings show that a disk driver can only
read or write to a sector after several retries, it indicates that the sector will
eventually become corrupt. Log files can also confirm problems with application
Chapter 6 Maintaining MetaFrame
133
software. If an application crashes, an application event log provides a record of
activity leading up to the event for support personnel to analyze.
Here are some suggestions to help you diagnose problems using event logs:
K
Archive logs in log format. The binary data associated with an event is
discarded if you archive data in text or comma-delimited format.
K
If you suspect a hardware component is the origin of system problems, filter
the system log to show events generated only by that component.
K
If a particular event seems related to system problems, try searching the event
log for other instances of the same event or to judge the frequency of an error.
K
Note Event IDs. These are unique numbers that match a text description in a
source message file. This number is used by product support representatives to
understand what occurred in the system.
Using Event Logs to Analyze Activity
Using spreadsheet or word-processing programs, you can manipulate event log
data saved as text to produce graphs, charts, and reports. Graphs generated from
event logs are used to show the times when logon activity is highest, the average
time between network failures, and so on.
Reading event logs into other applications requires saving them in text or commadelimited text format. This type of archive discards binary data associated with an
event but saves all other log details.
Network Monitor
Network Monitor can be used to capture and display frames (also called packets)
to detect and troubleshoot problems on the network. The Network Monitor is not
installed by default when Windows 2000 is installed.
Û To install Network Monitor and the Network Monitor Agent
1. In Control Panel, double-click Add/Remove Programs.
2. Select Add/Remove Windows Components.
3. In the Windows Components wizard, double-click Management and
Monitoring Tools.
4. Select Network Monitor Tools, then complete the Installation wizard.
You can now start Network Monitor from Administrative Tools or from a
command prompt.
134
MetaFrame Solutions Guide
ICA packets use TCP port 0x5D6 or 1494 using decimal notation. It is recognized
in Network Monitor by looking for the 5D6 in either the Source Port or
Destination Port address. A display filter can be set on the Source and Destination
port to show only 0x5D6 packets in Network Monitor.
Note Network Monitor is not the only place to get information about ICA traffic.
If you have connection problems, use MetaFrame Administration to monitor the
ICA connection status while a user attempts to log on.
ICA packets are encrypted. If an analysis of a trace is necessary to troubleshoot a
problem between the MetaFrame server and an ICA Client, save the capture data
to a file. Send this capture data to support personnel if the problem cannot be
resolved.
Performance Monitor
The hardware and software configuration used with a MetaFrame server has a
large effect on system performance as measured by user response time. The most
useful tool in tuning a MetaFrame server is Performance Monitor. Performance
Monitor is a graphical tool that collects and examines data concerned with system
activity. The overall performance of a MetaFrame server can be examined by
monitoring the following areas:
K
Processor(s)
K
Memory
K
Hard Disk(s)
K
Network
System throughput problems usually occur when demand for one of these
resources exceeds the supply. The available resources in this case are the
microprocessor(s), memory, hard disk(s), and networking hardware and software.
Finding out how user applications interact with each of these resources is a logical
first step when you start monitoring.
When monitoring a system, you are really monitoring the behavior of its objects.
In MetaFrame, an object is a standard mechanism for identifying and using a
system resource. Objects are created to represent individual processes, sections of
shared memory, and physical devices. Performance Monitor groups counters by
object type. A unique set of counters exists for the processor, memory, cache, hard
disk, users, processes, and other object types that produce statistical information.
Certain object types and their respective counters are present on all systems.
However, other counters, such as transport-protocol counters, appear only if the
computer is running the associated software.
Chapter 6 Maintaining MetaFrame
135
Each object type can have several instances. For example, the Processor object
type will have multiple instances if a system has multiple processors. The
PhysicalDisk object type has two instances if a system has two disks. Some object
types, such as Memory and Server, do not have instances. If an object type has
multiple instances, each instance produces the same set of statistics (counter
information).
Solving Performance Problems
The following sections describe potential bottlenecks that can affect system
performance and discuss how to use Performance Monitor to determine if any of
these areas are adversely affecting system performance.
Processor(s)
The processor-related factors that can affect performance on a MetaFrame server
include:
K
Processor utilization
K
Interrupts
K
Context switches
K
Screen savers
Processor Utilization
If processor utilization is over 90% on a regular basis, consider upgrading the
processors in the MetaFrame server. Install a faster processor if this is a singleprocessor system, or install additional processors or faster processors in a
multiprocessor system. Many server-class systems are designed to allow the
inclusion of additional processors or processor boards. MetaFrame scales linearly
as processors are added, subject to performance constraints from other system
resources such as memory. To determine CPU utilization, monitor the %Processor
Time counter under the Processor object. The %Processor Time shows the
percentage of elapsed time that a processor is busy executing non-idle threads. If
the %Processor Time counter consistently registers at or near 100%, the
processors might be slowing down the system response time. If 100% processor
utilization is consistent, check the processor queue length for excessiveness.
136
MetaFrame Solutions Guide
Interrupts
A defective device adapter can cause an excessive number of interrupts. This
severely degrades the performance of the system because most of the processor
time is spent handling interrupts. A moderately busy server (32-bit hard disk
adapter, network card, and about 12 users) will experience an average of about
100 interrupts per second. If the number of interrupts per second increases
dramatically without a corresponding increase in system activity, it could indicate
a hardware problem. To determine if there is excessive interrupt activity, monitor
the Interrupts/sec counter under the Processor object.
Context Switches
Device drivers perform context switches to switch between user and system level
processing. A poorly-written device driver can cause the system to make a large
amount of context switches. A typical value for context switches is 500 per second
or fewer. If the number of context switches per second is greater than 500, a
device driver may have built-in critical sections that are too long. To check the
server for poorly written device drivers, monitor the Context Switches/Second
counter under the System object.
Screen Savers
Screen savers, especially “busy” ones, can use a large amount of processor
resources and, in the case of an ICA connection, network bandwidth. If you plan
to use a screen saver, use a generic one and test it on the system before you
implement it.
To determine if a screen saver is using too much processing time, run the screen
saver on the console. Log on to an ICA Client and run Performance Monitor.
Monitor the %Processor Time counter under the Processor object. Note the
demand that the screen saver puts on the processor.
Memory
The factors related to system memory that can affect performance on a MetaFrame
server include:
K
Memory load
K
The system page file, Pagefile.sys
K
Memory paging
Chapter 6 Maintaining MetaFrame
137
Memory Load
To determine how much memory is present on the MetaFrame server, use the
Computer Management MMC as follows:
1. In the Administrative Tools group, click the Computer Management icon.
The Computer Management MMC appears.
2. Expand System Information and click System Summary. Memory statistics
appear in the right panel.
Pagefile.sys
Windows 2000 preallocates hard disk space for virtual memory. This area is
marked as a file called Pagefile.sys. In Windows 2000, the default pagefile size is
1.5 times the amount of physical memory. This value is determined during system
installation. The MetaFrame server can exceed the default size space if it is
determined that more memory is needed. However, this is time consuming and can
slow down the system.
Use Performance Monitor to monitor the demands on the pagefile. Check the
Commit Limit and the Committed Bytes counters under the Memory object to
determine how the pagefile is performing. When the Committed Bytes counter
exceeds the Commit Limit, increase the size of the pagefile as follows:
1. In Control Panel, double-click System.
2. Click the Advanced tab, then the Performance Options button.
3. Click the Change button in the Virtual Memory section, then enter new
Initial and Maximum sizes. Click Set and then click OK.
4. Click OK to exit.
Determine the optimum pagefile size by logging Committed Bytes over a period
of two weeks with Performance Monitor. Record the maximum value over the two
week period. Increase this number by 10% to 20% to determine the system’s
minimum pagefile size.
Memory Paging
Windows 2000 keeps the most used data in physical memory and pages the least
accessed data out to the pagefile. When a system is heavily loaded, memory is
paged in and out at a rapid rate. This affects system performance if the hardware is
unable to keep up with the server. The number of pages per second being paged in
and out of memory is a valuable indicator of hardware performance. The pages
per second should consistently average five or less per hard drive. If the pages per
second is constantly above five, the system is paging in and out of virtual memory
too much. Either use faster hard disks so the system can access virtual memory
quicker or add more RAM to the machine.
138
MetaFrame Solutions Guide
Note All configured connections, whether active or inactive, consume system
memory. To avoid allocating memory for connections that will never be used, be
sure to configure only the type and number of connections required for your
configuration.
Hard Disks
Citrix does not recommend installing MetaFrame on a RAID drive or using a
RAID drive for the MetaFrame swap file. RAID drives have additional overhead
that enhances data reliability but can adversely affect operating system
performance.
The factors related to hard disks that can affect performance on a MetaFrame
server include:
K
Percentage of disk time
K
Disk queue length
Percentage of Disk Time
The %Disk Time counter measures the percentage of time that a hard drive is
active. If the %Disk Time counter value is high, the hard disk is not adequate for
the system. Take one or more of the following steps:
1. Use a 32-bit PCI bus mastering SCSI controller or a higher-performance (for
example, Wide SCSI or Fast Wide SCSI) subsystem in the MetaFrame server.
This speeds up data transfer to and from the drive.
2. Spread the pagefile across multiple drives.
3. Install a separate hard drive and assign only the pagefile to the drive.
4. Install a separate SCSI controller and hard drive and assign only the pagefile to
that drive and controller.
5. Offload some of the more frequently accessed data to a less utilized server.
6. Install another server to help handle the user load.
Disk Queue Length
Another item to monitor is the Disk Queue Length counter. This measures the
number of I/O requests outstanding for the hard drive. If data has to wait in a long
queue before it is written or read from the disk, it can affect the MetaFrame server
performance. The Disk Queue Length values should be sustained at no more than
1.5 to 2 times the number of spindles making up the physical disk. Most disks
have only one spindle. RAID disks usually have more but appear as only one
physical disk to Performance Monitor.
Chapter 6 Maintaining MetaFrame
139
Network
When monitoring network performance, examine the total bytes per second
passing to and from the server. Compare this with the speed of the network being
used to transfer the data; for example, 10Mbps or 100Mbps Ethernet, or 4Mbps or
16Mbps Token Ring. (Because these values are in bits per second, divide by 8 to
get the number of bytes per second; for example 10Mbps Ethernet is actually
1.25MBps.) If the server’s total network throughput is close to the network’s
transfer speed, the network is saturated. Possible solutions are listed below.
Upgrading the Network
K
Add a faster network backbone
K
Add a router between network segments
K
Connect the servers directly to the backbone
Upgrading the Server
K
Add a faster network adapter
K
Use the latest drivers for the network adapter
K
Assign a lower interrupt for the network adapter to give it higher system
priority
Monitoring Users and ICA Sessions
MetaFrame supports multiple simultaneous users logged on to the MetaFrame
server from a variety of connections. You can use the Event Viewer to examine
events such as user logon and logoff and connection activity. You can use
Performance Monitor to track resource consumption by user or connection, or
diagnose connection problems by examining statistics gathered on a per-user or
per-connection basis.
For example, you can monitor the amount of processor time being used to identify
potential performance problems. Statistics can be used to find and diagnose
connection problems, such as a defective modem or WAN link, by finding
connections with excessive error counts.
Virtual Memory
In a multiuser environment like MetaFrame, the demand for memory is higher
than in single-user environments. It is, therefore, recommended that the system’s
pagefile size be increased.
1. In Control Panel, double-click System.
The System Properties dialog box appears.
2. Select the Advanced tab.
140
MetaFrame Solutions Guide
3. Click the Performance Options button, then the Change button in the
Virtual Memory section..
This opens the Virtual Memory dialog box.
4. Set the Initial Size and the Maximum Size to correspond to the calculated
value, which is 2.5 times the size of the system RAM. For example, if you have
256MB of RAM, set the Initial and Maximum sizes to 640MB.
Note Setting both the Initial Size and the Maximum Size to the same size
provides the best performance because the MetaFrame server does not take
extra time increasing the paging file.
Spreading the pagefile across all available drives improves the performance of
your MetaFrame server because the MetaFrame server can perform Read and
Write operations to more than one disk simultaneously.
Third-Party Technologies for Prioritizing ICA Traffic
Here are two solutions for ensuring that ICA packets are prioritized and routed
properly in busy network environments:
K
Cisco Queuing Technologies
K
Packeteer (PacketShaper)
Cisco Queuing Technologies in a Citrix Environment
For organizations using Cisco routers, a method exists for prioritizing the ICA
protocol when routing over low bandwidth links such as a serial connection. Cisco
offers two methodologies for prioritizing the ICA protocol. These methodologies,
Priority Queuing and Custom Queuing, relate to ICA traffic prioritization over
ports 1494 and 1604.
Note Routing is critical for large enterprise networks to function properly. Only
qualified personnel who are well versed with Cisco technologies should perform
router configuration.
Requirements
Hardware Requirements
K MetaFrame and/or WINFRAME servers
K
Cisco Router
Chapter 6 Maintaining MetaFrame
141
Software Requirements
K MetaFrame Version 1.8 for Windows 2000
- Or K
MetaFrame Version 1.0 or later on Windows Terminal Server
- Or -
K
WINFRAME Version 1.7 with Service Pack 5B or later
Usage
Using Cisco routers, ICA traffic can be prioritized by two distinct methods:
Priority Queuing and Custom Queuing. The following sections define and
describe these methods in detail. They also provide the necessary commands
required as input at the router command interpreter. These sections assume that
the user is knowledgeable in using Cisco routers and has the proper authorization
to make such changes. All commands in these sections are given to the router
from the privileged level of the EXEC command interpreter.
Priority Queuing
Priority Queuing allows you to set up a priority on a particular protocol or port
number. Anytime a buffer of that protocol or port number is transmitted, it is
given high, medium, or low priority.
By using this method, however, other protocols can be limited if there is
significant priority traffic running through the router. For example, during periods
of intense prioritized ICA traffic, there would not be sufficient network bandwidth
for an FTP session or non-ICA print job.
The steps required to set up a priority queue are listed below:
1. At the Router # command prompt, type config terminal. This places the
system in configuration mode.
2. Configure a priority list (1-16) and name the IP protocol as the one to
prioritize. Specify the transport layer protocol and port number (TCP 1494) to
be prioritized. At the Router#(config) prompt, type:
priority-list 1 protocol ip high tcp 1494
3. Assign a default level of prioritization. At the Router#(config) prompt, type:
priority-list 1 default low
In this case, protocols that do not fall into category 1 default to low priority.
4. Specify the queue sizes. This step is optional. See the Cisco documentation for
additional information.
142
MetaFrame Solutions Guide
5. Assign the priority list to an interface. This step applies to serial ports, so the
command refers to the serial interface (s0). To assign priority 1 to the interface
s0, from the Router#(config) prompt, type:
int s0
priority-group 1
To determine if the changes have taken effect, use the show interface (s0) or
the show queuing command.
Custom Queuing
Custom Queuing provides the ability to set up 16 different queues that act in a
round robin format. This is similar to division multiplexing. The router scans
process packets through all of the sequences in a round robin format. You set the
byte length for a specific queue so that multiple packets from the same protocol
are transmitted as opposed to one packet of another protocol. This is considered a
better alternative than Priority Queuing. Similar to token ring, everyone gets a
chance to transmit data. Only some protocols can transmit more data than the rest.
The steps required to set up Custom Queuing are as follows:
1. At the Router # command prompt, type config terminal. This places the
system in configuration mode.
2. Set custom queuing filters for protocols or interfaces. At the Router#(config)
prompt, type:
queue-list 1 protocol ip high tcp 1494
This configures queue list 1 for the IP protocol and the TCP port 1494, which
is what ICA uses to initiate a session.
3. Assign a default queue. This specifies the default queue for all unnamed
protocols and ports that are not explicitly defined. At the Router#(config)
prompt, type:
queue-list 1 default 2
4. Change queue capacity. This step is optional. See the Cisco documentation for
additional information.
5. Configure the transfer rate per queue. This sets the byte count for a particular
queue. This allows multiple packets to be sent for one queue while sending one
packet for another queue. At the Router#(config) prompt type:
queue-list 1 queue 1 byte-count 4500
Queue 1 in queue-list 1 has a byte-count of 4500, which is three times that of a
regular Ethernet packet, thereby sending three packets of this queue-list
member as opposed to one packet of the default queue.
Chapter 6 Maintaining MetaFrame
143
6. Assign the custom queue list to an interface. This step applies to serial ports so
the command refers to the serial interface (s0). The first entry designates the
serial interface while the second assigns custom queue 1 to the interface (s0).
From the Router#(config) prompt, type:
int s0
custom-queue-list 1
To determine if the changes have taken effect, use the show interface (s0) or
the show queuing command.
Troubleshooting
If a priority or custom queue is not working properly, follow these directions:
Unassign the queue from the ports for which it is configured. In interface setup
configuration, type the following:
1. If a priority is set up, from Router(config-if)#, type:
no priority-group 1
2. If a custom queue is set up, from Router(config-if)#, type:
no custom-queue-list 1
This immediately removes the policy from that interface until a problem is
determined. Repeat the procedure from the (config) mode to actually remove the
queues, inserting the word “no” in front of the commands to reverse them. Run
show running-config to verify that changes were made. Make sure you copy to
startup-config using copy running-config startup-config when changes are
acceptable.
Packeteer (PacketShaper)
PacketShaper comes in three configurations.
K
The PacketShaper 1000 manages WAN connections at speeds up to 384Kbps
K
The PacketShaper 2000 handles WAN and Internet connections at speeds up to
10Mbps
K
The PacketShaper 4000 supports WAN and Internet connections at speeds up
to 100Mbps
Typically a PacketShaper is located at the remote side just outside of the
CSU/DSU to manage the data flowing in and out of the remote location. You can
access PacketShaper through a Web interface, a Telnet command line interface, or
a console session. PacketShaper identifies traffic, in this case port 1494, traveling
in both directions and prioritizes that traffic in a way that allows ICA traffic to get
through on the busiest of WANs. PacketShaper can be easily set up.
144
MetaFrame Solutions Guide
Packeteer requires some knowledge to get the full benefit from the device.
Packeteer allows you to monitor the traffic traveling across the link and then apply
policies to that traffic depending upon mission criticality of the protocols or traffic
classes. Included in this note are the directions to set up Packeteer to recognize the
ICA protocol and start tracking it. You can toggle packet shaping on and off to see
the effect that it has on network traffic.
Requirements
Hardware Requirements
K WINFRAME or MetaFrame server
K
WAN Setup
Software Requirements
WINFRAME Version 1.7 or later
K
K
MetaFrame Version 1.0 or later
K
PacketShaper Version 3.0 or later
Installation
Below are the instructions to set up a PacketShaper running Version 3.0 to
recognize and prioritize ICA traffic. For Version 3.1, Packeteer has built-in
recognition for Citrix WINFRAME/MetaFrame, so when traffic autodiscovery is on,
PacketShaper detects WINFRAME/MetaFrame ICA and server balancing traffic and
automatically creates classes for both. To determine what version you are running,
log on to PacketShaper using the Web interface. Version information is in the top
right corner of the PacketShaper Policy Console home page.
1. Make sure your PacketShaper is correctly configured and is functioning on
your network. In your configuration (the Setup option of the PolicyConsole
navigation bar), make sure that Traffic Discovery is turned on. If you have any
questions about this, please contact Packeteer technical support at
[email protected] or (408) 873-4550.
2. Create a class for Inbound Citrix WINFRAME/MetaFrame traffic:
A. Click the Manage option of the PolicyConsole navigation bar.
B. Click Inbound in the Traffic Tree in the left side of the Manage dialog
box.
C. Click Class... in the New area in the right hand side of the Manage Traffic
Tree dialog box. This creates a child class on the inbound branch of the
traffic tree.
Chapter 6 Maintaining MetaFrame
145
D. In the New Class dialog box, complete the following areas:
Class name
Protocol family
Service
Server location
Outside port
outside_WinFrame/MetaFrame_inbound
IP
TCP
any
1494
E. Click the Add Class button.
3. Create a class for Outbound Citrix WINFRAME/MetaFrame traffic:
A. Click Outbound in the Traffic Tree in the left side of the Manage dialog
box.
B. Click Class... in the New area in the right hand side of the Manage Traffic
Tree dialog box.
C. In the New Class dialog box, complete the following areas:
Class name
Protocol family
Service
Server location
Outside port
inside_WinFrame/MetaFrame_outbound
IP
TCP
any
1494
D. Click the Add Class button.
4. Set up PacketShaper so you can monitor WINFRAME/MetaFrame traffic:
A. Click the Monitor option of the PolicyConsole navigation bar.
B. Click the Clear All Statistics... button so that you can see the
WINFRAME/MetaFrame traffic more clearly.
5. Create Citrix WINFRAME/MetaFrame traffic so that PacketShaper can detect it.
A. Open the WINFRAME/MetaFrame Client Remote Application Manager.
B. From Remote Application Manager, open the applications to which you
have access.
C. Return to PacketShaper’s PolicyConsole Monitor dialog box.
D. Click Update.
6. Set Policy to give WINFRAME/MetaFrame traffic priority over all other traffic.
A. Click the Manage option of the PolicyConsole navigation bar.
B. Click class outside_WinFrame/MetaFrame_inbound.
C. In the New column, select Policy.
D. From the Policy dialog box, click Priority.
E. When the screen refreshes, set priority to 7 and click Add Policy.
146
MetaFrame Solutions Guide
7. Repeat these steps for the inside WinFrame/MetaFrame outbound class.
You have now configured PacketShaper to manage network traffic so that ICA
traffic has priority over all other network traffic.
Applying Server Hotfixes and Service Packs
What are Hotfixes and Service Packs?
Hotfixes are interim WINFRAME or MetaFrame system patches available for
download from the Citrix Web site (http://citrix.com/support), the Citrix FTP site
(ftp.citrix.com), and the Citrix BBS (954-267-2590). Apply hotfixes only on the
advice of Citrix Technical Support. Hotfixes are tested and verified to fix specific
problems.
Service packs are collections of patches that are released between major revisions
of Windows NT. Service packs are cumulative; that is, they contain the patches
included in all prior service packs.
Hotfix Naming Convention
Hotfixes are posted as self-extracting executables and follow a specific naming
convention. MetaFrame and WINFRAME server hotfixes have a slightly different
naming convention than client hotfixes. Hotfix ME100010.EXE is used as a
server hotfix in the example for the table.
M
Digit 1 specifies whether the hotfix is applicable to a MetaFrame or WINFRAME
server. This digit can be one of two values: S = WINFRAME server hotfix, M =
MetaFrame server hotfix.
E
Digit 2 reflects the applicable language, English in this case. Other values include F
= French, G = German, S = Spanish, J = Japanese.
10
Digits 3 and 4 reflect the version of the software for which this hotfix is applicable,
MetaFrame Version 1.0 in this case.
0
Digit 5 indicates which service pack should be installed before the hotfix is
installed. If this digit is “0,” it indicates that the hotfix can be installed without first
installing a service pack.
010
Digits 6 through 8: this value is sequential and indicates the hotfix number. This
example shows it is the tenth hotfix since the last service pack was released.
International hotfix numbers match the domestic version of the hotfix
Chapter 6 Maintaining MetaFrame
147
The table below illustrates the naming convention used for client hotfixes. Hotfix
NE200581 is used as the example for this table.
N
Digit 1 specifies to what client the hotfix is applicable. This digit can be one of four
values: N = ICA 32-bit Client hotfix, W = ICA 16-bit Client hotfix, D = DOS
Client hotfix, B = Web Client hotfix.
E
Digit 2 reflects the applicable language, English in this case. Other values include F
= French, G = German, S = Spanish, J = Japanese.
2
Digit 3 reflects the security level of the client. This digit can be one of four values:
0 = No encryption, 1 = 40-bit encryption support, 2 = 56-bit encryption support, 3 =
128-bit encryption support.
00
Not used at this time
581
Digits 6 through 8 reflect the client build number, client build number 581 in this
case.
Extracting, Installing, and Removing Hotfixes
Create a directory called \Hotfix to store the self-extracting files that you
download. Create subdirectories for each hotfix. Use these subdirectories to store
the files that are archived within each self-extracting file. Each hotfix contains an
executable file, Hotfix.exe. Because each hotfix executable file has the same name
(Hotfix.exe), it is very important to store each hotfix in a separate subdirectory.
Install hotfixes from the directory where you store the extracted files.
Û To install a hotfix
Note Change drive letters and/or directories to match your system configuration.
1. Download the hotfix to the \Hotfix directory.
2. At a command prompt, change to the system directory; for example C:
3. Type cd \hotfix to change to the \Hotfix directory.
4. Create a subdirectory for the new hotfix; for example, md me100010. Change
to this directory.
5. Type ..\me100010 to execute the self-extracting file in the parent directory.
The files are extracted to the current directory.
6. Review the Readme.txt file for information about the hotfix, such as special
installation instructions.
7. Type hotfix /i to install the hotfix.
8. Type hotfix /v to verify that the files are correctly installed.
9. Type shutdown 0 /reboot to reboot the server.
148
MetaFrame Solutions Guide
Û To remove a hotfix
1. At a command prompt, type C: to switch to the current directory.
2. Change to the directory containing the hotfix; for example, cd me100010.
3. Type hotfix mf:me100010 /r to remove the hotfix.
4. Type shutdown 0 /reboot to reboot the server.
The Hotfix Utility
Hotfix is a utility that makes installing, tracking, and maintaining hotfixes easier.
Command Syntax
HOTFIX [ /H /R /V ] [hotfixname]
HOTFIX /I [sourcedir]
HOTFIX [\\computername] [ /L /F ] [hotfixname]
Parameters
\\computername
The name of a remote computer that is the target of the command. This can be
used only with the /LIST option.
hotfixname
The name of the hotfix.
sourcedir
Source directory containing the corrected files and the Hotfix.ini file for the
hotfix.
Options
/FULL or /F
Specifies a detailed listing of a specific hotfix. If /F is not specified, the default
is a brief description of the hotfix.
/HELP /H or /?
Displays the syntax for the utility and information about the utility’s options.
/INSTALL or /I
Installs the hotfix identified by the Hotfix.ini file in the source directory or the
current directory in the source directory was not specified. The fix is installed
on the local machine.
/LIST or /L
Displays a list of all installed hotfixes. If a hotfixname is specified, a detailed
listing of the specific hotfix is displayed.
Chapter 6 Maintaining MetaFrame
149
/REMOVE or /R
Removes the specified hotfix from the local machine.
/VERIFY or /V
Verifies that the specified hotfix is correctly installed on the local machine. If
no hotfixname is specified, all installed hotfixes are checked.
150
MetaFrame Solutions Guide
BLANK PAGE
IMPORTANT: This text will appear on screen, but will not print on a
PostScript printer.
This page should be the last one in this file; it was inserted by running the
InsertBlankPage macro.
Do not type any additional text on this page!
151
C H A P T E R
7
Troubleshooting the System
This chapter contains information to help you diagnose and solve problems with
your MetaFrame systems:
K
Troubleshooting user accounts
K
Finding memory leaks
K
Resolving driver conflicts
K
Setting up a MetaFrame server kernel debug session
Troubleshooting User Accounts
Periodically when using an application, I get an error from the application that
the hard disk or some group of files is corrupted or missing. Why is this
happening?
Many applications create temporary files as they run. They use these files to store
information about the document you are working on or information about your
particular settings. Any application temporary files are saved in the users’ home
directories. If users’ home directories exist on a network and your network is
unstable, these errors can occur. This can also happen when a network server goes
down, cannot be reached, or if the network becomes overloaded. If you are having
these problems, work with your network administrator to locate the network
problem and stabilize the network. You can also move the home directories to the
local MetaFrame hard drive to prevent saving temporary files over the network.
Do not keep users’ temporary files on a client drive.
Make sure the paths for the TEMP and TMP environment variables do not point
to a user’s client computer hard drives. If these variables point to a client drive,
applications that store temporary files in the directories specified by the TMP or
TEMP environment variables can run very slowly and can experience other
problems. The best place for temporary files is on the MetaFrame server itself.
152
MetaFrame Solutions Guide
Finding Memory Leaks
When multiple users are running a number of applications on a MetaFrame server,
it is not unusual for some of these applications to have some form of memory leak
that slowly consumes the available memory of the server. A memory leak occurs
when a memory pool allocates some of its memory to a process and the process
does not return the memory. When this happens repeatedly, the memory pool is
depleted. If you monitor paged pool bytes and page file usage in Performance
Monitor, you will see that they increase over time.
The most common signs that a system is experiencing a memory leak include but
are not limited to:
K
Virtual memory errors (displayed at the console only)
K
Excessive paging of the system pagefile(s)
K
Sluggish performance
K
System appears to hang
K
Client connection/disconnection problems
K
Processes and applications become unresponsive
Identifying Memory Leaks Using Performance Monitor
A memory leak can be caused by a process created by a service, a program, a
device driver, etc. The most common way to find a memory leak is to use
Performance Monitor to chart the following:
K
Object: Process
K
Instance: Process Name
K
Counter: Private Bytes
For example, on a system with 128MB RAM, a 384MB Pagefile, and two users,
the Spoolsv.exe shows 250,000,000 private bytes.
Always select the Memory, Objects, and Processes objects when you are looking
for a pool leak. Select all counters under each object. You can also select other
object counters to help you identify a specific problem. You then simply view all
charted objects until one or more objects show a trend that could be a pool leak.
1. By charting the memory resources, it becomes clear that one or more memory
pools are allocating memory and the available memory in one or more memory
pools is being continuously depleted. When charted, a memory pool can
display a continuously climbing stair-step effect while the process leaking
memory is running. However, during times of inactivity, it is common to see
the charted line remain flat. The charted line continues the stair-step pattern the
next time the process leaking memory is started and run.
Chapter 7 Troubleshooting the System
153
2. By charting the object counter Threads, it is evident that the thread count
grows in a manner similar to the tagged pool memory allocations and bytes
listed in Step 1. Depending on the amount of threads that are created, the
object counter Threads can jump to a high value immediately.
3. The object Process helps determine which process is causing the leak. Select
object counters Pool Nonpaged Bytes, Pool Paged Bytes, and Thread Count.
Chart all instances of these counters. The process leaking memory charts in a
manner similar to the pool memory charted in Step 1.
Identifying Memory Leaks in NT Services
Although Performance Monitor usually provides the necessary information to
determine which process is creating a pool leak, it does not always provide the
information necessary to determine the exact cause of a memory leak. A trend that
shows a memory leak can often be identified but an exact process is not always
identifiable as the cause of the memory leak.
If the process leaking memory is a service, you can identify which service it is by
stopping different services while using Performance Monitor to monitor the
number of threads running. The number of threads running depends on many
factors, but the number grows larger as the process leaking memory continues to
run.
Û To determine which service is leaking memory
1. Run Performance Monitor and add the Threads counter for the object type
Object to the chart.
2. From Control Panel, double-click Services.
3. Tile the windows so you can see both Performance Monitor and the Services
dialog box.
4. Stop and start the active services one at a time.
If the service that is leaking memory has been running long enough, there will
be a drastic reduction in threads when the service is stopped.
Note If no services are leaking memory, the leak could be caused by a regular
program. Repeat the above procedure, but instead of stopping services, close and
open all active programs one at a time.
154
MetaFrame Solutions Guide
Limiting the Impact of Memory Leaks
While there is no way to prevent memory leaks, rebooting the MetaFrame server
whenever possible can prevent memory leaks from compounding. Rebooting the
server has the added advantage of preventing system degradation caused by
disconnected user sessions, crashed applications, and runaway processes. A
regular reboot can be scheduled using the Tsshutdn command at the command
prompt. For more information about the Tsshutdn command, type tsshutdn /? at
a command prompt.
Resolving Driver Conflicts
I just installed the Canon GP200F printer/fax drivers on my MetaFrame server.
Now, every time I run Word 97 and select the Canon GP200F to print to from an
ICA Client, I get an error on the MetaFrame server.
The driver Dlls are disrupting the load process by, perhaps, having conflicting
base addresses that cannot be rebased. It could also be that the Dll initializations
fail because too many implicitly loaded Dlls need thread local storage.
One way to find out is to get the Listdlls executable from www.sysinternals.com
and run it in a command window as follows: Listdlls. You can also run Listdlls
/help for additional command line options. This lists all the Dlls in the address
space and where they are loaded.
Setting up a MetaFrame Server Kernel Debug Session
Kernel debugging is a process that uses the built-in debugging features of
Windows 2000 with Terminal Services installed to gather information for
detecting, isolating, and resolving system problems.
Kernel debugging involves two computers:
K
The computer being debugged, referred to as the target computer
K
A second computer that controls the execution of the target computer, called
the host computer
The host computer runs an application called the kernel debugger that is used to
examine memory and processor status, single-step through programs, and perform
other operations useful in problem determination. The target computer can be
allowed to run until an error condition occurs or it can be stopped at any time. For
Intel-based systems, the kernel debugger application is I386kd.exe.
To allow symbolic debugging (that is, debugging using descriptive names instead
of numbers), symbols are loaded onto both target and host computers. These
symbols contain information used to present data to technical personnel in a more
Chapter 7 Troubleshooting the System
155
readable manner; for example, displaying regions of memory in terms of their
actual usage instead of as lists of hexadecimal numbers. For the information
presented to be meaningful, it is important that the symbols present on the target
and host computers be identical.
The host computer controls the target computer through a serial communications
port. The host can be connected to a local target computer by a serial
communications null-modem cable (local debugging), or the host can be at a
remote location (such as Citrix headquarters) and connected to the target computer
by modem (remote debugging). The modem used can be any standard Hayescompatible PC modem; however, Citrix recommends using a U.S. Robotics
Sportster series 56Kbps modem for best results.
This section describes how to configure a target computer and a host computer for
local or remote debugging.
The Kernel Debugger (I386kd.exe)
Using the kernel debugger program, I386kd.exe, a support engineer can use the
host computer to control program execution on the target computer. The target
computer can be allowed to run until an error condition occurs or it can be
manually stopped at any time. The action of stopping the target computer is called
breaking in. The support engineer breaks into the target computer by pressing
CTRL+C in the kernel debugger session on the host computer. If a trap or fault
occurs on the target computer, the target machine halts and displays system
information. At this point, the operator on the host computer can interactively
examine the status of the target computer or allow execution to resume. Press G in
the kernel debugger session on the host computer to allow execution on the target
computer to resume.
The kernel debugger can be used to set execution and memory access breakpoints,
examine and modify memory contents, check the state of CPU registers,
disassemble code, and other operations.
Symbols and Symbol Trees
To allow symbolic debugging (that is, debugging using descriptive text instead of
hex numbers), symbols are loaded onto both the target and host computers. These
symbols contain information used to present data to technical personnel in a more
readable manner; for example, displaying regions of memory in terms of their
actual usage instead of as lists of hexadecimal numbers.
For the information presented to be meaningful, it is important that the symbols
installed on the target and host computers be identical and that they match the
executable files on the target computer. The symbol files for the base MetaFrame
system are located on the MetaFrame CD-ROM in the \Support\Debug\I386
\Symbols directory. The Symbols directory contains directories corresponding to
156
MetaFrame Solutions Guide
each type of file. You must use xcopy to copy the Symbols directory and all its
subdirectories to the %SystemRoot% directory on the target computer. These
symbols are also copied to a directory on the host computer; this can be any
directory and does not have to be the %SystemRoot% directory. These directory
structures are referred to as the symbol tree.
If hotfixes are installed on the MetaFrame server, the symbol files must be
installed in the proper order: first the base MetaFrame symbols, then the hotfix
symbols. This ensures that the symbols match the executable code.
Kernel Debug Configurations
There are two basic kernel debug configurations: local debug and remote debug.
A third type of debug configuration, the ICA debug, is a variation of local debug.
Each configuration is discussed below.
In a local debug configuration, the host and target computers are in close
proximity and are connected by a null-modem cable. While this is the simplest
debug configuration, it can only be used for on-site debugging.
In a remote debugging configuration, the host and target computers are connected
through dial-up modems. This configuration allows a support representative to
dial into the target computer located at a remote customer site from a host
computer located at Citrix headquarters.
In some cases, the support representative is not able to directly access the target
computer. If two MetaFrame servers are at the remote site, the support
representative can perform an ICA debug configuration.
Much like the local debug, the host and target computers are in the same location
connected by a null-modem cable. In addition, the host computer is configured to
accept an ICA dial-in connection. The remote support representative dials in to the
host computer and runs the kernel debugger in a remote session. This method
combines the simplicity and reliability of a local debug with the ability to remotely
debug a customer’s target computer.
Requirements for Debugging
To perform kernel debugging, you need the following equipment:
K
Target system: MetaFrame server with any hotfixes installed
K
Host system (local and ICA debug sessions): MetaFrame server with any
hotfixes installed
Chapter 7 Troubleshooting the System
157
Note The symbols for the MetaFrame server and hotfixes must be installed in the
proper order so that the symbols match the executable files. The host system must
have the same MetaFrame server and hotfix symbols installed, but it does not
require the same software configuration.
Hardware Requirements
Local Debug Session
K
Null-modem cable between host and target computers
Remote Debug Session
K
Modems and modem cables for host and target computers. The host computer
is usually preconfigured and is at the support provider’s site. The target
computer requires a modem configured to allow dial-in access to the target
system. Citrix recommends using the U.S. Robotics Sportster series 56Kbps
modem.
ICA Debug Session
K
Null-modem cable between host and target computers
K
Modems and modem cables for host and remote client computers. The host
computer must have a connection configured in Citrix Connection
Configuration
Configuring the Target Computer for Debugging
The procedure for configuring the target computer is similar for both local and
remote debugging. The only difference is that remote debugging requires you to
place the modem attached to the debugging port into auto-answer mode.
There are four steps to the setup process:
K
Installing hotfixes
K
Installing symbols
K
Preparing the modem and/or COM port
K
Modifying the Boot.ini to enable kernel debugging
Installing Hotfixes on the Target Computer
See “Applying Server Hotfixes and Service Packs” in Chapter 6, “Maintaining
MetaFrame.”
158
MetaFrame Solutions Guide
Installing Symbols on the Target Computer
The correct symbols must be installed on the target computer before kernel
debugging can occur.
Û To install the debugging symbols on the target computer
1. Create a Symbols directory in the %SystemRoot% directory; for example,md
%systemroot%\symbols.
2. Insert the MetaFrame CD-ROM into a CD-ROM drive that can be accessed by
the target computer. Use xcopy to copy the \Support\Debug\I386\Symbols
directory and its subdirectories from the MetaFrame CD-ROM to the Symbols
directory; for example: xcopy /v /s x:\support\debug\i386\symbols
%systemroot%\symbols, where x is the CD-ROM drive.
3. If you are installing hotfixes, copy the symbol files corresponding to the new
binaries in the hotfix to the %SystemRoot%\Symbols directory on the target
computer.
4. When you are done installing the symbols, configure the target system modem
and COM port.
Preparing the Target Computer Modem and COM Port
The next step is to configure the COM port and the optional modem (remote
debug only) on the target computer. Local and ICA debug configurations use a
null-modem connection between the target and host computers and do not need
modem configuration. Remote debug configurations require modem
configuration.
Û To configure the target system COM port for debugging
For both local and remote debugging, you must select the serial port that will be
used by the host system. This must be the highest numbered planar COM port; for
example, if your motherboard contains COM1 and COM2 ports, the debugger
defaults to COM2. Select the highest-numbered planar COM port in Device
Manager.
Note Do not configure the COM port used for debugging as a connection. Use
Citrix Connection Configuration to make sure no connection is configured for that
port.
Modifying the Boot.ini File to Enable Kernel Debugging
Boot.ini is a system text file that lists the operating systems that can be started, the
default operating system to start, and a timeout value specifying how long to wait
before automatically starting the default operating system.
Chapter 7 Troubleshooting the System
159
When you first start a MetaFrame server, the system loader (NTLDR) reads the
Boot.ini file in the system partition. Boot.ini defines what items will be listed in
the boot menu and how NTLDR will start each item. Here is a sample Boot.ini
file:
[boot loader]
timeout=30
default=multi(0)disk(0)rdisk(0)partition(1)\Winnt
[operating systems]
multi(0)disk(0)rdisk(0)partition(1)\Winnt="Microsoft Windows 2000
Advanced Server" /fastdetect
The line immediately following the [operating systems] section describes the path
NTLDR uses to boot this particular installation of Windows 2000. For the purpose
of this document, this line is referred to as the boot line. The boot line in this
example shows that the Windows 2000 server is installed in the \Winnt directory
on the first partition (partition 1) of the first disk (disk 0).
The target computer is placed in debug mode by setting one or more of the
following switches in the boot line in Boot.ini.
Boot.ini Debugger Switches
The following Boot.ini switches are used to enable the kernel debugger on the
target computer:
/Debug
Causes the kernel debugger to be loaded during boot and kept in
memory at all times. This allows a support engineer to break into
the target computer at any time, even if the system is not
suspended at a kernel STOP (blue) screen.
/Crashdebug
Causes the kernel debugger to be loaded during boot but swapped
out to the pagefile after boot. In this mode, a support engineer can
break into the debugger only if the target computer is suspended at
a kernel STOP (blue) screen.
/Baudrate=value
Determines the speed at which the target computer communicates
with the host computer. The default value is 19200 bps. For a
remote debug configuration, set the value for 9600 bps. This
switch also forces /Debug mode.
/Debugport=COMx
Specifies the serial port used for the kernel debugger on the target
computer, where x is the communications port to use. If no serial
port is specified, the kernel debugger defaults to COM2. Like
/Baudrate, this switch also forces /Debug mode.
Boot.ini Changes
Because the Boot.ini file usually has the Hidden, System, and Read-only file
attributes set, these attributes must be manually unset and then reset after editing.
160
MetaFrame Solutions Guide
Û To modify Boot.ini
1. Right click Boot.ini and select Properties. Uncheck the Read-only check box
in the Properties dialog box. Boot.ini can now be edited using Notepad. A
sample Boot.ini follows:
[boot loader]
timeout=30
default=multi(0)disk(0)rdisk(0)partition(1)\Winnt
[operating systems]
multi(0)disk(0)rdisk(0)partition(1)\Winnt="Microsoft Windows 2000
Advanced Server" /fastdetect
2. The best way to modify Boot.ini is to create a new boot entry for debugging.
This gives you the ability to boot your MetaFrame server for normal use or for
debug use. Copy the desired boot line and append the /Debug switch to the end
of the boot line. This switch is sufficient for local and ICA debug
configurations. For remote debug configurations, you must also append the
/Baudrate=9600 switch to the end of the boot line. If the debug modem or nullmodem cable is connected to a communications port other than COM2, make
sure you append the /Debugport=COMx switch. A sample modified Boot.ini
follows:
[boot loader]
timeout=30
default=multi(0)disk(0)rdisk(0)partition(1)\Winnt
[operating systems]
multi(0)disk(0)rdisk(0)partition(1)\Winnt="Microsoft Windows 2000
Advanced Server" /fastdetect
multi(0)disk(0)rdisk(0)partition(1)\Winnt="Microsoft Windows 2000
Advanced Server" /fastdetect /debug /baudrate=9600 debugport=com1
Note Do not configure the COM port used for debugging as a connection. Use
Citrix Connection Configuration to make sure no connection is configured for
that COM port.
After making the required changes, choose Save from the File pull-down menu
to save the changes.
3. Exit Notepad.
4. Right click Boot.ini and select Properties to restore the Read-only attribute of
Boot.ini.
5. Reboot the system.
The MetaFrame server is now ready for debugging by a remote host.
Chapter 7 Troubleshooting the System
161
Configuring the Host Computer for Debugging
The host computer set up is similar whether the host computer is used in a local,
remote, or ICA debug configuration. There are four steps to the set up process:
K
Installing symbols
K
Preparing the COM port and optional modem
K
Installing and configuring the kernel debugger
K
Running the kernel debugger
Installing Symbols on the Host Computer
To effectively debug the target computer, the host computer must have access to a
set of symbol files that exactly correspond to the files installed on the target
computer. Because the system files installed on the host may not match the system
files installed on the target (and are not required to), the symbol tree on the host
must be in a directory other than the host’s %SystemRoot% directory. Citrix
recommends creating a \Debug directory on the host computer with subdirectories
for each version of the symbol tree; for example the tree containing the symbols
for MetaFrame Version 1.8 for Windows 2000 might be named \Debug\MF18
\Symbols. Follow the same procedures used to install the symbol files on the
target computer to install symbols on the host computer, except that where the
procedure refers to the %SystemRoot% directory on the target computer, use the
\Debug directory on the host computer instead.
Û To install the debugging symbols on the host computer
1. Create a \Debug directory on the host computer. Create a subdirectory for each
version of the symbol tree; for example \Debug\MF18\Symbols.
2. Insert the MetaFrame CD-ROM into a CD-ROM drive that can be accessed by
the target computer. Use xcopy to copy the \Support\Debug\I386\Symbols
directory and its subdirectories from the MetaFrame CD-ROM to the directory
created in Step 1; for example: xcopy /v /s x:\support \debug\i386\symbols
d:\debug\mf18\symbols, where x is the CD-ROM drive.
3. If you are installing hotfixes, copy the symbol files corresponding to the new
binaries in the hotfix to the \Symbols directory of the target computer.
4. When you are done installing the symbols, configure the target system for
debugging.
Preparing the Host Computer Modem and COM Port
As with the target computer, the next step is to configure the COM port and the
optional modem (remote debug only) on the host computer. Local and ICA debug
configurations use a null-modem connection between the target and host
computers and do not need modem configuration. Remote debug configurations
require modem configuration.
162
MetaFrame Solutions Guide
Local Debug
For local debugging, very little configuration is required. Connect a null-modem
cable between the serial ports of the host and target computers.
Remote Debug
In a remote debug configuration, a modem is connected to the host computer. This
modem must be set to communicate at 9600 bps. It may also be necessary to
disable flow control, error correction, and compression. See “Running the Kernel
Debugger” later in this chapter for directions about resetting the modem.
ICA Debug
Like local debug configurations, ICA debug configurations require a null-modem
connection between the host and target computers. In addition, an async dial-in
connection must be configured on the host computer and a modem connected to
the dial-in connection port. Use Citrix Connection Configuration or the Dial-In
Setup wizard to create the dial-in connection.
Installing and Configuring the Kernel Debugger
Application
To install the kernel debugger application, insert the Windows 2000 CD-ROM in
the host computer. Run the Dbg.exe image in \Support\Debug and specify that it
installs to the \Debug directory on the host that was created to hold the symbol
files.
The following environment variables control the behavior of the kernel debug
application, I386kd.exe.
Variable
Purpose
_NT_DEBUG_PORT
COM port used by the host computer for
debugging. Default = COM1.
_NT_DEBUG_BAUD_RATE
The maximum baud rate for the debug
port. Use 9600 or 19200 for modem
connections, 19200 for null-modem serial
connections. Default = 19200.
_NT_SYMBOL_PATH
The path to the symbols directory.
_NT_DEBUG_LOG_FILE_APPEND
The name of the log file to which
debugger appends output.
_NT_LOG_FILE_OPEN
Optional; the name of the file to which to
write a log of the debug session.
Chapter 7 Troubleshooting the System
163
I386kd.exe supports the following command-line switches:
-b
Causes the debugger to stop execution on the target computer as soon as
possible by causing a debug breakpoint (INT 3).
-m
Causes the debugger to monitor modem control lines. The debugger is only
active when the data carrier detect (DCD) modem signal is asserted; otherwise,
the debugger is in terminal mode and all commands are sent to the modem.
This option can be used only with a remote debug configuration.
-r
Toggle output register flag.
-v
Verbose mode; displays more information about such things as when symbols
are loaded.
-x
Causes the debugger to stop execution on the target computer and break to a
command prompt when an exception first occurs rather than letting the
application or module that caused the exception handle it.
Citrix recommends that a batch file be used to configure the environment prior to
executing I386kd.exe. For example, assume the following host configuration:
K
Remote debug configuration
K
Host modem is connected to COM2
K
The baud rate is 9600
K
The host’s symbol tree is located in C:\Debug\MF18\Symbols
K
A log file is created in C:\Debug\MF18\Symbols
Here is a sample batch file using the assumptions listed above:
REM Sample Debug Batch File: SETDEBUG.BAT
REM Set Remote Debug Configuration: COM2, 9600 baud
set _NT_DEBUG_PORT=com2
set _NT_DEBUG_BAUD_RATE=9600
REM Set path to debug symbols
set _NT_SYMBOL_PATH=c:\debug\mf18\symbols
REM Enable logging and set log path
set _NT_LOG_FILE_OPEN=c:\debug\mf18\symbols\debug.log
REM Start kernel debugger: Verbose mode, Monitor DCD
i386kd -v -m
Running the Kernel Debugger
The actual debugging process is outside the scope of this document. This section
describes only how to verify that the debugger is installed and configured
properly. Once this is verified, the system is ready for a support engineer to debug
the system.
Local and ICA Debugs
When I386kd is executed on the host computer, the following text is displayed:
164
MetaFrame Solutions Guide
Microsoft(R) Windows 2000 Kernel Debugger
Version 5.00.2066.1
Copyright (C) Microsoft Corp. 1981-1999
Symbol search path is:
i386kd: waiting to reconnect...
At this point, the kernel debugger is waiting for user input. You can press
CTRL+C to break into the target computer if it is still running. If the target is
currently stopped at a blue screen, break in occurs automatically. If you have any
problems at this point, press CTRL+R to force a resynchronization between the
host and target computers.
Remote Debug
If you are using a remote debug configuration, I386kd must be executed with the
-m option. The following text is displayed:
Microsoft(R) Windows 2000 Kernel Debugger
Version 5.00.2066.1
Copyright (C) Microsoft Corp. 1981-1999
Symbol search path is: e:\;e:\mfsymbols
i386kd: waiting to connect...
i386kd: No carrier detect - in terminal mode
In this case, the debugger is in terminal mode, so you can directly send standard at
commands to the host modem. Begin by sending commands to disable hardware
compression, flow control, and error correction. These commands vary from
modem to modem, so consult your modem documentation. The following modem
initialization string is recommended for U.S. Robotics modems:
AT&H0&I0&K0&M0&N6
Once the modem is initialized properly, it must be instructed to dial the phone
number of the target modem. This is accomplished by sending the ATD command
to the modem. For tone dialing phone systems, type ATDTphonenumber, where
phonenumber is the telephone number of the modem connected to the target
system.
Some telephone systems use pulse dialing systems. For pulse dialing systems, type
ATDPphonenumber, where phonenumber is the telephone number of the target
modem.
Assuming the modem connected to the target system is properly configured, the
host modem and target modem establish a connection and assert the data carrier
detect (DCD) signal. Once DCD is detected, terminal mode is disabled and you
are connected to the debugger on the remote target computer.
At this point, the kernel debugger is waiting for user input. You can press
CTRL+C to break into the target computer, if it is still running. If the target is
Chapter 7 Troubleshooting the System
165
currently stopped at a blue screen, break in occurs automatically. If you have any
problems at this point, press CTRL+R to force a resynchronization between the
host and target computers.
With some remote debug configurations, it can be difficult to break into the
debugger. See “Troubleshooting” below for additional tips.
Troubleshooting a Debug Session
Typically, few problems are encountered with local and ICA debugs. Most
problems occur when doing a remote debug and they are generally modem related.
The most common problems encountered are:
K
Inability to break into the debugger
K
Failure of the target modem to auto-answer
K
[Parity Error] message
Each problem is discussed separately below.
Inability to Break into the Debugger
This is the most common problem experienced. The symptom is that the target
computer fails to respond to the CTRL+C and CTRL+R commands from the host
computer. The target and host modems appear to be connected and functioning
normally but the host operator is unable to stop the target computer.
It is not clear why this condition occurs. Because this problem can be difficult to
resolve, Citrix recommends using an ICA debug instead of a remote debug if the
problem occurs. If an ICA debug configuration is not possible, follow the steps
below to resolve this problem:
1. Make sure the target computer is started in debug mode. When the target
computer is rebooted in debug mode, the initial blue startup screen displays
text showing the kernel debugger enabled on a particular COM port. If this text
is not displayed, the debug options were not added correctly to the Boot.ini
file. Make sure the COM port displayed is the one to which the modem is
connected.
2. Change the modem make and model on the target computer. If possible, use
the same make and model modem as the Citrix representative. Similar modems
appear to have a higher remote debug success rate compared with modems
from different manufacturers. Citrix recommends using the U.S. Robotics
Sportster 56Kbps modem.
3. Force the baud rate of both modems to 9600 bps. Consult your modem
documentation for the initialization strings that set the DTE and DCE rates to
9600 bps. For U.S. Robotics modems, this command is AT&N6.
166
MetaFrame Solutions Guide
4. Add the /baudrate=9600 option to Boot.ini. This forces the baud rate on the
debug COM port to 9600 bps. Always set remote debug configurations for this
option.
5. Press the PrintScreen key on the target computer console. While in debug
mode, the PrintScreen key causes the host computer to break in.
6. Make sure both modems are set to transmit break signals. For some modems, a
break signal (CTRL+C) received from the computer may cause the modem to
perform a specific task without actually transmitting the break to the remote
system. For instance, the default behavior of U.S. Robotics modems is to flush
the data buffer before sending the break signal to the remote modem. Make
sure both modems are set to pass the CTRL+C character. Consult your modem
documentation for the necessary commands. For example, to disable
destructive breaks on U.S. Robotics modems, the command is AT&Y2.
7. With the modems connected and data carrier detect present, reboot the target
computer. If the target modem is set to ignore the state of DTR, the modems
will stay connected even if the target computer is rebooted. When the kernel
loads on the target computer, it outputs information to the debug port. If the
host computer is connected at that time, this can cause the systems to
synchronize.
Failure of the Target Modem to Auto-Answer
For all Hayes-compatible modems, ATS0=1 is the command that instructs the
modem to auto-answer on one ring. The target modem must be configured with
this setting. If the target modem does not auto-answer, follow the procedure
below:
1. Move the target modem to a COM port other than the port currently being used
by the kernel debugger. If only one COM port is available on the target
computer, connect the modem to a different computer or reboot the target with
the debugger disabled.
2. Use the Terminal application (or another communications program such as
Hyperterminal) to send the ATS0=1 command to the modem. Make sure you
receive an OK response from the modem.
3. If possible, dial the number for the modem from a telephone handset to check
that it now auto-answers.
4. Save the current modem configuration in non-volatile RAM so the modem is
in auto-answer mode when it is powered up. For example, the command
AT&W saves the current modem configuration to non-volatile RAM
(NVRAM) for U.S. Robotics modems. When the debug process is finished,
restore the factory defaults by sending the AT&F command (or equivalent) to
the modem. Use the AT&W command (or equivalent) to save the factory
defaults to NVRAM.
Chapter 7 Troubleshooting the System
167
5. Reconnect the target modem to the debug port on the target computer (or
restart the target computer in debug mode).
6. Use the host computer to dial into the target modem.
[Parity Error] Message
This message is displayed on the host computer if the baud rates are too high to
sustain a reliable connection. The following steps resolve this problem:
1. Force the baud rate of both modems to 9600 bps. Consult your modem
documentation for the initialization string(s) that sets the DTE and DCE rates
to 9600 bps. For U.S. Robotics modems, this command is AT&N6.
2. Add the /baudrate=9600 option to Boot.ini. This sets the baud rate on the
debug COM port to 9600 bps. Always set remote debug configurations for this
option.
3. Change the modem make and model on the target computer. If possible, use
the same make and model modem as the Citrix representative. Identical
modems appear to have a higher remote debug success rate versus modems
from different manufacturers.
5. Conduct a loopback test to isolate the network. Install the ICA Win32 Client
on the MetaFrame server and make an IPX connection back to the MetaFrame
server. If the loopback test passes, verify that ICA connections on the same
network segment as the MetaFrame server can connect. If clients on the same
network segment can connect but clients on other segments cannot connect,
there is a problem with the router configuration or cabling.
6. Install the most current ICA Client.
7. Install the most current network interface card (NIC) drivers on the client and
server machines.
8. Remove and reinstall the NWlink IPX service.
9. Use Event Viewer to check for connection-related error messages.
10. If the problem persists, create a debug trace for the ICA Client connection.
168
MetaFrame Solutions Guide
169
Index
A
access
granting to anonymous users 94
Accounting Software
Great Plains Dynamics C/S+ and Dynamics 40
Analyzing Your Business Needs 12
anonymous users 94
Application Compatibility 38
Application Installation and Configuration 34
Application Integration 33
Application Notes
software 40
Application Video Performance 38
applications
installing 33
software application notes 40
Applying Server Hotfixes and Service Packs 146
Auditing System Activity 96
AUDITLOG Utility 98
Client Platforms
IBM OS/2 Warp Version 4.0 44
Compaq Lightning MAC B2 18
compatibility
applications 38
Comtrol RocketModem 73
Configurations
kernel debug session 156
configuring applications 34
Configuring the Host Computer for Debugging 161
Configuring the Target Computer for Debugging 157
Connecting to the Web 117
Convention
hotfix naming 146
Conventions x
Corel WordPerfect Suite 8 79
Creating Server Farms 29
D
Benefits
end-user 9
IS management 8
Bulletin Board Service xiii
Business Alliance Partners 11
Business Needs, Analyzing 12
Debugging
host computer 161
target computer 157
Defining User Rights 93
Dell PowerEdge 4100/200 18
Deploying MetaFrame Servers and the ICA Clients 15
DirectICA Services 6
Disclaimer x
Driver Conflicts
resolving 154
C
E
Cisco Queuing Technologies 140
Citrix on the World Wide Web xii
Citrix Sales Offices xiii
Citrix Services 6
DirectICA 6
Installation Management 7
License Packs 7
Load Balancing 6
Resource Management 7
SecureICA 6
VideoFrame 7
Citrix Technical Support xiii
Citrix Web Computing 117
sample 122
Citrix-Compatible Program 11
Client Modem Support 30
E-Mail Software
Microsoft Exchange Server Version 5.0 and Microsoft
Exchange Mail Client Version 5.0 50
Microsoft Exchange Server Version 5.5 and Microsoft
Exchange Mail Client Version 5.0 55
Microsoft Outlook 98 59
End-User Benefits 9
Enterprise
securing
auditing system activity 96
defining user rights 93
protecting against viruses and Trojan horses 95
securing data and applications 99
SecureICA Services 99
Third-Party Security Products 102
Enterprise Application Challenges 1
B
170
MetaFrameFrame Solutions Guide
Event Logs
analyzing activity 133
event information included 132
using for troubleshooting 132
Event Viewer 131
Events
details 132
ExtendNet VPN Remote Access Server 69
Extracting Hotfixes 147
F
Features Included 9
Financial Software
PeopleSoft 6.x 61
Finding Information About Windows 2000 xii
Finding Memory Leaks 152
Finding More Information About MetaFrame xi
G
Great Plains Dynamics C/S+ and Dynamics 40
H
Host Computer
configuring for debugging 161
Host Connectivity Software
Hummingbird eXceed 5 for Windows 2000 66
Hotfix Naming Convention 146
Hotfix Utility 148
Hotfixes
extracting, installing, removing 147
Hummingbird eXceed 5 for Windows 2000 66
I
I386kd.exe 155
IBM Netfinity 3500 20
IBM Netfinity 7000 21
IBM Netfinity 7000 M10 (86802RU) 22
IBM OS/2 Warp Version 4.0 44
IBM PC Server 330 25
IBM ServeRAID Netfinity 5500 20
ICA Client Software
deploying
modem support 30
ICA Clients 5
deploying 15
ICA sessions
monitoring 139
ICA traffic
prioritizing 140
Cisco Queuing Technologies 140
Packeteer (PacketShaper) 143
Installation Management Services 7
Installing Applications 33
Application Compatibility 38
Application Video Performance 38
Software Application Notes 40
Installing Hotfixes 147
Installing MetaFrame 28
Installing Windows 2000 26
integrating applications 33
Internet Service Provider Connectivity Software
ExtendNet VPN Remote Access Server 69
IS Management Benefits 8
K
Kernel Debug Session
configurations 156
debugging, requirements for 156
host computer, configuring for debugging 161
setting up 154
symbols and symbol trees 155
target computer, configuring for debugging 157
troubleshooting 165
Kernel Debugger, I386kd.exe 155
L
License Packs 7
Load Balancing Services 6
Lotus Notes 4.5 for Windows NT 80
Lotus SmartSuite 97 83
M
Maintaining MetaFrame 131
Maintaining Server Performance
Monitoring Network Activity and Performance 131
troubleshooting 151
Memory Leaks
containing 154
finding 152
finding with Performance Monitor 152
in NT Services 153
MetaFrame
deploying 15
installing 28
maintaining 131
MetaFrame Application Server for Windows 3
MetaFrame Servers and NT Domains 26
MetaFrame’s Features and Benefits 8
Index
Microsoft Exchange Server Version 5.0 and Microsoft
Exchange Mail Client Version 5.0 50
Microsoft Exchange Server Version 5.5 and Microsoft
Exchange Mail Client Version 5.0 55
Microsoft Internet Explorer Version 4.0 for Windows
NT 118
Microsoft Internet Explorer Version 5.0 for Windows
NT 119
Microsoft Internet Information Server Version 5.0 121
Microsoft Office 2000 86
Microsoft Office 97 85
Microsoft Outlook 98 59
Microsoft Visual Basic Version 5.0 Enterprise Edition 91
Microsoft Windows 2000 Multi-Protocol Routing 76
Modem Connectivity Software
Comtrol RocketModem 73
modems 30
Monitoring Network Activity and Performance 131
Event Viewer 131
monitoring users and ICA sessions 139
Network Monitor 133
Performance Monitor 134
performance problems, solving 135
virtual memory 139
Monitoring Users and ICA Sessions 139
Performance Problems
solving 135
Prioritizing
ICA traffic 140
Cisco Queuing Technologies 140
Packeteer (PacketShaper) 143
Productivity Software
Corel WordPerfect Suite 8 79
Lotus Notes 4.5 for Windows NT 80
Lotus SmartSuite 97 83
Microsoft Office 2000 86
Microsoft Office 97 85
Novell GroupWise 5.5 88
Novell ManageWise 2.6 89
Symantec ACT! Version 3 78
Programming Software
Microsoft Visual Basic Version 5.0 Enterprise Edition 91
Protecting Against Viruses and Trojan Horses 95
R
references xii
Removing Hotfixes 147
Resolving Driver Conflicts 154
Resource Management Services 7
N
S
Naming Convention
hotfix 146
Netscape Communicator Version 4.61, 32-bit Version 120
Netscape FastTrack Server Version 3.01 for Windows
NT 122
Netscape Navigator Version 3.04, 32-bit Version 119
Network Activity
monitoring 131
Network Monitor 133
Networking Software
Microsoft Windows 2000 Multi-Protocol Routing
Service 76
Novell GroupWise 5.5 88
Novell ManageWise 2.6 89
NT Domains 26
NT Services
memory leaks 153
Sales Offices xiii
Sample Procedure for Setting Up Web Computing 122
Sample Server Configurations 16
SecureICA Services 6, 99
Securing Data and Applications 99
Securing the Enterprise 93
Auditing System Activity 96
Defining User Rights 93
Protecting Against Viruses and Trojan Horses 95
Securing Data and Applications 99
SecureICA Services 99
Third-Party Security Products 102
security 93
Security Dynamics ACE/Server 103
Server Farms
creating 29
Server Hardware Device Notes 17
Compaq Lightning MAC B2 18
Dell PowerEdge 4100/200 18
IBM Netfinity 3500 20
IBM Netfinity 7000 21
IBM Netfinity 7000 M10 (86802RU) 22
IBM PC Server 330 25
IBM ServeRAID Netfinity 5500 20
Server Hotfixes and Service Packs 146
Server-based Computing 3
how it works 2
P
Packeteer (PacketShaper) 143
Partnerships and Compatibility 11
PeopleSoft 6.x 61
Performance
monitoring 131
Performance Monitor 134
finding memory leaks 152
171
172
MetaFrameFrame Solutions Guide
Services
Citrix 6
Services,Citrix
DirectICA 6
Installation Management 7
License Packs 7
Load Balancing 6
Resource Management 7
SecureICA 6
VideoFrame 7
Setting up a Kernel Debug Session 154
Software Application Notes 40
Supported Web Browsers 118
Microsoft Internet Explorer Version 4.0 for Windows
NT 118
Microsoft Internet Explorer Version 5.0 for Windows
NT 119
Netscape Communicator Version 4.61, 32-bit
Version 120
Netscape Navigator Version 3.04, 32-bit Version 119
Supported Web Servers 121
Microsoft Internet Information Server Version 5.0 121
Netscape FastTrack Server Version 3.01 for Windows
NT 122
Symantec ACT! Version 3 78
Symbols and Symbol Trees 155
T
Target Computer
configuring for debugging 157
The Hotfix Utility 148
Third-Party Security Products 102
Security Dynamics ACE/Server 103
VTCP/SECURE Software 112
trojan horse attacks
preventing 95
Troubleshooting 151
kernel debug session 165
user accounts 151
Troubleshooting a Kernel Debug Session 165
U
User Accounts
troubleshooting 151
user profiles 93
Users
monitoring 139
Using the Guide ix
V
video performance 38
VideoFrame 7
Virtual Memory 139
viruses
preventing 95
VTCP/SECURE Software 112
W
Web Computing
sample 122
Web sites xii
What is MetaFrame? 1
Who Should Use this Guide ix
Windows 2000
installing 26
Y
Year 2000 Readiness xiii