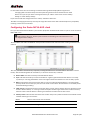
1
User Guide Dante-MY16-AUD Copyright © 2014 Audinate Pty Ltd All Rights Reserved. Audinate®, the Audinate logo and Dante are trademarks of Audinate Pty Ltd. All other trademarks are the property of their respective owners. Audinate products are protected by one or more of US Patents 7747725, 8005939, 7978696 , 8171152 and other patents pending or issued, see www.audinate.com/patents. Legal Notice and Disclaimer Audinate retains ownership of all intellectual property in this document. The information and materials presented in this document are provided as an information source only. While effort has been made to ensure the accuracy and completeness of the information, no guarantee is given nor responsibility taken by Audinate for errors or omissions in the data. Audinate is not liable for any loss or damage that may be suffered or incurred in any way as a result of acting on information in this document. The information is provided solely on the basis that readers will be responsible for making their own assessment, and are advised to verify all relevant representation, statements and information with their own professional advisers. Document Version Dante-MY16-AUD User Guide version 1.41, published August 2014. Contacts Audinate Pty Ltd Level 1, 458 Wattle Street Ultimo NSW 2007 AUSTRALIA Tel. +61 2 8090 1000 Postal address Audinate Pty Ltd PO Box 855 Broadway NSW 2007 AUSTRALIA Audinate Inc USA Tel: +1 503 224 2998 [email protected] www.audinate.com Dante-MY16-AUD User Guide Version 1.41 Page 2 of 46 TABLE OF CONTENTS Copyright ..................................................................................................................................................................................... 2 Legal Notice and Disclaimer ..................................................................................................................................................... 2 Document Version ..................................................................................................................................................................... 2 Contacts ....................................................................................................................................................................................... 2 Important Notices........................................................................................................................... 5 Warning ....................................................................................................................................................................................... 5 Information for Users on Collection and Disposal of Old Equipment .............................................................................. 5 Regulatory Information ............................................................................................................................................................ 6 Introduction .................................................................................................................................... 7 About Audinate .......................................................................................................................................................................... 7 About Dante................................................................................................................................................................................ 7 Package Contents ........................................................................................................................... 8 Getting Started: about this User Guide ......................................................................................... 8 About your Dante-MY16-AUD ....................................................................................................... 9 Dante-MY16-AUD Specifications............................................................................................................................................. 9 Dante-MY16-AUD Connectors and Indicators ....................................................................................................................10 Installing your card ....................................................................................................................... 12 Before you install .....................................................................................................................................................................12 To Install ....................................................................................................................................................................................12 Removing your card.................................................................................................................................................................13 About your Audinate Software .................................................................................................... 14 What is Dante Controller?......................................................................................................................................................14 What is the Dante Virtual Soundcard?.................................................................................................................................15 Obtaining your Audinate Software .............................................................................................. 17 Registering your Dante-MY16-AUD ......................................................................................................................................17 Obtain your Dante Virtual Soundcard License ID...............................................................................................................17 Downloading Dante Controller..............................................................................................................................................17 Downloading and Activating the Dante Virtual Soundcard..............................................................................................18 Connecting to a network .............................................................................................................. 19 Before you set up your Network: Important Notes ...........................................................................................................19 Gigabit Ethernet Support .................................................................................................................................................19 Choosing a Gigabit Ethernet Switch ...............................................................................................................................19 Choosing Ethernet Cabling...............................................................................................................................................19 Network Configuration Options ............................................................................................................................................20 Straight-through connection to your PC .......................................................................................................................20 Connection via a Gigabit Switch......................................................................................................................................20 Connection via a Redundant Network .................................................................................................................................21 UNSUPPORTED Dante Network Configurations .................................................................................................................23 Connecting Primary and Secondary redundant networks to the same switch ......................................................23 HA Remote ................................................................................................................................................................................24 HA Remote Chain Example 1 ...........................................................................................................................................24 HA Remote Chain Example 2 ...........................................................................................................................................24 Dante-MY16-AUD User Guide Version 1.41 Page 3 of 46 Mode Selection ..................................................................................................................................................................25 Special Considerations......................................................................................................................................................26 Dante-MY16-AUD Basic Operation .............................................................................................. 27 Pre-operation checklist...........................................................................................................................................................27 Using Dante Controller ...........................................................................................................................................................27 Setting up audio routes ..........................................................................................................................................................28 Configuring your card..............................................................................................................................................................28 Identifying individual Dante-MY16-AUD cards.............................................................................................................29 Dante-MY16-AUD Device name......................................................................................................................................29 Dante-MY16-AUD default Sample rate .........................................................................................................................30 Dante-MY16-AUD Advanced Configuration with Dante Controller ........................................... 31 Unicast and Multicast Modes ................................................................................................................................................31 Setting Latency .........................................................................................................................................................................32 Configuring the Dante-MY16-AUD clock .............................................................................................................................33 Master Clock.......................................................................................................................................................................34 Checking clock configuration.................................................................................................................................................34 Configuring your Yamaha Equipment .......................................................................................... 35 Upgrading Firmware................................................................................................................................................................36 Troubleshooting............................................................................................................................ 37 Introduction ..............................................................................................................................................................................37 Network Configuration – Gigabit Ethernet .........................................................................................................................37 PC / Mac network configuration ...........................................................................................................................................38 Checking your PC or Mac IP configuration....................................................................................................................39 Switch configuration and Cabling .........................................................................................................................................39 Symptoms of switch or cabling issues ...........................................................................................................................39 Switch and Cabling Checklist ...........................................................................................................................................39 PC Configuration ......................................................................................................................................................................40 Dante Configuration: Sample Rate .......................................................................................................................................40 Sample rate configuration checklist...............................................................................................................................40 Symptom: audio only appears on every second channel @96kHz...........................................................................40 Dante Configuration: Clock ....................................................................................................................................................41 How do I know if my Clock is incorrectly configured? ................................................................................................41 How do I fix it? ...................................................................................................................................................................41 Symptom: orange “Error” light with green “Sync” light .............................................................................................41 Symptom: Red “Sync” light with orange “Error” light ................................................................................................41 ANNEX A: Dante Synchronization and Clocking .......................................................................... 42 Dante Clock Types....................................................................................................................................................................42 The Dante PTP Master Clock..................................................................................................................................................42 Dante Clock Settings................................................................................................................................................................42 Dante Clocking and Redundancy...........................................................................................................................................43 Clock Status Monitoring .........................................................................................................................................................43 How to configure Dante clocking..........................................................................................................................................44 Automatically .....................................................................................................................................................................44 Choose an external clock for the Dante network to use ............................................................................................44 Manually choose a Dante PTP Master Clock ................................................................................................................44 Dante-MY16-AUD User Guide Version 1.41 Page 4 of 46 Important Notices Warning To avoid the possibility of personal physical injury or damage to the card, always take sensible precautions when using this card including but not limited to the following: Only install the card in compatible Yamaha audio devices and observe any restrictions on the max imum number of expansion cards that can be simultaneously installed. For more information see the Yamaha Pro Audio web site www.yamahaproaudio.com Do not attempt to modify the card or disassemble it. Disconnect the power cable of the audio device before installing this card. Turn off any peripheral devices connected to the audio device and unplug all related cables. Handle the card carefully and avoid touching exposed connectors and metal parts. Drain any static electricity from your body or clothing befor e handling the card. Do not drop the card or subject it to physical shock. Avoid loose screws or other extraneous metal objects coming into contact with the card when installed and powered up. Do not expose the card to sudden temperature changes from cold to hot. Do not expose the card to rain or moisture. Avoid installing this unit where foreign objects may fall onto this unit and/or this unit may be exposed to liquid dripping or splashing. Audinate cannot be held responsible for any loss or destruction of data or damage caused by improper use of or modifications to the device. Information for Users on Collection and Disposal of Old Equipment This symbol on the products, packaging, and/or accompanying documents means that used electrical and electronic products should not be mixed with general household waste. For proper treatment, recovery and recycling of old products, please take them to applicable collection points, in accordance with your national legislation and the Directives 2002/96/EC. By disposing of these products correctly, you will help to save valuable resources and prevent any potential negative effects on human health and the environment which could otherwise arise from inappropriate waste handling. For more information about collection and recycling of old products, please contact your local municipality, your waste disposal service or the point of sale where you purchased the items. For business users in the European Union If you wish to discard electrical and electronic equipment, please contact your dealer or supplier for further information. Information on Disposal in other Countries outside the European Union This symbol is only valid in the European Union. If you wish to discard these items, please contact your local authorities or dealer and ask for the correct method of disposal. Dante-MY16-AUD User Guide Version 1.41 Page 5 of 46 Regulatory Information FCC INFORMATION (U.S.A) IMPORTANT NOTICE: DO NOT MODIFY THIS UNIT! This product, when installed as indicated in the instructions contained in this manual, meets FCC requirements. Modifi cations not expressly approved by Audinate may void your authority, granted by the FCC, to use the product. IMPORTANT: When connecting this product to accessories and/or another product use only high quality shielded cables. Follow all installation instructions. Failure to follow instructions could void your FCC authorization to use this product in the USA. NOTE: This product has been tested and found to comply with the requirements listed in FCC Regulations, Part 15 for Class “B” digital devices. Compliance with these requirements provides a reasonable level of assurance that your use of this product in a residential environment will not result in harmful interference with other electronic devices. Compliance with FCC regulations does not guarantee that interference will not occur in all installations. If this product is found to be the source of interference, which can be determined by turning the unit "OFF' and "ON", please try to eliminate the problem by using one of the following measures: Relocate either this product or the device that is being affected by the interference. Utilize power outlets that are on different branch (circuit breaker or fuse) circuits or install AC line filter/so In the case of radio or TV interference, relocate/reorient the antenna. If the antenna lead-in is 300 ohm ribbon lead, change the lead-in to coaxial type cable. If these corrective measures do not produce satisfactory results, please contact the local retailer authorized to distribute this type of product. If you cannot locate the appropriate retailer, please contact Yamaha Corporation of America, Electronic Service Division, 6600 Orangethorpe Ave., Buena Park, CA 90620. The above statements apply ONLY to those products distributed by Yamaha Corporation of America or its subsidiaries. *This applies only to products distributed by YAMAHA CORPORATION OF AMERICA (Class B) This device complies with part 15 of the FCC Rules. Operation is subject to the following two conditions: (1) This device may not cause harmful interference, and (2) this device must accept any interference received, including interference that may cause undesired operation. COMPLIANCE INFORMATION STATEMENT CANADA (DECLARATION OF CONFORMITY PROCEDURE) This Class B digital apparatus complies with Canadian ICES-003. Responsible Party : Yamaha Corporation of America Cet appareil numérique de la classe B est conforme à la norme NMB-003 du Canada. Address : 6600 Orangethorpe Ave., Buena Park, Calif. 90620 Telephone : 714-522-9011 Type of Equipment : Dante INTERFACE CARD Model Name : Dante-MY16-AUD • This applies only to products distributed by Yamaha Canada Music Ltd. (class B) • Ceci ne s’applique qu’aux produits distribués par Yamaha Canada Musique Ltée. This device complies with Part 15 of the FCC Rules. Operation is subject to the following two conditions: 1) this device may not cause harmful interference, and 2) this device must accept any interference received including interference that may cause undesired operation. See user manual instructions if interference to radio reception is suspected. * This applies only to products distributed by YAMAHA CORPORATION OF AMERICA. (FCC DoC) Dante-MY16-AUD User Guide Version 1.41 Page 6 of 46 Introduction About Audinate Audinate Pty Ltd is a leading developer of media networking technology whose products and solutions are transforming the way the world interconnects multimedia systems. Audinate’s rapidly growing customer base spans the broader international AV industry and includes many key industry brands. Audinate’s hardware and software products and solutions are founded on patented technologies invented by its world-class networking experts. They enable manufacturers and AV system solution providers to produce sophisticated, easy to use, pro-audio quality AV solutions over standard IP networks. Audinate is based in the United States and in Sydney, Australia. Digital Media Networking Perfected About Dante Audinate’s Dante technology provides high performance digital media networking that meets the quality and performance requirements of professional live sound, AV installations and broadcast and recording systems. Designed to fully exploit the capabilities of today and tomorrow’s networking equipment, Dante provides media transport mechanisms that eliminate many traditional audio network design restrictions. Dante makes it easy to set up robust, flexible digital audio networks with virtually unrestricted performance. A Dante network can be designed with mixed Gigabit and 100Mbps network speeds, simultaneously support audio with different sample rates and bit depths, and even allow the design of network zones with different latencies. Dante is built on Internet Protocols — not just Ethernet. Because it uses standard IP over Ethernet, Dante is capable of running on inexpensive off-the-shelf computer networking hardware, and with the use of standard QoS can share installed networks with other data and computing traffic. Dante provides sample-accurate synchronization and can deliver the very low latency required by professional audio. Dante’s network-centric, audio-independent approach to synchronization allows perfectly synchronized playout across different audio channels, devices and networks, even over multiple switch hops. Dante makes networking a true plug-and-play process, allowing automatic device discovery and system configuration. Dante-enabled devices will automatically setup their network configuration and advertise themselves and their channels on the network, reducing complicated, error -prone set-up procedures. Instead of “magic numbers”, networked devices and their input and output signals can be named to make sense to the user. Dante is not restricted to allowing configuration and transmission of audio channels. Dante also provides mechanisms to send or receive control and monitoring information across the Dante IP network, including equipment-specific messages and control specified and developed by a particular manufacturer. With its strong foundations and links to current and evolving network standards, Dante is able to deliver a level of future proofing otherwise unavailable in other types of digital audio transportation. Dante was designed for Gigabit networks from its inception, and Dante as it exists today already incorporates aspects of the emerging AVB networking standards. Continued evolution of its networki ng technology is an integral part of the Dante roadmap. Dante technology is available in ready-to-implement hardware and software products, reference designs and development APIs. For more information, please visit the Audinate website at www.audinate.com. Dante-MY16-AUD User Guide Version 1.41 Page 7 of 46 Package Contents The following items are included with your Dante-MY16-AUD. Check to ensure you have everything listed here. Dante-MY16-AUD card in unopened anti -static bag Printed Getting Started Guide ‘Download Your Software’ card Getting Started: about this User Guide This User Guide has been designed to provide you with the information you will need to install and operate your Dante-MY16-AUD card in your Yamaha equipment. To start using your Dante-MY16-AUD card and recording and playing back audio, follow the steps below. Install your Dante-MY16-AUD card(s) Refer to the section About your Dante-MY16-AUD for details about your card specification and installation instructions. Register your Dante-MY16-AUD and obtain your Dante Virtual Soundcard License ID Refer to the section Obtaining your Audinate Software for details. Download and Install your Audinate software Refer to the section Obtaining your Audinate Software for details. Set up your Dante network Refer to the section Go to Audinate’s website: www.audinate.com. 1. Navigate to ‘Products’ -> ‘Dante Virtual Soundcard’. 2. Under ‘Download’, choose your operating system. 3. Click the red button to go to the relevant release. 4. Click the hyperlink under ‘File downloads’ to download the installer. When you first run Dante Virtual Soundcard you will need to activate it, using a valid Dante Virtual Soundcard license ID. Connecting to a network for details. Configure your Dante-MY16-AUD card(s) in your Yamaha equipment Refer to the sections Dante-MY16-AUD Basic Operation and Configuring your Yamaha Equipment for details. Dante-MY16-AUD User Guide Version 1.41 Page 8 of 46 About your Dante-MY16-AUD The Dante-MY16-AUD card is an expansion card for use with compatible Yamaha professional audio equipment. It allows the transmission and reception of up to 16 bidirectional channels of 48kHz, 24 -bit uncompressed digital audio data complying with Audinate’s Dante™ audio networking standard (8 bidirectional channels at 96kHz, 24bit). The Dante-MY16-AUD card has a fully compatible Yamaha Mini -YGDAI standard interface connector allowing it to be installed in a range of compatible Yamaha equipment. Gigabit Ethernet connectors ensure low latency, high-quality synchronization audio. Primary network interface Secondary network interface for use with redundant network Dante-MY16-AUD Specifications Gigabit Network Support Redundancy Synchronization 2 x Gigabit (1000Mbps) Ethernet RJ45 connectors Supports glitch-free Dante audio redundancy with dual Ethernet networks High quality on-board VCXO clock can provide master clock OR slave from audio equipment; automatic synchronization with Dante network Supported Sample Rates 48kHz and 96kHz Audio channels 16 bidirectional @ 48kHz OR 8 bidirectional @ 96kHz Sample bit-depth 24 bit PCM Serial port For support of HA Remote on capable Yamaha products Expandable Install up to four Dante-MY16-AUD cards in available MY16-compatible slots for up to 64 bidirectional audio channels Compatible Yamaha Compatible with a range of digital mixing consoles, processors and power equipment*: amps equipped with MY16-interface compatible card slots, including: Digital Mixers CL5/3/1, QL5/1, PM5D, DSP5D, M7CL, LS9, DM2000, DM1000, 02R96, 01V96, 01V96i Processors DME24N, DME64N, MTX5-D Power Amps TX4n/5n/6n * For latest information, please see the Yamaha Pro Audio web site at www.yamahaproaudio.com Dante-MY16-AUD User Guide Version 1.41 Page 9 of 46 Dante-MY16-AUD Connectors and Indicators Primary RJ45 Gigabit Ethernet connector Always used. Secondary RJ45 Gigabit Ethernet connector for use when glitch free redundancy is required. 5. In redundancy mode, a failure on either connection will not cause an interruption to the audio See the Go to Audinate’s website: www.audinate.com. 6. Navigate to ‘Products’ -> ‘Dante Virtual Soundcard’. 7. Under ‘Download’, choose your operating system. 8. Click the red button to go to the relevant release. 9. Click the hyperlink under ‘File downloads’ to download the installer. When you first run Dante Virtual Soundcard you will need to activate it, using a valid Dante Virtual Soundcard license ID. Connecting to a network section for more information on setting up redundant networks. Link status / activity LED Green indicates an established link; flashing indicates link activity. Gigabit link status LED Orange indicates an established Gigabit Ethernet link. Serial port For Yamaha HA Remote. Requires a straight-through DB9 (DE9) serial cable with a male connector. Status LEDs The status LEDs indicate the following conditions: System – Indicates the status of the Dante system on this card. A Green light indicates the system is operating properly. An amber or red light indicates that the system has failed to boot correctly. Sync – Indicates the synchronization status of the Dante device. A solid green light indicates that the device is a network slave and is sync hronized to the network master. A flashing green light indicates that the devi ce is the network clock master. An orange light indicates the syncing is in progress. A red light indicates a network synchronization error. Obtaining network sync may take up to 45 seconds. Serial – indicates Rx and Tx activity via either the external or HA remote serial port Dante-MY16-AUD User Guide Version 1.41 Page 10 of 46 Dante-MY16-AUD User Guide Version 1.41 Page 11 of 46 Error – Indicates Dante-host equipment synchronization state or network issues. Solid green indicates that the Yamaha host equipment and the Dante-MY16-AUD card are in lock. Solid orange indicates that the Yamaha host equipment and the Dante-MY16-AUD card are not in lock. Obtaining sync lock may take up to 45 seconds when multiple cards are installed. If sync is not achieved in 45 seconds check the word clock configuration in both the DanteMY16-AUD the card and the Yamaha equipment. Intermittent periods of solid red indicate network errors are being detected (such as dropped or corrupt packets). All LEDs flashing green All LEDs will flash green when the card’s Identify function has been activated using Dante Controller. All LEDs solid red If all LEDs are solid red it indicates that the Dante-MY16-AUD card has encountered errors on boot and entered failsafe mode. Dante-MY16-AUD User Guide Version 1.41 Page 12 of 46 Installing your card Before you install Before you install the Dante-MY16-AUD card, you should note down: The Serial Number of the card This is printed both on the Dante-MY16-AUD box, and on a label on the card itself as S/N: XXXXX-XXXXX-XXXXX-XXXXX-XXXXX The last 6 characters of the MAC address of the card This is printed on a label on the card itself. The last six characters of the MAC address of the card are used in the default device name. e.g.: Dante-MY16-AUD card with MAC address 00:1D:C1:03:01:C4 will show as MY16-0301C4 in Dante Controller until it is given a more suitable name. If you are installing more than one card, this will allow you to easily identify which card you have installed in which slot when viewing them on Dante Controller in order to configure or rename them appropriately. To Install To install your Dante-MY16-AUD card in your chosen compatible Yamaha equipment, please carefully follow the instructions below. For instructions relating to specific Yamaha equipment, please refer to the Manual for that equipment. Important note: Please observe normal antistatic precautions when handling sensitive electronic equipment to avoid damage. 1. Check that your Yamaha equipment has a compatible, empty MY16 slot. 2. Turn off the power to your Yamaha equipment 3. Remove the screws from the cover of the empty MY16 slot. 4. Store the blank slot cover and its screws in a safe place for later use. 5. Remove the Dante-MY16-AUD from its anti-static bag. 6. Carefully slide the Dante-MY16-AUD card into the slot, ensuring the card is sitting within the guide rails . Ensure top guide rail sits above Dante-MY16-AUD card; bottom guide rail is not visible 7. After checking the card is within the guide rails, fully install the card by pushing it firmly until the faceplate is flush with the back of the Yamaha equipment. 8. Screw the thumbscrews into place. Dante-MY16-AUD User Guide Version 1.41 Page 13 of 46 Removing your card To remove your Dante-MY16-AUD card, please carefully follow the instructions below. 1. Turn off the power to your Yamaha equipment 2. Unscrew the thumbscrews just enough that they are loose from the host Yamaha equipment, but still fastened to the Dante-MY16-AUD faceplate. 3. Using the thumbscrews, pull the card firmly and horizontally towards you to remove. 4. Replace the blank slot cover and its screws. 5. Store the Dante-MY16-AUD back in its anti-static bag and packaging while not in use. Dante-MY16-AUD User Guide Version 1.41 Page 14 of 46 About your Audinate Software To configure and use your Dante-enabled Yamaha equipment to route audio over a network, you need to install Dante Controller on a PC or Mac on the Dante network. To record and play out audio direct to your PC or Mac, you need to install the Dante Virtual Soundcard. What is Dante Controller? Dante Controller is a software application provided by Audinate which allows users to configure and route audio around Dante networks. It is available for PCs running Windows (7, 8, and 8.1), and Apple Macs running OS X (10.7.5, 10.8.5 and 10.9). You must have Dante Controller installed on a PC or Mac on your Dante network to control and route audio. It can be installed on the same PC or Mac as Dante Virtual Soundcard. Figure 1 - Dante Controller network view showing named and labeled Dante-enabled audio devices Dante Controller can be installed on a PC or Mac. Once you connect Dante Controller to a Dante network, you can: View all Dante-enabled audio devices and their Dante audio channels View device clock and network settings Set up audio channels (subscriptions) between channels on these devices, and view the state of existing subscriptions Change the labels of transmitted audio channels from numbers to names that suit you Dante-MY16-AUD User Guide Version 1.41 Page 15 of 46 Customize the device latency (latency before playout) for either individual devices or groups of devices Save and reapply audio routing presets Edit presets offline, and apply as configurations for new network deployments View device latency statistics, for supported devices (including the Dante-MY16-AUD) View clock status statistics View multicast bandwidth across the network, and transmit and receive bandwidth for each device Inspect advanced configuration options including o Changing the device name o Changing sample rate and clock settings o Viewing detailed network information o Viewing firmware and license information Please read the Dante Controller User Guide for information describing how to install, configure and use the Dante Controller software. What is the Dante Virtual Soundcard? The Dante Virtual Soundcard is a software application that turns your PC or Mac into a Dante-enabled device, allowing Dante audio traffic to be transmitted and received using the standard Ethernet p ort. No additional hardware is required. On Windows, the Dante Virtual Soundcard uses WDM or Steinberg’s ASIO audio interface, and can be used with any audio application that supports WDM or ASIO. On Mac OSX the Dante Virtual Soundcard uses the standard Core Audio interface, and can be used by almost any standard audio application. Once you install the Dante Virtual Soundcard on a PC or Mac and connect it to the Dante network, you can: View and change the current audio sample rate Customize the receive latency (latency a receiving device should use before playout) View and set your Ethernet network interface, and view network interface details Start and stop the Dante Virtual Soundcard On Windows you can also: View and set ASIO-specific parameters Dante-MY16-AUD User Guide Version 1.41 Page 16 of 46 Figure 2 - Running Dante Virtual Soundcard with active network link Please read the Dante Virtual Soundcard User Guide for information describing how to install, configure and use the Dante Virtual Soundcard software. Dante-MY16-AUD User Guide Version 1.41 Page 17 of 46 Obtaining your Audinate Software Registering your Dante-MY16-AUD You can register your Dante-MY16-AUD card to receive notifications of product firmware upgrades and updates, which Audinate strongly recommends. You need to have the serial number of your Dante-MY16-AUD card ready when you register. You can find the serial number printed: On the Dante-MY16-AUD box label On a label on the Dante-MY16-AUD card itself The serial number is printed in the format: S/N: XXXXX-XXXXX-XXXXX-XXXXX-XXXXX. To register your Dante-MY16-AUD card, go to: http://www.audinate.com/Dante-MY16-AUD/ Obtain your Dante Virtual Soundcard License ID Please read the Dante Virtual Soundcard User Guide for detailed information about minimum system requirements, installation and activation Included with your Dante-MY16-AUD is a DVS token, which can be redeemed for a Dante Virtual Soundcard license ID. You should have received a ‘Download Your Software’ card in your product packaging, with your DVS token printed on it: You can redeem the DVS token for a Dante Virtual Soundcard license ID at: www.audinate.com/RedeemDVSToken If you do not have a ‘Download Your Software’ card, please contact your equipment vendor. The license ID can then be used to acti vate Dante Virtual Soundcard. Note that the Dante Virtual Soundcard License ID is not the same as the Dante-MY16-AUD card serial number. Downloading Dante Controller The Dante Controller software is available for download from Audinate’s website. To download a copy of Dante Controller: 1. Go to Audinate’s website: www.audinate.com. Dante-MY16-AUD User Guide Version 1.41 Page 18 of 46 2. Navigate to ‘Products’ -> ‘Dante Controller’. 3. Under ‘Download’, choose your operating system. 4. Click the red button to go to the relevant release. 5. Click the hyperlink under ‘File downloads’ to download the installer. Downloading and Activating the Dante Virtual Soundcard The Dante Virtual Soundcard is available for download from Audinate’s website. To download a copy of the Dante Virtual Soundcard: 10. Go to Audinate’s website: www.audinate.com. 11. Navigate to ‘Products’ -> ‘Dante Virtual Soundcard’. 12. Under ‘Download’, choose your operating system. 13. Click the red button to go to the relevant release. 14. Click the hyperlink under ‘File downloads’ to download the installer. When you first run Dante Virtual Soundcard you will need to activate it, using a valid Dante Virtual Soundcard license ID. Dante-MY16-AUD User Guide Version 1.41 Page 19 of 46 Connecting to a network In order to configure and use your Dante-MY16-AUD card, you will need to set up an Ethernet network connecting your card(s), your PC or Mac running Dante Controller and Dante Virtual Soundcard, and any other Dante-enabled audio equipment you may have. Before you set up your Network: Important Notes Gigabit Ethernet Support Your Dante-MY16-AUD cards have been desi gned to perform with Gigabit Ethernet networks. Connecting your Dante-MY16-AUD card to older 100Mbit/s Ethernet switches or equipment is not supported. When connecting your Dante-MY16-AUD card to a switch, make sure it supports Gigabit Ethernet and you are connected to a Gigabit Ethernet port. If you are connecting a single Dante-MY16-AUD directly to a PC or Mac, make sure it has a Gigabit Ethernet network interface Choosing a Gigabit Ethernet Switch There are a number of available and affordable standard Gigabit Ethernet switches that enable you to get the best performance out of your Dante network. Dante uses standard Ethernet and IP Quality of Service (QoS) to ensure its high-quality synchronization is not affected even on loaded networks. Switch features to look for on a product datasheet include: DSCP-based QoS support with four queues and strict priority queuing Filtering and ACL support If you need to run long cables, consider fiber support including SFP pluggable modules Managed switches allow you to manage the switch and monitor network performance, and are recommended for installs The new EEE (Energy Efficient Ethernet) functions can interfere with real -time low latency audio traffic. We recommend testing for correct operation of EEE-capable switches, or selecting switches where EEE can be disabled, should it be necessary to do so. If you have chosen a switch that has been used before, you may need to check its settings to ensure it doesn’t have an incompatible configuration loaded. For more information about choosing switches, please visit the Support section of the Audinate website. Choosing Ethernet Cabling Dante uses completely standard Ethernet and IP, so it also uses standard Ethernet cabling, including Cat5e, Cat6 and fiber. Make sure your Cat5e and Cat6 Ethernet cables are in good condition and have intact locking tabs. Remember that Cat5e and Cat6 cabling has a limit of 100 meters at speeds of 1Gbps. If you require longer distances, you can use fiber. Dante-MY16-AUD User Guide Version 1.41 Page 20 of 46 Network Configuration Options Straight-through connection to your PC This configuration is applicable if you want to record and playback directly to and from your PC or Mac, you are only using one Dante-MY16-AUD card, and you do not have any other Dante-enabled audio equipment. It is also applicable if you simply need to connect your Dante-MY16-AUD card directly to another Dante-enabled audio device. In these cases, you can connect your Dante-MY16-AUD card to your PC or other Dante-enabled equipment directly using a standard Cat5e Ethernet cable. You are REQUIRED to have a Gigabit Ethernet interface on your PC or Mac to directly connect to your Dante-MY16-AUD card. Make sure the PC or Mac is set to automatically configure its IP address Connect the cable between the PC or Mac and the Dante-MY16-AUD card You may need to reboot the PC or Mac if it has an active previous IP network configuration Both devices will automatically be assigned IP network configurations. Connection via a Gigabit Switch This configuration is applicable if you have more than just your Dante-MY16-AUD card and one PC or Mac. You will need to use a switch to connect the additional devices to the same network. In this case, you should connect your PC or Mac(s), your Dante-MY16-AUD card(s) and any other Dante-enabled equipment using a Gigabit switch: If your switch has a mix of Gigabit and 100Mbps ports, make you are connecting all Dante-MY16-AUD cards, and if at all possible all devices, to the Gigabit ports. It is STRONGLY RECOMMENDED that the PC or Mac has a Gigabit Ethernet interface. This is REQUIRED if the PC is running Dante Virtual Soundcard with more than 32 active audio channels. Make sure any PCs or Macs are set to automatically configure their IP address Power on the switch Connect your Cat5e or Cat6 cables from each device to the central Gigabit switch and ports Dante-MY16-AUD User Guide Version 1.41 Page 21 of 46 You may need to reboot the PCs or Macs if they have active previous IP network configurations All devices will automatically be assigned IP network configurations. Connection via a Redundant Network Your Dante-MY16-AUD cards support glitch-free Dante Redundancy, to protect you against possible cable disconnections or switch failures. This configuration is applicable if you require complete glitch-free audio redundancy, for example in a live sound environment with longer cable runs, and you might have additional Dante-enabled devices that also support redundancy. Dante redundancy works by using two completely independent and separate networks, the Primary Network and the Secondary Network. To setup and use Dante Redundancy, connect your Dante-MY16-AUD cards and other redundant Dante-enabled audio equipment using duplicate Gigabit switches and Ethernet cables as shown below. Connect your PC or Mac running Dante Virtual Soundcard and other non-redundant Dante-enabled audio equipment to the Primary Network. Connect your computer running Dante Controller to the Primary Network, or optionally to both networks, if your computer has two or more network interfaces. The primary and secondary networks MUST NOT be interconnected at any point. NOTE: Dante Virtual Soundcard does not support Dante Redundancy or connection to Dante secondary networks. Make sure any PCs or Macs are set to automatically configure their IP address Power on the switches Connect your Primary Cat5e or Cat6 cables from each device to the central Primary network Gigabit switch and ports Connect your Secondary Cat5e or Cat6 cables from each device that supports redundancy to the central Secondary network Gigabit switch and ports You may need to reboot the PCs or Macs if they have active previous IP network configurations Dante-MY16-AUD User Guide Version 1.41 Page 22 of 46 All devices will automatically be assigned IP network configurations. Dante-MY16-AUD User Guide Version 1.41 Page 23 of 46 UNSUPPORTED Dante Network Configurations Connecting Primary and Secondary redundant networks to the same switch When using Dante redundancy with any Dante-enabled device, including Dante-MY16-AUD cards, two separate networks must be used. You CANNOT connect any secondary network connections to a switch used for the primary network, or any primary network connections to a switch used for the secondary network. Please refer to the previous section, Connection via a Redundant Network, for information about the correct configuration to use. Dante Audio traffic over Wireless Networks Wireless Ethernet networks should not be used to carry Dante audio traffic, and Audinate applications installed on a PC or Mac will not allow selection of Wireless Ethernet interface or any other non-standard wired Ethernet interface. You should NOT install any wireless components in your Dante network. Dante-MY16-AUD: Use of 100Mbps Network interface The use of 100 Mbps network with Dante-MY16-AUD cards is NOT SUPPORTED. You must only connect Dante-MY16-AUD cards to Gigabit interfaces: Gigabit switches, or a Gigabit port on an Ethernet switch Gigabit network interface on a PC or Mac Dante-MY16-AUD User Guide Version 1.41 Page 24 of 46 HA Remote The Dante-MY16-AUD card supports HA Remote control via its DB9 serial port, and also over the Dante network via its Ethernet ports. HA Remote control data that is received via the Ethernet port can be mirrored to the serial port, and vice-versa. HA Remote data can also be bridged between the host device (via the MY slot), and either the network or serial port on the Dante-MY16-AUD card. This means that HA Remote chains can be established that include a mix of serial connections and Dante network connections. No configuration of the Dante-MY16-AUD card is required to enable HA Remote support. HA Remote Chain Example 1 In Figure 3 below, a Yamaha LS9 console is acting as the HA Remote controller. It is connected via the primary Ethernet port on the installed Dante-MY16-AUD card to a network switch. The Dante-MY16-AUD card is set to HA Remote Mode 2, via Dante Controller (see Mode Selection below). A Rio 1608-D I/O rack is connected to the same network switch via an Ethernet cable, and is acting as the controlled device. A computer running Dante Virtual Soundcard is also connected to the network switch, for recording and/or audio playback. Figure 3 - HA Remote Chain - Example 1 HA Remote Chain Example 2 In Figure 4 below, a Yamaha PM5D console is acting as the HA Remote controller. It is connected via the primary Ethernet port on the installed Dante-MY16-AUD card to a network switch. The Dante-MY16-AUD card is set to HA Remote Mode 3 (see Mode Selection below). The HA Remote port on the PM5D is connected vi a straight-through DB9 cable to the Serial port on the DanteMY16-AUD card (to bridge the HA Remote traffic from the PM5D to the MY card). A DME64N is connected to the network switch (via the primary Ethernet port on its installed Dante-MY16-AUD card). The Dante-MY16-AUD card in the DME is set to HA Remote mode 3, which means that it is acting only as a bridging device - it is bridging the HA Remote data from the network switch to the next device in the chain, via its Serial port. The HA Remote traffic is not seen by the DME itself. Dante-MY16-AUD User Guide Version 1.41 Page 25 of 46 The Dante-MY16-AUD card in the DME is connected to a chain of controlled HA Remote devices (such as AD8HR modules) via DB9 cables. The entire chain of devices (using Dante network and serial connections) is recognized as one HA Remote chain. Figure 4 - HA Remote Chain - Example 2 Mode Selection HA Remote mode is set via Dante Controller. When you open the Device View in Dante Controller for a Dante-MY16-AUD card that supports HA Remote, an extra tab is displayed, called HA Remote (as shown in Figure 5 below). Figure 5 - HA Remote Bridging Mode in Dante Controller (Device View) To change the HA Remote bridging mode for the selected device, click the appropriate radio button. Dante-MY16-AUD User Guide Version 1.41 Page 26 of 46 The available modes are: Mode Name Description Mode 1 Slot ↔ DB9 Active, Network Inactive HA Remote data is bridged between the host device and the DB9 ('Serial') port on the Dante-MY16-AUD card, but is not transmitted across the Dante network. Mode 2 Slot ↔ Network Active, DB9 Inactive HA Remote data is bridged between the host device and the Dante network (via the Dante Ethernet ports), but is not bridged to the DB9 ('Serial') port on the Dante-MY16-AUD card. Mode 3 DB9 ↔ Network Active, Slot Inactive HA Remote data is bridged between the DB9 ('Serial') port on the Dante-MY16-AUD card and the Dante network, but is not bridged to the host device. Mode 4 All Inactive HA Remote data is not bridged at all. This is the default mode. For information about the most suitable HA Remote mode for your device, please see the table below. Yamaha Product Models HA Remote Mode CL1/3/5 QL1/5 M7CL48ES LS9 PM5D M7CL32/48 DM2000 DM1000 DME64N DME24N Other MYcompatible models 1 2 3 4 N/A N/A N/A N/A N/A N/A N/A N/A N/A (as an HA device) (as a controller) (as an MY card host) N/A Special Considerations Some Yamaha devices (listed below) do not bridge HA Remote control data directly from the host device to an installed Dante-MY16-AUD card. For these devices, use a straight-through male-to-female DB9 (DE9) cable to connect the REMOTE port on the host device to the Serial port on the Dante-MY16-AUD card, and select HA Remote Mode 3 in Dante Controller for the Dante-MY16-AUD card. Then connect the device to the network switch using the Primary Ethernet port on the Dante-MY16-AUD card. Affected devices: DM1000 DM2000 PM5D M7CL‐32/48 DME24N DME64N Dante-MY16-AUD User Guide Version 1.41 Page 27 of 46 Dante-MY16-AUD Basic Operation Once you have installed Dante-MY16-AUD cards in your Yamaha equipment and connected them to a network you are in a position to start using Dante networking in earnest to set up audio routes between devices, including other Dante-enabled devices you may have on the network and any PCs or Macs running Dante Virtual Soundcard. Pre-operation checklist To start configuring and using your Dante-MY16-AUD card and Audinate software you should have completed the following: Installed your Dante-MY16-AUD card in your Yamaha equipment Registered your Dante-MY16-AUD with www.audinate.com and redeemed your DVS Token for a Dante Virtual Soundcard License ID Downloaded and installed your Audinate software Set up a network between your PC or Mac and your Dante-MY16-AUD card(s) Referred to the Dante Controller and Dante Virtual Soundcard User Guides Using Dante Controller When you open Dante Controller it displays a grid view, which shows all the Dante-enabled devices on the network. Initially it will display devices, but not channels wi thin devices. Devices with transmitter (Tx) channels will be displayed along the top row and devices with receiver (Rx) channels will be displayed in the left hand column Channels can be viewed by clicking on the + symbol next to Dante Transmitters or Dante Receivers, or the + symbol next to a particular Dante device. The Dante Controller User Guide contains detailed information about all aspects of using Dante Controller. This section is only a brief overview – you will need to refer to the User Guide to be able to use all features of Dante Controller. Dante-MY16-AUD User Guide Version 1.41 Page 28 of 46 Setting up audio routes Dante Controller can be used to configure channel routing between Dante devices. In the expanded view, wherever there is a blue cell at the intersection of a Tx channel column and an Rx channel row, it is possible to establish an audio route between them Using the network view, click on the cell at the intersection of a transmit and receive channel to configure an audio route from the transmitting channel to the receiving channel. A green icon will appear when the route is established. Click again to remove the route. Configuring your card To configure features of your Dante-MY16-AUD card such as its name and sample-rate: Start Dante Controller Select the Dante-MY16-AUD card you want to configure if you have more than one new Dante-MY16-AUD card installed, you will need to identify it either by: Looking for the device name ending in the last six characters of its MAC address After selecting a device, using the “Identify” feature in Dante Controller to check which card it is There are two ways that you can select the device. You can either: Dante-MY16-AUD User Guide Version 1.41 Page 29 of 46 Click on the device name in Dante Controller network grid view. This can be done either by clicking on the entry in the transmitter row, or by clicking on the entry in the Receiver column. This opens a Device View window for the selected device OR Go to the Devices dropdown list in the Network View menu bar and select Device View (or simply type Ctrl+D). This opens a Device View window with no device selected. Select the device to configure using the dropdown list of avai lable devices in the Device View toolbar. The Device View has six tabs: Receive, Transmit, Status, Device Config, Network Config and HA Remote (specific to MY16 cards). The Receive tab for a configured Dante-MY16-AUD card is shown below. Identify feature Identifying individual Dante-MY16-AUD cards When you have several Dante-MY16-AUD cards installed, it can be very useful to know which card is which. Once you have selected a particular card within Device View in Dante Controller, you can click on the “identify” icon in the Device View toolbar. This will cause all of the LEDs on the Dante-MY16-AUD card to flash green for about ten seconds. Dante-MY16-AUD Device name By default the device name for Dante-MY16-AUD cards is MY16-nnnnnn, where nnnnnn is a unique alphanumeri c identifier consisting of the last six digits of the MAC address. This is the name the card will have when you first use it. It is possible to replace the Dante-MY16-AUD card default device name with a custom, user-defined name. To do this open Device View in Dante Controller, select the card you wish to modify in the Device View, and change the Device Name in the Device Config tab. If you rename a device, you must re-establish any existing audio routes to and from the renamed device using its new name. Dante-MY16-AUD User Guide Version 1.41 Page 30 of 46 Please refer to your Dante Controller manual for more information on renaming devices. Dante-MY16-AUD default Sample rate By default of the Dante-MY16-AUD card is configured to operate using a 48kHz sample rate. Audio routes can only be set up between devices that are operating at the same sample rate. It is possible to change the sample rate to 96kHz. To do this, open Device View in Dante Controller, select the card you wish to modify in the Device View, and change the sample rate using New Sample Rate in the Device Config tab. You may need to set your Yamaha equipment to “double-speed”, NOT “double-channel”. Please refer to the section Configuring your Yamaha Equipment. If you change the sample rate of your Dante-MY16-AUD card you MUST power-cycle the Yamaha Equipment that it is installed in. You may also need to CHANGE YOUR YAMAHA EQUIPMENT’s word clock settings. Please refer to the later section, Configuring your Yamaha Equipment, for further information. Dante-MY16-AUD cards installed in the same piece of Yamaha equipment MUST all be set to the same sample rate. Please refer to your Dante Controller manual for more information on changing sample rate. Dante-MY16-AUD User Guide Version 1.41 Page 31 of 46 Dante-MY16-AUD Advanced Configuration with Dante Controller Once you have installed Dante-MY16-AUD cards in your Yamaha equipment and connected them to a network you are in a position to configure your Dante-MY16-AUD card, using a PC or Mac on the network with Dante Controller installed and running on it. Some basic functions of Dante Controller have already been described: Setting up an audio route. Changing the device name. Changing sample rate. Identifying a specific Dante-MY16-AUD card. Dante Controller can also be used to configure a number of other more advanced features, including: Adjusting latency settings Choosing between unicast and multicast modes Selecting clock sources Specifying static IP addresses These are described briefly below. A more complete description of the functions of Dante Controller can be found in the Dante Controller User Guide. Unicast and Multicast Modes Dante audio routing creates flows. Each flow carries one or more channels of audio from a transmitting device to one or more receiving devices. There are two types of flow, unicast and multicast. Unicast routing creates flows to a single receiving device; a unicast flow typically assigns space for 4 channels of audio. Unicast flows are setup when a receiver subscribes to an available audio channel, and are automatically removed when the receiver unsubscribes from all channels in that flow. Multicast routing creates flows that can be received by multiple receivers. Multicast flows are assigned IDs enabling them to be identified in Dante Controller and to facilitate their removal. In contrast to unicast flows, multicast flows are setup on the transmitting Dante device. Dante routing is unicast by default. This means that a separate flow is set up for each pair of transmitter and receiver. If several receivers are all subscribed to the same channels of a transmitter, it may sometimes be more efficient to use multicast. Multicast sends the same set of channels to multiple receivers. In practice, this usually means that the audio flow is flooded throughout the network. If many receivers want the same channels, using multicast ca n reduce overall network use, especially on the transmitter since only one copy of each audio channel needs to be sent rather than many. Unlike unicast routing, multicast flows consume network bandwidth even if there are no receivers, but do not require additional bandwidth to add more receivers. Dante receivers will automatically prefer multicast to unicast if it is available. This means that if a new multicast flow is created containing the channels that a receiver is currently receiving as unicast, the receiver will switch over to receiving audio from the multicast flow and the unicast flow will be removed. Dante Controller can be used to choose what channels are to be multicast. Clicking on the Multicast Configuration icon in the toolbar of the Device View (regardless of which tab view is currently displayed) will open a Create Multicast Flow dialog box that allows the user to select individual channels to add to a new multicast flow. Dante-MY16-AUD User Guide Version 1.41 Page 32 of 46 The window shows a list of the Tx channels for the device and allows the user to add them to the new multicast flow that is being created, by checking the tick box next to each channel name. Once the user has selected all the channels required, the multicast flow can be created by clicking on the Create button at the bottom of the dialog box. To abandon creating a new multicast flow, click on the Cancel button. A single multicast flow can contain up to the maximum supported channels per flow for this device. This is displayed at the top of this window and is 8 channels for this device. If the user selects more than the maximum allowed channels per flow, multiple flows will be created. Once a flow has been created, it will appear in the list of flows in the transmit pane, along with the channels contained within that flow. Also once a flow has been created it cannot be edited, channels cannot be added or removed. Each time the dialog is used to select additional channels, a new multicast flow will be crea ted. It is STRONGLY RECOMMENDED that you read the Dante Controller User Guide before trying to set up multicast flows. Setting Latency To adjust the latency setting, open a Device View for the selected device in Dante Controller, and select the Device Config tab. This allows several device settings to be viewed and modified. It shows the current receive latency setting and allows the user to change the operating receive latency for the selected device. The allowed values are 0.15ms (150 microseconds) - suitable for a Gigabit network containing a single switch 0.25ms (250 microseconds) - suitable for a Gigabit network containing three switches 0.5ms - suitable for a Gigabit network containing five switches 1.0ms - suitable for a Gigabit network containing ten switches 2.0ms - suitable for a Gigabit network with 100 Mbps leaf nodes 5.0ms – a safe value for a network of almost any conceivable size Dante-MY16-AUD User Guide Version 1.41 Page 33 of 46 If a value other than the current setting is selected a message will be displayed warning the user: “Changing device receive latency will interrupt existing audio routes to this device from other devices. Are you sure you want to change the latency of <device name> from <current latency setting> to <new latency setting>. If you wish to make the change select “Yes” button; otherwise select “No”. The effect of changing the latency is that any existing audio routes to the device will be temporarily suspended, resulting in some loss of audio data. Configuring the Dante-MY16-AUD clock First, you will need to decide whether your Yamaha equipment should be clock master or sync to one of the DanteMY16-AUD cards. Please refer to Annex A, “Dante Synchronization and Clocking” for a fuller discussion and diagrams of this subject. The Clock Status tab within the Network View provides a network wide overview of the clocking state within the network. This view provides a convenient way of quickly scanning the network for clock information. The view is in table format, with the following fields for each device, in columns from the left, as follows: Device Name: the label currently associated with the device. Sync: Indicates the clock sync status for the device. A green light indicates that the device is currently synced to (or is driving) the network clock. A red light indicates that the device is not currently synced. Mute: Indicates the mute status for the device. A red icon indicates that the device is currently muted (usually due to loss of clock sync). No icon in the mute column means that the device is not muted (audio should be flowing normally). Clock Source: Indicates the clock source for the device. ‘Dante’ means that the device is deriving its clock from the Dante network, or is acting as master clock (but not deriving its clock from an external source) . ‘External’ means that the device is deriving its clock from an external word clock source. Primary Status: indicates the state of the PTP clock for the prima ry network interface. Clock Status values and their meanings are as follows: Master Device is PTP master on that network Slave Device is a PTP slave on that network Passive Device is not using clock synchronization information from this interface Link Down The interface is not connected to the network Dante-MY16-AUD User Guide Version 1.41 Page 34 of 46 Not Supported Where the device is non redundant the second interface is Not Supported Not Available The device does not support clock status reporting Other transient clock states exist, which are not listed above. Secondary Status: indicates the state of the PTP clock for the secondary network interface of a redu ndant device. Preferred Master: Checking "Preferred Master" raises the priority of the device in the clock master election. If only one device on the network has this box ticked this ensures that the selected device becomes clock master. When multiple devices have their Preferred Master box ticked, the master will be elected from within that group. This is a convenient method of controlling the group of devices from which the master can be selected. Enable Sync To External: When checked this will force the device to derive its local clock from the external word clock source. This will also ensure that this Dante device becomes clock master. It is not normal practice configure more than one device with an external clock source. In this case, the user is assumed to have synchronized external word clock sources (e.g. house clock). Where a device does not support slaving to an external Word Clock the value in this column will be N/A. Master Clock The Dante network clock master, also called the "Grand Master", i s displayed at all times in the center of the toolbar of the Network View. This is the device that is providing the time sync source for all devices on the network. The clock master is chosen automatically through an election process, though there are user configurable parameters that allow prioritization of some devices in the clock master election. Configuring a device to have an external word clock source will force that device to become clock master. Checking the preferred master flag will also raise the priority of a device in the clock master election. This can be done through the Network View: Clocking Status tab. Checking clock configuration Dante Controller can be used to view the Dante clock status of all devices on the network, and to display who is the Dante clock master. There may also be some occasions where you want to force a Dante device to become the Dante network clock master. Please refer to the Dante Controller User Guide and other Dante documentation for further information. Dante-MY16-AUD User Guide Version 1.41 Page 35 of 46 Configuring your Yamaha Equipment The host Yamaha equipment in which you have installed your cards needs to be configured to match your desired clock settings and sample rate. You will need to refer to the relevant Yamaha equipment manual for specific instructions on configuring sample rates and word clock for that equipment. Setting up clocking can be confusing: please refer to ANNEX A: Dante Synchronization and Clocking for detailed information and diagrams on setting up system clocking. Key configuration checks for the host Yamaha equipment for your Dante-MY16-AUD card: If: Your Dante-MY16-AUD cards are set to 48kHz and you want the host Yamaha equipment to derive its clock from Dante You will need to ensure that: Your Yamaha host equipment has its Word Clock set to one of the Dante-MY16-AUD card slots If: Your Dante-MY16-AUD cards are set to 96kHz and you want the host Yamaha equipment to derive its clock from Dante You will need to ensure that: None of your Dante-MY16-AUD cards has “Enable Sync To External ” set Your Yamaha host equipment has its Word Clock set to one of the Dante-MY16-AUD card slots The Yamaha host equipment has double-speed set for the Dante-MY16-AUD card slots (not doublechannel) If: You want the Dante network to derive its clock from its host Yamaha equipment You need to ensure that: the Yamaha host equipment has its Word Clock set to Internal All installed Dante-MY16-AUD cards are set to the same sample rate as the Internal clock One of the Dante-MY16-AUD cards has “Enable Sync To External ” set via the Clock Status tab in Dante Controller Dante-MY16-AUD User Guide Version 1.41 Page 36 of 46 Upgrading Firmware The Dante-MY16-AUD firmware can be upgraded using the Dante Firmware Update Manager, which can be downloaded from the Yamaha Commercial Audio website. Please read the associated user guide before updating the firmware on your device. Dante-MY16-AUD User Guide Version 1.41 Page 37 of 46 Troubleshooting Introduction Problems or issues related to Dante and setting up your Dante-MY16-AUD card tend to fall in one of three areas: Network Configuration o Standard networking issues o PC /Mac network configuration and firewalls o Switches and cables PC Application Configuration o Bonjour o Install issues o Audio application configuration confusion Dante Configuration o Clock configuration o Mismatched sample rates Network Configuration – Gigabit Ethernet All your Dante-MY16-AUD cards require a Gigabit Ethernet interface. This means that they should be connected to either: A Gigabit Ethernet Switch A PC or Mac with a Gigabit Ethernet interface What are the symptoms of NOT using Gigabit Ethernet? The Orange, right hand side Gigabit LED will NOT be lit: The Dante-MY16-AUD card will take a much longer time than usual for the Sync light to turn green Sync LED The Primary Link Speed of the card in the Device Info tab in Dante Controller shows 100Mbps IN RED Dante-MY16-AUD User Guide Version 1.41 Page 38 of 46 How can I check whether I AM using Gigabit Ethernet? The Orange, right hand side Gigabit LED will be lit: The Primary Link Speed of the card in the Device Info tab in Dante Controller shows 1Gbps PC / Mac network configuration Dante hardware devices are set to obtain their IP address automatically from the network. They will either: Automatically assign themselves an address in the range 169.254.*.* (172.31.*.* for the secondary network if present), or Obtain an IP address from a DHCP server if it is present on the network You can also specify a static IP address for one or both network interfaces via the Device View > Network Config tab. The PC or Mac must have a correct IP address (or addresses, if you are connecting to the network via two interfaces). How do I check which interfaces Dante Controller/Dante Virtual Soundcard is using? The selected network interfaces can be viewed or changed via the 'interface selection' button in the Network View toolbar of Dante Controller How do I check what IP addresses Dante Controller is using? The IP addresses can be viewed in the Configure Dante Interfaces dialog box brought up by the 'interface selection' button : If the Dante network is standalone and does not have a DHCP server installed, the primary address should be 169.254.*.* and the secondary address (if connected) should be 172.31.*.* If the Dante network is using a DHCP server, the IP address es should conform to the addressing scheme it is using (as in the image above) How do I check what IP address my Dante-MY16-AUD card is using? IP addresses configured for all Dante devices on the network can be viewed via the Device Info tab in Dante Controller Dante-MY16-AUD User Guide Version 1.41 Page 39 of 46 This includes Dante-MY16-AUD cards and Dante Virtual Soundcards What are the symptoms of using the wrong interface on my PC or Mac? Dante Controller cannot see any devices Dante Virtual Soundcard is not sending or receiving any audio when it is expected to Checking your PC or Mac IP configuration Is the PC set to use "Obtain an IP address automatically"? This way it will automatically acquire an Link Local automatic IP address in the same network as other Dante devices If a DHCP server is present, the PC and Dante devices will all acquire their IP addresses via DHCP Does it have a third-party firewall installed? Please read the Dante Controller and Dante Virtual Soundcard User Guides for detailed information about firewall requirements and configuration. Standard Windows and Mac firewalls will be configured on install ation. Third party firewalls will need to be manually configured. Switch configuration and Cabling Cables are the most vulnerable part of a network system, and “home-made” manually terminated cables can be error-prone. If you suspect cabling issues, check for: Unplugged /badly connected Ethernet cables Incorrectly configured switches Dante devices removed or turned off Symptoms of switch or cabling issues You cannot see (some) devices in the Dante Controller network view Dante Controller shows orange “unsuccessful subscription” icons, which usually means a device that was present earlier, is now missing Faulty cables can lead to intermittent faults , which may be heard as dropped samples or “cracks” in the audio Dante devices may appear and disappear in Dante Controll er Switch and Cabling Checklist Are all the connected link/status lights on the switch lit or flashing as expected? o Is the switch powered on? o Is the cable correctly plugged in at the switch and the PC or equipment? Is the switch correctly configured? o Perhaps QoS or VLANs have been incorrectly set up Are you using a switch from another application with an unchecked or tested configuration? o Consult the switch manual and check the switch configuration Is your switch using EEE (Energy Efficient Ethernet)? o Disable EEE if possible, or replace it with a switch that does not include EEE functionality Dante-MY16-AUD User Guide Version 1.41 Page 40 of 46 PC Configuration Before installing, a PC or Mac needs to have: Apple Bonjour installed (automatic for Macs). Note this is not a requirement for Dante Controller, but is currently required for Dante Virtual Soundcard. The user logged in with administrator privileges A PC or Mac for use on the Dante network should have: Dante Controller installed If using, Dante Virtual Soundcard and an audio application supporting either ASIO, WDM or Core Audio A correct PC or Mac Dante network configuration should have: The correct network interfaces selected The correct IP addresses used DVS running before starting the audio application An audio application correctly configured to use DVS as its audio interface Dante Configuration: Sample Rate Sample rate configuration checklist Have Dante-MY16-AUD cards and /or Yamaha consoles been configured with different sample rates? o Use Dante Controller to check Dante device sample rates Has a sample rate been changed without a power-cycling the Yamaha equipment? o Sample rate changes require the Dante-MY16-AUD card and its host Yamaha console to be re-booted before the change takes effect If using 96kHz, is the Yamaha console using “double speed” NOT “double channel” for the DanteMY16-AUD slots? o Double channel is NOT supported by the Dante-MY16-AUD cards o If the card slots are set to “double channel”, every second audio channel will be missing If the Yamaha console is providing its Internal word clock to a Dante-MY16-AUD card configured to receive an External clock, is it the correct sample rate? o All installed dante-MY16-AUD cards should be set to the same sample rate as the s elected Yamaha internal clock Symptom: audio only appears on every second channel @96kHz Some Yamaha equipment supports both a “double channel” and a “double speed” mode when operating at 96kHz. Dante-MY16-AUD cards will only operate in “double speed” mode. Ensure that your Yamaha equipment is configured accordingly. If “double cha nnel” mode is selected, audio from Dante-MY16-AUD cards will be interleaved: for example, Dante channels 1 and 2 will appear on channel 1 of the Yamaha device with a sample of each played out alternatively. Dante-MY16-AUD User Guide Version 1.41 Page 41 of 46 Dante Configuration: Clock It is possible to incorrectly configured system word clocks and clock directions. Please refer to ANNEX A: Dante Synchronization and Clocking for detailed information and diagrams. How do I know if my Clock is incorrectly configured? If your overall system clock is incorrectly configured, you may: See console warning messages Notice the Dante-MY16-AUD card “Error” LED remaining Orange Hear corrupt audio How do I fix it? Use Dante Controller Clock Status tab to view the clock configuration for all the Dante devices on the network. There should be one Primary Clock Master There should usually be only one clock set to “External” “Preferred Master” setting to be avoided unless advanced design and configuration is required Next, check your Yamaha equipment clock configuration: If an external clock source is used to drive the Dante PTP Clock Master, ensure it is using the correct sample rate and the Dante-MY16-AUD card is set to “Enable Sync To External ” Check clock signal routing to other digital networks for loops Symptom: orange “Error” light with green “Sync” light This indicates a clock sync issue between the host Yamaha equipment and the Dante-MY16-AUD displaying this condition. This could either be because your clock configuration is wrong, or you have incorrectly configured sample rates. Check the clock source on both the Yamaha device and the Dante-MY16-AUD card(s). If a Dante-MY16-AUD card is selected as the clock source on the Yamaha equipment, ALL of the Dante cards in this device must have their word clock source set to “Internal”. Similarly if a Dante-MY16-AUD card has “Enable Sync To External ” set, the Yamaha equipment must have an internal “Int” clock source selected. Symptom: Red “Sync” light with orange “Error” light This indicates the card was unable to lock with (or fell out of lock with) the Dante network clock. A number of issues may cause this condition to occur. The common issue for Dante-MY16-AUD cards is a 100Mbit link in the network: Dante-MY16-AUD cards require Gigabit networking between all Dante nodes. Dante-MY16-AUD User Guide Version 1.41 Page 42 of 46 ANNEX A: Dante Synchronization and Clocking All Dante-enabled audio equipment on the same Ethernet network uses the IEEE1588 Precision Time Protocol (PTP) to automatically and accurately synchronize their clocks with each other to sub-microsecond accuracy. Use the Dante Controller “Clock Status” tab to view and configure Dante device clock settings for all Dante devices connected to the network, including Dante-MY16-AUD cards. Figure 6: Dante Controller "Clock Status" tab Dante Clock Types Each Dante hardware device can derive its clock from either its high-quality onboard voltage-controlled crystal oscillator (VCXO) circuit, or an externally connected word clock. In the case of Dante Virtual Soundcard, the computer’s clock will be used. Each Dante device clock has a quality setting associated with it, indicating how accurate a clock it is . The lowest quality clocks are computer clocks. Dante devices with Gigabit connections will be deemed better tha n otherwise equal quality clocks with 100Mbps connections. A Dante device clock can be either a PTP Master Clock or a PTP Slave Clock. A Dante network will always have one active PTP Master Clock at any one time, and all Dante slave clocks will synchronize their clocks over the network with the chosen master clock. The Dante PTP Master Clock The “best master clock election” determines which Dante device will provide the PTP master clock. The election is performed on startup, when new devices join the network or a current PTP Master Clock device leaves . The Master Clock is chosen automatically by comparing the different Dante device clocks, choosing the “best” clock and designating it as the PTP Master Clock for that network. If a number of “equally -best” clocks are found, the MAC addresses are used to decide which of them will become the Master Clock. Once a PTP Master Clock has been chosen, all other Dante device clocks will become Slaves , and lock their onboard VCXOs to the PTP Master Clock. Dante Clock Settings Dante hardware devices, including Dante-MY16-AUD cards, have two optional clock settings that can be selected. Set “Enable Sync To External ” to use an external word clock (such as the Internal clock of host Yamaha equipment) to tune the onboard VCXO. When this attribute is set, the Dante device will become PTP Master Clock unless another Dante hardware device has “Preferred Master” set. Dante-MY16-AUD User Guide Version 1.41 Page 43 of 46 Dante Clocking and Redundancy If both primary and secondary Dante networks have been connected, each network will h ave its own PTP Master Clock. Clock Status Monitoring You can use Dante Controller to monitor the synchronization performance of Dante device clocks in real time. See the Dante Controller user guide for more information. Dante-MY16-AUD User Guide Version 1.41 Page 44 of 46 How to configure Dante clocking Automatically The easiest way to configure clocking on your Dante network is to let the Dante network provide the clock for all the audio equipment, and to allow the Dante devices to automatically elect a PTP Clock Master. All Dante devices including Dante-MY16-AUD cards should be in their default state (“Preferred Master” and “Slave to External Word Clock” UN-checked), and host equipment configured to derive its word clock from the Dante device or a Dante-MY16-AUD card. Choose an external clock for the Dante network to use Sometimes you may need to tell the Dante network to use an external word clock. In this case, you must select ONE Dante device, for example ONE Dante-MY16-AUD card, to derive its clock from this external source. In the example below, the word clock for the system will come from a Yamaha mixing desk. ONE of the DanteMY16-AUD cards in that mixing desk has its word clock source set to “external” and is deriving its clock from the input Yamaha clock signal. Any Dante device with this setti ng will immediately become the Dante PTP Clock Master, and all other Dante-enabled devices and cards will lock to its clock. Manually choose a Dante PTP Master Clock This is a more advanced feature, and should not be employed unless you have a more complex network and a clear plan for the clock configuration and settings of your network. Dante-MY16-AUD User Guide Version 1.41 Page 45 of 46 Every Dante hardware device, including Dante-MY16-AUD cards, has a PTP Preferred Master setting. If selected, that Dante device will become the PTP Master Clock for the Dante network. If more than one PTP Preferred Master is set, the normal PTP election rules apply. You may want to set PTP Preferred Master if: You have a complex install network, and a number of otherwise equal quality Dante cloc ks, and you would like to force the device most centrally connected to be the Dante PTP Master Clock. Dante-MY16-AUD User Guide Version 1.41 Page 46 of 46