1
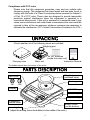
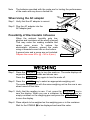
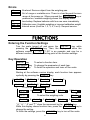
1WMPD4002673
SAFETY PRECAUTIONS
All safety messages are identified by the following, "WARNING" or
"CAUTION", of ANSI Z535.4 (American National Standard Institute: Product
Safety Signs and Labels). The meanings are as follows:
WARNING
CAUTION
A potentially hazardous situation which, if not
avoided, could result in death or serious injury.
A potentially hazardous situation which, if not
avoided, may result in minor or moderate injury.
This manual is subject to change without notice at any time to improve the product.
Product specifications are subject to change without any obligation on the part of
the manufacture.
When using the scale, the following safety precautions should always be followed.
WARNING
Repairs
Do not disassemble the scale. Contact your local A&D dealer if your
balance needs service or repair.
Troubleshooting
If a problem has occurred and you cannot clear it, stop using the scale,
place a notice on the scale and request service from the store where
you purchased the balance or from your local A&D dealer.
CAUTION
Conditions for use and Ambient Temperature
The scale is a precision instrument. Avoid installing the scale in direct
sunlight, excessive dust, high humidity, high temperature, large temperature
fluctuations or magnetic fields, which may cause problems or malfunctions.
Drafts and vibration may cause excessive weighing errors.
Use the scale range of the -10°C to 40°C, with less than 85% R.H.
Operation
Avoid using the weighing pan to mo ve the scale, as that could cause
damage to the scale.
Avoid overloading that could cause damage to the scale.
The scale is not waterproof type. Water invading into the scale may
cause damage.
If the scale is not to be used for a long period of time, remove all
batteries from the battery compartment to avoid battery leakage.
Do not mix batteries made by different manufactures, or mix old and
new batteries. Replace all of the batteries at one time.
Use only the specified AC adapter for the scale (AC adapter is optional).
2
Compliance with FCC rules
Please note that this equipment generates, uses and can radiate radio
frequency energy. This equipment has been tested and has been found to
comply with the limits of a Class A computing device pursuant to Subpart J
of Part 15 of FCC rules. These rules are designed to provide reasonable
protection against interference when the equipment is operated in a
commercial environment. If this unit is operated in a residential area it may
cause some interference and under these circumstances the user would be
required to take, at his own expense, whatever measures are necessary to
eliminate the interference. (FCC = Federal Communications Commission in the U.S.A.)
UNPACKING
Check whether all of the following items are included:
Weighing pan
Carrying case
4x“AA” batteries
(inside the main unit)
Instruction Manual
Main unit
The bubble should be in the center of the circle.
PARTS DESCRIPTION
Weighing pan
(stainless steel)
Sprit level
Pan support
OK
NG
Display
ON:OFF key
UNITS key
RE-ZERO key
Calibration
switch cover
Battery cover
(on the bottom)
Leveling foot
(Adjust the leveling feet as the bubble is in the middle of the circle.)
3
Security slot
AC adapter jack
(Use a security cable
commercially available.)
(Use a correct AC adapter
for your local voltage and
receptacle type.)
Battery indicator
STABLE indicator
NET indicator
Weighing units
ZERO indicator
ON:OFF
key
RE-ZERO
MODE
key
key
Turns the scale power on/off.
Sets the display to zero. When the weight is within ±2%
of the weighing capacity to the zero point at the
power-on, the key will zero the scale. When the weight
exceeds +2%, it will be subtracted as tare weight.
Changes the weighing units.
STABLE indicator
Turns on when the weight reading is stable.
NET indicator
Turns on when the net weight is displayed.
ZERO indicator
Turns on at the center of zero point. At the net weight
zero point, both the ZERO and NET turn on.
Shows the remaining battery level in 4 steps when
operated by batteries.
Battery indicator
PREPARATION
Installing Batteries
Battery cover
Step 1 Remove the battery cover.
Step 2 Before use, remove
insulation tape from
battery compartment.
Step 1
the
the
Step 3 Insert 4 new batteries into the
battery compartment, taking
care of the polarities.
4 new batteries
Insulation tape
Step 4 Replace the battery cover.
4
Step 2
Note
The batteries provided with the scale are for testing the performance
of the scale and may have a limited life.
AC adapter
When Using the AC adapter
Step 1 Verify that the AC adapter is correct.
Step 2 Plug the AC adapter into the
AC adapter jack.
AC adapter jack
Possibility of Electrostatic Influence
When the ambient humidity gets low,
plastics and insulators will be easily charged.
That may make the reading unstable and
cause some errors. To reduce the
electrostatic influence, ground the scale
using a threaded screw hole on the bottom.
A ground wire and a screw are not included.
Prepare the screw M3 x @ ~ M3 x # (mm).
Screw hole
WEIGHING
Step 1 Press the ON:OFF key to turn the scale on. The scale displays all
segments for a few seconds and shows zero.
Press the ON:OFF key again to turn the scale off.
Step 2 Press the UNITS key to select an appropriate weighing unit.
The scale will power up with the same weighing unit as the one in use
when turned off last time.
Step 3 Verify that the reading is zero. If not, press the RE-ZERO key to
zero the display. When you use a container for weighing, place an
empty container on the weighing pan and press the RE-ZERO key
to zero the display.
Step 4 Place objects to be weighed on the weighing pan or in the container.
Wait for the STABLE to be displayed and read the value.
5
Errors
eeeeee
------
Overload. Remove object from the weighing pan.
Out of range or unstable error. There is a load beyond the zero
range at the power-on. When pressed the RE-ZERO key or
powered on, unstable weighing shows this display either.
Low battery. Replace batteries with four new ones immediately.
Calibration error. Unstable weighing or incorrect calibration weight.
Internal errors (# will be 1, 2, 3, 4, 5 or 6). Request service.
lbeeee
Caleee
erree#
FUNCTIONS
Entering the Function Settings
Turn the scale turned off and press the ON:OFF key while
pressing the RE-ZERO key. Then, the display will show the
software version
p-1.00 (“1.00” is an example and may be a
different number.) This is the starting point of the function settings.
Key Operation
UNITS key
To select a function item.
RE-ZERO key To change the parameter of each item.
ON:OFF key
To finish the operation and turns off the scale.
Starting at the software version display, each function item appears
cyclically by pressing the UNITS key.
° p-1.00
°poff 1
°Cond 1
°Unit
°ltUp 3
°pnt 0
Press the
°Unit
°Unit
°Unit 3
RE-ZERO
°Unit
°trc 1
key.
°Unit
°Unit
°Unit
To select the weighing units.
°Unit
°Unit 2
°Unit 1
°Unit
°Unit
“ ”, “ ”, “ ” and “ ” show the movement by the UNITS key.
While the display shows function item, press the RE-ZERO key to
change the setting.
To finish the settings, press the ON:OFF key to turn off the scale.
6
Automatic Power Off Function
If the scale is left ON and the STABLE
is displayed, the automatic
power-off function turns power off after approximately 5 minutes.
poff 0
poff 1
Automatic power off function is disabled.
Automatic power off function is enabled. (factory default)
Setting the Response/Stability Condition
This function is to specify the response speed and to stabilize the
weight value reducing the influence of ambient environment like
vibration. But note that the setting is a trade-off between response
and stability.
Cond 0
Cond 1
Cond 2
Fast response / Sensitive to the vibration
Normal condition for both response and stability (factory
default)
Slow response / Insensitive to the vibration
Setting the Zero Tracking Function
This function is to automatically track small zero drift caused by
changes in the ambient environment.
trc 0
trc 1
Zero tracking function is disabled.
Zero tracking function is enabled. (factory default)
Selecting the Decimal Point
This function is to select the decimal separator.
pnt 0
pnt 1
“.” (period) (factory default)
“,” (comma)
Setting the LCD Backlight Operation
This function is to control how the LCD backlight turns off. When the
weight data becomes and stays stable for some seconds, the
backlight will automatically turn off. The weight change or the key
operation will turn the backlight on (except the settings “always on ”
and “always off”).
ltUp
ltUp
ltUp
ltUp
0
1
2
3
ltUp 4
ltUp 5
Backlight is always off.
Backlight turns off 5 seconds after STABLE turning on.
Backlight turns off 10 seconds after STABLE turning on.
Backlight turns off 30 seconds after STABLE turning on.
(factory default)
Backlight turns off 60 seconds after STABLE turning on.
Backlight is always on.
7
Setting the Weighing Units to Use
The scale has the weighing units listed in the table below and the
units to be used only can be selected. Set the weighing units enabled
or disabled as appropriate.
There are three types of taels, HK general/Singapore tael, HK jewelry
tael and Taiwan tael. But one of them can be selected.
The order of units to be displayed is as in the table and it cannot be
changed.
UNITS key
To select the unit to be set.
RE-ZERO key To set the displayed unit enabled or disabled.
The STABLE
ex. °Unit g
indicates the displayed unit enabled.
shows “g” enabled. °Unit g shows “g” disabled.
Unit
g
Unit name
Gram
Conversion to gram
0001 g
oz
ct
ozt
mom
dwt
GN
t
Ounce (avoir)
Metric carat
Troy ounce
momme
Pennyweight
Grain (UK)
Tola (India)
Tael (HK general)
Tael (HK jewelry)
Tael (Taiwan)
Newton
0028.349523125 g
0000.2 g
tl
N
0031.1034768 g
0003.75 g
0001.55517384 g
0000.06479891 g
0011.6638038 g
0037.7994 g
0037.4290 g
0037.5 g
See below.
At setting mode
°Unit
°Unit
°Unit
°Unit
°Unit
°Unit
°Unit
°Unit
°Unit 1
°Unit 2
°Unit 3
°Unit
HK = Hong Kong. HK tael (general) is equal to Singapore tael.
Newton is a value calculated as follows:
Newton = (weight in gram) x (9.80665 m/s2) / 1000.
8
CALIBRATION
When is Calibration Required?
Calibration switch
Calibration may be required when
the scale was initially installed or
has been moved to another
location.
Calibration
switch cover
Calibration Using a Calibration Weight
Step 1 Press the Calibration switch while the scale is in the weighing mode.
Then, Cal
will be displayed.
Step 2 Press the RE-ZERO key and Cal 0g will be displayed.
With nothing on the weighing pan, press the RE-ZERO key.
Step 3 The display shows Cal
blinking while waiting for the weighing
value to be stable. When becoming stable, the scale perform zero
calibration and will show Cal100g (factory default) with tens place
digit blinking).
Select the next step as follows:
Proceed to the span calibration of Step 4.
Press the
ON:OFF
key to finish the procedure without
performing the span calibration.
Step 4 At the display Cal100g , place the calibration weight 100 g (±2 mg)
on the center of the weighing pan and press the RE-ZERO key.
To use the other calibration weight (50 g or more recommended),
press the UNITS key to change by 10 g and place the weight
equal to the displayed value.
Step 5 The display shows Cal
blinking while waiting for the weighing
value to be stable. When becoming stable, the scale perform span
calibration and will show end
. Remove the calibration weight
and press the ON:OFF key to finish the procedure.
Gravity Acceleration Compensation
The scale is calibrated with the gravity acceleration value 9.7985 m/s2
at the factory. When the gravity acceleration at your location is
different value, you should calibrate the scale using a calibration
weight. But if the calibration weight cannot be prepared, change the
9
gravity acceleration of your scale to the value of the area where the
scale is used. See “The Value of Gravity Acceleration at Various
Locations” of this manual.
Step 1 Start from Cal
display at the Step 1 of “Calibration Using a
Calibration Weight”, and press the UNITS key and the current
acceleration value will be displayed.
ex. 9.7985
Step 2 Press the RE-ZERO and the digit that can be changed starts to
blink. Change the value with following keys.
RE-ZERO key To increment the blinking digit.
UNITS key
To move the blinking digit.
Step 3 After setting the new value, press the RE-ZERO key while
pressing the UNITS key. Then, the display will show end
for
a second and stop blinking the value. Press the ON:OFF key to
finish the procedure.
Restoring the Calibration Data
The zero calibration, span calibration and gravity acceleration values
can be restored to the factory default values.
Ex. The scale was calibrated with wrong weight, but there is no
correct weight. The values above can be reset to the factory default.
Step 1 Start from Cal
display at the Step 1 of “Calibration Using a
Calibration Weight”, and press the UNITS key twice to display
Clr
.
Step 2 Press the
Press the
RE-ZERO
RE-ZERO
key, then the display will show Clr no .
key again to display Clr go to restore.
Step 3 At the display Clr go , press the RE-ZERO key while pressing
the UNITS key. Then, the display will show end
for a
second and automatically return to Clr
.
Press the ON:OFF key to finish the procedure.
If perform the step 3. to the display Clr no , the display will
return to Clr
without showing end
.
10
SPECIFICATIONS
MODEL
Weighing capacity
Resolution
Non-linearity
Repeatability
Span drift
Operating temp.
Display
Display update
Power supply
Battery life
Pan size
Dimensions
Net weight
Max. Tare weight
Calibration weight
Accessories
Option
HT-120
120 g
0.01 g
± 0.02 g
0.01 g (Std. deviation)
50 ppm/°C (5°C to 35°C / 41°F to 95°F)
-10°C to 40°C / 14°F to 104°F, Less than 85%RH
15 mm / 0.59 inches, 7segment LCD with backlight
Approximately 10 times per second
4 x "AA" batteries (R6P / LR6) or AC adapter (option)
Approx. 500 hours with alkaline cells at 20°C / 68°F
(backlight off)
φ70 mm / φ2.76 inches
136 (W) x 150 (D) x 57.5 (H) mm
5.35 (W) x 5.91 (D) x 2.26 (H) inches
Approximately 500 g / 1.1 lb
120 g
100 g (factory default)
This manual, 4x“AA” batteries (for operation check)
AC adapter (contact your dealer)
The Value of Gravity Acceleration at Various Locations
Amsterdam
Athens
Auckland NZ
Bangkok
Brussels
Buenos Aires
Calcutta
Cape Town
Chicago
Copenhagen
Cyprus
Djakarta
Frankfurt
Istanbul
Havana
Helsinki
Kuwait
Lisbon
London (Greenwich)
Los Angeles
9.813 m/s2
9.807 m/s2
9.799 m/s2
9.783 m/s2
9.811 m/s2
9.797 m/s2
9.788 m/s2
9.796 m/s2
9.803 m/s2
9.815 m/s2
9.797 m/s2
9.781 m/s2
9.810 m/s2
9.808 m/s2
9.788 m/s2
9.819 m/s2
9.793 m/s2
9.801 m/s2
9.812 m/s2
9.796 m/s2
Madrid
Manila
Mexico City
Milan
New York
Oslo
Ottawa
Paris
Rio de Janeiro
Rome
San Francisco
Singapore
Stockholm
Sydney
Taipei
Tokyo
Vancouver, BC
Washington DC
Wellington NZ
Zurich
11
9.800 m/s2
9.784 m/s2
9.779 m/s2
9.806 m/s2
9.802 m/s2
9.819 m/s2
9.806 m/s2
9.809 m/s2
9.788 m/s2
9.803 m/s2
9.800 m/s2
9.781 m/s2
9.818 m/s2
9.797 m/s2
9.790 m/s2
9.798 m/s2
9.809 m/s2
9.801 m/s2
9.803 m/s2
9.807 m/s2
3-23-14 Higashi-Ikebukuro, Toshima-ku, Tokyo 170-0013, JAPAN
Telephone: [81] (3) 5391-6132
Fax: [81] (3) 5391-6148
http://www.aandd.jp/
A&D ENGINEERING, INC.
1756 Automation Parkway, San Jose, California 95131, U.S.A.
Telephone: [1] (408) 263-5333
Fax: [1] (408) 263-0119
http://www.andonline.com/
A&D INSTRUMENTS LIMITED
Unit 24/26 Blacklands Way, Abingdon Business Park, Abingdon, Oxfordshire OX14 1DY, United Kingdom
Telephone: [44] (1235) 550420
Fax: [44] (1235) 550485
http://www.aandd-eu.net/
A&D AUSTRALASIA PTY LTD
32 Dew Street, Thebarton, South Australia 5031, Australia
Telephone: [61] (8) 8301-8100
Fax: [61] (8) 8352-7409
http://www.andaustralasia.com.au/
A&D KOREA Limited
Manhattan Building 8th Floor, 36-2 Yoido-dong, Youngdeungpo-gu, Seoul, 150-749 Korea
Telephone: [82] (2) 780-4101
Fax: [82] (2) 782-4280
http://www.andk.co.kr/
OOO “A&D RUS”
Business-Center “Vereyskaya Plaza-2” 121357, Russian Federation, Moscow, Vereyskaya Street 17
Telephone: [7] (495) 937-33-44
Fax: [7] (495) 937-55-66
http://www.aandd.ru/
A&D INSTRUMENTS INDIA PRIVATE LIMITED
509, Udyog Vihar, Phase-V, Gurgaon - 122016, Haryana, India
Telephone: [91] (124) 4715555
Fax: [91] (124) 4715599
http://www.aanddindia.in/
12